branch membership portal - unite the union membership port… · branch membership portal . the...
TRANSCRIPT
Branch Membership Portal
The UNITE membership system
Step-by-Step Guide
Version 18.09.2012
Page 2 of 22
Table of Contents
Introduction ................................................................................................................................................. 3 Where to get Help .................................................................................................................................. 3
Logging In and Out of the Branch Portal ................................................................................................. 4
Getting Around the Site ............................................................................................................................. 5 The Home Page ..................................................................................................................................... 5 Members List Page ................................................................................................................................ 6 Unite Webmail Page .............................................................................................................................. 7 Unite Merchandise ................................................................................................................................. 7 Portal Updates ....................................................................................................................................... 8
Branch Information .................................................................................................................................... 9 Changing the Meeting Place information ............................................................................................... 9 Notify Unite of any Branch Officer changes ......................................................................................... 10 Checking Payments to Branch Admin and Branch Fund Accounts (Transactions) ............................ 11
Member List .............................................................................................................................................. 12 Viewing Member’s Details .................................................................................................................... 12 Adding and Removing Members ......................................................................................................... 13
Remove a Member .................................................................................................................13 Adding a Member ....................................................................................................................14
Informing Unite of any changes to a Member’s record ........................................................................ 15 Finding a Specific Member .................................................................................................................. 16
Removing or Adding Comments to a Specific Member ..........................................................17 Download Member’s Details to Excel .................................................................................................. 18 Cash Payers......................................................................................................................................... 19
Printing List for Cash Payers ..................................................................................................19
Appendix ................................................................................................................................................... 20 Excel – Basic Data Techniques ........................................................................................................... 20
Adjusting all the column widths to fit text ................................................................................20 Saving the list in an Excel format ............................................................................................20 Sorting Data ............................................................................................................................21
Simple Sort ....................................................................................................................... 21 AutoFilter .................................................................................................................................22 Deleting unwanted Rows or Columns .....................................................................................22
Where to get Help
Page 3 of 22
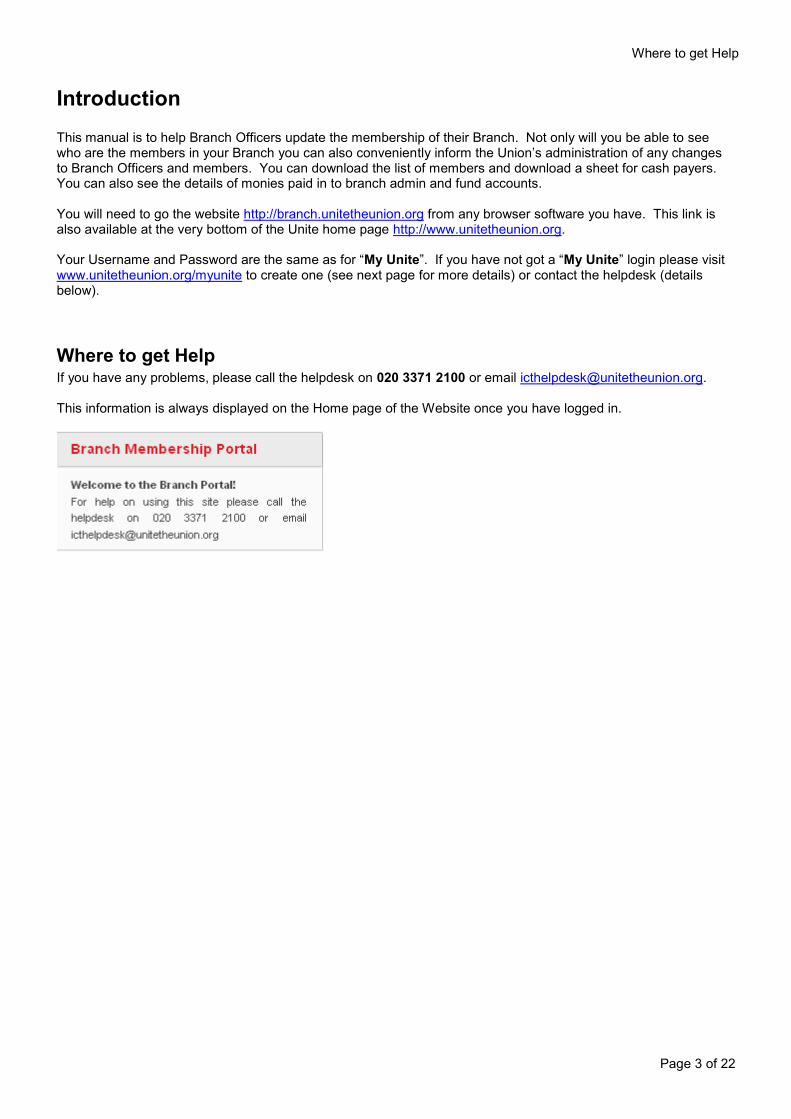
Introduction This manual is to help Branch Officers update the membership of their Branch. Not only will you be able to see who are the members in your Branch you can also conveniently inform the Union’s administration of any changes to Branch Officers and members. You can download the list of members and download a sheet for cash payers. You can also see the details of monies paid in to branch admin and fund accounts. You will need to go the website http://branch.unitetheunion.org from any browser software you have. This link is also available at the very bottom of the Unite home page http://www.unitetheunion.org. Your Username and Password are the same as for “My Unite”. If you have not got a “My Unite” login please visit www.unitetheunion.org/myunite to create one (see next page for more details) or contact the helpdesk (details below).
Where to get Help If you have any problems, please call the helpdesk on 020 3371 2100 or email [email protected]. This information is always displayed on the Home page of the Website once you have logged in.
Where to get Help
Page 4 of 22
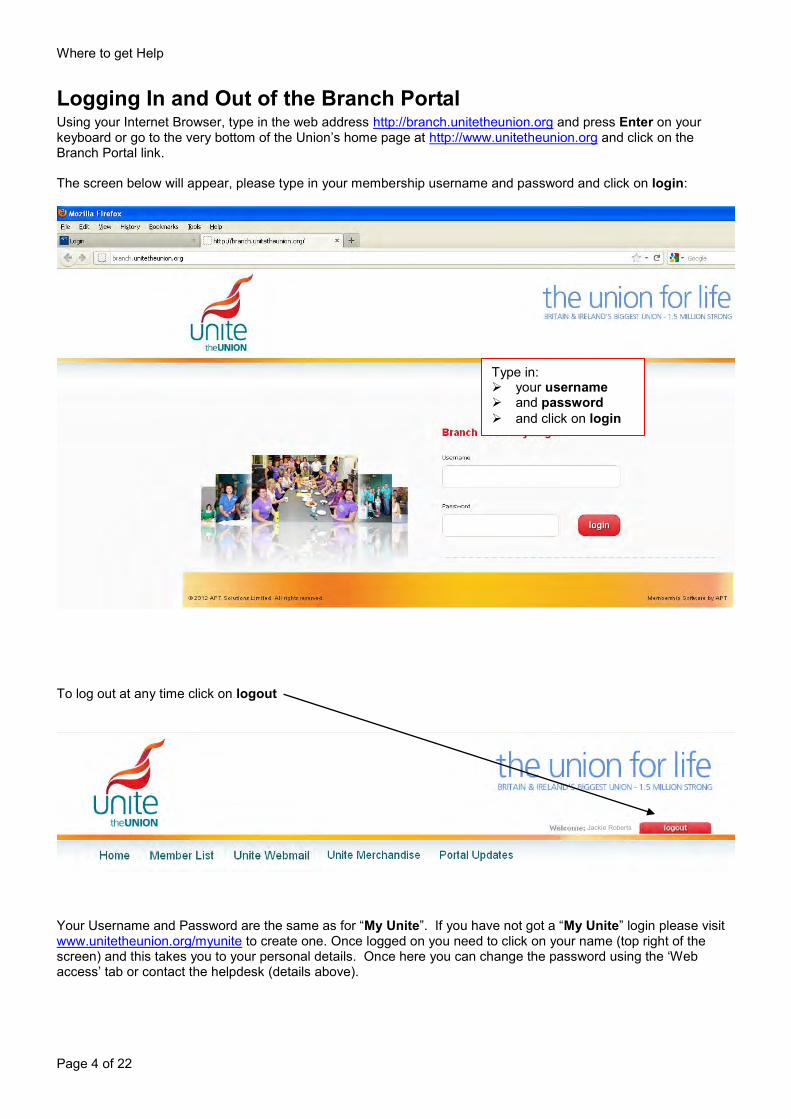
Logging In and Out of the Branch Portal Using your Internet Browser, type in the web address http://branch.unitetheunion.org and press Enter on your keyboard or go to the very bottom of the Union’s home page at http://www.unitetheunion.org and click on the Branch Portal link. The screen below will appear, please type in your membership username and password and click on login:
To log out at any time click on logout
Your Username and Password are the same as for “My Unite”. If you have not got a “My Unite” login please visit www.unitetheunion.org/myunite to create one. Once logged on you need to click on your name (top right of the screen) and this takes you to your personal details. Once here you can change the password using the ‘Web access’ tab or contact the helpdesk (details above).
Type in: your username and password and click on login
Jackie Roberts
The Home Page
Page 5 of 22
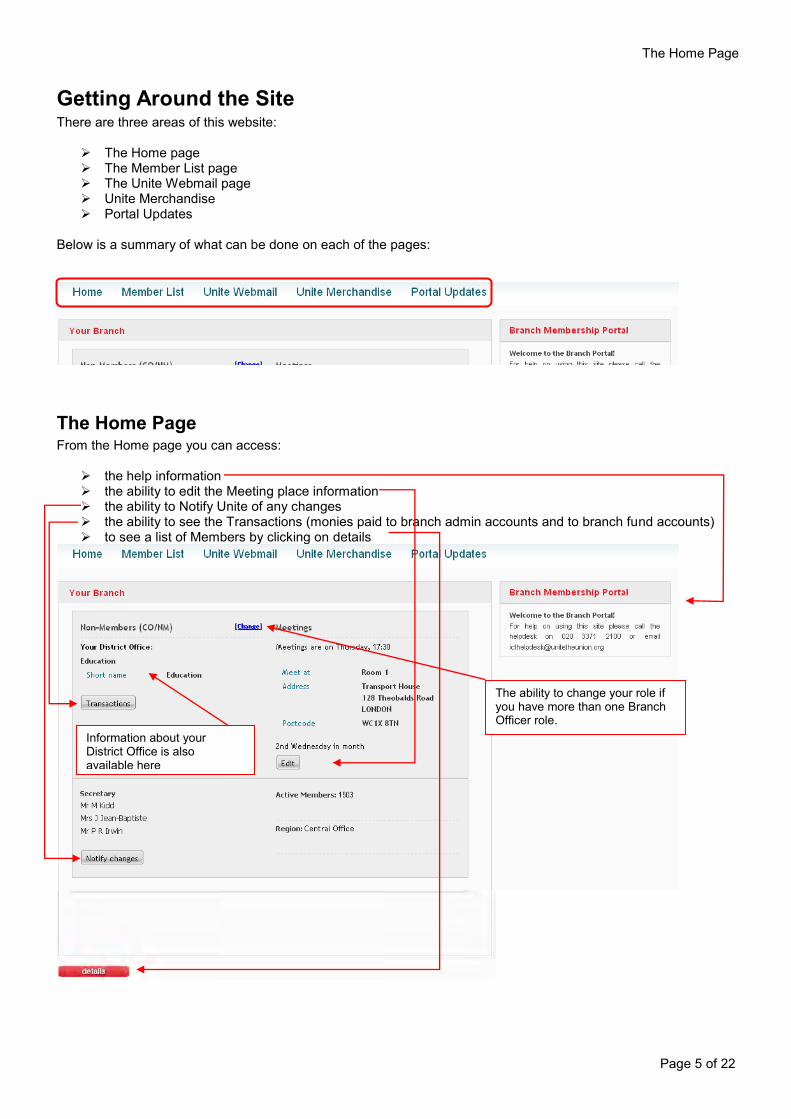
Getting Around the Site There are three areas of this website:
The Home page The Member List page The Unite Webmail page Unite Merchandise Portal Updates
Below is a summary of what can be done on each of the pages:
The Home Page From the Home page you can access:
the help information the ability to edit the Meeting place information the ability to Notify Unite of any changes the ability to see the Transactions (monies paid to branch admin accounts and to branch fund accounts) to see a list of Members by clicking on details
Information about your District Office is also available here
The ability to change your role if you have more than one Branch Officer role.
Members List Page
Page 6 of 22
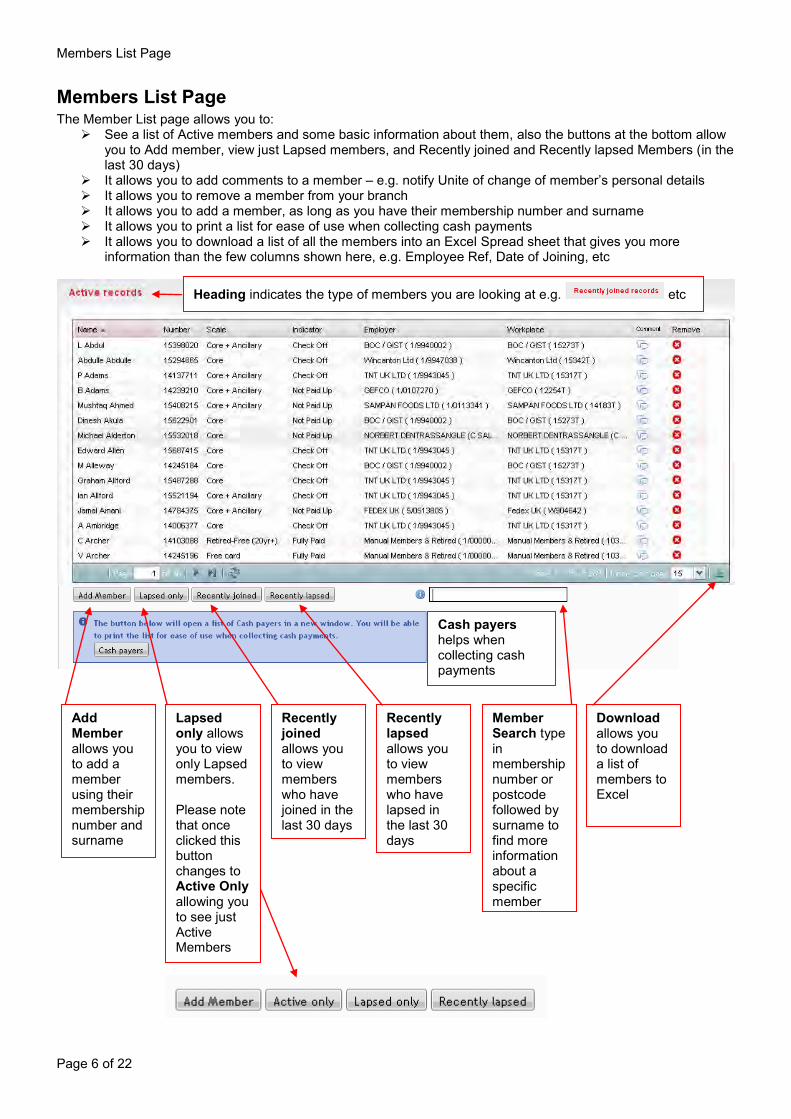
Members List Page The Member List page allows you to:
See a list of Active members and some basic information about them, also the buttons at the bottom allow you to Add member, view just Lapsed members, and Recently joined and Recently lapsed Members (in the last 30 days)
It allows you to add comments to a member – e.g. notify Unite of change of member’s personal details It allows you to remove a member from your branch It allows you to add a member, as long as you have their membership number and surname It allows you to print a list for ease of use when collecting cash payments It allows you to download a list of all the members into an Excel Spread sheet that gives you more
information than the few columns shown here, e.g. Employee Ref, Date of Joining, etc
Add Member allows you to add a member using their membership number and surname
Lapsed only allows you to view only Lapsed members. Please note that once clicked this button changes to Active Only allowing you to see just Active Members
Recently joined allows you to view members who have joined in the last 30 days
Recently lapsed allows you to view members who have lapsed in the last 30 days
Member Search type in membership number or postcode followed by surname to find more information about a specific member
Download allows you to download a list of members to Excel
Cash payers helps when collecting cash payments
Heading indicates the type of members you are looking at e.g. etc

Unite Webmail Page
Page 7 of 22
Unite Webmail Page This link opens another tab in your browser showing Outlook Web Access, for use if you have a unitetheunion.org email address. Please note that you can also open Outlook Web Access from the very bottom of the Union’s home page at www.unitetheunion.org.
If you do not have a unitetheunion.org email address and you would like one, this can be created for you. Please complete the Unite Email Address Activist Application which can be found in the Portal Updates link – see page 8. Please fill this in and send it to your Regional Office. If you previously had a tgwu.org.uk or amicustheunion.org email address and cannot log on using your usual details please contact the Helpdesk on 020 3371 2100 or [email protected].
Unite Merchandise This is the Unite the Union merchandise shop, where you can look for items to support and promote Unite. You can either browse by category or use the product search box. You will need to register for this service.
Portal Updates
Page 8 of 22
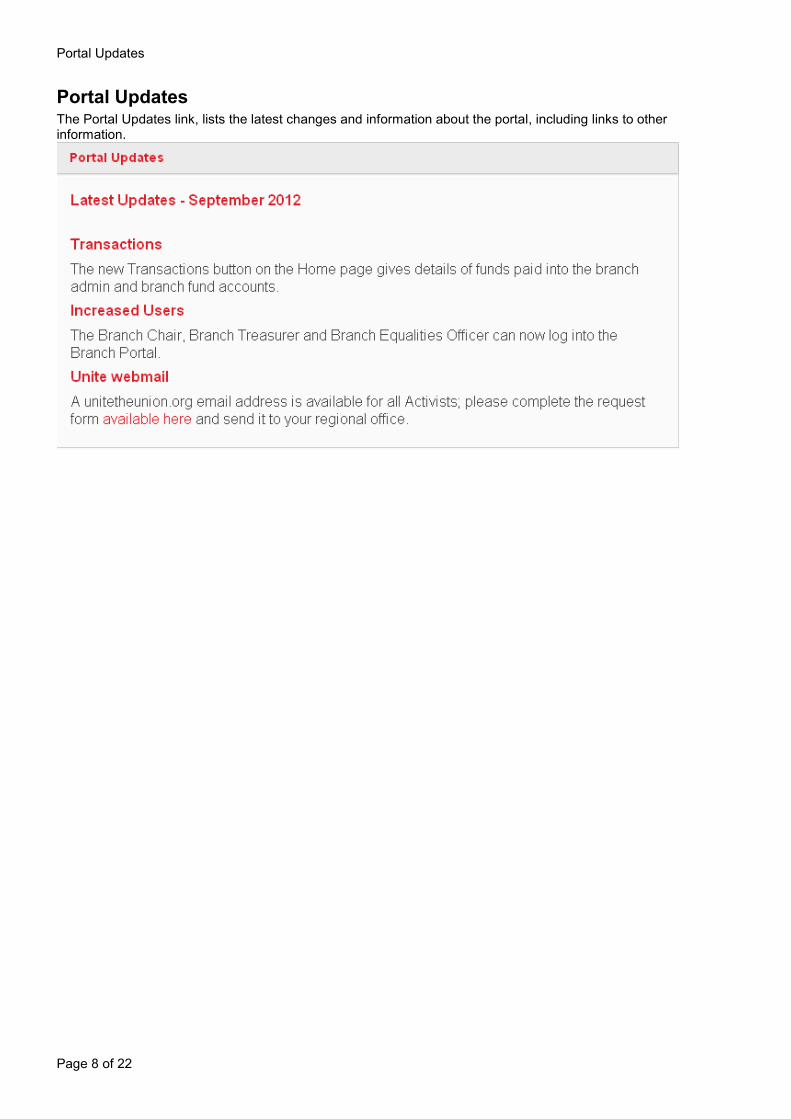
Portal Updates The Portal Updates link, lists the latest changes and information about the portal, including links to other information.

Changing the Meeting Place information
Page 9 of 22
Branch Information
Changing the Meeting Place information From the Home page, click on Edit under the Meetings area:
Please note that each area has an Information point that will give you up to date information on what is required,
e.g.
Where: Type in a description of where you will be meeting.
Find Address: Type in the postcode and click on Find. From the list choose the address you want – or if not listed choose Other Address (Enter address manually)
Schedule: To type in all this information you will need to use the Scrollbar to move down.
Days - Description e.g. First Tuesday of the month Time - Description e.g. 7pm – 9pm Meeting Comments - Any additional comments about the Meeting
Click on Save when completed.
Notify Unite of any Branch Officer changes
Page 10 of 22
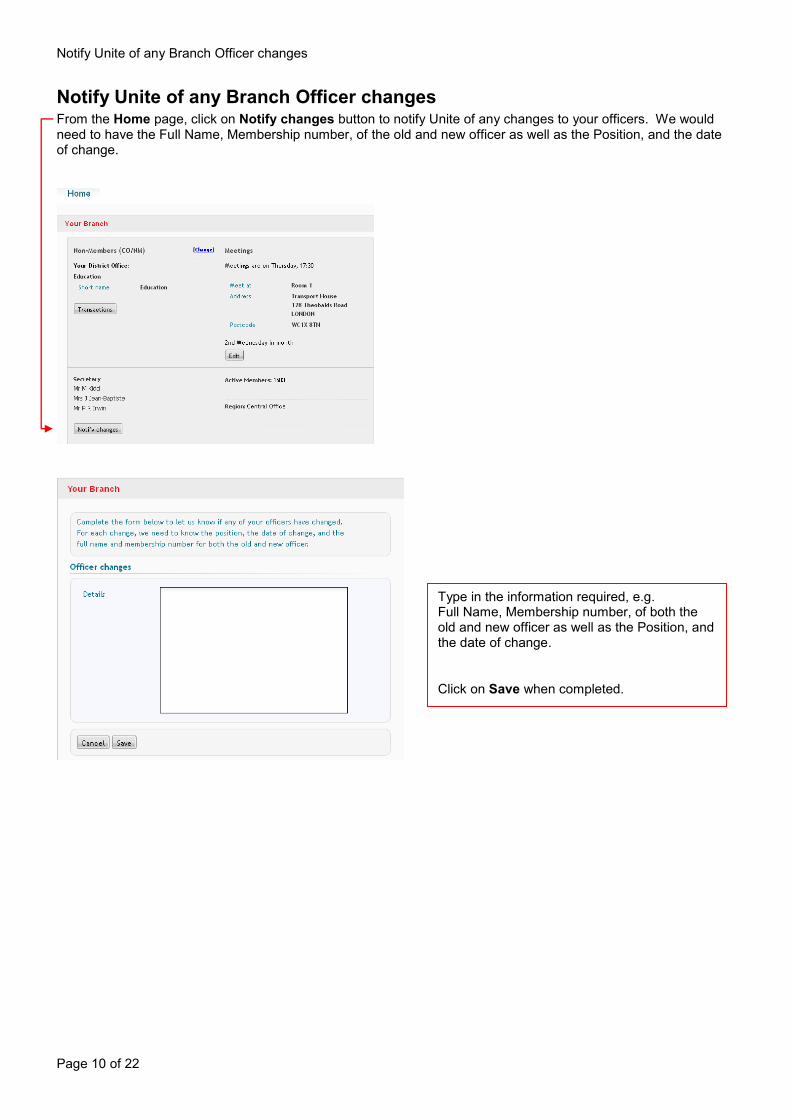
Notify Unite of any Branch Officer changes From the Home page, click on Notify changes button to notify Unite of any changes to your officers. We would need to have the Full Name, Membership number, of the old and new officer as well as the Position, and the date of change.
Type in the information required, e.g. Full Name, Membership number, of both the old and new officer as well as the Position, and the date of change. Click on Save when completed.

Checking Payments to Branch Admin and Branch Fund Accounts (Transactions)
Page 11 of 22
Checking Payments to Branch Admin and Branch Fund Accounts (Transactions) To check the monies paid to branch admin accounts and to branch fund accounts click on Transactions from the Home Page
The Transactions button leads to a list of payments:
The detail for each Payment Ref can be seen by clicking on the relevant link:
Viewing Member’s Details
Page 12 of 22
Member List
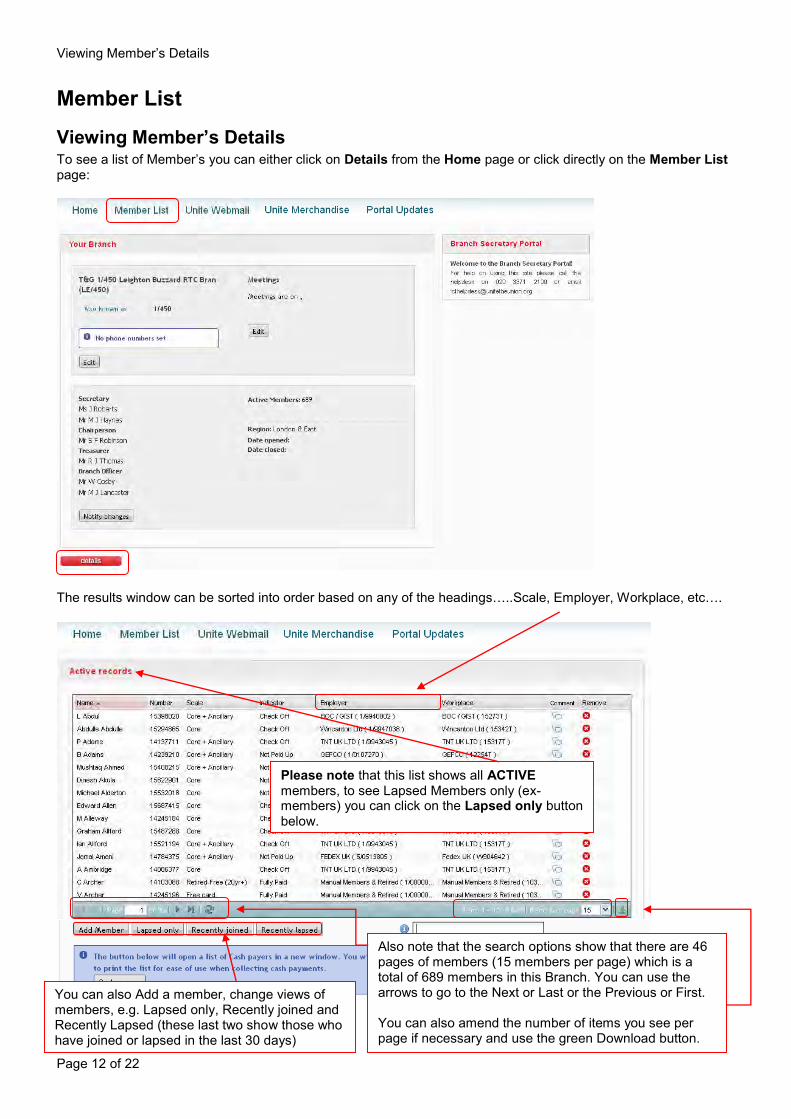
Viewing Member’s Details To see a list of Member’s you can either click on Details from the Home page or click directly on the Member List page:
The results window can be sorted into order based on any of the headings…..Scale, Employer, Workplace, etc….
Also note that the search options show that there are 46 pages of members (15 members per page) which is a total of 689 members in this Branch. You can use the arrows to go to the Next or Last or the Previous or First. You can also amend the number of items you see per page if necessary and use the green Download button.
You can also Add a member, change views of members, e.g. Lapsed only, Recently joined and Recently Lapsed (these last two show those who have joined or lapsed in the last 30 days)
Please note that this list shows all ACTIVE members, to see Lapsed Members only (ex-members) you can click on the Lapsed only button below.
Adding and Removing Members
Page 13 of 22
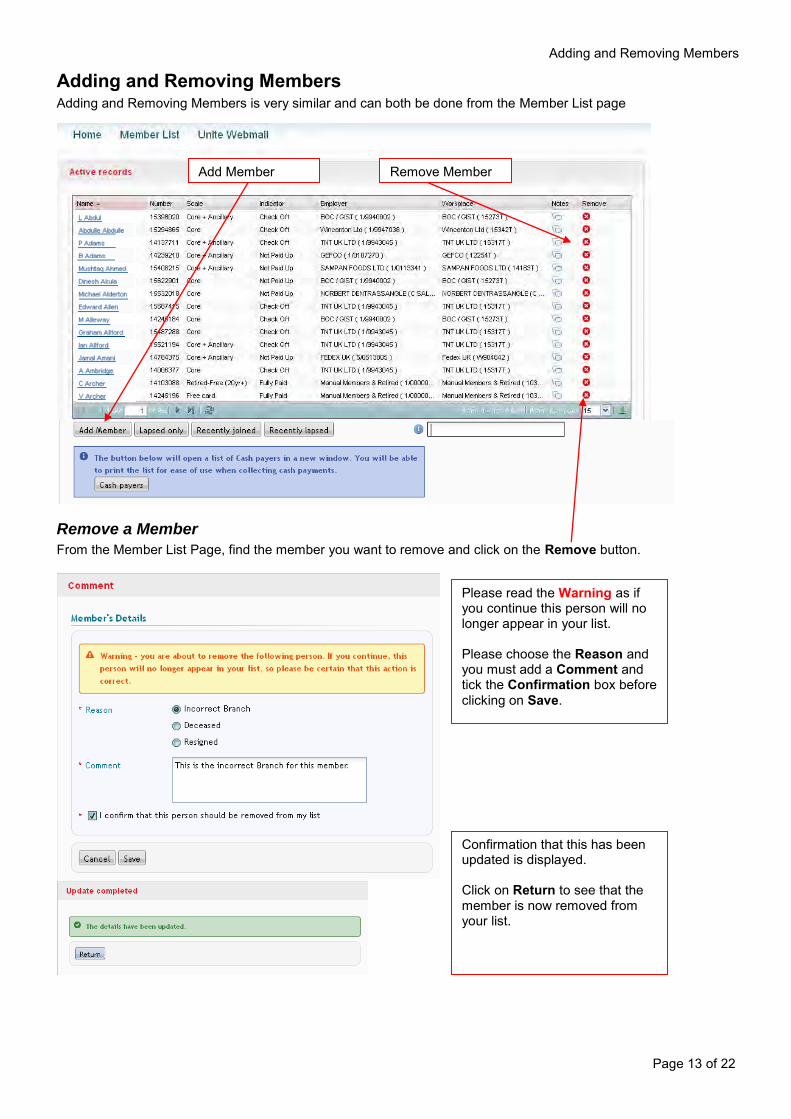
Adding and Removing Members Adding and Removing Members is very similar and can both be done from the Member List page
Remove a Member
From the Member List Page, find the member you want to remove and click on the Remove button.
Remove Member Add Member
Please read the Warning as if you continue this person will no longer appear in your list. Please choose the Reason and you must add a Comment and tick the Confirmation box before clicking on Save.
Confirmation that this has been updated is displayed. Click on Return to see that the member is now removed from your list.

Adding and Removing Members
Page 14 of 22
Adding a Member
To add a member, you must already have their membership number and surname. From the Member List Page click on Add Member at the bottom of the page.
Type in the Member’s number and Surname and click on Next
Type in a Comment and tick the Confirmation box. Click on Save
Click on Return and the member will now be added to your list.

Informing Unite of any changes to a Member’s record
Page 15 of 22
Informing Unite of any changes to a Member’s record If a member has changed name, address, telephone or email address, you can add a Comment to the member, from the Member List screen click on the icon on their row or click on Comment from the Member’s record :
Type in your Comment as much relevant information as possible and click on Save. Click on Return to the Completion screen
Finding a Specific Member
Page 16 of 22
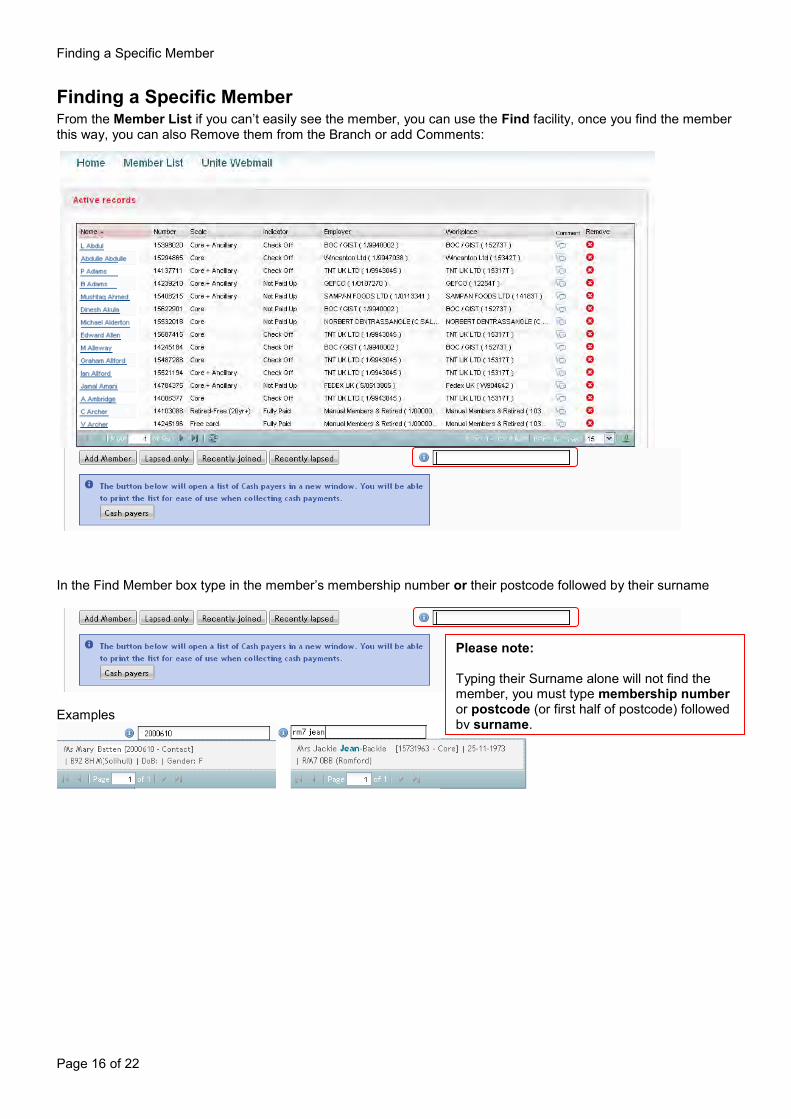
Finding a Specific Member From the Member List if you can’t easily see the member, you can use the Find facility, once you find the member this way, you can also Remove them from the Branch or add Comments:
In the Find Member box type in the member’s membership number or their postcode followed by their surname
Examples
Please note: Typing their Surname alone will not find the member, you must type membership number or postcode (or first half of postcode) followed by surname.
Finding a Specific Member
Page 17 of 22
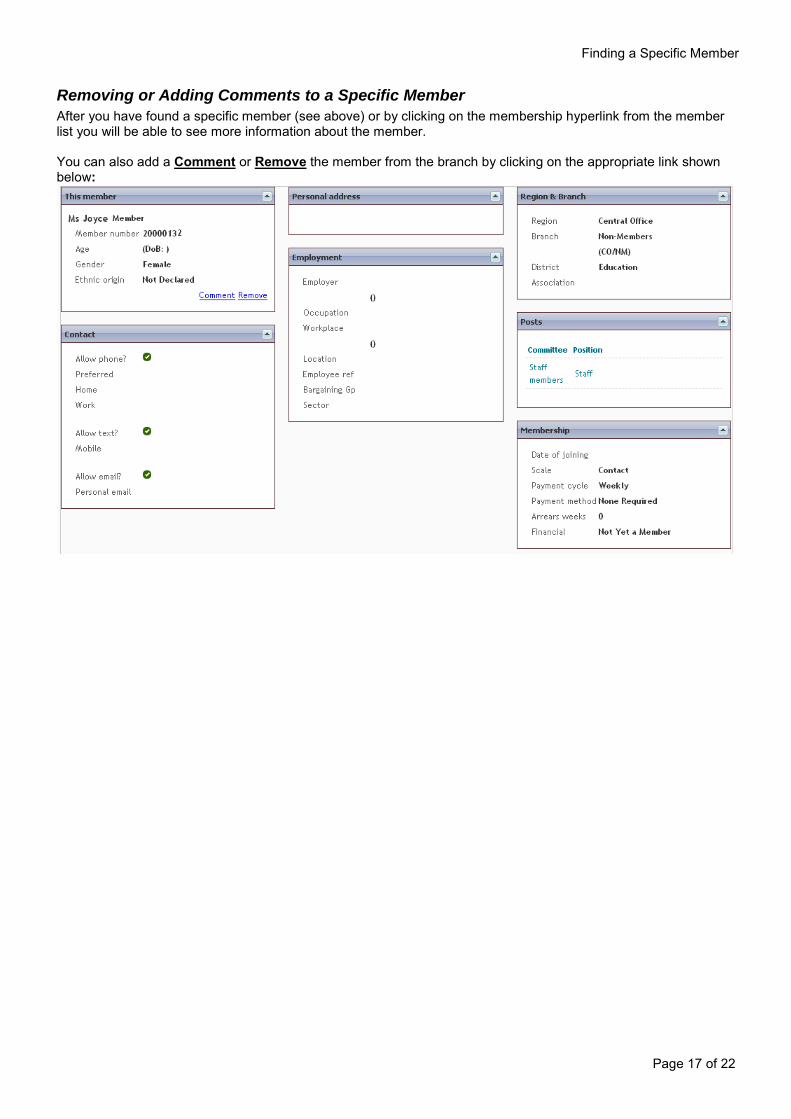
Removing or Adding Comments to a Specific Member
After you have found a specific member (see above) or by clicking on the membership hyperlink from the member list you will be able to see more information about the member. You can also add a Comment or Remove the member from the branch by clicking on the appropriate link shown below:
Download Member’s Details to Excel
Page 18 of 22
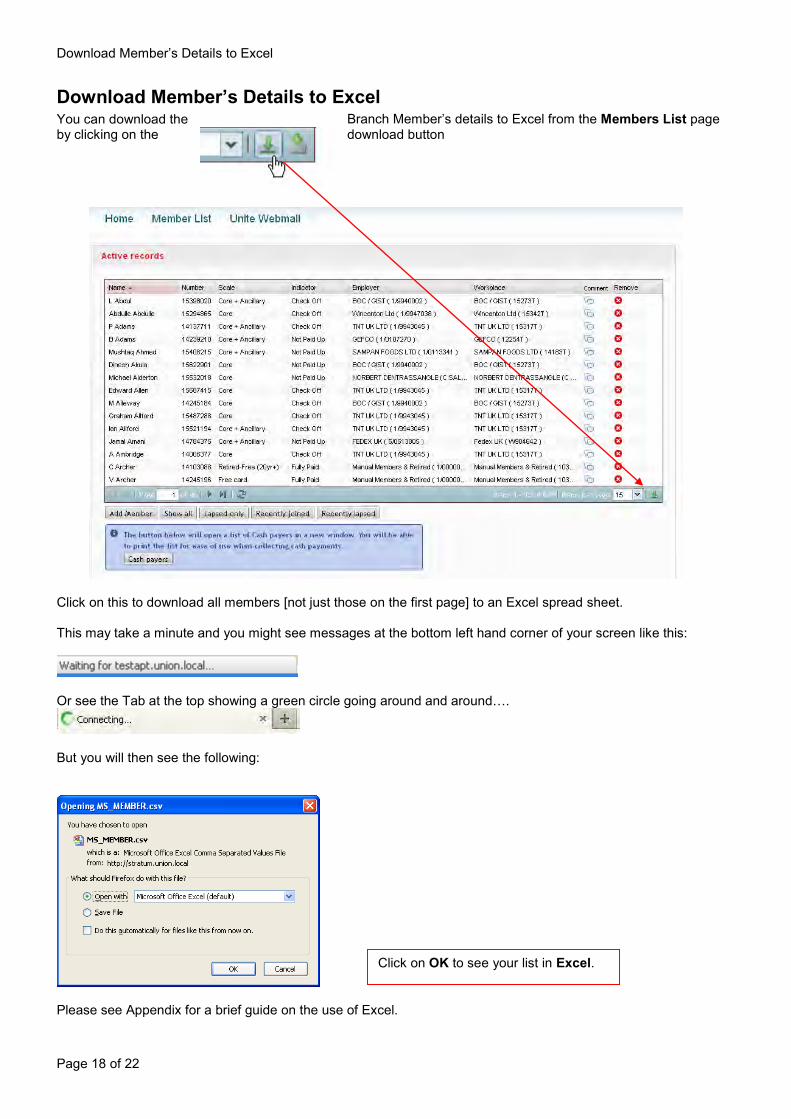
Download Member’s Details to Excel You can download the Branch Member’s details to Excel from the Members List page by clicking on the download button
Click on this to download all members [not just those on the first page] to an Excel spread sheet. This may take a minute and you might see messages at the bottom left hand corner of your screen like this:
Or see the Tab at the top showing a green circle going around and around….
But you will then see the following:
Please see Appendix for a brief guide on the use of Excel.
Click on OK to see your list in Excel.
Cash Payers
Page 19 of 22
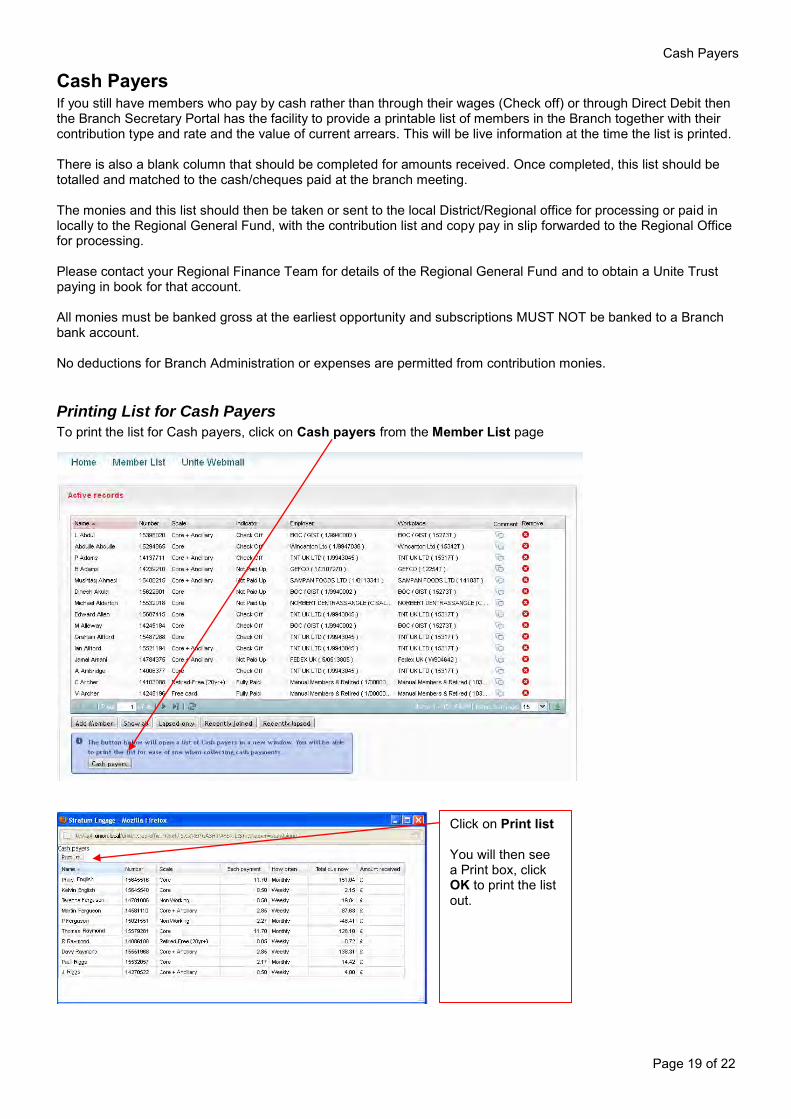
Cash Payers If you still have members who pay by cash rather than through their wages (Check off) or through Direct Debit then the Branch Secretary Portal has the facility to provide a printable list of members in the Branch together with their contribution type and rate and the value of current arrears. This will be live information at the time the list is printed. There is also a blank column that should be completed for amounts received. Once completed, this list should be totalled and matched to the cash/cheques paid at the branch meeting. The monies and this list should then be taken or sent to the local District/Regional office for processing or paid in locally to the Regional General Fund, with the contribution list and copy pay in slip forwarded to the Regional Office for processing. Please contact your Regional Finance Team for details of the Regional General Fund and to obtain a Unite Trust paying in book for that account. All monies must be banked gross at the earliest opportunity and subscriptions MUST NOT be banked to a Branch bank account. No deductions for Branch Administration or expenses are permitted from contribution monies.
Printing List for Cash Payers
To print the list for Cash payers, click on Cash payers from the Member List page
Click on Print list You will then see a Print box, click OK to print the list out.

Excel – Basic Data Techniques
Page 20 of 22
Appendix
Excel – Basic Data Techniques In a lot of cases we just need to do some adjustments once the data is in Excel so below are some of the more common techniques but this is not a substitute for Excel Training (please note Excel version shown below is Excel 2003):
Adjusting all the column widths to fit text
When you see your Excel spread sheet, you may need to adjust the column widths to be able to see everything – a quick way to do this is to click on the grey box to the left of the A column (this selects everything) and then take your mouse on the line that separates the A from the B and double click:
Saving the list in an Excel format
Now we need to save the file, click on File – Save As and you will be prompted to save the file:
And the Save as type has defaulted to Microsoft Office Excel Comma Separated Value – which is useful for mailmerge but strips out formatting, e.g. removes Bold and italics – so we recommend you change this to Microsoft Office Excel Workbook (*.xls).
Click here to select all the columns
Double click on the line to make all the columns wide enough
Note that the File name by default is blank so that you can name the data to anything you want….

Excel – Basic Data Techniques
Page 21 of 22
Sorting Data
All of the exported data from Stratum appears in Excel, sorted by Surname, so if that’s how you want it fine, but you may want to view or remove all the people who are in Arrears more than 26 weeks, or you may want to view or prepare to remove those who have an Invalid Home Address, or you may just want to see all those who pay by Direct Debit. Whatever your requirements you can sort the data several times until it is sorted the way you want.
Simple Sort To do a simple sort, e.g. I just want to see the Females before the Males then do the following:
Please Note: Once you have the list that way, you can delete the rows (see below) you don’t want, a lot easier as they will be together, and if you want to sort in surname order again, just select a single cell in the Surname column and click on the Ascending order button. You can also use the Sort dialogue box from the Data menu for more complex sorting. This is not covered in this manual.
Select a SINGLE cell in the column you want, e.g. Gender
Then click on to sort in Ascending order, e.g. F before M
or click on to sort in Descending order, e.g. M before F

Excel – Basic Data Techniques
Page 22 of 22
AutoFilter
AutoFilter is a quick way to hide the rows of information you don’t want temporarily, e.g. I don’t want to see the Males. Do the following:
Each column will now have a drop down list arrow to the right of the top cell:
Deleting unwanted Rows or Columns
To delete unwanted Rows, e.g. all the members who are more than 26 weeks in Arrears, I would first perform a simple sort (see above this) on the Arrears Weeks Column and then I can delete all the rows I want in one go:
To delete columns, you do the following:
Select a SINGLE cell in your data and click on Data, then Filter and then AutoFilter. Please note this is how you would turn the filter off as well.
Click on the drop down arrow of the column you want to filter by and choose from the list, e.g. F for Females in this case. Please note that you can select (All) to get all the rows back.
When you filter, it will tell you how many Females from the total at the bottom left of the screen:
Place your mouse on the first row number, e.g. 358 and a appears, drag this down to the last row you want to delete, e.g. 367.
Right mouse click into the selected area and choose Delete from the drop down menu.
Place your mouse on the first letter, e.g. O and a
appears, drag this across to the last column you want to delete, e.g. Q.
Right mouse click into the selected area and choose Delete from the drop down menu.