bravo manual v1 - irma-inf.com bravo.pdf · bravo express 5 1. introduction to bravo express bravo...
TRANSCRIPT
Bravo Express is made and distributed by Symtrax Corporation, USA. www.symtrax.com
S y m t r a x
User Manual
Bravo Express For Use with Version 1
Bravo Express
2
Table of Contents
1. INTRODUCTION TO BRAVO EXPRESS.. . . . . . . . . . . . . . . . . . . . . . . . . . . . . . . . . . . . . . . . . . . 5
2. INSTALLATION .. . . . . . . . . . . . . . . . . . . . . . . . . . . . . . . . . . . . . . . . . . . . . . . . . . . . . . . . . . . . . . . . . . . . . 6
2.1 Installation Check List 6
2.2 Installation from the Internet or CD-ROM 7 2.2.1 AS/400 library Installation ........................................7 2.2.2 Installing the PC Client Program ..............................10
3. GETT ING STARTED WITH BRAVO EXPRESS .. . . . . . . . . . . . . . . . . . . . . . . . . . . . . . . . 12
3.1 Connection Profile 12
3.2 Connection Properties 13
3.3 Setting up the options 14
3.4 Stream save mode 15
3.5 Displaying your AS/400 libraries 16
3.6 Managing files on the PC 17 3.6.1 PC file properties......................................................18
General tab............................................................................................. 18 Comment tab.......................................................................................... 18 Save tab................................................................................................. 19
3.7 Managing objects on the AS/400 20 3.7.1 AS/400 object properties.........................................21
General tab............................................................................................. 21 Save tab................................................................................................. 21 Other tab................................................................................................ 21
4. WHAT IS A BRAVO FILE? .. . . . . . . . . . . . . . . . . . . . . . . . . . . . . . . . . . . . . . . . . . . . . . . . . . . . . . 23
4.1 Creating a new Bravo file 24 4.1.1 By Copy and Paste....................................................24
Bravo Express
3
4.1.2 By Drag and Drop .....................................................24
4.2 How to restore a Bravo file 25 4.2.1 By Copy and Paste....................................................25 4.2.2 By Drag and Drop .....................................................25
4.3 Save and restore from AS/400 to AS/400 26 4.3.1 By Copy and Paste....................................................26 4.3.2 By Drag and Drop .....................................................26
4.4 Progression of a save/restore 27
5. PRESENTATION OF THE SEARCH FUNCTIONS .. . . . . . . . . . . . . . . . . . . . . . . . . . . . . 28
5.1.1 On the PC .................................................................29 Search parameters for Bravo files.............................................................. 29 Advanced ............................................................................................... 29
5.1.2 On the AS/400 .........................................................30 Object Parameters................................................................................... 30 Advanced ............................................................................................... 30
5.2 Creating a new search 31
5.3 Run a search 32
5.4 Modify a search 33
5.5 Delete a search 34
6. PRESENTATION OF THE FILTER MANAGER .. . . . . . . . . . . . . . . . . . . . . . . . . . . . . . . . 35
6.1 Create a new filter 36
6.2 Modify a filter 37
6.3 Delete a filter 38
6.4 Copy a filter 39
7. REFERENCES .. . . . . . . . . . . . . . . . . . . . . . . . . . . . . . . . . . . . . . . . . . . . . . . . . . . . . . . . . . . . . . . . . . . . . 40
7.1 Target release 40
7.2 Update history 41
Bravo Express
4
7.3 Object pre-check 42
7.4 Save active 43
7.5 Save active wait time 44
7.6 Save active message queue 45
7.7 Save access paths 46
7.8 Save file data 47
7.9 Storage 48
7.10 Data compression 49
7.11 Option 50
7.12 Database member option 51
7.13 Date when saved 52
7.14 Time when saved 53
7.15 Allow object differences 54
7.16 Force object conversion 55
7.17 Auxiliary storage pool ID 56
8. GETT ING HELP .. . . . . . . . . . . . . . . . . . . . . . . . . . . . . . . . . . . . . . . . . . . . . . . . . . . . . . . . . . . . . . . . . . . 57
Bravo Express
5
1. Introduction to Bravo Express Bravo Express is a simple PC interface to the AS/400�s integrated file structure. Bravo Express allows a user to see and work with almost any kind of AS/400 object:
Database files Logical files Save files Data areas Command files Data queue descriptions And more
(All objects accessible from the WRKOBJ command on the AS/400 may be copied and distributed using Bravo Express.) With Bravo Express, you may:
Move objects from one AS/400 to another by simply dragging and dropping. Restore a Bravo file to another AS/400 from the PC. Save objects as a compressed PC format for Internet distribution. Save objects to lower OS/400 versions for use on target machines that run
lower versions than the development machine Execute "CL" commands before and/or after restoring objects to the
AS/400 Create filters to quickly display and work with specific objects

Bravo Express
6
2. Installation
2.1 Instal lat ion Check L ist
Bravo Express works with the following configurations: 75 Mhz processor or higher 32 MB of available memory � Bravo Express uses approximately 5 MB 3.5 MB available hard disk space VGA monitor or higher resolution � Super VGA 800*600 is recommended PC OPERATING SYSTEM Windows 95 SR 2 or higher Windows 98 Windows NT Service Pack 4 or higher Windows 2000 AS/400 OPERATING SYSTEM OS/400 V3R2M0 or higher OS/400 V3R7M0 or higher OS/400 V4R3M0 or higher (in order to use the Streaming mode restore functions) AS/400 CONNECTION TYPE TCP/IP (local or remote connection) APPC (see the list of compatible routers below) COMPATIBLE ROUTERS (32 BITS) Client Access for win95/NT V3.13 (with Service Pack) Client Access for Win95/NT 3.20 Rally V6.1 Rumba Wall Data 5.1 Netsoft 2.0-2.11 Netsoft 2.21 Netsoft 3.1 Microsoft SNA Server V2.11 SP1 / V3.0 / V4.0
Bravo Express
7
2.2 Instal lat ion f rom the Internet or CD-ROM
2 .2 .1 AS /400 l i b rary Ins ta l l a t ion
STEP 1 Either download the file brv_as.exe from the Symtrax website, or install it from the CD-ROM if one has been sent to you by Symtrax. Please note that you only have to restore AS/400 libraries once and that ONE
AS/400 installation allows you to install client programs on ALL connected PCs. Go to the next step...
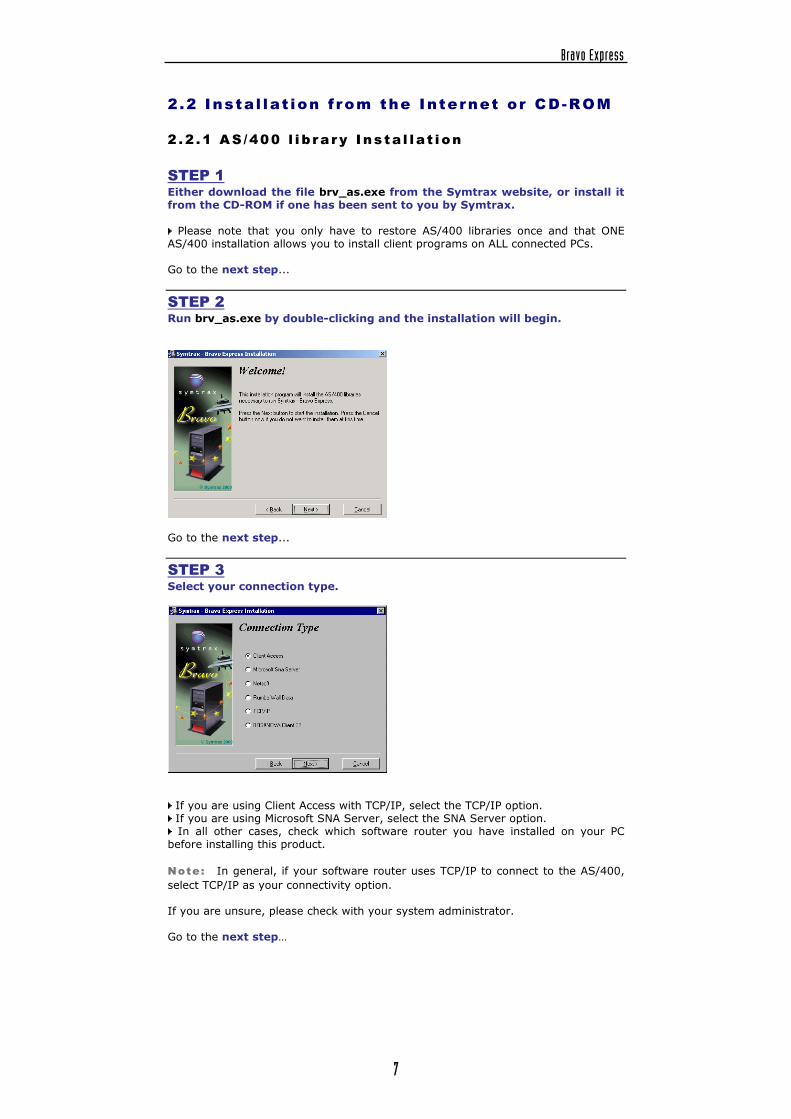
STEP 2 Run brv_as.exe by double-clicking and the installation will begin.
Go to the next step...
STEP 3 Select your connection type.
If you are using Client Access with TCP/IP, select the TCP/IP option. If you are using Microsoft SNA Server, select the SNA Server option. In all other cases, check which software router you have installed on your PC
before installing this product. Note: In general, if your software router uses TCP/IP to connect to the AS/400, select TCP/IP as your connectivity option. If you are unsure, please check with your system administrator. Go to the next step�
Bravo Express
8
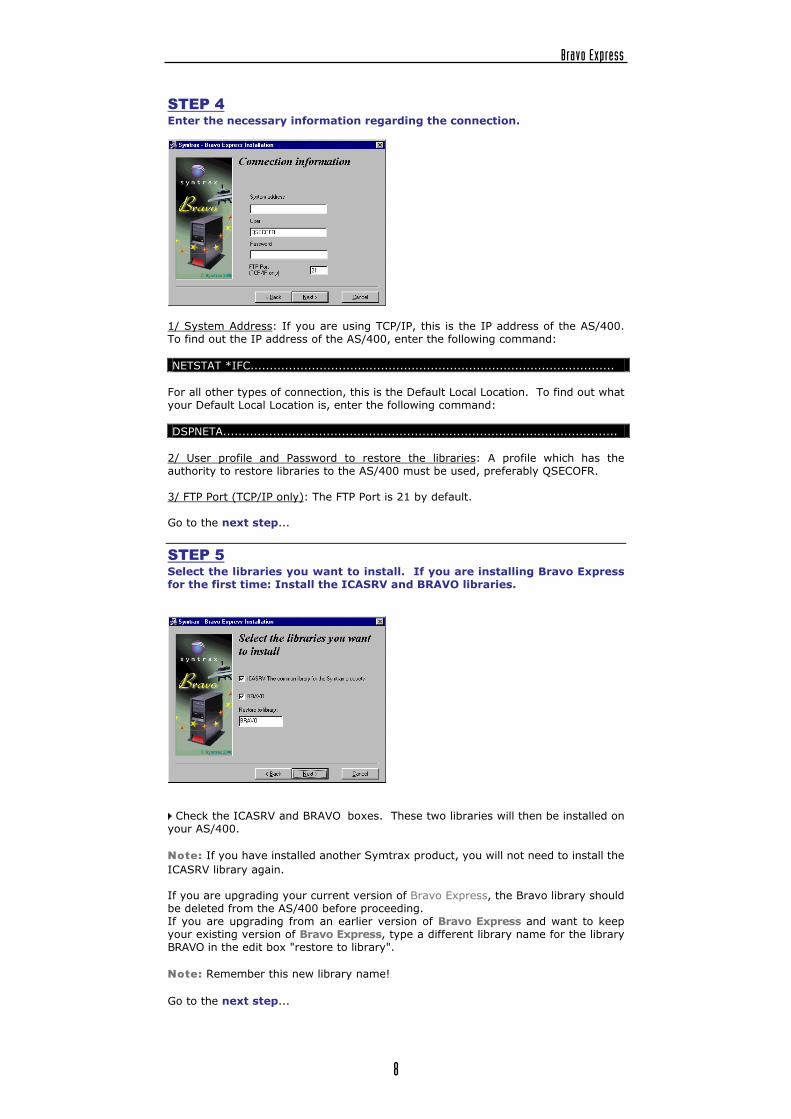
STEP 4 Enter the necessary information regarding the connection.
1/ System Address: If you are using TCP/IP, this is the IP address of the AS/400. To find out the IP address of the AS/400, enter the following command: NETSTAT *IFC...............................................................................................
For all other types of connection, this is the Default Local Location. To find out what your Default Local Location is, enter the following command: DSPNETA.......................................................................................................
2/ User profile and Password to restore the libraries: A profile which has the authority to restore libraries to the AS/400 must be used, preferably QSECOFR. 3/ FTP Port (TCP/IP only): The FTP Port is 21 by default. Go to the next step...
STEP 5 Select the libraries you want to install. If you are installing Bravo Express for the first time: Install the ICASRV and BRAVO libraries.
Check the ICASRV and BRAVO boxes. These two libraries will then be installed on
your AS/400. Note: If you have installed another Symtrax product, you will not need to install the ICASRV library again. If you are upgrading your current version of Bravo Express, the Bravo library should be deleted from the AS/400 before proceeding. If you are upgrading from an earlier version of Bravo Express and want to keep your existing version of Bravo Express, type a different library name for the library BRAVO in the edit box "restore to library". Note: Remember this new library name! Go to the next step...
Bravo Express
9
STEP 6 Start-up of ICASRV sub-system (if you are connecting with TCP/IP) Start up the ICASRV sub-system with the following command: STRSBS ICASRV/ICASRV.............................................................................
Go to the next step...
STEP 7 Enter Password You are now at the final stage of installing Bravo Express on your AS/400 system. All that remains is to enter your Symtrax provided password on the AS/400. To do this, enter the following command: CALL BRAVO/PWDBRAVO.................................................................
The AS/400 installation of Bravo is now complete!
Bravo Express
10
2 .2 .2 Ins ta l l i ng the PC C l ient P rogram
STEP 1 Either download the file brvexpress_us.exe from the Symtrax website, or install it from the CD-ROM if one has been sent to you by Symtrax. Go to the next step...
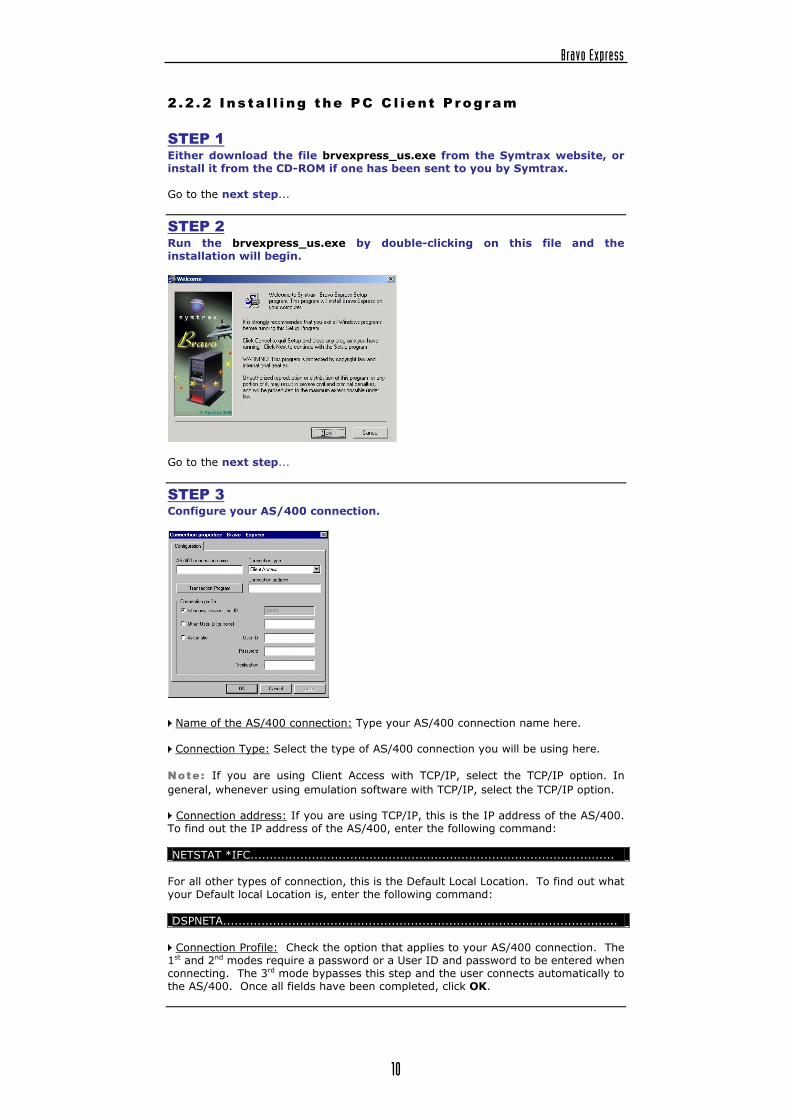
STEP 2 Run the brvexpress_us.exe by double-clicking on this file and the installation will begin.
Go to the next step...
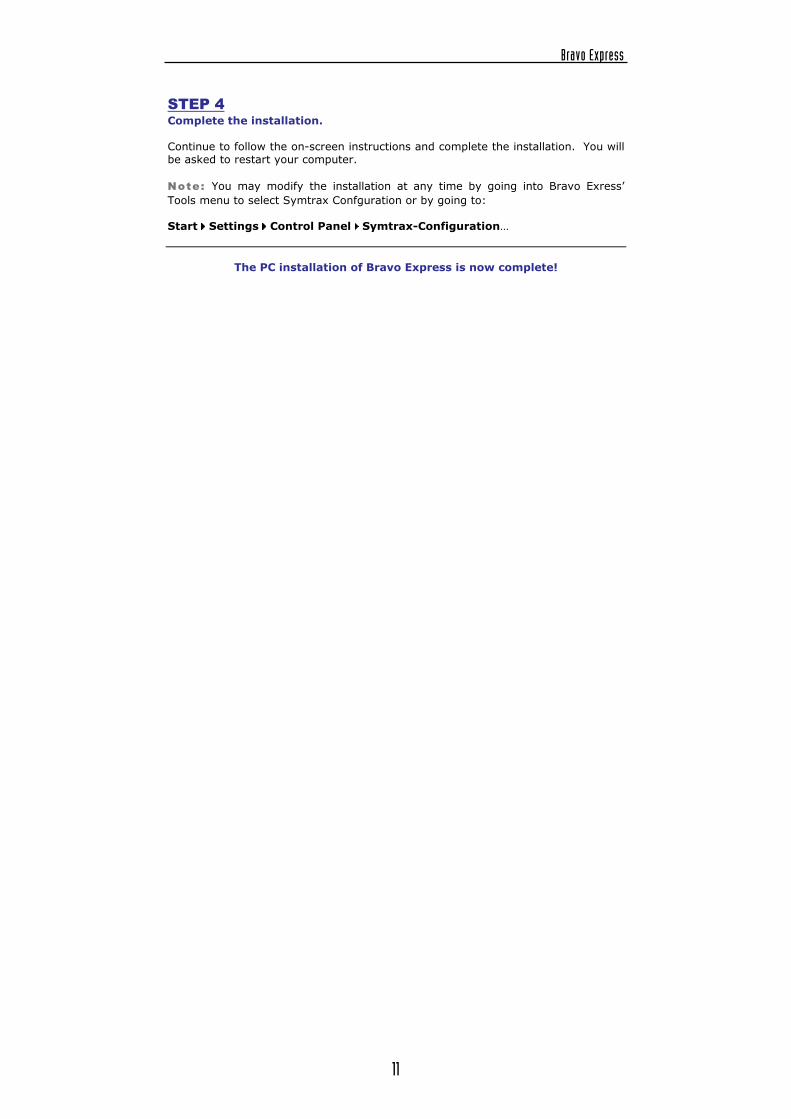
STEP 3 Configure your AS/400 connection.
Name of the AS/400 connection: Type your AS/400 connection name here. Connection Type: Select the type of AS/400 connection you will be using here.
Note: If you are using Client Access with TCP/IP, select the TCP/IP option. In general, whenever using emulation software with TCP/IP, select the TCP/IP option. Connection address: If you are using TCP/IP, this is the IP address of the AS/400.
To find out the IP address of the AS/400, enter the following command: NETSTAT *IFC...............................................................................................
For all other types of connection, this is the Default Local Location. To find out what your Default local Location is, enter the following command: DSPNETA.......................................................................................................
Connection Profile: Check the option that applies to your AS/400 connection. The
1st and 2nd modes require a password or a User ID and password to be entered when connecting. The 3rd mode bypasses this step and the user connects automatically to the AS/400. Once all fields have been completed, click OK.
Bravo Express
11
STEP 4 Complete the installation. Continue to follow the on-screen instructions and complete the installation. You will be asked to restart your computer.
Note: You may modify the installation at any time by going into Bravo Exress� Tools menu to select Symtrax Confguration or by going to: Start Settings Control Panel Symtrax-Configuration�
The PC installation of Bravo Express is now complete!
Bravo Express
12
3. Getting started with Bravo Express To open Bravo Express go to: START PROGRAMS SYMTRAX BRAVO EXPRESS.
3.1 Connect ion Prof i le
The first time that you browse through the AS/400 libraries and try to display the contents, a connection is made using the predefined parameters for the system. If the connection profile is not automatic, a dialog box will open asking for a valid connection profile (user name and password). The different systems available, along with their connection configurations are defined in the Symtrax Configuration Manager in the Windows control panel. Note: If you make changes to connect systems for Bravo Express in the configuration manager, Bravo must be restarted to take these changes into account. The Symtrax Configuration Manager may be opened directly from Bravo by going to the menu Tools AS/400 Configuration. If changes are made via this menu, then it is not necessary to restart Bravo Express. To display the connection properties of an AS/400, right click on the AS/400 icon and choose "Properties". To change the current connection profile to the AS/400, right click on the AS/400 icon and choose "Change User".
Bravo Express
13
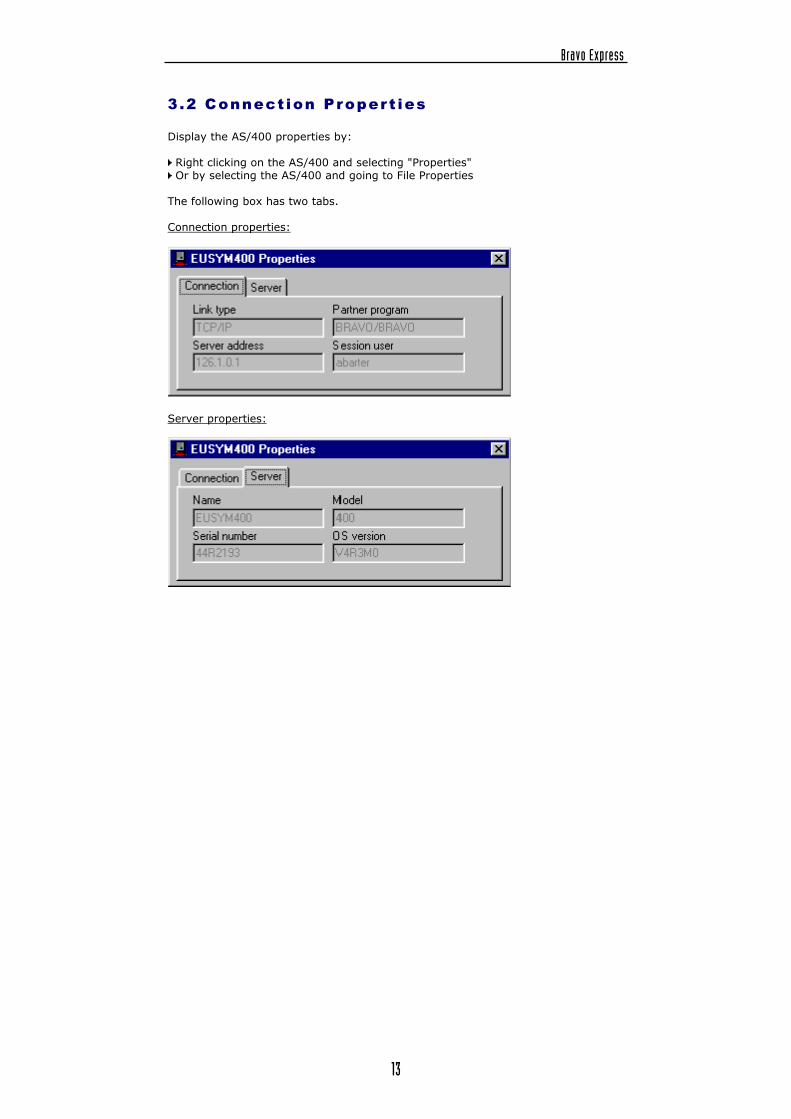
3.2 Connect ion Propert ies
Display the AS/400 properties by: Right clicking on the AS/400 and selecting "Properties" Or by selecting the AS/400 and going to File Properties
The following box has two tabs. Connection properties:
Server properties:
Bravo Express
14
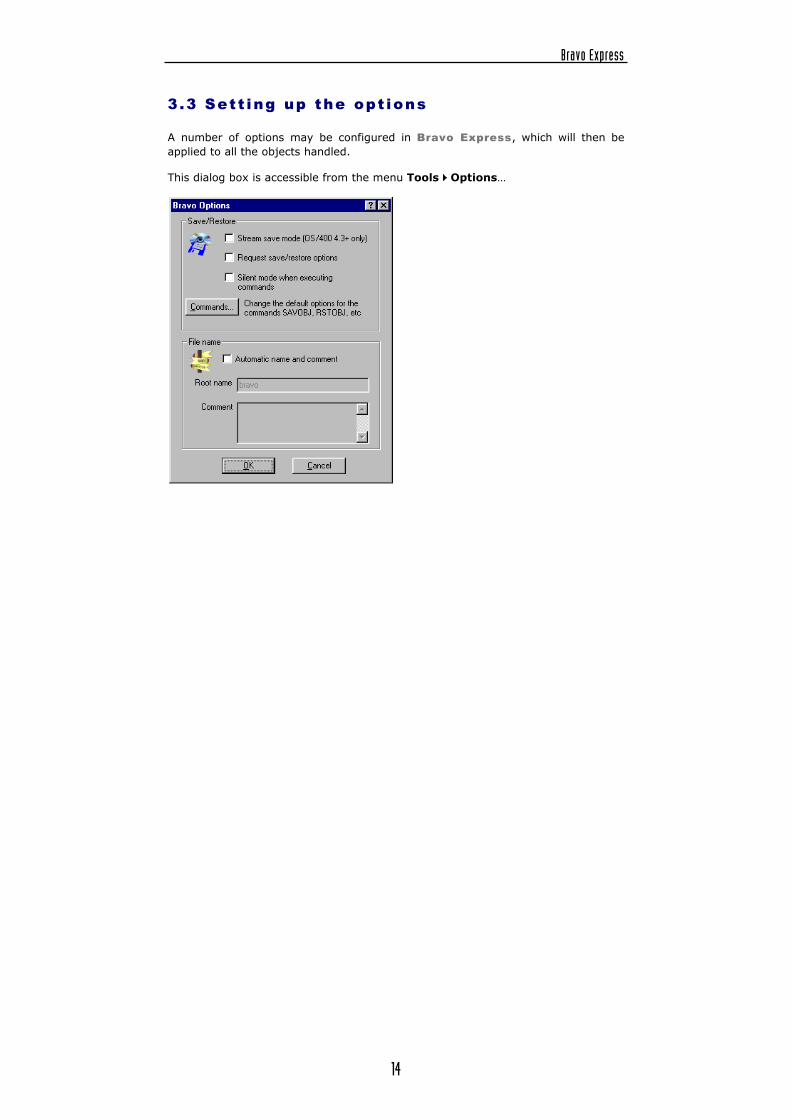
3.3 Sett ing up the opt ions
A number of options may be configured in Bravo Express, which will then be applied to all the objects handled. This dialog box is accessible from the menu Tools Options�
Bravo Express
15
3.4 Stream save mode
Check this option to save objects using the Stream Save Mode. This mode avoids the use of temporary disk space during a save operation. If this option is not active (Normal mode), a SAVF file (Save File) is first saved to the AS/400 temporary disk space, before being transferred to the PC. In Stream Save Mode the save may be cancelled at any time. Note: The Stream Save Mode is only available for OS/400 version V4R3 and up. Bravo files created in this mode may only be restored to AS/400�s which have V4R3 or higher.
Bravo Express
16
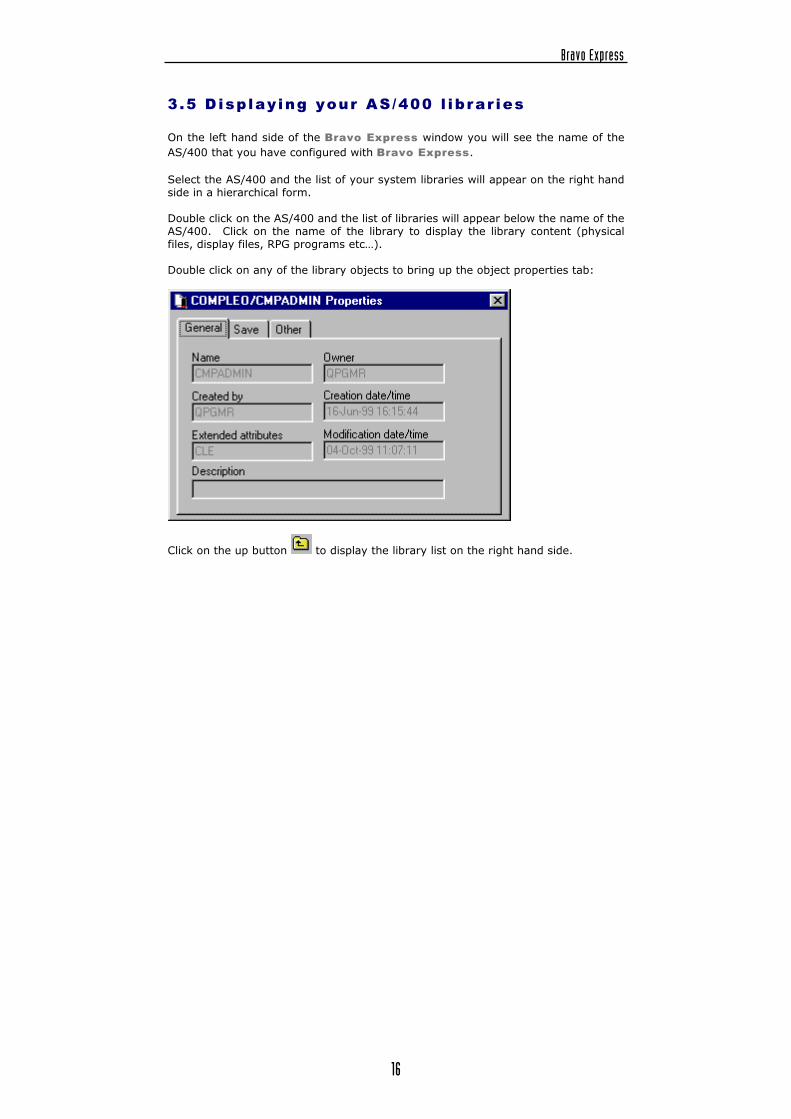
3.5 D isplaying your AS/400 l ibrar ies
On the left hand side of the Bravo Express window you will see the name of the AS/400 that you have configured with Bravo Express. Select the AS/400 and the list of your system libraries will appear on the right hand side in a hierarchical form. Double click on the AS/400 and the list of libraries will appear below the name of the AS/400. Click on the name of the library to display the library content (physical files, display files, RPG programs etc�). Double click on any of the library objects to bring up the object properties tab:
Click on the up button to display the library list on the right hand side.
Bravo Express
17
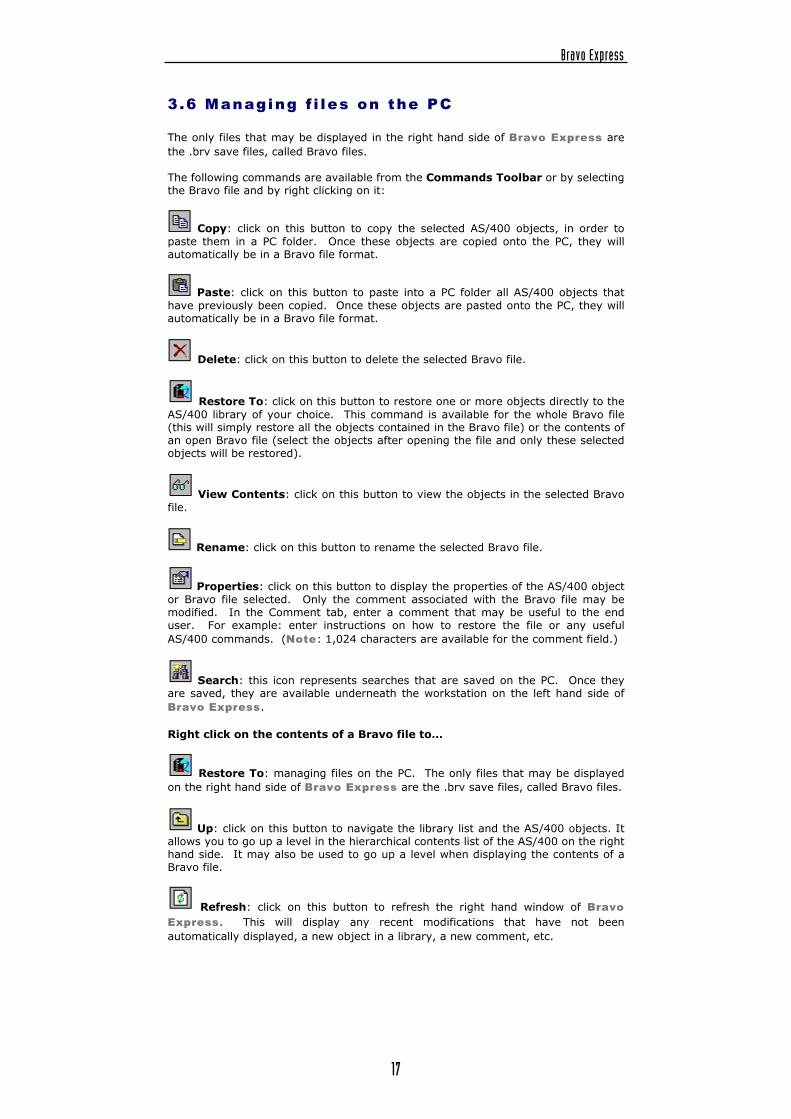
3.6 Managing f i les on the PC
The only files that may be displayed in the right hand side of Bravo Express are the .brv save files, called Bravo files. The following commands are available from the Commands Toolbar or by selecting the Bravo file and by right clicking on it:
Copy: click on this button to copy the selected AS/400 objects, in order to paste them in a PC folder. Once these objects are copied onto the PC, they will automatically be in a Bravo file format.
Paste: click on this button to paste into a PC folder all AS/400 objects that have previously been copied. Once these objects are pasted onto the PC, they will automatically be in a Bravo file format.
Delete: click on this button to delete the selected Bravo file.
Restore To: click on this button to restore one or more objects directly to the AS/400 library of your choice. This command is available for the whole Bravo file (this will simply restore all the objects contained in the Bravo file) or the contents of an open Bravo file (select the objects after opening the file and only these selected objects will be restored).
View Contents: click on this button to view the objects in the selected Bravo file.
Rename: click on this button to rename the selected Bravo file.
Properties: click on this button to display the properties of the AS/400 object or Bravo file selected. Only the comment associated with the Bravo file may be modified. In the Comment tab, enter a comment that may be useful to the end user. For example: enter instructions on how to restore the file or any useful AS/400 commands. (Note: 1,024 characters are available for the comment field.)
Search: this icon represents searches that are saved on the PC. Once they are saved, they are available underneath the workstation on the left hand side of Bravo Express. Right click on the contents of a Bravo file to�
Restore To: managing files on the PC. The only files that may be displayed on the right hand side of Bravo Express are the .brv save files, called Bravo files.
Up: click on this button to navigate the library list and the AS/400 objects. It allows you to go up a level in the hierarchical contents list of the AS/400 on the right hand side. It may also be used to go up a level when displaying the contents of a Bravo file.
Refresh: click on this button to refresh the right hand window of Bravo Express. This will display any recent modifications that have not been automatically displayed, a new object in a library, a new comment, etc.
Bravo Express
18
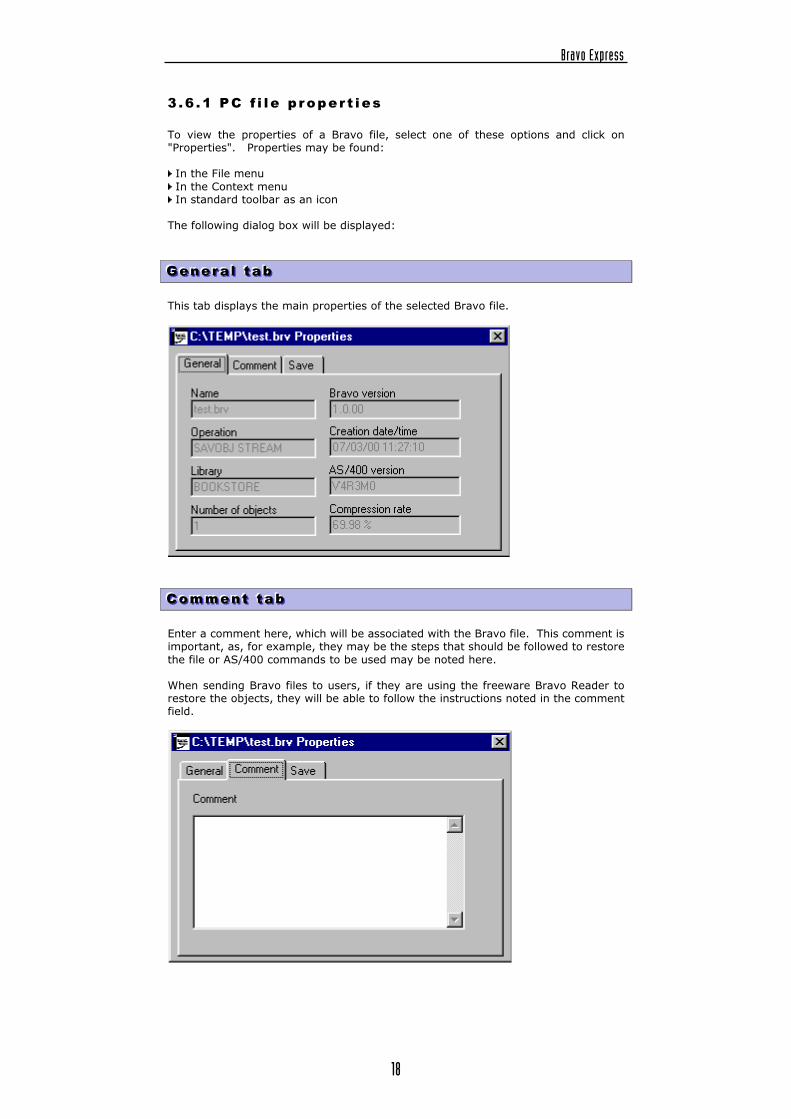
3 .6 .1 PC f i l e p roper t ies
To view the properties of a Bravo file, select one of these options and click on "Properties". Properties may be found: In the File menu In the Context menu In standard toolbar as an icon
The following dialog box will be displayed:
GGG eee nnn eee rrr aaa lll ttt aaa bbb
This tab displays the main properties of the selected Bravo file.
CCC ooo mmm mmm eee nnn ttt ttt aaa bbb
Enter a comment here, which will be associated with the Bravo file. This comment is important, as, for example, they may be the steps that should be followed to restore the file or AS/400 commands to be used may be noted here. When sending Bravo files to users, if they are using the freeware Bravo Reader to restore the objects, they will be able to follow the instructions noted in the comment field.
Bravo Express
19
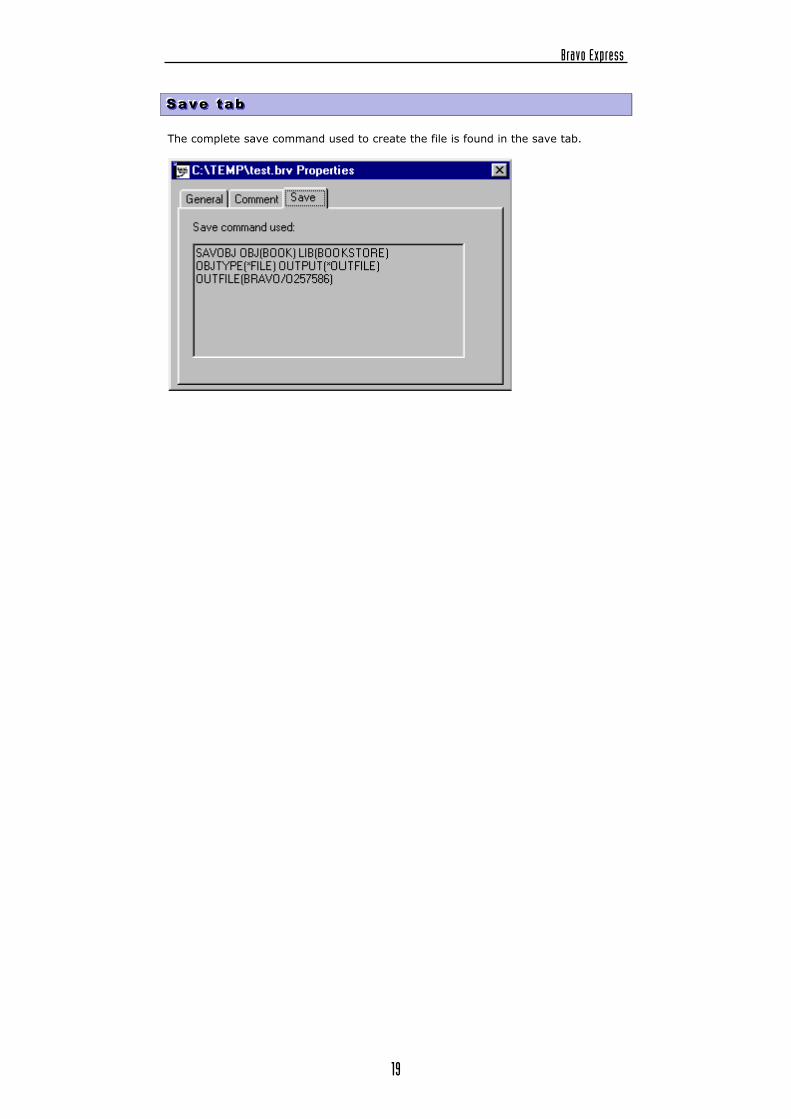
SSS aaa vvv eee ttt aaa bbb
The complete save command used to create the file is found in the save tab.
Bravo Express
20
3.7 Managing objects on the AS/400
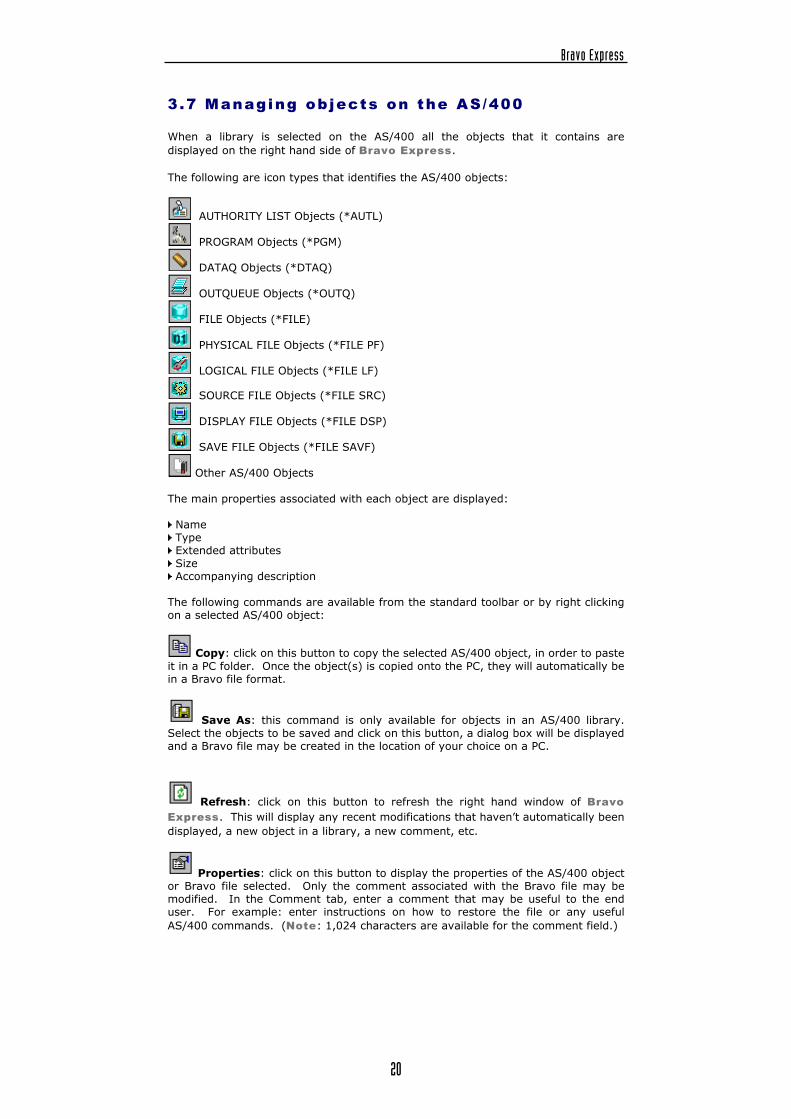
When a library is selected on the AS/400 all the objects that it contains are displayed on the right hand side of Bravo Express. The following are icon types that identifies the AS/400 objects:
AUTHORITY LIST Objects (*AUTL)
PROGRAM Objects (*PGM)
DATAQ Objects (*DTAQ)
OUTQUEUE Objects (*OUTQ)
FILE Objects (*FILE)
PHYSICAL FILE Objects (*FILE PF)
LOGICAL FILE Objects (*FILE LF)
SOURCE FILE Objects (*FILE SRC)
DISPLAY FILE Objects (*FILE DSP)
SAVE FILE Objects (*FILE SAVF)
Other AS/400 Objects The main properties associated with each object are displayed: Name Type Extended attributes Size Accompanying description
The following commands are available from the standard toolbar or by right clicking on a selected AS/400 object:
Copy: click on this button to copy the selected AS/400 object, in order to paste it in a PC folder. Once the object(s) is copied onto the PC, they will automatically be in a Bravo file format.
Save As: this command is only available for objects in an AS/400 library. Select the objects to be saved and click on this button, a dialog box will be displayed and a Bravo file may be created in the location of your choice on a PC.
Refresh: click on this button to refresh the right hand window of Bravo Express. This will display any recent modifications that haven�t automatically been displayed, a new object in a library, a new comment, etc.
Properties: click on this button to display the properties of the AS/400 object or Bravo file selected. Only the comment associated with the Bravo file may be modified. In the Comment tab, enter a comment that may be useful to the end user. For example: enter instructions on how to restore the file or any useful AS/400 commands. (Note: 1,024 characters are available for the comment field.)
Bravo Express
21
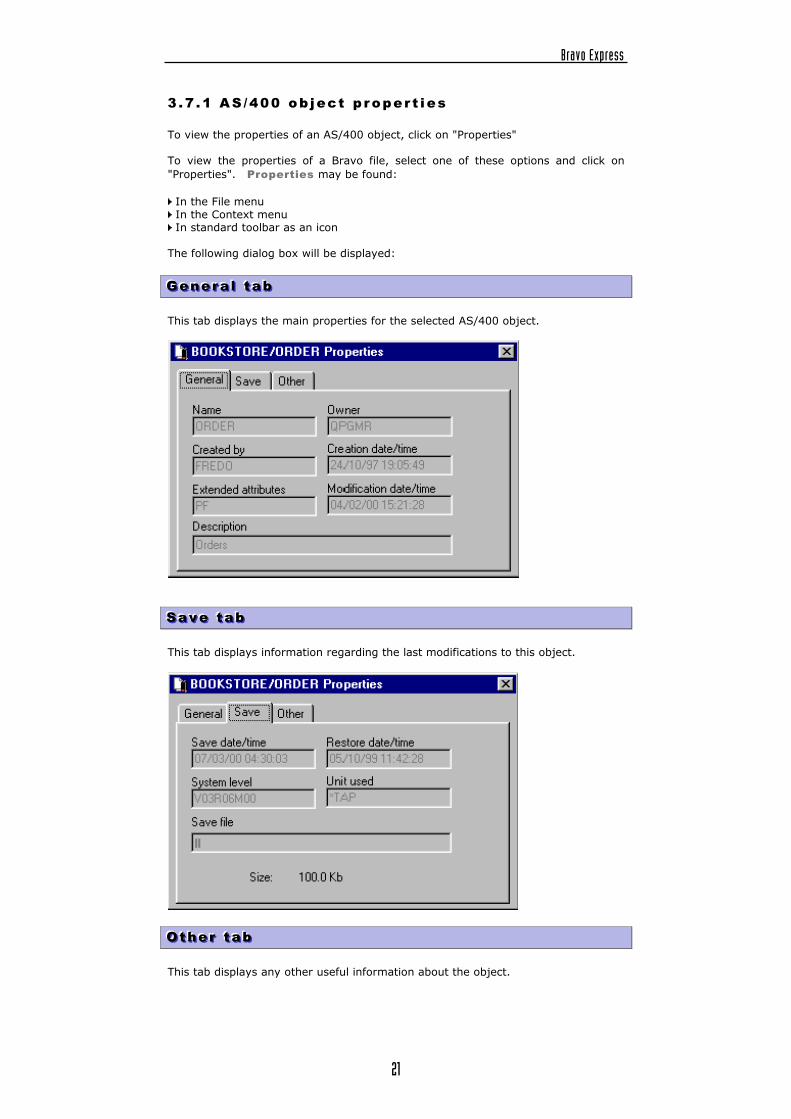
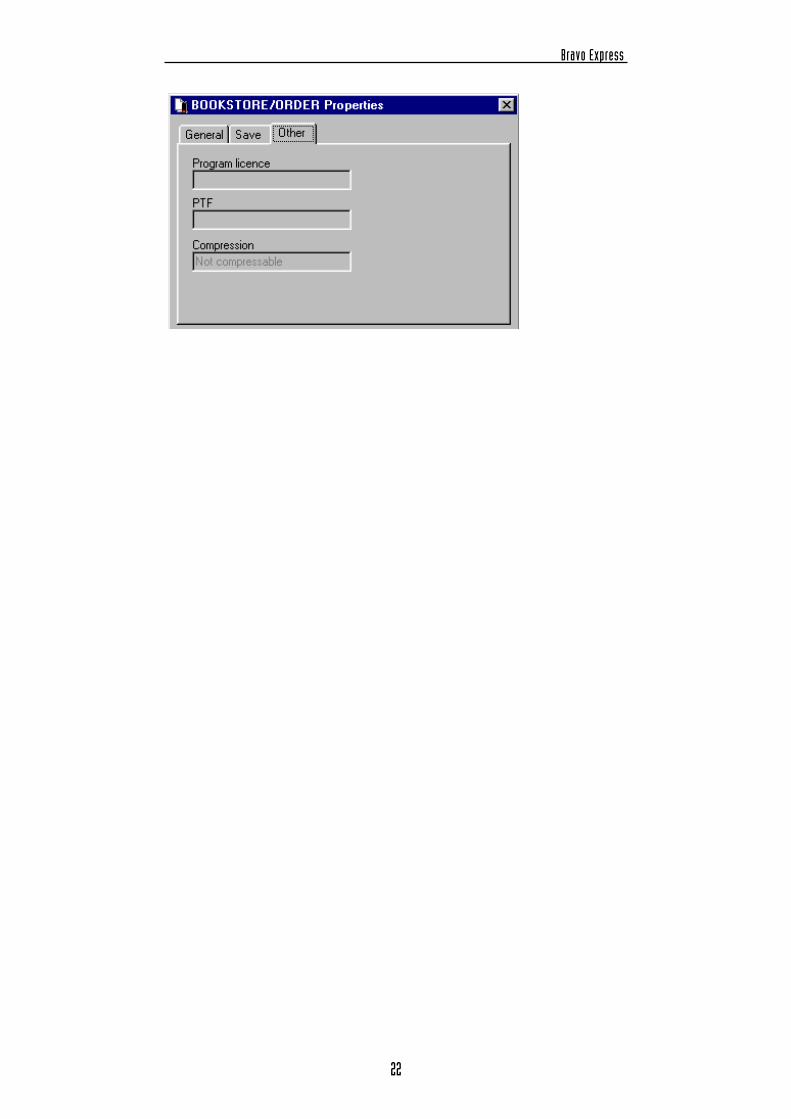
3 .7 .1 AS /400 ob ject p roper t ies
To view the properties of an AS/400 object, click on "Properties" To view the properties of a Bravo file, select one of these options and click on "Properties". Properties may be found: In the File menu In the Context menu In standard toolbar as an icon
The following dialog box will be displayed:
GGG eee nnn eee rrr aaa lll ttt aaa bbb
This tab displays the main properties for the selected AS/400 object.
SSS aaa vvv eee ttt aaa bbb
This tab displays information regarding the last modifications to this object.
OOO ttt hhh eee rrr ttt aaa bbb
This tab displays any other useful information about the object.
Bravo Express
22
Bravo Express
23
4. What is a Bravo file? A Bravo file (identified by its brv extension) is a save file created from one or more AS/400 objects by Bravo Express. This is a PC file and can therefore be distributed by e-mail, from a website, by CD-Rom or any other PC method. With the Bravo Reader, which is available for FREE from the Symtrax website (http://www.symtrax.com), users who receive Bravo files may restore them to any AS/400.
Bravo files are recognizable by the icon. When a Bravo file is displayed on the right hand window of Bravo Express, you will see the following properties: Name PC size AS/400 size Number of objects it contains Creation date Accompanying comments
Note: when a Bravo file is created, the AS/400 objects are compressed up to 80% of their original size. The compression takes place before the file transfer, so that the file transfer is faster.
Bravo Express
24
4.1 Creat ing a new Bravo f i le
To create a new Bravo file, carry out one of the following:
4 .1 .1 By Copy and Pas te
• Click on the library that contains the objects to be saved.
• Select the objects and click on "Copy" (either in the File menu, in the context menu or by clicking on the "Copy" button in the standard toolbar).
• In the left hand side of Bravo Express, scroll down to "My Computer" or
"Network Neighborhood" if it�s a remote PC.
• Select the folder in which to create the Bravo file.
• Click on "Paste" (either in the File menu, in the context menu or by clicking on the "Paste" button in the standard toolbar).
4 .1 .2 By D rag and D rop
• Click on the library that contains the objects to be saved.
• In the left hand side of Bravo Express, scroll down to "My Computer" or "Network Neighborhood" if it�s a remote PC and select the folder in which to create the Bravo file.
• Select the object(s) and drag and drop them into the PC folder.
• A window will open and keep you informed of the progress of the save. At
the end, a message is displayed informing the user of the number of objects saved and where they came from.
If Bravo Express was unable to save any objects, a message will be displayed.
Bravo Express
25
4.2 How to restore a Bravo f i le
To restore a Bravo file, carry out one of the following:
4 .2 .1 By Copy and Pas te
• Open the folder, which contains the Bravo file to restore. • Select it and click on "Copy" (either in the File menu, in the context menu
or by clicking on the "Copy" button in the standard toolbar). • In the left hand side of Bravo Express, scroll up to the AS/400 and click
on it to display the different libraries. • Select the library to restore the objects of the Bravo file to. • Click on "Paste" (either in the File menu, in the context menu or by clicking
on the "Paste" button in the standard toolbar).
4 .2 .2 By D rag and D rop
• Open the folder, which contains the Bravo file to restore. • On the left hand side of Bravo Express, scroll up to the AS/400 and click
on it to display the different libraries. • Select the Bravo file and drag and drop them into the AS/400 library. • A window will open and keep you informed of the progress of the restore.
At the end, a message is displayed informing the user of the number of objects restored and the name of the library they originated from before they were saved.
If Bravo Express was unable to restore any objects, a message will be displayed.
Bravo Express
26
4.3 Save and restore f rom AS/400 to AS/400
With Bravo Express, you may now transfer objects from one AS/400 to another. This task is in fact a save on the PC followed by a restore: The objects selected on the originating AS/400 are first saved to the PC in the form of temporary Bravo files (in the TEMP folder in the Bravo directory). They are then restored to the destination AS/400. To transfer objects from AS/400 to AS/400, carry out one of the following:
4 .3 .1 By Copy and Pas te
1. Select the AS/400 and then the library that contains the objects to be transferred.
2. Select the objects and click on "Copy" (either in the File menu, in the context menu or by clicking on the "Copy" button in the standard toolbar).
3. On the left hand side of Bravo Express, select the destination AS/400 and click on it to display the different libraries.
4. Select the library in which to transfer the objects. 5. Click on "Paste" (either in the File menu, in the context menu or by clicking
on the "Paste" button in the standard toolbar).
4 .3 .2 By D rag and D rop
1. Select the AS/400 and then the library that contains the objects to be transferred.
2. On the left hand side of Bravo Express, select the destination AS/400 and click on it to display the different libraries.
3. Select the object(s) to be transferred and drag and drop them into the destination library.
A window will open and keep you informed of the progress of the transfer. At the end, a message is displayed informing the user of the number of objects transferred and the name of the library where they came from. If Bravo Express was unable to transfer any objects, a message will be displayed. Click on "Details" for more information on the message.
Bravo Express
27
4.4 Progression of a save / restore
During a save or a restore, a window is displayed to keep you informed of the progress. At the end, a message is displayed informing the user of the number of objects saved or restored and the name of the library from where they came. If Bravo Express was unable to save or restore any objects, a message will be displayed. Click on "Details" for more information on the message.

Bravo Express
28
5. Presentation of the search functions
The search function in Bravo Express, represented by the icon, allows users to carry out detailed searches for objects, whether they are found on the AS/400 or as a Bravo file on the PC. All searches may be saved and re-run whenever necessary. The search criteria correspond to the AS/400 object attributes. Wildcards may be used to facilitate the search: * Replaces 0 or more characters ? Replaces one character
Bravo Express
29
5 .1 .1 On the PC
Search parameters for objects Object name: enter the name of the object to be searched for. Wildcards may be
used. Library name: enter the name of the library in which to carry out the search.
Wildcards may be used. Object type: specify which type of object to search for. If you do not want to
search by object type, leave the default *ALL. Wildcards may be used. Owner: specify the owner of the object to search for. If you do not want to
search by owner, leave the default *ALL. Wildcards may be used. Extended attributes: specify the extended attributes of the object to search for.
If you do not want to search by extended attributes, leave the default *ALL. Wildcards may be used.
SSS eee aaa rrr ccc hhh ppp aaa rrr aaa mmm eee ttt eee rrr sss fff ooo rrr BBB rrr aaa vvv ooo fff iii lll eee sss
File name: enter the name of the Bravo file in which to carry out the search. Wildcards may be used. Search in: enter the path to the Bravo file in which to carry out the search. For
example: C:\Temp\My Folder. The browse button may be used to select the path. Include subfolders: check this box for all the subfolders of the directory
indicated to be searched. If it is not checked, these subfolders will not be searched. Search selected files only: this option becomes available if more than one Bravo
file is selected on which to carry out the search. If this box is checked only the selected Bravo files will be searched. Otherwise, the criteria set above will define the search zone. Save date: enter in this tab the date the files to be searched for were saved.
AAA ddd vvv aaa nnn ccc eee ddd
Size: select whether the size of the objects defined to the right is either the minimum or the maximum size. System level: enter the version of OS/400 for the system corresponding to the
objects to be searched for. This must be in the format VxxRxxMxx, e.g.: V04R03M00. Containing description: enter the description associated with the object to be
searched for. Wildcards may be used.
Bravo Express
30
5 .1 .2 On the AS /400
OOO bbb jjj eee ccc ttt PPP aaa rrr aaa mmm eee ttt eee rrr sss
Object name: enter the name of the object to be searched for. Wildcards may be used. Library name: enter the name of the library in which to carry out the search.
Wildcards may not be used. Object type: specify which type of object to search for. If you do not want to
search by object type, leave the default *ALL. Wildcards maynot be used. Owner: specify the owner of the object to search for. If you do not want to
search by owner, leave the default *ALL. Wildcards may be used. Extended attributes: specify the extended attributes of the object to search for.
If you do not want to search by extended attributes, leave the default *ALL. Wildcards may be used. Save date: enter in this tab the date the files to be searched for were saved.
AAA ddd vvv aaa nnn ccc eee ddd
Size: select whether the size of the objects defined to the right is either the minimum or the maximum size. System level: enter the version of OS/400 for the system corresponding to the
objects to be searched for. This must be in the format VxxRxxMxx, e.g.: V04R03M00. Containing description: enter the description associated with the object to be
searched for. Wildcards can be used. Note: If a search is to long, it may be stopped by clicking on the "Stop" button.
Bravo Express
31
5.2 Creat ing a new search
To create a new search click on the button. In the dialog box that is displayed, choose to carry out the search On the PC or On the AS/400. The available parameters will change depending on your choice.
Bravo Express
32
5.3 Run a search
To run an existing search, select the search and click on the Run Search button by going:
In the Context menu: Run Search Or in the Search toolbar
Note: Searches that have already been carried out are saved and available underneath the workstation on the left hand side of Bravo Express. It is recognized
as the icon.

Bravo Express
33
5.4 Modi fy a search
To modify an existing search, select the search and click on the Modify Search button:
In the Tools menu � Search - Modify Search In the Context menu: Modify Search Or in the Search toolbar
Note: Searches that have already been carried out are saved and available underneath the workstation on the left hand side of Bravo Express. It is
recognized as the icon.
Bravo Express
34
5.5 Delete a search
To delete an existing search, select the search and click on the Delete Search button:
In the Tools menu � Search - Delete Search In the Context menu: Delete Search Or in the Search toolbar
Note: Searches that have already been carried out are saved and available underneath the workstation on the left hand side of Bravo Express. It is
recognized as the icon.
Bravo Express
35
6. Presentation of the Filter Manager The filters allow the user to limit the number of objects that are to be displayed, depending on the criteria specified in the Filter Manager dialog box. The filters are only applied to the contents of the AS/400 libraries. By filtering the objects by name and/or type, a lot of time will be saved when you display the objects, as the list that is displayed in Bravo Express from the AS/400 will be much lighter when filtered. Using the other filter criteria (Extended attributes, Owner, Date or Size�) it becomes much easier to display only the objects that you are looking for.
Access the functions of the Filter Manager from the menu from the menu Display Manage Filters. You may filter by: Name and Type
Object name: only the objects, which have the selected name, will be displayed. Wildcards may be used.
Object type: only the objects that have been selected from the drop down
list will be displayed. If the object type is not in the list it may be entered manually. Wildcards may not be used.
Extended attributes: only the objects that have the extended attributes
selected will be displayed. Choose either from the drop down list or enter them manually. Wildcards may be used. Owner: only the objects belonging to the specified owner will be displayed.
The owners name must be entered manually. Wildcards may be used. Modification date: specify in this tab the date of the last modification of
the object to be displayed. Advanced
Size: select whether the size of the objects defined to the right is either the minimum or the maximum size. System level: enter the version of OS/400 for the system corresponding
to the objects to be searched for. This must be in the format VxxRxxMxx, e.g., V04R03R00. Containing description: enter the description associated with the object
to be searched for. Wildcards may be used.
Bravo Express
36
6.1 Create a new f i l ter
Click on the button in the Filter Manager to create a new filter. Give it a name of your choice; and on the right hand side of the dialog box enter in the parameters for the new filter. Note: The filter must be selected on the left hand side of the dialog box to set the parameters, if not the right hand side is not available.

Bravo Express
37
6.2 Modi fy a f i l ter
To modify an existing filter, select it and then changed the parameters as needed.

Bravo Express
38
6.3 Delete a f i l ter
Click on the button in the Filter Manager to delete an existing filter.
Bravo Express
39
6.4 Copy a f i l ter
Click on the button in the Filter Manager to copy an existing filter. The new filter will have exactly the same properties as the original one, just change them as required for the new filter.
Bravo Express
40
7. References
7.1 Target re lease
Parameter corresponds to TGTRLS Specifies the release of the operating system on which you intend to restore and use the object. When specifying the target-release value, the format VxRxMx is used to specify the release, where Vx is the version, Rx is the release, and Mx is the modification level. For example, V2R3M0 is version 2, release 3, and modification level 0. To specify that an object be saved for distribution to a system at a different release level than the system on which the save operation is to occur; the procedure differs for program or non-program objects and by the release level on which a program object is created. If, for example, you are saving an object for distribution to a target system running on an earlier release, you have the following choices: For program objects - If the program object was created at a release level more current than the targeted earlier release, you must (1) create the program object again specifying the targeted earlier release, (2) save the program object specifying the targeted earlier release, and then (3) restore the program object on the target system. - If the program object was created at the same release level as the target system, you can (1) save the program object specifying the targeted earlier release and then (2) restore the program object on the target system. For non-program objects You may (1) save the object specifying the targeted earlier release and then (2) restore the object on the target system. The possible values are: *CURRENT The object is to be restored to, and used on, the release of the operating system currently running on your system. The object may also be restored to a system with any subsequent release of the operating system installed. *PRV The object is to be restored to the previous release with modification level 0 of the operating system. The object may also be restored to a system with any subsequent release of the operating system installed. Target-release Specify the release in the format VxRxMx. The object can be restored to a system with the specified release or with any subsequent release of the operating system installed. Valid values depend on the current version, release and modification level, and they change with each new release. Press F4 to see a list of valid target release values.
Bravo Express
41
7.2 Update h istory
Parameter corresponds to UPDHST Specifies whether the save history information of each saved object is changed with the date, time, and location of the save operation. The save history information for an object is displayed using the Display Object Description (DSPOBJD) command. The save history information is used to determine which journal entries are processed when RCVRNG(*LASTSAVE) and FROMENT(*LASTSAVE) are used on the Apply Journal Changes (APYJRNCHG) command. The possible values are: *YES The last save date, time and location is updated in each object saved. *NO The save history information contained in the description of each object saved is not updated. Note: UPDHST(*NO) should be used for a save operation that is not intended for recovery. For example, if the save data is sent, record by record, to another system and the save file is immediately deleted, the save history information is probably not to be updated.
Bravo Express
42
7.3 Object pre-check
Parameter corresponds to PRECHK Specifies whether the save operation for a library ends if any of the following are true: The objects do not exist The library or the objects were previously found to be damaged The library or the objects are locked by another job The requester of the save operation does not have authority to the library or to save the objects. The possible values are: *NO The save operation for a library continues, saving only those objects that may be saved. *YES If, after all specified objects are checked, one or more objects cannot be saved, the save operation for a library ends before any data is written. If multiple libraries are specified, the save operation continues with the next library. However, if PRECHK(*YES) and SAVACT(*SYNCLIB) are specified and an object in any library to be saved does not meet the preliminary check conditions, the save operation ends and no objects are saved.
Bravo Express
43
7.4 Save act ive
Parameter corresponds to SAVACT Specifies whether an object may be updated while it is being saved. Note: If your system is in a restricted state and the SAVACT parameter is specified, the save operation is performed as if SAVACT(*NO) was specified. The possible values are: *NO Objects that are in use are not saved. Objects may not be updated while being saved. *LIB Objects in a library may be saved while they are in use by another job. All of the objects in a library reach a checkpoint together and are saved in a consistent state in relationship to each other. Note: Libraries with thousands of objects may be too large for this option. *SYNCLIB Objects in a library may be saved while they are in use by another job. All of the objects and all of the libraries in the save operation reach a checkpoint together and are saved in a consistent state in relationship to each other. *SYSDFN Objects in a library may be saved while they are in use by another job. Objects in a library may reach checkpoints at different times and may not be in a consistent state in relationship to each other. Note: Specifying this value eliminates some size restrictions and may enable a library to be saved that could not be saved with SAVACT(*LIB).

Bravo Express
44
7.5 Save act ive wai t t ime
Parameter corresponds to SAVACTWAIT Specifies the amount of time to wait for a commit boundary or a lock on an object, if it is not available, before continuing the save. If a lock is not obtained in the specified time, the object is not saved. If a commit boundary is not reached in the specified time, the save operation is ended. The possible values are: 120 The system waits 120 seconds for a commit boundary or an object lock before continuing the save operation. *NOMAX No maximum wait time exists. Wait-time Specify the time (in seconds) to wait for a commit boundary or an object lock before continuing the save operation.
Bravo Express
45
7.6 Save act ive message queue
Parameter corresponds to SAVACTMSGQ Specifies the message queue that the save operation uses to notify the user that the checkpoint processing for a library is complete. A separate message is sent for each library to be saved when the *SYSDFN or *LIB value is specified on the Save active prompt (SAVACT parameter). When the *SYNCLIB value is specified on the Save active prompt (SAVACT parameter), one message is sent for all libraries in the save operation. This parameter can be used to save the objects at a known, consistent boundary to avoid additional recovery procedures following a restore operation. Applications can be stopped until the checkpoint processing complete message is received. The possible values are: *NONE No notification message is sent. *WRKSTN The notification message is sent to the workstation message queue. This value is not valid in batch mode. The possible library values are: *LIBL All libraries in the job's library list are searched until the first match is found. *CURLIB The current library for the job is used to locate the message queue. If no library is specified as the current library for the job, the QGPL library is used. Library-name Specify the name of the library where the message queue is located. Message-queue-name Specify the name of the message queue.
Bravo Express
46
7.7 Save access paths
Parameter corresponds to ACCPTH Specifies whether the logical file access paths that are dependent on the physical files being saved are also saved. The access paths are saved only in the case of the following: All members in which the access paths are built, are included in this save operation. The access paths are not invalid or damaged at the time of the save. The system checks to ensure the integrity of the access paths. Any discrepancies found by the system will result in the access paths being rebuilt. Informational messages are sent indicating the number of logical file access paths saved with each physical file. All physical files in which an access path is built must be in the same library. This parameter does not save logical file objects; it only controls the saving of the access paths. More information on the restoring of saved access paths is in the Backup and Recovery book, SC41-5304. Attention: If the based-on physical files and the logical files are in different libraries, the access paths are saved. However, if the logical files and the based-on physical files are in different libraries and the logical files or physical files do not exist at restore time (such as during disaster recovery or the files were deleted) the access paths are not restored. They are rebuilt. For the fastest possible restore operation for logical files, the logical files and the based-on physical files must be in the same library and must be saved at the same time. The possible values are: *NO Only those objects specified on the command are saved. No logical file access paths are saved. *YES The specified physical files and all eligible logical file access paths over them are saved. Note: Specifying this value does not save the logical files.
Bravo Express
47
7.8 Save f i le data
Parameter corresponds to SAVFDTA Specifies, for save file objects, whether the description of a save file or both the description and the contents of a save file are saved. The possible values are: *YES The description and contents of a save file are saved. *NO Only the description of a save file is saved.

Bravo Express
48
7.9 Storage
Parameter corresponds to STG Specifies whether the system storage that is occupied by the data portion of the specified members (except for save files), modules, programs, service programs, Structured Query Language (SQL) packages and journal receivers in the library being saved are freed as part of the save operation. Only the data portion of the objects is freed, not the descriptions of the objects. The possible values are: *KEEP The storage occupied by the data portion of the objects being saved is not freed. *FREE The storage occupied by the data portion of the specified objects being saved is freed as part of the save operation. The storage for all the objects in a library is freed only after all the objects in that library are saved successfully. Note: To prevent the possible abnormal end of a program, the program being saved should not be running in the system when *FREE is specified.
Bravo Express
49
7.10 Data compression
Parameter corresponds to DTACPR Specifies whether data compression is used. The possible values are: *DEV If the save is to tape and the target device supports compression, hardware compression is performed. Otherwise, no data compression is performed. Note: If *DEV is specified on both the Data compression prompt (DTACPR parameter) and the Data compaction prompt (COMPACT parameter), only device data compaction is performed if device data compaction is supported on the device. Otherwise, data compression is performed. If *YES is specified on the Data compression prompt (DTACPR parameter) and *DEV is specified on the Data compaction prompt (COMPACT parameter), both device data compaction and device data compression are performed. *NO No data compression is performed. *YES If the save is to tape and the target device supports compression, hardware compression is performed. If compression is not supported or if the save data is written to a save file or diskette, software compression is performed. If the save is running while other jobs on the system are active and software compression is used, the overall system performance may be affected.
Bravo Express
50
7.11 Opt ion
Parameter corresponds to OPTION Specifies how to handle restoring each object. The possible values are: *ALL All objects in the saved library are restored to the library on the system. Objects in the saved library replace the objects in the library on the system. Saved objects not on the system are added to the library on the system. Objects in the system library, but not in the saved library remain in the library. *NEW Only objects that do not exist in the library on the system are restored. Only objects not known to the library in the system are restored; known objects are not restored. This option adds objects that were deleted after they were saved or that are new to this library. If any saved objects have a current version in the library in the system, they are not restored; an informational message is sent for each object, but the restore operation continues. *OLD Only objects in the library that have a saved version are restored; the current version of each object is replaced by the saved version. Only objects known to the library are restored. If any saved objects are no longer part of the current version of the library, they are not added to the library; an informational message is sent for each object, but the restore operation continues. *FREE The saved objects are restored only if they exist in the library in the system with their space freed. The saved version of each object is restored in the system in its previously freed space. This option restores objects that had their space freed when they were saved. If any saved objects are no longer part of the current version of the library, or if the space is not free for any object, the object is not restored and an informational message is sent for each object. The restore operation continues and all of the freed objects are correctly restored.
Bravo Express
51
7.12 Database member opt ion
Parameter corresponds to MBROPT Specifies for database files already known to the system, which members are restored. Unless *MATCH is used, the member list in the saved file need not match member for member, the current version in the system. The possible values are: *MATCH The saved members are restored if the lists of the files where they exist match, member for member, the lists of the current system version. *ALL All members in the saved file are restored. *NEW Only new members (members not known to the system) are restored. *OLD Only members already known to the system are restored.
Bravo Express
52
7.13 Date when saved
Parameter corresponds to SAVDATE Specifies the date when the objects were saved. If the most recently saved version is not the one being restored or if multiple saved versions exist on the media volume, specify the date that indicates which version of the objects to restore. The date must be specified in the job date format. If a volume identifier or *MOUNTED is specified on the Volume identifier prompt (VOL parameter), but SAVDATE is not, the version of the objects that is restored is the first version found on the volume. This parameter is valid only if a volume identifier or *MOUNTED is specified on the Volume identifier prompt (VOL parameter) or if a Save file prompt (SAVF parameter) is specified. This parameter is ignored when the Sequence number prompt (SEQNBR parameter) is specified.
Bravo Express
53
7.14 Time when saved
Parameter corresponds to SAVTIME Specifies the time at which the objects were saved. The time may be specified with or without a time separator: Without a time separator : specify a string of 4 or 6 digits (hhmm or hhmmss) where hh = hours, mm = minutes, and ss = seconds. With a time separator : specify a string of 5 or 8 digits where the time separator specified for your job is used to separate the hours, minutes, and seconds. If you enter this command from the command line, the string must be enclosed in apostrophes. If a time separator other than the separator specified for your job is used, this command will fail. If a volume identifier or *MOUNTED is specified on the Volume identifier prompt (VOL parameter), but this parameter is not specified, the version of the objects to be restored is the first version found on the volume. This parameter is valid only if the Date when saved prompt (SAVDATE parameter) is also specified. This parameter is ignored when the Sequence number prompt (SEQNBR parameter) is specified.
Bravo Express
54
7.15 A l low object d i f ferences
Parameter corresponds to ALWOBJDIF Specifies whether certain differences encountered during a restore operation are allowed. The differences include: Ownership: the owner of the object on the system is different than the owner of the object from the save operation. File creation date: the creation date of the database file on the system does not match the creation date of the file that was saved. Member creation date: the creation date of the database file member on the system does not match the creation date of the member that was saved. Validation value verification: The validation value created at the time an object was created does not match the validation value created during the restore operation of an object on a System with a QSECURITY level of 40 or higher. Authorization list linking: the object is being restored to a system different from the one in which it was saved. Note: To use this parameter, you need *ALLOBJ special authority. The possible values are: *NONE None of the differences described above are allowed on the restore operation. For validation value verification failure cases, the object is restored but ownership is transferred to QDFTOWN and all authorities are revoked. For authorization list cases, the object is restored, but the object is not linked to the authorization list, and public authority is set to *EXCLUDE. For all other cases, a diagnostic message is sent for the object and the object is not restored. *ALL All the differences previously listed are allowed for the restore operation. An informational message is sent, except for validation value verification and authorization list linking cases, and the object is restored. The following should be noted: If the media and system owners of the object do not match, the system owner becomes the owner of the object. If there is a file level mismatch and *ALL is specified on this parameter and the database member option prompt (MBROPT parameter), the existing version of the file is renamed and the saved version of the file is restored. If there is a member level mismatch, the existing version of the member is renamed and the saved version of the member is restored. If the system security level is 40, you are restoring a program, you specify *ALL, and the program's validation value is missing or incorrect, the program is restored without authority changes. For programs without a validation value, specifying *ALL also prevents the system from attempting to translate the program again. If you are restoring objects to a system different from the one on which they were saved and the objects are secured by an authorization list, specifying *ALL automatically links the objects again to the authorization list. If the authorization list does not exist on the new system, a message that includes the name of the missing list is issued and the public authority is set to *EXCLUDE. If object differences are found, the final message for the restore operation is an escape message rather than the normal completion message.
Bravo Express
55
7.16 Force object convers ion
Parameter corresponds to FRCOBJCVN Specifies whether to convert user objects to the format required for use in the current version of the operating system when the objects are restored. Notes: This parameter applies only to user objects of the *MODULE, *PGM, *SRVPGM, and *SQLPKG object types. An object must be observable (have the required observable information) in order to be converted. If an object needs to be converted (because it is formatted for an earlier version of the operating system), but is not converted during this restore operation, the object is automatically converted the first time it is used. The possible Convert During Restore values are: *SYSVAL The objects are converted based on the value of the QFRCCVNRST system value. Notes: If this value is specified and the system value QFRCCVNRST has a value of "1," the restore operation proceeds as if FRCOBJCVN(*YES *RQD) is specified. If QFRCCVNRST has a value of "0", the restore operation proceeds as if FRCOBJCVN(*NO) is specified. *NO The objects are not converted during the restore operation. *YES The objects are converted during the restore operation. Notes: Specifying this value increases the time of the restore operation, but avoids the need to convert the objects when they are first used. The possible Objects to Convert values are: *RQD The objects are converted only if they require conversion to be used by the current operating system. If the objects are not observable, the objects are restored but are not converted. *ALL All objects are converted regardless of their current format. Even if the objects are in the current format, they are converted again. However, if the objects are not observable, the objects are not restored.
Bravo Express
56
7.17 Auxi l iary storage pool ID
Parameter corresponds to RSTASP Specifies whether objects are restored to the auxiliary storage pool (ASP) from which they were saved or to another ASP.ASP 1 is the system ASP. Libraries and their contained objects may be restored to user ASPs (2 through 16). However, some objects cannot be restored to user ASPs. More information about object types which can be restored to user ASPs is in the Backup and Recovery book, SC41-5304. If the library exists in, or is being restored to the system ASP, journals, journal receivers and save files can be restored to user ASPs. All other object types will be restored to the ASP of the library. The possible values are: *SAVASP The objects are restored to the ASP from which they were saved. ASP-identifier (1 - 16) When the specified ASP is 1, the objects are restored to the system ASP, and when the ASP ranges from 2 through 16, the objects are restored to the user ASP specified. Note: System libraries (QSYS, QUSRSYS, £LIBRARY, and so on) should not be created in nor should system libraries be restored to user ASPs (2 through 16). Doing so will create unpredictable results.
Bravo Express
57
8. Getting Help For technical support and questions regarding any Symtrax products please contact the nearest Symtrax office.
America & Asia
Symtrax Corporation Sales: (310) 216-9536 Tech Support:(310) 216-9536 Fax: (310) 216-9407
Sales email: [email protected] Tech support email: USA: [email protected] Latin: [email protected]
France & Scandinavia
Symtrax Europe Sales Tel (French): +33 1 43 91 10 00 Sales Tel (English): +33 1 43 91 10 03 Tech Support (French): +33 4 66 04 54 04 Tech Support (English): +33 4 66 04 54 05 Fax: +33 1 43 91 10 09
Sales email: [email protected] Tech support email: [email protected]
Germany, Austria & Switzerland
Symtrax Europe Tel: (D) 0800 183 38 38 (A) 0800 29 12 12 (CH) 0800 83 00 53 Fax: (D) 0800 183 38 33 (A) 0800 29 12 13 (CH) 0800 83 00 54
Sales email: [email protected] Tech support email: [email protected]
Holland & Belgium
Symtrax Benelux Sales Tel (French) +33 4 66 04 54 22 Sales Tel (English) +33 4 66 04 54 05 Tech Support (French) +33 4 66 04 54 04 Tech Support (English) +33 4 66 04 54 05
Sales email: [email protected] Tech support email: [email protected]
Italy
Symtrax Italy Tel: 800.78.14.30 Fax: 800.79.14.29
Sales email: [email protected] Tech support email: [email protected]
Spain
Symtrax Spain Tel: 900 97 33 97 Fax: 900 99 33 99
Sales email: [email protected] Tech support email: [email protected]
United Kingdom
Symtrax UK Tel: 0800 82 82 92 Fax: 0800 82 82 83
Sales email: [email protected] Tech support email: [email protected]