brekeke pbx- version 3 administrator's guide (advanced) · pdf filebrekeke software, inc....
TRANSCRIPT

Brekeke PBX Version 3
Administrator's Guide
(Advanced)
Brekeke Software, Inc.

BREKEKE SOFTWARE, INC.
1 Brekeke PBX Administrator's Guide (Advanced) p-adm-150802
Version
Brekeke PBX Version 3 Administrator’s Guide (Advanced)
Copyright
This document is copyrighted by Brekeke Software, Inc.
Copyright © 2015 Brekeke Software, Inc.
This document may not be copied, reproduced, reprinted, translated, rewritten or readdressed in
whole or part without expressed, written consent from Brekeke Software, Inc.
Disclaimer
Brekeke Software, Inc. reserves the right to change any information found in this document
without any written notice to the user.
Trademark Acknowledgement
LINUX is a registered trademark of Linus Torvalds in the United States and other countries.
Red Hat is a registered trademark of Red Hat Software, Inc.
Windows is a trademark or registered trademark of Microsoft Corporation in the United
States and other countries.
Mac is a trademark of Apple Computer, Inc., registered in the United States and other
countries.
Oracle and Java are registered trademarks of Oracle and/or its affiliates. Other names may
be trademarks of their respective owners.
Other logos and product and service names contained in this document are the properties
of their respective owners.

BREKEKE SOFTWARE, INC.
2 Brekeke PBX Administrator's Guide (Advanced) p-adm-150802
1. INTRODUCTION .............................................................................................. 5
2. PROCESSES ON BREKEKE PBX ................................................................... 5
2.1. Main Process ................................................................................................................... 5
2.2. Media Server Process ..................................................................................................... 5
2.3. Brekeke SIP Server Process .......................................................................................... 5
3. ABOUT RTP RELAY ........................................................................................ 6
4. SIP SERVER RELATIONSHIPS ....................................................................... 7
4.1. Brekeke PBX and the Bundled SIP Server Relationship ............................................. 7
4.2. Default Dial Plans in the Bundled SIP Server ............................................................... 7
5. CALL PROCESS FLOW .................................................................................. 8
6. NUMBER SYSTEM .......................................................................................... 9
6.1. Defining a Brekeke PBX User ........................................................................................ 9
6.2. Understanding Prefixes .................................................................................................. 9
7. CALL FORWARDING ...................................................................................... 11
7.1. Call Forwarding ............................................................................................................. 11
7.2. Call Forwarding (No Answer)/Call Forwarding (Busy) .............................................. 11
7.2.1. Example 1: Forwarding Unanswered/Busy Calls to Voicemail ............................. 12
7.2.2. Example 2: Forwarding Unanswered/Busy Calls to Another Extension ............. 12
7.2.3. Example 3: Busy Call Forwarding Is Empty ........................................................... 12
7.3. More Advanced Forwarding Settings .......................................................................... 13
7.3.1. Example 1: Ringer Time & Forwarding Destination (No Answer/Busy) ............... 13
7.3.2. Example 2: Ring Group and Call Forwarding ......................................................... 14
7.4. Call Distribution for Call Hunting Extension .............................................................. 16
7.4.1. Example 1: Call Hunting ........................................................................................... 17
7.4.2. Example 2: Call Hunting ........................................................................................... 17
7.4.3. Example 3: Call Queue .............................................................................................. 18
7.5. Schedule Call Forwarding ............................................................................................ 18
7.5.1. Schedule Setup .......................................................................................................... 18
7.5.2. Example DD (Date of Months) .................................................................................. 19
7.5.3. Example: DD-DD (Date-Duration) ............................................................................. 19
7.5.4. Example: MM/DD (Specific Date) ............................................................................. 19

BREKEKE SOFTWARE, INC.
3 Brekeke PBX Administrator's Guide (Advanced) p-adm-150802
7.5.5. Example: MM/DD-MM/DD (Specific Date-Period) ................................................... 19
7.5.6. Example: !MM/DD-MM/DD (Exclude Date-Period) .................................................. 19
7.5.7. Example: Time ........................................................................................................... 20
7.5.8. Example: Caller Filter ................................................................................................ 20
7.6. Add/Remove Forwarding Destinations (IVR) ............................................................. 20
8. SESSION MANAGEMENT ............................................................................. 21
8.1. Unlimited Sessions ....................................................................................................... 21
8.2. Limited Sessions (0-6) .................................................................................................. 21
8.3. Using Maximum Session Setting ................................................................................. 21
9. CALL HOLD/CALL TRANSFER ..................................................................... 22
9.1. Different Methods of Call Hold/Call Transfer .............................................................. 22
9.1.1. Call Hold by re-INVITE/Call Transfer by REFER ..................................................... 22
9.1.2. Call Hold/Call Transfer Using Keypad Commands ................................................ 22
9.2. Call Hold ......................................................................................................................... 22
9.2.1. Call Hold – Activation/Deactivation ......................................................................... 22
9.3. Initiating Call Transfer................................................................................................... 23
9.3.1. Initiating Call Transfer 1 – Calling a Third Party ..................................................... 23
9.3.2. Initiating Call Transfer 2 – Calling Multiple Users .................................................. 23
9.4. Processing Call Transfer .............................................................................................. 24
9.4.1. Processing Call Transfer 1 – Attended Transfer ..................................................... 24
9.4.2. Processing Call Transfer 2 – Unattended Transfer ................................................ 24
9.5. Canceling Call Transfer ................................................................................................ 25
9.5.1. Canceling Call Transfer 1 – Canceling Transfer While Talking with a Third Party
25
9.5.2. Canceling Call Transfer 2 – Cancel Transfer While Ringing a Third Party .......... 25
9.6. Cautions for Call Transfer ............................................................................................ 26
9.6.1. Extending Call Transfer ............................................................................................ 26
10. AUTO ATTENDANT ....................................................................................... 27
10.1. Cautions for Auto Attendant ..................................................................................... 27
10.1.1. Call Transfer to Auto Attendant ............................................................................ 27
10.1.2. Call Transfer from Auto Attendant to a Non-Brekeke PBX User ....................... 27
10.2. Speed Dial Settings Example for Auto Attendant ................................................... 28
10.2.1. Simple Speed Dial Settings ................................................................................... 28
BREKEKE SOFTWARE, INC.
4 Brekeke PBX Administrator's Guide (Advanced) p-adm-150802
10.2.2. Speed Dial Settings Using Regular Expressions ............................................... 28
11. VOICEMAIL .................................................................................................... 29
11.1. Accessing Voicemail ................................................................................................. 29
11.2. Greeting Messages .................................................................................................... 29
11.2.1. Recording/Uploading a Greeting Message ......................................................... 29
11.2.2. Selecting a Greeting Message .............................................................................. 29
11.3. Managing Messages .................................................................................................. 30
11.4. Retrieving Voicemail Messages ............................................................................... 30
11.5. Voicemail Message Status ........................................................................................ 30
11.5.1. New Message Status .............................................................................................. 30
11.5.2. Saved Message Status .......................................................................................... 30
11.6. E-mail Notification ..................................................................................................... 30
11.6.1. Set Up E-mail Notification ..................................................................................... 31
11.6.2. Send E-mail Notification of Messages from Call Recording ............................. 31
11.7. Voicemail Messages: Forwarding and E-mail Notification .................................... 31
11.7.1. Forwarding Voicemail Messages .......................................................................... 31
11.7.2. E-mail Notification of Voicemail Messages ......................................................... 31
11.7.3. Maximum Number of Messages ........................................................................... 32
11.8. Voicemail Inbox Access Limitation .......................................................................... 32
12. AUTOMATIC ROUTE SELECTION (ARS) ..................................................... 33
12.1. Route Search Process .............................................................................................. 34
12.2. Matching Patterns ...................................................................................................... 35
12.3. Deploy Patterns ......................................................................................................... 35
12.4. ARS Templates and Editing Variables ..................................................................... 36
13. THIRD-PARTY CALL CONTROL ................................................................... 36

BREKEKE SOFTWARE, INC.
5 Brekeke PBX Administrator's Guide (Advanced) p-adm-150802
1. Introduction
This document is for system administrators who have already reviewed the Brekeke PBX
Administrator’s Guide (Basic). This document provides more detailed and advanced information
about each function of Brekeke PBX.
2. Processes on Brekeke PBX
When Brekeke PBX is started, three processes are initiated: the Brekeke SIP Server (bundled
SIP server for Brekeke PBX) process, the Brekeke PBX main process and the media server
(Voicemail/IVR features) process.
2.1. Main Process
The Brekeke PBX main process receives and dispatches SIP sessions between SIP User
Agents (UAs). All call sessions between a caller and callee are mediated by the Brekeke PBX
main process.
2.2. Media Server Process
The media server process handles a number of Brekeke PBX features, such as Voicemail, ,
Call Recording, and all IVR functions (including Auto Attendant).
2.3. Brekeke SIP Server Process
The bundled SIP server for Brekeke PBX authenticates SIP requests and routes the SIP
requests between Brekeke PBX and registered or external User Agents. For details about the
bundled SIP server for Brekeke PBX, refer to Brekeke SIP Server Administrator’s Guide.
Brekeke PBX
Media Server Process
プロセス
Brekeke PBX
Main Process
Brekeke SIP Server
(for PBX) Process

BREKEKE SOFTWARE, INC.
6 Brekeke PBX Administrator's Guide (Advanced) p-adm-150802
3. About RTP Relay
Depending on your operating environment and its requirements, and to ensure proper SIP
communications, the RTP relay through Brekeke PBX may be necessary.
For example:
If you are using a SIP UA that does not support the SIP-INFO (DTMF-relay) method, and
you wish to use keypad commands to activate Brekeke PBX features, such as Call
Forwarding, Call Park, Call Recording, etc., RTP packets need to be relayed through the
Media Server.
If you are using SIP devices (SIP UA, SIP proxy server, etc.) that do not support changing
RTP sender information by receiving re-INVITE requests, RTP packets need to be relayed
through the Media Server.
If you are using SIP devices that do not allow changing a voice codec during a call, select
“on (G.711u only)” at the RTP relay setting or “0 (G.711u only)” at [Codec Priority] in the
Brekeke PBX setting. Selecting “off” at the RTP relay setting may not work well depending
on the SIP device. There may also be compatibility issues between different types of SIP
devices. Thorough testing is recommended before deciding to set the RTP relay setting
(which is not G.711u only) to “off” or to use a codec other than G.711u.
RTP relay settings can be set under several locations in Brekeke PBX: Options, ARS Settings
and User Phone type Settings. The settings under User > [Phones] -> [Type] have the highest
priority. When the default setting is defined in [Options] -> [Phone Type] and the Phone type is
set in User -> [Phones] ->[Type], the settings under [ARS Settings] are applied. When User
Phone type Settings and ARS Settings are set to their defaults, the settings at [Options] are
applied.
RTP relay will be turned off only when both endpoints are set to RTP relay “off.” When one of the
endpoints requires RTP relay, RTP will be relayed through Brekeke PBX. By increasing the
amount of RTP packets handled by Brekeke PBX, the Brekeke PBX server load will increase.
Even when the RTP relay setting is set to “off,” Brekeke PBX handles RTP for some features,
such as Music On Hold and Voicemail. Thus, depending on the type of usage and environment,
the maximum number of concurrent sessions may vary for each setting.
Brekeke PBX supports not only codec G.711 u-law, but also G.729 (Optional), G.711 A-law and

BREKEKE SOFTWARE, INC.
7 Brekeke PBX Administrator's Guide (Advanced) p-adm-150802
iLBC. When the RTP relay setting is set to “on,” Brekeke PBX will do conversions between
different codecs, so parties who are using devices with different codecs can talk each other
without any problems.
4. SIP Server Relationships
4.1. Brekeke PBX and the Bundled SIP Server Relationship
A SIP server is embedded in Brekeke PBX. If you log in to Brekeke PBX as an Administrator,
you can also access and manage the bundled SIP server. The bundled SIP server is a SIP
proxy server which provides call session management in a VoIP network and processes SIP
requests and responses. When Brekeke PBX receives a call session, it initiates another session
with the appropriate destination according to the user settings, such as assigned phones and
forwarding destinations, and then joins the two sessions.
4.2. Default Dial Plans in the Bundled SIP Server
The bundled SIP server has the following default settings in the Dial Plan:
From PBX
This dial plan rule will apply to a session coming from Brekeke PBX that does not match the Dial
Plan rules above it. It will disable Authentication and send the call to its destination.
To PBX from ITSP
All sessions from ITSP or SIP gateway devices with a localhost registration record will be routed
to Brekeke PBX. B2BUA mode will be set to “true” and Authentication will be set to “false.”
To PBX
Sessions that are initialized from registered UAs will be routed to Brekeke PBX with UDP
transport and without Authentication checking.
Subscribe
All SUBSCRIBE requests for Message Waiting Indicator (MWI), Presence, BLF, SCA and for
Multiline functions of SAXA IP Phones will be routed to Brekeke PBX.Thru Register
REGISTER requests from Brekeke PBX will be applied when Brekeke PBX is registering to a
third-party SIP proxy server using Thru Registration. When a third-party SIP proxy server has a
global IP address and the bundled SIP server does not have an interface for the global IP
address, the bundled SIP server will not send a REGISTER request to the third-party SIP proxy

BREKEKE SOFTWARE, INC.
8 Brekeke PBX Administrator's Guide (Advanced) p-adm-150802
server. This is to prevent problems with ITSPs since having a local IP address registered at an
ITSP’s proxy server tends to cause problems.
Register Behind NAT
This dial plan is disabled by default. Edit and enable it to solve NAT issues for registration from
some UAs. Also remove the underscore in either ®ister.contact.nat=true or
&net.registrar.adjust.expires=10.
5. Call Process Flow
In this section, we give a step-by-step explanation of how a call from UA1 to UA2 is processed.
The following items describe the steps in the above image:
1) The call initiated by UA1 matches with the Dial Plan rule “To PBX” at the bundled SIP
server and is routed to Brekeke PBX.
2) When Brekeke PBX receives the call, it searches for an ARS “Pattern IN” that matches with
the call. If Brekeke PBX finds a pattern, it will change the caller ’s address (From) and call
UA2
Brekeke PBX
Brekeke SIP Server (bundled for PBX)
1
2
3
5
6
UA1
4

BREKEKE SOFTWARE, INC.
9 Brekeke PBX Administrator's Guide (Advanced) p-adm-150802
recipient’s address (To) as specified in the Deploy Patterns.
3) If the “To” header includes a prefix for Call Pickup, Park Pickup or for accessing an existing
call, Brekeke PBX will join this call with the corresponding existing call. If not, Brekeke PBX
will treat this call as a new call.
4) Brekeke PBX will check the settings in [Users] > [Inbound] to determine the call destination.
If multiple destinations are set in the [Users] > [Inbound] > [Forward To] section or an
extension is set in the [Users] > [Settings] > [Automatic Monitoring*] field, Brekeke PBX will
process the call routings for multiple destinations in parallel with Step 5.
5) Brekeke PBX searches for an ARS “Pattern OUT” that matches the call. If Brekeke PBX
finds a pattern, it will change the caller ’s address (From) and call recipient’s address (To)
as specified in the Deploy Patterns.
6) The call is processed by the bundled SIP server’s Dial Plan feature and routed to UA2.
6. Number System
6.1. Defining a Brekeke PBX User
Brekeke PBX regards user extensions as Brekeke PBX users. It, therefore, associates a UA SIP
ID with each Brekeke PBX user by looking for the [Phone ID] field in the Brekeke PBX user
[Phones] page settings. All numbers entered in one user [Phone ID] field are considered as the
same Brekeke PBX user.
6.2. Understanding Prefixes
To provide easy access to Brekeke PBX features, such as Voicemail and IVR extensions,
Brekeke PBX uses a prefix system. By adding the appropriate prefix to an extension number,
users can directly access the related Brekeke PBX feature.
The prefixes used in Brekeke PBX are listed in the table below. Most prefixes cannot be
modified, with the exception of the call pickup prefix. Users can include these prefixes in their
settings, such as setting forwarding destinations as “vm100,” which will forward calls to user
extension 100’s voicemail.
The table below shows the default prefix settings:
IVR prefix ivr
Voicemail prefix vm
Voicemail review/Setting prefix msg

BREKEKE SOFTWARE, INC.
10 Brekeke PBX Administrator's Guide (Advanced) p-adm-150802
Call Pickup prefix *
It is not possible to dial a prefix directly from most types of SIP devices. We have prepared the
default ARS rule “mediaserver_prefix” so that users can dial numbers to directly access the
Media Server features (Voicemail).

BREKEKE SOFTWARE, INC.
11 Brekeke PBX Administrator's Guide (Advanced) p-adm-150802
7. Call Forwarding
Call Forwarding also includes Call Forwarding (No answer) and Call Forwarding (Busy).
7.1. Call Forwarding
Each user can set up Call Forwarding individually. When a call is received at a user extension,
the call will be forwarded to the destinations checked in the [Phone n] fields and also to the
extensions set in the [Other Forwarding Destinations*] field on the [Users] > [Inbound] page.
By default, the [Other Forwarding Destinations*] field is left blank and all incoming calls are
directed to the user’s assigned phones checked on the [Inbound] page. If there are destinations
specified in the [Other Forwarding Destinations*] field, both the checked phones and the
extensions set in this field will receive calls. Each extension’s phones will ring at the same time,
then the first person to answer will be connected with the caller.
Different ringing times can be set to each assigned phone and extension in an extension’s
[Other Forwarding Destinations*] field. When no setting is input for a phone’s [Ringer Time
(sec)], the default ringer time setting under the [Call Forwarding] section will be applied. If there
is a delay time set for a user-assigned phone, Brekeke PBX will wait the amount of time set in
the phone’s [Delay (sec)] field, then direct the call to this phone.
7.2. Call Forwarding (No Answer)/Call Forwarding (Busy)
Forwarding settings are used in the manner described below:
No answer after the ringer timeout occurs --> Call Forwarding (No answer)
The call cannot be established or it received a busy response --> Call Forwarding (Busy)
Each user can set up forwarding for unanswered/busy calls. By default, unanswered/busy calls
are forwarded to the user’s voicemail inbox.
Only a single destination can be assigned in the [Forwarding destination (No answer)] and
[Forwarding destination (Busy)] fields. If you need to set up multiple destinations to be used for
these features, you can set a group extension number in these fields.
In the following examples, the default setting is used for each phone ringer time.

BREKEKE SOFTWARE, INC.
12 Brekeke PBX Administrator's Guide (Advanced) p-adm-150802
7.2.1. Example 1: Forwarding Unanswered/Busy Calls to Voicemail
Extension: 001
Ringer time (sec) 15
Forwarding destination (No answer) vm001
Forwarding destination (Busy) vm001
Incoming calls to extension 001 are forwarded to the user’s voicemail inbox (extension vm001) if
the call is busy or remains unanswered after ringing for 15 seconds.
7.2.2. Example 2: Forwarding Unanswered/Busy Calls to Another Extension
Extension: 001
Ringer time (sec) 15
Forwarding destination (No answer) 16504016636
Forwarding destination (Busy) vm001
With this setting, if the call remains unanswered for 15 seconds, the call will be forwarded to
PSTN number 16504016636 through an available ARS route. If the extension is busy, the call
will be forwarded to extension 001’s voicemail.
7.2.3. Example 3: Busy Call Forwarding Is Empty
Extension:001
Ringer time (sec) 15
Forwarding destination (No answer) vm001
Forwarding destination (Busy)
If a call to extension 001 remains unanswered after ringing for 15 seconds, it will be forwarded
to the extension’s voicemail inbox (vm001). When the [Forwarding destination (Busy)] field is left
blank, Brekeke PBX will wait 15 seconds and then forward the call to the user’s voicemail, even
if the user’s extension is busy.

BREKEKE SOFTWARE, INC.
13 Brekeke PBX Administrator's Guide (Advanced) p-adm-150802
7.3. More Advanced Forwarding Settings
By combining Call Forwarding, Call Forwarding (No answer), Call Forwarding (Busy) and Ringer
time, you may create more advanced call forwarding settings.
Here are a few rules that may be useful to remember:
Only a single destination can be set in the [Forwarding destination (No answer/Busy)] field.
When Call Forwarding is set for an extension, the ringer time for the call depends on the
setting of Call Forwarding (No answer/Busy). If no one answers the call during the Ringer
time, the original call recipient’s (not the forwarding destination’s) [Forwarding destination
(No answer)] will be applied. (Please refer to section 7.3.1 below for more information.) If
none of the forwarding destinations can establish a call or if all forwarding destinations are
busy, [Forwarding destination (Busy)] will be applied.
After the call is forwarded by Busy Call Forwarding or No Answer Call Forwarding, the
forwarding destination’s setting in the [Forwarding destinations], [Forwarding destination
(No answer)] and [Forwarding destination (Busy)] fields will be used and the call may be
transferred to another destination. (Please refer to section 7.3.2 below for more details.)
In the following examples, the default setting is used for each phone’s ringer time.
7.3.1. Example 1: Ringer Time & Forwarding Destination (No Answer/Busy)
Extension: 001
Other Forwarding Destinations* 101, 102
Ringer time (sec) 20
Forwarding destination (No answer) vm001
Forwarding destination (Busy) vm001
Extension: 101
Other Forwarding Destinations*
Ringer time (sec) 15
Forwarding destination (No answer) vm101
Forwarding destination (Busy) vm101

BREKEKE SOFTWARE, INC.
14 Brekeke PBX Administrator's Guide (Advanced) p-adm-150802
Extension: 102
Other Forwarding Destinations*
Ringer time (sec) 25
Forwarding destination (No answer) vm102
Forwarding destination (Busy) vm102
1) All incoming calls to extension 001 are forwarded to both extensions 101 and 102.
2) Extension 101 rings for 15 seconds and Extension 102 rings for 20 seconds (not 25) if
neither extension 101 nor 102 answers the call.
3) The call will then be forwarded to extension 001’s voicemail inbox vm001.
User 001’s Ringer time and Call Forwarding (No answer) settings are treated as the highest
priority, even when extensions 101 and 102 have set up call forwarding (No answer) on all of
their calls. The Ringer time for extension 001 is set for 20 seconds, so that is the maximum
ringer time for any of the forwarding extensions. Even after User 101’s ringer stops, extension
102 continues ringing until 20 seconds has passed. If no one answers, the call will be forwarded
to extension 001’s voicemail (extension vm001).
With the settings above, incoming calls to extension 001 will be transferred to both extensions
101 and 102. If neither extension 101 nor 102 answers the call, it will be forwarded to the
destination specified in User 001’s [Call Forwarding (No answer)] field. The [Call Forwarding (No
answer)] settings for extensions 101 and 102 will not be used.
7.3.2. Example 2: Ring Group and Call Forwarding
Extension: 000
Other Forwarding destinations* 001
Ringer time (sec) 5
Forwarding destination (No answer) 001A
Forwarding destination (Busy) 001A
Extension: 001A
Other Forwarding destinations* 100A, 200A
Ringer time (sec) 10
Forwarding destination (No answer) 001B
Forwarding destination (Busy) 001B

BREKEKE SOFTWARE, INC.
15 Brekeke PBX Administrator's Guide (Advanced) p-adm-150802
Extension: 001B
Other Forwarding destinations* 100B, 200B
Ringer time (sec) 10
Forwarding destination (No answer) vm001
Forwarding destination (Busy) vm001
Extension: 100A
Group Extensions* 101, 102, 103
Extension: 200A
Group Extensions* 201, 202
Extension: 100B
Group Extensions 111, 112, 113, 114, 115, 116
Extension: 200B
Group Extensions 211, 212, 213, 214
1) All incoming calls to extension 000 are forwarded to extension 001.
2) When a call is unanswered for 5 seconds, it is forwarded to 001A.
3) The call is then forwarded to 100A and 200A.
4) Extensions 101, 102, 103, 201 and 202 will ring.
5) If extension 001’s [Ringer Time] is more than 5 seconds, 001 will continue to ring even after
5 seconds.
6) If the call is unanswered for 10 seconds, it is forwarded to extension 001B.
7) The call is then forwarded to 100B and 200B.
8) Extensions 111, 112, 113, 114, 115, 116, 211, 212, 213 and 214 will ring.
9) If the call is unanswered for 10 seconds, it is forwarded to extension 001’s voicemail inbox
(vm001).
10) When vm001 answers the call, all ringing will stop.
Meanwhile, all extensions that receive the call will keep ringing until their own Ringer time
settings expire or the call is answered.
BREKEKE SOFTWARE, INC.
16 Brekeke PBX Administrator's Guide (Advanced) p-adm-150802
For this example, we used letters for the extension numbers in order to clarify different groups.
If a caller is using a SIP UA that allows letters, the caller can make a call directly to an extension that
includes letters, such as 100B.
7.4. Call Distribution for Call Hunting Extension
Brekeke PBX features two types of call distribution for call hunting extension: Round-Robin and
Top-Down. The Round-Robin setting is useful if you want to distribute calls equally within a
specific group of extensions. The Top-Down setting is useful if you want to distribute calls in a
certain order within a specific group of extensions. In either case, the system will ring each
available extension sequentially until the call is answered.
Round-Robin
Under the Round-Robin setting, you establish the order of the extensions to which an incoming
call will be forwarded, and then the call will go to whichever extension is next in the list. For
example, if the last call was forwarded to the second extension in the list, the next call will go to
the third extension in the list, and so on.
Top-Down
Under the Top-Down setting, calls are always forwarded in the same order, starting with the
left-most number in the list and moving to the right. The same setting can be configured under
the basic call forward settings, but top-down settings are more simplified.
Single Attempt
When the Single Attempt setting is set to “no” (default setting), calls will keep ringing the next
destination even after the [Ringer time] has expired.
When the Single Attempt setting is set to “yes,” calls will be forwarded to the destination set at
[Forwarding destination (No answer)] after one failure to establish a connection.
Call Queue
Using the Call Queue feature, calls are kept on hold until a specified user answers the call. If the
Single Attempt setting is set to “yes,” the unanswered call will be forwarded to the destination
set at [Forwarding destination (No answer)] after one attempt.

BREKEKE SOFTWARE, INC.
17 Brekeke PBX Administrator's Guide (Advanced) p-adm-150802
7.4.1. Example 1: Call Hunting
Extension: 200
Hunt group destinations* 100,101,102
Ringer time (sec)* 10,5,5
Waiting time in the queue (sec) 0
Single attempt no
Forwarding destination (No answer) vm100
Top-Down Setting
1) Extension 100 starts ringing.
2) If the call is unanswered at extension 100 after 10 seconds, extension 101 starts ringing.
3) If the call is unanswered at extension 101 after 5 seconds, extension 102 starts ringing.
4) If the call is unanswered at extension 102 after 5 seconds, the call is forwarded to vm100.
Round-Robin Setting
The Call Forwarding order is the same as the top-down setting for the first call. However, from
the second call on, the call will be forwarded to the extension after the one that answered the
previous call.
7.4.2. Example 2: Call Hunting
Extension: 200
Hunt group destinations* 100,101,102
Ringer time (sec)* 10,5,5
Waiting time in the queue (sec) 0
Forwarding destination (No answer) vm100
Extension: 101 (Call Forwarding setting [Basic])
Other Forwarding destinations* 200,201
Ringer time (sec)* 20
Call Forwarding settings are established for each extension individually, regardless of the
settings of the extension the call is forwarded from. With the above example, when a call is
forwarded to extension 101, it is directed to extensions 200 and 201 simultaneously. If the call is
unanswered at both extensions after 5 seconds, extension 102 will ring. Extension 200 and 201
will keep ringing until they reach the time specified in the [Ringer times (sec)*] field.

BREKEKE SOFTWARE, INC.
18 Brekeke PBX Administrator's Guide (Advanced) p-adm-150802
7.4.3. Example 3: Call Queue
Extension 200
Hunt group destinations* 100,101,102
Ringer time (sec)* 20
Waiting time in the queue (sec) 180
Max number of calls in the queue 10
Forwarding destination (No answer) vm100
The Call Queue feature is used when a time of 1 second or more is set at the [Waiting time in
the queue (sec)] field.
Calls are sent to the available extensions among 100, 101 or 102, in the order established in the
mode setting (Round-Robin or Top-Down). If a call is unanswered, it is placed in the queue.
When the number of calls in the queue reaches 10, the 11th call will be forwarded to vm100. The
callers in the queue will hear hold music while waiting to be answered. If a call is not answered
after the caller waits 180 seconds in the queue, it will be forwarded to vm100.
After the period set in the [Call interval (msec)] field, the call at the top of the queue will be
forwarded to the next available extension. When the [Single attempt] field is set to “no,” the call
will keep ringing until the waiting time for the queue (180 seconds) expires. When the [Single
attempt] field is set to "yes," the call will be forwarded to the destination specified under
[Forwarding destination (No answer)] after one failed attempt.
7.5. Schedule Call Forwarding
Schedule call forwarding rules can be defined using conditions based on date, time, Caller ID
and route information.
7.5.1. Schedule Setup
Schedule settings are applied when the specified condition (period, date, hour or Caller ID)
occurs. (The action will be the same as the basic call forwarding setting.)
To set up a schedule:
1) Create a schedule extension at [Extensions] > [Schedule].
BREKEKE SOFTWARE, INC.
19 Brekeke PBX Administrator's Guide (Advanced) p-adm-150802
2) Click the [Add Forwarding Schedule] button. The menu item [Forwarding Schedule 1] will
appear.
3) To define a schedule, click the [Conditions] tab. This will open the schedule menu.
4) Choose the dates and times during which you would like calls to be forwarded. When
setting [Days of week], specify which day of which week in a month. For example:
Checking “First” and “Sunday” means the schedule will only apply to the first Sunday in
every month.
5) Set call forwarding destinations as you would under the [Forward To] tab.
7.5.2. Example DD (Date of Months)
5,10,15,20,25
This setting will be applied on the 5th, 10
th, 15
th, 20
th and 25
th of each month during the specified
term.
7.5.3. Example: DD-DD (Date-Duration)
5-10,15-20
This setting will be applied between the 5th and 10
th and also between the 15th and 20th of each
month during the specified term.
7.5.4. Example: MM/DD (Specific Date)
5/10,5/20,6/10,6/20
This setting will be applied on May 10th, May 20
th, June 10
th and June 20
th.
7.5.5. Example: MM/DD-MM/DD (Specific Date-Period)
5/10-6/20,8/10-8/20
The setting will be applied between May 10th and June 20
th, and also between August 10th and
August 20th during the specified term.
7.5.6. Example: !MM/DD-MM/DD (Exclude Date-Period)
!5/10-6/20,!8/10-8/20
The setting will be applied at all times during the specified term, except for the dates between
May 10th and June 20
th or between August 10
th and August 20
th.

BREKEKE SOFTWARE, INC.
20 Brekeke PBX Administrator's Guide (Advanced) p-adm-150802
7.5.7. Example: Time
08:30 – 13:30
23:30 – 00:30
This setting will be applied between 8:30 a.m. and 1:30 p.m., and also between 11:30 p.m. and
12:30 a.m.
7.5.8. Example: Caller Filter
Filter 3*
Route From any route
By adding “*” (wildcard) after a number, you can specify all numbers that start with that number.
By adding “?” after a number, you can specify any one number.
With the setting example above, when the [Matched] field is checked, all incoming calls that
start with the number 3 will be forwarded according to this extension’s call forwarding settings.
When the [Not Matched] field is checked, all incoming calls that start with any number other than
3 will be forwarded according to this extension’s call forwarding settings. When the [Filter] field is
left blank, all incoming calls will be redirected according to this extension’s call forwarding
settings.
When the [Router] field is set to “From external line,” all incoming calls through ARS routes with
the [External] field checked will apply this schedule setting.
When the [Router] field is set to “Not from external line,” all incoming calls through ARS routes
without the [External] field checked, or calls without an ARS route applied will apply this
schedule setting.
7.6. Add/Remove Forwarding Destinations (IVR)
With this feature, a user can add his/her own number to a Group extension [group extensions*]
from his/her phone, instead of via Brekeke PBX Admintool.
Extension 400
Type Add/Remove forwarding destinations
Target groups* 300,301
When user extension 200 calls extension 400, extension 200 is added to the forwarding
destinations for group extensions 300 and 301. If extension 200 already exists in the forwarding
destinations list for those numbers, then extension 200 will be removed as a forwarding
destination (technically, remaining as a forwarding destination with a “!” in the front of the
extension number).

BREKEKE SOFTWARE, INC.
21 Brekeke PBX Administrator's Guide (Advanced) p-adm-150802
8. Session Management
You can set a maximum number of sessions that an extension can receive in [Max inbound
sessions] under the Brekeke PBX user settings. Call sessions are counted either from the
beginning of the conversation or when the phone begins ringing until the phone call is
terminated.
8.1. Unlimited Sessions
When unlimited sessions are set at [Max inbound sessions], incoming calls will ring the
extension even if the extension is in one or more sessions already. When the call remains
unanswered by the extension after the specified (Ringer time), it is either forwarded to the
destination set at [Forwarding destination (No answer/Busy)], or it executes that SIP UA’s send
response, such as “busy,” “reject,” etc.
8.2. Limited Sessions (0-6)
If the callee’s extension already has the maximum number of sessions, as set at [Max inbound
sessions], and all of those sessions are busy, an incoming call will be forwarded to the
destination set at [Forwarding destination (No answer/Busy)]. If there is a session with ringing
status, an incoming call will stay in pending status until all sessions are occupied or until there
are no sessions remaining.
8.3. Using Maximum Session Setting
The Maximum Session setting may be useful in the following ways:
Preventing missed calls
By setting [Max inbound sessions], users can avoid missing calls. When multiple calls are
coming in at the same time, all calls except the first one are forwarded to the destination set at
[Forwarding destination (Busy)].
Setting the preferred number of simultaneous calls
For SIP UAs that have the ability to handle multiple sessions, users can limit the preferred
number of simultaneous calls in order to make other lines available for outgoing sessions.

BREKEKE SOFTWARE, INC.
22 Brekeke PBX Administrator's Guide (Advanced) p-adm-150802
9. Call Hold/Call Transfer
9.1. Different Methods of Call Hold/Call Transfer
9.1.1. Call Hold by re-INVITE/Call Transfer by REFER
Many SIP devices support Call Hold by re-INVITE (HOLD button) and/or Call Transfer by
REFER (TRANSFER button). You can use these features with Brekeke PBX.
When using Brekeke PBX, re-INVITE/REFER requests are processed by the server, so Call
Hold and Call Transfer will work even if the other party’s device does not support re-INVITE or
REFER.
9.1.2. Call Hold/Call Transfer Using Keypad Commands
Even if a SIP device does not support Call Hold by re-INVITE or Call Transfer by REFER, it can
send commands to Brekeke PBX by using DTMF (Keypad) for Call Hold/Call Transfer. On some
devices, you may be able to assign DTMF numbers to HOLD/TRANSFER buttons and use them
for the proprietary Brekeke PBX method of Call Hold/Call Transfer. Keypad commands for
Brekeke PBX are listed in the Brekeke PBX Users Guide.
9.2. Call Hold
Any extension using the Call Hold feature with keypad commands must be registered as a user
extension of Brekeke PBX. Call Hold permissions are set in the [Users > Edit] > [Keypad
Commands] option. In this section, Call Hold refers to the unique Call Hold feature of Brekeke
PBX, which is different from the Call Hold using re-INVITE request (Section 9.1).
9.2.1. Call Hold – Activation/Deactivation
When Brekeke PBX user extensions A and B are talking with each other (Figure 1), either user
can place the call on hold by using Keypad Commands (Figure 2). However, only the user who
placed the call on hold can take it off hold, so if User A placed User B on hold, then the
conversation will not resume until User A takes User B off hold.
A
BTalking
A
BCall Hold
A
BTalking
Figure 1 Figure 2 Figure 3
A
BTalking
A
BCall Hold
A
BTalking
Figure 1 Figure 2 Figure 3

BREKEKE SOFTWARE, INC.
23 Brekeke PBX Administrator's Guide (Advanced) p-adm-150802
9.3. Initiating Call Transfer
After putting a call on hold, Brekeke PBX users can transfer a call to other users.
In this section, Call Hold is referring to the unique Call Hold feature of Brekeke PBX, which is different
from Call Hold using a REFER request (Section 9.1).
9.3.1. Initiating Call Transfer 1 – Calling a Third Party
User A puts a call with User B on hold (Figure 4) and initiates a new session with User C (Figure
5). When User C answers the call, the session between User A and User C will be connected
(Figure 6).
9.3.2. Initiating Call Transfer 2 – Calling Multiple Users
If User C has set [Forwarding destinations] for his/her incoming calls, the calls will be transferred
to the specified destinations. In this example, User A has set User C and User D for the
destinations (Figure 7 and Figure 8). The first user who answers the phone will be connected
with User A.
A
B
Figure 4 Figure 5 Figure 6
C
Call Hold
A
B
C
Call Hold
Calling
A
B
C
Call Hold
Talking
A
B
Figure 4 Figure 5 Figure 6
C
Call Hold
A
B
C
Call Hold
Calling
A
B
C
Call Hold
Talking
A
B
Figure 7 Figure 8 Figure 9
C
Call Hold
A
B
C
Call Hold
Calling
A
B
C
Call Hold
Talking
D D DA
B
Figure 7 Figure 8 Figure 9
C
Call Hold
A
B
C
Call Hold
Calling
A
B
C
Call Hold
Talking
D D D

BREKEKE SOFTWARE, INC.
24 Brekeke PBX Administrator's Guide (Advanced) p-adm-150802
9.4. Processing Call Transfer
After talking with the transfer recipient, you will have the opportunity to go back to the original
session with User B.
In this section, Call Hold refers to the unique Call Hold feature of Brekeke PBX, which is different
from Call Hold using a REFER request (Section 9.1).
9.4.1. Processing Call Transfer 1 – Attended Transfer
When User A initiates a Call Transfer, the call between Users A and B is put on hold. When User
A hangs up the phone while the session between Users A and B is connecting (Figure 10,
similar to Figures 6 and 9), the call between Users A and B will be transferred from User A to
User C. Now Users B and C are connected.
9.4.2. Processing Call Transfer 2 – Unattended Transfer
While the session between Users A and B is on hold, User A tries to connect with User C (Figure
12, similar to Figures 6, 9 and 10). User A hangs up the phone before User C answers the call
and the call is transferred to User C, after which User B waits for User C to answer the call
(Figure 13).
Using Unattended Transfer, if User C does not answer the phone, User A’s phone will ring to
reestablish the call between Users A and B.
A
B
Figure 10 Figure 11
C
Call Hold
A
B
CTalking
Talking
A
B
Figure 10 Figure 11
C
Call Hold
A
B
CTalking
Talking
A
B
Figure 12 Figure 13 Figure 14
C
Call Hold
A
B
CCalling
A
B
C
TalkingCall Hold
A
B
Figure 12 Figure 13 Figure 14
C
Call Hold
A
B
CCalling
A
B
C
TalkingCall Hold

BREKEKE SOFTWARE, INC.
25 Brekeke PBX Administrator's Guide (Advanced) p-adm-150802
9.5. Canceling Call Transfer
You may cancel Call Transfer in the middle of the process and either go back to talk with the
original caller or transfer the call to a different destination.
In this section, Call Hold refers to the unique Call Hold feature of Brekeke PBX, which is different
from Call Hold using a REFER request (Section 9.1).
9.5.1. Canceling Call Transfer 1 – Canceling Transfer While Talking with a Third Party
There are two ways to cancel Call Transfer when you are talking with a third party:
User A executes the Cancel Call Transfer command.
User C hangs up the call with User A.
When the Call Transfer process between Users A and C is canceled while User B is on hold
(Figure 16, similar to Figures 6, 9 and 10), the call will be put back to the hold state between
Users A and B (Figure 17).
9.5.2. Canceling Call Transfer 2 – Cancel Transfer While Ringing a Third Party
There are two ways to cancel a Call Transfer while the third party’s extension is ringing:
User A executes the Cancel Call Transfer command.
The call to User C cannot be completed for some reason, such as User C’s phone is not
connected, Call blocking has been set, etc.
You can cancel a Call Transfer while User C’s phone is ringing (Figure 19, similar to Figures 5
and 8). The call status goes back to the hold state between Users A and B.
A
B
C
Talking
A
B
CA
B
C
Figure 15 Figure 16 Figure 17
Call Hold
Talking
Call Hold
A
B
C
Talking
A
B
CA
B
C
Figure 15 Figure 16 Figure 17
Call Hold
Talking
Call Hold
BREKEKE SOFTWARE, INC.
26 Brekeke PBX Administrator's Guide (Advanced) p-adm-150802
9.6. Cautions for Call Transfer
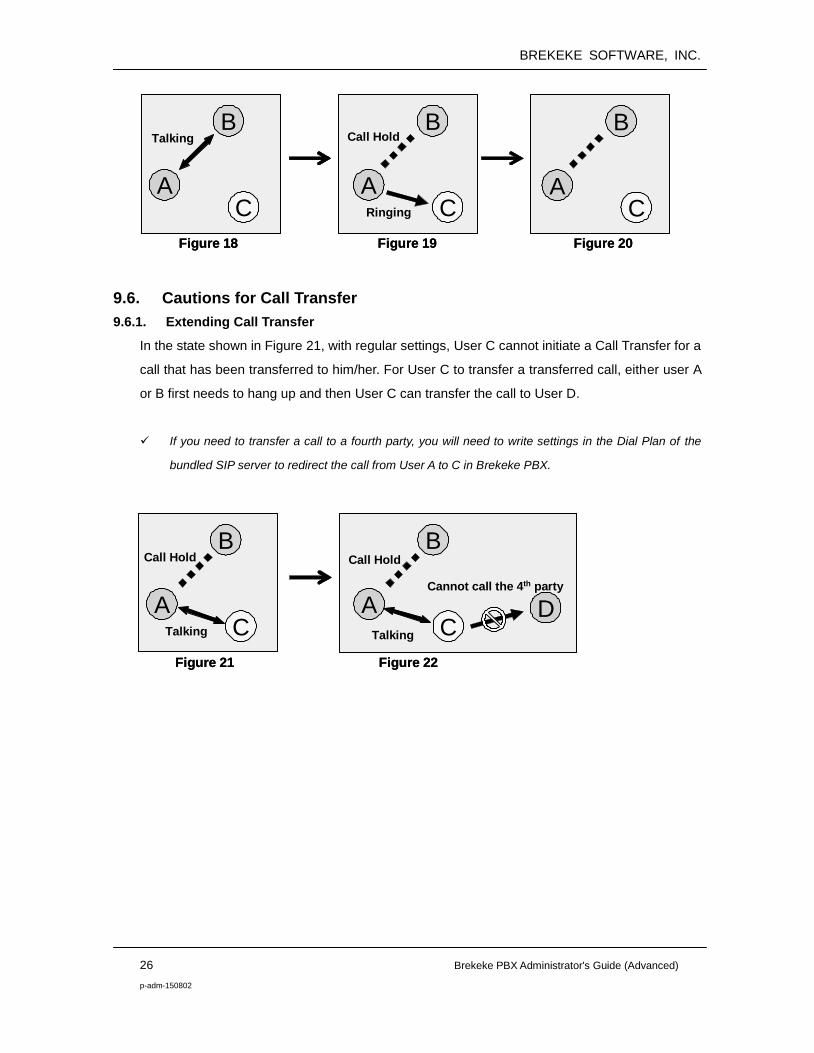
9.6.1. Extending Call Transfer
In the state shown in Figure 21, with regular settings, User C cannot initiate a Call Transfer for a
call that has been transferred to him/her. For User C to transfer a transferred call, either user A
or B first needs to hang up and then User C can transfer the call to User D.
If you need to transfer a call to a fourth party, you will need to write settings in the Dial Plan of the
bundled SIP server to redirect the call from User A to C in Brekeke PBX.
A
B
CA
B
C
Figure 18 Figure 19 Figure 20
A
B
C
Talking Call Hold
Ringing
A
B
CA
B
C
Figure 18 Figure 19 Figure 20
A
B
C
Talking Call Hold
Ringing
A
B
Figure 21 Figure 22
C
Call Hold
A
B
CTalking
Call Hold
Talking
DCannot call the 4th party
A
B
Figure 21 Figure 22
C
Call Hold
A
B
CTalking
Call Hold
Talking
DCannot call the 4th party
BREKEKE SOFTWARE, INC.
27 Brekeke PBX Administrator's Guide (Advanced) p-adm-150802
10. Auto Attendant
Auto Attendant is a feature that interactively traffics calls without the intervention of a human
operator.
10.1. Cautions for Auto Attendant
10.1.1. Call Transfer to Auto Attendant
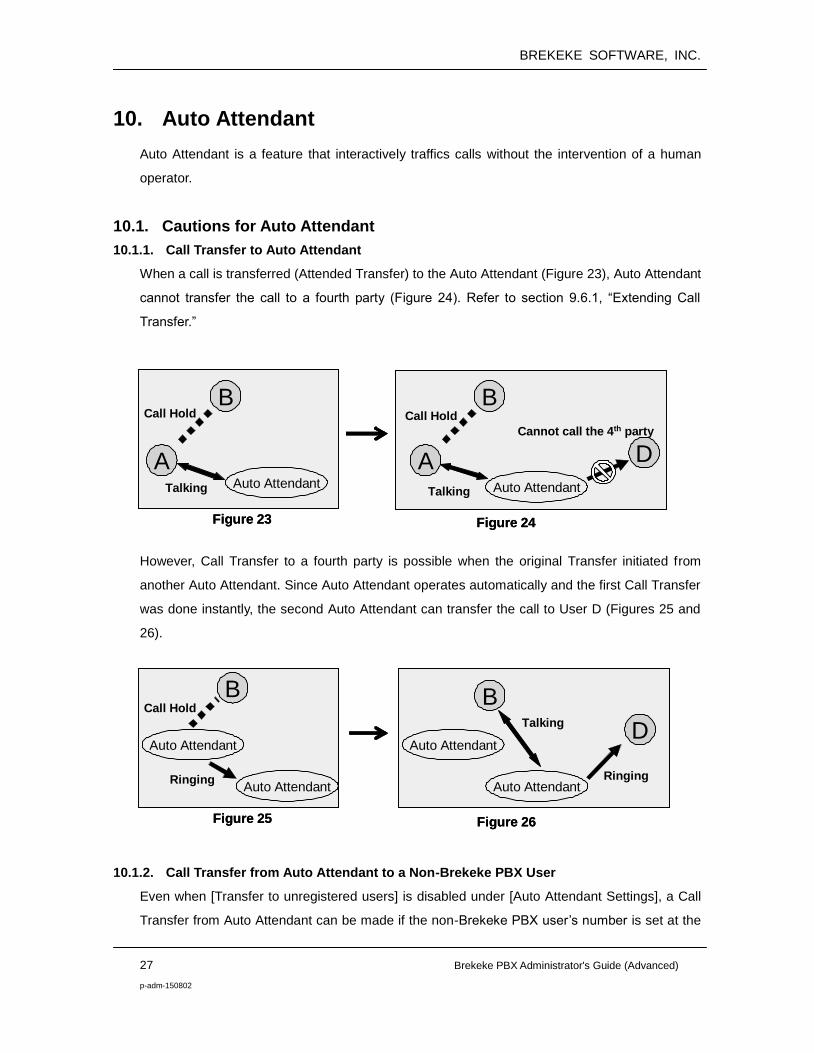
When a call is transferred (Attended Transfer) to the Auto Attendant (Figure 23), Auto Attendant
cannot transfer the call to a fourth party (Figure 24). Refer to section 9.6.1, “Extending Call
Transfer.”
However, Call Transfer to a fourth party is possible when the original Transfer initiated from
another Auto Attendant. Since Auto Attendant operates automatically and the first Call Transfer
was done instantly, the second Auto Attendant can transfer the call to User D (Figures 25 and
26).
10.1.2. Call Transfer from Auto Attendant to a Non-Brekeke PBX User
Even when [Transfer to unregistered users] is disabled under [Auto Attendant Settings], a Call
Transfer from Auto Attendant can be made if the non-Brekeke PBX user’s number is set at the
A
B
Figure 23 Figure 24
Auto Attendant
Call Hold
A
B
Talking
Call Hold
Talking
DCannot call the 4th party
Auto Attendant
A
B
Figure 23 Figure 24
Auto Attendant
Call Hold
A
B
Talking
Call Hold
Talking
DCannot call the 4th party
Auto Attendant
B
Figure 25 Figure 26
Auto Attendant
Call HoldB
Ringing
TalkingD
Auto Attendant
Auto Attendant Auto Attendant
Ringing
B
Figure 25 Figure 26
Auto Attendant
Call HoldB
Ringing
TalkingD
Auto Attendant
Auto Attendant Auto Attendant
Ringing
BREKEKE SOFTWARE, INC.
28 Brekeke PBX Administrator's Guide (Advanced) p-adm-150802
[Default operator] field or [Speed dial] field.
10.2. Speed Dial Settings Example for Auto Attendant
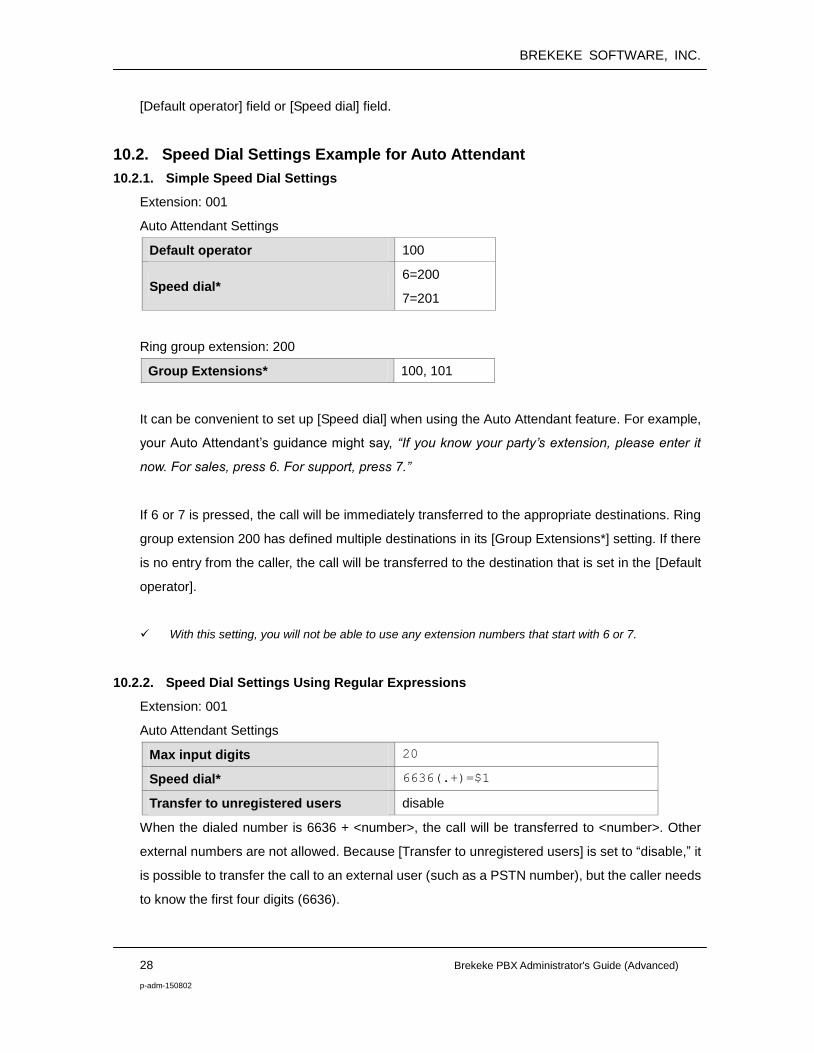
10.2.1. Simple Speed Dial Settings
Extension: 001
Auto Attendant Settings
Default operator 100
Speed dial* 6=200
7=201
Ring group extension: 200
Group Extensions* 100, 101
It can be convenient to set up [Speed dial] when using the Auto Attendant feature. For example,
your Auto Attendant’s guidance might say, “If you know your party’s extension, please enter it
now. For sales, press 6. For support, press 7.”
If 6 or 7 is pressed, the call will be immediately transferred to the appropriate destinations. Ring
group extension 200 has defined multiple destinations in its [Group Extensions*] setting. If there
is no entry from the caller, the call will be transferred to the destination that is set in the [Default
operator].
With this setting, you will not be able to use any extension numbers that start with 6 or 7.
10.2.2. Speed Dial Settings Using Regular Expressions
Extension: 001
Auto Attendant Settings
Max input digits 20
Speed dial* 6636(.+)=$1
Transfer to unregistered users disable
When the dialed number is 6636 + <number>, the call will be transferred to <number>. Other
external numbers are not allowed. Because [Transfer to unregistered users] is set to “disable,” it
is possible to transfer the call to an external user (such as a PSTN number), but the caller needs
to know the first four digits (6636).

BREKEKE SOFTWARE, INC.
29 Brekeke PBX Administrator's Guide (Advanced) p-adm-150802
11. Voicemail
Only Brekeke PBX users can make use of the voicemail feature. The Brekeke PBX system
treats a voicemail inbox number the same as a User ID or an extension number.
11.1. Accessing Voicemail
A user can access his/her voicemail inbox by pressing the voicemail prefix number plus his/her
extension number. For details, refer to Section 6.2, “Understanding Prefixes.”
Examples of accessing user extension 001’s voicemail inbox:
Dialing 07*001 accesses User 001’s voicemail inbox directly to leave a message.
Dialing 08*001 retrieves User 001’s messages and allows the caller to change the
voicemail inbox settings.
Pressing “*” (Star) while listening to the voicemail guidance is the same as dialing 08*001.
Each user’s voicemail inbox is the default destination of [Call forward (No answer)] and [Call
forward (Busy)]. For details about [Forwarding destination (No answer/Busy)], refer to Section 7,
“Call Forwarding.”
When a voicemail inbox receives a call, specified guidance is given to the caller. You can
choose voicemail guidance from two personalized greetings and the default greeting.
11.2. Greeting Messages
11.2.1. Recording/Uploading a Greeting Message
Users can record their personalized greeting messages through [Review/Option] (refer to a
separate document called“Voicemail Navigation Map” in our website) or upload them through
Brekeke PBX Admintool.
11.2.2. Selecting a Greeting Message
Users can have two personalized greeting messages: Personal Greeting and Alternative
Greeting. People commonly use the “Alternative Greeting” for special occasions, such as long
holidays, sick days, business trips, etc.
You can also select a greeting message by calling the voicemail inbox and accessing
[Review/Option], or through Brekeke PBX Admintool.

BREKEKE SOFTWARE, INC.
30 Brekeke PBX Administrator's Guide (Advanced) p-adm-150802
11.3. Managing Messages
The maximum length of voicemail messages that callers can leave is set in the Administrator's
[Options] menu. The maximum number of voicemail messages that users can save in their
inboxes is also set in the [Options] menu. Users can also set to forward voicemail messages to
specific extensions or destinations. For details, please refer to Section 11.7, “Voicemail
Messages: Forwarding and E-mail Notification.”
11.4. Retrieving Voicemail Messages
Retrieving voicemail can be done in several ways:
Download the sound file (WAV file) from the [Voice Mail] menu in Brekeke PBX Admintool
and listen to it.
Call your voicemail inbox and access the [Review/Option] menu.
Use the e-mail notification setting and then open the sound file (WAV file) that is attached
to the e-mail.
11.5. Voicemail Message Status
Your voicemail has two possible states: New message or Saved message.
New message: A message that you have not saved or erased, including newly arrived
messages.
Saved message: A message that you have chosen to save on the system.
11.5.1. New Message Status
This status is for newly arrived voicemail messages, including forwarded messages from other
users. These messages will remain in the inbox up to the number of days set in the [Days to
keep unsaved messages] field in the [Options] menu.
11.5.2. Saved Message Status
Users can save voicemail messages when they are in message review. Saved messages will
not be deleted even after the number of days set in the [Days to keep unsaved messages] field.
11.6. E-mail Notification
When a new message arrives in your voicemail inbox, an e-mail notification can be sent to a
specified e-mail address.

BREKEKE SOFTWARE, INC.
31 Brekeke PBX Administrator's Guide (Advanced) p-adm-150802
11.6.1. Set Up E-mail Notification
Detailed settings of E-mail Notification, such as the e-mail address to receive the notification or
message file, can only be set at Brekeke PBX Admintool. You can activate and deactivate e-mail
notification features by calling your voicemail access number without accessing Brekeke PBX
Admintool. In Brekeke PBX Admintool, you can set up your e-mail address to receive
notifications and choose whether or not to receive voicemail messages as an attachment with
the notifications. For details, please refer to Section 11.7, “Voicemail Messages: Forwarding and
E-mail Notification.”
11.6.2. Send E-mail Notification of Messages from Call Recording
Recorded messages are stored in the same location as voicemail messages. By default, e-mail
notification will not be sent for messages saved with Call Recording. To send e-mail notification
for recorded messages, you need to set an additional variable (described below) at [Options] >
[Advanced]. Note that restarting Brekeke PBX is necessary for this change to take effect.
Variable for setting e-mail notification of call recordings:
com.brekeke.pbx.Setting.CALL_RECORDING_EMAIL_NOTIFICATION=true
11.7. Voicemail Messages: Forwarding and E-mail Notification
11.7.1. Forwarding Voicemail Messages
If you have set up Voicemail Message Forwarding at [Users] > [Settings] > [Voicemail settings] >
[Message forwarding*], all voicemail messages will be forwarded to the specified destination.
You can also assign multiple destinations to receive voicemail messages. If you want to keep a
copy of the voicemail message, in addition to forwarding it to another destination, you will need
to include your voicemail inbox number in the field as well. You can also forward voicemail
messages to a group of destinations by using the forwarding settings.
11.7.2. E-mail Notification of Voicemail Messages
You may choose to receive e-mail notifications when new voicemail messages arrive in your
inbox. You can also receive e-mail notifications for messages that have been forwarded to other
users.
Example:
User 001 sets messages to forward to User 002. Only User 002 will receive voicemail
messages that come in to User 001.

BREKEKE SOFTWARE, INC.
32 Brekeke PBX Administrator's Guide (Advanced) p-adm-150802
User 001 enters e-mail addresses for both User 001 and User 002. Both User 001 and
User 002 will receive e-mail notifications when User 001 receives a voicemail message.
11.7.3. Maximum Number of Messages
Brekeke PBX System Administrators can limit the number of messages that users can have in
their voicemail inboxes in [Options] > [Media Server system setting] > [Max stored messages].
When the number of voicemail messages in the inbox reaches the maximum number, callers
cannot leave new messages in your voicemail inbox. Callers will hear the system default
message, “The message inbox is full.”
Additionally, a message forwarded to a user who has reached the maximum number of
messages in his/her inbox will not be accepted. If you are forwarding your voicemail messages
to multiple destinations, the messages will only be forwarded to inboxes that have not reached
the maximum number of messages.
11.8. Voicemail Inbox Access Limitation
Each voicemail inbox will only allow a single user access at one time. When you or another user
are accessing your voicemail inbox, no other accesses are allowed. In addition, when your
voicemail inbox is being accessed by phone, your voicemail settings cannot be modified in
Brekeke PBX Admintool.
BREKEKE SOFTWARE, INC.
33 Brekeke PBX Administrator's Guide (Advanced) p-adm-150802
12. Automatic Route Selection (ARS)
Most of the call management rules for outgoing and incoming calls through outside lines are set
at Automatic Route Selection.
Common outside lines to which Brekeke PBX connects:
Third-Party SIP Servers
A Third-Party SIP Server is any server software other than the bundled SIP server that
comes with Brekeke PBX. Common third-party SIP servers are those that are located at
VoIP service providers or other office locations.
Gateways
The gateways referred to here are SIP PSTN Gateways that connect digital and analog
PSTN lines or software gateways that convert between different protocols.
Defining rules in the [ARS] menu enables ARS to make optimal use of outside lines and of your
gateways. You can define extension numbers that will receive incoming calls, as well as which
lines to use for outgoing calls.
Here are some examples of uses for the ARS feature:
Select the least expensive calling options
You could save money by sending all international calls through an inexpensive long
distance carrier, or just send calls that connect to a branch office located in (for example)
Taipei through that specific carrier. With the ARS feature, you can use whichever calling
option is the least expensive for each call.
Effective port use of PSTN Gateways
When there are multiple PSTN Gateways installed in an office, some ports may be used
more frequently than others. You can use the ARS feature to select the most efficient PSTN
Gateway port automatically.
Effective Use of Outside Lines
Similar to the above example, when you subscribe to multiple VoIP service providers, some
phone numbers may be used more frequently than others. You can use the ARS feature to
select the most efficient service provider automatically.
Network Traffic Management and Load Balancing
When many sessions are in progress and the server load is too high or network bandwidth
is insufficient, you may choose to use the ARS feature to direct some calls through PSTN
Gateways.

BREKEKE SOFTWARE, INC.
34 Brekeke PBX Administrator's Guide (Advanced) p-adm-150802
Failover
With ARS failover, Brekeke PBX searches for an alternate route if the specified route is
unavailable or has failed, and then makes outgoing calls via the alternate route. For
example, if you have multiple ITSPs (Internet Telephony Service Providers) and/or PSTN
(Public Switched Telephone Network) gateways, Brekeke PBX allows for backup
connections if the VoIP (Voice over Internet Protocol) or Internet connection is lost. In this
situation, Brekeke PBX will automatically switch to an analog route through the PSTN
gateway. The original route can be reactivated manually from Brekeke PBX Admintool or
automatically by preset settings.
12.1. Route Search Process
Two sessions are used for each call in Brekeke PBX. Please refer to Section 5, “Call Process
Flow” for more details on session processing during calls.
When User A calls User B, the SIP session initiated by User A will be answered by Brekeke PBX.
Brekeke PBX will then process ARS Pattern-IN for the incoming session. Brekeke PBX also
initiates a session with User B and will process ARS Pattern-OUT for the outgoing session.
Route search is done by searching for Matching Patterns that apply to a call. The Route Search
starts from the highest priority (lowest number) as defined by the ARS rules. If multiple patterns
share a priority level, a pattern is selected at random. When a matching pattern is found, the
process will check if the [Max Sessions] value has been reached. If the pattern has sessions
available, the process will select the pattern and convert the From and To header fields
according to the settings defined in [Deploy Patterns].
For incoming sessions, Brekeke PBX will check if any ARS route matches and will then route
the session to an appropriate dial-in number. Please ensure that calls between your own
extension users do not match ARS rules, because those calls do not need to be routed through
your gateway and a third-party SIP provider.
For outgoing calls, it is necessary to set priorities for effective routing, depending on line usage.

BREKEKE SOFTWARE, INC.
35 Brekeke PBX Administrator's Guide (Advanced) p-adm-150802
12.2. Matching Patterns
Use regular expressions to enter conditions for the To or From headers, etc., for the matching
process. The fields can be set in the same way as the [Matching Patterns] fields in the Dial Plan.
If these fields are left blank, all calls will be considered to match the condition.
By changing the [User] field of an ARS Pattern-OUT setting, it is possible to restrict who can use
the ARS pattern. The “User” of the call for the ARS rule will be determined as follows:
1) If the callee is a Brekeke PBX user, then that callee is considered as the “User” of the call.
2) If #1 is not applicable and the call is forwarded through a Brekeke PBX user’s setting in the
[Other Forwarding destinations], [Forwarding destination (No answer)] or [Forwarding
destination (Busy)] field, the Brekeke PBX user will be considered as the “User” of the call.
3) If #2 is not applicable and the caller is a Brekeke PBX user, the caller will be considered as
the “User” of the call.
4) If none of the above is applicable, no user will considered as the “User” of the call.
The [Plugin], [Param] and [Return] fields are used only when you want to extend the matching
conditions using a JAVA plug-in. Please refer to “ARS Plug-in Developer’s Guide” for more
information.
12.3. Deploy Patterns
This is similar to the [Deploy Patterns] fields in the Dial Plan, however, there are several
important differences:
In ARS rules, numbers follow the “$” sign in [Deploy Patterns]. (Use “%” in the Dial Plan.)
Conversion of a From header that matches in [Matching Patterns] is done as described in
[Deploy Patterns] for the From header. Conversion of a To header is done as defined in
[Deploy Patterns] for the To header, DTMF and Target field. (In Dial Plan rules, multiple
lines can be defined in the [Matching Patterns] and [Deploy Patterns] fields, which are
processed simultaneously.)
By using &f<n>, &t<n> or &u<n> in the [Deploy Patterns] field, it is possible to use a value
in parenthesis of some [Matching Patterns] fields. The symbols &f, &t and &u correspond to
From, To and User, respectively. For example, &f1 refers to the value in the first
parenthesis in [Matching Patterns] > [From].
If the From or To field is blank, no conversion will be performed. If the DTMF field is blank,
no DTMF will be sent. If the Target field is blank, no target IP address will be specified. (In
most cases, the call will be routed to the domain specified in the To field.)

BREKEKE SOFTWARE, INC.
36 Brekeke PBX Administrator's Guide (Advanced) p-adm-150802
12.4. ARS Templates and Editing Variables
It is possible to create a template in ARS Settings for multiple ARS rules that have the same
configuration patterns. In [Running Status], real rules (not template) will be displayed. In the
template fields (excluding the [Route name], [Descriptions] and [Parameters] fields), you can
use the variables &v1, &v2,…&v9. You can specify real values in [Edit variables].
13. Third-Party Call Control
Using this feature, you can connect multiple SIP UAs through an external interface. That way,
you can create systems like “Click-to-Call” and “Autodialer.”
Using HTTP-GET (or POST) and the Web Service interface, you can access Brekeke PBX
externally. You can use HTTP-GET by doing the following:
1) Use regular expressions to set the allowed IP patterns at Brekeke PBX Admintool >
[Options] > [PBX system settings] > [Valid client IP Pattern].
2) Access the URL (format as below) using HTTP protocol from your PC with the IP
addresses set at [Valid client IP Pattern].
URL format
http://<server-ip-address>:<server-port>/pbx/3pcc?tenant=<tenant-name>&to=<callee-number
>&from=<caller-number>&user=<caller-user>&type=<type>
<server-ip-address> IP address of server where Brekeke PBX is installed.
<server-port> The same port number you use to access Brekeke PBX Admintool.
<tenant-name> The tenant name (Multi-Tenant PBX)
<callee-number> The callee’s number or his/her SIP URI. (You can specify multiple
numbers by dividing them with commas.)
<caller-number> The caller’s number or his/her SIP URI.
<caller-user> The Brekeke PBX User that is used to call out (caller). You can omit this
if it is the same as “caller-number.”
<type> Specify “1” when you want to call both destinations simultaneously.
Specify “2” when you want to connect the caller before connecting the
callee.
Response

BREKEKE SOFTWARE, INC.
37 Brekeke PBX Administrator's Guide (Advanced) p-adm-150802
Brekeke PBX will return the response: “succeeded: <ID number>.” This ID will be the ID used at
the [Call Status] screen for the session.