briefcam starter kit
TRANSCRIPT

BriefCam® Starter Kit
Quick Start Guide | Milestone XProtect®
TRANSFORMING VIDEO SURVEILLANCE
INTO ACTIONABLE INTELLIGENCE
September 2019

Page 2 of 9 BriefCam |
TRANSFORMING VIDEO SURVEILLANCE
INTO ACTIONABLE INTELLIGENCE
9/20/19
Introduction Welcome to the BriefCam Starter Kit for Milestone XProtect. This Quick Start Installation Guide outlines
the five-steps in five-minutes deployment for rapid time-to-value.
Get started and accelerate investigations with BriefCam RapidReview
• Review hours of video in minutes with VIDEO SYNOPSIS®
• Pinpoint objects of interest with robust multi-camera search capabilities supporting 27 classes and
attributes, face recognition, appearance similarity, color, size, speed, path, direction, and dwell time
• Quickly and effectively organizes all video assets of an investigation with collaborative Case
Management
• Rapidly visualize activity level, dwell time, common paths and background changes with powerful
Visual Layers
Your system components include:
1. A pre-configured and certified BriefCam hardware appliance with BriefCam RapidReview
2. BriefCam’s Open API (BOA) component
3. BriefCam’s Milestone VMS integration plugin
4. Milestone VMS server
5. N x Milestone XProtect Smart Client desktops

Page 3 of 9 BriefCam |
TRANSFORMING VIDEO SURVEILLANCE
INTO ACTIONABLE INTELLIGENCE
9/20/19
Five – Steps in Five – Minutes 1. Activate the BriefCam license
2. Complete the VMS IP Address Configuration
3. Activate the cameras
4. Update the SSO address
5. Install BriefCam’s Embedded Client for Milestone plug-in
Note: Creating user names is not neccesary since they are automatically created by the SSO.
STEP 1 – Activate the BriefCam License
1. On the BriefCam appliance, launch the BriefCam License Activation application from the Start
menu.
2. Enter the product key that you received from BriefCam and click Activate.

Page 4 of 9 BriefCam |
TRANSFORMING VIDEO SURVEILLANCE
INTO ACTIONABLE INTELLIGENCE
9/20/19
3. Upon successful activation, the following dialog will appear.
4. Click OK to close the dialog, then click Close in the main application window to close the
License Activation application.
STEP 2 – Complete the VMS IP Address Configuration
1. In a browser, enter the URL of the BriefCam appliance followed by slash (/) and the word
admin, for example: bcappliance/admin. The BriefCam Administrator Console will open.
2. Log into the console. The user is Administrator and the password is the password that
was given to you by BriefCam’s Support team when you received the appliance.
3. Open the Settings section and click Camera Management.

Page 5 of 9 BriefCam |
TRANSFORMING VIDEO SURVEILLANCE
INTO ACTIONABLE INTELLIGENCE
9/20/19
4. Click the Add directory. The Add Directory dialog opens.
5. From the Video Integration field, select Milestone Integration.
6. In the Directory Name field, enter a display name for the user directory.
7. In the Address field, enter the address of the Milestone VMS server.
STEP 3 – Activate the Cameras
1. In the User name and Password fields, enter an administrator user name and password of
the VMS server. You want to use an admin user so that BriefCam can addess all cameras.
2. Click Add to add the directory.
3. In the new directory, click the Status check box to enable all of the cameras and then click
Apply.
Page 6 of 9 BriefCam |
TRANSFORMING VIDEO SURVEILLANCE
INTO ACTIONABLE INTELLIGENCE
9/20/19
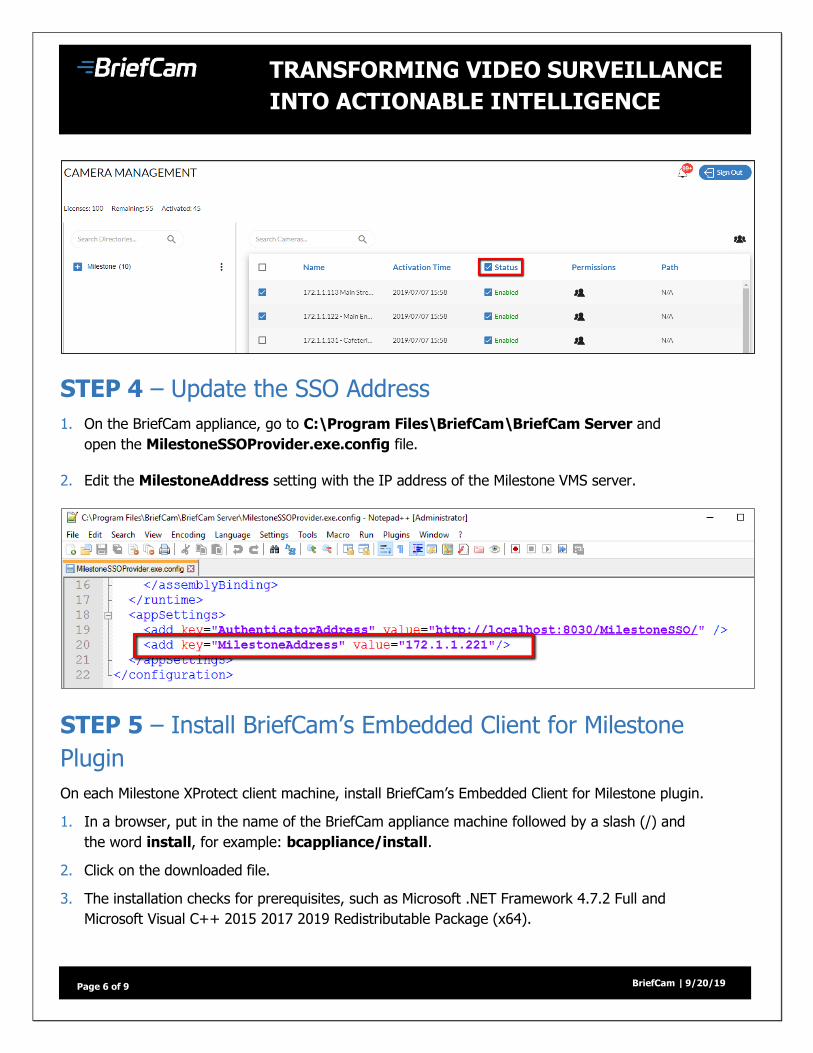
STEP 4 – Update the SSO Address
1. On the BriefCam appliance, go to C:\Program Files\BriefCam\BriefCam Server and
open the MilestoneSSOProvider.exe.config file.
2. Edit the MilestoneAddress setting with the IP address of the Milestone VMS server.
STEP 5 – Install BriefCam’s Embedded Client for Milestone
Plugin
On each Milestone XProtect client machine, install BriefCam’s Embedded Client for Milestone plugin.
1. In a browser, put in the name of the BriefCam appliance machine followed by a slash (/) and
the word install, for example: bcappliance/install.
2. Click on the downloaded file.
3. The installation checks for prerequisites, such as Microsoft .NET Framework 4.7.2 Full and
Microsoft Visual C++ 2015 2017 2019 Redistributable Package (x64).

Page 7 of 9 BriefCam |
TRANSFORMING VIDEO SURVEILLANCE
INTO ACTIONABLE INTELLIGENCE
9/20/19
4. If anything is missing, you will be prompted to install the missing prerequisites and click
Install.
5. In the Welcome screen, click Next.
6. Read the license, accept the License Agreement terms and click Next.
7. Select the installation destination path
and click Next.
Note that the installation path must be
the same directory where Milestone
XProtect Smart Client is installed.
(This may vary slightly between client
machines and between Milestone
versions.)
8. Enter the BriefCam Web Application
URL (which is the address of the
BriefCam appliance followed by
/synopsis) and verify that the
provided URL is correct by clicking the
Verify URL button.
9. In the BriefCam Open API (BOA)
Server Address field, enter the
address of the BriefCam appliance
followed by /BOA.
10. Click Next.
11. Click Install and then click Finish.

Page 8 of 9 BriefCam |
TRANSFORMING VIDEO SURVEILLANCE
INTO ACTIONABLE INTELLIGENCE
9/20/19
12. In the BriefCam Administrator Console, restart the services by selecting all of the services
and clicking the start button ( ).
When you are finished with the five steps, you’ll see BriefCam embedded directly into Milestone.

Page 9 of 9 BriefCam |
TRANSFORMING VIDEO SURVEILLANCE
INTO ACTIONABLE INTELLIGENCE
9/20/19