bug-out basecampout+base+camp+… · prepper projects w hen times turn bad, a bug-out basecamp is...
TRANSCRIPT

PREPPER PROJECTS
When times turn bad, a bug-out basecamp is your hidden, defendable, well-stocked safe haven. It’s a place where you and your fam-ily can hunker down for the long haul and sit
tight. In fact, life itself could someday depend on the efforts you invest now building a proper bug-out basecamp. It might never be needed, in which case you can enjoy it as a rural retreat. But if the warning signs we see really are what they seem to be, that bug out basecamp could take on a whole new survival value – way beyond what you could create in your everyday residence.
There are many features you can and should build into your regu-lar home to make it much more protective during a SHTF scenario. But facts are facts. No matter what you do to prepare a regular residence, it probably won’t be the ultimate safe haven when things get bad. How could it be? Many of the features that make a regu-lar home pleasant and livable in ordinary civilian life work against you when the world goes south. Lots of windows, easy accessibility, curb appeal and visual prominence are all things that are great in a regular house during regular times. But everything changes when all outsiders become a potential threat, looking to take what you have so carefully prepared.
1
BUG-OUT BASECAMPHow to locate, build, stock and thrive in your own secret survival facility

2
PREPPER PROJECTS
Any effective, purpose-built bug-out basecamp includes the many survival concepts we’ve brought to you in previous Prepper Projects. An independent power system, a safe room, a surveillance system and sustainable food production are all part of the bug out basecamp deal. The thing is, a bug-out basecamp takes it all to the next level by adding one powerful advantage. Seclusion.
The essential nature of a bug out basecamp is that it’s hidden, fortified, massively well stocked and defendable. Imagine a place where you can survive and thrive for a year or more without outside inputs and without anyone knowing you’re there. Image a place where threatening forces won’t even bother trying to find you because there’s no trace of you to tip them off in the first place. Imagine a place where you and your family can enjoy a level of safety that millions of ordinary people don’t even yet suspect they’ll need. This is the bug out basecamp proposition. What you’ll learn here will help you make it happen in your own, customized way.
Every bug out plan is based on underlying ideas, assumptions and preferences. The fact that so many bug out plans vary is precisely because the underlying ideas behind them vary. So to make things clear, I’ll start by telling you what’s behind the design and recommendations you’ll see here. You may agree with them or not, but these are the ideas that this particular Prepper Project bug out basecamp plan springs from.
Bug Out Basecamp Design Assumptions
Be flexible. No one set of bug out advice covers all possible scenarios perfectly. There are simply too many different ways to prepare yourself for trouble, and too many unknowns that’ll crop up when trouble does strike. The best you can do is design your system for flexibility.
Design for self-reliance. A true bug out basecamp should be equipped to keep you alive, safe, sane and happy for at least 6 months without outside inputs. A year is better.
Build for two realities.A bug out basecamp facility created to defend against a real crisis should be able to operate in two modes: everyday life mode where you live above ground, see the sunshine, breathe fresh air and do outdoor work; and crisis mode where you’ll hole up if you come under direct assault. No bug out basecamp can perform properly for everyday life and crisis without being built to operate in two modes. This is important.
Live with your bug out basecamp.Your bug out camp should be part of your regular life in some way, even if you don’t live at the place full time. Think of it like a rural retreat on steroids. Go there on weekends and holidays. Add features to the place. Make it special.
Give yourself time.It takes years to build a fully-equipped bug out basecamp. Be patient. Whether the world has that long remains to be seen. Just the same, expect to invest your spare time doing a lot of DIY on
your basecamp, and give yourself a chance to earn the money to make investments in the place. There’s plenty of advice out there about quick and cheap basecamp options. Isn’t your life and the life of your family worth more than a quick and cheap effort? If you think you need a bug out basecamp at all, doesn’t the idea require serious attention? The more you put in, the more you take out.
Focus on energy.Energy shortages will be one of the biggest shocks to the system after a SHTF event. It will be massive because we’re so dependent on energy as a society. That’s why you need to equip your bug out basecamp with energy systems that don’t rely on a central supply. Just don’t make the mistake of thinking that this always
ORIGIN OF THE TERM “BUG OUT”As far as anyone can tell, the term “bugging out” first appeared during World War II. It means leaving a place quickly, with little notice, like a disorganized group of bugs running away from the threat of being swatted or squashed. By 1950, the term “bugging out” had begun to make its way to the public world at large. Today “bug out” is both an action word (i.e. “I’ve got to bug out of here”), and a thing (i.e. “That was an effective bug out”).
TWO WAYS TO BUG OUTThere’s one particular prepper philosophy that recommends what I call the “wandering bug out”. This is where you keep a portable survival kit ready to roll for hitting the road to dodge danger, staying alive as a mobile, freelance survivor. Another branch of preppers believes something different. They maintain that wandering is the worst thing you can do after a SHTF event. “No shelter, no direction, no goal, no hope”, they say. “You’re just as likely to walk into lethal trouble as you are to walk away from it.”
So who’s right? Both. It all depends on where you live. If you’re currently in the city and you have no bug out basecamp or plans for one, you’re definitely a sitting duck when things go bad. A hungry, thirsty, cold, and easily rounded up sitting duck in a flock of similar ducks. Food, water, heat, safety – they all depend on an enormous and vulnerable urban infrastructure that’s coordinated and energy-dependent. That’s why if you’re a city dweller (with no bug out basecamp somewhere else), the wandering bug out is probably the way to go.
Do you live in the country already? Do you have a bug out base nearby? Do you have one planned? Then you don’t have far to go to make the best possible situation for yourself. Even with minimal or no travel preparations, you can at least be assured of food, water, heat, shelter and security. And that’s way more than most people will have. If this describes you, then there’s no need to wander.

3
PREPPER PROJECTS
means high-tech solar or home-brewed fuels. These things do have their place, but don’t forget about older, simpler technologies developed before energy became so centralized. Sometimes older is better. More on this later.
Section 1: Where to Build Your Bug Out Basecamp
Location. Location. Location. This is the first thing you need to consider when building a bug-out basecamp, and it matters because location has so much influence on success. Besides being out of the way, any ideal location still needs to be accessible to you when panicked people and heavy-handed forces clog roads. So what does good location boil down to in your case? The answer depends on a lot of things, but the end goal is the same.
Hidden, defendable, sustainable and productive. These are the main qualities of any good bug out basecamp. How do these four qualities affect your choice of basecamp locations? Here are a few suggestions:
The Forest-Farm Plan: Many regions with marginal agricultural potential have farms that include lots of forest. Properties with a combination of fields and forest have great basecamp potential because they offer seclusion, productivity and resources all in one location. I know the forest
farm scenario well because my own property is like this. Half of the 90 acres are cleared and good for growing food or grazing animals. Most of the back of the property is forest, adjoining other forested properties that in turn front onto 200 miles of open water. My location is on an island 150 miles from the nearest city, so I’m out of the way. You’ll find forest farm bug out locations in areas where mountains or hilly land transitions into farmland, or anywhere that farmland transitions into wilderness areas. It’s the transition zones that are best. Google Earth or other online satellite technology is great for the first stages of checking out individual properties.
The Lakeland Plan: Some areas of North America are dotted with lakes, with prop-
erties you can only get to by boat. These make excellent bug out basecamp re-gions. A water-access basecamp offers the perfect opportunity to build a cabin back from the shore while also being able to keep an eye on any-
one approaching from the water. You get seclusion and restricted access only from one side, and that’s a big plus.
The Wilderness Plan: This isn’t exactly a plan for building a bug out basecamp as
such, but more of an approach for bugging out of society completely for a while. The wilderness plan is the most primitive approach and it’s hard core. It’s best suited to a single,
self-sufficient individual or small group of preppers with above-average survival skills and a proven ability to work together and get along as a team. Arm yourself for survival living completely away from civilization, step into the wilderness with your bug out kit, then fend for yourself. Few places in the world still offer true wilderness, but there are opportunities. See “Bugging Out on Canadian Crown Land” on the next page for more.
THE BUG OUT GARDENThere are only so many
food and fuel supplies
you can stockpile ahead
of time, and that’s why
any plan for bugging
out long term needs to
involve preparations
for onsite production
of food and fuel. If your
basecamp is built on land that can support a garden, vegetable
seeds should be one of the things you keep in your basecamp,
along with the tools needed to work the land. The thing is, not
all vegetable seeds are what you want. In fact, most are not.
The world of vegetables is divided into hybrid and non-hybrid
varieties. Hybrids are made by intentionally cross breeding two
or more plant varieties so the resulting offspring have desirable
characteristics. Sweeter sweet corn, faster maturing beans,
higher vitamin C content in carrots – these are all the kind of
benefits you’ll find with hybrids. Trouble is, you can’t plant
seeds saved from hybrid vegetables and have them produce
the same desirable results. Seeds from hybrids will always breed
back to some former genetic strain. They don’t “breed true” as
the saying goes. You’ll almost certainly get wonky, undesirable
throw-backs to the parent plants of the hybrid. To be able to
plant and replant vegetables from seed you save yourself, you
need open pollinated varieties. You can save seeds from these
year after year and the results will always be the same.

4
PREPPER PROJECTS
Section 2:
Building the Bug Out Basecamp
There are eight essentials your bug out basecamp needs to provide: food, water, medical supplies, firearms, tools, clothing, enjoyable down time and concealment. Planning your installation around the need to provide these things is your main guiding principle. All the rest are details.
There’s no limit to the variety of structures you can build to provide the eight basecamp essentials, and this Prepper Project is based on the idea that you need two main structures to get the job done:
Structure #1: Bug Out CabinThis is a compact, secluded cabin for non-crisis living after a SHTF scenario. This place will be your home for months or even years, so it needs to be complete, comfortable and well stocked with essentials. Most of your time in bug out mode will be spent sitting tight and waiting things out. You need to be comfortable to stay the course.
Structure #2: Bug Out FortressThis is a fortified, attack-resistant structure for times when you and your family need to take shelter from direct assault. This isn’t the kind of place you’d want to live in for extended periods, but rather a last resort safe haven where you and your key supplies will enjoy ultimate levels of protection.
Constructing the Bug Out CabinLike I said before, your bug out basecamp structures should be built on a secluded property that you visit regularly and make
part of your life. Naturally, you’ll want the cabin part to be comfortable in all seasons, while small enough to be reasonable to build and maintain. I designed and built the cabin you see on the next page, and it makes the best possible use of a small space. Study
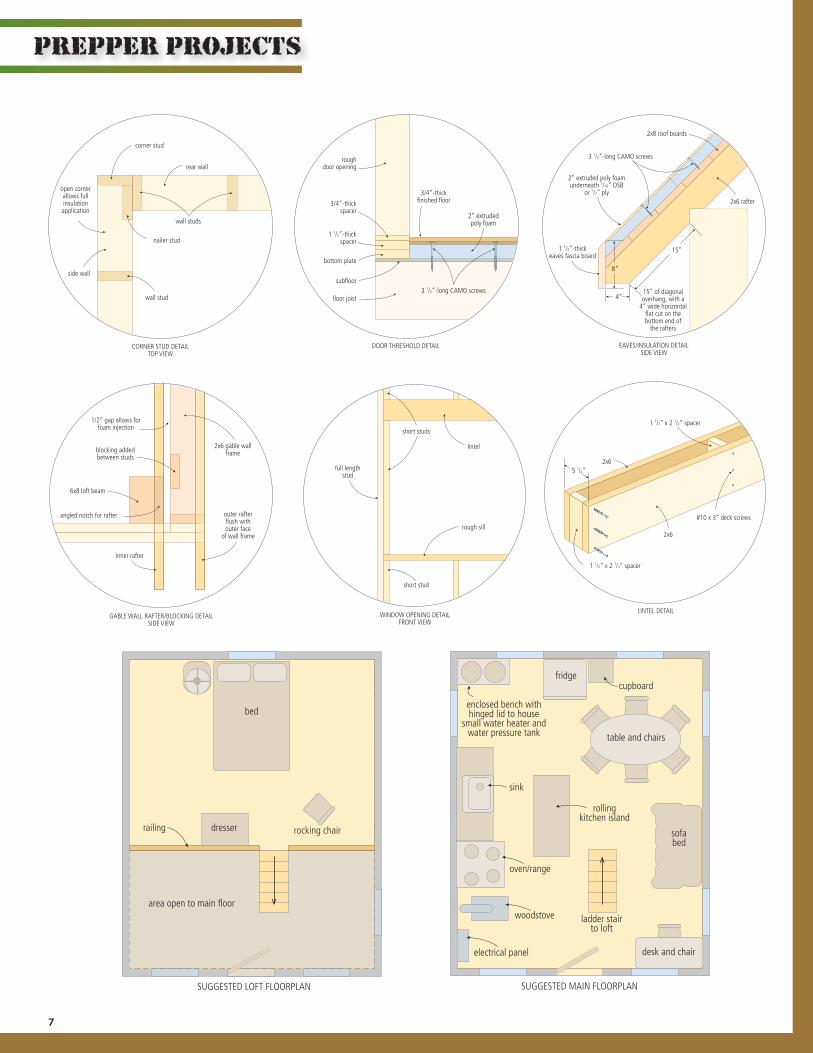
the plans on the next page for this 16” x 25” design before I briefly explain how each of the different parts of the cabin are built.
BUGGING OUT ON CANADIAN CROWN LAND
The vast majority of property in Canada has no deeds and is not owned by private individuals, and this offers one excellent bug out option, even for non-Canadians. About 89% of Can-ada is owned by the federal or provincial governments , and much of this is pristine wilderness – not national parks or re-serves, but actual wilderness. There are thousands of square miles that offer a perfect opportunity for anyone aiming for a Grizzly Adams bug out plan. How does the crown land thing work ? Details vary from province to province, and details do change over time, but there are some facts about Canadian crown land worth considering. First, most Canadian crown land is true wilderness – far wilder and more remote than what you’ll find in the US. You’ll be stepping in as part of a wild ecosystem. You eat what you kill.
Second, once you step away from civilization, no one will be able to find you if you don’t want them to. No one will even go looking for you because it would be pointless. It’s just too big and too wild out there.
Canadian crown land cannot be owned by individuals, but you are free to travel and camp on it. Some crown land is also made available for long-term lease. So how could you make use of this kind of land in your bug out plans? The easiest option is to consider it a destination when you bug out from your city home. This is one instance where
you’d need to make serious preparations for a portable bug out kit, and that you spend time getting to know the travel route to crown land and the lay of the land itself.
Depending on your citizenship and the province or territory involved, you could also obtain a permit to build your bug out basecamp on Canadian crown land. Leasing fees are very economical, and though the hassle of getting materials and supplies to your remote cabin site are real, there’s no more secluded a spot to get away from any SHTF scenario.

5
PREPPER PROJECTS
Structure#1: Bug Out Cabin
18” x 24” foundation pier
1/4” holefor spike
13’ , 5 3/8”
3 1/2”3 1/2”-wide x 1 1/2”-deep
rafter supportnotches
45°
36”o.c.
21”
11’ , 3 3/4”
4”
3”
45°
BIRDSMOUTH NOTCH RAFTER DETAILS
3”
3/4” pressuretreated plywood
subfloor secured withconstruction adhesive
and 2 1/2”-long screws every 8”
12”-16”
57”
16’
20’
1 1/2” - 2” dia.hole filled with
anchoringcement
5/8” dia.threaded rod
1/4”-thick steelcustom made post
bracket
5/8” plywoodwall sheathing
flatwasherand nut
counterbored hole
beam
joist blocking
2x12 floor joists
8” longhalf lap joint
upper frontwall plate upper side
wall plate
lowerside wall plate
full lengthstud
shortsupportstuds
porch beam
mortar forlevelling
pillar
nut
8x12floor beam
18” x 18”foundation pier
FOUNDATION PIER ANCHOR DETAIL
SIDE VIEW PORCH BEAM POCKET
12" spikes driven intopredrilled holes in beams
2x6 rafters
short 6x6porch beam
long 6x6porch beam
6x8 loft beams
2x8 construction-grade roof boards
2x10 ridge board
1 1/2" x 3 1/2"rafter support notches
2x6 gable blocking
trim loft beamcorners offafter rafterinstallation
anglednotch
for rafter2x10 eaves board
long 8x12porch beam
6x6 inner porch post
See DOOR THRESHOLD DETAIL
See GABLE WALL/RAFTER BLOCKING DETAIL SIDE VIEW
See LINTEL DETAIL
SeeEAVES/INSULATIONDETAIL SIDE VIEW
See CORNER STUD DETAILTOP VIEW
See WINDOW OPENINGFRONT VIEW
short 8x12porchbeam
6x6 porch post
66”
install this porch beamafter siding installation
2” extruded poly foamunderneath 7/16” OSB
or 1/2” ply
2x4 rafter supports
Barricade insulation panels fastened with3 1/2"-long CAMO or Headlok structural screws
every 12" along each rafter
2” extrudedpoly foam
under 1/2” subfloor

6
PREPPER PROJECTS
FRONT WALL
16’
36” x 36”roughwindow openings
7 1/4”top short
studs
41 1/4” bottomshort studs
39” x 83”roughdoor
opening
RIGHT WALL
open porch area
36” x 59 1/2”roughwindow openings
44 1/2”
26 1/2”
48 1/2”
21 1/4” x 38 1/4”rough openings for
VELUX C04 skylights
This loft beam rests against its rafters on the opposite side
compared to other rafters
2x4 rafter supports36” on center
3-inch gapallows continuous
weatherproof sidinginstallation
23”
6”
16”overhang
6”
23”7 1/4”top short
studs
18” bottom short studs
LEFT WALL
open porch area
36” x 59 1/4”rough
windowopening
23”
22 1/2”
no notches inthese rafters
notches inthese rafters 22 1/2” 22 1/2” 22 1/2” 22 1/2” 22 1/2” 22 1/2” 22 1/2”
REAR WALL
25”
26”36” x 36”rough
window openings
16”
7
PREPPER PROJECTS
CORNER STUD DETAILTOP VIEW
rear wall
side wall
wall studs
wall stud
corner stud
open cornerallows fullinsulationapplication
nailer stud
DOOR THRESHOLD DETAIL
1 1/2”-thickspacer
bottom plate
subfloor
floor joist
3/4”-thickspacer
3/4”-thickfinished floor
2” extrudedpoly foam
roughdoor opening
3 1/2”-long CAMO screws
EAVES/INSULATION DETAILSIDE VIEW
1 1/2”-thickeaves fascia board
2” extruded poly foamunderneath 7/16” OSB
or 1/2” ply
3 1/2”-long CAMO screws
2x6 rafter
2x8 roof boards
8”
4”
15”
15” of diagonaloverhang, with a
4” wide horizontalflat cut on thebottom end of
the rafters
GABLE WALL RAFTER/BLOCKING DETAILSIDE VIEW
1/2” gap allows forfoam injection
inner rafter
outer rafterflush withouter face
of wall frame
2x6 gable wallframe
6x8 loft beam
angled notch for rafter
blocking addedbetween studs
LINTEL DETAIL
1 1/2” x 2 1/2” spacer
1 1/2” x 2 1/2” spacer
5 1/2”2x6
2x6
#10 x 3” deck screws
SUGGESTED LOFT FLOORPLAN
bed
dresserrailing
area open to main floor
rocking chair
SUGGESTED MAIN FLOORPLAN
enclosed bench withhinged lid to house
small water heater andwater pressure tank
fridgecupboard
table and chairs
sofabed
ladder stairto loft
rollingkitchen island
woodstove
oven/range
sink
electrical panel desk and chair
WINDOW OPENING DETAILFRONT VIEW
short studs
short stud
full lengthstud
lintel
rough sill

8
PREPPER PROJECTS
The Foundation: I always build for the long haul and I recommend you do the same. I figure the world has more than enough junk in it already. Why add more? The cabin design here uses masonry piers built to support the structure 16” to 24” off the ground. I built them on the cheap, using free stone from my building site. Piers are simpler than a full basement and they work just as well for a building of this sort. You can also use blocks or poured concrete.
The Floor Frame: There are many ways to frame a cabin floor, and I chose the timber-rim approach for my design. Beams define the outside of the floor structure, with joists running between the beams to hold up the subfloor. There are a
couple of reasons I like timber rim floor frames in this application. First, it provides continuous support for the walls of a building that are only held up at half a dozen points around its perimeter. This means much less foundation work. Another plus is the fact that timber-rim construction is simple, durable, and forgiving for first-time cabin builders. You can use solid 8x12 beams for the frame, as I did, or bolt up up five 2x12 planks to make your own beams. The plans show how the beams and joists fit together. I used pressure treated wood for all floor frame parts, including the plywood subfloor. Rot is not likely to be a problem, with the floor frame raised off the ground, but why take the chance? Just be sure to use hot dipped galvanized or stainless steel fasteners when working with pressure treated lumber. Wood preservative chemicals these days are highly corrosive to metal.
The Walls: With your floor frame and subfloor in place, you’ve now got a flat, clean surface that’s perfect for building walls. Stud frame wall construction is still the most popular approach for conventional residential projects in many parts of the world, and it makes sense for your bug out cabin, too. Although you can save money framing with 2x4s, I recommend 2x6s for walls, even if you won’t be insulating. The extra 1 1/2” of frame thickness is stronger and offers greater storage opportunities for small items sitting on wall blocking if you opt to go without interior wall boards or insulation. Frame with 2x4s if you like, but realize you’re giving up a fair amount of practicality for minimal costs savings.
BEWARE THESE THREE DEADLY EMOTIONS
FEAR, HOPE AND PRIDE. These three emotions form the most deadly combination known to man. Fear makes you stupid. Hope is sometimes a very good thing, but it can fool you into believing that your current situation will get better on its own. Pride tricks you into believing that you’re too smart to fall victim to either fear or hope.
The danger as a prepper is that this deadly emotional trio will prevent you from activating your bug-out plans when reality says you really should. Being unable to pull the trigger on your bug-out move is more of a risk than you might realize. That’s why having a bug out activation checklist ahead of time is your best defense. Take the time right now, before things get bad, to list the societal conditions that will signal it’s time to move to your bug out basecamp, regardless of how much hope or fear or pride you feel at the time. Commit to bugging out when these conditions come to pass and you’ll be way ahead of all those other people mesmerized by the headlight of an oncoming SHTF freight train.
What might your bail-out checklist look like? That depends on your situation, location and preparations, but the checklist could include some or all of the following scenarios:
• Power outage lasting for more than 72 hours, with no indication of power coming back in neighbouring areas.• Municipal water or natural gas stops flowing for more than 24 hours.• Martial law declared.• More than one incident of open gun fighting in your neighbourhood.• Buildings burning with no attempt to put them out.• Longer-than-usual lines at grocery stores, gas stations, banks and home improvement stores.
Whatever you do, don’t wait for government authorities to order an evacuation. That’s often little more than an invitation to crowd the exits. You need to bug out before most other people. You’ll probably find this a surprisingly difficult call. That’s why you need a checklist.
“Perspective can easily distort reality.
That’s why you need to look at a map.
Most of North America is actually wide open and
crowd-free all the time. There’s a lot more room in our
world than meets the eye of a city dweller. And that’s
good news for people looking to build
a bug out base for themselves.”

9
PREPPER PROJECTS
The plans show the main parts of stud frame walls and how they fit together. These include studs (the vertical members making up the wall); plates (horizontal members that form the top and bottom of the wall frames); and lintels (horizontal members that span door and window openings).
Before you begin framing, take a look at all four wall views on the plans. The front wall is the one with the door; the rear wall is the one opposite the front wall; the right wall is on the right side of the cabin when you’re facing the door from the outside; and the left wall is the one on your left as you’re facing the door. Although you could start building any wall you like, it’s easiest to begin with the two walls that run the full length of the building. In this case, that’s both the right and left walls. The front and back walls fit between these two, so it makes sense to build them later, after the right and left walls are assembled and raised.
The Timber Porch Frame: The plans show how 6x6 posts and beams create a struc-ture to support the roof as it extends out over the porch. With only basic space in-side the cabin, a porch makes the de-sign much more liv-able. Essentially these posts and beams form an open extension of the walls. I used rough sawn pine 6x6s for porch timbers, sanding the rough surface of the wood lightly to remove fuzzy wood fibers while retaining the rustic circular saw mill marks.
The Loft Beams and Roof: There are many ways to frame a roof, but the one in my de-sign allows most of the volume underneath the rafters to function as usable space. Steep-ly pitched rafters are the traditional way to frame a cabin roof, and that’s what my design uses here. Both sides are sloped 45o from horizontal, making this
what’s called a “12/12 pitch” in carpenter talk. This means there’s 12” of vertical rise of the roof surface for every 12” of horizontal run, creating a 90o angle at the peak. The geometry is simple, yet the shape looks great and there’s usable space underneath for the loft. Climbing and working on a roof this steep is more challenging than shallow designs, but the hassles of the angle are well-worth the beauty, the longer shingle life and the additional floor area.
The plans show the rafter details you’ll need to follow. The design uses 36 rafters in all, including 32 that span the cabin structure itself, and two more pairs that extend out past the walls to create
the overhang past the porch and the back wall. Each rafter is made from a 14-foot long 2x6.
The floor of the loft sits on 6x8 timbers, both for good looks and to keep the thickness of the loft floor as thin as possible.
STOCKING UP ON MEDICATIONWhile it’s always easy to stock up ahead of time on headache pills, antiseptic, bandages and vitamins for your bug out basecamp, it’s now easier than ever to get medication that’s normally only available by prescription for specific
illnesses. Many online sources now offer antibiotics at the click of a mouse, with no doctor’s prescription required. And while it’s always best to get the help of a doctor for illnesses during normal times, key medications obtained online now could save lives when there’s no such thing as a functional doctor’s office or operational pharmacy. Stock up ahead of time and be prepared.
MOVING FORWARD BY GOING BACKNobody builds perfectly all the time, but it’s how you deal with
the inevitable errors that makes most of the difference. The
natural tendency is to forge ahead even when errors show up,
making whatever adjustments are needed in subsequent parts
to make up for previous mistakes. And while this may be natural
(and occasionally unavoidable), it’s not the way to build well.
When you do find that something isn’t fitting together like
it should, stop right there and find out what the real root of
the problem is. It may help you to avoid getting upset if you
realize that mistakes are made by builders all the time – even
experienced builders. Only after going back and fixing the root
issue should you move forward again. This move-forward-by-
going-backwards approach takes more patience, but it’s the
way all good builders work. And of all the places in your cabin
adventure you’re most likely to encounter things not fitting
properly, it’s testing the first two rafters you build. In cases like
these (and others) moving backwards, finding the real reason
why things don’t fit, fixing root cause errors, then moving
forward after it’s fixed is the single most important building skill
you can cultivate.

10
PREPPER PROJECTS
Exterior Wall Finish: You don’t want your bug out cabin to be a maintenance nightmare for yourself, and you don’t want it to stand out visually. This is why you need to be careful about how you cover the exterior walls. Perhaps the longest lasting, most
maintenance free and easily camouflaged siding choice is cedar shingles. They’ll last for 40 to 50 years with no finish, and they weather to a colour that blends in well with the natural landscape. You can also speed the weathering process by applying a unique treatment to them. Something called Eco Wood Treatment is a powder that you mix with water. Spray, roll or slosh on the tea-like liquid and it turns the wood a nice grey-brown colour beginning in a few hours. The effect reaches full results in about a month. I use it all the time on my own projects.
WHAT TO DO ABOUT DRINKING WATEROn-site access to drinking water is essential for any bug out basecamp location. Don’t invest in building your basecamp
where you need to bring water in from outside. That would be a huge mistake. Also, since water is so vital, don’t rely completely on an electric pump, generator,
solar set up or other energy-intensive, technology-dependent system for delivering water to you. You can install these systems in your basecamp, but make sure you have a very low tech “plan B” for getting water.
A hand pump is an excellent choice for bringing water up from a well, but if the level of water in your well is more than 20 feet below the surface, you’ll need what’s called a deep well hand pump. Water can’t be drawn upwards more than about 22 vertical feet, so deep well pumps have a pumping chamber down below, submerged in the well water itself. When you work the handle of these pump, you’re actually working a rod up and down inside the feed pipe. This rod moves a piston inside a pumping chamber down below, causing water to be pushed upwards and out the spout of the pump.
CHOOSE YOUR NEIGHBORS WELL
If everyone in the world could be counted upon to act kindly, selflessly, calmly and wisely during a crisis, then a societal breakdown would hold little danger. Lots of inconvenience perhaps, but little danger. We’d all work together, use resources carefully, think of the other guy ahead of ourselves, and sit tight while we rebuild our world. The problem is that not many people have the heart to live like this. Natural humanity is too selfish. It takes transformed people to live out love when the going gets tough, and that’s a rare thing. To the extent that you can, choose your neighbors well. Align yourself with people who know that there’s more to life than meets the eye. Partner with those uncommon folks who know and live the idea that life is not all about them. Do this and you might just find that when SHTF, it’s the best experience of your life.
“Today’s world does not encouragemeaningful thought. Quite the opposite.
We’re encouraged to fritter our time away with distractions. Most of the world does
this at its own peril.”
A LEGACY OF PREPARATION
While it’s obvious that building a bug out basecamp is all about protection and security, there may be another benefit, too. If you have kids in your life, building a basecamp will show them how much you value the “be prepared” mindset, and what this looks like in the real world. What better way to pass on your cherished values to the next generation. And in a world where so many young people are incompetent, spaced-out smartphone addicts, your kids will gain experience building, planning and learning big-time from the basecamp project.
BUG OUT BASECAMP ON WHEELSOne of the main things about survival preparation is that you can’t fully envision what will happen ahead of time. The details of societal collapse can never be predicted with any precision because there are too many variables. That’s where flexibility can be a lifesaver. One flexible approach is the rolling bug out basecamp. Imagine a travel trailer outfitted for post-SHTF camping. That’s a bug out basecamp trailer. Is it a good idea? Maybe, but like I said, precise scenarios are impossible to pinpoint. It makes sense in regions where road access is likely to stay open, and if you equip your rig with lots of on-board fuel storage. The mobile basecamp also makes sense in rural areas with logging roads. The ability to move around in concealed country is where the mobile option makes sense.

11
PREPPER PROJECTS
Structure#2: Septic TankSAFE ROOM
12 to 18 inchesof soil on top of tank
fiberglass manhole cover
1500 to 2000 gal.concrete holding
tanks
safe storageand protection
zone
vertical concreteescape tunnel
horizontal concreteescape tunnel
geogrid every16 inches to stabilizesoil if angled greater
than10% from horizontal
masonryretaining wall
two layers self-stickingroof membrane underneath fill
6-inch perforateddrainage tile
3/4-inch crushedstone base, 18 to
24 inches thick
root cellarstorage area
door between sections
bullet-resistantoutswing door
drain intocrushed stone
Constructing the Bug Out FortressLike I explained before, every complete bug out basecamp needs to be able to operate in two different modes: every day living mode and siege mode. The bug out fortress is the thing that will protect you when you need to kick into siege mode, when trouble comes looking for you. But the bug out fortress is also more than that. Besides being an installation capable of protecting you and your family in times of direct attack, it’s also a place to store essential supplies and gear during other times. Drinking water, food, firearms and tools are all essential to your survival. If you do come under immediate threat, your hidden bug out fortress offers physical protection in a concealed space. Ideally the fortress should be located so you enjoy a tactical position from which to defend intruders looking to steal from or destroy your basecamp cabin.
The plans show a concept and details for building an underground bug out fortress. Why go underground? Two reasons. First, it’s the best way to create a long-term food storage system (which every bug out basecamp needs). And underground location also offers protection and concealment like nothing else can.
12
PREPPER PROJECTS
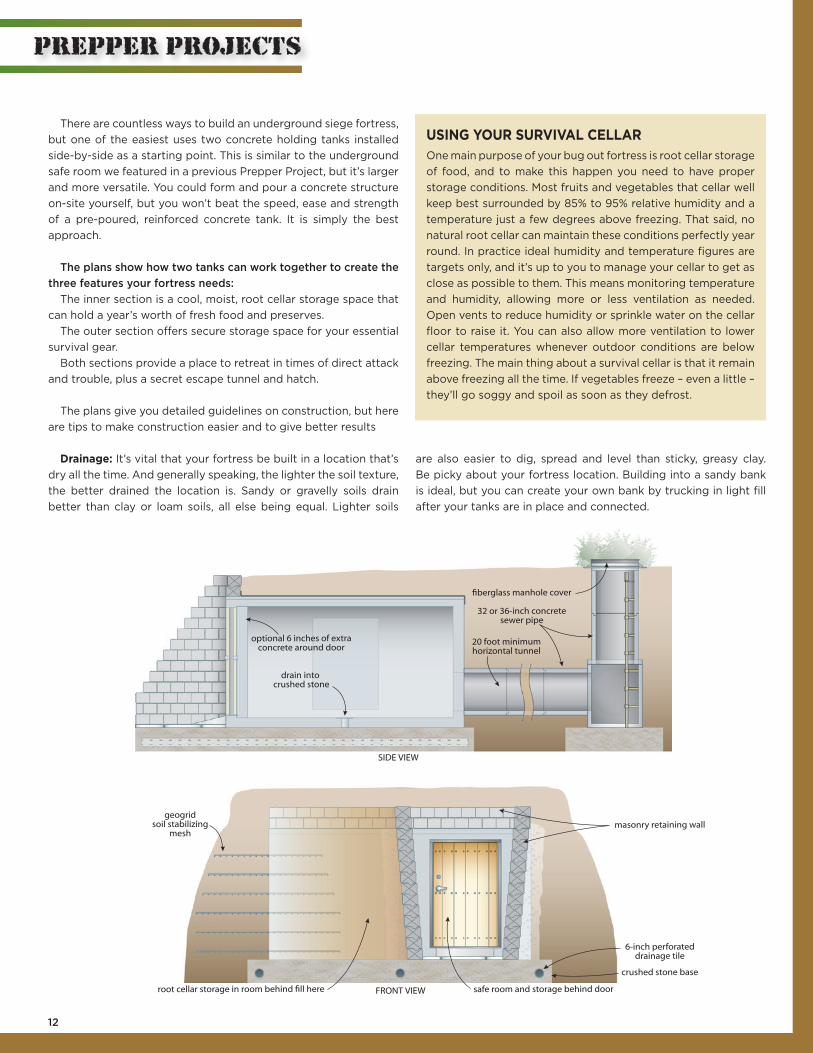
There are countless ways to build an underground siege fortress, but one of the easiest uses two concrete holding tanks installed side-by-side as a starting point. This is similar to the underground safe room we featured in a previous Prepper Project, but it’s larger and more versatile. You could form and pour a concrete structure on-site yourself, but you won’t beat the speed, ease and strength of a pre-poured, reinforced concrete tank. It is simply the best approach.
The plans show how two tanks can work together to create the three features your fortress needs:
The inner section is a cool, moist, root cellar storage space that can hold a year’s worth of fresh food and preserves.
The outer section offers secure storage space for your essential survival gear.
Both sections provide a place to retreat in times of direct attack and trouble, plus a secret escape tunnel and hatch.
The plans give you detailed guidelines on construction, but here are tips to make construction easier and to give better results
Drainage: It’s vital that your fortress be built in a location that’s dry all the time. And generally speaking, the lighter the soil texture, the better drained the location is. Sandy or gravelly soils drain better than clay or loam soils, all else being equal. Lighter soils
are also easier to dig, spread and level than sticky, greasy clay. Be picky about your fortress location. Building into a sandy bank is ideal, but you can create your own bank by trucking in light fill after your tanks are in place and connected.
USING YOUR SURVIVAL CELLAROne main purpose of your bug out fortress is root cellar storage of food, and to make this happen you need to have proper storage conditions. Most fruits and vegetables that cellar well keep best surrounded by 85% to 95% relative humidity and a temperature just a few degrees above freezing. That said, no natural root cellar can maintain these conditions perfectly year round. In practice ideal humidity and temperature figures are targets only, and it’s up to you to manage your cellar to get as close as possible to them. This means monitoring temperature and humidity, allowing more or less ventilation as needed. Open vents to reduce humidity or sprinkle water on the cellar floor to raise it. You can also allow more ventilation to lower cellar temperatures whenever outdoor conditions are below freezing. The main thing about a survival cellar is that it remain above freezing all the time. If vegetables freeze – even a little – they’ll go soggy and spoil as soon as they defrost.
fiberglass manhole cover
32 or 36-inch concretesewer pipe
20 foot minimumhorizontal tunnel
SIDE VIEW
FRONT VIEW
optional 6 inches of extraconcrete around door
drain into crushed stone
geogridsoil stabilizing
mesh
root cellar storage in room behind fill here safe room and storage behind door
6-inch perforateddrainage tile
masonry retaining wall
crushed stone base
13
PREPPER PROJECTS
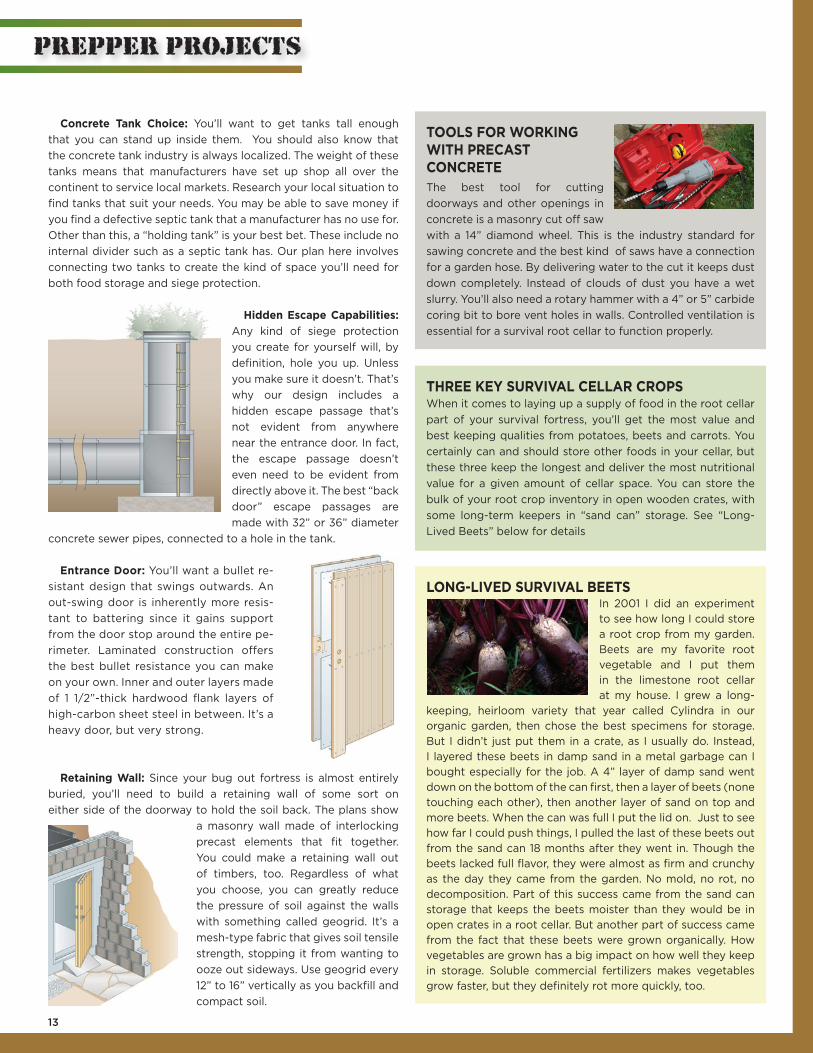
Concrete Tank Choice: You’ll want to get tanks tall enough that you can stand up inside them. You should also know that the concrete tank industry is always localized. The weight of these tanks means that manufacturers have set up shop all over the continent to service local markets. Research your local situation to find tanks that suit your needs. You may be able to save money if you find a defective septic tank that a manufacturer has no use for. Other than this, a “holding tank” is your best bet. These include no internal divider such as a septic tank has. Our plan here involves connecting two tanks to create the kind of space you’ll need for both food storage and siege protection.
Hidden Escape Capabilities: Any kind of siege protection you create for yourself will, by definition, hole you up. Unless you make sure it doesn’t. That’s why our design includes a hidden escape passage that’s not evident from anywhere near the entrance door. In fact, the escape passage doesn’t even need to be evident from directly above it. The best “back door” escape passages are made with 32” or 36” diameter
concrete sewer pipes, connected to a hole in the tank.
Entrance Door: You’ll want a bullet re-sistant design that swings outwards. An out-swing door is inherently more resis-tant to battering since it gains support from the door stop around the entire pe-rimeter. Laminated construction offers the best bullet resistance you can make on your own. Inner and outer layers made of 1 1/2”-thick hardwood flank layers of high-carbon sheet steel in between. It’s a heavy door, but very strong.
Retaining Wall: Since your bug out fortress is almost entirely buried, you’ll need to build a retaining wall of some sort on either side of the doorway to hold the soil back. The plans show
a masonry wall made of interlocking precast elements that fit together. You could make a retaining wall out of timbers, too. Regardless of what you choose, you can greatly reduce the pressure of soil against the walls with something called geogrid. It’s a mesh-type fabric that gives soil tensile strength, stopping it from wanting to ooze out sideways. Use geogrid every 12” to 16” vertically as you backfill and compact soil.
TOOLS FOR WORKING WITH PRECAST CONCRETEThe best tool for cutting doorways and other openings in concrete is a masonry cut off saw with a 14” diamond wheel. This is the industry standard for sawing concrete and the best kind of saws have a connection for a garden hose. By delivering water to the cut it keeps dust down completely. Instead of clouds of dust you have a wet slurry. You’ll also need a rotary hammer with a 4” or 5” carbide coring bit to bore vent holes in walls. Controlled ventilation is essential for a survival root cellar to function properly.
THREE KEY SURVIVAL CELLAR CROPSWhen it comes to laying up a supply of food in the root cellar part of your survival fortress, you’ll get the most value and best keeping qualities from potatoes, beets and carrots. You certainly can and should store other foods in your cellar, but these three keep the longest and deliver the most nutritional value for a given amount of cellar space. You can store the bulk of your root crop inventory in open wooden crates, with some long-term keepers in “sand can” storage. See “Long-Lived Beets” below for details
LONG-LIVED SURVIVAL BEETSIn 2001 I did an experiment to see how long I could store a root crop from my garden. Beets are my favorite root vegetable and I put them in the limestone root cellar at my house. I grew a long-
keeping, heirloom variety that year called Cylindra in our organic garden, then chose the best specimens for storage. But I didn’t just put them in a crate, as I usually do. Instead, I layered these beets in damp sand in a metal garbage can I bought especially for the job. A 4” layer of damp sand went down on the bottom of the can first, then a layer of beets (none touching each other), then another layer of sand on top and more beets. When the can was full I put the lid on. Just to see how far I could push things, I pulled the last of these beets out from the sand can 18 months after they went in. Though the beets lacked full flavor, they were almost as firm and crunchy as the day they came from the garden. No mold, no rot, no decomposition. Part of this success came from the sand can storage that keeps the beets moister than they would be in open crates in a root cellar. But another part of success came from the fact that these beets were grown organically. How vegetables are grown has a big impact on how well they keep in storage. Soluble commercial fertilizers makes vegetables grow faster, but they definitely rot more quickly, too.

14
PREPPER PROJECTS
Bug Out Basecamp Energy Systems
The fact of the matter is, the amount of energy we need to live comfortably is far less than we consume now. Far less and what we need can be obtained from far simpler sources than are common for most of us today. So what are the essential energy needs for a bug out basecamp where you might spent the next year or more living on your own? It comes down to three things: heat (to keep you warm and to cook); light (for reading and extending work
hours past daylight); and small amounts of electricity (to power simple tools and communication equipment). We’ve covered several energy topics in previous Prepper Projects, including photovoltaics, ethanol production and solar water heating. What we haven’t covered yet are traditional, low-tech options for meeting basic energy needs. Don’t dismiss the old ways. After all, they were developed at a time when things were technologically very much like today’s version of a collapsed society.
So what are the simplest options for getting the three basic forms of energy in a survival situation? And what about if you’re not a techno-geek capable of wiring up your own systems? Do what they did before there were such things as techno-geeks. Use a woodstove for heat and simple fuels for light. And as a concession to modern tastes and tools, use some of that simple fuel for a little electricity generation, too.
The main thing to understand about energy is that the fewer conversion steps involved, the more efficient the situation is. For instance, if you can burn wood directly for heat, you’re converting the chemical energy stored in the wood directly into the thing that you want – namely, heat. One conversion step, minimal energy losses.
Same goes for lighting. If you’ve got propane or naphtha mantle lamps in your basecamp fed from a large supply, they’ll give you a nice, white light in a single direct conversion step. Nothing to burn out, short out or fail And if it also happens to be cold enough outside to need supplemental heat in your cabin, then any “wasted” heat energy from the lamps is put to good use keeping you warm. Conversion is virtually 100% efficient.
But isn’t sustainable production of energy with solar or wind better than any kind of fuel supply because sustainable sources are renewable and unlimited? That’s true, but there’s a catch. A couple of catches, actually. First, it costs a lot
FIREARMS FOR BUGGING OUT
There are countless strong opinions about what type of firearm makes sense as a bug out gun, and countless reasons for holding these opinions. One option for a packable rifle in a bug out kit is the Browning’s SA-22 rimfire .22. This model has been in continuous production from 1914 to the present, and this beautiful little semi-auto rifle certainly has a long track record of reliability. This gun is in my own cabinet and it’s a gem. Tool-free break-down of the barrel from the receiver means that this 5 1/4 pound model comes down to an overall length of less than 20”, making it easy to store and carry. Not great for self defense, but an excellent option for small game subsistence hunting.
The .223 Remington cartridge is a popular choice with preppers, but it does have one drawback. There’s no such thing as a mild and quiet .223 load. And sometimes you don’t want to attract attention to yourself with a great big noise when something less obvious does the job. This is where ballistic versatility comes in.
Some of the most ballistically versatile firearms in the world are chambered for the .357 magnum cartridge. That’s because many models of these guns can also shoot the much milder .38 Special ammunition. You’ll find .38 Special offers quiet, sub-sonic performance that’s more than enough to take small game humanely. Firearms chambered for .38 Special also usually handle the beefiest .357 magnum loads as well. Fired from the same gun, the .357 magnum delivers more than 8x the power of a 22 LR – hefty enough for medium-sized game and serious self defense. And revolvers aren’t the only firearms chambered to accept .38 Special and .357 Magnum cartridges. The Ruger 77/357 is a lightweight, bolt action, stainless steel rifle with a polymer stock that feeds and fires both .38 Special and .357 magnum cartridges with equal ease. Being a rifle, the 77/357 squeezes significantly more energy and accuracy from the same cartridges fired from a handgun. You’ll get 400 to 500 feet per second greater velocity from an 18” rifle barrel than a 5” handgun barrel. At 35 1/2” overall length, the Ruger 77/357 is easy to carry. The toughness, versatility and ability to use one of the most common types of ammunition in the world makes this gun one of the best and most overlooked bug out rifles of all time.

15
PREPPER PROJECTS
Steve Maxwell and his family live on a 90 acre rural island homestead in Canada. For nearly 30 years he’s taught people how to be more skilled, self-reliant and capable. Connect with Steve online at BaileyLineRoad.com.
more per kilowatt-hour to set yourself up with alternative energy technologies than it does the older, simpler technologies like a woodstove and gas lamps. Modern, sustainable technologies are also more technically complicated than older heating and lighting systems. This makes them more dependent on outside parts and expertise that won’t necessarily be available after the SHTF. The best set-up is a combination of both old and new energy technologies. Consider a woodstove for instance.
The right kind of woodstove is a great way to meet the energy needs of your basecamp if there’s any kind of forest nearby. You’ll never find a more powerful, efficient, reliable method for heating space, for cooking food and for warming water. These are reasons why the woodstoves in general – and kitchen cookstoves
in particular – were always the center of the homestead years ago, long before there was a grid or even a hardware store nearby stocked with replacement parts. The same solid reasons that made the woodstove ideal back in the day, make it ideal today for a bug out basecamp today.
Most people will never build a bug out basecamp because they hope too much. Hope can be a dangerous thing sometimes. It convinces you that all will be well, even when warning signs say
trouble is coming. Even a casual observer has to admit that storm clouds are on the horizon for our world. The modern system is primed for financial collapse, social unrest, technological failure and a new “tolerance” that looks a lot like what we used to call hate. There’s even reason to believe that the coming “disasters” could be triggered intentionally, with the aim of softening up the population into accepting more control by Big Brother and more stripping away of constitutional rights. If it were possible to invest the time and money required to build a bug out basecamp after a serious SHTF event, hundreds of thousands of people would do it. Millions would want to. But disaster preparations don’t work like that. You’ve got to be ahead of the crowd, wiser, more committed and better equipped. Noah built the ark long before the first raindrop fell. It’s the same with bug out basecamp preparations.
BACKUP ENERGY SUPPLIESAlternative energy technologies such as solar and wind are great
as part of your bug out basecamp, but any reliable energy system
needs a back-up option, too. What else will you turn to if something
damages your photovoltaic
panels, or a bearing goes
out on your windmill, or
the inverter on your battery
bank craps out? Few things
are more useful in your
basecamp system than a
nice, big torpedo tank full of
propane. Not very cool in a
Greenpeace kind of way, but
very cool in a usefulness kind of way. Might as well stock up if
your setup allows the installation and filling of a big propane tank.
“CURING” VEGETABLES FOR SURVIVAL STORAGEIf you want maximum
storage life from your
survival produce, you’ll
need to let them air-
dry for a while before
storage. This process
is called curing and it
works by increasing the
toughness of the skin.
For instance, let onions and garlic to sit 2 to 4 weeks at room
temperature and humidity before stashing them away. They’ll
last much longer that way. Also, if you grow your own survival
onions for cellaring, they’ll never keep for more than a few
weeks unless you do something brutal before harvest and
curing. You need to step on them a month or so before harvest.
Breaking each and every green stalk under foot is essential
for shocking the bulbs into dormancy. Without this step your
onions will just keep on growing in the cellar, quickly using
up their internal stores of moisture, getting soft and green.
Potatoes also keep better when cured at 50oF to 60oF for a
couple of weeks before going into storage. Cure carrots like
this for a couple of days. Your winter squash will last longer
if they cure for a couple of weeks in a warm, dry spot. Don’t
cure any other vegetables before survival storage, since it will
reduce cellar life.“Being prepared isn’t just good for you,
it’s good for our world. The more people who
are ready to meet trouble, the fewer helpless
people there will be when trouble comes.”