build a hurdy gurdy bart brush - ning
TRANSCRIPT

Build A Hurdy
Two years ago, Bart Brush wrote an article about the Hurdy-Gurdy for Sing Out magazine. In it he explained the workings of the instrument, and has since received many letters requesting further information and plans. The information in t�is article and the drawings which accompany it will show you how to build a Hurdy-Gurdy. If you do not wish to work from these scale drawings, Bart has a detailed set of plans and drawings for a medieval-type Hurdy-Gurdy; they cost $5.00 per set. He also has detailed pictures and drawings for the Hurdy-Gurdy pictured in H. Bosch's painting, "Garden of Earthly Delights". These plans consist of drawings 18" x 24", in half scale, with all details and measurements, and instructions for step-by-step assembly. The price is $5.00 for each set of plans, ppd. Send to: Bart Brush, Box 546, Cooperstown, NY 13326.
This article will explain the basics of the construction of a Medieval type Hurdy-Gurdy, giving the essential measurements and procedures. It should be remembered that the Hurdy-Gurdy is not a hightly evolved instrument like the violin, for example, and therefore there is no one superior shape or form. In fact, even the important measurements of wheel diameter and string length which I have given, can be changed; these are just the particular ones I have found most satisfactory.
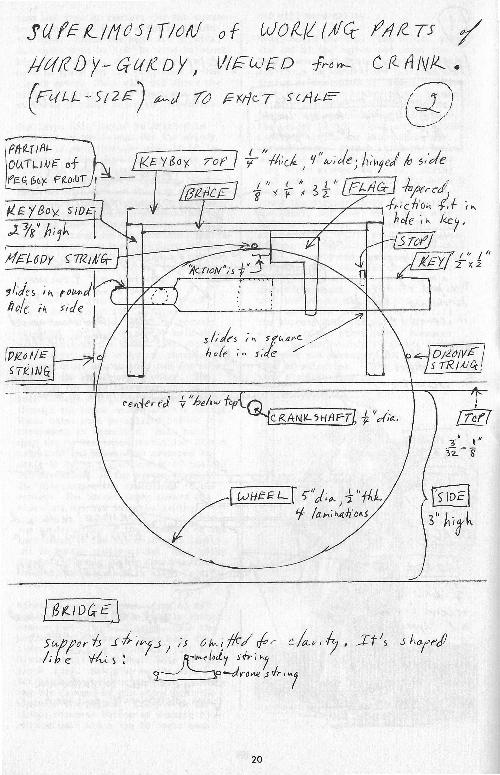
Drawing #2 shows that the 5" diameter wheel is centered¼" below the underside of the top. The size and position of thw wheel also determine where the three strings will lie. The keys, flags, and keybox sides and top must be placed so that they do not interfere with the strings, and this is shown in the superimposition. The flag and key assembly corresponds to a fret on a guitar, or a mechanical finger on the left hand of a violinist. The flag is a friction fit in a hole in the key, so that it can be swiveled to change the exact place at which it hits the melody string, and thus tune the note it makes. The key is ½" square and 5" long. In playing, the left hand sits on top of the keybox, and the fingers dangle over, working the keys on the end that sticks through the right hand side of the keybox, in drawing #2. A series of square holes are cut in this side, slightly
17
Gurdy by Bart Brush
larger than the½" square keys, thus allowing them to slide freely. As indicated, they need be pushed only¼" to contact the string. When playing, the instrument is tilted, and the keys fall back by gravity. The stop, shown in the drawing, allows the keys to fall back only far enough to keep from damping out the vibrating string. The left hand side of the keybox in drawing #2 has round holes, and this end of the key is whittled or turned down to fit. This is done because it is easier to make one end of the key round, than to make the holes in the keybox square. However, the other end of the key must be square to keep the key-flag assembly from flopping over. I usually use 12 diatonic keys, but the last two or three are very difficult to get a clear note with.
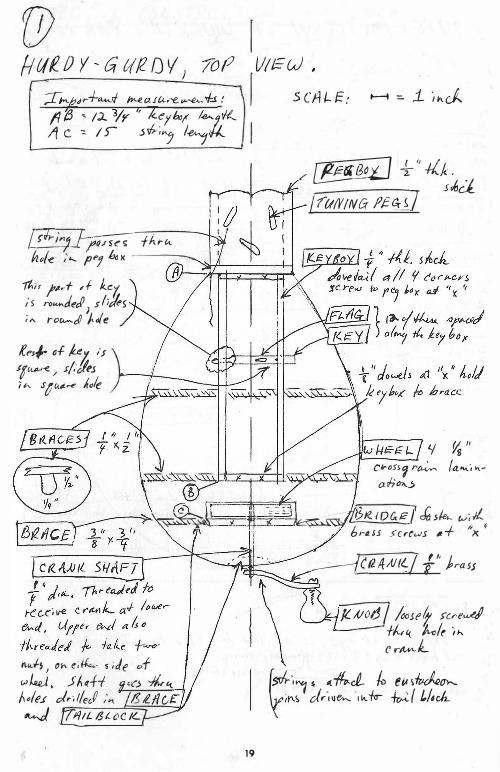
The positions of the keys and their holes in the keybox sides are laid out with the Rule of 18, which means that the distance fron any chromatic note to the next higher half-step is 1/lSth of the distance from that chromatic note to the bridge. In other words, if the note "C" on a given string is 18" long from fret to bridge, the next note "C#" is !/18th of that distance, or one inch closer to the bridge. Apply this to the Hurdy-Gurdy: If the string length is 15" from bridge to nut (the nut in this case being a hole through the pegbox front), then the distance to the first flag-key assembly is 15" multiplied by 1/18. Subtract this number from 15 and you have the new string length from the first key-flag assembly to the bridge. Divide this new string length, in turn, by 18; and you have the distance to the second keyflag assembly. Continue doing this 21 times, and you will have the locations of 21 chromatic notes.
However, you don't need a chromatic scale with all the sharps and flats, so eliminate the following note locations: 1, 3, 6, 8, 11, 13, 15, 18, and 20. This will leave you with 12 diatonic notes, just like the Appalachiandulcimer, allowing you to play in any of the 7 diatonic modes by changing the pitch relations of the drones and melody string. You should now take these 12 diatonic note locations and mark them accurately on both sides of the keybox,

then use them as centers for the square holes and round holes which will hold the keys. Since the keys are½" wide, and there.must be 1/8" between adjacent keys for support, this means you will have to space out the positions of the higher notes. This will not throw the pitch off, because the flags can be swiviled in their holes to compensate.
One large hole should be drilled in each end of the keybox for the melody string to pass through--make it ½" in diameter. Now, with all the holes in sides and ends drilled, dovetail the corners of the keybox together. The two ends will contact the top of the soundboard; but notice that the sides are raised abqut 1/8", so that they will not damp the vibrations. The keybox is fastened on the completed instrument with screws into the front of the pegbox, and 1/8" dowels through the top into the underlying brace, as shown in drawing #1.
The wheel is glued up from four oneeight inch laminations, crossgrained. It is turned on the lathe and crowned slightly. Drill a ¼" center hole while it is still on the lathe. The shaft is ¼" diameter steel or brass, threaded for the crank on one end, and for nuts to hold the wheel on the other. The bearings for this shaft consist of a hole through the tailblock, and a hole through the brace underneath the bridge. These holes must be drilled before the instrument is assembled. Make sure they are on the exact centerline of the tailblock and brace, and centered exactly ¼" below the underside of the top. The dimensions of the braces given in the diagram are the dimensions at the center. The braces taper toward the sides and are let into the linings.
The construction of the soundbox of the instrument is for the most part identical to guitar construction. See Irving Sloane's Classic Guitar Construction.
However, the sequence is slightly different.
After making the pegbox (drawing #3) and the back (use three equally spaced braces just like in Sloane), glue the pegbox onto the back. Next bend the sides and glue to tailblock, just as in Sloane (drill crank-shaft hole in tailblock, too). Now glue on the side tailblock assembly to the back, inserting the far end of the sides into the slots in the pegbox. Clamp with the clamps shown at bottom of drawing #3-you can make these for 10 cents each
18
and will need thirty.
Next, build the top. The braces under the end of the keybox and under the bridge must be located very accurately. All three top braces are let into the lining as described in Sloane. Notice that there is no lining at the corner of back and sides. Glue the top in place. Now attach keybox and bridge. The bridge is 3/8" thick at the bottom, tapering to top and sides where the strings rest. Attach it to the brace under the top with hide glue and two long brass screws, #4 or so. String with gut, using two violin A's and a D for the lower drone. Wrap cotton around the strings where they contact the wheel, and cover wheel with even coat of rosin for friction. The tips of the bridge should be filed down until the strings make contact with the wheel. You'll have to experiment with this--the more you file down the notches, the harder the string bears against the wheel. This means more volume, but wrecks the high notes, so you have to find a balance. If you file the notches down too much, fill them with epoxy and start over. Remember that the Hurdy-Gurdy is always somewhat strident and scratchy, and always in need of attention. This is why it became obsolete long ago.
H fJf_lJ Y, G v!/2 D V 1 10P
-;T;,,.j;,Jr--/-<4,_ef- Jr..eafU,'€..� ,/-J :
11ff .,_ 1::i.. 3/y ,, k':y&r 1.e,...7.i/1.._It c. --=- IS- 5./,-,'J I�#-..
jf;J;jnJ f-� ff..rt<. M.o/e ,'.__ pt'j hd x ·
-rk, t#�+ A lu7i,s ro""'JeeR J shJes ,;.. r-or,,,...J J.Je
f.es/,- �.f /Le /4 if
>f'�·-< / 4,!/eJ 7n. siru..e !t,,/e
1//f={_,J ,
SCA/....�: � :. j__ ihJ
� +"+i,j:�J_ [7?1/V!NG flt=t.:s/
if ½ ,,('t,-o,s'I r� /a-...� >i.�
o.rh'c,._!>
��1
" M i ')�/13tt..t0er1c7 dc.sle... w,IL · 6r-asJ 5crews �+ ''x f
nJ-� Oh e;{J..., � ;Jf of )
��i. J A d-1- 'l<'C> -/1,r<t A•ln ck, 1/eJ ;.,_ Is £.II cJ:: � /1/IL/JL()C/{._
19
� ( f2 If Al fl/ /'' J ra SJ
ft_ AJO/j / /oosff 5ae4 +1-,,« 'lvclr ,,.._CrfMA.L
{�-,.,,. I(�� k e,nlrxk(Jh..r;"'� dnue,,.._ ,k.-f:r -h,.,;..( U,ck..