build your own working model - mirax · building the hovercraft lay the airbox walls and airbox...
TRANSCRIPT
INST
RU
CT
ION
S
Build & Fly!
POWERED
Build your own working model
10+
2
WARNING! For children over 8 years of age only.
This kit is not suitable for children under 36 months due to small parts that could cause a choking hazard and long cord which may represent an entanglement hazard. Adult supervision is required at all times. Contains functional sharp points that could cause an injury.
Although the propeller on this kit is protected by a series of rings, care should be taken to avoid fingers or loose objects coming into contact with the propeller. This hazard may particularly affect younger children whose fingers may be small enough to pass through this protection. This product is not designed for use on water.
Important Safety Information!
3
This project is safe to do, but you must follow the instructions as specified.
Because children’s abilities vary
so much, even within age groups,
supervising adults should exercise
discretion as to whether the project is
suitable for children within their care.
The supervising adult should discuss
the warnings and safety information
with children before commencing the
activities, and should observe the
activities at all times. The activity in this
kit should only be completed with the
materials supplied/specified, and should
be used as instructed. Read and follow
these instructions, the safety rules
and any first aid information supplied.
Please retain all packaging material and
instructional material for future reference.
Keep small children and animals away
from this kit at all times. Carefully put all
equipment away when not in use, and
store out of the reach of children and
babies.
Do not mix different types of battery.
The supply terminals are not to be
short circuited.
Safety Advice for Supervising Adults
Batteries: Do not insert batteries
into the battery box until the model is
complete. Slide the switch to the ‘off’
position before inserting the batteries. 4 x
1.5V AAA batteries are required. Do not
use rechargeable batteries. Never try the
activity with different batteries to those
recommended. Never mix old and new
batteries. Do not attempt to recharge
non-rechargeable batteries. Remove and
carefully dispose of exhausted batteries
(recycle if possible). Batteries are to
be inserted with the correct polarity.
The spring in the battery compartment
corresponds to the negative (-) end of the
battery.
Mains Electricity: Never connect any
of the components in this kit to mains
electricity. Children should be instructed
about the dangers of mains electricity.
The Battery Box: Open and close the
battery box using a suitable screwdriver.
When connecting the battery box to
the motor, make certain that the plug
engages correctly with the socket. This
will ensure that the correct polarity is
maintained. Never cross or hold bare
wires when the batteries are connected
as this may cause injury, fire, or burning.
Never leave electrical circuits unattended,
even if they do not seem to be working.
Remove batteries from the battery box
when not in use.
4
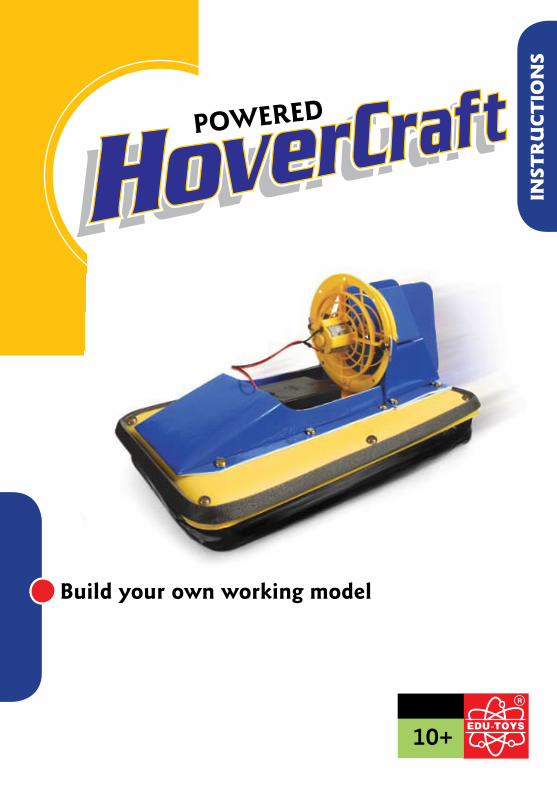
A Hovercraft is neither a ship, nor an aeroplane, nor a wheeled vehicle. It is completely unique, but it does combine many of the attributes of all these three forms of transport: It can carry heavy loads over land or water, and is airborne whilst in operation..
As the name suggests, Hovercraft ‘hover’
on a cushion of air, which is pumped into
the cavity under the hull by the powerful
fan. Because the Hovercraft has no physical
contact with the surface over which it is
travelling, it can not use conventional steering
systems, but needs to have aerodynamic
controls, rather like those of an aircraft.
Hovercraft are used where other vehicles
can not go. They can rescue people off
thin ice, they can explore rocky rivers that
other powered vehicles can’t visit, they can
act as ferries in places where the water is
too shallow for a normal boat, and they can
deliver troops and supplies right onto almost
any beach in the world. Hovercraft are also
used just to have fun. Your model hovercraft
is styled on a racing hovercraft. People all
over the world join “hoverclubs” and run
hovercraft races across land and water. You
can find information about a hovercraft club
near you on the internet.
Introduction
5
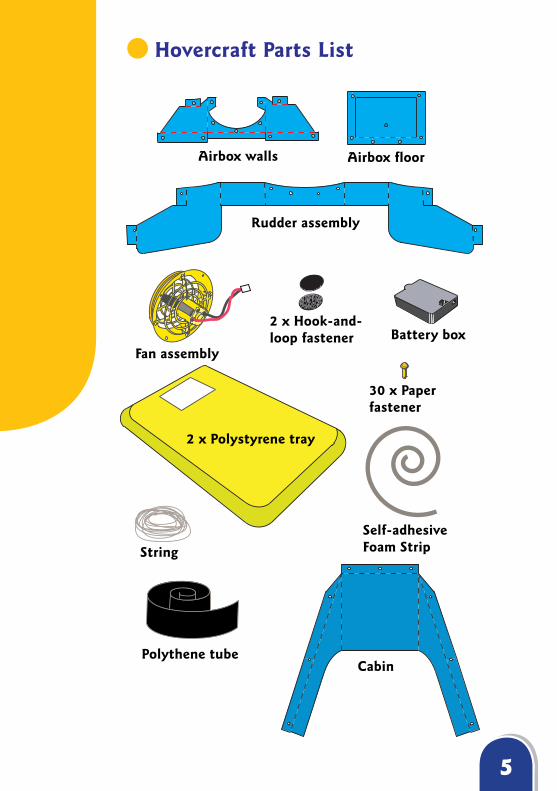
Hovercraft Parts List
Airbox walls Airbox floor
Rudder assembly
Battery boxFan assembly
2 x Hook-and-loop fastener
2 x Polystyrene tray
30 x Paper fastener
Self-adhesiveFoam StripString
CabinPolythene tube
6
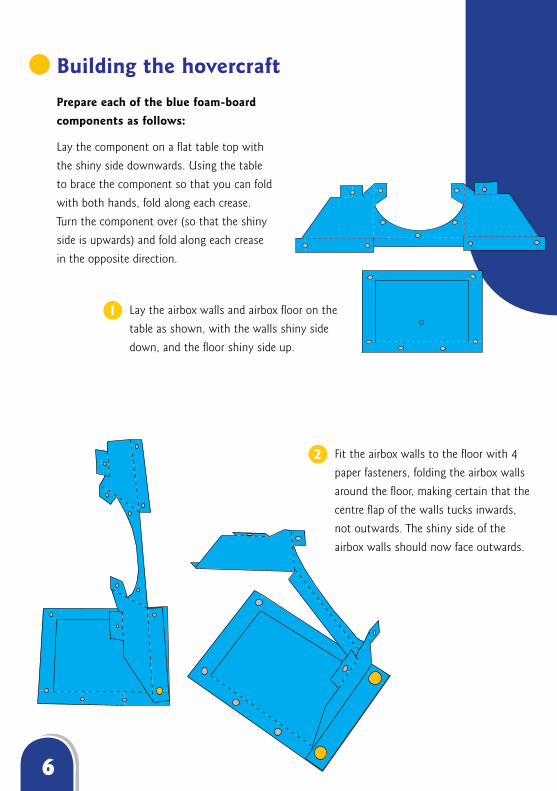
Prepare each of the blue foam-board components as follows:
Lay the component on a flat table top with
the shiny side downwards. Using the table
to brace the component so that you can fold
with both hands, fold along each crease.
Turn the component over (so that the shiny
side is upwards) and fold along each crease
in the opposite direction.
Building the hovercraft
Lay the airbox walls and airbox floor on the
table as shown, with the walls shiny side
down, and the floor shiny side up.
1
Fit the airbox walls to the floor with 4
paper fasteners, folding the airbox walls
around the floor, making certain that the
centre flap of the walls tucks inwards,
not outwards. The shiny side of the
airbox walls should now face outwards.
2
7
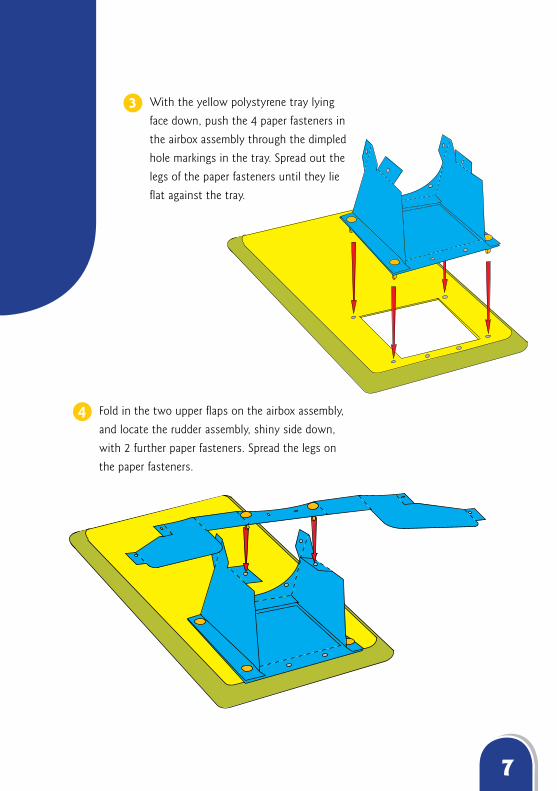
With the yellow polystyrene tray lying
face down, push the 4 paper fasteners in
the airbox assembly through the dimpled
hole markings in the tray. Spread out the
legs of the paper fasteners until they lie
flat against the tray.
3
Fold in the two upper flaps on the airbox assembly,
and locate the rudder assembly, shiny side down,
with 2 further paper fasteners. Spread the legs on
the paper fasteners.
4
8
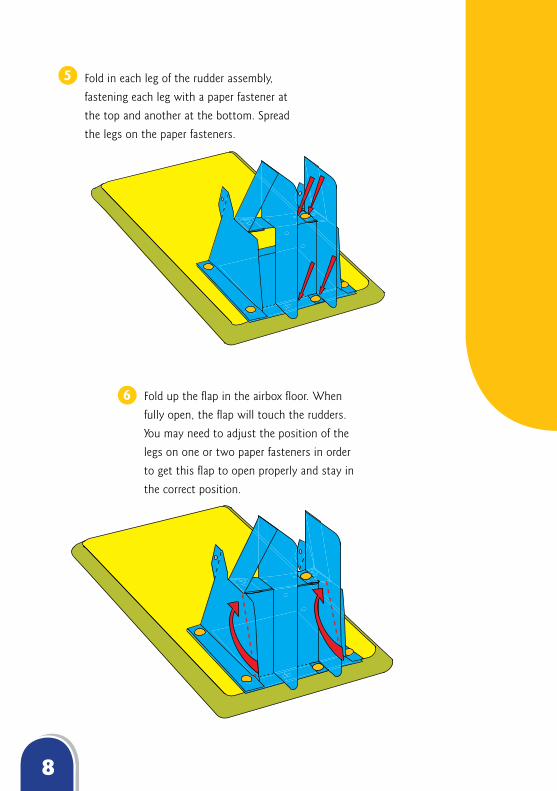
Fold up the flap in the airbox floor. When
fully open, the flap will touch the rudders.
You may need to adjust the position of the
legs on one or two paper fasteners in order
to get this flap to open properly and stay in
the correct position.
6
5 Fold in each leg of the rudder assembly,
fastening each leg with a paper fastener at
the top and another at the bottom. Spread
the legs on the paper fasteners.
9
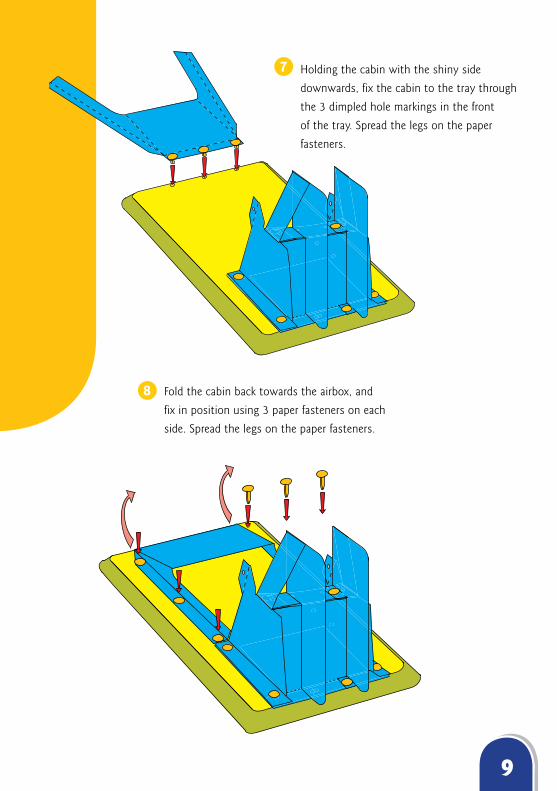
Fold the cabin back towards the airbox, and
fix in position using 3 paper fasteners on each
side. Spread the legs on the paper fasteners.
8
7 Holding the cabin with the shiny side
downwards, fix the cabin to the tray through
the 3 dimpled hole markings in the front
of the tray. Spread the legs on the paper
fasteners.
10
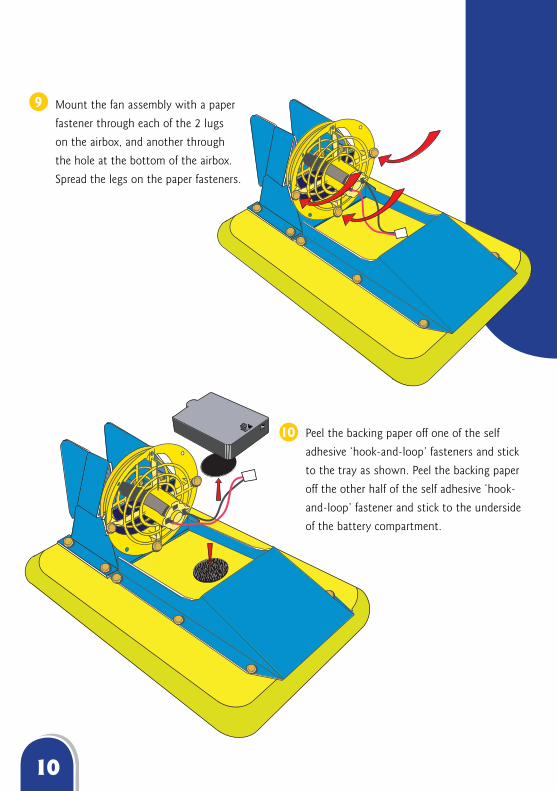
Peel the backing paper off one of the self
adhesive ‘hook-and-loop’ fasteners and stick
to the tray as shown. Peel the backing paper
off the other half of the self adhesive ‘hook-
and-loop’ fastener and stick to the underside
of the battery compartment.
10
9 Mount the fan assembly with a paper
fastener through each of the 2 lugs
on the airbox, and another through
the hole at the bottom of the airbox.
Spread the legs on the paper fasteners.
11
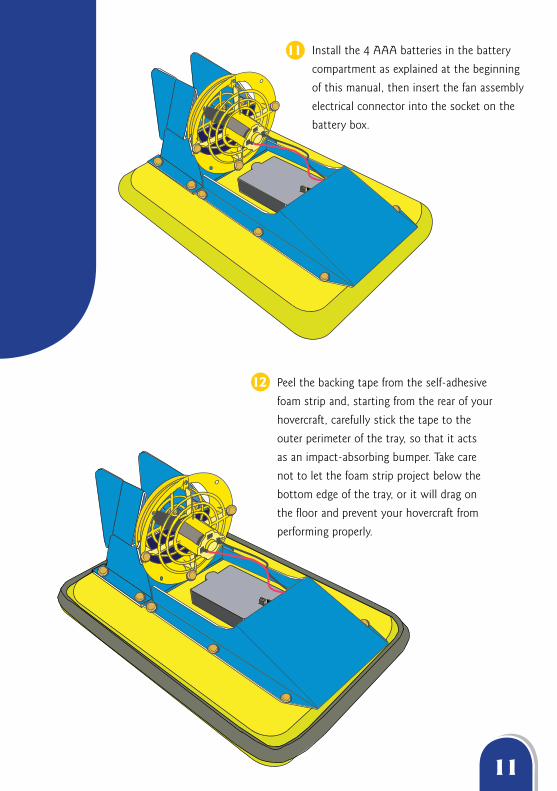
Install the 4 AAA batteries in the battery
compartment as explained at the beginning
of this manual, then insert the fan assembly
electrical connector into the socket on the
battery box.
11
Peel the backing tape from the self-adhesive
foam strip and, starting from the rear of your
hovercraft, carefully stick the tape to the
outer perimeter of the tray, so that it acts
as an impact-absorbing bumper. Take care
not to let the foam strip project below the
bottom edge of the tray, or it will drag on
the floor and prevent your hovercraft from
performing properly.
12
12
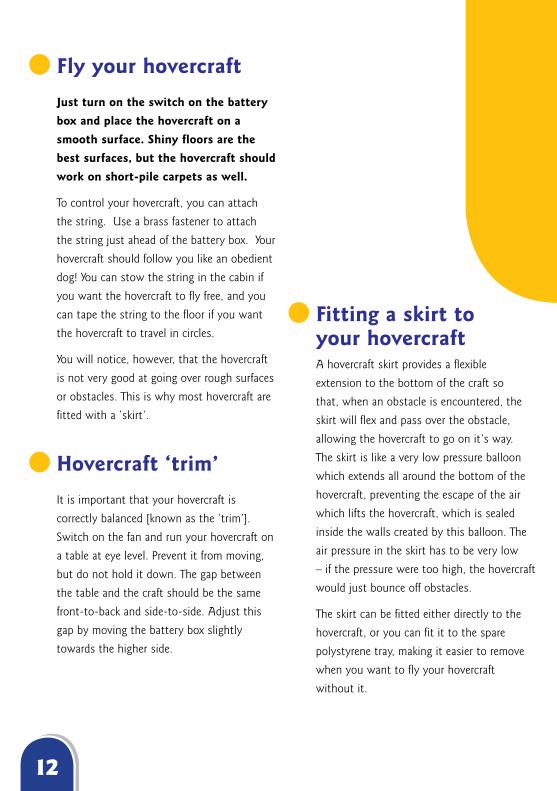
Just turn on the switch on the battery box and place the hovercraft on a smooth surface. Shiny floors are the best surfaces, but the hovercraft should work on short-pile carpets as well.
To control your hovercraft, you can attach
the string. Use a brass fastener to attach
the string just ahead of the battery box. Your
hovercraft should follow you like an obedient
dog! You can stow the string in the cabin if
you want the hovercraft to fly free, and you
can tape the string to the floor if you want
the hovercraft to travel in circles.
You will notice, however, that the hovercraft
is not very good at going over rough surfaces
or obstacles. This is why most hovercraft are
fitted with a ‘skirt’.
Fly your hovercraft
It is important that your hovercraft is
correctly balanced [known as the ‘trim’].
Switch on the fan and run your hovercraft on
a table at eye level. Prevent it from moving,
but do not hold it down. The gap between
the table and the craft should be the same
front-to-back and side-to-side. Adjust this
gap by moving the battery box slightly
towards the higher side.
Hovercraft ‘trim’
A hovercraft skirt provides a flexible
extension to the bottom of the craft so
that, when an obstacle is encountered, the
skirt will flex and pass over the obstacle,
allowing the hovercraft to go on it’s way.
The skirt is like a very low pressure balloon
which extends all around the bottom of the
hovercraft, preventing the escape of the air
which lifts the hovercraft, which is sealed
inside the walls created by this balloon. The
air pressure in the skirt has to be very low
– if the pressure were too high, the hovercraft
would just bounce off obstacles.
The skirt can be fitted either directly to the
hovercraft, or you can fit it to the spare
polystyrene tray, making it easier to remove
when you want to fly your hovercraft
without it.
Fitting a skirt to your hovercraft
13
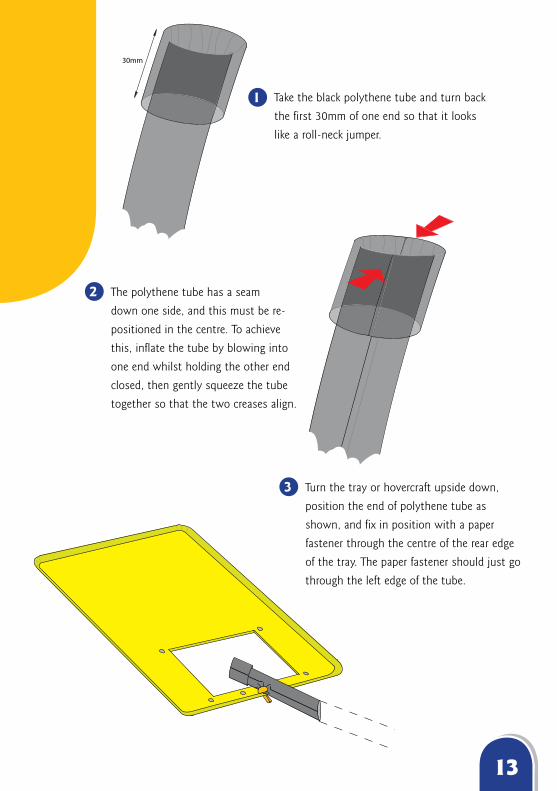
30mm
Take the black polythene tube and turn back
the first 30mm of one end so that it looks
like a roll-neck jumper.
1
The polythene tube has a seam
down one side, and this must be re-
positioned in the centre. To achieve
this, inflate the tube by blowing into
one end whilst holding the other end
closed, then gently squeeze the tube
together so that the two creases align.
2
A hovercraft skirt provides a flexible
extension to the bottom of the craft so
that, when an obstacle is encountered, the
skirt will flex and pass over the obstacle,
allowing the hovercraft to go on it’s way.
The skirt is like a very low pressure balloon
which extends all around the bottom of the
hovercraft, preventing the escape of the air
which lifts the hovercraft, which is sealed
inside the walls created by this balloon. The
air pressure in the skirt has to be very low
– if the pressure were too high, the hovercraft
would just bounce off obstacles.
The skirt can be fitted either directly to the
hovercraft, or you can fit it to the spare
polystyrene tray, making it easier to remove
when you want to fly your hovercraft
without it.
Fitting a skirt to your hovercraft
Turn the tray or hovercraft upside down,
position the end of polythene tube as
shown, and fix in position with a paper
fastener through the centre of the rear edge
of the tray. The paper fastener should just go
through the left edge of the tube.
3
14
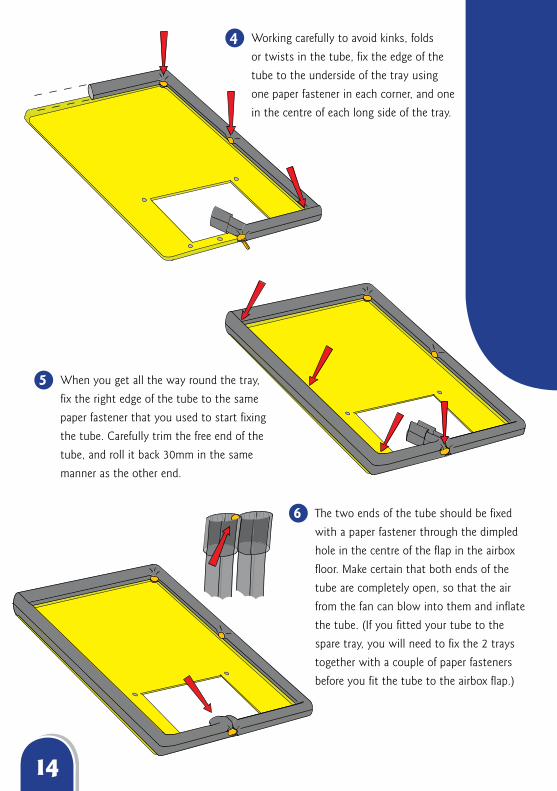
Working carefully to avoid kinks, folds
or twists in the tube, fix the edge of the
tube to the underside of the tray using
one paper fastener in each corner, and one
in the centre of each long side of the tray.
4
When you get all the way round the tray,
fix the right edge of the tube to the same
paper fastener that you used to start fixing
the tube. Carefully trim the free end of the
tube, and roll it back 30mm in the same
manner as the other end.
5
The two ends of the tube should be fixed
with a paper fastener through the dimpled
hole in the centre of the flap in the airbox
floor. Make certain that both ends of the
tube are completely open, so that the air
from the fan can blow into them and inflate
the tube. (If you fitted your tube to the
spare tray, you will need to fix the 2 trays
together with a couple of paper fasteners
before you fit the tube to the airbox flap.)
6
15
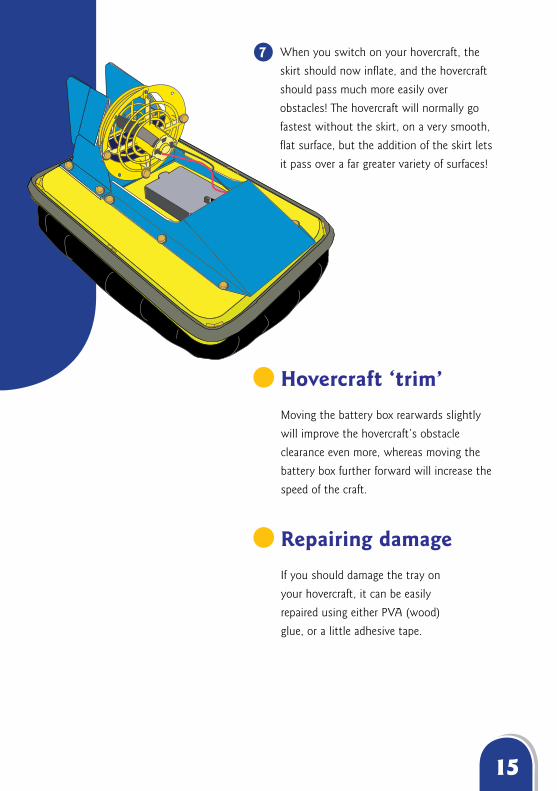
When you switch on your hovercraft, the
skirt should now inflate, and the hovercraft
should pass much more easily over
obstacles! The hovercraft will normally go
fastest without the skirt, on a very smooth,
flat surface, but the addition of the skirt lets
it pass over a far greater variety of surfaces!
7
Moving the battery box rearwards slightly
will improve the hovercraft’s obstacle
clearance even more, whereas moving the
battery box further forward will increase the
speed of the craft.
Hovercraft ‘trim’
If you should damage the tray on
your hovercraft, it can be easily
repaired using either PVA (wood)
glue, or a little adhesive tape.
Repairing damage

w
ww
.inte
rpla
yuk.
com
P38-EL258-81001000
Original design by Interplay UK Ltd.
www.interplayuk.com