builder erp
DESCRIPTION
Data regarding the National Building Museum of Washington DC. Has description of the various measures used up in the building that deems it as a green building. Also a through analysis of the spaces within.TRANSCRIPT
Thank you for selecting the National Building Museum (NBM) for your field trip. The information
found in this packet will help you prepare for your upcoming visit. Please be sure that all teachers
attending the field trip review the enclosed information.
Introduction to the National Building Museum
About the National Building Museum | 1
Design Education: How Students Learn at the National Building Museum | 2
Facts About the National Building Museum’s Historic Home | 3
Preparing for Your Visit
Preparing Your Students | 4
Map | 6
Directions | 6
Nametag Template | 7
Don’t Lose, Reuse Student Handout | 8
During Your Visit
Upon Arrival | 9
Lunches | 9
Visiting the Museum Shop | 9
Tips for Being a Good Museum Visitor | 9
Touring the Building and Exhibitions | 10
Reinforcing Your Visit
Post-Visit Lessons and Activities | 11
Provide Us with Feedback | 11
MUSEUM ORIENTATION & LOGISTICS

1
Introduction to the National Building Museum
About the National Building Museum
The National Building Museum advances the quality of the built environment by educating people about
its impact on their lives.
When most people think of a museum, they are likely to think of the things exhibited there: paintings,
moon rocks, totem poles, or other objects of artistic, scientific, or cultural value. The National Building
Museum has always offered visitors the chance to see many interesting objects, from drawings by
famous architects to a full‐scale, environmentally friendly house built in our own galleries. Indeed, the
care, interpretation, and thoughtful display of such artifacts are central to our mission.
The National Building Museum is, however, much more than a
repository of things, beautiful and intriguing though they may be. It
is above all a forum for the development, exploration, and exchange
of ideas. Created by an act of Congress in 1980, the National
Building Museum has become one of the world’s most prominent
and vital venues for informed, reasoned debate about the built
environment and its impact on people’s lives. Our exhibitions,
educational programs, and publications are well regarded not only
for their capacity to enlighten and entertain, but also as vehicles for
fostering lively discussions about a wide range of topics related to
development, architecture, construction and engineering, interior
design, landscape architecture, and urban planning.
The National Building Museum's impact is evidenced by the broad smiles of children taking part in our
innovative, hands‐on youth programs and the rave reviews our exhibitions routinely receive. Florida
Congresswoman Ileana Ros‐Lehtinen was so moved by the Museum that she wrote, in an unsolicited
letter, to congratulate us on our ability “to capture the essence of our nation’s rich history as well as the
promise of its bright future.”
The members, trustees, and staff of the National Building Museum share a belief that the world we
build is a reflection of the aspirations, achievements, and conflicts that shape our society. Furthermore,
because we believe that every American can play a part in the continual improvement of our built
environment, we strive not just to illuminate the past and present, but to give professionals and
laypeople alike the intellectual raw materials with which to construct the best possible future. We invite
you to join us in that ongoing and rewarding endeavor.
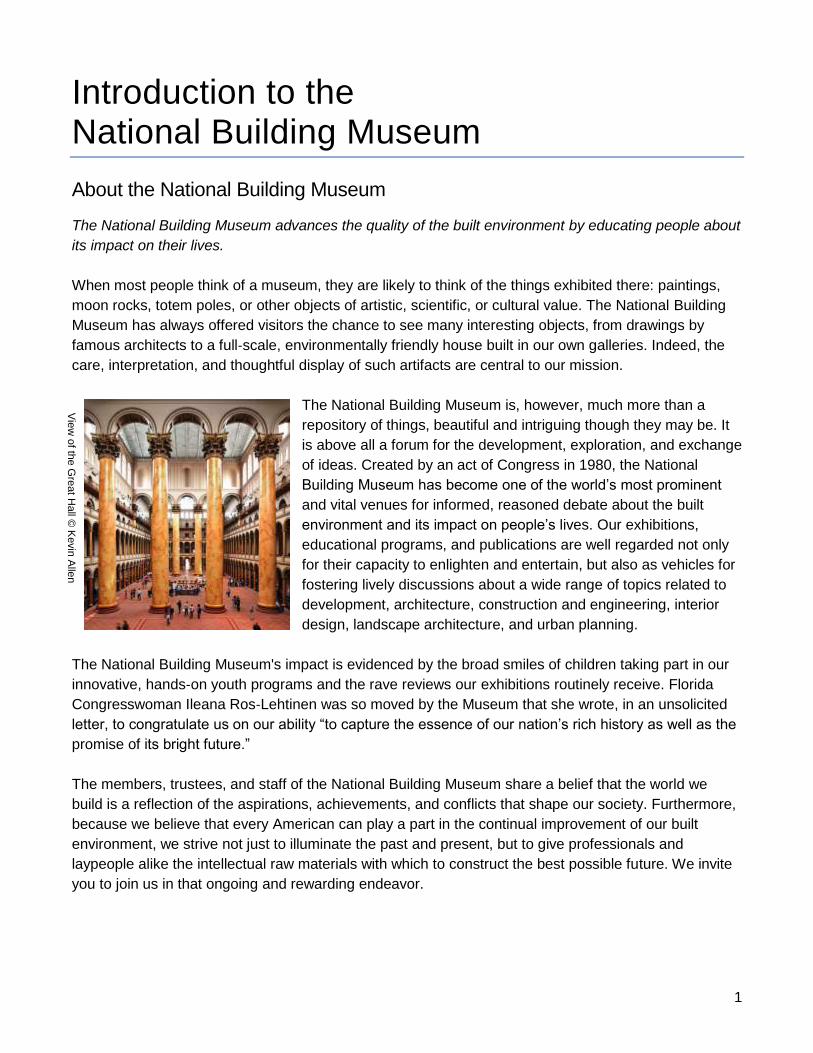
Vie
w o
f the G
reat H
all ©
Kevin
Alle
n
2
Design Education: How Students Learn at the National Building Museum
Youth education programs at the National Building Museum inspire students to examine the people,
processes, and materials that create buildings, places, and structures. The Museum programs are
created based on the ideas of design education. In design education, the design process is used as an
educational model that gives students a framework within which they can solve problems. The design
process asks young people to identify a problem or need, to imagine solutions, and to create, then
evaluate their design. Learning by doing is central to design education. After engaging in hands-on
activities that stimulate exploration of the built environment, students gain a fresh perspective on their
surroundings and begin to understand how design decisions can have an impact on the environment. What is Design?
Most people recognize a design as the aesthetic and functional details of a building or the layout of a
printed advertisement. But design is also an action, a creative process that does not necessarily entail
a visual component or even a tangible product. For example, a design can symbolize the organization
of a team of workers or represent a plan for navigating one’s way home during rush‐hour traffic. Design as a Process
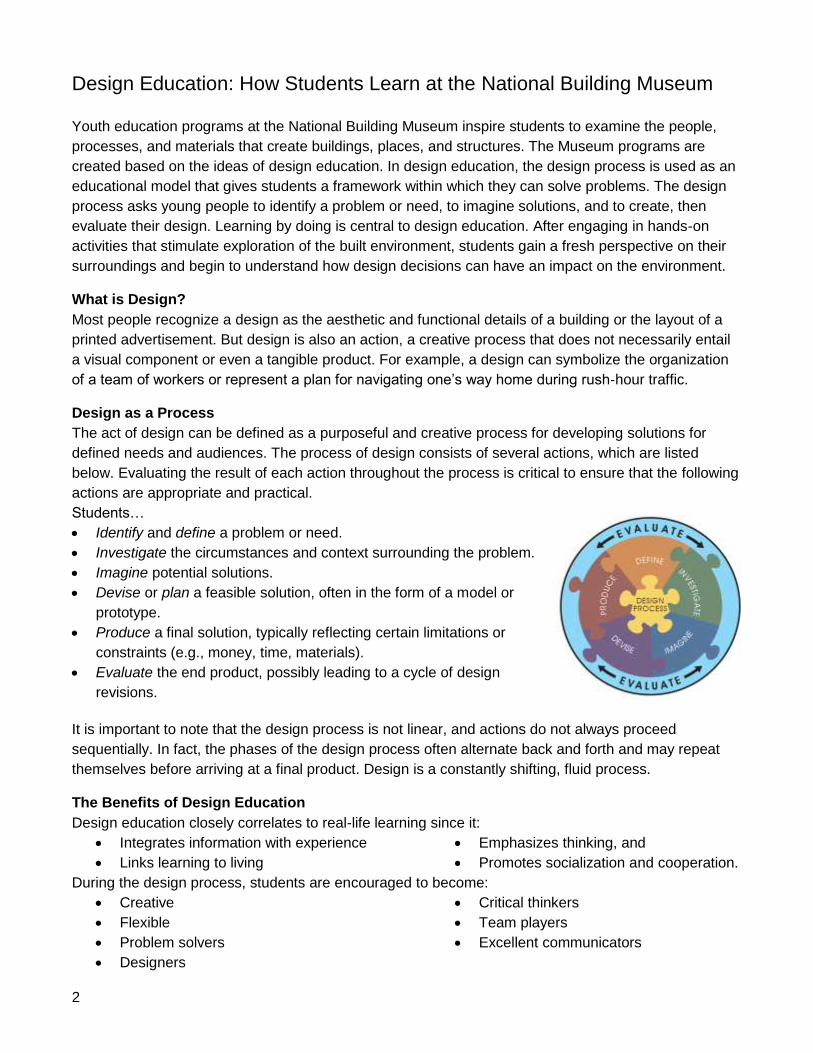
The act of design can be defined as a purposeful and creative process for developing solutions for
defined needs and audiences. The process of design consists of several actions, which are listed
below. Evaluating the result of each action throughout the process is critical to ensure that the following
actions are appropriate and practical.
Students…
Identify and define a problem or need.
Investigate the circumstances and context surrounding the problem.
Imagine potential solutions.
Devise or plan a feasible solution, often in the form of a model or
prototype.
Produce a final solution, typically reflecting certain limitations or
constraints (e.g., money, time, materials).
Evaluate the end product, possibly leading to a cycle of design
revisions.
It is important to note that the design process is not linear, and actions do not always proceed
sequentially. In fact, the phases of the design process often alternate back and forth and may repeat
themselves before arriving at a final product. Design is a constantly shifting, fluid process. The Benefits of Design Education
Design education closely correlates to real-life learning since it:
Integrates information with experience
Links learning to living
Emphasizes thinking, and
Promotes socialization and cooperation.
During the design process, students are encouraged to become:
Creative
Flexible
Problem solvers
Designers
Critical thinkers
Team players
Excellent communicators
3
Facts about the National Building Museum’s Historic Home 1. Who designed the National Building Museum?
Montgomery C. Meigs (1816-1892), Quartermaster General in charge of provisions during
the Civil War. He was a West Point-trained engineer. Meigs’ design was inspired by Italian
Renaissance architecture.
2. When was it built and how much did it cost? 1882-1887 and $886,614.04
3. What was the building used for before it was a museum?
Until 1926, it was occupied by the U.S. Pension Bureau, which provided pensions to
veterans disabled during wartime. The building was then later occupied by several other
government agencies before becoming the National Building Museum in 1980.
4. How big is it? On the exterior, 400 feet by 200 feet, 75 feet to cornice level
5. What is it made out of?
15,500,000 bricks with brick and terra cotta ornaments
6. How long is the frieze on the building’s exterior, and who designed it?
1,200 feet long, 3 feet high, made of terra cotta. Designed by Belgian-born sculptor Caspar
Buberl (1834-1899). Features a continuous parade of Union Civil War units.
7. What are some interesting facts about the Great Hall inside of the Museum?
The Great Hall is 316 feet by 116 feet (a little larger than a football field).
The Great Hall is 159 feet—approximately 15 stories—at its highest point (The Statue of
Liberty, without her base, could stand up straight if she were placed on top of the fountain.)
The Presidential seal has been in place since 1901—one of the few Presidential seals to be
permanently affixed to a building other than the White House.
Presidential inaugural balls, from Grover Cleveland’s in 1885 to Barack Obama’s in 2009,
have been held in the Great Hall.
8. What are the Corinthian columns made from and how tall are they?
They are among the tallest interior columns in the world—75 feet high, 8 feet in diameter,
and 25 feet in circumference. Each one is solid and built out of 70,000 bricks and covered
by plaster. The columns were originally painted in 1895 to resemble marble. The present
faux marble pattern was applied in 2000.
9. How many columns are part of the arcade and what are they made of?
On the first floor, there are 72 Doric-style columns (made out of terra cotta covered with
plaster) and on the second floor there are 72 Ionic-style columns (made of cast iron).
4
Preparing For Your Visit
Preparing Your Students
Arrange transportation and obtain permission slips.
Some of the programs have educator resource packets with pre‐ and post‐visit lessons. Use
these lessons to introduce concepts to your students before attending the museum program. The
appropriate educator resource packet can be downloaded from the Museum’s website:
http://go.nbm.org/educatorpackets. The more prepared your students are, the more they will get
out of their Museum program.
Review the map and directions to the National Building Museum (on page 6) and bring a copy
with you.
Contact the Museum’s school programs staff at 202.272.2448 or [email protected] if the
number of students in your group changes by five or more. If you need to cancel or reschedule
your program, you must do so at least three weeks in advance.
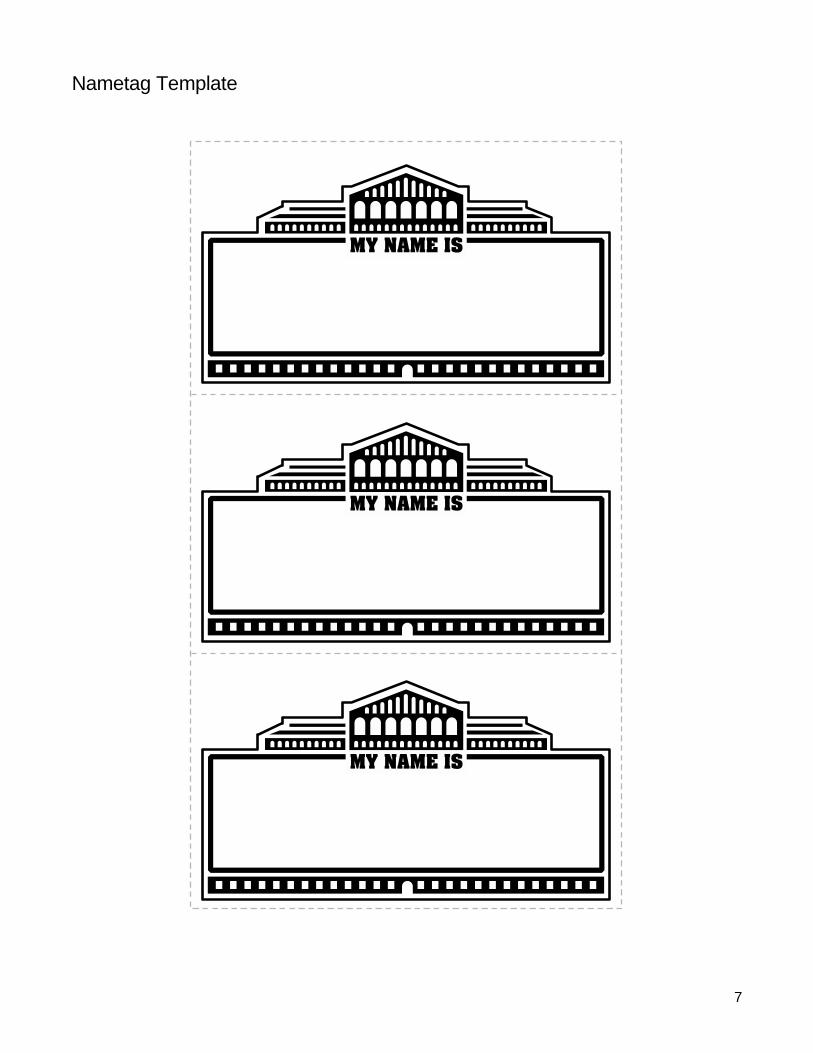
Make nametags—use the template on page 7 to make it a fun activity. This helps our teaching
staff work with your group.
If you are participating in a City by Design, Washington: Symbol & City, Green by Design, or My
House, My Home program, please send home the “Don’t Lose, Reuse” handout on page 8 so
students will collect the necessary program supplies.
A select number of school programs include a visit to one of the Museum's exhibitions. You are
welcome to visit the exhibitions (in small chaperone-led groups) at no additional cost before or
after your program. When you registered for your program, you indicated if and when you would
like to visit the exhibitions. Before visiting the exhibitions, orient your group to the content and
locations of the Museum's exhibitions. Many teachers like to create scavenger hunts or to give
students drawing or writing assignments while in the exhibitions. If you would like ideas for
exhibition activities, you are welcome to contact the School & Youth Groups team. More
information is available at http://go.nbm.org/schooltickets.
Divide the students in your class into even, compatible groups and select and assign a chaperone
(teacher or parent) to each group. Chaperones will accompany and assist each of the smaller
groups during the programs. See the table on the following page for the appropriate number of
chaperones and within-class groups for your visit. Please instruct chaperones that they are
expected to actively assist students and remain with the group at all times.
5
Chaperone Guidelines:
The Museum greatly values the time and support of chaperones. During the program, the Museum
asks chaperones to:
Keep their assigned student group together.
Listen carefully to the Museum Teacher’s instructions so that you may provide guidance to your
group.
Help keep students on task by providing them with encouragement and reminding them of the
Museum Teacher’s directions.
Ask the students if they need help. But rather than completing the task for them, provide
guidance or suggestions so they can complete the task on their own.
Remind students of appropriate behavior when necessary (listening to adults and classmates,
using indoor voices, being respectful to others).
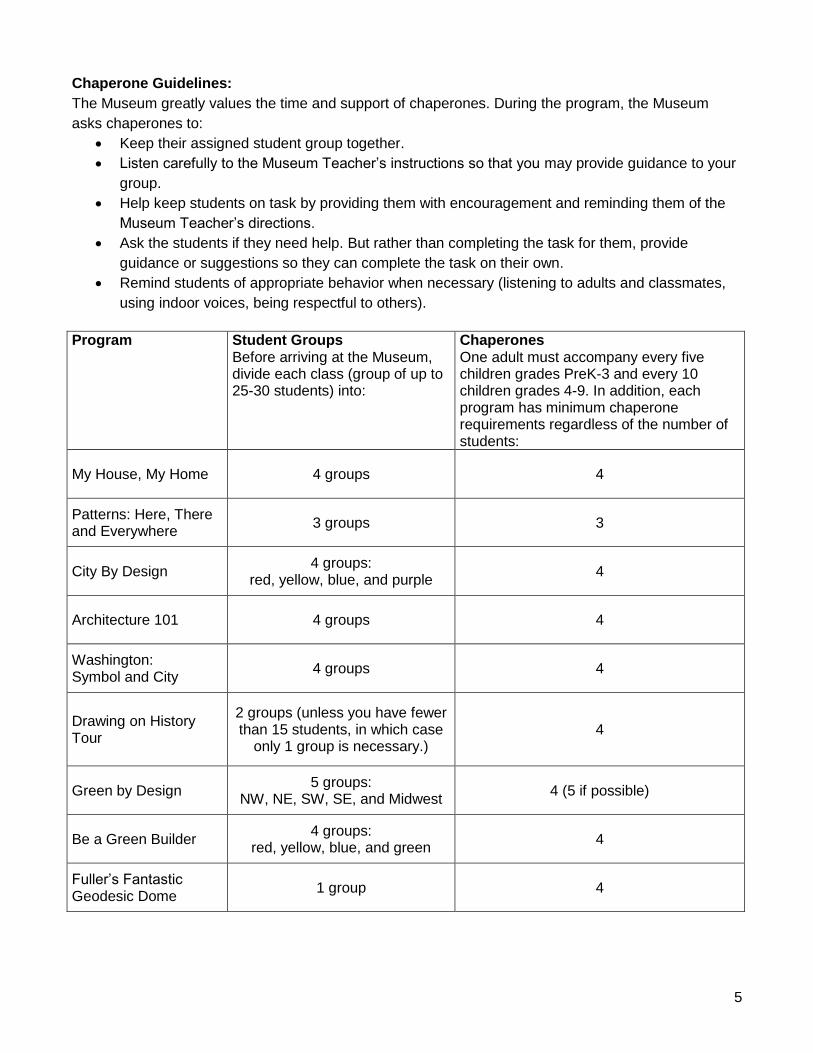
Program Student Groups Before arriving at the Museum, divide each class (group of up to 25-30 students) into:
Chaperones One adult must accompany every five children grades PreK-3 and every 10 children grades 4-9. In addition, each program has minimum chaperone requirements regardless of the number of students:
My House, My Home 4 groups 4
Patterns: Here, There and Everywhere
3 groups 3
City By Design 4 groups:
red, yellow, blue, and purple 4
Architecture 101 4 groups 4
Washington: Symbol and City
4 groups 4
Drawing on History Tour
2 groups (unless you have fewer than 15 students, in which case
only 1 group is necessary.) 4
Green by Design 5 groups:
NW, NE, SW, SE, and Midwest 4 (5 if possible)
Be a Green Builder 4 groups:
red, yellow, blue, and green 4
Fuller’s Fantastic Geodesic Dome
1 group 4
6
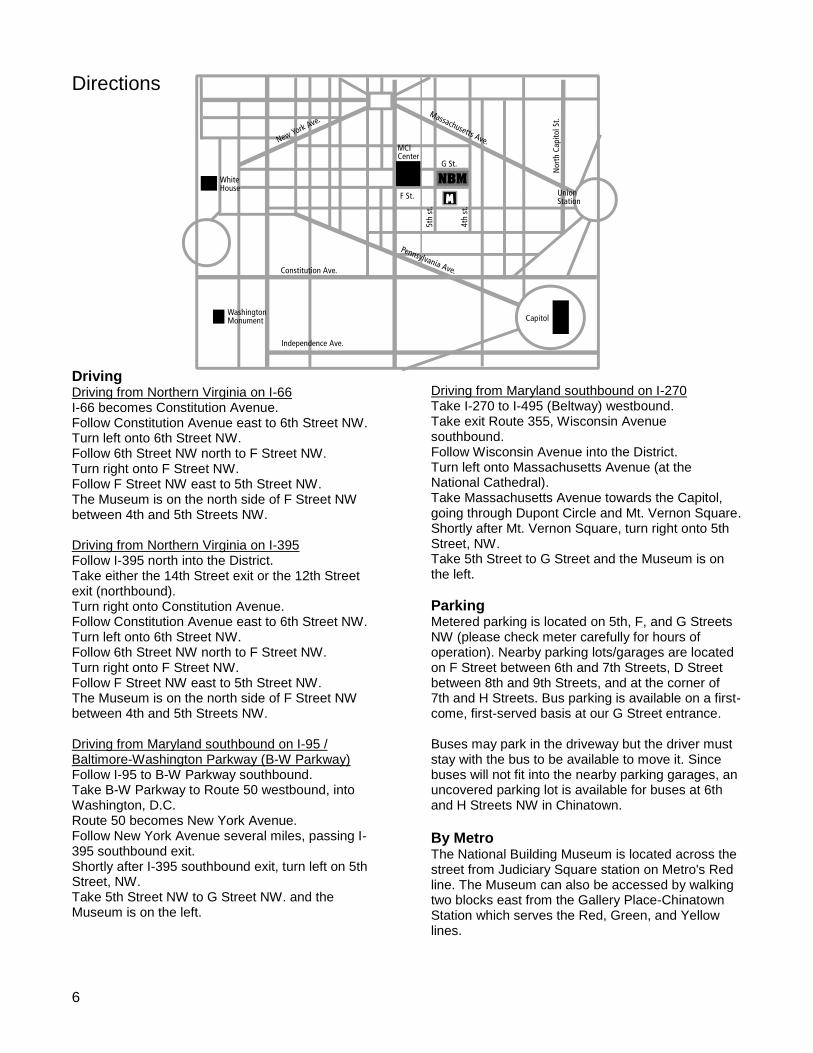
Directions
Driving Driving from Northern Virginia on I-66 I-66 becomes Constitution Avenue. Follow Constitution Avenue east to 6th Street NW. Turn left onto 6th Street NW. Follow 6th Street NW north to F Street NW. Turn right onto F Street NW. Follow F Street NW east to 5th Street NW. The Museum is on the north side of F Street NW between 4th and 5th Streets NW. Driving from Northern Virginia on I-395 Follow I-395 north into the District. Take either the 14th Street exit or the 12th Street exit (northbound). Turn right onto Constitution Avenue. Follow Constitution Avenue east to 6th Street NW. Turn left onto 6th Street NW. Follow 6th Street NW north to F Street NW. Turn right onto F Street NW. Follow F Street NW east to 5th Street NW. The Museum is on the north side of F Street NW between 4th and 5th Streets NW. Driving from Maryland southbound on I-95 / Baltimore-Washington Parkway (B-W Parkway) Follow I-95 to B-W Parkway southbound. Take B-W Parkway to Route 50 westbound, into Washington, D.C. Route 50 becomes New York Avenue. Follow New York Avenue several miles, passing I-395 southbound exit. Shortly after I-395 southbound exit, turn left on 5th Street, NW. Take 5th Street NW to G Street NW. and the Museum is on the left.
Driving from Maryland southbound on I-270 Take I-270 to I-495 (Beltway) westbound. Take exit Route 355, Wisconsin Avenue southbound. Follow Wisconsin Avenue into the District. Turn left onto Massachusetts Avenue (at the National Cathedral). Take Massachusetts Avenue towards the Capitol, going through Dupont Circle and Mt. Vernon Square. Shortly after Mt. Vernon Square, turn right onto 5th Street, NW. Take 5th Street to G Street and the Museum is on the left.
Parking Metered parking is located on 5th, F, and G Streets NW (please check meter carefully for hours of operation). Nearby parking lots/garages are located on F Street between 6th and 7th Streets, D Street between 8th and 9th Streets, and at the corner of 7th and H Streets. Bus parking is available on a first-come, first-served basis at our G Street entrance. Buses may park in the driveway but the driver must stay with the bus to be available to move it. Since buses will not fit into the nearby parking garages, an uncovered parking lot is available for buses at 6th and H Streets NW in Chinatown.
By Metro The National Building Museum is located across the street from Judiciary Square station on Metro's Red line. The Museum can also be accessed by walking two blocks east from the Gallery Place-Chinatown Station which serves the Red, Green, and Yellow lines.
7
Nametag Template
8
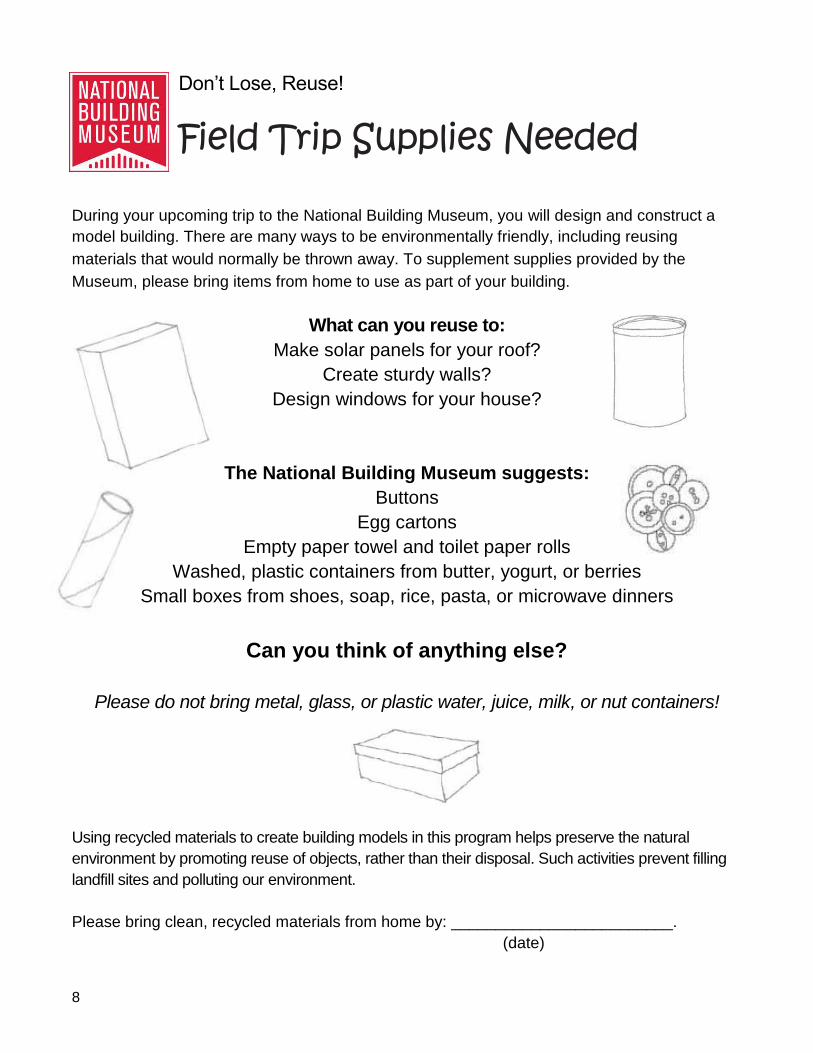
Don’t Lose, Reuse!
Field Trip Supplies Needed During your upcoming trip to the National Building Museum, you will design and construct a
model building. There are many ways to be environmentally friendly, including reusing
materials that would normally be thrown away. To supplement supplies provided by the
Museum, please bring items from home to use as part of your building.
What can you reuse to:
Make solar panels for your roof?
Create sturdy walls?
Design windows for your house?
The National Building Museum suggests:
Buttons
Egg cartons
Empty paper towel and toilet paper rolls
Washed, plastic containers from butter, yogurt, or berries
Small boxes from shoes, soap, rice, pasta, or microwave dinners
Can you think of anything else?
Please do not bring metal, glass, or plastic water, juice, milk, or nut containers!
Using recycled materials to create building models in this program helps preserve the natural
environment by promoting reuse of objects, rather than their disposal. Such activities prevent filling
landfill sites and polluting our environment.
Please bring clean, recycled materials from home by: _________________________.
(date)
9
During Your Visit
Upon Arrival
The Museum doors do not open until 10:00 am.
Have a total count of children and adults for the guard at the entrance.
Security measures may require the inspection of adult bags.
A Museum Teacher in a red shirt will greet you inside the Museum building near the fountain in
the Great Hall.
Bring a paper or electronic copy of all Museum-issued paperwork to the Museum with you.
Lunches
There are no formal lunch facilities at the Museum; however, students may eat in the Great Hall when
space is available. Please be advised that the Great Hall is frequently used for events, during which
times children will have to picnic on the Museum’s west lawn or elsewhere. If you would like to check
the availability of the Great Hall for lunch, please email [email protected].
Visiting the Museum Shop
When visiting the Museum Shop, please visit in small groups of students (ten or fewer). At least one
adult must accompany and supervise each group of ten students. Consider arranging for pre-packaged
souvenir goody bags. Please call 202.272.7706 for more information.
Tips for Being a Good Museum Visitor
Dispose of trash after lunch properly. There are recycling and trash bins throughout the building.
Remind your group to stay together at all times.
Please keep students at least a foot away from the fountain. Do not let students touch the water
in the fountain; it is recycled water.
Walk, don’t run in the Museum.
Do not climb on the columns; they are over 100 years old and can be damaged. Instead, try
making a human chain and “measuring” the column with your arms.
Talk and get involved with the program, but please use inside voices and be considerate of
other museum visitors who may be enjoying a school program or tour.
10
Touring the Building and Exhibitions
Unless otherwise noted, school programs do not include building or exhibition tours. School program fees include complimentary access to the Museum’s exhibitions during your visit. If you have arranged to visit the exhibitions before or after your programs, please review the guidelines below. Collecting Wristbands (Tickets) and Entering the Exhibitions 1. Bring a paper or electronic copy of all Museum-issued paperwork to the Museum with you. This might include a confirmation email and/or a receipt. 2. Seat the students and chaperones in the Museum's Great Hall, and have the teacher in charge check in at the Museum's Admissions Desk, usually located in the center of the Great Hall. 3. Show the Ticket Sales Representative your paperwork and give them an updated count of the total number of children and adults in your group. Every person 3 years old and up who enters the exhibitions must have a wristband. 4. If you arrive with more students or adults than you originally scheduled, let the Ticket Sales Representative know of your updated number. At that time, you may purchase tickets for the additional group members. 5. If you are also interested in visiting The Building Zone exhibition, you may request a 45-minute time slot when checking in. Building Zone times are allocated on a first-come, first-served basis. 6. Place the wristbands on the wrists of all group members entering the exhibitions. Exhibition Rules Please share these important rules with your group before you enter the Museum's galleries. Except where noted, these rules do not apply to the Museum's Great Hall.
No food, drink, plants, or real flowers are allowed. No pens. Pencils are allowed. No cell phone use. No photography. Photography is allowed throughout specific exhibitions, the Building Zone, and
the Great Hall. Backpacks must be carried by hand or placed on the chest. Strollers must remain outside of the galleries. No touching, except where noted. No running in the exhibitions or in the Great Hall.

11
Reinforcing Your Visit
Post-Visit Lessons and Activities
After returning to school reinforce the students’ field trip experience by having students create a written
or drawn reflection of their experience. You may also complete one of the post-visit activities included in
the Museum’s Educator Resource Packets. Educator Packets can be downloaded at
http://go.nbm.org/educatorpackets.
Provide Us with Feedback We welcome feedback regarding your visit to the Museum. Please complete an online evaluation after
your museum visit at http://go.nbm.org/eval.
B E A G R E E N B U I L D E R
NATIONAL BUILDING MUSEUMEDUCATOR RESOURCE PACKET GRADES 5—9

National Building Museum
About the National Building Museum
The National Building Museum is America’s leading cultural institution dedicated to advancing the qual-ity of the built environment by educating people about its impact on their lives. Through its exhibitions and educational programs, including innovative curricula for students, as well as online content and publications, the Museum tells the stories of the world people design and build.
The Museum is an independent, non-profit institution and is located in a historic landmark structure at 401 F Street NW, Washington, D.C. 20001. Connect with the Museum online at www.nbm.org, on Twitter at @BuildingMuseum, and on Facebook at www.facebook.com/NationalBuildingMuseum.
For Students and FamiliesThe Museum’s youth programming has won the Washington, D.C., Mayor’s Arts Award for Outstanding Contributions to Arts Education and been recognized by the National Endowment for the Arts. Each year, 50,000 young people and their families participate in hands-on learning experiences at the Museum. The Museum offers school programs for grades preK–9 as well as three innovative outreach programs for secondary school students. The Museum hosts three free family festivals annually; drop-in family work-shops; programs helping Cub and Girl Scouts earn activity badges; book-of-the-month readings; and more.
© 2012, National Building Museum. All rights reserved. For purposes of classroom instruction, the publisher grants permission for teach-ers to reproduce the student activity worksheets, not to exceed the number needed for students in each class. With the exception of the foregoing provision, no part of the Be a Green Builder Educator Resource Packet may be reproduced by any means—graphic, electronic (including electronic retrieval and storage systems), or mechanical, including photocopying, recording, and taping—without permission of the publisher.
Table of ContentsTo the Educator | 4
Program Description: Goals, Objectives, and Skills Used | 5
National Standards of Learning | 6
Lessons Matrix | 9
1. Green Building Essentials: Teacher Reading What Does it Mean to be Green? Teacher Reading | 12 The 5 Big Ideas of Green Building Teacher Reading | 13
2. Foundation Lessons Previsit lessons to complete prior to museum visit
The National Building Museum is Green too! | 18 Investigating Great Green Buildings Student Worksheet | 21 The National Building Museum is Green too! Student Handout | 22
Structural Elements: What Holds a Building Up? Part 1 | 24 The Be a Green Builder House Student Handout | 26 Building Information Student Handout | 27
Structural Elements: What Holds a Building Up? Part 2 | 28 Adding it All Up! Student Worksheet | 30
3. Reinforcement Lessons Postvisit lessons to complete after museum visit
Milli’s Insulation Investigation | 38 Testing Insulators Student Handout | 40 What Did You Observe? Student Worksheet | 41
Design Drawings: The Basics | 42 Historic Plans of the National Building Museum | 45 Plan, Section, Elevation Student Handout | 48
Green or Not? | 49 Green or Not? Student Worksheet | 52
Where You Live: Take a Closer Look | 53
4. Resources Be a Green Builder House Plans | 56 Architecture and Green Building Vocabulary | 60 Books | 62 Websites | 63 Organizations | 64
4
To The Educator Thank you for selecting the National Building Museum for your field trip. As an aid to teachers bringing students to the Museum for this program, the Museum has developed this Educator Resource Packet. It contains lessons for use in the classroom before and after a school group visits the Museum and provides other resources useful to teachers.
Why Study Architecture and Green Building?Buildings, neighborhoods, and cities are the result of decisions and choices made every day by architects, engineers, developers, and the general public. These decision makers need to consider many factors including costs, materials, structural strength, effect on the environment, and building site, when making these decisions.
As they participate in the Be a Green Builder program, students explore and become more aware of the process of home construction including: the hidden features that support houses such as foun-dations; the steps in the process of house construction; and sustainable design. As students begin to understand the built environment they begin to realize that they can affect the world around them.
Why Use Design as an Education Model?
All of the Museum’s youth education programs use the design process as an educational model. This model requires young people to identify problems or needs, gather information, generate ideas, produce a suitable solution, and evaluate their ideas throughout the process.
Learning by doing is central to design education and to the Be a Green Builder program. During the program students become carpenters and use power screwdrivers, ladders, and teamwork to con-struct an 8 ½ x 11’ one room wooden house. Through the act of construction students gain a fresh perspective on their surroundings, use critical thinking to evaluate ideas, and begin to understand how design and sustainability decisions impact the built environment around them.
What Are the Learning Benefits? The Be a Green Builder program and supplementary lessons in this Educator Resource Packet meet national standards of learning in language arts, mathematics, science, technological literacy, and visual arts. The specific standards are described on page 6 . The lessons in this curriculum encourage young people to explore and recognize the process and choices involved in building con-struction. Through hands-on, interdisciplinary lessons that address multiple learning styles, the Be a Green Builder program encourages and fosters life skills such as creative thinking, critical thinking, problem solving, teamwork, and communication.
The Educator Resource Packet Includes:• A list of national standards of learning addressed in the program and this resource packet. • A matrix of optional lessons to enhance students’ learning experience.• Introductory lessons to more fully prepare students for the Be a Green Builder program. • Reinforcement lessons for use after the Museum field trip to help students continue their explora-
tion of green building. • Vocabulary words and lists of supplementary resources.
5
Program DescriptionDuring the Be a Green Builder program, students join a work crew, become carpenters, and use power screwdrivers as they assemble an 8’ x 11’ house in one of the Museum’s classrooms. Emphasizing the importance of teamwork and communication on a construction site, students work in teams and lay the subfloor, connect the walls, and raise the roof. While building, they learn about the hidden features that support these building elements: foundations, frames, and trusses. As students construct the house they are introduced to green building ideas and materials that architects use today. They consider the impor-tance of the architect’s choices of design and materials as they build.
GoalsAfter completing the Be a Green Builder program students will:
• Understand the general process that is involved in constructing a building. • Understand some of the factors that affect the building process such as the environment,
budget, materials, and engineering.• Understand how structures such as a foundation, wall framing, and a truss roofing system help
buildings stand up.• Have an increased awareness of what it means to be green.• Have an increased awareness of the role communication and teamwork play in the
construction process.
ObjectivesDuring and after completing the Be a Green Builder program, students will be able to:
• Construct an 8 ½ x 11’ wooden house.• Describe the basic process for planning and constructing a wood frame house, including
understanding the use of plans.• Describe choices made during the building process and the factors that influence those
choices.• Identify hidden features of a house such as foundation, wall framing, and truss roofing system. • Identify the principles of green building.• Follow basic safety procedures of construction including safely using power screwdrivers,
ladders, and communicating and working as a team
Skills• Problem Solving • Cooperative Learning• Evaluation• Critical Thinking• Creative Thinking• Communication

6
National Standards of LearningBe a Green Builder meets local and national standards of learning in several disciplines. The national standards met are listed below by discipline.
Standards for the English Language Arts National Council of Teachers of English & the International Reading Association
Standard 1 Students read a wide range of print and non-print texts to build an understanding of texts, of themselves, and of the cultures of the United States and the world; to acquire new information; to respond to the needs and demands of society and the workplace; and for personal fulfillment. Among these texts are fiction and nonfiction, classic and contemporary works.
Standard 4 Students adjust their use of spoken, written, and visual language (e.g., conventions, style, vocabu-lary) to communicate effectively with a variety of audiences and for different purposes.
Standard 5 Students employ a wide range of strategies as they write and use different writing process ele-ments appropriately to communicate with different audiences for a variety of purposes.
Standard 7 Students conduct research on issues and interests by generating ideas and questions, and by pos-ing problems. They gather, evaluate, and synthesize data from a variety of sources (e.g., print and non-print texts, artifacts, people) to communicate their discoveries in ways that suit their purpose and audience.
Standard 8 Students use a variety of technological and information resources (e.g., libraries, databases, computer networks, video) to gather and synthesize information and to create and communicate knowledge.
Principles and Standards for School Mathematics National Council of Teachers of Mathematics
Numbers and Operations
Item C Compute fluently and make reasonable estimates
Alegebra
Item B Represent and analyze mathematical situations and structures using algebraic symbols
Geometry
Item D Use visualization, spatial reasoning, and geometric modeling to solve problems
Problem Solving
Item B Solve problems that arise in mathematics and in other contexts
Item B Apply and adapt a variety of appropriate strategies to solve problems

7
National Science Education Content Standards National Research Council
Content Standard A: As a result of activities in grades 5-8, all students should develop:
Item 1 Abilities necessary to do scientific inquiry
Item 2 Understandings about scientific inquiry
Content Standard B: As a result of activities in grades 5-8, all students should develop:
Item 1 Properties and changes of properties in matter
Item 2 Transfer of energy
Content Standard E: As a result of activities in grades 5-8, all students should develop:
Item 1 Abilities of technological design
Item 2 Understandings about science and technology
Content Standard F: As a result of activities in grades 5-8, all students should develop:
Item 2 Populations, resources, and environments
National Visual Arts Standards National Art Education Association
1. Content Standard: Understanding and applying media, techniques, and processes
Item 1a Select media, techniques, and processes; analyze what makes them effective or not effective in communicating ideas; and reflect upon the effectiveness of their choices
Item 1b Intentionally take advantage of the qualities and characteristics of art media, techniques, and pro-cesses to enhance communication of their experiences and ideas
6. Content Standard: Making connections between visual arts and other disciplines
Item 6a Compare the characteristics of works in two or more art forms that share similar subject matter, historical periods, or cultural context
Item 6b Describe ways in which the principles and subject matter of other disciplines taught in the school are interrelated with the visual arts
8
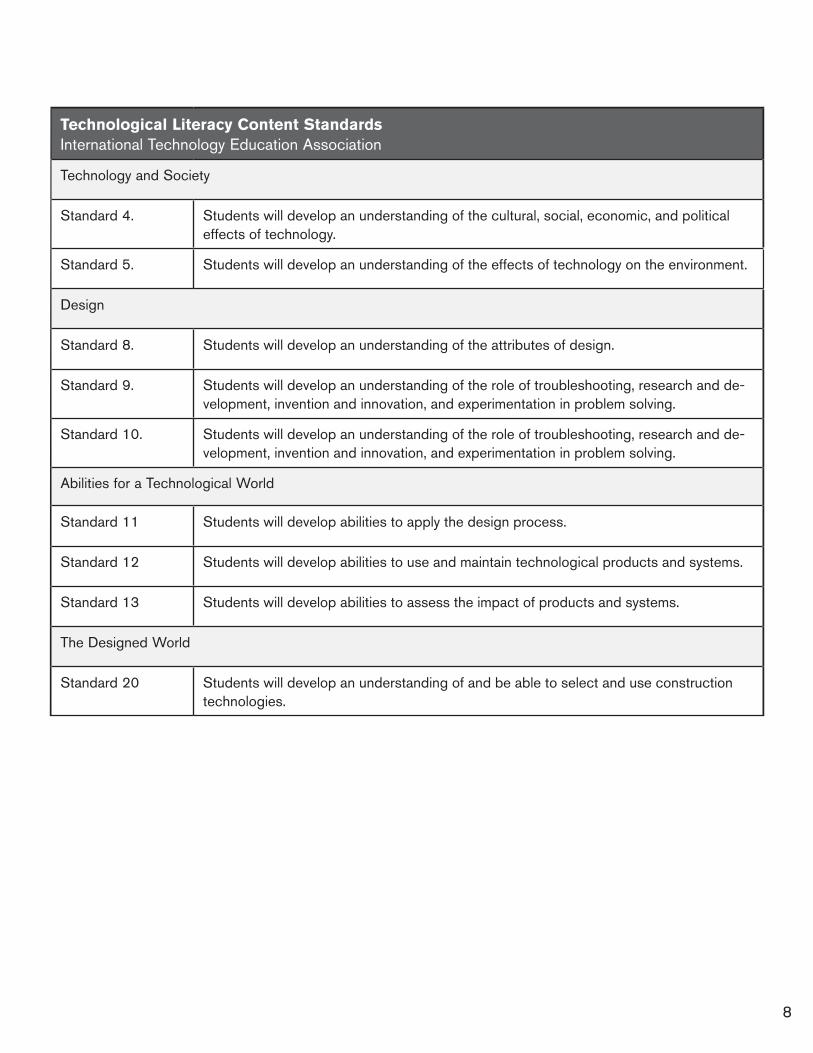
Technological Literacy Content Standards International Technology Education Association
Technology and Society
Standard 4. Students will develop an understanding of the cultural, social, economic, and political effects of technology.
Standard 5. Students will develop an understanding of the effects of technology on the environment.
Design
Standard 8. Students will develop an understanding of the attributes of design.
Standard 9. Students will develop an understanding of the role of troubleshooting, research and de-velopment, invention and innovation, and experimentation in problem solving.
Standard 10. Students will develop an understanding of the role of troubleshooting, research and de-velopment, invention and innovation, and experimentation in problem solving.
Abilities for a Technological World
Standard 11 Students will develop abilities to apply the design process.
Standard 12 Students will develop abilities to use and maintain technological products and systems.
Standard 13 Students will develop abilities to assess the impact of products and systems.
The Designed World
Standard 20 Students will develop an understanding of and be able to select and use construction technologies.

9
Lessons Matrix
Lesson Purpose Standards of Learning
Duration Materials Needed
The National Building Museum is Green too!p. 18
Introduce students to the 5 Big Ideas of Green Building.
English1, 7, 8ScienceE1, E2, F2Tech. Literacy4, 5, 8, 13
45 minutes • The 5 Big Ideas of Green Building Teacher Reading
• The National Building Museum is Green Too! Student Handout
• Investigating Green Buildings Student Worksheet
• Paper
• Pencils
Structural Ele-ments: What Holds a Building Up? Part 1p. 24
Introduce students to the basic structural features of a house.
English1, 7, 8ScienceE1, E2Tech. Literacy8, 9
30 minutes • Images of Be a Green Builder house
• Building Information Student Handout
Structural Ele-ments: What Holds a Building Up? Part 2p. 28
Students use math to calculate the cost of supplies needed to build the Be a Green Builder house.
English1, 8MathNumbers and Opera-tions C,Algebra BGeometry DProblem Solving B, CScienceE1, E2Tech. Literacy8, 9
45 minutes • Pencils
• Copies of Adding it All Up! Student Worksheet
• Copies of Building Informa-tion Student Handout,one for each student
10
Lesson Purpose Standards of Learning
Duration Materials Needed
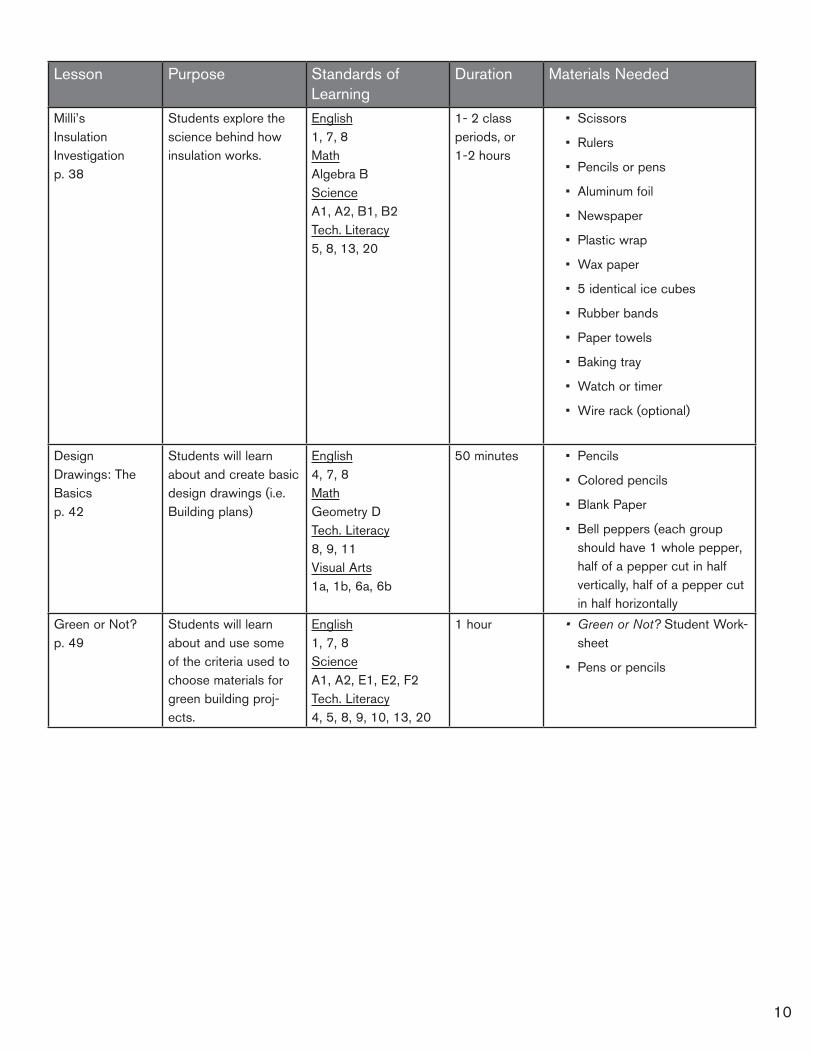
Milli’s Insulation Investigationp. 38
Students explore the science behind how insulation works.
English1, 7, 8MathAlgebra BScienceA1, A2, B1, B2Tech. Literacy5, 8, 13, 20
1- 2 class periods, or 1-2 hours
• Scissors
• Rulers
• Pencils or pens
• Aluminum foil
• Newspaper
• Plastic wrap
• Wax paper
• 5 identical ice cubes
• Rubber bands
• Paper towels
• Baking tray
• Watch or timer
• Wire rack (optional)
Design Drawings: The Basicsp. 42
Students will learn about and create basic design drawings (i.e. Building plans)
English4, 7, 8MathGeometry DTech. Literacy8, 9, 11Visual Arts1a, 1b, 6a, 6b
50 minutes • Pencils
• Colored pencils
• Blank Paper
• Bell peppers (each group should have 1 whole pepper, half of a pepper cut in half vertically, half of a pepper cut in half horizontally
Green or Not?p. 49
Students will learn about and use some of the criteria used to choose materials for green building proj-ects.
English1, 7, 8ScienceA1, A2, E1, E2, F2Tech. Literacy4, 5, 8, 9, 10, 13, 20
1 hour • Green or Not? Student Work-sheet
• Pens or pencils

11
The information in this section is designed to introduce you (the educator) to the basics of architecture and green building as they apply to this program. For additional information and re-sources, refer to the listings of books and websites found in the Resource section. For definitions of any unfamiliar terms used in this section please refer to the Vocabulary List in the resource section.
What Does it Mean to be Green? Teacher Reading
The 5 Big Ideas of Green Building Teacher Reading
12
Previous generations may not have used the terms “sustainable” or “green,” but they knew that a healthy community depended on clean air, fresh water, fertile land, and access to transportation. Coexisting peacefully with the environment was a matter of survival . . . and it still is. All our daily needs are met by materials and resources that come from the environment. We are an important part of nature and if we are to survive, nature must be preserved.
“Green” means making environmentally friendly choices that use our natural resources for pres-ent needs without depleting those resources for future generations. “Sustainable” is sometimes used interchangeably with “green.” By using sustainable materials and designs, we recognize and accept responsibility for the impact each of us has on the natural world.
Sustainable building and development is more than being environmentally friendly. It also includes consideration of the economic and social impact of the building or development. For example, a series of parks can be a great environmental addition to a community—adding plants and trees that will absorb carbon dioxide. Socially the park provides a healthy and safe place for children to play. On the economic side, it can provide additional work in the community and help increase home values for the surrounding residences.
It is also important to remember that being green is about making wise and balanced choices in both the way we build and the way we live.
Teacher Reading
What Does it Mean to be Green?
“Nothing living should ever be treated with contempt. Whatever it is that lives, a man, a tree, or a bird, should be touched gently, because the time is short. Civilization is another word for respect for life.”- Elizabeth Goudge, Author
“The survival of the world depends upon our sharing what we have and working together.” - Fools Crow, Ceremonial Chief of the Teton Sioux in a 1976 speech to Congress
13
Teacher Reading
The 5 Big Ideas of Green BuildingIn 2006, the National Building Museum opened The Green House: New Directions in Sustain-able Design, an exhibition that discussed five green principles that provide the foundation for sustainable homes. We have used these concepts here and identify them as the 5 Big Ideas of Green Buildings throughout the Educator Resource Packet and lessons.
1. Usenaturalenergy(sun,wind,water)topoweryourbuilding.
Most of us rely on oil, coal, natural gas, and other fossil fuels to heat and cool our homes. These resources pollute the environment and are in limited supply. A good alternative is to maximize the use of the renewable resources like sun, wind, and heat from the earth through either active or passive strategies.
Passive strategies might include:
• Design and orient the building to minimize summer afternoon solar heat gain and optimize winter solar heat gain. In the northern hemisphere, this means orienting the long sides of the building to face south and north, and creating roof overhangs and landscaping that shade the east, south, and west sides of the building.
• Choose colors and materials to reflect sun where you want to prevent heat gain, or absorb sun where you want warmth. Darker colors attract and absorb heat. Lighter colors reflect heat.
• Plant shade trees and shrubs around your building. In summer, well-placed plants and deciduous trees help keep the building cool by blocking the sun, while bare branches in winter let the sunlight through to warm the building.
Active strategies might include using:
• Solar hot water heaters in your roof use the sun’s energy directly to heat water for your home.
• Photovoltaic panels (solar panels) that transform the sun’s heat into energy.
• Small scale wind turbines, which can be mounted on your roof or in your yard to generate electricity.
2. Makesuretheairinsideyourhomeishealthyandclean.
Americans spend up to 90% of their time indoors where air quality can contain more pollution than the air outdoors. Pollutants range from toxins, such as asbestos and formaldehyde found in building materials, to allergens such as mold, mildew, fungus, bacteria, and dust mites. The negative effects of these pollutants may cause health problems upon initial exposure or even many years later.
These are some measures that can be taken to improve indoor air quality:
• Choose ventilation systems that remove dirt, dust, moisture, humidity, and pollutants.
• Seal off the garage from the building to eliminate fumes from cars and lawn mowers.
• Choose fabric and paints identified as “low VOC.” Low Volatile Organic Compound
14
materials have reduced toxic properties, limit off-gassing and keep chemical smells to a minimum.
• Test your home for toxins that influence air quality with a do-it-yourself kit or hire a specialist.
• Use the exhaust fan over your stove to remove gases like carbon monoxide from cooking.
• Use fans in the bathroom to remove water vapors that can cause molds to grow.
• Open windows to allow fresh outdoor air to circulate within your home.
• Keep plants in your home to help remove carbon dioxide and harmful toxins from the air.
3. Considerthegeographyandclimateofthelandandsitewhereyoubuild.
You can create a sustainable building by using the land your building sits on wisely, and by con-sidering the impact of the building on the surrounding environment. Some ways you can affect how wisely land is used on your building site include:
• Design a smaller, more compact building. Rather than building a wide, low building, build one which is taller, has a smaller footprint, and takes up less land.
• Choose a site that is located near public transportation, community services, jobs, shopping, and recreation to save fuel and money.
• Choose a neighborhood where buildings are clustered closer together, leaving more open space for residents to enjoy, and helping to preserve the natural landscape.
• Adopt smart gardening and landscaping practices, like using organic pesticides and com-posts, as well as native plants that do not require extensive irrigation systems.
• Use “pervious” materials rather than paving for patios and walks. Paved surfaces can cause storm water runoff, not allowing water to be absorbed into the earth. This can result in the contamination of local water sources. Pervious materials allow water to seep slowly into the ground.
4. Createahomethatconservesresourcesandisenergy-efficient.
The roof, walls, windows, and doors of a building create a building “envelope” that protects residents from weather and intruders, including pests, noise, and dirt. It also controls the entry of sunlight and, most importantly, helps maintain indoor comfort. Maintaining a constant level of comfort can waste energy and be expensive, but can be done efficiently and economically by the following means:
• Create a building envelope with more durable and energy-efficient materials that reduce drafts, balance room temperatures, control moisture, and save on heating and cooling costs.
• Seal any gaps or cracks where moisture can get in, and heat or cooling can leak out.
• Install insulation. Insulation materials vary, but the purpose is the same: slow the transfer of heat between your building and the outside world.
• Use high-efficiency appliances such as those that have earned the United States’ Depart-ment of Energy’s Energy Star rating.
• Design a smaller, more compact building, which uses less energy.
15
5. Carefullychooseconstructionmaterialsanduseonesthatarerenewable,reusable,anddurable.
When selecting products and materials to use in a building, look for ones that:
• Are quickly renewable, that are easily replaced by new growth or cannot be used up.
• Are reusable, that are reused from a previous construction project or that can be reused for future projects. (For example, brick from an old school can be reused to create a façade for a house.)
• Are durable, that are not easily damaged and can withstand the weather and climate of the site.
• Require low levels of energy to extract, process, and be transported. Choose local materials if possible.
• Have low levels of environmental impact; for example those that do not off-gas toxic materi-als.

16

17
Before visiting the Museum, these lessons may be used to introduce your students to green building. These lessons are optional but will increase students’ success during their museum visit.
The National Building Museum is Green too!
The National Building Museum is Green too! Student Handout
Investigating Great Green Buildings Student Worksheet
Structural Elements: What Holds a Building Up? Part 1
The Be a Green Builder Student Handout
Building Information Student Handout Structural Elements: What Holds a Building Up? Part 2
Adding it All Up! Student Worksheet
18
The National Building Museum is Green too!National Standards of Learning: English—1, 7, 8; Science— E1, E2, F2; Tech. Literacy—4, 5, 8, 13 Duration: 45 minutes
OverviewDuring this lesson students will be introduced to the 5 Big Ideas of Green Building, which are five princi-
ples that architects use as guidelines when designing and constructing green buildings. Students will use
these principles to explore and investigate the National Building Museum’s historic building. This building
illustrates a few ways of implementing these green ideas. The exposure to these five principles of green
building will contribute to students’ knowledge and provide them with a foundation for their visit to the Na-
tional Building Museum.
ObjectivesStudents will:
• Identify and define the 5 Big Ideas of Green Building; • Identify how a historic buildings can be green; and• Identify how these ideas can be implemented by exploring a real
example of green building.
Materials• The 5 Big Ideas of Green Building Teacher Reading• The National Building Museum is Green Too! Student Handout • Investigating Great Green Buildings Student Worksheet• Paper • Pencils
Teacher Prep• Copy worksheets
Teacher Tips• The worksheets will help direct students’ exploration with questions,
but they should write down everything else they think is important. • Review the 5 Big Ideas of Green Buildings Teacher Reading. This can
also be used as introductory reading for students.
Vocabulary • energy-efficient, reusable, renewable, natural resource, durable, ver-
nacular building, sustainable, green, geography, climate, architect, ventilation, daylighting
19
LessonPlan
1. What is “Green Building?” (5-10 minutes)
• As a class define what it means to be green. Answers should go beyond the idea of “being friendly to the environment” and lead to the understanding that being green involves making responsible choices about how to use our natural resources today so that there are enough resources available for future generations. Questions that can be used to prompt more thoughtful answers include:
• Why is “saving the environment” important to you?
• What parts of the environment do you use everyday? Answer: All of the things that we use everyday come from the environment: clothes, food, homes, etc.
• What if things start to disappear from the environment?
• How would a disapearing/changed environment affect your children or grandchildren?
• Explain to students that part of being environmentally friendly involves making choices. To help them make these choices, architects today have come up with these big ideas that help guide their design choices. Explain that you are going to discuss these ideas because when they arrive at the National Building Museum for their fieldtrip they will see how these ideas can be used to construct a house. Write the 5 Big Ideas on a white or black board. Ask for a volunteer to read aloud each concept. Ask students what they think each big idea might mean. Ask students to provide an example of something they can do at home that matches each idea. Refer back to Teacher Reading for examples.
1. Use natural energy (sun, wind, water) to power your building. (Mention windows as a passive way to use the sun’s energy to light the interior of a building.) 2. Make sure the air inside your home is healthy and clean. 3. Consider the geography and climate of the land and site where you build. (Help students define geography and climate, and how they might contribute to designing a green home.) 4. Create a home that conserves resources and is energy-efficient. (Mention keeping homes free from drafts that waste energy.) 5. Carefully choose construction materials and use ones that are renewable, reusable, and durable. (Help students define renewable, reusable, and durable.)
2. The National Building Museum is Green Too! (25 minutes)
• Now that the students have been introduced to the 5 Big Ideas of Green Building they are ready to become green investigators. Pass out the Investigating Great Green Buildings Student Work-sheet and the National Building Museum is Green too! Student Handout for students to use to investigate and collect information about ways that the museum’s building is green.
• Explain to students that old buildings like the one the National Building Museum is in can be environmentally friendly too. Ask students how and why these old buildings could be considered green. Some answers might include:
• Buildings built over 100 years ago used local materials and the builders had to carefully think about the climate and geography, making sure their buildings worked for that region.
20
• Supplies could not be easily transported across the country, so they had to use local natural resources which saved money and energy.
• Buildings had to withstand the regional weather (hurricanes, storms, snow, etc.) and be comfortable in the heat of summer or the cold of winter without electrical heating or cooling systems.
• Tell students that learning how people constructed buildings in the past gives today’s architects and engineers ideas for how to build green today.
• Give students 10 -15 minutes to complete the worksheet.
3. Conclusion (5 minutes)
• Review with students what they discovered about the green components of the National Building Museum’s building:
• The architect Montgomery Meigs limited the amount of land (or the footprint of the building) by building multiple floors on top of each other rather than building a long, wide, low building.
• The native plants around the Museum and its the rain garden use rain water and storm water runoff to grow. This limits the amount of energy and water used to water the plants with sprinklers.
• The building is made up of 15.5 million bricks. Bricks are made out of natural and local resources and are also very durable.
• Sun is used to light the building’s interior. The windows in the building allow the natural light to enter the building limiting the amount of artifical light used.
• In the past the windows opened and allowed fresh air to enter and circulate within the building helping to keep the air inside healthy and clean.
• Remind students that it is important to consider a building’s surroundings (other buildings, environment, geography, climate) when creating a design. Explain to the students that they will be discussing other ways to incorporate these green ideas into structures when they visit the National Building Museum for their fieldtrip.
Taking It Further
• Consider other historic buildings and how they may be green by visiting a building or by researching a building online. Possible buildings to research include Mt. Vernon and Monticello.

21
Let’s see how an architect of the past designed a building to work with the climate and geography of Washington, D.C. Look at the information for the National Building Museum’s historic building. Read how the architect used the 5 Big Ideas to make it a green building. Write your notes below.
1. How does the building use natural energy?
2. How is the air inside the building kept clean and fresh?
3. How is the building adapted to fit the geography and climate?
4. How does the building conserve energy, space, or resources?
5. What renewable, reusable or durable construction materials were used?
Name: ________________________________________
Student Worksheet
Investigating Great Green Buildings!
22
Student Handout
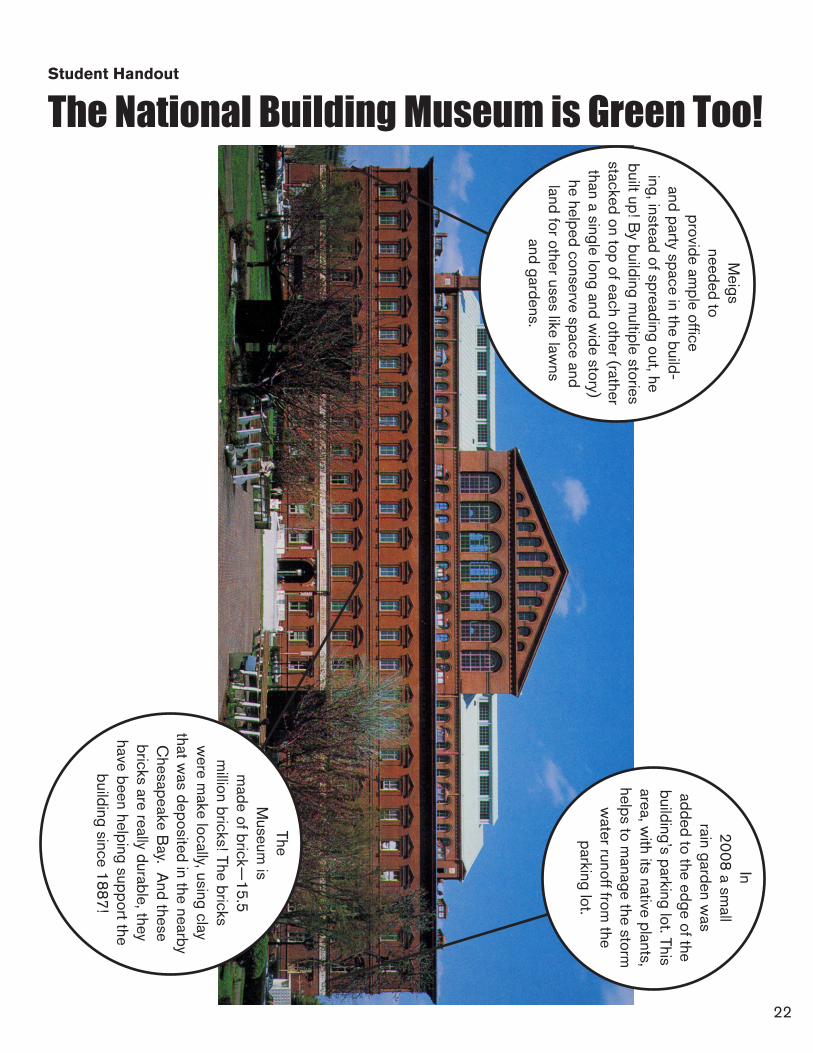
The National Building Museum is Green Too! M
eigs needed to
provide ample office
and party space in the build-ing, instead of spreading out, he
built up! By building m
ultiple stories stacked on top of each other (rather than a single long and w
ide story) he helped conserve space and land for other uses like law
ns and gardens.
The M
useum is
made of brick—
15.5 m
illion bricks! The bricks w
ere make locally, using clay
that was deposited in the nearby
Chesapeake B
ay. And these
bricks are really durable, they have been helping support the
building since 1887!
In 2008 a sm
all rain garden w
as added to the edge of the building’s parking lot. This area, w
ith its native plants, helps to m
anage the storm
water runoff from
the parking lot.
23
Student Handout
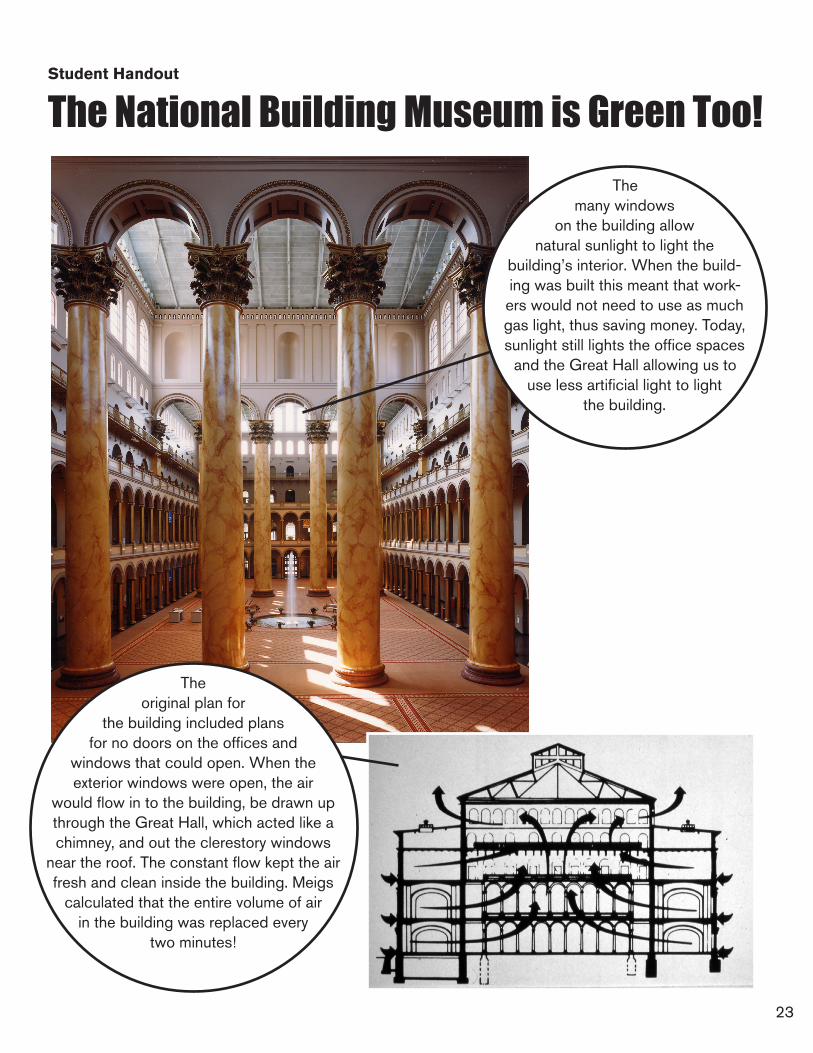
The National Building Museum is Green Too! The
many windows on the building allow
natural sunlight to light the building’s interior. When the build-ing was built this meant that work-ers would not need to use as much gas light, thus saving money. Today, sunlight still lights the office spaces
and the Great Hall allowing us to use less artificial light to light
the building.
The original plan for
the building included plans for no doors on the offices and
windows that could open. When the exterior windows were open, the air
would flow in to the building, be drawn up through the Great Hall, which acted like a chimney, and out the clerestory windows
near the roof. The constant flow kept the air fresh and clean inside the building. Meigs
calculated that the entire volume of air in the building was replaced every
two minutes!
24
Structural Elements: What Holds a Building Up? Part INational Standards of Learning: English—1, 7, 8; Science— E1, E2; Tech. Literacy—8, 9 Duration: 45 minutes
OverviewToo often people are familiar with a building’s floor, walls, and roof, but unaware of what supports each of
these features. Without the basic framework these commonly known elements could not exist. By examin-
ing the structural systems behind these exterior features, students will gain a better understanding of how
buildings stand up.
ObjectivesStudents will:
• Identify the basic structural elements of a wood balloon-frame house,• Identify the typical order that these would be added to a house, and• Discuss the role of each of these structural elements in a house.
Materials• Image of Be a Green Builder house• Building Information Student Handout
Teacher Prep• Photocopy handouts or project these images on a screen.
Vocabulary • foundation
• trusses
• studs
• insulation
• joists
• balloon frame
25
Lesson Plan
1. Review House Parts (5-10 minutes)
• Review the different parts of a house, using the Building Information Student Handout provided. Discuss how each part comes together to form the complete structure.
2. Discuss the Process of Construction ( 30 minutes)
• Show students a picture of the National Building Museum Be a Green Builder house that the students will assemble while at the Museum. Ask them what features they would build first when constructing a house. Have students explain their reasoning. Discuss the order in which you may assemble a house—from the ground up, —and the importance of each structure in the building process. Use the following questions to guide the discussion:
• What order should the parts of the house should be built/addes? (Answer: foundation, floor frame, wall frames, trusses/roof frame, roof, windows and doors, interior)
• Why does the roof get built before the inside of the house is finished? (Answer: The roof protects the inside of the house from the weather, preventing the interior of the house from being damaged.)
• Why would so many joists be used in the floor frame? (Answer: Joists help evenly distribute the weight and forces of objects that are placed on the floor. Having many joists means that the floor will be stronger.)
• If this house were built outside, could the wood floor frame be placed directly upon the ground? Why or why not? (Answer: No, wood will deteriorate when exposed to moisture, variable temperatures, and insects.)
• What would you do if the ground wasn’t level? What would happen if the house was built on ground that was not level? (Answer: The ground should be made level before building the foundation and house (Ex. digging out a portion of the hill). If the ground can’t be made level the top part of the foundation should be level to create a stable, level surface for the house to be attached to. If the ground and foundation are not level the house would not be strong and stable. It might shift and fall.)
• What would happen if headers and footers were not used around windows and doors? (Answer: Headers and footers are used to create extra support around openings in a wall. If they were not used the wall frame would not be as strong and might fail.)
3. Summary (5 minutes)
• Each structural element of a house has an important role in making the house strong, durable, and livable.
• The process by which these parts are assembled is important to make sure the house stays dry during the process, is safe, and the laborers are safe as well.
Taking It Further
• Students can draw their classroom or home from the “inside out”. Have them imagine what is behind the walls. What is holding up the structure? What other systems might be within the walls?
26
Student Handout
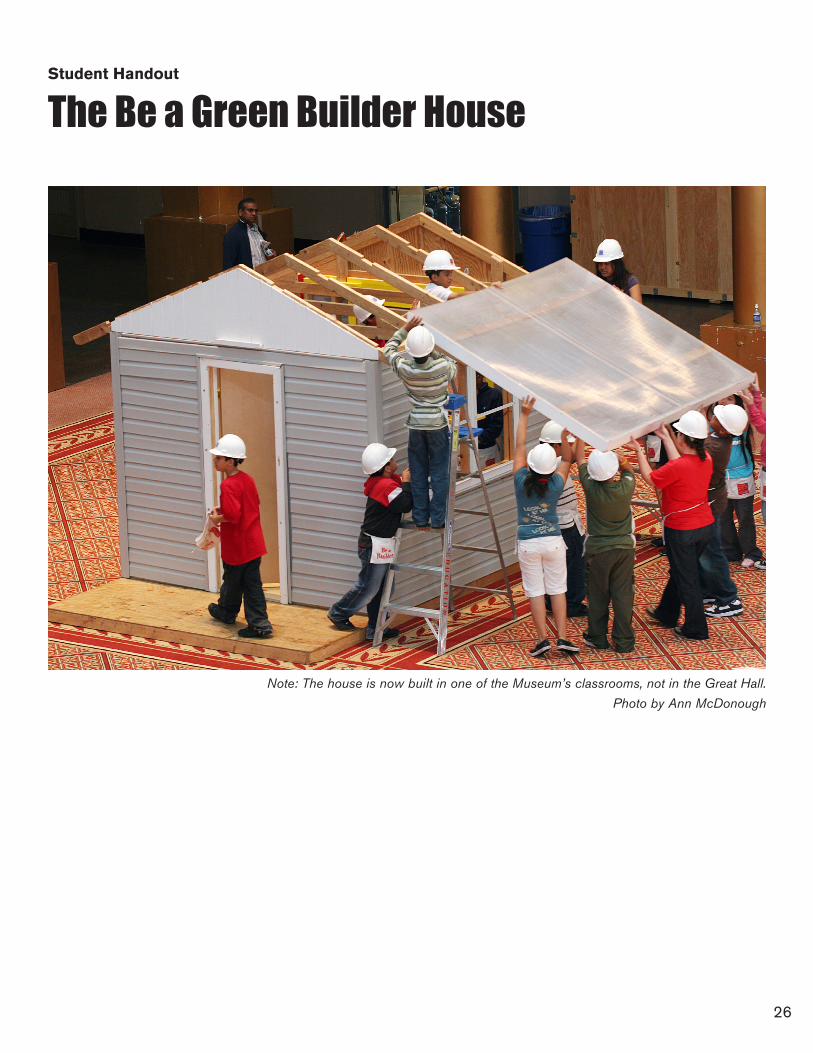
The Be a Green Builder House
Note: The house is now built in one of the Museum’s classrooms, not in the Great Hall.
Photo by Ann McDonough

27
Student Handout
Building Information
Joist StudDeckingBand
Siding
Truss
Header
Footer
Roof

28
Structural Elements: What Holds a Building Up? Part 2National Standards of Learning: English—1, 8; Math—Numbers and Operations C, Algebra B, Geometry D, Problem Solving B, C; Science— E1, E2; Tech. Literacy—8, 9 Duration: 45 minutes
OverviewIn addition to special skills like design and carpentry, people involved in building a house need to be able
to calculate the amount, type, and cost of materials for a building project. During this activity students use
math to calculate the cost of materials needed to construct the Be a Green Builder house.
ObjectivesStudents will:
• Use basic math to calculate the costs of constructing the frame for the Be a Green Builder house; and
• See how math is used by a carpenter or project manager.
Materials• Pencils• Adding it All Up! Student Worksheet
Teacher Prep• This lesson uses information learned in the previous lesson, Structural
Elements: What Holds a Building Up? Part 1. If you have not taught that lesson, consider reviewing some of the vocabulary on the Building Information Student Handout so students are comfortable with the words.
• Copy worksheet, one for each student• This can also be used as a homework assignment.
Vocabulary • truss
• joist
• siding
• plywood
• decking
• gables
• band
29
Lesson Plan
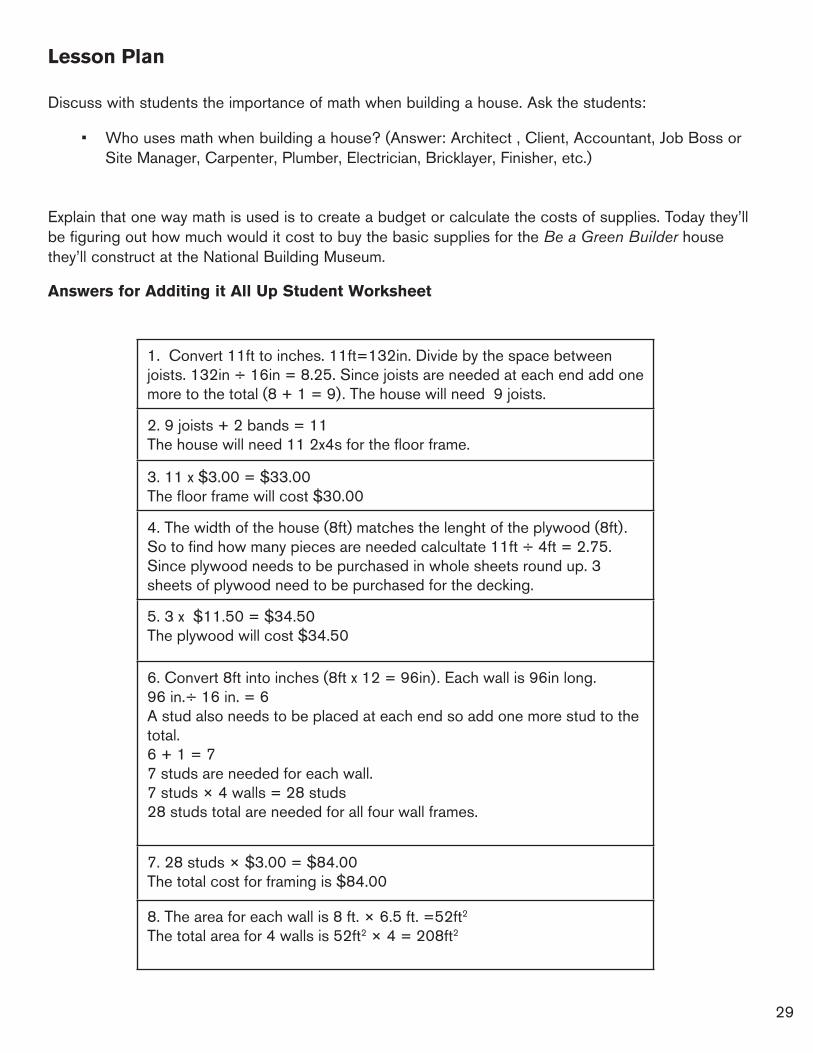
Discuss with students the importance of math when building a house. Ask the students:
• Who uses math when building a house? (Answer: Architect , Client, Accountant, Job Boss or Site Manager, Carpenter, Plumber, Electrician, Bricklayer, Finisher, etc.)
Explain that one way math is used is to create a budget or calculate the costs of supplies. Today they’ll be figuring out how much would it cost to buy the basic supplies for the Be a Green Builder house they’ll construct at the National Building Museum.
Answers for Additing it All Up Student Worksheet
1. Convert 11ft to inches. 11ft=132in. Divide by the space between joists. 132in ÷ 16in = 8.25. Since joists are needed at each end add one more to the total (8 + 1 = 9). The house will need 9 joists.
2. 9 joists + 2 bands = 11The house will need 11 2x4s for the floor frame.
3. 11 x $3.00 = $33.00 The floor frame will cost $30.00
4. The width of the house (8ft) matches the lenght of the plywood (8ft). So to find how many pieces are needed calcultate 11ft ÷ 4ft = 2.75. Since plywood needs to be purchased in whole sheets round up. 3 sheets of plywood need to be purchased for the decking.
5. 3 x $11.50 = $34.50The plywood will cost $34.50
6. Convert 8ft into inches (8ft x 12 = 96in). Each wall is 96in long. 96 in.÷ 16 in. = 6A stud also needs to be placed at each end so add one more stud to the total.6 + 1 = 7 7 studs are needed for each wall.7 studs × 4 walls = 28 studs28 studs total are needed for all four wall frames.
7. 28 studs × $3.00 = $84.00 The total cost for framing is $84.00
8. The area for each wall is 8 ft. × 6.5 ft. =52ft2
The total area for 4 walls is 52ft2 × 4 = 208ft2
30
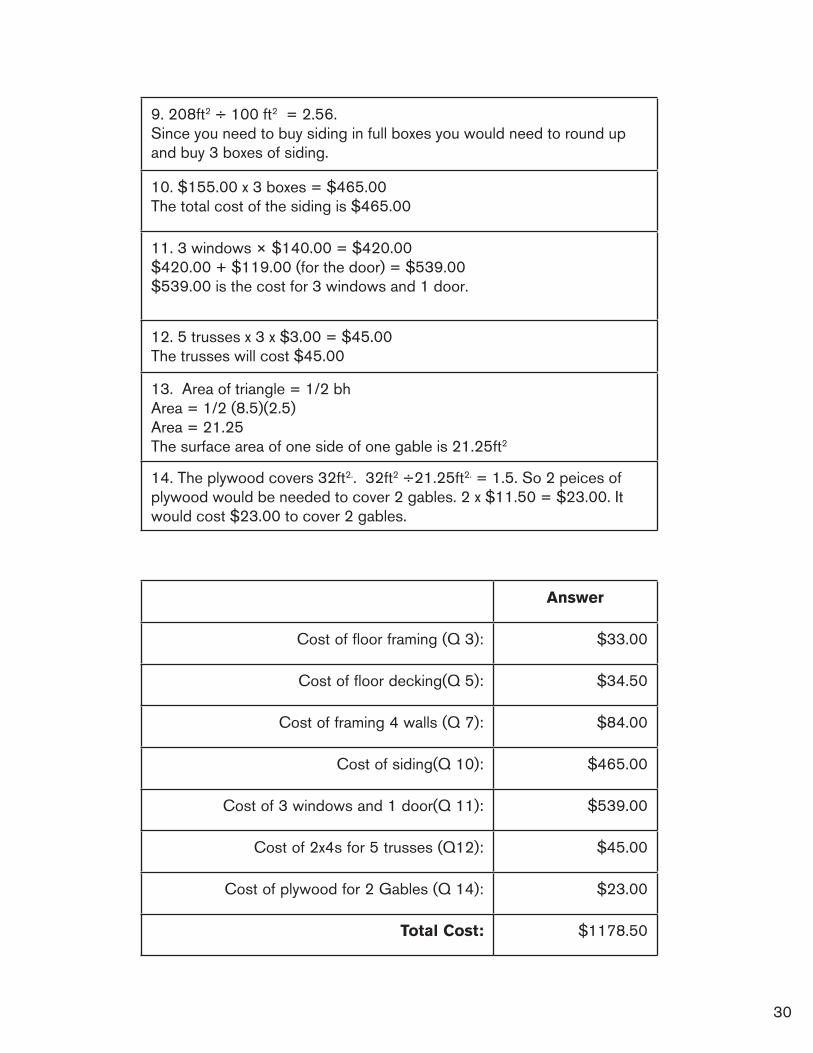
9. 208ft2 ÷ 100 ft2 = 2.56. Since you need to buy siding in full boxes you would need to round up and buy 3 boxes of siding.
10. $155.00 x 3 boxes = $465.00 The total cost of the siding is $465.00
11. 3 windows × $140.00 = $420.00 $420.00 + $119.00 (for the door) = $539.00 $539.00 is the cost for 3 windows and 1 door.
12. 5 trusses x 3 x $3.00 = $45.00 The trusses will cost $45.00
13. Area of triangle = 1/2 bhArea = 1/2 (8.5)(2.5)Area = 21.25The surface area of one side of one gable is 21.25ft2
14. The plywood covers 32ft2.. 32ft2 ÷21.25ft2. = 1.5. So 2 peices of plywood would be needed to cover 2 gables. 2 x $11.50 = $23.00. It would cost $23.00 to cover 2 gables.
Answer
Cost of floor framing (Q 3): $33.00
Cost of floor decking(Q 5): $34.50
Cost of framing 4 walls (Q 7): $84.00
Cost of siding(Q 10): $465.00
Cost of 3 windows and 1 door(Q 11): $539.00
Cost of 2x4s for 5 trusses (Q12): $45.00
Cost of plywood for 2 Gables (Q 14): $23.00
Total Cost: $1178.50
31
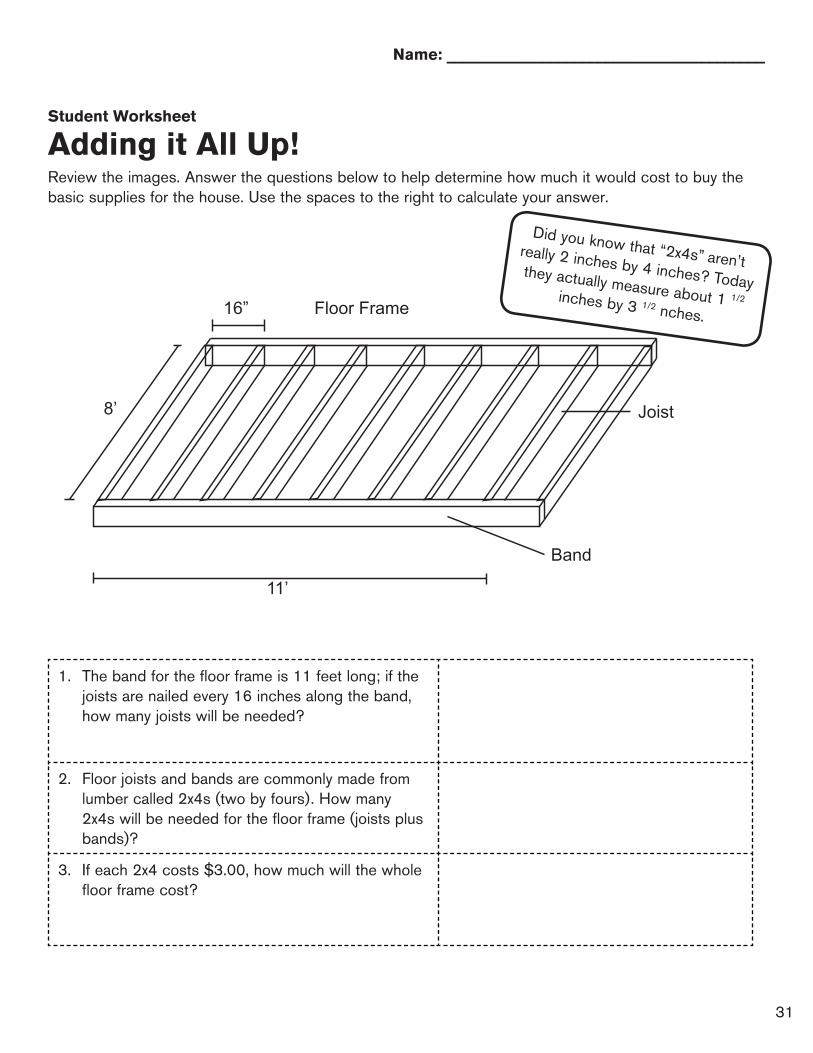
1. The band for the floor frame is 11 feet long; if the joists are nailed every 16 inches along the band, how many joists will be needed?
2. Floor joists and bands are commonly made from lumber called 2x4s (two by fours). How many 2x4s will be needed for the floor frame (joists plus bands)?
3. If each 2x4 costs $3.00, how much will the whole floor frame cost?
11’
8’
Band
Joist
16” Floor Frame
Name: ________________________________________
Student Worksheet
Adding it All Up! Review the images. Answer the questions below to help determine how much it would cost to buy the basic supplies for the house. Use the spaces to the right to calculate your answer.
Did you know that “2x4s” aren’t really 2 inches by 4 inches? Today they actually measure about 1 1/2 inches by 3 1/2 nches.

32
11’
8’
DeckingFloor Frame Covered with Decking
4. If each sheet of plywood is 4 ft. x 8 ft. and the floor frame is 8 ft. x 11 ft., how many sheets of plywood are needed for the decking? (You can draw on the image above to help figure out the answer).
5. If each sheet of plywood costs $11.50, what is the total cost of the decking?
Student Worksheet Continued
33
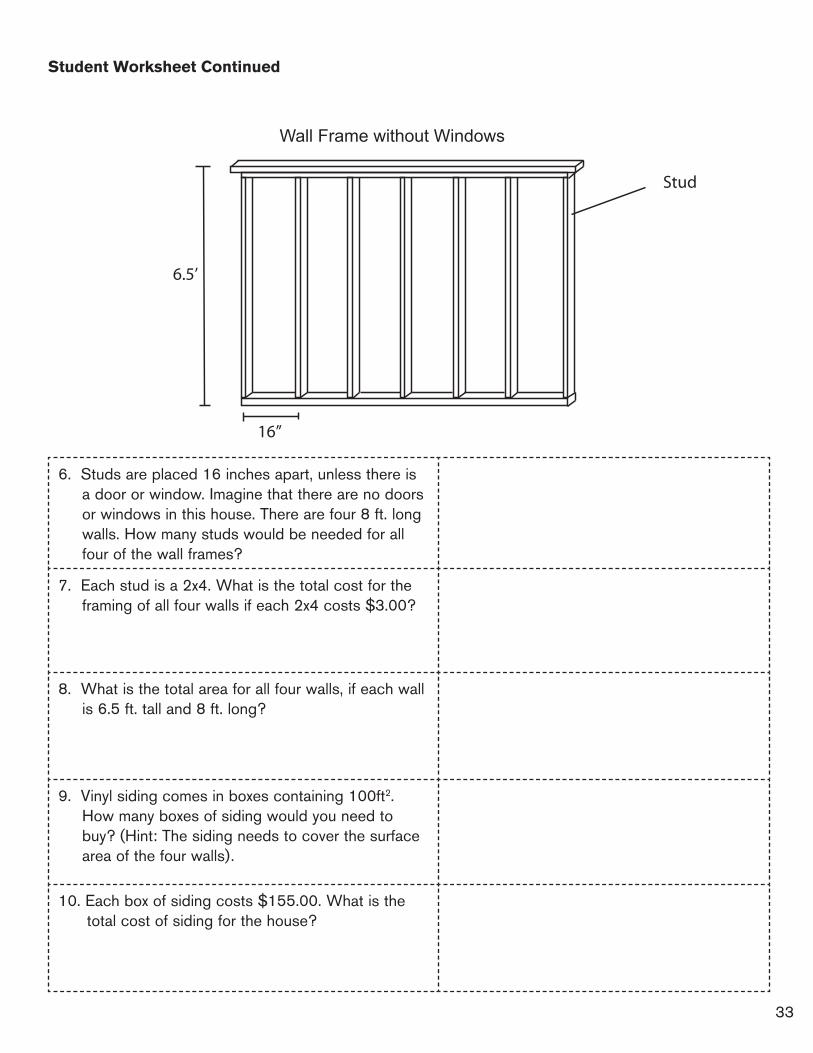
6. Studs are placed 16 inches apart, unless there is a door or window. Imagine that there are no doors or windows in this house. There are four 8 ft. long walls. How many studs would be needed for all four of the wall frames?
7. Each stud is a 2x4. What is the total cost for the framing of all four walls if each 2x4 costs $3.00?
8. What is the total area for all four walls, if each wall is 6.5 ft. tall and 8 ft. long?
9. Vinyl siding comes in boxes containing 100ft2. How many boxes of siding would you need to buy? (Hint: The siding needs to cover the surface area of the four walls).
10. Each box of siding costs $155.00. What is the total cost of siding for the house?
8’
16”
Stud
6.5’
Wall Frame without Windows
Student Worksheet Continued
34
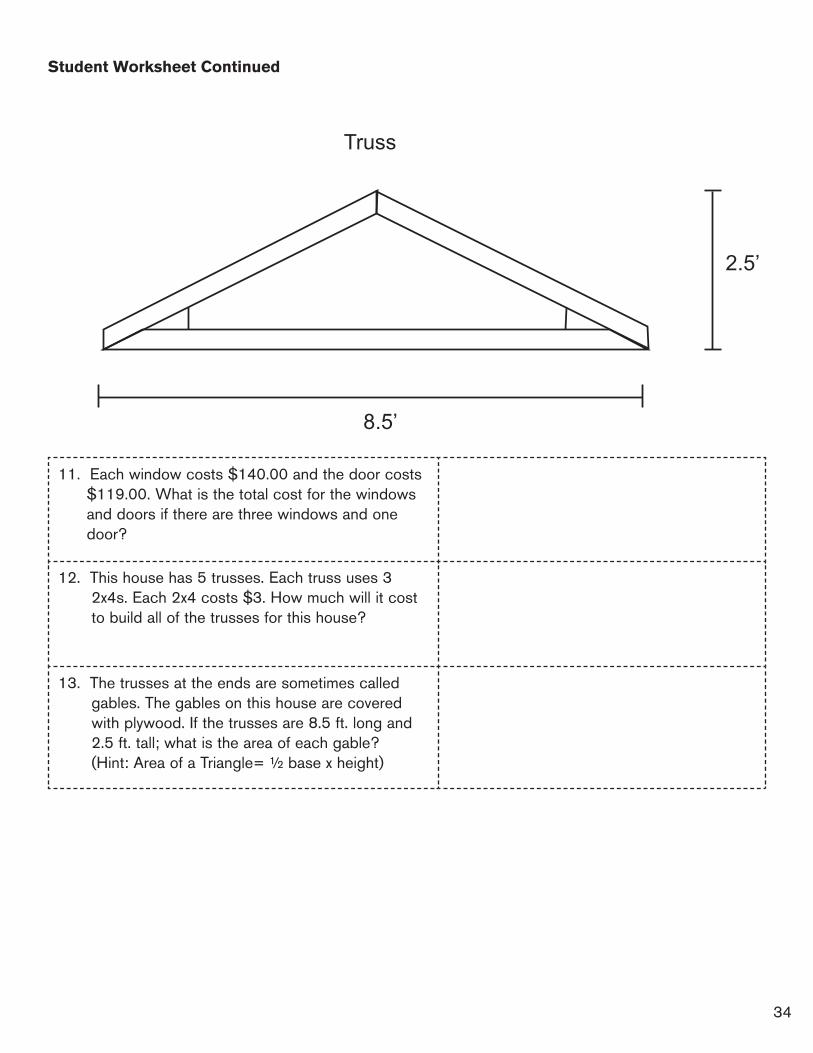
11. Each window costs $140.00 and the door costs $119.00. What is the total cost for the windows and doors if there are three windows and one door?
12. This house has 5 trusses. Each truss uses 3 2x4s. Each 2x4 costs $3. How much will it cost to build all of the trusses for this house?
13. The trusses at the ends are sometimes called gables. The gables on this house are covered with plywood. If the trusses are 8.5 ft. long and 2.5 ft. tall; what is the area of each gable? (Hint: Area of a Triangle= ½ base x height)
8.5’
2.5’
Truss
Student Worksheet Continued
35
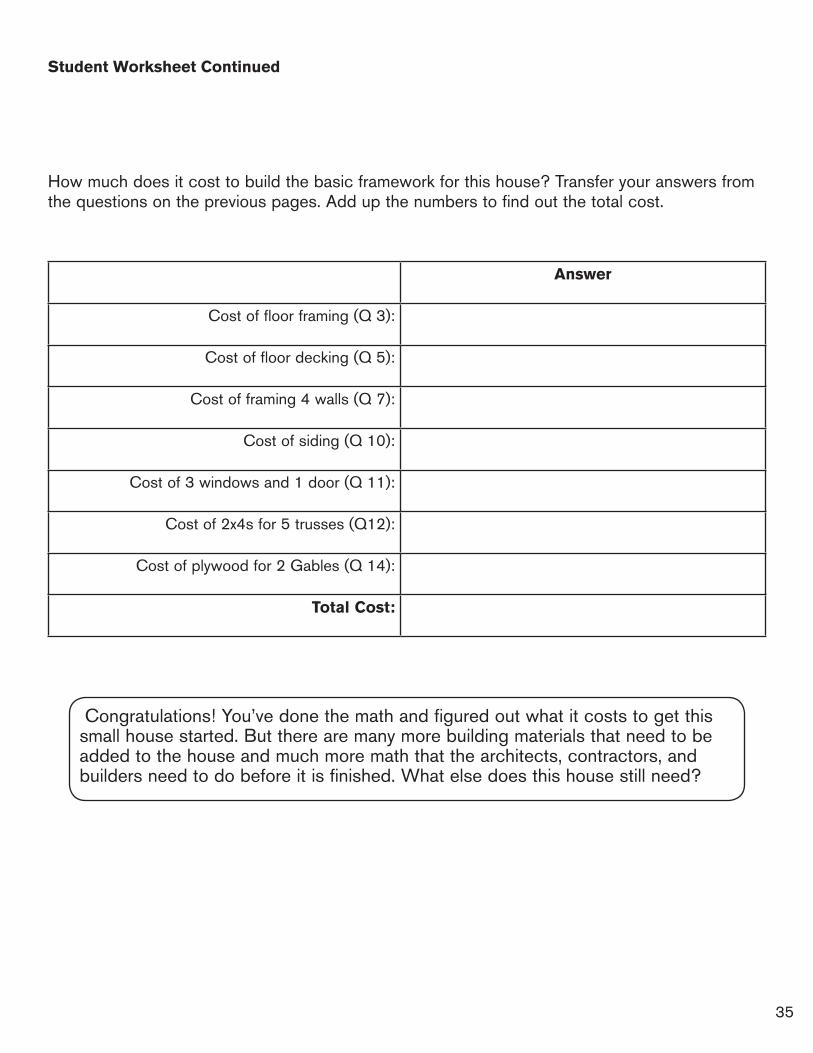
How much does it cost to build the basic framework for this house? Transfer your answers from the questions on the previous pages. Add up the numbers to find out the total cost.
Answer
Cost of floor framing (Q 3):
Cost of floor decking (Q 5):
Cost of framing 4 walls (Q 7):
Cost of siding (Q 10):
Cost of 3 windows and 1 door (Q 11):
Cost of 2x4s for 5 trusses (Q12):
Cost of plywood for 2 Gables (Q 14):
Total Cost:
Student Worksheet Continued
Congratulations! You’ve done the math and figured out what it costs to get this small house started. But there are many more building materials that need to be added to the house and much more math that the architects, contractors, and builders need to do before it is finished. What else does this house still need?

36
37
After visiting the National Building Museum, use these optional reinforcement lessons to strengthen the students’ understanding of the building process and sustainable design. Milli’s Insulation Investigation Testing Insulators Student Worksheet
What Did You Observe? Student Worksheet
Design Drawings: The Basics
Historic Plans of the National Building Museum
Plan, Section, Elevation Student Handout
Green or Not?
Green or Not? Student Worksheet
38
Milli’s Insulation Investigation*National Standards of Learning: English—1, 7, 8; Math—Algebra B; Science—A1, A2, B1, B2; Tech. Literacy— 5, 8, 13, 20Duration: 1-2 class periods or 1-2 hours
OverviewWhen it is cold, we have to heat our homes to keep them warm. When summer comes, we turn on fans
or air conditioning to keep our homes cool. Adding insulation to the walls helps decrease the amount of
energy used to heat or cool our homes. Insulation is one of the materials that impacts the greeness of our
homes. This experiment allows students to see how insulation works, by having them compare different
types of materials as insulation.*This activity was developed by the American Chemical Society (ACS) as part of their National Chemistry Week (NCW) publication, Celebrating Chemistry. It is reprinted with their permission. For more information about NCW and other ACS educational resources, visit www.acs.org.
ObjectivesStudents will:
• Identify how citizens impact their environment natural and built – through the choices they make in use of construction materials;
• Evaluate different insulating materials; and• Recognize the role of insulation in a house being environmentally
friendly
Materials• Scissors• Rulers• Pencils or pens• Aluminum foil• Newspaper• Plastic wrap• Wax paper• Testing Insulators Student Worksheet• What Did You Observe? Student Worksheet
Teacher Prep• Photocopy worksheets (1 for each group)• Review safety guidelines for conducting experiments with students• Gather supplies
Vocabulary • Insulation
• Chemistry
• Energy-efficient
• 5 identical ice cubes• Rubber bands• Paper towels• Baking tray• Watch or timer• Wire rack (optional)
39
Lesson Plan
1. What is Insulation?
• Explain to the students what insulation is. We want the temperature at home to be comfortable for living, no matter what the weather is like outside. When it is cold, we have to heat our homes to keep them warm. When summer comes, we turn on fans or air conditioning to keep our homes cool. Heat moves from a place where it is warmer to one where it is colder.
• To help keep your home comfortable inside, insulation is placed in the walls, where it works like a jacket around your home. The most common types of insulation used in homes are made from fiberglass and cellulose. Fiberglass is extremely fine strands of glass. Cellulose insulation looks like a pulpy, puffy form of just what it is: recycled newspapers, boxes and waste paper.
• Adding insulation to homes is a good way to save energy. In this activity you will test several different materials to find out which one is the best insulator.
2. Test the Insulators
• Divide the students into small groups. Work with the students to complete the following process of testing the insulators. Ask them follow the directions on the Testing Insulators Student Hand-out.
3. Discuss findings
• Discuss with students the results of their experiment. Which material was the best insulator? Why? Think about heating and cooling your home. If you didn’t have insulation in your walls, what would happen? Why is insulation energy-efficient? How does it save energy?
• Explain to the students that the wrapper that allowed more heat through to warm up the ice and melt it fastest is the worst insulator. The insulator that kept the heat away from the ice and melt-ed the ice the slowest is the best insulator. Metal tends not to be a good insulator because it transfers, or conducts, heat instead—in this case, the heat from the warmer air in the room to the cold ice. Materials like wood, cork, some plastics, and some fabrics, on the other hand, are good insulators because they are poor conductors. Whether a material conducts heat, and how quick-ly or slowly it does, is determined by its chemical make-up and arrangement. Chemists can study and tweak those designs to make new, high-tech materials that make everything from our houses more weather-resistant and energy-efficient to our parkas warmer and computers smaller!
Taking it Further
• Use a digital infrared thermometer (temperature gun) to measure and compare surfaces around your school (For example, black asphalt, gray concrete, brick, vinyl siding, or a grass field). Discuss the pros and cons of choosing these materials to use at the school.
40
1. Cut the aluminum foil, newspaper, plastic wrap, and wax paper to the same size for wrapping each ice cube.
2. Wrap one ice cube in each type of wrapper, being careful to wrap the cubes the same way each time.
3. Use a rubber band to hold each wrapper in place.
4. Cover the baking tray with a paper towel. Place the cubes on the baking tray. A wire rack may be placed on the tray to observe the cubes more easily.
5. Check the cubes every fifteen minutes and record your observations on the “What Did You Observe?” worksheet.
6. After the unwrapped cube has completely melted, or one and a half hours have passed, unwrap the cubes and observe how much ice is left inside each wrapper. Record your results on the “What Did You Observe?” worksheet.
7. Throw away the wet wrappers and paper towels. Thoroughly clean the work area and wash your hands.
Student Handout
Testing Insulators
41
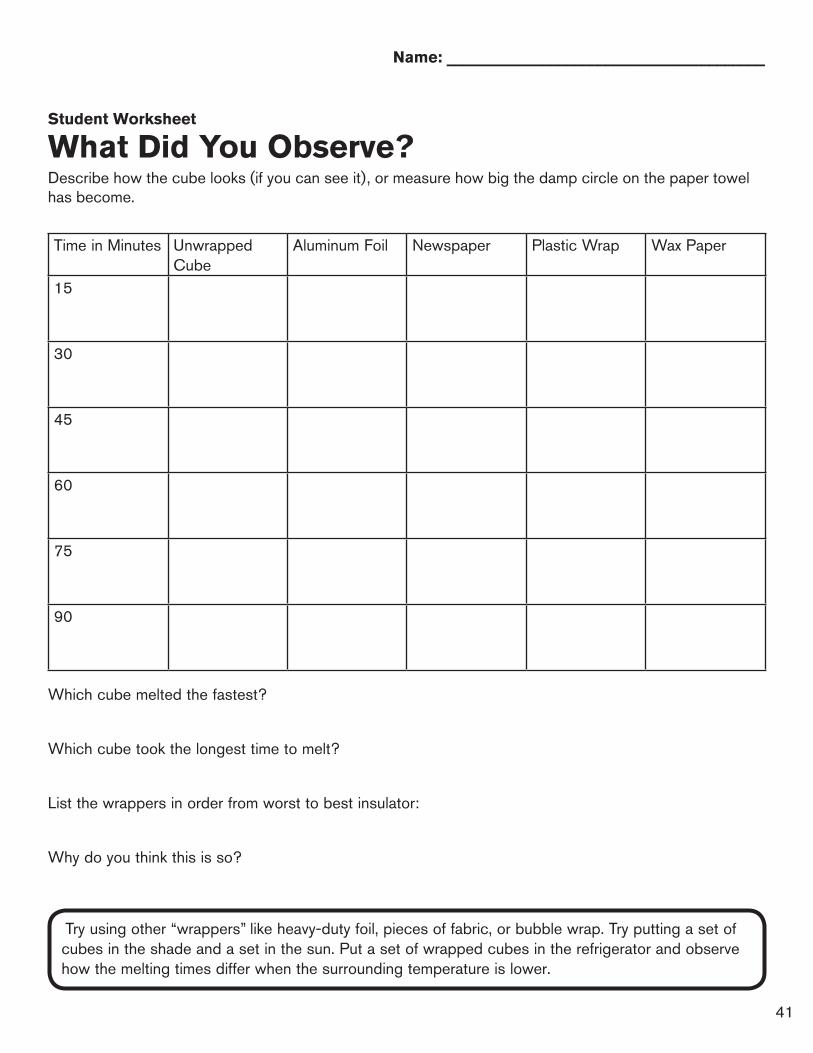
Describe how the cube looks (if you can see it), or measure how big the damp circle on the paper towel has become.
Time in Minutes Unwrapped Cube
Aluminum Foil Newspaper Plastic Wrap Wax Paper
15
30
45
60
75
90
Which cube melted the fastest?
Which cube took the longest time to melt?
List the wrappers in order from worst to best insulator:
Why do you think this is so?
Name: ________________________________________
Student Worksheet
What Did You Observe?
Try using other “wrappers” like heavy-duty foil, pieces of fabric, or bubble wrap. Try putting a set of cubes in the shade and a set in the sun. Put a set of wrapped cubes in the refrigerator and observe how the melting times differ when the surrounding temperature is lower.

42
Design Basics: Design Drawings National Standards of Learning: English—4, 7, 8; Math—Geometry D; Tech. Literacy— 8, 9, 11; Visual Arts—1a, 1b, 6a, 6bDuration: 50 minutes
OverviewArchitects and engineers plan buildings by making many kinds of drawings of their buildings. Each draw-ing or drawing set has a purpose that can include showing the client initial ideas, indicating the design of the landscape, or showing where the electrical and plumbing systems will be installed. This lesson teaches participants how to communicate information and ideas through three of the basic design drawings: plan, section, and elevation. These drawing types are universally recognized throughout the design community and enable a project to move from design to construction.
ObjectivesStudents will:
• explain the importance of universally recognized drawing types; and• identify and create basic plan, section, and elevation drawings.
Materials• Pencils and colored pencils • Blank paper• Bell peppers
Teacher Prep• Photocopy the Basic Design Drawings Student Handouts.• Purchase bell peppers. Cut some of the bell peppers in half vertically (i.e.
top to bottom) and cut some of the bell peppers in half horizontally (i.e. from left to right). Each student group should have one whole pepper, half of a pepper cut horizontally, and half of a pepper cut vertically.
• Request professional presentation and technical drawing examples of basic drawing types – plan, section, elevation – from local architects or use the examples included of the historic plans for the National Building Museum.
Vocabulary • Architect
• Elevation
• Plan
Teacher Tips
• This can be a great lesson for an artist or architect to teach. An artist can demonstrate the different drawing techniques, or an architect can explain and demonstrate the basic design drawings. If an artist or architect leads the class, ask him or her to give students a brief professional career synopsis. See a list of professional organizations in the resource section.
• Section
• Client
• Historic Plans of the National Building Museum
• Plan, Section, Elevation Stu-dent Handout
43
Lesson Plan
1. Importance of Basic Design Drawings (10 minutes)
• Post examples of design drawings on a white or black board; you may use the plans of the Be a Green Builder House or the National Building Museum included in this packet. Introduce the students to the idea of design drawings. Explain that a blueprint is an old method for copying these design drawings and the term is no longer commonly used by architects and design pro-fessionals.
• Have a discussion with students about the need for design drawings using the following series of questions:
• An architect is an individual who designs buildings and advises in their construction. How do you think architects use drawings? Answer: To sketch out ideas, to show others what a building will look like, to communicate ideas.
• Who uses the drawings architects create? Answer: Clients, engineers, construction managers, other individuals in the building trades. Be sure to discuss who these people are and what role they have in the construction process.
• Why is it important for architects to use the same basic drawing types? Answer: To communicate uniformly to individuals involved in the design and construction process. Using the same types of drawings and symbols is like speaking the same language.
• Why are there different kinds of design drawings? Answer: Each drawing contains only part of the information, to fully understand the final building the drawings needs to be used together, some drawings provide information for specific professions (carpenter, electrician, plumber)
• What might happen if every architect had a unique drawing style? Answer: On-site con-struction workers might misinterpret design; clients might not understand ideas. It would be hard to communicate ideas with someone who used a different visual language.
2. Introducing Plan, Section, and Elevation (5 minutes)
• Using a simple house as the subject or the included plans for the National Building Museum, show examples of each of the following drawing types while explaining each drawing type in simple terms:
• Elevation: the outside of a building being viewed from the front, side or back
• Plan: the top view of a building cut horizontally by an intersecting plane (i.e., birds’ eye view)
• Section: the inside of a building as it would appear if cut vertically by an intersecting plane (i.e., dollhouse view)
3. Sketching Plan, Section, and Elevation Drawings of Green Peppers (25 minutes)
• Post three pieces of chart paper. Each piece of paper should be labeled with a different type of design drawing, “Elevation,” “Plan,” or “Section.” Pass out the cut and whole peppers to each table of students.
44
• Using the peppers, model drawing elevation, plan, and section on the chart paper as the partici-pants sketch each one. Instruct participants to complete each drawing on a separate sheet of paper. Participants should only use pencils, erase if necessary, and take their time. Complete the drawings in the following order:
• Elevation: Demonstrate an elevation view by drawing the whole pepper from the side. Model how to sketch the whole pepper as an elevation. It is important to emphasize that elevation drawings do not include any perspective. Allow students five minutes to draw an elevation drawing using their whole peppers.
• Plan: Show participants a whole pepper, and then slice it in half horizontally. Ask if this rep-resents plan, section, or elevation. Model how to sketch the half pepper as a plan including details like the seeds, shadows, etc. Allow students five minutes to draw a plan drawing using their horizontally cut peppers.
• Section: Show participants a whole pepper, and then slice it in half vertically. Ask if this rep-resents plan, section, or elevation. Model how to sketch the pepper, this time as a section, continuing to use line weights and details. Allow students five minutes to draw a section drawing using their vertically cut peppers.
4. Closing (10 minutes)
• When participants have completed their pepper drawings, use these drawings to review with the class the characteristics of elevation, plan and section, and write these on the board.
• Which might be the most useful drawing for a client? For a construction worker? For a site supervisor?
• Why is it important to have all of these drawings?
• What other types of drawings might you need?
Taking it Further
• Have students draw a plan of their classroom or a room at home.
• Compare a painting, elevation drawing, and a photograph of the same building. What is the main reason for each type of image? What was the creator trying to show? Students can write about what they think the designer was trying to achieve.
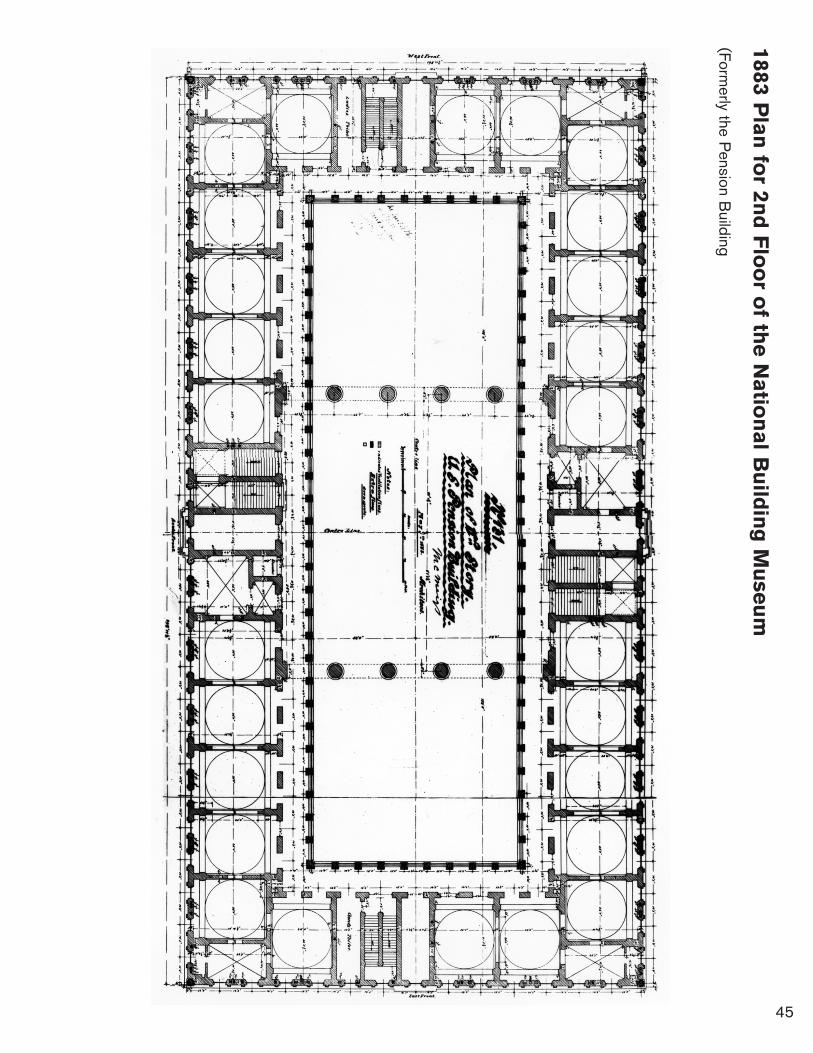
45
1883 Pla
n fo
r 2nd
Flo
or o
f the N
atio
nal B
uild
ing
Mu
seu
m
(Formerly the P
ension Building
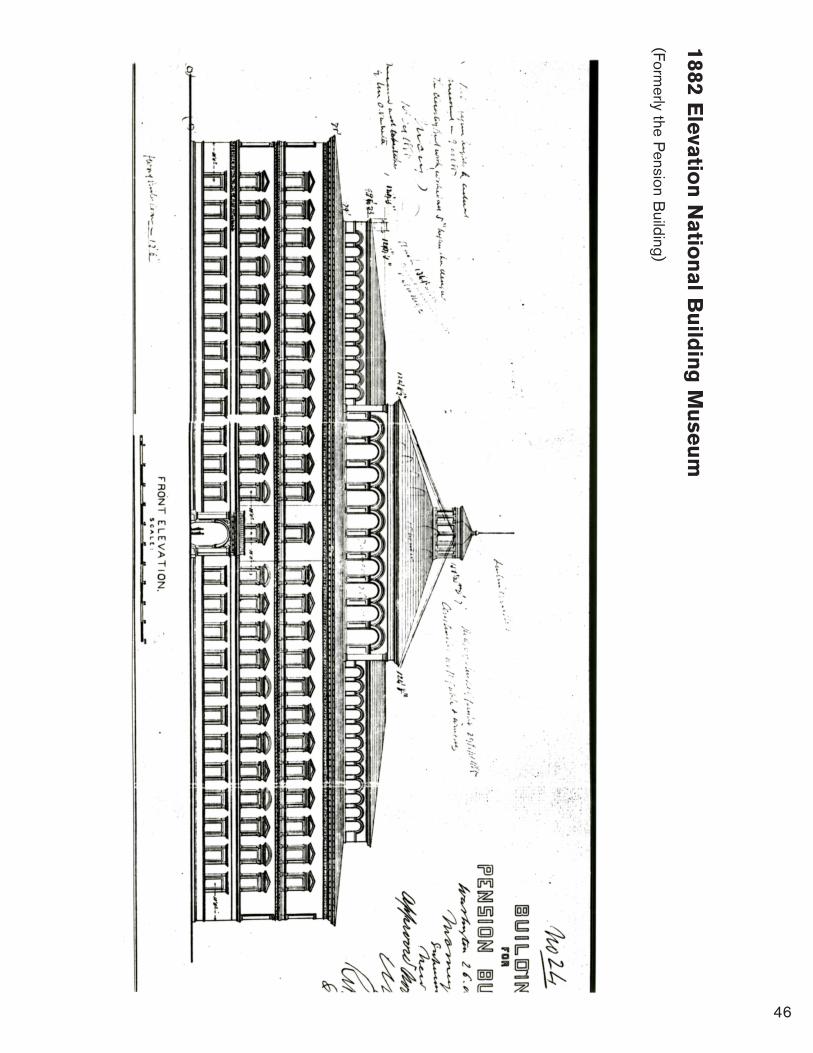
46
1882 Ele
vatio
n N
atio
nal B
uild
ing
Mu
seu
m
(Formerly the P
ension Building)
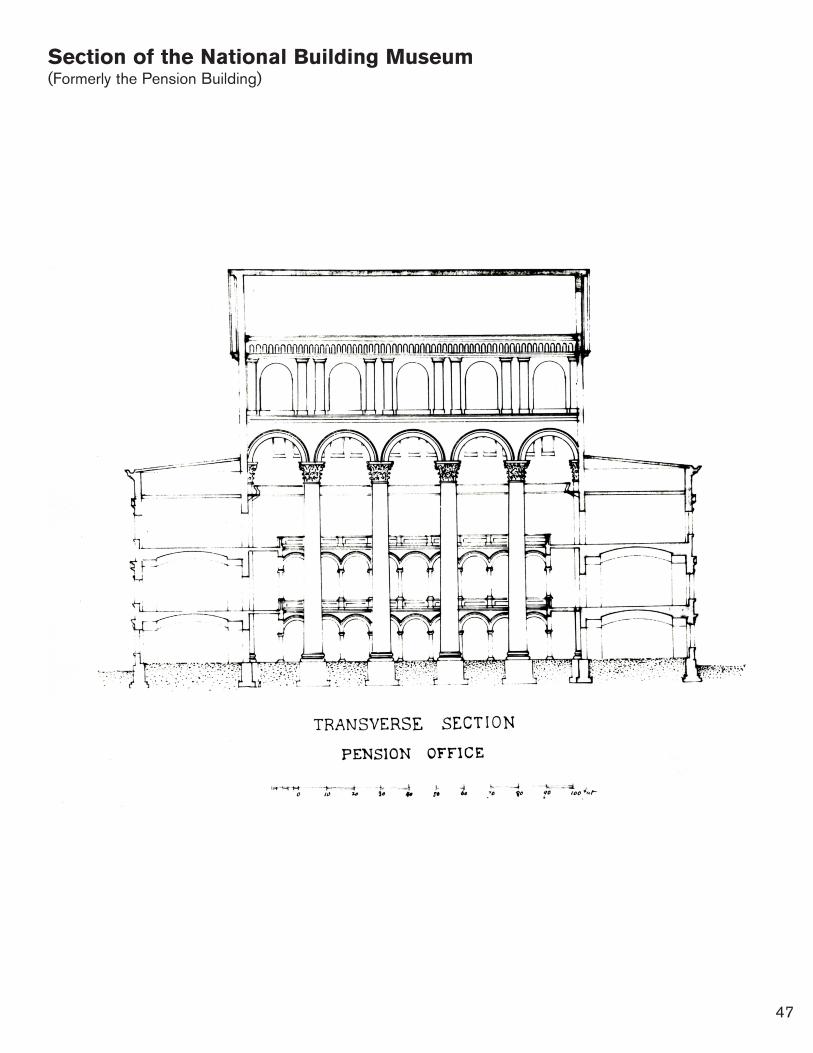
47
Section of the National Building Museum (Formerly the Pension Building)
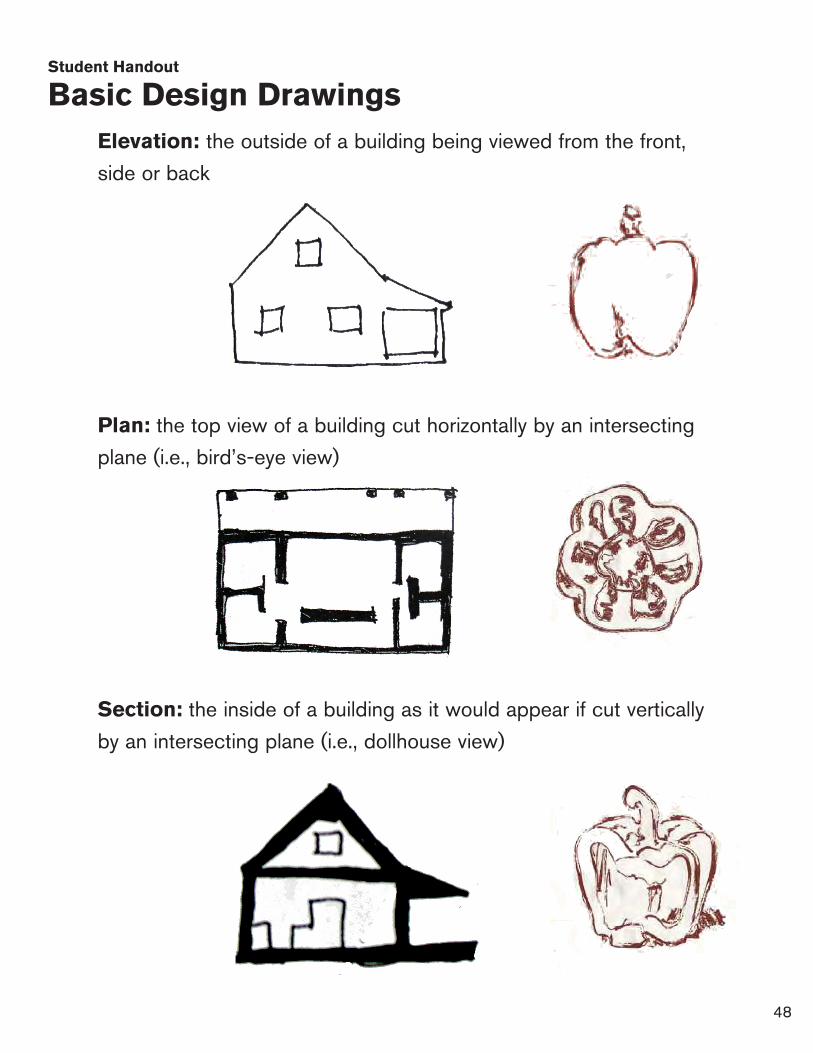
48
Student Handout
Basic Design DrawingsElevation: the outside of a building being viewed from the front,
side or back
Plan: the top view of a building cut horizontally by an intersecting
plane (i.e., bird’s-eye view)
Section: the inside of a building as it would appear if cut vertically
by an intersecting plane (i.e., dollhouse view)
49
Green or Not?National Standards of Learning: English—1, 7, 8; Science—A1, A2, E1, E2, F2; Tech. Literacy— 4, 5, 8, 9, 10, 13, 20Duration: 1 hour plus additional research time
OverviewDuring the Be a Green Builder program students learned about some of the green materials available for house construction. During this lesson students learn how to evaluate materials and about what character-istics make a material green.
Students will be introduced to some common green building materials. Students will compare two of these materials used for the same purpose (example brick and vinyl siding) and decide which one they think is “greener.” While evaluating the two materials students will come to realize that there is no “right” answer; instead, the choice of the architect depends on the specific building circumstances.
ObjectivesStudents will:
• Be introduced to some of the criteria that architects and designers use to measure a materials “greenness;”;
• Learn about some common green building materials; and• Understand that making material choices is an important component of
designing a green building.
Materials• Green or Not? Worksheet• Pens or pencils• Access to computer and internet to complete research
Teacher Prep• Photocopy worksheets (1 for each student group)
Vocabulary • green
• sustainable
• design
• insulation
• siding

50
Lesson Plan
1. Review Sustainable (Green) Design (5 minutes)
• Review the definition of green. Remind students that being green or environmentally friendly means meeting the needs of present generation without depleting the ability of future genera-tions to meet their own needs.
• Explain to students that Green Design or Sustainable Design means creating products or build-ings that are green and have the least amount of negative impact on the health of people, the economy of an area, and the environment.
2. Sustainable Design as a Process of Making Choices (5 minutes)
• During their visit to the National Building Museum they explored some materials choices as they constructed the Be a Green Builder house. Making choices about materials is a big part of designing green buildings. Discuss with students what criteria architects and designers might use when choosing a material for a green project. Brainstorm ideas with students; write their ideas down on the black or whiteboard. Some questions to consider include:
• Will the material give off fumes?
• Does it matter what natural resources are used to produce the product?
• Does the waste produced during the processing and disposal of a material make it more or less green?
• What role does transportation play in material choice? (Local materials require less gass and may produce less pollution to transport to the work site).
• Is the product waterproof, fireproof, mold-resistant, bug-resistant, wind-resistant, sun-proof? Does this affect how green the product is?
• Should you consider how long the product will last?
• Explain to students that during this activity they will act as architects and make critical decisions about what building materials to choose for constructing a house. Students will review, evaluate, and choose which materials they think are the best for constructing a green home.
3. Evaluate Object Pairs (35 minutes + homework)
• Pair the up students, making sure each pair choose two materials that are used for the same purpose (see list of suggestions at the end of this lesson). Ask students to research each material by gathering information from the internet. As they gather information they should refer to the criteria on the Green or Not? Student Worksheet. Use the student worksheet to evaluate the material pairs. Students may add their own criteria to the list that already exists.
• Ask students to decide which one of their pair is the most sustainable (or least harmful to the enviornment and future generations)?
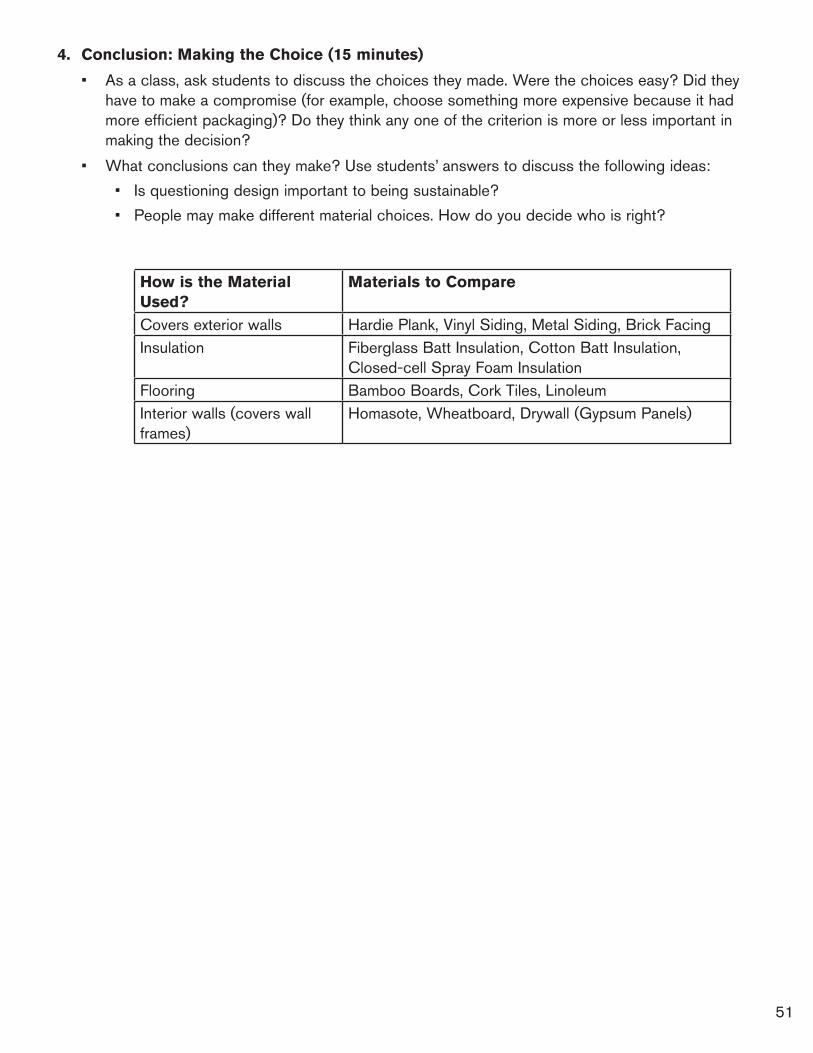
51
4. Conclusion: Making the Choice (15 minutes)
• As a class, ask students to discuss the choices they made. Were the choices easy? Did they have to make a compromise (for example, choose something more expensive because it had more efficient packaging)? Do they think any one of the criterion is more or less important in making the decision?
• What conclusions can they make? Use students’ answers to discuss the following ideas:
• Is questioning design important to being sustainable?
• People may make different material choices. How do you decide who is right?
How is the Material Used?
Materials to Compare
Covers exterior walls Hardie Plank, Vinyl Siding, Metal Siding, Brick FacingInsulation Fiberglass Batt Insulation, Cotton Batt Insulation,
Closed-cell Spray Foam InsulationFlooring Bamboo Boards, Cork Tiles, LinoleumInterior walls (covers wall frames)
Homasote, Wheatboard, Drywall (Gypsum Panels)
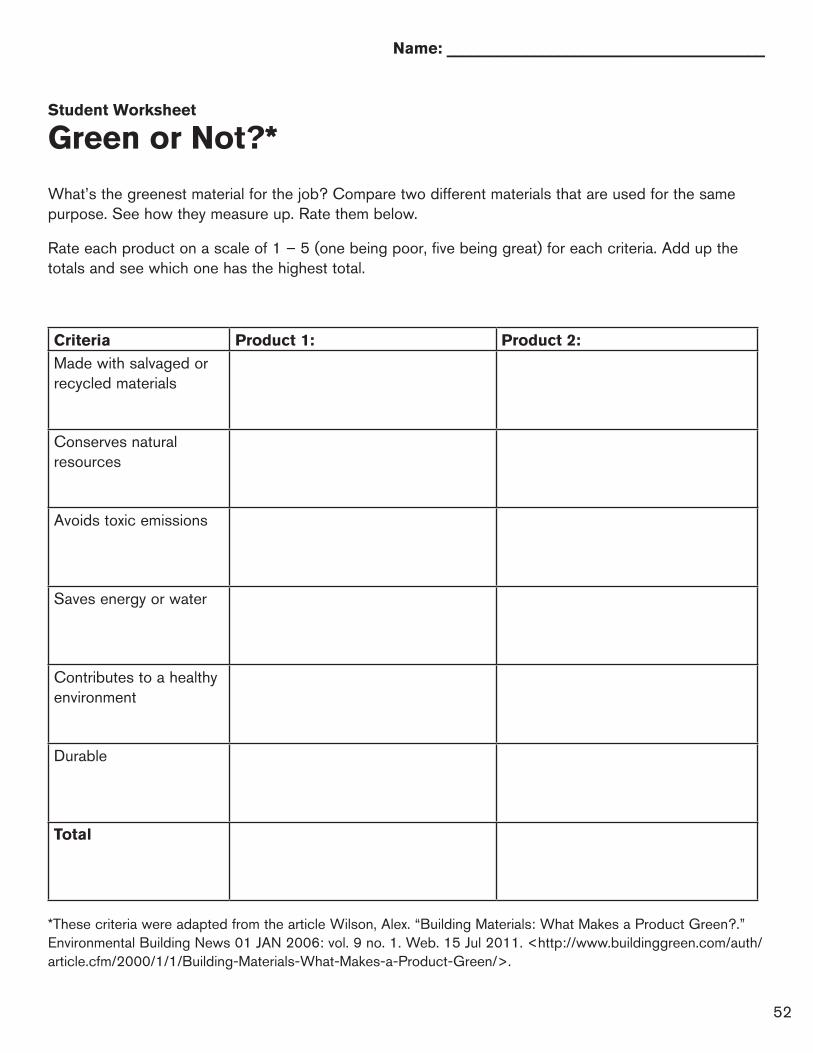
52
Name: ________________________________________
Student Worksheet
Green or Not?*
What’s the greenest material for the job? Compare two different materials that are used for the same purpose. See how they measure up. Rate them below.
Rate each product on a scale of 1 – 5 (one being poor, five being great) for each criteria. Add up the totals and see which one has the highest total.
Criteria Product 1: Product 2: Made with salvaged or recycled materials
Conserves natural resources
Avoids toxic emissions
Saves energy or water
Contributes to a healthy environment
Durable
Total
*These criteria were adapted from the article Wilson, Alex. “Building Materials: What Makes a Product Green?.” Environmental Building News 01 JAN 2006: vol. 9 no. 1. Web. 15 Jul 2011. <http://www.buildinggreen.com/auth/article.cfm/2000/1/1/Building-Materials-What-Makes-a-Product-Green/>.

53
Green Building: Here, There, and EverywhereGreen buildings are being built all around us, in locations that might surprise you. Identify a green building in or near your neighborhood. Contact the building owner or architect to arrange a tour of the building. Conduct interviews with people involved in the construction or manage-ment of the building. What factors influenced the material choices: budget, client needs, poli-cies or laws, etc? Who influenced the design decisions: architect, developer, client, residents, etc? How does this building benefit the community?
Resources: United States Green Building Council Project Profiles, https://new.usgbc.org/projects
Career ExplorationWhat does it take to be a green builder? Have students brainstorm careers in the building in-dustry that they would be interested in pursuing. Ask students to research what education and job skills are needed in these professions. Identify a local professional and have them visit the school or have the students visit them at work. Prepare a list of student questions for the visit.
Resources: The Bureau of Labor Statistics, www.bls.gov; Construct My Future, www.constructmyfuture.com; Career One Stop, www.careeronestop.org
Community Service BuildingA safe, comfortable, affordable home is something that everyone would like to have. What can you do to improve housing in your community? Gather a group together and volunteer time to build or repair a home.
Resources: Habitat for Humanity, www.habitat.org; Rebuilding Together, http://rebuildingtogether.org/
Where You Live: Take a Closer Look

54

55
Information in this section comprises the following:
Plans for the Be a Green Builder house
Architecture and Green Building Vocabulary
Books
Web sites
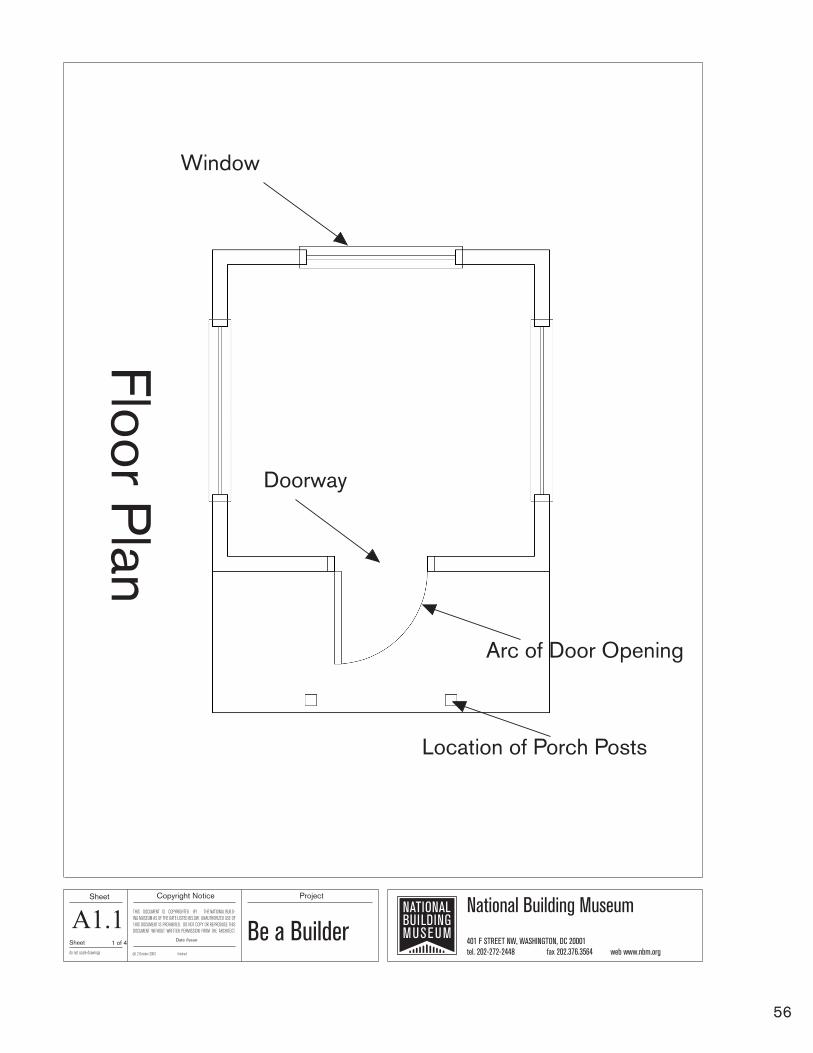
56
Floor Plan
Window
Doorway
Arc of Door Opening
Location of Porch Posts
National Building Museum
401 F STREET NW, WASHINGTON, DC 20001tel. 202-272-2448 fax 202.376.3564 web www.nbm.org
Sheet Copyright Notice
THIS DOCUMENT IS COPYRIGHTED BY THE NATIONAL BUILD-ING MUSEUM AS OF THE DATE LISTED BELOW. UNAUTHORIZED USE OF THIS DOCUMENT IS PROHIBITED. DO NOT COPY OR REPRODUCE THIS DOCUMENT WITHOUT WRITTEN PERMISSION FROM THE ARCHITECT.
Date /Issue Sheet
do not scale drawings
1 of 4
@ 2 October 2003 finished
Project
Be a BuilderA1.1
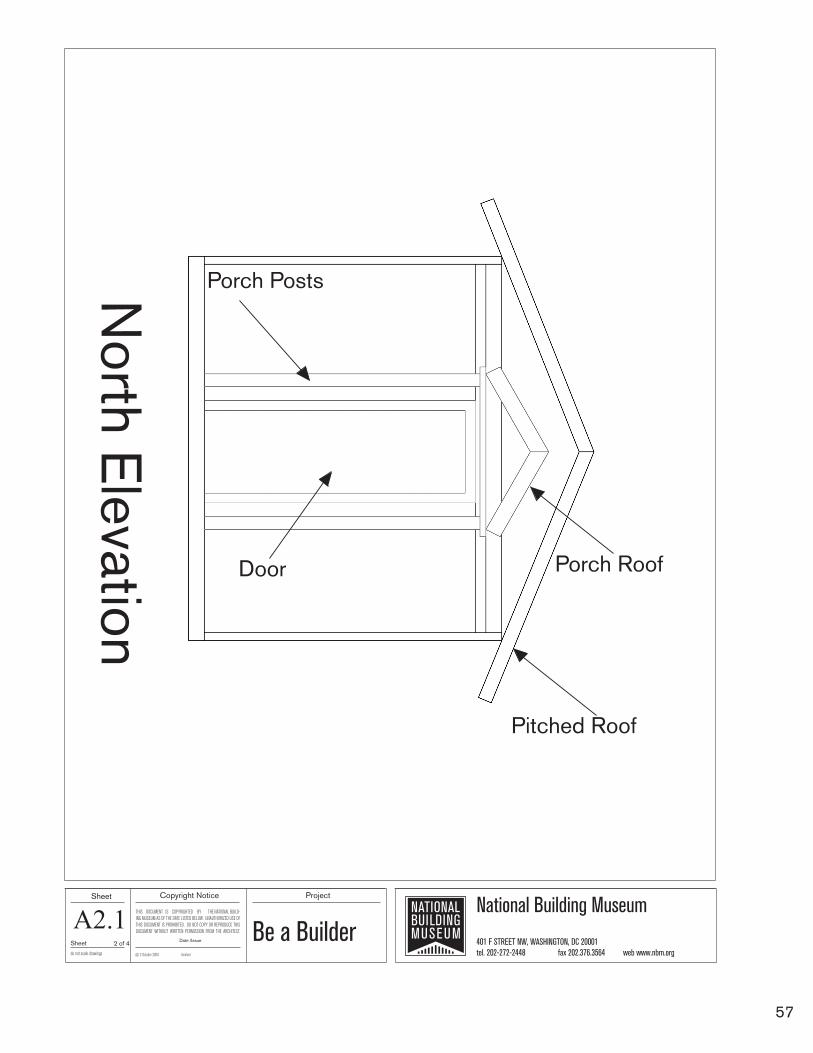
57
North E
levationPitched Roof
Porch RoofDoor
Porch Posts
National Building Museum
401 F STREET NW, WASHINGTON, DC 20001tel. 202-272-2448 fax 202.376.3564 web www.nbm.org
Sheet Copyright Notice
THIS DOCUMENT IS COPYRIGHTED BY THE NATIONAL BUILD-ING MUSEUM AS OF THE DATE LISTED BELOW. UNAUTHORIZED USE OF THIS DOCUMENT IS PROHIBITED. DO NOT COPY OR REPRODUCE THIS DOCUMENT WITHOUT WRITTEN PERMISSION FROM THE ARCHITECT.
Date /Issue Sheet
do not scale drawings
2 of 4
@ 2 October 2003 finished
Project
Be a BuilderA2.1

58
South E
levationPitched Roof
Window
National Building Museum
401 F STREET NW, WASHINGTON, DC 20001tel. 202-272-2448 fax 202.376.3564 web www.nbm.org
Sheet Copyright Notice
THIS DOCUMENT IS COPYRIGHTED BY THE NATIONAL BUILD-ING MUSEUM AS OF THE DATE LISTED BELOW. UNAUTHORIZED USE OF THIS DOCUMENT IS PROHIBITED. DO NOT COPY OR REPRODUCE THIS DOCUMENT WITHOUT WRITTEN PERMISSION FROM THE ARCHITECT.
Date /Issue Sheet
do not scale drawings
4 of 4
@ 2 October 2003 finished
Project
Be a BuilderA2.3

59
East E
levation
National Building Museum
401 F STREET NW, WASHINGTON, DC 20001tel. 202-272-2448 fax 202.376.3564 web www.nbm.org
Sheet Copyright Notice
THIS DOCUMENT IS COPYRIGHTED BY THE NATIONAL BUILD-ING MUSEUM AS OF THE DATE LISTED BELOW. UNAUTHORIZED USE OF THIS DOCUMENT IS PROHIBITED. DO NOT COPY OR REPRODUCE THIS DOCUMENT WITHOUT WRITTEN PERMISSION FROM THE ARCHITECT.
Date /Issue Sheet
do not scale drawings
3 of 4
@ 2 October 2003 finished
Project
Be a BuilderA2.2
Main Roof
Porch Posts
Porch Roof

60
Architecture and Green Building Vocabulary Architect A person who professionally designs large structures including buildings
Balloon Frame
A type of wood framed house which uses dimen-sional lumber (2×4, 2×6 etc.). The vertical wood studs run all the way from the foundation to the top of the second story. As compared to a platform framed house (see below).
Built Environment
Human-made surroundings, such as buildings, structures, parks, streets, bridges, etc.
Client
A person or company who is paying for the con-struction of a building.
Climate
The generally prevailing weather conditions of a region throughout the year, averaged over a series of years.
Conserve (Earth’s Resources)
To preserve and/or to use in such a way as to avoid waste
Daylighting
To light an interior space using natural light through the addition of translucent structures like windows or skylights
Durable
Long-lasting, strong, requires little maintenance
Elevation Plan
The outside of a building being viewed from the front, side or back
Energy-efficient
Using energy wisely and carefully to limit use and costs
Envelope
The “skin” of a building—including the windows, doors, walls, foundation, basement slab, ceilings, roof, and insulation—that separates the interior of a building from the outdoor environment
Environmental Impact
The effect of materials on the environmental quality inside your home and to the outdoor environment and atmosphere
Footprint
Land area taken up by a building
Fossil Fuels
Carbon-rich deposits in the earth, such as petro-leum (oil), coal, or natural gas, derived from the remains of ancient plants and animals and used for fuel; non-renewable energy
Foundation
The prepared base on which a structure rests; typi-cally made from masonry including concrete and brick
Geography
The study of the natural features of the earth’s sur-face, including topography, climate, soil, vegetation, and people’s response to those features
Green
Making environmentally friendly choices that use natural resources for present needs without deplet-ing those resources for future generations
Insulation
A material used to prevent or reduce the passage, transfer, or leakage of heat, electricity, or sound
Joist
Parallel beams of timber, steel, reinforced concrete, etc., used to support floors, ceilings, or similar structures
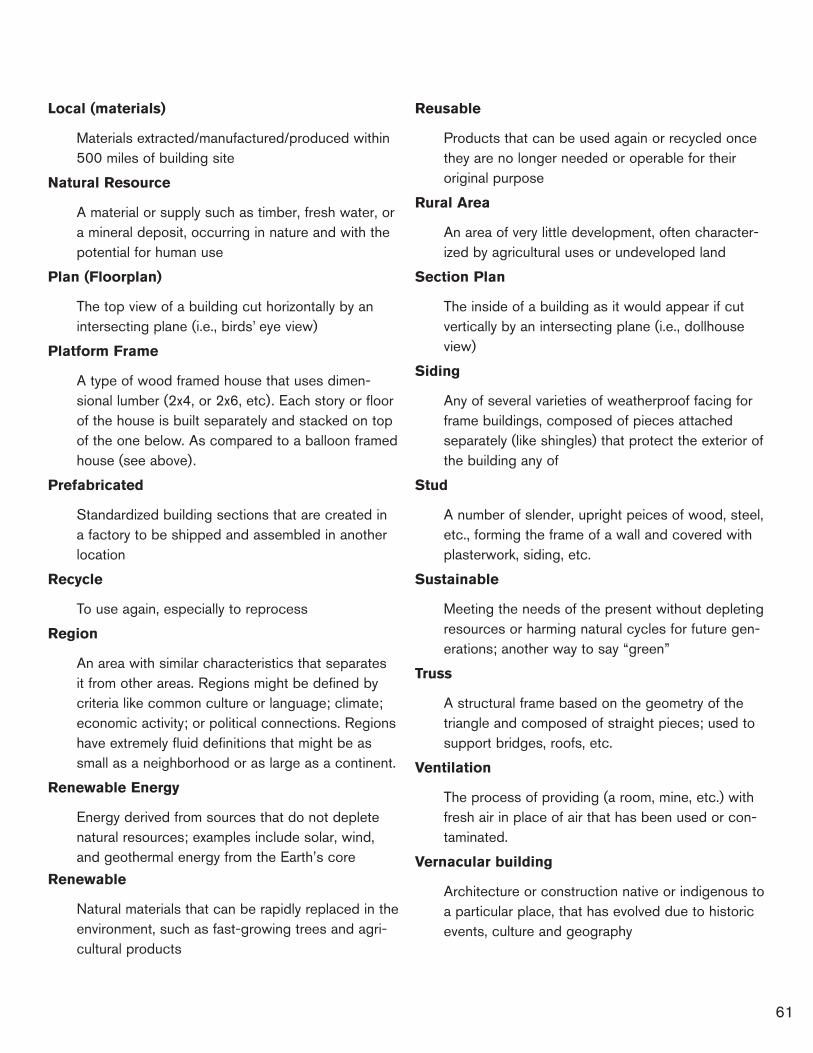
61
Local (materials)
Materials extracted/manufactured/produced within 500 miles of building site
Natural Resource
A material or supply such as timber, fresh water, or a mineral deposit, occurring in nature and with the potential for human use
Plan (Floorplan)
The top view of a building cut horizontally by an intersecting plane (i.e., birds’ eye view)
Platform Frame
A type of wood framed house that uses dimen-sional lumber (2x4, or 2x6, etc). Each story or floor of the house is built separately and stacked on top of the one below. As compared to a balloon framed house (see above).
Prefabricated
Standardized building sections that are created in a factory to be shipped and assembled in another location
Recycle
To use again, especially to reprocess
Region
An area with similar characteristics that separates it from other areas. Regions might be defined by criteria like common culture or language; climate; economic activity; or political connections. Regions have extremely fluid definitions that might be as small as a neighborhood or as large as a continent.
Renewable Energy
Energy derived from sources that do not deplete natural resources; examples include solar, wind, and geothermal energy from the Earth’s core
Renewable
Natural materials that can be rapidly replaced in the environment, such as fast-growing trees and agri-cultural products
Reusable
Products that can be used again or recycled once they are no longer needed or operable for their original purpose
Rural Area
An area of very little development, often character-ized by agricultural uses or undeveloped land
Section Plan
The inside of a building as it would appear if cut vertically by an intersecting plane (i.e., dollhouse view)
Siding
Any of several varieties of weatherproof facing for frame buildings, composed of pieces attached separately (like shingles) that protect the exterior of the building any of
Stud
A number of slender, upright peices of wood, steel, etc., forming the frame of a wall and covered with plasterwork, siding, etc.
Sustainable
Meeting the needs of the present without depleting resources or harming natural cycles for future gen-erations; another way to say “green”
Truss
A structural frame based on the geometry of the triangle and composed of straight pieces; used to support bridges, roofs, etc.
Ventilation
The process of providing (a room, mine, etc.) with fresh air in place of air that has been used or con-taminated.
Vernacular building
Architecture or construction native or indigenous to a particular place, that has evolved due to historic events, culture and geography
62
Books
Abhau, Marcy. Architecture in Education: A Resource of Imaginative Ideas and Tested Activities. Foundation for Architecture, Philadel-phia, 1986.
A series of hands-on activities for exploring architecture and the built environment. Available to download as a pdf from www.aiabookstore.com
Dean, Angela M. Green by Design: Creating a Home for Sustainable Living. Glybbs Smith: Lay-ton, Utah, 2003.
Includes information about the process of design-ing and building your own sustainable home.
Haun, Larry. Habitat for Humanity: How to Build a House Revised and Updated. Newton: Taunton Press, 2008
A step-by-step manual explaining how to construct a typical American house.
Roberts, Jennifer. Good Green Homes. Gibbs Smith: Salt Lake City, Utah, 2003.
Ideas to consider when constructing or designing a sustainable home.
Salvadori, Mario. Why Buildings Stand Up. New York: WW Norton & Company, 1980.
A clear explanation of how and why buildings stand up. Salvadori uses examples from ancient times to the 20th century to illustrate basic structural theory.
Salvadori, Mario. The Art of Construction. Chi-cago: Chicago Review Press, 1990.
Principles and projects for beginning architects and engineers. Some of these activities are appropriate for students to do.
Stang, Alanna and Christopher Hawthorne. The Green House: New Directions in Sustainable Architecture. Princeton Press: New York, New York, 2005.
A survey of contemporary house designs that were designed to be sustainable and have a low impact on the environment. Includes numerous photo-graphs and building plans.
Trask, Crissy. Its Easy Being Green: A Handbook for Earth-Friendly Living. Gibbs Smith: Salt Lake City, Utah, 2007.
Easy and practical tips for going green at home.
Wiland, Harry and Dale Bell. Edens Lost and Found: How Ordinary Citizens are Restoring Our Great American Cities. Chelsea Green Publish-ing: White River Junction, Vermont, 2007.
Part of a PBS series that suggests practical solu-tions to improve the environment and quality of life in cities.
Winters, Nathan B. Architecture is Elementary. Gibbs M. Smith, Inc.: Salt Lake City, Utah, 2005.
A guide to visual thinking through the examination of architecture.
Kaner, Etta. Earth-Friendly Buildings, Bridges and More. New York: Kids Can Press, 2012.
This colorful book is structured as a journal of Cory Lapont, an imanginary and inquisitive child. Cory explores how different types of buildings, bridges, and structures are both environmentally friendly and structurally sound.
Pease, Pamela. Design Dossier: Architecture for Kids. New York: Paintbox Press, 2011.
One of a series of books that introduces kids to design. This book describes the profession of architecture: its history and creative process. It includes profiles of contemporary architects and project ideas.
General
For Students
63
Web Sites
General:Center for Understanding the Built Environment www.cubekc.org
Educational organization that encourages educators and community organizations to work together to effect change in the built and natural environments. Offers award-winning curricula.
Commission for Architecture and the Built Envi-ronment www.cabe.org.uk/teachingresources
A United Kingdom organization that encourages the government to build safe, sustainable, beautiful and efficient communities. Numerous free curricula about the built environment.
D.C. Schoolyard Greening Consortium www.dcschoolyardgreening.org
The D.C. Environmental Education Consortium pro-vides teachers and administrators with resources for beginning their own schoolyard greening proj-ect.
design:e2 http://www.pbs.org/designe2/
A PBS series that explores the built environment and environmentally friendly architecture.
The EnviroLink Network http://www.envirolink.org/categories.html?catid=1
An online community listing environmental resourc-es.
Green Roofs for Healthy Cities www.greenroofs.org
Explanation of how green roofs work, as well as the benefits and components of green roofs.
Green Schools www.mcps.k12.md.us/departments/facilities/greenschoolsfocus
Learn more about the Green Building Program of Montgomery County Public Schools and other green programs in Maryland.
Healthy Schools Network http://www.healthyschools.org/index.html
Information and actions to create a healthy school environment for students and teachers.
U.S. Green Building Council: K-12 Curriculum and Programs http://www.usgbc.org/DisplayPage aspx?CMSPageID=1887
A list of award winning green building curricula and programs.
Student Activities:Bobbie Bigfoot http://www.kidsfootprint.org/
Online student activity to measure ecological foot-print, as well as classroom lesson plans about envi-ronmental responsibility.
Energy Hog http://www.energyhog.org/
Online activity that teaches students about energy efficiency and how to save energy. Teacher and student guide for 3rd through 6th grade available to print out.
The Green Squad http://www.nrdc.org/greensquad/intro/intro_1.asp
The Green Squad is an interactive web site that teaches students about the relationship between their schools and environment. The site is primarily for students in 5th through 8th grade, but also has information for teachers.www.greenroofs.org

64
Professional Organizations:
The American Institute of Architects www.aia.org
National professional association of architects.
Associated Builders and Contractors www.abc.org/
A national association representing construction and construction-related firms.
The Associated General Contractors of America www.agc.org
A national association for the construction industry.
National Association of Home Builders www.nahb.org
A national trade association of home builders dedi-cated to improving housing affordability, availability, and choice.
National Association of Women in Construction www.nawic.org
A national organization designed to create a sup-port system for women in construction and to enhance the success of women in the construction industry
United States Green Building Associationwww.usgbc.org
A national organization dedicated to ensuring that buildings are designed, built and operated in a sustainable way.
The list below represent a selection of assocations and organizations related to the building industry. Many of these groups have local chapters with members who may be willing to speak to your class.
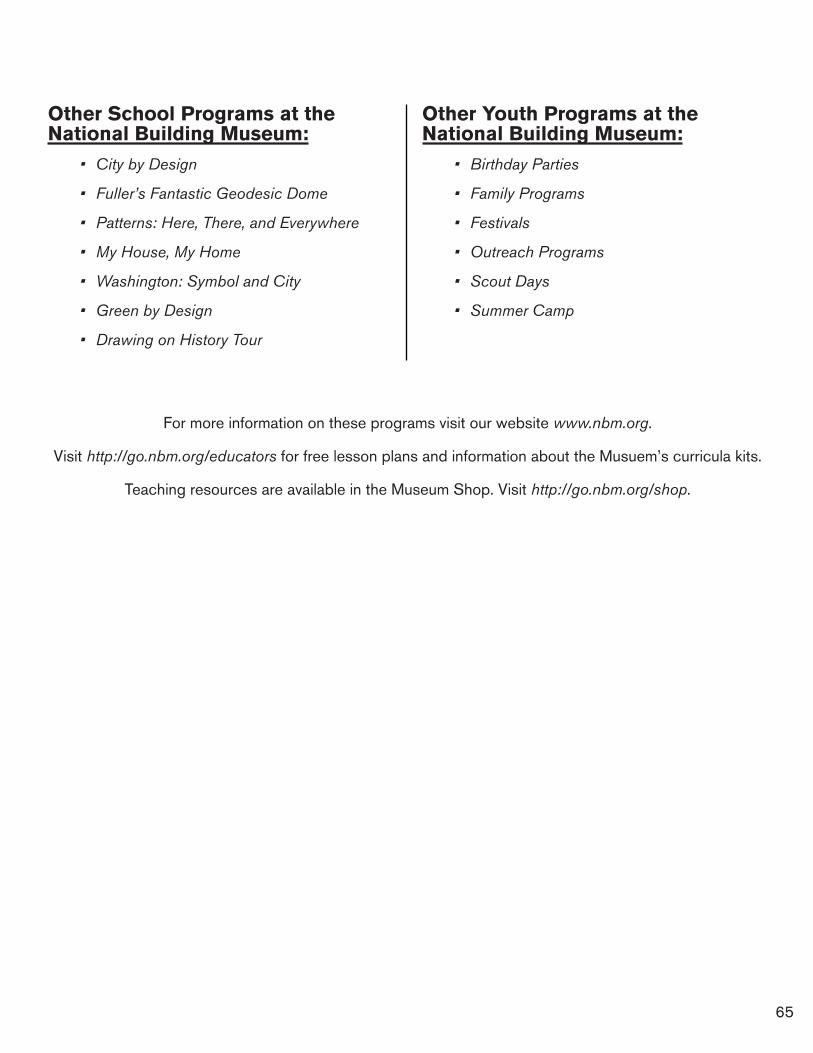
65
Other School Programs at the National Building Museum:
• City by Design
• Fuller’s Fantastic Geodesic Dome
• Patterns: Here, There, and Everywhere
• My House, My Home
• Washington: Symbol and City
• Green by Design
• Drawing on History Tour
Other Youth Programs at the National Building Museum:
• Birthday Parties
• Family Programs
• Festivals
• Outreach Programs
• Scout Days
• Summer Camp
For more information on these programs visit our website www.nbm.org.
Visit http://go.nbm.org/educators for free lesson plans and information about the Musuem’s curricula kits.
Teaching resources are available in the Museum Shop. Visit http://go.nbm.org/shop.

NATIONAL BUILDING MUSEUM | 401 F Street, NW Washington, DC 20001 | 202-272-2448 | www.nbm.org
MuseumHoursMon – Sat 10:00am – 5:00 pm, Sun 11:00 am – 5:00 pmLocation401 F Street NW, between 4th and 5th Streets Red Line Metro, Judiciary Square
The National Building Museum tells the stories of architecture, engineering, and design. The Museum offers something for everyone, from children to design buffs to building professionals. The engaging exhibitions and all-ages programming showcase the world people design and build.