building a simple nxt treaded robot...start motor mounts make two (mirrored): • connect a 3x5...
TRANSCRIPT

Building a Simple NXT Treaded Robot
by Tom Bickford
Maine Robotics
© 2009

Parts List (79 pieces total)
• (1) NXT• (2) motors• (2) wires• (4) 6x12 plates
– Or (12) 2x12 plates
• (4) 1x16 Technic bricks• (2) 1x8 Technic bricks• (1) 6x8 Technic brick (square)• (1) 2x4 brick• (1) 2x8 brick• (2) treads• (4) sprockets• (2) 16 tooth gears
• (2) #10 axles• (2) #8 axles• (1) 9-hole technic lift arm• (2) 9-hole bent technic lift arm• (4) 3x5 Technic “L” lift arm• (22) Technic short friction pins
(black)• (4) Technic axle-pins• (8) Full bushings• (8) Technic long friction pins
with full bushing (black)

Start the Chasis
Make two:• Connect two 1x16 Technic Bricks
using two black Technic friction pins• Use the first hole in on one end and
the second hole in on the other end

Start Motor Mounts
Make two (mirrored):• Connect a 3x5 “L” Technic lift arm to the
chassis piece• Mirror the two sides• The “L” piece should connect to holes 3
and 5 and be on the end that had a pinin hole #2

Connect the Motors
Make two (mirrored):• Connect the two motors using two
long Technic friction pins with end bushing
• Mirror the two sides• The “L” piece will connect using the
2nd and 4th holes on the long side

Motor Mount complete
Make two (mirrored):• Note that the order goes:
• 1x16 chassis section• 3x5 Technic Lift arm• Motor

Add the Drive Axle and Sprocket
Make two (mirrored):• NOTE: The axle hole on the
motor should line up with the first hole on the 1x16 technic blocks.
• Put a #10 axle through the hole and through the motor
• Place the bushing on the axle
• Place the sprocket on the axle
• Finish with the 16 tooth gear on the axle, and it should nestle into the sprocket

Finished drive axle and adding the support axle and sprocket
Make two (mirrored):• NOTE: The second axle must go
through the 3rd hole on the other end of the 1x16 technic brick. Treads must always be 13 holes apart (11 holes between the axles)
• Put a #8 axle through the hole• Place a bushing on each side of
the chassis blocks with most of the axle on the side away from the motor side
• Place the sprocket on the axle• Finish with a last bushing on the
axle, and it should nestle into the sprocket

Chassis Side Assembly
Make two (mirrored):• Completed side assembly,
ready for tread

Pair of Sides Assembled
NOTE: Extra axle length can be pushed to the inside, (and adjust the inside bushings) before putting plates on.

Add Decking
Complete Chassis:• Place 6x12 plates on top of deck,
starting at the front, leaving no deck at the back (motor) end of the chassis.

Add spacers to Chassis
Add Spacers:• Using a 1x8 Technic Brick, a 2x8
brick and a 2x4 brick as shown, add spacers onto the bottom of the 6x12 plates.
• These spacers will serve three purposes.
• They will add strength between the top and bottom of the chassis
• The Technic brick at the front will give you technicholes to attach to if needed.
• The middle 2x8 brick will also support the seam between the two plates.

Finish the Chassis
Finish the Chassis:• Add the last two 6x12 plates to
the bottom of the chassis and make sure the plates and bricks are securely fastened.

Add Motor Cross Support
Cross Support:• Using a 1x9 Technic Lift
arm and 4 short Technic friction pins, secure the two motors together.

NXT Attachment
NXT Attachment:• Assemble the parts as
show:• (2) 3x5 “L” Technic
Lift arms with 2 long friction pins with stop bushing on each as shown.
• Two #9 bent Technic Lift arms with 4 black friction Technic pins and 2 Technic axle-pins on each as shown.
• NOTE: Each is a mirror of the other

Assemble the NXT Holder
NXT Attachment:• Assemble the parts as
show:• Connect the 3x5 and
#9 bent Technic Lift arms together as shown.
• Attach a 1x8 Technic brick to the long side of a 6x8 Technic square using 2 Technic friction pins (black)

Alternate NXT Attachment Base
If you don’t have a 6x8 Technic Square, you can build the equivalent using five 1x8 Technic bricks, 6 friction pins, and four 2x6 plates as shown.
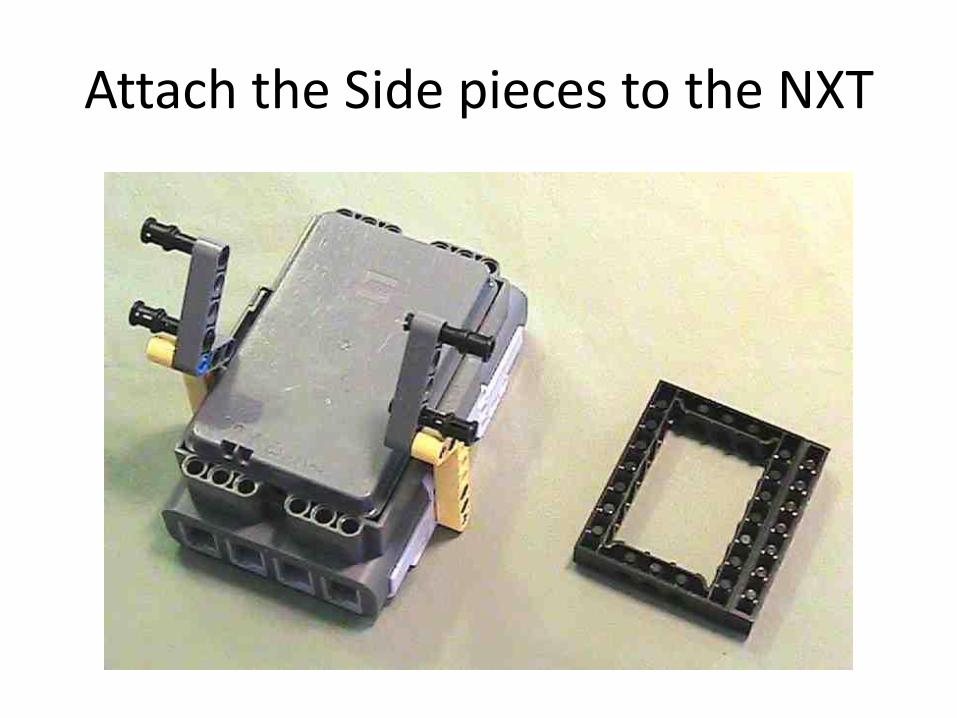
Attach the Side pieces to the NXT

Attach the Side pieces to the Base using 4 long friction pins with full bushings

Finished assembly
NXT Attachment:• NOTE:
• The NXT is 9 knobs wide, so you will always have an odd number to build if you want to attach it to your robot.
• This is usually done (as is here) by adding an extra brick, beam, or lift arm to widen your assembly.

Adding the NXT to the Base
NXT Attachment:• The NXT base is
ready to attach directly to the Chassis base.
• Place it as far back (to the motors) as possible to keep the weight well balanced.
• NOTE: The NXT is an odd number of knobs wide, but the Chassis is an even number, so it will be off center by one knob.

Assembled - Complete with Wires

Total of 79 pieces
Credits
• This material may be used for non-commercial educational applications as long as full credit to Maine Robotics is provided and this material is copied or printed as shown.
• For commercial or other applications, contact Maine Robotics at [email protected].
• Copyright 2009, all rights reserved.