building archydro using national hydrography - purdue university
TRANSCRIPT
1
Building ArcHydro using National Hydrography Dataset
Prepared by
Venkatesh Merwade
School of Civil Engineering, Purdue University
November 2010
Introduction
ArcHydro is a common ArcGIS geodatabase model for storing geospatial and temporal hydrologic
data in a structural manner. A geodatabase or data model is different from simulation models (eg.
HEC-RAS, HEC-HMS, and SWAT) because it does not simulate or model any physical or
environmental processes. A data model is just a framework for storing data in a standard format.
A data model is like a book shelf or a computer folder where books or files are organized in a
specific way depending on their content, use and other factors. In a geodatabase model, the data
are organized in specific feature classes, with each feature class having specific fields, and some
of the feature classes are linked depending on their links in the hydrologic system. For example,
a stream gauging station is linked to a particular river reach, which is then linked to the
watershed. The objectives of this exercise are to (a) apply ArcHydro schema to an empty
geodatabase; (b) populate the new ArcHydro geodatabase with NHD (National Hydrography
Dataset) stream network, watershed boundary, and USGS gaging station, (c) build a hydro-
network for tracing water, and (d) use ArcHydro toolbar to populate some ArcHydro feature
attributes.
Computer Requirements
You must have a computer with windows operating system, and the following programs
installed:
1. ArcGIS 9.3 (with ArcInfo)
2. ArcHydro tools (version that works with 9.3)
Make sure the ArcHydro tools (version that works with 9.3) are installed on the system. There
are lots of ArcHydro tools available on the internet. The version that is used in this tutorial, and
the installation instructions are available at the following link.
ftp://ftp.ecn.purdue.edu/vmerwade/download/data/tools.zip
You will need to have administrative access to install these tools.
Data Requirements and Description
The data files used in this exercise consist of NHD data for Cedar Creek in northeast Indiana,
which include stream network, USGS gaging station location, watershed boundary and water
2
bodies. Although the data are provided with this exercise, the steps involved in downloading the
NHD data from the USGS website are described in the following document: ` 1
http://web.ics.purdue.edu/~vmerwade/education/ned_nhd.pdf
It is highly recommended that you go through the exercise of downloading the data to make
yourself aware of the procedure involved. The St. Joseph River data downloaded from the NHD
website are clipped for the Cedar Creek area using the Cedar Creek watershed boundary.
Download the data from ftp://ftp.ecn.purdue.edu/vmerwade/download/data/archydro.zip
Unzip archydro.zip in your working directory. The unzipped data should contain two files:
NHD_stjoseph.mdb (geodatabase) containing the data and
ArcHydroFrameworkWithTimeSeries.xml containing the ArcHydro schema. The ArcCatalog-
view of the data folder with expanded view of NHD_stjoseph.mdb and its featured datasets is
shown below (Note: tables and relationship classes are not shown):
All feature classes that have “_cedar” suffix are clipped to the Cedar Creek watershed, which is
stored in Watershed_cedar. We will use only these feature classes in creating the ArcHydro data
model. NHDFlowline_cedar contains the stream network, NHDWaterbody_cedar contains water
bodies, NHDPoint_cedar contains gaging stations, NHDPoint_cedar_snapped contains the same
data in NHDPoint_cedar, but these points are snapped to the NHDFlowline_cedar to create a
network.

3
Getting Started
Create an empty ArcHydro geodatabase by applying ArcHydro schema
Open ArcCatalog. In your working folder create an empty geodatabase named
Cedar_ArcHydro.mdb. To do this right-click on your working folder, select NewPersonal
Geodatabase, and name it as Cedar_ArcHydro.mdb.
Next, we will apply the ArcHydro schema to Cedar_ArcHydro.mdb. The schema is stored in the
ArcHydroFrameworkWithTimeSeries.xml file. You should be able to see the xml file from ArcCatalog.
Double click on the xml file to open the document in a web browser.

4
This xml file describes the feature classes, tables, fields, and relationships defined in the ArcHydro with
Time Series schema as described in Chapters 2 and 7 of the ArcHydro book.
To apply the schema to the empty geodatabase just created (Cedar_ArcHydro.mdb), right-click on the
geodatabase and select ImportXML Workspace Document…
Choose the Schema Only option, browse to the ArcHydroSchemaWithTimeSeries.xml file, and click Next.

5
In the next window, where you see the names of different feature classes, click Finish, and you should see
a progress bar importing the schema to the new geodatabase.
After the schema is imported, select the working directory, refresh ArcCatalog by pressing F5, and look
at Cedar_ArcHydro.mdb. Refreshing ArcCatalog is important, or you won’t be able to see the ArcHydro
structure applied to Cedar_ArcHydro.mdb. Expand Cedar_ArcHydro.mdb and the feature dataset inside
it to see the names of feature classes that can store various types of hydrologic data. It also has
relationships (HydrojuctionHasMonitoringPoint, MonitoringPointHasTimeSeries, TSTypeHasTimeSeries,
etc.) and tables. Notice the structure of the geodatabase, different symbols that represent feature dataset,
feature classes (points, lines, and polygons), relationships and tables.
To preview attribute table of any feature class, select the feature class, and on right hand side window of
ArcCatalog, select the Preview tab. At the bottom of this tab, choose to preview the Table instead of
Geography. You will notice that there are no features in the feature class, but the feature class has
ArcHydro attributes (HydroID, HydroCode, etc).
The next critical step after a new geodatabase is created is to insure that a proper coordinate system is
defined for the data. If you right-click on ArcHydro feature dataset, and select the Properties menu, you
will see that the spatial reference associated with the schema is already applied to the newly created
feature dataset.

6
We will leave this coordinate system unchanged because it is applicable to the Cedar Creek data. If the
coordinate system needs to be changed, you can press the edit button, and define/import appropriate
coordinate system, but we will skip this step in this exercise, and adopt the pre-defined coordinate system.
Now we have an empty ArcHydro geodatabase for Cedar Creek with an appropriate coordinate system
defined. The next step is to populate this geodatabase with some data. In this exercise, we will populate
HydroEdge with NHDFlowline_cedar, MonitoringPoint with NHDPoint_Cedar, HydroJunction with
NHDPoint_cedar_snapped, Watershed with Watershed_cedar, and Waterbody with Waterbody_cedar.
Loading data into ArcHydro database
The empty Cedar_ArcHydro.mdb already has an empty geometric network HydroNetwork
in the ArcHydro feature dataset. HydroNetwork is formed from HydroEdge and
HydroJunction which are also empty. To have features in HydroNetwork, we need to add data to
HydroEdge and HydroJunction feature classes. Because HydroNetwork is linked to HydroEdge and
HydroJunction feature classes, it will not allow adding features to these feature classes so it is necessary
to delete the network, populate data into HydroEdge and HydrJunction, and then rebuild the network.
Go ahead and delete HydroNetwork from ArcHydro feature dataset. Now, we are ready to import data
into ArcHydro.
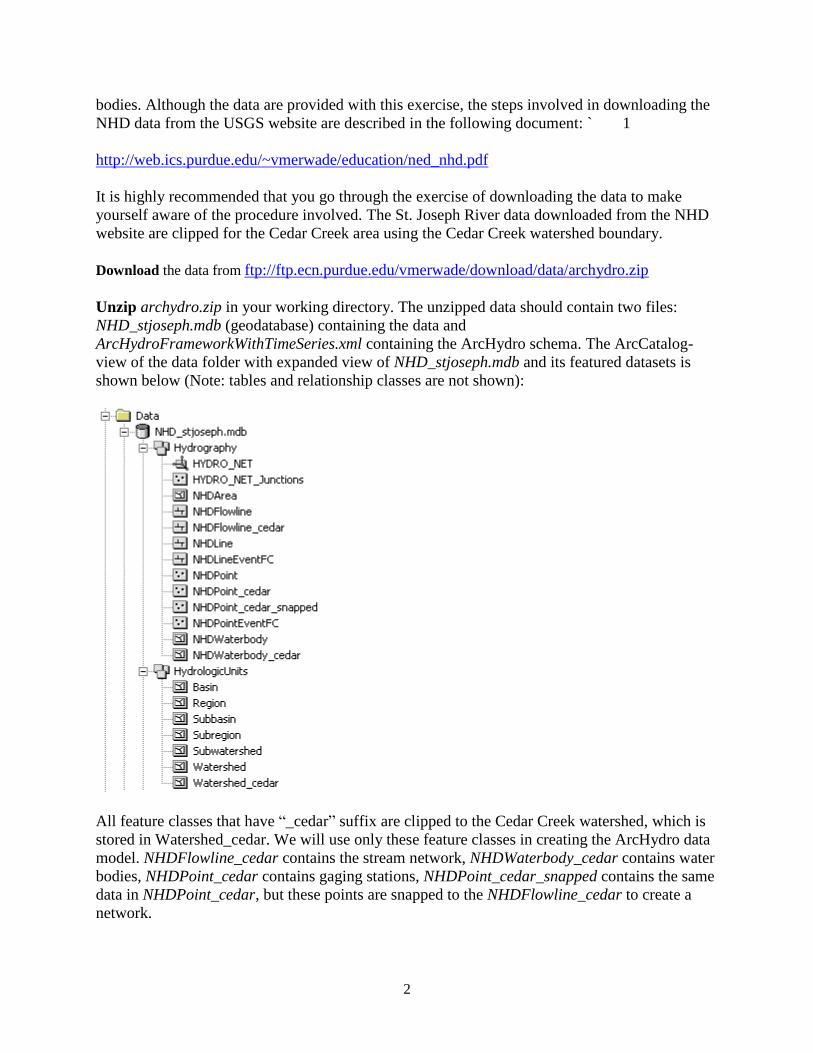
In the ArcHydro feature dataset (inside Cedar_ArcHydro.mdb), right-click on HydroEdgeLoadLoad
Data… (If the Load Data button inactive, you probably forgot to delete HydroNetwork! Delete the
HydroNetwork, and then right-click).
7
In the Simple Data Loader window, browse to NHDFlowline_cedar feature class in NHD_stjoseph.mdb,
click Add (to add the data to List of source data to load window), and then click Next.
Keep the defaults on the next window (you do not want to load the data into a subtype). Click Next.
On the next window, make one change. Set the matching source field for HydroCode to be ComID. In
ArcHydro, the HydroCode is the permanent public identifier of the feature that was assigned by the
agency that created it. The HydroID is an internal ArcHydro identifier that is assigned by the ArcHydro

8
tools and is used for relating ArcHydro features to one another and to time series associated with them.
The ComID is a unique identifier for NHD features, so it makes sense to use this as the HydroCode. Click
Next.
Leave the default option (Load all the source data) unchanged on the next window, and Click Next.
Click Finish on the summary window to complete the data load.
Once the process has completed, refresh your geodatabase (Hit F5 in ArcCatalog). You should see the
HydroEdge feature class populated. You can see the features in the Preview tab by using the Geography
view.
9
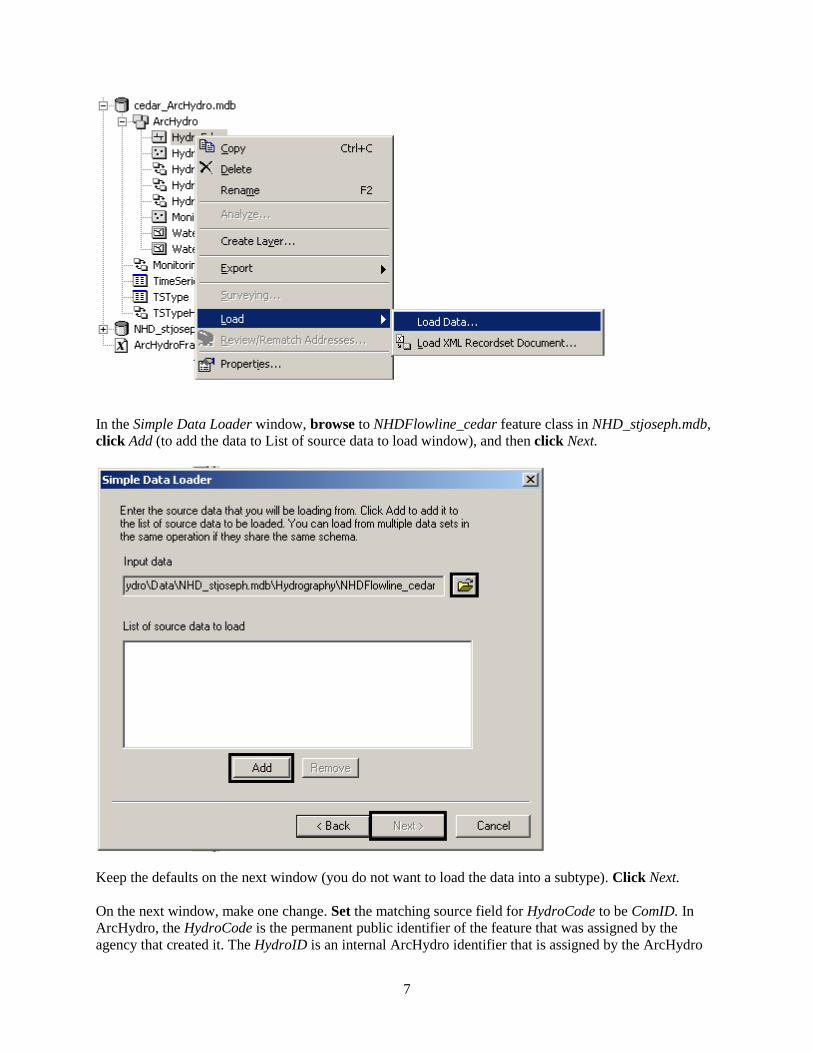
Now let us load features into HydroJunction feature class. Right-click on HydroJunctionLoadLoad
Data. In the simple data loader window, browse to NHDPoint_cedar_snapped feature class in
NHD_stjoseph.mdb, click Add, and then Click Next. Set the matching source field for HydroCode to be
StationID, click Next, and then click Finish to complete the data import.
Similarly load data from NHDPoint_cedar to MonitoringPoint feature class in Cedar_ArcHydro by
matching HydroCode to StationID, and Name to GNIS_Name.

10
Next, load data from NHDWaterbody_cedar in NHD_stjoseph.mdb to Waterbody feature class in
Cedar_ArcHydro by matching ComID to HydroCode, Name to GNIS_Name, and AreaSqKm to
AreaSqKm.
Finally load data from Watershed_cedar feature class in HydrologicUnits feature dataset in
NHD_stjoseph.mdb to Watershed feature class in Cedar_ArcHydro.mdb by matching Name field to
HydroCode.
Now, let us build the geometric network (HydroNetwork) using the HydroEdge and HydroJunction
feature classes.
Building the HydroNetwork
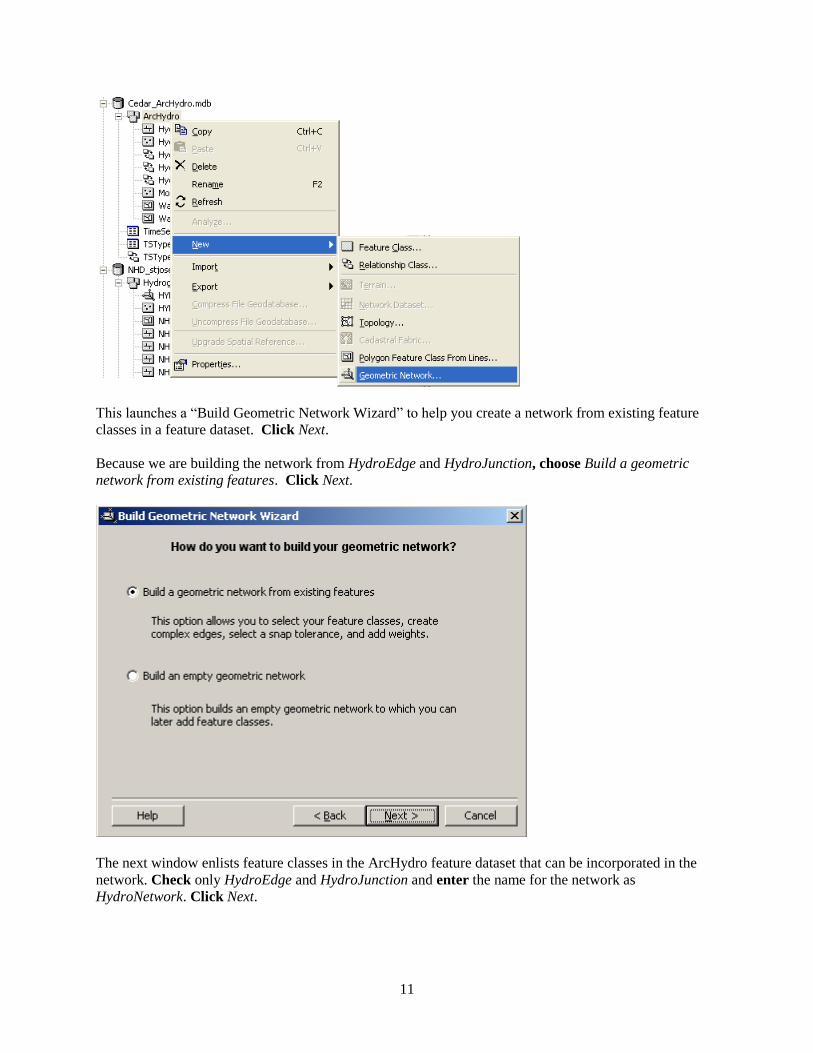
Inside Cedar_Archydro.mdb, right-click on ArcHydro feature dataset, and select NewGeometric
Network…
11
This launches a “Build Geometric Network Wizard” to help you create a network from existing feature
classes in a feature dataset. Click Next.
Because we are building the network from HydroEdge and HydroJunction, choose Build a geometric
network from existing features. Click Next.
The next window enlists feature classes in the ArcHydro feature dataset that can be incorporated in the
network. Check only HydroEdge and HydroJunction and enter the name for the network as
HydroNetwork. Click Next.

12
For Do you want to preserve existing enabled values?, Choose Yes, and Click Next.
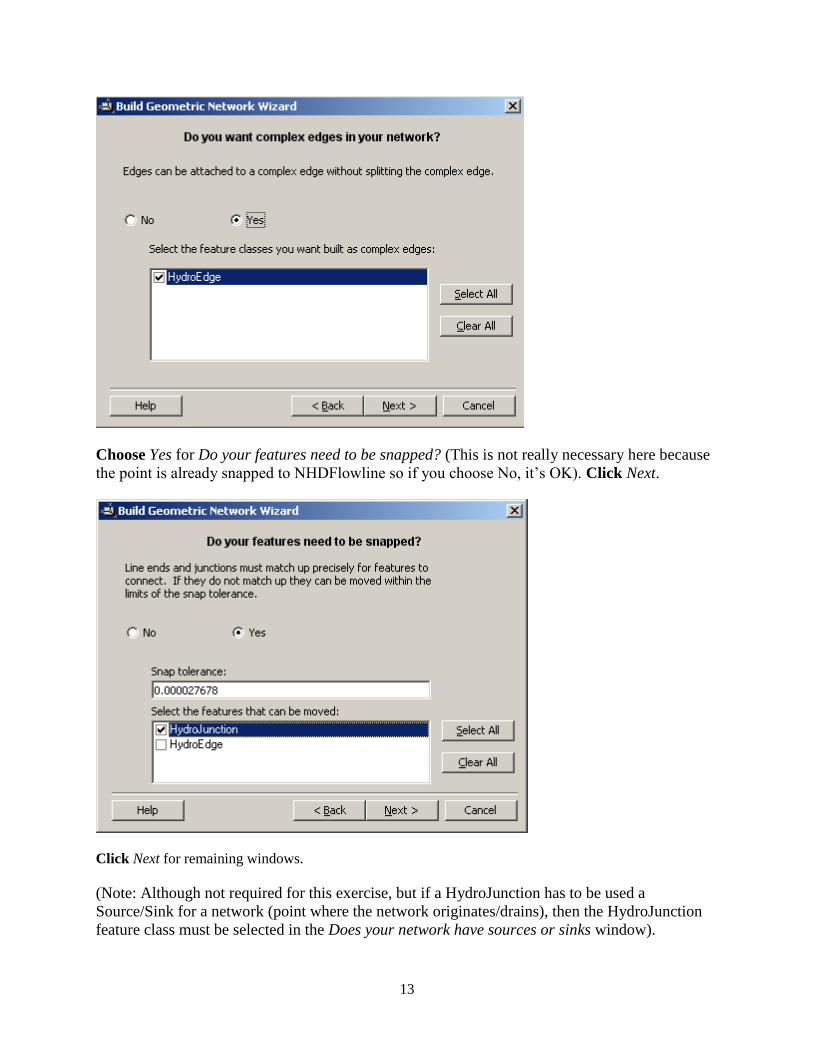
For Do you want complex edges in your network?, Choose Yes to allow complex edges in
HydroEdge. Click Next. ArcHydro uses Complex Edges so that Junctions can be added
anywhere along the lengths of the edges. Simple Edges require the edge to be split when a
junction is added. “Edge” and “Junction” are terms used in ArcGIS to signify lines and points
that participate in a geometric network.
13
Choose Yes for Do your features need to be snapped? (This is not really necessary here because
the point is already snapped to NHDFlowline so if you choose No, it’s OK). Click Next.
Click Next for remaining windows.
(Note: Although not required for this exercise, but if a HydroJunction has to be used a
Source/Sink for a network (point where the network originates/drains), then the HydroJunction
feature class must be selected in the Does your network have sources or sinks window).

14
You have just created a geometric network! What this means is that lines are transformed to
network edges, edges meet at points called junctions (HydroNetwork_Junctions, in this case),
and the connectivity of lines and junctions is defined by an internal data structure called a logical
model (as distinct from the geometric model of the lines and edges which defines where they are
located in geographic space).
Look in the ArcHydro feature dataset. A new icon and new feature classes are added: the
HydroNetwork network and its accompanying HydroNetwork_Junctions.
Close ArcCatalog. We are done with ArcCatalog part of the exercise. Now let us look at the
network in ArcMap, assign attributes, and use the Utility Network Analyst to do some cool stuff
with HydroNetwork.
Open ArcMap, and save the document as archydro.mxd (or whatever name you like) in your
working directory.
In the main toolbar, press the Add button , browse to the ArcHydro feature dataset in
Cedar_ArcHydro.mdb, select HydroNetwork, and click Add. Three feature classes associated
with HydroNetwork: HydroEdge, HydroJunction, and HydroNetwork_Junctions, will be added to
the map document.

15
Turn-off the HydroNetwork_Junctions feature class by un-checking the box next to it (do not remove the
layer from the map).
HydroNetwork Edges can be of two types: Flowlines (EdgeType = 1) and Shorelines (EdgeType = 2).
To set the HydroEdges to be Flowlines, start the Editor, and select HydroEdge as the feature class to be
edited. Right-Click on the EdgeType attribute and select Calculate to get the Field Calculator, and set
EdgeType = 1 as shown below in the Field Calculator. You’ll see the EdgeType field goes from being
<null> to “1” or “Flowline”, as required.

16
Save the edits, and stop editing.
The first step in analyzing any network is assigning flow directions. Before we analyze the network, let us
set the flow direction on the edges. All NHDFlowline features have flow direction already assigned to
them and stored in FlowDir attribute. Let us use the FlowDir attributes to set the flow direction. We will
do this by using the ArcHydro tools. It is assumed that ArcHydro tools are already installed on the
computer. Add the ArcHydro toolbar to the map document by selecting ViewToolbarsArcHydro
Tools
In the ArcHydro toolbar, select Network ToolsSet Flow Direction…
In the Set Flow Direction window, select HydroEdge for Layers and Uninitialized for Select Flow
Direction. Check the Assign based on attribute option, and choose FlowDir field. Click OK.

17
Click OK on the flow direction completion message box. The flow directions are now assigned to
HydroEdge features. With flow direction assigned, the HydroNetwork can now be used to trace water
flow. Save the map document.
(Note: If the FlowDir field in NHD data is not assigned or un-initialized, no flow direction is assigned by
ArcHydro to these lines and these lines will not participate in some of the ArcHydro attribute tools such
as next downstream or length to watershed outlet.)
Network Tracing
Add the Utility Network Analyst toolbar by selecting View ToolbarsUtility Network Analyst (Do not
get confused with Network Analyst. We need “Utility Network Analyst”). The Utility Network Analyst
toolbar should identify the network in the map document, and show HydroNetwork in the Network
combo-box.
With flow direction already defined, select FlowDisplay Arrows to see the flow direction in the
network.
You should see the arrows displayed on the network.

18
ArcGIS takes longer time to display the network with the arrows turned on. This may not be an issue with
a small dataset used for this exercise, but we will still turn it off for a better display. On the utility
network analyst toolbar, click on FlowDisplay Arrows again to turn the arrows off. Now let us perform
tracing along the network.
Before performing the trace, we will set some analysis options. On the utility network analyst toolbar,
select AnalysisOptions…
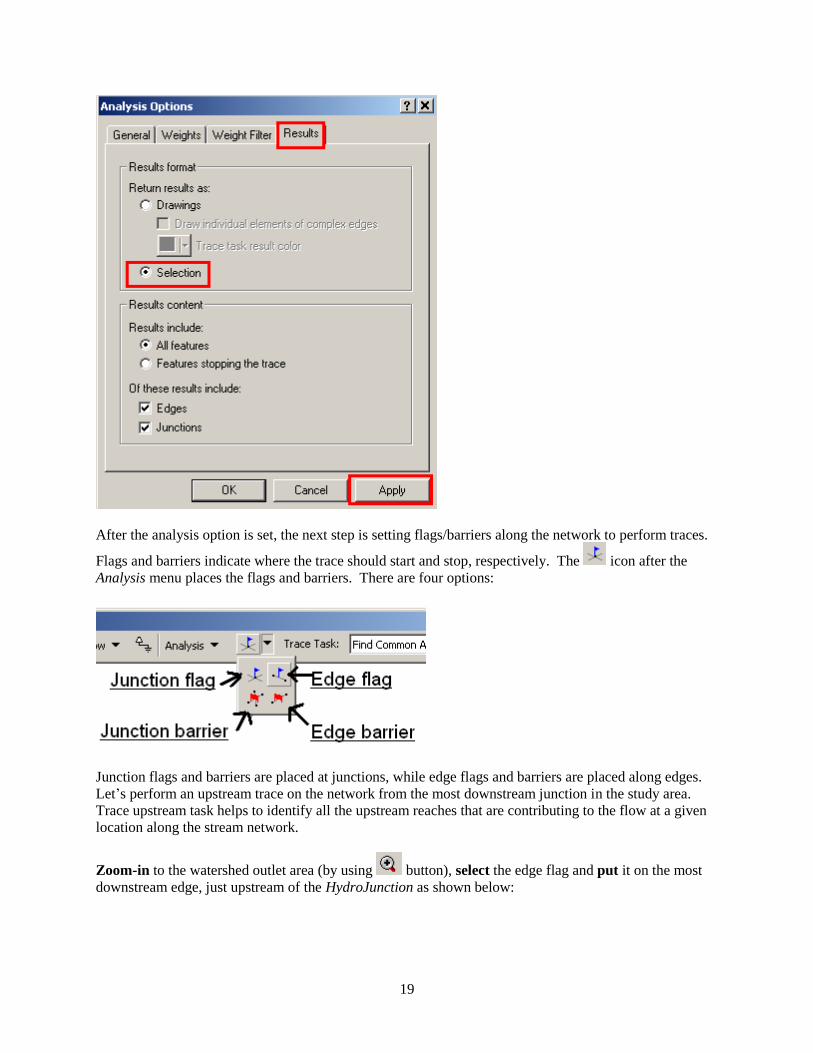
In the Analysis Options, click on the Results tab, and choose Selection for Results format. Leave other
options with default values, click Apply, and then press OK.
19
After the analysis option is set, the next step is setting flags/barriers along the network to perform traces.
Flags and barriers indicate where the trace should start and stop, respectively. The icon after the
Analysis menu places the flags and barriers. There are four options:
Junction flags and barriers are placed at junctions, while edge flags and barriers are placed along edges.
Let’s perform an upstream trace on the network from the most downstream junction in the study area.
Trace upstream task helps to identify all the upstream reaches that are contributing to the flow at a given
location along the stream network.
Zoom-in to the watershed outlet area (by using button), select the edge flag and put it on the most
downstream edge, just upstream of the HydroJunction as shown below:

20
Set the Trace Task to Trace Upstream.
Press the Solve button on the network analyst toolbar to perform the trace. The program will take
few seconds to trace the whole network upstream of the flag, and show the results as selected features.
Zoom to the full extent (by using button) to see the entire upstream features selected by the trace
task.
Unselect the HydroEdge features by right-clicking on the layer and selecting SelectionClear selected
features from the ArcMap window. Save the map document.
Now we will perform another trace task (Find Path). The find path trace helps find connection between
any two points along a stream network, which is useful in calculating distances, travel time, etc. Zoom-in
to an area upstream of the watershed, and place another edge flag as shown below (leave the downstream
edge flag untouched):

21
Change the Trace Task to Find Path, and press the solve button.
Zoom to the full extent, and you will the program has traced the path between the two edge flags.
Unselect the HydroEdge features. Now we will perform a downstream trace task. The downstream trace
task helps to trace the flow from any point in the stream network to the sink. Clear the existing flags by
selecting AnalysisClear Flags.

22
Place an edge flag along any edge in the upstream area, and change the Trace Task to Trace Downstream
The program will select all the edges downstream of the flag (including the edge that contains the flag).
Wow, we can do lots of cool stuff once a HydroNetwork is built! Now, let us use ArcHydro tools to do
some more cool stuff. Clear network flags, and save the map document.
Applying Hydrologic Attributes using ArcHydro Tools
In this section, we will explore the attribute tools available with the ArcHydro toolbar. Since we will use
MonitoringPoint and Watershed feature classes, add them to the map document (by using the add button)
because we need to assign them HydroIDs.
Select Attribute ToolsAssign HydroID

23
We will assign HydroID to all feature classes in the map document. In the Assign HydroID window,
press Select All button, choose No for Overwrite Existing HydroID, and Apply to All features, click OK.
Assigning HydroID should take a couple of seconds (for this exercise) to finish. Click OK on the process
completion message.
HydroID is a unique identifier for all features in a geodatabase. HydroID is used to establish relationships,
which means one feature class can be linked to another feature class, feature classes can be linked to time-
series, etc. Open the attribute table of one of the feature classes (by right clicking on the feature class, and
selecting Open Attribute Table..) to see the HydroID field populated as shown below (Note: The
HydroIDs shown in the table below may or may not match with your HydroID, it is okay if your
HydroIDs are different from the ones shown here):

24
Notice how the HydroID is unique across all feature classes in the ArcHydro geodatabase. This is a
critical feature of ArcHydro which does not exist in core ArcGIS.
Close the attribute table, and save the map document.
Now let us assign From/To Node to HydroEdge features. On the ArcHydro toolbar, select Attribute
ToolsGenerate From/To Node for Lines.
Select HydroEdge for Line, and click OK.
Click OK on the process completion window. Open the attribute table for HydroEdge, and look at the
FROM_NODE and TO_NODE attributes. These attributes store the topological connectivity between
lines in case you want to use that in an application program outside of ArcGIS (this connectivity is used
in the preprocessing programs for the HEC models). The numbers assigned are not based on OBJECTID
or HydroID.

25
Now let us find next downstream line for each feature in the HydroEdge feature class. On the ArcHydro
toolbar, select Attribute ToolsFind Next Downstream Line.
Select HydroEdge for line, and click OK. After the process is complete, dismiss the message box, and
open the attribute table for HydroEdge.
The NextDownID attribute for each HydroEdge feature is the HydroID of the downstream feature.

26
Now, let us calculate the downstream length (distance to the watershed outlet) for edges. NHD has the
Length in Kilometers LengthKm computed for each network edge. In ArcHydro, this was inherited when
the NHD data were loaded into ArcHydro at the beginning of the Exercise. (Note: If you are working with
a larger dataset, assigning downstream distance may take several minutes to run.)
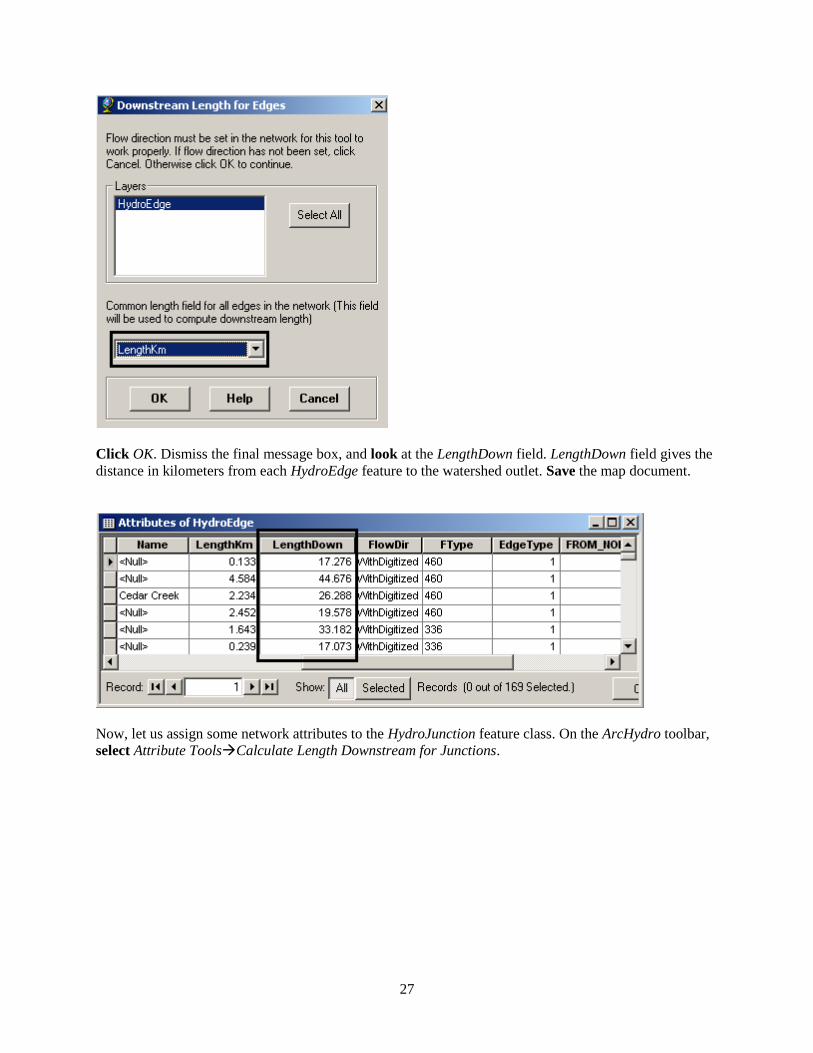
On the ArcHydro toolbar, select Attribute ToolsCalculate Length Downstream for Edges
Select HydroEdge for Layers, and LengthKm field for calculating lengths.
27
Click OK. Dismiss the final message box, and look at the LengthDown field. LengthDown field gives the
distance in kilometers from each HydroEdge feature to the watershed outlet. Save the map document.
Now, let us assign some network attributes to the HydroJunction feature class. On the ArcHydro toolbar,
select Attribute ToolsCalculate Length Downstream for Junctions.

28
Select HydroJunction for Layers, LengthKm for the common length field for edges, and click OK.
Open the attribute table for HydroJunction, and look at the LengthDown field to see the distance from
each junction to the watershed outlet. Because we have only one point (junction) in our network, which is
very close to the watershed outlet, the LengthDown should be very close or equal to zero.
Similar to finding next downstream line, we can also find next downstream junction. Because we have
only one junction, its attribute will be -1, but we will still go ahead and run the next downstream junction
tool. On the ArcHydro toolbar, select Attribute ToolsFind Next Downstream Junction.

29
In the Find Next Downstream Junction window, select the HydroJunction layer and HydroID as the
common identifier field. Choose No for “Do you want to use spatially….”, and click OK.
Click OK on the process completion message. Open the attribute table for HydroJuction, and look at the
NextDownID field, which is equal to -1 because no junction is present downstream.

30
OK, we are done with assigning network attributes to HydroEdge and HydroJunction. In the next section,
we will establish relationship between HydroJunction and Watershed, and HydroJunction and
MonitoringPoint. Save the map document.
Establishing Relationship Between ArcHydro Features
First we will establish relationship between HydroJunction and Watershed features. The HydroID of a
junction that serves as the watershed outlet will be stored as the JunctionID in the watershed feature class.
First, zoom-in to the HydroJunction (watershed outlet), with both Watershed and HydroJunction visible.
Next, on the ArcHydro toolbar, select the Assign Related Identifier tool . Select the Source Layer as
HydroJuction, and its field as HydroID. Similarly, select the Target Layer as Watershed and its field as
JunctionID, and Click OK.
Now click on the Watershed feature (it should get selected), and with your cursor on the nearest
HydroJuction feature, right-click to get Assign Attribute menu as shown below. Then click on the Assign
Attribute menu. Both Watershed and HydroJunction features should flash, and the HydroID of the
HydroJunction will be copied as JunctionID of the watershed.

31
Open the attribute tables of HydroJunction and Watershed to see the link between HydroID and
JunctionID.
Now we will establish relationship between HydroJunction and MonitoringPoint. Zoom-in to the single
MonitoringPoint feature such that it can be seen apart from the corresponding HydroJunction feature.

32
Select the related identifier button , and select appropriate Source (HydroJunction) and Target
(MonitoringPoint) layers, and their corresponding fields (HydroID and JunctionID). This will assign the
HydroID of the HydroJunction as JunctionID of the corresponding MonitoringPoint feature. Click OK.
Now click on the MonitoringPoint feature (target feature), and then right-click on the adjacent
HydroJunction feature (source feature). Click the Assign Attribute menu, and both MonitoringPoint and
HydroJunction should flash.
Open the attribute table for MonitoringPoint to see the JunctionID field populated with the HydroID of
the corresponding HydroJunction.
Close the attribute table, and save the map document.

33
Now that we have assigned related attributes to Watershed and MonitoringPoint, lets see how the
relationships stored in the ArcHydro (HydroJunctionHasWatershed and
HydroJunctionHasMonitoringPoint) can be verified. In other words, we will see how the information
stored in relationship classes is picked-up by GIS tools when they are used.
If the map display is changed (not zoomed on HydroJuction), zoom again to the HydroJunction feature, or
if the display is zoomed on the HydroJunction feature, select the identifier tool , and click on the
HydroJunction feature. Expand the identifier results by clicking at the plus sign next to the
HydroJunction Identifier Number (which is 0418000 in this case) to see what features are related to it as
shown below:
Because we have three relationship classes in the dataset (HydroJunctionHas – MonitoringPoint,
Watershed, and Waterbody), all three names will appear, but we did not relate Waterbody feature/s to
HydroJunction so there is no information associated with Waterbody. When you expand and click on
numbers associated with MonitoringPoint and Watershed (which is 1 in this case), you can see attribute
information about these features as well. You will also see the features flash when you switch from one
feature to the other. Pretty cool!!
OK, you are done!!