building the merit 1/35th scale british hms x-craft ... · building the merit 1/35th scale british...
TRANSCRIPT

Building the Merit 1/35th scale X-craft – Chris King, February 2016
1
Building the Merit 1/35th scale British HMS X-Craft Submarine
Chris King, February 2016.
This kit is a great starting point to build one of the early X-craft: X5 through X10; and X20 through X25.
My research shows that X5 through X10 were painted in standard naval colours of black upper surfaces and dark
admiralty grey lower surfaces. The later craft painted all-over black.
For those wishing to build X20 through X25 , the kit will require further modifying - a visit to Gosport Submarine
museum would be in order as X-24 is on display there. It should also be noted that the later X-craft, XE and X-51
through X-54 were 2 foot longer and slightly different in construction.
Let’s get started on the kit. The hull is built in 2 halves with one half having the complete upper deck. I began by
opening up the flood holes and slots in both halves with a drill / knife (see photos 1 to 4 and 6).
Photo 1, opened up flood holes fore Photo 2, opened up flood holes aft

Building the Merit 1/35th scale X-craft – Chris King, February 2016
2
Photo 3, opened up flood holes side Photo 4, opened up flood holes side
At the rear, the model has raised dimples like rivets. These appear on the dive plane, rudder halves and rear fins as
well (photo 5). There should be flood holes in here, so I carefully cut the tops off with a knife and used the proud
white bits as markers for drilling.
Photo 5, opened up flood holes aft side Photo 6 , opened up flood holes both halves
As I wished to display this model with the rear hatch open, I painted the visible interior white to simulate the interior
(photo 7). I have seen some scratch built interiors, but unless you’re doing a cutaway, very little will be seen.
To join the two hull halves, take care to do it step by step, about 150mm (6”) at a time. This leaves you with a nice
join requiring no filler except at the keel (photo 10), as you can see in the photos 8 to 11.
Photo 7, white paint to interior Photo 8, assembled hull

Building the Merit 1/35th scale X-craft – Chris King, February 2016
3
Photo 9 , assembled hull Photo 10, visible join line in keel
Photo 11, a nice clean join line on the port side (left).
A second area that needs attention is the kit’s propeller which is sadly under-sized. It looks more like an aircraft
propeller than a marine propeller. Fortunately, Eduard appeared to have taken notice of the online debate regarding
this kit on Britmodeller and elsewhere and have issued a photo-etch set (HMS X-craft submarine, #53153). This
corrects the propeller, the keel flood vents and adds detail to the rest of the kit (Photos 12 & 13).
Photo 12, kit propeller and rectifying blades Photo 13, Eduard etch

Building the Merit 1/35th scale X-craft – Chris King, February 2016
4
Once you have cut the old blades off, rolled the replacements to the correct shape and glued them in place with
superglue, you will have an accurate looking propeller (photo 14). I then went on to add photo-etch panel details to
the top of the hull, (photo 15). A word to the wise however, I would suggest using superglue gel rather than just
normal superglue as it tends to grab the photo-etch quickly, leaving no time to position the panel, whereas gel gives
you time to tinker before it sets.
Photo 14, corrected propeller in place Photo 15, top etch panels added
An inaccuracy with this kit is the fact that the dive plane is provided with linkages for both sides, when in reality they
were only ever fitted to the starboard (right) side. This I confirmed whilst examining numerous photos in my research,
including some I took of X-24 many moons ago.
Having assembled the horizontal fins and the rudder/dive plane assembly with the braces, I filled in the 4 holes in
front of the fins and the lug mounts top and bottom of the dive plane (photo 16).
Photo 16, filled control linkage holes
To prevent any unpainted parts showing once assembled, I pre painted the keel pipe and the inside of the fixing
brackets on the sprue and also the area behind the pipe on the keel (photos 17, 18 & 19).

Building the Merit 1/35th scale X-craft – Chris King, February 2016
5
Photo 17, painted prior to assembly Photo 18, painted prior to assembly
Photo 19, painted prior to assembly
Having previously filled and sanded the join line on the bottom of the keel, this also received a coat of paint to
highlight any areas needing attention. A coat of grey was applied to the rudder/dive plane assembly undersides to do
the same (photo 20). Note this was also done because once the linkages are added your access to this area will be
greatly restricted.
Photo 20, base coat to lower aft

Building the Merit 1/35th scale X-craft – Chris King, February 2016
6
The control linkages were assembled and a coat of matt black was applied (photos 21 & 22).
Photo 21, control linkages added and paint Photo 22, control linkages added and paint
Then I added the keel pipes and brackets - now you can see the wisdom in pre-painting, followed by the photo-etch to
the keel. The Eduard flood hole panels had more rows of holes than the kit supplied ones, adding to the accuracy of
your build (Photos 23, 24 and 25).
Photo 23, keel pipes, brackets and etch, (eduard + kit supplied)
Photo 24, keel pipes, brackets and etch Photo 25, keel pipes, brackets and etch

Building the Merit 1/35th scale X-craft – Chris King, February 2016
7
I then applied a coat of dark grey to the lower hull, (photos 26 and 27). Having decided to enhance the model with a
couple of figures, I purchased the Italeri 1/35th scale MTB crew. One figure was as I wanted it with woolly hat and
Aldis lamp, the other had to be modified to suit, namely wearing waterproof overalls (photo 28). I then added the
photo-etch parts to the fore-deck (photo 29).
Photo 26, first coat of grey to lower hull Photo 27, first coat of grey to lower hull
Photo 28, figures Photo 29, deck fittings added
Regarding the two hatches, one was to be built closed and one open. I added the hinges and handles in their
appropriate positions and added brass strip for inner handle of the open hatch (photos 30 and 31).
Photo 30, hatch exteriors Photo 31, handle added to interior
Continuing along the deck, the main periscope housing was added with the fixed scope guards glued in place, as well
as the lifting horn and guard on both sides. The hatch wells were painted black leaving the hinge mounting points bare
for gluing and a trial run with the figures (photos 32 and 33).

Building the Merit 1/35th scale X-craft – Chris King, February 2016
8
Photo 32, paint to hatch wells, lifting lugs & guards Photo 33, trial fit of figures
Photo-etch was then added to control linkages on starboard (right) side, to the top of the induction mast, to the lifting
horn guards and the upper sides of the hull (photos 34 to 37).
Photo 34, etch added to control linkages Photo 35, etch to top of mast
Photo 36, foot plates to guards added Photo 37, dry fit of saddle tanks and etch to sides
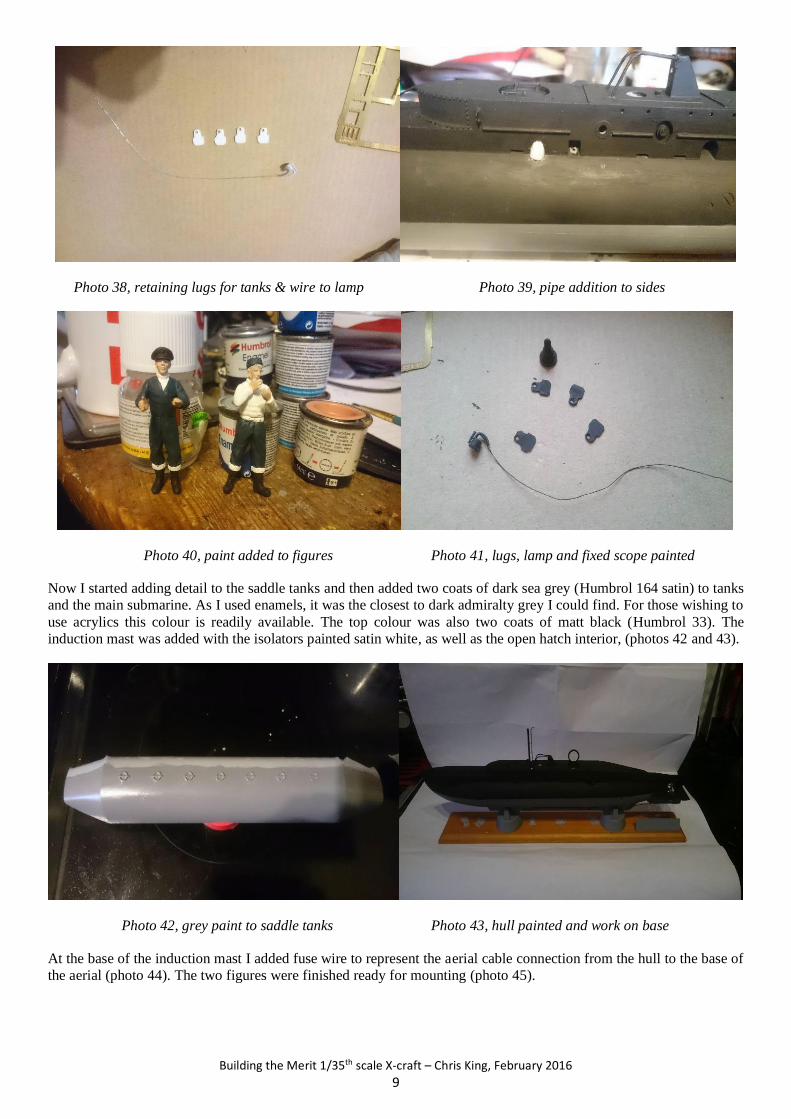
The kit lacks any saddle tank retaining gear, so I scratch-built some T-shaped lugs to sit over the release pins that do
come with the kit. I also added some fuse wire to the bottom of the Aldis lamp for an electrical cable (photo 38). There
are two recesses at the front that should have a proud pipe bulge, but don’t, so I scratch-built a couple from my
grandson’s 1/72nd scale Harrier bombs that he wasn’t using. With a little profile sanding they fit without the need for
filler (photo 39). Some paint was applied to figures, lugs, lamp and fixed scope (photos 40 and 41). Note the captain’s
arms were added and posed for the tiller.
Building the Merit 1/35th scale X-craft – Chris King, February 2016
9
Photo 38, retaining lugs for tanks & wire to lamp Photo 39, pipe addition to sides
Photo 40, paint added to figures Photo 41, lugs, lamp and fixed scope painted
Now I started adding detail to the saddle tanks and then added two coats of dark sea grey (Humbrol 164 satin) to tanks
and the main submarine. As I used enamels, it was the closest to dark admiralty grey I could find. For those wishing to
use acrylics this colour is readily available. The top colour was also two coats of matt black (Humbrol 33). The
induction mast was added with the isolators painted satin white, as well as the open hatch interior, (photos 42 and 43).
Photo 42, grey paint to saddle tanks Photo 43, hull painted and work on base
At the base of the induction mast I added fuse wire to represent the aerial cable connection from the hull to the base of
the aerial (photo 44). The two figures were finished ready for mounting (photo 45).

Building the Merit 1/35th scale X-craft – Chris King, February 2016
10
Photo 44, wire to ariel Photo 45, finished figures
The release pins were painted brass (Humbrol 54) and the release lugs white, added after being painted black on the
underside. The kit comes with the D shackles and eyes but no mooring cable. So courtesy of eBay I sourced some
0.75mm diameter scale cable for the job. The saddle tanks were now dry fitted (photos 46 and 47).
Photo 46, mooring line and retaining lugs Photo 47, 0.75mm dia. wire rope
Using the 8 fork rods supplied and cutting down 4 fork rods from the spare linkages that were included, I then
scratch-built 4 brass forks from the photo-etch surround. I used the raised periscope and binnacle that was spare as I’d
built them in the lowered position for tension sleeves between the forks, drilling out the ends for the fork rods to sit in.
This took care of 4 linkages, the spares box provided the other 4, also drilled out (photo 48). I used Micro Kristal
Clear for the front of the Aldis lamp and the front of the fixed scope to make them look like glass. The saddle tanks
were glued in place after the fork lugs were glued on and the final coat of black was added. One side of the linkages
were painted black.
Photo 48, saddle tank linkages with forked ends

Building the Merit 1/35th scale X-craft – Chris King, February 2016
11
Moving now to final assembly, the linkages and crew figures were superglued in place. A coat of matt black was
added to the tops of the linkages making them black all over. The mooring line was painted light ghost grey (Humbrol
127 satin) as I read that nylon rope was preferred for towing of the X-craft. So a bit of modeller’s licence, as it looked
about right in the photos I’ve seen.
For a display base I used a Poundshop coat hanger rack, removing the brass hangers and filling in the screw holes. I
then glued the two bases supplied with the kit to the wood. A couple of coats of navy blue (Humbrol 77) were applied,
edged with a gold highlighter. I used one of the white ensigns supplied with the kit and printed off a label. Finally I
gave it a coat of satin varnish and glued the model in place.
Below are photos of the finished model.

Building the Merit 1/35th scale X-craft – Chris King, February 2016
12

Building the Merit 1/35th scale X-craft – Chris King, February 2016
13
Reference books:
Underwater Warriors - Paul Kemp. Reference photo next to page 65, X-craft in dry dock.
Above us the Waves - C.E.T. Warren and James Benson. Reference photo next to page 113, X-5 prior to hoisting out
for towing to Tirpitz mission.
Below are my own reference photos of X-24 at Gosport. Produced in the second batch, there are visible differences to
the first batch.

Building the Merit 1/35th scale X-craft – Chris King, February 2016
14

Building the Merit 1/35th scale X-craft – Chris King, February 2016
15
And finally a big thank you to,
Graham James,
for his help in the publishing of this build guide.