building websites with expressionengine 1 - packt · pdf filefor more information: in this...
TRANSCRIPT

Building Websites with ExpressionEngine 1.6
Leonard Murphy
Chapter No. 3 "Start Posting"

For More Information: www.packtpub.com/building-websites-with-expressionengine-1.6/book
In this package, you will find: A Biography of the author of the book
A preview chapter from the book, Chapter NO.3 "Start Posting"
A synopsis of the book’s content
Information on where to buy this book
About the Author Leonard Murphy has been building websites since 1997. He was one of the earliest adopters of ExpressionEngine when it was first released in 2004, and wrote a series of tutorials to help other new users see what ExpressionEngine had to offer. Leonard started his career in the UK, graduating from UW Aberystwyth with a Software Engineering degree. In 2004, he moved to the United States, and is currently the Lead Application Engineer for Summit Credit Union (a non-profit financial institution headquartered in Madison, Wisconsin). He also provides consulting and technical support for small business websites.
I would like to thank my wife, Megan, for her ongoing encouragement and support. I would like to acknowledge my friends who haven't seen me much over the last year: Gina, Isabelle and Jordan, Courtney, Riley and Rosella, and Tina and Eric. Finally. I would also like to thank the people I work with, most notably, Kathy, Sara, Erika, and Vicki.
For More Information: www.packtpub.com/building-websites-with-expressionengine-1.6/book
Building Websites with ExpressionEngine 1.6 ExpressionEngine is a content management system that is designed to make it easy to manage engaging, interactive websites for your visitors.
This book provides clear, concise, and practical guidance to take you from the basics of setting up ExpressionEngine to developing the skills you need to create feature-rich, professional ExpressionEngine websites. The book will walk you through the process of setting up a website with ExpressionEngine.
Starting with the installation itself, you will learn how to work inside the ExpressionEngine control panel, how to customize your site, and how to publish and manage content. You will also learn how to set up member-features such as member-only pages and mailing lists, and you will learn how to implement modules that really enhance your site, such as a photo gallery and an events calendar. Throughout the book, there are tips, hints, and best practice recommendations that will get your website working in no time.
What This Book Covers Chapter 1 introduces you to ExpressionEngine—what it can do and how it compares. It describes who this book is aimed at and describes how this book will help you. Finally, it provides links to other resources that will help you on your ExpressionEngine journey.
In Chapter 2, you will learn how to install and configure ExpressionEngine, including removing or renaming the index.php file that appears in ExpressionEngine URLs and keeping your ExpressionEngine files secure. At the end of this chapter, ExpressionEngine will be up and running.
In Chapter 3, we take a short tour of the ExpressionEngine control panel and experiment with creating templates, before diving right into the first section of our example website—a News from the President weblog. By the end of the chapter, you will have a completely working weblog, and a great understanding of how you can use HTML and CSS in templates.
In Chapter 4, we really start building our site. Clear, step-by-step instructions guide you through creating an attractive multiple-page website of our own design by using only ExpressionEngine templates and weblog entries. We discuss everything you need to build a search-engine and visitor-friendly website, including 404 pages, customized URLs and a stylish menu. By the end of this chapter, adding a new page to our website will be as simple as typing in the text you want and choosing the URL you want it to appear on.

For More Information: www.packtpub.com/building-websites-with-expressionengine-1.6/book
In Chapter 5, we take our knowledge of weblogs and templates one step further by building a product showcase. Visitors can browse the toast we have for sale, view detailed information on individual products, and leave feedback in the form of comments that other visitors can see. We'll talk about securing the comment entry system to avoid comment spam, and we talk about making your templates easier to manage by using variables.
In Chapter 6, we really dive deep into the member functionality of ExpressionEngine. We talk about creating member-only areas on our website, and creating cool mailing lists for our members to sign up for. We also walk through the process of creating new member groups, and we create a special member group with locked-down control panel access that can be used for people who want to update the website.
In Chapter 7, we apply our skills to creating an events calendar. At the end of the chapter, you will have a stylish calendar that you can add new events to at the click of a button. Although there is a lot of code required to generate a calendar and make it look pretty, we walk through it slowly, patiently explaining everything we're doing. So you not only have a calendar, but you have a comprehensive understanding of how it works, and you can make your own adjustments in confidence.
In Chapter 8, we take a thorough look at the Photo Gallery module. We cover everything from installing the Photo Gallery module to designing the photo gallery so it is an integral part of our website. We show you how easy it is to upload new photos, edit those photos, create thumbnails, add descriptions, and make them instantly available for the world to browse and comment upon.
By Chapter 9, you have the core-skills needed to tackle any project in ExpressionEngine. This final chapter takes you on a whirlwind tour of many advanced modules and functionality that ExpressionEngine has to offer and is packed with hints, tips, and recommendations. We discuss the discussion forum, create a wiki, integrate PayPal into our product showcase, and talk through status groups, categories, related entries.
We also cover how to safely back up your site, and how to upgrade ExpressionEngine to take advantage of the latest and greatest features.
Appendix A talks you through installing XAMPP, which puts PHP, MySQL, and Apache on your own computer so that you can experiment and test ExpressionEngine without a web server.
Appendix B gives you the solutions to exercises that are found throughout the book.
For More Information: www.packtpub.com/building-websites-with-expressionengine-1.6/book
Start PostingBy now, we should have ExpressionEngine installed, and we are ready to start creating our website. In this chapter, we are going to start from scratch and use ExpressionEngine to create a single web page that is easy for anyone to update. Following completion of this chapter, we will be able to:
Create a simple ExpressionEngine template that we can publish to the worldCreate a simple ExpressionEngine weblog that we can use to keep our website content freshIntegrate some basic CSS into our ExpressionEngine templates
Toast for Sale! To demonstrate the power of ExpressionEngine, we are going to use a fi ctitious business as an example throughout this book, with each chapter building on the next. Our website is in the business of selling toast (heated bread with melted butter) online.
With this example, we will be able to explore many of the nuances of building a complete website with ExpressionEngine. Though unlikely that we would really want to sell toast over the internet, the concepts of our example should be transferable to any website.
In this chapter, we want to introduce the world to our business, so we are going to create a 'News from the President' webpage. This will allow the President of our company to communicate to customers and investors the latest goings-on in his business.
•
•
•

For More Information: www.packtpub.com/building-websites-with-expressionengine-1.6/book
Start Posting
[ 34 ]
Inside the Control Panel When you fi rst log into the control panel, there are lots of options. Let us take a quick tour of the control panel.
First, we will need to log into ExpressionEngine. If you are using XAMPP to follow along with this chapter, go to http://localhost/admin.php or http://localhost/system/index.php to log in.
Throughout this book, it is assumed that you are using XAMPP with http://localhost/ addresses. If you are following along on an actual website, substitute http://localhost/ for your website domain (for example, http://www.example.com/).
In Chapter 2, we discussed moving the login page to the root of our website to mask the location of our system directory. If http://localhost/admin.php does not work, refer to Chapter 2.
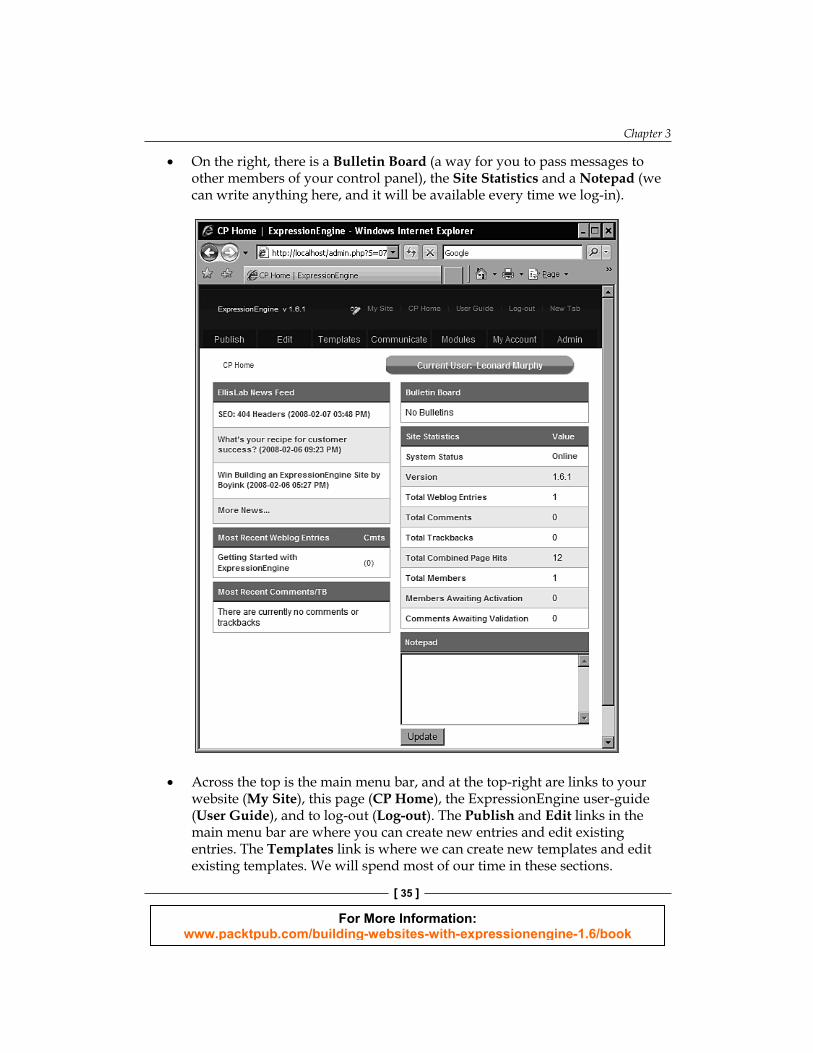
T he fi rst page we see is the CP Home. We can return to this page anytime by selecting CP Home from the menu at the top-right of the screen, above the main menu. In the left column, we have EllisLab News Feed. Below, we have Most Recent Weblog Entries as well as any Recent Comments or trackbacks visitors may have left. In our case, our site is brand new, so there will be no recent comments or trackbacks, and only 1 recent weblog entry (Getting Started with ExpressionEngine). Clicking on the link will take you directly to that entry.
•
For More Information: www.packtpub.com/building-websites-with-expressionengine-1.6/book
Chapter 3
[ 35 ]
O n the right, there is a Bulletin Board (a way for you to pass messages to other members of your control panel), the Site Statistics and a Notepad (we can write anything here, and it will be available every time we log-in).
Ac ross the top is the main menu bar, and at the top-right are links to your website (My Site), this page (CP Home), the ExpressionEngine user-guide (User Guide), and to log-out (Log-out). The Publish and Edit links in the main menu bar are where you can create new entries and edit existing entries. Th e Templates link is where we can create new templates and edit existing templates. We will spend most of our time in these sections.
•
•

For More Information: www.packtpub.com/building-websites-with-expressionengine-1.6/book
Start Posting
[ 36 ]
Th e Communicate tab is where we can manage bulk-emails to our website members. At this time we do not have any members to email (other than ourselves), but as our site grows larger, this feature can be a useful communication/marketing tool.
Be careful to avoid sending unsolicited bulk emails (or spam) using this feature. In many countries, there are laws governing what can or cannot be done. In the United States, commercial emails must meet very specifi c guidelines set by the Federal Trade Commission (http://www.ftc.gov/spam/).
Th e Modules tab is where we can manage all the modules that come with ExpressionEngine, as well as optional third-party modules that we may wish to install. We can download additional modules from http://expressionengine.com/downloads/addons/category/modules/.Th e My Account tab is where we can edit our login preferences, including our username and password. We can also edit the look and feel of the control panel home page from this screen, as well as send private messages to other members. Much of this page is irrelevant when we are the only member of the site (as we are right now).Th e Admin tab is where most of the confi guration of ExpressionEngine takes place, and we will spend a lot of time here. By default, most of the ExpressionEngine settings are already properly set, but feel free to browse and explore all the options that are available. Full documentation on each of the options is available at http://expressionengine.com/docs/cp/admin/index.html.
This concludes our brief tour of ExpressionEngine. We will be returning to these controls many times over the course of this book, but for now we are going to delve into one of the most important parts of the control panel—templates.
Templates and URLsTh e basic concept in ExpressionEngine is that of a template. Go to any ExpressionEngine-powered website and you will undoubtedly be looking at a template. Templates are what the outside world sees.
At its most basic, a template in ExpressionEngine is a HTML (or CSS or JavaScript) fi le. If we wanted to, we could use a template exactly like a HTML fi le, without any problems. We could create an entire website without ever using any other part of ExpressionEngine.
•
•
•
•

For More Information: www.packtpub.com/building-websites-with-expressionengine-1.6/book
Chapter 3
[ 37 ]
However, we can take templates a lot further than that. By using ExpressionEngine tags inside our templates, we can take advantage of all the features of ExpressionEngine and combine it with all the fl exibility that HTML and CSS offers in terms of layout and design. We are not limited to pre-defi ned 'cookie-cutter' templates that have been carefully adapted to work with ExpressionEngine. This is why ExpressionEngine is very popular with website designers.
On the fl ip side, this is also why there is such a learning curve with ExpressionEngine. There is no point-and-click interface to change the look and feel of your website; you have to have some experience with HTML to get the most out of it.
Let us take a closer look at templates and how they relate to URLs:
1. If you are not already logged in, log into ExpressionEngine at either http://localhost/admin.php or http://www.example.com/admin.php.
2. Click on the Templates button on the top of the screen.
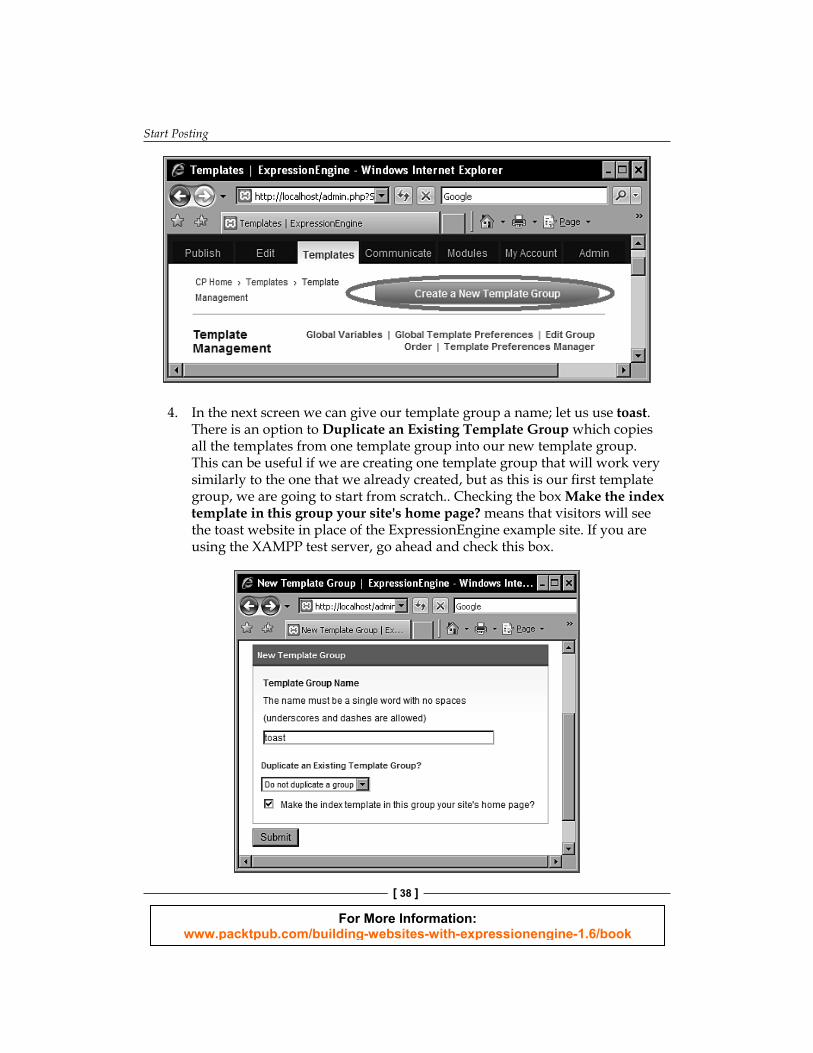
3. Tem plates are stored in groups. There is no 'right' way to group templates—some sites have all their templates in a single group and other sites have lots of template groups. We are going to create a new template group for each section of our website.
ExpressionEngine does come pre-installed with two template groups: the site template group and the search template group. As a new user, it is best not to delete these template groups in case you want to refer to them later.
For More Information: www.packtpub.com/building-websites-with-expressionengine-1.6/book
Start Posting
[ 38 ]
4. In t he next screen we can give our template group a name; let us use toast. There is an option to Duplicate an Existing Template Group which copies all the templates from one template group into our new template group. This can be useful if we are creating one template group that will work very similarly to the one that we already created, but as this is our fi rst template group, we are going to start from scratch.. Checking the box Make the index template in this group your site's home page? means that visitors will see the toast website in place of the ExpressionEngine example site. If you are using the XAMPP test server, go ahead and check this box.

For More Information: www.packtpub.com/building-websites-with-expressionengine-1.6/book
Chapter 3
[ 39 ]
5. Hit S ubmit to create the template group. We will be returned to the Template Management screen. A message will appear saying Template Group Created, and the new template will appear in the box of groups on the left-hand side.
6. Left-c lick on the New Template group in the Choose Group box on the left-hand side. Each template group comes with an initial template, called index. Remembering that a template is like an HTML fi le, a template group is like a directory on our server. The index template is the equivalent of the index.html fi le—when a visitor visits our template group, the index template is displayed fi rst. For that reason, the index template cannot be renamed or deleted. Let us edit the index template to see what it does. Click on the word index.

For More Information: www.packtpub.com/building-websites-with-expressionengine-1.6/book
Start Posting
[ 40 ]
7. A template is essentially just text (although it usually contains HTML, CSS, or ExpressionEngine code). When we fi rst create a template, there is no text, and therefore all we see is an empty white box. Let us write something in the box to demonstrate how templates are seen by visitors. Type in a sentence and click Update and Finished.
8. Just like HTML fi les and directories, templates and template groups relate directly to the URL that visitors see. In the URL http://www.example.com/index.php/toast/index, the index.php is what distinguishes this as an ExpressionEngine page. Then comes the template group name, in our case called toast. Finally, we have the template name, in this case index.
In Chap ter 2, we discussed removing index.php from URLs using an .htaccess fi le. If this was successful, index.php would not be a visible part of the URL. Further, because index is the default template, it does not have to be explicitly defi ned. Linking to http://www.example.com/index.php/toast would return the same page as http://www.example.com/index.php/toast/index.

For More Information: www.packtpub.com/building-websites-with-expressionengine-1.6/book
Chapter 3
[ 41 ]
9. Go to the previous URL (with or without the index.php as appropriate, for example, http://www.example.com/toast/index or http://localhost/toast/index) and the template we just edited should appear.
10. Now try typing the template group without specifying which template to load. The index template is always returned.
11. What happen s if we do not specify the template group, and just go to our base domain (http://localhost/ or http://www.example.com/)? In this case, the toast template of the default template group is returned. The default template group is indicated on the templates screen with an * before the template group name and underneath the list of template groups.

For More Information: www.packtpub.com/building-websites-with-expressionengine-1.6/book
Start Posting
[ 42 ]
Working with Multiple TemplatesNow that we have created one template, let us create a second template in the toast template group so that we can really play around with these URLs.
1. Back on the templates screen in the control panel, select the toast template group on the left-hand side, and then select New Template.
2. Let us call the new template test. Leave the Template Type as Web Page. The Default Template Data allows us to choose between starting with a blank template, duplicating an existing template, or using a template from our library. ExpressionEngine does not come with a pre-defi ned library of templates that we can pick from. This is because templates are the equivalent of HTML fi les, and the HTML for one website will be very different to the HTML for another website. However, as we build our site, we may fi nd ourselves reusing the same templates repeatedly, so we can build our own template library based on those templates. Right now, we are going to create an empty template. Click Submit.

For More Information: www.packtpub.com/building-websites-with-expressionengine-1.6/book
Chapter 3
[ 43 ]
3. Now we need to edit the template so that it is not completely blank. From the Templates screen, click on the New Template to edit it. Then type in some text (or HTML code), making sure it is different from the previous template we created. Then click Update and Finished.

For More Information: www.packtpub.com/building-websites-with-expressionengine-1.6/book
Start Posting
[ 44 ]
4. Now we can go t o http://localhost/toast/test (or http://www.example.com/toast/test) and see the new template. At http://localhost/toast, we can still see the index template.
5. We will not be using the test template any further, so we can go ahead and delete it. To do this, return to the Templates screen, select the toast template group, and then select the Delete option next to the test template. We will see a warning telling us THIS ACTION CANNOT BE UNDONE. Hit Delete to delete the template.
Creating Our First EntryAt this stage, we know that templates are a fundamental concept in ExpressionEngine. Everything the visitor sees on our ExpressionEngine website is going to be in a template. We could, at this stage, use templates to create an entire website. However, the beauty of ExpressionEngine is that we do not have to.
One of the most important concepts after a template is that of a weblog. Many people new to ExpressionEngine confuse the term weblog with that of a blog. Not surprising, because the association is intentional. At its most basic, an ExpressionEngine weblog can be used to set up a blog with dated entries in descending chronological order. However, there are so many other uses for a weblog that it is more appropriate to think of it as a dynamic data container. Anything that changes regularly (that is, the text of our website) should be a weblog, and anything that stays the same (that is, the HTML formatting of our website) should be a template.
In this section, we are going to create a basic weblog to demonstrate the concept.
Although we use the term weblog in this book, many people prefer to use a more generic term, such as section. It is entirely possible to change weblog to section throughout ExpressionEngine. To do this, go to Admin | System Preferences | General Confi guration | Section Designation Word.

For More Information: www.packtpub.com/building-websites-with-expressionengine-1.6/book
Chapter 3
[ 45 ]
1. In the menu bar at the top of any control panel screen, select Admin.
2. On the left-hand side, select Weblog Administration.

For More Information: www.packtpub.com/building-websites-with-expressionengine-1.6/book
Start Posting
[ 46 ]
3. Now, select Weblog Management in the center of the screen.
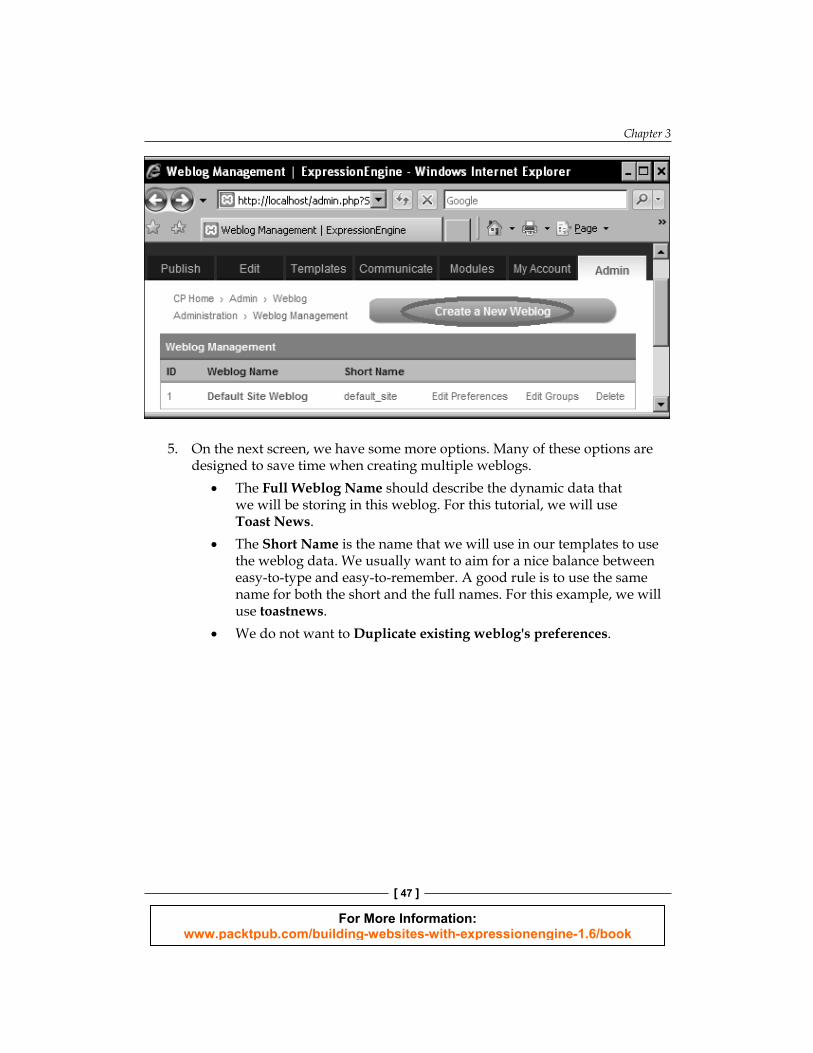
4. On the next screen, we have a list of all our weblogs. ExpressionEngine comes with one weblog out of the box, called Default Site Weblog, but we will create our own from scratch. At the top-right, select Create a New Weblog.
For More Information: www.packtpub.com/building-websites-with-expressionengine-1.6/book
Chapter 3
[ 47 ]
5. On the next screen, we have some more options. Many of these options are designed to save time when creating multiple weblogs.
The Full Weblog N ame should describe the dynamic data that we will be storing in this weblog. For this tutorial, we will use Toast News.The Short Name is the name that we will use in our templates to use the weblog data. We usually want to aim for a nice balance between easy-to-type and easy-to-remember. A good rule is to use the same name for both the short and the full names. For this example, we will use toastnews.We do not want to Duplicate existing weblog's preferences.
•
•
•

For More Information: www.packtpub.com/building-websites-with-expressionengine-1.6/book
Start Posting
[ 48 ]
Select Edit Group Preferences, and select a Category Group of Default Category Group, a Status Group of Default Status Group, and a Field Group of toastwebsite.We also do not want to Create New Templates For This Weblog.
•
•
For More Information: www.packtpub.com/building-websites-with-expressionengine-1.6/book
Chapter 3
[ 49 ]
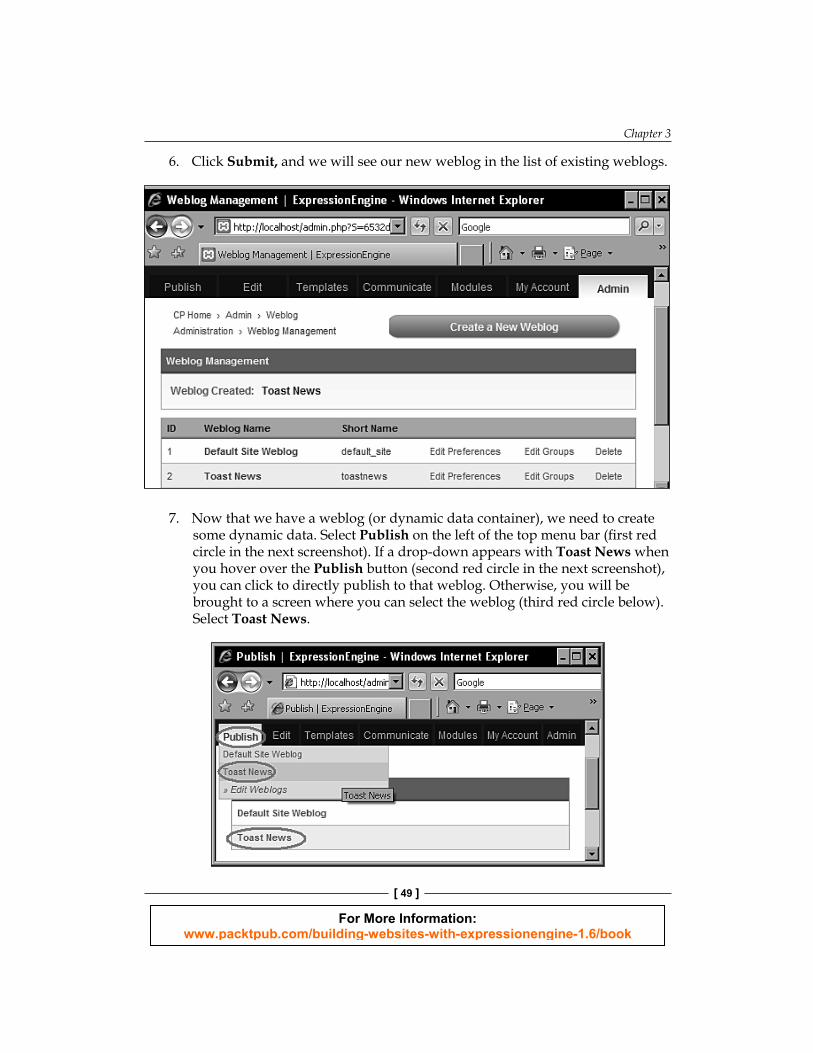
6. Click Submit, and we will see our new weblog in the list of existing weblogs.
7. Now that we have a weblog ( or dynamic data container), we need to create some dynamic data. Select Publish on the left of the top menu bar (fi rst red circle in the next screenshot). If a drop-down appears with Toast News when you hover over the Publish button (second red circle in the next screenshot), you can click to directly publish to that weblog. Otherwise, you will be brought to a screen where you can select the weblog (third red circle below). Select Toast News.

For More Information: www.packtpub.com/building-websites-with-expressionengine-1.6/book
Start Posting
[ 50 ]
8. This screen has a lot o f options, and can be a little overwhelming.
First, our new entry needs a Title. This title will appear on our website (unless you choose not to display it), so we want to give it a name that both describes the entry and grabs our readers' attention. As this is our fi rst entry, we are going to give it the title of Exciting First Entry.The URL Title is a little more involved. Every entry we post is given its own page, and this is the URL to get to that page. We therefore want to keep the title short but still understandable. It cannot contain spaces (though underscores or dashes are acceptable). A suggestion for the URL title is entered for us when we type in the title fi eld. We are not required to keep this suggestion, but for our purposes we will. Therefore, our URL Title is exciting_fi rst_entry.
Further down, there are three collapsible sections called Summary, Body, and Extended text. Only the Body section is expanded by default. Go ahead and expand the Summary section, then write some text in both the Summary and the Body fi elds.
•
•
•

For More Information: www.packtpub.com/building-websites-with-expressionengine-1.6/book
Chapter 3
[ 51 ]
Ignore the plethora of other options and click Submit on the right hand side. We can see a message saying that the entry has been submitted.
Viewing Our First EntryNow one question remains: where do we have to go to see our entry? The answer is that our entry is not yet on our website. That is because the entry does not appear in a template and everything on an ExpressionEngine website must go into a template before it can be viewed. Follow these instructions to point a template to our new weblog.
1. Click on Templates in the menu bar. Select Create a New Template Group, and call the New Template Group to be news. Leave all the other options at their default and click Submit.
•

For More Information: www.packtpub.com/building-websites-with-expressionengine-1.6/book
Start Posting
[ 52 ]
2. Select the news template gr oup, and then click on the index template to edit it.
3. To include a weblog in a te mplate, we use a tag. A tag is a unique Expressi onEngine piece of code that is used in templates to include extra functionality. In this case, we want to include a weblog, so we need a weblog tag. A tag has two parts: variables and parameters. Parameters are always part of the opening tag whereas variables are used between the opening tag and the closing tag. In the news/index template we will add in the weblog tag as well as some standard HTML code.<!DOCTYPE html PUBLIC "-//W3C//DTD XHTML 1.0 Strict//EN"
"http://www.w3.org/TR/xhtml1/DTD/xhtml1-strict.dtd">
<html xmlns="http://www.w3.org/1999/xhtml">
<head>
<title>News from the President</title>
<meta http-equiv="content-type" content="text/html; charset=UTF-8" />
</head>
<body>
<h1>Toast for Sale!</h1>
<h2>News from the President</h2>
{exp:weblog:entries weblog="toastnews"}

For More Information: www.packtpub.com/building-websites-with-expressionengine-1.6/book
Chapter 3
[ 53 ]
<h3>{title}</h3>
{summary}
{body}
{extended}
{/exp:weblog:entries}
</body>
</html>
The indentation helps to demarcate related sections and therefore make the code more readable, but is certainly not required.
4. Click Update and Finished to save our updates.
The difference between Update and Update and Finished is that Update will keep you in the template editing screen so that you can continue to make further edits, whereas Update and Finished returns you to the main templates screen.
For More Information: www.packtpub.com/building-websites-with-expressionengine-1.6/book
Start Posting
[ 54 ]
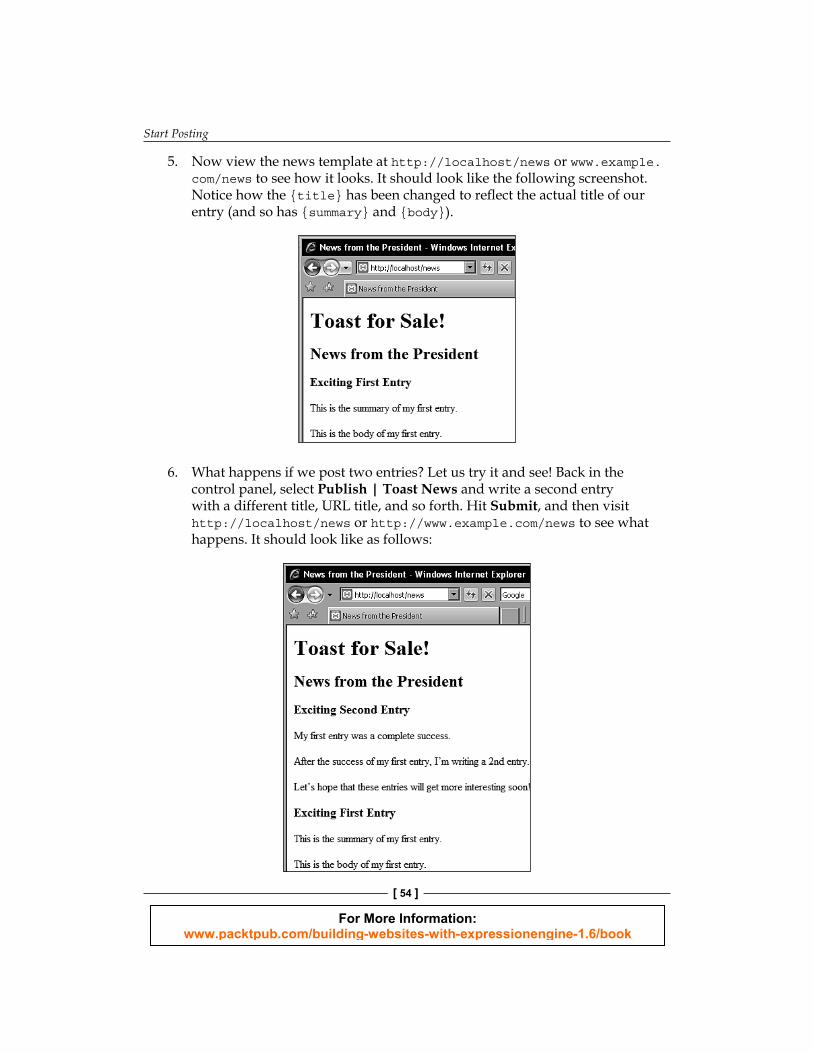
5. N ow view the news template at http://localhost/news or www.example.com/news to see how it looks. It should look like the following screenshot. Notice how the {title} has been changed to refl ect the actual title of our entry (and so has {summary} and {body}).
6. Wh at happens if we post two entries? Let us try it and see! Back in the control panel, select Publish | Toast News and write a second entry with a different title, URL title, and so forth. Hit Submit, and then visit http://localhost/news or http://www.example.com/news to see what happens. It should look like as follows:

For More Information: www.packtpub.com/building-websites-with-expressionengine-1.6/book
Chapter 3
[ 55 ]
7. For our fi nal enhancement, let us edit the template to include variables for the author name and the date of the entry. To do this, add the highlighted code as shown next:<body>
<h1>Toast for Sale!</h1> <h2>News from the President</h2> {exp:weblog:entries weblog="toastnews"} <h3>{title}</h3> {summary} {body} {extended} <p class="footnote">Written by {author} on {entry_date format="%F %j%S"}</p> {/exp:weblog:entries}</body>
{author} is a variable that returns the name of the person who was logged in when the entry was created.{entry_date} is a variable that displays the date that the entry was written on. format is a parameter of the entry_date variable that is used to specify how the date should be formatted.%F is the month of the year spelled out; %j is the day of the month; and %S is the suffi x (for example, nd or th). So %F %j%S is rendered as 'February 7th'. For a complete list of date formats, visit http://expressionengine.com/docs/templates/date_variable_formatting.html.
•
•
•
8. Rev isit http://localhost/news or http://www.example.com/news, and you can now see the author name underneath both entries.

For More Information: www.packtpub.com/building-websites-with-expressionengine-1.6/book
Start Posting
[ 56 ]
Make Our Weblog Pretty Using CSSOur weblog, whilst functional, is not exactly the prettiest on the web. We w ill spruce it up with some more HTML and CSS. This section will not introduce any new ExpressionEngine features but will demonstrate how to incorporate standard CSS into our templates. An understanding of HTML and CSS will be invaluable as we develop our ExpressionEngine site.
Please note that this book can only demonstrate the basics of using HTML with CSS in an ExpressionEngine website. There are lots of books and websites dedicated to CSS that will teach far more than can be possibly covered here.If you are already familiar with using HTML and CSS, then you will only need to go through the fi rst section (Creating and Linking to a Styling Template) to create the CSS template and link to it from the HTML template.
Creating and Linking to a Styling TemplateAs w ith a more conventional HTML/CSS website, our CSS code will be separated out from our HTML code, and placed in its own template (or fi le). This requires creating a new CSS template and modifying our existing template to identify the main styling elements, as well as to link to the CSS template.
1. First, let us go back into our news template and add the following code (highlighted). The trick with writing HTML with CSS is to identify the main sections of the HTML code using the <div> tag.<body>
<div id="header"> <h1>Toast for Sale!</h1> <h2>News from the President</h2>
</div> <div id="content">
{exp:weblog:entries weblog="toastnews"} <h3>{title}</h3>
<div class="contentinner"> {summary} {body}
For More Information: www.packtpub.com/building-websites-with-expressionengine-1.6/book
Chapter 3
[ 57 ]
{extended} </div>
<p class="footnote">Written by {author} on {entry_date format="%F %j%S"}</p> {/exp:weblog:entries}
</div></body>
Here we have identifi ed three sections using the <div> tag. We have encapsulated our website title in a header section. We have wrapped up all of our ExpressionEngine entries into a content section. Finally, we have created a contentinner section that contains just the text for each ExpressionEngine entry, but does not include the title. Also note that footnote is a section.What is the difference between an id and a class in our <div> tags? A section defi ned with an id only appears once on a page. In our case, the header only appears once, so we can use the id. A section defi ned with a class may appear multiple times. As the contentinner section will appear on the page for each entry present there, we have used a class for this section.
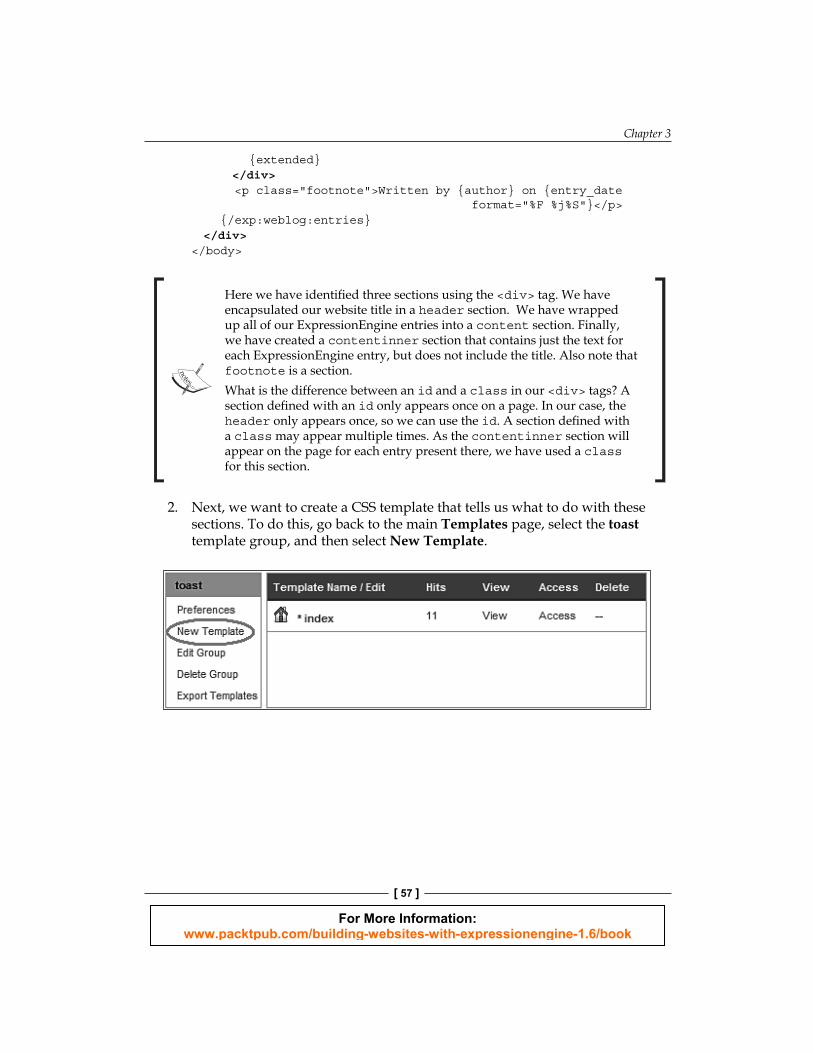
2. Next , we want to create a CSS template that tells us what to do with these sections. To do this, go back to the main Templates page, select the toast template group, and then select New Template.

For More Information: www.packtpub.com/building-websites-with-expressionengine-1.6/book
Start Posting
[ 58 ]
3. Call the new template toast_css. Under Template Type select CSS Stylesheet instead of Web Page. Leave the Default Template Data as None – create an empty template and hit Submit.
4. Before we start editing our new CSS template, we must be sure to tell the HTML template about it. Select to edit the index template in the news template group.
For More Information: www.packtpub.com/building-websites-with-expressionengine-1.6/book
Chapter 3
[ 59 ]
5. Insert the following highlighted commands between the <head> and </head> tags to tell the HTML template where the CSS template is.
<head> <title>News from the President</title> <link rel='stylesheet' type='text/css' media='all' href='{path=toast/toast_css}' /> <style type='text/css' media='screen'>@import "{path=toast/toast_css}";</style> <meta http-equiv="content-type" content="text/html; charset=UTF-8" /></head>
Styling Colors and FontsWe now have a blank CSS template, toast_css. We are now going to start editing our CSS template, defi ning the various elements we use in our news template, and defi ning the background colors and fonts we want to use.
If you already know how to use CSS, this section can be skipped in favor of your own CSS design.
1. We will defi ne the four sections we used earlier (header, content, contentinner, and footnote). Note that because contentinner and footnote were defi ned as class, they are preceded by a period. The header and the content sections are preceded with # as they were identifi ed in the HTML with id.
As well as identifying the four sections that are unique to us, we have defi ned some HTML elements within those sections as well. For example, we have an h1 and an h2 style within our header div; so we have defi ned the corresponding elements in our CSS template.
body{ background: #8B4513;}
#header{ background-color: #DEB887;}
#header h1{ color: black;}
#header h2{ color: #8B4513;

For More Information: www.packtpub.com/building-websites-with-expressionengine-1.6/book
Start Posting
[ 60 ]
}
#content{}#cont ent h3{ color: #F0E68C;}#content p{}
.contentinner{ background: #DEB887;}
.footnote{ color: #F0E68C;}
2. Click Update and view your news template in a browser (http://localhost/news or http://www.example.com/news). It will look like the following screenshot. Essentially, all we have done is color in some of our CSS elements. By doing this, we can better see the structure of our page. For example, the tan (#DEB887) box shows us where our contentinner section is.
If you do not see anything as colorful as the following screenshot, it is usually a sign that the HTML template is not referencing the CSS template correctly (see the previous step), or that the Template Type of toast_css was not set as CSS Stylesheet when it was fi rst created. If this is the case, delete the toast_css template and follow the steps to create it again, this time selecting CSS Stylesheet instead of Web Page.

For More Information: www.packtpub.com/building-websites-with-expressionengine-1.6/book
Chapter 3
[ 61 ]
3. Next, we are going to change some of the fonts. Make the following highlighted changes to the code:body{ background: #8B4513; font-family: Verdana, "Trebuchet MS", Arial, Helvetica, sans-serif;}
#header h1{ color: black;
font-family: Arial, Helvetica, sans-serif; font-size: 300%; font-weight: bold; text-align: left;
}
#header h2{ color: #8B4513;
font-family: Arial, Helvetica, sans-serif; font-size: 200%; font-weight: bold; text-align: left;
}
#content{ font-size: 80%;
}
#content h3{ color: #F0E68C;
font-family: Arial, Helvetica, sans-serif; font-weight: bold;
}
.footnote{ color: #F0E68C;
font-size: 75%;}
Instead of reprinting the entire template, we are showing only the elements that are changing, with the changes highlighted.

For More Information: www.packtpub.com/building-websites-with-expressionengine-1.6/book
Start Posting
[ 62 ]
4. Click Update, and now view the template in the browser (http://localhost/news or http://www.example.com/news). The font tag in the body section means that all the text on our page will be Verdana. We then placed font tags in our h1, h2, and h3 headings which will override the body font tag and make our headings Arial. If the computer or device viewing the page does not have the fi rst font in the list, then the next is tried and so on. If the device does not have any of the listed fonts, then any sans-serif font that the device does have is used. We have also changed the size of our fonts, making our h1, h2, and h3 headings bigger, and in bold, and reducing the size of our footnote element.
Note th at where one CSS element is inside another (such as where content is inside body), any properties assigned to the parent element also apply to the child elements. As content is inside body, we do not have to specify the font for the content separately. However, if we do specify the font in both places, then it is the child element that overrides the parent element. (This is where the cascading of Cascading Style Sheets comes in).Also note that as content has a font-size of 80% and footnote has a font-size of 75% and footnote is inside content, footnote has an actual font-size of 75% of 80% (that is, 60%).
For More Information: www.packtpub.com/building-websites-with-expressionengine-1.6/book
Chapter 3
[ 63 ]
Moving Our Elements AroundWe have now used CSS to alter the colors and fonts on our page. However, the page still reads from top to bottom. Ahead of us, we have the challenge of moving our elements around to provide a more natural fl ow. We will also put our logo in as part of the heading.
CSS posi tioning can be challenging for newcomers. As this book focuses principally on ExpressionEngine, we cannot delve too much into the ins and outs of CSS.
1. First, we are going to change where some elements will appear on the page. We are going to add a margin to our entire page. To do this, we use margin: 5% auto. The 5% provides a buffer on the top side (to prevent the header from touching the top edge of the browser). The auto results in centering the entire page (auto means that the left and right margins are being calculated automatically depending on the width of the page in the browser). We can then set our page width to be 770px. By doing this, it ensures that our website will be rendered on a screen resolution of 800x600 without any horizontal scrolling. We then change the width of our content section so that it only takes up the left 70% of the page. This will give us the room to put a menu on the right hand side at a later stage. We will also add a margin around all our paragraphs in the content section—the 1% means that there will be less space between paragraphs than there otherwise would be. Finally, we are putting a border around our contentinner section to make it look more interesting and right-aligning our footnote.body{ background: #8B4513; font-family: Verdana, "Trebuchet MS", Arial, Helvetica, sans- serif;
margin: 5% auto; width: 770px;
}
#content{ font-size: 80%;
width: 70%; float: left;
}
#content p{ margin: 1%;
}
.contentinner{ background: #DEB887;

For More Information: www.packtpub.com/building-websites-with-expressionengine-1.6/book
Start Posting
[ 64 ]
border: 2px dotted #FFEFD5;}
.footnote{ color: #F0E68C; font-size: 75%;
text-align: right;}
In addit ion to being able to change the margin of any element, we can also alter the padding. The difference is that a margin is applied outside the box (and so creates space between the box and other elements). The padding is applied to the inside of the box, so the box does not move but there is more space between the edge of the box and the contents of the box.
2. Click Update again, and visit http://localhost/news or http://www.example.com/news to see the changes.
3. We are getting close to being done. One element that our site is missing that most normal sites would have is a logo. Luckily, our toast website does have a logo that we can now use. First, copy square.png to your website images directory via FTP (C:\xampp\htdocs\images\ if you are using XAMPP, or /Applications/MAMP/htdocs/images/ if you are using MAMP on a Macintosh).
For More Information: www.packtpub.com/building-websites-with-expressionengine-1.6/book
Chapter 3
[ 65 ]
The fi le square.png can be downloaded from the Packtpub website at http://www.packtpub.com/support.When uploading new fi les to your website, you must place them in an existing subdirectory, or you must add the new fi le or directory to your .htaccess fi le (if you are using a .htaccess fi le to remove index.php as outlined in Chapter 2).
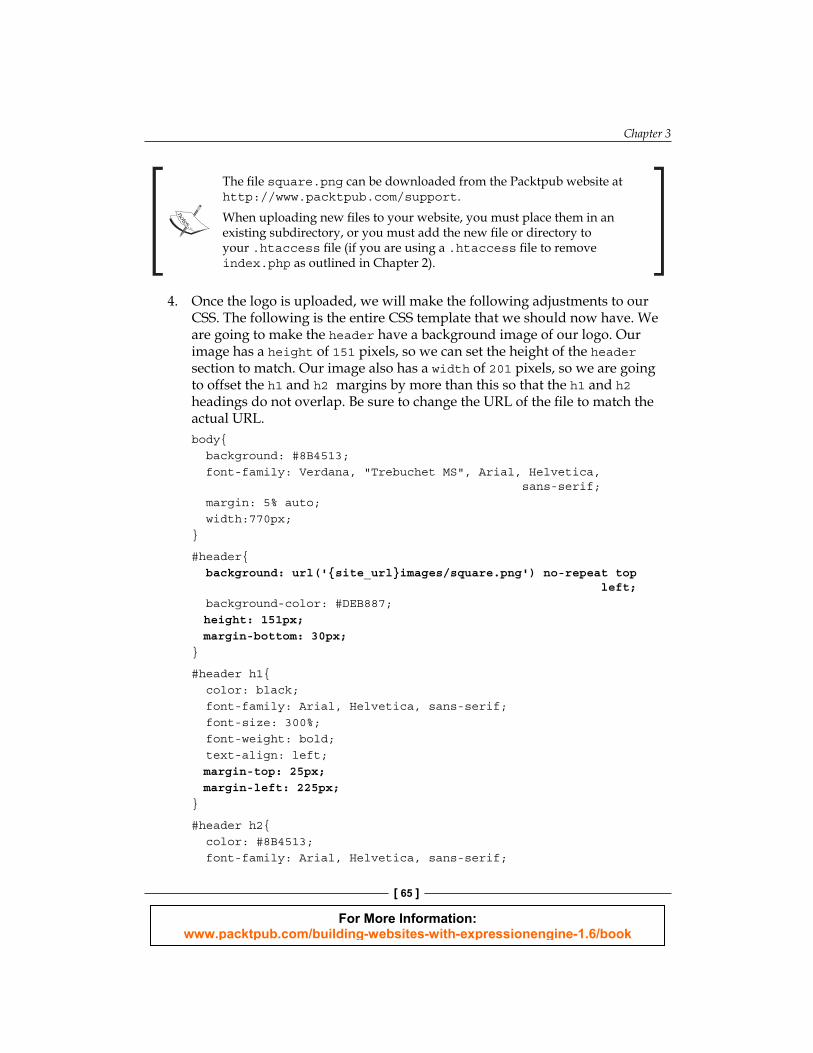
4. Once the l ogo is uploaded, we will make the following adjustments to our CSS. The following is the entire CSS template that we should now have. We are going to make the header have a background image of our logo. Our image has a height of 151 pixels, so we can set the height of the header section to match. Our image also has a width of 201 pixels, so we are going to offset the h1 and h2 margins by more than this so that the h1 and h2 headings do not overlap. Be sure to change the URL of the fi le to match the actual URL.body{ background: #8B4513; font-family: Verdana, "Trebuchet MS", Arial, Helvetica, sans-serif; margin: 5% auto; width:770px;}
#header{ background: url('{site_url}images/square.png') no-repeat top left; background-color: #DEB887;
height: 151px; margin-bottom: 30px;
}
#header h1{ color: black; font-family: Arial, Helvetica, sans-serif; font-size: 300%; font-weight: bold; text-align: left;
margin-top: 25px; margin-left: 225px;
}
#header h2{ color: #8B4513; font-family: Arial, Helvetica, sans-serif;

For More Information: www.packtpub.com/building-websites-with-expressionengine-1.6/book
Start Posting
[ 66 ]
font-size: 200%; font-weight: bold; text-align: left;
margin-left: 225px;}
#content{ font-size: 80%; width: 70%; float: left;}
#content h3{ color: #F0E68C; font-family: Arial, Helvetica, sans-serif; font-weight: bold;}
#content p{ margin: 1%;}
.contentinner{ background: #DEB887; border: 2px dotted #FFEFD5;}
.footnote{ color: #F0E68C; font-size: 75%; text-align: right;}
{site_url} is an ExpressionEngine variable that, when the CSS is loaded by a browser, will be converted into the actual URL of your site (in this case, http://localhost/ or http://www.example.com/). By using this variable, we can avoid hard-coding the URL name of the website in our CSS fi le.
5. Going back to our page after making these updates, we can see that our website is looking a lot more visually appealing. You may have noted, however, that the website may not exactly look like the following screenshot. This is because different browsers and different operating systems and different screen resolutions can all make a difference on how the fi nal product looks. The key is not to try and make it look identical on all platforms, but to make it usable on all platforms.
For More Information: www.packtpub.com/building-websites-with-expressionengine-1.6/book
Chapter 3
[ 67 ]
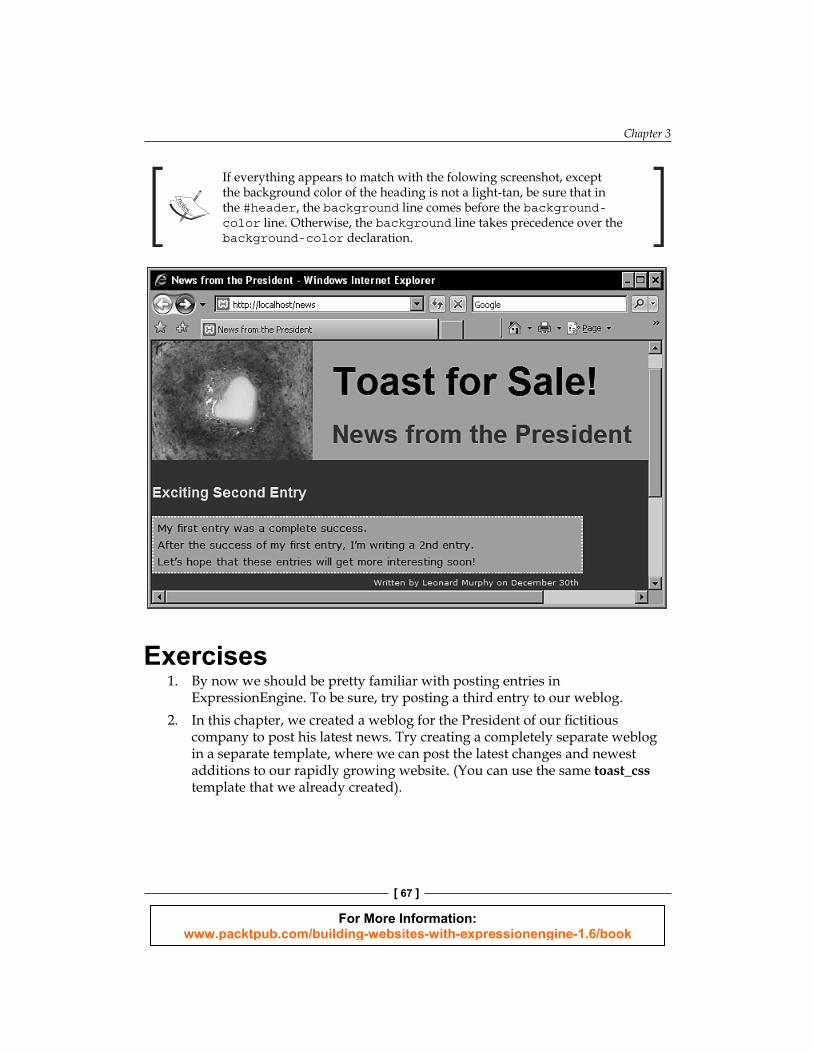
If everyt hing appears to match with the folowing screenshot, except the background color of the heading is not a light-tan, be sure that in the #header, the background line comes before the background-color line. Otherwise, the background line takes precedence over the background-color declaration.
Exercises1. By now we s hould be pretty familiar with posting entries in
ExpressionEngine. To be sure, try posting a third entry to our weblog.2. In this chapter, we created a weblog for the President of our fi ctitious
company to post his latest news. Try creating a completely separate weblog in a separate template, where we can post the latest changes and newest additions to our rapidly growing website. (You can use the same toast_css template that we already created).

For More Information: www.packtpub.com/building-websites-with-expressionengine-1.6/book
3. The only way to really get to grips with CSS is to experiment through trial and error. Try removing or changing a line in our CSS template, saving it, and then seeing what changes on our website. The following changes are a good start:
Have a go at changing the color scheme of the toast_css without touching the news template. Instead of our shades of cream and brown, try creating your own color combo. A list of color names and their corresponding HTML codes is available at http://www.w3schools.com/css/css_colornames.asp. Additionally, http://en.wikipedia.org/wiki/Web_colors has good information.As part of our design, we deliberately left space for a menu on the right-hand side. If we decided that we didn't want to have a menu after all, what line of code could we change to fi ll the space?Try playing around with the photo on the website. I chose a photo of 201x151 pixels. If you upload a photo of a different size, what lines of code would you have to change?
To fi nd out the size of a photo in Windows, you can open the image in Paint, and then select Image | Attributes to see what the height and width are.
SummaryWe have now demonstrated some of the most basic features of ExpressionEngine, including templates, weblogs, and tags. To summarize, tags go in templates to point to weblogs.
Everything you do in ExpressionEngine must eventually be viewable in a template. To create a new weblog, you fi rst create the weblog, and then place tags into a template that will pull the weblog data into the browser.
Templates map directly to URLs that visitors can see. Within templates, you can write standard HTML and CSS. The stronger your HTML skills, the better your site will look.
In the next chapter, we will use ExpressionEngine to create what appears to visitors to be a conventional website, but with the added benefi t that anyone can make editorial changes without ever seeing (or inadvertently deleting) HTML code.
•
•
•

For More Information: www.packtpub.com/building-websites-with-expressionengine-1.6/book
Where to buy this book You can buy Building Websites with ExpressionEngine 1.6 from the Packt Publishing website: http://www.packtpub.com/building-websites-with-expressionengine-1.6/book.
Free shipping to the US, UK, Europe and selected Asian countries. For more information, please read our shipping policy.
Alternatively, you can buy the book from Amazon, BN.com, Computer Manuals and most internet book retailers.
www.PacktPub.com