bumbleride indie twin · · 2017-05-11... bumbleride or its authorized repair center, will...
TRANSCRIPT

BUMBLERIDE INDIE TWIN
ASSEMBLYOPERATIONMAINTENANCE
Questions about your Bumbleride?We’d love to hear from you.
Within the US:
Phone: 1-800-530-3930E-mail: [email protected]
www.bumbleride.com
INDIE TWIN WARNINGS
OPERATIONMAINTENANCE
1 | Bumbleride 1-800-530-3930 [email protected] www.bumbleride.com
IMPORTANT SAFETY INSTRUCTIONS
WHEN USING THIS STROLLER, BASIC PRECAUTIONS SHOULD ALWAYS BE FOLLOWEDPlease note the following:READ ALL INSTRUCTIONS BEFORE USING THIS STROLLER! WHEN ASSEMBLING THIS STROLLER, ENSURE CHILDREN ARE A SAFE DISTANCE AWAY! ALWAYS ENSURE CHILDREN ARE A SAFE DISTANCE AWAY WHEN OPENING AND CLOSING STROLLER!
WARNINGS- Read these instructions carefully before use and keep them for future reference. Your child’s safety may be a�ected if you do not follow these instructions.- NEVER LEAVE YOUR CHILD UNATTENDED!- ALWAYS ENSURE CHILDREN ARE A SAFE DISTANCE AWAY WHEN OPENING AND CLOSING STROLLER!- Always use complete 5 point safety harness to avoid serious injury by falling or sliding out of the stroller. - Never overload the stroller. This product is designed for a child whose maximum weight is 45 lbs. (20 kg) per seat and whose maximum height is 43 in. (110 cm) per seat. - Always use the brakes when not holding the stroller.- Excess weight may cause hazardous or unstable condition to exist. Never allow more than one child per seat in the stroller. - Never leave children in the stroller when folding the stroller. Make sure children are clear of all moving parts when making any adjustment to the stroller. - Never leave children in the stroller when using stairs or escalators. - Child may slip into leg openings and strangle. Never use in reclined carriage position unless the safety harness is used to secure the child.- Do not leave stroller exposed to heat for long periods of time.- Do not fold stroller when wet. - Parcels and/or accessory items placed on the stroller may cause it to become unstable. - Unstable and/or hazardous conditions may exist if accessories/attachments other than Bumbleride products are added to the stroller.- Do not hang shopping bags from the handle as this may a�ect the stability of the stroller. Always use the basket provided. Maximum weight capacity of basket is 11 lbs. (5 kg). Any pouch or pocket provided with this unit is designed to carry a maximum weight of 0.4 lbs. (0.2 kg).- Care must be taken when folding and unfolding the stroller to prevent �nger entrapment. - Ensure that all locking devices are engaged before use of the stroller.- This product is not suitable for running or skating.
MAINTENANCEThis stroller requires regular maintenance. Regularly check for loose rivets, loose screws and/or broken parts, etc. Check all safety devices and brakes to ensure all are functioning properly. Clean and lubricate the stroller frame and moving parts. The removable seat fabric can be machined-washed using cold water only. The canopy fabric can be spot cleaned. DO NOT machine-dry any fabric part. Please note the weight capacity for this product is 90 lbs. (40 kg).As a part of continuous product development, Bumbleride reserves the right to make design changes without any notice or obligation.
SAVE THIS OPERATING MANUAL

OPERATIONMAINTENANCE
1 | Bumbleride 1-800-530-3930 [email protected] www.bumbleride.com | 2
SAFETY STANDARDThis product is manufactured in compliance with ASTM F833-07 (Standard Consumer Safety Performance Speci�cations for Carriages/Strollers) as well as EN 1888 (Child Care Articles, Wheeled Child Conveyances Safety Requirements and Test Methods).
BUMBLERIDE LIMITED WARRANTYBumbleride Inc. (“Bumbleride”) guarantees its products, when owned by the original customer, to be free from defects in materials and/or defects caused by workmanship for one year from the original date of purchase. The warranty card must be returned with proof of purchase in order to activate the warranty period. You may also register your Bumbleride online by visiting www.bumbleride.com.
This warranty does not cover damage caused by normal wear and tear, neglect, accidents, lack of maintenance or damaged caused by parts not manufactured by Bumbleride.
This warranty covers Bumbleride products purchased from authorized Bumbleride dealers only. A list of authorized dealers can be found by visiting www.bumbleride.com.
All warranty claims must be made directly to the authorized Bumbleride dealer from whom the product was purchased. All costs associated with shipping and handling are the responsibility of the customer. Upon receipt of the product, Bumbleride or its authorized repair center, will arrange for inspection of the item. If the problem is due to defective parts or defective workmanship on behalf of Bumbleride, Bumbleride will repair or replace the product at Bumbleride’s option. If the product is not covered under the original warranty, the customer will be responsible for all expenses associated with the service provided.
MANUAL CONTENTS
OPERATIONMAINTENANCE
3 | Bumbleride 1-800-530-3930 [email protected] www.bumbleride.com
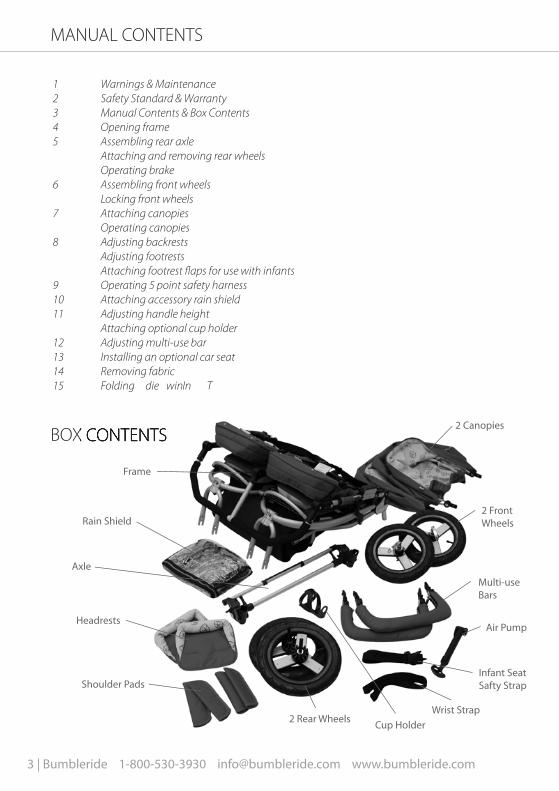
BOX CONTENTSBOX CONTENTS
Frame
Rain Shield
Axle
Headrests
Shoulder Pads
2 Rear WheelsCup Holder
Wrist Strap
Infant SeatSafty Strap
Air Pump
Multi-useBars
2 Front Wheels
2 Canopies
1 Warnings & Maintenance2 Safety Standard & Warranty3 Manual Contents & Box Contents4 Opening frame5 Assembling rear axle Attaching and removing rear wheels Operating brake6 Assembling front wheels Locking front wheels 7 Attaching canopies Operating canopies8 Adjusting backrests Adjusting footrests Attaching footrest �aps for use with infants9 Operating 5 point safety harness10 Attaching accessory rain shield11 Adjusting handle height Attaching optional cup holder12 Adjusting multi-use bar13 Installing an optional car seat14 Removing fabric15 Folding Indie Twin

OPERATIONMAINTENANCE
1 | Bumbleride 1-800-530-3930 [email protected] www.bumbleride.com | 4
Opening frame:Please ensure that your child is a safe distance away before unfolding the Indie Twin frame. Begin by releasing the black folding locks on both sides of the frame (1). Pull up on the handle to open the frame (2). You may need to pull the rear legs out from underneath the frame (3). Ensure that the handle engages into place (4). Grip the backrests and press downward to lock them onto the frame (5).
1 2
3 4
5
OPERATIONMAINTENANCE
5 | Bumbleride 1-800-530-3930 [email protected] www.bumbleride.com
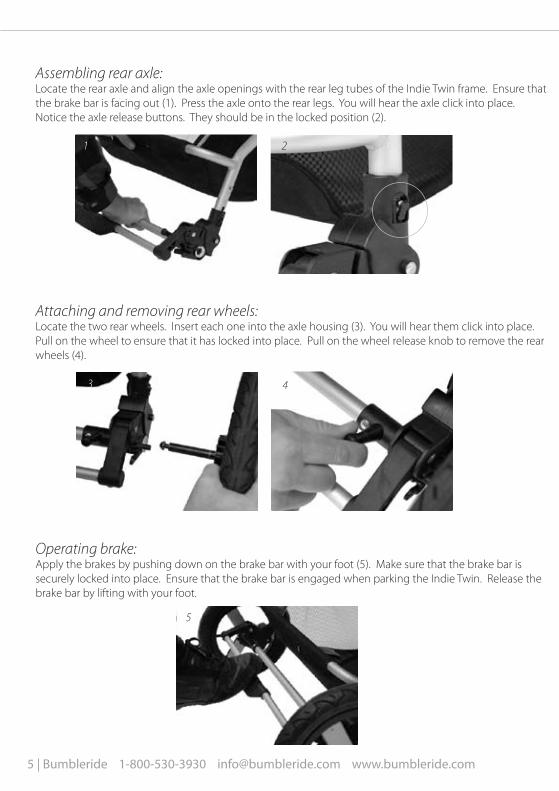
Assembling rear axle:Locate the rear axle and align the axle openings with the rear leg tubes of the Indie Twin frame. Ensure that the brake bar is facing out (1). Press the axle onto the rear legs. You will hear the axle click into place. Notice the axle release buttons. They should be in the locked position (2).
Attaching and removing rear wheels:Locate the two rear wheels. Insert each one into the axle housing (3). You will hear them click into place. Pull on the wheel to ensure that it has locked into place. Pull on the wheel release knob to remove the rear wheels (4).
Operating brake:Apply the brakes by pushing down on the brake bar with your foot (5). Make sure that the brake bar is securely locked into place. Ensure that the brake bar is engaged when parking the Indie Twin. Release the brake bar by lifting with your foot.
1 2
3 4
5
1 | Bumbleride 1-800-530-3930 [email protected] www.bumbleride.com | 6
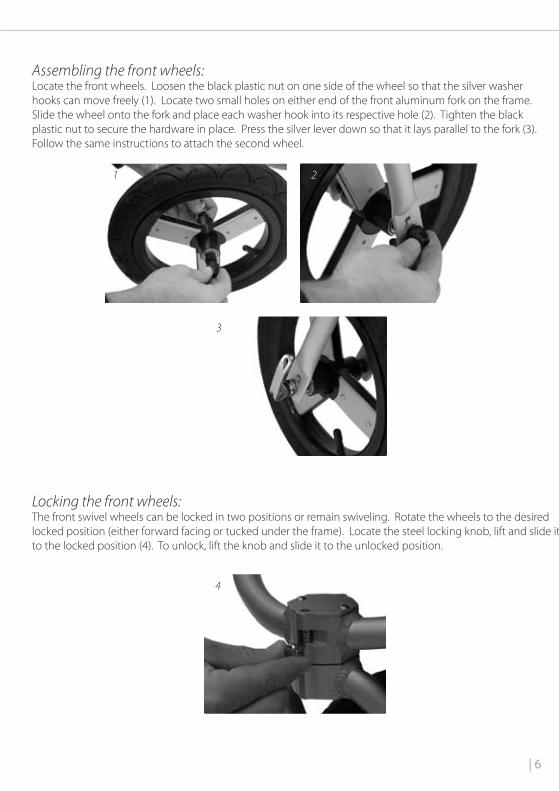
Assembling the front wheels:Locate the front wheels. Loosen the black plastic nut on one side of the wheel so that the silver washer hooks can move freely (1). Locate two small holes on either end of the front aluminum fork on the frame. Slide the wheel onto the fork and place each washer hook into its respective hole (2). Tighten the black plastic nut to secure the hardware in place. Press the silver lever down so that it lays parallel to the fork (3). Follow the same instructions to attach the second wheel.
Locking the front wheels:The front swivel wheels can be locked in two positions or remain swiveling. Rotate the wheels to the desired locked position (either forward facing or tucked under the frame). Locate the steel locking knob, lift and slide it to the locked position (4). To unlock, lift the knob and slide it to the unlocked position.
1 2
3
4
OPERATIONMAINTENANCE
7 | Bumbleride 1-800-530-3930 [email protected] www.bumbleride.com
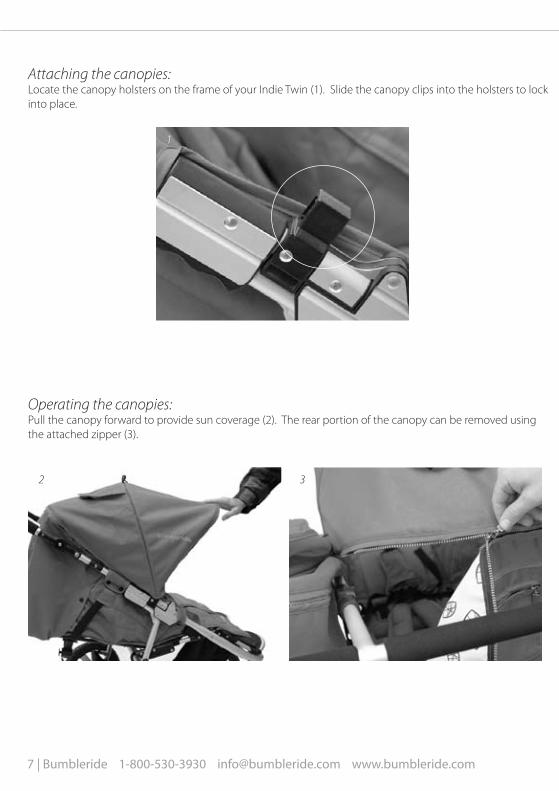
Attaching the canopies:Locate the canopy holsters on the frame of your Indie Twin (1). Slide the canopy clips into the holsters to lock into place.
Operating the canopies:Pull the canopy forward to provide sun coverage (2). The rear portion of the canopy can be removed using the attached zipper (3).
2
1
3

1 | Bumbleride 1-800-530-3930 [email protected] www.bumbleride.com | 8
Adjusting backrests:To recline the backrests, simply squeeze the adjuster’s button and pull downward (1). The backrest will fall into place. To raise, pull the d-ring downward and squeeze the adjuster up to the desired position.
Adjusting the footrests:To raise, simply lift the footrest to the desired position. To lower the footrest, push the hidden buttons underneath the footrest and adjust the footrest down to the desired position (2).
Attaching footrest �aps for use with infants:Always ensure that the footrest �aps are attached to the seat fabric when using with an infant (3).
1
2
3
9 | Bumbleride 1-800-530-3930 [email protected] www.bumbleride.com
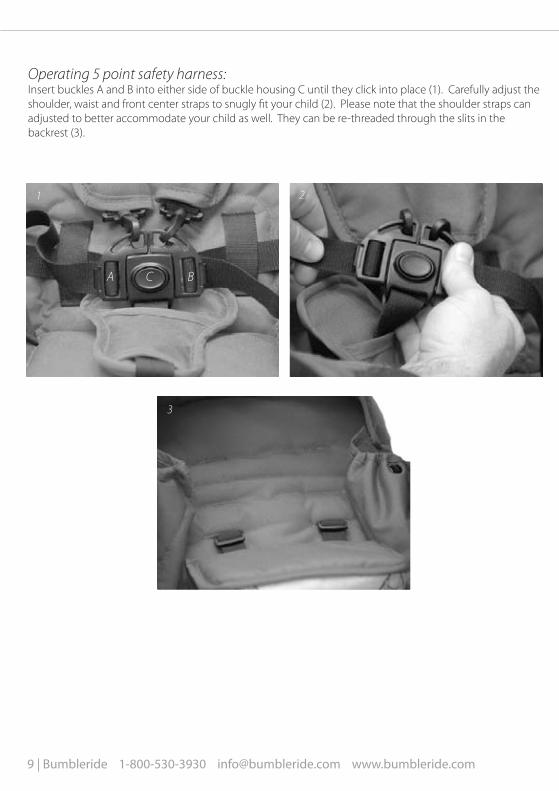
Operating 5 point safety harness:Insert buckles A and B into either side of buckle housing C until they click into place (1). Carefully adjust the shoulder, waist and front center straps to snugly �t your child (2). Please note that the shoulder straps can adjusted to better accommodate your child as well. They can be re-threaded through the slits in the backrest (3).
1
A BC
3
2

1 | Bumbleride 1-800-530-3930 [email protected] www.bumbleride.com | 10
Attaching the accessory rain shield:Begin by unfolding the packaged rain shield and placing it over the Indie Twin. Pull the upper �aps through the handle openings (1). Notice the Velcro attachments on both sides of the �aps. Secure the Velcro attachments found on the upper �ap to the corresponding attachments on the sidewalls of the rain shield. Secure the Velcro loops around the front portion of the frame (2).
Warning: Do not use the accessory rain shield with Queen B model when accessory Toddler Seat is attached.
1
2
OPERATIONMAINTENANCE
11 | Bumbleride 1-800-530-3930 [email protected] www.bumbleride.com
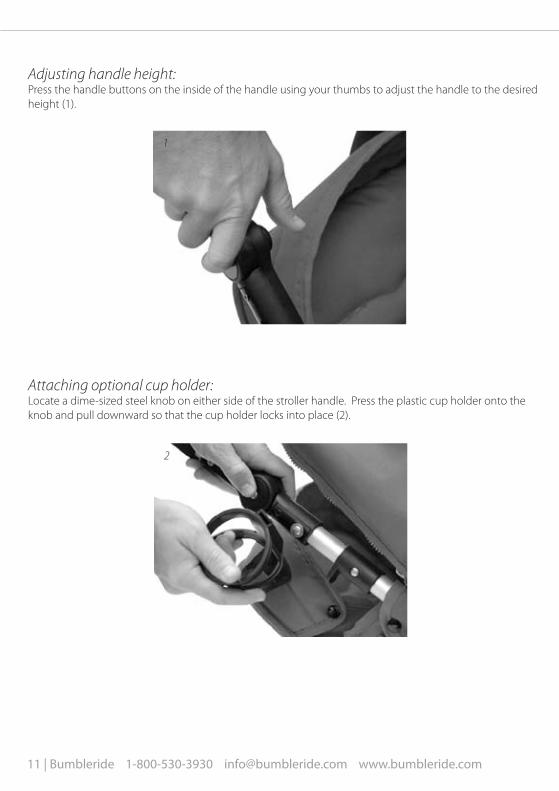
Adjusting handle height:Press the handle buttons on the inside of the handle using your thumbs to adjust the handle to the desired height (1).
Attaching optional cup holder:Locate a dime-sized steel knob on either side of the stroller handle. Press the plastic cup holder onto the knob and pull downward so that the cup holder locks into place (2).
1
2

OPERATIONMAINTENANCE
1 | Bumbleride 1-800-530-3930 [email protected] www.bumbleride.com | 12
Adjusting multi-use bar:Locate the holsters on the Indie Twin frame that the multi-use bar installs into (1). When used as a bumper bar, ensure that the multi-use bar is adjusted to position 1. When used as an infant seat adapter bar, ensure that it is adjusted to position 2. To adjust the bar simply press the grey buttons in while adjusting up or down (2). The multi-use bar can also be folded completely �at to fold the stroller.
1
2
Bumper barposition
Infant seatadapter barposition Adjuster Button
OPERATIONMAINTENANCE
13 | Bumbleride 1-800-530-3930 [email protected] www.bumbleride.com
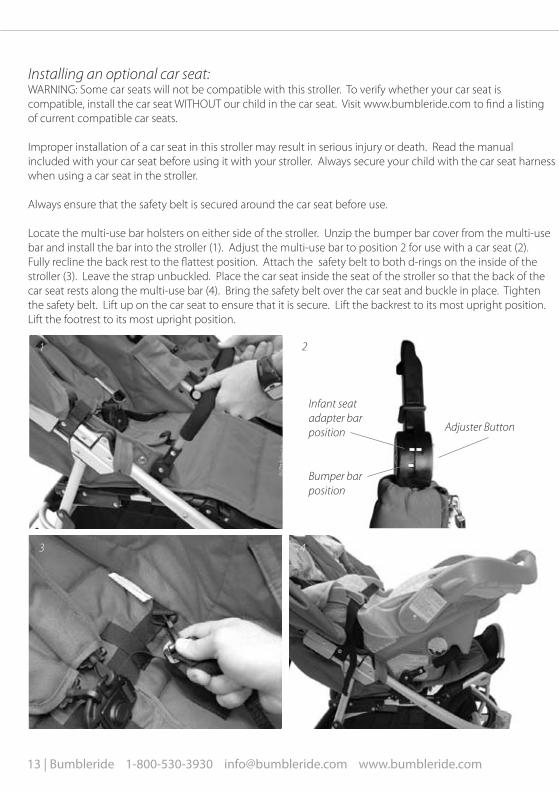
Installing an optional car seat: WARNING: Some car seats will not be compatible with this stroller. To verify whether your car seat is compatible, install the car seat WITHOUT our child in the car seat. Visit www.bumbleride.com to �nd a listing of current compatible car seats.
Improper installation of a car seat in this stroller may result in serious injury or death. Read the manual included with your car seat before using it with your stroller. Always secure your child with the car seat harness when using a car seat in the stroller.
Always ensure that the safety belt is secured around the car seat before use.
Locate the multi-use bar holsters on either side of the stroller. Unzip the bumper bar cover from the multi-use bar and install the bar into the stroller (1). Adjust the multi-use bar to position 2 for use with a car seat (2). Fully recline the back rest to the �attest position. Attach the safety belt to both d-rings on the inside of the stroller (3). Leave the strap unbuckled. Place the car seat inside the seat of the stroller so that the back of the car seat rests along the multi-use bar (4). Bring the safety belt over the car seat and buckle in place. Tighten the safety belt. Lift up on the car seat to ensure that it is secure. Lift the backrest to its most upright position. Lift the footrest to its most upright position.
1
3 4
2
Bumper barposition
Infant seatadapter barposition Adjuster Button
1 | Bumbleride 1-800-530-3930 [email protected] www.bumbleride.com | 14
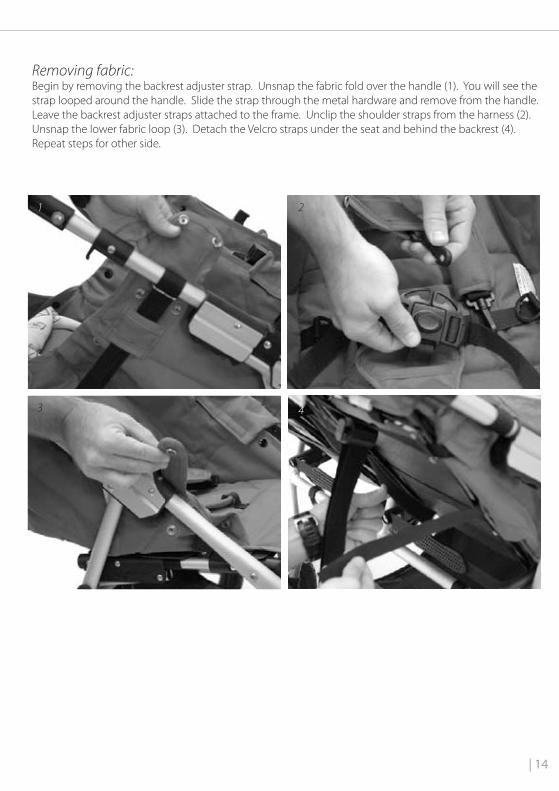
Removing fabric:Begin by removing the backrest adjuster strap. Unsnap the fabric fold over the handle (1). You will see the strap looped around the handle. Slide the strap through the metal hardware and remove from the handle. Leave the backrest adjuster straps attached to the frame. Unclip the shoulder straps from the harness (2). Unsnap the lower fabric loop (3). Detach the Velcro straps under the seat and behind the backrest (4). Repeat steps for other side.
1 2
3 4
OPERATIONMAINTENANCE
15 | Bumbleride 1-800-530-3930 [email protected] www.bumbleride.com
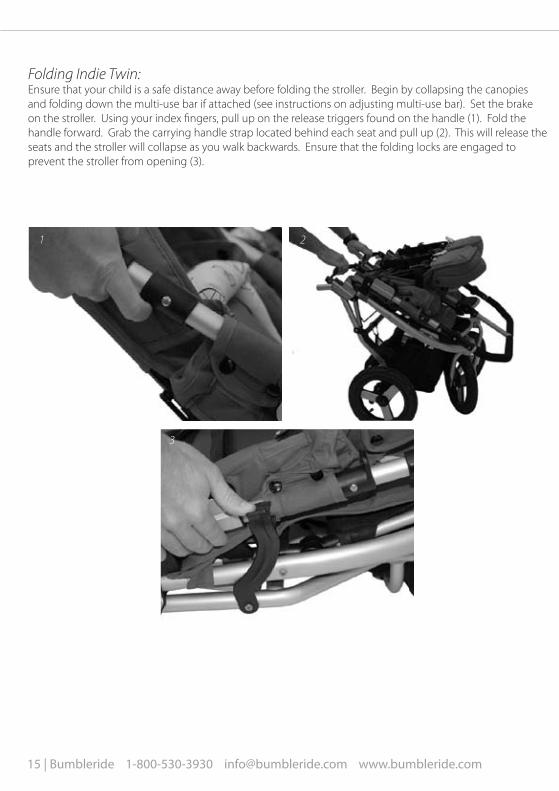
Folding Indie Twin:Ensure that your child is a safe distance away before folding the stroller. Begin by collapsing the canopies and folding down the multi-use bar if attached (see instructions on adjusting multi-use bar). Set the brake on the stroller. Using your index �ngers, pull up on the release triggers found on the handle (1). Fold the handle forward. Grab the carrying handle strap located behind each seat and pull up (2). This will release the seats and the stroller will collapse as you walk backwards. Ensure that the folding locks are engaged to prevent the stroller from opening (3).
1 2
3

BUMBLERIDE INDIE TWIN
ASSEMBLYOPERATIONMAINTENANCE
Questions about your Bumbleride?We’d love to hear from you.
Within the US:
Phone: 1-800-530-3930E-mail: [email protected]
www.bumbleride.com