business portal for dynamics gp - · pdf filerana abdul rahman business portal for dynamics gp...
TRANSCRIPT

Rana Abdul Rahman
Business Portal for Dynamics GP
Over view Business Portal is a web-based application used to provide access to Microsoft Dynamics GP data to users who don’t have access to the Microsoft Dynamics GP application. You can use Business Portal as your company’s intranet by including other content that is used by your organization, but that is not stored in the accounting system, such as your company’s employee handbook. Business Portal is built on a stack of other applications, beginning with Windows Server 2008, or Windows Server 2008 R2. Internet Information Services (IIS), a component of Windows Server 2008, or Windows Server 2008 R2, hosts virtual servers, each of which can contain a separate web-based application. Business Portal is installed on a SharePoint web application and site collection.
Domain users can access Business Portal through a web browser. By default, Business Portal is designed for intranet use; it is typically accessed over a local network or through a virtual private network (VPN). However, you can configure Business Portal to support external users.
Business Portal site structure
Rana Abdul Rahman
Web server configuration Install Internet Information Services (IIS) Internet Information Services (IIS) should be installed before you install any other prerequisites on the web server.
1. Open the Server Manager. Start > Administrative Tools > Server Manager.
2. Select the Roles node in the Server Manager. The currently installed roles are displayed. 3. In the Action menu, choose Add Roles. The Add Roles Wizard appears. Click Next to continue. 4. In the list of available roles, select the Web Server (IIS) role. Click Next to continue.
A message appears if you are required to install features for the Web Server (IIS) role. Click Add Required Features.
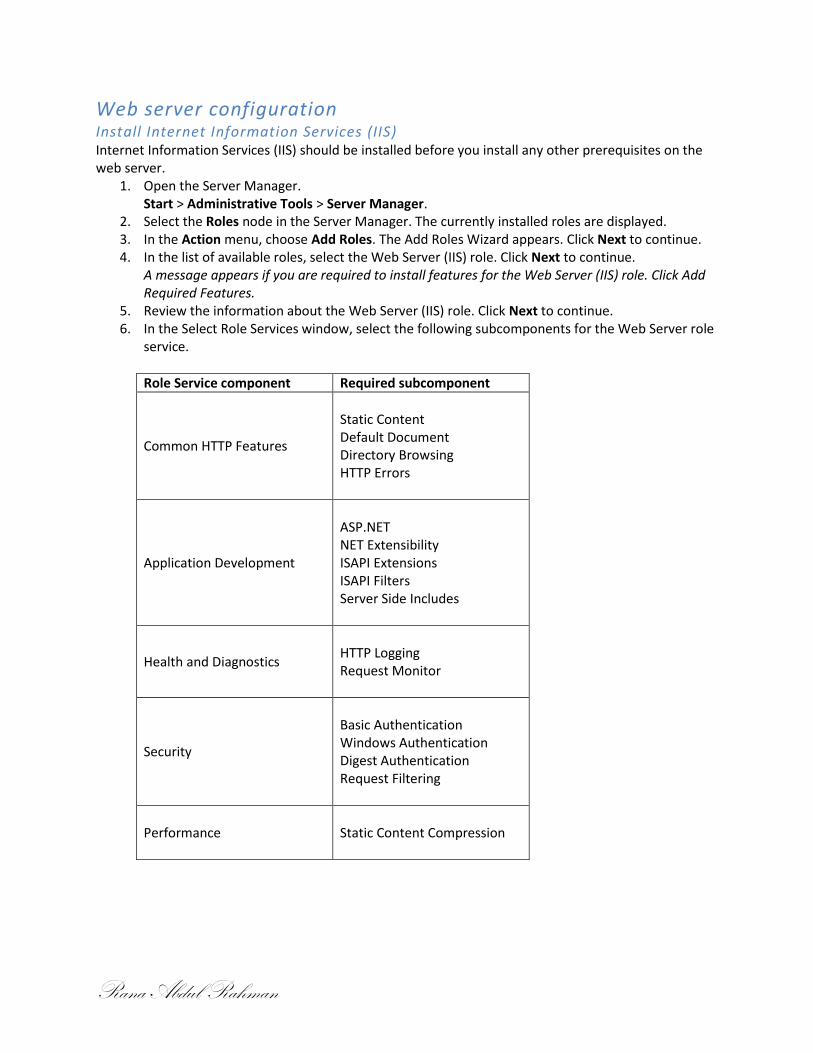
5. Review the information about the Web Server (IIS) role. Click Next to continue. 6. In the Select Role Services window, select the following subcomponents for the Web Server role
service.
Role Service component Required subcomponent
Common HTTP Features
Static Content Default Document Directory Browsing HTTP Errors
Application Development
ASP.NET NET Extensibility ISAPI Extensions ISAPI Filters Server Side Includes
Health and Diagnostics
HTTP Logging Request Monitor
Security
Basic Authentication Windows Authentication Digest Authentication Request Filtering
Performance Static Content Compression

Rana Abdul Rahman
Configure SharePoint To create a web application:
1. Open SharePoint Central Administration. Start > Microsoft SharePoint 2010 Products > SharePoint 2010 Central Administration
2. Click Application Management. 3. Under the Web Applications heading, click Manage web applications. 4. Click New in the ribbon to open the Create New Web Application page. 5. Select an IIS web site and security configuration. 6. In the Application Pool section, click create a new application pool and enter a name (we
recommend calling the new application pool BusinessPortal). 7. When a web application fails, it usually causes the application pool to fail, as well. If you are
going to install other web applications on this server, we recommend that you assign them to separate application pools. That way, one failed application can’t cause the other applications to fail.
8. Click Configurable and enter the user account you created for SharePoint. Be sure to enter the account in domain\username format.
9. Verify that the database name and other information on the page is correct and click OK. When the process is complete, the Application Created page is displayed. We recommend that the database name should be the <Web Application name> - Port#. An example of a database name is MySites - 82.
10. On the Application Created page, click OK.
To create a site collection: 1. Open the Create Site Collection page. Go to SharePoint Central Administration and click Application Management. Under the Site Collections heading, click Create site collections. 2. Select the web application you just created. 3. Enter a title and description for the site collection. You cannot install Business Portal if the name of the site collection contains “BP” or “Business Portal” in its name. 4. Specify the URL for the site collection, if necessary. Be sure the URL does not contain spaces. 5. Select the Team Site template. 6. Specify a site collection administrator. 7. Click OK.

Rana Abdul Rahman
BP Pre-requisites
Start services on the web server Before installing, verify that the following services are started on the web server where you will install Business Portal:
• IIS Admin Service • World Wide Web Publishing Service
SharePoint Foundation or SharePoint Server Catalog Maintenance This component is required to use the Order Management application. Catalog Maintenance is used to create item catalogs for managing inventory items. You can install this component on any computer that has an ODBC connection to the Microsoft Dynamics GP server. Catalog Maintenance can be installed using the Business Portal installation program. For more information, refer to the Order Management documentation. You can install Catalog Maintenance before installing Business Portal. However, you will encounter errors when opening Catalog Maintenance if Business Portal has not yet been installed. You must install Business Portal before opening Catalog Maintenance. Web Services for Microsoft Dynamics GP Microsoft SQL Server Reporting Services
Back up SharePoint databases Register Business Portal applications Before you can install Business Portal applications, you must register them in Microsoft Dynamics GP. Some applications may require certain back office modules to be registered, as well. For more information about entering registration keys, refer to your Microsoft Dynamics GP documentation.
Business Portal components The following Business Portal components are installed by the installation wizard: Virtual directory: A virtual directory called “BusinessPortal” is created in Internet Information Services (IIS). An IIS virtual directory maps to a folder on your web server’s hard disk that contains web pages. The virtual directory provides security; people who access your web pages won’t be able to determine where the files are located on your web server, and therefore can’t modify them. Program files: Business Portal program files are installed on the web server’s hard disk. SQL Server objects: SQL Server objects are created in Microsoft SQL Server. These objects include the tables that store Business Portal data, and the SQL Server credentials that Business Portal uses to retrieve data from your databases. The Reports Catalog is installed only if you’re using Business Portal with SharePoint Foundation.

Rana Abdul Rahman
Reports Catalog: The Reports Catalog enables Business Portal users to view Microsoft Dynamics GP reports that have been published to Reports pages in Business Portal. You can limit users’ access to reports based on user roles. The Reports Catalog is a shared folder on a server, plus a SQL table and business entity. Reports in the Reports Catalog are static—the data they show is current as of the date they were published. You determine how often each report is published. Report Scheduler is a module that you can add to Microsoft Dynamics GP to schedule and publish Report Writer reports to the Reports Catalog shared folder.
Install Business Portal Before you install, consider the following:
• We recommend backing up the web.config file before installing Business Portal.
o The web.config file is located at C:\inetpub\wwwroot\wss\ VirtualDirectories\<port number>, where <port number> is the port number of the IIS web site where you will install Business Portal.
• We recommend backing up the content (WSS_Content) and configuration (SharePoint_Config)
databases of SharePoint before installing Business Portal. The content database is the database that will store the web application that Business Portal will be installed to.
• The web site must use Integrated Windows authentication to complete the installation. If
necessary, the installation program will change the authentication method to Integrated Windows before installing and then revert to your original settings when the installation is complete.
• Be sure that the SharePoint site collection is running on the web server before you install Business Portal. You need to be sure that you can browse the site collection from the web server you want to install Business Portal on.
• Internet Information Services (IIS) will be reset during the Business Portal installation. We recommend that you perform this installation at a time when IIS resets will have the least amount of impact on any web applications on this server. If you have disabled the IISReset command-line utility, you must enable it before installing Business Portal. To enable the IISReset command-line utility, click Start > Run and type iisreset /enable, then press ENTER. Complete the following procedure to install Business Portal. If you have multiple web servers, you should perform this procedure on each server.

Rana Abdul Rahman
1. From the Business Portal installation media, browse and double-click the 2. CDSetup.exe files to open the main Business Portal installation window.
3. Under Install, click Business Portal for Microsoft Dynamics GP.
4. The Backup SharePoint Databases window appears.
5. The End-User License Agreement window appears. Read and accept the terms and conditions, then select I accept the terms in the License Agreement, and click Next.

Rana Abdul Rahman
6. The Connection Information window appears.
Enter the location of your Microsoft Dynamics GP SQL database. You also must select the type of authentication that should be used when creating the SQL tables and objects that are used by Business Portal. These credentials are used only during the installation process.
• If you select Windows Trusted Authentication, you don’t need to enter any other information. Click Next.
• If you select SQL Authentication, enter a SQL Server administrator ID and password. Click Next.

Rana Abdul Rahman
7. The Select Features window appears. Select the features to install.
8. Specify the folder where you want the Business Portal files installed. The default folder is
C:\Program Files\Microsoft Dynamics\Business Portal. To select a different folder, click Browse. After you have specified the installation folder, click next.
Rana Abdul Rahman
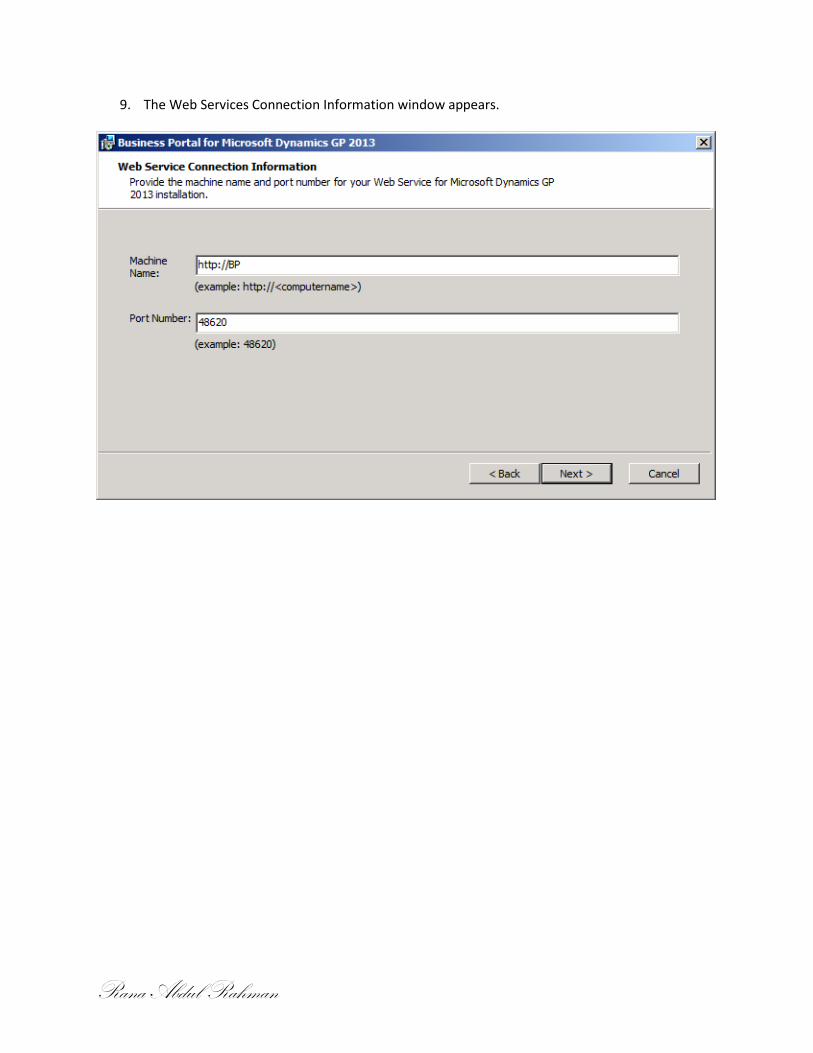
9. The Web Services Connection Information window appears.
Rana Abdul Rahman
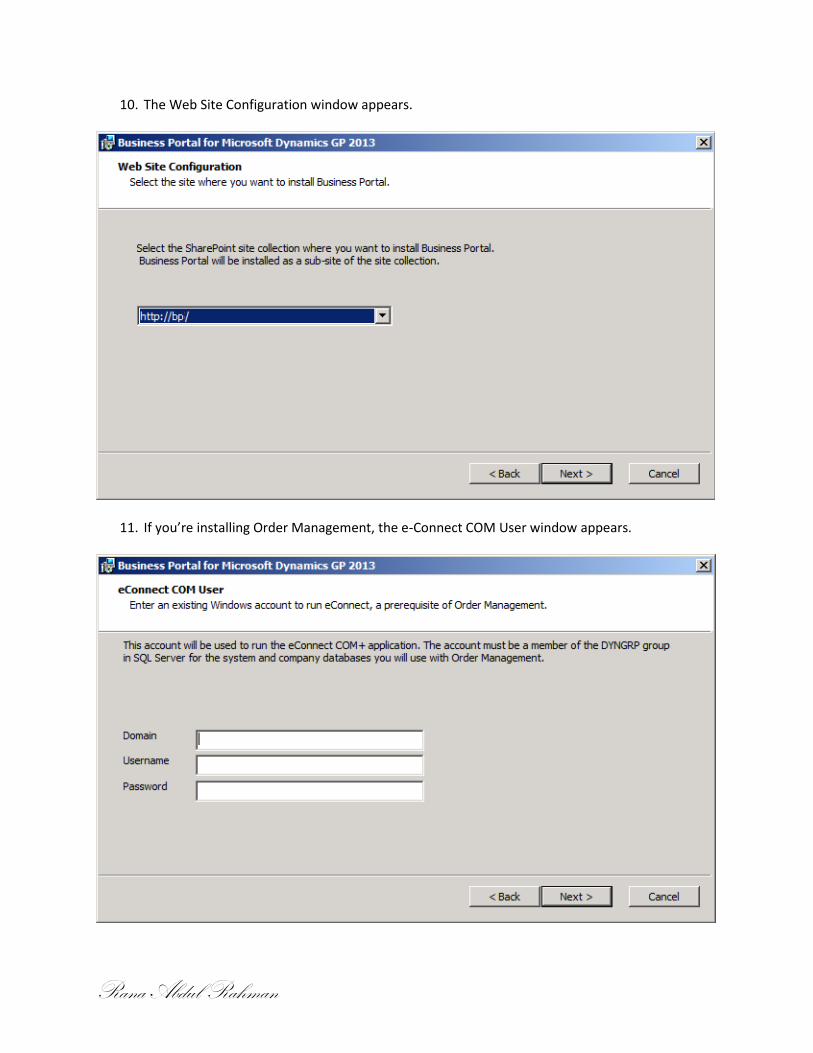
10. The Web Site Configuration window appears.
11. If you’re installing Order Management, the e-Connect COM User window appears.

Rana Abdul Rahman
12. The Business Portal SQL Configuration window appears.
13. The Ready to install window appears. Click Install. The installation process will take some time to complete.
14. The Finish window appears. Click Finish. 15. We recommend creating an additional backup of the web.config file after installing Business
Portal. The web.config file is located at C:\inetpub\wwwroot\wss\VirtualDirectories\<port number>, where <port number> is the port number of the IIS web site where you installed Business Portal.
16. You can continue to configure Business Portal, if needed.

Rana Abdul Rahman
Start Business Portal Start Business Portal by entering the Business Portal URL in the address field of Internet Explorer.
• If you installed Business Portal on the default web site, enter http://ServerName/BP in the address field.
• If you installed Business Portal on a port other than 80, enter http://ServerName:PortNumber/BP in the address field.
• If you are using managed paths, enter http://ServerName/ManagedPath/BP in the address field. If you’ve configured your Business Portal to use Secure Sockets Layer (SSL), use “https” instead of “http” in the URL.
Depending on your Internet Explorer security settings, you may be required to log on. When you launch Business Portal for the first time, you might be prompted to install ActiveX components that are needed to use certain MBF pages. The MBFWebBehaviors.cab contains the ActiveX components. If you are not using User Account Control (UAC), you may be asked to install the MBFWebBehaviors.cab multiple times. You can double-click the BusinessPortal- ActiveX.msi (Business Portal installation media\PreReqs\ActiveXControl) to install ActiveX components. On each computer, the user who launches Business Portal for the first time must have access privileges to view and use cabinet (.cab) files. This user also must have access rights to the Downloaded Program Files folder. (The folder is typically in the Windows.) Typically, members of the Administrators and the Power Users groups have these rights.