by meghan kaiserman and aileen ritchie - analog.com · meter design fully complies with the...
TRANSCRIPT

AN-916APPLICATION NOTE
One Technology Way • P.O. Box 9106 • Norwood, MA 02062-9106, U.S.A. • Tel: 781.329.4700 • Fax: 781.461.3113 • www.analog.com
A Multifunction Power Meter Reference Design Based on the ADE71xx/ADE75xx Family
by Meghan Kaiserman and Aileen Ritchie
Rev. 0 | Page 1 of 24
INTRODUCTION This application note describes the single-phase multifunction energy meter design based on the ADE7569. This meter is designed for single-phase, 2-wire distribution systems.
The ADE71xx/ADE75xx family of devices, which includes the ADE7569, integrates the analog front end and fixed function DSP of the Analog Devices, Inc., energy (ADE) metering ICs with an enhanced 8052 MCU core. The integrated RTC, LCD driver, and peripherals create an electronic energy meter with an LCD display within a single part. The ADE7566/ADE7569/ ADE7166/ADE7169 data sheet, available from Analog Devices, should be used in conjunction with this application note.
This energy meter, based on the ADE7569 model, performs active, reactive, and apparent energy measurements along with current and voltage rms readings. The current measurement is taken on a single channel. The design on which this meter is based can be used with any model in the family with a few modi- fications. The software program, written in the C programming language and developed to work with this reference design, is available as part of the evaluation board kit.
DESIGN GOALS The goal for the energy meter design is to create a Class 1 meter based on the IEC specifications. In addition to the accuracy requirements of the meter, many of the features included in a multifunction LCD meter are incorporated. The meter is designed to withstand electromagnetic influences included in the IEC tests for electrostatic discharge (ESD), IEC 1000-4-2, and electrical fast transient (EFT) immunity, IEC 1000-4-4. The meter design fully complies with the accuracy requirements of the IEC specification at unity gain power factor and at a low (PF = 0.5) power factor. Table 1 lists the accuracy requirements for the meter in accordance with IEC 62053-21.
Table 1. Accuracy Requirements
The ranges for current accuracy shown in Table 1 are expressed in terms of the basic current (IB). The basic current is defined in IEC62052-11 as the value of current in accordance with which the relevant performance of a direct connection meter is fixed. IMAX is the maximum current at which the specified accuracy is maintained.
Power factor (PF) in Table 1 relates to the phase relationship between the fundamental (45 Hz to 65 Hz) voltage and current waveforms. In this case, PF can be simply defined as
PF = cos(θ)
where θ is the phase angle between pure sinusoidal current and voltage.
Class index is defined in IEC62053 (2003-01) as the limits of the permissible percentage error. The percentage error is defined as
%100% ×−
=EnergyTrue
EnergyTrueMeterbyRegisteredEnergyError
Current Value PF Percentage Error Limits
Class 1 Class 20.05 IB < I < 0.1 IB 1 +1.5% +2.5%0.1 IB < I < IMAX 1 +1.0% +2.0%0.1 IB < I < 0.2 IB 0.5 Lag
0.8 Lead +1.5% +1.5%
+2.5%
0.2 IB < I < IMAX 0.5 Lag 0.8 Lead
+1.0% +1.0%
+2.0%

AN-916 Application Note
Rev. 0 | Page 2 of 24
TABLE OF CONTENTS Introduction ...................................................................................... 1
Design Goals ..................................................................................... 1
Functional Block Overview ............................................................. 3
Energy Measurement Information ............................................. 3
Capacitor-Based Power Supply ................................................... 3
Real-Time Clock (RTC) ............................................................... 3
LCD Panel ...................................................................................... 3
Battery Backup .............................................................................. 3
Nonvolatile Memory Storage ...................................................... 3
External Communication ............................................................ 3
Calibration ..................................................................................... 4
Energy Measurement Design .......................................................... 5
Current Input Networks .............................................................. 5
Voltage Input Network ................................................................. 5
Power Supply Management and Design ........................................ 6
Capacitor-Divider Supply ............................................................ 6
Battery Backup .............................................................................. 6
Choosing the External Circuitry Power Supply ....................... 7
Designing for Sleep Mode ........................................................... 8
Input/Output Design ........................................................................9
Input/Output Allocation ..............................................................9
Input/Output Structure ................................................................9
Sinking and Sourcing Current .....................................................9
Using VINTD as an External Power Supply ..................................9
ADE71xx/ADE75xx Special Input/Output Functions .......... 10
External Circuitry ........................................................................... 11
Communication ......................................................................... 11
EEPROM Management ............................................................. 12
Using the LCD Driver ................................................................ 13
Using the ADE71xx/ADE75xx RTC ........................................ 14
Design for Immunity to Electromagnetic Disturbance ............. 15
Types of Electromagnetic Interference .................................... 15
EMI Immunity Design Considerations ................................... 16
Meter Results ................................................................................... 17
Reference Meter Schematics ......................................................... 18
Bill of Materials ............................................................................... 21
Appendix A ..................................................................................... 22
Antitamper Configurations ...................................................... 22

Application Note AN-916
Rev. 0 | Page 3 of 24
FUNCTIONAL BLOCK OVERVIEW
0747
3-02
6
Figure 1. The ADE71xx/ADE75xx Reference Design
The purpose of the ADE71xx/ADE75xx reference design is to provide a fully functional reference meter that meets the spec-ifications outlined in the Design Goals section. The meter provides a working example of how the ADE71xx/ADE75xx family of devices can be used to produce a full energy metering system with minimal external components. Figure 1 shows a picture of the complete design.
The following functional blocks are incorporated into the ADE71xx/ADE75xx reference design.
ENERGY MEASUREMENT INFORMATION The active energy information is calibrated to meet Class 1 accuracy over a dynamic range of 300:1. A 350 μΩ shunt resis-tor is used for current sensing (see the Energy Measurement section.) The instantaneous voltage and current rms readings are recorded and displayed on the LCD display.
CAPACITOR-BASED POWER SUPPLY The on-board power supply provides the power necessary to run the IR communications and the ADE71xx/ADE75xx while remaining within the IEC power consumption specifications. See the Power Supply Management section for full details
REAL-TIME CLOCK (RTC) The on-chip real time clock (RTC) allows a full calendar to be maintained in the EEPROM nonvolatile memory. The date and time are displayed on the LCD panel. This feature allows multi-tariff and time of use (TOU) energy billing, if required. See the Using the ADE71xx/ADE75xx RTC section for more details.
LCD PANEL A 92-segment LCD panel is driven directly by the internal LCD driver and shows active energy accumulation and instantaneous rms values, along with the date and time. Two push-buttons are provided to scroll through the measurements on the LCD. See the Using the LCD Driver section for details.
BATTERY BACKUP A lithium 3.6 V backup battery is connected to the designated battery input. Internal circuitry monitors the VDD supply and switches to the secondary power source, when necessary. See the Battery Backup section for more details.
NONVOLATILE MEMORY STORAGE An EEPROM is included in the design for nonvolatile storage of calibration coefficients and energy consumption. This allows essential information to be safely stored in the event of a power outage. See the EEPROM Management section for more details.
EXTERNAL COMMUNICATION The following methods of communication are available to send and retrieve meter data:
• UART serial interface
• Infrared
• Single-pin emulation
• Calibration frequency (CF)
• Push-buttons
See the Communication section for more details on these features.
Figure 2 shows a block diagram of the entire system.

AN-916 Application Note
Rev. 0 | Page 4 of 24
P0.7
P0.5
Tx
Rx
iCOUPLER
ISO_CF1
ISO_CF2
CF1
CF2
VREG ISOPWRVREG
R24 C23
VSWOUT
R26 C24
VSWOUT
PUSHBUTTON
23 × 4 (92 SEGMENT) LCD
4
23
LOAD
–
+
350µΩ
R1
C1
R2
C2
R3
C3
R15 C4
R16R19
VBAT
VDD VSWOUT
C7 C8 C39
R35VSWOUT
PSU
+3.3VVREGL6
MOV1
PHA
SE
NEU
TRA
L
220V
RxD TxD P0.5 P0.7
EEPROM
VINTD
SCLK
SDATA
COMx
SEGx
CLKOUT
CLKIN
P1./T2EX/FP24P2.2/FP16
CF1
CF2
VN
VP
IN
IP
INT0
ADE71xx/ADE75xx
0747
3-00
1
Figure 2. Reference Design Block Diagram
CALIBRATION The meter is calibrated digitally by configuring the set of registers inside the ADE71xx/ADE75xx energy metering DSP. The calibration values are stored in the EEPROM and written into the calibration registers during initialization by user code (see the EEPROM Management section). The calibration para-meters can be programmed into the EEPROM directly from the IR/RS-485/UART interface. The value of the calibration
constants is determined by following the steps in a LabVIEW™-based calibration program that interacts with the reference firmware through the UART using a serial communication protocol. Refer to the AN-950 Application Note for further details on the calibration process. Upon reset or power-up, the new parameters are loaded into the ADE71xx/ADE75xx energy metering DSP to provide a calibrated meter.

Application Note AN-916
Rev. 0 | Page 5 of 24
ENERGY MEASUREMENT DESIGN To ensure that accurate and linear energy measurement is obtained, the input networks on both the current and voltage channel are carefully designed to minimize noise and maintain matching. Antialiasing filters on both channels prevent possible distortion due to sampling. The effects of aliasing are shown in Figure 3.
409.60 819.22FREQUENCY (kHz)
SAMPLINGFREQUENCY
ALIASING EFFECTS
IMAGEFREQUENCIES
0747
3-02
7
Figure 3. Aliasing Effects
The aliasing effects are caused by frequency components in the ADC input signal that are higher than half the sampling rate of the ADC, appearing in the sampled signal at frequencies below half the sampling rate. This is shown in Figure 3 by the black arrows above half the sampling frequency (also known as the Nyquist frequency, that is, 409.6 kHz) being imaged or folded back down below 409.6 kHz. This happens with all ADCs regardless of the architecture. To prevent any image signals appearing in the band of interest for metering (from 40 Hz to 2 kHz), antialiasing low-pass filters are included in the inputs to the ADCs. These filters ensure that at least 40 dB of attenuation is provided at frequencies greater than the sampling rate.
CURRENT INPUT NETWORKS The ADE75xx family provides a differential analog input to measure current. On the reference design, a shunt resistor serves as the current measurement device. Shunt resistors are a low cost way to measure the current with high linearity and minimal phase shift. Figure 4 shows the current channel input network as configured in the reference design.
220V
NEUTRAL
PHASE
350µΩ
LOA
D
33nFIAP
1kΩ
33nFIN
1kΩ
PGND
0747
3-00
2
Figure 4. Current Channel Inputs
An antialiasing filter is included on the current channel input. Resistor and capacitor values of 1 kΩ and 33 nF, respectively, are used for this filter. These values set the corner frequency to 4.8 kHz, providing attenuation of greater than 40 dB at 500 kHz and above. This magnitude of attenuation ensures that there are no negative effects due to aliasing.
Note that the ADE71xx/ADE75xx reference design focuses on a nonantitamper application using the ADE7569. This part includes all the metering features, but only one current input channel. With some small hardware adjustments, this reference design can be configured to operate using the ADE71xx series of antitamper meters. See Appendix A for more information on configuring the reference design for an antitamper meter.
VOLTAGE INPUT NETWORK The line input voltage is attenuated to 330 mV by a simple resistor-divider network as shown in Figure 5.
220V
NEUTRAL
33nFVP
1kΩ
33nFVN
1kΩ
499kΩ 499kΩ
0747
3-00
3
Figure 5. Voltage Channel Inputs
The topology of the network is such that the phase matching between the voltage and current channel is preserved. As shown in Figure 5, the corner of the RC filter is determined by the 1 kΩ resistor and 33 nF capacitor combination. This is because the sum of the two 499 kΩ resistors is much larger than 1 kΩ.
The antialiasing filter corner of 4.8 kHz is preserved to prevent any aliasing effects and ensure matching between the channels. Because the ADE71xx/ADE75xx transfer function is linear, a one-point calibration (IB) at unity power factor is all that is needed to calibrate the gain of the meter.
AN-916 Application Note
Rev. 0 | Page 6 of 24
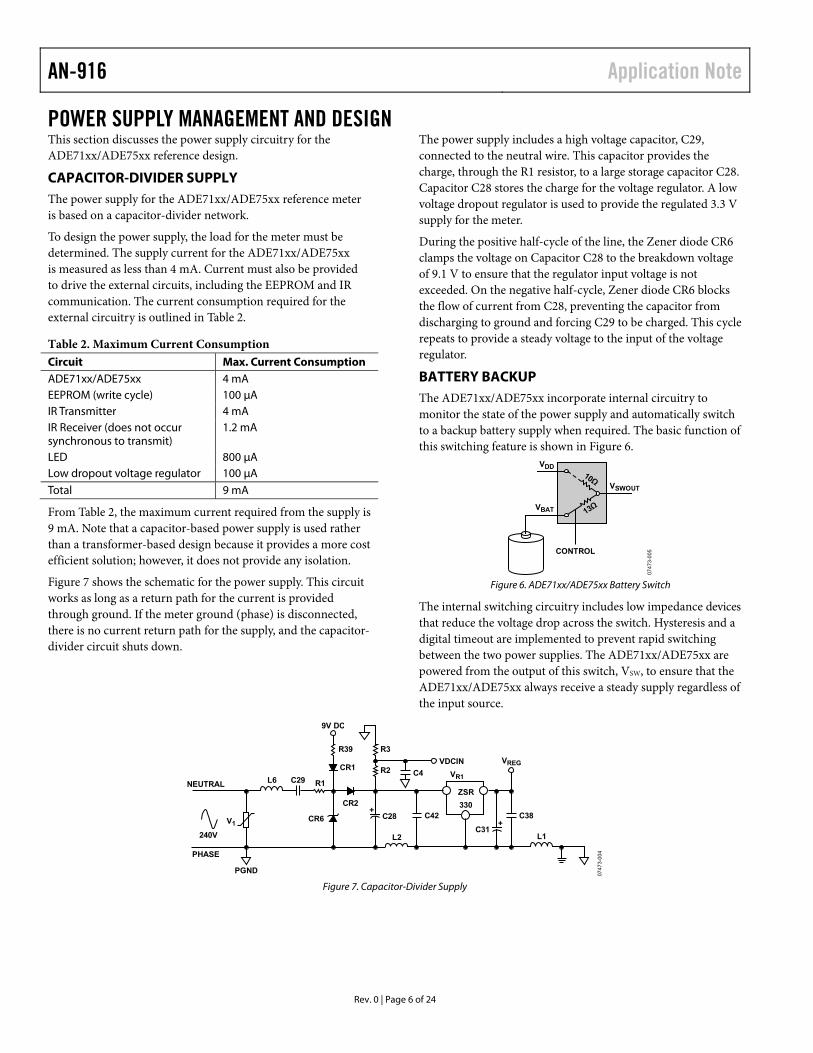
POWER SUPPLY MANAGEMENT AND DESIGN This section discusses the power supply circuitry for the ADE71xx/ADE75xx reference design.
CAPACITOR-DIVIDER SUPPLY The power supply for the ADE71xx/ADE75xx reference meter is based on a capacitor-divider network.
To design the power supply, the load for the meter must be determined. The supply current for the ADE71xx/ADE75xx is measured as less than 4 mA. Current must also be provided to drive the external circuits, including the EEPROM and IR communication. The current consumption required for the external circuitry is outlined in Table 2.
Table 2. Maximum Current Consumption Circuit Max. Current Consumption ADE71xx/ADE75xx 4 mA EEPROM (write cycle) 100 μA IR Transmitter 4 mA IR Receiver (does not occur synchronous to transmit)
1.2 mA
LED 800 μA Low dropout voltage regulator 100 μA Total 9 mA
From Table 2, the maximum current required from the supply is 9 mA. Note that a capacitor-based power supply is used rather than a transformer-based design because it provides a more cost efficient solution; however, it does not provide any isolation.
Figure 7 shows the schematic for the power supply. This circuit works as long as a return path for the current is provided through ground. If the meter ground (phase) is disconnected, there is no current return path for the supply, and the capacitor-divider circuit shuts down.
The power supply includes a high voltage capacitor, C29, connected to the neutral wire. This capacitor provides the charge, through the R1 resistor, to a large storage capacitor C28. Capacitor C28 stores the charge for the voltage regulator. A low voltage dropout regulator is used to provide the regulated 3.3 V supply for the meter.
During the positive half-cycle of the line, the Zener diode CR6 clamps the voltage on Capacitor C28 to the breakdown voltage of 9.1 V to ensure that the regulator input voltage is not exceeded. On the negative half-cycle, Zener diode CR6 blocks the flow of current from C28, preventing the capacitor from discharging to ground and forcing C29 to be charged. This cycle repeats to provide a steady voltage to the input of the voltage regulator.
BATTERY BACKUP The ADE71xx/ADE75xx incorporate internal circuitry to monitor the state of the power supply and automatically switch to a backup battery supply when required. The basic function of this switching feature is shown in Figure 6.
VDD
VBAT
VSWOUT
CONTROL
10Ω
13Ω
0747
3-00
5
Figure 6. ADE71xx/ADE75xx Battery Switch
The internal switching circuitry includes low impedance devices that reduce the voltage drop across the switch. Hysteresis and a digital timeout are implemented to prevent rapid switching between the two power supplies. The ADE71xx/ADE75xx are powered from the output of this switch, VSW, to ensure that the ADE71xx/ADE75xx always receive a steady supply regardless of the input source.
R39
NEUTRAL
PHASE
240V
V1
L6 C29 R1
CR6
PGND
L2
CR2
CR1
9V DC
+C28
+C31
330ZSR
VR1
C38
C4
C42
VREGVDCIN
L1
0747
3-00
4
R3
R2
Figure 7. Capacitor-Divider Supply

Application Note AN-916
Rev. 0 | Page 7 of 24
62
59LDO
LDO
POWER SUPPLYMANAGEMENT
VOLTAGESUPERVISORY
VOLTAGESUPERVISORY
6158
60
64
VSWOUT
VINTA
VINTD
VBAT
VDD
VDCIN
3.3VREGULATOR
5V TO 12V DCBULK
PSU
(240V, 220V,110V TYPICAL)
AC INPUT
0747
3-00
6
Figure 8. Power Management
The following two conditions can cause the internal switch to move to the battery:
• The unregulated bulk voltage that is applied directly to the VDCIN via a resistor-divider network (see Figure 8) drops below 1.2 V.
• The regulated VDD supply (see Figure 8) drops below 2.75 V.
By monitoring all of these external events, failure in the line voltage can be detected early to prevent disruption to the VSW supply.
When the power supply switches over to the VBAT supply, the internal analog LDO turns off. There are two 2.5 V low dropout voltage regulators inside the ADE71xx/ADE75xx: one for the analog circuitry and one for the digital circuitry. The features associated with the analog LDO are the ADCs and the energy metering fixed function DSP. Subsequently, when the power supply switches to the VBAT supply, the energy metering ADCs and associated DSP signal processing are disabled. When the ADE71xx/ADE75xx go into a low power sleep mode during battery operation, the digital LDO turns off, resulting in the MCU being disabled.
CHOOSING THE EXTERNAL CIRCUITRY POWER SUPPLY Because the ADE71xx/ADE75xx output two voltages, VINTA and VINTD, different power supplies are available under different operating conditions. To produce an efficient metering system with low power consumption and extended battery life, it is important to carefully choose the power supply that is connected to the external circuitry. Following are the three main power supplies to choose from when connecting external circuitry:
• VDD is the normal, line-powered supply that is available in power supply mode 0 (PSM0) only.
• VSW, the output of the battery switch, is always powered as long as VDD or VBAT is valid. This supply should be available in all operating modes.
• VINTD, the 2.5 V digital supply, is powered when the MCU is powered. This supply should be available in both PSM0 and PSM1.
To reduce power consumption, external circuitry that is not required during battery operation is connected to VDD. Circuitry that is required during battery operation can be divided into the following two groups:
• Circuitry that can wake the MCU, such as IR receivers and push-buttons.
• Circuitry that is only used when the MCU is awake, such as IR transmitters and EEPROM.
The circuitry that falls into the first group should be attached to the VSW supply to ensure that it remains active at all times, while the circuitry that falls into the second group should be powered from VINTD to minimize current consumption while in sleep mode (PSM2). Refer to the ADE7566/ADE7569/ADE7166/ ADE7169 data sheet for detail specifications on each of these power supplies.
What follows is a list of the external circuitry attached to the three main power supplies in the ADE71xx/ADE75xx reference design.
• VDD
• CF LED and isolation circuitry
• RS-485
• VSW
• IR transmitter
• IR receiver
• Push-buttons
• Single pin emulation
• UART serial interface
• VINTD
• EEPROM
AN-916 Application Note
Rev. 0 | Page 8 of 24
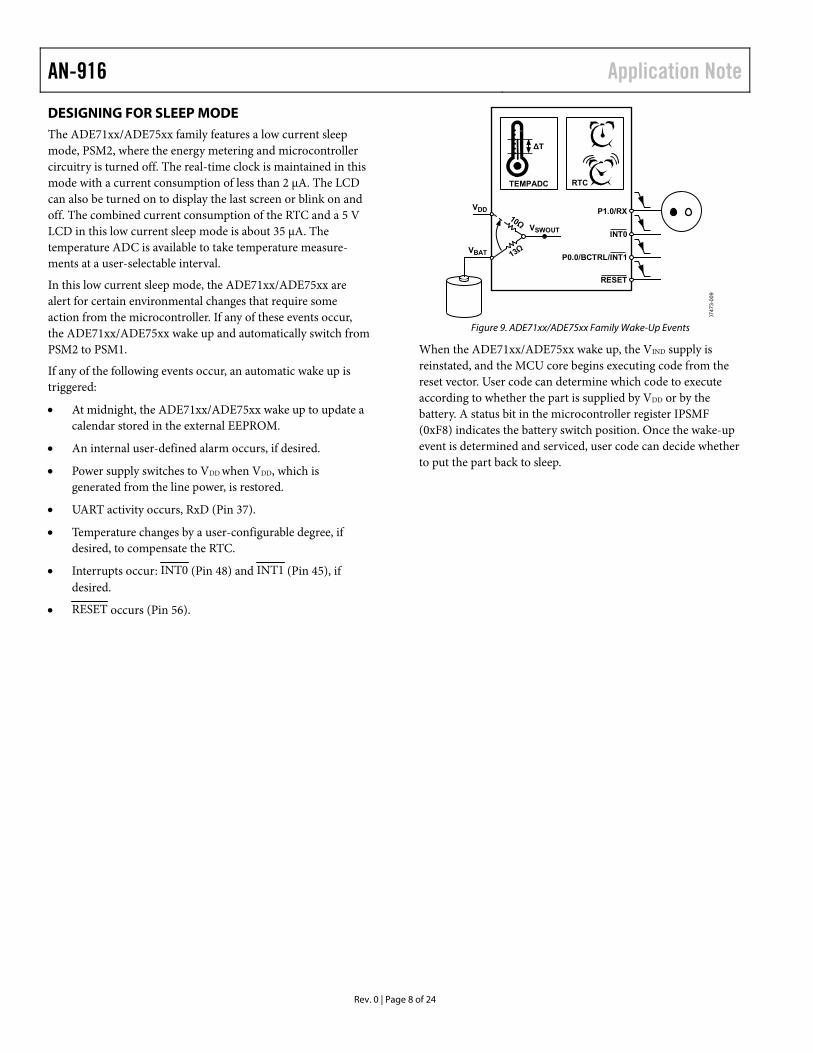
DESIGNING FOR SLEEP MODE The ADE71xx/ADE75xx family features a low current sleep mode, PSM2, where the energy metering and microcontroller circuitry is turned off. The real-time clock is maintained in this mode with a current consumption of less than 2 μA. The LCD can also be turned on to display the last screen or blink on and off. The combined current consumption of the RTC and a 5 V LCD in this low current sleep mode is about 35 μA. The temperature ADC is available to take temperature measure-ments at a user-selectable interval.
In this low current sleep mode, the ADE71xx/ADE75xx are alert for certain environmental changes that require some action from the microcontroller. If any of these events occur, the ADE71xx/ADE75xx wake up and automatically switch from PSM2 to PSM1.
If any of the following events occur, an automatic wake up is triggered:
• At midnight, the ADE71xx/ADE75xx wake up to update a calendar stored in the external EEPROM.
• An internal user-defined alarm occurs, if desired.
• Power supply switches to VDD when VDD, which is generated from the line power, is restored.
• UART activity occurs, RxD (Pin 37).
• Temperature changes by a user-configurable degree, if desired, to compensate the RTC.
• Interrupts occur: INT0 (Pin 48) and INT1 (Pin 45), if desired.
• RESET occurs (Pin 56).
VDD
VBAT
VSWOUT
10Ω
13Ω
RTC
ΔT
TEMPADC
P1.0/RX
INT0
P0.0/BCTRL/INT1
RESET
0747
3-00
9
Figure 9. ADE71xx/ADE75xx Family Wake-Up Events
When the ADE71xx/ADE75xx wake up, the VIND supply is reinstated, and the MCU core begins executing code from the reset vector. User code can determine which code to execute according to whether the part is supplied by VDD or by the battery. A status bit in the microcontroller register IPSMF (0xF8) indicates the battery switch position. Once the wake-up event is determined and serviced, user code can decide whether to put the part back to sleep.

Application Note AN-916
Rev. 0 | Page 9 of 24
INPUT/OUTPUT DESIGN The ADE71xx/ADE75xx family supports 20 input/output pins. Note that all pins have alternate functions.
INPUT/OUTPUT ALLOCATION The ADE71xx/ADE75xx reference design uses a 92-segment LCD which requires 92/4, or 23, segment lines. The input/ output pins on the meter are allocated as shown in Table 3. Seven input/output pins are used for the LCD, two are used for I2C communications, two are used for UART communications, one is used for a watt pulse output, one is used for an RTC 1 Hz output pulse, and two pins are used as interrupts. Five pins are used for general-purpose input/output.
Table 3. Input/Output Allocation Port Pin
Alternate Function Description
INT0 INT0: indicates LCD scroll up or scroll down
P0.7 SS, T1 Output: IR transmit with 38 kHz modulation
P0.6 SCLK/T0 I2C: SCLK P0.5 MIS0 Input: IR demodulated receive P0.4 MOSI/SDATA I2C: SDATA P0.3 CF2 RTC: 1 Hz output P0.2 CF1 CF1: Watt pulse output P0.1 FP19 LCD: FP19 P0.0 BCTRL/INT1 INT1: case open or IR interrupt
P1.7 FP20 LCD: FP20 P1.6 FP21 LCD: FP21 P1.5 FP22 LCD: FP22 P1.4 FP23/T2 LCD: FP23 P1.3 FP24/T2EX Input: LCD scroll up P1.2 FP25 Input: case open high P1.1 TxD UART: Tx P1.0 RxD UART: Rx P2.3 SDEN SDEN: serial download enable. P2.2 FP16 Input: LCD scroll down P2.1 FP17 LCD: FP17 P2.0 FP18 LCD: FP18
INPUT/OUTPUT STRUCTURE Figure 10 shows the ADE71xx/ADE75xx input/output structure. The ADE71xx/ADE75xx allow weak pull-ups on all of their input/output pins to be individually disabled to reduce power consumption in the battery-operated sleep mode.
ALTERNATEINPUT
FUNCTION
ALTERNATEOUTPUT
FUNCTION
Px.xPIN
CLOSED: PINMAPx.x = 0OPEN: PINMAPx.x = 1
DVDD
LATCH
QD
CL Q
INTERNALPULL-UP
READLATCH
INTERNALBUS
WRITETO LATCH
READPIN
0747
3-01
0
Figure 10. ADE71xx/ADE75xx Input/Output Structure
SINKING AND SOURCING CURRENT Each ADE71xx/ADE75xx input/output pin is capable of sinking 2 mA and sourcing 80 μA with a 3.3 V supply voltage. For this reason, it is better to control high current devices, such as LEDs, by turning them on with a low voltage.
USING VINTD AS AN EXTERNAL POWER SUPPLY When the 2.5 V digital supply, VINTD, is used to power external circuitry, it is important that these circuits be designed to prevent leakage back to VINTD during sleep mode. This leakage can come from the input/output pins. For example, the EEPROM in the ADE71xx/ADE75xx reference design is connected as shown in Figure 11. During normal and battery operation, when the MCU is running, the SCLK and SDATA are configured as open drain as the I2C peripheral is enabled. When the ADE71xx/ADE75xx shuts down the MCU core to sleep during battery operation, weak pull-ups on the SCLK pin (Pin 39) and the SDATA pin (Pin 41) are enabled by default. Then, the SCLK and SDATA pins are pulled up to battery voltage, as is the VINTD node, through R10 and R11. This results in excess current being drawn and prevents the ADE71xx/ ADE75xx from going into a low current sleep mode. To prevent this undesirable condition, disable the weak pull-ups on SCLK and SDATA by setting Bit 6 and Bit 4 in the PINMAP0 register. This results in VINTD dropping down to 0 V during sleep mode. The circuit now meets the ADE71xx/ADE75xx specifications of 2 μA typical current draw.
EEPROM
R11R10
SCLK
SDATA
VINTD
0747
3-01
1
Figure 11. EEPROM Circuit
Note that the ADE71xx/ADE75xx do not allow the input/ output to exceed the power supply in open-drain mode.

AN-916 Application Note
Rev. 0 | Page 10 of 24
ADE71xx/ADE75xx SPECIAL INPUT/OUTPUT FUNCTIONS 38 kHz Modulation
The ADE71xx/ADE75xx family offers a 38 kHz modulation on some input/output pins. Internally, a 38 kHz signal is OR’d with the level of the port pin, resulting in a continuous high level for a 1 and a 38 kHz signal for a 0 as shown in Figure 12.
LEVEL WRITTENTO MOD38
38kHz MODULATIONSIGNAL
OUTPUT ATMOD38 PIN 07
473-
015
Figure 12. 38 kHz Modulation
Uses for this 38 kHz modulation include IR modulation of a UART transmit signal or a low power signal to drive an LED.
The ADE71xx/ADE75xx family offers 38 kHz modulation functionality on the following pins:
• P1.4/FP23/T2 (Pin 7)
• P1.5/FP22 (Pin 8)
• P1.6/FP21 (Pin 9)
• P1.1/TxD (Pin 36)
• P0.7/SS/T1 Pin 38)
• P0.5/MISO (Pin 40)
• P0.3/CF2 (Pin 42)
• P0.2/CF1/RTCCAL (Pin 43)
The 38 kHz modulation can be enabled or disabled on each pin individually.
The P0.7 general input/output pin (Pin 38), which is used as an IR transmit line in this reference design, is configured for 38 kHz modulation.

Application Note AN-916
Rev. 0 | Page 11 of 24
EXTERNAL CIRCUITRY COMMUNICATION Infrared Communication
The IR receiver used in the ADE71xx/ADE75xx reference design integrates a 38 kHz demodulation function. The standby current of this device is typically 1.2 mA. However, because one of the goals for this reference meter design is to achieve a five-year shelf life on battery power, the current draw of the TSOP348 is too high to leave this device powered on continuously.
The suggested configuration for the device is to supply it from the 2.5 V digital supply, VINTD, which is powered when the MCU is turned on. Then, press a button to turn on the MCU before attempting IR communication with the device if it is in battery mode.
Alternatively, the IR communication can be done without 38 kHz modulation. A phototransistor, such as the BPW96 from Vishay Intertechnology, Inc., can be used to receive the IR signals. The current through this circuit in dark conditions is very low. This circuit can be used to wake the ADE71xx/ADE75xx from sleep directly when an IR communication is received.
RxD
10kΩ
VINTD
0747
3-00
7
Figure 13. Alternate IR Receive Circuit
A photodiode is used for the IR transmit function. A transis- tor is used to control the photodiode because the ADE71xx/ ADE75xx input/output pins cannot source or sink enough current for this device. The voltage level on the source of the transistor is the same as that on the TXD pin (Pin 36) during the low current sleep mode to ensure that this circuit has low power consumption in battery mode.
TxD
VSWOUT
0747
3-00
8
Figure 14. IR Tx Circuitry
CF LEDs Communication
Most energy metering standards require a precisely calibrated frequency output that is proportional to the energy consumption, such as 3200 impulses for every kWh. These standards also require an LED to turn on with the calibration pulse. The polarity of the CF pulse on the ADE71xx/ADE75xx is inverted from other ADE products as shown in Figure 15. Instead of an active-high pulse, the CF pulse is active-low.
t1
t3
t2
t4
ADE7755 CF
ADE71xx/ADE75xx CF
0747
3-01
2
Figure 15. CF Polarity
Figure 16 shows a simple way to implement the external circuitry to turn on an LED when CF is active, which in the ADE71xx/ADE75xx is a low going pulse.
VREG
CF2
CF1
0747
3-01
3
Figure 16. CF Configuration 1
This implementation sinks 1 mA of current into the ADE71xx/ ADE75xx CFx pins (Pin 42 or Pin 43) when the LED is on. However, this could affect the energy metering performance because the analog and digital grounds are tied together inside the IC. It is preferable to isolate the sensitive analog circuitry by using a configuration as shown in Figure 17 and making a long ground return for these signals in the PCB layout.
CF2
CF1
VREG
0747
3-01
4
Figure 17. CF Configuration 2
UART Communication
The full duplex UART serial interface is provided on Port 4 (P4) of the ADE71xx/ADE75xx reference design, as shown in Figure 18.
DGND
1234
P4
3M-929835-01-36
VSWOUTRxDTxD
0747
3-02
8
Figure 18. UART Connections
This communication port can be used to download code and communicate with the ADE71xx/ADE75xx (see the UART Debug/Boot Loader section). Use this port with the LabVIEW calibration software. See the AN-950 Application Note.

AN-916 Application Note
Rev. 0 | Page 12 of 24
Single-Pin Emulation
The ADE71xx/ADE75xx feature an isolated single-pin emulator, unique to Analog Devices, that allows code debugging while directly connected to the line. The single- pin emulation feature is provided on Port 3 (P3) of the ADE71xx/ADE75xx reference design, as shown in Figure 19.
321
P3
640455-3
VSWOUT
EA
VSWOUT
R1410kΩ
0747
3-03
7
Figure 19. Single-Pin Emulation
An emulation pod, ADE8052-EMUL1, can be connected to this port. This emulation pod is available with the ADE71xx/ ADE75xx evaluation kit and can also be ordered separately from the Analog Devices website. To prevent accidental entrance into emulation mode, the SDEN pin must be held high while a reset is issued on the RESET pin. Refer to the UART Debug/Boot Loader section for further details on entering emulation mode.
When the bidirectional EA pin is held high, the ADE71xx/ ADE75xx can fetch code from the internal memory locations. A pull-up resistor to VSWOUT, R14, is included in the design because the EA pin should not be left floating.
Push-Button Communication
Four push-buttons are available on the reference design. S2 and S3 are associated with the LCD scrolling. The connections for these buttons are displayed in Figure 20.
0747
3-03
1
DGND
R2410kΩ
1 243
S2
B3S
1000
C230.1µF
VSWOUT
SCROLL_DOWN
DGND
1 243
S3
B3S
1000
VSWOUT
SCROLL_UP
R2610kΩ
C240.1µF
INT0
SCROLL_UP
SCROLL_DOWN
12
3
CR
7
Figure 20. LCD Scrolling Push-Buttons
U1 provides an AND gate function that allows an interrupt to be generated when either or both of the LCD push-buttons are pressed (driven low). When receiving an interrupt on the INTO pin, the ADE71xx/ADE75xx can monitor the SCROLL_UP and SCROLL_DOWN control lines that are directly attached to Pin 6 and Pin 14, respectively, to determine the required action. The VSW supply is used to power these functions to ensure that they are available in all operating modes.
UART Debug/Boot Loader
The remaining two push-buttons, S1 and S4, are used to trigger the ADE71xx/ADE75xx to enter serial download mode and emulation.
DGND DGND
VSWOUT
RESET
R2310kΩ
1 243
S4
B3S
1000
1 243
S1
B3S
1000
C220.1µF
R2510kΩ
C250.1µF
VSWOUT
SDEN
0747
3-03
2
Figure 21. Serial Download Push-Buttons
This feature allows code to be downloaded into the Flash memory via the standard UART serial interface. Serial download mode is entered by pressing and holding SDEN (S4), while issuing a RESET (pressing S1). Full details on the serial download feature are available in the ADE71xx/ADE75xx data sheet.
EEPROM MANAGEMENT The 4 kb I2C EEPROM, 24AA04, supports a 1.8 V to 5.5 V supply voltage range with a maximum clock frequency of 100 kHz for supply voltages of 2.5 V or lower. This allows the EEPROM to be connected to the VINTD supply that is regulated to 2.5 V.
The EEPROM stores ADE calibration register values to bring the watt measurement within 0.5% accuracy over a 500:1 dynamic range. It also holds calibration values used by the firmware to turn ADE voltage and current rms readings into displayable volts and amps. After reset, the calibration values are read from the EEPROM.
When the line power goes down, the firmware stores the kilowatt hour energy consumption into the EEPROM.
The EEPROM is configured using Table 4. The data is stored in little-endian format with less significant data at lower addresses.

Application Note AN-916
Rev. 0 | Page 13 of 24
Table 4. EEPROM Configuration Data Constant Address Bytes Daily kWh Total 0x00 5 Daily KVARh Total 0x07 5 Daily KVAh Total 0x0E 5 Storage Day 0x15 1 Current Date (weekday, day of the month,
month and year) 0x17 4
Fault Date 0x1D 4 Fault Days 0x23 1 Monthly kWh Total 0x25 5 Monthly KVARh Total 0x2C 5 Monthly KVAh Total 0x33 5 PHCAL 0x3A 1 GAIN 0x3C 1 WGAIN 0x41 2 VARGAIN 0x44 2 WATTOS 0x4A 2 VAROS 0x4D 2 IRMSOS 0x50 2 VRMSOS 0x53 2 CF1DEN 0x56 2 CF2DEN 0x59 2 RTCCOMP 0x5C 1 TEMPCAL 0x5E 1 ICONSTANT 0x60 2 VCONSTANT 0x63 2 MODE1 0x66 1 MODE2 0x68 1 INTPR 0x6A 1 CALMODE 0x6C 1
USING THE LCD DRIVER The ADE71xx/ADE75xx can be used with either a 3.3 V or 5 V LCD panel. A 5 V LCD is used in the ADE71xx/ADE75xx reference design due to the superior contrast it offers over temperature extremes when compared to the 3.3 V LCDs. The ADE71xx/ ADE75xx charge pump drives the LCD. It requires capacitors on the LCDVA, LCDVB, and LCDVC pins as well as between the LCDVP1 and LCDVP2 pins, as shown in Figure 22.
LCDVP1 LCDVP2C12
C15 C14 C13
LCDVA LCDVB LCDVC
0747
3-01
6
Figure 22. Charge Pump Connections
Opting to use the ADE71xx/ADE75xx charge pump over a resistor ladder provides superior contrast over temperature and induces less dc offset in the LCD waveforms than using a resistor-divider network. If a dc offset of 50 mV or greater is applied to an LCD for a long period, it degrades the LCD crystal, decreasing the lifespan of the LCD.
Figure 23 shows the COM and SEG lines when the LCD is driven by a resistor ladder with a resistance of 301 kΩ between voltage steps. The COM line is yellow and the SEG line is blue. The charge and discharge curve that occurs as the individual LCD segments, which act as capacitors, are turned on and off is evident.
0747
3-01
7
Figure 23. 3.3 V Resistor Ladder with All Segments On and
29 μA Current Draw with Three 301 kΩ Resistors in the Ladder

AN-916 Application Note
Rev. 0 | Page 14 of 24
Figure 24 demonstrates the same 3.3 V LCD driven by the ADE71xx/ADE75xx charge pump. The smooth transitions of the COM line demonstrate the superior drive strength of the charge pump.
However, the dc offset for the resistor ladder configuration is 112 mV as opposed to 8.85 mV from the charge pump in this experiment. Further optimizing the resistor ladder for a lower current further increases the dc offset and degrades the LCD lifetime
0747
3-01
8
USING THE ADE71xx/ADE75xx RTC The ADE71xx/ADE75xx family provides a real-time clock that counts from hundredths of a second up to hours. This clock keeps accurate time to within ±2 ppm or ±0.17 sec/day with a digital compensation scheme. The internal RTC is used to maintain a full calendar that is stored in the EEPROM and displayed on the LCD panel.
There are two compensation registers within the RTC, one to compensate the nominal crystal frequency at 25°C and another to compensate the frequency over temperature.
The compensation algorithm works by adding or subtracting pulses from the 32.768 kHz crystal over a 30.5 second window, so that the calibration is accurate over 30.5 seconds. In con-junction with the temperature ADC, it is possible to compensate for the crystal’s change in frequency over temperature to keep the RTC accurate, while maintaining low current consumption during battery operation. See the AN-949 Application Note for more information on the calibration procedure for the RTC.
Figure 24. 3.3 V Charge Pump with All Segments On and 33 μA Current Draw
Note that the current consumption for the charge pump shown in Figure 24 is slightly higher than the consumption for the resistor ladder shown in Figure 23. The charge pump consumes 33 μA of current compared to the resistor ladder configuration consuming 29 μA.
.
Application Note AN-916
Rev. 0 | Page 15 of 24
DESIGN FOR IMMUNITY TO ELECTROMAGNETIC DISTURBANCE According to section 4.5 of IEC61036 meters should be designed so that conducted or radiated electromagnetic disturbances as well as electrostatic discharge do not damage nor substantially influence the meter. The considered disturbances are:
• Fast transience burst
• Electrostatic discharge
All of the precautions and design techniques, such as ferrite beads, capacitor line filters, physically large SMD resistors, and PCB layout considerations, including grounding, contribute to protecting the meter electronics from each form of electro-magnetic disturbance. Some precautions, such as the use of ferrite beads, however, play a more important role in the presence of certain kinds of disturbances, such as RF and fast transience bursts.
TYPES OF ELECTROMAGNETIC INTERFERENCE Electrical Fast Transients
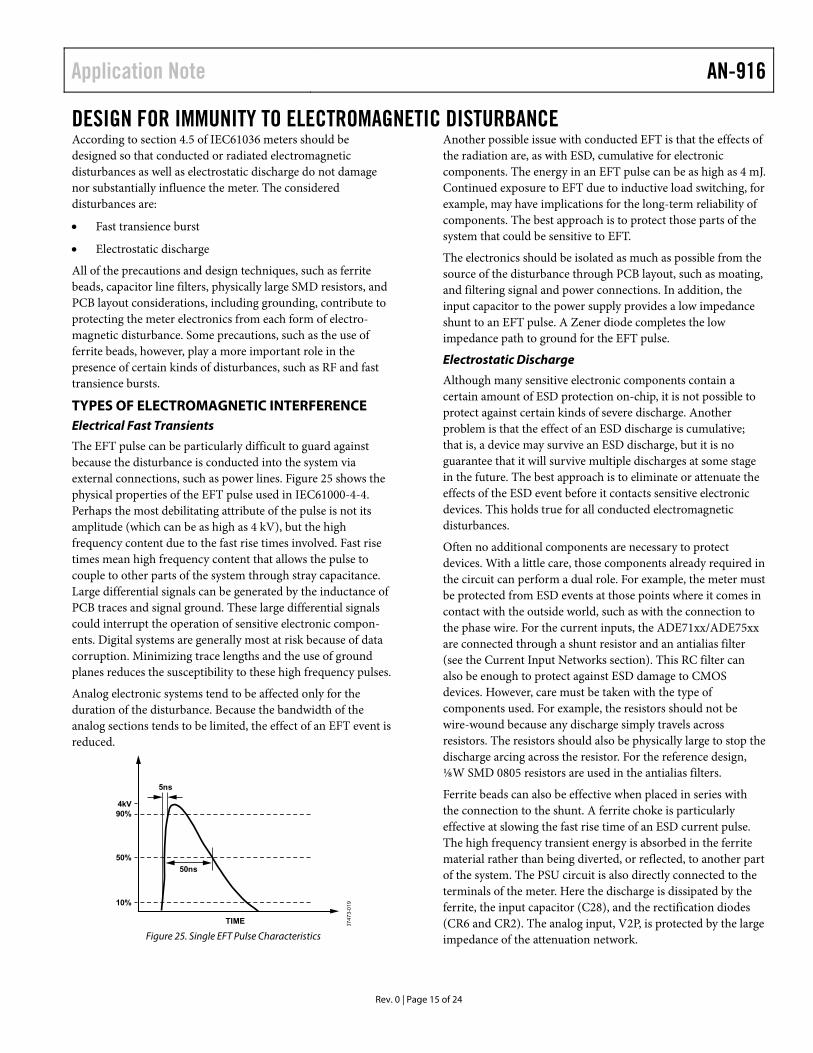
The EFT pulse can be particularly difficult to guard against because the disturbance is conducted into the system via external connections, such as power lines. Figure 25 shows the physical properties of the EFT pulse used in IEC61000-4-4. Perhaps the most debilitating attribute of the pulse is not its amplitude (which can be as high as 4 kV), but the high frequency content due to the fast rise times involved. Fast rise times mean high frequency content that allows the pulse to couple to other parts of the system through stray capacitance. Large differential signals can be generated by the inductance of PCB traces and signal ground. These large differential signals could interrupt the operation of sensitive electronic compon-ents. Digital systems are generally most at risk because of data corruption. Minimizing trace lengths and the use of ground planes reduces the susceptibility to these high frequency pulses.
Analog electronic systems tend to be affected only for the duration of the disturbance. Because the bandwidth of the analog sections tends to be limited, the effect of an EFT event is reduced.
5ns
4kV90%
50%
10%
50ns
TIME 0747
3-01
9
Figure 25. Single EFT Pulse Characteristics
Another possible issue with conducted EFT is that the effects of the radiation are, as with ESD, cumulative for electronic components. The energy in an EFT pulse can be as high as 4 mJ. Continued exposure to EFT due to inductive load switching, for example, may have implications for the long-term reliability of components. The best approach is to protect those parts of the system that could be sensitive to EFT.
The electronics should be isolated as much as possible from the source of the disturbance through PCB layout, such as moating, and filtering signal and power connections. In addition, the input capacitor to the power supply provides a low impedance shunt to an EFT pulse. A Zener diode completes the low impedance path to ground for the EFT pulse.
Electrostatic Discharge
Although many sensitive electronic components contain a certain amount of ESD protection on-chip, it is not possible to protect against certain kinds of severe discharge. Another problem is that the effect of an ESD discharge is cumulative; that is, a device may survive an ESD discharge, but it is no guarantee that it will survive multiple discharges at some stage in the future. The best approach is to eliminate or attenuate the effects of the ESD event before it contacts sensitive electronic devices. This holds true for all conducted electromagnetic disturbances.
Often no additional components are necessary to protect devices. With a little care, those components already required in the circuit can perform a dual role. For example, the meter must be protected from ESD events at those points where it comes in contact with the outside world, such as with the connection to the phase wire. For the current inputs, the ADE71xx/ADE75xx are connected through a shunt resistor and an antialias filter (see the Current Input Networks section). This RC filter can also be enough to protect against ESD damage to CMOS devices. However, care must be taken with the type of components used. For example, the resistors should not be wire-wound because any discharge simply travels across resistors. The resistors should also be physically large to stop the discharge arcing across the resistor. For the reference design, ⅛W SMD 0805 resistors are used in the antialias filters.
Ferrite beads can also be effective when placed in series with the connection to the shunt. A ferrite choke is particularly effective at slowing the fast rise time of an ESD current pulse. The high frequency transient energy is absorbed in the ferrite material rather than being diverted, or reflected, to another part of the system. The PSU circuit is also directly connected to the terminals of the meter. Here the discharge is dissipated by the ferrite, the input capacitor (C28), and the rectification diodes (CR6 and CR2). The analog input, V2P, is protected by the large impedance of the attenuation network.

AN-916 Application Note
Rev. 0 | Page 16 of 24
A varistor or metal oxide varistor can be used to add additional protection. This device acts as a nonlinear voltage-dependent resistor. See the EMI Immunity section for a description of this device.
Care should be taken to minimize trace lengths in the power supply to reduce the effects of parasitic trace inductance. Stray inductance due to leads and PCB traces means that the MOV will not be as effective in attenuating the differential EFT pulse. The MOV is effective in attenuating high energy, relatively long duration disturbances, such as those due to lighting strikes.
EMI IMMUNITY DESIGN CONSIDERATIONS ADE71xx/ADE75xx Grounding
In the ADE71xx/ADE75xx IC, the analog ground is used as a reference for internal LDOs, the crystal oscillator, and other analog circuitry. The digital ground is internally connected to the analog ground and is used as a reference for the MCU and other digital circuits.
Therefore, because the AGND and DGND are so interrelated, it is important that these grounds have the same potential and do not move with respect to each other. For this reason, the analog ground plane and digital ground plane on the reference design are directly connected together with a star ground. Separate analog and digital ground planes are maintained to reduce the noise transfer from external digital circuitry to the analog ground.
The power supply portion of the PCB is the only place where both phase and neutral wires are connected. Because the PSU is capacitor-based, a substantial current flows in the ground return back to the phase wire (system ground). This portion of the PCB contains the transience suppression circuitry, such as MOV or ferrite, and the power supply circuitry. The length of the path for the power supply return current is kept to a minimum to isolate it from the analog circuitry.
The ADE71xx/ADE75xx and sensitive signal paths are located in a quiet part of the board that is isolated from the noisy elements of the design, such as the power supply, and flashing LED. The ground currents from the power supply are at the same frequency as the signals being measured and may cause accuracy issues, that is, crosstalk between the PSU as analog inputs, if care is not taken with the routing of the return current. In addition, part of the attenuation network for the voltage channel is in the power supply portion of the PCB. This helps to eliminate possible crosstalk to the current channel by ensuring that analog signal amplitudes are kept as low as possible in the analog (quiet) portion of the PCB. Remember that with a shunt resistor of 350 μΩ , the voltage signal range on Channel 1 is 3.5 mV rms at IB.
The ground return for the CF LEDs should be directed away from the sensitive analog and digital circuitry on the ADE71xx/ ADE75xx. To minimize interference, the CF LED ground trace is kept long and should ideally connect into the star ground between the AGND and DGND planes.
High frequency noise sources from the digital circuit are decoupled as close to the ADE71xx/ADE75xx as possible with high frequency ceramic capacitors. Note that large capacitors, such as an aluminum electrolytic, do not work because they have a typical residual series inductance of 6.8 nF. This tends to reduce the decoupling effect of the capacitor at high frequencies
ADE71xx/ADE75xx ESD
A ferrite bead is inserted between the output of the voltage regulator and the VDD pin to filter the 3.3 V power supply. This is effective at protecting the ADE71xx/ADE75xx from ESD.

Application Note AN-916
Rev. 0 | Page 17 of 24
METER RESULTS Figure 26 shows performance linearity curves obtained with the ADE71xx/ADE75xx reference meter.
Watt Linearity
The active energy was measured over a dynamic range of 1000:1 with a maximum input current of 40 A. Power factors of 1, +0.5, and −0.866 were recorded.
0747
3-04
0
1.5
–1.5
–1.0
–0.5
0
0.5
1.0
0.01 0.1 1 10 100
ERR
OR
(% O
F R
EAD
ING
)
CURRENT CHANNEL (% OF FULL-SCALE)
PF = +1PF = +0.5
PF = –0.866
MID-CLASS C
MID-CLASS C
Figure 26. Active Energy Linearity
The results obtained are well within the desired range with a maximum percentage error of 0.2%.
IRMS Linearity
The IRMS linearity was measured using the CF output over a dynamic range of 1000:1 with a maximum current of 40A.
0747
3-04
1
2.0
–2.0
–1.5
–1.0
–0.5
0
0.5
1.0
1.5
0.01 0.1 1 10 100
ERR
OR
(% O
F R
EAD
ING
)
CURRENT (% OF FULL-SCALE)
RUN 1
RUN 2
RUN 3
MID-CLASS C
MID-CLASS C
Figure 27. IRMS Linearity
Figure 27 shows three IRMS linearity plots taken consecutively under the same conditions. A maximum percentage error of 0.13% was obtained.
Current Consumption
The reference meter consumes <2 μA when connected to the battery in sleep mode with the RTC running. If a 5 V LCD is also turned on in sleep mode, the current consumption is around 40 μA.

AN-916 Application Note
Rev. 0 | Page 18 of 24
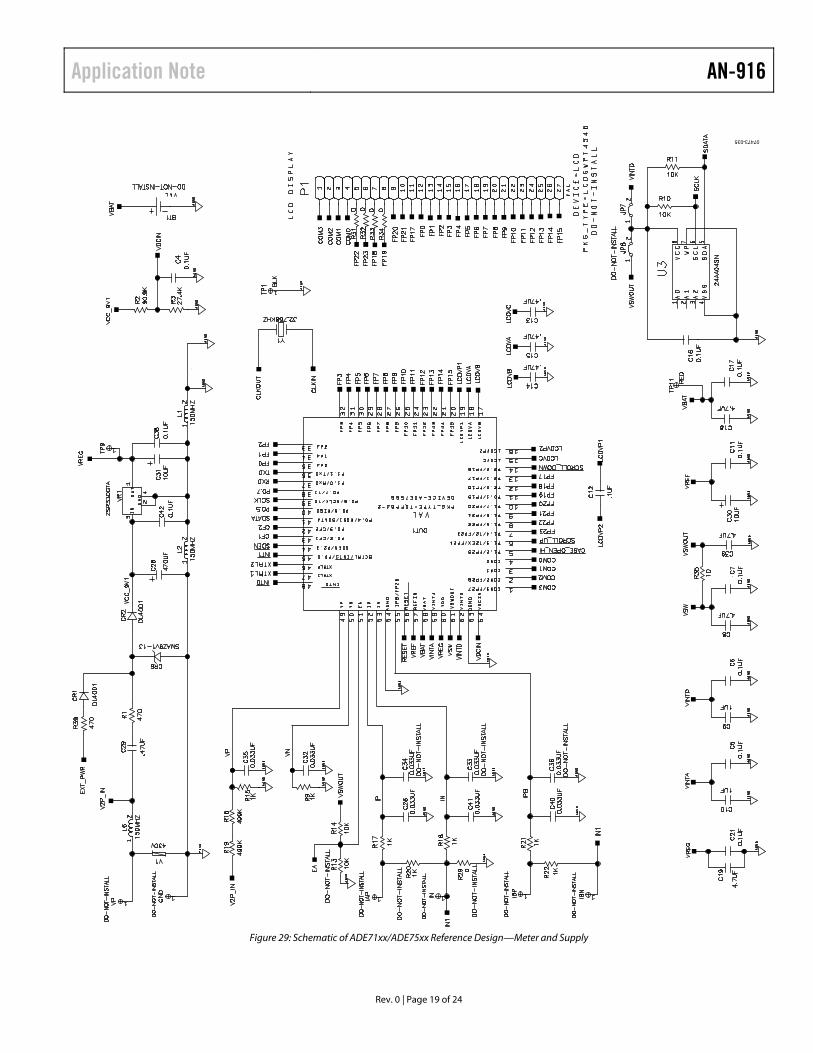
REFERENCE METER SCHEMATICS
07473-034
Figure 28. Schematic of ADE71xx/ADE75xx Reference Design—Communication Circuits
Application Note AN-916
Rev. 0 | Page 19 of 24
07473-035
Figure 29: Schematic of ADE71xx/ADE75xx Reference Design—Meter and Supply

AN-916 Application Note
Rev. 0 | Page 20 of 24
0747
3-03
6
Figure 30. Schematic of ADE71xx/ADE75xx Reference Design—Interrupt Circuits
Application Note AN-916
Rev. 0 | Page 21 of 24
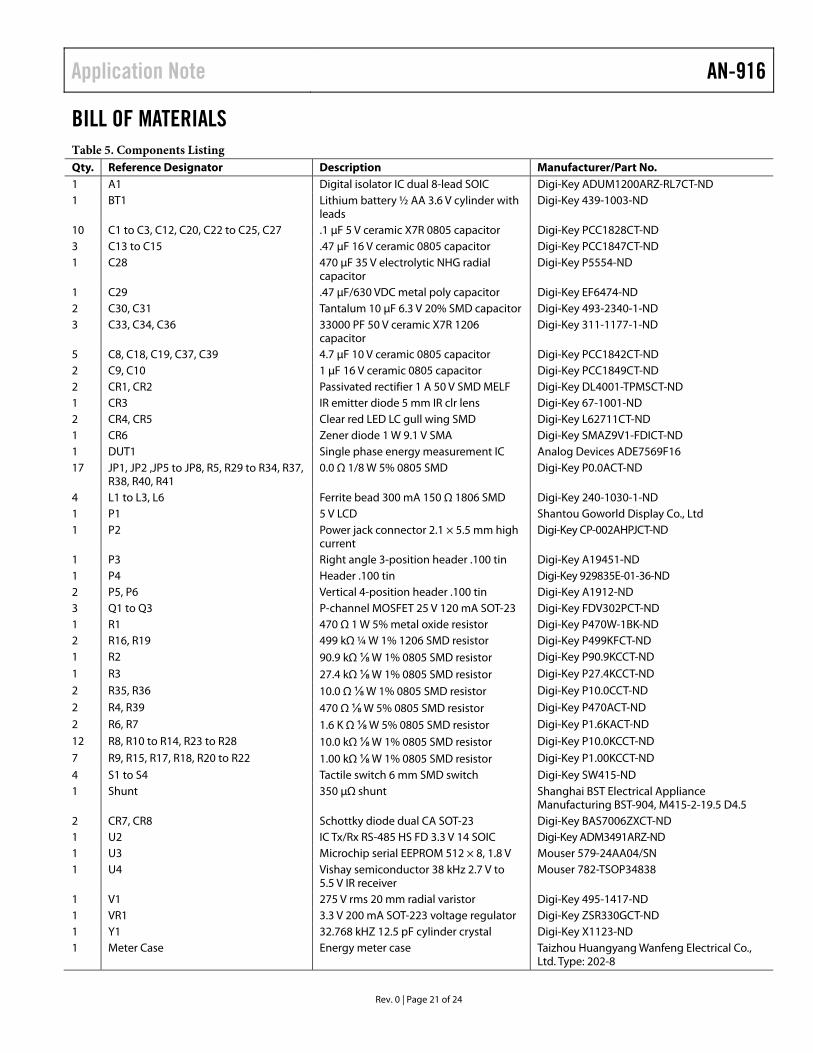
BILL OF MATERIALS Table 5. Components Listing Qty. Reference Designator Description Manufacturer/Part No. 1 A1 Digital isolator IC dual 8-lead SOIC Digi-Key ADUM1200ARZ-RL7CT-ND 1 BT1 Lithium battery ½ AA 3.6 V cylinder with
leads Digi-Key 439-1003-ND
10 C1 to C3, C12, C20, C22 to C25, C27 .1 μF 5 V ceramic X7R 0805 capacitor Digi-Key PCC1828CT-ND 3 C13 to C15 .47 μF 16 V ceramic 0805 capacitor Digi-Key PCC1847CT-ND 1 C28 470 μF 35 V electrolytic NHG radial
capacitor Digi-Key P5554-ND
1 C29 .47 μF/630 VDC metal poly capacitor Digi-Key EF6474-ND 2 C30, C31 Tantalum 10 μF 6.3 V 20% SMD capacitor Digi-Key 493-2340-1-ND 3 C33, C34, C36 33000 PF 50 V ceramic X7R 1206
capacitor Digi-Key 311-1177-1-ND
5 C8, C18, C19, C37, C39 4.7 μF 10 V ceramic 0805 capacitor Digi-Key PCC1842CT-ND 2 C9, C10 1 μF 16 V ceramic 0805 capacitor Digi-Key PCC1849CT-ND 2 CR1, CR2 Passivated rectifier 1 A 50 V SMD MELF Digi-Key DL4001-TPMSCT-ND 1 CR3 IR emitter diode 5 mm IR clr lens Digi-Key 67-1001-ND 2 CR4, CR5 Clear red LED LC gull wing SMD Digi-Key L62711CT-ND 1 CR6 Zener diode 1 W 9.1 V SMA Digi-Key SMAZ9V1-FDICT-ND 1 DUT1 Single phase energy measurement IC Analog Devices ADE7569F16 17 JP1, JP2 ,JP5 to JP8, R5, R29 to R34, R37,
R38, R40, R41 0.0 Ω 1/8 W 5% 0805 SMD Digi-Key P0.0ACT-ND
4 L1 to L3, L6 Ferrite bead 300 mA 150 Ω 1806 SMD Digi-Key 240-1030-1-ND 1 P1 5 V LCD Shantou Goworld Display Co., Ltd 1 P2 Power jack connector 2.1 × 5.5 mm high
current Digi-Key CP-002AHPJCT-ND
1 P3 Right angle 3-position header .100 tin Digi-Key A19451-ND 1 P4 Header .100 tin Digi-Key 929835E-01-36-ND 2 P5, P6 Vertical 4-position header .100 tin Digi-Key A1912-ND 3 Q1 to Q3 P-channel MOSFET 25 V 120 mA SOT-23 Digi-Key FDV302PCT-ND 1 R1 470 Ω 1 W 5% metal oxide resistor Digi-Key P470W-1BK-ND 2 R16, R19 499 kΩ ¼ W 1% 1206 SMD resistor Digi-Key P499KFCT-ND 1 R2 90.9 kΩ ⅛ W 1% 0805 SMD resistor Digi-Key P90.9KCCT-ND 1 R3 27.4 kΩ ⅛ W 1% 0805 SMD resistor Digi-Key P27.4KCCT-ND 2 R35, R36 10.0 Ω ⅛ W 1% 0805 SMD resistor Digi-Key P10.0CCT-ND 2 R4, R39 470 Ω ⅛ W 5% 0805 SMD resistor Digi-Key P470ACT-ND 2 R6, R7 1.6 K Ω ⅛ W 5% 0805 SMD resistor Digi-Key P1.6KACT-ND 12 R8, R10 to R14, R23 to R28 10.0 kΩ ⅛ W 1% 0805 SMD resistor Digi-Key P10.0KCCT-ND 7 R9, R15, R17, R18, R20 to R22 1.00 kΩ ⅛ W 1% 0805 SMD resistor Digi-Key P1.00KCCT-ND 4 S1 to S4 Tactile switch 6 mm SMD switch Digi-Key SW415-ND 1 Shunt 350 μΩ shunt Shanghai BST Electrical Appliance
Manufacturing BST-904, M415-2-19.5 D4.5 2 CR7, CR8 Schottky diode dual CA SOT-23 Digi-Key BAS7006ZXCT-ND 1 U2 IC Tx/Rx RS-485 HS FD 3.3 V 14 SOIC Digi-Key ADM3491ARZ-ND 1 U3 Microchip serial EEPROM 512 × 8, 1.8 V Mouser 579-24AA04/SN 1 U4 Vishay semiconductor 38 kHz 2.7 V to
5.5 V IR receiver Mouser 782-TSOP34838
1 V1 275 V rms 20 mm radial varistor Digi-Key 495-1417-ND 1 VR1 3.3 V 200 mA SOT-223 voltage regulator Digi-Key ZSR330GCT-ND 1 Y1 32.768 kHZ 12.5 pF cylinder crystal Digi-Key X1123-ND 1 Meter Case Energy meter case Taizhou Huangyang Wanfeng Electrical Co.,
Ltd. Type: 202-8

AN-916 Application Note
Rev. 0 | Page 22 of 24
APPENDIX A ANTITAMPER CONFIGURATIONS The ADE71xx family provides two differential analog inputs to measure the current: Channel IA and Channel IB. To adapt the ADE71xx/ADE75xx reference meter to serve as an antitamper metering system, a few small modifications are required on the current channel input network. Figure 31 displays a possible antitamper configuration using both a CT and a shunt resistor.
220V
NEUTRAL
PHASE
350µΩ
LOA
D
33nFIPA
1kΩ
33nFIN
1kΩ
33nFIPB
1kΩ
R2
0747
3-02
0
Figure 31. Antitamper Input Network
When using an antitamper configuration similar to the examples shown in Figure 31, extra care is required when compensating for phase mismatch between channels. If using both a shunt and a CT, note that the CT has an inherently larger phase shift than the shunt resistor. This may lead to large errors at small power factors if accurate compensation is not applied.
Calibration can be achieve by either using the internal phase compensation register, PHCAL, or adjusting the corner of the external low-pass filters to induce a phase shift and match the channels.
For further details on the calibration procedure for antitamper meters, refer to the AN-950 Application Note.

Application Note AN-916
Rev. 0 | Page 23 of 24
NOTES

AN-916 Application Note
Rev. 0 | Page 24 of 24
NOTES
©2008 Analog Devices, Inc. All rights reserved. Trademarks and registered trademarks are the property of their respective owners. AN07473-0-5/08(0)