c 1042625
DESCRIPTION
wcsTRANSCRIPT

WebSphere® Commerce - Express
Installation Guidefor IBM System i and i5/OS
Version 6.0
GC10-4262-05
���


WebSphere® Commerce - Express
Installation Guidefor IBM System i and i5/OS
Version 6.0
GC10-4262-05
���

Note:
Before using this information and the product it supports, be sure to read the general information under “Notices” on page
141.
Edition Notice
This edition of this book applies to Version 6.0 of the following editions of WebSphere Commerce and to all
subsequent releases and modifications until otherwise indicated in new editions:
v IBM WebSphere Commerce - Express (product number 5724-i36)
Ensure that you are using the correct edition for the level of the product.
Order publications through your IBM representative or the IBM branch office serving your locality.
IBM welcomes your comments. You can send your comments by using the online IBM WebSphere Commerce
documentation feedback form.
When you send information to IBM, you grant IBM a nonexclusive right to use or distribute the information in any
way it believes appropriate without incurring any obligation to you.
© Copyright International Business Machines Corporation 1996, 2008.
US Government Users Restricted Rights – Use, duplication or disclosure restricted by GSA ADP Schedule Contract
with IBM Corp.

Contents
Preface . . . . . . . . . . . . . . vii
About this book . . . . . . . . . . . . . vii
Document description . . . . . . . . . . vii
Providing feedback on this book . . . . . . vii
Updates to this book . . . . . . . . . . vii
Conventions used in this book . . . . . . . viii
Terminology used in this book . . . . . . . viii
Path variables used in this book . . . . . . ix
Other variables used in this book . . . . . . x
Port numbers used by WebSphere Commerce . . xi
Knowledge requirements . . . . . . . . . xii
Part 1. Getting started . . . . . . . . 1
Getting the latest installation
information . . . . . . . . . . . . . 3
Getting the latest WebSphere Commerce Installation
Guide . . . . . . . . . . . . . . . . . 3
Getting WebSphere Commerce technotes . . . . . 3
Obtaining WebSphere Commerce
software . . . . . . . . . . . . . . 5
Overview: Installing WebSphere
Commerce . . . . . . . . . . . . . 7
Part 2. Planning your WebSphere
Commerce installation . . . . . . . 9
Coexistence with previous versions of
WebSphere Commerce or WebSphere
Application Server . . . . . . . . . . 11
Coexistence with previous versions of WebSphere
Commerce . . . . . . . . . . . . . . . 11
Coexistence with previous versions of WebSphere
Application Server . . . . . . . . . . . . 11
Software supported by WebSphere
Commerce . . . . . . . . . . . . . 13
Supported application servers . . . . . . . . 13
Notes on the supported application servers . . . 14
Database servers supported when using WebSphere
Application Server Version 6.0 . . . . . . . . 14
Web servers supported when using WebSphere
Application Server Version 6.0 . . . . . . . . 14
Common topologies . . . . . . . . . 15
One-node topology . . . . . . . . . . . . 15
Two-node topology . . . . . . . . . . . . 15
WebSphere Commerce environments 17
Production server environment . . . . . . . . 17
Staging server environment . . . . . . . . . 17
Development environment . . . . . . . . . 17
Migrating previous versions of
WebSphere Commerce . . . . . . . . 19
Part 3. Prerequisites . . . . . . . . 21
Hardware prerequisites . . . . . . . 23
Operating system prerequisites . . . . 25
Networking prerequisites . . . . . . . 27
National language prerequisites . . . . 29
WebSphere Commerce tools
prerequisites . . . . . . . . . . . . 31
WebSphere Commerce tools hardware prerequisites 31
WebSphere Commerce tools software prerequisites 31
Documentation prerequisites . . . . . 33
Part 4. Installing WebSphere
Commerce using the quick
installation . . . . . . . . . . . . 35
Quick installation overview . . . . . . 37
Preparing your system to run the
WebSphere Commerce installation
wizard . . . . . . . . . . . . . . . 39
Checklist tasks . . . . . . . . . . . . . 39
Reviewing the README file . . . . . . . . 39
Creating an i5/OS user profile . . . . . . . 40
Information required to complete a
quick installation . . . . . . . . . . 43
Operating system information required to complete
the installation wizard . . . . . . . . . . . 44
WebSphere Commerce information required to
complete the installation wizard . . . . . . . 44
Starting the installation wizard . . . . 47
Usage notes when using CD images . . . . . . 47
Starting the installation wizard . . . . . . . . 47
Completing a quick installation . . . . 49
Install the most recent fixes . . . . . . . . . 52
© Copyright IBM Corp. 1996, 2008 iii
|||

Mandatory changes for System i 6.1
(V6R1) systems . . . . . . . . . . . 53
Verifying a quick installation . . . . . 55
Verifying your WebSphere Commerce installation . 55
Verifying your installation with the WebSphere
Commerce tools . . . . . . . . . . . . . 55
Verifying your installation using iSeries Navigator 56
Verifying your installation using log files . . . . 57
WebSphere Commerce installation logs . . . . 58
WebSphere Application Server installation logs 58
WebSphere Commerce instance creation logs . . 59
Part 5. Preparing for a custom
installation . . . . . . . . . . . . 61
Custom installation overview . . . . . 63
Preparing your systems to run the
WebSphere Commerce installation
wizard . . . . . . . . . . . . . . . 65
Reviewing the README file . . . . . . . . . 65
Creating an i5/OS user profile . . . . . . . . 66
Preparing application servers for use
with WebSphere Commerce . . . . . . 69
Using WebSphere Application Server Version 6.0 . . 69
Part 6. Installing WebSphere
Commerce using the custom
installation . . . . . . . . . . . . 71
Custom installation components . . . 73
WebSphere Commerce Server . . . . . . . . 73
Remote WebSphere Commerce Management Utilities 73
WebSphere Commerce Information Center . . . . 73
Completing a custom installation . . . 75
Usage notes when using CD images . . . . . . 75
Completing a custom GUI installation . . . . . 75
Completing a custom silent installation . . . . . 79
Completing a remote silent installation . . . . 79
Completing a local silent installation . . . . . 80
Install the most recent fixes . . . . . 83
Mandatory changes for System i 6.1
(V6R1) systems . . . . . . . . . . . 85
Verifying a custom installation . . . . 87
Verifying your installation using iSeries Navigator 87
Verifying your installation using log files . . . . 89
WebSphere Commerce installation logs . . . . 89
WebSphere Application Server installation logs 90
Part 7. Creating a WebSphere
Commerce instance . . . . . . . . 91
Before you create or modify an
instance with Configuration Manager . 93
Installing the Configuration Manager client . . . . 93
Configuration Manager prerequisites . . . . . . 95
Verify remote Configuration Manager client level 95
Instance creation requirements using a remote
database . . . . . . . . . . . . . . 96
Modifying your iSeries user profile . . . . . 97
Starting the Configuration Manager . . . . . . 98
Stopping the Configuration Manager . . . . 100
Creating a WebSphere Commerce
instance . . . . . . . . . . . . . 101
Considerations when creating a WebSphere
Commerce instance . . . . . . . . . . . 101
Considerations when creating multiple WebSphere
Commerce instances . . . . . . . . . . . 101
Adding another IP address to an iSeries system 102
Creating a new WebSphere Commerce instance . . 103
Verifying the instance creation . . . . . . . . 104
Testing multiple instances . . . . . . . . . 105
Completing the configuration of a remote database 106
Setting the time zone . . . . . . . . . . . 106
Mandatory post-instance creation
tasks . . . . . . . . . . . . . . . 107
Web server post-instance creation tasks . . . . . 107
Finding the WebSphere Application Server
administration port number . . . . . . . . 107
Part 8. Last steps . . . . . . . . . 109
Part 9. Uninstalling WebSphere
Commerce . . . . . . . . . . . . 111
Uninstalling WebSphere Commerce 113
Uninstalling WebSphere Commerce
Configuration Manager client . . . . 115
Uninstalling WebSphere Application
Server Version 6.0 . . . . . . . . . 117
Part 10. Installation and
administration tasks . . . . . . . 119
WebSphere Commerce tasks . . . . 121
Starting or stopping a WebSphere Commerce
instance . . . . . . . . . . . . . . . 121
Starting and stopping the WebSphere Commerce
Information Center . . . . . . . . . . . 121
Modifying a WebSphere Commerce instance . . . 122
iv WebSphere Commerce - Express Installation Guide for IBM System i and i5/OS
+++
||
+++

Deleting a WebSphere Commerce instance . . . . 122
Changing the ports used for WebSphere Commerce
tools . . . . . . . . . . . . . . . . 124
Starting and stopping the IBM HTTP Server . . . 125
WebSphere Application Server tasks 127
Starting or stopping WebSphere Application Server 127
Launch the WebSphere Application Server
Administrative Console . . . . . . . . . . 127
Starting the WebSphere Application Server
subsystem . . . . . . . . . . . . . . 128
Ending the QWAS6 subsystem . . . . . . 128
Deleting a WebSphere Application Server profile 128
Part 11. Appendixes . . . . . . . 129
Appendix A. Troubleshooting . . . . 131
Appendix B. Understanding i5/OS
unique concepts . . . . . . . . . . 133
The i5/OS file systems used by WebSphere
Commerce . . . . . . . . . . . . . . 133
The QSYS.LIB file system . . . . . . . . 133
The Integrated File System (IFS) . . . . . . 133
Querying the layout of the database . . . . . . 135
Appendix C. Configuring a
WebSphere Commerce instance with
a remote Web server . . . . . . . . 137
Pre-instance creation tasks . . . . . . . . . 137
Configuring the WebSphere Commerce instance 137
Post instance creation tasks . . . . . . . . . 138
Notices . . . . . . . . . . . . . . 141
Trademarks . . . . . . . . . . . . 145
Contents v
+ + + + + + + + + +

vi WebSphere Commerce - Express Installation Guide for IBM System i and i5/OS

Preface
About this book
Use this part of the book to learn about the following topics:
v “Document description”
v “Providing feedback on this book”
v “Updates to this book”
v “Conventions used in this book” on page viii
v “Terminology used in this book” on page viii
v “Path variables used in this book” on page ix
v “Other variables used in this book” on page x
v “Knowledge requirements” on page xii
Document description
This book describes installation and configuration of WebSphere® Commerce up to
and including creating a WebSphere Commerce instance. Once you have a
WebSphere Commerce instance, further configuration instructions are provided in
the WebSphere Commerce Information Center.
This guide provides information on how to install the following products on the
IBM® i5/OS® operating systems:
v IBM WebSphere Commerce - Express (5724-i36)
It is intended for system administrators or anyone else responsible for performing
installation and configuration tasks.
Providing feedback on this book
IBM welcomes your comments. You can send your comments about this document
by using the online IBM WebSphere Commerce documentation feedback form.
Updates to this book
This book, and any updated versions of this book, are available as PDF files from
the WebSphere Commerce technical library Web site. For additional information for
your WebSphere Commerce edition, see the overview pages:
v WebSphere Commerce Enterprise
v WebSphere Commerce Professional
v WebSphere Commerce Express
For support information, see the WebSphere Commerce support Web site.
Additional support is available on the WebSphere Commerce newsgroup forums.
To learn about late changes to the product, see the updated product README file,
also available from the preceding Web site. For instructions on installing
WebSphere Commerce Version 6.0 and its supported products, see the WebSphere
Commerce Installation Guide. For instructions on how to install WebSphere
Commerce development environment and its supported products, see the
WebSphere Commerce Developer Installation Guide.
© Copyright IBM Corp. 1996, 2008 vii
|

Major updates from the last version of this document are identified by revision
characters contained in the margin. This book uses the following conventions for
revision characters:
v The ″+″ character identifies updates that have been made in the current version
of this document.
v The ″|″ character identifies any updates that have been made in the previous
versions of this document.
Minor updates such as spelling and punctuation errors are not identified by
revision characters.
Update history
This section provides an outline of the history of changes to this book:
Edition Updates
First Edition, Fifth
Revision
v Updates for WebSphere Commerce fix pack 5.
v Added information for installation on System i 6.1
First Edition, Third
Revision
v Updates for WebSphere Commerce fix pack 3.
v Added Appendix for configuring i5/OS WebSphere Commerce
instance with remote HTTP.
First Edition,
Second Revision
v Added information on obtaining software.
v Updates to correct remote database information notices.
v Removed support for z/OS® and S/390®.
First Edition, First
Revision
v Minor updates for WebSphere Commerce fix pack 1.
First Edition v Original publication of this book
Conventions used in this book
This book uses the following highlighting conventions:
Boldface type Indicates commands or graphical user interface (GUI) controls
such as names of fields, icons, or menu choices.
Monospace type Indicates examples of text you enter exactly as shown and
messages.
Italic type Indicates names for which you must substitute the appropriate
values for your system and new terms.
This icon marks a Tip - additional information that can help you
complete a task.
i 6.1
Indicates information specific to System i 6.1 operating system.
Terminology used in this book
This book uses the following terms:
viii WebSphere Commerce - Express Installation Guide for IBM System i and i5/OS

node A node is a single machine or machine partition with a unique IP host
address on which you install one or more WebSphere Commerce
components.
WebSphere Commerce instance
A WebSphere Commerce instance is a standalone runtime environment that
can contain a single store, or multiple stores. Each one of these stores
responds to a different host name. In this case, if you stop your WebSphere
Commerce instance all of your stores stop as well. You can also create
multiple WebSphere Commerce instances for each installation of
WebSphere Commerce. The benefits of creating multiple WebSphere
Commerce instances is that each instance can operate independently from
the others. Stopping one instance does not stop the another. Adding a
customization to one instance does not impact the other. Each instance
contains the following:
v A Web server
v A database
v A WebSphere Application Server profile that contains your WebSphere
Commerce J2EE application.
remote
Remote is often used as an adjective to indicate when something is on a
separate node from the WebSphere Commerce Server. The following terms
are some common terms in this book that use remote in this way:
remote Web server
A Web server running on a separate node from the WebSphere
Commerce Server.
remote database
A database on a separate node from WebSphere Commerce Server.
remote database server
A database server running on a separate node from WebSphere
Commerce Server.
remote WebSphere Commerce Payments
WebSphere Commerce Payments running on a separate node from
WebSphere Commerce Server.
Path variables used in this book
This guide uses the following variables to represent directory paths:
WAS_installdir
This is the default installation directory for WebSphere Application Server
Version 6.0:
The default directory for WebSphere Application Server Base edition or
Express edition is:
/QIBM/ProdData/WebSphere/AppServer/V6/Base
WAS_userdir
The directory for all the data that is used by WebSphere Application Server
which can be modified or needs to be configured by the user.
The default directory for WebSphere Application Server Base edition and
Express edition is one of the following depending on the edition of
WebSphere Application Server:
/QIBM/UserData/WebSphere/AppServer/V6/Base
Preface ix

The default directory for WebSphere Application Server Network
Deployment is
WAS 6.0
/QIBM/UserData/WebSphere/AppServer/V6/ND
WC_profiledir
This directory is created for the WebSphere Application Server profile that
is used by a WebSphere Commerce instance. For example:
The default directory for WebSphere Application Server Base edition or
Express edition is:
/QIBM/UserData/WebSphere/AppServer/V6/Base/profiles/profile_name
The default directory for WebSphere Application Server Network
Deployment is:
/QIBM/UserData/WebSphere/AppServer/V6/ND/profiles/profile_name
WC_installdir
This is the installation directory for WebSphere Commerce. The default
installation directory for WebSphere Commerce is:
/QIBM/ProdData/CommerceServer60
WC_userdir
The directory for all the data that is used by WebSphere Commerce which
can be modified or needs to be configured by the user:
/QIBM/UserData/CommerceServer60
instance_root
This variable represents the directory path of the WebSphere Commerce
instance_name For example:
WC_userdir/instances/instance_name
Note: The preceding default installation paths cannot be altered or modified on
iSeries®. The WebSphere Commerce for iSeries product expects the preceding
directories to exist and will not function properly if they do not exist.
Other variables used in this book
Some of the other variables used in this book are as follows:
profile_name
This variable represents the name of the WebSphere Application Server
profile that is created for your WebSphere Commerce instance. This
variable has the same name as your WebSphere Commerce instance.
host_name
This variable represents the fully qualified host name of your WebSphere
Commerce server (for example, server.mydomain.ibm.com is fully
qualified).
instance_name
This variable represents the name of the WebSphere Commerce instance
with which you are working (for example, demo).
cell_name
This variable represents the name of the WebSphere Application Server
cell.
x WebSphere Commerce - Express Installation Guide for IBM System i and i5/OS
payments_instance_name
This variable represents the name of the WebSphere Commerce Payments
instance with which you are working.
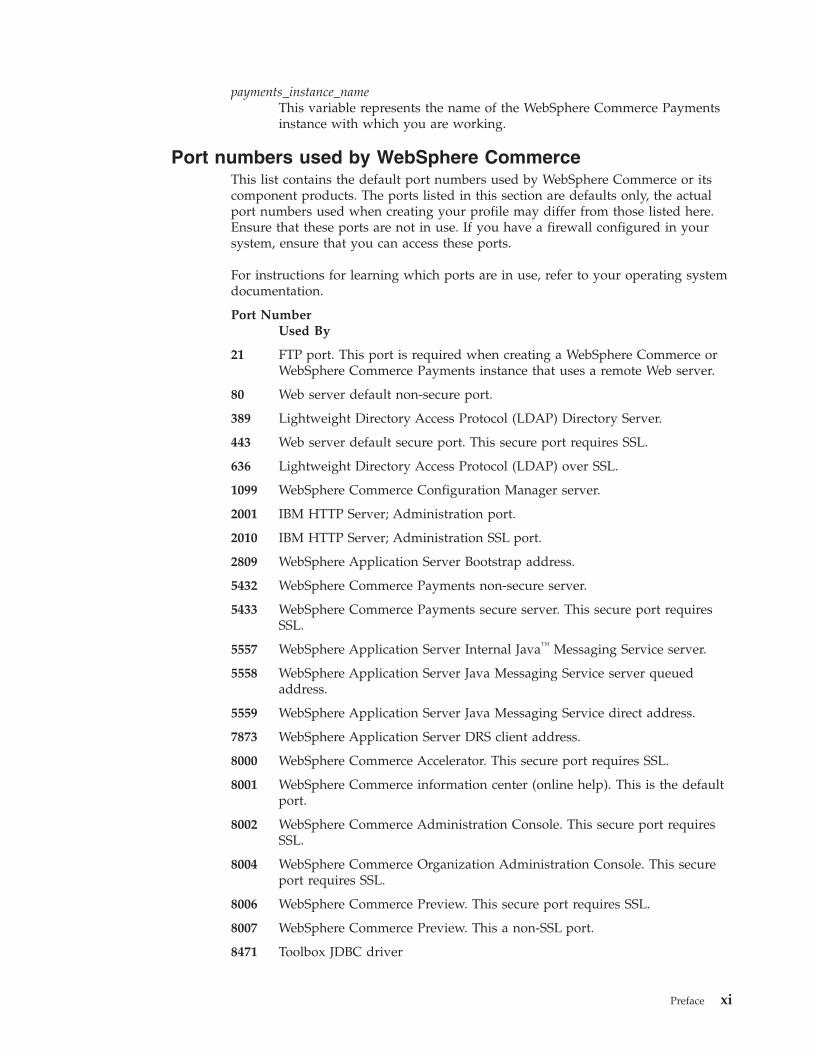
Port numbers used by WebSphere Commerce
This list contains the default port numbers used by WebSphere Commerce or its
component products. The ports listed in this section are defaults only, the actual
port numbers used when creating your profile may differ from those listed here.
Ensure that these ports are not in use. If you have a firewall configured in your
system, ensure that you can access these ports.
For instructions for learning which ports are in use, refer to your operating system
documentation.
Port Number
Used By
21 FTP port. This port is required when creating a WebSphere Commerce or
WebSphere Commerce Payments instance that uses a remote Web server.
80 Web server default non-secure port.
389 Lightweight Directory Access Protocol (LDAP) Directory Server.
443 Web server default secure port. This secure port requires SSL.
636 Lightweight Directory Access Protocol (LDAP) over SSL.
1099 WebSphere Commerce Configuration Manager server.
2001 IBM HTTP Server; Administration port.
2010 IBM HTTP Server; Administration SSL port.
2809 WebSphere Application Server Bootstrap address.
5432 WebSphere Commerce Payments non-secure server.
5433 WebSphere Commerce Payments secure server. This secure port requires
SSL.
5557 WebSphere Application Server Internal Java™ Messaging Service server.
5558 WebSphere Application Server Java Messaging Service server queued
address.
5559 WebSphere Application Server Java Messaging Service direct address.
7873 WebSphere Application Server DRS client address.
8000 WebSphere Commerce Accelerator. This secure port requires SSL.
8001 WebSphere Commerce information center (online help). This is the default
port.
8002 WebSphere Commerce Administration Console. This secure port requires
SSL.
8004 WebSphere Commerce Organization Administration Console. This secure
port requires SSL.
8006 WebSphere Commerce Preview. This secure port requires SSL.
8007 WebSphere Commerce Preview. This a non-SSL port.
8471 Toolbox JDBC driver
Preface xi

8880 WebSphere Application Server SOAP Connector address.
9043 WebSphere Application Server Administrative Console Secure Port. This
secure port requires SSL.
9060 WebSphere Application Server Administrative Console Port.
9080 WebSphere Application Server HTTP Transport.
9501 WebSphere Application Server Secure Association Service.
9502 WebSphere Application Server Common Secure Port.
9503 WebSphere Application Server Common Secure Port.
Additional ports are used as you create additional WebSphere Commerce instances.
When you create a new WebSphere Commerce instance, a new application server
is created that has unique port numbers for the following ports:
v Bootstrap Address
v WebSphere Application Server Internal Java Messaging Service server
v WebSphere Application Server Java Messaging Service server queued address
v WebSphere Application Server SOAP Connector address
v WebSphere Application Server HTTP Transport
These additional port numbers are automatically selected by WebSphere
Application Server. Within the same WebSphere Application Server instance, the
new ports numbers are generally selected by adding to the port number used by
the last server created within the WebSphere Application Server instance.
Knowledge requirements
This book should be read by system administrators or anyone else responsible for
installing and configuring WebSphere Commerce.
People who are installing and configuring WebSphere Commerce should have
knowledge in the following areas:
v IBM i5/OS operating system
v Basic operating system commands
v IBM DB2® Universal Database™ for iSeries operation, configuration, and
maintenance
v Basic SQL commands
v The Internet
xii WebSphere Commerce - Express Installation Guide for IBM System i and i5/OS

Part 1. Getting started
This book describes how to install and configure WebSphere Commerce Version 6.0
for IBM Eserver iSeries on i5/OS. It is intended for system administrators or for
anyone else responsible for performing installation and configuration tasks.
Read through the sections in this part of the book before starting to plan your
WebSphere Commerce installation. To avoid problems, it is important to obtain the
latest installation information available for WebSphere Commerce before starting
your installation.
For information about how to obtain all of the latest installation information
available to you, refer to “Getting the latest installation information” on page 3.
This section contains the following chapters:
v “Getting the latest installation information” on page 3
v “Overview: Installing WebSphere Commerce” on page 7
© Copyright IBM Corp. 1996, 2008 1

2 WebSphere Commerce - Express Installation Guide for IBM System i and i5/OS

Getting the latest installation information
Before you install make sure you have all of the latest installation information
available to you. You should make sure you have the most recent information
provided in the following documentation:
v WebSphere Commerce Installation Guide (this book)
Refer to “Getting the latest WebSphere Commerce Installation Guide.”
Getting the latest WebSphere Commerce Installation Guide
The WebSphere Commerce Installation Guide (this book) is updated regularly with
corrections and new information. The most recent version of this book is available
on the IBM publications Web site .
You can verify that you have the most recent version by comparing the
publication number of this book with the publication number shown at
the preceding URL. The publication number is displayed in parenthesis
after the one line description of the book at the preceding URL. The
publication number of this book is GC10-4262-05.
If the dash level of this book’s publication number (-05) is lower than
the dash level of the publication number shown at the URL, you should
download the newer book from the URL. If the dash level of this book’s
publication number and the dash level of the publication number shown
at the URL are the same, you have the most recent version of this book.
Getting WebSphere Commerce technotes
Technotes contain information essential to successfully install successful WebSphere
Commerce. Refer to the WebSphere Commerce Version 6.0 installation master
technote #1231090.
© Copyright IBM Corp. 1996, 2008 3

4 WebSphere Commerce - Express Installation Guide for IBM System i and i5/OS

Obtaining WebSphere Commerce software
WebSphere Commerce software media is obtained through the IBM Passport
Advantage® Web site. Through this Web site, you can either download media
images or order physical media (CDs).
For instruction on obtaining WebSphere Commerce software, refer to Downloading
WebSphere Commerce media images.
© Copyright IBM Corp. 1996, 2008 5
|
|
|||
||

6 WebSphere Commerce - Express Installation Guide for IBM System i and i5/OS

Overview: Installing WebSphere Commerce
This section provides an overview of how to use this book effectively when
installing WebSphere Commerce.
Use this book as follows:
__ Step 1. Ensure that you are using the latest version of this book and that you
have reviewed all of the installation-related technotes.
Refer to “Getting the latest installation information” on page 3.
__ Step 2. Ensure that you have all of the WebSphere Commerce software
required to complete the instructions in this book.
__ Step 3. Review Part 2, “Planning your WebSphere Commerce installation,” on
page 9.
This part of the book provides you with information to make the
following decisions:
v What software stack you will use for WebSphere Commerce.
v What topology you want to use for WebSphere Commerce.
v What kind of WebSphere Commerce environment you want.__ Step 4. Ensure that each system on which you want to install parts of the
WebSphere Commerce software stack meets the prerequisites outlined
in Part 3, “Prerequisites,” on page 21.
__ Step 5. Based on your review of the planning information, decide what type of
installation you will perform:
Quick installation
You should perform a quick installation in the following
situations:
v You want to install WebSphere Commerce and its software
stack on one machine that has none of the following
software installed.
A quick installation does the following tasks on a single
machine:
v Installs WebSphere Application Server Express Version 6.0
v Installs WebSphere Application Server Plug-in for IBM HTTP
Server Version 6.0
v Installs WebSphere Commerce
v Creates a WebSphere Commerce instance
A quick installation requires a ″clean machine″ — none of the
software installed by a quick installation can exist on the
system before performing a quick install.
Custom installation
You should perform a custom installation in the following
situations:
v You want to use software already installed as part of the
WebSphere Commerce software stack
v You want to do a distributed installation of WebSphere
Commerce and its software stack components
© Copyright IBM Corp. 1996, 2008 7

A custom installation allows you to select various components
to install on one machine at a time. To install different
components on different machines, you have to perform a
WebSphere Commerce custom install on each of the machines
in your configuration.
A custom installation does not create your WebSphere
Commerce instance automatically. You must create the instance
after installing WebSphere Commerce and its software stack.__ Step 6. Complete the following steps for the type of installation you will
perform:
Quick installation
Complete the tasks in Part 4, “Installing WebSphere Commerce
using the quick installation,” on page 35.
Custom installation
Complete the following sections of this book:
a. Complete the instructions in Part 5, “Preparing for a custom
installation,” on page 61.
b. Complete the tasks in Part 6, “Installing WebSphere
Commerce using the custom installation,” on page 71.
c. Complete the tasks in Part 7, “Creating a WebSphere
Commerce instance,” on page 91.__ Step 7. Once your installation of WebSphere Commerce is complete, review
Part 8, “Last steps,” on page 109 to decide on how to continue.
8 WebSphere Commerce - Express Installation Guide for IBM System i and i5/OS

Part 2. Planning your WebSphere Commerce installation
This section provides information to help you plan your configuration of
WebSphere Commerce. Review all of the information in this section before
continuing with your installation of WebSphere Commerce.
This section contains the following chapters:
v “Coexistence with previous versions of WebSphere Commerce or WebSphere
Application Server” on page 11
v “Software supported by WebSphere Commerce” on page 13
v “Common topologies” on page 15
v “Migrating previous versions of WebSphere Commerce” on page 19
© Copyright IBM Corp. 1996, 2008 9

10 WebSphere Commerce - Express Installation Guide for IBM System i and i5/OS

Coexistence with previous versions of WebSphere Commerce
or WebSphere Application Server
Coexistence with previous versions of WebSphere Commerce
WebSphere Commerce Version 6.0 can coexist on the same machine with the
following previous versions of WebSphere Commerce:
v WebSphere Commerce Version 5.6.1
v WebSphere Commerce Version 5.6
v WebSphere Commerce Version 5.5
Coexistence of other versions of WebSphere Commerce is not supported.
Coexistence of different versions of WebSphere Commerce depends on coexistence
of different versions of the supporting software. Review “Coexistence with
previous versions of WebSphere Application Server” for more information on
coexistence with previous versions of WebSphere Application Server. For
information on the supported coexistence scenarios for the other components of the
WebSphere Commerce supported software, refer to your product documentation.
The machines on which different versions of WebSphere Commerce will coexist
must meet the requirements for WebSphere Commerce Version 6.0 documented in
Part 3, “Prerequisites,” on page 21.
If you plan to run two or more versions of WebSphere Commerce at the same
time:
v You might have port conflicts that must be resolved before you can run different
versions of WebSphere Commerce simultaneously.
v Your machine requirements will be greater than those listed in Part 3,
“Prerequisites,” on page 21. For memory, hard disk, and processor requirements,
you must sum the requirements for all versions of WebSphere Commerce
running on the same machine in order to determine the hardware requirements.
These requirements are the minimum requirements that are a starting point and
might need to be increased in a production environment.
For more information refer to “Considerations when creating multiple WebSphere
Commerce instances” on page 101.
If you plan to run only one version of WebSphere Commerce at a time:
v You will not need to resolve port conflicts with the other versions of WebSphere
Commerce.
v Your machine must meet the requirements listed in Part 3, “Prerequisites,” on
page 21.
Coexistence with previous versions of WebSphere Application Server
WebSphere Commerce Version 6.0 installs WebSphere Application Server Network
Deployment Version 6.0 or WebSphere Application Server Express Version 6.0
depending on the edition of WebSphere Commerce you have purchased.
WebSphere Commerce Version 6.0 can also be used with a preinstalled WebSphere
Application Server Version 6.0.2.5. WebSphere Application Server Version 5.1.1.3 or
WebSphere Application Server Version 5.0 can be installed on the same machine
© Copyright IBM Corp. 1996, 2008 11

where you plan to install WebSphere Application Server Version 6.0.2.5. Two or
more versions of WebSphere Application Server can coexist on the same machine,
however there might be port conflicts that must be resolved as both versions of
WebSphere Application Server use the same ports.
Important
WebSphere Commerce always installs itself into the highest version of
WebSphere Application Server Version 6.0.
If more than one edition of WebSphere Application Server Version 6.0 is
installed, WebSphere Commerce searches for, and uses these editions in the
following order:
v WebSphere Application Server Network Deployment
v WebSphere Application Server
v WebSphere Application Server Express
Note: WebSphere Commerce Express uses WebSphere Application Server
Express. Neither WebSphere Commerce Enterprise nor WebSphere
Commerce Professional will use WebSphere Application Server
Express.
For more information about WebSphere Application Server 6.0.2.5 coexistence
support, refer to the Coexisting topic in the WebSphere Application Server
Information Center.
12 WebSphere Commerce - Express Installation Guide for IBM System i and i5/OS

Software supported by WebSphere Commerce
WebSphere Commerce requires a number of supporting software packages to run.
The supporting software packages are referred to as the software stack.
This section provides information on the following topics:
v “Supported application servers”
v “Database servers supported when using WebSphere Application Server Version
6.0 ” on page 14
v “Web servers supported when using WebSphere Application Server Version 6.0”
on page 14
Important
This guide has been tested using the software levels listed in this section.
However, at the time of your installation, there might be more recent fixes
and patches available for the WebSphere Commerce software stack
components (for example, WebSphere Application Server or DB2 Universal
Database for iSeries).
The official list of software supported by WebSphere Commerce Version 6.0 is
available in the WebSphere Commerce Version 6.0 supported software
Technote #7007501.
This guide was tested with WebSphere Commerce and the supporting
software stack running on the same operating system. Heterogeneous
operating environments have not been tested.
Supported application servers
The software stack supported by WebSphere Commerce depends on the version of
WebSphere Application Server that you want to use with WebSphere Commerce.
WebSphere Commerce requires any of the following editions or versions of
WebSphere Application Server to run:
WebSphere Application Server Network Deployment Version 6.0.2.5
This is WebSphere Application Server Network Deployment Version 6.0 .
WebSphere Application Server Version 6.0.2.5
This is WebSphere Application Server Version 6.0 with refresh pack 2 and
fix pack 5 or higher.
WebSphere Application Server Express Version 6.0.2.5
This is WebSphere Application Server Express Version 6.0 with refresh pack
2 and fix pack 5 or higher.
This edition of WebSphere Application Server is provided with WebSphere
Commerce - Express and can be installed by the WebSphere Commerce
installation wizard.
© Copyright IBM Corp. 1996, 2008 13

Note: You must bring WebSphere Application Server to the level required
by WebSphere Commerce by installing the required PTFs manually.
The required PTFs are not installed by the WebSphere Commerce
installation wizard.
The remaining supported software sections list the supported software stack
components for WebSphere Commerce for the versions of WebSphere Application
Server supported by WebSphere Commerce.
Notes on the supported application servers
Database servers supported when using WebSphere Application
Server Version 6.0
When using WebSphere Application Server Version 6.0 with WebSphere Commerce,
you can use the following database servers:
v DB2 Universal Database for iSeries V5R3M0
v DB2 Universal Database for iSeries V5R4M0
v
i 6.1
DB2 Universal Database for System i 6.1 (V6R1)
Web servers supported when using WebSphere Application Server
Version 6.0
When using WebSphere Application Server Version 6.0 with WebSphere Commerce,
you can use the following Web servers:
v IBM HTTP Server for iSeries (5722DG1) on V5R3
v IBM HTTP Server for i5/OS (5722DG1) on V5R4
v
i 6.1
IBM HTTP Server for i5/OS (5761DG1) on System i 6.1 (V6R1)
14 WebSphere Commerce - Express Installation Guide for IBM System i and i5/OS
+
+

Common topologies
This section describes common topologies for WebSphere Commerce components
and the supporting software, such as the database server and the Web server.
Although the topologies described in this chapter are the most common, other
topologies of WebSphere Commerce are still possible. The following topologies are
the most common:
v “One-node topology”
v “Two-node topology”
WebSphere Commerce is tested with all nodes in a given topology running the
same operating system at the same level. This includes any patches, revisions, or
PTFs required by WebSphere Commerce.
For a list of software supported by WebSphere Commerce, refer to “Software
supported by WebSphere Commerce” on page 13.
In this chapter the following terms are used:
Database node
A node in a topology that only contains the database server used by
WebSphere Commerce.
Web server node
A node in a topology that only contains the Web server used by
WebSphere Commerce.
WebSphere Commerce node
A node in a topology that contains the WebSphere Commerce Server. While
the node can also contain the database server or Web server, depending on
the topology, if a node contains the WebSphere Commerce Server, it will be
referred to as the WebSphere Commerce node.
Important
The instructions in this section are meant as a general outline only to provide
information for planning purposes. Detailed instructions are provided later in
this book.
One-node topology
In a one-node topology, all WebSphere Commerce components and the supporting
software are installed on a single node. This includes your database server, Web
server, WebSphere Application Server, and the WebSphere Commerce Server.
Two-node topology
In a two-node topology, the database server is installed on one node and all
WebSphere Commerce components and the Web server are installed on a different
node. Alternatively, the Web server is installed on one node and all WebSphere
Commerce components and the database server are installed on a different node.
© Copyright IBM Corp. 1996, 2008 15

To install WebSphere Commerce in a two-node topology you must use the custom
installation option of the installation wizard.
The following diagram shows a two-node topology:
Note: WebSphere Commerce Configuration Manager consists of two components:
a GUI client and a server.
In order to use the WebSphere Commerce Configuration Manager client, you
must install the client software on a Windows® workstation capable of
displaying graphics.
The WebSphere Commerce Configuration Manager client can be installed
separately. Instructions for installing the WebSphere Commerce
Configuration Manager client are provided in “Installing the Configuration
Manager client” on page 93.
16 WebSphere Commerce - Express Installation Guide for IBM System i and i5/OS

WebSphere Commerce environments
Important
WebSphere Commerce is tested with all nodes in the production server
configuration running the same operating system at the same, required levels.
Heterogeneous operating environments have not been tested.
Production server environment
The production server environment is the ″live″ environment that is open for
business and accessible to customers.
Staging server environment
The staging server environment is an instance of WebSphere Commerce that is
used for testing purposes before new functions or data are deployed to the
production server.
Notes:
1. The staging server should be run on a separate LPAR or system for testing of
fixes for Java, custom code, WebSphere Application Server, DB2 Universal
Database for iSeries, IBM HTTP Server, and WebSphere Commerce.
2. The staging server must be on an LPAR or system that is at the same release
level as the production server.
Note:
The staging environment requires you to configure the WebSphere Commerce
instance as a staging server when you create the WebSphere Commerce instance.
You cannot convert a WebSphere Commerce production server environment to a
WebSphere Commerce staging server environment.
After you install WebSphere Commerce using the custom installation option of the
installation wizard, you must create the WebSphere Commerce instance after the
installation wizard finishes. You can choose to make this instance a staging server
instance.
For more information on staging servers, see the Staging server topic on the
WebSphere Commerce Information Center.
Development environment
The development environment is used to customize parts of WebSphere Commerce
and unit test any changes. The development environment must be installed on a
separate machine from WebSphere Commerce. The machine must be running
Microsoft® Windows 2000, Windows 2003, or Windows XP.
This development environment is provided in the WebSphere Commerce
Developer product. It is not provided with WebSphere Commerce.
© Copyright IBM Corp. 1996, 2008 17
+
+
+++
++

For more information about the development environment, refer to WebSphere
Commerce - Express Developer Edition Installation Guide available from theWebSphere
Commerce technical library.
18 WebSphere Commerce - Express Installation Guide for IBM System i and i5/OS

Migrating previous versions of WebSphere Commerce
Migration to WebSphere Commerce Version 6.0 from the following versions of
WebSphere Commerce is supported:
v WebSphere Commerce Version 5.6.1
v WebSphere Commerce Version 5.6
v WebSphere Commerce Version 5.5
The following migration scenarios are not supported:
v Migration from other versions of WebSphere Commerce and WebSphere
Commerce Suite
For information about migrating to WebSphere Commerce Version 6.0 from
previous versions of WebSphere Commerce, refer to the WebSphere Commerce
Migration Guide available from the WebSphere Commerce technical library.
© Copyright IBM Corp. 1996, 2008 19

20 WebSphere Commerce - Express Installation Guide for IBM System i and i5/OS

Part 3. Prerequisites
This section contains the following chapters:
v “Hardware prerequisites” on page 23
v “Operating system prerequisites” on page 25
v “Networking prerequisites” on page 27
v “National language prerequisites” on page 29
v “WebSphere Commerce tools prerequisites” on page 31
v “Documentation prerequisites” on page 33
Ensure that your systems meet all of the prerequisites in all of the chapters in this
section.
© Copyright IBM Corp. 1996, 2008 21

22 WebSphere Commerce - Express Installation Guide for IBM System i and i5/OS

Hardware prerequisites
Ensure that the machine on which you want to install WebSphere Commerce meets
the requirements listed in the IBM WebSphere Commerce Version 6.0 Hardware
prerequisites Technote #7007428.
© Copyright IBM Corp. 1996, 2008 23

24 WebSphere Commerce - Express Installation Guide for IBM System i and i5/OS

Operating system prerequisites
Ensure that the machine on which you want to install WebSphere Commerce meets
the requirements listed in the IBM WebSphere Commerce Version 6.0 Operating
System prerequisites Technote #7007429.
© Copyright IBM Corp. 1996, 2008 25

26 WebSphere Commerce - Express Installation Guide for IBM System i and i5/OS

Networking prerequisites
Ensure that the machine on which you want to install WebSphere Commerce meets
the requirements listed in the IBM WebSphere Commerce Version 6.0 Networking
prerequisites Technote #7007430.
© Copyright IBM Corp. 1996, 2008 27

28 WebSphere Commerce - Express Installation Guide for IBM System i and i5/OS

National language prerequisites
For national languages, WebSphere Commerce only uses valid Java language
locales. Ensure that your systems have the appropriate national language locale
installed for your language. Ensure that any locale-related environment variables
are set to include the WebSphere Commerce supported locale.
Table 1. i5/OS locale codes supported by WebSphere Commerce
Language Locale Code
German de_DE
English en_US
Spanish es_ES
French fr_FR
Italian it_IT
Japanese ja_JP
Korean ko_KR
Brazilian Portuguese pt_BR
Simplified Chinese zh_CN
Traditional Chinese zh_TW
Note: Ensure that the WebSphere Commerce non-root user’s locale is set to the
appropriate language. If the locale is not set properly, some of the
WebSphere Commerce tools will not display properly.
© Copyright IBM Corp. 1996, 2008 29

30 WebSphere Commerce - Express Installation Guide for IBM System i and i5/OS

WebSphere Commerce tools prerequisites
The following WebSphere Commerce tools can be accessed only from a remote
Windows machine:
v WebSphere Commerce Accelerator
v WebSphere Commerce Administration Console
v WebSphere Commerce Organization Administration Console
Any machine that will be used to access these tools must meet the requirements
listed in this section.
WebSphere Commerce tools hardware prerequisites
In order to use the WebSphere Commerce tools, the machine must meet the
following minimum requirements:
Graphics adapter
The following are the minimum requirements for the graphics adapter:
Parameter Minimum value
Resolution 1024x768
Color depth 256 colors
Ensure that the system meets or exceeds these requirements.
WebSphere Commerce tools software prerequisites
In order to use the WebSphere Commerce tools, you require the following software
and operating system settings:
Web browser requirements
You can only access the WebSphere Commerce tools using Microsoft
Internet Explorer 6.0:
v On a machine running a Windows operating system on the same
network as your WebSphere Commerce machine.
v On a machine running a Windows operating system on a different
network from your WebSphere Commerce machine. Ensure the network
and any firewalls are configured to allow access to the tools pages.
You must use Internet Explorer full version 6.0 (also known as Internet
Explorer 6.0 Service Pack 1 and Internet Tools) or later with the latest
critical security updates from Microsoft. Prior versions do not support full
functionality of WebSphere Commerce tools.
© Copyright IBM Corp. 1996, 2008 31

Accessing WebSphere Commerce tools from Windows Server 2003:
Windows Server 2003 Internet Explorer Enhanced Security might
prevent access to the WebSphere Commerce tools.
If you want to access the WebSphere Commerce tools from a
Windows Server 2003 system, add the following URLs to the list of
trusted sites in the security settings for Internet Explorer:
v http://host_name
v http://fully_qualified_host_name
v https://host_name
v https://fully_qualified_host_name
For example, if the fully qualified host name of your Web server is
commerce.ibm.com, you would add the following URLs to the list of
trusted sites:
v http://commerce
v http://commerce.ibm.com
v https://commerce
v https://commerce.ibm.com
Refer to your Internet Explorer documentation for instructions on
how to add URLs to the list of trusted sites in the security settings.
Operating system display settings
Ensure that you have set the following display values to the recommended
values or higher:
Display setting Minimum value
Screen area 1024x768
Colors 256 colors
32 WebSphere Commerce - Express Installation Guide for IBM System i and i5/OS

Documentation prerequisites
In order to view the WebSphere Commerce documentation and use the
documentation links in the WebSphere Commerce launch pad and First Steps
panels, you must have the following software installed:
A Web browser (remote Windows system only)
Documentation is launched in the default Web browser for the system.
The WebSphere Commerce documentation and the WebSphere Commerce launch
pad are not available in a native i5/OS environment.
© Copyright IBM Corp. 1996, 2008 33

34 WebSphere Commerce - Express Installation Guide for IBM System i and i5/OS

Part 4. Installing WebSphere Commerce using the quick
installation
This section contains the following chapters:
v “Quick installation overview” on page 37
v “Preparing your system to run the WebSphere Commerce installation wizard” on
page 39
v “Information required to complete a quick installation” on page 43
v “Starting the installation wizard” on page 47
v “Completing a quick installation” on page 49
v “Verifying a quick installation” on page 55
© Copyright IBM Corp. 1996, 2008 35

36 WebSphere Commerce - Express Installation Guide for IBM System i and i5/OS

Quick installation overview
The quick installation does the following tasks:
v Installs WebSphere Application Server Express Version 6.0
v Installs WebSphere Commerce.
v Creates a WebSphere Commerce instance.
A quick installation will be prevented if any of the following conditions are
detected on the system:
v Any edition of WebSphere Application Server Version 4.0 (denoted as product
5733WA4) is installed.
v WebSphere Application Server Version 5.0 (denoted as product 5733WS5
Options 1 and 2).
v WebSphere Application Server Version 5.1 options 1 or 2 are installed (denoted
as product 5733W51 Options 1 and 2).
v Any WebSphere Commerce Version 6.0 components are installed.
v Any previous version of WebSphere Commerce is installed on the machine.
v TCP/IP port 1099 is already in use on your Eserver iSeries system.
To check if this TCP/IP port 1099 is already in use:
1. From the iSeries command line, type the following:
netstat *cnn
2. On the Work with TCP/IP Connection Status screen, ensure that port 1099 is
not listed. Ensure that you page through the whole listing.
You can sort the list by pressing F13, select Sort by local port from
the list, then display all port numbers by pressing F14.
3. If port 1099 is in use, stop the application using the port before starting the
quick installation.v The QMQM subsystem is active on the Eserver iSeries system.
During the WebSphere Commerce installation, the WebSphere Application Server
product will also be installed.
Ensure that subsystem QMQM is ended if the WebSphere MQ classes product is
already installed on the iSeries system.
Do not use a quick installation if the following statement applies to your
WebSphere Commerce installation:
v I want to use an existing installation of WebSphere Application Server as the
WebSphere Commerce application sever.
If this statement applies to your WebSphere Commerce configuration, you must
use the custom installation. To use the custom installation option of the WebSphere
Commerce installation wizard, refer to Part 6, “Installing WebSphere Commerce
using the custom installation,” on page 71.
© Copyright IBM Corp. 1996, 2008 37

38 WebSphere Commerce - Express Installation Guide for IBM System i and i5/OS

Preparing your system to run the WebSphere Commerce
installation wizard
Checklist tasks
Use the instructions in the following sections to complete the checklist below
which is used to ensure that you are ready to run the WebSphere Commerce
installation wizard.
__ 1. Ensure that any Lotus® Notes® server, Web servers, Java application servers,
and any nonessential Java processes are stopped before installing WebSphere
Commerce.
__ 2. Ensure that any other InstallShield MultiPlatform installers have completed
or you have exited them before installing WebSphere Commerce.
__ 3. If you have firewall enable on the system, disable it before starting the
Quick installation. Instance creation may fail if the firewall is running. You
can enable the firewall again after installation has completed.
__ 4. Review the WebSphere Commerce README file. The README file contains
information about last-minute changes to the product. Last-minute changes
can include additional fixes that must be installed before using WebSphere
Commerce.
For more information, see “Reviewing the README file.”
__ 5. Ensure that you have access to the QSECOFR user profile, or an i5/OS user
profile that is created with USRCLS(*SECOFR) and SPCAUT(*USRCLS). If you
need to create an i5/OS user profile, refer to “Creating an i5/OS user
profile” on page 40.
Ensure that this user profile has the correct CCSID for the language under
which you want to install WebSphere Commerce. Valid CCSIDs are listed in
“Creating an i5/OS user profile” on page 40.
Important
Ensure this user profile is able to issue the sbmjob command with all
parameters left at their default values. If the job does not start, ensure
the subsystem that the job was submitted to is active.
__ 6. If you have a Web server or any other service on your machine that is
currently using any of the following ports: 80, 443, 5432, 5433, 8000, 8001,
8002, 8004, 8006, and 8007, stop the Web server.
Reviewing the README file
Reviewing the README file is an important prerequisite for installing WebSphere
Commerce. The README file contains information about last-minute changes to
the product. Last-minute changes can include additional fixes that must be
installed before using WebSphere Commerce.
Failure to install any last minute fixes listed in the README file will result in
WebSphere Commerce not functioning correctly.
The README file can be found in the readme directory of WebSphere Commerce
CD 1. The README file name is:
© Copyright IBM Corp. 1996, 2008 39

readme_language_code.htm
where language_code is one of the following values:
Language Language code
German de_DE
English en_US
Spanish es_ES
French fr_FR
Italian it_IT
Korean ko_KR
Brazilian Portuguese pt_BR
Simplified Chinese zh_CN
Creating an i5/OS user profile
To create an i5/OS user profile, you can either use the i5/OS command line or use
iSeries Navigator.
To create an i5/OS user profile using the i5/OS command line:
1. Enter CRTUSRPRF.
2. Press F4 for a prompt.
3. Complete the necessary parameters, and then press Enter to create the user
profile.
Ensure that USRCLS is set to *SECOFR and SPCAUT is set to *USRCLS for this
profile.
The iSeries user profile should be created with the following localized settings:
Table 2. Localized settings for iSeries user profiles
Language CCSID LangID CountryID
English 37 ENU US
French 297 FRA FR
German 273 DEU DE
Italian 280 ITA IT
Spanish 284 ESP ES
Brazilian Portuguese 37 PTB BR
Japanese 5035 JPN JP
Korean 933 KOR KR
Traditional Chinese 937 CHT TW
Simplified Chinese 935 CHS CN
After the iSeries user profile has been created, use the DSPUSRPRF command to
determine the Home Directory (HOMEDIR). Ensure that the HOMEDIR exists on your
iSeries system. If the HOMEDIR does not exist, create it using the i5/OS command:
MKDIR. (The HOMEDIR will be denoted as home_directory.)
40 WebSphere Commerce - Express Installation Guide for IBM System i and i5/OS

The HOMEDIR must contain a file named SystemDefault.properties, with a coded
character set ID of 819 and containing ASCII data. This file must specify the
file.encoding property that matches your iSeries user profile. The file.encoding
property must be specified on one line, must contain no spaces, and is case
sensitive. The file.encoding property can be one of the following values:
v Simplified Chinese:
file.encoding=Cp1381
v Korean:
file.encoding=KSC5601
v Traditional Chinese:
file.encoding=Cp950
v Japanese:
file.encoding=SJIS
v All other languages:
file.encoding=ISO8859_1
To create the SystemDefault.properties file do the following:
1. On a PC, using a text editor, create a file named SYSDFT.FILE
2. In this file, enter the appropriate file.encoding line for you language. For
example:
file.encoding=ISO8859_1
3. Save this file and copy it to your iSeries system in the /QIBM directory.
4. From an i5/OS command line, enter the following:
COPY OBJ(’/QIBM/SYSDFT.FILE’)
TOOBJ(’/home_directory/SystemDefault.properties’)
TOCCSID(819)
where home_directory is your HOMEDIR.
5. Once the new file is created, ensure that it contains the proper ASCII data.
Preparing your system to run the WebSphere Commerce installation wizard 41

42 WebSphere Commerce - Express Installation Guide for IBM System i and i5/OS

Information required to complete a quick installation
Before completing this section, ensure that you have completed “Preparing your
system to run the WebSphere Commerce installation wizard” on page 39.
The WebSphere Commerce installation wizard prompts you for a number of
different user IDs and other information in order to complete the installation.
Before starting your installation, fill in the following table so you will have the
information handy when you complete the WebSphere Commerce installation
wizard.
Descriptions of the IDs and other information required to complete the installation
wizard are provided in the following sections:
v “Operating system information required to complete the installation wizard” on
page 44
v “WebSphere Commerce information required to complete the installation
wizard” on page 44
i5/OS information
Review the descriptions in “Operating system information required to
complete the installation wizard” on page 44 then fill in this table:
Information Value
Local CA password
*SYSTEM certificate store password
WebSphere Commerce information
Review the descriptions in “WebSphere Commerce information required to
complete the installation wizard” on page 44 then fill in this table:
Other
information
Your value
Instance name
Instance
password
WebSphere
Commerce Site
Administrator ID
WebSphere
Commerce Site
Administrator
password
Merchant key
© Copyright IBM Corp. 1996, 2008 43

Operating system information required to complete the installation
wizard
To complete the installation of WebSphere Commerce, you will need the following
IDs defined:
Password Description
Local CA
password
Local CA password in Digital Certificate Manager. If you do not have a
local CA created in Digital Certificate Manager, the Quick installation will
create it for you and use the value you enter for this parameter. If you
have a local CA created, the Quick installation will use the value you
enter for this parameter.
*SYSTEM
certificate store
password
The password of the *SYSTEM certificate store in Digital Certificate
Manager. If the *SYSTEM certificate store does not exist in Digital
Certificate Manager, the Quick installation will create it for you and use
the value you enter for this parameter. If you have the *SYSTEM certificate
store created, the Quick installation will use the value you enter for this
parameter.
WebSphere Commerce information required to complete the
installation wizard
To complete the installation of WebSphere Commerce, you will need to know the
following additional information:
Information Description
WebSphere Commerce
Instance name
This is a name for the WebSphere Commerce instance. A
WebSphere Commerce instance user profile will also be
created with this name. The maximum length is 10 characters.
Ensure that the instance name does not contain any
double-byte characters.
WebSphere Commerce
Instance password
This is the password for the WebSphere Commerce instance
user profile.
WebSphere Commerce Site
Administrator ID
This ID is used to access the WebSphere Commerce tools such
as the WebSphere Commerce Accelerator, the WebSphere
Commerce Administration Console, and the WebSphere
Commerce Organization Administration Console.
This is not an operating system ID. It is recommended that
this ID is unique on your system. This ID is created by the
WebSphere Commerce installation wizard.
WebSphere Commerce Site
Administrator password
WebSphere Commerce requires that the Site Administrator
password adhere to the following rules:
v Must be at least 8 characters in length.
v Must contain at least one numeric character (0–9).
v Must contain at least one alphabetic character (a–z, A–Z).
v Cannot contain four consecutive occurrences of a character.
v The same character cannot appear more than four times in
the password.
44 WebSphere Commerce - Express Installation Guide for IBM System i and i5/OS

Information Description
Merchant Key The merchant key is used by WebSphere Commerce as an
encryption key. You must enter your own key in the Merchant
key field. Ensure that the key that you enter will be sufficient
to protect your site.
The merchant key is a 16 digit hexadecimal number that must
meet the following criteria:
v Must contain at least one numeric character (0–9).
v Must contain at least one alphabetic character (a–f).
Important: Uppercase letters are not valid in the merchant
key.
v Cannot contain four consecutive occurrences of a character.
v The same character cannot appear more than four times in
the merchant key.
Note: Keep a record of the merchant key you entered and
keep this copy in a safe place.
Information required to complete a quick installation 45

46 WebSphere Commerce - Express Installation Guide for IBM System i and i5/OS

Starting the installation wizard
The WebSphere Commerce product will be installed, on your i5/OS system using
the GUI based remote installation.
GUI based remote installation
The GUI based remote installation installs WebSphere Commerce on your
i5/OS system from any Windows 2000 or 2003 machine, or any version of
a Windows machine that supports Universal Disk Format (UDF) CDs. The
Windows machine must be connected to the same IP network as the i5/OS
system. The Windows machine must also have at least 100 MB of disk
space available.
Depending on your network and Eserver iSeries machine, the installation
might take several hours.
For instructions on starting a GUI based remote installation, refer to
“Starting the installation wizard.”
Usage notes when using CD images
When installing WebSphere Commerce from CD images on a hard drive or
network location, be aware of the following information:
v The path to the WebSphere Commerce CDs must not contain the character ″#″.
v The path to the WebSphere Commerce CD 1 must not contain the digit ″1″.
The exception to this is that WebSphere Commerce CD 1 may be in a directory
called ″disk1″. However, if the CD-image of WebSphere Commerce CD 1 is in a
directory called ″disk1″, WebSphere Commerce CD 2 must be in a directory
called ″disk2″ or the installation will fail.
Starting the installation wizard
To start a GUI based remote install:
1. Insert the WebSphere Commerce CD 1 into the CD-ROM drive on the remote
Windows system.
Note: Depending on your Windows system, the starting of the launch pad can
take up to 3 minutes. Ensure you minimize all your windows sessions so
that the initial window, for the language selection, is not missed.
2. The WebSphere Commerce launch pad starts. Select the language for the launch
pad and click OK to continue.
If the launch pad does not start automatically after you insert the CD:
a. In Windows Explorer, browse the CD-ROM drive containing WebSphere
Commerce CD 1.
b. Double-click autorun.exe.
When the launch pad displays, it provides the following options:
Prerequisites
Documentation
Install Product
Install Product on iSeries Machine
© Copyright IBM Corp. 1996, 2008 47

Exit
3. Click Install Product on iSeries Machine to start the graphical installation
wizard, then proceed to the next step.
If you want to start the graphical installation wizard without using the launch
pad, do one of the following:
v Navigate to the CD-ROM drive and double click on iSeriesServer.bat to
launch the installer.
v Issue the following command from a Windows command prompt:
drive:\iSeriesServer.bat
where drive is the location of the WebSphere Commerce CD image.
v
i 6.1
If installing on a System i 6.1 system, complete the following steps:
a. Download the pdinstall file to the Windows machine where the
WebSphere Commerce Version 6.0 installer will be launched and store the
file in a temporary directory.
b. Issue the following command from a Windows command prompt:
drive:\setup.exe -os400
-W depcheck.controlFile=path_to_pdinstall.ini\pdinstall.ini
where drive is the location of the WebSphere Commerce CD image.4. After a few minutes, the language selection panel displays. Select the
installation language in the language selection panel, and select OK.
The software will be installed in this language, regardless of the language
settings of your system.
5. The iSeries Logon panel is shown. Enter the System Name, User Profile, and
Password for the iSeries system on which you are installing WebSphere
Commerce.
Ensure that you log on to your iSeries system as a user with SECOFR class
authority. This user profile requires the correct CCSID for the language under
you which you want to install WebSphere Commerce.
If you did not create a user profile meeting these requirements, refer to
“Creating an i5/OS user profile” on page 40 for instructions.
Click Next.
If at any point during the installation, the text in the installation wizard
appears to be cut off, resize the wizard so that you can read all of the
text on the wizard.
After you have completed the instructions in this section, proceed to “Completing
a quick installation” on page 49.
48 WebSphere Commerce - Express Installation Guide for IBM System i and i5/OS
+
+++
+
++
+

Completing a quick installation
Prerequisites
__ No version or edition of WebSphere Commerce is installed on the machine.
__ No version or edition of WebSphere Application Server is installed on the
machine.
Note: You can complete a quick installation if one, or both of the following
Licensed Programs is installed on the machine:
– WebSphere Application Server V5.0 Network Deployment
(5733WS5 option 5)
– WebSphere Application Server V5.1 Network Deployment (5733W51
option 5)__ The system on which you are starting the installation wizard meets all of the
requirements listed in Part 3, “Prerequisites,” on page 21.
__ You have completed all of the tasks listed in “Preparing your system to run
the WebSphere Commerce installation wizard” on page 39.
__ You have started the installation wizard according to the instructions in
“Starting the installation wizard” on page 47.
Procedure
To complete a quick installation:
1. Select the installation language in the language selection panel, and select OK.
The software will be installed in this language, regardless of the language
settings of your system. Do not select a language not supported by the system
on which you are performing the installation.
2. The iSeries Logon panel is shown. Enter the System Name, User Profile, and
Password for the iSeries system on which you are installing WebSphere
Commerce.
Ensure that you log on to your iSeries system as a user with *SECOFR class
authority. This user profile requires the correct CCSID for the language under
you which you want to install WebSphere Commerce.
If you did not create a user profile meeting these requirements, refer to
“Creating an i5/OS user profile” on page 40 for instructions.
Click Next.
3. Review the information on the Welcome panel and select Next.
4. Review the terms of the license agreement.
If you accept the terms of the license agreement, select I accept the terms in
the license agreement and select Next.
If you decline the terms of the license agreement, select I do not accept the
terms in the license agreement and select Next. Declining the terms of the
license agreement exits the install program.
5. Select Quick Installation, and select Next.
6. Enter the following information:
v WebSphere Commerce Instance name
v WebSphere Commerce Instance password
© Copyright IBM Corp. 1996, 2008 49

Ensure that you enter the same value in the WebSphere Commerce Instance
password field and the verification field.
For descriptions of these items, refer to “Information required to complete a
quick installation” on page 43.
Note: If you are using a system security program on your iSeries machine
that checks for default passwords, ensure that the password you select
for your WebSphere Commerce instance is different from the instance
name. If the instance name and password are the same, the user ID for
the instance may become disabled, preventing WebSphere Commerce
from functioning properly.
Select Next to continue.
7. Enter the following information:
v Local CA password
v *SYSTEM certificate store password
For descriptions of these items, refer to “Information required to complete a
quick installation” on page 43.
Ensure that you enter the same value in the local CA password field and the
Verification field. Ensure that you enter the same value in the *SYSTEM
certificate store password field and the Verification field.Select Next to
continue.
8. Enter the following information:
v Site Administrator ID
v Site Administrator password
Note: Ensure you enter the same value in the Site Administrator password
field and the Verification field.
v Merchant Key
For descriptions of these items, refer to “Information required to complete a
quick installation” on page 43.
Select Next to continue.
9. Enter the following information:
v WebSphere Commerce Configuration Manager password.
Note: Ensure you enter the same value in the WebSphere Commerce
Configuration Manager password field and the Verification field.
The WebSphere Commerce Configuration Manager ID is
configadmin. You can not change this ID.Select Next to continue.
10. Confirm your installation options and parameters, and select Next to continue.
11. Insert the CDs as prompted by the WebSphere Commerce installation wizard,
follow the on-screen prompts.
The WebSphere Application Server is installed first. When prompted, specify
the root directory of the WebSphere Application Server CD. A progress bar
indicates how much of the installation has completed. Once the WebSphere
Application Server is installed the installation wizard installs WebSphere
Commerce.
Note: During the installation of WebSphere Application Server, the following
message may appear:
50 WebSphere Commerce - Express Installation Guide for IBM System i and i5/OS

The installation of IBM WebSphere Application Server has timed out.
Examine log.txt in temp_path for details.
If you wish to continue with the WebSphere Commerce installation,
ensure that the installation of IBM WebSphere Application Server has
successfully completed.
If this message is posted appears, refer to Troubleshooting: Installation
of WebSphere Application Server displays a timeout message.A progress bar indicates how much of the installation has completed.
Note: After changing CDs a Windows Autorun window may display. Cancel
or exit this dialog window.
A Window Autorun dialog contains text similar to the following:
Windows can perform the same action each time you insert a
disk or connect a device with this kind of file:
12. After the installation has completed a new screen shows the status of the
WebSphere Commerce instance creation. Messages are displayed during the
creation of the WebSphere Commerce instance.
13. After WebSphere Commerce instance creation is completed, information about
the WebSphere Commerce instance is shown on the panel. Review this
information and click OK.
14. The InstallShield Wizard completion display is shown. Click Next to continue.
The First Steps panel displays after a few minutes.
The First Steps panel provides access to the following information:
Documentation
Support
Registration
Information Center
Easy Start
Exit
You can start the First Steps panel at any later point by doing the following:
a. Insert the WebSphere Commerce CD 1 into the CD-ROM drive on a
remote Windows system.
b. The WebSphere Commerce launch pad will start. At the initial language
selection, click Cancel.
c. Navigate to the extra folder on the CD-ROM drive and double-click
FirstStepsiSeriesRemote.bat.
d. Select the language and click OK.
e. The iSeries Logon panel is shown. Enter the System Name, User Profile
and Password for the iSeries system where WebSphere Commerce is
installed. Click Next.
f. After a few moments, the First Steps panel is shown.15. Install the most recent fix pack for WebSphere Commerce Version 6.0. For
information about where to obtain the fix pack and installation instructions for
the fix pack, refer to “Install the most recent fixes” on page 52.
Completing a quick installation 51

Important
After you have completed the installation, you need to apply the WebSphere
Application Server, WebSphere Commerce fixes. To apply these fixes, refer to
“Install the most recent fixes”
After completing this section, proceed to “Verifying a quick installation” on page
55.
Install the most recent fixes
After installing WebSphere Commerce, you should install the most recent
WebSphere Application Server and WebSphere Commerce fix packs available if any
exists.
WebSphere Commerce fix packs are cumulative, so the most recent fix pack for a
version of WebSphere Commerce will contain all of the fixes and updates found in
previous fix packs for that version.
Fix packs and the instructions for installing the fix packs are available from the
WebSphere Commerce - Express support Web site.
After you have completed the installation, you need to apply the WebSphere
Application Server PTFs. The list of PTFs required by your edition of WebSphere
Commerce are available from the WebSphere Commerce support Web site. At this
Web site, select your edition and on the next page, look for a document called PTFs
needed for WebSphere Commerce 6.0 on iSeries in the Other resources section.
This document lists all PTFs required for WebSphere Commerce and is updated
regularly.
After you have completed the installation you must apply the most recent
maintenance. To apply the most recent maintenance, see WebSphere Commerce
required maintenance Technote #1232042.
52 WebSphere Commerce - Express Installation Guide for IBM System i and i5/OS

Mandatory changes for System i 6.1 (V6R1) systems
If you have installed WebSphere Commerce Version 6.0 and WebSphere
Application Server Version 6.0, on a System i 6.1 system, complete the following
steps:
1. Download and apply WebSphere Application Server Version 6.0 PTF SI29611.
This PTF provides the required QSVTAPGT service program.
2. Open WC_installdir/instances/default/httpconf/httpd.conf.
3. Replace the line:
LoadModule was_ap20_module /QSYS.LIB/$WAS_INSTALL_LIBRARY$/qsvtap20.SRVPGM
with the line:
LoadModule was_ap20_module /QSYS.LIB/$WAS_INSTALL_LIBRARY$/qsvtapgt.SRVPGM
4. Save the changes.
5. Open WC_userdir/instances/instance_name/httpconf/httpd.conf.
6. Replace line:
LoadModule was_ap20_module /QSYS.LIB/QWAS6/qsvtap20.SRVPGM
with the line:
LoadModule was_ap20_module /QSYS.LIB/QWAS6/qsvtapgt.SRVPGM
7. Save your changes.
8. Restart the associated Web server for your WebSphere Commerce instance.
© Copyright IBM Corp. 1996, 2008 53
+
+
+++
++
+
+
+
+
++
+
+
+
+
++
+

54 WebSphere Commerce - Express Installation Guide for IBM System i and i5/OS

Verifying a quick installation
You can verify a quick installation by doing the following:
1. “Verifying your WebSphere Commerce installation.”
2. “Verifying your installation with the WebSphere Commerce tools.”
3. “Verifying your installation using iSeries Navigator” on page 56.
4. “Verifying your installation using log files” on page 57.
After you complete a quick installation, review Part 8, “Last steps,” on page 109 to
decide how to continue.
Verifying your WebSphere Commerce installation
If it is not started, start WebSphere Commerce and its software stack in the
following order:
1. Start IBM HTTP Server.
To start IBM HTTP Server, issue the following command from an i5/OS
command line:
STRTCPSVR SERVER(*HTTP) HTTPSVR(instance_name)
where instance_name is the name of the WebSphere Commerce instance.
2. Start WebSphere Commerce.
See the Starting and stopping WebSphere Commerce topic in the WebSphere
Commerce Information Center.where default values for WC_profiledir are listed
in “Path variables used in this book” on page ix
In the following steps, fully_qualified_hostname is the fully qualified host name of
the machine on which you completed the quick installation of WebSphere
Commerce.
Verifying your installation with the WebSphere Commerce tools
After completing a quick installation, you can verify your installation by doing the
following:
1. Start IBM HTTP Server.
To start IBM HTTP Server, issue the following command from an i5/OS
command line:
STRTCPSVR SERVER(*HTTP) HTTPSVR(instance_name)
2. Start WebSphere Commerce.
See the Starting and stopping WebSphere Commerce topic in the WebSphere
Commerce Information Center.where default values for WC_profiledir are listed
in “Path variables used in this book” on page ix
3. Ensure that you can access the following URLs:
v http://fully_qualified_hostname
v https://fully_qualified_hostname
If you cannot access the secure (https) URL, refer to “Web server post-instance
creation tasks” on page 107.
4. Ensure that the secure URL (https) functions before continuing.
© Copyright IBM Corp. 1996, 2008 55

5. Access the following URLs:
v https://fully_qualified_hostname:8000/accelerator
Note: A warning might display, indicating that no stores are defined. This is
an indication of a successful log in attempt.
v https://fully_qualified_hostname:8002/adminconsole
v https://fully_qualified_hostname:8004/orgadminconsole
For each of these URLs:
a. Ensure that you see the login page for each URL.
b. For each URL, log in using the Site Administrator ID and password you
entered when completing a quick installation.
If you can complete this section successfully, you can skip the other verification
steps.
Verifying your installation using iSeries Navigator
To verify that your installation of WebSphere Commerce was successful, check the
following:
1. The following library should exist on your Eserver iSeries system:
v QWAS6 — WebSphere Application Server library2. The Integrated File System (IFS) on your Eserver iSeries system will have one
or more of the following directories:
v /QIBM/ProdData/CommerceServer60
v /QIBM/ProdData/CommerceServer60/payments (Custom Install option
only)
v /QIBM/ProdData/WebSphere/
v /QIBM/UserData/WebSphere (Quick Install option only)
v /QIBM/UserData/WebSphere/AppServer/V60/edition_name/profiles/profile_name (Quick Install option only)
3. Use iSeries Navigator to show what products have been installed on your
Eserver iSeries system:
Notes:
a. Ensure that you are using the level of iSeries Navigator that matches your
version of i5/OS you are using. For example, if WebSphere Commerce is
installed on a i5/OS V5R3M0, use a Version 5 Release 3 level of iSeries
Navigator.
b. Ensure that the latest iSeries Access fix pack is installed. Download the
latest fix pack from the iSeries Access page. To confirm the fix pack level,
complete the following steps:
1) Select Windows > IBM iSeries Access for Windows > iSeries Access
for Windows Properties.
2) Review the service level, and confirm that it is the latest version by
comparing it to the level listed on the iSeries Access page.
3) If it is not at the highest fix pack level, apply the most recent fix pack
and continue.
56 WebSphere Commerce - Express Installation Guide for IBM System i and i5/OS

Note: Ensure that you are using the level of iSeries Navigator that matches
your version of i5/OS you are using. For example, if WebSphere
Commerce is installed on a i5/OS V5R3M0, use a Version 5 Release 3
level of iSeries Navigator.
a. On a PC where iSeries Navigator can be accessed, click Start > Programs >
IBM iSeries Access for Windows > iSeries Navigator
b. In the iSeries Navigator window, expand Management Central > Endpoint
Systems
c. Right-click on the applicable iSeries system and click Inventory > Collect
d. A new window opens. Ensure that the Software check box is selected. Click
OK to start the collection
e. Expand Management Central > Task Activity.
f. Click Inventory.
g. In the right-hand panel, a task for your iSeries system should be listed.
Press the F5 key (refresh) until the Status shows Completed.
h. Click Management Central > Endpoint Systems > iSeries system >
Configuration and Service > Software Inventory and click Installed
Products.
i. The right-hand panel will show a listing of products. Scroll to the bottom to
view the WebSphere Commerce products.
The following diagram is an examples of what you will see if all components were
installed successfully:
After verifying your installation using the iSeries Navigator, you can continue by
verifying your installation using the log files generated during the installation.
Verifying your installation using log files
During the installation of WebSphere Commerce and its components, log files are
generated. Examine the following log files to ensure that your installation was
successful:
v “WebSphere Commerce installation logs” on page 58
v “WebSphere Application Server installation logs” on page 58
Verifying a quick installation 57

v “WebSphere Commerce instance creation logs” on page 59
WebSphere Commerce installation logs
The following log files contain messages generated by the WebSphere Commerce
installation wizard. The default location for these log files on the Eserver iSeries
system is:
Installation type Log file location
GUI based remote
installation
v /InstallLogs/install.log
v /WC_installdir/logs/wcinstall.log
Note: The wcinstall.log file is only created when errors are
encountered.
v /WC_installdir/logs/wctrace_timestamp.log
Remote silent
installation
v /InstallLogs/install.log
v /tmp/InstallShield/wcinstall.log
Note: The wcinstall.log file is only created when errors are
encountered.
v /tmp/InstallShield/wctrace_timestamp.log
Local silent installation v /tmp/InstallShield/install.log
v /tmp/InstallShield/wcinstall.log
Note: The wcinstall.log file is only created when errors are
encountered.
v /tmp/InstallShield/wctrace_timestamp.log
Note: For multiple installation attempts, the log will be appended in the existing
install.log file.Depending on the components of WebSphere Commerce that are installed, the
following messages may appear at the end of the install.log file:
CMN7704S: IBM WebSphere Commerce Installer has successfully copied file
from /QIBM/ProdData/CommerceServer60/bin/config_env.sh to
/QIBM/ProdData/CommerceServer60/bin/config_env.db2.sh
CMN7720S: IBM WebSphere Commerce Installer internal Generic Catch Warning caught:
Command ended normally with exit status 0.
/QIBM/ProdData/CommerceServer60/bin/iSeriesFileAuth.sh
CWXAI7779S: IBM WebSphere Commerce Installer has successfully modified the
Configuration Manager user password.
CMN7753S: WebSphere Commerce installation complete.
This message is formatted to fit the page size of this book.
WebSphere Application Server installation logs
The WebSphere Application Server installation log file (log.txt) will be located on
the Eserver iSeries machine. The log file will be located in the following directory:
/tmp/InstallShield/log.txt
/WAS_installdir/logs/log.txt
Check the log.txt for the following message which will be at or near the end of
the file:
58 WebSphere Commerce - Express Installation Guide for IBM System i and i5/OS

Install, com.ibm.ws.install.ni.ismp.panels.OS400WASSummaryPanel, msg1,
Installation of IBM WebSphere Application Server - Express, V6 completed
successfully.
The quick installation installed the WebSphere Application Server product. You can
view entries for this product in the iSeries Navigator. Refer to step 3 in “Verifying
your installation using iSeries Navigator” on page 56 and look for product
5733W60. The following diagrams are examples of what you will see if all options
were installed successfully:
WebSphere Application Server installation
WebSphere Commerce instance creation logs
The configuration information for the WebSphere Commerce instance created as
part of the quick installation is stored in the following file:
WC_profiledir/installedApps/WC_instance_name_cell/
WC_instance_name.ear/xml/config/wc-server.xml
where default values for WC_userdir are listed in “Path variables used in this
book” on page ix.
Confirm that this file exists before checking the log files produced during instance
creation.
Creating a WebSphere Commerce instance produces log files in the following
directory:
WC_userdir/instances/instance_name/logs
where default values for WC_userdir are listed in “Path variables used in this
book” on page ix and instance_name is the name of WebSphere Commerce instance.
Ensure that there are no errors in the following log files:
v createInstanceANT.err.log
v createInstanceANT.log
v trace.txt
v messages.txt
Verifying a quick installation 59

Instance creation is successful if the log files do not contain any errors or
exceptions. The createInstanceANT.err.log file should be empty if no errors were
encountered.
The following log file is created in the WAS_userdir/profileRegistry/logs/wasprofile directory:
v wasprofile_create_profile_name.log
where default values for WAS_userdir are listed in “Path variables used in this
book” on page ix.
If the profile creation process was a success, the log displays an
INSTCONFSUCCESS message.
Note: There may be several INSTCONFSUCCESS messages in the log file.
The following log file is created in the WC_userdir/logs directory:
v WCSconfig.log
where default values for WAS_userdir are listed in “Path variables used in this
book” on page ix.
If instance creation failed you must delete the failed instance by completing the
following instructions in “Deleting a WebSphere Commerce instance” on page 122.
Once the failed instance is deleted, the WebSphere Commerce instance can be
created manually by following the instructions in Part 7, “Creating a WebSphere
Commerce instance,” on page 91.
After you complete a quick installation, review Part 8, “Last steps,” on page 109 to
decide how to continue.
60 WebSphere Commerce - Express Installation Guide for IBM System i and i5/OS

Part 5. Preparing for a custom installation
To prepare for a custom installation, you should know the following information:
__ 1. The topology you want to use for this installation of WebSphere Commerce.
__ 2. The software stack components — application server, database server, and
Web server — you want to use with WebSphere Commerce.
__ 3. How to prepare the systems to run the WebSphere Commerce installation
wizard.
The first two steps were covered earlier in this book in Part 2, “Planning your
WebSphere Commerce installation,” on page 9. If you have not reviewed this
material already, review it before continuing.
This section contains the following chapters covering the remaining items:
v “Custom installation overview” on page 63
v “Preparing your systems to run the WebSphere Commerce installation wizard”
on page 65
v “Preparing application servers for use with WebSphere Commerce” on page 69
© Copyright IBM Corp. 1996, 2008 61

62 WebSphere Commerce - Express Installation Guide for IBM System i and i5/OS

Custom installation overview
The custom installation option of the WebSphere Commerce allows you to select
which WebSphere Commerce components you want to install on a machine.
Use the custom installation option in any of the following situations:
v You want to use a remote Web server.
v You want to use a remote database server.
v You want to use an existing installation of WebSphere Application Server as the
WebSphere Commerce application server.
© Copyright IBM Corp. 1996, 2008 63
++

64 WebSphere Commerce - Express Installation Guide for IBM System i and i5/OS

Preparing your systems to run the WebSphere Commerce
installation wizard
Before starting the WebSphere Commerce installation wizard, complete the
following checklist:
__ 1. Review the WebSphere Commerce README file. The README file contains
information about last-minute changes to the product. Last-minute changes
can include additional fixes that must be installed before using WebSphere
Commerce.
For more information, see “Reviewing the README file.”
__ 2. Ensure that you have access to the QSECOFR user profile, or an i5/OS user
profile that is created with USRCLS(*SECOFR) and SPCAUT(*USRCLS). If you
need to create an i5/OS user profile, refer to “Creating an i5/OS user
profile” on page 66.
Ensure that this user profile has the correct CCSID for the language under
which you want to install WebSphere Commerce. Valid CCSIDs are listed in
“Creating an i5/OS user profile” on page 66.
Important
Ensure this user profile is able to issue the sbmjob command with all
parameters left at their default values. If the job does not start, ensure
the subsystem that the job was submitted to is active.
__ 3. Ensure that any Lotus Notes server, Web servers, Java application servers,
and any nonessential Java processes are stopped before installing WebSphere
Commerce.
__ 4. Ensure that any other InstallShield MultiPlatform installers have completed
or you have exited them before installing WebSphere Commerce.
__ 5. If you have a Web server or any other service on your machine that is
currently using any of the following ports: 80, 443, 5432, 5433, 8000, 8001,
8002, 8004, 8006, and 8007, stop the Web server.
Reviewing the README file
Reviewing the README file is an important prerequisite for installing WebSphere
Commerce. The README file contains information about last-minute changes to
the product. Last-minute changes can include additional fixes that must be
installed before using WebSphere Commerce.
Failure to install any last minute fixes listed in the README file will result in
WebSphere Commerce not functioning correctly.
The README file can be found in the readme directory of WebSphere Commerce
CD 1. The README file name is:
readme_language_code.htm
© Copyright IBM Corp. 1996, 2008 65

where language_code is one of the following values:
Language Language code
German de_DE
English en_US
Spanish es_ES
French fr_FR
Italian it_IT
Korean ko_KR
Brazilian Portuguese pt_BR
Simplified Chinese zh_CN
Creating an i5/OS user profile
To create an i5/OS user profile, you can either use the i5/OS command line or use
iSeries Access.
To create an i5/OS user profile using the i5/OS command line:
1. Enter CRTUSRPRF.
2. Press F4 for a prompt.
3. Complete the necessary parameters, ensuring that USRCLS is set to *SECOFR
and SPCAUT is set to *USRCLS for this profile. Press Enter to create the user
profile.
The iSeries user profile should be created with the following localized settings:
Table 3. Localized settings for iSeries user profiles
Language CCSID LangID CountryID
English 37 ENU US
French 297 FRA FR
German 273 DEU DE
Italian 280 ITA IT
Spanish 284 ESP ES
Brazilian Portuguese 37 PTB BR
Japanese 5035 JPN JP
Korean 933 KOR KR
Traditional Chinese 937 CHT TW
Simplified Chinese 935 CHS CN
After the iSeries user profile has been created, use the DSPUSRPRF command to
determine the Home Directory (HOMEDIR). Ensure that the HOMEDIR exists on your
iSeries system. If the HOMEDIR does not exist, create it using the i5/OS command:
MKDIR. (The HOMEDIR will be denoted as home_directory.)
The HOMEDIR must contain a file named SystemDefault.properties, with a coded
character set ID of 819 and containing ASCII data. This file must specify the
file.encoding property that matches your iSeries user profile. The file.encoding
66 WebSphere Commerce - Express Installation Guide for IBM System i and i5/OS

property must be specified on one line, must contain no spaces, and is case
sensitive. The file.encoding property can be one of the following values:
v Simplified Chinese:
file.encoding=Cp1381
v Korean:
file.encoding=KSC5601
v Traditional Chinese:
file.encoding=Cp950
v Japanese:
file.encoding=SJIS
v All other languages:
file.encoding=ISO8859_1
To create the SystemDefault.properties file do the following:
1. On a PC, using a text editor, create a file named SYSDFT.FILE
2. In this file, enter the appropriate file.encoding line for you language. For
example:
file.encoding=ISO8859_1
3. Save this file and copy it to your iSeries system in the /QIBM directory.
4. From an i5/OS command line, enter the following:
COPY OBJ(’/QIBM/SYSDFT.FILE’)
TOOBJ(’/home_directory/SystemDefault.properties’)
TOCCSID(819)
where home_directory is your HOMEDIR.
5. Once the new file is created, ensure that it contains the proper ASCII data.
Preparing your systems to run the WebSphere Commerce installation wizard 67

68 WebSphere Commerce - Express Installation Guide for IBM System i and i5/OS

Preparing application servers for use with WebSphere
Commerce
Important
If you are planning to complete a silent installation (either local or remote),
you must complete this section. If you are planning to complete a remote GUI
install, you are not required to complete this section.
Using WebSphere Application Server Version 6.0
WebSphere Application Server version 6.0 introduces a separation of the
WebSphere Application Server binary application files from the runtime
environments for applications deployed in WebSphere Application Server. The
runtime environment includes configuration files, the default location for deployed
applications, logs, and other data. These runtime environments are called profiles.
For more information on WebSphere Application Server profiles refer to the
WebSphere Application Server version 6.0 information center.
To find topics referenced in this section, enter the topic title in the Search field of
the WebSphere Application Server version 6.0 information center and click GO.
The silent installation method requires that WebSphere Application Server version
6.0.2.5 is installed prior to starting the silent installation of WebSphere Commerce.
To manually install WebSphere Application Server refer to the Installation of
WebSphere Application Server Version 6.0 for OS/400 topic in the WebSphere
Application Server Information Center. Once you have installed your WebSphere
Application Server you must update it to the correct maintenance level (6.0.2.5 or
higher). For more information refer to the Installation of WebSphere Application
Server Version 6.0 for OS/400 topic in the WebSphere Application Server
Information Center.
© Copyright IBM Corp. 1996, 2008 69
|||
|||||||||

70 WebSphere Commerce - Express Installation Guide for IBM System i and i5/OS

Part 6. Installing WebSphere Commerce using the custom
installation
You should perform a custom installation in the following situations:
v You want to use software already installed as part of the WebSphere Commerce
software stack
v You want to do a distributed installation of WebSphere Commerce and its
software stack components
A custom installation allows you to select various components to install on one
machine at a time. To install different components on different machines, you have
to perform a WebSphere Commerce custom install on each of the machines in your
configuration.
A custom installation does not create your WebSphere Commerce instance
automatically. You must create the instance after installing WebSphere Commerce
and its software stack.
Before completing the instructions in this section, ensure that you have completed
the instructions in “Preparing your systems to run the WebSphere Commerce
installation wizard” on page 65.
This section contains the following chapters:
v “Custom installation components” on page 73
v “Completing a custom installation” on page 75
v “Verifying a custom installation” on page 87
Important
If you have completed a quick installation
The WebSphere Commerce instance was created as part of the quick
installation process. You can skip this section and continue your
installation and configuration of WebSphere Commerce by following
the instructions in Part 8, “Last steps,” on page 109.
If you want to install WebSphere Commerce Developer
Refer to the WebSphere Commerce Developer Installation Guide.
© Copyright IBM Corp. 1996, 2008 71

72 WebSphere Commerce - Express Installation Guide for IBM System i and i5/OS

Custom installation components
This section provides a description of each component you can choose to install
when performing a custom installation and restrictions when selecting any of these
components in the installation wizard. Review the descriptions in this section to
help you decide which components you need to install.
When you perform a custom installation, each of the following components can be
installed on separate nodes:
v WebSphere Commerce components
– “WebSphere Commerce Server”
– “Remote WebSphere Commerce Management Utilities”
– “WebSphere Commerce Information Center”
– WebSphere Commerce Payments
Notes:
v During a custom installation, the WebSphere Application Server product is
installed if it is not already installed on the iSeries system.
WebSphere Commerce Server
This component provides all of the functionality of WebSphere Commerce except
for WebSphere Commerce Payments.
Selecting this component installs the following subcomponents on the node:
v WebSphere Commerce Server
v WebSphere Commerce Information Center
v WebSphere Commerce starter stores
v WebSphere Application Server Express product
Remote WebSphere Commerce Management Utilities
This component allows you to create instances and configure WebSphere
Commerce and WebSphere Commerce Payments from a node remote from both the
WebSphere Commerce and WebSphere Commerce Payments nodes.
WebSphere Commerce Information Center
The WebSphere Commerce Information Center is a subcomponent of the
WebSphere Commerce Server. Selecting this component installs the context
sensitive help for the following languages:
v Brazilian Portuguese
v English
v French
v German
v Italian
v Japanese
v Korean
© Copyright IBM Corp. 1996, 2008 73

v Simplified Chinese
v Spanish
v Traditional Chinese
If you select English, the context sensitive help and the English WebSphere
Commerce Information Center is installed. To download the WebSphere Commerce
Information Center refer to theWebSphere Commerce technical library.
74 WebSphere Commerce - Express Installation Guide for IBM System i and i5/OS

Completing a custom installation
You can install the WebSphere Commerce product on your i5/OS system in two
ways:
GUI based remote installation (recommended)
A GUI based remote installation installs WebSphere Commerce on your
i5/OS system from any version of a Windows machine that supports
Universal Disk Format (UDF) CDs. The Windows machine must be
connected to the same IP network as the i5/OS system. The Windows
machine must also have at least 100 MB of disk space available.
Depending on your network and Eserver iSeries machine, the installation
might take several hours.
For instructions on starting a GUI based remote installation, refer to
“Completing a custom GUI installation.”
Silent installation
A silent response file based remote installation can be completed from a
remote Windows machine, or from the i5/OS system itself.
The remote silent option installs WebSphere Commerce on your i5/OS
system from any version of a Windows machine that supports Universal
Disk Format (UDF) CDs. The Windows machine must be connected to the
same IP network as the i5/OS system.
The local silent option installs WebSphere Commerce directly from your
i5/OS system without requiring the Windows machine..
Depending on your network and Eserver iSeries machine, the installation
might take several hours.
For instructions on starting a silent response file based remote installation,
refer to “Completing a custom silent installation” on page 79.
Usage notes when using CD images
When installing WebSphere Commerce from CD images on a hard drive or
network location, be aware of the following information:
v The path to the WebSphere Commerce CDs must not contain the character ″#″.
v The path to the WebSphere Commerce CD 1 must not contain the digit ″1″.
The exception to this is that WebSphere Commerce CD 1 may be in a directory
called ″disk1″. However, if the CD-image of WebSphere Commerce CD 1 is in a
directory called ″disk1″, WebSphere Commerce CD 2 must be in a directory
called ″disk2″ or the installation will fail.
Completing a custom GUI installation
Prerequisites
__ The machines on which you are starting the installation wizard meets all of
the requirements listed in Part 3, “Prerequisites,” on page 21.
__ You have completed all of the tasks listed in “Preparing your systems to run
the WebSphere Commerce installation wizard” on page 65.
© Copyright IBM Corp. 1996, 2008 75
|
||
|
|
||||

This includes ensuring that you have access to the QSECOFR user profile, or an
i5/OS user profile of USRCLS(*SECOFR) and that this user profile has the
correct CCSID for the language under you which you want to install
WebSphere Commerce. You will be prompted for this user profile during the installation.
Procedure
To complete a custom installation on a node:
1. Insert the WebSphere Commerce CD 1 into the CD-ROM drive on the remote
Windows system.
Note: Depending on your Windows system, the starting of the launch pad
can take up to 3 minutes. Ensure you minimize all your windows
sessions so that the initial window, for the language selection, is not
missed.
2. The WebSphere Commerce launch pad starts. Select the language for the
launch pad and click OK to continue.
If the launch pad does not start automatically after you insert the CD:
a. In Windows Explorer, browse the location of the WebSphere Commerce
CD 1 image.
b. Double-click autorun.exe.
When the launch pad displays, it provides the following options:
Prerequisites
Documentation
Install Product
Install Product on iSeries Machine
Exit
3. You can choose the version of WebSphere Application Server that your
WebSphere Commerce environment will use. Select one of the following
versions:
v
– To use the launch pad, Click Install Product on iSeries Machine to start
the graphical installation wizard.
– To use the command line, click Exit to exit the launch pad. Issue the
following command form a Windows command prompt:
drive\iSeriesServer.bat
–
i 6.1
If installing on a System i 6.1 system, complete the following
steps:
a. Download the pdinstall file to the Windows machine where the
WebSphere Commerce Version 6.0 installer will be launched and store
the file in a temporary directory.
b. Issue the following command from a Windows command prompt:
drive:\setup.exe -os400
-W depcheck.controlFile=path_to_pdinstall.ini\pdinstall.ini
where drive is the location of the WebSphere Commerce CD image. 4. Select the installation language in the language selection panel, and select OK.
76 WebSphere Commerce - Express Installation Guide for IBM System i and i5/OS
||
++
+++
+
++
+

The software will be installed in this language, regardless of the language
settings of your system.
If at any point during the installation, the text in the installation wizard
appears to be cut off, resize the wizard so that you can read all of the
text on the wizard.
5. The iSeries Logon panel is shown. Enter the System Name, User Profile, and
Password for the iSeries system on which you are installing WebSphere
Commerce.
Ensure that you log on to your iSeries system as a user with SECOFR class
authority. This user profile requires the correct CCSID for the language under
you which you want to install WebSphere Commerce.
If you did not create a user profile meeting these requirements, refer to
“Creating an i5/OS user profile” on page 40 for instructions.
Click Next.
6. Review the information on the Welcome panel and select Next.
7. Review the terms of the license agreement.
If you accept the terms of the license agreement, select I accept the terms in
the license agreement and select Next.
If you decline the terms of the license agreement, select I do not accept the
terms in the license agreement and select Next. Declining the terms of the
license agreement exits the install program.
8. Select Custom Installation and select Next.
Note: If you have a previous version of WebSphere Commerce installed, a
warning message will be displayed. Click Yes to proceed with the
installation or click No to cancel the installation. More information on
coexistence can be found in “Coexistence with previous versions of
WebSphere Commerce or WebSphere Application Server” on page 11.
9. Select the components you want to install on the node. Select Next to
continue.
Descriptions of each component are provided in “Custom installation
components” on page 73.
Components detected on the system will be unavailable for selection in the
wizard.
a. The system checks for an installed edition of WebSphere Application
Server Version 6. If the correct edition is detected, a panel is displayed.
Click Next to continue. If the correct edition is not detected, no panel is
displayed.
b. Depending on the components you have selected to install, you are
prompted to enter a WebSphere Commerce Configuration Manager user
password. Enter values and click Next to continue.10. If you want to create a WebSphere Commerce response file based on your
custom install options, select the Create a response file check box and specify
a filename and location. Select Next.
Note: By selecting this option you can choose to record the selections that you
have made during your GUI installation in a response file. This
response file can then be used during silent installations on separate
machines.
Completing a custom installation 77

11. On the confirmation page, review the components being installed and their
location. To make any changes, select Back to return to the panel where you
want to make changes.
To begin installing the components listed on the confirmation page, select
Next.
12. Insert the CDs as prompted by the WebSphere Commerce installation wizard,
following the on-screen prompts.
Notes:
a. If you are doing a GUI based remote installation and a Windows Autorun
window displays after changing CDs, close the window.
A Windows Autorun window resembles an Explorer window.
b. If you are doing a GUI based remote installation and a Windows Autorun
dialog displays after changing CDs, cancel or exit the dialog.
A Window Autorun dialog contains text similar to the following:
Windows can perform the same action each time you insert a
disk or connect a device with this kind of file:
Progress bars indicate how much the installation has completed.
13. When the installation is complete a new panel is shown. Review the
information on this panel and click Next.
14. The InstallShield Wizard completion display is shown. Click Next to continue.
If you are doing a GUI based remote install, the First Steps panel displays
after a few minutes.
The First Steps panel provides access to the following information:
Documentation
Support
Registration
Information Center
Easy Start
Exit
You can start the First Steps panel at any later point by doing the following:
1. Insert the WebSphere Commerce CD 1 into the CD-ROM drive on a remote
Windows system or navigating to the WebSphere Commerce CD 1 image
location.
2. If you are launching the WebSphere Commerce CD 1 from a CD-ROM drive,
the WebSphere Commerce launch pad will start. At the initial language
selection, click Cancel.
3. Navigate to the WebSphere Commerce CD 1 image location and double-click
FirstStepsiSeriesRemote.bat found in the extra folder.
4. Select the language and click OK.
5. The iSeries Logon panel is shown. Enter the System Name, User Profile and
Password for the iSeries system where WebSphere Commerce is installed. Click
Next.
6. After a few moments, the First Steps panel is shown.
78 WebSphere Commerce - Express Installation Guide for IBM System i and i5/OS
|||
|||
||

Important
v After you have completed the installation, you need to apply the
WebSphere Application Server, WebSphere Commerce fixes. To apply these
fixes, refer to “Install the most recent fixes” on page 83.
Completing a custom silent installation
Completing a remote silent installation
Prerequisites:
__ The machines on which you are starting the installation wizard meets all of
the requirements listed in Part 3, “Prerequisites,” on page 21.
__ The WebSphere Commerce software stack has been preinstalled and is
configured properly, as instructed in the following sections:
– “Preparing application servers for use with WebSphere Commerce” on
page 69.__ You have completed all of the tasks listed in “Preparing your systems to run
the WebSphere Commerce installation wizard” on page 65.
__ All WebSphere Commerce media must be available during the silent install.
You will not be prompted to change disks during the install.
__
i 6.1
If installing on a System i 6.1, refer to “Completing a custom GUI
installation” on page 75.
To start a silent remote install:
1. Insert the WebSphere Commerce CD 1 into the CD-ROM drive on the remote
Windows system.
Note: Depending on your Windows system, the starting of the launch pad can
take up to 3 minutes. Ensure you minimize all your windows sessions so
that the initial window, for the language selection, is not missed.
2. On the Language Selection panel, click Cancel.
3. Copy the contents of the WebSphere Commerce CD Disk 1 and Disk 2 into a
temporary location on the Windows machine. For example:
WC_temp\disk1
WC_temp\disk2
where WC_temp is the temporary directory.
4. Save the following file to a temporary directory:
drive:\WC_temp\disk1\wcresponsefile_exp.txt
where drive is the drive letter of the drive containing the WebSphere Commerce
CD images.
5. Open the wcresponsefile_exp.txt file in a text editor, and edit it appropriately.
Ensure that you specify a user with SECOFR class authority. This allows the
installer to log on to the remote machine with the proper authority. This user
profile requires the correct CCSID for the language under you which you want
to install WebSphere Commerce.
Completing a custom installation 79
++

If you did not create a user profile meeting these requirements, refer to
“Creating an i5/OS user profile” on page 40 for instructions.
6. Save and close the file.
7. To install WebSphere Commerce silently, issue the following command:
drive:\WC_temp\disk1\setup.exe -is:javaconsole -silent
-options response_file_home\wcresponsefile_exp.txt
where:
drive is the drive letter of the drive containing the WebSphere Commerce CD
images.
WC_temp
is the temporary directory that you have saved the WebSphere
Commerce CD images.
response_file_home
is the location of your wcresponsefile_exp.txt file.
Important
v After you have completed the installation, you need to apply the
WebSphere Application Server, WebSphere Commerce fixes. To apply these
fixes, refer to “Install the most recent fixes” on page 83.
Completing a local silent installation
Prerequisites
__ The machines on which you are starting the installation wizard meets all of
the requirements listed in Part 3, “Prerequisites,” on page 21.
__ The WebSphere Commerce software stack has been preinstalled and is
configured properly, as instructed in the following sections:
– “Preparing application servers for use with WebSphere Commerce” on
page 69.__ You have completed all of the tasks listed in “Preparing your systems to run
the WebSphere Commerce installation wizard” on page 65.
__ All WebSphere Commerce media must be available during the silent install.
You will not be prompted to change disks during the install.
__
i 6.1
If installing on a System i 6.1, refer to “Completing a custom GUI
installation” on page 75.
To start a local silent install:
1. Ensure that you log on to your iSeries system as a user with SECOFR class
authority. This user profile requires the correct CCSID for the language under
you which you want to install WebSphere Commerce.
If you did not create a user profile meeting these requirements, refer to
“Creating an i5/OS user profile” on page 40 for instructions.
2. Copy the contents of the WebSphere Commerce CD Disk 1 and Disk 2 into a
temporary location on the iSeries machine. For example:
WC_temp/disk1
WC_temp/disk2
where WC_temp is the temporary directory.
3. Copy the following file to a temporary location:
80 WebSphere Commerce - Express Installation Guide for IBM System i and i5/OS
++
||
||
|
|

WC_temp/disk1/wcresponsefile_exp.txt
4. Open the following file, and edit it appropriately:
response_file_home/disk1/wcresponsefile_exp.txt
where response_file_home is the temporary directory containing your edited
response file.
5. Save and close the file.
6. To install WebSphere Commerce silently, start a QShell session (STRQSH) and
issue the following command:
WC_temp/disk1/setup.qsh -options response_file_home\wcresponsefile_exp.txt
where:
WC_temp
is the temporary directory containing the contents of the WebSphere
Commerce CDs.
response_file_home
is the location of your wcresponsefile_exp.txt file.
Important
v After you have completed the installation, you need to apply the
WebSphere Application Server, WebSphere Commerce fixes. To apply these
fixes, refer to “Install the most recent fixes” on page 83.
Completing a custom installation 81
|
|
|
||
||
|
|
|||
||

82 WebSphere Commerce - Express Installation Guide for IBM System i and i5/OS

Install the most recent fixes
After installing WebSphere Commerce, you should install the most recent
WebSphere Application Server and WebSphere Commerce fix packs available if any
exists.
WebSphere Commerce fix packs are cumulative, so the most recent fix pack for a
version of WebSphere Commerce will contain all of the fixes and updates found in
previous fix packs for that version.
Fix packs and the instructions for installing the fix packs are available from the
WebSphere Commerce - Express support Web site.
After you have completed the installation, you need to apply the WebSphere
Application Server PTFs. The list of PTFs required by your edition of WebSphere
Commerce are available from the WebSphere Commerce support Web site. At this
Web site, select your edition and on the next page, look for a document called PTFs
needed for WebSphere Commerce 6.0 on iSeries in the Other resources section.
This document lists all PTFs required for WebSphere Commerce and is updated
regularly.
After you have completed the installation you must apply the most recent
maintenance. To apply the most recent maintenance, see WebSphere Commerce
required maintenance Technote #1232042.
After completing this section, proceed to “Verifying a custom installation” on page
87.
© Copyright IBM Corp. 1996, 2008 83

84 WebSphere Commerce - Express Installation Guide for IBM System i and i5/OS

Mandatory changes for System i 6.1 (V6R1) systems
If you have installed WebSphere Commerce Version 6.0 and WebSphere
Application Server Version 6.0, on a System i 6.1 system, complete the following
steps:
1. Download and apply WebSphere Application Server Version 6.0 PTF SI29611.
This PTF provides the required QSVTAPGT service program.
2. Open WC_installdir/instances/default/httpconf/httpd.conf.
3. Replace the line:
LoadModule was_ap20_module /QSYS.LIB/$WAS_INSTALL_LIBRARY$/qsvtap20.SRVPGM
with the line:
LoadModule was_ap20_module /QSYS.LIB/$WAS_INSTALL_LIBRARY$/qsvtapgt.SRVPGM
4. Save the changes.
Note: Refer to the System i Memo to Users which contains more information on
the new operating system level.
© Copyright IBM Corp. 1996, 2008 85
+
+
+++
++
+
+
+
+
++
++

86 WebSphere Commerce - Express Installation Guide for IBM System i and i5/OS

Verifying a custom installation
You can verify a custom installation by doing the following:
v “Verifying your installation using iSeries Navigator.”
v “Verifying your installation using log files” on page 89.
Verifying your installation using iSeries Navigator
To verify that your installation of WebSphere Commerce was successful, check the
following:
1. The following library should exist on your Eserver iSeries system:
v QWAS6 — WebSphere Application Server library2. The Integrated File System (IFS) on your Eserver iSeries system will have one
or more of the following directories:
v /QIBM/ProdData/CommerceServer60
v /QIBM/ProdData/CommerceServer60/payments (Custom Install option
only)
v /QIBM/ProdData/WebSphere/
v /QIBM/UserData/WebSphere (Quick Install option only)
v /QIBM/UserData/WebSphere/AppServer/V60/edition_name/profiles/profile_name (Quick Install option only)
3. Use iSeries Navigator to show what products have been installed on your
Eserver iSeries system:
Notes:
a. Ensure that you are using the level of iSeries Navigator that matches your
version of i5/OS you are using. For example, if WebSphere Commerce is
installed on a i5/OS V5R3M0, use a Version 5 Release 3 level of iSeries
Navigator.
b. Ensure that the latest iSeries Access fix pack is installed. Download the
latest fix pack from the iSeries Access page. To confirm the fix pack level,
complete the following steps:
1) Select Windows > IBM iSeries Access for Windows > iSeries Access
for Windows Properties.
2) Review the service level, and confirm that it is the latest version by
comparing it to the level listed on the iSeries Access page.
3) If it is not at the highest fix pack level, apply the most recent fix pack
and continue.
Note: Ensure that you are using the level of iSeries Navigator that matches
your version of i5/OS you are using. For example, if WebSphere
Commerce is installed on a i5/OS V5R3M0, use a Version 5 Release 3
level of iSeries Navigator.
a. On a PC where iSeries Navigator can be accessed, click Start > Programs >
IBM iSeries Access for Windows > iSeries Navigator
b. In the iSeries Navigator window, expand Management Central > Endpoint
Systems
c. Right-click on the applicable iSeries system and click Inventory > Collect
© Copyright IBM Corp. 1996, 2008 87

d. A new window opens. Ensure that the Software check box is selected. Click
OK to start the collection
e. Expand Management Central > Task Activity.
f. Click Inventory.
g. In the right-hand panel, a task for your iSeries system should be listed.
Press the F5 key (refresh) until the Status shows Completed.
h. Click Management Central > Endpoint Systems > iSeries system >
Configuration and Service > Software Inventory and click Installed
Products.
i. The right-hand panel will show a listing of products. Scroll to the bottom to
view the WebSphere Commerce products.
The following diagrams are examples of what you will see for each component
you can install using the custom installation option of the installation wizard:
WebSphere Commerce Server
WebSphere Commerce Documentation
88 WebSphere Commerce - Express Installation Guide for IBM System i and i5/OS

WebSphere Application Server
Verifying your installation using log files
During the installation of WebSphere Commerce and its components, log files are
generated. The location of each log file referenced in this section is valid only if the
component was installed through the WebSphere Commerce installer. Examine the
log files that correspond to the components you installed to ensure that your
installation was successful:
v “WebSphere Commerce installation logs”
v “WebSphere Application Server installation logs” on page 90
WebSphere Commerce installation logs
The following log files contain messages generated by the WebSphere Commerce
installation wizard. The default location for these log files on the Eserver iSeries
system is:
Installation type Log file location
GUI based remote
installation
v /InstallLogs/install.log
v /WC_installdir/logs/wcinstall.log
Note: The wcinstall.log file is only created when errors are
encountered.
v /WC_installdir/logs/wctrace_timestamp.log
Remote silent
installation
v /InstallLogs/install.log
v /tmp/InstallShield/wcinstall.log
Note: The wcinstall.log file is only created when errors are
encountered.
v /tmp/InstallShield/wctrace_timestamp.log
Local silent installation v /tmp/InstallShield/install.log
v /tmp/InstallShield/wcinstall.log
Note: The wcinstall.log file is only created when errors are
encountered.
v /tmp/InstallShield/wctrace_timestamp.log
Verifying a custom installation 89

Note: For multiple installation attempts, the log will be appended in the existing
install.log file.Depending on the components of WebSphere Commerce that are installed, the
following messages may appear at the end of the install.log file:
CMN7704S: IBM WebSphere Commerce Installer has successfully copied file
from /QIBM/ProdData/CommerceServer60/bin/config_env.sh to
/QIBM/ProdData/CommerceServer60/bin/config_env.db2.sh
CMN7720S: IBM WebSphere Commerce Installer internal Generic Catch Warning caught:
Command ended normally with exit status 0.
/QIBM/ProdData/CommerceServer60/bin/iSeriesFileAuth.sh
CWXAI7779S: IBM WebSphere Commerce Installer has successfully modified the
Configuration Manager user password.
CMN7753S: WebSphere Commerce installation complete.
This message is formatted to fit the page size of this book.
WebSphere Application Server installation logs
The WebSphere Application Server installation log file (log.txt) will be located on
the Eserver iSeries machine. The log file will be located in the following directory:
/tmp/InstallShield/log.txt
/WAS_installdir/logs/log.txt
Check the log.txt for the following message which will be at or near the end of
the file:
Install, com.ibm.ws.install.ni.ismp.panels.OS400WASSummaryPanel, msg1,
Installation of IBM WebSphere Application Server - Express, V6 completed
successfully.
Whether the custom installation installed the WebSphere Application Server
product or not, you can view the product in the iSeries Navigator. Refer to step 3
in “Verifying your installation using iSeries Navigator” on page 87 and look for
product 5733W60.
90 WebSphere Commerce - Express Installation Guide for IBM System i and i5/OS

Part 7. Creating a WebSphere Commerce instance
Once you have installed all the required software, you can create a WebSphere
Commerce instance through the Configuration Manager.
This section contains the following chapters:
v “Before you create or modify an instance with Configuration Manager” on page
93
v “Creating a WebSphere Commerce instance” on page 101
Note: To create a WebSphere Commerce instance using ANT targets, refer to the
WebSphere Commerce Information Center:
v ANT targets
v ANT target: createInstance
ANT targets require a properties file that is generated from Configuration
Manager.
If you experience problems while creating your instance, refer to the
Troubleshooting: WebSphere Commerce configuration issues page.
© Copyright IBM Corp. 1996, 2008 91
++
+
+
++
++

92 WebSphere Commerce - Express Installation Guide for IBM System i and i5/OS

Before you create or modify an instance with Configuration
Manager
Before you start the Configuration Manager server or before you create or modify
an instance with Configuration Manager:
1. Ensure that you have installed any fixes mentioned in the README file. Refer
to “Reviewing the README file” on page 65.
2. If you plan to launch the Configuration Manager from a remote Configuration
Manager machine, you must disable the firewall if the system has firewall
enable. The Configuration Manager client may have problem connecting to the
remote Configuration Manager server if a firewall is enable on the system
3. Ensure that you apply the most recent WebSphere Commerce fix pack. Refer to
WebSphere Commerce Version 6.0 fix pack master technote.
4. If your Web server is remote from your WebSphere Commerce server, refer to
Appendix C, “Configuring a WebSphere Commerce instance with a remote Web
server,” on page 137
5. Ensure that you have installed the Remote WebSphere Commerce Management
Utilities on a Windows PC. Refer to “Installing the Configuration Manager
client.”
6. Ensure that you meet the prerequisites for starting Configuration Manager. The
prerequisites are listed in “Configuration Manager prerequisites” on page 95.
7. Start the Configuration Manager. Refer to “Starting the Configuration Manager”
on page 98.
Important
You should only modify the following Web server properties, as well as any
WebSphere Commerce related properties, through the Configuration Manager
GUI (and not through the Web server GUI nor the WebSphere Application
Server Administrative Console):
v SSL (enabling or disabling)
v Web server instance name or port number
v SSL port number
v System IP address (Payments server host)
This will ensure that all configuration files, not just the Web server
configuration files, are updated properly with the correct information.
Installing the Configuration Manager client
Before you create or modify a WebSphere Commerce instance with Configuration
Manager, you will need to install the Remote WebSphere Commerce Management
Utilities on a Windows PC.
Note: Ensure that the Windows machine you will be using to install the Remote
WebSphere Commerce Management Utilities code has 150 MB of free space
available on the drive where you want to install the Remote WebSphere
Commerce Management Utilities code.
© Copyright IBM Corp. 1996, 2008 93

Install the Configuration Manager client as follows:
1. Insert the WebSphere Commerce CD 1 into the CD-ROM drive on your
remote Windows system.
The WebSphere Commerce Launch pad starts. Select the language for the
launch pad and click OK to continue.
Note: Depending on your Windows system, the starting of the launch pad
might take up to 3 minutes. Ensure you minimize all your windows
sessions so that the initial window, for the language selection, is not
missed.
2. The WebSphere Commerce launch pad starts. Select the language for the
launch pad and click OK to continue.
If the launch pad does not start automatically after you insert the CD:
a. In Windows Explorer, browse the CD-ROM drive containing WebSphere
Commerce CD 1.
b. Double-click autorun.exe.
When the launch pad displays, it provides the following options:
Prerequisites
Documentation
Install Product
Install Product on iSeries Machine
Exit
Click Install Product to continue.
Note: If you do not want to install the Remote WebSphere Commerce
Management Utilities using the launch pad, or if the launch pad does
not start you will need to launch the installer manually. Navigate to the
CD-ROM drive into which the WebSphere Commerce CD 1 was
inserted and double click on setup.exe to start the InstallShield Wizard.
3. Select the language for the InstallShield wizard and click OK to continue.
4. The Welcome screen is displayed. Click Next.
5. Read the license agreement. If you accept the terms of the agreement, select
that you accept the terms and click Next.
Note: The Installation prerequisite warning screen may display. Review the
information on the screen. If a memory size warning is reported, click
Next to continue.
6. Choose Custom Installation and click Next.
Note: A warning message may display indicating that a previous version of
WebSphere Commerce is installed. Click Yes to proceed with the
installation. Click No to cancel.
7. Select Remote WebSphere Commerce Management Utilities and click Next.
8. You can choose to select the default destination path or select Browse for
another destination path. A new directory can be specified, and the
installation wizard will create that directory for you. Once you have selected
your destination path, click Next to continue.
94 WebSphere Commerce - Express Installation Guide for IBM System i and i5/OS

9. If you want to create a WebSphere Commerce response file based on your
custom install options, select the Create a response file check box and specify
a filename and location. Select Next.
10. Confirm your installation choices.
To start the installation, click Next.
To modify your choices, click Back.
After you click Next, the installation begins. The window displays the
progression of the installation.
11. Insert the CDs as prompted and, if required, enter the location of the CDs.
12. On the Installation Complete panel, click Finish.
The installation is complete and the wizard closes.
Note: The directory on the Windows PC where the Configuration Manager Client
code is installed will be denoted by: WC_rmtMgt_installdir in the remaining
sections of this Guide.To verify that the Remote WebSphere Commerce Management Utilities are installed
properly on your Windows machine, refer to the following log file:
WC_rmtMgt_installdir/logs/install.log
WC_rmtMgt_installdir/logs/wctrace_timestamp.log
where WC_rmtMgt_installdir is the installation directory for the Remote WebSphere
Commerce Management Utilities.
Configuration Manager prerequisites
Before starting the WebSphere Commerce Configuration Manager server, complete
the following:
v Ensure that you start the WebSphere Commerce Configuration Manager under a
user profile that has the required CCSID for the language in which you want
your instance created. Valid CCSIDs are listed in “Creating an i5/OS user
profile” on page 40.
Verify remote Configuration Manager client level
The Configuration Manager client and the Configuration Manager must be at the
same level. If you have applied any WebSphere Commerce fix packs on the
WebSphere Commerce node, you must apply the same or corresponding Windows
fix pack level to the Configuration Manager client node.
To verify if the remote Configuration Manager client and the Configuration
Manager server are at the same level:
1. On the Configuration Manager server node (WebSphere Commerce or
WebSphere Commerce Payments node):
a. Open the following file in a text editor:
WC_installdir/properties/version/COMMERCE.productb. Check the value in the <version> tags. For example,
<version>6.0.0.0</version>
c. Check the value in the <build-info> tag. For example,
<build-info date="06/12/05" level="051206dev"/>
d. Check the value in the <id> tag. For example,
<id>wc.server.pro</id>
2. On the Configuration Manager client node:
Before you create or modify an instance with Configuration Manager 95

a. Open the following file in a text editor:
WC_rmtMgt_installdir/properties/version/COMMERCE.productb. Check the value in the <version> tags. For example,
<version>6.0.0.0</version>
c. Check the value in the <build-info> tag. For example,
<build-info date="12/05/06" level="051206dev"/>
d. Check the value in the <id> tag. For example,
<id>wc.server.pro</id>
3. If the values for both tags on both nodes match, the Configuration Manager
client and server are at the same level.
Instance creation requirements using a remote database
If you are using a relational database other than *LOCAL, you will need to set up
the database for remote access.
To configure your iSeries system to use a remote database:
1. Start the DDM TCP/IP server on the remote iSeries system using either of the
following:
Note: When using the DDM server and the native JDBC driver, the QCCSID
system value must be a valid CCSID other than 65535.
v The Network option under your remote iSeries system in iSeries Navigator
v The following i5/OS command:
STRTCPSVR SERVER(*DDM)
Note: To check if the DDM server job is running on your iSeries, check for job
QRWTLSTN in subsystem QSYSWRK.
2. On the iSeries system where WebSphere Commerce Version 6.0 is installed, use
the WRKRDBDIRE command to ensure that there is an entry for the remote
database where your instance’s schema will be created.
3. On the iSeries system where WebSphere Commerce is installed, run the
following command on one line:
RUNJVA CLASS(com.ibm.db2.jdbc.app.DB2PackageCreator)
PARM(’database_name’ ’user’ ’password’)
where the variables are defined as follows:
database_name
The name of the database where the instance’s schema will be created.
On this remote system, use the WRKRDBDIRE command and record
the Relational Database value defined as *LOCAL.
user A profile with authority to create new objects on the remote iSeries
system.
password
The password associated with the user.
Note: The command opens up a Java Shell Display. The following message
should be displayed after the command has completed: Java program
completed
4. Create a user profile on the remote iSeries system. The user profile must have
the same name as the WebSphere Commerce instance name (instance_name) that
96 WebSphere Commerce - Express Installation Guide for IBM System i and i5/OS

you are creating. Configure the user profile so that it’s language settings match
the language you intend to choose as the default language for your WebSphere
Commerce instance.
The password for this user profile must be the same as on the *LOCAL system
(the machine where WebSphere Commerce is installed). This is the password
that will be entered in the Instance Logon Password field on the Schema page
while configuring the instance in the Configuration Manager.
For information in creating an iSeries user profile, refer to “Creating an i5/OS
user profile” on page 40.
5. Ensure that the instance user profile, you just created on the remote iSeries
system, has authority to the *SQLPKG objects in library QGPL by running the
following command on one line:
GRTOBJAUT OBJ(QGPL/*ALL) OBJTYPE(*SQLPKG) USER(instance_name)
AUT(*CHANGE)
During instance creation, it is recommended that Use iSeries Toolbox driver is
selected in the WebSphere panel.
Modifying your iSeries user profile
Note: If you are using a remote database, you are not required to complete this
section on that remote database server machine.Use the DSPUSRPRF command to determine the Home Directory (HOMEDIR) of
your *SECOFR user profile. Ensure that the HOMEDIR exists. If the HOMEDIR does not
exist, create it using the i5/OS command: MKDIR.
Ensure that the user profile uses the localized settings for the language as listed in
the following table.
Table 4. Localized settings for iSeries user profiles
Language CCSID LangID CountryID
English 37 ENU US
French 297 FRA FR
German 273 DEU DE
Italian 280 ITA IT
Spanish 284 ESP ES
Brazilian Portuguese 37 PTB BR
Japanese 5035 JPN JP
Korean 933 KOR KR
Traditional Chinese 937 CHT TW
Simplified Chinese 935 CHS CN
The HOMEDIR must contain a file named SystemDefault.properties, with a Coded
character set ID of 819 and containing ASCII data. This file must specify the
file.encoding property that matches your user profile. The file.encoding
property must be specified on one line, must contain no spaces, and is case
sensitive. If this file already exists, use the EDTF command to set the
file.encoding property to one of the following values:
v Japanese:
file.encoding=SJIS
Before you create or modify an instance with Configuration Manager 97

v Korean:
file.encoding=KSC5601
v Simplified Chinese:
file.encoding=Cp1381
v Traditional Chinese:
file.encoding=Cp950
v All other languages:
file.encoding=ISO8859_1
If this file does not exist, you must copy it to your HOMEDIR using one of these
commands:
Note: The HOMEDIR will be denoted as home_directory in the following list.
v Simplified Chinese:
COPY OBJ(’/QIBM/ProdData/CommerceServer60/config/SystemDefault_CN.properties’)
TOOBJ(’home_directory/SystemDefault.properties’)
TOCCSID(819)
v Korean:
COPY OBJ(’/QIBM/ProdData/CommerceServer60/config/SystemDefault_KR.properties’)
TOOBJ(’home_directory/SystemDefault.properties’)
TOCCSID(819)
v Traditional Chinese:
COPY OBJ(’/QIBM/ProdData/CommerceServer60/config/SystemDefault_TW.properties’)
TOOBJ(’home_directory/SystemDefault.properties’)
TOCCSID(819)
v Japanese:
COPY OBJ(’/QIBM/ProdData/CommerceServer60/config/SystemDefault_JP.properties’)
TOOBJ(’home_directory/SystemDefault.properties’)
TOCCSID(819)
v All other languages:
COPY OBJ(’/QIBM/ProdData/CommerceServer60/config/SystemDefault.properties’)
TOOBJ(’home_directory/SystemDefault.properties’)
TOCCSID(819)
Once the new file is created, ensure that it contains the proper ASCII data.
Starting the Configuration Manager
To start the WebSphere Commerce Configuration Manager on iSeries:
1. Start the Configuration Manager server by doing the following:
a. Log on to the iSeries machine ensuring that the profile has a *SECOFR user
class, and is set up with the language specific settings of either English, or
the language that you will choose as the default language for your instance.
b. Start a QShell session by entering the following command:
STRQSH
and do the following in the QShell session:
1) Navigate to the WebSphere Commerce Server bin directory by issuing
the following command:
cd WC_installdir/bin
Default values for WC_installdir are listed in “Path variables used in this
book” on page ix.
98 WebSphere Commerce - Express Installation Guide for IBM System i and i5/OS

2) Start the Configuration Manager server program by issuing the
following command:
config_server.sh [-port server_port_number]
The - port server_port_number parameter is optional. If you do not
specify this parameter, the default port of 1099 is used. The
Configuration Manager server will listen using this port number. If you
specify the server_port_number, the value must be between 1024 and
65535 and not currently in use on the iSeries system.
Note: If you are using a system where your primary language is not the
same as the language in which you are creating your instance, then
you must add the QSYSlanguage_feature_number library into your user
profile’s library list. Otherwise the profile will try to locate it under
QSYS. To add the language feature library, use the EDTLIBL command.
c. If this is the first time that Configuration Manager is run on the system, you
will see the following messages:
Attaching Java program to /QIBM/ProdData/CommerceServer60/lib/ConfigManager.jar
Attaching Java program to /QIBM/ProdData/CommerceServer60/lib/Utilities.jar
Attaching Java program to /QIBM/ProdData/CommerceServer60/lib/Enablement-
BaseComponentsLogic.jar.
Attaching Java program to /QIBM/ProdData/CommerceServer60/lib/jtopen.jar.
d. When the following messages are posted:
Registry created.
CMServer bound in registry.
proceed to the next step.2. Start the Configuration Manager client on the Windows machine where the
Configuration Manager client code was installed.
a. Using a command prompt on the Configuration Manager client machine,
change to the WC_rmtMgt_installdir/bin directory.
b. Start the Configuration Manager client by running the following command:
configClient.bat -hostname iSeries_Host_name [-port server_port_number]
where
iSeries_Host_name
Is the fully qualified host name of the server.
The fully qualified host name of the server must exactly match the
host name (HOSTNAME) and the domain name (DMNNAME)
values displayed when viewing the CFGTCP command, option 12,
on the system where the Configuration Manager server is running.
This parameter is case-sensitive.
server_port_number
Is the port number on the iSeries server on which the Configuration
Manager is listening. You only need to specify this value if the
server is listening on a non-default port. The port parameter is
optional, but if it was specified in the config_server.sh command,
it needs to be specified here.3. Log in to Configuration Manager. The ID is configadmin and the initial
password is defined during the installation process.
4. Continue with the instructions in “Creating a WebSphere Commerce instance”
on page 101.
Before you create or modify an instance with Configuration Manager 99

Stopping the Configuration Manager
To end Configuration Manager:
1. In the Configuration Manager GUI, click on Console and Exit.
2. Click OK when the message ’For Security reasons, the Config Manager
Server will now be stopped.’ is posted.
3. Exit from the DOS window where the Configuration Manager client was
started.
4. Exit from the QSHELL session, on your iSeries system, where the Configuration
Manager server was started.
100 WebSphere Commerce - Express Installation Guide for IBM System i and i5/OS

Creating a WebSphere Commerce instance
This chapter describes how to create WebSphere Commerce instances. For
information about modifying a WebSphere Commerce instance, refer to “Modifying
a WebSphere Commerce instance” on page 122.
WebSphere Commerce also supports the creation of multiple WebSphere
Commerce instances. That is, with WebSphere Commerce, you can run two or
more instances of WebSphere Commerce concurrently by using a different host
name for each WebSphere Commerce instance. In this case, a customer can access
host1.domain and host2.domain. This method involves the use of virtual host names.
Multiple instances are used mainly to have different occurrences of WebSphere
Commerce that do not share information. Each instance will be unique.
Considerations when creating a WebSphere Commerce instance
When you create a WebSphere Commerce instance, always specify the
fully-qualified host name in the appropriate Configuration Manager panels.
If you have installed WebSphere Commerce on the same machine as your database
and other applications, you should ensure that your instance is run in a separate
memory pool. For more information, refer to the following pages:
v Running WebSphere in its own Share Pool
v Running WebSphere Application Servers in different Memory Pools, but in the
same subsystem
If you are using a system security program on your iSeries machine that checks for
default passwords, ensure that the password you select for your WebSphere
Commerce instance and WebSphere Commerce Payments instance is different from
the instance name. If the instance name and password are the same, the userid for
the instance may become disabled, preventing WebSphere Commerce from
functioning properly.
Note:
v Although the Configuration Manager client code can be installed on more
than one Windows PC, creating a WebSphere Commerce instance or
WebSphere Commerce Payments instance must be limited to one PC at
any given time. Attempting to create instances from two or more PCs at
the same time is not supported.
v When using the DDM server and the native JDBC driver, the QCCSID
system value must be a valid CCSID other than 65535.
Considerations when creating multiple WebSphere Commerce
instances
Ensure that the node meets the following requirements:
v For each additional WebSphere Commerce instance on a system, increase the
system’s memory by 2 GB. The amount of memory required varies with
additional load on the server or increase in throughput. Additional CPW might
also be required as you add additional WebSphere Commerce instances.
© Copyright IBM Corp. 1996, 2008 101

v Each WebSphere Commerce instance must have its own host name.
v You cannot create more than one instance at a time.
v Each host name for each instance requires its own IP address. The IP address
must be valid on the network, with associated host names in the DNS server.
The IP address must also be on the same VLAN as the IP address of the original
instance.
v You can also use the IP address and host name of the node for one of
the instances. In this case, you need just two IP addresses for two
instances.
v Each WebSphere Commerce instance requires its own host name.
Note: IBM HTTP Server does not allow underscore characters ( _ ) in a host
name.
For instructions on adding another IP address to a machine, refer to “Adding
another IP address to an iSeries system.”
v The host name for each instance must resolve fully to separate IP addresses. For
example, to verify that you can run WebSphere Commerce Configuration
Manager and create multiple instances, run the nslookup command from a
Windows PC on both the host name and IP address for each instance. The host
name should resolve to its correct IP address, and the IP address should resolve
to its correct host name:
nslookup ’host1.domain’
nslookup ’xxx.xxx.xxx.xxx’
nslookup ’host2.domain’
nslookup ’yyy.yyy.yyy.yyy’
Adding another IP address to an iSeries system
To add another IP address to your iSeries machine and then start the address, enter
the following commands in an iSeries session:
ADDTCPIFC INTNETADR(’intnetadr’) LIND(lind) SUBNETMASK(’subnetmask’)
STRTCPIFC INTNETADR(’intnetadr’)
where
v intnetadr is the new IP address.
v lind is the name of the line description associated with the new interface. The
line description must be defined before you can add the IP interface.
v subnetmask is the subnet mask for this IP address.
For example, if you wanted to add the address 129.42.16.99, and then start the
address, you would enter the following commands:
ADDTCPIFC INTNETADR(’129.42.16.99’) LIND(LANETH) SUBNETMASK(’255.255.255.0’)
STRTCPIFC INTNETADR(’129.42.16.99’)
For more information on the TCP/IP commands such as ADDTCPIFC and STRTCPIFC,
refer to your iSeries product documentation.
To add the host table entry for the WebSphere Commerce instance enter the
following commands in an iSeries session:
ADDTCPHTE INTNETADR(’intnetadr’) HOSTNAME((WC_instanceName.domainName)
(WC_instanceName));
Where the domainName is the domain name under CFGTCP option 12.
102 WebSphere Commerce - Express Installation Guide for IBM System i and i5/OS

Set the host name search priority to *local:
CHGTCPDMN HOSTSCHPTY(*LOCAL)
Creating a new WebSphere Commerce instance
Important
WebSphere Commerce modifies the Web server configuration file whenever
you do any of the following tasks:
v Create a WebSphere Commerce instance.
v Update information in the Web Server panel in Configuration Manager for
an existing instance.
These changes are marked by the following text:
IBM WebSphere Commerce (Do not edit this section)
or
IBM WebSphere Payments (Do not edit this section)
Customized changes within these sections are not supported by WebSphere
Commerce as any changes made within these sections might be overwritten
at any time by WebSphere Commerce configuration tools such as
Configuration Manager.
You can use the following table to record your instance information so that you
have the information handy when you complete your instance creation.
Object Instance variable New instance variable
WebSphere Commerce instance
name
WC_instance
IP address xxx.xxx.xxx.xxx
Host name host
Domain name domain
Fully qualified host name host1.domain
WebSphere Commerce schema
name
WC_schema
If you have a existing instance, you do not have to modify any of the parameter
values for that instance in order to add an additional instance. You might want to
modify some parameters of your original instance in order to better organize your
multi-instance environment.
Notes:
1. You cannot create more than one instance at a time. Attempting to create
multiple instances at the same time can cause errors.
2. To create a WebSphere Commerce Payments instance, refer to the Creating a
WebSphere Commerce Payments instance topic in the WebSphere Commerce
Information Center. If you have created a WebSphere Commerce instance in the
same session, ensure that you restart the WebSphere Commerce Configuration
Manager before you go on to create a WebSphere Commerce Payments
instance.
Creating a WebSphere Commerce instance 103

3. You are not required to create the WebSphere Application Server profile before
creating your WebSphere Commerce instance. The WebSphere Commerce
Configuration Manager automatically creates the WebSphere Application Server
profile that is used by the WebSphere Commerce instance.
4. To configure a remote Web server for your WebSphere Commerce instance,
refer to Appendix C, “Configuring a WebSphere Commerce instance with a
remote Web server,” on page 137
To create a new WebSphere Commerce instance, do the following:
1. Start the WebSphere Commerce Configuration Manager. For details, refer to
“Starting the Configuration Manager” on page 98.
2. Under WebSphere Commerce, expand your hostname.
3. Expand Commerce.
4. Right-click on Instance List.
5. From the resulting popup menu, select Create Instance. The Instance Creation
wizard starts.
6. Complete each panel of the Instance Creation wizard. For more information
about the Instance Creation wizard, refer to WebSphere Commerce
Configuration Manager online help by clicking the Help button.
7. When you have completed the necessary information in the panels, the Finish
button is enabled. Click Finish to create the WebSphere Commerce instance.
The time required to create an instance depends on the speed of your system.
8. When instance creation is complete, a dialog box appears containing a
summary similar to the following:
Commerce instance demo is created under WebSphere Application
Server profile demo. The WebSphere Application Server administrative console
port is 9060. Restart your Web server to apply the changes to your Web server
configuration file.
Review the summary and record the port number listed. This port will be
required to access the WebSphere Application Server Administrative console.
Click OK to close the dialog box.
9. Exit Configuration Manager by selecting Console > Exit.
10. The following message is displayed: For security reasons, the Config
Manager Server will now be stopped. Click OK to close Configuration
Manager.
11. Exit from the DOS window where the Configuration Manager client was
started.
12. Exit from the QShell session, on your iSeries system, where the Configuration
Manager server was started.
13. You can now verify the creation of the WebSphere Commerce instance by
following the instructions in “Verifying the instance creation.”
14. Complete the tasks in “Mandatory post-instance creation tasks” on page 107.
You must complete the tasks in that section for WebSphere Commerce to
function correctly.Continue by doing one of the following steps:
Verifying the instance creation
The configuration information for the new WebSphere Commerce instance is stored
in the following file:
104 WebSphere Commerce - Express Installation Guide for IBM System i and i5/OS
++++

WC_profiledir/installedApps/WC_instance_name_cell/
WC_instance_name.ear/xml/config/wc-server.xml
where default values for WC_profiledir are listed in “Path variables used in this
book” on page ix and instance_name is the name of WebSphere Commerce instance.
Confirm that this file exists before checking the log files produced during instance
creation.
Creating a WebSphere Commerce instance produces log files in the following
directory:
WC_userdir/instances/instance_name/logs
where default values for WC_userdir are listed in “Path variables used in this
book” on page ix and instance_name is the name of WebSphere Commerce instance.
Ensure that there are no errors in the following log files:
v createInstanceANT.err.log
v createInstanceANT.log
v messages.txt
v trace.txt
v Schema.log
v WASConfiguration.log
The following log files are created in the WC_userdir/logs directory:
v WCSconfig.log
Testing multiple instances
If you have created multiple instances, complete the following steps to test the
original and new instances:
1. Start all WebSphere Commerce instances. For instructions, see the Starting and
stopping WebSphere Commerce topic in the WebSphere Commerce Information
Center..
2. Test the following URLs:
Original instance New instance
v http://host1.domain
v http://host1.domain:5432/webapp/
PaymentManager
v https://host1.domain
v https://host1.domain:8000/accelerator
v https://host1.domain:8002/adminconsole
v https://host1.domain:8004/
orgadminconsole
v http://host2.domain
v http://host2.domain:5432/webapp/
PaymentManager
v https://host2.domain
v https://host2.domain:8000/accelerator
v https://host2.domain:8002/adminconsole
v https://host2.domain:8004/
orgadminconsole
Creating a WebSphere Commerce instance 105

Completing the configuration of a remote database
If your instance has been configured to use a remote database, you must complete
additional configuration. Change the instance user profile on the remote machine
so that the instance library is set to the current library. To complete these changes,
run the following command:
CHGUSRPRF USRPRF(instance_name) CURLIB(instance_name)
where instance_name is the name of the WebSphere Commerce instance.
Setting the time zone
After you have created your WebSphere Commerce instance, you need to set the
time zone for your WebSphere Commerce instance.
To ensure that the appropriate time zone is written in your trace files, set the
user.timezone property in the SystemDefault.properties file. The property has the
following syntax:
user.timezone=time_zone
where time_zone is the code for your time zone (for example, CST for Central
Standard Time; for other time_zone values, refer to the Web Site shown at the end
of this section).
Edit the SystemDefault.properties file that is located in the instance_root/Home
directory. Default values for instance_root are listed in “Path variables used in this
book” on page ix. Specifying the time zone property in this way only affects
WebSphere Application Server. For additional information, see the Setting the time
zone topic in the WebSphere Application Server for iSeries Information Center.
106 WebSphere Commerce - Express Installation Guide for IBM System i and i5/OS

Mandatory post-instance creation tasks
Depending on your WebSphere Commerce topology, perform the tasks in the
following sections after creating your WebSphere Commerce instance:
1. “Web server post-instance creation tasks”
2. If you have a remote Web server, perform the tasks in Appendix C,
“Configuring a WebSphere Commerce instance with a remote Web server,” on
page 137.
Web server post-instance creation tasks
Review the security information in the WebSphere Commerce Information Center
for information on enabling Secure Sockets Layer (SSL) for your WebSphere
Commerce instance HTTP server. Without enabling SSL, your WebSphere
Commerce instance will not start properly.
You must assign a certificate to your HTTP server in Digital Certificate Manager
(DCM) on the iSeries Web server machine. If you have installed WebSphere
Commerce using the quick install, then the local CA, the *SYSTEM certificate store
and the certificate are created for you. The certificate has been assigned to your
IBM HTTP Server in DCM as well.
Without assigning a certificate, your WebSphere Commerce instance will not start
For information refer to the IBM eServer iSeries Information Center. Once you are
at the site, select your operating system version and your language. Search for the
topic ″Manage public Internet certificates for SSL communication sessions″
Finding the WebSphere Application Server administration port number
The WebSphere Application Server administration port number is used when
accessing the WebSphere Application Server administration console. To find the
WebSphere Application Server administration port number, complete the following
steps:
1. Open the following file in a text editor:
WC_profiledir/config/cells/WC_instance_name_cell/nodes/
WC_instance_name_node/serverindex.xml
2. Search for the WC_adminhost entry. The port number listed for this entry is the
WebSphere Application Server administration port number.
© Copyright IBM Corp. 1996, 2008 107

108 WebSphere Commerce - Express Installation Guide for IBM System i and i5/OS

Part 8. Last steps
Continue your installation and configuration of WebSphere Commerce by
performing the following tasks:
Install and configure the additional software provided with WebSphere
Commerce
WebSphere Commerce provides a number of additional software packages
that enhance WebSphere Commerce and provide additional functionality.
For more information on the additional software provided with WebSphere
Commerce, see the WebSphere Commerce Additional Software guide.
© Copyright IBM Corp. 1996, 2008 109

110 WebSphere Commerce - Express Installation Guide for IBM System i and i5/OS

Part 9. Uninstalling WebSphere Commerce
WebSphere Commerce and the software stack components must be uninstalled in
the reverse order from which they were installed. Uninstall WebSphere Commerce
and its software stack components in the following order:
1. All WebSphere Commerce components.
For example, WebSphere Commerce server, Remote WebSphere Commerce
Management Utilities, and the WebSphere Commerce information center.
All WebSphere Commerce components should be removed from all nodes on
which they are installed before uninstalling any other software stack
components.
2. WebSphere Application Server.
This section contains the following chapters:
v “Uninstalling WebSphere Commerce” on page 113
v “Uninstalling WebSphere Commerce Configuration Manager client” on page 115
v “Uninstalling WebSphere Application Server Version 6.0” on page 117
© Copyright IBM Corp. 1996, 2008 111

112 WebSphere Commerce - Express Installation Guide for IBM System i and i5/OS

Uninstalling WebSphere Commerce
To uninstall WebSphere Commerce:
1. Stop the WebSphere Commerce Information Center as described in the
Starting and stopping WebSphere Commerce topic in the WebSphere
Commerce Information Center.
2. Delete any WebSphere Commerce instances following the instructions
provided in “Deleting a WebSphere Commerce instance” on page 122.
3. Stop the WebSphere Commerce Configuration Manager server as described in
“Starting the Configuration Manager” on page 98.
4. Start a QShell session by entering the following command:
STRQSH
5. Change your current directory to the WebSphere Commerce _uninst directory
cd WC_installdir/_uninst
6. Run the uninstall command:
uninstall.qsh
This command starts a text based uninstall wizard.
7. Select the language for the uninstall wizard.
8. The WebSphere Commerce directory displays along with the features that will
be uninstalled. Press Enter to begin the uninstallation.
9. The uninstallation of WebSphere Commerce begins with the message
’Uninstalling IBM WebSphere Commerce 6.0’.
Note: The uninstall of WebSphere Commerce might take a long time.
10. When the uninstallation is complete, the following message will be displayed:
’The InstallShield Wizard has successfully uninstalled IBM WebSphere
Commerce 6.0. Choose Finish to exit the wizard.’
Press 3 and press Enter to exit the Wizard.
11. Press the F3 function key to exit the QShell session.
Default values for WC_installdir are listed in “Path variables used in this book” on
page ix.
© Copyright IBM Corp. 1996, 2008 113

114 WebSphere Commerce - Express Installation Guide for IBM System i and i5/OS

Uninstalling WebSphere Commerce Configuration Manager
client
To uninstall the Configuration Manager client on the Windows system where the
Configuration Manager client is installed:
1. Navigate to the following directory:
WC_rmtMgt_installdir/_uninst
2. Run the uninstall.exe command.
3. A WebSphere Commerce window displays. Select the preferred Language and
click OK.
4. Review the Welcome Page and click Next.
5. The next screen shows the WC_rmtMgt_installdir directory and the installed
features.
6. Click Next to begin uninstalling the Configuration Manager client code.
7. Once the uninstallation has completed, click Finish to close the wizard.
Note: The WC_rmtMgt_installdir directory might remain after the uninstallation
completes. At this time, you can delete this directory on your Windows
system.
© Copyright IBM Corp. 1996, 2008 115

116 WebSphere Commerce - Express Installation Guide for IBM System i and i5/OS

Uninstalling WebSphere Application Server Version 6.0
If you have a distributed installation of WebSphere Commerce, you must uninstall
WebSphere Application Server from the WebSphere Commerce node, and the Web
server node.
For information about uninstalling WebSphere Application Server, refer to:
v Uninstall WebSphere Application Server Version 6.0 for OS/400 topic of the
WebSphere Application Server Information Center
© Copyright IBM Corp. 1996, 2008 117

118 WebSphere Commerce - Express Installation Guide for IBM System i and i5/OS

Part 10. Installation and administration tasks
This sections contains the following chapters:
v “WebSphere Commerce tasks” on page 121
v “WebSphere Application Server tasks” on page 127
© Copyright IBM Corp. 1996, 2008 119

120 WebSphere Commerce - Express Installation Guide for IBM System i and i5/OS

WebSphere Commerce tasks
This section provides instructions for WebSphere Commerce tasks you might need
to complete while installing and administering WebSphere Commerce:
v “Starting or stopping a WebSphere Commerce instance”
v “Starting and stopping the WebSphere Commerce Information Center”
v “Modifying a WebSphere Commerce instance” on page 122
v “Deleting a WebSphere Commerce instance” on page 122
v “Changing the ports used for WebSphere Commerce tools” on page 124
Starting or stopping a WebSphere Commerce instance
The WebSphere Commerce instance is created and administered within a
WebSphere Application Server profile. To start your WebSphere Commerce
instance, refer to the Starting and stopping WebSphere Commerce topic in the
WebSphere Commerce Information Center.
1. Ensure that your Web server is started.
To start IBM HTTP Server, issue the following command from an i5/OS
command line:
STRTCPSVR SERVER(*HTTP) HTTPSVR(instance_name)
where instance_name is the name of the IBM HTTP Server instance you are
using with WebSphere Commerce.
2. (Optional) Ensure that the WebSphere Commerce Information Center is started.
For instructions on starting the WebSphere Commerce Information Center, refer
to “Starting and stopping the WebSphere Commerce Information Center.”
3. To start or stop a WebSphere Commerce instance you must start or stop a
WebSphere Application Server profile. To do this refer to “Starting or stopping
WebSphere Application Server” on page 127.
Starting and stopping the WebSphere Commerce Information Center
To start and stop to the WebSphere Commerce Information Center, refer to the
Starting and stopping WebSphere Commerce topic in the WebSphere Commerce
Information Center.
© Copyright IBM Corp. 1996, 2008 121

Modifying a WebSphere Commerce instance
Important
WebSphere Commerce modifies the Web server configuration file whenever
you do any of the following tasks:
v Create a WebSphere Commerce instance.
v Update information in the Web Server panel in Configuration Manager for
an existing instance.
These changes are marked by the following text:
IBM WebSphere Commerce (Do not edit this section)
or
IBM WebSphere Payments (Do not edit this section)
Customized changes within these sections are not supported by WebSphere
Commerce as any changes made within these sections might be overwritten
at any time by WebSphere Commerce configuration tools such as
Configuration Manager.
If you want to change any of the configuration settings for your WebSphere
Commerce instance, you can do so from the Configuration Manager.
To update a WebSphere Commerce instance using the Configuration Manager:
1. Start Configuration Manager. Refer to “Starting the Configuration Manager” on
page 98.
2. In Configuration Manager, under WebSphere Commerce, expand hostname.
Choose to expand Commerce or Payments and select the instance you want to
alter.
Refer to the online help for the Configuration Manager for information about
the various fields and panels of Configuration Manager.
3. After you update your instance, click Apply to apply your changes.
4. When the changes have been successfully applied, exit the Configuration
Manager client. This also terminates the Configuration Manager server.
5. Restart the instance you have modified.
Deleting a WebSphere Commerce instance
To delete a WebSphere Commerce instance, do the following:
1. Ensure that the Web server associated with the WebSphere Commerce instance
has been stopped.
2. Export the WebSphere Commerce Enterprise Application from the WebSphere
Application Server Administration Console to save any customization that you
have done to the WebSphere Commerce instance. For example, Store
Publishing. Your Enterprise Application name is WC_instance_name.
3. Delete the WebSphere Commerce instance by doing the following:
a. Start the default WebSphere Application Server application server (server1)
associated with your WebSphere Commerce instance, if it is not already
started.
122 WebSphere Commerce - Express Installation Guide for IBM System i and i5/OS

For instructions on starting an application, refer to “Starting or stopping
WebSphere Application Server” on page 127.
In a federated or cloned environment you must ensure that the WebSphere
Application Server deployment manager is started. For instructions on
starting the deployment manager, refer to “Starting or stopping WebSphere
Application Server” on page 127.
b. Start a QShell session.
c. In the QShell session, change directories to WC_installdir/bin/. Default
values for WC_installdir are listed in “Path variables used in this book” on
page ix.
d. Issue the following command from a QShell session:
config_ant.sh
-DinstanceName=instance_name
RemoveInstance
where
instance_name
is the name of the WebSphere Commerce instance you want to
delete.
Important
Ensure that you enter the name of the WebSphere Commerce instance
and not the name of the WebSphere Commerce application server.
The command does the following:
v Removes the WebSphere Commerce data source from WebSphere
Application Server.
v Removes the WebSphere Commerce virtual hosts from WebSphere
Application Server.
v Removes JAAS authentication data alias for the WebSphere Commerce
database.
v Removes the WebSphere Commerce JDBC Provider.
v Uninstalls the WebSphere Commerce EAR from WebSphere Application
Server.
v Removes WebSphere Commerce Web server configuration file.
v Deletes the WebSphere Commerce instance directory.
v Regenerates the WebSphere Application Server Web server plug-in
configuration file.
v Removes the WebSphere Commerce instance from Configuration
Manager.e. Drop your WebSphere Commerce database. The ANT command
RemoveInstance in the step above does not drop the database automatically
for you.
v If you choose to drop your database, refer to your database software
documentation for instructions on dropping a database.
v If you do not drop your database, you can reuse the database when you
create a new instance by selecting the appropriate options in
Configuration Manager wizard.f. If you have a federated or cloned environment you can optionally remove
the cluster members from your cluster and remove the cluster using the
WebSphere Commerce tasks 123
|||
||
|||

WebSphere Application Server deployment manager Administrative Console.
For instructions, see the Removing a cluster member topic in the WebSphere
Commerce Information Center4. Delete the HTTP entry in the QATMHINSTC file in QUSRSYS library. The entry will
be of the form instance_name, where instance_name is the name of the
WebSphere Commerce instance you want to delete.
5. Delete the user profile associated with the instance using the following i5/OS
command:
DLTUSRPRF USRPRF(instance_name) OWNOBJOPT(*DLT)
Note: All jobs associated with the user profile must be ended before the user
profile can be deleted. This will also delete the database for your
instance. If you want to save the information contained in your database,
ensure that you backup the database before performing this step.Where instance_name is the name of the WebSphere Commerce instance you
want to delete.
Note: Deleting your WebSphere Commerce instance does not delete the
corresponding WebSphere Application Server profile (for example
WAS_installdir/profiles/WC_demo). To remove your WebSphere Application
Server profile, see the Deleting a profile topic in the WebSphere Application
Server Information Center.
Changing the ports used for WebSphere Commerce tools
In the Instance creation wizard, you can specify the WebSphere Commerce tools
ports to be different from the default values (8000, 8002, 8004, 8006). However, if
you want to change the tools ports after the instance creation, do the following:
1. Start Configuration Manager. For instructions on starting Configuration
Manager, refer to “Starting the Configuration Manager” on page 98.
2. From the list of instances, expand the instance for which you want to change
the tools ports.
3. Expand Instance Properties and click WebServer.
4. Change the port values in fields listed in the following table, depending on
which ports you want to change:
WebSphere Commerce tool Field Default port
WebSphere Commerce
Accelerator
WC Accelerator Port 8000
WebSphere Commerce
Administration Console
WC Admin Port 8002
WebSphere Commerce
Organization Administration
Console
WC OrgAdmin Port 8004
WebSphere Commerce
Preview
WC Preview port 8006
WebSphere Commerce
Preview
WC Preview port 8007
5. Click Apply.
6. Exit Configuration Manager.
7. Start WebSphere Commerce.
124 WebSphere Commerce - Express Installation Guide for IBM System i and i5/OS

8. Restart the Web server.
Starting and stopping the IBM HTTP Server
To start or stop your IBM HTTP Server, do one of the following:
v To start the IBM HTTP Server.
To start IBM HTTP Server, issue the following command from an i5/OS
command line:
STRTCPSVR SERVER(*HTTP) HTTPSVR(instance_name)
where instance_name is the name of the WebSphere Commerce instance.
v To stop the IBM HTTP Server.
To stop IBM HTTP Server, issue the following command from an i5/OS
command line:
ENDTCPSVR SERVER(*HTTP) HTTPSVR(instance_name)
where instance_name is the name of the WebSphere Commerce instance.
WebSphere Commerce tasks 125

126 WebSphere Commerce - Express Installation Guide for IBM System i and i5/OS

WebSphere Application Server tasks
This section provides instructions for WebSphere Application Server tasks you
might need to complete while installing and administering WebSphere Commerce:
v “Starting or stopping WebSphere Application Server”
v “Launch the WebSphere Application Server Administrative Console”
v “Starting the WebSphere Application Server subsystem” on page 128
v “Deleting a WebSphere Application Server profile” on page 128
Starting or stopping WebSphere Application Server
To start or stop an application server on i5/OS:
1. Ensure the WebSphere Application Server subsystem is started by doing the
following:
a. Start an i5/OS command session.
b. Issue the following command:
WRKSBS
Ensure that the QWAS6 subsystem is started. If the subsystem is started, refer
to “Starting the WebSphere Application Server subsystem” on page 128.2. Start a QShell session by entering the following from an i5/OS command line:
STRQSH
3. Do one of the following:
v To start an application server, issue the following command:
WC_profiledir/bin/startServer server1
v To stop an application server, issue the following command:
WC_profiledir/bin/stopServer server1
These commands are case sensitive.
Launch the WebSphere Application Server Administrative Console
Before starting the WebSphere Application Server Administrative Console, start the
default WebSphere Application Server application server (server1). For
instructions, refer to “Starting or stopping WebSphere Application Server.”
Open the WebSphere Application Server Administrative Console by opening a Web
browser and entering the following URL:
http://hostname:port/ibm/console
or
https://hostname:port/ibm/console
where hostname is the fully qualified TCP/IP name of the machine running
WebSphere Application Server and port is the administration port for the
WebSphere Application Server profile.
© Copyright IBM Corp. 1996, 2008 127

The default port for the WebSphere Application Server Administrative Console
depends on the protocol specified in the URL and the port number assigned when
the profile was created. For the http protocol, the default port is 9060. For the https
protocol, the default port is 9043.
Starting the WebSphere Application Server subsystem
Your user profile must have *JOBCTL authority to start the WebSphere Application
Server subsystem.
To start the WebSphere Application Server subsystem on iSeries:
1. Start Transmission Control Protocol/Internet Protocol (TCP/IP). On the i5/OS
command line, issue the following command:
STRTCP
2. Start the subsystem:
v If you are using WebSphere Application Server Version 6.0, start the QWAS6
subsystem by running the following command on the i5/OS command line:
STRSBS SBSD(QWAS6/QWAS6)
Ending the QWAS6 subsystem
In order to end the QWAS6 subsystem, all the WebSphere Commerce instances,
WebSphere Commerce Payments instances and non-default WebSphere Application
Server applications must be stopped. Refer to the appropriate sections to stop the
instances that are running on the system. To ensure that all jobs have stopped,
enter the following at the i5/OS command line:
v For WebSphere Application Server 6.0:
WRKACTJOB SBS(QWAS6)
The subsystem will be displayed and no other jobs should be active within the
subsystem.
You can now proceed to end the applicable subsystem:
v To end the QWAS6 subsystem, enter the following at the i5/OS command line:
ENDSBS QWAS6
Deleting a WebSphere Application Server profile
Deleting your WebSphere Commerce instance does not delete the corresponding
WebSphere Application Server profile (for example WAS_profiledir/WC_demo).
To remove your WebSphere Application Server 6.0 profile, refer to Deleting a
profile topic in the WebSphere Application Server Information Center.
128 WebSphere Commerce - Express Installation Guide for IBM System i and i5/OS

Part 11. Appendixes
© Copyright IBM Corp. 1996, 2008 129

130 WebSphere Commerce - Express Installation Guide for IBM System i and i5/OS

Appendix A. Troubleshooting
For more troubleshooting information, refer to one of the following links:
v Troubleshooting WebSphere Commerce installation issues
v Troubleshooting WebSphere Commerce configuration issues
v Troubleshooting general WebSphere Commerce issues
v Troubleshooting WebSphere Application Server
Also, more troubleshooting information can be gathered by turning on the trace
feature for WebSphere Commerce in WebSphere Application Server. For more
information about the trace feature, refer to the WebSphere Commerce Information
Center.
You should go through the checklists in this appendix before contacting your IBM
support representative
© Copyright IBM Corp. 1996, 2008 131
+
+
+
+
+

132 WebSphere Commerce - Express Installation Guide for IBM System i and i5/OS

Appendix B. Understanding i5/OS unique concepts
This chapter describes concepts that are unique to the IBM Eserver iSeries and the
i5/OS operating system. It includes the following:
v A discussion of the different file systems within the Integrated File System (IFS)
v File organization for the WebSphere Commerce system
The i5/OS file systems used by WebSphere Commerce
It is important that you understand the Integrated File System (IFS) so that you can
decide where to store your Web assets, such as JSP and HTML files, and how to
configure the corresponding file servers.
A file system provides the support to access specific segments of storage that are
organized as logical units. These logical units are files, directories, folders, libraries,
and objects.
Each file system has a set of logical structures and rules for interacting with
information in storage. These structures and rules can be different from one file
system to another. From the perspective of structures and rules, the i5/OS support
for accessing database files and various other object types through libraries can be
thought of as a file system. Similarly, the i5/OS support for accessing documents
(which are really stream files) through the folder structure behaves as a separate
file system.
The Integrated File System treats the library support and folder support as
separate file systems. Other types of i5/OS file management support, all with their
own capabilities, function as separate file systems. The iSeries file systems that are
used by WebSphere Commerce are described in this section. For information about
other i5/OS file systems, refer to your i5/OS documentation.
WebSphere Commerce stores information in two different file systems within the
Integrated File System: QSYS.LIB library file system and the root file system.
The QSYS.LIB file system
The QSYS.LIB library file system supports the iSeries library structure. This file
system provides access to database files and all of the other iSeries object types
that the library support manages.
The Integrated File System (IFS)
The IFS takes full advantage of the hierarchical directory structure and stream file
support of the Integrated File System. The IFS file system has the characteristics of
the DOS and OS/2® file systems.
WebSphere Commerce uses a divided IFS file structure. All the data that is used by
WebSphere Commerce which can be modified or needs to be configured by the
user is placed in the /QIBM/UserData subdirectory, and all of the WebSphere
Commerce proprietary data is placed in the /QIBM/ProdData subdirectory. This has
been done to make a clear distinction between the two types of information, to
make future migration as simple as possible, and to facilitate the servicing of files
therein.
© Copyright IBM Corp. 1996, 2008 133

Notes:
1. You can only change the files that are contained in the instance_root path.
Default values for WC_userdir are listed in “Path variables used in this book”
on page ix.
2. When the instance’s Enterprise application is deployed, all of the JSP files and
other assets are stored in:
WC_profiledir/installedApps/cell_name/WC_instance_name.ear
Files in this directory can be modified as well. Default values for WC_profiledir
are listed in “Path variables used in this book” on page ix.
When you configure WebSphere Commerce for a particular instance, the
Configuration Manager copies all of the required files for the selected configuration
option to the WC_userdir path. You should not change the original files, contained
in the following path:
WC_installdir
Default values for WC_installdir and WC_userdir are listed in “Path variables used
in this book” on page ix.
Attention: Applying PTFs or reinstalling the product can delete or overwrite the
files in the ProdData directory path. You should therefore not store any customized
files in the ProdData directory path.
The following table lists the directories and stream files that are created by the
WebSphere Commerce installation and configuration process and stored in the root
file system.
Path Significance
/instance_root/xml/instance_name.xml The instance configuration file. This
file contains configuration settings
for the WebSphere Commerce
Server.
/instance_root/web
The IBM HTTP Server; document
root directory.
/instance_root/httpconf
The directory containing the IBM
HTTP Server; configuration file
(httpd.conf).
WC_profiledir/installedApps/
cell_name/
WC_instance_name.ear
The directory containing instance
properties files. For exact location of
customized assets, refer to the
WebSphere Commerce Information
Center.
/instance_root/logs The directory containing WebSphere
Commerce log files.
/instance_root/xml The directory containing WebSphere
Commerce instance configuration
XML files.
Default values of WC_profiledir are listed in “Path variables used in this book” on
page ix.
134 WebSphere Commerce - Express Installation Guide for IBM System i and i5/OS

Querying the layout of the database
You can query information about the database layout by using SQL statements.
You can use either the DB2/400 Query Manager and the SQL development kit
(STRSQL command), or you can use iSeries Navigator.
Note: If you are using the STRSQL command, ensure that the command is run with
the COMMIT parameter set to *CS.To use iSeries Access to perform database queries, do the following:
1. Start iSeries Navigator from the PC where it is installed.
2. Expand Databases, right-click the appropriate Relational Database, and select
Run SQL Scripts.
3. In the Run SQL Scripts window, click Connections and then JDBC Setup.
4. Expand the Commit mode parameter and select Repeatable read (*CS). Click
OK.
5. Type the desired SQL statement in the window. For example,
v To view a list of all the tables in the database, type (on one line, uppercase
only):
SELECT TABLE_NAME FROM QSYS2.SYSTABLES WHERE
TABLE_SCHEMA=’DB_SCHEMA_NAME’
v To view a list of the columns in a particular table, type (on one line):
SELECT * FROM QSYS2.SYSCOLUMNS WHERE TABLE_SCHEMA=’DB_SCHEMA_NAME’
AND TABLE_NAME=’TABLE_NAME’
v To view the records in a particular table, type:
SELECT * FROM ’DB_SCHEMA_NAME’.’TABLE_NAME’
where
’DB_SCHEMA_NAME’
is the name of the instance database.
’TABLE_NAME’
is the name of the database table that you want to query.
For more information about these and other SQL statements, refer to the DB2
Universal Database for iSeries SQL Reference which you can find in the IBM eServer
iSeries Information Center.
Appendix B. Understanding i5/OS unique concepts 135
+
++
+
++
+
++
++
+
++
+
+
+
++
++

136 WebSphere Commerce - Express Installation Guide for IBM System i and i5/OS

Appendix C. Configuring a WebSphere Commerce instance
with a remote Web server
This chapter describes the high level tasks to configure your WebSphere Commerce
instance with a remote Web server. These tasks are unique to the IBM Eserver
iSeries and the i5/OS operating system. The tasks are:
v Pre-instance creation
v Configuring the WebSphere Commerce instance
v Post instance creation
Pre-instance creation tasks
Before creating the WebSphere Commerce instance, you need to create a
configuration directory. This directory contains the resources generated by the
WebSphere Commerce Web server configuration task. Complete the following
steps:
1. On the remote Web server machine, create a configuration directory. For
simplicity in later steps, create the directory:
v WC_userdir/instances/instance_name
where instance_name is the name of the WebSphere Commerce instance you will
be creating. This directory is denoted by remote_directory and is used in a later
steps.
2. A user is required on the remote Web server machine. This user should have
sufficient authority to create files. Do the following:
v Sign onto the remote Web server machine.
v Create a user that has sufficient authority to create files. This user and its
password are denoted by remote_user and remote_password. These values are
used in later steps.
v Sign onto the WebSphere Commerce machine.
v FTP to the remote Web server machine and ensure you can sign on using
remote_user and remote_password.
v Exit or quit the FTP session.
The remote_user is used to ftp Web server configuration files during instance
creation.
Configuring the WebSphere Commerce instance
Refer to Part 7, “Creating a WebSphere Commerce instance,” on page 91.
To configure a remote Web server, do the following while creating the WebSphere
Commerce instance:
v On the Web server panel of the Commerce Instance Creation wizard, check the
Use Remote Web server box.
v Enter the Hostname. This is the fully qualified host name that your WebSphere
Commerce instance will use.
v Enter the remote_directory value in the Remote Configuration Directory field.
v Enter the fully qualified host name of the remote Web server machine in the
Remote Server Name field.
© Copyright IBM Corp. 1996, 2008 137
+
+
+
+++
+
+
+
++
++++
++
+
+++
++
+
+++
+
++
+
++
++
+
++
++
++
+
++

v Enter the remote_user value in the Remote User Name field.
v Enter the remote_password in the Remote User Password field.
Post instance creation tasks
After the WebSphere Commerce instance is created successfully, do the following
steps:
1. On the remote Web server machine, verify that these Web server configuration
files exist:
v WC_userdir/instances/instance_name/httpconf/httpconf.conf
v WC_userdir/instances/instance_name/httpconf/plugin-cfg.xml
v WC_userdir/instances/instance_name/httplogs
v WC_userdir/instances/instance_name/web
v WC_userdir/instances/instance_name/web/index.html 2. On the remote Web server machine, assign a certificate to the HTTP server.
Refer to“Web server post-instance creation tasks” on page 107.
3. On the remote Web server machine, open a QShell session and issue the
command:
chmod -R 755 /QIBM/UserData/CommerceServer60/instances/instance_name
4. As a check, ensure the WebSphere Commerce instance and associated Web
server start successfully.
5. Log into the WebSphere Administrative Console. Navigate to Servers > Web
servers.
6. Click webserver1. Under Additional Properties click Remote Web server
management. Enter remote_user and remote_password. Click OK.
7. Save your changes.
8. On the Web servers panel, check the box for webserver1 and click Generate
Plug-in.
9. On the Web servers panel, check the box beside webserver1 and click
Propagate Plug-in.
10. Logout from the WebSphere Administrative Console.
11. Restart the WebSphere Commerce Web server.
12. On the WebSphere Commerce machine, create a save file (savf) in a temporary
library (templib). Issue the following command:
SAV DEV(’/qsys.lib/templib.lib/savf.file) OBJ((’WC_profiledir/installedApps/
WC_instance_name_cell/WC_instance_name.ear)) SUBTREE(*ALL) SAVACT(*YES)
13. FTP the save file, in binary mode, from the WebSphere Commerce machine to
the remote Web server machine.
14. On the remote Web server machine, start an iSeries Navigator session.
15. Create the following directory:
WC_profiledir/installedApps/WC_instance_name_cell
The created directory must be identical to the directory on the WebSphere
Commerce machine.
16. On the remote Web server machine, restore the save file that was created in
step 12. Use the following command:
RST DEV(’/qsys.lib/templib.lib/savf.file) OBJ((’WC_profiledir/installedApps/
WC_instance_name_cell/WC_instance_name.ear)) SUBTREE(*ALL) ALWOBJDIR(*OWNER)
17. On the remote Web server machine, assign correct permissions to the Web
server objects. Issue the following commands:
138 WebSphere Commerce - Express Installation Guide for IBM System i and i5/OS
+
+
++
++
++
+
+
+
+
+
++
++
+
++
++
++
+
++
++
+
+
++
++
++
+
+
+
++
++
++
++

CHGAUT OBJ(WC_profiledir) USER(QTMHHTTP) DTAAUT(*RX) SUBTREE(*ALL)
CHGAUT OBJ(WC_profiledir) USER(QTMHHTTP) DTAAUT(*RWX) SUBTREE(*ALL)
18. On the remote Web server machine, only static-content files are required.
Remove the following files:
WC_profiledir/installedApps/WC_instance_name_cell/WC_instance_name.ear/*.jsp
WC_profiledir/installedApps/WC_instance_name_cell/WC_instance_name.ear/*.jar
WC_profiledir/installedApps/WC_instance_name_cell/WC_instance_name.ear/*.rar
19. Restart the WebSphere Commerce Web server.
Appendix C. Configuring a WebSphere Commerce instance with a remote Web server 139
++
++
+++
+

140 WebSphere Commerce - Express Installation Guide for IBM System i and i5/OS

Notices
This information was developed for products and services offered in the U.S.A.
IBM may not offer the products, services, or features discussed in this document in
other countries. Consult your local IBM representative for information on the
products and services currently available in your area. Any reference to an IBM
product, program, or service is not intended to state or imply that only that IBM
product, program, or service may be used. Any functionally equivalent product,
program, or service that does not infringe any IBM intellectual property right may
be used instead. However, it is the user’s responsibility to evaluate and verify the
operation of any non-IBM product, program, or service.
Any reference to an IBM licensed program in this publication is not intended to
state or imply that only IBM’s licensed program may be used. Any functionally
equivalent product, program, or service that does not infringe any of IBM’s
intellectual property rights may be used instead of the IBM product, program, or
service. Evaluation and verification of operation in conjunction with other
products, except those expressly designated by IBM, is the user’s responsibility.
IBM may have patents or pending patent applications covering subject matter
described in this document. The furnishing of this document does not give you
any license to these patents. You can send license inquiries, in writing, to:
IBM Director of Licensing
IBM Corporation
North Castle Drive
Armonk, NY 10504–1785
U.S.A.
For license inquiries regarding double-byte (DBCS) information, contact the IBM
Intellectual Property Department in your country or send inquiries, in writing, to:
IBM World Trade Asia Corporation
Licensing
2-31 Roppongi 3-chome, Minato-ku
Tokyo 106, Japan
The following paragraph does not apply to the United Kingdom or any other
country where such provisions are inconsistent with local law:
INTERNATIONAL BUSINESS MACHINES CORPORATION PROVIDES THIS
PUBLICATION ″AS IS″ WITHOUT WARRANTY OF ANY KIND, EITHER
EXPRESS OR IMPLIED, INCLUDING, BUT NOT LIMITED TO, THE IMPLIED
WARRANTIES OF NON-INFRINGEMENT, MERCHANTABILITY OR FITNESS
FOR A PARTICULAR PURPOSE. Some states do not allow disclaimer of express or
implied warranties in certain transactions, therefore, this statement may not apply
to you.
This information could include technical inaccuracies or typographical errors.
Changes are periodically made to the information herein; these changes will be
© Copyright IBM Corp. 1996, 2008 141

incorporated in new editions of the publication. IBM may make improvements
and/or changes in the product(s) and/or the program(s) described in this
publication at any time without notice.
Any references in this information to non-IBM Web sites are provided for
convenience only and do not in any manner serve as an endorsement of those Web
sites. The materials at those Web sites are not part of the materials for this IBM
product and use of those Web sites is at your own risk.
IBM may use or distribute any of the information you supply in any way it
believes appropriate without incurring any obligation to you.
Licensees of this program who want to have information about it for the purpose
of enabling: (i) the exchange of information between independently created
programs and other programs (including this one) and (ii) the mutual use of the
information which has been exchanged, should contact:
IBM Canada Ltd.
Office of the Lab Director
8200 Warden Avenue
Markham, Ontario
L6G 1C7
Canada
Such information may be available, subject to appropriate terms and conditions,
including in some cases payment of a fee.
The licensed program described in this document and all licensed material
available for it are provided by IBM under terms of the IBM Customer Agreement,
IBM International Program License Agreement or any equivalent agreement
between us.
Any performance data contained herein was determined in a controlled
environment. Therefore, the results obtained in other operating environments may
vary significantly. Some measurements may have been made on development-level
systems and there is no guarantee that these measurements will be the same on
generally available systems. Furthermore, some measurement may have been
estimated through extrapolation. Actual results may vary. Users of this document
should verify the applicable data for their specific environment.
Information concerning non-IBM products was obtained from the suppliers of
those products, their published announcements or other publicly available sources.
IBM has not tested those products and cannot confirm the accuracy of
performance, compatibility or any other claims related to non-IBM products.
Questions on the capabilities of non-IBM products should be addressed to the
suppliers of those products.
All statements regarding IBM’s future direction or intent are subject to change or
withdrawal without notice, and represent goals and objectives only.
This information is for planning purposes only. The information herein is subject to
change before the products described become available.
This information contains examples of data and reports used in daily business
operations. To illustrate them as completely as possible, the examples include the
142 WebSphere Commerce - Express Installation Guide for IBM System i and i5/OS

names of individuals, companies, brands, and products. All of these names are
fictitious and any similarity to the names and addresses used by an actual business
enterprise is entirely coincidental.
Credit card images, trademarks and trade names provided in this product should
be used only by merchants authorized by the credit card mark’s owner to accept
payment via that credit card.
Notices 143

144 WebSphere Commerce - Express Installation Guide for IBM System i and i5/OS

Trademarks
The IBM logo and the following terms are trademarks of International Business
Machines Corporation in the United States, other countries, or both:
v DB2®
v DB2 Universal Database
v i5/OS
v IBM
v iSeries
v Lotus
v Notes
v WebSphere
Java and all Java-based trademarks and logos are trademarks of Sun Microsystems,
Inc. in the United States, other countries, or both.
Microsoft and Windows are trademarks of Microsoft Corporation in the United
States, other countries, or both.
Other company, product and service names may be trademarks or service marks of
others.
© Copyright IBM Corp. 1996, 2008 145

146 WebSphere Commerce - Express Installation Guide for IBM System i and i5/OS


����
Printed in USA
GC10-4262-05