ca user manual - leegov.com contents purpose ... the purpose of this manual will help to clarify how...
TRANSCRIPT

Coordinated Assessment CSN User Manual

2
Contents PURPOSE ....................................................................................................................................................... 3
WHAT IS HMIS? ......................................................................................................................................... 3
WHAT IS A COORDINATED ASSESSMENT? ................................................................................................ 3
HAVE ANY QUESTIONS? ............................................................................................................................ 3
LOGGING IN................................................................................................................................................... 4
THE BASICS .................................................................................................................................................... 5
CLIENT SEARCH ............................................................................................................................................. 6
CLIENT SEARCH (CONT.) ............................................................................................................................ 7
DEMOGRAPHICS ........................................................................................................................................... 7
COORDINATED ASSESSMENT ........................................................................................................................ 8
HOUSEHOLD MEMBERS ................................................................................................................................ 9
PROGRAM SUMMARY ................................................................................................................................. 10
SERVICE SUMMARY ..................................................................................................................................... 10
SERVICES ................................................................................................................................................. 11
NOTES ......................................................................................................................................................... 11
SUCCESSFUL LINKAGE ................................................................................................................................. 12
HMIS AGENCY REFERRAL ............................................................................................................................ 12
HMIS REFERRAL ....................................................................................................................................... 13
RELEASE ....................................................................................................................................................... 13

3
PURPOSE The purpose of this manual will help to clarify how to enter information into and complete a
coordinated assessment.
WHAT IS HMIS? A Homeless Management Information System (HMIS) is a local information technology system
used to collect client‐level data as well as data on the provision of housing and services to
homeless individuals and families and persons at risk of homelessness. Each Continuum of Care
(CoC) is responsible for selecting an HMIS software solution that complies with the data
collection, management, and reporting standards given by the Department of Housing and
Urban Development (HUD). Client Services Network (CSN) from Bell Data Systems is the HMIS
software used in Lee County.
WHAT IS A COORDINATED ASSESSMENT? A coordinated assessment is defined as a centralized process or system designed to coordinate
program participant intake, assessment, and provision of referrals in a CoC. In this system, all
programs within a CoC work together to assure that services are accessible and well‐targeted to
the immediate needs of the client.
HAVE ANY QUESTIONS? Please take the time to familiarize yourself with who the agency administrators are for your
agency in CSN. They will be your first point of contact for any questions you may have regarding
the system. However, if there are any questions they are not able to answer or if you require
any other assistance with CSN, please e‐mail Eric Pateidl ([email protected]) or Juan Albino
([email protected]) at the Department of Human Services.

4
LOGGING IN 1. Go to https://csn.leegov.com.
2. Type your user ID in the appropriate field. This field is not case sensitive.
In most cases, your user ID will be your first initial and last name together. For example,
if the user’s name is John Williams, his user ID would be JWILLIAMS.
3. Type your password in the appropriate field. This field IS case sensitive.
If this is your first time logging in or your password has been reset, your password will
be “PASSWORD” in all capital letters. Again, this field is case sensitive so please be
careful. After three failed attempts, your account will be locked and must be reset by an
administrator.
For only those logging in for the first time or who had their password reset, the screen
that follows after the initial log‐in will require you to reset your password. Type
“PASSWORD” again in the “Old Password” field, and then create a new password in the
following fields using the criteria in the top section of the screen.
NOTE: Please verify that a user account has been created for you in CSN before
attempting to log in. You may check with an administrator at your agency or you may
contact Eric Pateidl or Juan Albino at Lee County Department of Human Services as well.

5
THE BASICS After logging in, you will find yourself at the Client Search screen. This is also known as the
Home screen. Before we proceed, we will take a moment to get familiarized with the layout of
the Coordinated Assessment program in CSN.
The layout of CSN is broken down into three sections: the header, the menu, and the
content/screen.
The header will always contain your name, the program you’re working in, as well as the
current date and time. If the user has not loaded a new screen in 10 minutes, the header will
also flash a message in red counting down the seconds until the system will log you out due to
inactivity. This is a mandatory security feature. If this occurs, do not panic. Simply save your
work or click to a different screen within CSN to restart the inactivity timer.
The menu on the left side of the screen contains four buttons: Home, Main, Clients, and Logout (Note: The menu options may change depending on your specific agency and requirements). You will also see a blue arrow button that allows you to minimize and maximize this menu at your convenience. Clicking the Main or Client button will reveal a submenu for each section containing links to specific screens. The Home button will take you to the client search screen while clicking the Logout button will take you to a screen asking you to confirm your desire to log out of the system. NOTE: For security reasons, it is highly recommended for each user to log out of CSN before leaving to go to another website or closing the browser.
The content/screen section is the largest and displays the appropriate content related to the
link selected in the menu bar on the left. Please note that all coordinated assessment screens
are attached to a client’s record and require for a client to be searched for and selected before
displaying any content.

6
CLIENT SEARCH
At the very top of the client search screen, you will find a section called Agency Notices. If there
is any relevant program‐wide news regarding CSN that needs to be shared with all users, you
will find it in this section.
Next is the Client Search section. It is very important that a thorough search is done for each
client to minimize creating a duplicate client in the system. CSN provides a few different ways
to search for a client: by Social Security number, first and last name, date of birth, or card ID.
SSN/DOB: Social Security number and date of birth are typically very accurate methods of
searching for a client in a system where each are required at entry. However, because some
agencies only require partial information or none at all when it comes to SSN/DOB, they are not
the most reliable method of conducting a search in CSN. If you search for a client using these
fields to no avail, please try searching by name as well.
First and Last Name: Each name field allows only five characters. For more accurate and
expedient searching, it is best to use at least two letters in each name field. Please be mindful
that aliases or nicknames may have been used by the client at other agencies in the system
where he/she received services. For example, you may be searching for a client named Charles
who was seen at another agency using the name Chuck. For this name, using “ch” in the first
name field would be most appropriate. Use your best judgment in these circumstances when it
comes to searching by name.
Card ID: When a client is entered into CSN, the system assigns the client a unique identifying
number called a card ID. When available, this is the fastest and most accurate method of pulling
up a client in CSN. However, the client may not know their card ID so if you do not have prior
record of this number, you will want to use the previous methods of searching for a client.

7
CLIENT SEARCH (CONT.)
When the desired fields are filled out, click the Search Now button to view the results. If the
system finds matches, you will see them listed as seen above. Please keep in mind that you may
find duplicate names listed with the same date of birth, SSN, and date of birth but with
different entries listed under “Program”. It is likely that these entries are all the same client and
selecting any of them will take you to the same demographics screen for that client. For
duplicate clients please contact your agency administrator or the CSN staff.
DEMOGRAPHICS
Selecting a client or hitting the Add button will take you to the Demographics screen. If the
client already exists in the system, you will see all of the demographics information already
entered for the client (this information can be edited by clicked the Edit button). If the client is
new in the system, you will see a screen with fields for you to fill out. Every field on this screen
with the exception of Suffix and Date Of Death are required fields so please fill them out
accurately and appropriately and click the Save button (or Update button if you are editing an
entry). CSN will not allow you to save the record without each field being completed. You will
see a red asterisk next to field on the left. Afterwards, you may click on the Coordinated
Assessment link in the menu on the left to proceed to the next screen.

8
COORDINATED ASSESSMENT
Once the demographics screen has been completed you can then move onto the Coordinated
Assessment screen. After entering the date, marital status, and form of identification, the
coordinated assessment screen is broken up into five sections:
1. Veteran Status: In this section, you will enter whether the client served in the U.S.
Armed Forces or not. If the client did serve, please proceed to enter if they have a DD
214 available, if and how they were discharged, and their length of service.
2. Housing Situation: Please proceed to ask and answer the questions based on client
response. You may determine Homeless Status at Entry for the client based on where
the client is currently staying.
3. Income or Benefits: Please enter the client’s total monthly income and mark the
applicable checkboxes for any sources of income listed the client currently receives.
4. Disabling Condition: Please enter any disabling conditions the client is experiencing.
5. Additional Info: Mark the checkbox next to any question the client answers “yes” to in
this section. The notes section is available for you to enter any additional relevant
information to the client’s current homeless situation.
After all fields are completed, please click the Save button. Please double check your entries for
accuracy. Once done, you may proceed to the next screen by clicking the Household Members
link in the menu on the left.

9
HOUSEHOLD MEMBERS
The household members screen shows a summary of all persons who are currently in the
household or, in some cases, may have been in the household at one time. From left to right,
you will see the card ID numbers, names, dates of birth, genders, relationship to the applicant,
and whether the person currently lives in the same household as the applicant.
To add a person to the household, click the Add button. You will see a screen very similar to the
client search on the Home page. This screen will allow you to search for the household member
to see if the person is already in the system. If so, you may select the person in the results list
and see the entry added to the household. If not, please click the Add button and proceed to
complete a demographics screen for the person being added.

10
To make edits to the information or to simply view the household members’ information in
more detail, click the Detail button at the top of the page. In this detail section, you can edit
household members to update their demographic information, to reflect their relationship and
if the person is currently residing in the household, or simply add a comment.
PROGRAM SUMMARY The program summary lists all of the programs the client has entered into at your agency as
well as other agencies currently in CSN.
NOTE: Entries will only appear on this screen from agencies where the client has approved and
signed a release. This will be explained in further detail (See Release Pages 13 & 14).
SERVICE SUMMARY The service summary lists all of the services the client has received at your agency as well as
other agencies currently in CSN. Adding more services to this summary must be done through
the Services screen.
NOTE: Entries will only appear on this screen where the client has approved and signed a
release and the services have not been marked as confidential.

11
SERVICES
The services screen is used to document services provided to the client. This screen can be
customized for each agency, although the layout is similar for all.
To make an entry, you must first select the household member who is receiving the service.
Next, select the date the service was provided. Quantity can be used to reflect units, whether
that represents time or occurrences. Each agency can determine how to quantify their services.
After entering the quantity, you may select the service provided. The services list will be
customized to reflect the services your agency provides. The comments field can be used to
document any information associated with the service provided and may be used at each
agency’s discretion.
NOTES
The notes screen is used to document any information or comments regarding the client and
can be used as needed by each agency. This screen may be used as needed for each agency.
Simply select the program associated with the note and enter the date of entry before typing.
Notes on this screen are ordered in descending order from newest to oldest. You will see a
checkbox labeled “Important” to the right of the Date field. Checking this box will cause the
note being entered to remain static on top of all notes regardless of date. Use this box to
ensure important notes are seen first before all others. The Incident field is used to reflect any
incidents between the agency and the client that you may desire to attach to the note. This list
is customizable for each agency. Some examples of incidents agencies have used include
abusive behavior towards staff, banning of the client, and fraud.
12
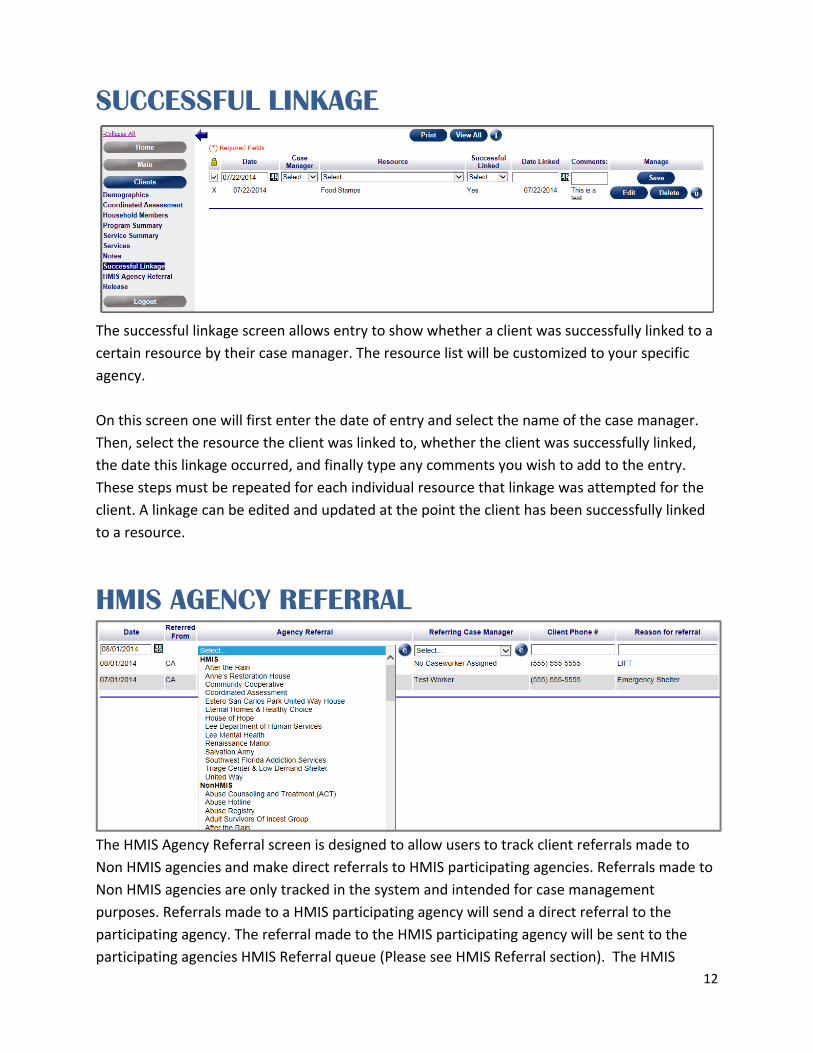
SUCCESSFUL LINKAGE
The successful linkage screen allows entry to show whether a client was successfully linked to a
certain resource by their case manager. The resource list will be customized to your specific
agency.
On this screen one will first enter the date of entry and select the name of the case manager.
Then, select the resource the client was linked to, whether the client was successfully linked,
the date this linkage occurred, and finally type any comments you wish to add to the entry.
These steps must be repeated for each individual resource that linkage was attempted for the
client. A linkage can be edited and updated at the point the client has been successfully linked
to a resource.
HMIS AGENCY REFERRAL
The HMIS Agency Referral screen is designed to allow users to track client referrals made to
Non HMIS agencies and make direct referrals to HMIS participating agencies. Referrals made to
Non HMIS agencies are only tracked in the system and intended for case management
purposes. Referrals made to a HMIS participating agency will send a direct referral to the
participating agency. The referral made to the HMIS participating agency will be sent to the
participating agencies HMIS Referral queue (Please see HMIS Referral section). The HMIS

13
agency referral screen collects the date of the referral, the agency the referral has been made
from, the agency referred to, case manager, client phone number, reason for referral,
service/resource, and notes field.
HMIS REFERRAL
Clients with a HMIS referral will come up in a queue under the referral agencies “HMIS
Referral” screen in the Main subgroup tab. Depending on the participating agencies policies and
procedures what is done with agencies in the queue may vary. An agency may choose to
contact the client and set up and appointment or wait for the client to appear. In either case
the user can edit the referral record, make notes, and check if the client was or was not
successfully linked. The agency queue list will maintain referrals for a set period of time for
each specific agency. This period of time can be set to vary for each agency the current default
is 30 days. If client has not made contact with the agencies within the set time period the client
will be removed the queue.
RELEASE
The Release screen is an essential part of the coordinated assessment process. The release
allows other agencies within the HMIS system to see the information that has been entered on
14
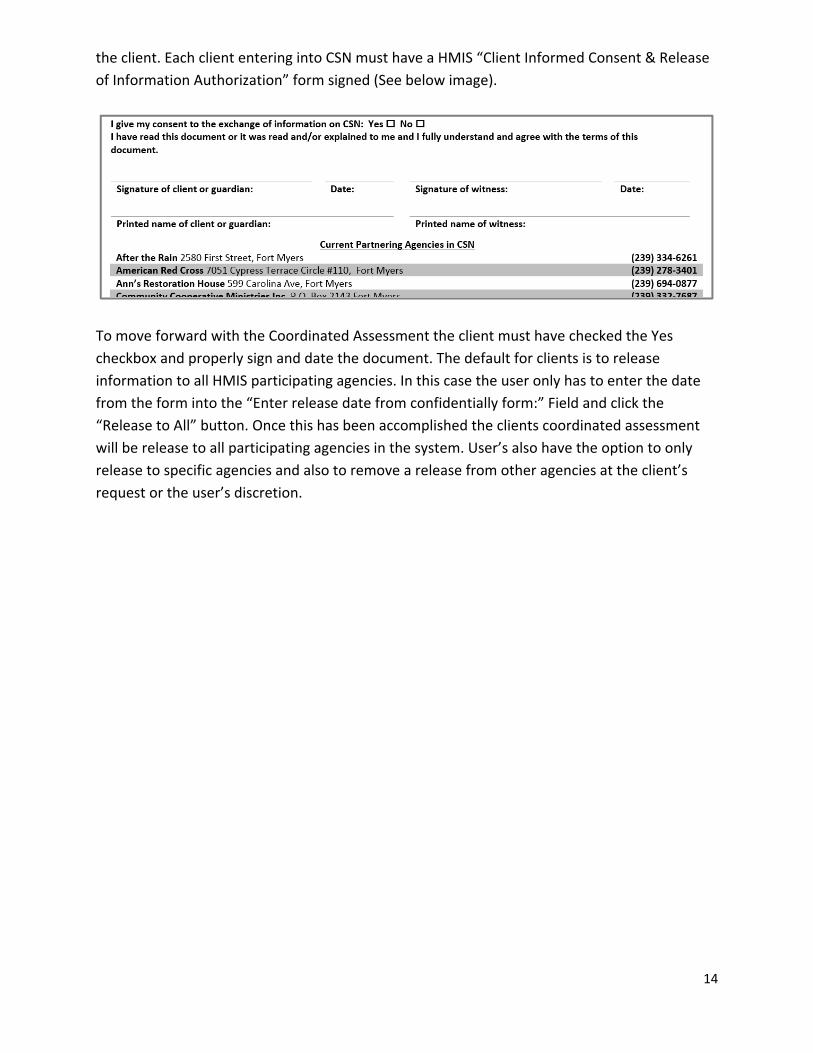
the client. Each client entering into CSN must have a HMIS “Client Informed Consent & Release
of Information Authorization” form signed (See below image).
To move forward with the Coordinated Assessment the client must have checked the Yes
checkbox and properly sign and date the document. The default for clients is to release
information to all HMIS participating agencies. In this case the user only has to enter the date
from the form into the “Enter release date from confidentially form:” Field and click the
“Release to All” button. Once this has been accomplished the clients coordinated assessment
will be release to all participating agencies in the system. User’s also have the option to only
release to specific agencies and also to remove a release from other agencies at the client’s
request or the user’s discretion.