cake craft and decoration - december 2014
DESCRIPTION
Cake Craft and DecorationTRANSCRIPT

9 exclusive step-by-step projects for all skill levels
December 2014 Issue 193 £3.70 The world’s leading sugarcraft magazine
Christmas cakes galore!
Hand Painting Sugar Flowers Fun Modelling Edible Wrappers
Christmas cakes galore!
www.cake-craft.com
# Learn how to use cake lace # Perfecting appliqué skills # Make stunning Christmas flowers # Create perfect stencilling# Learn how to use cake lace # Perfecting appliqué skills # Make stunning Christmas flowers # Create perfect stencilling
Over £800of prizes to be won!
How to make these...
Fun festive friendsFun festive friends
Dec cover v9_OFC_CakeDecember2014 20/10/2014 16:16 Page OFC1

IFC Dec_1PAGE TEMP 14/10/2014 15:09 Page 1
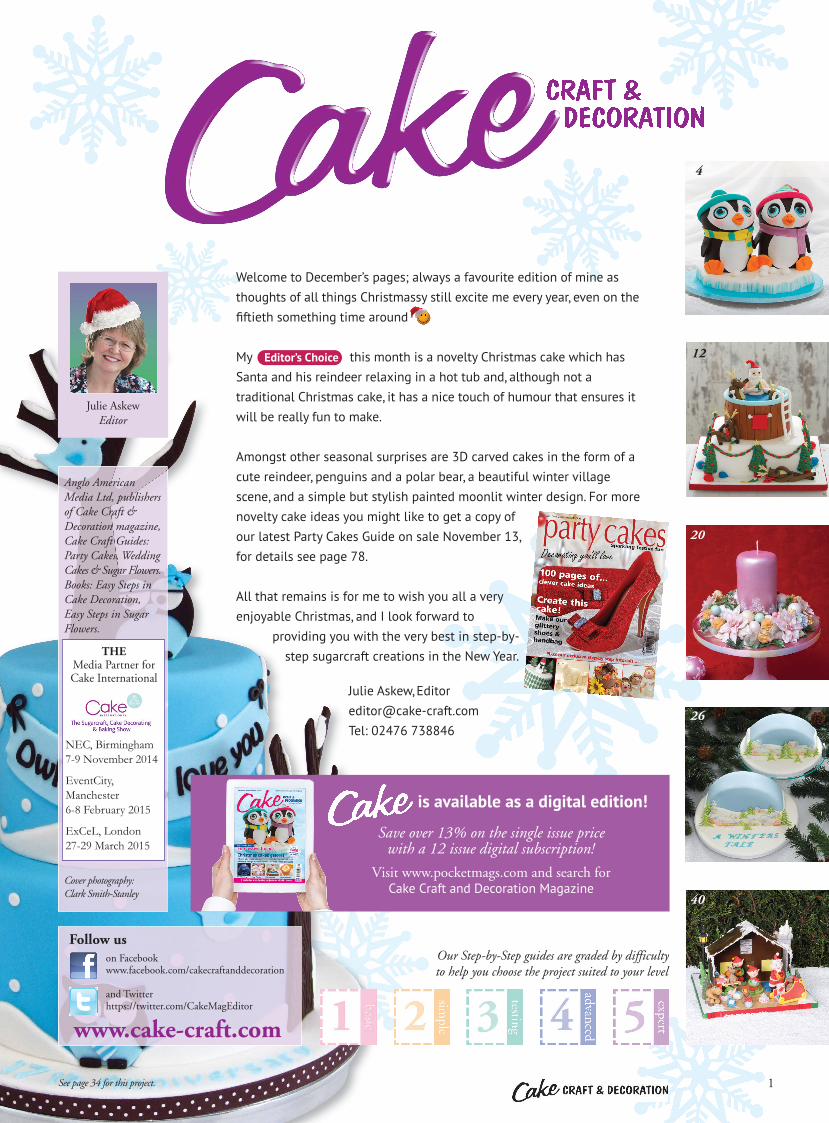
Welcome to December’s pages; always a favourite edition of mine asthoughts of all things Christmassy still excite me every year, even on thefiftieth something time around
My this month is a novelty Christmas cake which hasSanta and his reindeer relaxing in a hot tub and, although not atraditional Christmas cake, it has a nice touch of humour that ensures itwill be really fun to make.
Amongst other seasonal surprises are 3D carved cakes in the form of acute reindeer, penguins and a polar bear, a beautiful winter villagescene, and a simple but stylish painted moonlit winter design. For morenovelty cake ideas you might like to get a copy ofour latest Party Cakes Guide on sale November 13,for details see page 78.
All that remains is for me to wish you all a veryenjoyable Christmas, and I look forward to
providing you with the very best in step-by-step sugarcraft creations in the New Year.
Julie Askew, [email protected]: 02476 738846
1
Our Step-by-Step guides are graded by difficultyto help you choose the project suited to your level
12
4
20
26
40
Julie AskewEditor
Follow uson Facebook www.facebook.com/cakecraftanddecoration
and Twitterhttps://twitter.com/CakeMagEditor
www.cake-craft.com
See page 34 for this project.
Editor’s Choice
Anglo AmericanMedia Ltd, publishersof Cake Craft &Decoration magazine,Cake Craft Guides:Party Cakes, WeddingCakes & Sugar Flowers.Books: Easy Steps inCake Decoration,Easy Steps in SugarFlowers.
Cover photography: Clark Smith-Stanley
THEMedia Partner forCake International
NEC, Birmingham7-9 November 2014
EventCity,Manchester 6-8 February 2015
ExCeL, London 27-29 March 2015
is available as a digital edition!
Save over 13% on the single issue price with a 12 issue digital subscription!
Visit www.pocketmags.com and search for Cake Craft and Decoration Magazine
Eds letter Dec_p01_CakeDecember2014 20/10/2014 17:05 Page 1

p02_cakedecember_1PAGE TEMP 14/10/2014 15:10 Page 1
Editor’s Choice
4 Just Chillin’ Two adorable little penguins from Rose Macefield, just chilling out whilst enjoying each other'scompany. This is a perfect, carved novelty cake for Christmas or a birthday cake for any penguin lover.
10 Market PlaceThe latest information from the cake industry along with fabulous free product giveaways.
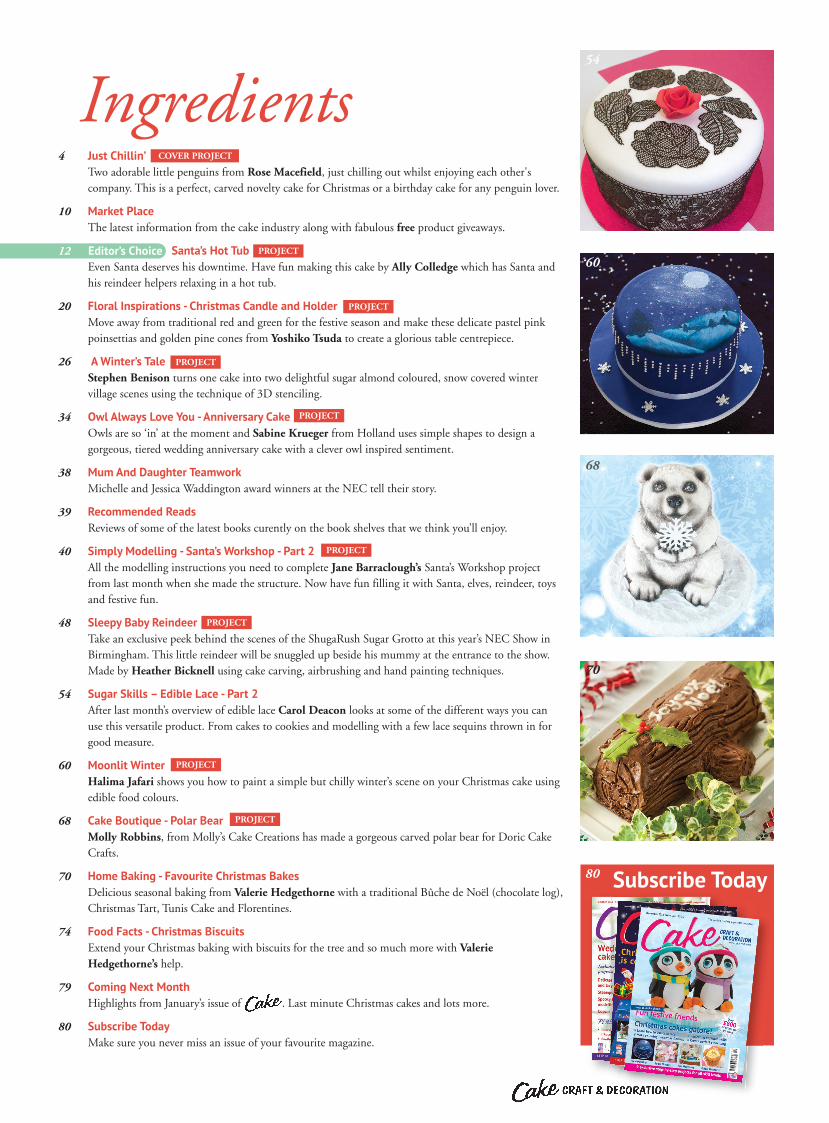
12 Santa’s Hot TubEven Santa deserves his downtime. Have fun making this cake by Ally Colledge which has Santa andhis reindeer helpers relaxing in a hot tub.
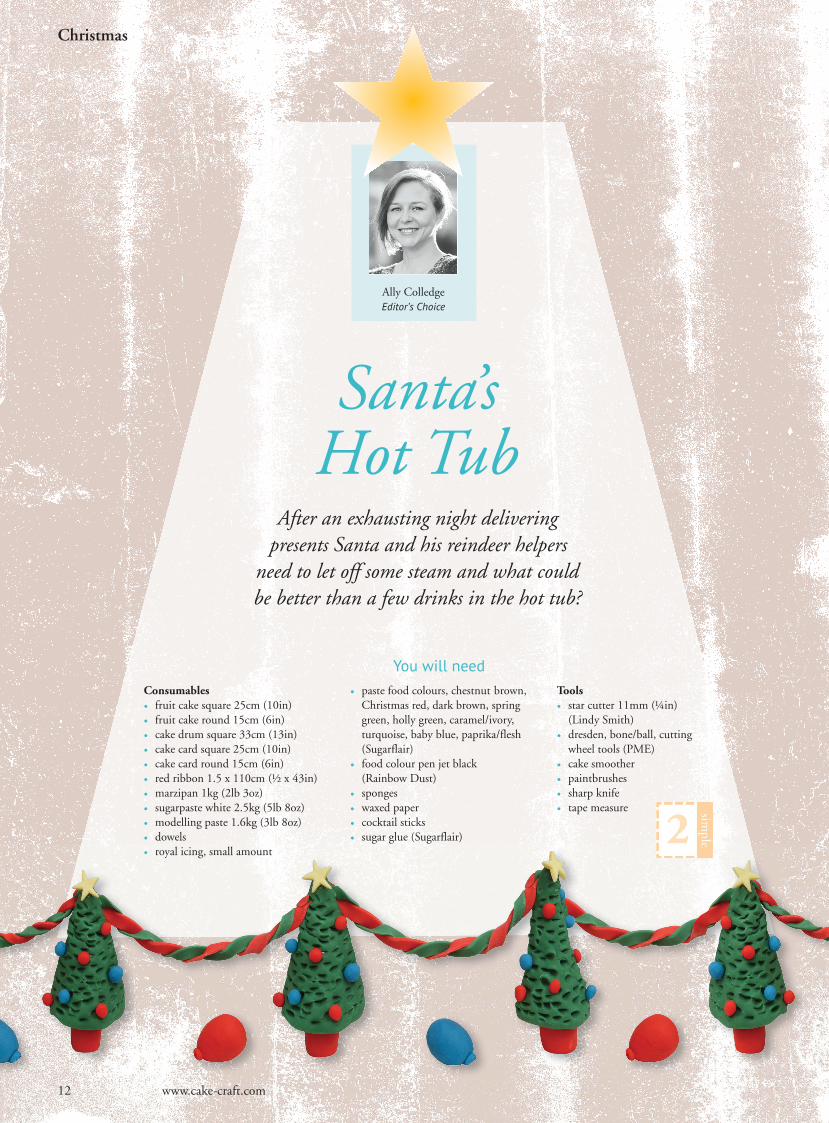
20 Floral Inspirations - Christmas Candle and Holder Move away from traditional red and green for the festive season and make these delicate pastel pinkpoinsettias and golden pine cones from Yoshiko Tsuda to create a glorious table centrepiece.
26 A Winter’s TaleStephen Benison turns one cake into two delightful sugar almond coloured, snow covered wintervillage scenes using the technique of 3D stenciling.
34 Owl Always Love You - Anniversary CakeOwls are so ‘in’ at the moment and Sabine Krueger from Holland uses simple shapes to design agorgeous, tiered wedding anniversary cake with a clever owl inspired sentiment.
38 Mum And Daughter TeamworkMichelle and Jessica Waddington award winners at the NEC tell their story.
39 Recommended ReadsReviews of some of the latest books curently on the book shelves that we think you’ll enjoy.
40 Simply Modelling - Santa’s Workshop - Part 2All the modelling instructions you need to complete Jane Barraclough’s Santa’s Workshop projectfrom last month when she made the structure. Now have fun filling it with Santa, elves, reindeer, toysand festive fun.
48 Sleepy Baby ReindeerTake an exclusive peek behind the scenes of the ShugaRush Sugar Grotto at this year’s NEC Show inBirmingham. This little reindeer will be snuggled up beside his mummy at the entrance to the show.Made by Heather Bicknell using cake carving, airbrushing and hand painting techniques.
54 Sugar Skills – Edible Lace - Part 2After last month’s overview of edible lace Carol Deacon looks at some of the different ways you canuse this versatile product. From cakes to cookies and modelling with a few lace sequins thrown in forgood measure.
60 Moonlit WinterHalima Jafari shows you how to paint a simple but chilly winter’s scene on your Christmas cake usingedible food colours.
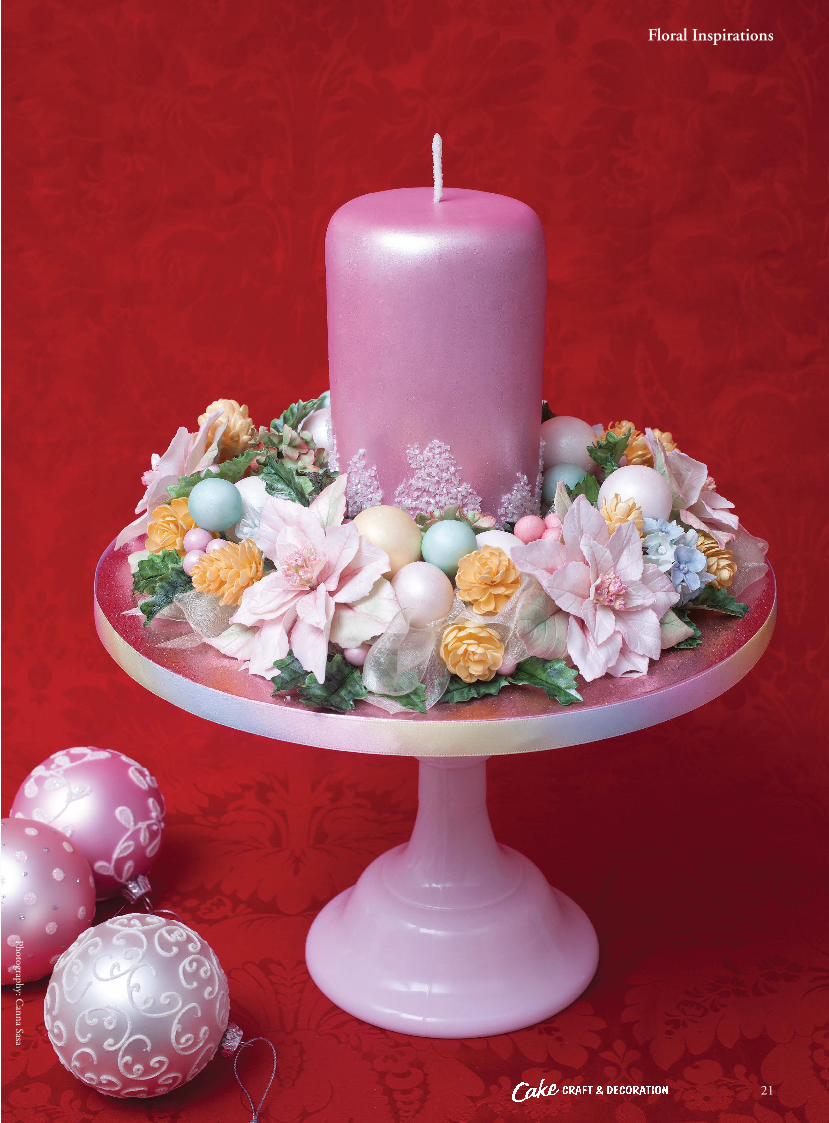
68 Cake Boutique - Polar BearMolly Robbins, from Molly’s Cake Creations has made a gorgeous carved polar bear for Doric CakeCrafts.
70 Home Baking - Favourite Christmas BakesDelicious seasonal baking from Valerie Hedgethorne with a traditional Bûche de Noël (chocolate log),Christmas Tart, Tunis Cake and Florentines.
74 Food Facts - Christmas BiscuitsExtend your Christmas baking with biscuits for the tree and so much more with ValerieHedgethorne’s help.
79 Coming Next MonthHighlights from January’s issue of . Last minute Christmas cakes and lots more.
80 Subscribe TodayMake sure you never miss an issue of your favourite magazine.
54
60
70
68
Ingredients
PROJECT
COVER PROJECT
PROJECT
PROJECT
PROJECT
PROJECT
PROJECT
PROJECT
PROJECT
80 Subscribe Today
REVISED Ingredients Dec_p03_CakeDecember2014 20/10/2014 16:32 Page 3

You will needConsumables• madeira cakes round x 3 13cm (5in)• sphere cake 15cm (6in)• drum board round 41cm (16in)• cake cards round 8cm (3in), 10cm (4in), 15cm (6in)
• sugarpaste white 1kg (2Ib 3oz), black 1.75kg (3Ib 7oz), turquoise 500g (1lb 2oz), fuchsia 125g (5oz), dusky lilac 250g (9oz), green 125g (5oz), pastel yellow 250g (9oz), jade 250g (9oz), orange 175g (6oz) (Renshaw)
• modelling/flower paste white 250g (9oz) (Renshaw)
• buttercream• confectioners glaze• pearl lustre spray (PME)• tylo powder• rice crispy treats (1½ x basic recipe)
• lustre dusts ice blue, pearl white• dust powder coral• royal icing 4 tbsp• dowels
Tools • texture tool (Kemper)• rolling pins large and small• cake smoother x 2• ruler• dusting brushes• serrated knife• bulbous cone tool (PME)• ball tool • zigzag tool• mini palette knife or craft knife
• circle cutter 3.8cm (1½in)• piping nozzles 2D (JEM),
No. 2 (PME)• small round plunger cutter
4 www.cake-craft.com
Christmas
These two adorable little penguins are just chilling out,enjoying each other's company and the chilly conditions.
This is a perfect novelty cake for Christmas or a birthday cake for any penguin lover.
Rose Macefield
Just Chillin’
Ingredients90g butter420g marshmallows300g Rice Krispies
Method
1Place the butter and marshmallows in apan.
2Heat the pan over a gentle heat, stir themixture regularly until the marshmallowshave melted.
3Take off the heat and stir in the RiceKrispies until they are completely coated.
4Allow the mixture to cool before handlingit. If the marshmallow coating is stillstringy then allow to cool a little more.
5As soon as you can handle it without itsticking, model into shape compacting itfirmly and leave to harden, make sure youuse Trex® on your hands and work surfaceas it can still be a bit sticky.
6It can be carved into a better shape ifnecessary.
7It can be made a few days in advance andcan be frozen for up to six weeks.
Rice Krispie Treats Recipe For Modelling And Sculpting
REVISED Rose Dec_CakeDecember2014new 16/10/2014 10:04 Page 4

5
Christmas
Photography:Clark Sm
ith-Stanley
REVISED Rose Dec_CakeDecember2014new 16/10/2014 10:06 Page 5

Christmas
Place the cooled Rice Krispie treats on the drum and flattendown so it is 30cm diameter and 2.5cm deep, use a large caketin and flatten it down so that it has a level surface. Form atleast six irregular straight sides using the smoothers to create aniceberg effect.
Roll out the white sugarpaste to 5mm thickness and cover theRice Krispies treats, use the smoothers to press the icing aroundthe iceberg sides so that they are straight and sharp.
Use the ruler to press into the sugarpaste and indent linesaround the sides.
Brush a little water around the drum, knead together 250g ofturquoise sugarpaste with 200g of white sugarpaste to create apaler ice blue colour. Roll out long strips of the sugarpaste 5mmthick and 3in wide and attach to the board around the iceberg.Spray the whole board and iceberg with pearl lustre spray.
Use a smoother on the top of the cake and another on each sideto create sharper edges. Trim off excess sugarpaste.
1
3
2
4
65
You can use fruitcake instead ofMadeira as thereis not too muchcarving, makesure you cover thefruit cake withmarzipan beforecovering withsugarpaste.
Tip
Mix together 50% of the ice blue and pearl white lustre dusts,dust each line to enhance them.
6 www.cake-craft.com
REVISED Rose Dec_CakeDecember2014new 16/10/2014 10:07 Page 6

7
Christmas
Level all the round cakes, cut one in half horizontally, place onehalf on each of the other cakes and buttercream together tocreate the bodies.
Carve away the front of the body a little to flatten it, coat eachbody with buttercream.
Roll out a thick sausage of black sugarpaste 4cm wide and cutfour discs for the legs, attach two of them to the bottom of eachbody. Roll four balls of orange sugarpaste 20g each, flatten intoa thick disc and emboss with the bulbous cone tool to createthe webbed feet, attach to the legs with a little water.
Place the 7.5cm card on top of each cake body and carvearound it to chamfer the top.
Roll out 750g of black sugarpaste per body and cover them.Tuck the black neatly under the bottom of each.
7
9
8
10
1211
The Rice Krispiestreat iceberg iscreating a firmfoundation forthe penguins tosit on but youcould choose fruitcake instead. Youcould even chooseto make theiceberg from adummy cakeinstead if youdon’t need toomuch cake.
Tip
Roll out some black sugarpaste and cut out four triangles tocreate the flippers maximum 4cm wide, attach to the sides of thebodies with a little water and support with some kitchen towel.
REVISED Rose Dec_CakeDecember2014new 16/10/2014 10:09 Page 7

8 www.cake-craft.com
Christmas
Roll out some white modelling/flower paste and cut out two x10cm discs, roll over them to elongate the paste into ovalshapes, attach them to the front of the body with a little water.
13
15
14
16
You canpersonalise thedesign bychanging thecolour and styleof the hats andscarves torepresent footballand sports teamsor just favouritecolours or styles.
Tip
Cut poly dowels to size so that they are flush with the top of thebodies. Cut a circle out of the centre of the 7.5cm cards andsecure to the top of the bodies with royal icing. Place the bodieson to the board and push the dowels into the iceberg to secure thebodies, use a little royal icing between the iceberg and the body.
Carve the bottom of each half of the sphere cake to round itoff, press the smallest circle cutter into the front of the halfsphere and cut out the circles to create eye sockets.
Roll out 500g of black sugarpaste and cover each head, smooththe sugarpaste under neatly and use the small rolling pin topush the sugarpaste into the eye sockets. Attach to the top ofthe body with some royal icing.
17 18
Attach the white paste over the front of the face and use the4cm circle cutter to cut out the eye sockets.
Roll out the remaining white modelling/flower paste and usethe template provided to cut out the eye area.
REVISED Rose Dec_CakeDecember2014new 16/10/2014 10:11 Page 8

Add tylo powder and roll out the yellow sugarpaste into a strip45cm x 3cm. Roll out jade sugarpaste and cut thin zigzag strips.Place these onto yellow strip and roll over this. Place roundpenguins neck and use a short strip for the scarf front. Usedusky lilac for the other penguin's scarf.
Christmas
Roll a 10g ball of orange sugarpaste into a cone, cut down thecentre to create an open beak and use the small ball tool toindent two holes into the top of the beak.
Mix a little turquoise sugarpaste with some white for a subtleblue, add some tylo powder. Roll 4 x 20g balls. Mix a deeperblue, roll out and cut two circles for irises with the 2D nozzle.Cut two black circles with the No. 2 nozzle for pupils, then twowhite spots with the small plunger cutter.
Cut a circle from the green sugarpaste using the 15cm card, cutfour triangles of yellow and place on top of the green, position ontop of the penguin’s head and attach with a little water. Roll out asausage of jade sugarpaste to 48cm long, emboss with the texturetool and attach around the head. Roll a small ball of paste tomake the bobble, texture and attach to the centre of the hat.
This kind of cakeis quite tall andheavy, if you aretravelling with ityou should swapto wooden dowelsand add a coupleextra to help withthe support.
Allow the cake atleast 24 hours to setbefore moving it.
21
20
22
Tip
Roll out and form a mexican hat from the remaining lilacsugarpaste, cut to 15cm diameter and attach to the head of theother penguin. Cut zigzag strips of blue and green sugarpasteand arrange on the hat as a pattern. Roll out a 48cm longsausage of fuchsia sugarpaste and texture, place around the topof the head. Make a small bobble and secure to the hat.
23 24
19
Brush the eyes with the confectioners glaze to make them shine.Dust the cheeks lightly with the coral dust powder.
9
REVISED Rose Dec_CakeDecember2014new 16/10/2014 10:12 Page 9

TEN TieredCaker apps to giveaway worth £120!
Market Place
'Market Place' is where you can find useful information from the trade or organisationswhich we think will be of interest to readers. It's also the place where you can always
find an opportunity to pick up a free sample.For a chance of winning one of Cake’s Giveaways either:• Send in a card to PO Box 3693, Nuneaton, Warks, CV10 8YQ, stating which item you are applying for (not forgetting to include your name, address and email address) or • Visit www.cake-craft.com and enter online from 6th November. The final date for the giveaways will be 2nd December 2014.
10 www.cake-craft.com
TieredCaker, by Calculated Cakes £12.00, is theultimate app for helping your clients find theirperfect tiered cake. Use the app’s calculator toimmediately see all of your different cake optionsfor the desired number of servings, or stack a cakefrom scratch with a 3D preview! Once you’vefound the perfect cake for your client, email thema cutting guide and a preview image of theircake sttaight from the app!
Calculated Cakes is a small, family runcompany specialising in creating cake apps for
iPhone, iPad, and iPod touch. They currently havetwo apps available in the App Store and areworking hard to bring you more.
For more information about the apps, and for freecake cutting guides and serving charts, please visitwww.calculatedcakes.com
To enter this competition go to www.cake-craft.com and click on ‘This Month’sCompetition’. The closing date for thiscompetition is 2nd December.
online competition
Natural Looking Holly
Yoshiko Tsuda uses thisHolly Cutter Set fromOrchard Products in herproject on pages 20-25as it produces veryrealistic looking Holly.
Orchard Products OPare British made fromnon-stick materialswhich meet all the appropriate FDAregulations for food contact materials and are available fromsugarcraft suppliers around the world. If you cannot find the OPcutters you are looking for go to www.orchardsugarart.co.uk orcall Orchard Products UK Ltd +44 20 8391 4668 or [email protected]
We have 10 Holly Cutter sets to give away to our lucky readers.See the top of this page for details on how to enter and place OP Holly Cutters on postal entries.
£156 of goodies to give away - PRIZE A
Discover Your Inner Mary Berry With Arden and Amici
When it comes to baking we take our tips from the top and want to offer two luckyreaders the chance to do the same and create their own culinary masterpiece, ‘MaryBerry style’.
Included in this fantastic prize is the book by the undisputed Queen of Baking, ‘MaryBerry’s Baking Bible’, plus a classic Mason Cash Mixing Bowl, Stoneware Jug and CakeStand - so not only can you create your work of art stylishly but can serve it in style too.The prize also includes some of Arden and Amici’s versatile and iconic Savoiardi spongefingers (available at Waitrose - priced from £1.39) which can take a simple pudding toanother level (and for those who can’t wait, they’re delightfully more-ish with a coffee too -delizioso!). Find out more at www.ardenandamici.co.uk at @Ardenandamici andwww.facebook.com/ArdenandAmici - Made in Italy Prepared by Friends.
To apply for this giveaway see the details on the top of this page and place Arden andAmici on postal entries.
10 sets of Holly cutters worth £55 to give away -PRIZE B
MP Dec_CakeDecember2014 16/10/2014 15:28 Page 10

Latest Products From Katy Sue
Just in time for to decorate yourChristmas cakes and other edibleproducts, are these three fabulous newproducts from Katy Sue Designs Ltd.We really fell in love with this ChristmasBaubles mould £9.99.
Katy Sue’s mouldsare made in theirfactory here in UKand are made withFDA compliantfood gradesilicone. Theirmoulds can be used for sugarpaste, flower paste,
modellingpaste,marzipan, chocolate, candy, boiledsugar, cold porcelain, salt dough, air
drying clays andembossing powder.
Then there is atraditional andbeautifully detailedHolly Trio £7.99mould and with this
you can create highlydetailed holly
embellishments in three sizes.These can be made simply by usingcoloured sugarpaste or you can createa mini work of art by using yourpainting skills.
Lastly they have a highlydetailed Holly DesignMat £9.99 (4 x 4in)which you can use togive patterned texture topaste and then cutout circular tops for atruly stylish finish toyour cupcakes.
To apply for this giveaway seethe details on the top of page10 and place Katy SueChristmas Designs on postalentries.
Karen Davies Sugarcraft Ltd have several newChristmas moulds in their range to give awayto our readers and these will all be featured inour January edition on Karen’s multi-cakeproject. We thought you might like to knowabout this early so you can make sure you getthem before the Christmas rush!
There are four moulds: Sitting Santa, SittingElf, Sitting Reindeer and Sitting Snowmanwhich are perfect for any festive cake, theyalso compliment the other Christmas mouldsby Karen! They all come with extra featureson the mould which can be usedindependently on other cakes, cookies, cakepops etc. The Santa mould comes withpresents and crackers, the Elf comes with agingerbread house, gingerbread man and agingerbread woman, the Reindeer comes withmistletoe, a bunch of carrots and two differentsized holly leaves and the Snowman has threedifferent snowflakes and a cute penguin.
Each mould retails for £15.50 and fit welltogether to create a border around a cake.Available from sugarcraft suppliers or ourwebsite www.karendaviescakes.co.uk Toenter this giveaway see the top of page 10 toenter this draw and place December - KarenDavies Moulds on postal entries.
11
Market Place
Paint It NEW From Rainbow Dust Colours
A new, easy to use opaque paint from Rainbow Dust Colours.Apply straight from the container using a suitable brush oran EasyCover sponge (for larger areas) and you’ll get greatresults every time. Suitable for use on sugarpaste, flower pasteand other modelling pastes. Paint It, SRP £3.25 is available in10 fantastic colours and is available at all good cakedecorating shops.
To apply for this giveaway see the top of page 10 and placePaint It on postal entries.
6 sets of 5 x Paint It! colours worth £97.50 to give away - PRIZE C
20 moulds worth £310 to give away - PRIZE E
Karen Davies Christmas Moulds
15 to give away worth £139.85 - PRIZE D
MP Dec_CakeDecember2014 16/10/2014 15:55 Page 11
Christmas
After an exhausting night deliveringpresents Santa and his reindeer helpers
need to let off some steam and what couldbe better than a few drinks in the hot tub?
Ally ColledgeEditor’s Choice
Santa’s Hot Tub
You will need
12 www.cake-craft.com
Consumables• fruit cake square 25cm (10in)• fruit cake round 15cm (6in)• cake drum square 33cm (13in)• cake card square 25cm (10in)• cake card round 15cm (6in)• red ribbon 1.5 x 110cm (½ x 43in)• marzipan 1kg (2lb 3oz)• sugarpaste white 2.5kg (5lb 8oz)• modelling paste 1.6kg (3lb 8oz)• dowels• royal icing, small amount
• paste food colours, chestnut brown, Christmas red, dark brown, spring green, holly green, caramel/ivory, turquoise, baby blue, paprika/flesh (Sugarflair)
• food colour pen jet black (Rainbow Dust)
• sponges• waxed paper• cocktail sticks• sugar glue (Sugarflair)
Tools • star cutter 11mm (¼in) (Lindy Smith)
• dresden, bone/ball, cutting wheel tools (PME)
• cake smoother • paintbrushes• sharp knife• tape measure
Ally Dec_CakeDecember2014 16/10/2014 13:55 Page 12

13
Christmas
Photography:Clark Sm
ith-Stanley
Ally Dec_CakeDecember2014 16/10/2014 13:56 Page 13

14
Christmas
Using 600g of white sugarpaste, coat the 33cm square cakedrum, smooth and attach the red ribbon. Secure with sugarglue and a pin.
With the remaining sugarpaste coat the 25cm square and 15cmround cakes and leave to dry. When dry stick the square cake tothe centre of the board. Measure and cut the dowels then insertthem into the square cake. Finally place the round cake on top.
Using approximately 70g of white modelling paste roll a cableabout 1cm thick and glue it round the outside of the waterclose to the edge of the cake.
Hot Tub: To make the water, roll about 70g of the bluemodelling paste out and cut a 12cm circle. Secure this to the topof the round cake with sugar glue and smooth down.
Attach the squareand round cakesto the cake cardsand cover bothcakes withmarzipan.
Smooth themand leave to dry.Colour themodelling paste.
You will needapproximately350g (12oz)green (made froma mix of thespring and hollygreens), 300g(10oz) darkbrown, 250g(9oz) chestnut,200g (7oz)Christmas red,150g (5oz)white, 100g(3oz) turquoise,100g (3oz) flesh,100g (3oz) babyblue and 50g(2oz) caramel.
1
3
2
4
65
Preparation
Add a little extraCMC powderwhen making themodelling pastefor the ladder,towel rail andantlers to makesure they are extrastrong when set.
Tip
When the planks are firm glue them around the side of theround cake. The planks should be flush with the white cable rim.
Roll out the chestnut modelling paste and using the ribboncutter cut strips 2cm wide. Cut the strips approximately 9cmlong and using light strokes of a cutting wheel texture the stripsto make wooden planks.
www.cake-craft.com
Ally Dec_CakeDecember2014 16/10/2014 13:48 Page 14

15
Christmas
Roll a larger cable with approximately 100g turquoise modellingpaste and secure around the top of the cake between the whiterim and planks. Leave to dry.
Make a towel rail with leftover ropes. Cut a 3cm rope and usetwo balls of paste for the fitting. When it's dry roll out somered paste, cut into a towel and drape over the rail. Secure withglue and attach to the hot tub. Cut an extra towel and fold forthe sleeping reindeer.
For the ladder roll two 5cm ropes from white modelling paste.Cut two about 16cm long and curve over a third of the waydown. Cut three 2cm pieces for the ladder rungs. Use two smallballs of paste for the base. Leave to harden completely beforesticking together and drying on clean sponges. Attach at the end.
7
9
8
10
1211
Use cut pieces ofclean sponge tosupport thereindeer andantlers whilethey're drying tohelp keep theirposition.
Tip
For the streamers, roll out the green and red paste thinly andcut long thin strips with the cutting wheel. While they're stillsoft wrap them together and twist. Cut to length and glue tothe cake between the tops of the trees.
Add a drop ofglycerine whenmaking thestreamers to makethem morepliable. They candry quite quicklywhile you'retwisting themwithout it and italso makespositioning themeasier.
Tip
To make the trees roll 30g of green paste into rounded cones.Flatten the backs slightly and push your thumbs into thebottom to create an overhang. Use the dresden tool to texturethe trees. Attach to the cake and decorate with small paste ballsand a yellow star.
Christmas Trees: For the Christmas trees begin by rolling smallballs of modelling paste into tapered pot shapes. Make a dent inthe widest end and fill with a piece of dark brown paste. Addsmall trunks and stick around the base of the cake.
Ally Dec_CakeDecember2014 16/10/2014 13:49 Page 15

16 www.cake-craft.com
Christmas
For his head roll and shape a ball. Add eyes and nose usingsmall balls of white and flesh paste with black for pupils. Attachthe head to the body with sugar glue and a cocktail stick.
Reindeer: To make antlers you'll need to roll sausages ofcaramel paste making them a bit wider at one end. With asharp knife cut into the antlers a few times. Smooth the sharpedges with your fingers and leave to dry completely.
Santa: Roll a ball of modelling paste and shape into a slouchingtorso. Roll his arms from sausages of paste, pinching in at thewrist and elbow then flatten the ends for hands. Cut in athumb and shape. Glue into the hot tub.
Make Santa's hat from a long cone of red modelling paste.Shape the base wide and push your thumb lightly into the base.Squash an oval ball of paste and indent with the dog bone tool.Glue the pieces together and add a tiny pom-pom of paste tofinish. Glue on to Santa's head.
13
15
14
16
1817
Make a few spareantlers just incase you breakany whileattaching to thecake – they'revery delicate!
Tip
The bottles are balls of green paste pinched to form a neck. Rubbetween your fingers to shape the neck and then flatten thebase. Make a larger bottle with more rounded body for thechampagne. Finally add a white paste label and use a cocktailstick to poke a hole in the top. A splash of ivory paste can beadded to show liquid spilling.
For Santa's beard and hair use a small amount of whitesugarpaste. Out of a ball form a horseshoe and dent lightly withyour fingers to give texture. Santa's hair is a flattened piece ofpaste. Glue it securely on to the head and leave to dry.
Ally Dec_CakeDecember2014 16/10/2014 13:50 Page 16

For the legs roll long sausages of dark brown paste and make asocket in the end with a pointed tool. Form a hoof from blackpaste and glue into the socket. Press lightly together until secure.
17
Christmas
Roll three ovals for the heads and a half oval for the submergedone. Mark the top with the dresden tool for ears and use thedog bone tool for the eye, nose and antler sockets. Poke a holein one mouth for the party blower. Leave one head without eyesockets for the sleeping reindeer.
Make the reindeer bodies from dark brown modelling paste.Form two long bodies with tapered ends. For Rudolf make ahalf-torso like Santa's. Make small indents to attach the limbsand head. Squash a piece of caramel paste out for the patch onthe tummy. Leave them to dry.
21
20
22
To make a glass from white modelling paste take a small sausage,pinch in the middle and flatten the bottom. Shape a stem, makea cavity then add a piece of caramel paste for champagne. Theparty blower is a small sausage of red paste lightly flattened thencoiled and balloons are rolled pear shaped paste.
When the balloonsare dry arrangeround the cakeand glue. Make awiggly line with ablack food pen onthe board to makethe string. Finallyglue the bottlesand party bloweron to the cake andthe antlers on tothe reindeer.
23 24
19
Arrange the reindeer on the cake. One lying with his head onthe folded towel, one sitting, one in the tub and one submerged.Secure them with glue. Draw sleepy eyes on the recliningreindeer with a black food colour pen.
Ally Dec_CakeDecember2014 16/10/2014 13:50 Page 17

Pg 18_1PAGE TEMP 14/10/2014 15:11 Page 1

Pg 19_1PAGE TEMP 14/10/2014 15:11 Page 1

Consumables• tall candle 6.5cm (2½in) x 15cm (6in) • round pink board 30cm (11in) (Surbiton
Sugarcraft) • round board 15cn (6in) • polystyrene ball (3cm diameter)• sugarpaste 500g (1lb) white • flower paste 300g (sugarpaste 300g and
¾tsp of CMC)• royal icing (small amount)• paste colour fresh Christmas green
(Sugarflair) hyacinth (Squires Kitchen)• liquid colour old gold, holly berry (Sugarflair)• airbrush colour gold (Surbiton Sugarcraft)• dust colour light metallic gold (Squires
Kitchen)• dust colours pearl white, plum, pink
shimmer, claret wine, forest green, foliage green, black, emerald green, eucalyptus, frosty holly (Sugarflair)
• dust colour periwinkle blue, iridescent red fusion (Rainbow Dust)
• edible glitter white (Rainbow Dust)
• edible glue• confectioners glaze• vegetable fat• sanding sugar white (CK Products)• sand sugar white/pearl (CK Products)• egg white• piping bag• wire white 24 , 26, 28, 30 gauge *• wire silver 26 gauge *• floral tape white, green (Surbiton Sugarcraft)• stamens (Surbiton Sugarcraft)• 2cmm organza ribbon 2m• 1cm lace ribbon
Tools • piping tube No. 0, 1 (PME)• rolling pin *• grooved board *• foam pad *• ball tool, veining tool *• rose leaf cutter set of 4 *• daisy cutter sets small, large *• holly leaf cutter set of 4 *• daphne cutter set *• leaf veiner GM01H009-01 (Squires Kitchen)• airbrush *• tweezers • wheel cutter• small scissors• cosmetic foundation brush• paintbrush
* Orchard Products
All items are available from Surbition Sugarart
20 www.cake-craft.com
Floral Inspirations
If you are looking for a different colour scheme for your Christmas cakethis year how about this? A romantic pink candle and wreath to stun
your party guests with.
Yoshiko Tsuda
Christmas Candleand Candle Holder
You will need
yosh dec_CakeDecember2014 16/10/2014 16:23 Page 20
21
Floral Inspirations
Photography: Canna Sasa
yosh dec_CakeDecember2014 16/10/2014 16:23 Page 21

22 www.cake-craft.com
Floral Inspirations
To make the candle shimmer, rub vegetable fat very lightly andevenly all over the surface. Mix plum, pink shimmer and pearlwhite together. Using a thick brush, brush this mixture all overthe candle. Allow to dry.
Water down royal icing and brush on to the bottom of the tallcandle and coat with sand sugar.
Tape seven centre pieces together with half-width wide tape tomake one centre for each flower. Each poinsettia requires threeextra small, three small, three medium and three or four largebracts on 28g wires.
Poinsettia: Cut a 30g wire into six pieces and make a hook oneach. Roll a tiny ball of flower paste into a cone shape. Insert thewire and flatten the top. Cut into the sides and top and allow todry. For pollen mix pink shimmer and white edible glitter. Dipinto egg white and then pollen. Make seven for each poinsettia.
Cut a 28g wire into six pieces. Roll out flower paste over thegroove on the board and cut out using a rose leaf cutter. Insert awire into the centre vein and dust with iridescent red fusionand soften the edge. Vein with a leaf veiner and dry. Make fourin different sizes.
Cut a 24g wire into approximately 5cm lengths. Roll a tiny ballof sugarpaste into a sausage shape and attach along the wire.Allow to dry. Dip into the egg white then into sanding sugar.
1
3
2
4
65
yosh dec_CakeDecember2014 16/10/2014 16:24 Page 22

Floral Inspirations
Using the largest rose leaf cutter make three larger bracts in thesame way as in step 5. Once these are dry, dust with emeraldgreen and frosty holly all over, then dust the edges with plum.
Tape three green bracts around the base of the flower.
Second And Third Layers: Roll out old gold coloured paste andwith the daisy cutter DY6 cut out two petals. Use a knife to cutoff petals to make five petal and six petal pieces and repeat theprevious step. Roll a tiny ball of flower paste for a spacer andattach behind the previous layer. Attach the third layer withedible glue.
Pine Cone: Cut a 24g wire into six. Roll a tiny ball of old goldflower paste and insert a wire. First layer: Cut out a layer withDY7 daisy cutter. Cut with a craft knife to make 3 and 4 petalshapes. Soften with ball tool, spread and cup each petal. Attachto the centre starting with the three petal piece.
Tape each bract with half-width white tape. Tape the threesmallest bracts around the centre followed by the next sizeslightly below. Repeat this with the larger bracts.
7
9
8
10
1211
Fourth And Fifth Layers: Cut out two layers with daisy cutterDY5, from old gold flower paste. Cut off a petal to make aseven petal piece for the fourth layer and use full eight petalpiece for the fifth layer. Repeat the same process as the previousstep adding a ball of paste for spacers as shown
23
yosh dec_CakeDecember2014 16/10/2014 16:25 Page 23

24 www.cake-craft.com
Floral Inspirations
Eighth To Tenth Layers: Cut out layers with daisy cutter DY5,DY6 and DY7. Without cutting off any petals, soften the edgesand make a cup shape with the balling tool then adhere to thebase of the cone from largest petal to smallest. Allow to dry.
Using the airbrush spray gold liquid colour all over the pinecones and leave them to dry.
Holly Berry: Cut a 26g wire into six pieces and make a hookon each. Roll white flower paste into a ball and insert a hookedwire. Allow to dry then dust with pink shimmer.
Sixth And Seventh Layers: Cut out two layers using daisycutter DY4. Use full eight petal pieces for both layers, repeatthe same process as in the previous step. For the sixth layer only,add a spacer.
Holly Leaf: Cut a 28g wire into six pieces. Roll out greenflower paste over the groove on the board and cut out using aholly leaf cutter H1. Insert the wire into the centre vein andsoften the edge with a balling tool on the foam pad. Vein with aleaf veiner and dry on the sponge to create a natural finish.Allow to dry. Three leaves are needed for each spray.
Ornament Balls:
Thread a 26gwire through thepolystyrene balland twist at thebottom of theball. Roll whiteflower pastethinly and coverthe ball. Neatenthe base thenallow to dry.Once dry, dustwith shimmercolours, green,periwinkle blue,frosty holly, pink,plum, pearlwhite, and lightmetallic gold.
13
15
14
16
1817
Tip
Dust the leaves with forest green, foliage green and black, thensteam and glaze. Allow to dry. Tape three leaves and two orthree holly berries together.
yosh dec_CakeDecember2014 16/10/2014 16:28 Page 24

25
To make the base of the candle holder, roll sugarpaste into along sausage then place around a 15cm board creating a ringshape and leave it to half dry. Dust with frosty green shimmer.
20
19
21
Because sugarflowers are fragile,place ribbon loopsunderneath or inbetween toprevent breakages.
Tip
Insert the five poinsettias into the ring base then fill the gapswith the pine cones, holly leaves, hydrangeas and ornament balls.
22
Place the candle holder on to the pink cake board and place theribbon round the edge of the board. Place the candle in thecentre of the holder.
23
Dust eucalyptus or frosty holly over the petal and dust pink inthe centre of the blue hydrangea and dark pink on edge of thegreen hydrangea. Using half-width tape put four together andthen tape four or five bunches of four together.
Hydrangea: Cut a 28g wire into six pieces and make a hook on theend of each. Roll blue or green flower paste into a ball, insert ahooked wire. Flatten the top and draw a cross with the wheelcutter. Roll out flower paste very thinly then cut out with a daphnecutter. Vein the petal with a veining tool and thin the edges with aball tool and shape. Thread the wire through and stick with edibleglue then leave to dry. A large number of these are required.
Floral Inspirations
yosh dec_CakeDecember2014 16/10/2014 16:26 Page 25
26 www.cake-craft.com
Christmas
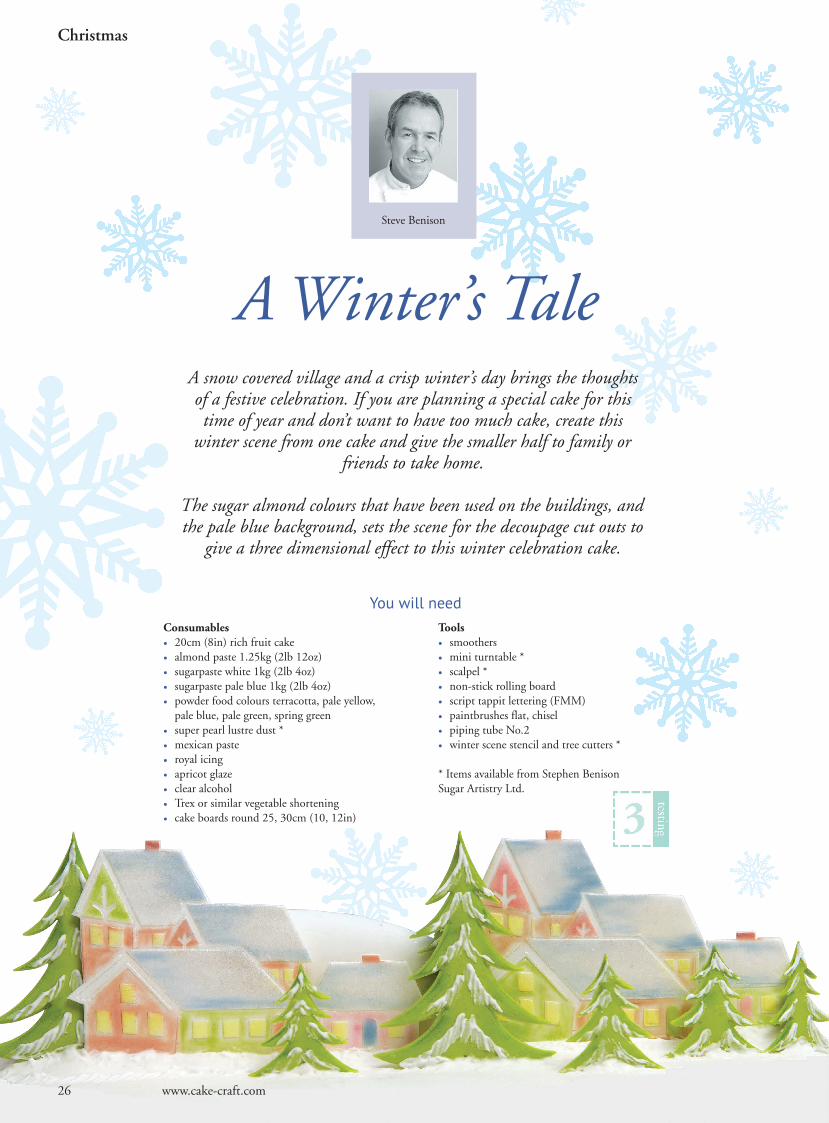
A snow covered village and a crisp winter’s day brings the thoughtsof a festive celebration. If you are planning a special cake for thistime of year and don’t want to have too much cake, create this
winter scene from one cake and give the smaller half to family orfriends to take home.
The sugar almond colours that have been used on the buildings, andthe pale blue background, sets the scene for the decoupage cut outs to
give a three dimensional effect to this winter celebration cake.
Steve Benison
A Winter’s Tale
You will needConsumables• 20cm (8in) rich fruit cake• almond paste 1.25kg (2lb 12oz)• sugarpaste white 1kg (2lb 4oz) • sugarpaste pale blue 1kg (2lb 4oz) • powder food colours terracotta, pale yellow, pale blue, pale green, spring green
• super pearl lustre dust *• mexican paste• royal icing• apricot glaze• clear alcohol• Trex or similar vegetable shortening• cake boards round 25, 30cm (10, 12in)
Tools • smoothers • mini turntable *• scalpel *• non-stick rolling board• script tappit lettering (FMM)• paintbrushes flat, chisel • piping tube No.2 • winter scene stencil and tree cutters *
* Items available from Stephen Benison Sugar Artistry Ltd.
Steve dec_CakeDecember2014 16/10/2014 16:01 Page 26

27
Christmas
Photography:Clark Sm
ith-Stanley
Steve dec_CakeDecember2014 16/10/2014 16:01 Page 27

28 www.cake-craft.com
Christmas
Cut the cakes in two by making a card template with thedividing line measuring 12cm. Fill any small indentations withalmond paste then place the cake with the cut side down on tosilicone paper.
Knead the almond paste on a worktop dusted with icing sugaruntil it is soft and pliable. Fill any indentations in the cake withsmall pieces of the paste. Use a spacer to give an even thicknessto the paste when rolling out. Cover the cake with the paste.Repeat on the smaller cake.
Draw a horizon line on to a piece of paper then cut out. Securethe paste to the bottom of the cake with a little water. Cut alongthe horizon line with a scalpel around the sides of the cake.Smooth the edge with your finger. Repeat on the smaller cake.
Make the background snow scene by rolling out whitesugarpaste to approximately 3mm thickness. Smooth over thesurface then cut a straight line on one edge. Measure thecircumference around the base of the cake and cut to size.
Lightly grease a board with vegetable shortening. Roll outmexican paste then place on the stencil which has been lightlygreased. Use a rolling pin to roll over the surface, then cutaround the outside of the stencil.
Allow the almond paste covering to skin over, then brush thecovering with clear alcohol. Knead sugarpaste, roll out to aneven thickness and cover the cake. Use two smoothers, one ineach hand, to smooth both sides of the cake. Place the cakes oncovered cake boards.
1
3
2
4
65
Steve dec_CakeDecember2014 16/10/2014 16:02 Page 28

Christmas
Use powder colours and a small flat chisel paintbrush. Placesome of the colour dust on to a piece of kitchen towel to avoidcolour blotches. Apply terracotta dust to the cross, chimney andgable end with super pearly on the rooftops.
Carefully remove the stencil by lifting the edge with a smallpalette knife. Place the board on to a small turntable and cutaround the edges of the building with a scalpel, turning as required.
Finally add the yellow for the church tower windows and thencheck the shading and detailed areas. Use an angled paletteknife to remove the cut out church on to a flat absorbentsurface. Foam sponge or ply wood is ideal.
Use a clean paintbrush and add pale yellow for the windows.Use pale blue to highlight the roof tops and then remove anysurplus powder colour.
Add the pale green dust colour to the gable ends taking care notto overload the paintbrush. Any pastel dust colours can be usedif those mentioned are not available.
7
9
8
10
1211
Cut out lots ofChristmas treesusing the cutters.They can be usedfor the side andback of the cakeif you wish andmake excellentcupcake topperswith small piecesof coloured pastesecured withroyal icing toresemble baubles.
Use theChristmas tree asan embosser toemboss on to caketops or the side ofthe cake.
Tips
Make the houses using the same method of securingthe stencil to the mexican paste. Add colour to theroof, windows and gable ends.
29
Steve dec_CakeDecember2014 16/10/2014 17:07 Page 29

Christmas
Remove the stencil from the paste. The stencil can be reversedto give an opposite image and more interest for the houses asshown on the smaller cake.
Cut around the outside edge of the houses with a good qualityscalpel. The mini turntable is excellent when cutting out smallpieces and makes the job easier. Remove to a flat drying surface.
Secure the distant houses with soft royal icing on the snowhorizon. Add small trees on either side, then pipe a snow line atthe base of the house and brush out the edges.
Use powder blue to give shadow to the roof tops. Colourwindows and doors while the stencil is in place.
Make the two sizes of trees from mexican paste. Place thecutters on to a rolling out board with a piece of non slip matbeneath. Place the paste on to the cutters then apply a firmpressure as you roll over the surface with a small rolling pin.
13
15
14
16
1817
Cut theChristmas treesin half lengthwisewhile still softthen allow to dry.Cut out moretrees and whilethe paste is stillsoft, use the edgeof a palette knifeto mark a linedown the centreof the tree. Brushthe edge of thehalf tree withwater and secureon to the paste.Allow to dry.This will giveyou a tree withmore branchesand will standupright.
Tip
Allow the trees to dry. Dust the edges with springgreen. Pipe soft white royal icing over the branchesusing a No.2 tube, then soften the icing edgesusing downward brush strokes with a paintbrush.
www.cake-craft.com30
Steve dec_CakeDecember2014 16/10/2014 16:04 Page 30
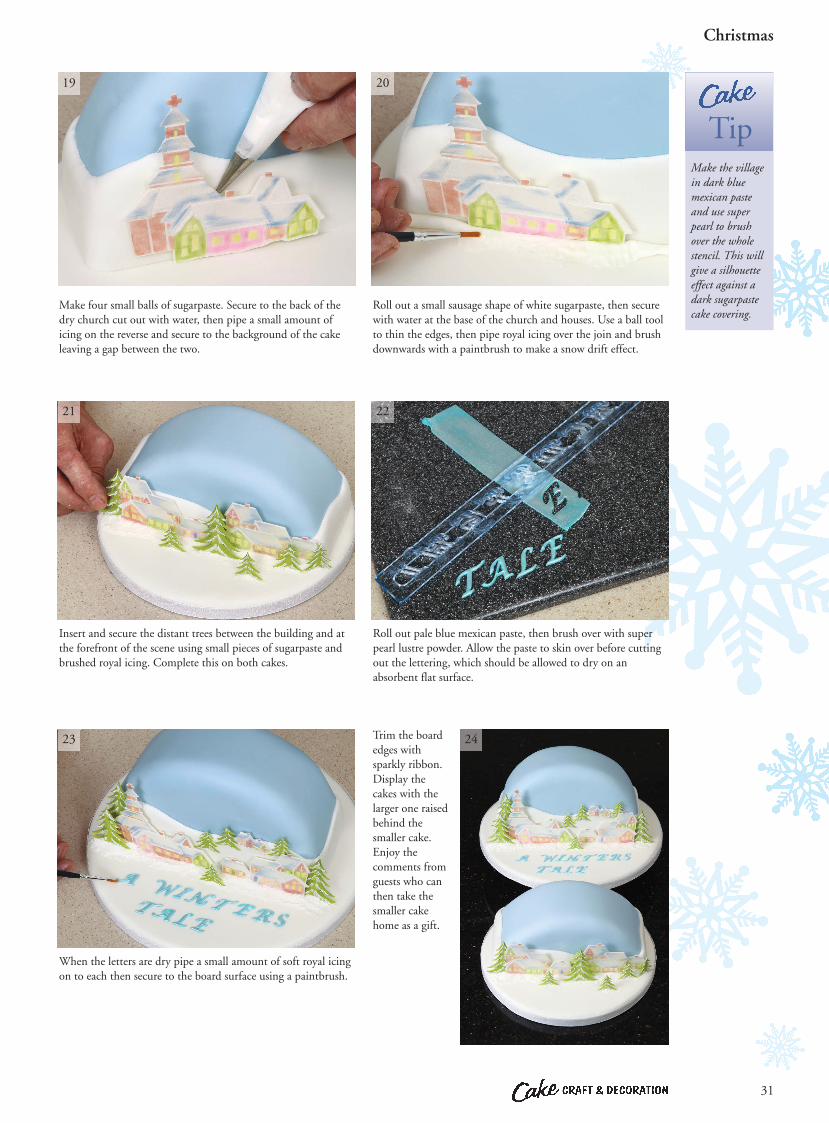
Insert and secure the distant trees between the building and atthe forefront of the scene using small pieces of sugarpaste andbrushed royal icing. Complete this on both cakes.
31
Christmas
Roll out a small sausage shape of white sugarpaste, then securewith water at the base of the church and houses. Use a ball toolto thin the edges, then pipe royal icing over the join and brushdownwards with a paintbrush to make a snow drift effect.
Make four small balls of sugarpaste. Secure to the back of thedry church cut out with water, then pipe a small amount oficing on the reverse and secure to the background of the cakeleaving a gap between the two.
Roll out pale blue mexican paste, then brush over with superpearl lustre powder. Allow the paste to skin over before cuttingout the lettering, which should be allowed to dry on anabsorbent flat surface.
Make the villagein dark bluemexican pasteand use superpearl to brushover the wholestencil. This willgive a silhouetteeffect against adark sugarpastecake covering.
21
20
22
Tip
When the letters are dry pipe a small amount of soft royal icingon to each then secure to the board surface using a paintbrush.
Trim the boardedges withsparkly ribbon.Display thecakes with thelarger one raisedbehind thesmaller cake.Enjoy thecomments fromguests who canthen take thesmaller cakehome as a gift.
23 24
19
Steve dec_CakeDecember2014 16/10/2014 16:03 Page 31

32 www.cake-craft.com
NEW CHRISTMAS MOULDS | NEW CHRISTMAS MOULDS | NEW CHRISTMAS MOULDS |
www.karendaviescakes.co.uk Tel: 0151 643 0055 email [email protected] Trade enquiries welcome
Unit 4, Royal Standard House, 334 New Chester Rd, Birkenhead CH42 1LE
SEE OUR WEBSITE FOR OUR LATEST CLASSESFind us on facebook, twitter, pinterest
Helping you make better cakesSitting Elf – comes withgingerbread man,gingerbread woman and agingerbread house
Sitting Santa – comes withpresents and a christmascracker
Sitting Reindeer –comes with carrots, holly
and misteltoe
Sitting Snowman – comeswith penguin and three
different snowflakes
Pg 32_1PAGE TEMP 14/10/2014 15:12 Page 2

www.decomagic.net We are on:
• Metallic gel speciallydesigned for piped cakedecorations
• Can be used with siliconmats
• Works with chocolate
• Freeze / thaw / stable
• Very versatile (over 30different techniques)
• Dries firm to make 3Ddecorations
• Easy to use
• Professional results
TRADE ENQUIRIES WELCOME
Pg 33_Layout 1 14/10/2014 15:13 Page 1

Consumables• sponge cakes 15, 20cm (6, 8in) two of each • buttercream• sugarpaste blue 700g (1lb 8oz)• sugarpaste light blue 150g (6oz)• sugarpaste white 300g (10oz)• sugarpaste chocolate 150g (6oz)• edible glue• cake drum 28cm (11in)• cake boards 15, 20cm (6, 8in)• dowels
Tools • non-stick board• non-stick rolling pins small, large• smoother• alphabet cutters (JEM)• number cutters (JEM)• multi-ribbon cutter (PME)• wood grain textured rolling pin• owl cutter (Cakes by Bien)• small bow set (First Impressions)• bird cutters (Cakes by Bien)• small teardrop cutter (Lindy Smith)• craft knife• palette knife• cutting wheel (PME)• template
34 www.cake-craft.com
Wedding Anniversary
With its pretty blue, white andchocolate colour scheme this clever cakegives inspiration for a winter weddinganniversary to show a beloved one just
how special they are...
Owl always love you.
Sabine Kreuger
Owl AlwaysLove You
You will need
Sabine Dec_CakeDecember2014 09/10/2014 17:13 Page 34

35
Wedding Anniversary
Photography: Sabine Kreuger
Sabine Dec_CakeDecember2014 09/10/2014 17:15 Page 35

36 www.cake-craft.com
Wedding Anniversary
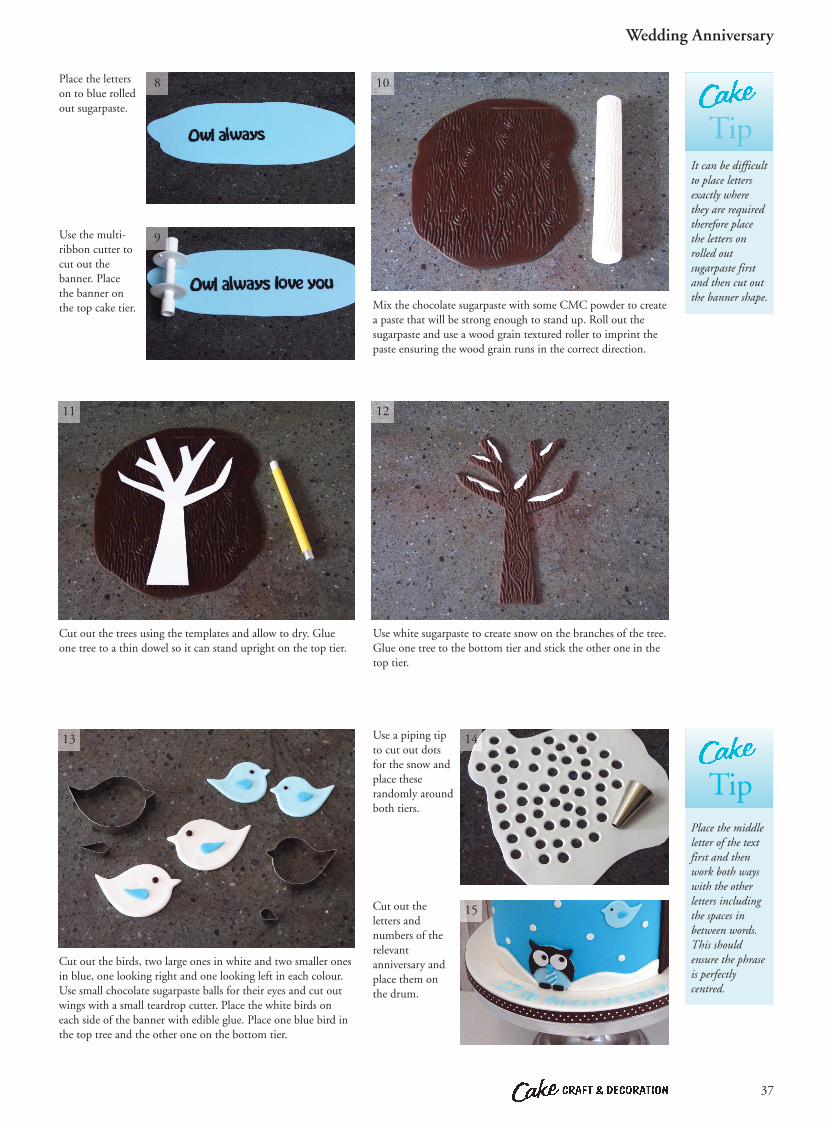
Owls: Cut out the body in blue and brown and cut out thebrown 'tummy'. Place brown shape over the blue one. Cut out theeyes and add to the owl. Roll a small brown ball, cut in half androll into balls then place as eyes. The girl looks down and the boylooks up. Form a triangle for the beak and make the feet.
Roll two very thinsausages using asmoother toobtain very thin,even shapes.
Roll out the chocolate sugarpaste very thinly. Allow it torest for 15 minutes to partially dry. Place clingfilm over thepaste and press in a letter.
Roll out white sugarpaste for the snow. Use the multi-ribboncutter to make a ribbon and with the cutting wheel divide it intwo lengthways, then stick both sides in place around thebottom edges of the cakes.
When removing the ‘stamp’ also remove the clingfilm. This willleave the cut out letter in the stamp, remove the stamp and theletter will stick to the clingfilm. This assists with easy placementon to the sugarpaste.
Use the bow mould to create the female bird’s bow.
Place the cakeson to correct cakeboards. Fill bothcakes with afilling of yourchoice and coatthem withbuttercream.
Cover the 28cmcake drum withwhite sugarpasteand cover thecake with bluesugarpaste. Stackthem on top ofeach other usingcake dowels tosupport the weightof the cake. Placethe stacked cakeson the drum andfinish the drumwith a matchingribbon.
1
4
2
Cut the sausagesin small piecesand place themtogether, rollthinly and cut outthe tie.
3
5
76
Preparation
Sabine Dec_CakeDecember2014 09/10/2014 17:17 Page 36
37
Wedding Anniversary
Cut out the trees using the templates and allow to dry. Glueone tree to a thin dowel so it can stand upright on the top tier.
Cut out the birds, two large ones in white and two smaller onesin blue, one looking right and one looking left in each colour.Use small chocolate sugarpaste balls for their eyes and cut outwings with a small teardrop cutter. Place the white birds oneach side of the banner with edible glue. Place one blue bird inthe top tree and the other one on the bottom tier.
Mix the chocolate sugarpaste with some CMC powder to createa paste that will be strong enough to stand up. Roll out thesugarpaste and use a wood grain textured roller to imprint thepaste ensuring the wood grain runs in the correct direction.
Use white sugarpaste to create snow on the branches of the tree.Glue one tree to the bottom tier and stick the other one in thetop tier.
Place the letterson to blue rolledout sugarpaste.
8
Use the multi-ribbon cutter tocut out thebanner. Placethe banner onthe top cake tier.
9
Use a piping tipto cut out dotsfor the snow andplace theserandomly aroundboth tiers.
14
Cut out theletters andnumbers of therelevantanniversary andplace them onthe drum.
15
11
10
12
13
It can be difficultto place lettersexactly wherethey are requiredtherefore placethe letters onrolled outsugarpaste firstand then cut outthe banner shape.
Tip
Place the middleletter of the textfirst and thenwork both wayswith the otherletters includingthe spaces inbetween words.This shouldensure the phraseis perfectlycentred.
Tip
Sabine Dec_CakeDecember2014 09/10/2014 17:23 Page 37

Michelle and Jessica Waddington award winners at the NEC tell their story.
www.cake-craft.com
Feature
38 www.cake-craft.com
‘I'm a full time mum of 13year old twins and have bakedsince I can remember. I lovenothing better than gettingmy apron on, recipe booksout and choosing my nextbaking creation while singingalong to the radio!
Sleeves rolled up…Once I became a mum bakingdays become extra special asthe kids would pull up chairsto reach the work tops, havetheir little aprons on, sleevesrolled up ready to get downand messy. My daughter
Jessica took a specialinterest from a youngage and would nevermiss an opportunity toget the mixer out,whilst my son washappy licking the bowland tasting the finaloutcomes.
When the prospectus arrivedDue to being a full time mum and running around afterthem both like a headless chicken, I started to feel like Ihad lost my own identity and theability to hold an adult conversation,so I decided to look into enrollingon a community college course.
When the prospectus arrived CakeDecoration seemed the perfect course for meto choose.
Have a goMy first course covered creating sugarpasteroses and I loved every minute. Learning howto make something look so realistic wasamazing. Jessica would be waiting for me toreturn home to show her what I had learnt and she wouldbe itching to have a go. I used to get my equipment out whenever Ihad the chance to perfect my skills and techniques and it was neverlong before my little shadow would be there watching, asking manyquestions that I couldn't answer at the start but I always encouragedher to have a go too.
Kid in a Candy ShopAs I continued with the courses my skills increased so didJessica's. Then a few of my college friends decided to have aChristmas get together and have a day out at Cake InternationalBirmingham. It was amazing, I was like a kid in a candy shop. Itook loads and loads of pictures to show Jessica the amazing workand couldn't stop talking about it for weeks. One evening I was sitting making sugar flowers chatting awaywith Jessica when she had the bright idea that I should enter, Ishrugged it off and thought “I wish”. Then I received an email
promoting Cake International‘13 at Birmingham and onmentioning it to Jessica she againsaid I should enter and neverstopped going on until I finallypressed enter and received theconfirmation that I was acompetitor.I have never felt so nervous orout of my depth. Jessica camewith me to the show on all threedays and on the Saturdaymorning she ran straight to mycake to find I had been awardedSILVER, saying "Told you mum,I knew you could do it." It wasone of my proudest momentsand really did give me a massiveconfidence boost and whenJessica saw there was a juniorcategory she was determined toenter.
Team T-shirtsWe both came home and startedworking on ideas straight awayso we could enter Cake
International Manchester '14 . We had a great time working onour cakes. Jessica has a real talent and an eye for detail. There weremany wonderful hours spent at the kitchen table together and
memories I will cherish forever! A Mother andDaughter Team, we decided to show the cakeworld that's what we are and we had our t-shirtsprinted saying just that. The show was great,Jessica didn't seem nervous at all, where I was aquivering wreck for the both of us. Saturdaymorning we rushed to the show to find out theresults. I went to Jessica's cake and she went tomine. I couldn't believe it when I got there, hercake was stood in all its glory with a Gold awardand a second place rosette. I was overwhelmedand bursting with pride! I forgot about myresult and Jessica had to come running over to
tell me I had won Silver again.
And in the future...We have both decided to enter CakeInternational again at some point asit was a fantastic experience.
Jessica has now decided to studycatering at GCSE level next year. Iam back at college learning newskills and hoping to find a part timejob in the industry. Although ourultimate dream is that one dayMother and Daughter will berunning a thriving cake business,employing Jack my son and Jessica'stwin as chief cake tasters.’
Mother and Daughter Team
38 Feature_p038-CakeDecember2014 16/10/2014 14:40 Page 38

Recomm
ended ReadsCool Layer CakesAuthor: Ceri OlofsonPrice: £12.99Publisher: Apple PressISBN: 978-184543-523-3Pages: 160Size: 220mm x 250mm,hardbackContent: Cake expertCeri Olofson offers 50cakes from one of thelatest trends, layer cakes.Multiple layers ofdeliciously different cakessandwiched withbuttercream to create adelightful taste infusion.Try Rainbow Surprise,Ombre Piped ItalianButtercream Cake and Wild Thing then go on to developyour own style of cakes that look good and taste amazing.
Deliciously Decorative CookiesAuthor: Fiona PearcePrice: £12.99Publisher: Apple Press ISBN: 978-1-84543-541-7Pages: 144Size: 270mm x 226mm,hardbackContent: 50 projects forbakers of every skill level,this superb book offerscookies that are so prettyyou almost want to keepthem, rather than eatthem. A wide range ofdecorating techniques are covered including piped royalicing, fondant covered cookies or cookies baked withdifferent coloured dough. Create fantastic 3D sculptures.Step by step instructions, full photography for everyproject, and projects that will have all your family andfriends amazed at your creativity.
Twenty To Make - Sugar ChristmasDecorationsAuthor: Georgie GodboldPrice: £4.99Publisher: Search Press ISBN: 978-1-78221-015-3Pages: 48Size: 215mm x 155mm, paperbackContent: Another in the superTwenty to Make series andthis one offers quirky, wobblySugarcraft characters. Projectinstructions include reindeer,elves, fairies, Father Christmasand Mrs Claus and manyothers. Step by stepinstructions and goodphotography will help youmake lots of sweet decorationsand gifts for Christmas.
Little Christmas Decorations to Knitand CrochetAuthor: Sue Stratford and Val PiercePrice: £8.99Publisher: Search Press ISBN: 978-1-78221-129-7 Pages: 96Size: 234mm x 191mm,paperbackContent: 40 tiny projects to knit and crochet as giftsand novelties for the festiveseason. Mini Christmasstockings, holly leaves,reindeer, snowmen,snowflakes to name but afew. Full instructions together with materials lists areincluded, simple photography allows clear views of thedesigns. Lots of ideas for displaying the projects. What a great way to use up the scraps of yarn we all havehidden away.
Naughty CakesAuthor: Maisie ParrishPrice: £15.99Publisher: David & CharlesISBN: 978-1-4463-0383-2 Pages: 128Size: 275mm x 210mm,paperbackContent: 25 naughty butnice cake designs for alloccasions. Witty, cleverand just that little bitrisqué, these are superblyput together so that youcan create them for thespecial parties you give orto add great ideas if youwant to expand yourrepertoire of designs. Welllaid out and photographed and easy to follow projectsmake this a very worthwhile purchase.
The Art of SugarcraftAuthor: Squires Kitchen International SchoolPrice: £50.00Publisher: B. Dutton PublishingISBN: 978-1-905113-49-1 Pages: 520Size: 286mm x 243mm,hardbackContent: OK so we admit thisprice for a book makes it aconsidered purchase, however itcovers so much and has projectsand advice from the maestros ofthe industry. What it doesn’tcover is not worth knowing. It is a beautiful book to ownand to look through. Contributors include Paddi Clark,Alan Dunn, Ceri DD Griffiths, Carlos Lischetti and manyothers and the areas covered are Sugarpaste Skills, SugarFlowers, Modelling, Cake Decorating, Baking, Patisserie,Chocolate, Royal Icing and Commercial Cakes. This willbecome an industry bible.
Recommended Reads
39
RR Dec_p039_CakeDecember2014 09/10/2014 18:47 Page 39

40 www.cake-craft.com
Simply Modelling
Here are the models to complete Santa's workshop from last month's issue. To complete the scene extra bits can be added too, such as toys, decorations, a
calendar or even more elves.
Alternatively the models could be made separately to decorate a small Christmas cake.
Jane Barraclough
Santa’s WorkshopPart 2
You will needConsumablesModelling Paste:• red 200g (7oz)• teddy bear brown 100g (4oz)• lincoln green 80g (3½oz)• bottle green 80g (3½oz)• light brown 75g (3oz)• grey 75g (3oz)• white 50g (2oz)• flesh 50g (2oz)• black 30g (1½oz)• yellow 30g (1½oz)• chocolate brown 25g (1oz)• pink, blue, orange, blue 25g (1oz)
• sugarpaste white 100g (to let down with cooled boiled water for snow and sticking models to the board)
• food colour pens various• magic sparkles• rice paper/edible icing sheet• silver balls for tree decorations• glue or cooled boiled water• liquid colour black • lustre dust pearl white • alcohol• spaghetti or sugar sticks for
support• ribbon to finish board
Tools • cobblestone mat• wood grain mat• oval cutter• strip cutters• circle cutter 9cm (3½in)• clay gun• rolling pin• craft knife• cutting wheel• dresden tool• ball/shell tool• celpin (CelCakes)• piping nozzle• paintbrushes• scissors
Jane B Dec_CakeDecember2014 11/10/2014 08:13 Page 40

41
Simply Modelling
Photography: Shaun Wheatley
Jane B Dec_CakeDecember2014 11/10/2014 08:13 Page 41

Simply Modelling
Roll out 75g greymodelling paste,not too thinly.Mark with thecobble mat. Cutout a chimneywith a narrow top.Remove an ovalfor the fireplace.Cut a strip for thehearth. Mix asmall amount ofred and yellow,cut an oval for thefire. Stick to theside wall. Cut a 25g black modelling paste sausage in half. Bend the
rounded end and pinch a heel. Mark on the sole with a cuttingwheel and top with dresden tool. Flatten two x 5g whitemodelling paste balls, stick to top of the boots. Cut around thesides with scissors.
Insert a support through into the boots. Roll a 25g redmodelling paste cone, cut off the fat end and stick on to thetrousers. Stick a thin black strip around the middle for the belt.Stick on a small black square for the buckle. Add white furaround the bottom and up to the belt.
Stick a smallflattened pink ballinto the mouth.Stick two smallflattened fleshballs to the cheekarea. Roll twowhite teardropsand stick underthe nose, with thefat ends togetherunderneath.
Roll a 20g red modelling paste sausage long enough to sit acrossthe top of the boots. Mark the middle of the front and back witha dresden tool. Mark creases in each side. Stick to the top of theboots. Gently push the sides in so it narrows towards the waist.
Cut and dry apiece of lightbrown modellingpaste embossedwith the woodgrain mat readyfor the table.
Cut 3 pieces ofdowel to sit justbelow thewindow height.Brush with waterand cover withteddy bearbrown.
1
3
2
4
65
Preparation
Note
Always inform thecake/model’srecipient of anysupports that areused and itemswhich need to beremoved beforecutting the cake.
Insert a support as far as the trousers. Roll 25g fleshmodelling paste into a slight oval shape. Stick on to thesupport. Mark a smile with a piping nozzle then opendownwards slightly with a dresden tool. Mark the eyes witha celpin and stick on a small oval nose. Mark wrinkles onthe eyes, forehead and chin.
42 www.cake-craft.com
Jane B Dec_CakeDecember2014 11/10/2014 08:15 Page 42

Simply Modelling
Roll a small white sausage, pinch the middle so it is roughly a‘Y’ and stick under the chin for the beard. Cut into this withscissors as for the fur trim. Add white into the eyes and stick asmaller black ball on top for the pupils. Outline with blackliquid colour.
Add a white trim around the base and a white ball to the peakof the hat. Press into two small flesh balls with celpin, stick tohead and push inwards to shape. Press into a flat white sausagewith a shell tool and stick around the head beneath the ears.
Roll a 15g teddy bear brown sausage, roll around the middle toshape. Mark nostrils and eyes with a celpin. Mark the mouthbeneath the nostrils with a piping nozzle and open up with acelpin. Mark two holes into the top of the head with the celpin.
Add two white teardrops over the eyes for eyebrows and highlightthe pupils with pearl white and alcohol. Roll a 5g red modellingpaste cone; open out so it will sit on the head. Press in to thesides with dresden tool for creases and stick on to the head.
Roll four x 5g teddy bear brown cones. Flatten four smallchocolate brown ovals and stick to the front of each. Mark up themiddle with craft knife. Roll a 25g teddy bear brown modellingpaste cone, bend the fat end upwards. Stick to the legs.
7
9
8
10
1211
Use the side walltemplate tomeasure theheight of thechimney.
Mark wrinkles atthe edges of theeyes with the edgeof a craft knife orribbon insertiontool. Open theeyes up ifnecessaryafterwards.
Putting the blockinto the sleighwill help to givesupport to theedges. Instead ofpresents fill thesleigh with sweets.
Tips
Add white eyes and black pupils, outline with black liquid colourand highlight with pearl white and alcohol. Add two chocolatebrown eyebrows above the eyes. Roll two small long browncones, flatten. Press the dresden tool into the edges, leave to dry.
43
Jane B Dec_CakeDecember2014 11/10/2014 08:15 Page 43

Simply Modelling
Press a celpin into a small teddy bear brown ball, cut in half andpinch the cut edges together. Stick one to each side of the headfor the ears. Stick on a red ball for the nose and stick the headto the body.
Roll two x 5g green modelling paste long cones, flatten slightlyand curl up the pointed ends. Flatten two x 3g green balls, stickto the top of the cones. Make red trousers in the same way asfor Santa’s with 15g paste. Stick to the tops of the boots.
Make the hat in the same way as Santa, from 5g red paste andadd a yellow ball on the tip. Flatten two small flesh cones andstick to the sides of the head. Stick a 5g green sausage aroundthe front of the body for arms. Repeat with 10g red for Santa.
Once the antlers are dry stick into the holes on the top of thehead. Stick a chocolate brown circle on to the front of the body.Stick a brown ball to the back of the body.
Open out the fat end of a 15g green cone, stick on to thetrousers. Mark up the front with cutting wheel. Add four silverballs for the buttons. Press into 2g flat red ball with ball tooland stick to the neck. Add a small flesh ball into the neck.
13
15
14
16
1817
Use a clay gun totrim the edges ofthe sleigh or rollpaste on theworktop with asmoother to thin.
Add an oblong ofpaste in front ofthe fire for ahearth rug.
Tips
Insert a supportthrough the bodyplaced at an anglethrough one leg.Stick a 15g fleshball to the neck.Mark a smile witha piping nozzle,open downwardsslightly. Add thenose. Mark theeyes with a celpin.Add black eyesand highlightthese. Add pinkinto the mouthand a small whiteball for a tooth.
44 www.cake-craft.com
Jane B Dec_CakeDecember2014 11/10/2014 08:16 Page 44

Cut a second strip the same width as the sleigh. Curl one endaround a small celpin. Stick to the base and edges of the back ofthe sleigh. Roll two x 10g yellow modelling paste sausages; rollup each end to fit the sides of the sleigh. Finish the edges withyellow trim.
Simply Modelling
Roll out 50g red modelling paste and cut two x 9cm circles. Cuta segment from the bottom then use the cutter to remove asegment from the top. Cut a red modelling paste strip the samelength as the bottom of the sleigh.
Make various sized squares, rectangles and balls from assortedcolours for the parcels. Once dry decorate with food colourpens, paste bows and curled strands of sugarpaste. Open thenarrow end of a 50g light brown cone, roll a neck betweenfingers. When dry write ‘TOYS’ on the front. Add a ropearound the top.
Make Christmastrees from bottlegreen modellingpaste by rolling acone and cuttingin to it with scissors.
Add a calendarabove the door bywriting on ricepaper or edibleicing paper with afood colour pen.
21
20
22
Tips
Make some small toys as shown; a teddy from brown paste -cone body with smaller cones for limbs, a train from rectanglesand circles, a doll from a flattened cone and a flattened ball andballs made from two colours, cut and alternated together.
23 24
19
45
Stick the table under the window (see preparation). Once dryadd presents and toys, then add the elves, Santa, sleigh andreindeer. Finish the board with a ribbon.
Cut a thick piece of red modelling paste slightly narrower thanthe width of the sleigh, roughly 4cm long. Stick to the base ofthe sleigh. Stick the sides to the sides of the block with thebottom edge sitting on to the base.
Jane B Dec_CakeDecember2014 11/10/2014 08:16 Page 45
46 www.cake-craft.com
SugarVeil.com
Pg 46_1PAGE TEMP 14/10/2014 15:13 Page 2

Cake International / NEC - Birmingham - November 7 to 9
Stand D50 3 Century Court, Tolpits Lane, Watford WD18 9RS
Tel: 020 8451 6188 E-mail: [email protected]
47
Pg 47_1PAGE TEMP 14/10/2014 15:14 Page 1

Consumables• sponge cakes, 2 x 20cm, 1 x 25cm (2 x 8in, 1 x 10in)• cake drum square 46cm (18in)• buttercream 500g (1lb)• sugarpaste 3kg (6lb) white• sugarpaste black 250g (8oz)• airbrush colours black, brown (Kroma)• edible dusting colour brown, black, copper, white
(Sugarflair)• rejuvenator spirit• dowel rod• confectioners glaze• edible glue• edible white glitter
Tools • palette knife• serrated large knife• straight edged kitchen knife• bowl and mixing spoon• large non-stick rolling pin• ball tool• flower leaf modelling tool (PME)• paintbrushes• airbrush• flexi smoother (Squires)
48 www.cake-craft.com
Christmas
Heather Bicknell
Sleepy BabyReindeer
You will need
Heather dec_CakeDecember2014 16/10/2014 14:54 Page 48

49
Christmas
We have an exclusive look behind the scenes of the ShugaRush Sugar Grotto featuring at Cake International on
7th – 9th November at the NEC in Birmingham.
This little chap will be snuggled up with his majestic mummy atthe entrance to the grotto. Here is how you can make one for
yourself, an ideal centrepiece for any Christmas table.
Even if you have never carved a cake previously this easy to followproject incorporates some airbrush and hand painting techniques.
Photography:Clark Sm
ith-Stanley
Heather dec_CakeDecember2014 16/10/2014 14:55 Page 49

50 www.cake-craft.com
Christmas
Position one of the 20cm cakes on top of the 25cm cake with theedges aligned. Slice a straight edge 3cm in from the widest point.Slice the remaining 20cm cake in half and stack both halves withthe straight edges aligned. Place the straight edges together.
Sandwich the two layers together using a thin layer ofbuttercream. Carve the edge of the 25cm and 20cm cake toform a smooth sloping line.
Crumble the offcuts into a bowl and add sufficient buttercreamto make a dough texture. If required, this mixture can be chilledfor 15 minutes to make it firmer to handle.
Carve the leg shape by removing a triangle shape from the frontof the 20cm cake. Ensure it slopes downwards to shape thefoot. Place a small amount of the offcuts in front of thetrimmed stacked 20cm cake.
Use this mixture to model the muzzle into a rounded shapeadding an additional portion for where the antlers will sit.Cover the whole model with a layer of buttercream.
Slice the point from the two 20cm cakes, approxiately 2cm in.Cut a 3cm square from the 20cm and 25cm cakes.
1
3
2
4
65
Heather dec_CakeDecember2014 16/10/2014 14:56 Page 50

51
Christmas
Roll out white sugarpaste to the thickness of a pound coin thenlift and drape this over the cake.
Trim the excess sugarpaste away and place to one side. Usingthe ball tool again mark the placement of the eyes and the antlers.
For the antlers roll a tapered sausage of sugarpaste 8cm long.Cut into the outer edge and bend this outwards. Flatten andshape the top of the antler as shown.
Using a flexi smoother, rub the sugarpaste ensuring that all thedefinition of the cake is followed. The recess of the leg area canbe tricky, cut a line in the sugarpaste and use a ball tool to pushthe sugarpaste into the corners.
For the ears, roll a teardrop shape of sugarpaste,flatten and pinch in the middle to create a goodshape. Secure to the head using edible glue.
7
9
8
10
1211
Try searching forpictures of realreindeer, theyvary from greyshades to brownshades and it ispersonalpreference as towhich one tomake. Tryexperimentingwith differentratios of black tobrown airbrushcolour.
Tip
Insert half a dowel into the antler for support and then secureto the head in the previously made recess using edible glue.Support with folded kitchen paper if necessary until dry.
Heather dec_CakeDecember2014 16/10/2014 14:56 Page 51

52 www.cake-craft.com
Christmas
Attach around the base of each antler and the inside edge of theear and blend the edges into the head. The more hair you usethe fluffier the look of the reindeer.
For the tail, roll a ball of sugarpaste and flatten one edge. Usingthe modelling tool drag the paste on the edge as before. Thendrag down the top of the ball onto the flattened area to make atufty tail. Bend into a curve slightly to give movement to thetail and attach to the cake using edible glue.
Roll two small balls of white paste for the eyes to fit in the areapreviously marked out by the ball tool. Attach using edibleglue. Use the brown edible dust mixed with a couple of dropsof rejuvenator spirit and paint the eyes brown.
For the ear and antler fringe/hair, roll out a 3cm sausage ofsugarpaste. Using the modelling tool drag the edge of thesausage outwards and down towards the surface to create afringe. Do this on both sides. You will need one for each earand one for each antler.
Using the airbrush, start with the black colour and highlight allthe darker shaded areas. These being the leg recess, base of thecake, leg creases, ear and antler shadows, face markings anddown the spine.
13
15
14
16
1817
The closer theairbrush to thecake the finer thedetails and betterdefinition of theshading.
To remove anymistakes,airbrush paintcan be removedwith vodka andclean whitekitchen paper.
After paintingthe eyes withconfectionersglaze, clean yourbrush thoroughlywith brushcleaner to avoidruining yourbrush.
Tips
Give the whole cake a very fine mist of black to remove all thewhite, be light handed here, you can always add more but can’ttake it away. Overmist with another light spray of the brownpaying attention to the shadowed areas. This is where you canalter the look of your reindeer from a grey reindeer to a brownreindeer depending on your preferences.
Heather dec_CakeDecember2014 16/10/2014 15:00 Page 52

Place small sausages of black around the eyes for eyelids, use themodelling tool to add creases and to blend into the head.
Christmas
Add highlights to the eyes using the white dust and then paintthe entire eye using confectioners glaze. This will dull down theappearance of the bronze giving a more natural look.
Mix the black dust with the rejuvenator spirit and paint an ovalshape in the centre of each eye. The remaining brown area canthen be lightly overpainted using the bronze dusts andrejuvenator spirit.
Make sure younotify therecipient of thedowels in theantlers so thatthey can beremoved beforecutting the cake.
Cake can becoated inganache insteadof buttercream ifrequired.
21
20
22
Tips
To complete the board, place different sized sausages ofsugarpaste around the board and then overlay strips ofsugarpaste in drapes ensuring a snug fit to the cake. Use a balltool if required to push the sugarpaste into the corners.
23
19
Roll out the black sugarpaste and, using edible glue, attach arounded triangle shape for the muzzle and one for the hoof.Using the flatter end of the modelling tool indent the nostrilsand add the markings for the mouth as shown. Use the whiteand black dusts to add highlights or shadows to the face untilyou are happy with the look.
Finish with a lightsprinkle of ediblewhite glitter ifrequired for atouch ofChristmas sparkle!
24
53
Heather dec_CakeDecember2014 16/10/2014 14:58 Page 53
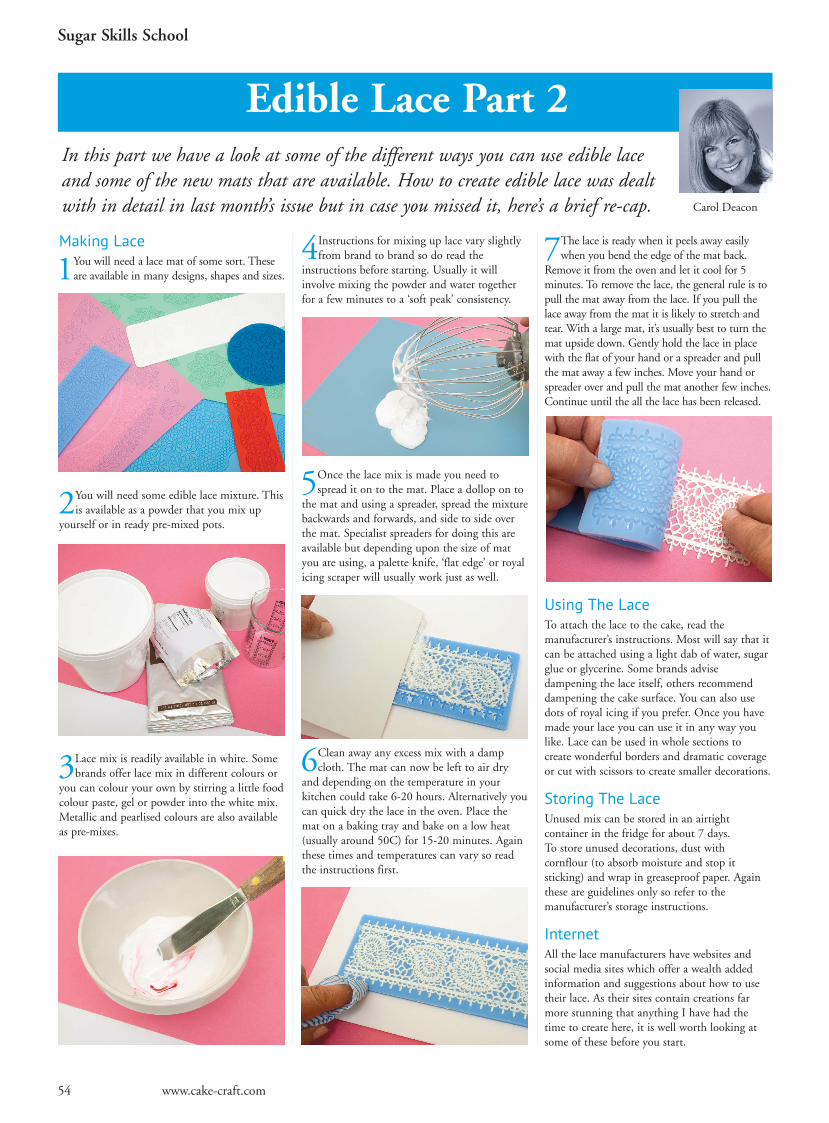
Making Lace
1You will need a lace mat of some sort. Theseare available in many designs, shapes and sizes.
2You will need some edible lace mixture. Thisis available as a powder that you mix up
yourself or in ready pre-mixed pots.
3Lace mix is readily available in white. Somebrands offer lace mix in different colours or
you can colour your own by stirring a little foodcolour paste, gel or powder into the white mix.Metallic and pearlised colours are also availableas pre-mixes.
4Instructions for mixing up lace vary slightlyfrom brand to brand so do read the
instructions before starting. Usually it willinvolve mixing the powder and water togetherfor a few minutes to a ‘soft peak’ consistency.
5Once the lace mix is made you need tospread it on to the mat. Place a dollop on to
the mat and using a spreader, spread the mixturebackwards and forwards, and side to side overthe mat. Specialist spreaders for doing this areavailable but depending upon the size of matyou are using, a palette knife, ‘flat edge’ or royalicing scraper will usually work just as well.
6Clean away any excess mix with a dampcloth. The mat can now be left to air dry
and depending on the temperature in yourkitchen could take 6-20 hours. Alternatively youcan quick dry the lace in the oven. Place themat on a baking tray and bake on a low heat(usually around 50C) for 15-20 minutes. Againthese times and temperatures can vary so readthe instructions first.
7The lace is ready when it peels away easilywhen you bend the edge of the mat back.
Remove it from the oven and let it cool for 5minutes. To remove the lace, the general rule is topull the mat away from the lace. If you pull thelace away from the mat it is likely to stretch andtear. With a large mat, it’s usually best to turn themat upside down. Gently hold the lace in placewith the flat of your hand or a spreader and pullthe mat away a few inches. Move your hand orspreader over and pull the mat another few inches.Continue until the all the lace has been released.
Using The LaceTo attach the lace to the cake, read themanufacturer’s instructions. Most will say that itcan be attached using a light dab of water, sugarglue or glycerine. Some brands advisedampening the lace itself, others recommenddampening the cake surface. You can also usedots of royal icing if you prefer. Once you havemade your lace you can use it in any way youlike. Lace can be used in whole sections tocreate wonderful borders and dramatic coverageor cut with scissors to create smaller decorations.
Storing The LaceUnused mix can be stored in an airtightcontainer in the fridge for about 7 days.To store unused decorations, dust withcornflour (to absorb moisture and stop itsticking) and wrap in greaseproof paper. Againthese are guidelines only so refer to themanufacturer’s storage instructions.
InternetAll the lace manufacturers have websites andsocial media sites which offer a wealth addedinformation and suggestions about how to usetheir lace. As their sites contain creations farmore stunning that anything I have had thetime to create here, it is well worth looking atsome of these before you start.
In this part we have a look at some of the different ways you can use edible laceand some of the new mats that are available. How to create edible lace was dealtwith in detail in last month’s issue but in case you missed it, here’s a brief re-cap.
54
Sugar Skills School
www.cake-craft.com
Carol Deacon
Edible Lace Part 2
Carol Deacon Dec_CakeDecember2014 11/10/2014 08:58 Page 54

This design made with white lace on a white orred cake would make a delicate Christmas cake.This is a more dramatic version made using darkcoloured lace so that you can see the designbetter. In fact although it looks black, this lace isactually made using a mix in a shade called‘Extra Dark Chocolate’. But for the purposes ofthis article we’ll call it black. You can use anysuitable mat or border design and any lace mix.If you are colouring your own I’d recommendusing edible black food colour powder so thatyou don’t affect the consistency of the lace mix.
1Coat the mat with lace mix and allow to dry.
2Remove the lace from the mould and ifusing a large wide mat like this, cut out a
strip wide enough to create a border around thecake. You may need two or three sections to goright round the cake.
3Carefully stick the lace into place against thecake.
4Cut out small sections of lace and arrangeand stick them on the top of the cake. Top
with a sugarpaste rose to finish.
Lace mat used : Sugar Veil : Rose Manilla
CookiesEdible Lace is an easy way to turn a simplecookie into something very grand. You can usevirtually any design of mat.
1Coat the mat with lace mix and allow to dry.You will need to make several sections of lace
depending upon the size of mat you are usingand the number of cookies you intend covering.
2Cut a strip of lace the width of the cookiewith scissors. You might need to cut a curve
into the edges.
3Dab a little water or sugar glue on to the backof the lace and carefully place it into position.
Lace mat used : Lakeland Lace-Look Silicone Icing Mat
55
Sugar Skills School
Black Lace Border Cake
Carol Deacon Dec_CakeDecember2014 11/10/2014 08:59 Page 55

56
Sugar Skills School
Gingerbread ManGingerbread is very seasonal this time of year.For a bit of fun you could dress yourgingerbread man in a pair of racey, lacey shorts!
1Cut out a small rectangle of edible lace andcut a small ‘V’ shape into the base.
2Stick the shorts in place with a light dab ofwater.
3Pipe a mouth, nose and eyes with a littleroyal icing.
Lace mat used : Lakeland Lace-Look Silicone Icing Mat
Sugarpasted Cookies and CakesPlacing a sugarpaste disc on the top of a cookie orcupcake before attaching the lace will really bringout the details of the lace. Red and green basecolours look especially festive at this time of year.
1Fill the mat, dry the lace and turn it out. Makeas many lace rounds as you have cookies.
2Cut out a coloured sugarpaste disc about thesame size as the top of the cookie and place
on top of the cookie. Stick it in place with alittle water, sugar glue or jam.
3Place the lace on top and hold in place witha light dab of water. Finish the cookie with a
sugarpaste rose in the centre if you wish.
Lace Mat used: “Milan Mould” from Sweet LaceExpress (Cake Craft World)
Cupcakes
The same design will work equally as well oncupcakes using either a disc or strip of lace.
Lace Mat used: “Orlando Mould” from Sweet LaceExpress (Cake Craft World)
Novelty CakesEdible lace is also a useful tool for the noveltycake maker. For instance it could be used tocreate long delicate bridal veils which previouslyhad always had always been difficult to create onwedding cakes. Cut out a long tapering triangularlace shape and attach to the bride’s head with alittle royal icing.
Lace Mat used: Sugarveil Flower Net 20-505
Another possibility is on a christening cake. Laya little baby model on a section of lace. Tomaximise the ‘aah’ factor when you produceyour cake, gather the lace up in one corner andhook under the baby’s hand to make it look asthough he’s pulling at the blanket.
Lace Matused:SugarveilFlower Net20-505
www.cake-craft.com
Carol Deacon Dec_CakeDecember2014 11/10/2014 08:59 Page 56

57
Sugar Skills School
Alternative MatsAs well as pretty lace, there are other matdesigns that can be used with lace mix. Here area few examples.
Cake Wrappers
If you want something a little bit different howabout making your own edible cake wrappers.
1Fill the wrapper mould with your chosencolour of cake lace mix. Bake or allow the
wraps to set then carefully release them from themoulds.
2Bend the wrapper into a circle and secure thejoin with a little royal icing.
3Use as you would a normal paper wrapperand place your cake within the wrap.
Lace Mat used: Claire Bowman Butterfly Wrappers
Sequins
At first glance the sequin mat didn’t look like aparticularly inspiring bit of kit but when usedwith a metallic or pearlised lace mix you cancreate wonderful little sequins which will add atouch of showbiz glamour to any cake. Theselittle cakes here merely show how to use themoulds. For more inspiration it is definitelyworth viewing the manufacturer’s website.
1Cover the mat with your chosen sequincolour lace mix and allow to set.
2Carefully ease the sequins out of the mat
3Attach the sequins to your cake using dots ofroyal icing. Allow them to overlap slightly as
real sequins do. If you are using a pearl ormetallic lace mix, this will add to the lustre.
Bridal Couple
Suitable for awedding,anniversary orengagement cake, this dancing couple and coachand horses can be used to bring a touch offairytale magic to a cake.
Lace Mat Used : Eternal Romance from Crystal Candy
Parcel
This ribbon matallows you tocreate a parcelcake quickly andeasily. Make afew extra bowsand use them tocreate quick and easy toppers for cupcakes.
Lace Mat Used “Ribbon” by Silikomart (Doric)
Carol Deacon Dec_CakeDecember2014 11/10/2014 09:00 Page 57

Bunting
Along with a string of bunting to hang aroundyour cake, this mat contains a ‘Happy Birthday’message too and useful little sweet decorations.
Lace Mat used: “Tricot Décor Candy Party” bySilikomart (Doric)
ButterfliesButterflies seem unlikely to fly out of fashionany time soon and are easy to create using ediblelace mix. These were created using gold andsilver metallic lace mixes and glued to the cakewith dots of royal icing.
Lace mat used “3D Butterflies” Karen’s EdibleCake Lace
Golden GirlBe resourceful withyour lace mats.Small mats can beused for cakecentrepieces as well
as individualcookies andcupcakes.
Lace mat used“Design CC2”Karen’s edible Cake lace
A Cautionary TaleAnd finally a warning to all lace users. Don’tstand a rack of drying washing next to your lacecreations. As you will know if you’ve ever madesugar flowers, moisture and sugar do not gotogether. Honestly I really should know better!As my washing dried in the warmth of theevening sunstreamingthrough thewindow mydelicate lace bowwent from this…
To this….
Lace mat used:Tricot DécorRibbon bySilikomart, Doric
Happy Christmas!
58 www.cake-craft.com
Sugar Skills School
Many thanks once again to the contributors to this article:
Cake Craft World www.cakecraftworld.co.ukClaire Bowman Cake Lace www.cakelace.co.ukCrystal Candy www.crystalcandyuk.comDoric www.doriccakecrafts.co.uk Karen’s Edible Cake Lace www.ediblecakelace.co.uk Lakeland www.lakeland.co.uk SugarVeil www.SugarVeil.com
Trouble Shooting As with any new product, practice makes perfect. During my few weeks of playing with it Igradually became less and less frightened of it and found that quite often you can bring yourlace back from the dead!
Dried Out LaceA few times the lace cracked and became brittle. One mat of dried out, un-useable lace sat bythe sink for quite a while. When I finally got round to picking the mat up to wash it I realisedit had absorbed moisture from the air and become pliable again. Reading up on the internetthere is a lot of advice about this. Surround your mat with damp cloths for an hour or so oreven gently dab with a clean damp cloth are various suggestions. It is certainly worth tryingbefore you throw a huge wobbly and bin the lot!
Sticky LaceYou have followed the manufacturer’s instructions to the letter. You have dried the lace for therequired length of time and it’s pulling away from the edges. You start to extract it from the matbut … urgh… there’s a blobby bit in the middle that’s still not dry. If this happens then simplypop it back into the oven and bake for another five minutes or so. The lace will take beingreheated quite happily.
Double FillingSome brands in some moulds shrivelled quite a lot when baked making them really delicate.Sometimes this wasn’t a problem but if it rendered the lace too weak to use you can double fillthe mould. Gently spread another layer of lace mix over the first and re-bake for about 10minutes or so. You should be left with stronger and thicker lace.
Carol Deacon Dec_CakeDecember2014 11/10/2014 09:00 Page 58

Pg 59_1PAGE TEMP 15/10/2014 14:32 Page 1

60 www.cake-craft.com
This contemporaryChristmas cake has beeninspired by a winter scenefound on a Christmas card.
Using food colour pastes aspaint, this easy hand painted
cake will bring accolades fromfamily and friends around the
Christmas tea table.
MoonlitWinter
You will need
Halima Jafari
Christmas
Consumables• fruit cake 20cm (8in)• cake drum 30cm (12in)• marzipan 800g (1lb 12oz) • sugarpaste navy 1.5kg (2lb 4oz) (Renshaw)• flower paste small amount• cooled boiled water• edible glitter white (Rainbow Dust)• royal icing 1 tbsp • lustre dust snowflake (Sugarflair)• superwhite powder (Sugarflair)• kitchen roll
Tools • paint palette• flat medium sized brush• small round brush• pencil and paper• icing smoothers• large rolling pin• craft knife• scriber tool• parchment paper• paper icing bag• nozzle No. 2• small snowflake cutter
Halima Dec_CakeDecember2014 16/10/2014 15:15 Page 60

61
Christmas
Photography:Clark Sm
ith-Stanley
Halima Dec_CakeDecember2014 16/10/2014 15:15 Page 61
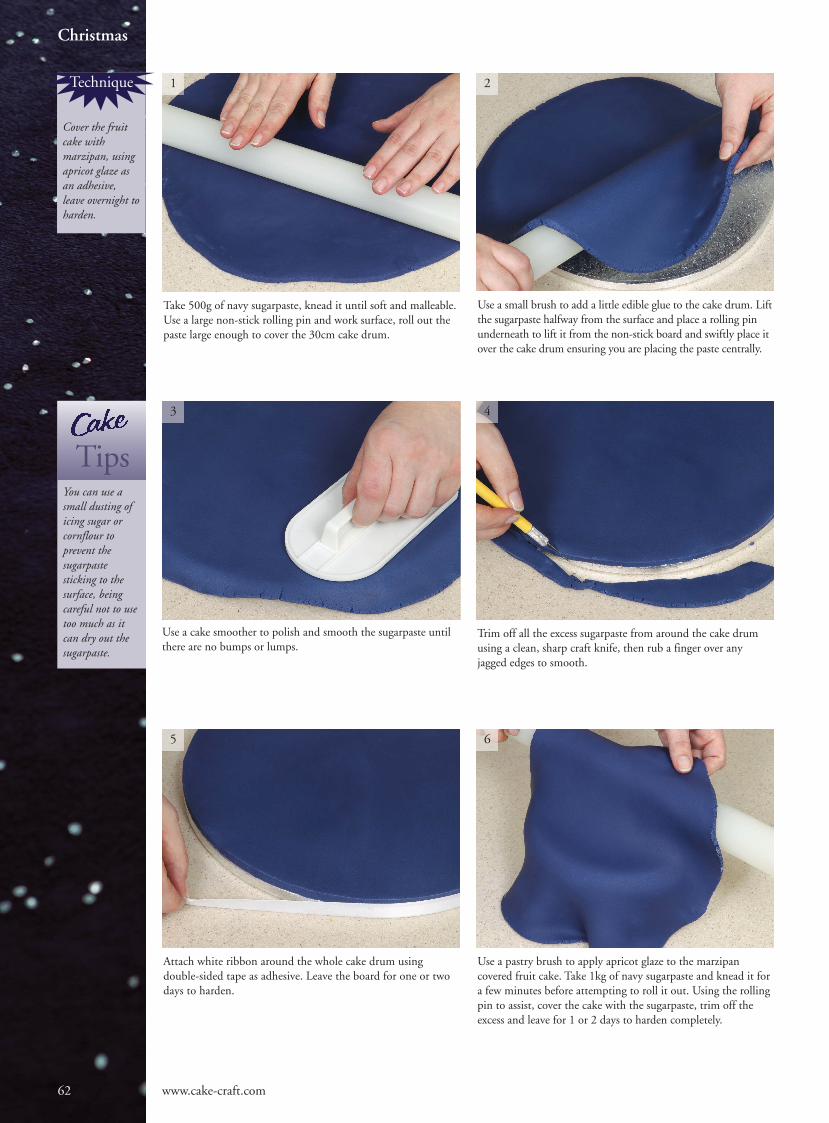
62 www.cake-craft.com
Christmas
Take 500g of navy sugarpaste, knead it until soft and malleable.Use a large non-stick rolling pin and work surface, roll out thepaste large enough to cover the 30cm cake drum.
Use a small brush to add a little edible glue to the cake drum. Liftthe sugarpaste halfway from the surface and place a rolling pinunderneath to lift it from the non-stick board and swiftly place itover the cake drum ensuring you are placing the paste centrally.
Attach white ribbon around the whole cake drum usingdouble-sided tape as adhesive. Leave the board for one or twodays to harden.
Trim off all the excess sugarpaste from around the cake drumusing a clean, sharp craft knife, then rub a finger over anyjagged edges to smooth.
Use a pastry brush to apply apricot glaze to the marzipancovered fruit cake. Take 1kg of navy sugarpaste and knead it fora few minutes before attempting to roll it out. Using the rollingpin to assist, cover the cake with the sugarpaste, trim off theexcess and leave for 1 or 2 days to harden completely.
Use a cake smoother to polish and smooth the sugarpaste untilthere are no bumps or lumps.
1
3
2
4
65
You can use asmall dusting oficing sugar orcornflour toprevent thesugarpastesticking to thesurface, beingcareful not to usetoo much as itcan dry out thesugarpaste.
Tips
Cover the fruitcake withmarzipan, usingapricot glaze asan adhesive,leave overnight toharden.
Technique
Halima Dec_CakeDecember2014 16/10/2014 15:16 Page 62

63
Christmas
Make up some royal icing and a paper icing bag. Place a No. 2nozzle in the bag and add 1 tbsp of the royal icing. Fold downthe top of the bag and add a few blobs of royal icing to thecentre of the covered drum. Place the cake on top of the boardand use cake smoothers to position in place.
Remove the parchment paper and using the previously maderoyal icing, pipe over each dot covering three rows beforefollowing Step 10 then return to this step. Continue with thisuntil each dot is piped over with the royal icing.
Pour a small amount of edible pearl metallic paint into a paintpalette and use a fine round brush to colour each pearl with thepaint. Allow to dry.
Measure parchment paper to go round the cake, using a penciland ruler, draw out the pattern of dots drawing four down thentwo down and repeat this until the parchment paper is covered.Keep a distance of 5mm between each dot. Attach the paper tothe cake using a pearl or glass end pin then use a scriber tool tomark out the dots.
Use a damp flat brush to pat down the tips of the piped pearlsto prevent a pointed finish on them. Allow the pearls to dry foraround 1 hour before following the next step.
7
9
8
10
1211
Using thesmoothers toposition the cakein place willensure no fingeror nail marks arefound on thecake, whenpainting on thecake a verysmooth surface isneeded to workon so be extracareful.
Think about theposition of thetrees whendrawing them,rememberingthat the closesttree will be largerand the trees thatare further awaywill be smaller inproportion.
Tips
Measure a piece of paper 20cm x 20cm and draw a simplewinter scene. Do not worry about the picture being perfect aslong as you have a guide to follow. Keep the picture in viewwhen moving on to the next painting steps.
Halima Dec_CakeDecember2014 16/10/2014 15:16 Page 63

64 www.cake-craft.com
Christmas
Add a tiny drop of water to the navy paste and mix. Use thevery tip of the fine round brush to pick up some navy colour.Follow your picture to copy its outline on to the top of thecake. Keep two glasses of water at hand to clean your brushesbetween use, one for white and one for navy.
Use the medium flat brush dipped into the navy paste to beginbuilding up colour, use the very tip of the brush to create thetexture of the trees by dabbing the tip of the brush over theshape of the trees. Wash your brush well as the same brush isused for the white in the next step.
Use the fine brush to add white snowdrops all over the scene,paint small and larger blobs of paint to give realism.
Use a cocktail stick to place a small amount of navy colourpaste into a paint palette, in another well of the palette add 1tsp of superwhite powder. Pour a small amount of cooled boiledwater on to the superwhite powder and mix until it becomes athick white colour paste.
Use the flat medium brush to pick up some white paste fromthe palette, paint the moon in the top right hand corner anduse downward strokes over the tops of the hills to create a snoweffect. Build up the colour gradually rather than applying thickamounts of colour in one go.
13
15
14
16
1817
Use kitchen towelto dab the tip ofthe brush on to,this will absorbexcess paint. Iftoo much paint ison the brush yourpainting willbecome wet andmessy.
Tip
Use the finer brush with navy paint, again be careful not to pickup too much colour on the brush, then paint the outlines of thehills and enhance the trees, also colour the bottom of each hillin upward stokes. Wash the brush thoroughly.
Halima Dec_CakeDecember2014 16/10/2014 15:17 Page 64

Roll out a small amount of white flower paste and cut out eightsmall snowflakes.
65
Christmas
Tip a small amount of glitter into the glitter pot lid and tapgently over the cake to add a beautiful finish to the scene andgive it a magical glow.
Dampen the wide brush with water and pat on the kitchentowel. Brush over and around the moon, going from left toright only, this will create the glow from the moon.
Place the cut out snowflakes on a clean sheet of kitchen toweland dust each one with the snowflake lustre dust.
21
20
22
Use a small amount of edible glue to attach each snowflakearound the board.
23
19
Halima Dec_CakeDecember2014 16/10/2014 15:18 Page 65

66 www.cake-craft.com
SUGAR CITYHome of DPM Co’s wonderful moulds, veiners,
platinum flowerpaste, colours, cutters, tools, gums & glazeVISIT OUR ON LINE SHOP www.sugarcity.co.uk
Speedy mail order service UK and abroadTrade enquiries: DPM Co 01424 201505
Email: [email protected]
78 Battle Road • St Leonards-On-SeaEast Sussex TN37 7AG
Tel: 01424 432448 • Fax: 01424 421359E: [email protected] W: www.sugarcity.co.uk
Let Creating Cakesbe part of all your creations
T: 01795 426358www.creating-cakes.co.uk
Vast range of cake decorationsBespoke handmade cakes & toppers
Cake decorating equipment & suppliesTin and stand hire
NEW online store with FREE ‘click & collect’ service
63 East Street, Sittingbourne, Kent ME10 4BQAlso small unit
Hempstead Valley, Gillingham ~ open till late
10% discount from our online storeJust add voucher code CDM10 at the checkout
valid until 24/12/14
The Glitter Mine
Pg 66_1PAGE TEMP 14/10/2014 16:25 Page 2

67
Pg 67_1PAGE TEMP 14/10/2014 15:16 Page 1

68 www.cake-craft.com
Cake Boutique
Polar Bear Cake3 x 20cm madeira cakes stacked and iced with Sugar and Crumbs Velvet VanillaIcing Sugar (27D-IVV500). Carve the initial shape to give the basic shape of the
body, legs, head, snout etc.
Made by M
olly Robins from
Mollys C
ake Creations
Create lace snowflakes usingDoric’s new Wondercake’sSnowflake Mat, (34E-116)available from all Doricstockists.
Mix Doric Sweet Lace to use in the Snowflake Mat(27T-100), lace can be premade and stored months in advance.
Roll out strips of Ivory Sugarpaste (21M-SPIV50) and use the shell end of the shell and blade PME tool (33C-124) to createthe fur effect. Attach the strips starting from the bottom andbuild up the layers, using the blade side to blend the layerstogether to give a realistic appearance. Make the eyes from ClearIsomalt (27J-A09101) and then paint the pupils on the underside.
Use clear Isomalt tocreate realistic eyes (27J-A09101).
The Polar Bear’s noseis glazed using pipinggel (27J-E12218).
Make the nose andmouth detail fromBlack Sugarpaste(21M-SPBK50) andtexture with acocktail stick. Addglaze to the nosewith piping gel (27J-A09101). Dustthe fur and aroundthe nose withSugarflair blackblossom tint(27I-D134).
Freeze the cake prior to carving tomake sculpting easier.
Cover the cake in an initialsmooth layer of M&B Ivorysugarpaste (21M-SPIV50).Make the basic shape for theears, arms, paws etc usingsugarpaste and attach usingedible glue (27J-E12104).
Reader Offer • Reader OfferDoric are offering 5 of our readers a chance to win a potof sweet lace (RRP £18.00) along with a new sweet lacesnowflakes mat, featured in the project (RRP £30.86).For details on how to enter for this giveaway see the topof page 10 and place Doric December on postal entries.
All items are available from Doric Cake Crafts
CB Dec_CakeDecember2014 16/10/2014 14:03 Page 68

69
Cake Boutique
Pic?M
ade by Molly R
obins from M
olly’s Cake C
reations
CB Dec_CakeDecember2014 16/10/2014 14:04 Page 69

Home Baking
Favourite Christmas BakesRecipes for popular Christmas bakes to make,
give and share over the festive season. ValerieHedgethorne
70 www.cake-craft.com
Photography: Brett C
aines
Ingredients25g (1oz) unsalted butter25g (1oz) caster sugar25g (1oz) glacé cherries – chopped25g (1oz) blanched almonds – finely chopped15g (½oz) flaked almonds25g (1oz) together mixed peel, angelica and glacéginger1 tablespoon single creamCoating50g (2oz) plain chocolate
Method
1Line the baking trays with rice paper. Heat theoven to Gas 4 / 180°C / 350°F.
2Melt the butter in a small pan, add the sugarand stir until dissolved, then bring to the boil.
3Stir in the fruits and nuts with the cream.Leave to cool slightly.
4Place small spoonfuls of the mixture well aparton the baking trays. Bake for 5 – 7 minutes oruntil golden brown. If necessary push theminto a good round shape.
5Allow them to cool on the rice paper then peelit away from the edges.
6Melt the chocolate and spread on the ricepaper and make wavy lines with an icingcomb or a fork. Leave to set.
7Store in an airtight container. Although theywill keep for a few days they are really besteaten fresh.
FlorentinesThese delicious biscuits area mixture of glacé fruitsand nuts encased in caramel.
When cold they are coatedon one side with chocolate.There are many differentrecipes for these but thisone is scrumptious.
You will need 2 baking trays,sheets of rice paper and anicing comb for the chocolate.
The rice paper gives a good smooth surface for coating.
Baking Dec_CakeDecember2014 11/10/2014 09:41 Page 70

71
Home Baking
IngredientsPastry175g (6oz) plain flour110g (4oz) butter25g (1oz) caster sugar1 egg – beatenFilling150g (5oz) raisins25g (1oz) cranberries fresh or frozen2 tablespoons light muscovado sugar4 satsumas2 bananas50g (2oz) ground almonds
Method
1Pastry: Rub the butter into the flour,add the sugar and mix to a firmdough with one tablespoon of theegg. Wrap and leave in therefrigerator for at least 15 minutes.Grease the tin or plate. Heat the ovento Gas 6 / 200°C / 400°F.
2Roll out the pastry to line the tin andreserve the trimmings.
3Filling: Mix together the raisins,cranberries and sugar. Peel andsegment the satsumas, cut them intopieces, catching the juice. Mash thebananas and stir into the raisin mixwith the satsumas and the groundalmonds. Spoon into the pastry.
4Roll out the reserved pastry and cutout holly leaves. Arrange these on topof the filling in the centre.
5Brush the leaves with the remainingegg. Bake for approximately 25minutes or until the pastry is goldenand the filling is just firm.
6Serve either warm or cold with crèmefraiche or Greek yoghurt and place afew cranberries in the very centre ofthe pastry holly leaves.
ChristmasTart
This is an open tartdecorated with pastryholly leaves.
The mixture ofChristmas fruits gives alovely flavour to beenjoyed at any time overthe festive season.
You will need a 20cm (8in)
tart tin or pie plate and a
holly leaf cutter.
Make this in advance and freeze.Defrost when required and warm for a few minutes before serving.
Baking Dec_CakeDecember2014 11/10/2014 09:41 Page 71

Home Baking
72 www.cake-craft.com
Tunis Cake
IngredientsCake175g (6oz) butter175g (6oz) golden caster sugar3 large eggs150g (5oz) self raising flour50g (2oz) plain flour25g (1oz) ground almonds1 large orangeTopping150g (5oz) good quality plain chocolate1 tablespoon water25g (1oz) unsalted butterButter Icing25g (1oz) butter50g (2oz) icing sugar1 orangeMarzipan Fruits110g (4oz) marzipanFood colourings: yellow, red, green, brown
Method
1Line the tin with greaseproof paper and greaseit. Heat the oven to Gas 3 / 170°C / 325°F.
2Cream together the butter and sugar.Gradually beat in the eggs. Fold in the floursand ground almonds with the grated orangezest and enough juice to give a fairly softdropping consistency.
3Put into the tin and smooth the top, making aslight hollow in the centre.
4Bake for approximately 1 hour or until firm inthe centre. Cool for ten minutes in the tinbefore turning out onto a cooling rack.Decorate when completely cold.
5Chocolate Topping: Put the ingredients intoa basin over a pan of hot water and stir tomelt. Leave to cool a little.
6Secure a piece of foil or Bake-O-Glide tightlyaround the cake extending above the top.
7Pour in the melted chocolate, tap the cake toget a smooth finish and leave to set thenremove the foil.
8Butter Icing: Cream together the butter andsugar with a little orange juice. Using thepiping bag and star tube pipe a shell borderaround the top edge.
9Colour the marzipan to make small fruits e.g.bananas, apples, oranges etc. and place themon top.
10Fasten a ribbon around the cake.
For some of us this cake is a trip down memory lane. It was once sold in a tin atChristmas but it is once again becoming popular. It is an orange flavoured Madeira
topped with a thick layer of chocolate and a decoration of marzipan fruits.
You will need a deep round 18cm (7in) cake tin, a large piping bag, a star tube and a ribbon.
Use a chocolate with at least 70% cocoa butter.
Baking Dec_CakeDecember2014 11/10/2014 09:42 Page 72

73
Home Baking
Bûche De Noël
IngredientsChocolate Sponge45g (1½oz) unsalted butter3 eggs75g (3oz) caster sugar75g (3oz) plain flour15g (½oz) cocoaCrème au Beurre2 tablespoons cocoa50g (2oz) granulated sugar4 tablespoons water2 egg yolks150g (5oz) unsalted butterDecoration50g (2oz) white chocolate50g (2oz) marzipanGreen food colouring
Method
1Line the tin with silicone paper. Have readytwo pieces of paper the size of the tin,
2Heat the oven to Gas 5 / 190°C / 375°F.
3Melt the butter and leave to cool.
4Whisk the eggs and sugar over a pan of hotwater until very thick.
5Sieve the flour and cocoa together and foldinto the mixture alternately with the butter.Pour into the tin and bake for 12 – 15minutes until firm to a fingertip touch.
6Turn out onto a sugared paper, cut a verythin slice off the sides and mark a cut at ashort end, only part way through. Place thesecond piece of paper on top and roll uptightly with the end underneath.
7Crème: In a small basin blend the cocoawith just enough boiling water to make asmooth cream.
8Soften the butter in a bowl. In a heavy basedpan over gentle heat dissolve the sugar in thewater then boil to 105°C/214°F. Do not stir.
9Have the egg yolks in a bowl and pour onthe syrup in a thin stream whisking all thetime until thick and mousse-like.
10Whisk this into the softened butter a littleat a time, followed by the cocoa.
11Unroll the cake, remove the paper, spreadover half the crème and re-roll.
12Place on a board or plate. Cut off a smallslice at an angle and place on the side ofthe cake to resemble a branch. Spread allover with the remaining crème. Make lineswith a fork dipped in hot water to looklike bark. Smooth a small section and pipeJoyeux Noël in white chocolate.
13Colour the marzipan green, roll out andcut out holly leaves to decorate the top ofthe log.
Always use the crème at room temperature,not straight from the refrigerator.
This must be thefavourite of all the
cakes and this recipewith the wonderful
crème au beurre fillingand coating is the tops.
You will need a swiss roll tin 30 x 23cm (12 x 9in),
a sugar thermometer and a holly leaf cutter.
Baking Dec_CakeDecember2014 11/10/2014 09:42 Page 73

We can make biscuits any time but Christmas gives us theopportunity to take pleasure in baking special cookies for ourguests or to give as presents. Try some of the following delights.
Food Facts
ValerieHedgethorne
74
Christmas Biscuits
FlorentinesThe recipe for these is on thebaking pages. They are a bitspecial, full of nuts and glacéfruit encased in crisp caramelwith a chocolate coating on oneside.
Some recipes add flour but thatisn’t necessary. The fruits canvary and other ingredients canbe added such as sunflowerseeds, walnuts and currants.The chocolate should be ofgood quality and coating halfwith white chocolate and halfmilk chocolate can make adelightful display.
To avoid any difficulties in removing them fromthe baking tray it is recommended they are bakedon rice paper which also gives a base for thechocolate.
ShortbreadA Scottish speciality over many years usedespecially at Christmas.
Pretty Christmas shortbreads can be made havingchopped glacé cherries and angelica kneaded in.The shortbread is made with the usual recipe i.e.50g (2oz) caster sugar, 110g (4oz) butter and175g (6oz) flour. Roll out to approximately 1cm(½in) thick and cut into neat fingers crimped atone end. Prick with a fork and bake in a cool oven.
Dutch Christmas Biscuits(Speculaas)There are several recipes for these and they areactually a version of shortbread with spices,lemon and nibbed almonds.
Ingredients175g (6oz) butter150g (5oz) soft brown sugar225g (8oz) self raising flour½ teaspoon mixed spice1 teaspoon cinnamon½ lemon – grated zest110g (4oz) nibbed almonds
Method
1Roll out and cut into rounds or shapes, bakein a moderate oven for about 20 minutes.
Christmas Tree BiscuitsThis recipe makes biscuits which bake hardenough to keep and hang on the Christmas tree.They can be cut into a variety of shapes such asstars, bells, trees, angels etc. and threaded with aribbon for hanging. They are fun to make anddecorate using coloured icing and hundreds andthousands so they will also keep children amusedwhilst they help make them.
You will need baking trays and cutters of yourchoice, a paper icing bag and a small plain tube.
Ingredients75g (3oz) granulated sugar90g (3½oz) margarine40g (1½oz) golden syrup½ beaten egg225g (8oz) plain flour¼ teaspoon ground ginger¼ teaspoon mixed spice ½ teaspoon baking powder1 tablespoon water225g (8oz) icing sugar1 egg whitefood colouringscoloured hundreds and thousandsnarrow red ribbon
Method
1Put the sugar, margarine and golden syrupinto a small pan and melt them together over gentle heat.
2Sieve the flour, spices and baking powdertogether, then mix to a firm dough with theegg, syrup mixture and water. Leave to restfor about 15 minutes.
3Grease the baking trays and heat the oven toGas 4/180°C/350°F.
4Roll out the dough fairly thinly and cut outthe biscuits, place them on the baking trays.
5Make a small hole in the top of each tothread the ribbon through.
6Bake for 10 – 15 minutes until lightly brown. Loosen on the baking trays with apalette knife and leave to cool.
7Make the icing and colour as required andpipe on the decorations using colouredhundreds and thousands where required.
8These biscuits can be stored in an airtight container until required.
Greek Christmas Biscuits(Kourabietes)These are a Grecian national biscuit baked forChristmas and Easter. Although similar to ourshortbread they can make a delicious changeboth in texture and shape.
To make them even more special finely choppedalmonds are sometimes added.
Ingredients110g (4oz) unsalted butter50g (20z) icing sugar1 egg yolk225g (8oz) plain flour¼ teaspoon baking powder25g (1oz) finely chopped almonds2 teaspoons brandyIcing sugar to dredge
Method
1Cream the butter and sugar, beat in the eggyolk then add the other ingredients.
2Refrigerate. Divide into 18 and form intodifferent shapes. e.g. rings, ‘s’ shapes andcurves.
3Bake in a moderate oven for about 20minutes then toss them in icing sugar whilstthey are still warm.
www.cake-craft.com
Other attractivebiscuits can be made with acoloured boiled sweet placed ina hole in the centre beforebaking which will look likecoloured glass.
FF Dec_p074_CakeDecember2014 11/10/2014 09:56 Page 74

AIRBRUSHING
www.shesto.comThe
AIRBRUSHINGSpecialists
Kits, Colours,‘How To’ Videos & DVDs
Tel: 020 8451 6188email: [email protected]
Blue RibbonsSUGARCRAFT
29 Walton Road, East Molesey, Surrey KT8 0DH T: 020 8941 1591E: [email protected] W: www.blueribbons.co.ukSpeedy & Secure
SugarDaddy’sSugarcraft Shop
1 Fishers Yard, Market Square, St Neots, Cambs PE19 2AF
Tel/Fax 01480 471200
Website: www.sugar-daddys.co.uk
Authentic CakesAn Aladdin’s cave of cakemaking,
decorating & equipmentClasses available on request
Tin / stand hireWedding / celebration cake specialist
www.authenticcakes.co.ukFREE local parking available
01223 246840124 Wulfstan Way • Cambridge
CAKE EQUIPMENT CAKE STANDS / BOXES
Yorkshire’s Biggest Stock Range
1 Lotherton Way | Garforth (next to Tesco) | Leeds LS25 2JYNOW ALSO AT: Unit 2 Pyramid Court | Acomb | York YO26 5NB
Open Monday - Saturday 9.30am - 5pm
T: 0113 287 3629 (Leeds) 01904 791201 (York)
o Large showroomo Doorstep parkingo Low prices
TRADE SUPPLIEROPEN TO THE PUBLIC
Please quote the following code when ordering ‘I love Cake’ - Find out about our mystery prize folks
DEVON
New shop now OPEN at Unit 7 Falcon Way, Eagle Business Park, Yaxley,Peterborough PE7 3GR. Tel: 01733 245451Come along and see what great products andcake making ideas we have in store for you!
See our websitewww.cambridgeshiresugarcraftsupplies.co.uk
CUTTERS
LIKE US ON FACEBOOK FOR FANTASTIC COMPETITIONS
CAMBRIDGESHIRE
BASINGSTOKE
BASINGSTOKE SUGARCRAFT CENTRE &SCHOOL OF SUGARCRAFT
Wide range of sugarcraft equipmentTin/stand hire • photo-scan system available
CLASSES23b Goat Lane ~ Basingstoke ~ Hants
01256 470087Www.basingstokesugarcraftcentre.co.uk
New catalogue out now!See our new look website
Guy Paul & Co LtdPlease contact us for all your sugarcraft supplies
TRADE ONLY
PO Box 522 • Amersham HP6 6ZNTel: 01494 432121 • Fax: 01494 432727
www.guypaul.co.uk e-mail: [email protected]
NOW AVAILABLE IN THE UK!!
www.dunstablecakehouse.co.uk
Try this fantastic and colourful sugarpasterecommended by Debbie Brown
NOW! Order online at...
Pg 75_Pg 77 15/10/2014 16:12 Page 1

Blue RibbonsSUGARCRAFT
29 Walton Road, East Molesey, Surrey KT8 0DH T: 020 8941 1591E: [email protected] W: www.blueribbons.co.ukSpeedy & Secure
CHESHIRE
COURSES CUTTERS
CUTTERS
Cameo CakecraftSUGARCRAFT SUPERMARKET
Unit 4 , Park Entrance Business Centre, Vittoria Street, Birkenhead Merseyside CH41 4EZ
T: 0151 647 1697Largest sugarcraft shop on the Wirral
www.cameo-cakes.com
Manufacturers of Fine Quality Metal Cutters suitable for Sugarcraft and Cold PorcelainOver 300 designs
For a brochure or more details please Tel 01202 659760 or Fax 01202 659133
Email: [email protected] Moor Road • Broadstone • Dorset BH18 8AZ
or check out our website ~ www.framarcutters.co.ukSuppliers to the trade only
We are expanding our customer base - contact us now for details of our range
FRAMAR CUTTERS LTDFRAMAR CUTTERS LTD
“Fine Cut”EXTENSIVE RANGE OF HIGH QUALITY TIN PLATE,
SUGARCRAFT CUTTERS MANUFACTURED IN ENGLANDEnquiries for catalogue of over 450 products inc
NEW RANGE of Décor Art Cutters to:‘FINE CUT’ SUGARCRAFT PRODUCTS
Workshop No. 4 • Old Stable BlockHolme Pierrepont Hall • Holme Pierrepont
Nottingham NG12 2LD • Tel/Fax: 0115 933 4349www.finecutsugarcraft.com
NEW - DIGITAL EDITIONS ARE NOW AVAILABLE... go to www.cake-craft.com
Tracey’s Cupcake Corneris an Essex based company
specialising in bespoke cakes and cupcakes. We are pleased to be able to offer cupcake classesfor beginners at just £50 per person for a full day.
Enquire via our websitewww.traceyscupcakecorner.com
or e-mail me at [email protected]. You can also find us on Facebook
ESSEX
67-69 VICTORIA ROAD
ROMFORD • ESSEX RM1 2LTTEL: 01708 761727
Specialists in cakes, silk flowers, equipment,
lessons, favours
For all your
sugarcraft and
cake decorating
requirements.
Call in for some
friendly service
& advice.
449-451 Ashley RoadParkstonePoole BH14 0AXTel: 01202 716286
www.magicmomentssugarcraft.co.uk
POOLE WINDSOR
• Cake Decorating Supplies & Accessories• Park free and easily at our shop.• We serve the Slough, Windsor and
Maidenhead area• In-house Classes and Tin and Stand Hire• 01753 865682• [email protected]• www.pipedreams-sugarcraft.co.uk
BILSTON
All About Cakes46 High Street, Bilston, Wolverhampton WV14 0EP
T: 01902 497498 E: [email protected]
Please call in to see usOur Sugarcraft school offers classes from beginner to advanced.
Tins for hire, Sugarflair and Rainbow Colours, FMM, Karen Davies, Jem, PME, Squires, Pillars, Tinkertech,
Great Impressions, FPC and many many more.We are always here to give you help and advice.
Have a look at our online shop for offerswww.allaboutcakesbilston.co.uk
��
BIRMINGHAM
Happy Anniversary - 30 Years!
DUMMIES
Dummies Directwww.dummiesdirect.co.uk
T: 0121 778 4692
Dummies from high qualitypolystyrene in all shapes and sizes
Dummies Direct
ICING WORLD1196 Warwick Road, Acocks Green, Birmingham B27 6BY
Tel: 0121 706 2922www.icingworld.co.uk
ONLY 6 MILES FROM THE NECHuge range of sugarcraft equipment including PME, JEM, Framar,
Squires, Rainbow Dust, Sugarflair and many more. Tin and stand hire • Ribbons
High quality marzipan and sugarpaste at low pricesSmall friendly classes in all aspects of sugarcraft.
We are approved teachers for PME diploma coursesVisit on our late night - Wednesday open til 7pm
LOTS OF FREE FRIENDLY ADVICE
Pg 76_Pg 77 15/10/2014 16:13 Page 1
18 Upper High St, Thame,Oxon OX9 3EXT: 01844 213428E: [email protected]: www.sugaricing.com
CALLING ALL CAKE DECORATORS - Difficult to find the supplies you need?
Just pick up the phone and give us a call or visit our website to see thevast range of equipment we can supply.
Boards, boxes, cutters, tins, sugarpastes and marzipan,our own world renowned flower paste and lots more...
Fast and friendly mail orderPLEASE MENTION THIS ADVERT WHEN ORDERING
Corteil & BarrattServing the world of cake for over 30 years
Complete range of sugarcraft / cake decoratingmaterials and equipment
Demonstrations, shop courses and classes availableCake stand & tin hire
Celebration cakes made to orderLarge selection of wedding favours
We offer a large selection of sugar flowers to tradeand retail customers at very competitive prices.40 HIGH STREET • EWELL VILLAGE
EPSOM • SURREY KT17 1RW
Tel/Fax: 020 8393 0032www.cakesrus.co.uk
T R A D E D I S C O U N T • M A I L O R D E R S E R V I C E
SURREY
THAME
Blue RibbonsSUGARCRAFT
29 Walton Road, East Molesey, Surrey KT8 0DH T: 020 8941 1591E: [email protected] W: www.blueribbons.co.ukSpeedy & Secure
SUNFLOWER SUGARARTSUGAR ARTISTRY
To advertise, please call
Melanie Underwoodon
01690710455
MOULDS
LEICESTERSHIRE
Sugar & IceLEICESTERSHIRE’S LARGEST
CAKE DECORATING SPECIALISTTin/stand hire • edible photoplaques • sugarcraft classes
equipment salesWedding & Celebration Cakes -
made to order
NEW BIGGER PREMISES NOWAT COALVILLE
24 Hotel St, Coalville LE67 3EP01530 817210
3-5 Cyril St, Leicester LE3 2FF0116 263 0846@sugarandiceleic
DERBYSHIRE
CRAZY ABOUTCAKECRAFTFor all your sugarcraft equipment
Contact:1 New Beetwell Street
Chesterfield • Derbyshire S40 1QR01246 234853
www.crazyaboutcakecraft.co.uk
DUDLEY
Rose-Maries Cakes & SugarcraftCake decorating supplies, beginners cake decorating
courses, one-one tuition and monthly workshopsFor all your cake decorating needs andfriendly advice please give us a call:
01902 23810007917 176453 www.rose-maries.org.uk Unit 3, Castle Street, Roseville, Coseley,
West Midlands WV14 9DP
DEVON
ICING ON THE TOP & CROSS PATCH
Specialists in sugarcraft equipmentand decorations. Tin and stand hire.
Classes7 Ladysmith Road • Lipson • Plymouth
01752 252836
Well worth a visit
KINGSWINFORD
Occasional Cakes& Sugar Craft Supplies
Visit our site at www.occasionalcakesuk.comSHOP 2 BARNETT LANE • KINGSWINFORD DY6 9PJ
TEL 01384 402204
Stockists of... PME, Wilton, JEM, Katey Sue Designs, Purple Cup Cakes, Blossom Art and many more
MAIL ORDER AVAILABLEBOOK NOW for classes - all levels available
Renshaws 5kg White Sugarpaste - from £13.50Bulk buy savings - call for details
NOW BOOKING - CAKE DECORATING CLASSES
Pg 77_Pg 77 15/10/2014 16:14 Page 1

78 www.cake-craft.com
ON SALE NOW
Available from and all good newsagents
or order direct at www.cake-craft.com
Over 90 pages of design ideas to inspire or adapt
DIGITAL EDITIONSnow available - go to www.cake-craft.com
Just £4.95for 100 pages
Pay by direct debit and receive a FREEcopy of Cake Craft Guide 11 -
Wedding Cakes & Sugar Flowers
4 issues for just £16.80*
MAKE SURE YOU NEVER MISS AN ISSUE!Go to www.cake-craft.com
Call: 01778 395162
Email: [email protected]*Overseas rates: 4 issues Europe + Eire £24.50, Rest of World £27.00
BACK ISSUES
Issue 18 Issue 19 Issue 20
September 2014 October 2014 November 2014
For digital and paper back issues go to www.cake-craft.comPrevious issues are also available on our website
£3.95 inc p&p per back issue copy (UK only), Europe £4.95 inc p&p, RoW £5.95 inc p&p.
£4.95 inc p&p per back issue copy (UK only), Europe £5.95 inc p&p, RoW £6.95 inc p&p.
COMPLETE YOUR COLLECTION OF
COMPLETE YOUR COLLECTION OF
Go to www.cake-craft.comand for just £5.95 + p&p you can treat yourself to aCake Craft & Decoration
12 issue binder
WANT TO KEEP YOUR BACK ISSUES IN GREAT CONDITION?SUBSCRIBE
AND SAVE OVER 15%
• All the news and gossip in the Cake Craft world.• Find out what we're planning for our next great issue.• Keep up to date with any special offers.• Share your fantastic cake creations with us and our followers.
Cake Craft & Decoration is also on Twitter at twitter.com/CakeMagEditor and
Pinterest at www.pinterest.com/cakecraftmag
We look forward to seeing you there!
Don’t miss all the latest Cake Craft news
Join us on...
www.facebook.com/cakecraftanddecoration
Pg 78_1PAGE TEMP 14/10/2014 15:17 Page 1

Make sure you don’t miss anything, turn to page 80 to subscribe today
79
Last minute Christmas cakes and much more...
Editorial Office: Cake Craft & DecorationPO Box 3693, Nuneaton, Warwickshire CV10 8YQTel/Fax: 024 7673 8846 Email: [email protected]
Editor: Julie AskewAssistant Editor: Glynne WilsonHome Economist: Valerie HedgethorneGraphic Designer: Jacqueline South
Advertising & Business Development Manager:Melanie UnderwoodSweet Media Solutions Ltd Tel: 01690 710455Email: [email protected]
Advertisement Copy: TJ DesignTel: 01386 438534Email: [email protected]
Subscriptions Enquiries, Back Issues, Binders and Cake Craft Guides: Cake Craft & Decoration Magazine, Anglo American Media Ltd, West Street, Bourne,Lincolnshire PE10 9PHTel: 01778 395162Email: [email protected]: www.cake-craft.com
Annual Subscription Rates:UK £44.40 including postageEurope and Eire £57.00 including airmail postageUSA $108.00 Canada Can $122.00Rest of the World £73.00 including airmail postageFor US and Canada call toll free 1 877 363-1310 or visit www.expressmag.com
Newsagent and Distribution Enquiries: Paul Yeardley, Warners Group Publications Plc, West Street, Bourne, Lincolnshire PE10 9PHTel: 01778 391046Email: [email protected]
UK Sugarcraft Shop Sales:Natalie Cole, Warners Group Publications Plc, West Street, Bourne, Lincolnshire PE10 9PHTel: 01778 391404Email: [email protected]
American Cake Shop Distribution: Cake Craft Shoppe Tel: 281-491-3920www.cakecraftshoppe.com
Cake Craft and Decoration is published by Anglo American Media Ltd. Registered Office:The Maltings, West Street, Bourne, Linconshire PE10 9PHPublisher: Judy Reed 0208 785 2688
Reproduction by Colin Reed Graphics, BristolPrinted in England by Warners Midlands plc
Magazine established April 1994 ISSN 1473-0383
We take great care to ensure accuracy but cannot acceptany liability for mistakes or misprints. All prices quotedare the manufacturers recommended retail prices at thetime of going to press - variations may occur withindependent retail outlets. No responsibility can beaccepted for any action arising from information in thismagazine. No part of this publication may bereproduced without written permission. We regret thatwe may be unable to reply personally to allcorrespondence received. Anglo American Media Ltd© 2014.
Cake Craft & Decoration, ISSN 1473-0383, is publishedmonthly (12 times a year) by Anglo American Media Ltd.
American and Canadian Copies:Cake Craft & Decoration by Anglo American MediaLtd c/o USACAN Media Corp. at 123A DistributionWay Building H-1, Suite 104, Plattsburgh, NY 12901.Periodicals Postage paid at Plattsburgh, NY.POSTMASTER: send address changes to Cake Craft & Decoration c/o Express Mag, POBox 2769, Plattsburg, NY 12901-0239
In next month’s great issue of
The January issue is on sale from 4th December 2014 in
plus leading newsagents & sugarcraft supplies shops.
Plus your regular favourites• Market Place • Over To You • Gallery • Sugar Skills School
Kay Gajra of Kaykes with a grunge style rag doll cake.
A complete NEW series onsugar flowers begins with
the January issue.
Our NEW Masterclass series begins with advanced runout work.
Try this sparkling snowflake cakefor a winter wedding.
Make the prettiestchristening cake ever.
Learn how tobring mouldedcharacters to life.
Dec next month_CakeDecember2014 15/10/2014 16:57 Page 79

Every issue of this essential sugarcraft title brings you:• Detailed ‘how to’ projects• Wedding cakes, novelty cakes, fl oral decorations and much more• Something for all skill levels, from the beginner to the professional artisan• Sugar fl owers, sugar modelling, pastillage work, sugarpaste, marzipan, royal icing…
Every issue of this essential sugarcraft title brings youEvery issue of this essential sugarcraft title brings youEvery issue of this essential sugarcraft title brings you
9 exclusive step-by-step projects for all skill levels
December 2014 Issue 193 £3.70 The world’s leading sugarcraft magazine
Christmas cakes galore!
Hand Painting Sugar Flowers Fun Modelling Edible Wrappers
Christmas cakes galore!
www.cake-craft.com
# Learn how to use cake lace # Perfecting appliqué skills # Make stunning Christmas flowers # Create perfect stencilling
# Learn how to use cake lace # Perfecting appliqué skills # Make stunning Christmas flowers # Create perfect stencilling
Over £800of prizes to be won!
How to make these...
Fun festive friendsFun festive friends
Dec cover v9_OFC_CakeDecember2014 20/10/2014 16:16 Page OFC1
O R D E R F O R M
Signature(s)
Date
80
Yes, I would like to subscribe to Cake Craft & Decoration byDirect Debit and pay £35 for 12 issues per annum and receive aFREE Christmas Jingles Lace Mat.
Instructions to your Bank or Building Society to pay by Direct Debit
Service User Number 836356
Don’t want to pay by Direct Debit or live overseas - you can pay by card or cheque❑ £38.00 12 issue annual UK subscription ❑ £71.00 24 issue UK subscription❑ £57.00 12 issue annual European subscription ❑ £73.00 12 issue Rest of World subscription❑ Please send me my FREE Christmas Jingles Lace Mat. Please add £2 p&p for overseas orders❑ I have enclosed a cheque made payable to Cake Craft & Decoration❑ I will organise a bank transfer to Anglo American Media Ltd., Sort Code 30-98-67, account
No. 00826724, please make your reference your full name and mag title e.g. MARKSMITH-CAKECRAFT❑ I would like to pay by credit card - please complete the card details below
*By filling in these details you are consenting to the publisher of Cake Craft & Decoration (Anglo American Media Ltd) contacting you.
USA and Canada Subscriptions: Call 1 877 363 1310 or go to www.expressmag.comUSA 1 year subscription $120.00, Canada 1 year subscription Can $138.00. Unfortunately the gift is not available on these subscriptions.
Please complete and return your order form to: Cake Craft and Decoration Subscriptions Department, Anglo American Media Ltd, FREEPOST PE211, West Street, Bourne, Lincolnshire, PE10 9BR, UK.For overseas orders please complete and return your order form to: Cake Craft and Decoration Subscriptions Department, Anglo American Media Ltd, West Street, Bourne, Lincolnshire, PE10 9PH, UK.
T&Cs: If you are paying by Direct Debit, once we have received your order we will write to you confirming your payment dates at least 10 days before your first payment is claimed. Payments will be shown on your bank statement as Anglo American Media Ltd. A no refund policy is in place for the first 12 months of the subscription. Your gift will be sent within one month of your first payment being claimed. Closing date for orders is 1 March 2015.
Instruction to pay your Bank or Building Society.Please pay Anglo American Media Ltd Direct Debitsfrom the account detailed on this instructionsubject to the safeguards assured by The DirectDebit Guarantee. I understand that this instructionmay remain with Anglo American Media Ltd and, ifso, will be passed electronically to myBank/Building Society
Reference number
To The Manager Bank or Building Society
Post Code
FOR ANGLO AMERICAN MEDIA LTD OFFICIAL USE ONLY CAKE/Xmas14This is not part of the instruction to your Bank or Building Society
Branch sort code
Bank or Building Society account number
Names of account holder(s)
Address
Email*
❑ We would like to send you special offers and promotions in the post. If you would rather we didn’t, tick this box
Telephone (including area code)* Mobile*
Address
Post Code
Title Forename Surname
Card No.
Issue no.
Expiry date 3 digit security code Start date
Signature Date
Subs Dec revised_Layout 1 18/10/2014 16:13 Page 1
Package worth over £53.00
Subscribe today Subscribe todaySubscribe todaySubscribe todaySubscribe todayand never miss an issue for JUST£35*
4 WAYS TO SUBSCRIBE!4 WAYS TO SUBSCRIBE! www.cake-craft.com
4 WAYS TO SUBSCRIBE! www.cake-craft.com [email protected] www.cake-craft.com www.cake-craft.com 01778 395162 quoting ref CAKE/XMAS14 Or return your completed form to us
*Price based on a 12 issue UK Direct Debit. Overseas subscribers please add £2 for postage and packing. Gift not available in USA or Canada.
4 WAYS TO SUBSCRIBE!4 WAYS TO SUBSCRIBE!4 WAYS TO SUBSCRIBE!
You will also receive a FREE Christmas Jingles Lace Matfrom Caketinsmith
CC DEC14 SUBS.indd 1 21/10/2014 10:20

IBC Dec_1PAGE TEMP 14/10/2014 15:08 Page 1

OBC Dec_1PAGE TEMP 14/10/2014 15:09 Page 1