california hiv/aids surveillance standard operating ... document library... · ldet standard...
TRANSCRIPT
California HIV/AIDS Surveillance
Standard Operating Procedures
External
Electronic Laboratory Reporting (ELR) Module
Supplement for the Laboratory Data Entry Tool (LDET)
Version 2.0
November 5, 2015

ii
LDET Standard Operating Procedures – ELR Module Supplement
REVISION HISTORY
Version # Revision Date Summary of Changes Revised By
1.0 05/27/2015 Initial draft Will Wheeler
1.1 06/15/2015 Second Draft Will Wheeler
1.19 09/22/2015 Third Draft, including follow-up
features in pilot version 4.2 Will Wheeler
2.0 11/05/2015 Fourth Draft, including follow-up
features in final version 4.2 Will Wheeler
iii
LDET Standard Operating Procedures – ELR Module Supplement
Table of Contents
1 Definitions .............................................................................................................................. 1
2 Background ............................................................................................................................ 1
2.1 Installing LDET 4.2 with ELR Module .............................................................................. 4
3 Opening the ELR Module ....................................................................................................... 7
4 Importing ELR Records .......................................................................................................... 9
5 Processing ELR Records Requiring Follow Up .................................................................... 12
5.1 Follow-up Disposition .................................................................................................... 15
5.2 Selecting Records ......................................................................................................... 19
5.3 Navigate, Search, Filter, Print and Export Follow-up Records ....................................... 19
6 Processing ELR Records during Evaluation Periods ........................................................... 20
6.1 Record Received via Both ELR and CLF ...................................................................... 21
6.2 Record Received via Both ELR and CLF but Data Differ............................................... 21
6.3 Record Received via ELR, but Not CLF ........................................................................ 23
6.4 Record Received via ELR, but negative test ................................................................. 23
6.5 Record Received via CLF, but Not ELR ........................................................................ 23
7 Exporting ELR Data to Send to OA ...................................................................................... 26
8 Searching and Filtering ELR Records .................................................................................. 27
8.1 Searching or Filtering by Selected Variables ................................................................. 28
8.2 Searching or Filtering by Specimen Collection Date ...................................................... 30
8.3 Searching or Filtering by Follow-up ............................................................................... 31
9 Sorting ELR Records ........................................................................................................... 33
10 Deleting ELR Records ......................................................................................................... 33
11 Generating Printed Reports of ELR Records ....................................................................... 34
11.1 Printing All ELR Records or All Filtered Records ........................................................... 35
11.2 Printing Only Selected ELR Records ............................................................................. 36
12 Exporting ELR Records for LHJ Use .................................................................................... 38

1
1 Definitions
Conventional laboratory feeds (CLF): Processes that are currently being employed for transferring HIV-related laboratory result records from the testing and/or requesting laboratory to the local health jurisdiction (LHJ) which can be through electronic, paper, or other means.
Electronic Laboratory Reporting (ELR): Laboratory records that are sent to the Office of AIDS (OA) directly from ordering and/or testing laboratories or facilities, and are processed centrally and distributed to the LHJs based on the California address (with the priority being facility, then provider, then patient address).
Production ELR Feed: This is what we refer to as the official ELR feed. Laboratories whose ELR records have been evaluated and have been deemed of suitable quality will be included the production ELR feed.
2 Background
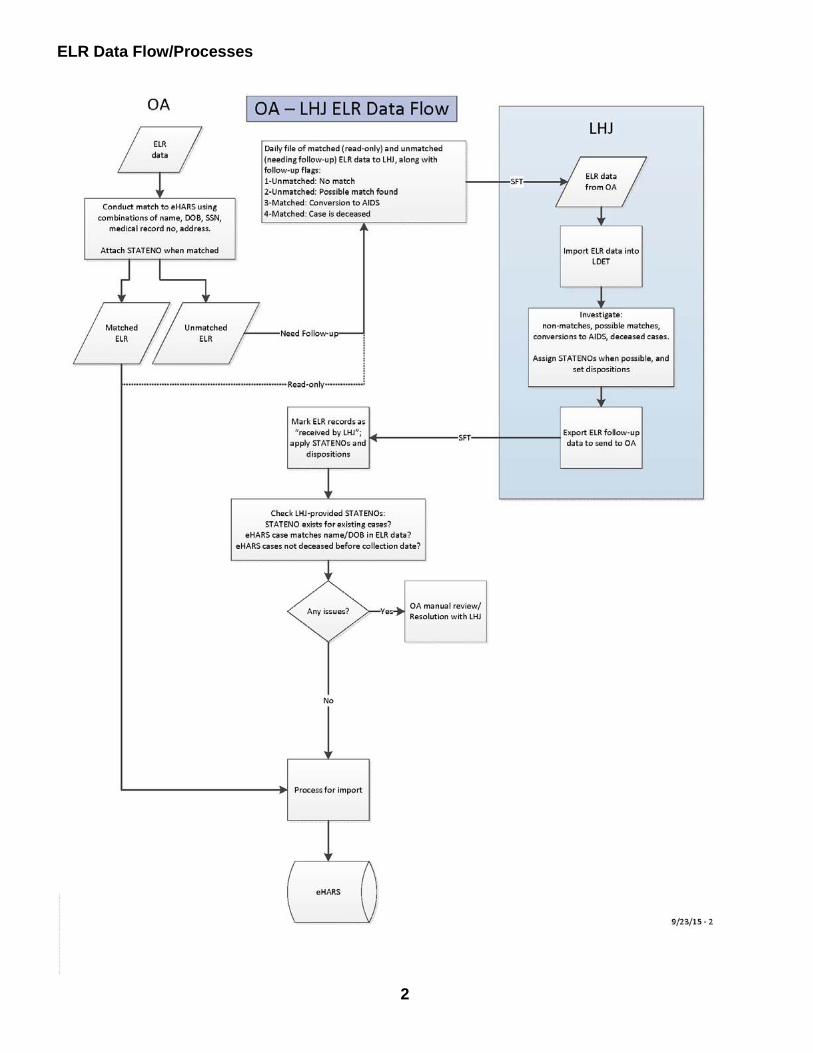
As of November 2, 2015, OA will have begun sending HIV-related test results electronically from the first production ELR laboratories to your LHJ. The eventual goal is to turn off the non-ELR reporting processes for all laboratories that are reporting labs electronically. To accommodate ELR processes, OA has developed an ELR Module for the Laboratory Data Entry Tool (LDET) and a data flow protocol to ensure that the statewide ELR data we receive here at OA are appropriately processed and made immediately available to LHJs for routine prevention and care follow up activities. We will first attempt to match the ELR data we receive to any existing reported cases in eHARS. If a lab is successfully matched, we will add a STATENO to the record and import the lab record into eHARS. Lab records that we are unable to match with a case in eHARS, cases with evidence of AIDS transition and records otherwise needing investigation are identified for follow-up. These matched and follow-up records are sent to the appropriate LHJ via the SFT. The ELR Module for the Laboratory Data Entry Tool (LDET) has been designed to store these lab records and facilitate follow up on the records that require investigation.
This document explains how to use the LDET ELR Module for managing ELR data. The ELR Module of LDET functions as a tool for LHJs to manage follow up of: 1) ELR records that OA is unable to match or only able to determine a possible (fuzzy) match with a case, cases with laboratory evidence of transition to AIDS, and labs that appear to have been matched with deceased cases. You are also able to view, sort and export all case-matched ELR records and their associated STATENOs. Finally, the ELR Module will continue to be used to evaluate new ELR-reporting labs that are testing their ELR feeds prior to onboarding with production ELR. Laboratories participating in Electronic Laboratory Reporting send laboratory reports to OA on at least a daily basis. OA processes ELR once a day, usually overnight. The lab reports are first converted into a SAS dataset, cleaned using modified CDC- provided code and put through a matching process that attempts to match with existing cases in eHARS on a number of identifying variables including name, birthdate, social security number, medical record number, among many others. An algorithm determines the strength of a match based on which among these variables match between the ELR record and the eHARS record. Strong matches, such as one that exactly matches name, birthdate and SSN, are considered matched and are imported into eHARS.
Matches that are less strong, but still have a reasonably high probability of being a match are considered possible, or fuzzy, matches. Records that have a very weak match to a case in eHARS or do not match with any cases in eHARS are considered to be not matched.
2
ELR Data Flow/Processes

3
Both of these types of records will be sent to the corresponding LHJ with a flag indicating that they require LHJ follow up to determine if the record belongs to an existing case, if it belongs to a new case or if it not an HIV related lab test at all. Records will also be flagged for LHJ follow up if it is matched to a case, and the lab result is a low CD4 count, indicating a possible transition to AIDS (if the person’s current disease status is HIV in eHARS), which requires an Adult Case Report Form to be submitted. The final reason a record might be flagged for follow up is if the case was matched to a person whose eHARS record indicates the person is deceased. This requires further investigation as to whether the person was mistakenly identified as deceased in eHARS, the lab record was mistakenly matched to the wrong person, or some other circumstance.
All ELR records that are received - including matched, possible matches, non-matches, AIDS transition, and matched with deceased case - are sent on a daily basis to LHJs based on the California address of the facility, or provider address if facility is missing or out of state, or patient address if both provider and facility addresses are missing or out of state. These are sent in a double pipe (||) delimited file that was specifically designed for LDET. The matched records (with STATENOs) are sent for the LHJ’s use only and do not require any LHJ follow up. The other categories of files require some follow up from the LHJ, whether investigating a possible match, determining if a lab belongs to a new case, entering a new Adult Case Report Form (ACRF) for labs indicating recent AIDS transition, or investigating how a lab was matched to a deceased case. The ELR module in LDET 4.2 identifies records requiring follow up and displays the number of records needing follow up for each reason on the main ELR form. Section 5 will explain the specifics of how to enter required information for follow up cases.
ELR Evaluation Processes: Additional laboratories will begin evaluating their ELR feeds in groups (cohorts) starting in January, 2016 and will continue throughout 2016. In order to bring on new laboratories submitting ELR into production ELR, OA and LHJs must agree that the test results received through the ELR feed of HIV-related results are comparable to those received through the CLF processes you currently use to receive laboratory results. For each new cohort, we will ask you to compare the ELR feed of HIV results to your CLF.
There are several outcomes that must be evaluated for each ELR feed for us to feel confident to turn off the CLF. The first is to determine which laboratory records were received in both the CLF and ELR feeds, the second is to determine which records were received via ELR, but not via CLF, and the third (and most crucial) is to determine which records were received via CLF, but were not received via ELR. We expect that most of the records will be reported in both CLF and ELR, but also expect, due to sheer volume, a fair number to be reported in ELR, but not CLF. Before we can turn off the CLF, we must feel confident that records received via CLF, but not via ELR, are minimized, because this indicates that the ELR feed is an inadequate replacement for the CLF.
The LDET ELR Evaluation form facilitates evaluating these outcomes. The first two outcomes can be evaluated on the “Manage ELR Data Form” using the information displayed in the table at the bottom of the form. For records received via both CLF and ELR, select “ELR and CLF” in the LHJ_Verify dropdown box to indicate this outcome (see Section 6.1). For records that were received via both CLF and ELR but have reported information that differs (for example, different specimen collection dates), select “ELR-CLF Differ” in the LHJ_Verify dropdown box (Section 6.2). Records that have “ELR Only” in the LHJ_Verify dropdown box are those received via ELR, but not CLF (see Section 6.3) and records of negative tests received should be identified as such (see Section 6.4). For records received via CLF, but not ELR, use the “CLF Records not in

4
ELR Feed Page” (see Section 6.5). This guide explains these and other features of the LDET ELR Module, and how to use it to manage ELR data in your LHJ. Section 7 lays out the procedures for exporting data from the ELR module, and Sections 8- 12 give general information about the functions of the ELR Module.
Note: For the purposes of testing and generating screenshots for this manual, fields that store sensitive information (StateNo, Name, SSN, etc.), data with an “_F” suffix indicates that it is computer generated or fake. For example, Jackson_F is a computer generated last name and Daniella_F is a computer generated first name.
2.1 Installing LDET 4.2 with ELR Module
The two things you will have to do to ensure that LDET 4.2 is installed correctly is successfully re-link to your current LDET backend database (LDET_be.accdb) and also link to the ELR tables (LDET_be_ELR), which are stored in a separate back end database. This is very easy. When you download LDET 4.2 from the SFT, be sure to store the LDET_be_ELR.accdb file in the same folder as the LDET_be.accdb file. When you open LDET 4.2 for the first time, it automatically checks to see if it is connected to the back end databases. The first time you open LDET 4.2, or any other time when you need to connect to a back-end database, the message below should appear.
When you first open LDET 4.2, you will have to connect to both back-end databases. However, note that sometimes this message may say that only the ELR or standard LDET back-end database connection is missing, in which case, you will only have to do the following steps once. Click the “OK” button to continue.
Connect to back-end database messages
This will bring up a standard file system browse pop-up. Navigate to the location of the LDET back-end database that you were using for your current version of LDET, usually called LDET_be.accdb. If this database is already connected, ignore this step. Double click on LDET_be.accdb to select it.

5
Select ldet_be_ELR.accdb back-end database file
This will bring up a second browse window asking you to select the ldet_be_ELR.accdb file. If you’ve stored this file in the same folder as your ldet_be.accdb file, then it should appear immediately. Once you have found it, double click on this file to select it.
You will now get a confirmation message saying that the links were successful. You are now ready to continue with LDET 4.2.

6
Select ldet_be_ELR.accdb back-end database file

7
3 Opening the ELR Module
To open the LDET ELR Module, click on the “Manage ELR Data” button on the LDET Main Page.
LDET Main Page Showing the Manage ELR Data Button
This will open the ELR Main Form as shown below.
ELR Main Menu (Showing Follow-up and All ELR Records Information)

8
The “ELR Main Menu” has five main functions:
1. Import ELR record files sent from OA 2. Export ELR record files to send to OA 3. Link to the “ELR Follow Up Records Form” and display the number of unresolved and
resolved follow up records 4. Link to the “ELR Evaluation Records Form” and display the number of unresolved and
resolved evaluation records 5. Link to the View All ELR Records Form
These functions will be covered in Section 5 with more specific information about general search, print, etc. functions that are applicable to Follow-up, Evaluation and All Record Forms in Section 8 through 11.
ELR Main Menu (Showing ELR Evaluation Records Information)

9
4 Importing ELR Records
ELR data files containing laboratory records for each LHJ (based upon California address as described earlier) will be generated by OA on a daily basis and uploaded to the ELR folder in each LHJ’s Secure File Transfer (SFT) account. The ELR folder will be used to store ELR files generated by OA and sent to LHJs. Instructions regarding how to use the SFT network to download and upload files are available on page 75 of the California HIV/AIDS Surveillance Handbook at: https://internal.cdph.ca.gov/sites/dcdc/CMR/CalREDIEHIV/Document%20Library/Surveillance%20Handbook%20-%20v.%202.5%20-%203-2012.pdf#search=survprocedures. The files generated by OA will be a specific format using a double-pipe (||) delimited format. The filename for these data files will contain “ELR_ldet_”, county code, county name, date/time stamp (yyyy-mm-dd-hh-mm format) and a count of the number of records included in the file. For example, a file containing 130 ELR records for Alameda County uploaded on April 17, 2015 at 1:36 pm would be named “ELR_ldet_CA03- ALAMEDA_2015-04-17_13-36_130_recs”. A new feature has been added in LDET 4.2 to make importing ELR files from OA a little easier. LDET automatically searches for new files to import in a specific, user-designated folder. When you download files from the SFT, you can save them in this designated folder and the next time you open LDET, it will automatically search for any new files, ask if you want to import them, and if you say yes, it will import, rename the file with “IMPORTED_YYYYDDMM_HHMM” prefix, and store the files in an archive folder. The default folder ELR OA Files for Import is created in the same folder that the ELR back end database file is stored. You can change the location of the import folder by clicking on the “Browse” button on the ELR Data Main Form and selecting a folder. The database will create an ELR OA Files for Import folder within the selected folder.
Importing an ELR Data File that has been downloaded from Your SFT Folder

10
To manually import an ELR data file that has been downloaded from your LHJ’s SFT folder, click on the “Import ELR Data from OA” button on the ELR Main Menu Form. This will bring up a standard file browse window to allow you to navigate and select the file you would like to import. Double-click on the file you’d like to import. Note: because the files OA sends contain a cumulative collection of everything OA hasn’t received back from you in an export file, it is only necessary to import the latest file you download from SFT in order to be “caught up” with everything OA has sent you. There is no harm in importing every file, since LDET will check for duplicates before importing records that may have already been imported, but there is no need importing anything but the latest file.
For both import methods two additional dialogue boxes will pop up to confirm that the file selected is the one you’d like to import. These are intended make sure that the correct file has been selected. Once confirmed, the LDET will import the records in the file, though it will only load unique ELR records that have not been imported previously into the LDET ELR Module.
Note: This feature only identifies duplicate records in the ELR Module; it does not flag laboratory results that were entered manually into LDET that you received via CLF. For example, if you previously entered five records received via CLF into LDET that are also in the ELR feed that you are importing, those five records will not be considered duplicates, so they would still be imported into the ELR Module. This is not terrible, because eHARS will manage these duplicate records, but it is preferable to keep these to a minimum if possible. The duplicate check works in a situation where you import a file and forty records are loaded into the ELR Module, but you mistakenly try to import those same records a week later, those forty records will be considered duplicates and will not be imported into the LDET Module again.
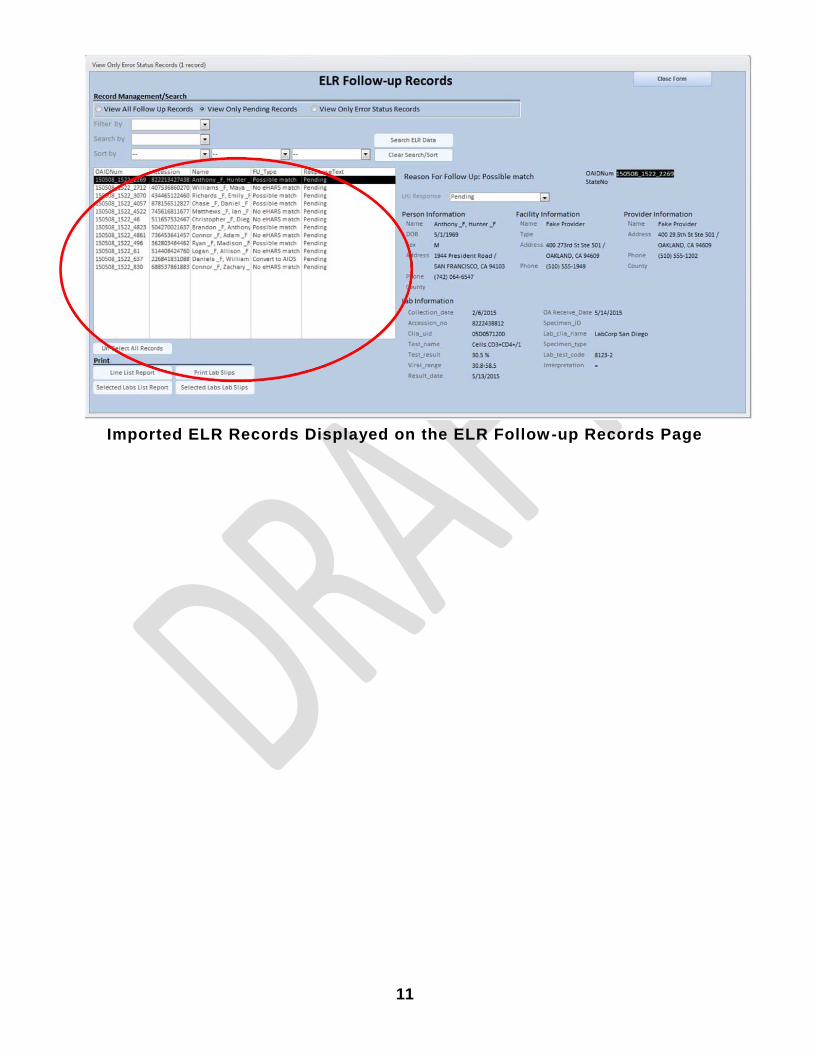
Once the LDET ELR Module is finished importing records, a pop up message will display indicating how many records were successfully imported, as well as how many records were duplicates and therefore not imported. Be sure to check that the number of records identified in the file name matches the total number of records (successfully imported + duplicates). If these numbers do not match or there are a large number of unexpected duplicates, please notify OA staff. The ELR data table, which includes all ELR records for your jurisdiction (including records flagged for follow-up and evaluation), is now populated with all of the successfully imported records.
11
Imported ELR Records Displayed on the ELR Follow-up Records Page

12
5 Processing ELR Records Requiring Follow Up
Office of AIDS uses an algorithm to determine the strength of a match based on which among several identifying variables match between the ELR record and the eHARS record. Strong matches, such as one that exactly matches first and last name, birthdate and SSN, are considered matched and are imported into eHARS. Matches that are less strong, but still have a reasonably high probability of being a match are considered possible, or fuzzy, matches. Records that have a very weak match to a case in eHARS or do not match with any cases in eHARS are considered to be not matched. Both of these types of records will be sent to the corresponding LHJ with a flag indicating that they require LHJ follow up to determine if the record belongs to an existing case, if it belongs to a new case, or if it is not related to an HIV case. Records will also be flagged for LHJ follow up if the lab’s result is a low CD4 count for a case with a current status of HIV in eHARS which indicates a possible transition to AIDS and may require an Adult Case Report Form to be submitted. The final reason a record might be flagged for follow up is if the case was matched to a person who is recorded as deceased in eHARS. This requires further investigation as to whether the person was mistakenly identified as deceased in eHARS, the lab record was mistakenly matched to the wrong person, or some other reason.
All ELR records that are received, including matched, possible matches, non-matches, AIDS transition, and matched with deceased case, are sent on a daily basis to LHJs based on address of facility, or provider address if provider is missing, or patient address if both provider and facility addresses are missing. These are sent in a double pipe (||) delimited file that was specifically designed for LDET. These matched records are sent for the LHJ’s use only and do not require any LHJ follow up. The other categories of files require some follow up from the LHJ, whether investigating a possible match, determining if a lab belongs to a new case, entering a new Adult Case Report Form (ACRF) or investigating how a lab was matched to a deceased case. The ELR module in LDET 4.2 identifies records requiring follow up and displays the number or records needing follow up for each reason on the main ELR form.
The total number of records that require follow up and the number of records for each category, are displayed on the “ELR Main Menu.”

13
Number of Records Requiring Follow Up on ELR Main Menu
To view and edit records requiring follow up, click on the “Follow-up Records” button on the ELR Main Menu.

14
Click to open the ELR Follow-up Records Form
This will open the ELR Follow-up Records Form, which will allow you to search, navigate, print and enter follow up data for labs requiring additional information.

15
Main ELR Follow‐up Records Form
The format of the Main ELR Follow-up Records Form has changed slightly from the previous version. There is a list box on the left side of the form that contains basic information including OAIDNum, an ID number assigned to each ELR record that contains the date and time received (YYMMDD_HHMM) and a random sequence number, Accession Number, Patient Name, Reason for Follow Up and the LHJ Response for follow up. When you click on a record in the list box on the left side of the screen, a more complete display of the information about the ELR record, including information about the patient, testing facility, provider, specimen and test appears on the right side of the form. Most of this information, except for fields related to LHJ response, is not editable.
Most other functionality from the previous LDET version remains, although it may have moved around on the form. These functions will be explained in Sections 7 through 11.
5.1 Follow-up Disposition
For each reason that an ELR record requires follow up, there are different disposition responses available. For non-matched and fuzzy matched labs, the options for response are:
New Case (needs ACRF)
Existing Case
Unresolved (Enter Reason) If your investigation on the ELR record reveals that it is for a new case, either a person with a new diagnosis of HIV infection or a person who recently moved to California, then you would select “New Case (Needs ACRF)” in the LHJ Response Field. When you do this, the StateNo field becomes visible next to it, and you can enter the StateNo for the new case in this field. If you find that an ELR record actually belongs to an existing case, you can choose “Existing Case” in the LHJ Response Field and enter the StateNo for this case in the “StateNo” field.

16
Enter StateNo for New or Existing Case on Main ELR Follow-up Records Form
If your investigation reveals that this ELR record is for a non-HIV related test, is an HIV test with a negative result (which is not part of a multi-spot or other multi-test algorithm), or is otherwise unresolved, you can choose “Unresolved (Enter Reason).” When you choose this option, a “Reason” dropdown field becomes visible with options to respond including “Not a Case”, “Other”, or “Unknown.”
Reason for Unresolved Lab on Main ELR Follow-up Records Form
NOTE: At the point of LDET 4.2 release, we anticipate most of the reasons will be for non-HIV related labs, such as CD4 tests from an oncology provider. However if we notice that we are receiving many “Other” responses, we can add options in this field if it is deemed important information to have for either OA or LHJs.
In the case that a follow-up record requires a StateNo or Reason to be entered, but you have not entered one, this record will be flagged as being in error status. A message box will pop up indicating that you have not entered additional required information.

17
Error Status Message Box
It gives you two options on how to proceed. You can click “No” or “Cancel” and LDET will automatically reset the record to pending, which will give you additional time to investigate without putting the record in error status. This is the preferred way to proceed. However, you can also click “Yes” which will save the record in error status.
Any error status records are viewable using the “View Error Status Records” radio button option at the top of the form. The label for button will appear in red font and show the number of error status records in parentheses. If the “View Error Status Records” is in black font, then you can be sure that none of your records are in error status.

18
Error Status Records
To resolve error status records, click on the “View Error Status Records,” select the record in the list box that you would like to update the information for, and enter the updated information. You can click the small “Save” button next to the StateNo or Reason field and the record should be removed from the error status list (sometimes it takes a minute to update, so you can click around on the List Box a couple of times to make sure it’s updated).
The other main reason for follow up is if an ELR record is for a lab test that indicates the patient’s HIV infection has progressed to AIDS (i.e., the current status in eHARS is HIV, and the CD4 count or percent is below a certain threshold) and therefore requires an ACRF needs to be completed. The LHJ response for this is simply to acknowledge that an ACRF needs to be completed and submitted.
AIDS Conversion on Main ELR Follow-up Records

19
5.2 Selecting Records
The procedure for selecting records has changed for the Follow-up and Evaluation Forms in LDET 4.2. You can select records using the same procedures as you would in highlighting records in Excel. To select a range of records, click on the first record in the range with your mouse cursor, then hold down the SHIFT key on your keyboard while you click on the last record in the range with your mouse cursor. To select individual records, hold down the CONTROL key on your keyboard and click on records you would like to select with your mouse cursor. Note: Multi-select records should only be used for selecting records for printing. When there are multiple selects in the list box on the left, there are no records displayed on the right.
5.3 Navigate, Search, Filter, Print and Export Follow-up Records
Instructions on how to export (Section 7), search/filter (Section 8), sort (Section 9) and print (Section 11) records are explained in subsequent sections.

20
6 Processing ELR Records during Evaluation Periods
There are several outcomes that must be evaluated for each ELR feed for us to feel confident to turn off the CLF:
1. Determine which laboratory records were received in both the CLF and ELR feeds, 2. Of these records that were received in both feeds, which have differing or conflicting
information 3. Determine which records were received via ELR, but not via CLF, and 4. Most crucially, determine which records were received via CLF, but were not received via
ELR. We expect that most of the records will be reported in both CLF and ELR, but also expect, due to sheer volume of ELR records, a fair number to be reported in ELR, but not CLF. Before we can turn off the CLF, we must feel confident that records received via CLF, but not via ELR, are minimized, because this indicates that the ELR feed is an inadequate replacement for the CLF.
Comparing records in the ELR Module those received via CLF can be accomplished easily. How you actually verify that you received records both via CLF and ELR will differ a lot from county to county depending on your standard operations, the volume of laboratory records you receive, and other factors. One way to do it would be to print out a Line List or Lab Slip style report (see Section 11) and use that to match up with the paper laboratory result slips you received through your CLF feed. You could also print out a Line List report and compare it to records that you’ve already entered in the non- ELR part of LDET. If you have CLF laboratory records organized alphabetically, or by provider, or some other way, you can filter the records (see Section 8) or sort the records (see Section 9) in the table on the Manage ELR Data page and compare records in the table directly to CLF records. If you have questions about how to accomplish the comparison, please contact your surveillance coordinator.
During evaluation periods, all records will be imported as “Pending” in the LHJ_Verify field. Follow the instructions in Sections 6.1–6.4 to give OA feedback about your comparison of your CLF and ELR feeds. When you are done with all CLF and ELR records, export the evaluation data from the ELR Module as instructed in Section 7.
Note: You should continue to process results received via your CLF as you normally would during the evaluation period, including those received from any laboratory being evaluated. The pool of laboratory results sent to you for comparison during each ELR evaluation period is based on the range of Specimen Collection Dates of the samples upon which the laboratory tests were based, not the dates the results were actually received by your LHJ. Only compare laboratory results received via your CLF that have Specimen Collection dates corresponding to the Specimen Collection Date range used for the evaluation. For example, if the evaluation is based on specimens with collection dates from May 1, 2015 to May 31, 2015, you would not compare results you received during this time period with earlier specimen collection dates. However, results you received in June that had specimen collection dates of May 1, 2015 to May 31, 2015 should also be included in the evaluation.

21
6.1 Record Received via Both ELR and CLF
Select “ELR and CLF”
The field “LHJ_Verify” is used to evaluate whether CLF and ELR feeds are in agreement. If you identify that a laboratory record was received via both your CLF and ELR feeds, simply select “ELR and CLF” in the “LHJ_Verify” dropdown field for that record on the Manage ELR Data page. There is no need to save the record, as it is automatically saved when you select a value in the drop-down box.
LHJ Response Field on the ELR Evaluation Records Form
6.2 Record Received via Both ELR and CLF but Data Differ
Select “ELR-CLF Differ”
If you identify a record that you received via both the ELR and CLF but one or more of the fields differ between ELR and CLF records, choose the “ELR-CLF Differ” option in the LHJ_Verify field. This will bring up a pop-up box with some instructions on how to enter additional information about the differing information between the two records.

22
Information about entering information on records where ELR and CLF differ
Clicking on “OK” on this dialog box will send you to the ELR_CLF_Differ field, which is a Notes field that can accommodate a large amount of text. A dialog window will open for you to enter what information differs between the ELR and CLF feeds. Below is an example:
Entering information on which fields differ
Enter which field differs and the value entered in the CLF field. In this example, the ELR and CLF records differ on the Collection Date field, and the date entered on the CLF Collection Date field is May 24, 2015. It isn’t necessary to enter what date is in the Collection Date field on the ELR record, because that information is already stored in the ELR record.
23
6.3 Record Received via ELR, but Not CLF
Select “ELR Only”
For any ELR record for which you can’t find a corresponding CLF record, simply select “ELR Only” in the LHJ_Verify dropdown box. That will signal that you tried to find the record in your CLF feed, but could not find it.
6.4 Record Received via ELR, but negative test
Select “Negative Test”
For any ELR record that has evidence that it is a negative test, simply select “Negative Test” in the LHJ_Verify dropdown box.
6.5 Record Received via CLF, but Not ELR
Click the “Identify Labs Missing from ELR Feed” Button and Report it Using the “CLF Records not in ELR Feed” Page
Identifying records received via CLF that were not received via ELR is critical for the ELR evaluation. If you discover a record that you received via CLF during the evaluation period that was not included in the ELR data, please follow the instructions in this section. There may be a number of possible reasons why these records show up – chief among them being that they might have mistakenly been sent to the wrong LHJ. Even this is extremely informative, as it will allow OA to refine the processes used to distribute records to LHJs. We tried to limit the number of fields that needed to be entered, including only those needed to match with ELR records in the OA Master ELR database.
To report records that you received via CLF that you didn’t receive in the ELR feed, click on the “Identify Labs Missing From ELR Feed” button on the Manage ELR Data Form.

24
Location of the “Identify Labs Missing from ELR Feed” Button
This will open the “CLF Records Not In ELR Feed” page. On this page, there are two ways to identify CLF records that were not in the ELR feed – manual entry or importing from the non-ELR part of LDET. If the CLF record missing from the ELR Module has already been entered into the non-ELR part of LDET, you can import the record from the non-ELR part of LDET to the “CLF Records not in ELR Feed” page. To do this, click on the “Import LDET Record” button.
This brings up the “Select LDET Lab Record that isn’t in the ELR feed” page containing a list of all the laboratory records in non-ELR LDET. You can search by STATENO, Accession Number, or by a range of dates for Specimen Collection Date or Entered Date. Once you have found the non-ELR LDET record that you received via CLF, but not via ELR, double click on the record to have it automatically imported into the “CLF Records not in ELR Feed” page.
Example of the “CLF Records not in ELR Feed” Page
If the CLF record missing from the ELR Module was not entered into non-ELR LDET, or you can’t

25
find it, you can return to the previous form by clicking the “Return to ELR Missing Data Form” button and enter the information manually. Alternatively, you can enter the record in non-ELR LDET and then return to the “CLF Records not in ELR Feed” page and import it. When you are finished entering or importing, click “Return to ELR Form” button to return to the main Manage ELR Data page.
Note: For non-HIV-related CLF records that are missing from the ELR feed (such as a cancer-related CD4 results), you can ignore the discrepancy, given that it would not normally be reported to OA.
Select LDET Record that isn’t in the ELR Feed

26
7 Exporting ELR Data to Send to OA
There are now two different types of data in the ELR Module that can be exported from LDET: ELR Evaluation data and ELR Follow-up data. Clicking on “Export data file to OA” button on the ELR Main Menu creates an export file that includes both follow-up and evaluation data to be sent to OA.
Export Evaluation Data using the “Send Data File to OA” Button on the Manage ELR Data Page
This button automatically generates a text file containing all of the information you recorded regarding ELR records in the ELR Module. Click the button and a box will appear asking you to confirm that you want to create this file. Click “Yes” to confirm and a file will be created called “OA_ELR_EXPORT_41 ELR_<County Code>_<County Name_YYYYMMDD” in the same folder as where the main LDET application is stored. For example, an evaluation data file exported on June 18th, 2015 from Sonoma County would be named “OA_ELR_EXPORT_41 ELR_CA49_SONOMA_20150614”.
IMPORTANT NOTE: Similar to the CLR (manual lab entry) LDET process you have been following, you must manually upload the exported LDET data file to your SFT folder for it to be received by OA. Instructions regarding how to use the SFT network to download and upload files are available on page 75 of the California HIV/AIDS Surveillance Handbook at: https://internal.cdph.ca.gov/sites/dcdc/CMR/CalREDIEHIV/Document%20Library/Surveillance%20Handbook%20-%20v.%202.5%20-%203-2012.pdf#search=survprocedures.

27
8 Searching and Filtering ELR Records
There are numerous fields that you can use to search records, when you want to display only a subset of records. For the purposes of this document, Filter refers to limiting the number of displayed records to those matching the specified reason for follow up (for this reason – filters are only applicable to the follow-up form, not the evaluation form). Search fields are fields such as name, StateNo, accession number, draw date, facility name, etc. that you can specify a value or a sub-string or a range in the case of a date, and limit the displayed records to those that match the search criteria. There is also a search option with two dashes (--) that will clear all searches. To display records based on a filter on the ELR Follow-up Records form, simply select the follow-up type you would like to filter by.
Location of the “Search by” Drop -Down Box on the Manage ELR Data Page
Instructions for searching for an ELR laboratory record by STATENO, Patient Last Name, Facility Name, and Facility City are covered in Section 8.1 on the next page. Instructions for searching by Specimen Collection Date are presented in Section 8.2. Instructions for searching by LHJ_Verify are in Section 6.3.

28
8.1 Searching or Filtering by Selected Variables
For all search fields except Collection Date, only one search term field will appear when you choose the search field. For example, the “Last Name” search field has been selected below.
LastName” Selected in the “Search by” Drop -Down Box to Filter by LastName = “Jackson_F”
Note: For the purposes of testing and generating this manual, fields that store sensitive information (StateNo, Name, SSN, etc.), data with an “_F” suffix indicates that it is computer generated or fake. So in the first record, Jackson_F is a computer generated last name and Daniella_F is a computer generated first name.
“Search by” Drop-Down Box – Results for Search by Facility Name LIKE “EBAC”
When searching for fields like StateNo, Accession Number, Last Name, Facility Name and Facility City, you have two options: an exact match and a “Like” match. To perform an exact match, choose the field you would like to search on in the “Search By” field and then choose “Equals” in the dropdown box next to the “Search By” field. Then enter a single search term exactly as it appears in the ELR record. Once you have entered a search term, click on the “Search ELR Data” button, and only records matching your search term will show. For example, above the exact term “Jackson_F” has been entered as a search term, and only records with the name “Jackson_F” are now displayed.

29
The Like match, will find any record with the entered search term anywhere in the field you specify. For example, if you select “Like” and enter “Jam” in the search field, the search will result in any records with “jam” anywhere in the last name. This would include “James” and also “Benjamin” among others.
Search for “LastName” that includes “Jam” anywhere in the name
Results for “LastName” that includes “Jam” anywhere in the name
The “Search by” drop-down can also be used to filter the ELR data so that only specific cases meeting your criteria are exported or reported, as is discussed in Reports and Exporting (Sections 9 and 10, respectively). To search/filter using a different value, simply delete what is in the field and enter the new search term. To search/filter using a different field, choose the different field in the “Search by” drop- down box and enter your new search term. If the search term field is empty, and the “Search ELR Data” button is clicked, all records in the ELR Module will be displayed, thereby removing all filters.
You can also select the two dash “--” option in the “Search by” drop-down box to reset/clear all searches/filters. Clicking on the Clear Search/Sort button will also reset/clear all searches and sorts.

30
8.2 Searching or Filtering by Specimen Collection Date
When searching or filtering by Specimen Collection Date, two search term fields appear—one for the Earliest Date and the other for the Latest Date of the search term. Enter dates in both of the fields and click the “Search ELR Data” button to display records with specimen collection dates (the “Collect Dt” column) between the earliest and latest dates you specified.
“Collection Date” Selected in the “Search by” Drop -Down Box to Filter by Specimen Collection Date
Note: The search dates are inclusive (greater/less than or equal to) so a search between April 1st and April 30th will include records with dates of both April 1st and April 30th (and every date in between). If a date is only entered in the Earliest Date field, all records with a specimen collection date on or after the Earliest Date will be displayed. Likewise, if a date is entered only in the Latest Date field, only records with a specimen collection date on or before the latest date will be displayed.

31
8.3 Searching or Filtering by Follow-up
The third option for searching records is to filter based on the reason for follow up on the ELR Follow-up Form. This allows you to filter records so you can view all records that have the same reason for follow up on the Follow-up Main Form.
“No eHARS match” in the Filter by box to Filter by Follow Up Reason = “No eHARS match”
If you’re working on the Evaluation Main Form, you can use the “LHJ Response” option in the search field to view records based on whether evaluation records are still pending, or if they’ve been assigned a status of “ELR and CLF,” “ELR-CLF Differ,” “ELR Only,” or “Unknown.” To do this, select “LHJ Response” in the “Search By” dropdown box. Instead of a text field, the search term box is now another dropdown box that contains the selection options for the LHJ_Verify field. Select one of the options to filter the records according to the LHJ_Verify Status.

32
“LHJ Response Equals ELR and CLF” in the Search by boxes to Filter by = “ELR and CLF”

33
9 Sorting ELR Records
By default, records are sorted by the OA ID Number which is a number generated by OA that includes the year, month, day and time when OA processed the record, plus a sequence number to prevent duplicates. There are also three fields at the bottom of the Record Management/Search area that can be used to sort your data. They will sort in the order from left to right. So if you choose Facility City in the box furthest to the left, and then choose Last Name in the middle box, the List Box will display all records sorted by Facility City and then by Last Name within each Facility City group. There is no way to specify whether you would like ascending or descending order; the default is ascending order. The sort procedure is the same for Follow-Up Records, Evaluation Records and All Records.
To clear all sort variables, you can either select the “--“ option in each of the sort dropdown boxes, or click on the “Clear Search/Sort” button next to the sort boxes.
Note: When you generate reports, the way the table is sorted will transfer to the report. So if the table is sorted by Facility Name in ascending order in the table, and you elect to run a Line List Report, and select Yes in the pop up dialog box, the report will also be sorted by Facility Name in ascending order.
Sortable Fields on the ELR Follow-up Records Form
10 Deleting ELR Records
We eliminated the functionality to delete ELR records from LDET. This was for a variety of reasons. The primary reason is to avoid conflicts between ELR records in LDET and ELR records at OA. If you have a concern about a record or records stored in LDET that shouldn’t be there, contact your surveillance coordinator at OA to discuss this.
34
11 Generating Printed Reports of ELR Records
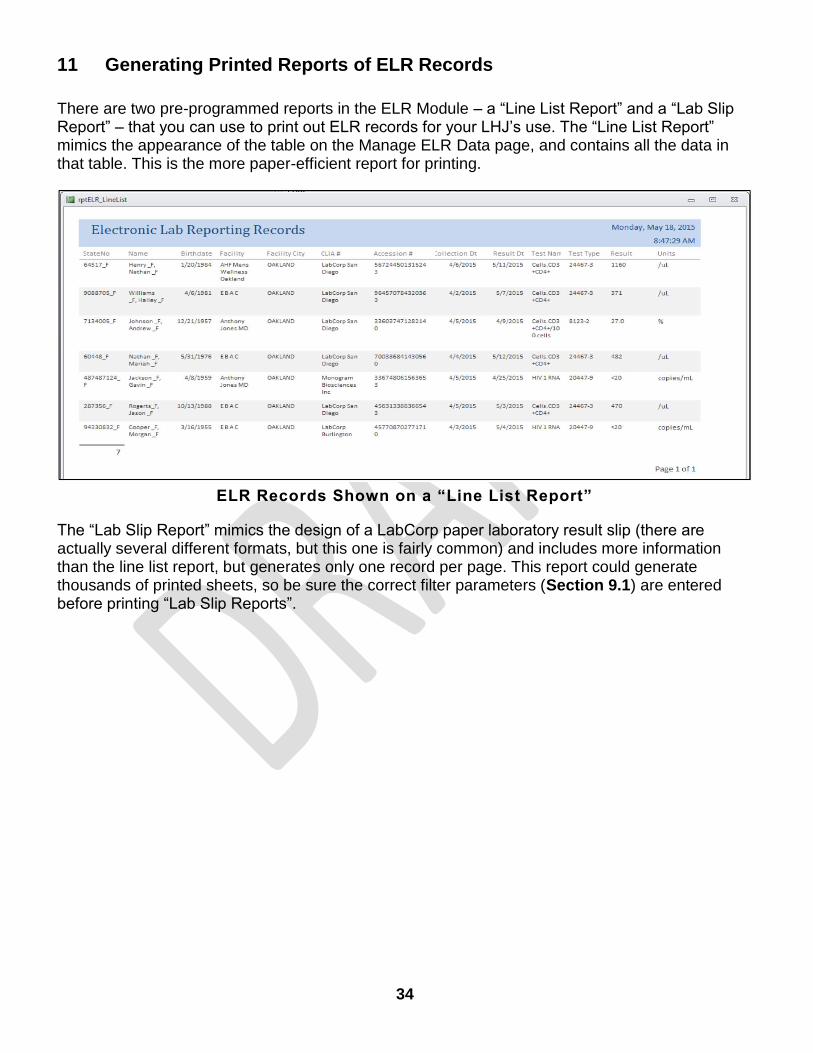
There are two pre-programmed reports in the ELR Module – a “Line List Report” and a “Lab Slip Report” – that you can use to print out ELR records for your LHJ’s use. The “Line List Report” mimics the appearance of the table on the Manage ELR Data page, and contains all the data in that table. This is the more paper-efficient report for printing.
ELR Records Shown on a “Line List Report”
The “Lab Slip Report” mimics the design of a LabCorp paper laboratory result slip (there are actually several different formats, but this one is fairly common) and includes more information than the line list report, but generates only one record per page. This report could generate thousands of printed sheets, so be sure the correct filter parameters (Section 9.1) are entered before printing “Lab Slip Reports”.

35
ELR Record Shown on a “Lab Slip Report”
11.1 Printing All ELR Records or All Filtered Records
The “Create Line List Report” and “Print Lab Slips” buttons generate the reports described above for either all of the records in the ELR Module or all records that are displayed after you filter using the “Search by” button, as described in Section 6.
“Create Line List Report” and “Print Lab Slips” Buttons on the Manage ELR Data Page

36
When you click either of the circled buttons above, a pop up box will appear asking if you would like to use the “currently specified search parameters.”
ELR Report Pop Up Box
If you would like to print reports for all records in the ELR Module, click “No”. Be cautioned that this means that a line list or individual laboratory slip (depending on which button you clicked) will be created that includes every ELR record.
If you would instead like to print reports for only ELR records that meet specified criteria (e.g., for a particular person or facility), you should first use the search filter described in Section 6. For example, if you would like to only print ELR records from a specific facility, you should specify that facility in the “Search by” field, then click either the “Create Line List Report” or “Print Lab Slips” button, and then click “Yes” when the above pop up box appears to create a report with only those records. For more information about search and filtering ELR records, see Section 6.
If you would like to cancel the report creation process, simply click “Cancel”.
To print the report after it is generated, go to “File” then select “Print” on the menu bar. Select the printer you would like to use to print the report and click “OK”.
11.2 Printing Only Selected ELR Records
The ELR Module also allows you to select only specific records for printing by clicking on the “SELECT” checkboxes for those records, located at the far left side of each record.

37
Selecting Specific Records for Printing on the Manage ELR Data Page
Select the records you would like to include and then click on either the “Selected Labs List Report” button or the “Selected Labs Lab Slips” button to create a report for only those records you selected. Clicking these buttons ignores the search filter parameters and only prints the selected records.
If you’ve made an error, you can click the check box again to cancel the selection, or if you’d like to clear all selected records, click the “Clear Selected Records” button.
Note: Checking the “SELECT” box doesn’t modify the data in the record, and the checks are not saved. At this time, it is not possible to export selected records.
To print the report after it is generated, go to “File” then select “Print” on the menu bar. Select the printer you would like to use to print the report and click “OK”.

38
12 Exporting ELR Records for LHJ Use
The “Export ELR Data” button generates a comma separated value file (.csv) with either all of the records in the ELR Module or with only records selected using the “Search by” Filter described in Section 6. The purpose of this export is to allow LHJs to export ELR records so that they can be imported into other programs for analysis or for other appropriate uses. This function is only available on the All ELR Records (Read Only) form. You can subset follow-up or evaluation records by using the “flag_fu” or “flag_eval” fields when you import the CSV into excel or statistical software. Note: It is important to keep in mind that the ELR records and the ELR Evaluation records serve completely different purposes and should be separated when performing any analyses.
Export ELR Data Button on the Manage ELR Data Page
When you click the “Export ELR Data” button, a pop up box will appear asking if you would like to use the “currently specified search parameters”.
39
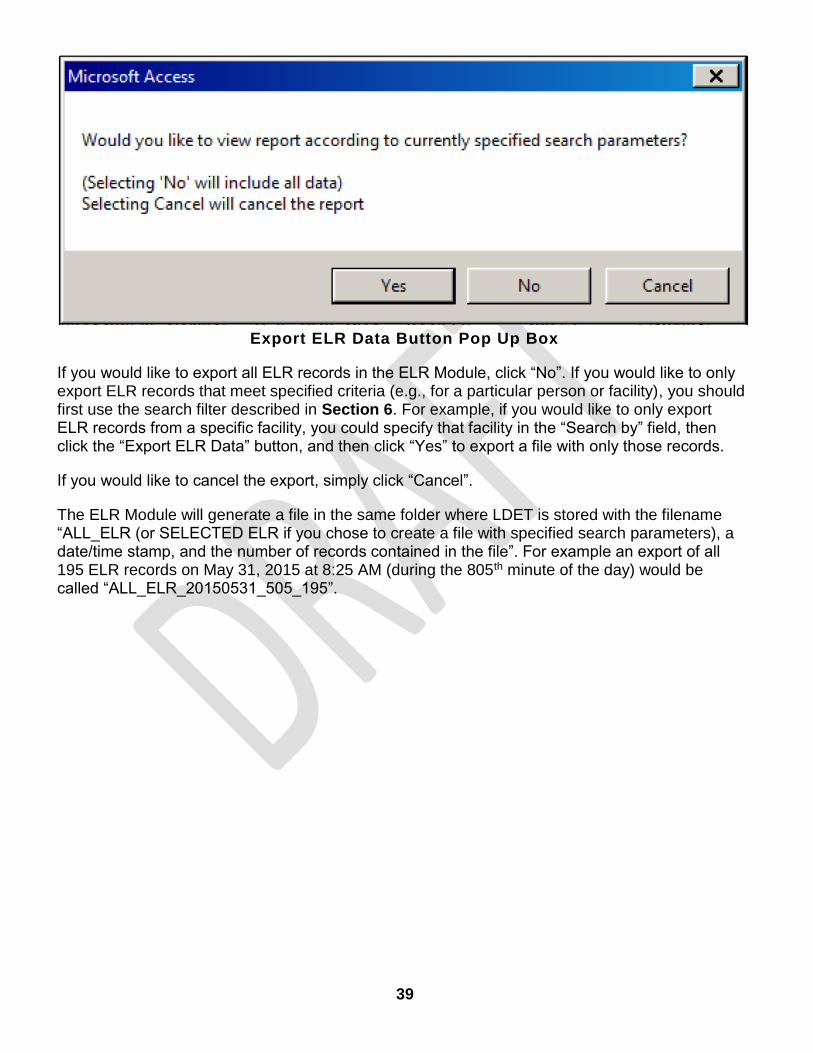
Export ELR Data Button Pop Up Box
If you would like to export all ELR records in the ELR Module, click “No”. If you would like to only export ELR records that meet specified criteria (e.g., for a particular person or facility), you should first use the search filter described in Section 6. For example, if you would like to only export ELR records from a specific facility, you could specify that facility in the “Search by” field, then click the “Export ELR Data” button, and then click “Yes” to export a file with only those records.
If you would like to cancel the export, simply click “Cancel”.
The ELR Module will generate a file in the same folder where LDET is stored with the filename “ALL_ELR (or SELECTED ELR if you chose to create a file with specified search parameters), a date/time stamp, and the number of records contained in the file”. For example an export of all 195 ELR records on May 31, 2015 at 8:25 AM (during the 805th minute of the day) would be called “ALL_ELR_20150531_505_195”.