canning tomatoes and tomato products (pdf) · canning tomatoes and tomato products 3 of the jars...
TRANSCRIPT

Canning Tomatoes and Tomato Products
A Pacific Northwest Extension PublicationOregon State University • Washington State University • University of Idaho
PNW 300

2 Canning Tomatoes and Tomato Products
Canning Tomatoes and Tomato Products
Contents Selecting and Preparing Equipment 2Preparing Tomatoes 3Packing the Jars 4Adding Acid 4Adding Salt 5Closing the Jars 5Processing 5
Boiling water canner 5 Pressure canner 6
Cooling the Jars 7Testing the Seal 8Storing 8Before Using Your Canned Product 8
Detoxification process 9Styles of Home-Canned Tomatoes 9Instructions for canning tomatoes,
tomato juice, and tomato sauce (Table 2) 10
Recipes for Tomato-Vegetable Combinations 14
Safety Checklist 16
All varieties and sizes of tomatoes, including heirloom tomatoes, are preserved the same way
Ripening tomatoes are a familiar sight in Pacific Northwest gardens and fields during the late summer months. Because the storage life of fresh tomatoes is limited, many households preserve them for year-round enjoyment. Home canning is one of the most popular preservation methods.
When canning tomatoes and tomato products, safe procedures must be used. Microorganisms (molds, yeast, bacteria) that cause either poor quality or potentially unsafe products are destroyed by heat processing.
Processing times are scientifically determined. Several factors influence the length of time home-canned products must be processed. Therefore, it is extremely important to follow a tested recipe for canning tomatoes and tomato products (such as spaghetti sauce). Changes in the amount or type of ingredients and method of preparation can influence the processing conditions needed to guarantee safety. For example, adding vegetables to a tomato sauce recipe can change acidity, and overcooking can change consistency and density. Products that are not prepared according to the research-based instructions in this publica-tion should be frozen.
As a result of new research findings and changes in tomato varieties, tomato-canning recommendations have changed over the years. This publication contains the most current recommendations. Be sure to replace all previously published instructions to ensure a high quality and safe product.
These recommendations are effective for all varieties and sizes of tomatoes including heirloom tomatoes. Underripe or green tomatoes can also be preserved using these instructions. The instructions for crushed, whole, or halved tomatoes are for peeled tomatoes.
Selecting and Preparing Equipment Tomato products are processed using either a boiling
water canner or pressure canner. Follow the processing instructions included with each recipe. Crushed, halved, and whole tomatoes can be safely canned using either method. The results of each method are similar, so it is a personal choice which method of processing to use.
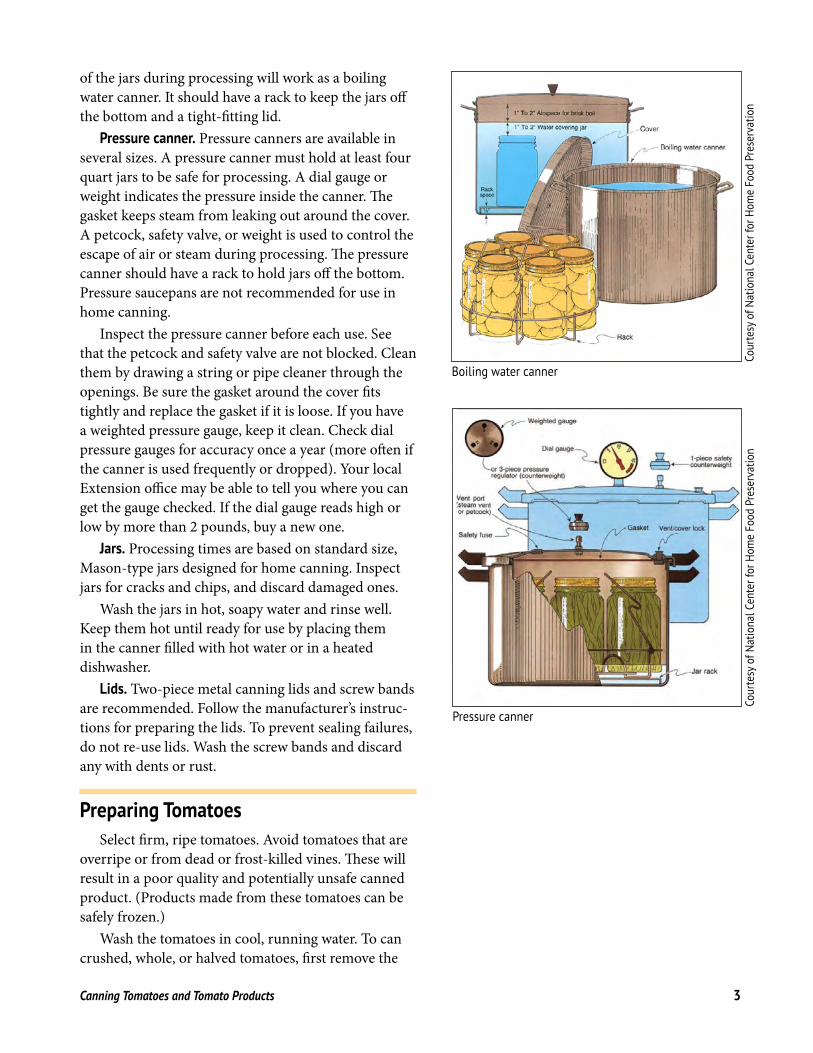
Boiling water canner. Any pot deep enough so that at least 1 to 2 inches of briskly boiling water covers the tops
Phot
o by
Jean
ne B
rand
t, ©
Ore
gon
Stat
e Un
iver
sity
Canning Tomatoes and Tomato Products 3
of the jars during processing will work as a boiling water canner. It should have a rack to keep the jars off the bottom and a tight-fitting lid.
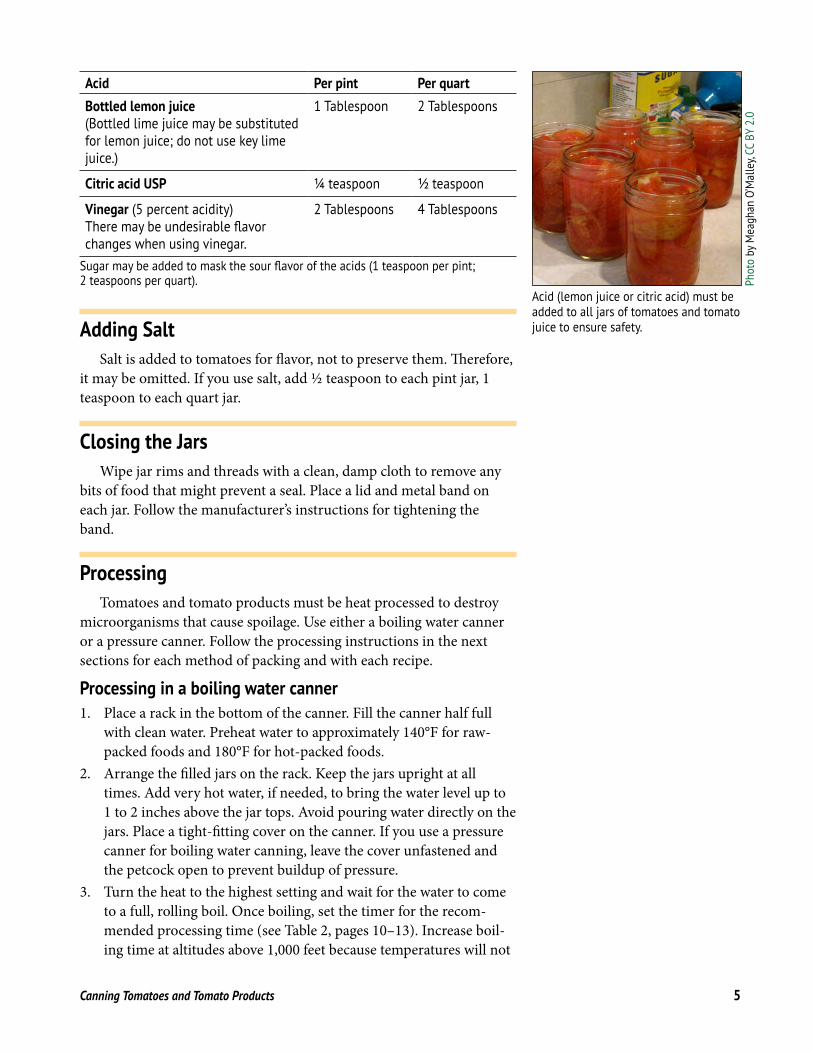
Pressure canner. Pressure canners are available in several sizes. A pressure canner must hold at least four quart jars to be safe for processing. A dial gauge or weight indicates the pressure inside the canner. The gasket keeps steam from leaking out around the cover. A petcock, safety valve, or weight is used to control the escape of air or steam during processing. The pressure canner should have a rack to hold jars off the bottom. Pressure saucepans are not recommended for use in home canning.
Inspect the pressure canner before each use. See that the petcock and safety valve are not blocked. Clean them by drawing a string or pipe cleaner through the openings. Be sure the gasket around the cover fits tightly and replace the gasket if it is loose. If you have a weighted pressure gauge, keep it clean. Check dial pressure gauges for accuracy once a year (more often if the canner is used frequently or dropped). Your local Extension office may be able to tell you where you can get the gauge checked. If the dial gauge reads high or low by more than 2 pounds, buy a new one.
Jars. Processing times are based on standard size, Mason-type jars designed for home canning. Inspect jars for cracks and chips, and discard damaged ones.
Wash the jars in hot, soapy water and rinse well. Keep them hot until ready for use by placing them in the canner filled with hot water or in a heated dishwasher.
Lids. Two-piece metal canning lids and screw bands are recommended. Follow the manufacturer’s instruc-tions for preparing the lids. To prevent sealing failures, do not re-use lids. Wash the screw bands and discard any with dents or rust.
Preparing Tomatoes Select firm, ripe tomatoes. Avoid tomatoes that are
overripe or from dead or frost-killed vines. These will result in a poor quality and potentially unsafe canned product. (Products made from these tomatoes can be safely frozen.)
Wash the tomatoes in cool, running water. To can crushed, whole, or halved tomatoes, first remove the
Pressure canner
Cour
tesy
of N
atio
nal C
ente
r for
Hom
e Fo
od P
rese
rvat
ion
Boiling water canner
Cour
tesy
of N
atio
nal C
ente
r for
Hom
e Fo
od P
rese
rvat
ion

4 Canning Tomatoes and Tomato Products
skins by dipping them in boiling water for 30 to 60 seconds or until the skins split. You can score the tomatoes on the bottom with a knife before dipping in hot water to help with peeling. Dip them in cold water, then slip off the skins and remove the cores.
Yields vary. The amount generally needed per quart is as follows:
Type Pounds neededWhole or halved tomatoes 3Crushed tomatoes 2¼Tomato juice 3¼Tomato sauce 5 to 6½
Packing the Jars Follow either hot-pack or raw-pack directions in the
following pages. In the hot-pack method, food is packed in jars while it is very hot. Then the cooking liquid or boil-ing water is added. In the raw-pack method, raw food is packed in the jars and covered with boiling water or juice. There is also one method for raw packed tomatoes that calls for no added liquid (see Table 2, page 10).
Pack food and liquid to allow ½ inch of headspace for jars that will be processed in a boiling water canner and 1 inch of headspace for jars that will be processed in a pressure canner. Headspace is the space between the food or liquid and the top of a jar. If the jars are too full, some of the contents could bubble out during heat processing and prevent sealing by sticking to the rim. Too much head-space may also prevent sealing if the processing time is too short to exhaust all air from the jar.
After packing, remove any air bubbles by running a plastic knife or other thin, nonmetal utensil around the inside of the jar. Adjust the headspace if needed.
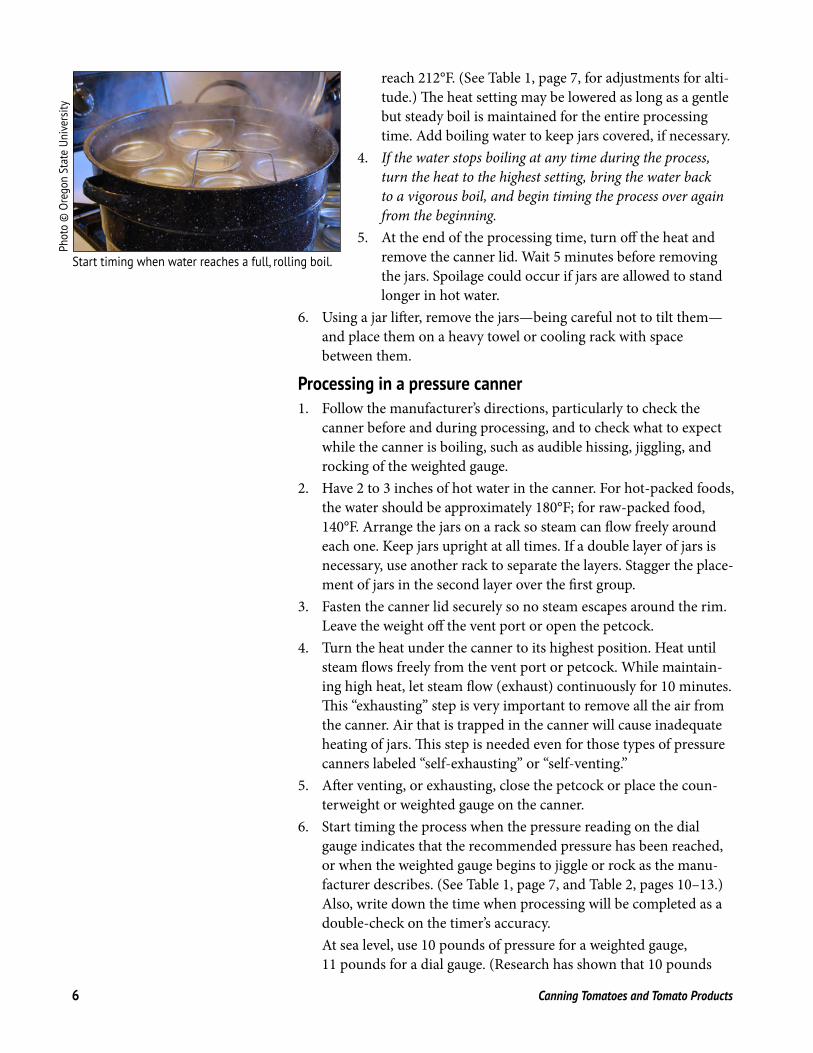
Adding Acid Because of the variation in tomato varieties, acid must
be added to all jars of canned tomatoes and tomato juice before processing to ensure safety. The acid may be added before or after the jars are filled with tomatoes. Acid must be added to both boiling water canning and pressure can-ning options.
To remove the tomato skins, dip the tomatoes in boiling water for 30 to 60 seconds or until the skins split
Dip them in cold water
You should be able to slip off the skins
Phot
o by
Chr
is B
aran
ski, C
C BY
2 0
Phot
o by
Chr
is B
aran
ski, C
C BY
2 0
Phot
o by
ilov
ebut
ter, C
C BY
2 0
Canning Tomatoes and Tomato Products 5
Acid Per pint Per quartBottled lemon juice (Bottled lime juice may be substituted for lemon juice; do not use key lime juice )
1 Tablespoon 2 Tablespoons
Citric acid USP ¼ teaspoon ½ teaspoon
Vinegar (5 percent acidity) There may be undesirable flavor changes when using vinegar
2 Tablespoons 4 Tablespoons
Sugar may be added to mask the sour flavor of the acids (1 teaspoon per pint; 2 teaspoons per quart).
Adding SaltSalt is added to tomatoes for flavor, not to preserve them. Therefore,
it may be omitted. If you use salt, add ½ teaspoon to each pint jar, 1 teaspoon to each quart jar.
Closing the Jars Wipe jar rims and threads with a clean, damp cloth to remove any
bits of food that might prevent a seal. Place a lid and metal band on each jar. Follow the manufacturer’s instructions for tightening the band.
Processing Tomatoes and tomato products must be heat processed to destroy
microorganisms that cause spoilage. Use either a boiling water canner or a pressure canner. Follow the processing instructions in the next sections for each method of packing and with each recipe.
Processing in a boiling water canner 1. Place a rack in the bottom of the canner. Fill the canner half full
with clean water. Preheat water to approximately 140°F for raw-packed foods and 180°F for hot-packed foods.
2. Arrange the filled jars on the rack. Keep the jars upright at all times. Add very hot water, if needed, to bring the water level up to 1 to 2 inches above the jar tops. Avoid pouring water directly on the jars. Place a tight-fitting cover on the canner. If you use a pressure canner for boiling water canning, leave the cover unfastened and the petcock open to prevent buildup of pressure.
3. Turn the heat to the highest setting and wait for the water to come to a full, rolling boil. Once boiling, set the timer for the recom-mended processing time (see Table 2, pages 10–13). Increase boil-ing time at altitudes above 1,000 feet because temperatures will not
Acid (lemon juice or citric acid) must be added to all jars of tomatoes and tomato juice to ensure safety
Phot
o by
Mea
ghan
O’M
alle
y, CC
BY
2 0
6 Canning Tomatoes and Tomato Products
reach 212°F. (See Table 1, page 7, for adjustments for alti-tude.) The heat setting may be lowered as long as a gentle but steady boil is maintained for the entire processing time. Add boiling water to keep jars covered, if necessary.
4. If the water stops boiling at any time during the process, turn the heat to the highest setting, bring the water back to a vigorous boil, and begin timing the process over again from the beginning.
5. At the end of the processing time, turn off the heat and remove the canner lid. Wait 5 minutes before removing the jars. Spoilage could occur if jars are allowed to stand longer in hot water.
Start timing when water reaches a full, rolling boil
6. Using a jar lifter, remove the jars—being careful not to tilt them—and place them on a heavy towel or cooling rack with space between them.
Processing in a pressure canner 1. Follow the manufacturer’s directions, particularly to check the
canner before and during processing, and to check what to expect while the canner is boiling, such as audible hissing, jiggling, and rocking of the weighted gauge.
2. Have 2 to 3 inches of hot water in the canner. For hot-packed foods, the water should be approximately 180°F; for raw-packed food, 140°F. Arrange the jars on a rack so steam can flow freely around each one. Keep jars upright at all times. If a double layer of jars is necessary, use another rack to separate the layers. Stagger the place-ment of jars in the second layer over the first group.
3. Fasten the canner lid securely so no steam escapes around the rim. Leave the weight off the vent port or open the petcock.
4. Turn the heat under the canner to its highest position. Heat until steam flows freely from the vent port or petcock. While maintain-ing high heat, let steam flow (exhaust) continuously for 10 minutes. This “exhausting” step is very important to remove all the air from the canner. Air that is trapped in the canner will cause inadequate heating of jars. This step is needed even for those types of pressure canners labeled “self-exhausting” or “self-venting.”
5. After venting, or exhausting, close the petcock or place the coun-terweight or weighted gauge on the canner.
6. Start timing the process when the pressure reading on the dial gauge indicates that the recommended pressure has been reached, or when the weighted gauge begins to jiggle or rock as the manu-facturer describes. (See Table 1, page 7, and Table 2, pages 10–13.) Also, write down the time when processing will be completed as a double-check on the timer’s accuracy.
At sea level, use 10 pounds of pressure for a weighted gauge, 11 pounds for a dial gauge. (Research has shown that 10 pounds
Phot
o ©
Ore
gon
Stat
e Un
iver
sity
Canning Tomatoes and Tomato Products 7
of pressure with a weighted gauge is comparable to 11 pounds on a dial gauge.) At altitudes above 1,000 feet for a weighted gauge canner and above 2,000 feet for a dial gauge canner, it is necessary to increase the pounds of pressure to compensate for decreased atmospheric pressure.
7. Regulate the heat under the canner to maintain steady pressure at or slightly above the correct gauge pressure.
8. If, at any time, the pressure goes below the recommended level, bring the canner back to pressure by increasing the heat, and begin the timing process over again, using the original processing time.
9. When the processing time is complete, turn off the heat. Remove the canner from the heat and allow it to cool undisturbed.
10. After the canner is completely depressurized, remove the weight from the vent port or slowly open the petcock. Wait 10 minutes. Then, unfasten the lid, and remove it carefully. For older canners, you may want to loosen the lid (but do not remove it), and then wait 10 minutes. Tilt the lid away from you so that the steam does not burn your face.
11. Using a jar lifter, remove the jars, being careful not to tilt them. Place them on a heavy towel or cooling rack with space between them. Spoilage could occur if jars are allowed to stand in the warm canner.
12. After the canner has cooled, wash and dry the canner, lid, and gasket.
Table 1. Pressure adjustments for altitude Elevation Pounds of pressure Weighted gauge canner Sea level to 1,000 feet 10 pounds Above 1,000 feet 15 pounds Dial gauge canner Sea level to 2,000 feet 11 pounds 2,001 to 4,000 feet 12 pounds 4,001 to 6,000 feet 13 pounds 6,001 to 8,000 feet 14 pounds
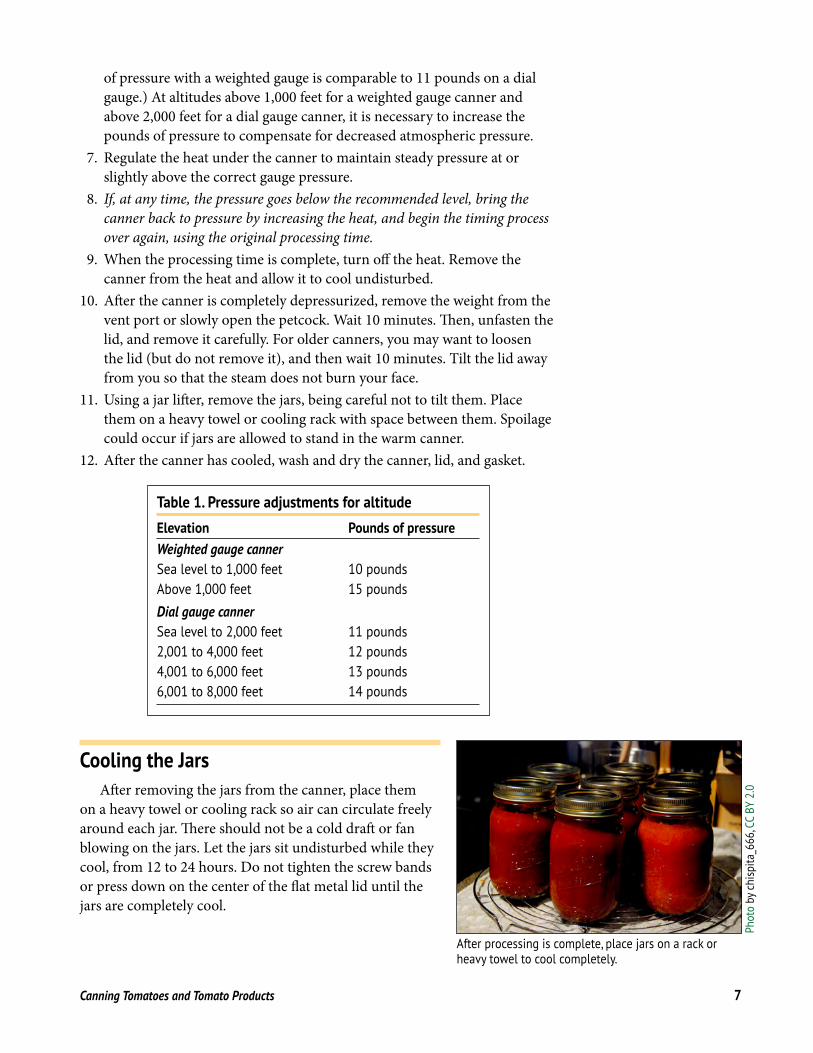
Cooling the Jars After removing the jars from the canner, place them
on a heavy towel or cooling rack so air can circulate freely around each jar. There should not be a cold draft or fan blowing on the jars. Let the jars sit undisturbed while they cool, from 12 to 24 hours. Do not tighten the screw bands or press down on the center of the flat metal lid until the jars are completely cool.
After processing is complete, place jars on a rack or heavy towel to cool completely
Phot
o by
chi
spita
_666
, CC
BY 2
0

8 Canning Tomatoes and Tomato Products
Testing the Seal Test each jar for a seal within 12 to 24 hours. Jars with flat, metal
lids are sealed if you can confirm the following: 1. The lid has popped down in the center. 2. The lid does not move when pressed down in the middle with a
finger. 3. The center of the lid gives a clear, ringing sound when tapped with
a spoon. (This is not as reliable as the other methods.) If a jar does not seal, refrigerate or freeze the contents or reprocess
within 24 hours of the original processing. Reprocess using a hot or raw pack as recommended for that product. Wipe jar rims clean. Use a new lid and process for the full time listed.
Jars that have not sealed, or jars that were under-processed or improperly processed and held over 24 hours, should be destroyed. If jars unseal during storage, do not consume the contents.
Storing Remove the screw bands, then wash and dry them. Store them
separately from the jars, because liquid under the bands could cause rusting. Wipe the jars and label them with the date and contents.
Store jars in a cool, dark, dry place. Exposure to heat, freezing tem-peratures, or light decreases the quality and shelf life of canned food. For best eating quality and nutritive value, eat the food within 1 year.
Before Using Your Canned ProductAs you select each jar for use, examine it for signs of spoilage. With
the jar at eye level, examine the outside of the jar for streaks of dried food. Inside the jar, look for cloudy canning liquid, rising air bubbles, or any unnatural color. While opening the jar, watch for spurting liquid or cotton-like mold growth on food surfaces or underside of lid. Smell for unnatural or off odors. Never taste food from a jar with an unsealed lid or food that shows signs of spoilage.
Carefully discard any jar of spoiled food to prevent possible ill-ness to you, your family, or your pets. Spoiled tomatoes and tomato products, or tomato products that were not acidified prior to canning, should be treated as having produced botulinum toxin and be handled in one of two ways:
If the suspect jars are still sealed, write on the jar:
Danger: Poison Do Not Eat
Place the jars in a heavyweight garbage bag. Close the bag and place it in a regular trash container or a nearby landfill.
Remove the screw bands, wipe off the jars, and label before storage
Phot
o by
Rac
hel T
ayse
, CC
BY 2
0

Canning Tomatoes and Tomato Products 9
Detoxification process• Wear rubber or heavy plastic gloves when handling suspect
foods and cleaning up. • Remove the jar lids, and carefully place the suspect jars on their
sides (along with the lids) in a stock pot, pan, or boiling water canner (8-quart volume or larger).
• Wash your gloved hands well. • Carefully add water until the level is 1 inch above the jars. Put a
lid on the pot and heat the water to boiling. • Boil for 30 minutes to detoxify the food. • Cool jars and contents in the pot, and discard the food and lids
when they have cooled. • Wash the jars and pot.• Spray or wet contaminated surfaces (such as counters and
cutting boards) with a room temperature, household chlorine bleach solution (1 part unscented 5–6% sodium hypochlorite bleach to 5 parts clean water) and let stand for 30 minutes.
• Wipe up treated spills with paper towels and put them in a plastic bag before discarding in the trash.
• Rinse surfaces.• Soak metal utensils in a mild chlorine solution (1 teaspoon
bleach to 1 quart room temperature water) for 30 minutes. Rinse.
If the suspect jars are unsealed, open, or leaking, they should be detoxified before disposal. Never taste food
from a jar with an unsealed lid or food that shows signs of spoilage.
Styles of Home-Canned Tomatoes There are scientifically tested processing recommendations for sev-
eral styles of home-canned tomatoes. Use Table 2 (pages 10–13) to find the instructions you need, and then make these decisions: 1. Do you want to can crushed tomatoes, whole or halved tomatoes,
tomato sauce, or tomato juice? 2. If tomatoes are whole or halved, what type of liquid will you add
(water, juice, none)? 3. Will you use a boiling water canner or a pressure canner?

10 Canning Tomatoes and Tomato Products
Table 2. Instructions for canning tomatoes, tomato juice, and tomato sauce
Whole or halved Packed raw without added liquid
Prepare tomatoes as directed (pp. 3–4). Leave whole or halve. Loosely fill jars with raw tomatoes, pressing until spaces fill with juice. Leave ½ inch headspace. Add acid (pp. 4–5). If desired, add salt (p. 5). Adjust lids, and process in a boiling water canner or pressure canner
Pint Quart
25* 25*
85 85
90 90
95 95
100 100
Whole or halved Packed in water
Prepare tomatoes as directed (pp. 3–4). Leave whole or halve. Raw pack: Fill jars with raw, peeled tomatoes Cover with hot water, leaving ½ inch headspace Add acid (pp. 4–5). If desired, add salt (p. 5). Hot pack: Add enough water to cover tomatoes in a large pan and boil gently for 5 minutes. Fill jars with hot tomatoes and cover with hot cooking liquid, leaving ½ inch headspace Add acid (pp. 4–5). If desired, add salt (p 5) Adjust lids, and process in a boiling water canner or pressure canner
Pint Quart
10* 10*
40 45
45 50
50 55
55 60
Type of tomato product
Preparation Jar size
Pressure cannerProcessing time, in minutes, at 240°F (10 lb for weighted gauge; 11 lb for dial gauge)
Boiling water canner Processing time, in minutes, with adjustments for altitude
0– 1,001– 3,001– 6,001– 1,000 ft 3,000 ft 6,000 ft 8,000 ft
* For altitudes above 1,000 feet, see Table 1 (page 7) for pressure adjustments (continued on next page)

Canning Tomatoes and Tomato Products 11
Whole or halved Packed in tomato juice
Prepare tomatoes (pp. 3–4) and tomato juice (p 12) as directed Raw pack: Heat tomato juice in a saucepan Fill jars with raw tomatoes and cover with hot tomato juice, leaving ½ inch headspace Add acid (pp. 4–5). If desired, add salt (p. 5). Hot pack: Completely cover tomatoes with tomato juice in large pan Boil gently for 5 minutes Fill jars with hot tomatoes and cover with hot tomato juice, leaving ½ inch headspace. Add acid (pp. 4–5). If desired, add salt (p 5) Adjust lids, and process in a boiling water canner or pressure canner
Pint Quart
25* 25*
85 85
90 90
95 95
100 100
Crushed Packed hot without added liquid
Prepare tomatoes as directed (pp. 3–4). Trim off any bruised or discolored portions and cut into quarters Heat one-sixth of a canner load quickly in a large pot, crushing them with a wooden spoon as they are added, to press out juice (Continue heating to boiling, stirring to prevent burning ) Gradually add remaining quartered tomatoes, stirring constantly (Crushing is not necessary for these ) Boil gently for 5 minutes after adding all tomatoes Fill jars immediately with hot tomatoes, leaving ½ inch headspace for boiling water canning or 1 inch headspace if pressure canning Add acid (pp. 4–5). If desired, add salt (p. 5). Adjust lids, and process in a boiling water canner or pressure canner
Pint Quart
15* 15*
35 45
40 50
45 55
50 60
Table 2. Instructions for canning tomatoes, tomato juice, and tomato sauce (continued)
* For altitudes above 1,000 feet, see Table 1 (page 7) for pressure adjustments (continued on next page)
Type of tomato product
Preparation Jar size
Pressure cannerProcessing time, in minutes, at 240°F (10 lb for weighted gauge; 11 lb for dial gauge)
Boiling water canner Processing time, in minutes, with adjustments for altitude
0– 1,001– 3,001– 6,001– 1,000 ft 3,000 ft 6,000 ft 8,000 ft

12 Canning Tomatoes and Tomato Products
Tomato juice
Wash, remove stems, and trim off bruised or discolored portions To prevent juice from separating into water and pulp layers, quickly cut about 1 pound of tomatoes into quarters and heat immediately to boiling in a saucepan while crushing Continue to slowly add and crush freshly cut tomato quarters to the boiling mixture (Make sure the mixture boils constantly and vigorously while you add the remaining tomatoes ) Simmer 5 minutes after adding all pieces. If you are not concerned about juice separation, simply slice or quarter tomatoes into a large saucepan Crush, heat, and simmer for 5 minutes before juicing Press both types of heated, crushed tomatoes through a sieve or food mill to remove skins and seeds Heat juice again to boiling Fill jars with hot juice, leaving ½ inch headspace Add acid (pp. 4–5). If desired, add salt (p. 5). Adjust lids, and process in a boiling water canner or pressure canner
Pint Quart
15* 15*
35 40
40 45
45 50
50 55
Table 2. Instructions for canning tomatoes, tomato juice, and tomato sauce (continued)
* For altitudes above 1,000 feet, see Table 1 (page 7) for pressure adjustments (continued on next page)
Type of tomato product
Preparation Jar size
Pressure cannerProcessing time, in minutes, at 240°F (10 lb for weighted gauge; 11 lb for dial gauge)
Boiling water canner Processing time, in minutes, with adjustments for altitude
0– 1,001– 3,001– 6,001– 1,000 ft 3,000 ft 6,000 ft 8,000 ft

Canning Tomatoes and Tomato Products 13
Tomato-vegetable juice blend
Prepare, crush, and simmer tomatoes as for tomato juice An average of 22 pounds of tomatoes is needed per canner load of 7 quarts Add no more than 3 cups of any combination of finely chopped celery, onions, carrots, and peppers to each 22 pounds of tomatoes Simmer mixture 20 minutes Press hot cooked tomatoes and vegetables through a sieve or food mill to remove skins and seeds Bring tomato-vegetable juice to boiling, and fill jars immediately, leaving ½ inch headspace Add acid (pp. 4–5). If desired, add salt (p. 5). Adjust lids, and process in a boiling water canner or pressure canner
Pint Quart
15* 15*
35 40
40 45
45 50
50 55
Tomato sauce
Wash tomatoes, remove stems, and trim off bruised or discolored portions Heat and press as for tomato juice Simmer in large-diameter pan until sauce reaches desired consistency (Volume should be reduced by about one-third for thin sauce, or about one-half for thick sauce ) Fill jars, leaving ½ inch headspace. Add acid (pp. 4–5). If desired, add salt (p 5) Adjust lids, and process in boiling water canner or pressure canner
Pint Quart
15* 15*
35 40
40 45
45 50
50 55
* For altitudes above 1,000 feet, see Table 1 (page 7) for pressure adjustments
Table 2. Instructions for canning tomatoes, tomato juice, and tomato sauce (continued)Type of tomato product
Preparation Jar size
Pressure cannerProcessing time, in minutes, at 240°F (10 lb for weighted gauge; 11 lb for dial gauge)
Boiling water canner Processing time, in minutes, with adjustments for altitude
0– 1,001– 3,001– 6,001– 1,000 ft 3,000 ft 6,000 ft 8,000 ft

14 Canning Tomatoes and Tomato Products
Recipes for Tomato-Vegetable CombinationsApproximate 1-pound equivalents 1 pound = 3 to 4 small tomatoes 1 pound = 10 large chile peppers 1 pound = 2½ cups chopped onions 1 pound = 6½ cups sliced mushrooms
Mexican Tomato Sauce 2½ to 3 pounds chile peppers, chopped 18 pounds tomatoes3 cups onions, chopped 1 Tablespoon salt 1 Tablespoon oregano ½ cup vinegar (5% strength)
Yield: About 9 pints Caution: Wear plastic or rubber gloves, and do not
touch your face when handling or cutting hot peppers. If you don’t wear gloves, wash hands thoroughly with soap and water before touch-ing your face or eyes.
Procedure: Wash and dry chiles. Slit each pepper along the side (to allow steam to escape while heating). Peel using one of the following methods: • Oven or broiler. Place chiles on a rack or
pan in a 400°F oven or under a broiler for 6 to 8 minutes, until skins blister.
• Range top. Cover a hot burner, either gas or electric, with a heavy wire mesh. Place chiles on the burner for several minutes until skins blister.
Place peppers in a pan and cover with a damp cloth. (This will make peeling easier.) After several minutes of cooling, slip off skins. Discard seeds and chop. Wash tomatoes, and dip in boiling water for 30 to 60 seconds or until skins split. Dip in cold water, slip off skins, and remove cores. Coarsely chop tomatoes, and combine with chopped peppers and remaining ingredients in a large saucepan. Bring to a boil. Cover and simmer for 60 minutes.
Fill jars, leaving 1 inch headspace. Adjust lids, and process in a pressure canner: 20 minutes for pints, 25 minutes for quarts (10 pounds of pressure
Tomato-vegetable combinations should be made following tested instructions
with a weighted gauge; 11 pounds of pressure with a dial gauge). Adjust pressure for altitude (see Table 1, page 7).
Chile Salsa (Hot Tomato-Pepper Sauce) 2 pounds chile peppers, chopped 5 pounds tomatoes 1 pound onion, chopped 1 cup vinegar (5% strength) 1 Tablespoon salt ½ teaspoon pepper
Yield: 6 to 8 pints Caution: Wear plastic or rubber gloves, and do not
touch your face when handling or cutting hot peppers. If you don’t wear gloves, wash hands thoroughly with soap and water before touch-ing your face or eyes.
Procedure: Prepare chiles as directed in the Mexican Tomato Sauce recipe. Wash tomatoes, and dip in boiling water for 30 to 60 seconds or until skins split. Dip in cold water, slip off skins, and remove cores. Coarsely chop tomatoes, and combine with onions, peppers, and remaining ingredients in a large saucepan. Heat to boiling, and simmer for 10 minutes.
Fill jars, leaving ½ inch headspace. Adjust lids, and process in a boiling water canner: 15 minutes for 0 to 1,000 feet altitude; 20 minutes for 1,001 to 6,000 feet; or 25 minutes at 6,001 to 8,000 feet.
Phot
o by
Jean
ne B
rand
t, ©
Ore
gon
Stat
e Un
iver
sity

Canning Tomatoes and Tomato Products 15
Spaghetti Sauce Without Meat 30 pounds tomatoes 1 cup onions, chopped* 5 cloves garlic, minced 1 cup celery or green pepper, chopped* 1 pound mushrooms, sliced* (optional)¼ cup vegetable oil 4½ teaspoons salt, or to taste 2 teaspoons black pepper 2 Tablespoons oregano ¼ cup parsley, minced¼ cup brown sugar *It is not safe to increase the proportion of onions, celery, peppers, or mushrooms.
Yield: About 9 pints Procedure: Wash tomatoes, and dip in boiling
water for 30 to 60 seconds or until skins split. Dip in cold water and slip off skins. Remove cores and quarter. Boil 20 minutes, uncovered, in a large saucepan. Put through a food mill or sieve.
Sauté onions, garlic, celery or peppers, and mushrooms (if desired) in vegetable oil, until tender. Combine sautéed vegetables and tomatoes, and add salt, pepper, herbs, and sugar. Bring to a boil. Simmer, uncovered, until thick enough for serving. (The volume will reduce by nearly one-half.) Stir frequently to avoid burning.
Fill jars, leaving 1 inch headspace. Adjust lids, and process in a pressure canner: 20 minutes for pints; 25 minutes for quarts (10 pounds of pres-sure with a weighted gauge; 11 pounds of pressure with a dial gauge). Adjust pressure for altitude (see Table 1, page 7).
Spaghetti Sauce With Meat 30 pounds tomatoes 2½ pounds ground meat or sausage 5 cloves garlic, minced 1 cup onion, chopped*1 cup celery or green peppers, chopped*1 pound mushrooms, sliced (optional)*
4½ teaspoons salt, or to taste 2 teaspoons black pepper 2 Tablespoons oregano ¼ cup parsley, minced ¼ cup brown sugar *It is not safe to increase the proportion of
onions, celery, peppers, or mushrooms. Yield: About 9 pints Procedure: To prepare tomatoes, follow directions
for the Spaghetti Sauce Without Meat recipe. Sauté meat or sausage until brown. Drain off
fat. Add garlic, onion, celery or green pepper, and mushrooms (if desired). Cook until vegetables are tender. Combine with tomato pulp in a large sauce-pan. Add salt, pepper, herbs, and sugar. Bring to a boil. Simmer, uncovered, until thick enough for serving. (Volume will reduce by nearly one-half.) Stir frequently to avoid burning.
Fill jars, leaving 1 inch headspace. Adjust lids, and process in a pressure canner: 60 minutes for pints; 70 minutes for quarts (10 pounds of pres-sure with a weighted gauge; 11 pounds of pressure with a dial gauge). Adjust pressure for altitude (see Table 1, page 7).
Tomatoes with Okra or Zucchini Use about 3 pounds of tomatoes to 1 pound
of okra or zucchini. Approximately 12 pounds of tomatoes and 4 pounds of okra or zucchini is needed per canner load of 7 quarts. Approximately 7 pounds of tomatoes and 2½ pounds of okra or zucchini is needed per canner load of 9 pints.Procedure: Wash tomatoes and okra or zucchini.
Dip tomatoes in boiling water for 30 to 60 sec-onds or until skins split. Then dip in cold water, slip off skins, remove cores, and quarter.
Trim stems from okra and slice into 1-inch pieces, or leave whole. Slice or cube zucchini (if used). Bring tomatoes to a boil and simmer 10 minutes. Add okra or zucchini and boil gently 5 more minutes.
Fill hot jars with hot mixture, leaving 1 inch headspace. Add ½ teaspoon salt to each pint jar or 1 teaspoon salt to each quart jar, if desired. Remove
16 Canning Tomatoes and Tomato Products
air bubbles. Wipe jar rims. Adjust lids, and process in a pressure canner: 30 minutes for pints and 35 minutes for quarts (10 pounds of pressure with a weighted gauge; 11 pounds of pressure with a dial gauge). Adjust pressure for altitude (see Table 1, page 7).Variation: You may add four or five pearl onions or
two ¼-inch-thick onion slices to each jar.
Stewed Tomatoes 2 quarts chopped tomatoes¼ cup chopped green peppers¼ cup chopped onions2 teaspoons celery salt
2 teaspoons sugar¼ teaspoon salt
Yield: About 3 pintsProcedure: Combine all ingredients. Cover and
cook 10 minutes, stirring occasionally to prevent sticking.
Pour hot mixture into hot jars, leaving ½ inch headspace. Remove air bubbles. Wipe jar rims. Adjust lids, and process in a pressure canner: 15 minutes for pints and 20 minutes for quarts (10 pounds of pressure with a weighted gauge; 11 pounds of pressure with a dial gauge). Adjust pressure for altitude (see Table 1, page 7).
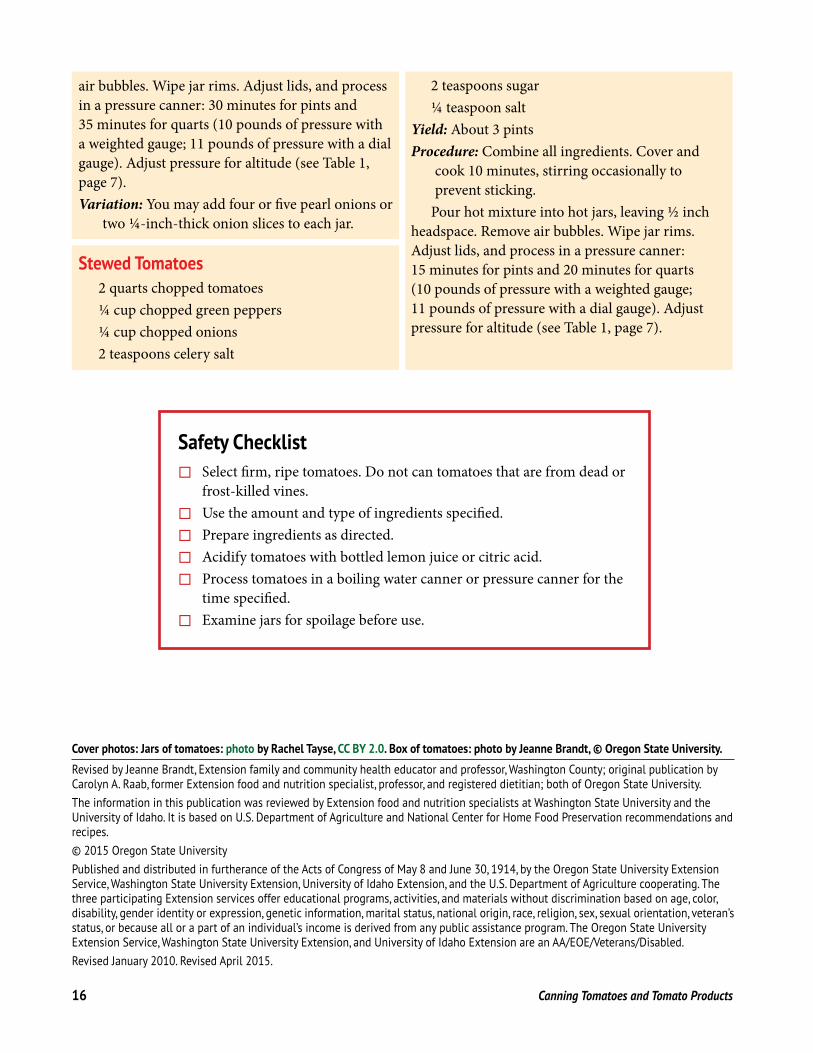
Safety Checklist Select firm, ripe tomatoes. Do not can tomatoes that are from dead or
frost-killed vines. Use the amount and type of ingredients specified. Prepare ingredients as directed. Acidify tomatoes with bottled lemon juice or citric acid. Process tomatoes in a boiling water canner or pressure canner for the
time specified. Examine jars for spoilage before use.
Revised by Jeanne Brandt, Extension family and community health educator and professor, Washington County; original publication by Carolyn A Raab, former Extension food and nutrition specialist, professor, and registered dietitian; both of Oregon State University The information in this publication was reviewed by Extension food and nutrition specialists at Washington State University and the University of Idaho It is based on U S Department of Agriculture and National Center for Home Food Preservation recommendations and recipes © 2015 Oregon State UniversityPublished and distributed in furtherance of the Acts of Congress of May 8 and June 30, 1914, by the Oregon State University Extension Service, Washington State University Extension, University of Idaho Extension, and the U S Department of Agriculture cooperating The three participating Extension services offer educational programs, activities, and materials without discrimination based on age, color, disability, gender identity or expression, genetic information, marital status, national origin, race, religion, sex, sexual orientation, veteran’s status, or because all or a part of an individual’s income is derived from any public assistance program The Oregon State University Extension Service, Washington State University Extension, and University of Idaho Extension are an AA/EOE/Veterans/Disabled Revised January 2010 Revised April 2015
Cover photos: Jars of tomatoes: photo by Rachel Tayse, CC BY 2.0. Box of tomatoes: photo by Jeanne Brandt, © Oregon State University.