canon eos rebel t3i front casing replacement · canon eos rebel t3i front casing replacement this...
TRANSCRIPT

Canon EOS Rebel T3i Front CasingReplacement
This guide will help you replace the body of the Canon EOS Rebel T3i.
Written By: Natalie Crock
Canon EOS Rebel T3i Front Casing Replacement Draft: 2019-03-09Guide ID: 50559 -
This document was generated on 2019-09-28 08:06:43 AM (MST).
© iFixit — CC BY-NC-SA www.iFixit.com Page 1 of 10

INTRODUCTION
Use this guide to replace the front casing on your Canon EOS Rebel T3i.
TOOLS:Phillips #000 Screwdriver (1)Spudger (1)
Canon EOS Rebel T3i Front Casing Replacement Draft: 2019-03-09Guide ID: 50559 -
This document was generated on 2019-09-28 08:06:43 AM (MST).
© iFixit — CC BY-NC-SA www.iFixit.com Page 2 of 10
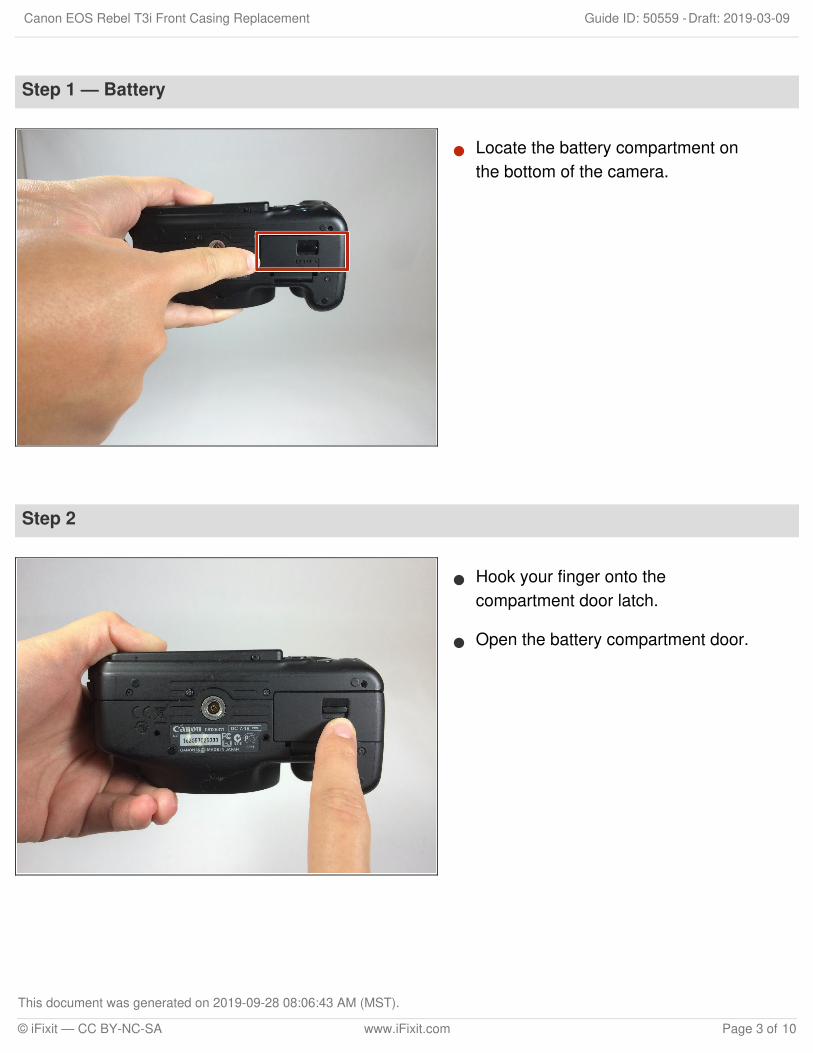
Step 1 — Battery
Locate the battery compartment onthe bottom of the camera.
Step 2
Hook your finger onto thecompartment door latch.
Open the battery compartment door.
Canon EOS Rebel T3i Front Casing Replacement Draft: 2019-03-09Guide ID: 50559 -
This document was generated on 2019-09-28 08:06:43 AM (MST).
© iFixit — CC BY-NC-SA www.iFixit.com Page 3 of 10
Step 3
Remove the battery from thecompartment.
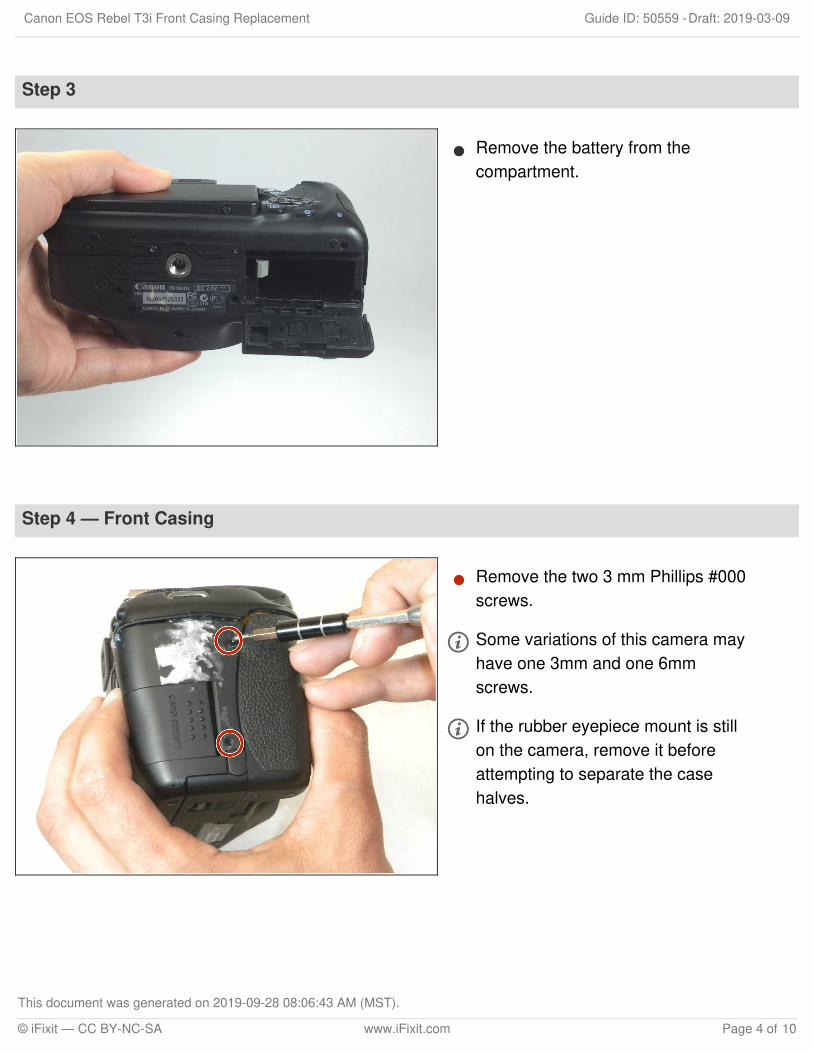
Step 4 — Front Casing
Remove the two 3 mm Phillips #000screws.
Some variations of this camera mayhave one 3mm and one 6mmscrews.
If the rubber eyepiece mount is stillon the camera, remove it beforeattempting to separate the casehalves.
Canon EOS Rebel T3i Front Casing Replacement Draft: 2019-03-09Guide ID: 50559 -
This document was generated on 2019-09-28 08:06:43 AM (MST).
© iFixit — CC BY-NC-SA www.iFixit.com Page 4 of 10

Step 5
Remove the three 3 mm Phillips#000 screws.
Remove the single 6 mm Phillips#000 screw.
Some variation of this camera havetwo 3mm and two 6mm screws
Step 6
Peel back the grip tape with yourfingernail.
Depending on the age of thecamera, the grip tape will stick backin place with no need for extra glue.
Canon EOS Rebel T3i Front Casing Replacement Draft: 2019-03-09Guide ID: 50559 -
This document was generated on 2019-09-28 08:06:43 AM (MST).
© iFixit — CC BY-NC-SA www.iFixit.com Page 5 of 10

Step 7
Remove the four 5 mm Phillips #000screws.
Some variation of this model mayhave three 5mm screws and one6mm
Step 8
Slide off the right side of thecamera.
Do not completely separate thebody yet. There are still wires thatmust be disconnected. If the body ispulled apart too quickly, it maycause damage.
Canon EOS Rebel T3i Front Casing Replacement Draft: 2019-03-09Guide ID: 50559 -
This document was generated on 2019-09-28 08:06:43 AM (MST).
© iFixit — CC BY-NC-SA www.iFixit.com Page 6 of 10

Step 9
Lift off the USB cover.
Do not completely remove the backof the camera. There are still wiresthat must be disconnected.Removing the back too quickly maycause damage to wires.
When lifting the cover, the only thingresisting your tug is the plug coverstopper. Just pull, you'll be fine.
When replacing it, having the coverssnug on the plate will make it easierto push the whole cover on
Step 10
After separating the back, gently liftoff one side of the light blue wirewith the spudger until the connectoris totally removed.
You may feel a slight resistance asyou pull the top of the back cover off,it will click but that is fine.
Canon EOS Rebel T3i Front Casing Replacement Draft: 2019-03-09Guide ID: 50559 -
This document was generated on 2019-09-28 08:06:43 AM (MST).
© iFixit — CC BY-NC-SA www.iFixit.com Page 7 of 10

Step 11
With the spudger, remove theorange ribbon cable leading to thecircuit board from the back of thecamera.
Step 12
Remove the two 6 mm Phillips #000screws.
Canon EOS Rebel T3i Front Casing Replacement Draft: 2019-03-09Guide ID: 50559 -
This document was generated on 2019-09-28 08:06:43 AM (MST).
© iFixit — CC BY-NC-SA www.iFixit.com Page 8 of 10

Step 13
Remove the single 6 mm and two 3mm Phillips #000 screws.
Step 14
Use the spudger to lift the plasticunder the tripod mount.
Canon EOS Rebel T3i Front Casing Replacement Draft: 2019-03-09Guide ID: 50559 -
This document was generated on 2019-09-28 08:06:43 AM (MST).
© iFixit — CC BY-NC-SA www.iFixit.com Page 9 of 10

To reassemble your device, follow these instructions in reverse order.
Step 15
Lift the front cover off.
Canon EOS Rebel T3i Front Casing Replacement Draft: 2019-03-09Guide ID: 50559 -
This document was generated on 2019-09-28 08:06:43 AM (MST).
© iFixit — CC BY-NC-SA www.iFixit.com Page 10 of 10