capturewiz pro - indiamartimghost1.indiamart.com/data2/cp/uc/my-2045630/writing_sample.pdf ·...
TRANSCRIPT
CaptureWiz® Pro User Guide Screen Capture Tool
Techrite Solutions 11, Dream House, Datta Mandir Road Nashikroad 422101 Maharashtra India Ph.: +91.253.2458473 Mobile: +91.9158080022

Copyright© All rights reserved. No part of this manual may be reproduced, distributed, or transmitted in any form or by any means, including photocopying, recording, or other electronic or mechanical methods, without the prior written permission of the publisher, except in the case of brief quotations embodied in critical reviews and certain other non-commercial uses permitted by copyright law. For permission requests, write to the publisher.
Techrite Solutions 11, Dream House, Datta Mandir Road Nashikroad 422101 Maharashtra India Ph.: +91.253.2458473 Mobile: +91.9158080022

Disclaimer This manual is made as a writing sample. There is no commercial value intended for this manual. All the names of persons, companies are fictional unless otherwise noted. The CaptureWiz® software is the property of PixelMetrics® unless purchased. A free trial version of the software can be downloaded for a period of 30 days after which the software, if used, without purchasing becomes illegal and pirated usage and can be legally enforceable. If the material is found and does not belong to you please return it to:
Techrite Solutions 11, Dream House, Datta Mandir Road Nashikroad 422101 Maharashtra India Ph.: +91.253.2458473 Mobile: +91.9158080022
Preface This manual will guide a user to use the CaptureWiz® software to capture screen images for various purposes. This user guide has detailed explanation about all the functions and applications of the CaptureWiz® software. In this manual you will learn how to:
Take snapshots of the screen.
Take snapshots of the required area.
Select a frame and take a snapshot.
Take snapshot of a page bigger than the screen.
Record a video or a particular selection of the video screen. This is a useful application for online training manuals.
Record audio while explaining some particular application. Useful for online voice enabled training manuals)
CaptureWiz Pro
Techrite Solutions, Nashik 5
Contents INTRODUCTION .................................................................................................................. 8
GUIDE OVERVIEW .............................................................................................................. 8
CAPTUREWIZ PRO ............................................................................................................. 9
CAPTURE ........................................................................................................................... 10
SPEED CAPTURE TOOL ‐‐‐‐‐‐‐‐‐‐‐‐‐‐‐‐‐‐‐‐‐‐‐‐‐‐‐‐‐‐‐‐‐‐‐‐‐‐‐‐‐‐‐‐‐‐‐‐‐‐‐‐‐‐‐‐‐‐‐‐‐‐‐‐‐‐ 11 FULL SCREEN CAPTURE ‐‐‐‐‐‐‐‐‐‐‐‐‐‐‐‐‐‐‐‐‐‐‐‐‐‐‐‐‐‐‐‐‐‐‐‐‐‐‐‐‐‐‐‐‐‐‐‐‐‐‐‐‐‐‐‐‐‐‐‐‐‐‐‐‐ 11 2‐POINT CAPTURE TOOL ‐‐‐‐‐‐‐‐‐‐‐‐‐‐‐‐‐‐‐‐‐‐‐‐‐‐‐‐‐‐‐‐‐‐‐‐‐‐‐‐‐‐‐‐‐‐‐‐‐‐‐‐‐‐‐‐‐‐‐‐‐‐‐‐ 12 FRAME CAPTURE TOOL ‐‐‐‐‐‐‐‐‐‐‐‐‐‐‐‐‐‐‐‐‐‐‐‐‐‐‐‐‐‐‐‐‐‐‐‐‐‐‐‐‐‐‐‐‐‐‐‐‐‐‐‐‐‐‐‐‐‐‐‐‐‐‐‐‐ 12 SCROLL CAPTURE ‐‐‐‐‐‐‐‐‐‐‐‐‐‐‐‐‐‐‐‐‐‐‐‐‐‐‐‐‐‐‐‐‐‐‐‐‐‐‐‐‐‐‐‐‐‐‐‐‐‐‐‐‐‐‐‐‐‐‐‐‐‐‐‐‐‐‐‐‐‐‐‐ 13 VIDEO CAPTURE ‐‐‐‐‐‐‐‐‐‐‐‐‐‐‐‐‐‐‐‐‐‐‐‐‐‐‐‐‐‐‐‐‐‐‐‐‐‐‐‐‐‐‐‐‐‐‐‐‐‐‐‐‐‐‐‐‐‐‐‐‐‐‐‐‐‐‐‐‐‐‐‐‐ 13 AUDIO CAPTURE ‐‐‐‐‐‐‐‐‐‐‐‐‐‐‐‐‐‐‐‐‐‐‐‐‐‐‐‐‐‐‐‐‐‐‐‐‐‐‐‐‐‐‐‐‐‐‐‐‐‐‐‐‐‐‐‐‐‐‐‐‐‐‐‐‐‐‐‐‐‐‐‐‐ 14
MAIN WINDOW ................................................................................................................ 15
OPTIONS ............................................................................................................................ 17
MAIN ‐‐‐‐‐‐‐‐‐‐‐‐‐‐‐‐‐‐‐‐‐‐‐‐‐‐‐‐‐‐‐‐‐‐‐‐‐‐‐‐‐‐‐‐‐‐‐‐‐‐‐‐‐‐‐‐‐‐‐‐‐‐‐‐‐‐‐‐‐‐‐‐‐‐‐‐‐‐‐‐‐‐‐‐‐ 18 CAPTURE BAR ‐‐‐‐‐‐‐‐‐‐‐‐‐‐‐‐‐‐‐‐‐‐‐‐‐‐‐‐‐‐‐‐‐‐‐‐‐‐‐‐‐‐‐‐‐‐‐‐‐‐‐‐‐‐‐‐‐‐‐‐‐‐‐‐‐‐‐‐‐‐‐‐‐‐‐ 18 SCROLL ‐‐‐‐‐‐‐‐‐‐‐‐‐‐‐‐‐‐‐‐‐‐‐‐‐‐‐‐‐‐‐‐‐‐‐‐‐‐‐‐‐‐‐‐‐‐‐‐‐‐‐‐‐‐‐‐‐‐‐‐‐‐‐‐‐‐‐‐‐‐‐‐‐‐‐‐‐‐‐‐‐‐‐ 19 VIDEO ‐‐‐‐‐‐‐‐‐‐‐‐‐‐‐‐‐‐‐‐‐‐‐‐‐‐‐‐‐‐‐‐‐‐‐‐‐‐‐‐‐‐‐‐‐‐‐‐‐‐‐‐‐‐‐‐‐‐‐‐‐‐‐‐‐‐‐‐‐‐‐‐‐‐‐‐‐‐‐‐‐‐‐‐ 20 EDITOR ‐‐‐‐‐‐‐‐‐‐‐‐‐‐‐‐‐‐‐‐‐‐‐‐‐‐‐‐‐‐‐‐‐‐‐‐‐‐‐‐‐‐‐‐‐‐‐‐‐‐‐‐‐‐‐‐‐‐‐‐‐‐‐‐‐‐‐‐‐‐‐‐‐‐‐‐‐‐‐‐‐‐‐ 21 OUTPUT ‐‐‐‐‐‐‐‐‐‐‐‐‐‐‐‐‐‐‐‐‐‐‐‐‐‐‐‐‐‐‐‐‐‐‐‐‐‐‐‐‐‐‐‐‐‐‐‐‐‐‐‐‐‐‐‐‐‐‐‐‐‐‐‐‐‐‐‐‐‐‐‐‐‐‐‐‐‐‐‐‐‐ 22 MISCELLANEOUS‐‐‐‐‐‐‐‐‐‐‐‐‐‐‐‐‐‐‐‐‐‐‐‐‐‐‐‐‐‐‐‐‐‐‐‐‐‐‐‐‐‐‐‐‐‐‐‐‐‐‐‐‐‐‐‐‐‐‐‐‐‐‐‐‐‐‐‐‐‐‐‐‐ 23 MISCELLANEOUS‐‐‐‐‐‐‐‐‐‐‐‐‐‐‐‐‐‐‐‐‐‐‐‐‐‐‐‐‐‐‐‐‐‐‐‐‐‐‐‐‐‐‐‐‐‐‐‐‐‐‐‐‐‐‐‐‐‐‐‐‐‐‐‐‐‐‐‐‐‐‐‐‐ 23
MACROS ............................................................................................................................. 24
CAPTURE BAR BUTTONS ‐‐‐‐‐‐‐‐‐‐‐‐‐‐‐‐‐‐‐‐‐‐‐‐‐‐‐‐‐‐‐‐‐‐‐‐‐‐‐‐‐‐‐‐‐‐‐‐‐‐‐‐‐‐‐‐‐‐‐‐‐‐‐‐ 25 KEYBOARD HOTKEYS ‐‐‐‐‐‐‐‐‐‐‐‐‐‐‐‐‐‐‐‐‐‐‐‐‐‐‐‐‐‐‐‐‐‐‐‐‐‐‐‐‐‐‐‐‐‐‐‐‐‐‐‐‐‐‐‐‐‐‐‐‐‐‐‐‐‐‐‐ 26 TASKBAR ICONS ‐‐‐‐‐‐‐‐‐‐‐‐‐‐‐‐‐‐‐‐‐‐‐‐‐‐‐‐‐‐‐‐‐‐‐‐‐‐‐‐‐‐‐‐‐‐‐‐‐‐‐‐‐‐‐‐‐‐‐‐‐‐‐‐‐‐‐‐‐‐‐‐‐ 27
GLOSSARY .......................................................................................................................... 28
INDEX .................................................................................................................................. 29
FEEDBACK FORM ............................................................................................................ 30

CaptureWiz Pro
Techrite Solutions, Nashik 6
Table of Figures FIGURE 1: CAPTUREWIZ PRO HOMEPAGE 9 FIGURE 2: CAPTURE TYPES 10 FIGURE 3: FRAME CAPTURE TOOL 12 FIGURE 4: MAIN WINDOW FOR IMAGE EDITING 15 FIGURE 5: OPTIONS MAIN 17 FIGURE 6: OPTIONS CAPTURE BAR 18 FIGURE 7: OPTIONS SCROLL 19 FIGURE 8: OPTIONS VIDEO 20 FIGURE 9: OPTIONS EDITOR 21 FIGURE 10: OPTION OUTPUT 22 FIGURE 11: OPTION MISC 23 FIGURE 12: MACROS 24 FIGURE 13: MACRO CAPTURE BAR BUTTONS 25 FIGURE 14: MACRO KEYBOARD HOTKEYS 26 FIGURE 15: MACROS TASKBAR ICONS 27

CaptureWiz Pro
Techrite Solutions, Nashik 7
Tables in Manual TABLE 1: GUIDE OVERVIEW 8 TABLE 2: MAIN WINDOW FUNCTIONS 16 TABLE 3: OPTIONS VIDEO FIELDS 20 TABLE 4: OPTIONS AUDIO FIELDS 20 TABLE 5: OPTIONS OUTPUT SAVE TO FILE 22 TABLE 6: OPTIONS OUTPUT PRINT 22 TABLE 8: FEEDBACK FORM (A) 30 TABLE 9: FEEDBACK FORM (B) 30

CaptureWiz Pro
Techrite Solutions, Nashik 8
Introduction The screen capture tool is a useful application for many purposes. Technical writers all over depend heavily on screen capture tools. Though Microsoft has a screen capture tool called Paint Brush, the functionalities of the same are limited. Taking this into consideration the CaptureWiz Pro has been designed and developed for easier ways to capture screenshots and use the same for various applications.
Guide Overview Use this guide to see what you will learn from this manual. Table 1: Guide Overview
Chapters Description
Capture
This chapter will detail various applications for taking screenshots
Main Window This will discuss about the dash board and about editing screenshots.
Options This chapter will define ways to personalise the software application.
Macros
This chapter will enable the user to define commands for the applications and various other ways to personalise the application.
CaptureWiz Pro
Techrite Solutions, Nashik 9
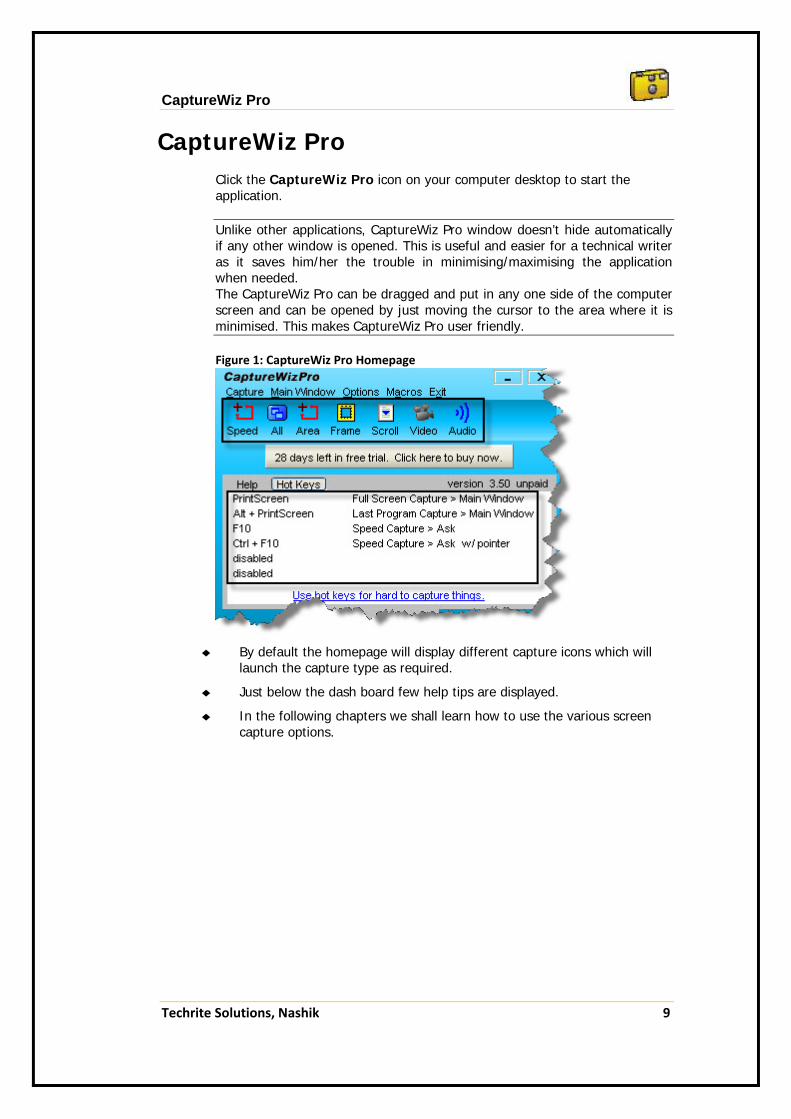
CaptureWiz Pro Click the CaptureWiz Pro icon on your computer desktop to start the application.
Unlike other applications, CaptureWiz Pro window doesn’t hide automatically if any other window is opened. This is useful and easier for a technical writer as it saves him/her the trouble in minimising/maximising the application when needed. The CaptureWiz Pro can be dragged and put in any one side of the computer screen and can be opened by just moving the cursor to the area where it is minimised. This makes CaptureWiz Pro user friendly. Figure 1: CaptureWiz Pro Homepage
By default the homepage will display different capture icons which will launch the capture type as required.
Just below the dash board few help tips are displayed.
In the following chapters we shall learn how to use the various screen capture options.
CaptureWiz Pro
Techrite Solutions, Nashik 10
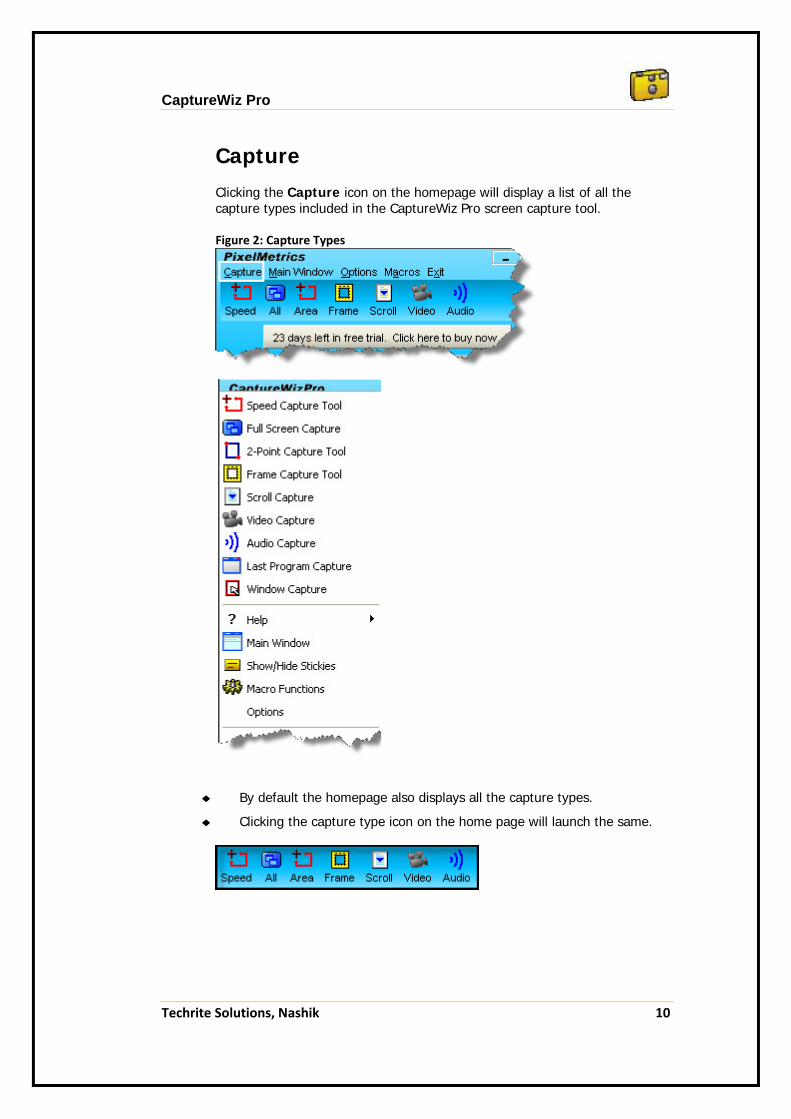
Capture Clicking the Capture icon on the homepage will display a list of all the capture types included in the CaptureWiz Pro screen capture tool.
Figure 2: Capture Types
By default the homepage also displays all the capture types.
Clicking the capture type icon on the home page will launch the same.
CaptureWiz Pro
Techrite Solutions, Nashik 11
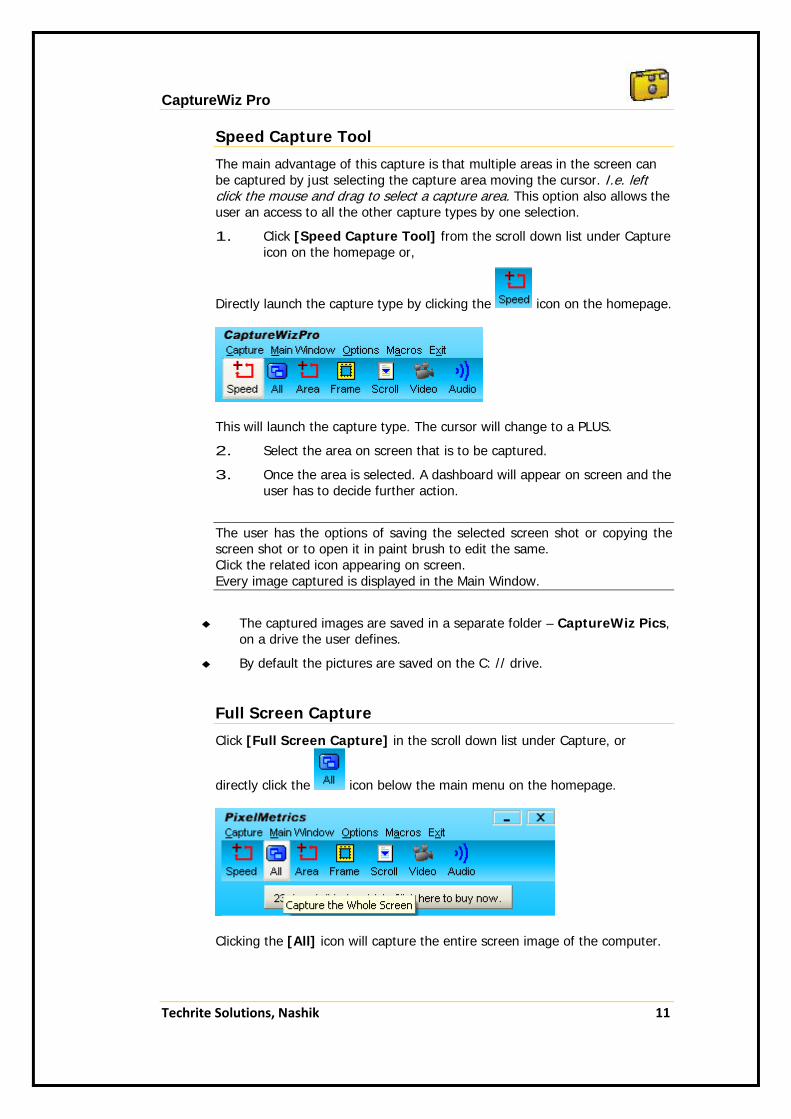
Speed Capture Tool
The main advantage of this capture is that multiple areas in the screen can be captured by just selecting the capture area moving the cursor. I.e. left click the mouse and drag to select a capture area. This option also allows the user an access to all the other capture types by one selection.
1. Click [Speed Capture Tool] from the scroll down list under Capture icon on the homepage or,
Directly launch the capture type by clicking the icon on the homepage.
This will launch the capture type. The cursor will change to a PLUS.
2. Select the area on screen that is to be captured.
3. Once the area is selected. A dashboard will appear on screen and the user has to decide further action.
The user has the options of saving the selected screen shot or copying the screen shot or to open it in paint brush to edit the same. Click the related icon appearing on screen. Every image captured is displayed in the Main Window.
The captured images are saved in a separate folder – CaptureWiz Pics, on a drive the user defines.
By default the pictures are saved on the C: // drive.
Full Screen Capture
Click [Full Screen Capture] in the scroll down list under Capture, or
directly click the icon below the main menu on the homepage.
Clicking the [All] icon will capture the entire screen image of the computer.
CaptureWiz Pro
Techrite Solutions, Nashik 12
2-Point Capture Tool
1. Select [2-Point Capture Tool] from the drop down menu under
Capture, Or by click the icon on the dashboard to launch the capture tool.
2. Select the area of capture.
3. Left click the mouse. A dashboard will appear on screen.
4. Select the action you want to perform.
This capture tool allows the user to select a particular area on screen for capturing the screen image. The user can re-size the area even after the selection is made.
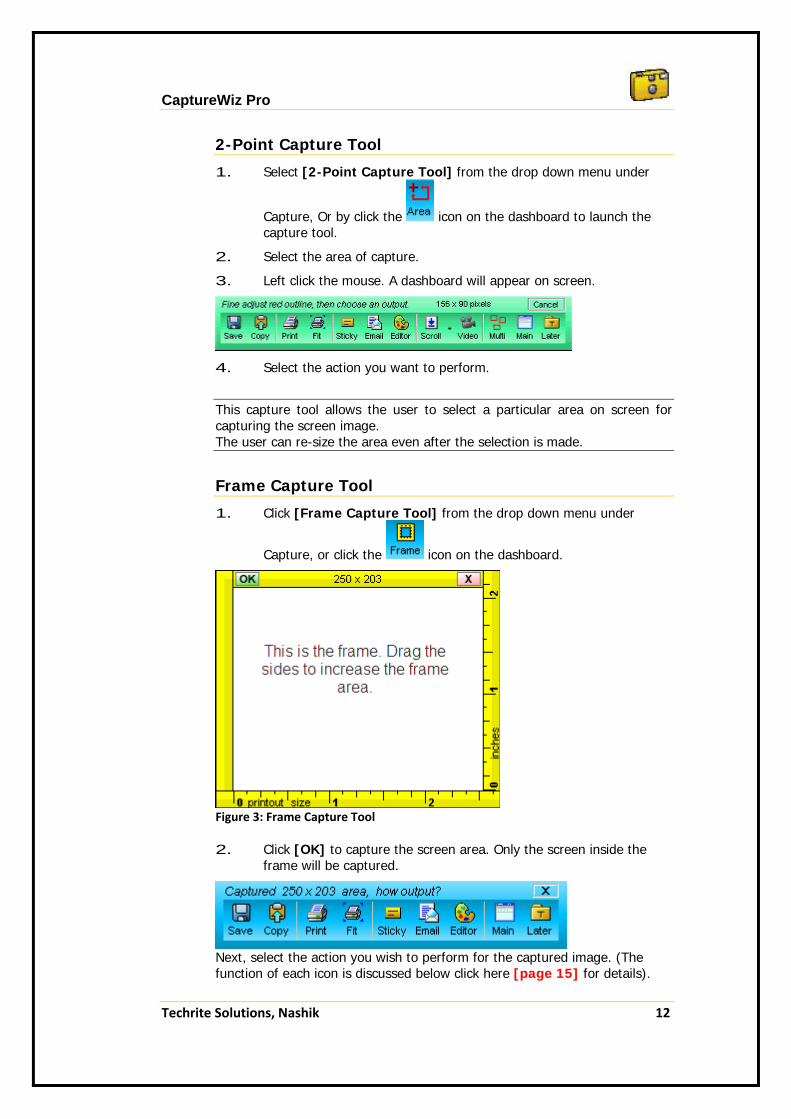
Frame Capture Tool
1. Click [Frame Capture Tool] from the drop down menu under
Capture, or click the icon on the dashboard.
Figure 3: Frame Capture Tool
2. Click [OK] to capture the screen area. Only the screen inside the frame will be captured.
Next, select the action you wish to perform for the captured image. (The function of each icon is discussed below click here [page 15] for details).

CaptureWiz Pro
Techrite Solutions, Nashik 13
Scroll Capture
This capture tool is useful in capturing area larger than screen.
1. Click [Scroll Capture Tool] from the drop down menu under
Capture, or click the icon on the dashboard.
2. Select the area from where the scroll capture tool has to capture image.
3. Next, a dashboard will appear on screen.
4. Select whether the scroll capture is downwards, upwards or the entire length of the page. This will auto-scroll and capture the screen image. The scroll capture can also be done manually.
5. The captured image is then displayed in the Main Window. You can edit the captured image as per requirements
Video Capture
This screen capture tool is useful for online training purposes.
1. Click [Video Capture] from the drop down menu under capture, or
click icon on the dashboard.
2. Select the area of capture.
A dashboard will appear on screen.
3. Click [Start]. This will start recording your actions on screen.
Clicking Start will immediately start capturing the Video. In case you
want to start the capture after some time select
4. After you finish recording click [Cancel] on the top left corner of the dashboard.
5. Select [Save it] and define the path and folder where you want to save the captured video. The captured video can also be directly
saved by clicking the icon.
CaptureWiz Pro
Techrite Solutions, Nashik 14
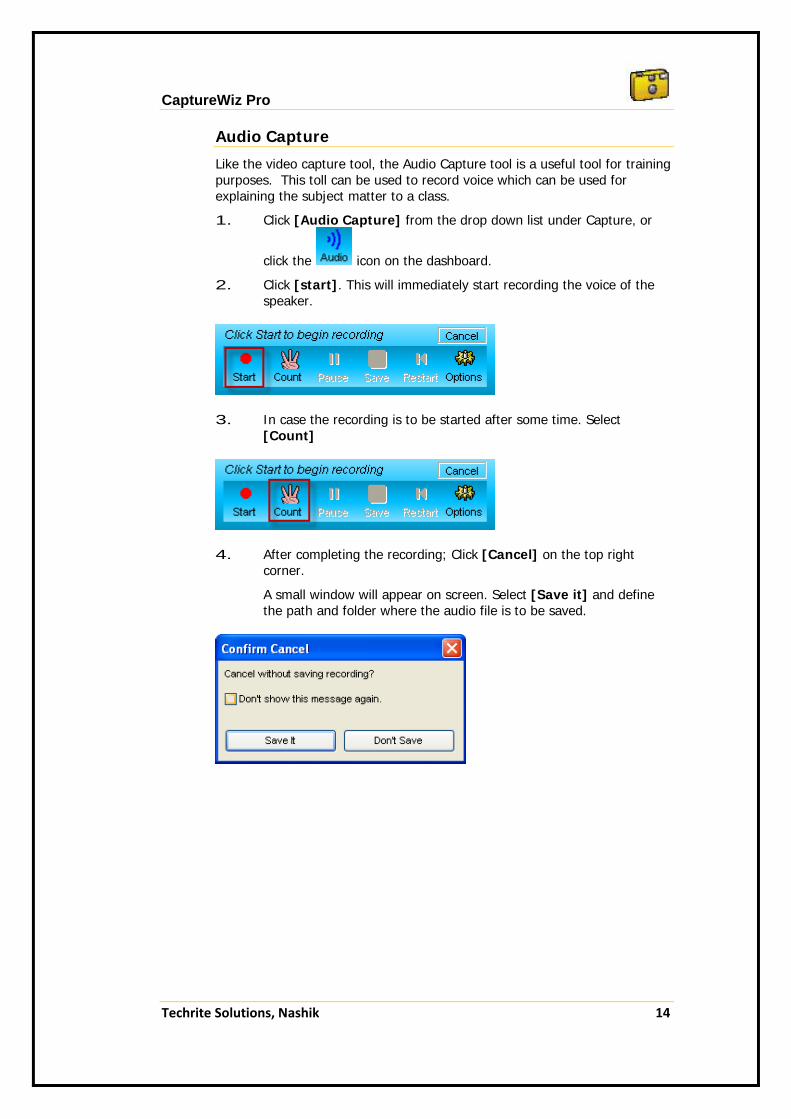
Audio Capture
Like the video capture tool, the Audio Capture tool is a useful tool for training purposes. This toll can be used to record voice which can be used for explaining the subject matter to a class.
1. Click [Audio Capture] from the drop down list under Capture, or
click the icon on the dashboard.
2. Click [start]. This will immediately start recording the voice of the speaker.
3. In case the recording is to be started after some time. Select [Count]
4. After completing the recording; Click [Cancel] on the top right corner.
A small window will appear on screen. Select [Save it] and define the path and folder where the audio file is to be saved.
CaptureWiz Pro
Techrite Solutions, Nashik 15
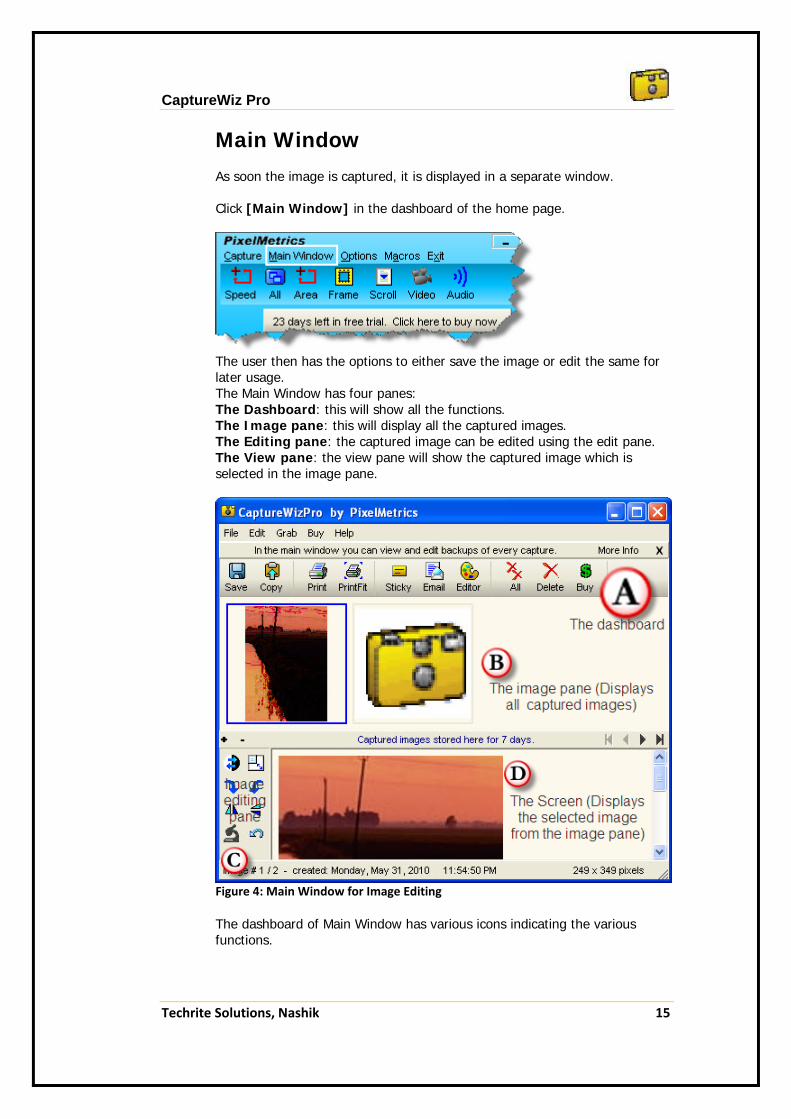
Main Window As soon the image is captured, it is displayed in a separate window. Click [Main Window] in the dashboard of the home page.
The user then has the options to either save the image or edit the same for later usage. The Main Window has four panes: The Dashboard: this will show all the functions. The Image pane: this will display all the captured images. The Editing pane: the captured image can be edited using the edit pane. The View pane: the view pane will show the captured image which is selected in the image pane.
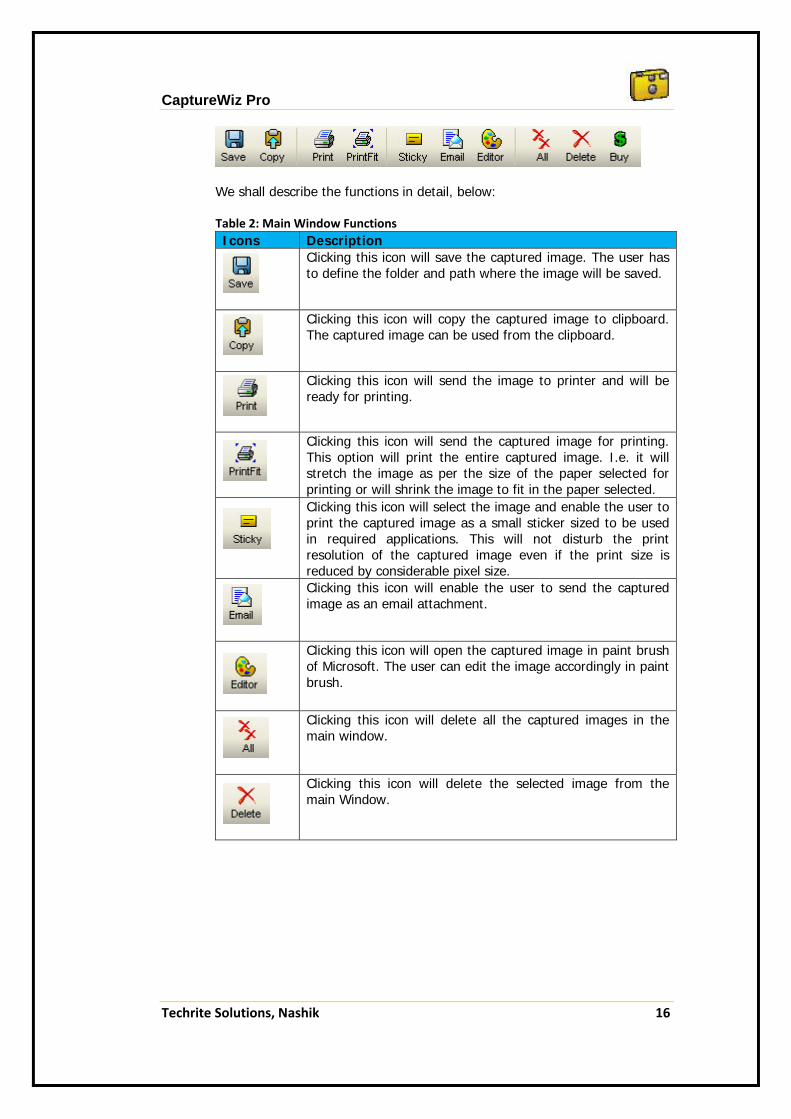
Figure 4: Main Window for Image Editing
The dashboard of Main Window has various icons indicating the various functions.
CaptureWiz Pro
Techrite Solutions, Nashik 16
We shall describe the functions in detail, below: Table 2: Main Window Functions
Icons Description Clicking this icon will save the captured image. The user has to define the folder and path where the image will be saved.
Clicking this icon will copy the captured image to clipboard. The captured image can be used from the clipboard.
Clicking this icon will send the image to printer and will be ready for printing.
Clicking this icon will send the captured image for printing. This option will print the entire captured image. I.e. it will stretch the image as per the size of the paper selected for printing or will shrink the image to fit in the paper selected. Clicking this icon will select the image and enable the user to print the captured image as a small sticker sized to be used in required applications. This will not disturb the print resolution of the captured image even if the print size is reduced by considerable pixel size. Clicking this icon will enable the user to send the captured image as an email attachment.
Clicking this icon will open the captured image in paint brush of Microsoft. The user can edit the image accordingly in paint brush.
Clicking this icon will delete all the captured images in the main window.
Clicking this icon will delete the selected image from the main Window.
CaptureWiz Pro
Techrite Solutions, Nashik 17
Options
Software is made keeping the end user in view. But still there are certain aspects wherein the user is allowed to personalise the software as per their choice and preferences. This section will explain how to personalise the screen capture tool.
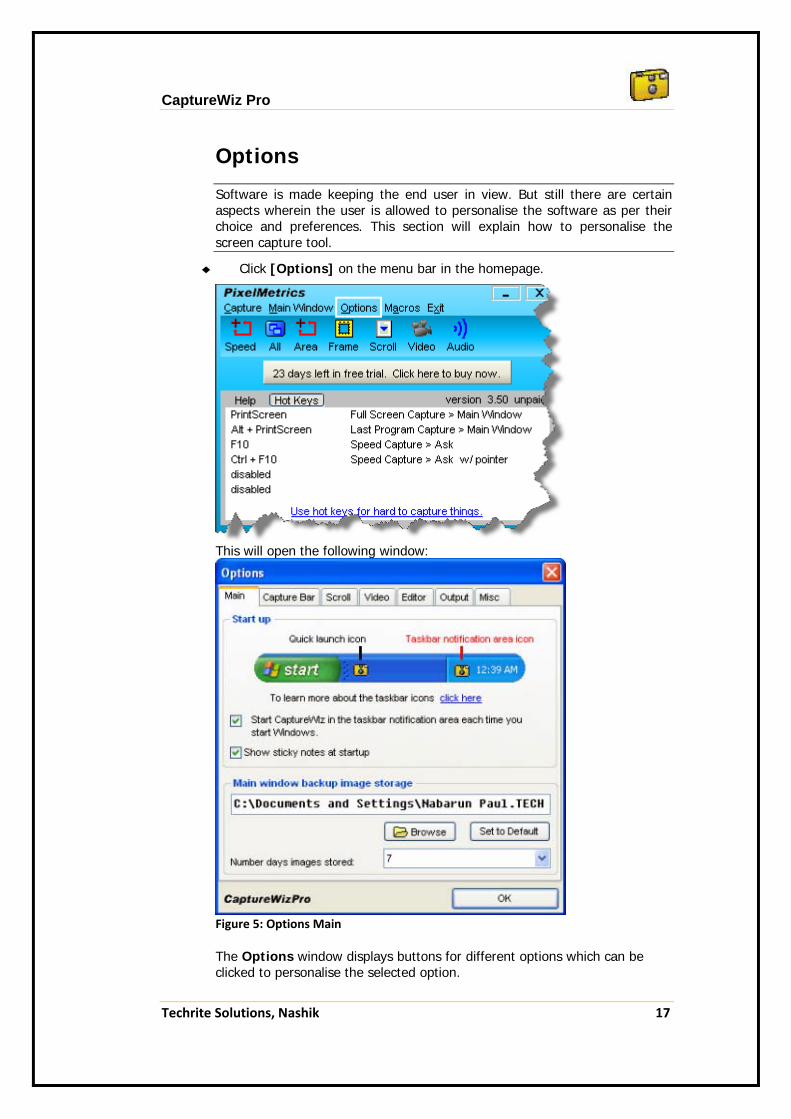
Click [Options] on the menu bar in the homepage.
This will open the following window:
Figure 5: Options Main
The Options window displays buttons for different options which can be clicked to personalise the selected option.
CaptureWiz Pro
Techrite Solutions, Nashik 18
Main
The first option is Main. The user can define the start-up actions for the capture tool.
1. Click [Main] to set the details.
2. Enter details and make the selections as per your requirement.
3. Click [OK]
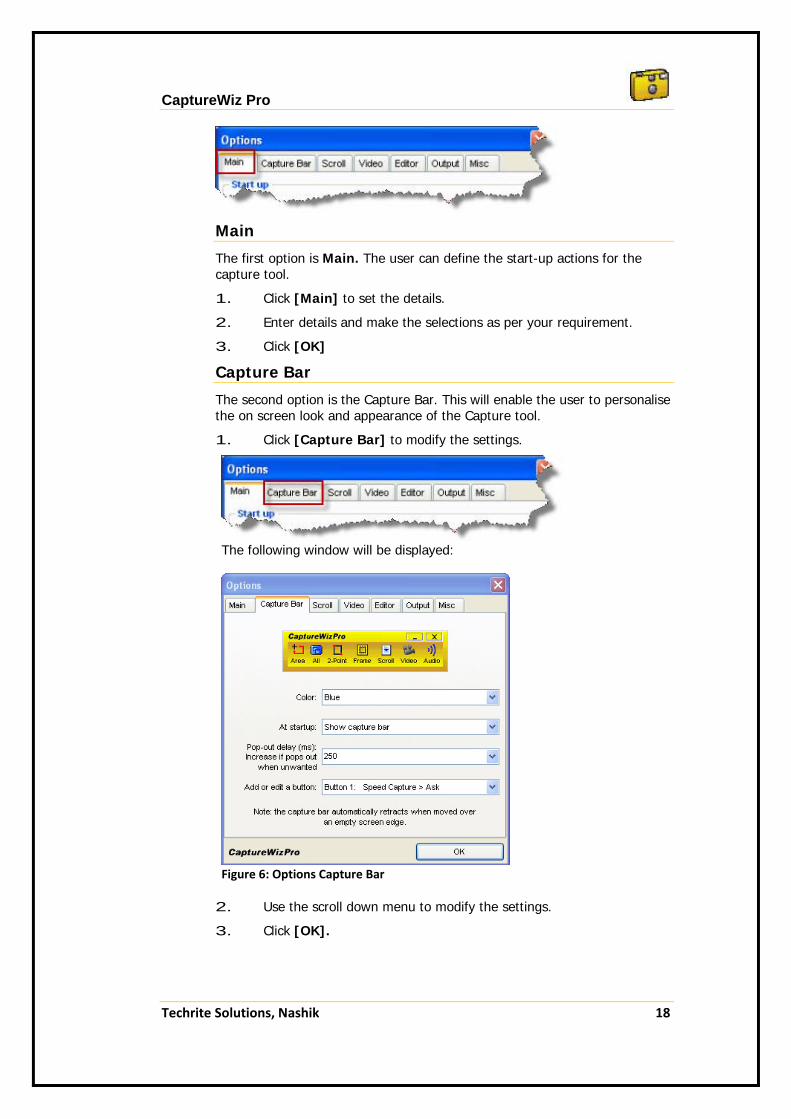
Capture Bar
The second option is the Capture Bar. This will enable the user to personalise the on screen look and appearance of the Capture tool.
1. Click [Capture Bar] to modify the settings.
The following window will be displayed:
Figure 6: Options Capture Bar
2. Use the scroll down menu to modify the settings.
3. Click [OK].
CaptureWiz Pro
Techrite Solutions, Nashik 19
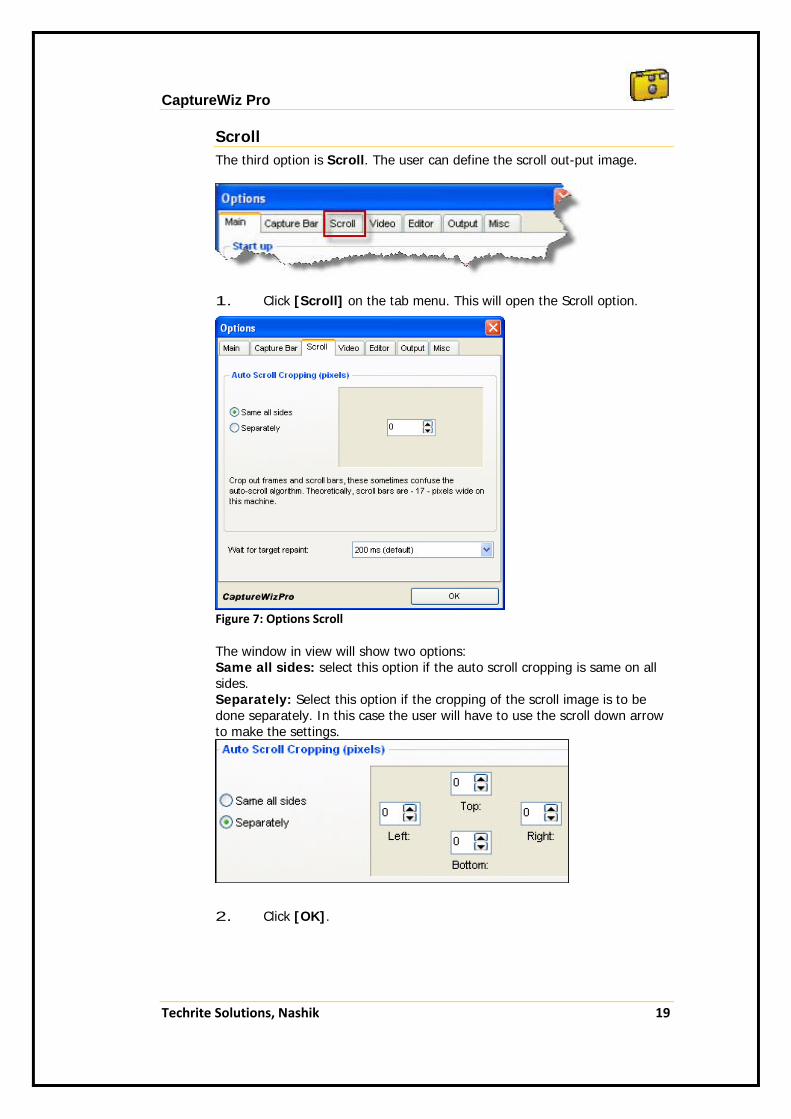
Scroll The third option is Scroll. The user can define the scroll out-put image.
1. Click [Scroll] on the tab menu. This will open the Scroll option.
Figure 7: Options Scroll
The window in view will show two options: Same all sides: select this option if the auto scroll cropping is same on all sides. Separately: Select this option if the cropping of the scroll image is to be done separately. In this case the user will have to use the scroll down arrow to make the settings.
2. Click [OK].

CaptureWiz Pro
Techrite Solutions, Nashik 20
Video
Click [Video] to modify the settings.
This will open the Video page. The user can modify the settings for Video and Audio as per requirement.
Figure 8: Options Video
Table 3: Options Video Fields Countdown (seconds) Select the time from the scroll down list. Frames Per Second (fps) The default selection is seen. Modify the
setting using the drop down list. Compression Use the slide button to modify the
setting. Include Audio Select the option if an audio clip is to be
included in the video recording. Capture XP tooltips Select this option if the tooltips are to be
recorded. Table 4: Options Audio Fields
Channel & Volume Click the Settings Tab to modify the same.
Sample Rate(samples/sec); Sample size (bits)
Select the samples rate/ sample size from the Scroll down menu.
Mono or stereo Select whether the recording is to be done in mono or stereo. This will define output of the audio quality.
Click [OK].
CaptureWiz Pro
Techrite Solutions, Nashik 21
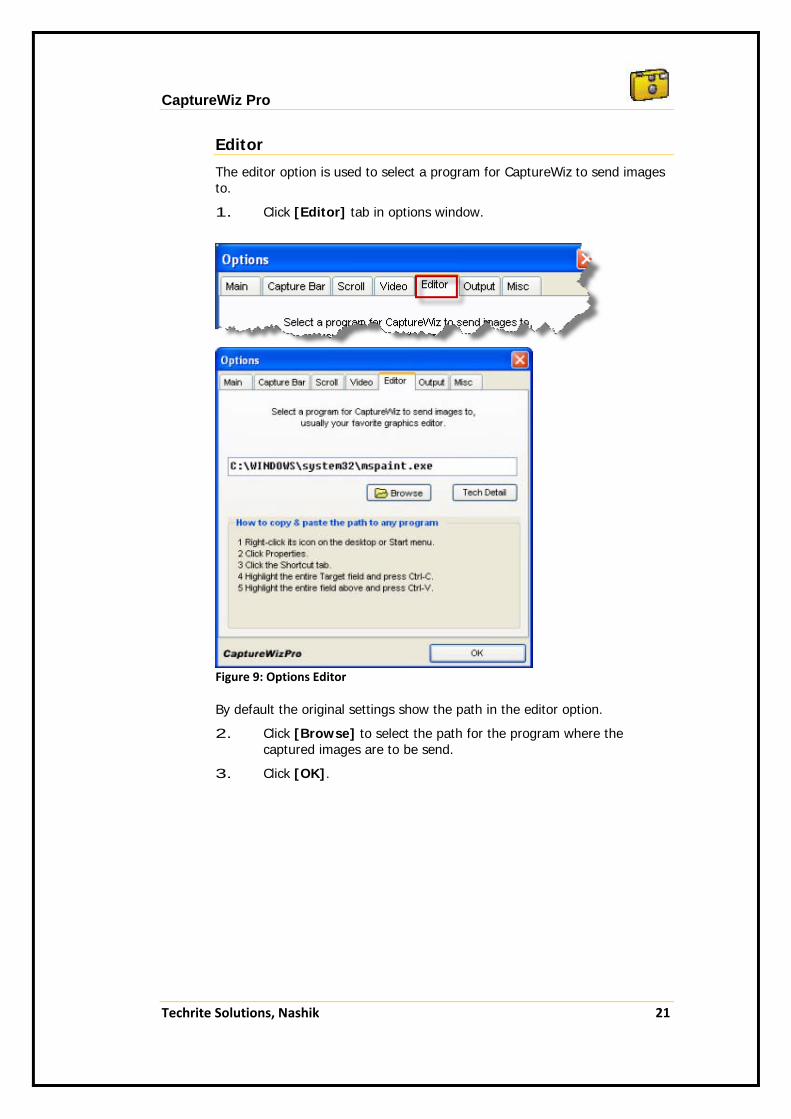
Editor
The editor option is used to select a program for CaptureWiz to send images to.
1. Click [Editor] tab in options window.
Figure 9: Options Editor
By default the original settings show the path in the editor option.
2. Click [Browse] to select the path for the program where the captured images are to be send.
3. Click [OK].
CaptureWiz Pro
Techrite Solutions, Nashik 22
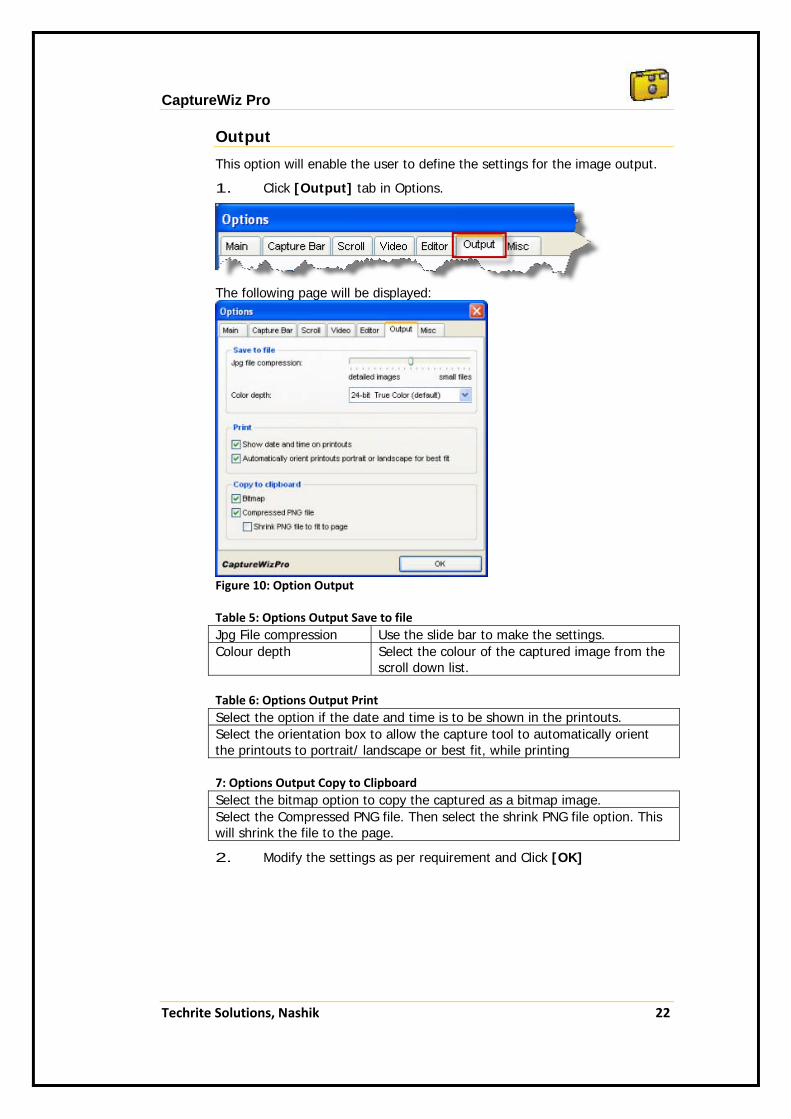
Output
This option will enable the user to define the settings for the image output.
1. Click [Output] tab in Options.
The following page will be displayed:
Figure 10: Option Output
Table 5: Options Output Save to file
Jpg File compression Use the slide bar to make the settings. Colour depth Select the colour of the captured image from the
scroll down list. Table 6: Options Output Print
Select the option if the date and time is to be shown in the printouts. Select the orientation box to allow the capture tool to automatically orient the printouts to portrait/ landscape or best fit, while printing 7: Options Output Copy to Clipboard
Select the bitmap option to copy the captured as a bitmap image. Select the Compressed PNG file. Then select the shrink PNG file option. This will shrink the file to the page.
2. Modify the settings as per requirement and Click [OK]

CaptureWiz Pro
Techrite Solutions, Nashik 23
Miscellaneous
This option enables the user to personalise the Capture tool further. The user can modify the colour of the tool bar. The email settings can be defined. The email provider can be defined.
1. Click [Misc] tab in Options.
The following page is displayed:
Figure 11: Option Misc
2. Modify the settings as required and click [OK].
CaptureWiz Pro
Techrite Solutions, Nashik 24
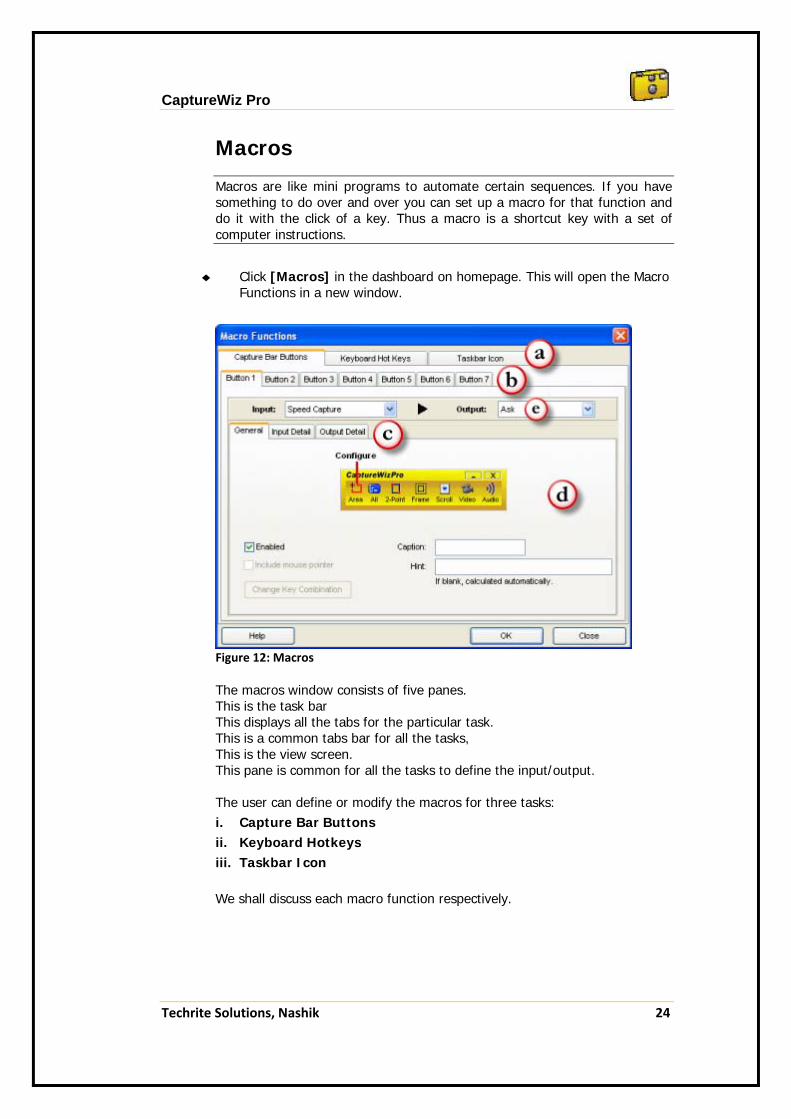
Macros
Macros are like mini programs to automate certain sequences. If you have something to do over and over you can set up a macro for that function and do it with the click of a key. Thus a macro is a shortcut key with a set of computer instructions.
Click [Macros] in the dashboard on homepage. This will open the Macro Functions in a new window.
Figure 12: Macros
The macros window consists of five panes. This is the task bar This displays all the tabs for the particular task. This is a common tabs bar for all the tasks, This is the view screen. This pane is common for all the tasks to define the input/output. The user can define or modify the macros for three tasks: i. Capture Bar Buttons ii. Keyboard Hotkeys iii. Taskbar Icon We shall discuss each macro function respectively.
CaptureWiz Pro
Techrite Solutions, Nashik 25
Capture Bar Buttons
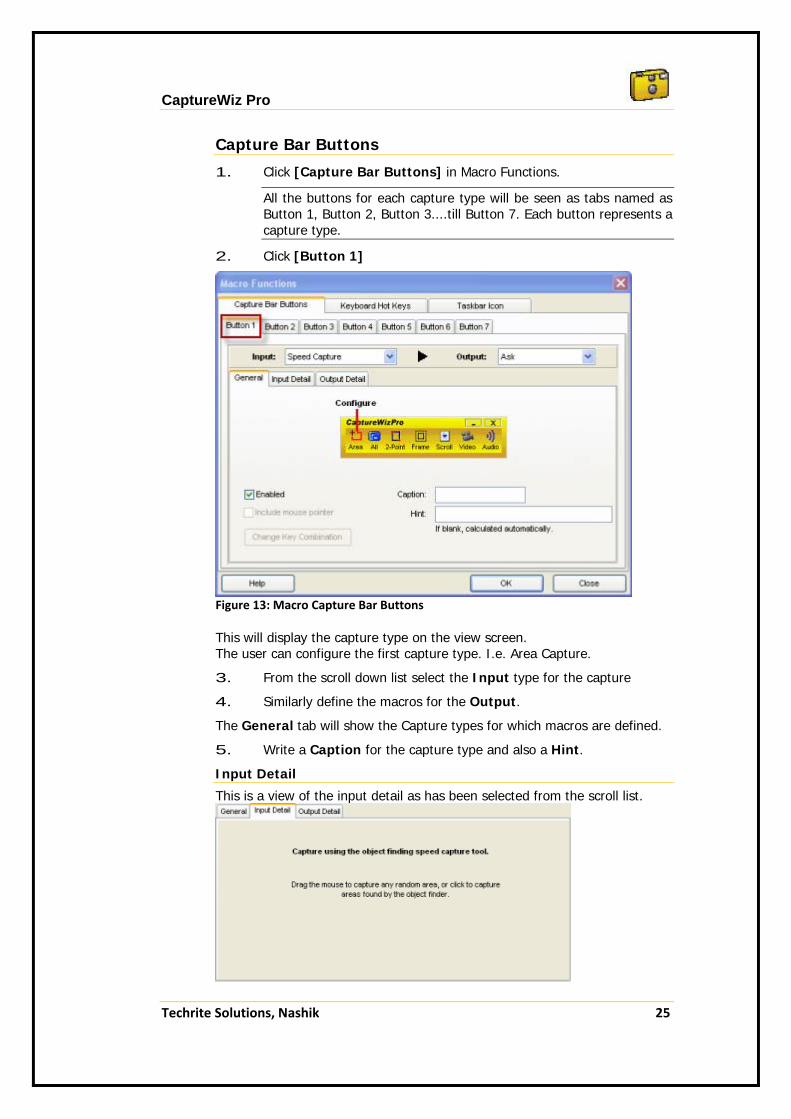
1. Click [Capture Bar Buttons] in Macro Functions.
All the buttons for each capture type will be seen as tabs named as Button 1, Button 2, Button 3....till Button 7. Each button represents a capture type.
2. Click [Button 1]
Figure 13: Macro Capture Bar Buttons
This will display the capture type on the view screen. The user can configure the first capture type. I.e. Area Capture.
3. From the scroll down list select the Input type for the capture
4. Similarly define the macros for the Output.
The General tab will show the Capture types for which macros are defined.
5. Write a Caption for the capture type and also a Hint.
Input Detail
This is a view of the input detail as has been selected from the scroll list.

CaptureWiz Pro
Techrite Solutions, Nashik 26
Output Details
This is a view of the output details as has been selected from the scroll list.
Similarly macro functions for all the buttons (Capture type) can be defined.
Keyboard Hotkeys
This will define a shortcut key for the capture tool and all relevant actions.
1. Click [Keyboard Hotkeys]. The macro for allocating shortcut keys is displayed. The user can modify the macros for the same accordingly anytime.
Figure 14: Macro Keyboard Hotkeys
The shortcut keys or keyboard Hotkeys combination for the capture type are already defined.
2. Click [PrintScreen]
3. Select the input/ output details from the scroll down list
CaptureWiz Pro
Techrite Solutions, Nashik 27
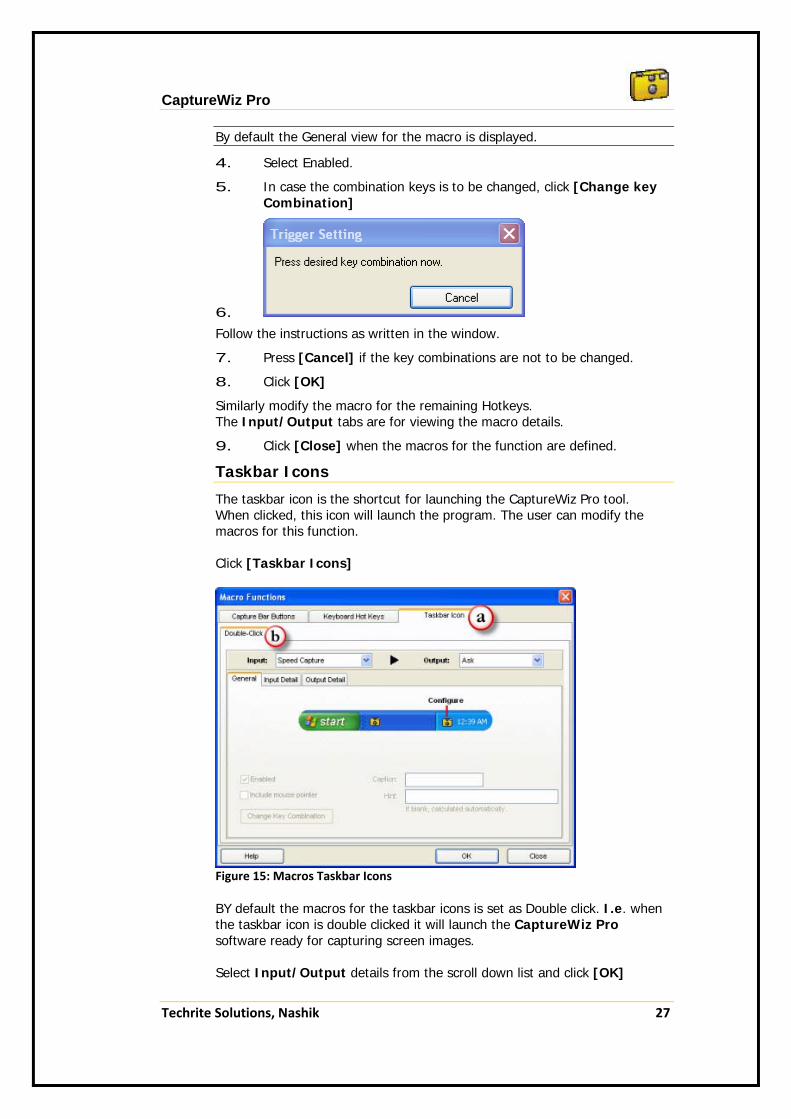
By default the General view for the macro is displayed.
4. Select Enabled.
5. In case the combination keys is to be changed, click [Change key Combination]
6.
Follow the instructions as written in the window.
7. Press [Cancel] if the key combinations are not to be changed.
8. Click [OK]
Similarly modify the macro for the remaining Hotkeys. The Input/Output tabs are for viewing the macro details.
9. Click [Close] when the macros for the function are defined.
Taskbar Icons
The taskbar icon is the shortcut for launching the CaptureWiz Pro tool. When clicked, this icon will launch the program. The user can modify the macros for this function. Click [Taskbar Icons]
Figure 15: Macros Taskbar Icons
BY default the macros for the taskbar icons is set as Double click. I.e. when the taskbar icon is double clicked it will launch the CaptureWiz Pro software ready for capturing screen images. Select Input/Output details from the scroll down list and click [OK]
CaptureWiz Pro
Techrite Solutions, Nashik 28
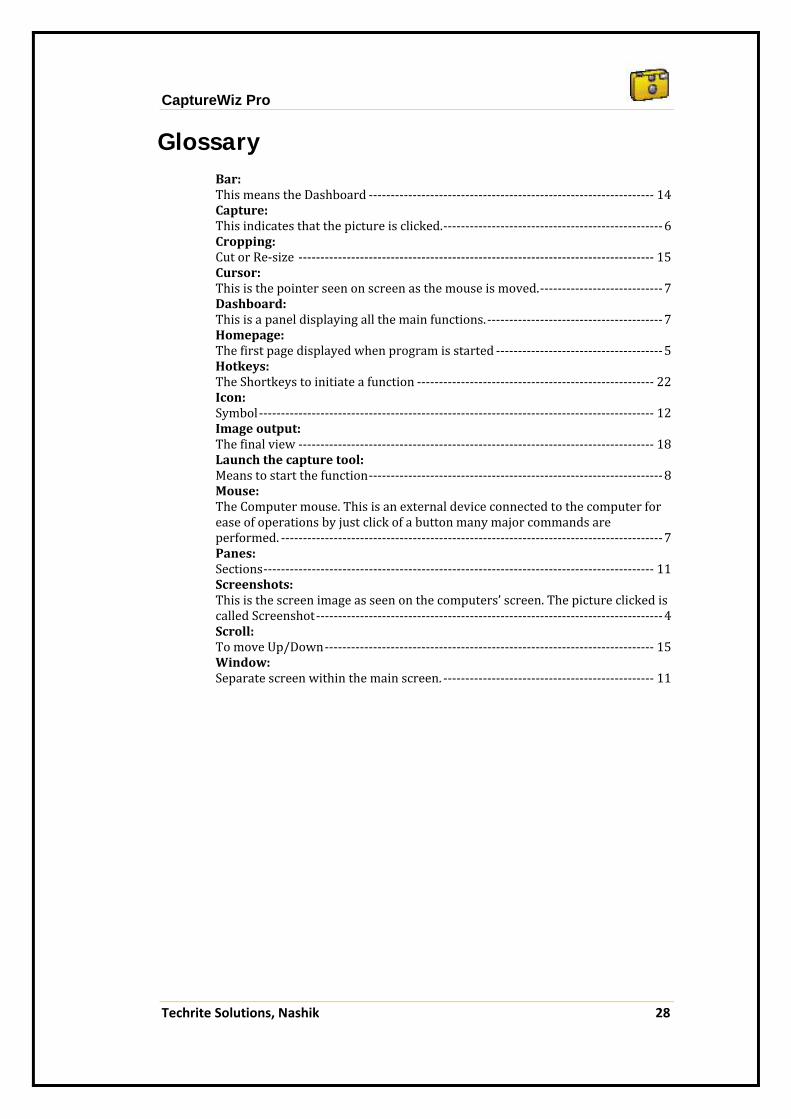
Glossary Bar: This means the Dashboard ‐‐‐‐‐‐‐‐‐‐‐‐‐‐‐‐‐‐‐‐‐‐‐‐‐‐‐‐‐‐‐‐‐‐‐‐‐‐‐‐‐‐‐‐‐‐‐‐‐‐‐‐‐‐‐‐‐‐‐‐‐‐‐‐‐ 14 Capture: This indicates that the picture is clicked. ‐‐‐‐‐‐‐‐‐‐‐‐‐‐‐‐‐‐‐‐‐‐‐‐‐‐‐‐‐‐‐‐‐‐‐‐‐‐‐‐‐‐‐‐‐‐‐‐‐‐ 6 Cropping: Cut or Re‐size ‐‐‐‐‐‐‐‐‐‐‐‐‐‐‐‐‐‐‐‐‐‐‐‐‐‐‐‐‐‐‐‐‐‐‐‐‐‐‐‐‐‐‐‐‐‐‐‐‐‐‐‐‐‐‐‐‐‐‐‐‐‐‐‐‐‐‐‐‐‐‐‐‐‐‐‐‐‐‐‐‐ 15 Cursor: This is the pointer seen on screen as the mouse is moved. ‐‐‐‐‐‐‐‐‐‐‐‐‐‐‐‐‐‐‐‐‐‐‐‐‐‐‐‐ 7 Dashboard: This is a panel displaying all the main functions. ‐‐‐‐‐‐‐‐‐‐‐‐‐‐‐‐‐‐‐‐‐‐‐‐‐‐‐‐‐‐‐‐‐‐‐‐‐‐‐‐ 7 Homepage: The first page displayed when program is started ‐‐‐‐‐‐‐‐‐‐‐‐‐‐‐‐‐‐‐‐‐‐‐‐‐‐‐‐‐‐‐‐‐‐‐‐‐‐ 5 Hotkeys: The Shortkeys to initiate a function ‐‐‐‐‐‐‐‐‐‐‐‐‐‐‐‐‐‐‐‐‐‐‐‐‐‐‐‐‐‐‐‐‐‐‐‐‐‐‐‐‐‐‐‐‐‐‐‐‐‐‐‐‐‐ 22 Icon: Symbol ‐‐‐‐‐‐‐‐‐‐‐‐‐‐‐‐‐‐‐‐‐‐‐‐‐‐‐‐‐‐‐‐‐‐‐‐‐‐‐‐‐‐‐‐‐‐‐‐‐‐‐‐‐‐‐‐‐‐‐‐‐‐‐‐‐‐‐‐‐‐‐‐‐‐‐‐‐‐‐‐‐‐‐‐‐‐‐‐‐‐ 12 Image output: The final view ‐‐‐‐‐‐‐‐‐‐‐‐‐‐‐‐‐‐‐‐‐‐‐‐‐‐‐‐‐‐‐‐‐‐‐‐‐‐‐‐‐‐‐‐‐‐‐‐‐‐‐‐‐‐‐‐‐‐‐‐‐‐‐‐‐‐‐‐‐‐‐‐‐‐‐‐‐‐‐‐‐ 18 Launch the capture tool: Means to start the function ‐‐‐‐‐‐‐‐‐‐‐‐‐‐‐‐‐‐‐‐‐‐‐‐‐‐‐‐‐‐‐‐‐‐‐‐‐‐‐‐‐‐‐‐‐‐‐‐‐‐‐‐‐‐‐‐‐‐‐‐‐‐‐‐‐‐‐ 8 Mouse: The Computer mouse. This is an external device connected to the computer for ease of operations by just click of a button many major commands are performed. ‐‐‐‐‐‐‐‐‐‐‐‐‐‐‐‐‐‐‐‐‐‐‐‐‐‐‐‐‐‐‐‐‐‐‐‐‐‐‐‐‐‐‐‐‐‐‐‐‐‐‐‐‐‐‐‐‐‐‐‐‐‐‐‐‐‐‐‐‐‐‐‐‐‐‐‐‐‐‐‐‐‐‐‐‐‐‐ 7 Panes: Sections ‐‐‐‐‐‐‐‐‐‐‐‐‐‐‐‐‐‐‐‐‐‐‐‐‐‐‐‐‐‐‐‐‐‐‐‐‐‐‐‐‐‐‐‐‐‐‐‐‐‐‐‐‐‐‐‐‐‐‐‐‐‐‐‐‐‐‐‐‐‐‐‐‐‐‐‐‐‐‐‐‐‐‐‐‐‐‐‐‐ 11 Screenshots: This is the screen image as seen on the computers’ screen. The picture clicked is called Screenshot ‐‐‐‐‐‐‐‐‐‐‐‐‐‐‐‐‐‐‐‐‐‐‐‐‐‐‐‐‐‐‐‐‐‐‐‐‐‐‐‐‐‐‐‐‐‐‐‐‐‐‐‐‐‐‐‐‐‐‐‐‐‐‐‐‐‐‐‐‐‐‐‐‐‐‐‐‐‐‐ 4 Scroll: To move Up/Down ‐‐‐‐‐‐‐‐‐‐‐‐‐‐‐‐‐‐‐‐‐‐‐‐‐‐‐‐‐‐‐‐‐‐‐‐‐‐‐‐‐‐‐‐‐‐‐‐‐‐‐‐‐‐‐‐‐‐‐‐‐‐‐‐‐‐‐‐‐‐‐‐‐‐‐ 15 Window: Separate screen within the main screen. ‐‐‐‐‐‐‐‐‐‐‐‐‐‐‐‐‐‐‐‐‐‐‐‐‐‐‐‐‐‐‐‐‐‐‐‐‐‐‐‐‐‐‐‐‐‐‐‐ 11
CaptureWiz Pro
Techrite Solutions, Nashik 29
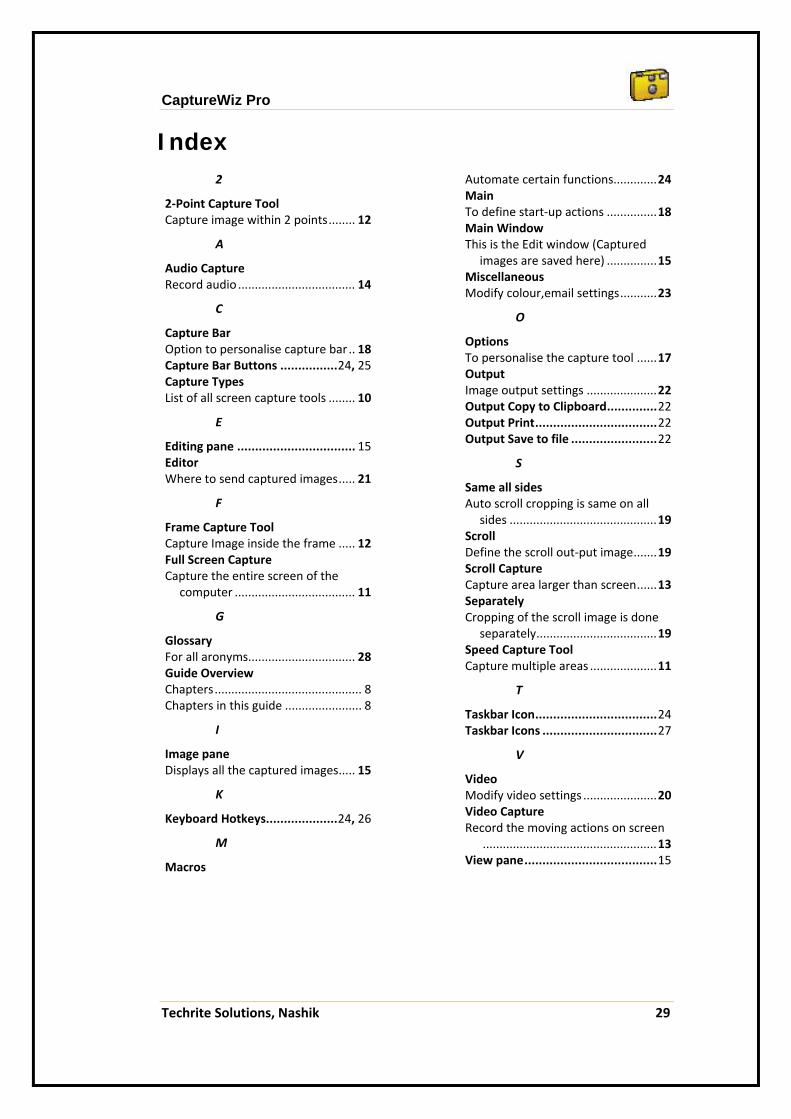
Index 2
2‐Point Capture Tool Capture image within 2 points ........ 12
A
Audio Capture Record audio ................................... 14
C
Capture Bar Option to personalise capture bar .. 18 Capture Bar Buttons ................ 24, 25 Capture Types List of all screen capture tools ........ 10
E
Editing pane ................................. 15 Editor Where to send captured images ..... 21
F
Frame Capture Tool Capture Image inside the frame ..... 12 Full Screen Capture Capture the entire screen of the
computer .................................... 11
G
Glossary For all aronyms................................ 28 Guide Overview Chapters ............................................ 8 Chapters in this guide ....................... 8
I
Image pane Displays all the captured images ..... 15
K
Keyboard Hotkeys.................... 24, 26
M
Macros
Automate certain functions............. 24 Main To define start‐up actions ............... 18 Main Window This is the Edit window (Captured
images are saved here) ............... 15 Miscellaneous Modify colour,email settings ........... 23
O
Options To personalise the capture tool ...... 17 Output Image output settings ..................... 22 Output Copy to Clipboard .............. 22 Output Print .................................. 22 Output Save to file ........................ 22
S
Same all sides Auto scroll cropping is same on all
sides ............................................ 19 Scroll Define the scroll out‐put image ....... 19 Scroll Capture Capture area larger than screen ...... 13 Separately Cropping of the scroll image is done
separately .................................... 19 Speed Capture Tool Capture multiple areas .................... 11
T
Taskbar Icon .................................. 24 Taskbar Icons ................................ 27
V
Video Modify video settings ...................... 20 Video Capture Record the moving actions on screen
.................................................... 13 View pane ..................................... 15
CaptureWiz Pro
Techrite Solutions, Nashik 30
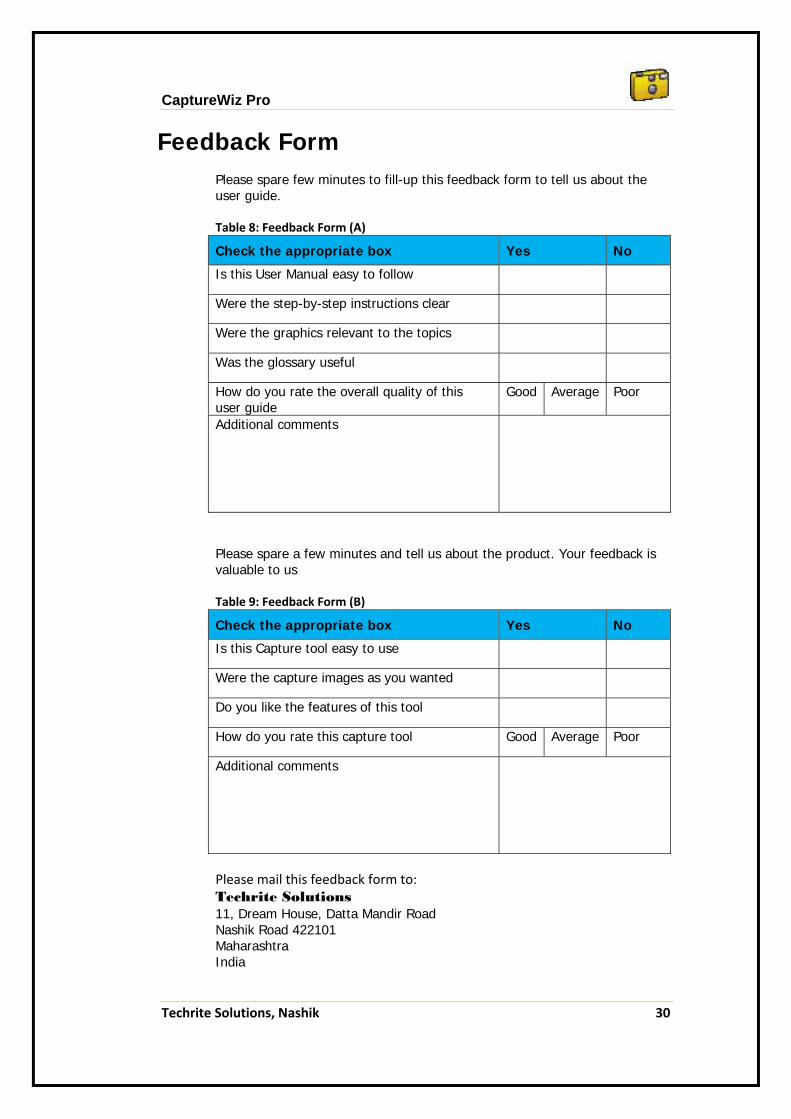
Feedback Form Please spare few minutes to fill-up this feedback form to tell us about the user guide. Table 8: Feedback Form (A)
Check the appropriate box Yes No
Is this User Manual easy to follow
Were the step-by-step instructions clear
Were the graphics relevant to the topics
Was the glossary useful
How do you rate the overall quality of this user guide
Good Average Poor
Additional comments
Please spare a few minutes and tell us about the product. Your feedback is valuable to us Table 9: Feedback Form (B)
Check the appropriate box Yes No
Is this Capture tool easy to use
Were the capture images as you wanted
Do you like the features of this tool
How do you rate this capture tool Good Average Poor
Additional comments
Please mail this feedback form to: Techrite Solutions 11, Dream House, Datta Mandir Road Nashik Road 422101 Maharashtra India