cargo portal user guide · 1. click profile link in the my account section of global navigation...
TRANSCRIPT
Cargo Portal User Guide
Ver. 1.1e
Contents
1
2
3
4
5
6
7
System SummaryMachine Configuration, Browser/Mobile Spec. .….…….. 3P
Join Us & ProfileID Registration, Profile setting, Adding Sub ID …..…….. 4P
Schedule SearchDaily Schedule Search ………………….…….…..…..…..……. 10P
BookingSingle/Multi Booking, Spot Rate, Booking Template .. 12P
e-AWBSending FWB/FHL, Sending Multiple FHL ………………. 24P
MAWB TrackingMaster AWB Tracking, Subscribe Notification ……….... 30P
My CargoPerformance/Allotment Plot, My Bookings ……….….... 33P
1. System Summary
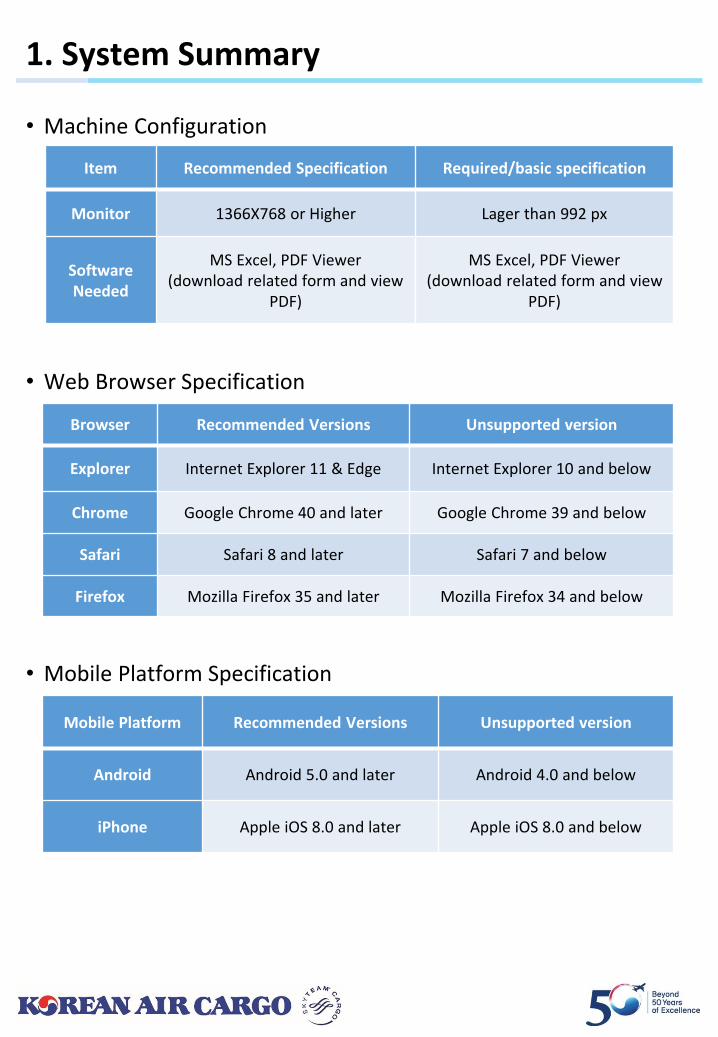
• Machine Configuration
• Web Browser Specification
• Mobile Platform Specification
Item Recommended Specification Required/basic specification
Monitor 1366X768 or Higher Lager than 992 px
Software Needed
MS Excel, PDF Viewer(download related form and view
PDF)
MS Excel, PDF Viewer(download related form and view
PDF)
Browser Recommended Versions Unsupported version
Explorer Internet Explorer 11 & Edge Internet Explorer 10 and below
Chrome Google Chrome 40 and later Google Chrome 39 and below
Safari Safari 8 and later Safari 7 and below
Firefox Mozilla Firefox 35 and later Mozilla Firefox 34 and below
Mobile Platform Recommended Versions Unsupported version
Android Android 5.0 and later Android 4.0 and below
iPhone Apple iOS 8.0 and later Apple iOS 8.0 and below
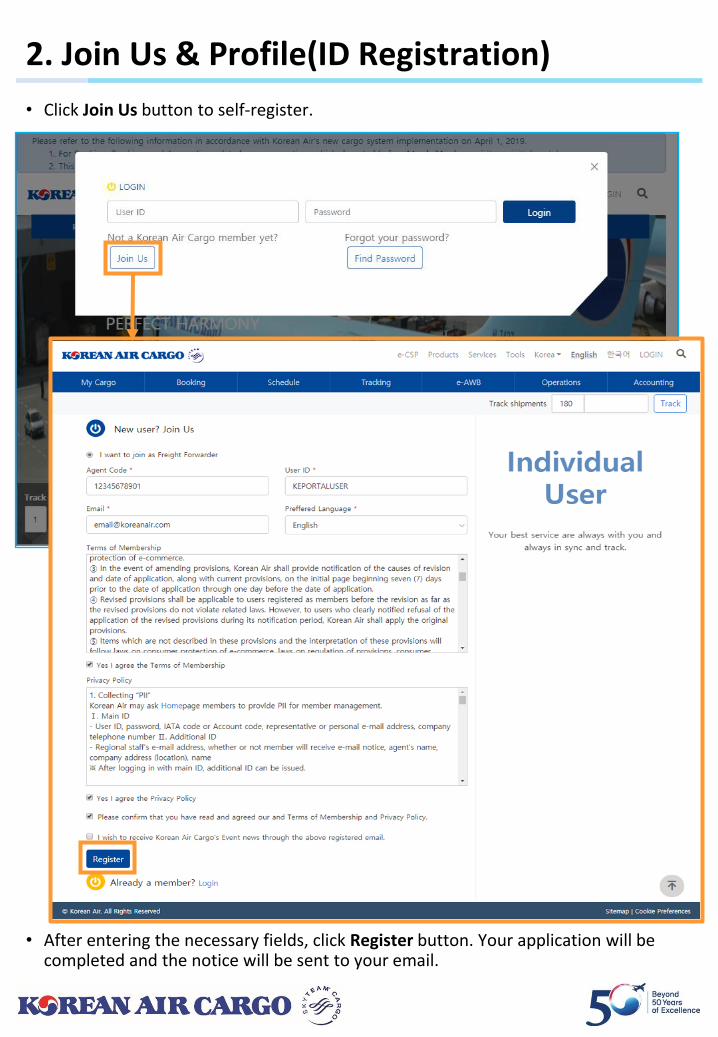
• Click Join Us button to self-register.
• After entering the necessary fields, click Register button. Your application will be completed and the notice will be sent to your email.
2. Join Us & Profile(ID Registration)
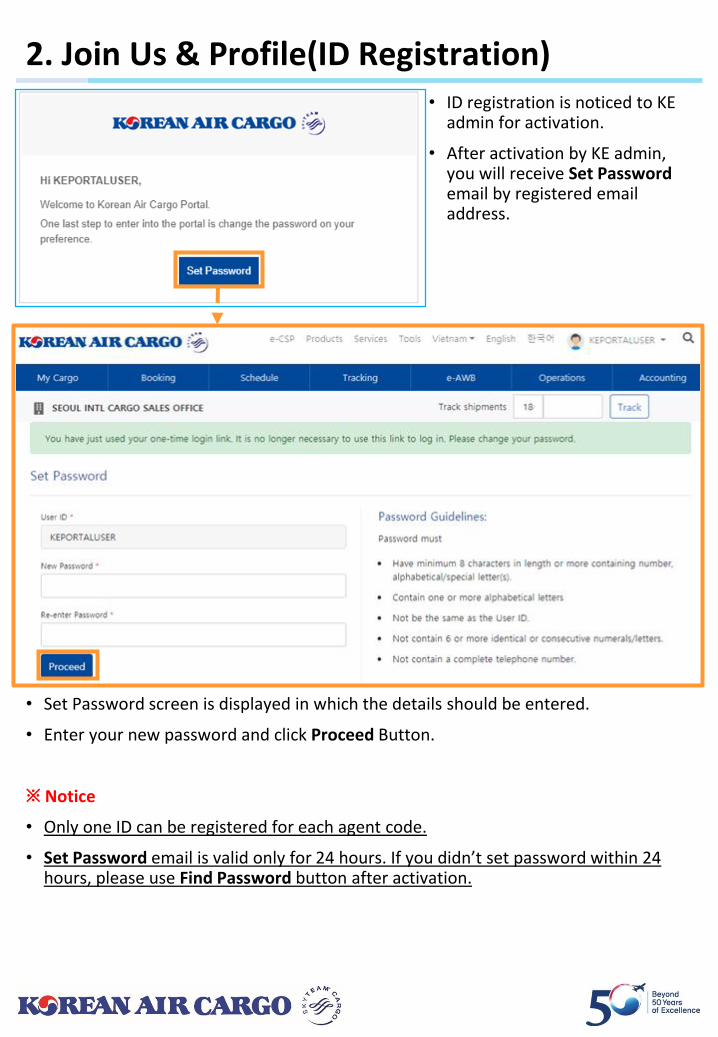
• Set Password screen is displayed in which the details should be entered.
• Enter your new password and click Proceed Button.
※ Notice
• Only one ID can be registered for each agent code.
• Set Password email is valid only for 24 hours. If you didn’t set password within 24 hours, please use Find Password button after activation.
2. Join Us & Profile(ID Registration)• ID registration is noticed to KE
admin for activation.
• After activation by KE admin, you will receive Set Password email by registered email address.
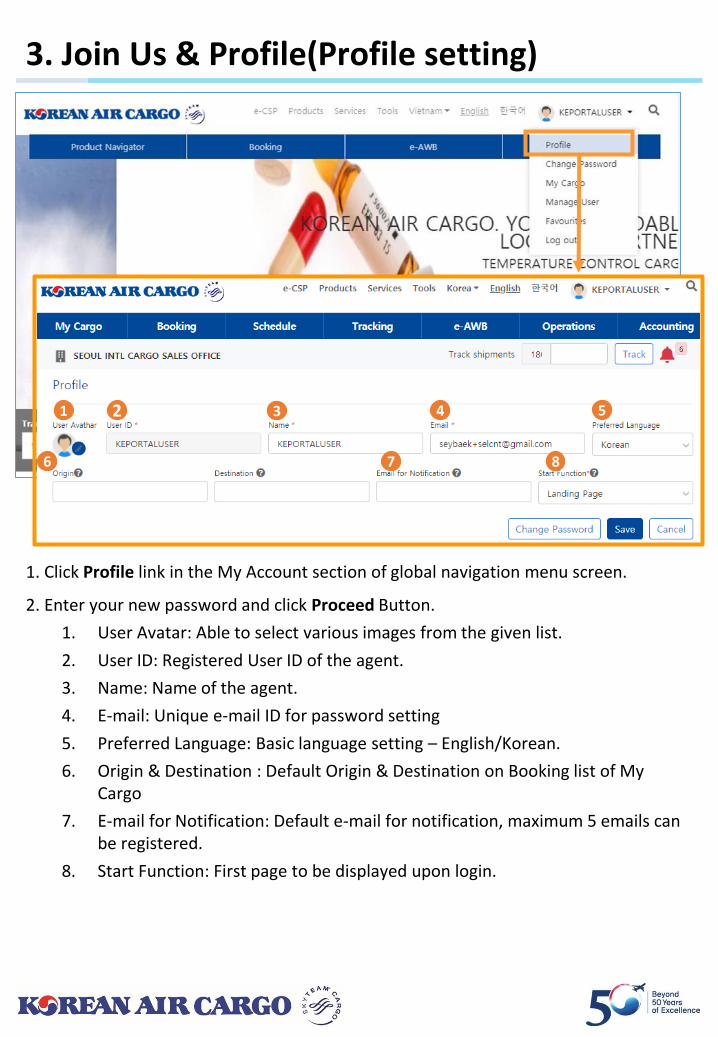
1. Click Profile link in the My Account section of global navigation menu screen.
2. Enter your new password and click Proceed Button.
1. User Avatar: Able to select various images from the given list.
2. User ID: Registered User ID of the agent.
3. Name: Name of the agent.
4. E-mail: Unique e-mail ID for password setting
5. Preferred Language: Basic language setting – English/Korean.
6. Origin & Destination : Default Origin & Destination on Booking list of My Cargo
7. E-mail for Notification: Default e-mail for notification, maximum 5 emails can be registered.
8. Start Function: First page to be displayed upon login.
3. Join Us & Profile(Profile setting)
1 2 3 4 5
6 7 8
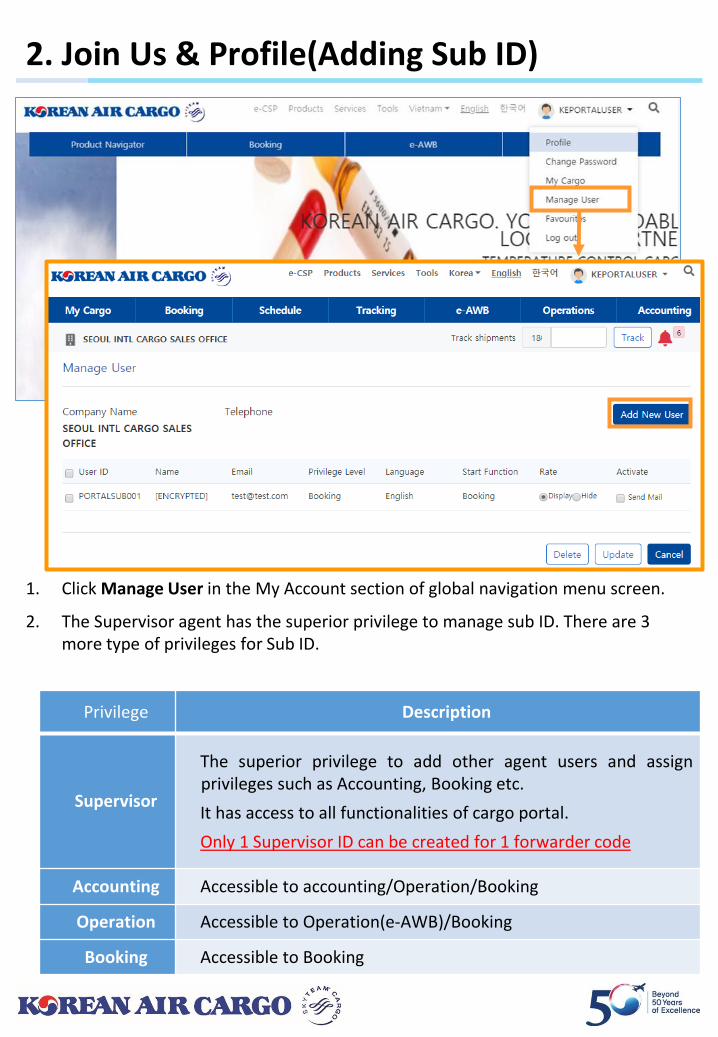
1. Click Manage User in the My Account section of global navigation menu screen.
2. The Supervisor agent has the superior privilege to manage sub ID. There are 3 more type of privileges for Sub ID.
2. Join Us & Profile(Adding Sub ID)
Privilege Description
Supervisor
The superior privilege to add other agent users and assignprivileges such as Accounting, Booking etc.
It has access to all functionalities of cargo portal.
Only 1 Supervisor ID can be created for 1 forwarder code
Accounting Accessible to accounting/Operation/Booking
Operation Accessible to Operation(e-AWB)/Booking
Booking Accessible to Booking
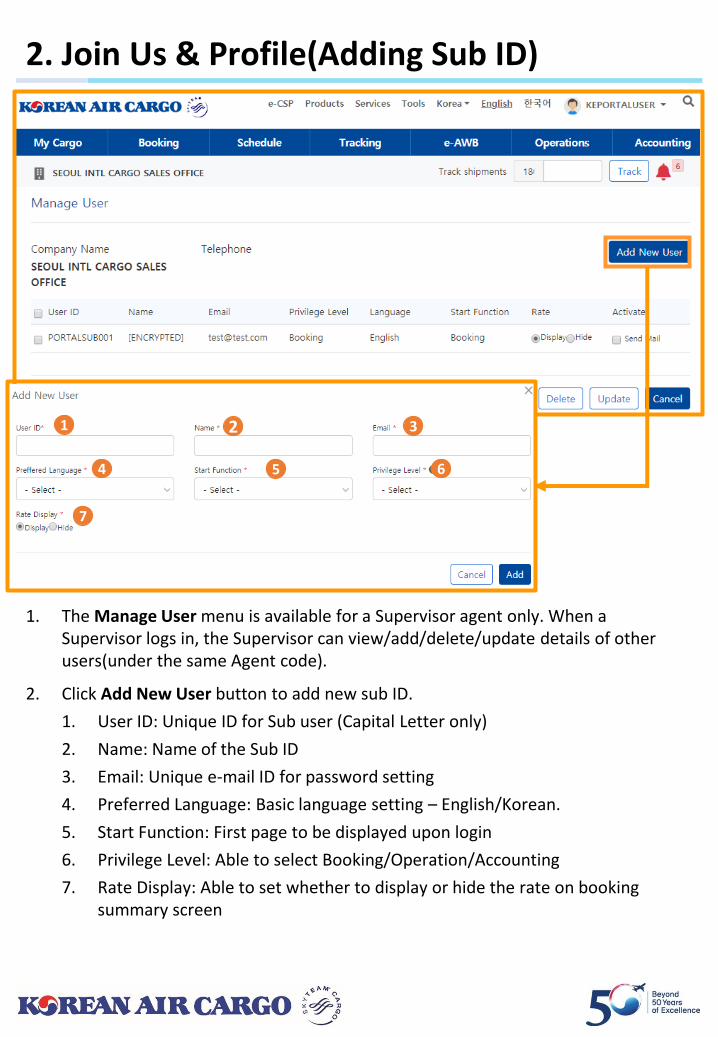
1. The Manage User menu is available for a Supervisor agent only. When a Supervisor logs in, the Supervisor can view/add/delete/update details of other users(under the same Agent code).
2. Click Add New User button to add new sub ID.
1. User ID: Unique ID for Sub user (Capital Letter only)
2. Name: Name of the Sub ID
3. Email: Unique e-mail ID for password setting
4. Preferred Language: Basic language setting – English/Korean.
5. Start Function: First page to be displayed upon login
6. Privilege Level: Able to select Booking/Operation/Accounting
7. Rate Display: Able to set whether to display or hide the rate on booking summary screen
2. Join Us & Profile(Adding Sub ID)
1 2 3
4 5 6
7
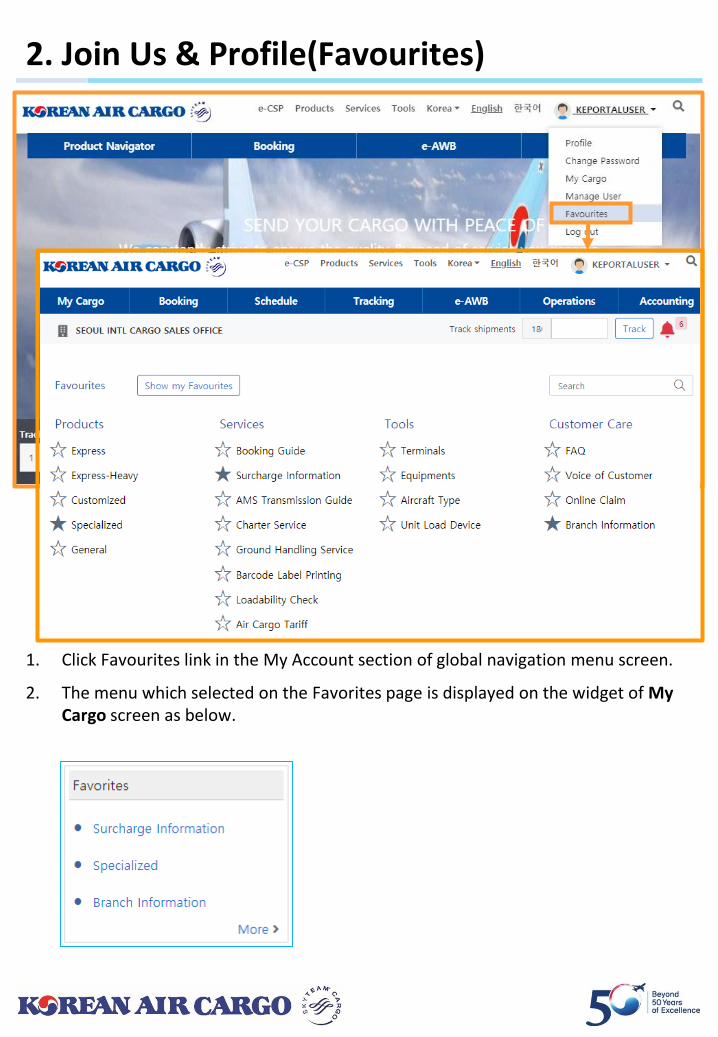
1. Click Favourites link in the My Account section of global navigation menu screen.
2. The menu which selected on the Favorites page is displayed on the widget of My Cargo screen as below.
2. Join Us & Profile(Favourites)
3. Schedule Search
1
2
3
4
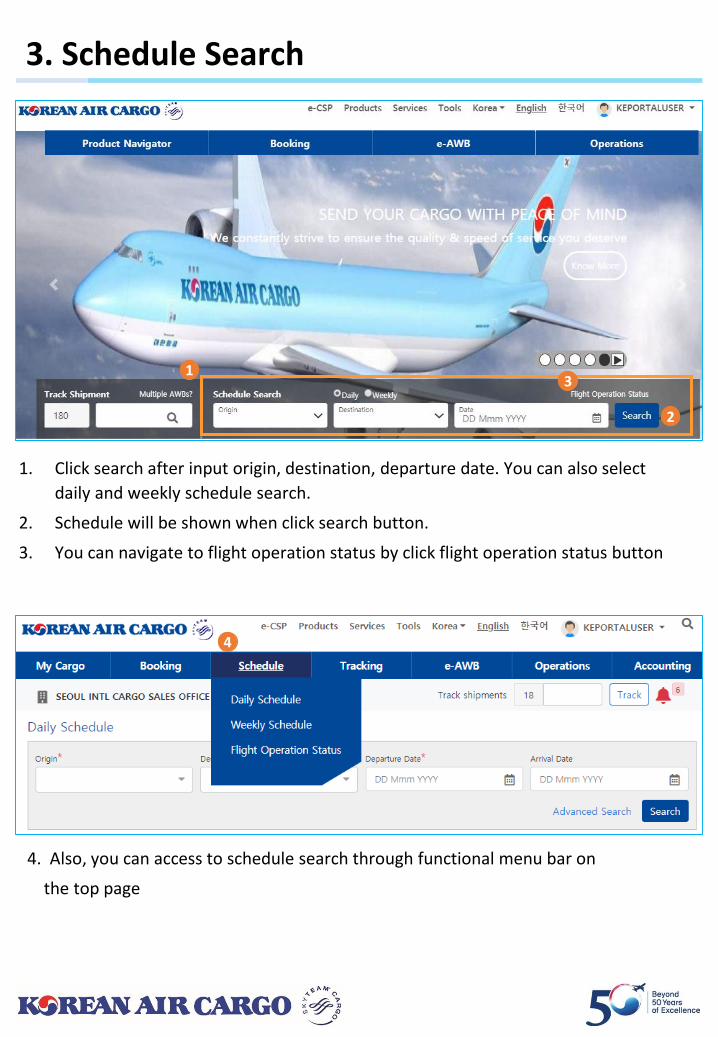
1. Click search after input origin, destination, departure date. You can also select
daily and weekly schedule search.
2. Schedule will be shown when click search button.
3. You can navigate to flight operation status by click flight operation status button
4. Also, you can access to schedule search through functional menu bar on
the top page
3. Schedule search
1
2
3
46
5
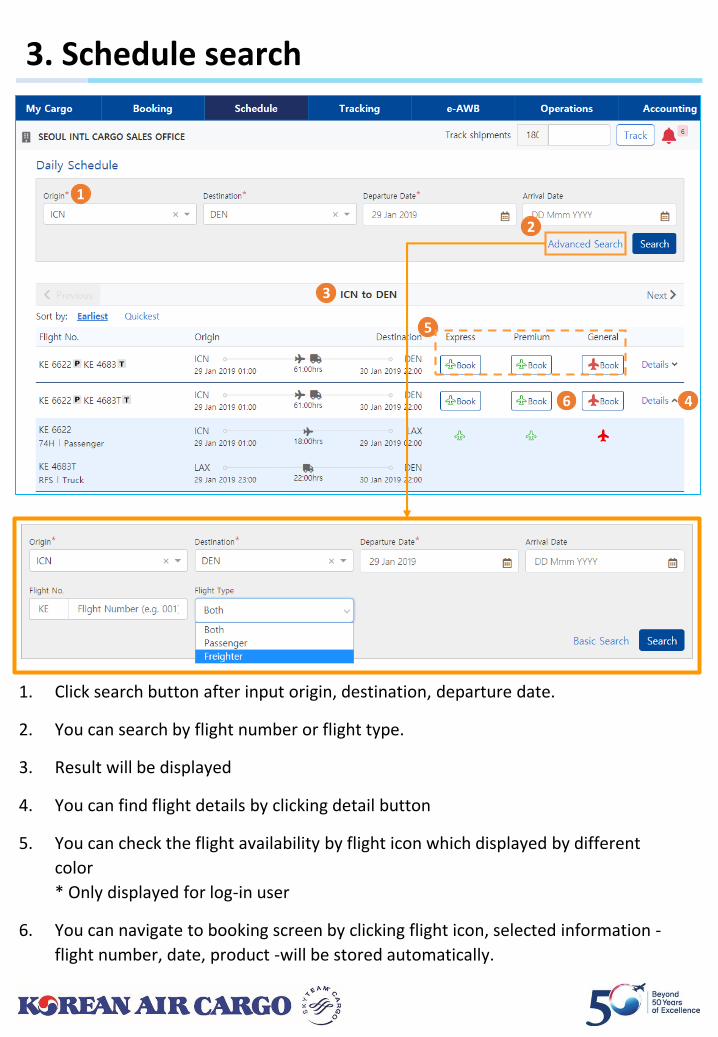
1. Click search button after input origin, destination, departure date.
2. You can search by flight number or flight type.
3. Result will be displayed
4. You can find flight details by clicking detail button
5. You can check the flight availability by flight icon which displayed by different
color
* Only displayed for log-in user
6. You can navigate to booking screen by clicking flight icon, selected information -
flight number, date, product -will be stored automatically.
4. Booking (input page)
1 2
3
4 5
6 7
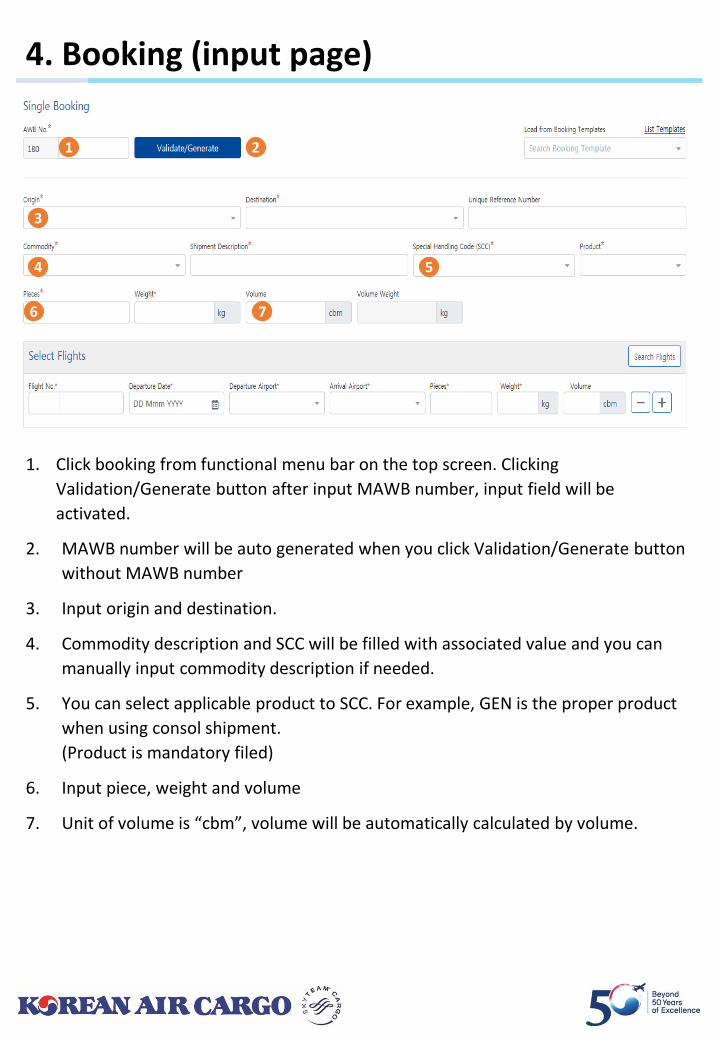
1. Click booking from functional menu bar on the top screen. Clicking
Validation/Generate button after input MAWB number, input field will be
activated.
2. MAWB number will be auto generated when you click Validation/Generate button
without MAWB number
3. Input origin and destination.
4. Commodity description and SCC will be filled with associated value and you can
manually input commodity description if needed.
5. You can select applicable product to SCC. For example, GEN is the proper product
when using consol shipment.
(Product is mandatory filed)
6. Input piece, weight and volume
7. Unit of volume is “cbm”, volume will be automatically calculated by volume.
4. Booking (input page)
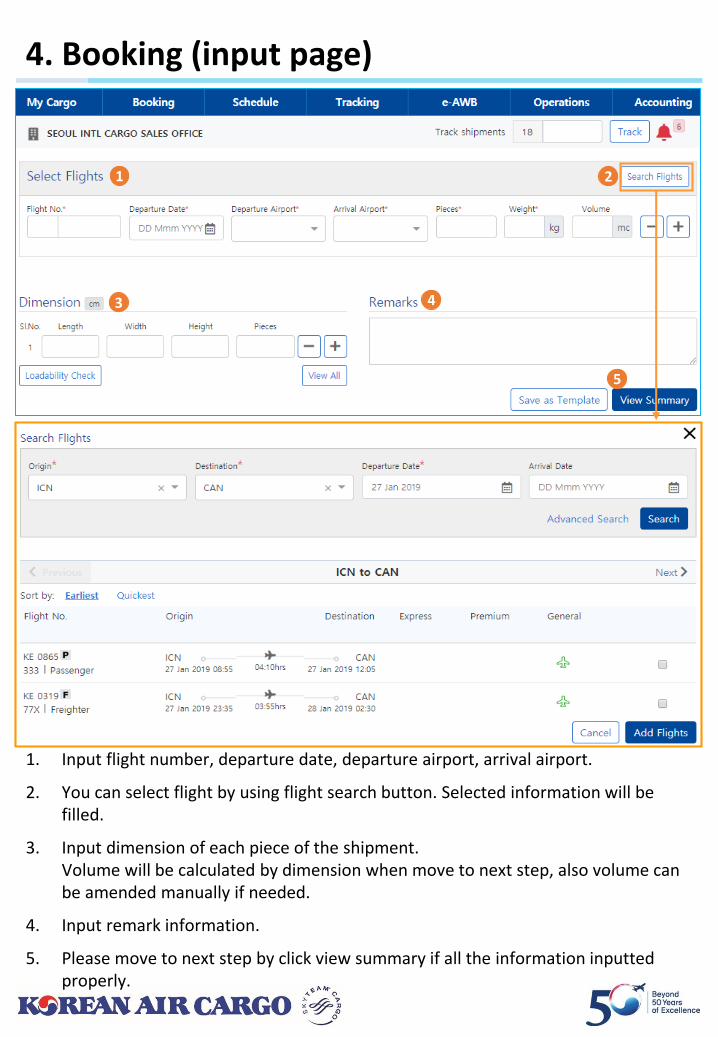
1. Input flight number, departure date, departure airport, arrival airport.
2. You can select flight by using flight search button. Selected information will be filled.
3. Input dimension of each piece of the shipment.Volume will be calculated by dimension when move to next step, also volume can be amended manually if needed.
4. Input remark information.
5. Please move to next step by click view summary if all the information inputted properly.
1 2
3 4
5
4. Booking (Temp control and live animal)
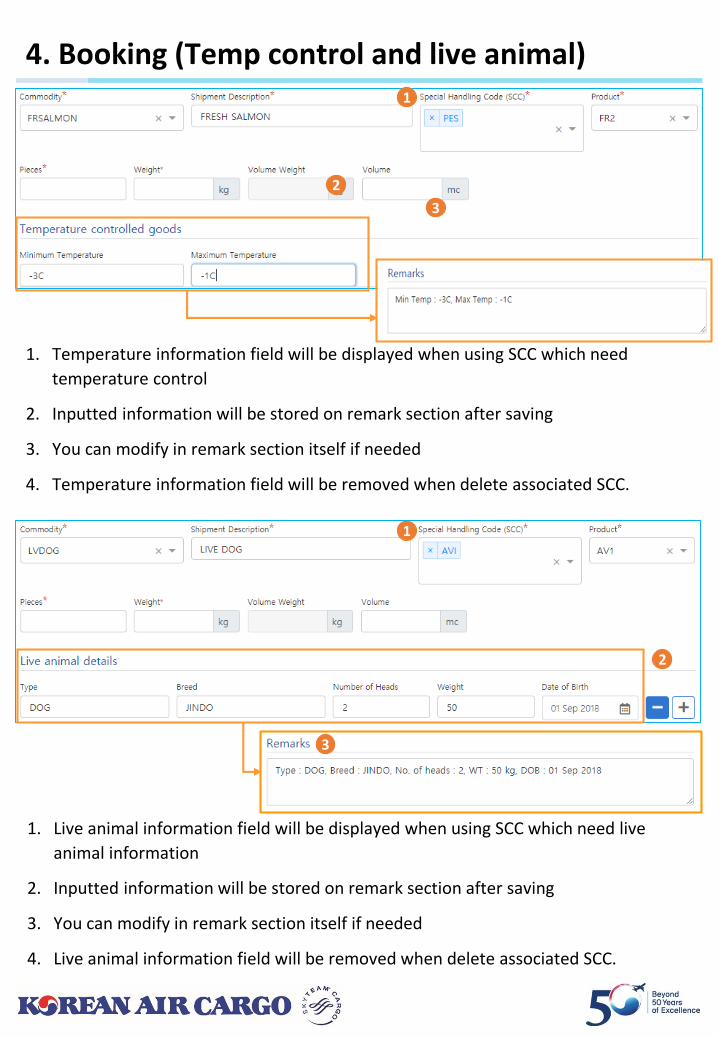
1. Temperature information field will be displayed when using SCC which need
temperature control
2. Inputted information will be stored on remark section after saving
3. You can modify in remark section itself if needed
4. Temperature information field will be removed when delete associated SCC.
1. Live animal information field will be displayed when using SCC which need live
animal information
2. Inputted information will be stored on remark section after saving
3. You can modify in remark section itself if needed
4. Live animal information field will be removed when delete associated SCC.
1
2
3
1
2
3
4. Booking (Dangerous Goods)
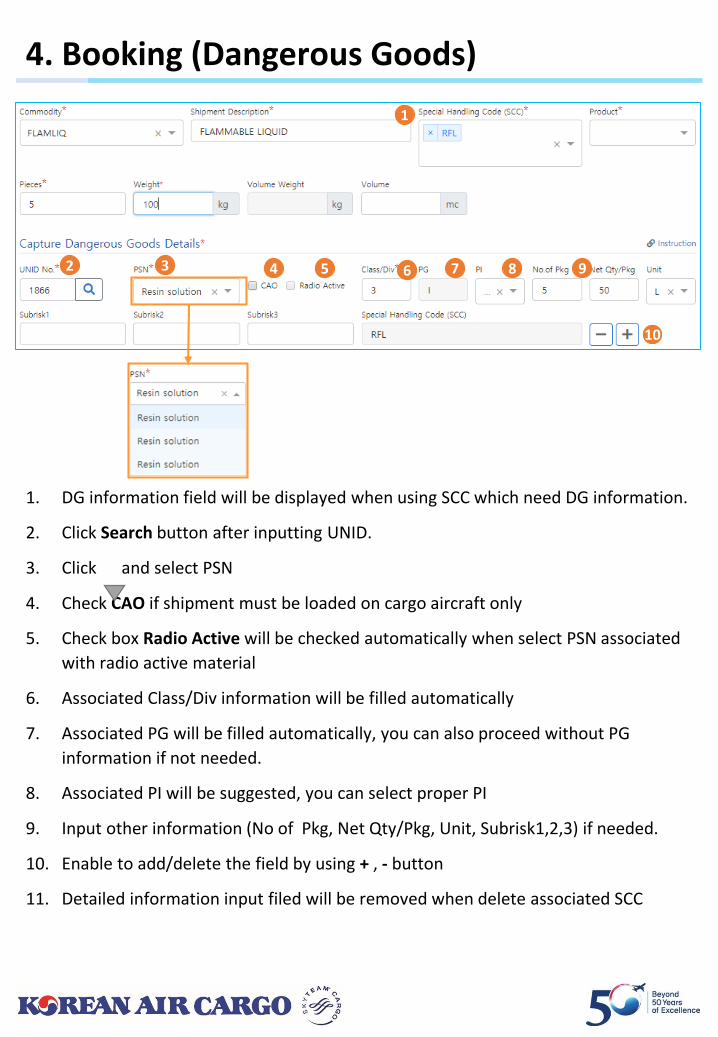
1. DG information field will be displayed when using SCC which need DG information.
2. Click Search button after inputting UNID.
3. Click and select PSN
4. Check CAO if shipment must be loaded on cargo aircraft only
5. Check box Radio Active will be checked automatically when select PSN associated
with radio active material
6. Associated Class/Div information will be filled automatically
7. Associated PG will be filled automatically, you can also proceed without PG
information if not needed.
8. Associated PI will be suggested, you can select proper PI
9. Input other information (No of Pkg, Net Qty/Pkg, Unit, Subrisk1,2,3) if needed.
10. Enable to add/delete the field by using + , - button
11. Detailed information input filed will be removed when delete associated SCC
1
2 3 4 65 987
10
4. Booking (Booking Summary)
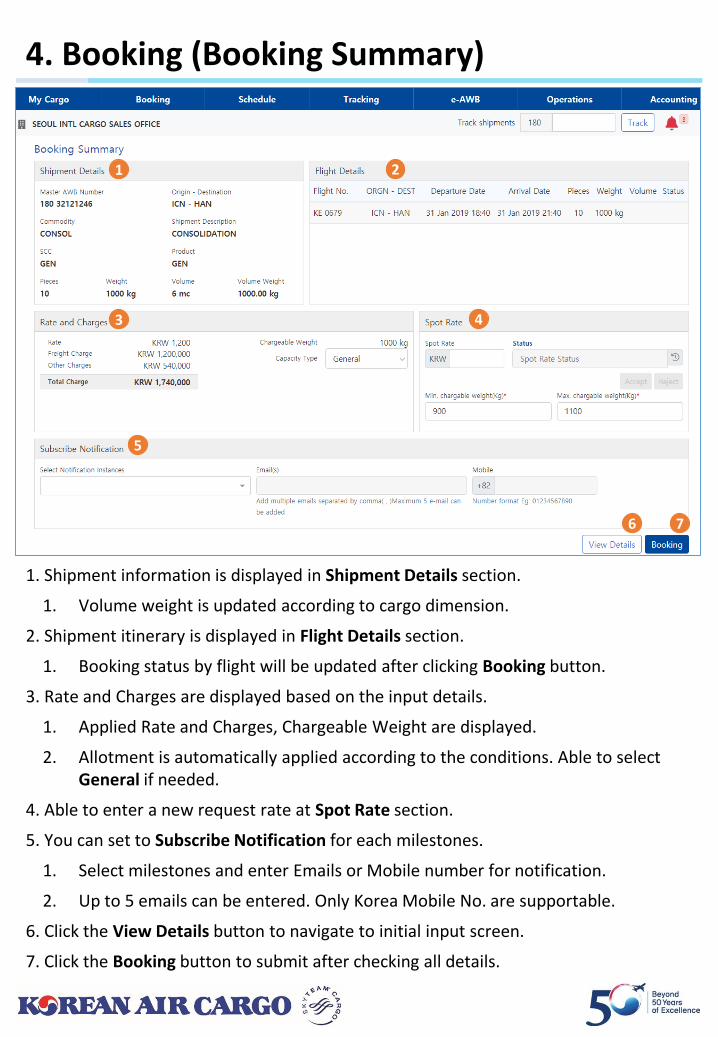
1. Shipment information is displayed in Shipment Details section.
1. Volume weight is updated according to cargo dimension.
2. Shipment itinerary is displayed in Flight Details section.
1. Booking status by flight will be updated after clicking Booking button.
3. Rate and Charges are displayed based on the input details.
1. Applied Rate and Charges, Chargeable Weight are displayed.
2. Allotment is automatically applied according to the conditions. Able to select General if needed.
4. Able to enter a new request rate at Spot Rate section.
5. You can set to Subscribe Notification for each milestones.
1. Select milestones and enter Emails or Mobile number for notification.
2. Up to 5 emails can be entered. Only Korea Mobile No. are supportable.
6. Click the View Details button to navigate to initial input screen.
7. Click the Booking button to submit after checking all details.
1 2
3 4
5
76
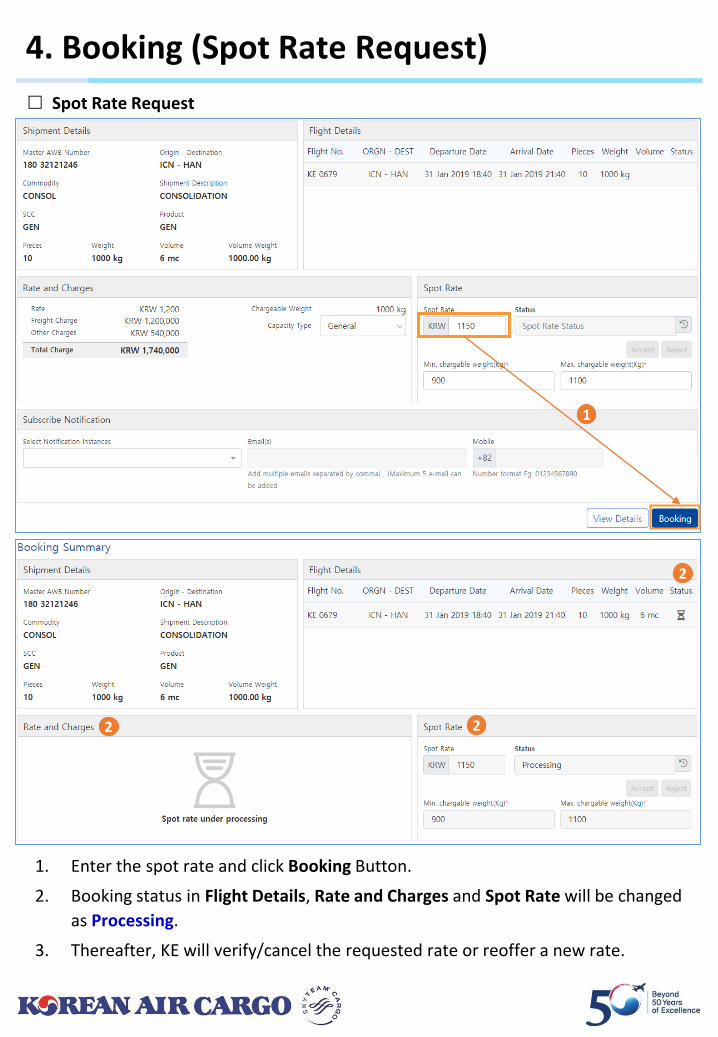
4. Booking (Spot Rate Request)
1. Enter the spot rate and click Booking Button.
2. Booking status in Flight Details, Rate and Charges and Spot Rate will be changed
as Processing.
3. Thereafter, KE will verify/cancel the requested rate or reoffer a new rate.
⮚ Spot Rate Request
1
2
2
2
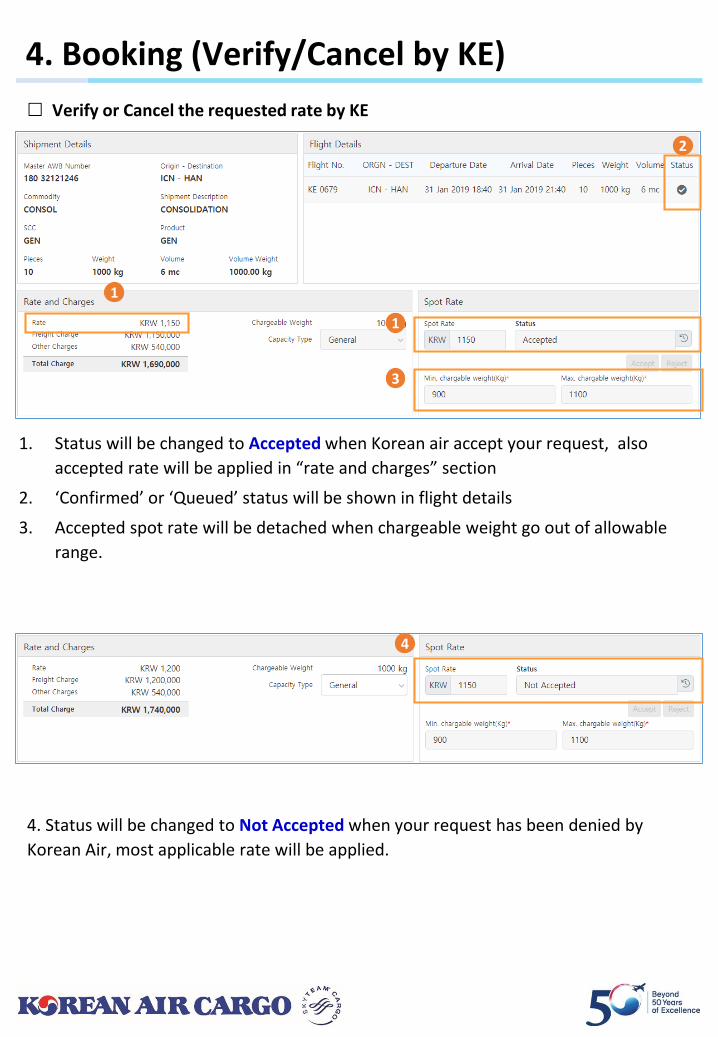
4. Booking (Verify/Cancel by KE)
1. Status will be changed to Accepted when Korean air accept your request, also
accepted rate will be applied in “rate and charges” section
2. ‘Confirmed’ or ‘Queued’ status will be shown in flight details
3. Accepted spot rate will be detached when chargeable weight go out of allowable
range.
⮚ Verify or Cancel the requested rate by KE
2
3
1
4
1
4. Status will be changed to Not Accepted when your request has been denied by
Korean Air, most applicable rate will be applied.
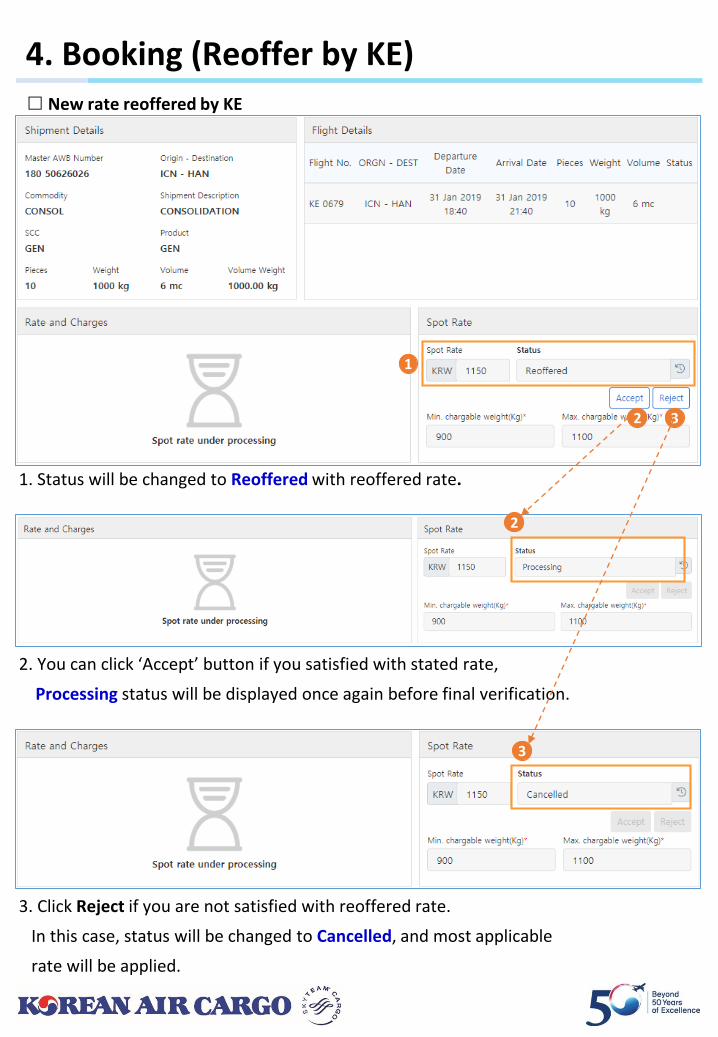
4. Booking (Reoffer by KE)⮚New rate reoffered by KE
3. Click Reject if you are not satisfied with reoffered rate.
In this case, status will be changed to Cancelled, and most applicable
rate will be applied.
1. Status will be changed to Reoffered with reoffered rate.
2. You can click ‘Accept’ button if you satisfied with stated rate,
Processing status will be displayed once again before final verification.
1
2
3
2 3
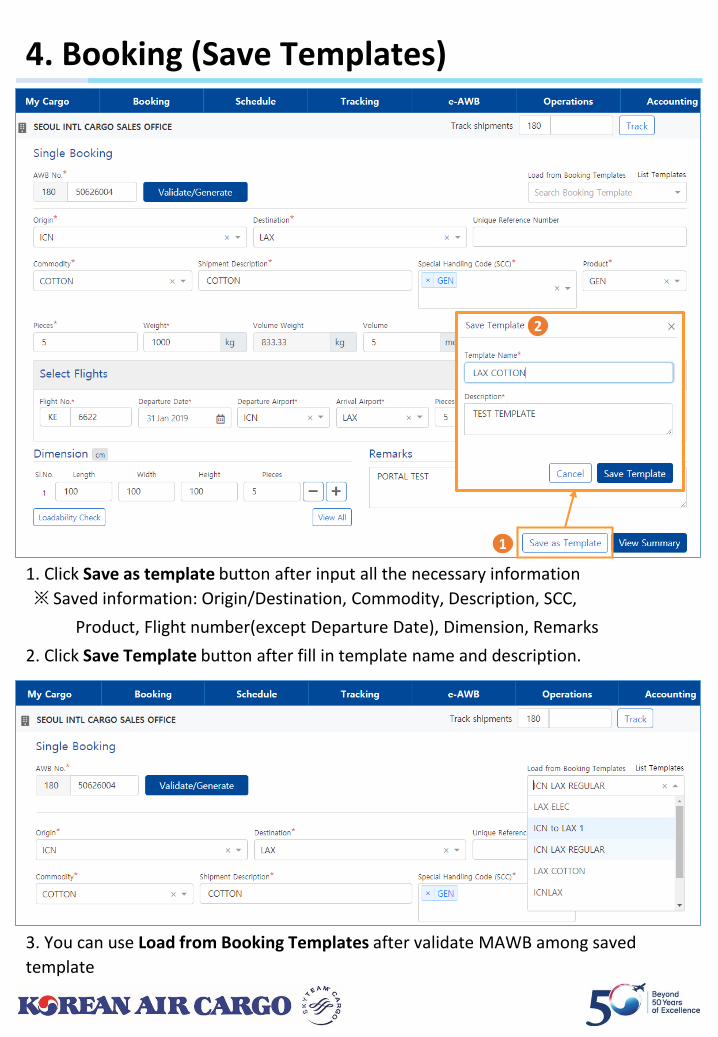
4. Booking (Save Templates)
1. Click Save as template button after input all the necessary information
※ Saved information: Origin/Destination, Commodity, Description, SCC,
Product, Flight number(except Departure Date), Dimension, Remarks
2. Click Save Template button after fill in template name and description.
3. You can use Load from Booking Templates after validate MAWB among saved
template
1
3
2
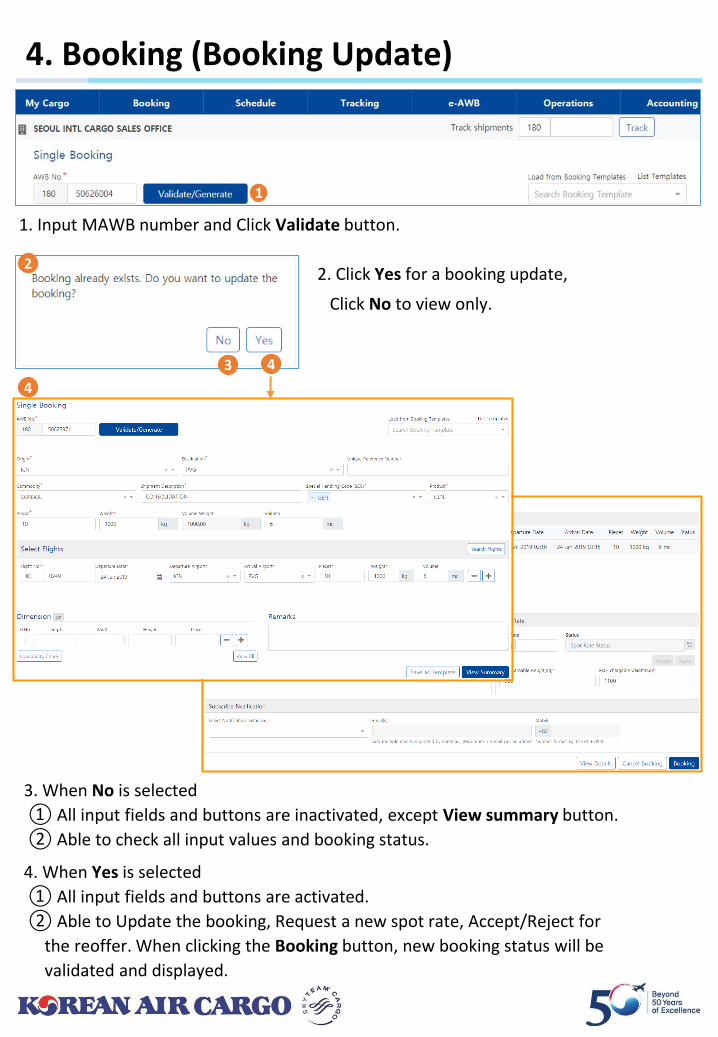
4. Booking (Booking Update)
3. When No is selected
① All input fields and buttons are inactivated, except View summary button.
② Able to check all input values and booking status.
4. When Yes is selected
① All input fields and buttons are activated.
② Able to Update the booking, Request a new spot rate, Accept/Reject for
the reoffer. When clicking the Booking button, new booking status will be
validated and displayed.
1. Input MAWB number and Click Validate button.
2. Click Yes for a booking update,
Click No to view only.
1
2
3 4
4
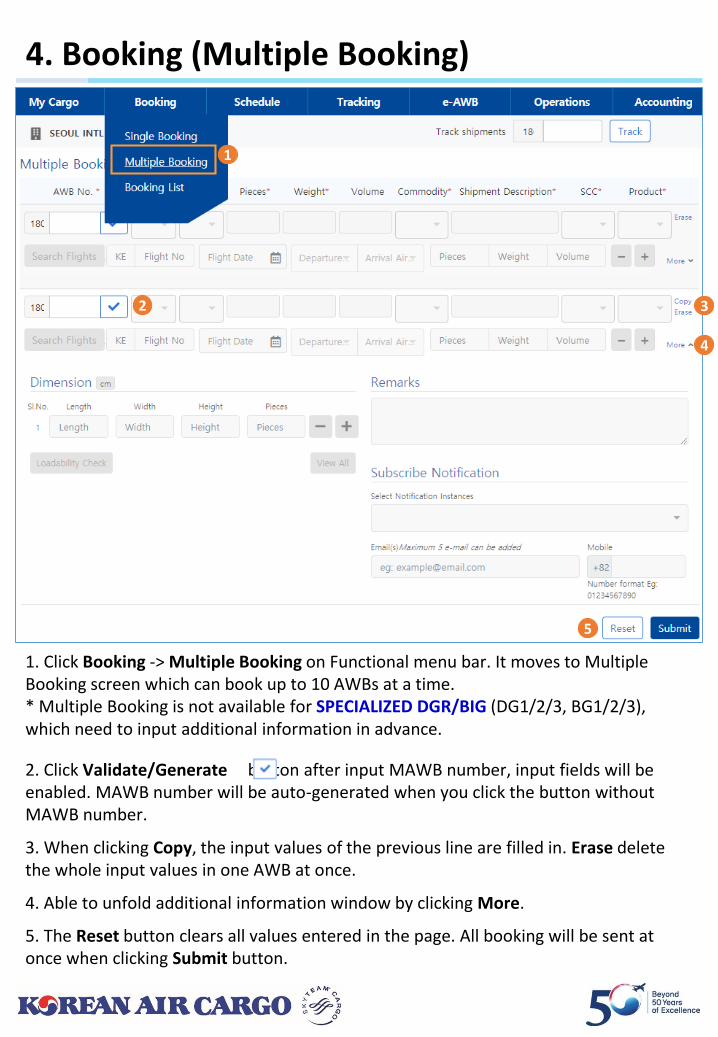
4. Booking (Multiple Booking)
1. Click Booking -> Multiple Booking on Functional menu bar. It moves to Multiple Booking screen which can book up to 10 AWBs at a time.* Multiple Booking is not available for SPECIALIZED DGR/BIG (DG1/2/3, BG1/2/3), which need to input additional information in advance.
2. Click Validate/Generate button after input MAWB number, input fields will be enabled. MAWB number will be auto-generated when you click the button without MAWB number.
3. When clicking Copy, the input values of the previous line are filled in. Erase delete the whole input values in one AWB at once.
4. Able to unfold additional information window by clicking More.
5. The Reset button clears all values entered in the page. All booking will be sent at once when clicking Submit button.
1
2 3
4
5
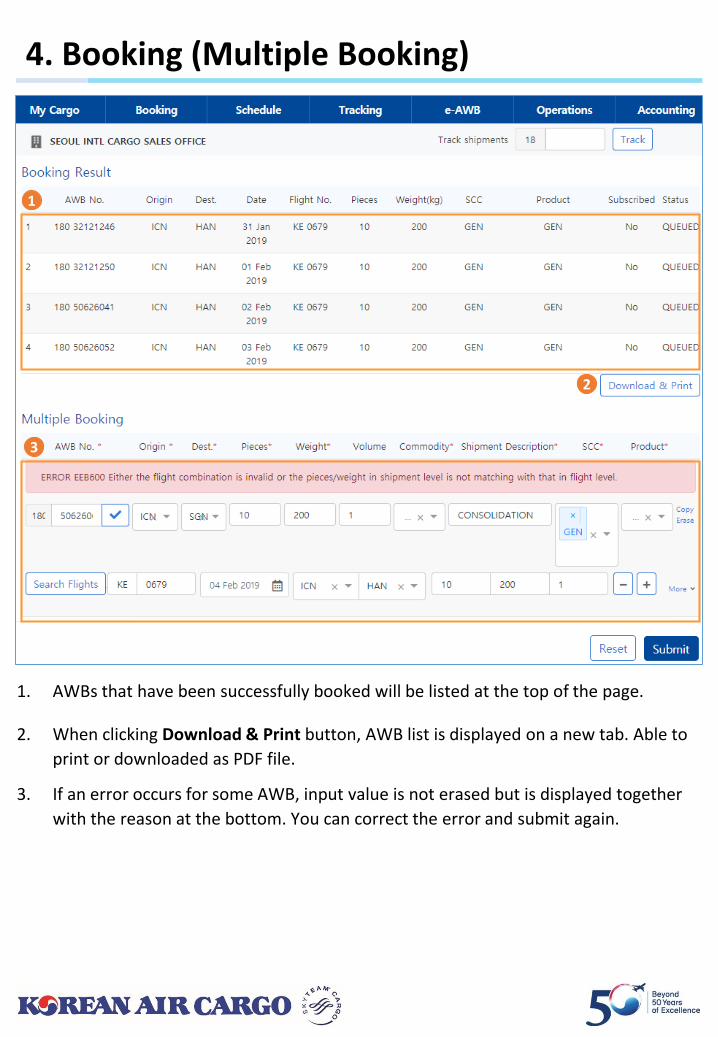
4. Booking (Multiple Booking)
1. AWBs that have been successfully booked will be listed at the top of the page.
2. When clicking Download & Print button, AWB list is displayed on a new tab. Able to
print or downloaded as PDF file.
3. If an error occurs for some AWB, input value is not erased but is displayed together
with the reason at the bottom. You can correct the error and submit again.
1
2
3
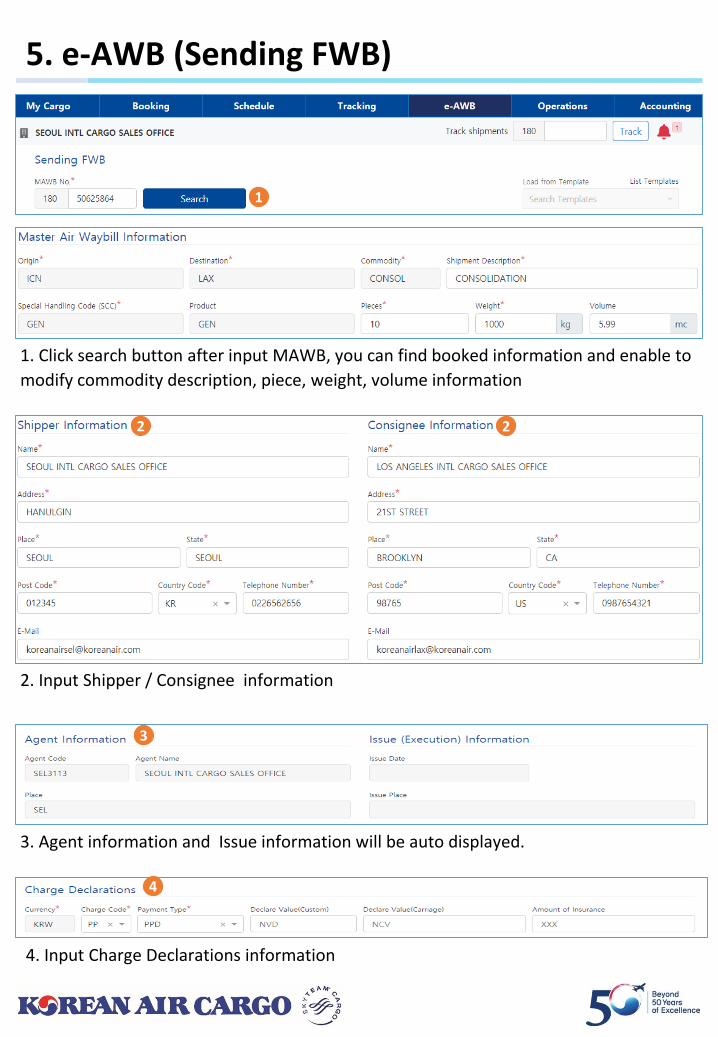
5. e-AWB (Sending FWB)
2. Input Shipper / Consignee information
1. Click search button after input MAWB, you can find booked information and enable to
modify commodity description, piece, weight, volume information
4. Input Charge Declarations information
3. Agent information and Issue information will be auto displayed.
1
2
3
2
4

5. e-AWB (Sending FWB)
1. Input other information
2. Input OCI information
① Other information (information ID, Customs information ID, ISO country
code) will be automatically filled when input Supplementary customs info
② Mandatory for China bound shipment
3. Enable to add, delete by using ‘+’ , ‘-’ button
4. You can load frequently used information from Load from Template such
as SHPR, CNEE, OCI information on the top
5. Go to next step by clicking FWB summary button.
[ Save Template ] [ Load from Template ]
2
1
11
1
4
3
5
5. e-AWB (Sending FWB)
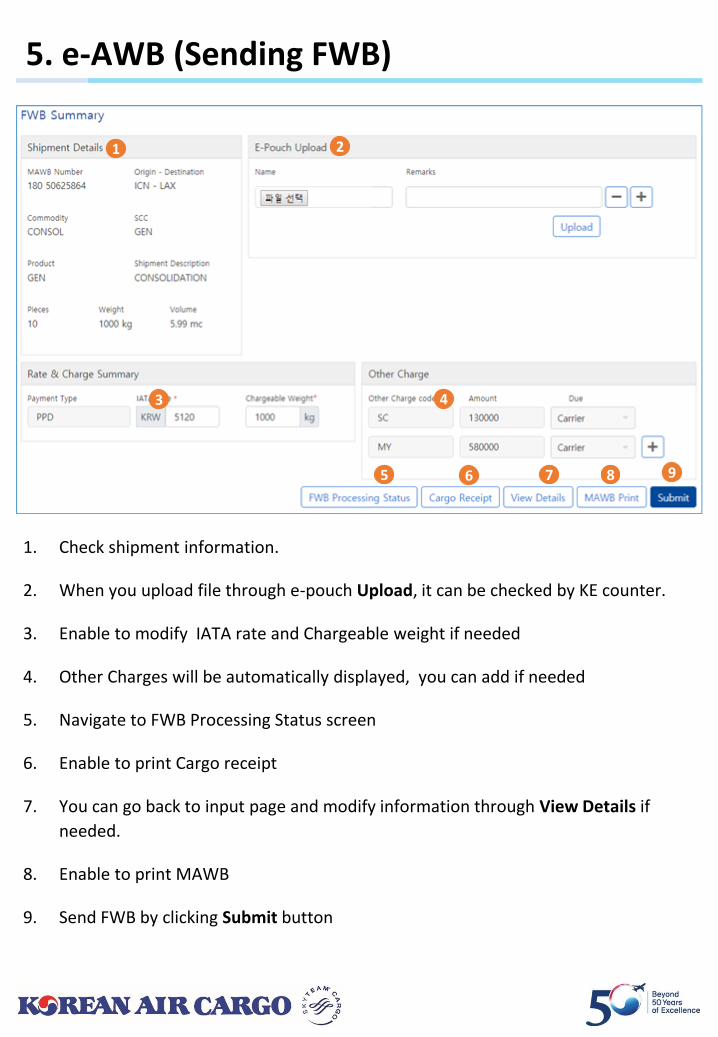
1. Check shipment information.
2. When you upload file through e-pouch Upload, it can be checked by KE counter.
3. Enable to modify IATA rate and Chargeable weight if needed
4. Other Charges will be automatically displayed, you can add if needed
5. Navigate to FWB Processing Status screen
6. Enable to print Cargo receipt
7. You can go back to input page and modify information through View Details if
needed.
8. Enable to print MAWB
9. Send FWB by clicking Submit button
21
43
75 986
5. e-AWB (Sending FHL)
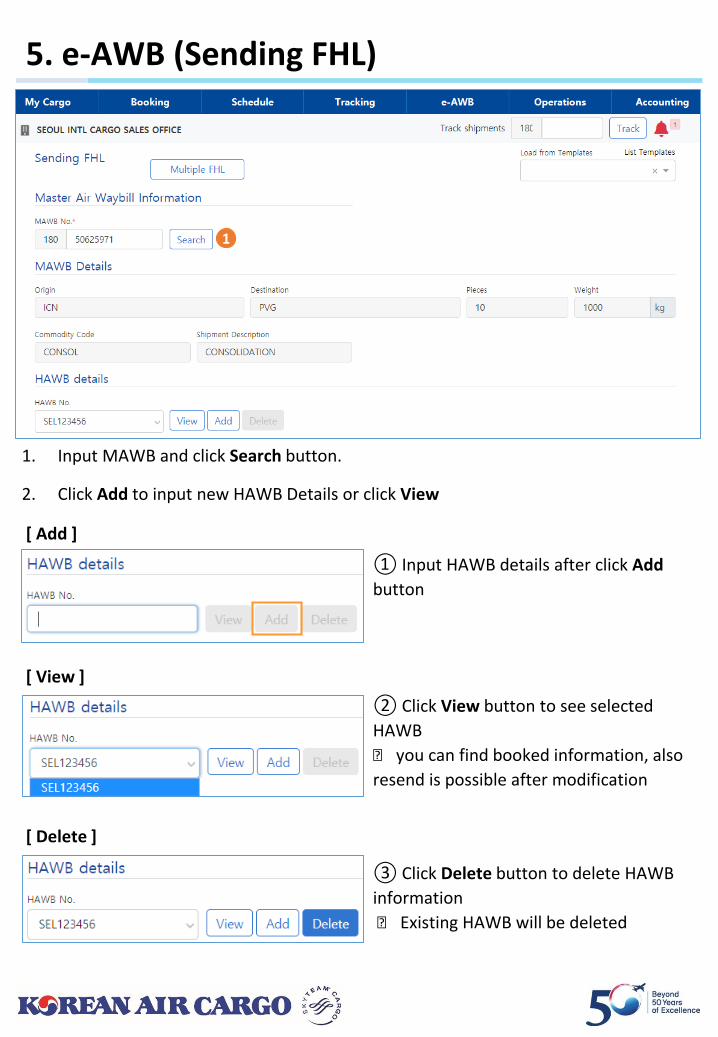
1. Input MAWB and click Search button.
2. Click Add to input new HAWB Details or click View
② Click View button to see selected
HAWB
🡺 you can find booked information, also
resend is possible after modification
① Input HAWB details after click Add
button
③ Click Delete button to delete HAWB
information
🡺 Existing HAWB will be deleted
[ Add ]
[ View ]
[ Delete ]
1
5. e-AWB (Sending FHL)
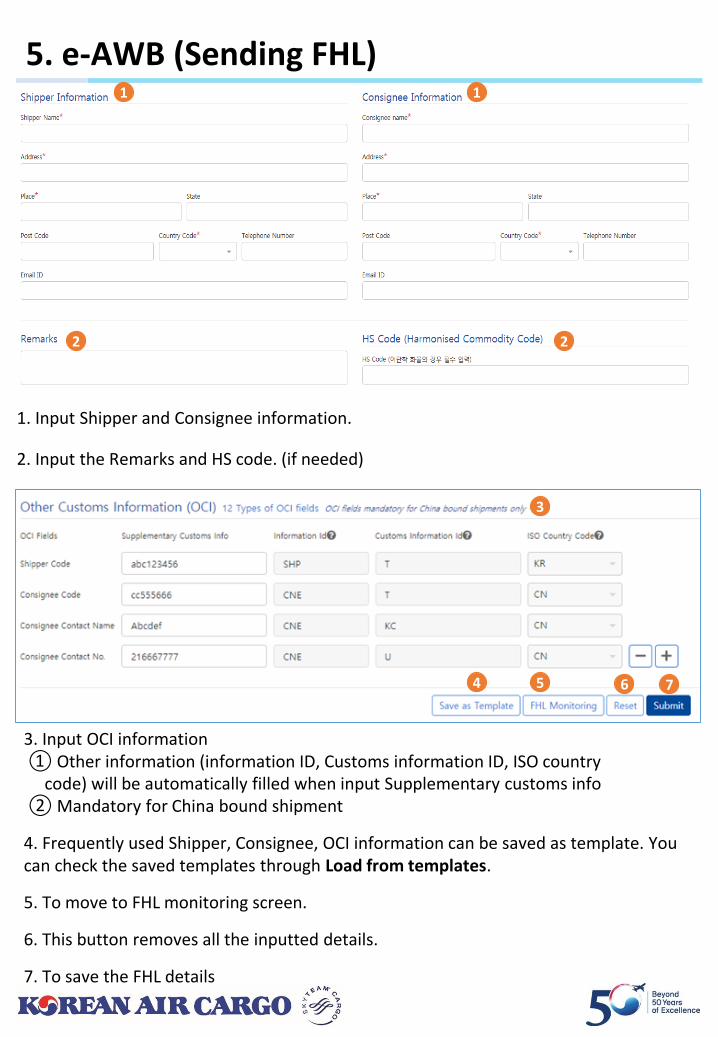
3. Input OCI information① Other information (information ID, Customs information ID, ISO country
code) will be automatically filled when input Supplementary customs info ② Mandatory for China bound shipment
4. Frequently used Shipper, Consignee, OCI information can be saved as template. You can check the saved templates through Load from templates.
5. To move to FHL monitoring screen.
6. This button removes all the inputted details.
7. To save the FHL details
1. Input Shipper and Consignee information.
2. Input the Remarks and HS code. (if needed)
2
1
4
3
75 6
1
2

5. e-AWB (Sending Multiple FHL)
2. You can download FHL Template(excel file).
3. A PDF file of how to use the FHL Template is displayed in a new tap.
4. If you upload the FHL template(excel file), the contents filled in the file are automatically entered on the screen.
5. Enter the MAWB No. and click Tick button to display MAWB information.
6. You can input House details in HAWB line, also able to add/delete the line by using +, - button. (Up to 50 can be input at once)
7. Click Details to unfold the input field of Shipper, Consignee, Remarks, HS code.
8. Able to add or delete the MAWB input line.
9. Click the Submit button to send all FHL data entered on the screen.
1. If you wish to view the Multiple FHL screen, click Multiple FHL button in the Sending
FHL screen.
2
1
6
3
5
4
7
6
8
9
6. MAWB Tracking
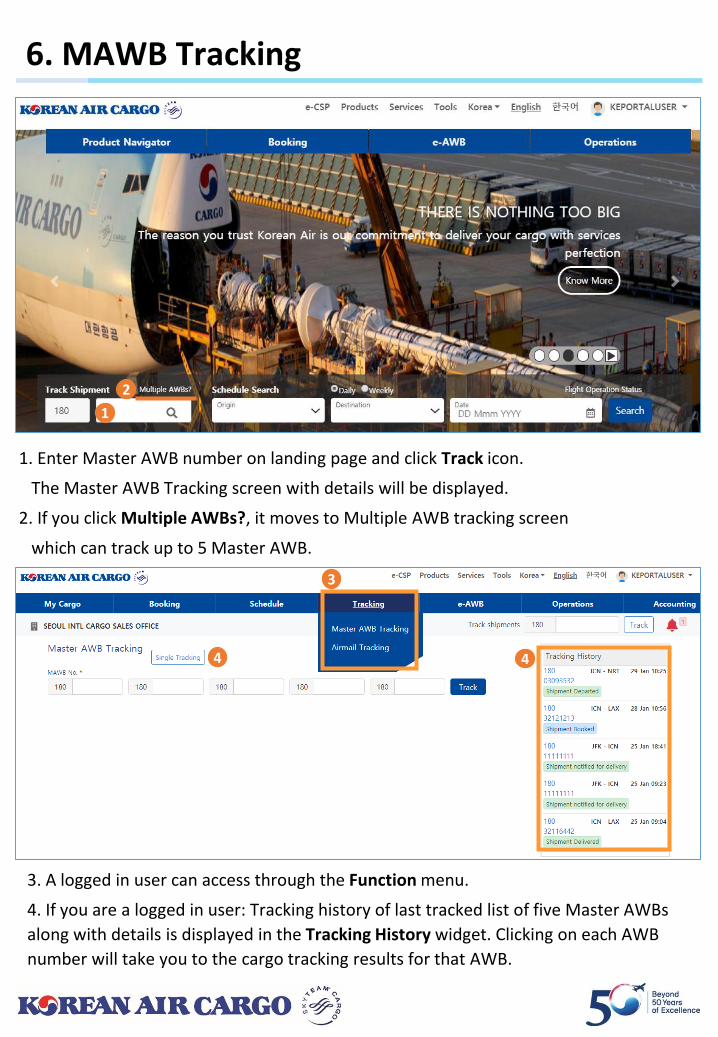
1. Enter Master AWB number on landing page and click Track icon.
The Master AWB Tracking screen with details will be displayed.
2. If you click Multiple AWBs?, it moves to Multiple AWB tracking screen
which can track up to 5 Master AWB.
3. A logged in user can access through the Function menu.
4. If you are a logged in user: Tracking history of last tracked list of five Master AWBs
along with details is displayed in the Tracking History widget. Clicking on each AWB
number will take you to the cargo tracking results for that AWB.
1
2
4
3
4
6. MAWB Tracking
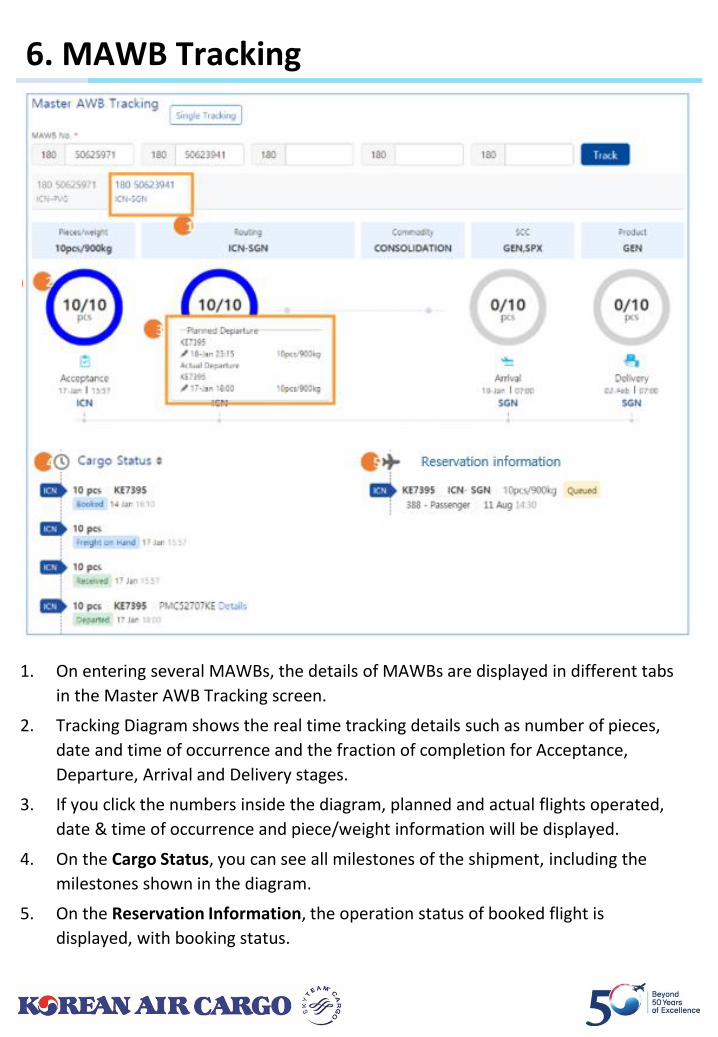
1. On entering several MAWBs, the details of MAWBs are displayed in different tabs
in the Master AWB Tracking screen.
2. Tracking Diagram shows the real time tracking details such as number of pieces,
date and time of occurrence and the fraction of completion for Acceptance,
Departure, Arrival and Delivery stages.
3. If you click the numbers inside the diagram, planned and actual flights operated,
date & time of occurrence and piece/weight information will be displayed.
4. On the Cargo Status, you can see all milestones of the shipment, including the
milestones shown in the diagram.
5. On the Reservation Information, the operation status of booked flight is
displayed, with booking status.
1
2
3
4 5
6. MAWB Tracking(Subscribe Notification)
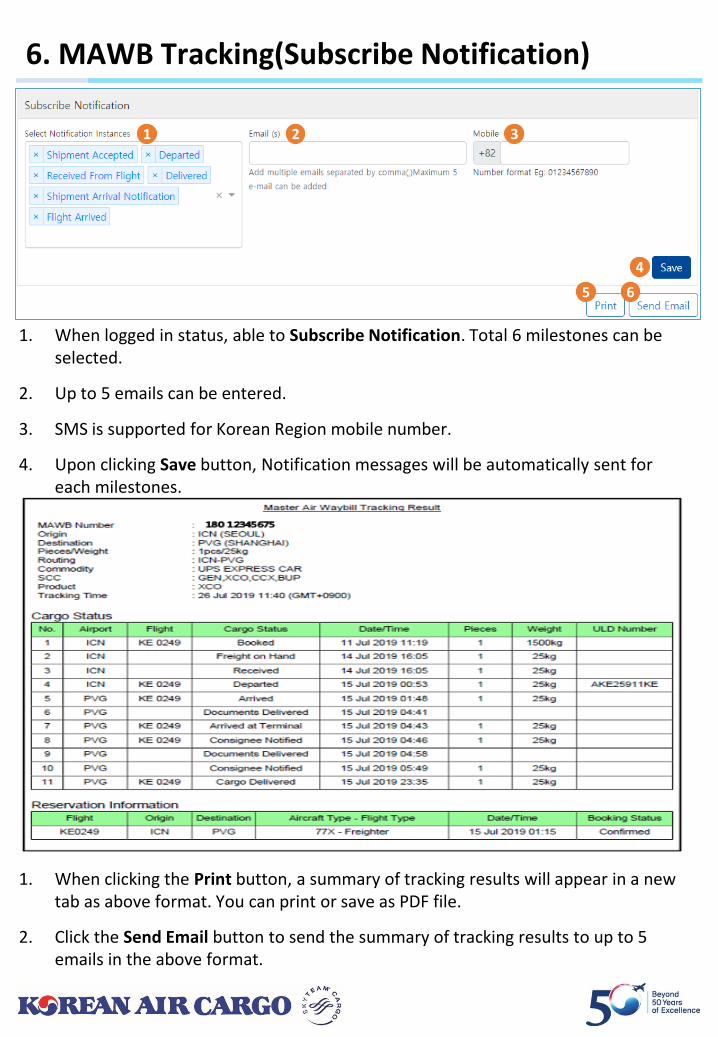
1. When logged in status, able to Subscribe Notification. Total 6 milestones can be selected.
2. Up to 5 emails can be entered.
3. SMS is supported for Korean Region mobile number.
4. Upon clicking Save button, Notification messages will be automatically sent for each milestones.
1. When clicking the Print button, a summary of tracking results will appear in a new tab as above format. You can print or save as PDF file.
2. Click the Send Email button to send the summary of tracking results to up to 5 emails in the above format.
1 2 3
4
5 6

1. Click My Cargo link in the My Account section of global navigation menu
or Functional menu bar after logged in.
7. My Cargo
2. If you click the red bell at the top right,
Queued and Reoffered AWBs which booked on
that day will be listed.
2
1
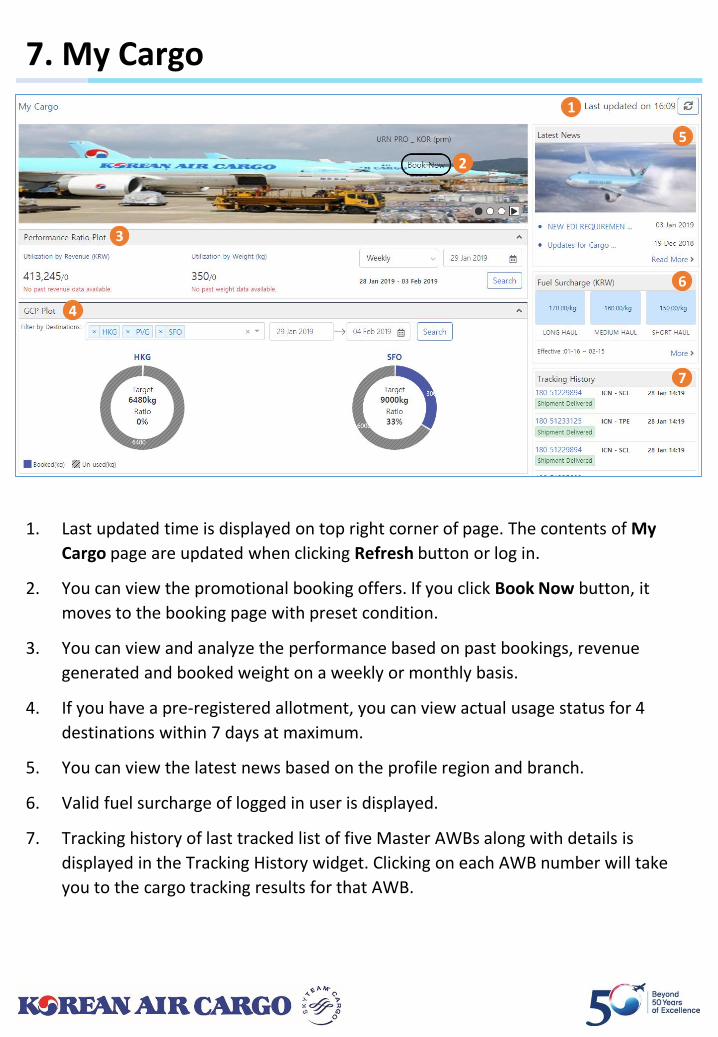
1. Last updated time is displayed on top right corner of page. The contents of My
Cargo page are updated when clicking Refresh button or log in.
2. You can view the promotional booking offers. If you click Book Now button, it
moves to the booking page with preset condition.
3. You can view and analyze the performance based on past bookings, revenue
generated and booked weight on a weekly or monthly basis.
4. If you have a pre-registered allotment, you can view actual usage status for 4
destinations within 7 days at maximum.
5. You can view the latest news based on the profile region and branch.
6. Valid fuel surcharge of logged in user is displayed.
7. Tracking history of last tracked list of five Master AWBs along with details is
displayed in the Tracking History widget. Clicking on each AWB number will take
you to the cargo tracking results for that AWB.
7. My Cargo
1
2
3
4
5
6
7
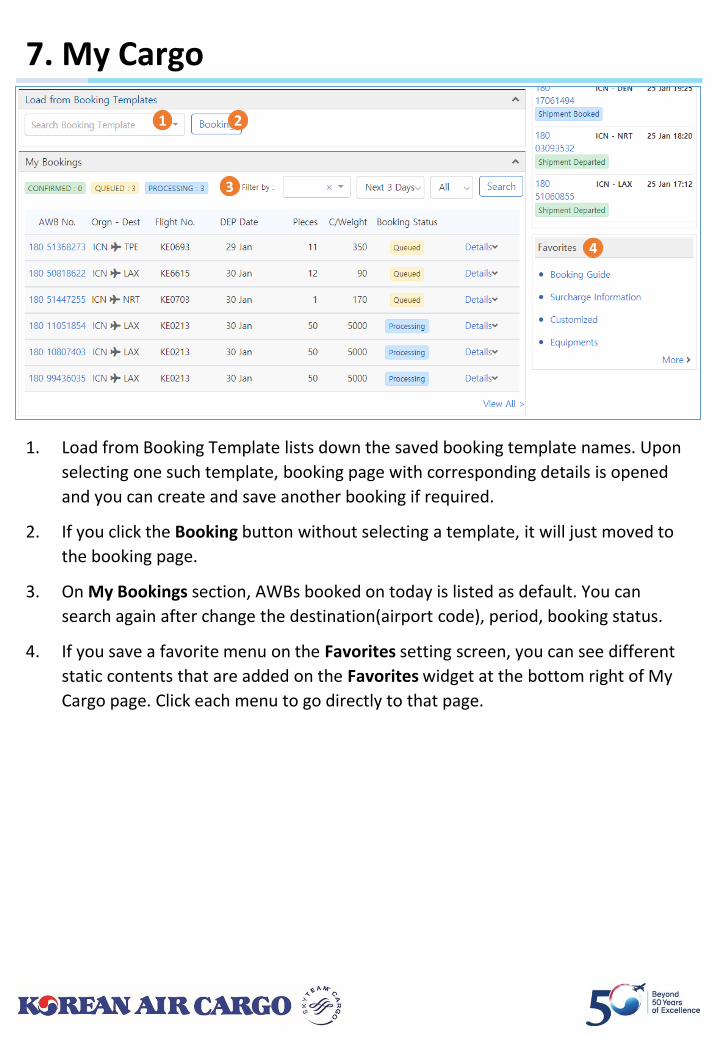
1. Load from Booking Template lists down the saved booking template names. Upon
selecting one such template, booking page with corresponding details is opened
and you can create and save another booking if required.
2. If you click the Booking button without selecting a template, it will just moved to
the booking page.
3. On My Bookings section, AWBs booked on today is listed as default. You can
search again after change the destination(airport code), period, booking status.
4. If you save a favorite menu on the Favorites setting screen, you can see different
static contents that are added on the Favorites widget at the bottom right of My
Cargo page. Click each menu to go directly to that page.
7. My Cargo
1 2
3
4