carisolv - nlpum.tistory.comnlpum.tistory.com/attachment/fk24.pdf · tissue preservation in caries...
TRANSCRIPT

1
Minimally-invasive, patient-friendlyremoval of caries
Carisolv®
Clinical Manual

2
Content
Minimally-invasive and patient-friendly removal of caries 3
Carisolv® 3
Dentine caries 4
Treatment of caries lesion 5
Drills 5
Lasers 5
Air abrasion 5
Atraumatic restorative treatment 5
Chemo-mechanical caries removal 5
Description of Carisolv® 6
Instructions for use – Carisolv® gel 8
Carisolv® instruments for caries excavation 9
Cases – step-by-step treatment 10
Treating children 12
Caries at crown margins 12
Your first cases 13
Evaluating a caries-free surface 13
Caries removal with a drill and with Carisolv® – a comparison 14
Scientific publications relating to Carisolv® 15
Questions & Answers 16
Summary of chemo-mechanical characteristics 17
Tissue preservation in caries treatment – a textbook 18
List of references 18

3
Minimally-invasive, patient-friendlyremoval of caries
In every field of dentistry, an awareness of the importance of preserving toothtissue, combined with a patient-friendly approach, is becoming self-evident. It hasbeen shown that operative treatment often leads on an increasing scale to furtheroperative and more invasive treatment. Wherever possible, tissue should be pre-served; invasive treatment should be kept to a minimum and natural tissue shouldbe replaced with artificial substitutes only when it is absolutely unavoidable.
The best way to ensure a maximum life for the natural tooth is to respect thesound tissue and protect it from damage by using minimally-invasive techniquesin restorative dentistry.
Carisolv®
This compendium is about Carisolv®, a method for minimally-invasive, gentle den-tine caries removal based on biological principles. The system uses a gel and spe-cial instruments that preserve healthy tissue. Patient comfort is significantly en-hanced.
Carisolv® gel is applied to the caries affected area of the dentine. It softens thediseased portion of the tooth, while healthy tissue is preserved. The softened cari-ous dentine is removed with special Carisolv® instruments. The treatment is quietand effective. Many patients and dentists call it “a silent revolution”.
How long will it take to remove caries with Carisolv®?As with any treatment, this naturally depends on the type of patient and lesionyou are treating. A recent study showed that dentists who use Carisolv® frequentlyhave a treatment time close to those for drilling. This is a significant improvementcompared with the very first studies back in 1998 when the caries excavation timewas almost twice that for drilling.
Carisolv® can be used on its own or in combination with the drill, or some othermethod for caries excavation, depending on the clinical situation. The remainingdentine surface is suitable for etching and bonding with modern adhesive restora-tive materials. A quick review of dentine caries will clarify the requirements of aneffective, chemo-mechanical caries removal system.
The gel is applied to the carious dentineusing a Carisolv® instrument.

4
Dentine cariesDentine is a vital, mineralised tissue that surroundsthe pulp. The tissue is formed in a collagen networkand has dentinal tubules that radiate from the pulpto the enamel. Unlike the enamel, only half thedentinal tissue volume consists of hydroxyapatite.The crystals are smaller and contain more carbon-ates.1
As bacterial acids come in contact with the vital den-tine, the odontoblast processes in the dentinal tu-bules begin to deposit mineral. New dentine is alsoformed on the walls of the pulp.2 As the bacterialacids gradually dissolve the mineral, the collagennetwork is exposed and the dentine softened. Thecrystals become smaller during the dissolution pro-cess and porous areas are formed. Re- and deminer-alisation also lead to the deposition of irregular crys-tals in the tubules and the dentine. At this stage, thedeeper (inner) carious layer is slightly demineralised,but it contains an intact organic matrix with soundcollagen fibres and some apatite crystals bound tothe fibres. The intact collagen framework of the in-
ner layer has the potential to reorganise andremineralise if the acid challenge is discontinued,1, 3
whereas recalcification does not occur in the outercarious layer.2
If the disease progresses, the collagen exposed to thebacterial acids becomes less resistant to enzymaticdegradation and the demineralisation is no longerreversible. As the mineral dissolves, enzymes breakdown the collagen4 and eventually the dentinal struc-ture in the necrotic part of the lesion is lost. Contin-ued progression of the disease results in the destruc-tion of the pulp and apical periodontitis.
It is therefore clear that an effective, chemo-mechani-cal dentine caries removal system should identify theborder between remineralisable and non-remineralisable dentine and only influence the lat-ter, in order to be a minimally-invasive treatment al-ternative. The surface that remains after caries re-moval should be hard and etchable to support a fill-ing.
Zone 1The outermost layer of carious dentine is necrotic. It is infected,dead and not sensitive. The collagen is irreversibly denatured.Both acids and enzymes have affected the structure of thecollagen and the cross-links have been destroyed. An electronmicrograph shows that the characteristic collagenouscrossbands have completely disappeared.5 The dentine is softto probing and cannot be reorganised to its original structure.
Zone 2The dentine is not infected, it is vital and sensitive. It is softbut capable of remineralisation. The collagen network in theinner, carious dentine is reversibly denatured, i.e. it canreorganise.6 There may be discoloration.
Zone 3In the zone near the pulp, the dentine has been affected byacid, but it is alive and can be remineralised. The hardness issomewhat reduced. This zone is usually separated from thepulp by a translucent zone.
The dentine has responded to irritation by depositing mineral inthe dentinal tubules.4
Unaffected dentine is encountered nearest the pulp andperipheral to the lesion. The dentine is not as hard nearest thepulp because of the larger number of dentinal tubules per unitarea.
Cross-section of a carious lesion
Zone 1
Zone 2Zone 3

5
Treatment of carious lesionsThe current odontological era is characterised by anincreasing move towards less invasive treatment andtowards preventive dentistry. It is understood thatpreservation of original tissue enhances the progno-sis of the tooth.
DrillsConventional operative caries treatment is usuallycarried out with a high-speed handpiece to obtainaccess to the lesion and a low-speed handpiece toremove the caries. A water coolant is often used toreduce damage to the pulp.
LasersLaser technology involves the “non-touch applica-tion” of energy impulses. The latest instruments canalso remove hard tissue with a laser beam. Impulsesare passed directly to the treatment point via a flex-ible fibre.
Air abrasionDuring air abrasion, an air-powdered stream of asubstance like aluminium oxide is blasted onto thetooth. The stream is applied with incremental pres-sure from 40 to 150 psi. It can be used to clean crownsand bridges and to obtain access to and remove car-ies to some extent. The equipment comes in manyshapes and price categories.
The relative ability of the various excavation techniques to remove tooth tissueMethod Sound Sound Carious Carious Notes
enamel dentine enamel dentineHand – – + ++excavatorsRotary burrs +++ +++ +++ +++ Air turbine and slow-speed handpiece
Air abrasion +++ +++ ++ + Depends on abrasive agent used
Air polishing + + + – Requires hard surface substance for abrasion
Ultrasonics + + + – Retrograde root filling cavity preparation
Sono-abrasion – + + ++ Further work required
Carisolv® – – – +++ Still requires conventional access to dentine
Lasers + + + + Depends on wave length, intensity, pulse duration etc.
Enzymes – – – + Further work required
Extracted from Banerjee et al, British Dental Journal 2000;188(9):476-4828.
Atraumatic restorativetreatmentAtraumatic Restorative Treatment (ART) involvesboth the prevention and treatment of dental caries.The ART procedure is based on excavating and re-moving caries with hand instruments alone. Thetooth is then restored with an adhesive filling mate-rial, i. e. glass ionomers.7
Chemo-mechanical cariesremovalChemo-mechanical caries removal (CMCR) is themost documented alternative to traditional drillingfor dentine caries removal. To summarise, the pro-cedure involves the application of a chemical solu-tion to the carious dentine followed by gentle removalwith hand instruments. CMCR is currently the onlyapproach that includes a selective caries softener.

6
Carisolv® gelCarisolv® gel is a two-component mixture. Equalparts of the two are mixed to form the active gelsubstance. One of the components primarily containsthree amino acids (glutamic acid, leucine and lysine)and sodium hydroxide. The other fluid contains thereactive hypochlorite component (NaOCl). Carisolv®
gel is available in two different packages; Carisolv®
gel multimix and Carisolv® gel singlemix.
The first marketed version of Carisolv® gel was red.In recent years, the gel has been further developed atthe University of Göteborg, Sweden. To improve itsefficacy, an increase of the amount of free chlora-mines was needed, which in turn required a higherconcentration of NaOCl. One effect of the higherconcentration of NaOCl is that the colour agent hasbeen removed, i.e. the gel is uncoloured. Basic re-search has been performed on this revised gel com-position and no differences in terms of surface to-pography, pulp effects or soft tissue effects have beennoted. The mode of action is the same for both ver-sions of the gel. So the published research is still ap-plicable.
Mode of actionWhen the Carisolv® gel is mixed, the amino acidsbind chlorine and form chloramines at a high pH.The softening effect on the carious tissue is the re-sult of several reactions that act in concert to disruptthe fibre structure of collagen. The three aminoacids (all of which are found among the twenty thatare used naturally as building blocks in proteins) aredifferently charged, which allows for an electrostaticattraction to different areas of the proteins in thecarious dentine. The peptide chains of all proteins,including collagen, are made up of hydrophilic (posi-tively or negatively charged) and hydrophobic (non-charged) patches. So each of the three chloro-aminoacids in Carisolv® electrostatically attracts one ofthese patches, effectively bringing reactive power tothe full length of the target, the collagen fibre, whileminimising unwanted side-reactions from hypochlo-rite.9 The formation of chloramines reduces the re-activity of the chlorine without altering its chemicalfunction. Moreover, chlorinated amino acids areprobably able to disrupt the several types of electro-static bond that hold the fibrous structure together.
The chemical result of these processes is a break-down of degraded collagen characteristically foundin the demineralised portion of a carious lesion. Thegel only softens the carious dentine, while healthytissue is unaffected. The degraded collagen has an
Carisolv® gel multimix and hand instruments
Carisolv® gel singlemix and hand instruments
Description of Carisolv®
Carisolv® is a minimally-invasive method for chemo-mechanical dentine caries removal, developedin close collaboration between universities, scientists and industry in Sweden. Carisolv® is a pat-ented product system, comprising two parts: a gel and specially-designed hand or power-operatedinstruments.
open structure and is therefore more susceptible tofurther breakdown by chloramines. The porous na-ture of demineralised dentine allows Carisolv® topenetrate. The unaffected collagen is more resistantto degradation, but the framework of degraded col-lagen in the porous mineral is broken down and caneasily be scraped off – sound and carious dentinebecome easily separable clinically: the carious den-tine is easier to dislodge than the sound dentine.

7
Carisolv® instrument tips have sharpedges but a blunt angle. They thusprovide excellent depth control when thedentist scrapes away the cariousdentine that has been softened by theCarisolv® gel.
Instruments with sharper cutting anglesare designed to work themselves downinto dental tissue and make it difficultto control the depth.
Worn out burrs or excavators withrounded cutting angles slide over thesurface and the scraping effect istherefore poor.
Carisolv® instrument tipsWhen the lesion has been accessed and the demineralised dentine softened, special instrument tips are usedto remove the carious tissue layer by layer. Most of the Carisolv® instrument tips have a sharp edge andblunt cutting angles, resulting in a large support area against the underlying surface, coupled with control-led and effective caries removal. No sound tooth substance is sacrificed or damaged unnecessarily. Drillsand excavators are designed to work their way into a material in a non-precise manner due to their aggres-sive cutting angles and smaller support areas.

8
The gel does not affect healthy dentine or soft tissue. Nor does it affect enamel. ConsequentlyCarisolv® should be used in combination with the drill or alternative techniques.
Drilling can be used whenever the cavity needs to be opened up, to adjust the cavity periphery orwhenever there are large amounts of caries and when the risk of affecting healthy tissue is minimal.Carisolv® makes it possible to avoid drilling deep into the cavity. For treatment time see page 17.
Instructions for use – Carisolv® gel
Carisolv® gel1. Mix the two components of Carisolv® (NaOCl
and amino acid solution) thoroughly accordingto the instructions included with the package.Put the required amount of gel into a suitablecontainer.
2. Use a Carisolv® instrument to pick up the gel andapply it to the carious dentine. Soak the cariesgenerously.
3. Wait for at least 30 seconds, for the chemicalprocess to soften the caries.
4. Select a PowerDrive™ tip or a Carisolv® handinstrument to match the size, position andaccessibility of the cavity. Scrape off the superfi-cial softened carious dentine. The hand instru-ment with the multistar tip may facilitate theearly penetration of the gel. Work carefully usingscraping or rotating movements. Remove thesoftened carious dentine with the instrument.Avoid flushing or drying the cavity.
5. Keep the lesion soaked with gel and continuescraping. No 30 seconds of waiting time isneeded. Repeat until the gel no longer turnscloudy and the surface feels hard using theinstrument. Check extra carefully for caries atthe dentinoenamel junction. If you are using adrill to adjust the periphery before filling, thiscan be done while the gel is still in the cavity.
6. When the cavity feels free from caries, removethe gel and wipe the cavity with a moistenedcotton pellet or rinse it with lukewarm water,inspect and check it with a sharp probe. If thecavity is not free from caries, apply new gel andcontinue scraping.
Note: when the cavity is dried with air, thetreated surface looks frosted and not shiny, as itdoes after excavation using a drill.
7. If necessary the periphery of the cavity should beadjusted using hand instruments or the drill.Restore the tooth with a suitable filling materialaccording to the manufacturer’s instructions foruse.
NoteOnce the gel has been mixed, its caries softeningability will begin to decline after about 30 minutes.Any gel that is left over should be destroyed in ac-cordance with local regulations.
For detailed information, refer to the Instructions for Use enclosed ineach package of gel.

9
Carisolv® instruments for caries excavationHand instrumentsHand instruments with permanent or interchange-able tips designed to access different types of lesion.
Instruments with permanent tipsThe instrument tips are paired together in double-ended Carisolv® instruments.
Instruments with interchangeable tipsA single handle can be used with a range of differentinterchangeable Carisolv® instrument tips.
The tips of the instruments have been designed to provide optimal access to different types of lesion.For further information about the instruments, see the separate product sheet.
Specially-designed tips
Flat 0Star 1 Star 3 MultistarStar 3extrabend
Flat 0extrabend
Flat 3 Point
PowerDrive™
PowerDrive™ is a combined electronic instrument forpower-operated, minimally-invasive caries removalwith Carisolv® and for endodontic treatment.
PowerDrive™ for caries removal with Carisolv®
• Selective and precise – removes only cariousdentine
• Fast, simple and efficient removal of caries
• PowerDrive™ operates with high tissue controland at a low sound level
• Patients can operate the control unit themselves.Useful for patients with dental phobia.
Tips for PowerDrive™
The tips to be used for caries excavation withCarisolv® gel work in two directions – clockwise (red)for more aggressive excavation, anti-clockwise(green) for less aggressive excavation. The cuttingangles are more (red) or less (green) aggressive, al-though none of them cuts.
The tips come in three different sizes, correspondingto Star 1, 2 and 3 of the hand instruments. N.B. For a more detailed description of the use of PowerDrive™, please see
Instructions for Use PowerDrive™, or the product sheet for PowerDrive™.

10
Cases – step-by-step treatmentCarisolv® is a suitable approach for all situations in which minimally-invasive dentistry is desired.Some step-by-step treatment instructions for Carisolv® now follow. In all situations, healthy tissueis preserved and the need for anaesthesia and/or drilling is minimised.
Clinical experience also shows that post-operative problems are very uncommon after treatmentwith Carisolv®. This is probably due to the fact that there are no movements of fluid in the dentinaltubules and no large variations in temperature caused by drilling instruments on the dentine.
Root caries
Step-by-step treatment of root carieslesions using Carisolv®
Apply gel with the tipcalled star 3.
Wait 30 seconds.
Remove the softened cariousdentine with flat 3 instrument.Use rapid movements – notforce!
Check with probe.Caries-free.Clean.
Restore as usual.
Add more gel (no needto wait 30 seconds).
Dan Ericson
1. Use PowerDrive™ or star 3/star 2 to apply thegel depending on the size of the lesion.
2. Cover the whole lesion with mixed Carisolv®
gel.
3. Wait 30 seconds – then start to work withPowerDrive™ or rotate/whisk the multistar orstar-shaped tip (unless the lesion is shallow –then use a back-and-forth movement with aflat tip).
4. When using hand instruments, use quick move-ments rather than force.
5. Continuously add more gel – but now you donot have to wait 30 seconds before scraping.
6. When the gel is cloudy, scope/remove it with thePowerDrive™ or appropriate Carisolv® instru-ments depending on the size and accessibility ofthe lesion.
7. Root caries lesions often become caries-freequickly. Check with the probe before rinsing.
8. If caries is still present, add more gel after re-moving excess debris.
9. When the probe does not give a tug-back feel-ing, thoroughly clean the area with a cottonpellet soaked in warm water.
10. If necessary, use hand instruments or a drill toadjust the enamel margins.
11. Etch, apply priming/bonding systems and restoreaccording to the manufacturer’s recommendations.
If the patient has multiple root caries lesions, youwill be more efficient if you work with several ca-vities at the same time. Apply the gel to two or morelesions and proceed according to the instructionsabove.
N.B. The images illustrate the red Carisolv® gel. The follow-upis uncoloured, but the clinical procedure is the same.
11
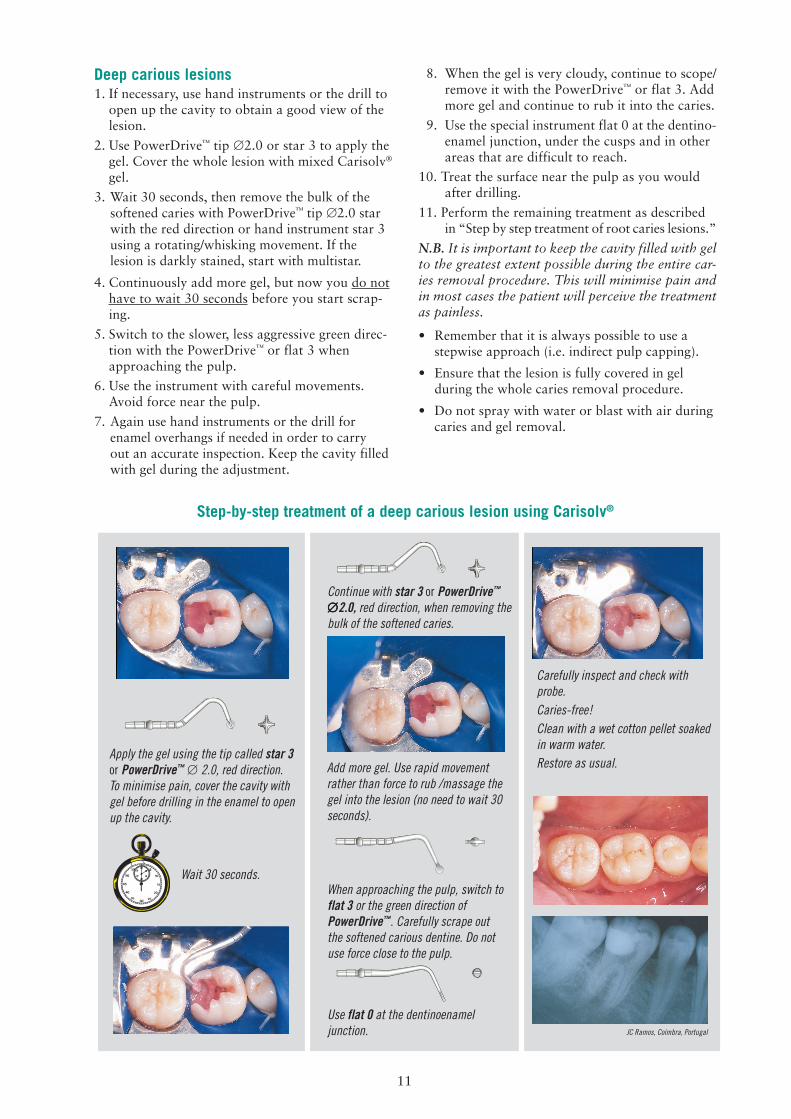
Deep carious lesions1. If necessary, use hand instruments or the drill to
open up the cavity to obtain a good view of thelesion.
2. Use PowerDrive™ tip ∅2.0 or star 3 to apply thegel. Cover the whole lesion with mixed Carisolv®
gel.
3. Wait 30 seconds, then remove the bulk of thesoftened caries with PowerDrive™ tip ∅2.0 starwith the red direction or hand instrument star 3using a rotating/whisking movement. If thelesion is darkly stained, start with multistar.
4. Continuously add more gel, but now you do nothave to wait 30 seconds before you start scrap-ing.
5. Switch to the slower, less aggressive green direc-tion with the PowerDrive™ or flat 3 whenapproaching the pulp.
6. Use the instrument with careful movements.Avoid force near the pulp.
7. Again use hand instruments or the drill forenamel overhangs if needed in order to carryout an accurate inspection. Keep the cavity filledwith gel during the adjustment.
Step-by-step treatment of a deep carious lesion using Carisolv®
Apply the gel using the tip called star 3or PowerDrive™ ∅ 2.0, red direction.To minimise pain, cover the cavity withgel before drilling in the enamel to openup the cavity.
Wait 30 seconds.
Continue with star 3 or PowerDrive™
∅∅∅∅∅2.0, red direction, when removing thebulk of the softened caries.
Add more gel. Use rapid movementrather than force to rub /massage thegel into the lesion (no need to wait 30seconds).
8. When the gel is very cloudy, continue to scope/remove it with the PowerDrive™ or flat 3. Addmore gel and continue to rub it into the caries.
9. Use the special instrument flat 0 at the dentino-enamel junction, under the cusps and in otherareas that are difficult to reach.
10. Treat the surface near the pulp as you wouldafter drilling.
11. Perform the remaining treatment as describedin “Step by step treatment of root caries lesions.”
N.B. It is important to keep the cavity filled with gelto the greatest extent possible during the entire car-ies removal procedure. This will minimise pain andin most cases the patient will perceive the treatmentas painless.
• Remember that it is always possible to use astepwise approach (i.e. indirect pulp capping).
• Ensure that the lesion is fully covered in gelduring the whole caries removal procedure.
• Do not spray with water or blast with air duringcaries and gel removal.
When approaching the pulp, switch toflat 3 or the green direction ofPowerDrive™. Carefully scrape outthe softened carious dentine. Do notuse force close to the pulp.
Use flat 0 at the dentinoenameljunction.
Carefully inspect and check withprobe.Caries-free!Clean with a wet cotton pellet soakedin warm water.Restore as usual.
JC Ramos, Coimbra, Portugal

12
Treating childrenMaria is eight years old and her experience of dentalcare has so far been limited to regular check-ups andpreventive dentistry. She has now developed a deepcarious lesion on a deciduous molar, which has to berestored.
Maria is accompanied by her father who is rathernervous. His earlier experiences of drilling and localanaesthesia have not been positive. The child senseshis anxiety and also becomes nervous and tense.
They are both relieved when the dentist explains howCarisolv® may enable Maria to be treated withoutlocal anaesthesia or drilling.
In this case, it is important not to rush. Be sure togive the gel 30 seconds to react. Keep the patientwell informed during the treatment. If the patientexperiences any pain, check that the cavity is com-pletely covered with gel and consider the potentialbenefit of local anaesthesia. It is very important notto work with too much force – use speed and notpressure in your movement of the Carisolv® instru-ments. Rub/massage the gel into the carious lesion.
For complete instructions, see “Deep carious lesions”
Caries in a deciduous tooth – the treatmentstep by step
Sverker Toreskog
Caries at crown marginsOne of my patients, whom I have been looking afterfor decades, came to me for his regular yearly check-up. When examining him I found caries just underthe margin of a newly-made three-unit bridge. Hetold me that he had had some private problems andhad taken anti-depressive medication during the lastyear. He had noticed that he had less saliva duringthis period, but it had not bothered him too much.
I did not like the idea of drilling in this area since Ihad prepared the tooth; of course, I was also wor-ried about the reconstruction. I tried to solve it inthe most atraumatic way I could think of. By onlyplacing a few drops of Carisolv® and using the smallstar-shaped instrument I was able carefully to scrapeaway the softened carious dentine without harmingthe bridge or taking away too much healthy toothsubstance.
When the composite filling was in place, you couldhardly see that there had been a problem. He wasdelighted with the treatment that had not caused anypain to him or to his wallet. I will naturally monitorhim carefully in the future.
For details in treatment performance, see “Root car-ies”.

13
Your first cases• Select fully-visible, easily-accessible lesions, such as buccal root caries or an
occlusal/approximal cavity with an opening that measures 1-2 mm or openup with the drill.
• Take your time!
The gel needs to remain in the cavity for at least 30 seconds before scrapingwith the Carisolv® instrument. Use PowerDrive™ star ∅2.0 or the multistarto help the gel penetrate and to remove the bulk of the caries in large cavi-ties. New gel is then continuously applied and the treatment can proceedwithout any further delay or pauses.
• Be observant and check the dentinoenamel junction as described in thestep-by-step instructions. If necessary, take away enamel overhangs tosimplify cavity inspection.
• Remember that a learning curve is associated with the effective use of theCarisolv® procedure, just as it is with any other new approach. It will takesome practice (about 15–20 cases) before you completely understand howand when to combine the treatment with the drill/laser/air abrasion andrecognise the look of the caries-free surface after Carisolv® excavation.
During your first cases you should avoid:• Caries which is difficult to access
• Leathery and darkly-stained caries
• Patients with dental fear or young children
“Practise” on more tolerant patients until you become familiar with andconfident about the method.
Evaluating a caries-free surfaceThe most common criteria for determining that acavity is free from caries are the colour and surfacetexture of the dentine and the fact that a sharp probedoes not give a tug-back feeling.10 This also appliesto Carisolv® and it is time to check with the probewhen no more dentine can be removed (the gel re-mains clear, does not become cloudy) and a scrapingsound from the instruments indicates a hard surface.
Note that, when Carisolv® has been used, the remain-ing surface is rougher than a drilled cavity since thehealthy tissue remains intact.
N.B. Various types of caries indicator dye tend tostain even sound dentine to some extent,11 especiallywhen the surface is porous, i.e. close to the pulp.This in turn may lead to over-excavation.

14
Caries removal with a drill and with Carisolv® results indifferent dentinal surfaces
Drill Carisolv®
Carious lesion prepared with adrill, seen at a magnification of×75. The surface is smooth.Some sound dentine has beenremoved.
Carious lesion after Carisolv®
treatment, seen at amagnification of ×75. Thesurface is uneven. Only carioustissue has been removed.
A detail (×1500) of themechanically-prepared surface.The surface is smooth andcovered with a smear layer.
Carious lesion prepared withCarisolv®. The cavity is uneven andfollows the spread of the lesion. Thedentine has a different structure andno sound dentine has been removed.
Carious lesion prepared with a drill. Thecavity is fairly symmetrical and followsthe contours made by the drill as itremoves tissue. The structure of thedentine shows that even sound tissuehas been removed and furthermore thepulp has been exposed.
A detail (×1500) of the surfacetreated with Carisolv®. The un-even topography increases thearea available for retention of therestorative material.
It takes time to become familiar with the fact that,after Carisolv® treatment, the dentinal surface is dif-ferent from a mechanically-prepared surface, whichis usually flat, shiny and smooth. After Carisolv®
treatment, the surface is dull and has a frosty ap-pearance when dried. The surface is uneven becausethe depth of action of the gel is restricted to the car-ies in the lesion.
In scanning electron micrographs, the surface topo-graphy is assumed to follow the pattern of caries inthe lesion and resembles an alpine landscape. There
is no obvious smear layer and the surface appearsclean.12, 13 The surface excavated with a regular drillhas a compact smear layer.
It is important to note that, when the dentine hasbeen conditioned with phosphoric acid or polyacrylicacid before the insertion of a restorative material, theouter layer of the surface treated by chemo-mechani-cal caries removal and the smear layer on the me-chanically-prepared surface have been removed,14 sothat the appearance of the two surfaces are the sameafter etching.

15
Scientific publications relating to Carisolv®
Clinical studies confirm caries-freeBerakdar, Burke, Chaussain, Ericson, Fure,Haffner, Kavvadia, Kobaslija, Masouras,Munshi, Nadanovsky, Songpaisan
Caries-free confirmed in vitroBanerjee, Braun, Dammaschke,Ericson, Haffner, Hahn, Markovic,Moran, Splieth
1-year resultsFure, Nevrin, Zimmerman
Good dentine bondingFrankenberger, Erhardt, Haak,Harada, Pawlowska, Russo,Suda
No negative effects on softtissue (mucosa)Arvidsson, Wennerberg
Selective softening confirmed in vitroGaller, Igarashi, Tonami Rough surface topography
Wennerberg
No effect on healthy enamel ordentineGaller, Wennerberg
No adverse pulp effectsDammaschke, Lumbau, Young
Effect on bacteriaBaysan, Kneist, Lager
A large number of studies of various research projects including Carisolv® have been presented.Links to abstracts of scientific publications available on the Internet can be found in the “Book ofAbstracts”at www.mediteam.com. A complete listing of all presented research can be found onMediTeam’s website under “List of References”.
Clinical studies confirm caries freeTo date, several studies have been conducted show-ing that the treatment of dentine caries with Carisolv®
leaves a caries-free surface. Both the chemical andthe mechanical part of the treatment are importantwhen it comes to achieving this. However, it is im-portant to have good access to the dentine caries andto check all surfaces, especially the dentinoenameljunction for complete caries removal, before restor-ing the cavity.
High patient acceptanceThe clinical studies also include answers to questionsrelating to patient acceptance of the Carisolv® treat-ment. The results show that most patients have ahigh acceptance of the method, i.e. are more com-fortable, feel less pain and are more relaxed duringtreatment, compared with other treatments, such asdrilling and ART.
In vitro evaluation of caries-freeSeveral in-vitro/pre-clinical studies have shown thatCarisolv® removes dentine caries effectively.
No effect on healthy dentine or enamelStudies confirm that Carisolv® gel only softens cari-ous dentine. Carisolv® gel does not affect the enamel,or healthy dentine.
Surface topographyThe surface topography of the healthy dentine re-maining after complete caries removal with Carisolv®
is rougher than that after conventional caries removalwith the burr. No typical smear layer is left on thesurface. The surface remaining after caries removalwith Carisolv® may contain thin patches of smear,but they are much less prominent than after drilling.
Good dentine bondingSeveral studies have shown that modern dental fill-ing materials bond just as well, or better, to the sur-face left after treatment with Carisolv® as those leftby the conventional method of drilling.
No adverse pulp effectThe application of Carisolv® to deep cavities and di-rectly to pulp tissue does not elicit adverse effects ifcontact times are short. No adverse effects are re-ported from clinical studies.
No negative effects on soft tissue (mucosa)An experimental, clinical study shows that Carisolv®
gel does not affect the oral mucosa. To date, numer-ous patients have been treated with Carisolv™, withand without the use of a rubber dam, and no nega-tive reactions have been reported.

16
Is Carisolv® a minimally-invasive method?Yes, according to Banerjee et al.,8 Carisolv® is a se-lective method that only removes carious dentine.
How do I know when it is caries-free?The traditional probe is still the most commonly usedapproach, and as usual it should not tug-back to theremaining dentine. The tactile sensation and the re-moval of debris during the procedure will also indi-cate when you are approaching a hard, caries-freesurface. Always probe the surface before removingthe Carisolv® gel and then check again after the gelhas been removed.
Why is there less pain?• Healthy dentine is not removed by the instru-
ments.
• There are no vibrations from drilling.
• There are no large temperature variations.
• The dentine is covered with isotonic gel of bodytemperature.
• The high pH value.
• Psychology; the method is quiet and pleasant.
• In many cases, the dentine between the cariouslesion and the pulp, is sclerotic.
A slight anaesthetic effect from the gel has also beenobserved (Braun et al.).
How is pain minimised during treatment?Patient perception is influenced by factors such asthe force applied to the instruments and flushing withcold water. It is important that the carious lesion isthoroughly covered with gel during the entire proce-dure. Do not work with a half-filled/half-dry cavity.Use the PowerDrive™ and Carisolv® hand instrumentswith speed and light pressure rather than excessiveforce. Initially, probe for a caries-free lesion by go-
Effect on bacteriaBacteria in dentine after caries removal has been anissue that has been discussed over the years. It is per-fectly clear that conventional methods using rose-burrs for caries removal do not leave the dentine ster-ile, but bacteria can be found in small numbers. Car-ies removal using Carisolv® does not dramaticallydiffer in this respect. A few studies have demonstrateda slight antibacterial effect by Carisolv® and dentinecaries removal using the Carisolv® system appears toproduce somewhat fewer bacteria in the cavity floor.
Carisolv® in combination with laserCarisolv® can be used in combination with other car-ies excavation methods. Yamada et al. found thatcombined treatment with lasers produced good re-sults.
Questions & Answersing through the gel. If the probe does not give a tug-back feeling, clean out with a Carisolv® instrumenttip and then use a wet cotton pellet. Avoid sprayingwith water or blasting with air. Another importantfactor is that the patient is well informed.
Why should I use the special Carisolv®
instruments?During the development of the gel, the need for spe-cial non-cutting, tissue-preserving instruments be-came clear. They are needed effectively to rub the gelinto the carious lesion and to avoid cutting healthydentine.
Some of the instrument tips, such as multistar, alsoincrease the speed of dentinal caries removal. Thedifferent working parts have different modes of ac-tion and, when combined, they make it possible totreat all types of caries. A regular excavator (see il-lustration, page 7) works in a cutting mode and digsinto the healthy dentine, which can give the patientpain sensations.
Must I use a special bonding system?No. For a summary of tested bond strength, pleaserefer to page 15. Our recommendation is to makesure that you have completely cleaned the cavity fromgel and then to follow the manufacturer’s instruc-tions regarding the etching and bonding procedure.
Can I combine air abrasion, drills or laserswith Carisolv®?Yes, use air abrasion, drills or laser to obtain accessto the carious lesion and maybe remove the bulk ofthe caries. Then continue with Carisolv® accordingto the instructions (see step-by-step procedures). Al-ways remove the deepest part of the caries withCarisolv®.
Carisolv® gel uncolouredThe chemical composition of the amino acids andthe sodium hypochlorite components respectively hasbeen further optimised to produce a more effectivegel compared with the original red gel. Carisolv® geluncoloured has been shown to reduce the time forcaries excavation significantly. Treatment times arecomparable to those found for drill excavation inother studies.
17
Should I apply rubber dam before usingCarisolv®?It depends on the clinical situation and the kind ofrestorative material you plan to use. However, a rub-ber dam is recommended when the patient has a drymouth.
Can I use Carisolv® in connection withprosthetic work?Carisolv® is ideal for removing caries at crown mar-gins as it minimises the risk of fracturing the crown/bridge. Carisolv® can also be used to “clean” thedentine after using a temporary crown.
How long will it take to remove caries withCarisolv®?As with any treatment, this naturally depends on thetype of patient and lesion you are treating. In theearly studies of Carisolv®, the mean treatment timewas ten minutes for coronal caries and six minutesfor root surface lesions. The mean time for drillingwas four to five minutes in these cases. A more re-cent study showed that dentists who use Carisolv®
frequently have a mean treatment time of six min-utes with the uncoloured gel (2/3 coronal caries, morethan 80% medium to deep caries).
Summary of chemo-mechanical characteristics• Only demineralised dentine containing denatured collagen is affected. The three
amino acids react with the NaOCl to form chloramines. This modifies the chlorinereactivity, i.e. neutralises its aggressive behaviour on healthy tissue.
• The gel is applied at room temperature, which reduces the risk of pain sometimesassociated with the cool liquids that are used with other caries removal proce-dures.
• The gel consistency simplifies control of the application and reduces the risk ofspillage.
• The mechanical removal of the softened caries is performed with the power-operated PowerDrive™ or special hand instruments. The hand instruments areavailable with permanent or interchangeable tips that have different sizes andshapes. The unique designs of both PowerDrive™ and Carisolv® hand instrumenttips enable effective caries removal and access in hard-to-reach areas. The non-cutting characteristics of the instruments assure ultimate tissue preservation.
Are there any disadvantages to Carisolv®?If preconceived expectations of Carisolv® are unre-alistic, professionals and patients will be disap-pointed. It is important to remember that moderndrills are high-precision tools that are excellent inmany situations, when cutting enamel/dentine toobtain access to the carious lesion or during prepa-ration for inlays or crowns, for example.
What are the greatest advantages withCarisolv®?The components of Carisolv® gel only affect cariousdentine, so that it can be easily and completely re-moved, leaving the sound tissue intact.
Carisolv® reduces and in some cases eliminates theneed for local anaesthesia.
Whether used alone or in combination with drills,Carisolv® is always a gentle, safe, precise and non-traumatic alternative that enhances tissue preserva-tion and increases patient comfort – a minimally-invasive method for caries removal.

18
List of referencesThe following articles have been referred to in the text.
1. Mjör IA. The morphology of dentin and dentinogenesis. In Linde A (ed): Dentin anddentinogenesis. Boca Raton. CRC Press Inc, 1984;4:351-353.
2. Kato S, Fusayama T. Recalfication of artificially decalcified dentine in vivo.J Dent res 1970;49:1060-1067.
3. Miyauchi H, Iwaku M, Fusayama T.Physiological recalcification of carious dentin.Bull Tokyo Med Dent Univ 1978;25:169-179.
4. Thylstrup A, Fejerskov O. Clinical and pathological features of dental caries. In:Thylstrup A, Fejerskov O (eds): Textbook of clinical cariology, 1994 (2nd ed),Munksgaard, Copenhagen.
5. Shimizu C, Yamashita T, Ichijo T, Fusayama T. Carious change of dentine observed onlongspan ultrathin sections. J Dent Res 1981;60:1826-1831.
6. Kuboki Y, Ohgushi K, Fusayama T. Collagen biochemistry of the two layers of cariousdentin. J Dent Res 1977;56:1233-1237.
7. Atraumatic restorative treatment approach to control dental caries manual, WHOcollaborating centre for oral health services research. Groningen 1997.
8. Banerjee A, Watson T F, Kidd E A M. Dentine caries excavation: a review of currentclinical techniques. Br Dent J 2000;188(9): 476-482.
9. Strid L, Hedward C. 1989. Patent SE870483.
10. Kidd EA, Joyston-Bechal S, Beighton D. The use of a carious detector dye during cavitypreparation: a microbiological assessment. Br Dent J 1993;174(7):245-248.
11. Yip HK, Stevenson AG, Beeley JA. The specificity of caries detector dyes in cavitypreparation. Br Dent J 1994;176(11):417-421.
12. Wennerberg A, Sawase T, Kultje C. The influence of Carisolv™ on enamel and dentinsurface topography. Eur J Oral Sci 1999;107(4):297-306.
13. Banerjee A, Kidd EAM, Watson TF. Scanning electron microscopic observations ofhuman dentine after mechanical caries excavation. J Dent 2000; 28(3):179-186.
14. Burke FM, Lynch E. Glasspolyalkenote bond strength to dentine after chemo-mechanicalcaries removal. J Dent 1994;22:283-291.
If you want to read more about Carisolv®, please look for:
Tissue Preservation in Caries Treatment – abook from Quintessence Publishing.The book “Tissue Preservation in Caries Treatment”,edited by T Albrektsson, D Bratthall, P-O Glantz andJ Lindhe, is an international book with contributionsfrom more than 30 authors from Europe, Asia, Northand South America and Australia. The theme is tis-sue preservation with special emphasis on treatingcarious lesions. This new book has something for“everyone”– undergraduate and graduate students,general practitioners and specialised dentists.

19
MediTeam Dental AB is a Swedish research-oriented dental company that markets new methods worldwidebased on odontological research.
For more information, please visit www.mediteam.com
The Carisolv® system is patented. PowerDrive™ and Carisolv® are trademarks owned by MediTeam Dental AB.
©MediTeam Dental AB, 2002

MediTeam Dental AB (publ), Göteborgsvägen 74, SE-433 63 Sävedalen, Sweden.Phone +46 31 336 91 00. Fax +46 31 336 82 10
www.mediteam.com
50008 GB-0 02.08