carpet installation basics overview - bentley … · page 1 of 20 carpet installation basics...
TRANSCRIPT

PAGE 1 of 20
CARPET INSTALLATION BASICS OVERVIEW
Bentley Mills Inc. 201608
Table of Contents
About 2
General Requirements 3
Moisture & pH Standards 4
Seaming Guide 5
Direct-glue Installation 6
Pattern Registration 10
Understanding Pattern Measurements 11
The Importance of Climatizing Graphic Carpets 14
Carpet Tile (18x36”, 24x24”, 36x36”) 17

PAGE 2 of 20
CARPET INSTALLATION BASICS OVERVIEW
Bentley Mills Inc. 201608
About this Guide This guide is intended to give practical instruction for qualified installation contractors and mechanics on proven techniques, methods, and support products for the installation of a range of textile floor covering products manufactured by Bentley Mills. The purpose of this guide is to help prevent problems, maximize performance, and to complete a floor covering design strategy for carpet installation. Taking shortcuts or ignoring any portion of these instructions can have serious consequences that may not always be immediately obvious. For instance, concrete moisture can slowly eat away at adhesive for months or years before causing adhesive breakdown and installation failure. On many broadloom products, an installer’s decision to shortchange an installation by leaving off the seam sealer may not become obvious until the backing begins to separate or yarn begins to fall out along seams or transitions. Constant research and development into backing systems and product design aesthetics for our customers, has led to an evolving menu of product choices for commercial flooring application. The variety ranges from standard broadloom, to structured backings of polyurethane, available in moisture resistant constructions with or without cushion. Until now, most of these products have been derived in some fashion from petroleum-based synthetics. That too, is changing. Bentley Mills’ commitment to environmental sustainability is leading to development of products that will help stem depletion or further contamination of earth’s limited resources. As a result, many historical assumptions about carpet installation are no longer valid. This guide will help avoid assumptions that can lead to problems or affect long-term performance.

PAGE 3 of 20
CARPET INSTALLATION BASICS OVERVIEW
Bentley Mills Inc. 201608
General Requirements Bentley Mills has adopted the Carpet and Rug Institute’s “Standard for Installation of Commercial Carpet,” (CRI 104) (www.carpet-rug.org) as the basic minimum supplement to more specific installation requirements to accommodate special backings or carpet constructions. Bentley Mills reserves the right to exceed the CRI Standard where more specific installation instructions are needed. Technical experts are available in every major region to help assure proper installation. A variety of technical bulletins, roll inserts, and advisory documents are also available to supplement the information found in the most recent edition of CRI 104. Qualified Mechanics Only Bentley Mills is dedicated to producing the finest quality carpet and backing systems available for commercial application. These carpets must be installed by experienced, qualified mechanics using the proper tools and techniques. Unfortunately, this does not always happen and problems usually result. Bentley Mills will not be responsible for problems resulting from an installer’s failure to follow the specifics of these instructions or for carpet that has been installed incorrectly. Bentley Mills supports the International Standards & Training Alliance (INSTALL), Floor Covering Installation Contractors Association (FCICA), and the International Certified Floorcovering Installers Association (CFI). These groups are supporting the industry by training installers and making them aware of the right tools and techniques required to properly install carpet. The Bentley Mills Field Services team can provide on-site consultation, special training, or instruction when needed. If any questions arise regarding this information, please contact Bentley Mills Customer Care. Copies of all technical advisories relating to installation, maintenance, and other technical issues are also available from the Customer Care Department at 800.423.4709. Important Advice: These installation procedures are recommendations designed for the experienced and competent installer, such as those trained and certified. Strict adherence to these procedures will result in a quality installation under most conditions. Any situation that could alter the installation procedure or jeopardize the possibility of a satisfactory installation, such as identification of defective material or unusual installation conditions, creates a responsibility for the installer to STOP the installation immediately and call Bentley Mills Customer Care. Bentley Mills will not be responsible for substandard installation or for an installer’s decision to proceed with an installation that is not resulting in a satisfactory or acceptable finished project.

PAGE 4 of 20
CARPET INSTALLATION BASICS OVERVIEW
Bentley Mills Inc. 201608
Moisture and pH Standards CRI 104 establishes effective guidelines for determining the chemical pH and acceptable moisture vapor emission levels for concrete slabs. Water vapor is constantly moving through concrete. The rate of that movement, vapor emission, is determined by a combination of factors such as concrete porosity or the ratio of temperatures above and below the concrete subfloor. Woven carpet backings allow more moisture to pass through without obstruction. Structured or moisture resistant backings allow less vapor to pass through into the air above. A buildup of condensation, on woven broadloom backings or on structured backings can lead to product damage or adhesive breakdown. An installation contractor can only determine whether the floor covering selection is appropriate for use on concrete subfloor by measuring the vapor emission rate in a climatized environment with temperatures and humidity levels similar to those expected when the building is occupied. These tests are especially critical for moisture barrier products such as carpet tile or moisture resistant carpets. Test Conditions Accurate testing of concrete floors requires the building to be fully enclosed with the air conditioning and heating system functioning to a level similar to that expected when the space is occupied. Calcium Chloride The test must be administered in strict adherence to the specifications of the ASTM F1869 test procedure. Moisture emissions must be eight (8) pounds or less per 1,000 square feet for 24 hours. If the test results are higher than eight pounds, do not proceed with the installation until subsequent testing demonstrates the emission rate is eight pounds or less. Once testing has confirmed the slab to be within eight pounds of moisture as determined by the proper application of the calcium chloride test, the chemical pH of the slab must also be determined. Relative Humidity testing will take precedence over Calcium Chloride testing when both tests are performed on the same project. Relative Humidity The test must be administered in strict adherence to the specifications of ASTM F2170 and as described here. Moisture levels in the concrete subfloor must be 90-percent or less before proceeding. Once levels have been determined to be 90-percent or less, then the chemical pH of the concrete subfloor should also be tested. In the event of a discrepancy between Calcium Chloride Test results and the results from Relative Humidity testing, the decision on whether to remediate or correct excessive vapor emission should be based on results from Relative Humidity testing. Relative Humidity testing will take precedence over Calcium Chloride testing when both tests are performed on the same project. Chemical pH All concrete floors, old or new, should be tested for alkalinity by using an approved alkalinity test kit, a pH Test Probe or pH Test Meter which meets ASTM F710 Standard for testing Alkalinity. The slab should have an alkalinity level ranging from 7.0 to 9.0 to be suitable for installation. Chemical pH test strips should be capable of measuring a range of 0-14. The area to be tested must be enclosed and acclimated as described. • Clean floor by lightly grinding, sanding, or bead blasting into the substrate, making sure to
break the surface removing any dirt, Monokote, concrete sealer or old adhesive residue

PAGE 5 of 20
CARPET INSTALLATION BASICS OVERVIEW
Bentley Mills Inc. 201608
(not to exceed 1/8”) • Apply a small amount of testing fluid (distilled water) approximately 1½ inches diameter to
the area prepared for testing and let stand for 30 seconds • Take a pH strip and touch to the area where the testing fluid was applied; Maintain contact
with the water for one full second, remove the strip and hold in a level position for 15 seconds
• After 15 seconds compare the test strip to the color chart to determine the pH level If the pH is over nine (9) contact Bentley Mills Customer Care at 800.423.4709. Site testing should consist of two (2) pH tests for every 1000 square feet of floor area. A reading greater than nine pH can cause adhesive failure and should be neutralized by using one roller application of W. F. Taylor 2025 primer. Seaming Guide Bentley Mills uses a variety of leading edge tufting technologies to create unique patterned and highly styled carpets. These broadloom products all have tufted rows that will allow for proper row cutting to create side seams. Broadloom carpets with stretchable backing systems, such as standard High Performance backing, Optimum Barrier ll, and many styles with Prestige Plus attached cushion should be cut from the face by following the space between tuft rows, also known as row cutting, on both sides to make proper side seams. Although seams will never be totally invisible, row cutting is necessary to decrease seam visibility. Patterns cannot be matched properly without row cutting both side seams. Advances in cushion technology now enable stretching to overcome edge variation and for stretching patterns into place on many carpet products made by Bentley Mills. Row cutting is essential to achieving the best possible seaming on stretchable carpets. When row cutting, lay all pieces flat and allow them to acclimate. This will help relax any stiffness in the latex backing. Latex binds the primary and secondary backings together as well as holding shifted yarns in place. Use a broad, flat-blade screwdriver, awl, or row finder to open the rows. Cut from the face using a loop-pile or cushion-back top cutter. On patterned carpet, trim on the pattern line to match the pattern seam. Always cut patterns on the pattern so that a full pattern is visible when two drops are seamed together. Seal all seam edges and transitions to other flooring surfaces before proceeding. Seam Sealer Bentley Mills’ broadloom carpets require an appropriate seam sealer for all seams and transitions whether the installation method involves direct glue, double glue or stretch-in methods. This requirement for seam sealer is also noted in CRI 104. No exceptions. On all Glue Downs A bead of Non solvent-based seam sealer such as Bentley Mills’ Healthbond 3000 must be applied to the carpet edges to be seamed. The bead should be large enough to cover the primary backing, yarn bundles and secondary backing, but never contact the face fiber. Also see CRI 104 section 12.2.2 for seam sealing.

PAGE 6 of 20
CARPET INSTALLATION BASICS OVERVIEW
Bentley Mills Inc. 201608
All Hot Melt Seams and Transitions A good quality latex or acrylic seam adhesive should be applied to both edges prior to beginning the hot melt or hand sewing process. This process is known as “buttering” the seams. See also CRI 104. The latex seam sealer should be applied to cover the primary backing and secondary backings at the base of the yarn bundles on both sides of the seam, but never contact the face fiber. Because the seam sealer is not compatible with the thermoplastic adhesive on the face of the seaming tape, the sealer must be dry before making the seam. Seam sealers can effectively prevent seam delamination and edge ravel and must be used for Bentley Mills’ product warranties to remain in effect. For more information, call Bentley Mills Customer Care at 800.423.4709. Important advice: These installation procedures are recommendations designed for the experienced and competent installer such as those trained and certified. Strict adherence to these procedures will result in a quality installation under most conditions. Any situation that could alter the installation procedure or jeopardize the possibility of a satisfactory installation, such as identification of defective material or unusual installation conditions, creates a responsibility for the installer to STOP the installation immediately and call Bentley Mills Customer Care at 800.423.4709. Bentley Mills will not be responsible for substandard installation or for an installer’s decision to proceed with an installation that is not resulting in a satisfactory or acceptable finished project. Direct Glue Installation The direct glue installation method can be used for all Bentley Mills’ broadloom and attached cushion products. In addition to the specific requirements outlined here for the proper installation of Bentley Mills’ carpet, the basics in the most recent version of CRI 104 must be followed for product-related warranties to remain in effect. Additional instructions are available for specific styles of carpet. Please call Bentley Mills Customer Care for more information. Site Conditions Carpet, adhesives, and padding when used should be conditioned on site at a temperature of no less than 65 degrees Fahrenheit and humidity of no more than 65 percent. Conditions should be maintained 24-48 hours before, during and after installation. New concrete must be cured between 90-to-120 days. Slab must also be checked for moisture and alkalinity. Concrete floors, even with adequate cure time, can demonstrate an unacceptable moisture condition by allowing excessive amounts of moisture to pass through. This is known as the moisture emission rate, and can be a problem even on suspended concrete floors. Please refer to Moisture and pH requirements on pages 4 and 5. Concrete Subfloor All new concrete shall be fully cured, clean and dry. Old concrete must be clean, dry, level and free of paint, dirt, old adhesive, oils, or other contaminates. All concrete floors must comply with moisture and alkalinity requirements prior to proceeding with installation. The concrete shall be free of curing or parting agents that interfere with the bonding of the adhesive. Whenever a powdery surface is encountered, such as lightweight concrete, a sealer compatible with the adhesive, such as WF Taylor 2025 must be used to provide a suitable surface for direct glue installation. Bond tests are required prior to proceeding with the installation.

PAGE 7 of 20
CARPET INSTALLATION BASICS OVERVIEW
Bentley Mills Inc. 201608
Level the floor to the standards outlined in the American Concrete Institute specifications for Concrete Building ACI 301 in regards to trowel finish and finishing tolerance. Leveling compounds must be Portland-based cement. Patch cracks and holes with one of the following approved patching compounds: Ardex Feather Finish, Ardex K-15, Henry's 547, Mapei Plani Patch, or similar cement based compound. Do not exceed manufacturer's recommendation for patch thickness. Gypsum based compounds are not recommended, please reference ASTM F710 Standard Practice for Preparing Concrete Floors to Receive Resilient Flooring. Note: Incompatible adhesives, solvent based materials and other contaminates should be removed, or encapsulated with such product as WF Taylor Encap 500 prior to installation of carpet. Contact Bentley Mills for further information on specific contaminates at 800.423.4709. Once the carpet has been checked and all the necessary site preparations have been completed, layout according to the seaming diagram and proceed with careful attention to dye lot placement and roll sequencing. If patterned products are involved, be sure to refer to Pattern Sequencing on page 9 and 10 which calls for “Pattern Sequencing” when laying out all the carpet before spreading any adhesive to avoid any pitfalls that could arise from standard pattern size variation. Layout Follow industry accepted methods for a glue down installation as outlined in most recent edition of CRI 104. Based on the floor plan and seaming diagram, start near the center of the room and snap a chalk line between opposite walls. This will be the first seam. Ideally, all the carpet should be laid out, squared with the dominant walls, rough cut to fit and side seams trimmed before any glue is spread. Dry laying is especially critical on all patterned products to allow for product acclimation. Patterned products must be “Pattern Sequenced” according size variation to allow for any pattern size variation. Variation occurs to some extent in all patterned carpets. To help facilitate this sequencing, Bentley Mills provides pattern sequencing measurements with most patterned products. Pattern sizes are also included on roll tags. If these measurements are unavailable for any reason, the installer should count the number of patterns in a 10 ft length on each roll and then arrange the rolls to facilitate a pattern match. Dry Lay Before spreading any glue, make sure the rolls are sequenced according to pattern size. Sequence the patterns by starting with the largest patterns and moving to rolls with decreasing pattern size. This makes dry laying carpet essential for patterned products. Dry laying is also important because it allows products the chance to acclimate to changes in relative humidity. Be certain pile is laying all in one direction. Pile orientation should face the room’s entryway or follow primary traffic direction. Allow 1-1/2-inches at the walls for trimming. Adhesives Bentley Mills recommends using the appropriate Healthbond, premium multipurpose adhesive for broadloom products. Please note that some warranties may require Bentley Mills’ adhesives and installation products. Bentley Mills will not be responsible for installation failures that result from the use of other adhesives.

PAGE 8 of 20
CARPET INSTALLATION BASICS OVERVIEW
Bentley Mills Inc. 201608
Important Advice: These installation procedures are recommendations designed for the experienced and competent installer such as those trained and certified. Strict adherence to these procedures will result in a quality installation under most conditions. Any situation that could alter the installation procedure or jeopardize the possibility of a satisfactory installation, such as identification of defective material or unusual installation conditions, creates a responsibility for the installer to STOP the installation immediately and call Bentley Mills Customer Care at 800.423.4709. Bentley Mills will not be responsible for substandard installation or for an installer’s decision to proceed with an installation that is not resulting in a satisfactory or acceptable finished project. Stretch-in Installation Issues Recent developments allow most patterned carpets to be manufactured with an attached cushion. An attached cushion offers comfort under foot as well as the added security of a direct glue installation. This technological advancement enables comfort under foot without the problems so often inherent in a stretch-in installation. Yet, in spite of the long term potential for installation-related issues, many of the broadloom carpets manufactured by Bentley Mills are still installed by the stretch-in method. All Bentley Mills’ broadloom carpet being installed in a stretch-in application must be power stretched one to one percent (1%) in both the length and width of the carpet as outlined in CRI 104, this amounts to about an inch and a half for every 12 feet of carpet length and width. Avoid simply stretching until the carpet "feels tight." Instead, calculate the amount of stretch needed to get the one to one-and-a-half percent in both the length and width. That amounts to about an inch-and-a-half stretch for every 10-feet of carpet length and width. Knee Kickers Aren't Enough Knee kickers are designed for positioning carpet and are not adequate for properly stretching carpet. A knee kicker can be helpful in nudging the carpet during power stretching to prevent concentrating the stretch only around the stretcher head. To further prevent concentrating the stretch in only part of the carpet, the total stretch should be broken down into several "bites" that are held in place with stay nails until the next stretch or bite with the stretcher has been completed. For example, a room that is 40x40 feet should yield six inches of excess carpet stretched beyond the tackless strips in both the length and width. Choosing the Right Tools Two types of power stretchers are available for stretching carpet. The Junior Power Stretcher is acceptable for rooms in which the dimensions are less than 30 feet in length and width. In rooms that have dimensions of greater size, a Senior Power Stretcher must be used. The Senior Stretcher allows for more stretch because of its superior strength. In addition, power-stretcher tail pins are not to be used in lieu of power stretcher poles. Power stretcher tails, often referred to as stinger pins, may damage the face yarns, the primary and secondary backings, the cushion and possibly even the floor. Secure Double tackless strip or architectural tackless strip should be used throughout the installation to insure an adequate grip.
PAGE 9 of 20
CARPET INSTALLATION BASICS OVERVIEW
Bentley Mills Inc. 201608
Buckling Proper power stretching reduces the potential for the carpet to later buckle or wrinkle during shifts in humidity levels. Buckling is not considered a manufacturing defect and can usually be traced to inadequate stretching during the initial installation. Buckling can create a tripping hazard as well as accelerate carpet wear and cause the backings to separate or delaminate. Power stretching and proper cushion selection reduces the potential for buckling. Cushion Properly specified padding can extend the carpet's life. However, excessively thick or soft cushion can cause delamination and buckling. Cushion selection should be limited to those designed for the traffic demands of commercial application. That means a maximum thickness of three-eighths of an inch (3/8”) and a minimum density of 10-pounds. Restretches When carpet buckles, the only certain means of correction is to remove all furniture and literally re-install the carpet with proper power stretching techniques described here. Using a knee kicker to make the wrinkles lay flat is only a temporary fix and the carpet is likely to buckle again with the next rise in humidity. A proper restretch means that the carpet will be stretched past corners and doorways, creating the need for plugs. In all likelihood, seams will have to be opened and remade. Please Note: Buckling carpet is not considered a manufacturing defect. Bentley Mills will only be responsible for carpet stability in restretches that are supervised and done as specified by a Bentley Mills Field Technician. For more details or help in planning a restretch, call the Bentley Mills Quality Claims Department or your local Bentley Mills representative. Pattern Registration All forms of pattern distortion and procedures for correction are detailed in the installation guide. Pattern distortion is generally isolated to broadloom products. The pulling, twisting, or elongation of the pattern occurs primarily during the backing process when the secondary backing is applied. Such distortion presents a problem during installation, but can be corrected or re-aligned by stretching with a power stretcher, even in glue-down applications if the distortion is within a range of one-to-1.5 percent. For instance, a one-inch bow that is spread gradually throughout a 12-foot width of carpet (144-inches wide) will need to be stretched 1.44 percent to be brought back into proper alignment. Keep in mind that these ratios can become extremely difficult if the bow is concentrated into a smaller portion of the carpet; if the job site poses additional challenges; or if there is more than one form of distortion taking place simultaneously. Bow, combined with skew or pattern elongation, can be far more difficult to correct. Ratios of pattern distortion that exceed tolerance can increase installation time by as much as 30-40 percent. The one-inch manufacturing tolerance for bow, skew, or pattern elongation is the key reason for: • Sequencing rolls according to pattern size rather than roll number • Planning the job in greater detail and dry laying as much as possible • Allowing more time and money for the installation

PAGE 10 of 20
CARPET INSTALLATION BASICS OVERVIEW
Bentley Mills Inc. 201608
Evaluation and Correction First determine the correct nature of the problem based on the criteria found in the pages that follow this general overview. Keep in mind that manufacturing tolerances exist because uncertainties in the textile manufacturing process make pattern straightness and elongation variations difficult to avoid. The patterned broadloom backing process is still not an exact science. Pattern Sequencing Pay attention to sequence patterns by pattern size rather than by roll number. Ask the installer whether the job has been sequenced according to pattern sequence information, pattern count sizes, which is provided by the mill. The pattern size for each roll is also affixed to the end of each roll of patterned carpet. If there are any questions please contact Bentley Mills Customer Care at 800.423.4709 for further assistance. Dry Laying Make sure care has been taken to lay out as much job as possible prior to spreading adhesive so that appropriate plans can be taken to overcome any variation. Power Stretch Correcting most variations means cutting on the pattern and stretching the carpet, even in glue, back to a straight line. Short patterns must be stretched into alignment with longer patterns because long patterns cannot be effectively compressed. Understanding Pattern Measurements Pattern measurements play a critical role in understanding what should be expected when developing estimates for either materials or labor. Simply looking at a sample and assuming the pattern will be a random or “monkey match” can cause carpet shortages and unrealistic production schedules for the installation crews. Overlooking or ignoring the potential impact of pattern size during the estimating process is a direct cause of eroded margins and often forces installation crews to compromise quality by cutting corners to meet unrealistic schedules. Simply put, the more surprises that can be anticipated and eliminated during the estimating process, the more likely we are to deliver a quality installation, at a reasonable price and with a reasonable profit margin. For a number of years now, Bentley Mills has proactively led the industry by taking the extra effort to help installers eliminate surprises by providing extensive measurements from each production run of patterned carpet. These measurements give the installer a production road map that is essential in helping anticipate potential pattern alignment problems during preplanning or staging and help minimize the need for stretching patterns into alignment. Pattern measurements should be attached to the wrappings of every roll of Bentley Mills’ patterned carpet. A pattern sequence sheet can be emailed or faxed to help the installer group rolls of carpet according to pattern size on an order. The installer should start the project by first installing the roll with the largest pattern size and proceed throughout the project by installing rolls with decreasing pattern sizes. This process is explained in more detail in the section on pattern elongation. Bentley Mills takes this unique concept of installation planning several steps further. There’s no
PAGE 11 of 20
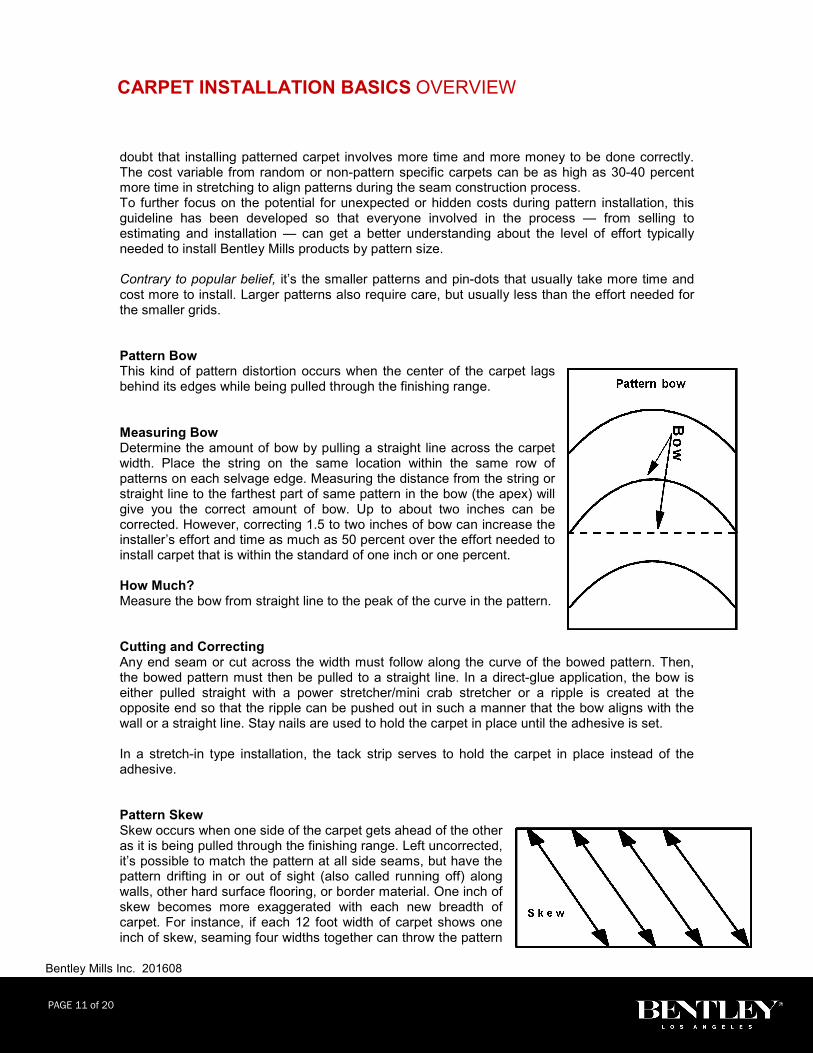
CARPET INSTALLATION BASICS OVERVIEW
Bentley Mills Inc. 201608
doubt that installing patterned carpet involves more time and more money to be done correctly. The cost variable from random or non-pattern specific carpets can be as high as 30-40 percent more time in stretching to align patterns during the seam construction process. To further focus on the potential for unexpected or hidden costs during pattern installation, this guideline has been developed so that everyone involved in the process — from selling to estimating and installation — can get a better understanding about the level of effort typically needed to install Bentley Mills products by pattern size. Contrary to popular belief, it’s the smaller patterns and pin-dots that usually take more time and cost more to install. Larger patterns also require care, but usually less than the effort needed for the smaller grids. Pattern Bow This kind of pattern distortion occurs when the center of the carpet lags behind its edges while being pulled through the finishing range. Measuring Bow Determine the amount of bow by pulling a straight line across the carpet width. Place the string on the same location within the same row of patterns on each selvage edge. Measuring the distance from the string or straight line to the farthest part of same pattern in the bow (the apex) will give you the correct amount of bow. Up to about two inches can be corrected. However, correcting 1.5 to two inches of bow can increase the installer’s effort and time as much as 50 percent over the effort needed to install carpet that is within the standard of one inch or one percent. How Much? Measure the bow from straight line to the peak of the curve in the pattern. Cutting and Correcting Any end seam or cut across the width must follow along the curve of the bowed pattern. Then, the bowed pattern must then be pulled to a straight line. In a direct-glue application, the bow is either pulled straight with a power stretcher/mini crab stretcher or a ripple is created at the opposite end so that the ripple can be pushed out in such a manner that the bow aligns with the wall or a straight line. Stay nails are used to hold the carpet in place until the adhesive is set. In a stretch-in type installation, the tack strip serves to hold the carpet in place instead of the adhesive. Pattern Skew Skew occurs when one side of the carpet gets ahead of the other as it is being pulled through the finishing range. Left uncorrected, it’s possible to match the pattern at all side seams, but have the pattern drifting in or out of sight (also called running off) along walls, other hard surface flooring, or border material. One inch of skew becomes more exaggerated with each new breadth of carpet. For instance, if each 12 foot width of carpet shows one inch of skew, seaming four widths together can throw the pattern

PAGE 12 of 20
CARPET INSTALLATION BASICS OVERVIEW
Bentley Mills Inc. 201608
off a total of four inches on the opposite wall. Although the carpet is within manufacturing tolerances, there are few customers who would tolerate such run-off along their walls. How much? Establish a straight line across the width of the carpet by creating a right triangle. Carefully measure six feet along the selvage and eight feel along the width. The formula for determining the hypotenuse tells us that if the six-foot and eight-foot sides are connected by a 10-foot hypotenuse, then the sides must form a right angle. The right angle gives us a straight line to measure the amount of skew. Measure the distance from the straight line to the nearest pattern. Then, on the opposite side, measure the farthest pattern from the line. The difference between the measurements will give us the amount of skew in each 12-foot width. Don’t assume the roll end is straight. Use the right angle. Cutting and Correcting As with bow, any cuts must follow along the angle of the skew. Then, the skew must then be pulled or pushed to a straight line with a power stretcher. In a direct-glue application, stay nails are used to hold the carpet in place until the adhesive is set. In a stretch-in type installation, the tack strip serves to hold the carpet in place instead of the adhesive. Pattern Elongation In much the same manner the patterns can become bowed or skewed during application of the secondary backing, patterns can also become longer during the backing process. Bentley Mills takes every available precaution to hold this variation within tolerances of about one inch in a 12-foot length. Yet, the installer must be prepared to stretch smaller patterns to match or align with longer ones. Power stretching may be necessary, even in glue-down applications. Stretch the Short Side In this illustration, the smaller patterns on the left must be stretched into alignment with the longer patterns on the right side of the diagram. Helping Plan the Match In addition to taking extensive steps during manufacturing to helping prevent bow, skew and pattern elongation, Bentley Mills measures the front and back (or end) of each patterned roll of carpet to check pattern elongation. The measurements are printed on tag and affixed to the outside of each roll when patterns are involved. The measurements are also forward to Bentley Mill’s customers so the installation can be planned, staged and sequenced by pattern size rather than by roll number. Small patterns can be stretched to meet longer ones, but longer patterns cannot be compressed to meet shorter ones. Pattern sequencing and dry laying are critical steps necessary for a successful installation. Make certain pattern sequencing information is available before cutting or staging the installation. For questions regarding this information, please contact Bentley Mills Customer Care at 800.423.4709.
Stretch
Stretch
Seam
Seam

PAGE 13 of 20
CARPET INSTALLATION BASICS OVERVIEW
Bentley Mills Inc. 201608
Trueness of Edge Serpentine or snakey edges are nearly always present in some degree on all tufted broadloom carpet. The proper term for describing “S” shaped carpet is Trueness of Edge. Even carpet that drifts as much as 2 to 3 inches can be corrected relatively easy, as long as each outward move corresponds to an inward drift on the opposite side of the 12-foot width. Pulling on one side to a straight line has the effect of straightening the corresponding or opposite side of the snake. One inch within a 12-foot length should be very easily corrected. Measuring Serpentine or Trueness of Edge Pull a straight line lengthwise down the roll from one tufted corner to another or to a corresponding peak. The distance of the “valley” from the straight line should give the correct amount of variation. Correcting Serpentine An excellent tool for correcting most serpentine or trueness of edge problems is the crab-stretcher. Like most other forms of pattern distortion, the carpet must be pulled to a straight line, even in adhesive. The straight line is held in place with stay-nails until the adhesive is set. The tack strip functions in the same way as the adhesive in a stretch-in installation. Please Note: The key to recognizing trueness of edge problems is the “S” or serpentine drift. An outward drift should always have a corresponding inward drift. If the carpet suddenly dives inward or outward on one side without having a corresponding peak or valley on the opposite side ... the affected area will likely have to be cut out rather than stretched out. A sudden dip on one side is likely where the carpet fell off the pins that hold the selvage in place as the carpet is pulled along by its edges through the finishing process. The Important of Climatizing Graphic Carpets The patterns in many Bentley Mills carpets are created when a shifting needle bar moves from side to side. This process of creating tufted patterns has produced a family of carpet styles called graphics. Carpets tufted with graphics-related technology are easily identified by the zigzag stitch pattern along the selvage edge of each roll of carpet. This zigzag pattern creates the design, but it also makes carpets created in this style more sensitive to sudden changes in moisture gain and moisture loss or fluctuations in humidity if not installed properly. The zigzag creates range of patterns, but also creates a heavier backstitch than straight line tufting. Because nylon absorbs moisture, sudden changes in humidity or moisture can cause the carpet to expand or contract before the adhesive is fully cured. The result can include gaps along seams or wrinkling if these basic requirements are ignored during the installation process. The increased use of water instead of solvents in carpet adhesives has greatly improved the all around safety of indoor air quality. However, increased use of water-based adhesives can also create problems with graphic carpets if the installer fails to follow these precautions for controlling moisture gain and loss during the installation. Most carpet manufacturers include graphics designs as core products in their running line of offerings. This need for care to avoid sudden shifts in humidity or moisture is true for any carpet from any manufacturer using graphics technology. In addition to the CRI 104 Installation Standard, the following includes essential precautions to help the installer avoid problems that may be more difficult to correct once the installation is complete:

PAGE 14 of 20
CARPET INSTALLATION BASICS OVERVIEW
Bentley Mills Inc. 201608
• Conditioning the building: the temperature should be between 65 and 95 degrees
Fahrenheit. Humidity should not exceed 65 percent. That means the building to receive the carpet should be enclosed and, in many instances, requires that the air be either heated or cooled to assure proper conditions.
• Conditioning the carpet: let the carpet breathe for a while. Graphics carpet should always be rough cut and spread out for 24- 48 hours prior to installation in the area to be installed. This allows the carpet to assume the same basic moisture level that is likely during the installation itself.
• Adhesive set up: humidity and moisture can cause graphics carpets to expand because of the extra nylon buried in the backing from the zig-zag stitch. To prevent expansion and peaking seams when the adhesive is wet or gapped seams when the adhesive later dries, make certain most of the moisture has left the adhesive before putting the carpet into the glue. Let the adhesive get tacky and develop legs before the carpet goes in.
• Row cut: the best method for making side seams is by using a cushion-back top cutter or loop-pile cutter and row cutting between the tuft rows. Row cut both sides being seamed. Trace cutting or double cutting seams are not recommended methods and can void the warranty. All seams must be sealed.
• Roll thoroughly: graphic carpets should be rolled twice with a roller not to exceed 75 pounds. The second rolling should come three-to-12 hours after the initial rolling.
Prestige Plus Attached Cushion Bentley Mills’ Prestige Plus comes with a factory applied polyurethane cushion in full broadloom widths. The cushion permits stretching for pattern alignment as well as enhanced feel and load deflection. However, unlike stretch-in or double glue installation, the factory application of the cushion guarantees long term performance and the installation ease of a direct glue installation. Prestige Plus is installed much like any direct glue carpet. When the carpet involved has a pattern in its design, all the precautions necessary for a successful pattern installation should be followed. (Please see Patterns Need a Plan for more detail on installing patterns.) That means: • Dry laying to map pattern sizes and avoid gluing small patterns before installing patterns • Row cutting each side seam • Power stretching to assure pattern straightness and matches at all side seams • Stay nails should be used to keep the carpet from retracting until the adhesive sets In addition to the specific requirements outlined here for the proper installation of Bentley Mills’ carpet, the basics in the Carpet and Rug Institute’s most recent Installation Standard, must be followed for product-related warranties to remain in effect. If there are questions, call the Bentley Mills Customer Care Department at 800.423.4709. Site Conditions Carpet and adhesive must be conditioned on site at a minimum temperature of 65-95 degrees Fahrenheit and a maximum relative humidity of 65 percent. These conditions should be main-tained before, during and after the installation. New concrete must be cured for at least 90-120 days. Please refer to Moisture and pH Standards on page 4-5. A reading greater than nine pH can cause adhesive failure and should be neutralized by using one roller application of W. F. Taylor 2025 primer. New concrete slabs should be sealed; older floors can be checked for porosity by applying a small amount of water to several areas of the floor.
PAGE 15 of 20
CARPET INSTALLATION BASICS OVERVIEW
Bentley Mills Inc. 201608
If the water beads, the floor does not need to be sealed. If the water soaks in quickly, the floor needs to be sealed or damp mopped. If excess moisture is present or hydrostatic conditions exist, do not install the carpet and contact Bentley Mills Customer Care Department at 800.423.4709. Concrete Subfloor All new concrete shall be fully cured, clean and dry. Old concrete must be clean, dry, level and free of paint, dirt, old adhesive, oils, or other contaminates. All concrete floors must comply with moisture and alkalinity requirements prior to proceeding with installation. The concrete shall be free of curing or parting agents that interfere with the bonding of the adhesive. Whenever a powdery surface is encountered, such as lightweight concrete, a sealer compatible with the adhesive, such as WF Taylor 2025 must be used to provide a suitable surface for direct glue installation. A Bond test is required to verify performance. Level the floor to the standards outlined in the American Concrete Institute specifications for Concrete Building ACI 301 in regards to trowel finish and finishing tolerance. Leveling compounds must be Portland-based cement. Patch cracks and holes with one of the following approved patching compounds: Ardex Feather Finish, Ardex K-15, Henry's 547, Mapei Plani Patch, or similar cement based compound. Do not exceed manufacturer's recommendation for patch thickness. Layout Follow industry accepted methods for a glue down installation. Refer to the CRI 104 (www.carpet-rug.org). Based on the floor plan and seaming diagram, start near the center of the room and snap a chalk line between opposite walls. This will be the first seam. Before spreading any glue, dry lay carpet by overlapping the edges one-and-a-half inches over the chalk line. Be certain that the pile is all laying in one direction as noted by arrows on the backing. Pile direction should face the room's entryway or with the traffic direction. Allow an inch-and-a-half at the walls for trimming. Seaming Detail Trim off factory edges when making seams. Do not use the double cut method. The edge for the first cut should be trimmed from the face by following the space between the rows of tufts or "row cut." The best tool is a cushion back top cutter. Start the cut about an inch-and-a half from the edge. Slightly angle the cutter into the backing and away from the face yarns for a bevel cut that will help make a tight seam. The second side-seam should be cut in the same fashion. Adhesives Use one of Bentley Mills’ Healthbond premium multipurpose adhesives at a rate of about 12-15 square yards per gallon. All seams must be sealed using Healthbond 3000 seam sealer. Installation Periodically check trowel to ensure that the notches are delivering the correct bead of adhesive. Allow adhesive to develop tack. Permit adhesive to dry until it develops two-inch legs when finger tested. However, the adhesive should still be wet enough to transfer to the backing and allow for pattern matching.

PAGE 16 of 20
CARPET INSTALLATION BASICS OVERVIEW
Bentley Mills Inc. 201608
Lay one side into the adhesive and up to the chalk line. Smooth out the carpet. With the back of a push broom, carpet core or a 30-50 pound roller, smooth over the carpet away from the seams to assure complete adhesive transfer and to eliminate any air bubbles. Seam Sealer All seams and transitions to other surfaces must be sealed. Use a plastic squeeze bottle for easy application. Carefully apply a 1/8-inch bead of seam sealer to the primary backing at the tuft line. Transition strip or cap assures maximum performance when adjoining hard surface flooring. Lay the other side of the carpet into the adhesive. Butt the second edge tightly against the first edge. This will allow the seam adhesive to transfer from one edge to the other and completely seal the seam. With cut pile carpet, make sure yarn is not trapped in the seam. Important Advice: These installation procedures are recommendations designed for the experienced and competent installer such as those trained and certified. Strict adherence to these procedures will result in a quality installation under most conditions. Any situation that could alter the installation procedure or jeopardize the possibility of a satisfactory installation, such as identification of defective material or unusual installation conditions, creates a responsibility for the installer to STOP the installation immediately and call Bentley Mills Customer Care at 800.423.4709. Bentley Mills will not be responsible for substandard installation or for an installer’s decision to proceed with an installation that is not resulting in a satisfactory or acceptable finished project. Carpet Tile Bentley Mills offers carpet tile in three sizes (18x36”, 24x24”, 36x36”) for modular creativity and flexibility in design. Carpet Tile products are paired with either our patented NexStep® Cushion Tile backing or Thermoplasic AFIRMA® Hardback Tile technology. NexStep® Cushion Tile features an 18-pound density polyurethane cushion with fiberglass between the cushion and thermoplastic pre-coat for exceptional dimensional stability. The pre-coat provides a moisture barrier to keep liquid-based stains on the surface where they can be easily cleaned and a deflection foundation to enhance roller mobility. This combination of technologies provides the utmost in performance and appearance retention. To assure maximum performance, floor primers and adhesives have been specially formulated for these specific backing types. Use of any other primer or adhesives can affect long-term performance and may void the Bentley Mills product warranty. Ideally, to help avoid any breakdown of the moisture barrier, Bentley Mills’ modular carpets should be installed using the following adhesive products: • Bentley Mills Healthbond 2300 pressure sensitive adhesive (NexStep Cushion backing) • Bentley Mills Healthbond 2300 pressure sensitive adhesive (Afirma Hard backing) • Bentley Mills Healthbond 4200, seam cleaner • WF Taylor Encap 500 (moisture sealer up to 95 RH) • WF Taylor Encap 500 (adhesive residue encapsulation) • WF Taylor Encap 2025 (sealer and pH limiter)

PAGE 17 of 20
CARPET INSTALLATION BASICS OVERVIEW
Bentley Mills Inc. 201608
Testing the Slab Testing for concrete moisture or vapor emission is another essential step in preparing the floor. Usually it’s the General Contractor’s responsibility to provide a suitable subfloor for carpeting. However, it’s the installer’s responsibility to make sure the subfloor being covered meets Bentley Mills’ installation requirements to maintain warranty coverage. Any questions regarding installation requirements STOP the installation and immediately call Bentley Mills Customer Care at 800.423.4709. Test Conditions Accurate testing of concrete floors requires the building to be fully enclosed with the air conditioning and heating system functioning to a level similar to that expected when the space is occupied. Calcium Chloride The test must be administered in strict adherence to the specifications of the ASTM F1869 test procedure. Moisture emissions must not exceed eight (8) pounds or less per 1,000 square feet for 24 hours. If the test results are higher than eight pounds, do not proceed with the installation until subsequent testing demonstrates the emission rate is eight pounds or less. Once testing has confirmed the slab to be within eight pounds of moisture as determined by the proper application of the calcium chloride test, the chemical pH of the slab must also be determined. Relative Humidity The test must be administered in strict adherence to the specifications of ASTM Standard F2170 and as described here. Moisture levels in the concrete subfloor must be 90-percent or less before proceeding. Once levels have been determined to be 90 percent or less, then the chemical pH of the concrete subfloor should also be tested. In the event of a discrepancy between Calcium Chloride Test results and the results from Relative Humidity testing, the decision on whether to remediate or correct excessive vapor emission should be based on results from Relative Humidity testing. Relative Humidity testing will take precedence over Calcium Chloride testing when both tests are performed on the same project. Chemical pH All concrete floors, old or new, should be tested for alkalinity by using an approved alkalinity test kit, a pH Test Probe or pH Test Meter which meets ASTM F710 Standard for testing Alkalinity. The slab should have an alkalinity level ranging from 7.0 to 9.0 to be suitable for installation. Chemical pH test strips should be capable of measuring a range of 0-14. The area to be tested must be enclosed and acclimated as described. CRI 104 Commercial Installation Standard In addition to the specific instructions detailed here, the Carpet and Rug Institute Standard for Installation of Commercial Carpet must be closely followed as basic minimum requirement for floor preparation and installation on all carpet installations. Please note that many of the Bentley Mills’ installation requirements detailed here may actually exceed those in the CRI Installation Standard because of specific product characteristics.
PAGE 18 of 20
CARPET INSTALLATION BASICS OVERVIEW
Bentley Mills Inc. 201608
Full Spread Once the floor has been properly prepared, a full spread method is most important in preventing lateral shifting and ensuring the successful installation of Bentley Mills’ modular carpet. Full spread simply means that the entire area to receive modular carpet should be covered only with Bentley Mills approved pressure sensitive adhesive. NexStep® Cushion Tile products require a full spread application of Healthbond 2300 pressure adhesive designed specifically for this backing option. Only Bentley Mills’ pressure sensitive adhesive should be used. This specially formulated adhesive can be applied with a 3/4-inch nap paint roller or 1/16 x 1/32 x 1/32 U notch towel. Expect a spread rate of 35-40 square yards per gallon. Substrate conditions and or HVAC conditions may affect actual spread rates. Afirma™ Hardback Tile products require a full spread application of Healthbond 2300 pressure sensitive adhesive designed specifically for this backing option. This specially formulated adhesive can be applied with a ¾-inch paint roller or 1/16 x 1/32 x 1/32 U notch trowel. Expect a spread rate between 35-40 yards per gallon. Substrate conditions and or HVAC conditions may affect actual spread rates. Correct Color and Style The Installer must verify Bentley Mills’ tile product conforms to owner’s specifications, including correct product, color and backing. Once an incorrect color or product has been installed, Bentley Mills will not be held responsible or assume related costs for corrective action. Construction Site Far too often, textile floor covering products are installed before the construction site is reasonably accessible or ready. Floor covering products can be permanently damaged during the construction process. Please understand that Bentley Mills will not be held responsible for any staining, soiling, contamination or damage caused by building construction. Both the installer and the general contractor should consider the risks when installing carpet products before other construction trades have completed their work. Solvents, petroleum base cleaners, paints or lacquer over-spray, spills, excessive soiling are among a variety of possible job site contaminates that will void the owner’s product warranty. Temperature and Lighting Job site and all products or materials to be used in the installation must be preconditioned at a temperature between 60º F (15.5º c) and 95º F (35º c) for a period of 48-72 hours before installation begins. The temperature must remain within this range throughout the installation. Lighting must be in service to allow inspection under specified lighting conditions. Solvent-free Seam Cleaners For adhesive, use only Healthbond 4200 seam cleaner. Take special care to keep solvents away from backing materials. Tools Required Inch/metric steel measuring tape; white chalk line; razor knife; straight edge; and 3/4-inch nap paint roller or 1/16 x 1/32 x 1/32 U notch trowel (for adhesive). Extra care should be taken to keep sharp blades.
PAGE 19 of 20
CARPET INSTALLATION BASICS OVERVIEW
Bentley Mills Inc. 201608
Concrete Subfloor All new concrete shall be fully cured, clean and dry. Old concrete must be clean, dry, level and free of paint, dirt, old adhesive, oils, or other contaminates. All concrete floors must comply with moisture and alkalinity requirements prior to proceeding with installation. The concrete shall be free of curing or parting agents that interfere with the bonding of the adhesive. Whenever a powdery surface is encountered, such as lightweight concrete, a sealer compatible with the adhesive, such as WF Taylor 2025 Primer must be used to provide a suitable surface for direct glue installation. Level the floor to the standards outlined in the American Concrete Institute specifications for Concrete Building ACI 301 in regards to trowel finish and finishing tolerance. Leveling compounds must be Portland-based cement. Patch cracks and holes with one of the following approved patching compounds: Ardex Feather Finish, Ardex K-15, Henry's 547, Mapei Plani Patch, or similar cement based compound. Do not exceed manufacturer's recommendation for patch thickness. Note: Incompatible adhesives, solvent based materials and other contaminates should be removed, or encapsulated with such product as WF Taylor Encap 500 Residue Encapsulator prior to installation of carpet. Contact Bentley Mills for further information, 800.423.4709. Unique Layout The unique shape of Bentley Mills’ carpet modules enables a variety of installation patterns that can be tailored for the customer’s design preference. The parquet method may be preferred on many styles. Some carpet patterns may even be installed monolithically. Bentley Mills recommended product layouts should be evaluated with the customer to determine their preference for the type of layout before proceeding with the full installation. Centering and Squaring Divide the room into four quadrants and snap a chalk line. Make sure quadrants meet at right angles. Take care to keep perimeter modular carpet cuts larger than half size or 9.84 inches (25 cm). Arrows Point the Way Modular carpet tiles are printed or embossed on the back with arrows showing pile direction. For monolithic installation, ensure arrows point in the same direction throughout the installation. Through Doorways In order to spread adhesive throughout the room and allow for a single set up time, an additional perpendicular line should be established and squared from the center line of the room to run through doorways. Care should be taken to measure a distance equal to an even number of carpet modules from the room’s centerline to a point in the doorway. That point in the doorway will determine where the first tile is installed. By establishing a line through the doorway and perpendicular to the centered chalk-line-grid in the room, adhesive can be spread in the room. The installer can spread back through the doorway and begin a square installation in the doorway without having to track back through the adhesive. Once the chalk lines have been established at right angles in the center of the room, install only

PAGE 20 of 20
CARPET INSTALLATION BASICS OVERVIEW
Bentley Mills Inc. 201608
one carpet module. This first module should be snugly in the corner formed by the 90° angle of the chalk lines with two sides of the module aligned along two chalk lines of one quadrant. Repeat procedure on remaining quadrants. Tipping Modules into Place Tip individual carpet modules into place. Please take care to prevent module corners from rolling under when tiles are positioned. Sliding modules across the adhesive will cause corners to roll under and should be avoided. Frequently check module joints for proper alignment and firm abutment. Avoid tight or overly compressed joints that can cause peaking edges or corners. Check Tightness Expect a slight gain as the modules are installed because of spacing at the joints. For example, when measuring in the length direction of 36 inch tile modules, determine the amount of gain by measuring 10 installed modules from edge to edge, spanning 11 seams. The measurement should be slightly more than 360 inches with a gain no greater than 1/8-inch. (about 1/8-inch). If gain exceeds 1/8-inch, tiles should be reinstalled and butted more tightly along backing edge. Reposition and check again. Measure Gain If gain exceeds 1/8-inch, tiles should be reinstalled and butted more tightly. Reposition and check again. When measuring in the width direction of tile modules (18 inches), determine the amount of gain by measuring 10 installed modules from edge to edge, spanning 11 seams. The measurement should be slightly more than 180 inches with a gain no greater than 1/8-inch. If gain exceeds 1/8-inch, tiles should be reinstalled and butted more tightly along backing edge. Reposition and check again. Important Advice These installation procedures are recommendations designed for the experienced and competent installer such as those trained and certified. Strict adherence to these procedures will result in a quality installation under most conditions. Any situation that could alter the installation procedure or jeopardize the possibility of a satisfactory installation, such as identification of defective material or unusual installation conditions, creates a responsibility for the installer to STOP the installation immediately and call Bentley Mills Customer Care. Bentley Mills will not be responsible for substandard installation or for an installer’s decision to proceed with an installation that is not resulting in a satisfactory or acceptable finished project. Contact Us Bentley Mills, Inc. 14641 East Don Julian Road City of Industry, CA 91746 800.423.4709 www.bentleymills.com