caseback markings - accurist · check caseback markings and refer to the resistance to water...
TRANSCRIPT

CASEBACK MARKINGS
Model Number
Calibre Number
Battery Number

CARE OF YOUR WATCH
Avoid temperature extremes1. Avoid leaving your watch in direct sunlight or in extremely warm conditions for long periods of time: this will cause malfunctioning and shorten the life of the battery.2. Do not leave your watch for long periods of time in extremely cold places; this may cause your watch to gain or lose time. Should it begin to gain or lose time, place your watch on your wrist to restore it to its normal working temperature.
Avoid wet conditions1. Do not operate the buttons when your watch is wet, even on models marked ‘Water Resistant’.2. Check caseback markings and refer to the Resistance to water section.

Care Of Your Watch
Avoid strong shocks1. This watch will withstand the bumps and jars normally incurred during sports activities.2. Avoid dropping your watch on the ground or otherwise imparting severe shock to it.
Avoid strong magnetic fields1. Keep your watch away from strong magnets.2. Generally, your watch is not affected by magnetic fields from household appliances such as television sets and stereo equipment.

Care Of Your Watch
Avoid harmful chemicals, solvents & gases1. Avoid wearing your watch in the presence of strong chemicals, solvents or gases.2. Avoid materials such as gasoline, benzene, paint thinner, alcohol, spray cosmetics, nail polish, nail polish remover, adhesives or paint.
Periodic inspection1. A regular 4 to 5 years service by an authorised Accurist technician will ensure trouble free operation.2. Refer to the After Sales Service section for details.

Care Of Your Watch
IMPORTANT1. Keep the batteries out of reach of infants and small children. Should accidental ingestion occur consult a doctor immediately.2. Do not attempt to replace the battery yourself as this invalidates your guarantee.
Keep your watch cleanWipe off any moisture that adheres to the case, glass or band with a soft, clean cloth.

BRACELET ADJUSTMENT
The bracelet requires a small adjustment and the model has a Z-type clasp.
1. Depress the end of the spring bar on the centre clasp with a pin.
2. Relocate the spring bar in an alternative hole.
Bracelet Adjustment
The bracelet requires a significant adjustment or the model does not have a Z-type clasp.1. Use the enclosed wrist gauge to measure and mark the size of your wrist.2. Return the completed wrist gauge with your watch.3. Follow the instructions in the After Sales Service section to return your watch for adjustment. Your watch will be adjusted free of charge.

RESISTANCE TO WATER
Indications on dial or caseback Light spray,Perspiration,Light rain, etc.
Swimming, etc.
Dial Caseback
- Water resistant Ok X
Water resistant50M (5 ATM)
Water resistant Ok Ok
Water resistant100M (10 ATM)
Water resistant Ok Ok
Water resistant150M (15 ATM)and deeper
Water resistant Ok Ok

QUARTZ ANALOGUE OPERATING INSTRUCTIONS
Position A
Position B

Quartz Analogue Operating Instructions
Please note: The second hand will not start moving until the crown has been returned to Position A.
To set the time:1. Gently pull out crown to Position B.2. Turn crown either way to correct time.3. Push in crown to Position A.

QUARTZ ANALOGUE WITH DATE OPERATING INSTRUCTIONS
24 hour hand
Second hand
Date
Date position may be located at different position depends on model.
1st position
2nd position
Minute hand
Normal crown position

Quartz Analogue With Date Operating Instructions
Setting the time: 1. Pull the crown out to the 2nd position.2. Turn the crown to set hour and minute hands.3. When the crown is pushed back to the normal position, second hand begins to run.
Setting the time: 1. Pull the crown out to the 1st position.2. Turn the crown counter-clockwise to set the date. * If the date is set between the hours of around 9:00 PM and 1:00 AM, the date may not change the following day.3. After the date has been set, push the crown back to the normal position.

Quartz Analogue With Date Operating Instructions
For Calendar Models
Positions: A B C

Quartz Analogue With Date Operating Instructions
To set the calendar/date: 1. Gently pull out crown to Position B.2. Turn crown anti-clockwise to adjust date, clockwise to adjust the day.3. Push in crown to Position A.
Note: The Day will start to change at 11.25 p.m. and complete its change by12 0’ clock midnight. The Date will start to change at 12 0’ clock midnight and complete its change by 4 a.m. Day/Date models have Bi-Lingual daysettings; if you select English, the watch will continue to display in English.
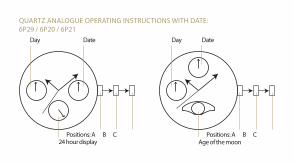
QUARTZ ANALOGUE OPERATING INSTRUCTIONS WITH DATE:6P29 / 6P20 / 6P21
Positions: A B C
Day
24 hour display
Date
Positions: A B C
Day
Age of the moon
Date

Quartz Analogue Operating Instructions With Date: 6P29 / 6P20 / 6P21
To set the time/day:1. Gently pull out crown to Position C.2. Turn crown either way to set the time.3. Push in crown to Position A.
To set the day of the week:1. Gently pull out crown to Position C.2. Turn crown clockwise to advance the hour hand by 24 hours per day.3. Push in crown to Position A.
Quartz Analogue Operating Instructions With Date: 6P29 / 6P20 / 6P21
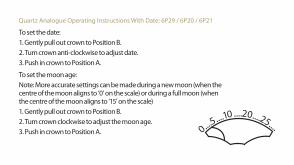
To set the date:1. Gently pull out crown to Position B.2. Turn crown anti-clockwise to adjust date.3. Push in crown to Position A.
To set the moon age:Note: More accurate settings can be made during a new moon (when the centre of the moon aligns to ‘0’ on the scale) or during a full moon (when the centre of the moon aligns to ‘15’ on the scale)1. Gently pull out crown to Position B.2. Turn crown clockwise to adjust the moon age.3. Push in crown to Position A. 0...
.5....10 ....20....25....

Quartz Analogue Operating Instructions With Date: 6P29 / 6P20 / 6P21
To read the moon age:Note: The age of the moon is determined by the period between each new moon. This period is approximately 29.5 days. The moon dial can be used as a guide to moon phase and tides.
New Moon Moon’s age: 0 Spring tide
First quarter moon Moon’s age: 7 Neap tide
Full Moon Moon’s age: 15 Spring tide
Last quarter moon Moon’s age: 22 Neap tide

QUARTZ ANALOGUE OPERATING INSTRUCTIONS WITH DATE:6P27 / 6P77
Day (of the week)
Hour hand
24 hour hand
Second hand 1st position
2nd position
Date Minute hand
Normal crown position

Quartz Analogue Operating Instructions With Date: 6P27 / 6P77
Setting the day:1. Pull the crown to the 2nd position to stop the second handat 0 (12 o’clock).2. Turn the hour/minute hands in a clockwise direction to set a day.In order to set the day, you must advance the hour hand by 24 hours per day.Note: Do not set the day by turning the crown in counter-clockwise direction. The day changes somewhere between 0:00 a.m. and 5:30 a.m. or a little later.

Quartz Analogue Operating Instructions With Date: 6P27 / 6P77
Setting the time:After setting the day, set the hour (and 24hour) and minute hands.1. Turn the hour/minute hands in a clockwise direction to set the time.2. To ensure time is set accurately, first turn the minute hand 5 minutesahead of desired time and then turn back (in a counter-clockwise) to the desired time.Note: Make sure you have correctly set AM/PM before setting the time.When the day changes over, it is a.m..(Day changes over between 0:00 a.m. and 5:30 a.m. or little later)Check am./p.m. by the 24hour hand.

Quartz Analogue Operating Instructions With Date: 6P27 / 6P77
Setting the date (by quick operation):Pull the crown out to the 1st position. Turn the crown counter-clockwise to set the date quickly.Note: Do not set the date between the hours 9:00 p.m. and 0:30 a.m. The date may not change correctly the next day.

Setting the time:1. Pull the crown out to the 1st position.2. Turn the crown to set hour and minute hands.3. Push the crown back to the normal position.
1st position
Minute handHour hand
Normal crown position
MIYOTA WATCH MOVEMENT OPERATING INSTRUCTIONS

HOW TO ASSEMBLE YOUR CHARMED WATCH WITH ADDITIONAL BEADS
Lobster Clasp (a)
“O” Ring Chain (b)
Safety Chain (d)
Stopper (c) Stopper (c)
Stopper (c) Stopper (c)

How to assemble your Charmed watch with additional beads
Step 1: Remove the lobster clasp (a) by gently unscrewing at the point where the snake bracelet meets the clasp.Step 2: Remove the “O” ring chain (b) by gently unscrewing at the point where the snake bracelet meets the chain.Step 3: Remove all stoppers (c) from both sides of the bracelet by sliding gently.Step 4: Add beads to each side of the bracelet and re-position stoppers (c). Ensure that the last item on each side is a stopper. This will help keep the beads in place. If you have purchased the safety chain from Accurist, this should be the last item placed on each side of the bracelet.

How to assemble your Charmed watch with additional beads
Step 5: Re-attach lobster clasp (a) by screwing the clasp to the bracelet fully, taking care to ensure a secure fit.Step 6: Re-attach “O” ring chain (b) by screwing the chain to the bracelet fully, taking care to ensure a secure fit.Step 7: Hold watch across wrist and attach lobster clasp (a) to “O” ring chain (B) at the appropriate point for best fit. Ensure clasp is closed correctly.N.B. Accurist cannot be held responsible for any damage to beads not manufactured by Accurist, however incurred.

CHARMED SPECIAL CARE INSTRUCTIONS
To ensure the best level of safety and security for your watch and beads it is recommended that after beads are added to the bracelet, a stopper is used to keep them in place. When using beads on your watch, a safety chain is also suggested as it helps to keep both sides of the bracelet connected in the event that you accidentally fail to secure the bracelet correctly. In this instance, the safety chain would be applied after all beads and stoppers. Once all beads, stoppers and the safety chain are in place, you should always check that the clasp and “O” rings are fully screwed to the bracelet and that they are fully attached to each other.

Charmed special care instructions
Should you need to return your Accurist Charmed watch to us for any service or repair, please ensure you remove all beads and charms before sending your watch in. Accurist cannot be held responsible for any beads or charms.All Accurist Charmed models are either sterling silver or silver plated. Due to the nature of silver, both sterling silver and silver plate may be liable to some level of tarnishing over time. Should this occur we recommend you use the silver polishing cloth provided (or any suitable alternative) to gently buff the watch. Please take care when using hand creams and perfumes, as they often contain alcohol which can adversely affect your watch.NB. A small moisture square may be included within the packaging. Please keep this away from children, as it may present a choking hazard.
Charmed special care instructions
Avoid temperature extremes:1. Avoid leaving your watch in direct sunlight or in extremely warm conditions for long periods of time: this will cause malfunctioning and shorten the life of the battery.2. Do not leave your watch for long periods of time in extremely cold places; this may cause your watch to gain or lose time. Should it begin to gain or lose time, place your watch on your wrist to restore it to its normal working temperature.
Avoid harmful chemicals, solvents & gases:1. Avoid wearing your watch in the presence of strong chemicals, solvents or gases.2. Avoid materials such as gasoline, benzene, paint thinner, alcohol, spray cosmetics, nail polish, nail polish remover, adhesives or paint.

Charmed special care instructions
Avoid wet conditions:1. This watch is not designed to withstand submersion in water.
Avoid strong shocks:1. This watch will withstand the bumps and jars normally incurred duringsports activities.2. Avoid dropping your watch on the ground or otherwise imparting severe shock to it.
Avoid strong magnetic fields:1. Keep your watch away from strong magnets.2. Generally, your watch is not affected by magnetic fields from household appliances such as television sets and stereo equipment.

Charmed special care instructions
Maintaining your watch:1. A regular 4 to 5 years service by an authorised Accurist technician will ensure trouble free operation.
IMPORTANT1. Keep the batteries out of reach of infants and small children. Should accidental ingestion occur consult a doctor immediately.2. Do not attempt to replace the battery yourself as this invalidates your guarantee.
Keep your watch clean:Wipe off any moisture that adheres to the case, glass or band with a soft, clean cloth.

CERAMIC WATCH SPECIAL CARE INSTRUCTIONS
Every care has been taken in the manufacture of this ceramic watch butdue to the nature of the material used extra care should be taken.The ceramic although scratchproof is not shatterproof therefore care must be taken to avoid dropping or knocking the watch against a hard surface.We would therefore recommend storing the watch in its watch box or suitable storage box when not being worn. To clean just use a clean damp lint free cloth do not use any cleaning agents as these may affect the look and lustre of the ceramic.

Ceramic special Care Instructions
Important:• Ceramics will not wear over time.• Ceramics are scratch-resistant.• Ceramic is a naturally porous material.• Ceramic is fragile and should be handled with care.You should note that whilst our guarantee covers the watch movement the ceramic parts and glass are not covered other than for manufacturing defects.