cataloging: use bibliographic constant data - oclc · cataloging: use bibliographic constant data 9...
TRANSCRIPT
OCLC Connexion Client Guides
Cataloging:
Use Bibliographic Constant Data Last updated: July 2016
OCLC Online Computer Library Center, Inc.
6565 Kilgour Place Dublin, OH 43017-3395
Revision History
Date Section title Description of changes
June 2007 1 Create bibliographic constant data
Can derive a new record from a bibliographic institution record (see new Cataloging, Use Bibliographic Institution Records booklet for more information
October 2007 1 Create bibliographic constant data
Added a new section containing instructions for how to insert blank fields, keep blank subfields, and/or preserve fixed field values when applying constant data. Previously, this information was part of a procedure.
July 2016 1 Create bibliographic constant data
Removed references to institution records
© 2016 OCLC
The following OCLC product, service and business names are trademarks or service marks of OCLC, Inc.: CatExpress, Connexion,
DDC, Dewey, Dewey Decimal Classification, OCLC, WorldCat, WorldCat Resource Sharing and "The world's libraries. Connected."
In addition, the WorldCat symbol and OCLC symbol are service marks of OCLC. Third-party product and service names are trade-
marks or service marks of their respective owners.
OCLC grants permission to photocopy this publication as needed.
Contents 1. Create, edit, or delete bibliographic constant data records ........................................................................... 5
Create constant data online or in local files .................................................................................................. 5
About bibliographic constant data records .................................................................................................... 5
Create a constant data record from a workform ........................................................................................... 7
Create a constant data record by deriving from another record .................................................................... 9
How to insert blank fields, keep blank subfields, and preserve fixed field values when applying constant
data ............................................................................................................................................................ 10
Caution on saving constant data from the local file to the online file ........................................................... 10
Edit a constant data record ........................................................................................................................ 11
Delete a constant data record .................................................................................................................... 11
Tips for using constant data ....................................................................................................................... 12
2. Apply bibliographic constant data .............................................................................................................. 13
Ways to apply constant data ...................................................................................................................... 13
About default constant data ........................................................................................................................ 13
Set default constant data............................................................................................................................ 14
View default constant data ......................................................................................................................... 14
Apply default constant data ........................................................................................................................ 15
Apply constant data by name ..................................................................................................................... 15
Apply constant data from a list ................................................................................................................... 16
Applying fixed or variable fields or both: Limitations and workarounds ....................................................... 17
Format mismatch warning .......................................................................................................................... 18
3. Find bibliographic constant data records .................................................................................................... 19
About finding bibliographic constant data records ...................................................................................... 19
Find specific bibliographic constant data records by name or My Status .................................................... 19
Stopwords .................................................................................................................................................. 20
Set a default My Status or add My Status to a single record (optional) ....................................................... 20
List all bibliographic constant data records ................................................................................................. 21
4. Use constant data search results ............................................................................................................... 22
How results display .................................................................................................................................... 22
Use the results list ...................................................................................................................................... 22
Hide columns or change the order ............................................................................................................. 23
Resize columns .......................................................................................................................................... 24
Re-sort a list ............................................................................................................................................... 24
Online constant data list only: View a list of more than 100 records ........................................................... 24
Select a multiple records in a list ................................................................................................................ 25
Print a list or selected entries ..................................................................................................................... 25
Open records in a list ................................................................................................................................. 26
Print a record ............................................................................................................................................. 26
Navigate among records and lists .............................................................................................................. 26
Actions on bibliographic constant data records .......................................................................................... 27
Cataloging: Use Bibliographic Constant Data
20160708
5
1. Create, edit, or delete bibliographic constant data records
Create constant data online or in local files
Using the Connexion client, you can create bibliographic constant data online or create constant data in one
or more local files located on your workstation or shared network drive. The client provides a blank default
local constant data file (DefaultBibCD.bibcd.db). See more about local files, their locations, and how to
share them in Basics, Manage Local Files, "Manage local files."
This topic covers procedures for creating constant data both online and in local constant data files.
About bibliographic constant data records
Why create constant data records?
Using constant data is a way to apply frequently used information to records. You add the same data to
bibliographic records to:
Avoid rekeying frequently used data
Reduce errors and improve consistency among related records
Develop and maintain local standards for bibliographic records, for specific collections, or for different
types of resources
What is bibliographic constant data?
A constant data record is a partial bibliographic or authority record you create that contains standardized
content for reuse when you create or edit a record.
Online constant data:
Users at the same institution (same OCLC symbol) share an online constant data file to store all
constant data records you create online.
There is only one online constant data file. It is accessed by both Connexion interfaces, the browser
and the client.
Anyone at your institution can add constant data records to this database, edit them, use a stored
record as default constant data, or delete records.
Your library's constant data records are not shared with Connexion users at any other institution.
When you set a constant data record as the default, it is associated with your logon authorization. Staff
sharing the authorization also share the default constant data.
Local constant data:
The local bibliographic constant data file is located on your workstation or can be located on a network
drive for shared access.
Use the local files to create, store, and apply bibliographic constant data offline or to apply to online
records when logged on.
The Connexion client automatically creates a default local bibliographic constant data file when you
install the software. The path and file name is: X:\Documents and Settings\[user
name]\Application Data\OCLC\ Connex\Db\DefaultBibCD.bibcd.db (where X is the letter of your
hard drive)

Cataloging: Use Bibliographic Constant Data
20160708
6
Create multiple local bibliographic constant data files on your workstation or on a shared drive for
special tasks or for use by individual staff members. Designate or change the default. And move or
copy records from one local file to another.
You cannot delete your designated default local constant data record.
When you set a local constant data record as the default, it is stored in the local file. By assigning
different authorizations to local files, staff can maintain different default constant data.
For more about working with local constant data files, see Basics, Manage Local Files, "Manage local files."
Maximum number of records in an online or local save file: 9,999. The system prevents you from adding
records that would exceed the limit.
About creating constant data:
Create a constant data record from a workform based on a specific MARC format (Books, Scores, etc.),
or "derive" a constant data record from an existing bibliographic record or constant data record.
When you create a constant data record, you must enter a name.
Optionally, you can also enter a custom My Status.
The name and My Status help you retrieve records.
About applying constant data to bibliographic records:
Designate a record as the default when you create it or later. Then, when you want to insert the
constant data into a record:
When logged on, on the Edit menu, click Constant Data > Online > Apply Default (or press
<Ctrl><A>).
Or
When logged on or offline, click Constant Data > Local > Apply Default (or press <Ctrl><V>).
Note: Your default online constant data is tied to your logon authorization (anyone logging on using
the authorization has the same default). Your default local constant data is tied to the local file. To
maintain different default constant data, staff members can use separate local constant data files.
Alternatively, apply constant data by name or from a list. Use the same menus and submenus as
listed in the previous bullet, but click one of the following (for Online commands, you must be logged
on):
Edit > Constant Data > Online > Apply by Name (or press <Ctrl><U>) Edit > Constant Data > Local > Apply by Name (or press <Ctrl><B>) Edit > Constant Data > Online > Apply from List (or press <Alt><E><O><L>) Edit > Constant Data > Local > Apply from List (or press <Alt><E><L><L>)
For more about searching for, creating, and editing non-Latin script constant data records, see Cataloging,
International Cataloging guide.
Caution for online constant data only: When you create a constant data record, you are required to give it
a unique name. When you name online constant data records or assign an optional My Status, avoid using
punctuation, special characters, and diacritics. These characters can cause errors when you retrieve, save,
apply, delete, or take other actions on the records.
Cataloging: Use Bibliographic Constant Data
20160708
7
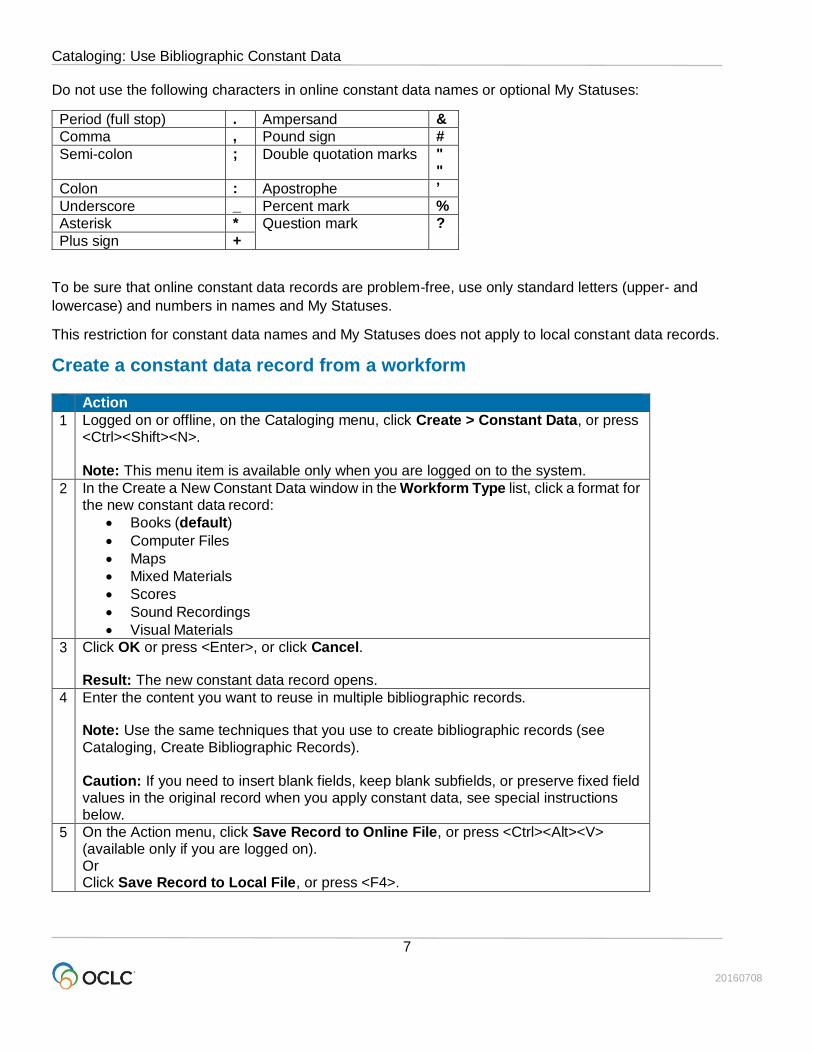
Do not use the following characters in online constant data names or optional My Statuses:
Period (full stop) . Ampersand &
Comma , Pound sign #
Semi-colon ; Double quotation marks " "
Colon : Apostrophe ’
Underscore _ Percent mark %
Asterisk * Question mark ?
Plus sign +
To be sure that online constant data records are problem-free, use only standard letters (upper- and
lowercase) and numbers in names and My Statuses.
This restriction for constant data names and My Statuses does not apply to local constant data records.
Create a constant data record from a workform
Action
1 Logged on or offline, on the Cataloging menu, click Create > Constant Data, or press <Ctrl><Shift><N>. Note: This menu item is available only when you are logged on to the system.
2 In the Create a New Constant Data window in the Workform Type list, click a format for the new constant data record:
Books (default)
Computer Files
Maps
Mixed Materials
Scores
Sound Recordings
Visual Materials
3 Click OK or press <Enter>, or click Cancel.
Result: The new constant data record opens.
4 Enter the content you want to reuse in multiple bibliographic records.
Note: Use the same techniques that you use to create bibliographic records (see
Cataloging, Create Bibliographic Records).
Caution: If you need to insert blank fields, keep blank subfields, or preserve fixed field values in the original record when you apply constant data, see special instructions below.
5 On the Action menu, click Save Record to Online File, or press <Ctrl><Alt><V> (available only if you are logged on). Or Click Save Record to Local File, or press <F4>.
Cataloging: Use Bibliographic Constant Data
20160708
8
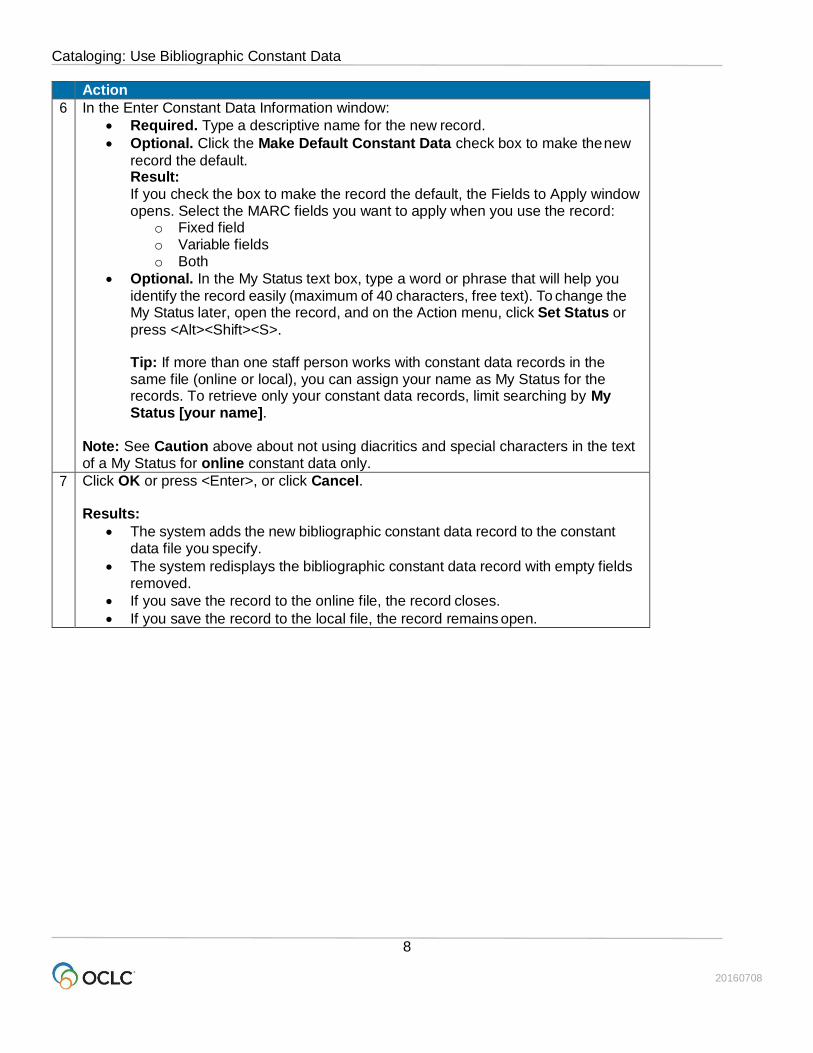
Action
6 In the Enter Constant Data Information window:
Required. Type a descriptive name for the new record.
Optional. Click the Make Default Constant Data check box to make the new
record the default. Result:
If you check the box to make the record the default, the Fields to Apply window opens. Select the MARC fields you want to apply when you use the record:
o Fixed field o Variable fields o Both
Optional. In the My Status text box, type a word or phrase that will help you
identify the record easily (maximum of 40 characters, free text). To change the My Status later, open the record, and on the Action menu, click Set Status or
press <Alt><Shift><S>.
Tip: If more than one staff person works with constant data records in the same file (online or local), you can assign your name as My Status for the records. To retrieve only your constant data records, limit searching by My Status [your name].
Note: See Caution above about not using diacritics and special characters in the text of a My Status for online constant data only.
7 Click OK or press <Enter>, or click Cancel.
Results:
The system adds the new bibliographic constant data record to the constant data file you specify.
The system redisplays the bibliographic constant data record with empty fields removed.
If you save the record to the online file, the record closes.
If you save the record to the local file, the record remains open.

Cataloging: Use Bibliographic Constant Data
20160708
9
Create a constant data record by deriving from another record
Action
1 With an online or local bibliographic record, or constant data record open:
On the Edit menu, click Derive > New Constant Data, or press <Ctrl><I>.
See also: Cataloging: Create Bibliographic Records, “Create a bibliographic record from an existing record” for:
Specifics about the data the client transfers
How to pre-select fields you want to transfer to derived records (Tools > Options > Derive Record tab)
2 When the client asks if you want to transfer the fixed field values to the new record: Click Yes to transfer the fixed field.
Or Click No to derive the new record without transferring the fixed field.
Or Click Cancel to cancel deriving a new record.
The client redisplays the record content with NEW in place of an OCLC control number. Result of transferring the fixed field:
The fixed field values from the original record transfer, except for:
OCLC number
Rec Stat
Entered Date
Replaced Date
Used Data Caution: If you transfer the fixed field from the constant data record, values in the
original record are overwritten. See section below about how to keep fixed field values in the original record.
3 To complete the record, edit it and/or follow steps 4 - 7 in the procedure above for constant data workforms. Note: Use the same techniques as for creating and editing bibliographic records. Results:
The system adds the new bibliographic constant data record to the appropriate constant data file.
The system redisplays the bibliographic constant data record with empty fields removed.
If you save the record to the online file, the record closes.
If you save the record to the local file, the record remains open.
If you save the record from the online file to the local file, the client asks if you want to delete the record from the online file.
Cataloging: Use Bibliographic Constant Data
20160708
10
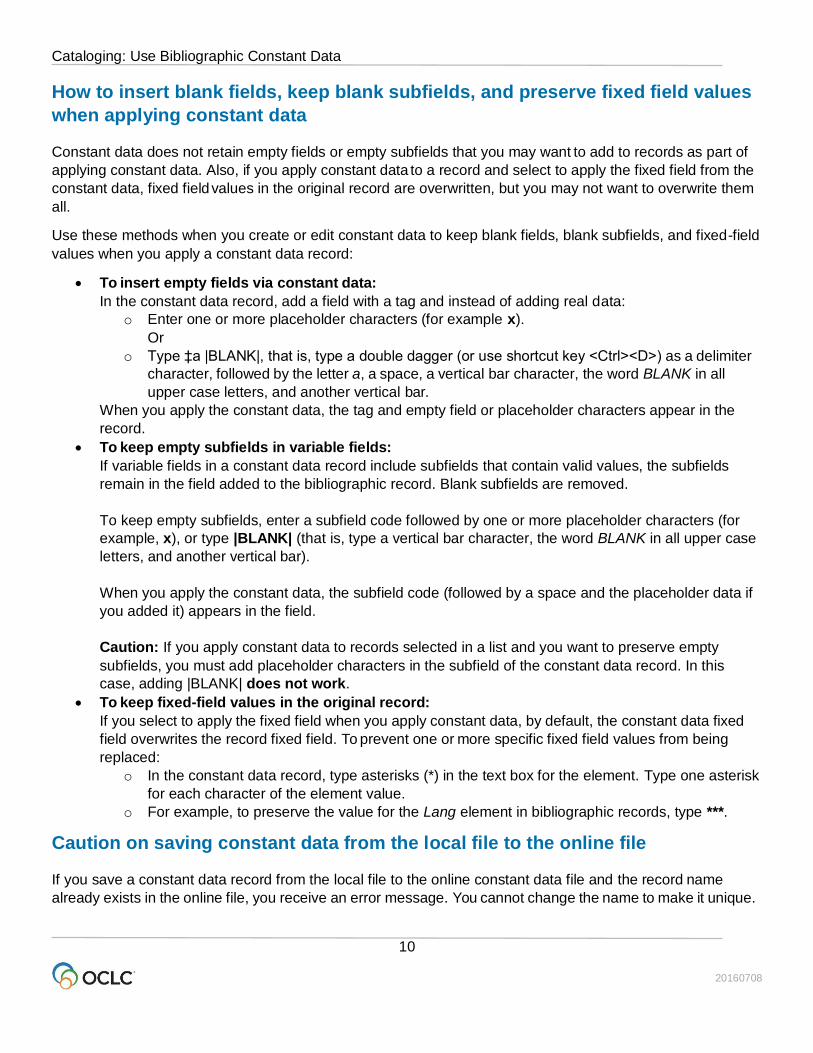
How to insert blank fields, keep blank subfields, and preserve fixed field values
when applying constant data
Constant data does not retain empty fields or empty subfields that you may want to add to records as part of
applying constant data. Also, if you apply constant data to a record and select to apply the fixed field from the
constant data, fixed field values in the original record are overwritten, but you may not want to overwrite them
all.
Use these methods when you create or edit constant data to keep blank fields, blank subfields, and fixed-field
values when you apply a constant data record:
To insert empty fields via constant data:
In the constant data record, add a field with a tag and instead of adding real data:
o Enter one or more placeholder characters (for example x).
Or
o Type ‡a |BLANK|, that is, type a double dagger (or use shortcut key <Ctrl><D>) as a delimiter
character, followed by the letter a, a space, a vertical bar character, the word BLANK in all
upper case letters, and another vertical bar.
When you apply the constant data, the tag and empty field or placeholder characters appear in the
record.
To keep empty subfields in variable fields:
If variable fields in a constant data record include subfields that contain valid values, the subfields
remain in the field added to the bibliographic record. Blank subfields are removed.
To keep empty subfields, enter a subfield code followed by one or more placeholder characters (for
example, x), or type |BLANK| (that is, type a vertical bar character, the word BLANK in all upper case
letters, and another vertical bar).
When you apply the constant data, the subfield code (followed by a space and the placeholder data if
you added it) appears in the field.
Caution: If you apply constant data to records selected in a list and you want to preserve empty
subfields, you must add placeholder characters in the subfield of the constant data record. In this
case, adding |BLANK| does not work.
To keep fixed-field values in the original record:
If you select to apply the fixed field when you apply constant data, by default, the constant data fixed
field overwrites the record fixed field. To prevent one or more specific fixed field values from being
replaced:
o In the constant data record, type asterisks (*) in the text box for the element. Type one asterisk
for each character of the element value.
o For example, to preserve the value for the Lang element in bibliographic records, type ***.
Caution on saving constant data from the local file to the online file
If you save a constant data record from the local file to the online constant data file and the record name
already exists in the online file, you receive an error message. You cannot change the name to make it unique.

Cataloging: Use Bibliographic Constant Data
20160708
11
Instead, derive a new constant data record (Edit > Derive > New Constant Data, or <Ctrl><I>) and assign a
new name.
Edit a constant data record
More than one person at your library can access the online or local constant data file, but only one person at
a time can open a constant data record from either file. Other staff at your library cannot access the record
until you save or cancel your changes and close the record.
Caution: If you need to insert blank fields, keep blank subfields, or preserve original fixed field values when
you apply constant data, see special instructions above.
Use the following techniques and procedures for editing bibliographic constant data records as for editing
bibliographic records (see Cataloging, Edit Bibliographic Records):
Text strings
MARC field Help
Text editing commands
Right-click shortcut menu
Move to next record area
Change the position of the fixed field or display as variable fields
Change the fixed field to another MARC format
Find and replace text
Edit or insert fields 006, 541, or 583 using guided entry
Reformat records
View institution name for symbol in 040
Open and view multiple record and list windows: When to pin
Information on saving records (see Save Bibliographic Records) and entering LCCNs in records (see Edit
Bibliographic Records) also applies to constant data records.
Delete a constant data record
Action
1 Open a bibliographic constant data record you want to delete from either the online save file or the local save file, or select records in a local bibliographic constant data list.
Note: For local constant data only, you cannot delete your default record. The client gives you an error message if you try. To delete your default constant data record, first set another record as the default (see “Apply bibliographic constant data” for the procedure for setting/changing the default record). Caution: If you share local constant data with other staff, another staff member can
delete your local default record.
2
On the Action menu, click Delete Record, or click , or press <Ctrl><Alt><D>.
3 Click Yes to confirm or No to keep the record.
Cataloging: Use Bibliographic Constant Data
20160708
12
Tips for using constant data
Copying constant data records within a file.
You cannot copy constant data records within the same local file, since each record must have a
unique name. To copy a record within the same file, derive a new record from the one you want to copy
(Edit > Derive > New Constant Data) and give it a different name.
Copying or moving constant data to another file.
o If you maintain more than one local bibliographic constant data file, you can copy or move
single records from one local file to another.
o You can also copy or move multiple constant data records selected in a local file list to another
local file or to the online constant data file.
o You cannot move records selected in an online constant data list to a local file.
Local file size.
When you delete or move records from a local file, file size (number of bytes) does not change.
To remove empty space in a local file, you can compact and/or repair local files after deleting and
moving records (File > Local File Manager; click Compact/ Repair).
See Basics, Manage Local Files, “Manage local files” for more information on moving records and
compacting/repairing local files.
Cataloging: Use Bibliographic Constant Data
20160708
13
2. Apply bibliographic constant data
Ways to apply constant data
You can apply online or local constant data several ways using Edit > Constant Data commands on either
the Online submenu or the Local submenu:
Apply default. If you have set a default constant data record, selected the fields you want to apply
(fixed, variable, or both), you can apply the default to records with a single command.
Or apply the default to:
o Imported records–applies local default constant data (see "Import bibliograhic records")
o Records retrieved via batch searching–applies online default constant data if you import to the
online save file or applies the local default if you import to the local save file (see "Run batch
processing")
Apply by name. Enter the name of the constant data record you want to apply and select the fields to
apply (fixed, variable, or both).
Apply from a list. Retrieve a list of constant data records, select a record you want to apply, select
the fields to apply (fixed, variable, or both), and apply from the list.
Caution: The client gives you the option to apply fixed or variable fields or both. See more below about
limitations of these choices and workarounds.
About default constant data
Online default constant data:
o One default constant data record is associated with each Connexion authorization during each
session.
o If multiple people at your institution share the same authorization, you also share one default
bibliographic constant data.
o If one person changes the default constant data, the new default is set for all people who share
the authorization.
Local default constant data:
o You can create as many local constant data files as you need to accommodate the needs of
different staff people. However, if you share a local file:
Each file can have only one designated default constant data record.
If multiple people share the same local file, you also share one default constant data.
If one person changes the default constant data, the new default is set for all people
who share the local file.
To maintain different default constant data, staff members can use separate local
constant data files.
You can set any constant data record as your default bibliographic constant data (Edit > Constant
Data > Online [or Local] > Set as Default).
You can edit your default bibliographic constant data or change the default to another record any time.
The advantage of using default constant data is that you can apply data you use often to a
bibliographic record you are editing without having to search for the constant data record first.
Cataloging: Use Bibliographic Constant Data
20160708
14
Set default constant data
You can designate a constant data record as the default when you create it (see “Create, edit, or delete
constant data records”) or make an existing record the default. To make an existing record the default:
Action
1 With an online constant data record open, on the Edit menu, click Constant Data > Online >Set as Default, or press <Alt><E><D><O><D>.
Or With a local constant data record open, on the Edit menu, click Constant Data > Local > Set as Default, or press <Alt><E><D><L><D>.
2 In the Fields to Apply window, select the MARC fields you want to apply: Fixed, Variable, or Both.
Default: Variable fields Caution: The client gives you the option to apply fixed or variable fields or both. See
more below about limitations of these choices and workarounds. Note: To change the Fields to Apply setting for a default constant data record, you must reset the record as default to open the Fields to Apply window.
3 Click OK or press <Enter>.
View default constant data
Action
While logged on or offline:
On the Cataloging menu, click Show > Default Constant Data, or press
<Ctrl><Shift><F>. Result if offline: The Logon OCLC Connexion window opens. As soon as you log on and close the Message of the Day, the default constant data record opens automatically.
Or
Click Show > Default Local Constant Data, or press <Alt><C><H><D>.
Note: To view the name of the default constant data record, on the View men, click User Information, or
press <Ctrl><Alt><U>. See category, Default Bibliographic CD.
Cataloging: Use Bibliographic Constant Data
20160708
15
Apply default constant data
Action
With an online or local bibliographic record open to which you want to apply your default constant data: Apply online default: While logged on, on the Edit menu, click Constant Data > Online >Apply Default, or
press <Ctrl><A>.
Or
Apply local default: While logged on or offline, on the Edit menu, click Constant Data > Local >Apply Default, or press <Ctrl><Y>.
Note: Alternatively, apply the default constant data automatically to:
Imported records (see "Import bibliographic records")
Records retrieved via batch searching (see "Run batch processing")
Apply constant data by name
Action
1 With an online or local bibliographic record open:
Apply online constant data by name: While logged on or offline, on the Edit menu, click Constant Data > Online > Apply by Name, or press <Ctrl><U>.
Or Apply local constant data by name: While logged on or offline, on the Edit menu, click Constant Data > Local > Apply by Name, or press <Ctrl><B>.
2 In the Apply Constant Data Record window, type the name of the constant data record you want to apply.
3 Click a button to select the MARC fields you want to apply: Fixed, Variable, or Both.
Default: Variable
Caution: The client gives you the option to apply fixed or variable fields or both. See
more below about limitations of these choices and workarounds.
4 Click OK or press <Enter> to apply.
Or Click Cancel to cancel applying constant data.
Cataloging: Use Bibliographic Constant Data
20160708
16
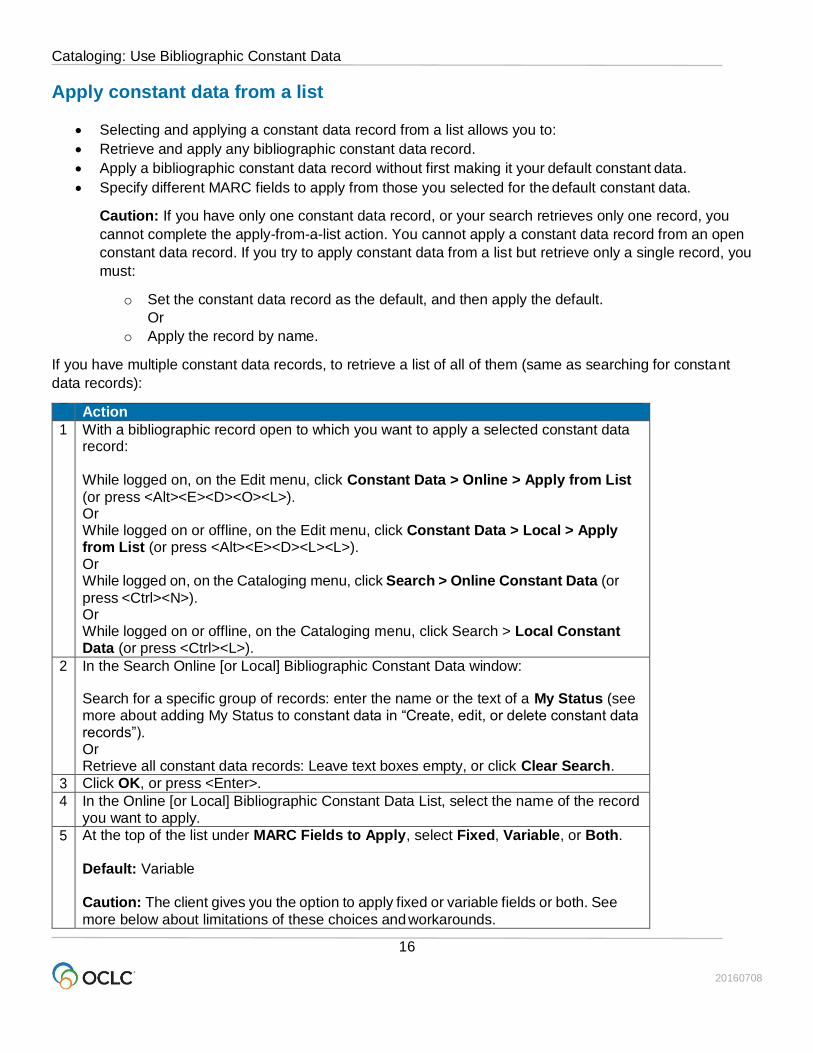
Apply constant data from a list
Selecting and applying a constant data record from a list allows you to:
Retrieve and apply any bibliographic constant data record.
Apply a bibliographic constant data record without first making it your default constant data.
Specify different MARC fields to apply from those you selected for the default constant data.
Caution: If you have only one constant data record, or your search retrieves only one record, you
cannot complete the apply-from-a-list action. You cannot apply a constant data record from an open
constant data record. If you try to apply constant data from a list but retrieve only a single record, you
must:
o Set the constant data record as the default, and then apply the default.
Or
o Apply the record by name.
If you have multiple constant data records, to retrieve a list of all of them (same as searching for constant
data records):
Action
1 With a bibliographic record open to which you want to apply a selected constant data record: While logged on, on the Edit menu, click Constant Data > Online > Apply from List
(or press <Alt><E><D><O><L>). Or While logged on or offline, on the Edit menu, click Constant Data > Local > Apply from List (or press <Alt><E><D><L><L>). Or While logged on, on the Cataloging menu, click Search > Online Constant Data (or
press <Ctrl><N>). Or While logged on or offline, on the Cataloging menu, click Search > Local Constant Data (or press <Ctrl><L>).
2 In the Search Online [or Local] Bibliographic Constant Data window:
Search for a specific group of records: enter the name or the text of a My Status (see more about adding My Status to constant data in “Create, edit, or delete constant data records”). Or Retrieve all constant data records: Leave text boxes empty, or click Clear Search.
3 Click OK, or press <Enter>.
4 In the Online [or Local] Bibliographic Constant Data List, select the name of the record you want to apply.
5 At the top of the list under MARC Fields to Apply, select Fixed, Variable, or Both. Default: Variable
Caution: The client gives you the option to apply fixed or variable fields or both. See
more below about limitations of these choices and workarounds.
Cataloging: Use Bibliographic Constant Data
20160708
17
Action
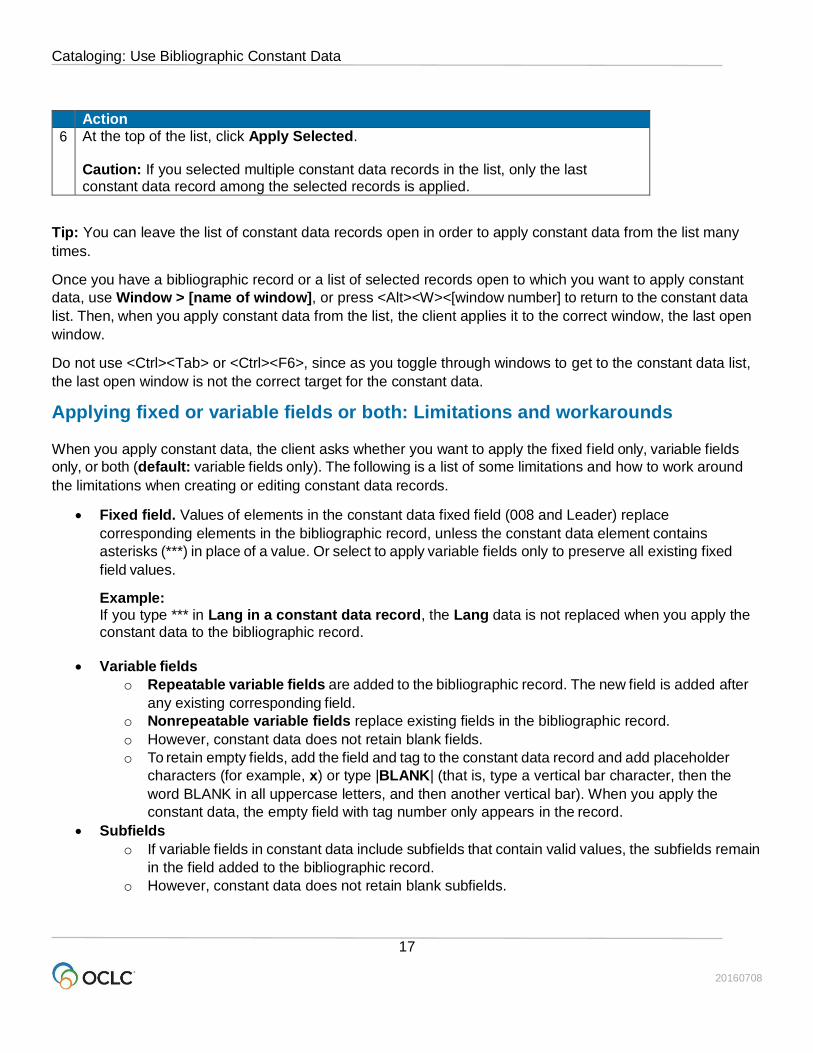
6 At the top of the list, click Apply Selected.
Caution: If you selected multiple constant data records in the list, only the last constant data record among the selected records is applied.
Tip: You can leave the list of constant data records open in order to apply constant data from the list many
times.
Once you have a bibliographic record or a list of selected records open to which you want to apply constant
data, use Window > [name of window], or press <Alt><W><[window number] to return to the constant data
list. Then, when you apply constant data from the list, the client applies it to the correct window, the last open
window.
Do not use <Ctrl><Tab> or <Ctrl><F6>, since as you toggle through windows to get to the constant data list,
the last open window is not the correct target for the constant data.
Applying fixed or variable fields or both: Limitations and workarounds
When you apply constant data, the client asks whether you want to apply the fixed field only, variable fields
only, or both (default: variable fields only). The following is a list of some limitations and how to work around
the limitations when creating or editing constant data records.
Fixed field. Values of elements in the constant data fixed field (008 and Leader) replace
corresponding elements in the bibliographic record, unless the constant data element contains
asterisks (***) in place of a value. Or select to apply variable fields only to preserve all existing fixed
field values.
Example: If you type *** in Lang in a constant data record, the Lang data is not replaced when you apply the
constant data to the bibliographic record.
Variable fields
o Repeatable variable fields are added to the bibliographic record. The new field is added after
any existing corresponding field.
o Nonrepeatable variable fields replace existing fields in the bibliographic record.
o However, constant data does not retain blank fields.
o To retain empty fields, add the field and tag to the constant data record and add placeholder
characters (for example, x) or type |BLANK| (that is, type a vertical bar character, then the
word BLANK in all uppercase letters, and then another vertical bar). When you apply the
constant data, the empty field with tag number only appears in the record.
Subfields
o If variable fields in constant data include subfields that contain valid values, the subfields remain
in the field added to the bibliographic record.
o However, constant data does not retain blank subfields.

Cataloging: Use Bibliographic Constant Data
20160708
18
o To retain empty subfields, add the subfield code and one or more placeholder characters (for
example, x), or add the subfield code and type |BLANK| (that is, type a vertical bar character,
then the word BLANK in all uppercase letters, and then another vertical bar).
Example:
Typing 100 10 ‡b |BLANK| in a constant data record is added to the bibliographic record as
100 10 ‡b
When you apply the constant data, the subfield code, followed by a space, appears in the
record.
o If you apply constant data to records selected in a list, empty subfields are retained only if you
have added one or more placeholder characters in the subfield of the constant data record. In
this case, adding |BLANK| does not retain empty subfields.
Format mismatch warning
If the MARC format of the selected constant data record does not match the format of the bibliographic record,
the system displays a warning message. Click Cancel to cancel applying the different format of the constant
data record, or click OK to apply the new format.
Notes:
The system does not compare formats if you choose to apply variable fields only.
The system does not compare formats when you apply constant data to records selected in a list. For
those records, the fixed field is automatically overwritten.

Cataloging: Use Bibliographic Constant Data
20160708
19
3. Find bibliographic constant data records
About finding bibliographic constant data records
See also: “Use bibliographic constant data search results.”
You can find constant data records by:
Specifying a name which you assign when you create the record.
Specifying a My Status that you can assign (Action > SetStatus).
Listing all records.
View the default (without having to search for it) (see “Apply bibliographic constant data for more
information).
Find specific bibliographic constant data records by name or My Status
Action
1 On the Cataloging menu, click Search > Online Constant Data, or press
<Ctrl><N>. Or Click Search > Local Constant Data, or press <Ctrl><L>.
2 The Search Online [or Local] Constant Data window opens.
Optional for local constant data file. Change the default file:
In the Search Local Constant Data window in the Local File list at the top, select a different local file. Result: Once you change the file, enter the search, and click OK or press <Enter>, the client gives you a message that changing the file will:
Close all records from the file
Change the default file to the one you selected Click Yes to confirm or No to cancel changing the default file.
3 In the Search Online [or Local] Bibliographic Constant Data window, in the Search for box, type a constant data record name and select the Name index from the adjacent list if not already selected. Or In the Search for box, type text you assigned to a constant data record as a custom My Status and select the My Status index from the adjacent list. Tip: Assigning your name as My Status for your constant data records and then searching the My Status index for your name is a good way to retrieve only your constant data records.
4 Optional. Type a second search term (constant data name or My Status), select AND, OR, or NOT to indicate how you want to combine the terms, and select the index from
the adjacent list.
AND: Finds records that contain both terms in the same record
OR: Finds records that contain either term
NOT: Finds records that contain the first term but not the second term
Cataloging: Use Bibliographic Constant Data
20160708
20
Action
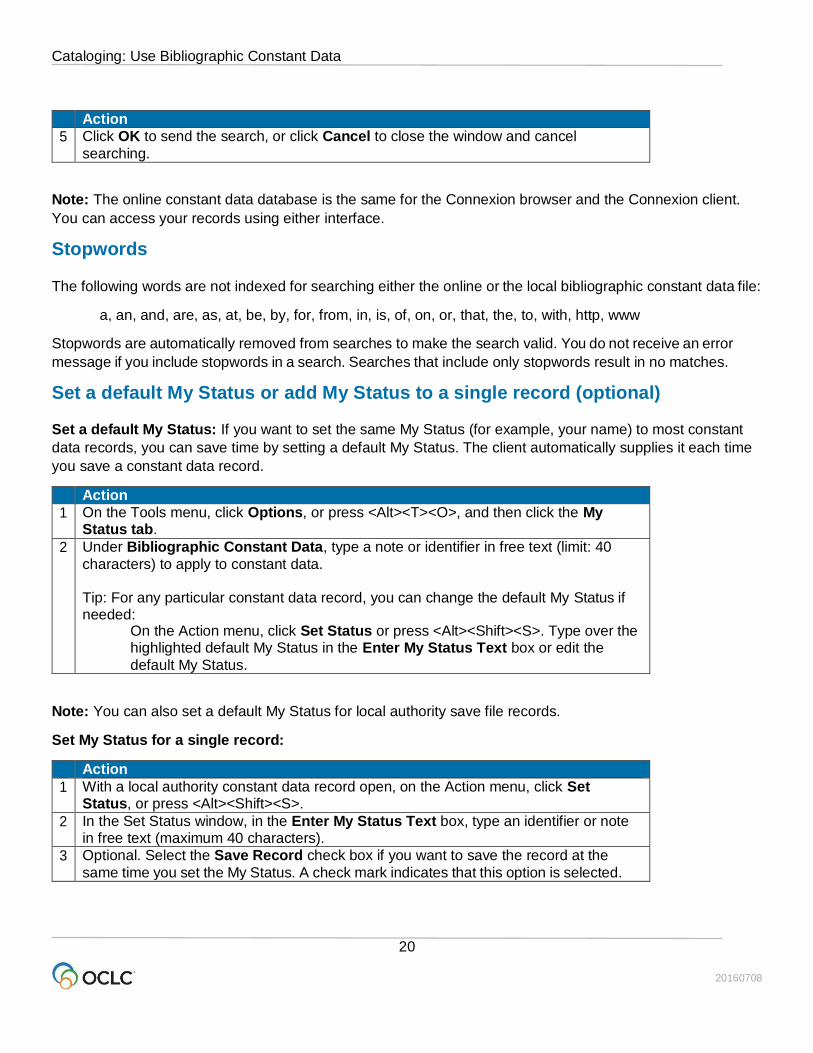
5 Click OK to send the search, or click Cancel to close the window and cancel
searching.
Note: The online constant data database is the same for the Connexion browser and the Connexion client.
You can access your records using either interface.
Stopwords
The following words are not indexed for searching either the online or the local bibliographic constant data file:
a, an, and, are, as, at, be, by, for, from, in, is, of, on, or, that, the, to, with, http, www
Stopwords are automatically removed from searches to make the search valid. You do not receive an error
message if you include stopwords in a search. Searches that include only stopwords result in no matches.
Set a default My Status or add My Status to a single record (optional)
Set a default My Status: If you want to set the same My Status (for example, your name) to most constant
data records, you can save time by setting a default My Status. The client automatically supplies it each time
you save a constant data record.
Action
1 On the Tools menu, click Options, or press <Alt><T><O>, and then click the My Status tab.
2 Under Bibliographic Constant Data, type a note or identifier in free text (limit: 40
characters) to apply to constant data. Tip: For any particular constant data record, you can change the default My Status if needed:
On the Action menu, click Set Status or press <Alt><Shift><S>. Type over the highlighted default My Status in the Enter My Status Text box or edit the
default My Status.
Note: You can also set a default My Status for local authority save file records.
Set My Status for a single record:
Action
1 With a local authority constant data record open, on the Action menu, click Set Status, or press <Alt><Shift><S>.
2 In the Set Status window, in the Enter My Status Text box, type an identifier or note in free text (maximum 40 characters).
3 Optional. Select the Save Record check box if you want to save the record at the
same time you set the My Status. A check mark indicates that this option is selected.
Cataloging: Use Bibliographic Constant Data
20160708
21
Action
4 Click OK or press <Enter> to assign or change the My Status, or click Cancel.
Results:
The My Status you entered displays in the record's status bar.
If you selected the Save Record check box, the client asks if you want to save
to the online file or to a local file. o If you save to the online file, the client closes the record. o If you save to the local file, the record remains open.
List all bibliographic constant data records
Action
1 In the Search Online [or Local] Bibliographic Constant Data window (Cataloging > Search > Online Constant Data, or Cataloging > Search > Local Constant Data, leave all text boxes empty, or click Clear Search.
2 Click OK or press <Enter>.
Cataloging: Use Bibliographic Constant Data
20160708
22
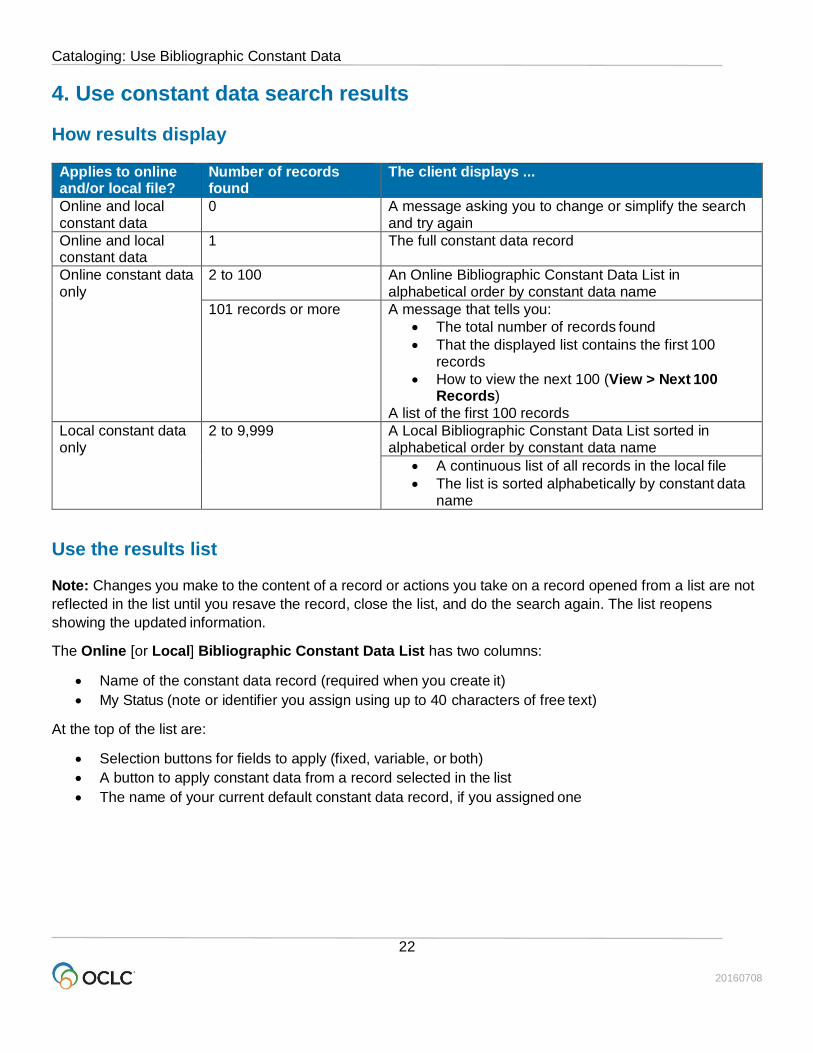
4. Use constant data search results
How results display
Applies to online and/or local file?
Number of records found
The client displays ...
Online and local constant data
0 A message asking you to change or simplify the search and try again
Online and local constant data
1 The full constant data record
Online constant data only
2 to 100 An Online Bibliographic Constant Data List in alphabetical order by constant data name
101 records or more A message that tells you:
The total number of records found
That the displayed list contains the first 100 records
How to view the next 100 (View > Next 100 Records)
A list of the first 100 records
Local constant data only
2 to 9,999 A Local Bibliographic Constant Data List sorted in alphabetical order by constant data name
A continuous list of all records in the local file
The list is sorted alphabetically by constant data name
Use the results list
Note: Changes you make to the content of a record or actions you take on a record opened from a list are not
reflected in the list until you resave the record, close the list, and do the search again. The list reopens
showing the updated information.
The Online [or Local] Bibliographic Constant Data List has two columns:
Name of the constant data record (required when you create it)
My Status (note or identifier you assign using up to 40 characters of free text)
At the top of the list are:
Selection buttons for fields to apply (fixed, variable, or both)
A button to apply constant data from a record selected in the list
The name of your current default constant data record, if you assigned one
Cataloging: Use Bibliographic Constant Data
20160708
23
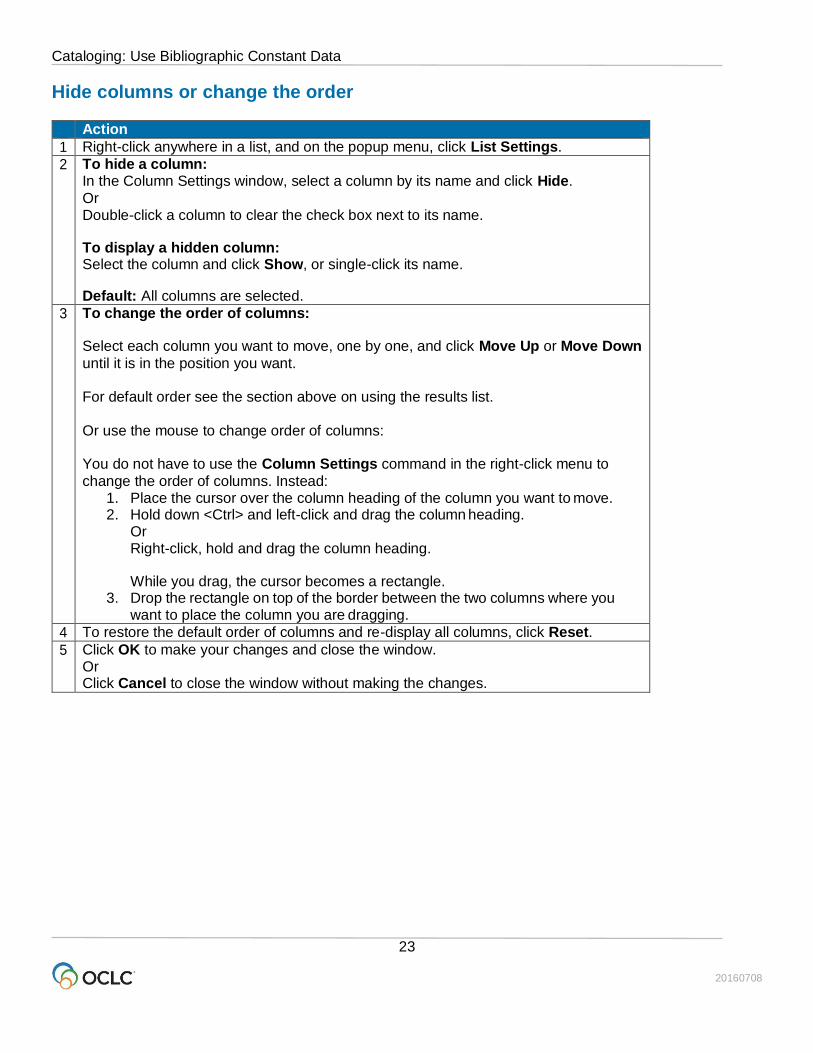
Hide columns or change the order
Action
1 Right-click anywhere in a list, and on the popup menu, click List Settings.
2 To hide a column: In the Column Settings window, select a column by its name and click Hide.
Or Double-click a column to clear the check box next to its name.
To display a hidden column: Select the column and click Show, or single-click its name.
Default: All columns are selected.
3 To change the order of columns:
Select each column you want to move, one by one, and click Move Up or Move Down
until it is in the position you want. For default order see the section above on using the results list. Or use the mouse to change order of columns: You do not have to use the Column Settings command in the right-click menu to
change the order of columns. Instead: 1. Place the cursor over the column heading of the column you want to move. 2. Hold down <Ctrl> and left-click and drag the column heading.
Or Right-click, hold and drag the column heading.
While you drag, the cursor becomes a rectangle. 3. Drop the rectangle on top of the border between the two columns where you
want to place the column you are dragging.
4 To restore the default order of columns and re-display all columns, click Reset.
5 Click OK to make your changes and close the window. Or Click Cancel to close the window without making the changes.
Cataloging: Use Bibliographic Constant Data
20160708
24
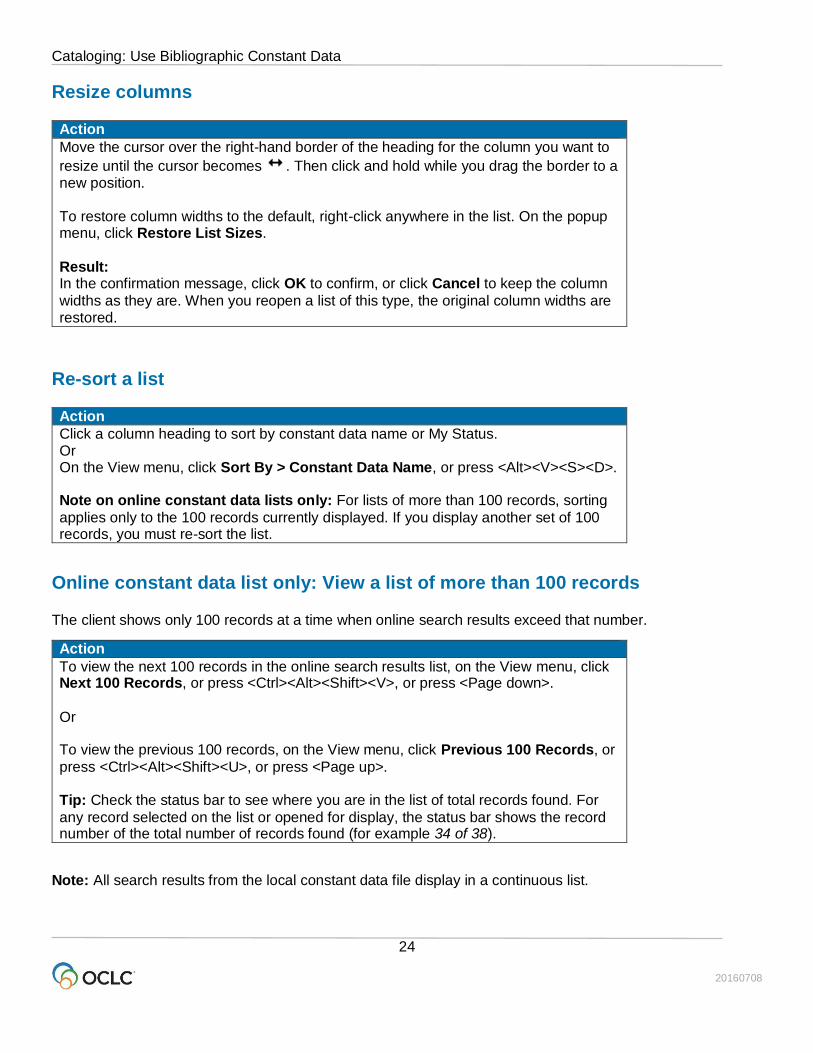
Resize columns
Action
Move the cursor over the right-hand border of the heading for the column you want to
resize until the cursor becomes . Then click and hold while you drag the border to a new position. To restore column widths to the default, right-click anywhere in the list. On the popup menu, click Restore List Sizes.
Result: In the confirmation message, click OK to confirm, or click Cancel to keep the column
widths as they are. When you reopen a list of this type, the original column widths are restored.
Re-sort a list
Action
Click a column heading to sort by constant data name or My Status. Or On the View menu, click Sort By > Constant Data Name, or press <Alt><V><S><D>.
Note on online constant data lists only: For lists of more than 100 records, sorting
applies only to the 100 records currently displayed. If you display another set of 100 records, you must re-sort the list.
Online constant data list only: View a list of more than 100 records
The client shows only 100 records at a time when online search results exceed that number.
Action
To view the next 100 records in the online search results list, on the View menu, click Next 100 Records, or press <Ctrl><Alt><Shift><V>, or press <Page down>.
Or To view the previous 100 records, on the View menu, click Previous 100 Records, or
press <Ctrl><Alt><Shift><U>, or press <Page up>. Tip: Check the status bar to see where you are in the list of total records found. For
any record selected on the list or opened for display, the status bar shows the record number of the total number of records found (for example 34 of 38).
Note: All search results from the local constant data file display in a continuous list.
Cataloging: Use Bibliographic Constant Data
20160708
25
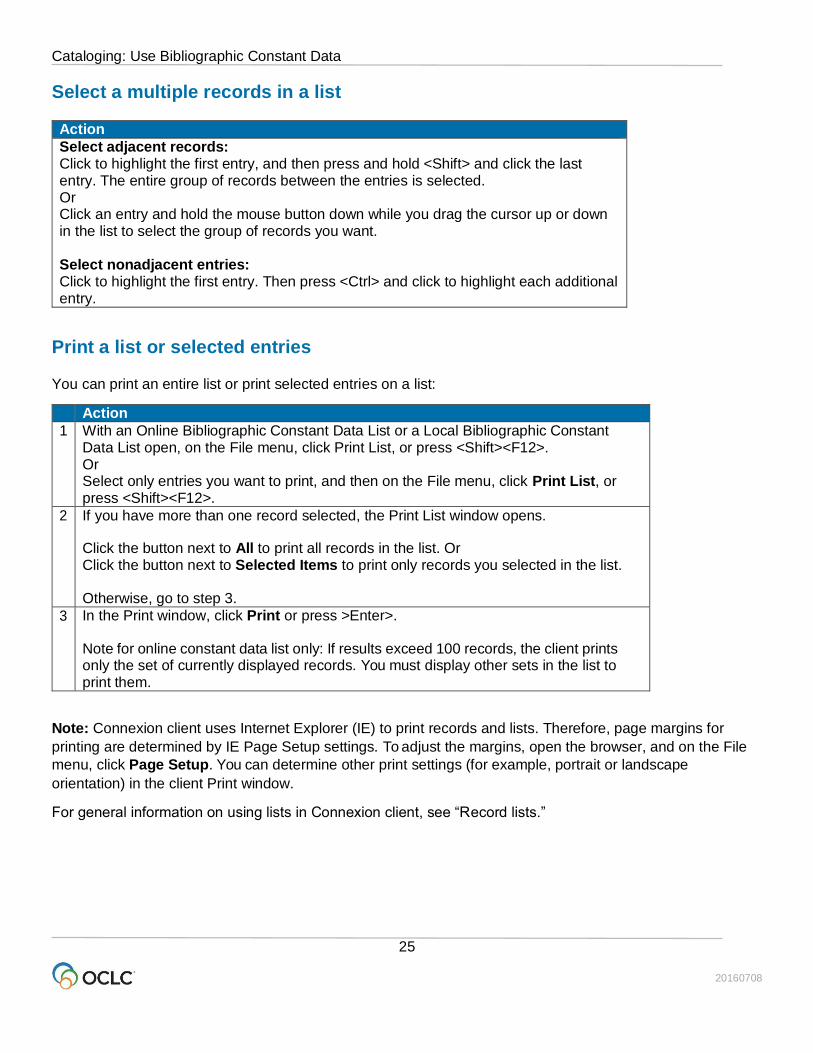
Select a multiple records in a list
Action
Select adjacent records: Click to highlight the first entry, and then press and hold <Shift> and click the last entry. The entire group of records between the entries is selected. Or Click an entry and hold the mouse button down while you drag the cursor up or down in the list to select the group of records you want. Select nonadjacent entries: Click to highlight the first entry. Then press <Ctrl> and click to highlight each additional entry.
Print a list or selected entries
You can print an entire list or print selected entries on a list:
Action
1 With an Online Bibliographic Constant Data List or a Local Bibliographic Constant Data List open, on the File menu, click Print List, or press <Shift><F12>. Or Select only entries you want to print, and then on the File menu, click Print List, or press <Shift><F12>.
2 If you have more than one record selected, the Print List window opens. Click the button next to All to print all records in the list. Or Click the button next to Selected Items to print only records you selected in the list.
Otherwise, go to step 3.
3 In the Print window, click Print or press >Enter>.
Note for online constant data list only: If results exceed 100 records, the client prints only the set of currently displayed records. You must display other sets in the list to print them.
Note: Connexion client uses Internet Explorer (IE) to print records and lists. Therefore, page margins for
printing are determined by IE Page Setup settings. To adjust the margins, open the browser, and on the File
menu, click Page Setup. You can determine other print settings (for example, portrait or landscape
orientation) in the client Print window.
For general information on using lists in Connexion client, see “Record lists.”
Cataloging: Use Bibliographic Constant Data
20160708
26
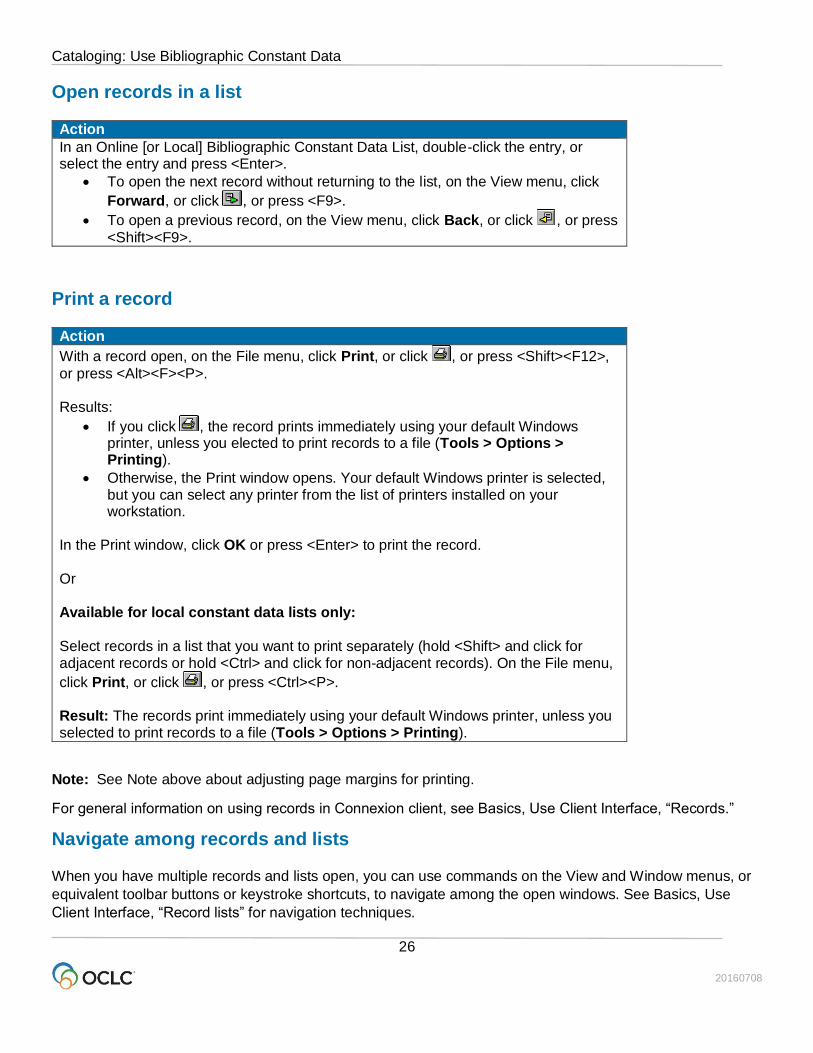
Open records in a list
Action
In an Online [or Local] Bibliographic Constant Data List, double-click the entry, or select the entry and press <Enter>.
To open the next record without returning to the list, on the View menu, click
Forward, or click , or press <F9>.
To open a previous record, on the View menu, click Back, or click , or press
<Shift><F9>.
Print a record
Action
With a record open, on the File menu, click Print, or click , or press <Shift><F12>,
or press <Alt><F><P>. Results:
If you click , the record prints immediately using your default Windows printer, unless you elected to print records to a file (Tools > Options > Printing).
Otherwise, the Print window opens. Your default Windows printer is selected, but you can select any printer from the list of printers installed on your workstation.
In the Print window, click OK or press <Enter> to print the record.
Or Available for local constant data lists only: Select records in a list that you want to print separately (hold <Shift> and click for adjacent records or hold <Ctrl> and click for non-adjacent records). On the File menu,
click Print, or click , or press <Ctrl><P>.
Result: The records print immediately using your default Windows printer, unless you selected to print records to a file (Tools > Options > Printing).
Note: See Note above about adjusting page margins for printing.
For general information on using records in Connexion client, see Basics, Use Client Interface, “Records.”
Navigate among records and lists
When you have multiple records and lists open, you can use commands on the View and Window menus, or
equivalent toolbar buttons or keystroke shortcuts, to navigate among the open windows. See Basics, Use
Client Interface, “Record lists” for navigation techniques.
Cataloging: Use Bibliographic Constant Data
20160708
27
Actions on bibliographic constant data records
The following table shows actions you can take on single bibliographic constant data records or on multiple
records selected in a constant data list:
Action Available in ... logged on? offline? How to
Print records or a list
Online constant data And Local constant data (logged on or offline)
See sections above about printing a record and printing a list
Set default constant data
Online constant data And Local constant data (logged on or offline)
With an online constant data record open, on the Edit menu, click Constant Data > Online > Set as Default, or press
<Alt><E><D><O><D>. Or With a local constant data record open, on the Edit menu, click Constant Data > Local > Set as Default, or press <Alt><E><D><L><D>.
Derive new record from existing bibliographic or constant data record
Online constant data And Local constant data (logged on or offline)
With a constant data or bibliographuic record open, on the Edit menu, click Derive > New Constant Data, or press <Ctrl><I>.
Edit record Online constant data And Local constant data (logged on or offline)
Open a constant data record and edit or add content as needed.
Save record Online constant data And Local constant data (save to online file only when logged on)
With a constant data record open, or with records selected in an online or local constant data list:
On the Action menu, click Save Record to Online File, or press <Ctrl><Alt><V> (must be logged on). Or Click Save Record to Local File, or press <F4>.
Add or change My Status
Online constant data And Local constant data (logged on or offline)
With a constant data record open, or with records selected in an online or local list:
1. Pn the Action menu, click Set Status, or press <Alt><Shift><S>.
2. In the Enter My Status Text box, type a
new My Status, or edit or replace a My Status (40 characters maximum).
3. Click OK or press <Enter>.

Cataloging: Use Bibliographic Constant Data
20160708
28
Action Available in ... logged on? offline? How to
Delete record Online constant data And Local constant data (logged on or offline)
With a constant data record open, or with records selected in an online or local list:
1. On the Action menu, click Delete
Record, or click , or press
<Ctrl><Alt><D>. 2. Click Yes to confirm.
Move record (between local files only)
Local constant data only (logged on or offline)
With a local constant data record open or with records selected in a local constant data list, on the Action menu, click Move Record, or press <Alt><A><V>. Note: Local constant data records cannot be copied within the same file, since each record must have a unique name. To copy a record within the same file, use Edit > Derive > New Constant Data to create a copy with a different name.
For summaries on applying default constant data, applying constant data by name, or applying constant data
from a list, see Cataloging, Save Bibliographic Records, “Save bibliographic records.”