categories - yesmua...a) add, edit and delete categories * add category: - step 1: click add...
TRANSCRIPT

Website: http://www.yesmua.com YesMua Corporation
3
CATEGORIES
I/ Introduce Main Screen when Nails 123 System ................................................ 4
II) Instruction ....................................................................................................... 5
1) Add/Edit technician .......................................................................................... 5
2) How to change Categories and Services .......................................................... 8 a) Add, edit and delete Categories................................................................... 9 b) Add, edit and delete Service ...................................................................... 10
3) Payment type (Cash, Credit, Gift Card or Check)............................................ 11 a) Only one technician doing service ............................................................. 11 b) Multi Technician doing services ................................................................. 14 c) Pay by Credit Card ...................................................................................... 14
4) How to sell Gift Card ...................................................................................... 15
5) Manage Customer ......................................................................................... 15 a) Add new cusomer ...................................................................................... 16
6) Manage Appointment .................................................................................... 18 a) Add appointment ....................................................................................... 18 b) Edit/Delete Appointment .......................................................................... 19
III) Owner/Manager .......................................................................................... 19
1) Manager (default security code 0000) ........................................................... 20 a) Ticket .......................................................................................................... 20 b) C-Card (Credit Card) Yesmua Merchant Only ............................................ 20 c) Expense ...................................................................................................... 21 d) Report ........................................................................................................ 21 e) Setup .......................................................................................................... 22
2) Owner (default security code 1234) ............................................................... 25
Website: http://www.yesmua.com YesMua Corporation
4
NAILS 123 SYSTEM
I/ Introduce Main Screen when Nails 123 System
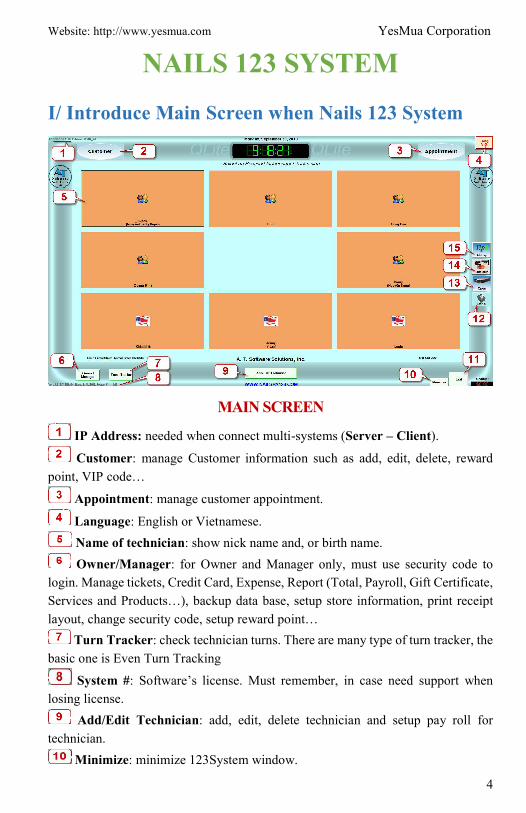
MAIN SCREEN
IP Address: needed when connect multi-systems (Server – Client).
Customer: manage Customer information such as add, edit, delete, reward
point, VIP code…
Appointment: manage customer appointment.
Language: English or Vietnamese.
Name of technician: show nick name and, or birth name.
Owner/Manager: for Owner and Manager only, must use security code to
login. Manage tickets, Credit Card, Expense, Report (Total, Payroll, Gift Certificate,
Services and Products…), backup data base, setup store information, print receipt
layout, change security code, setup reward point…
Turn Tracker: check technician turns. There are many type of turn tracker, the
basic one is Even Turn Tracking
System #: Software’s license. Must remember, in case need support when
losing license.
Add/Edit Technician: add, edit, delete technician and setup pay roll for
technician.
Minimize: minimize 123System window.
Website: http://www.yesmua.com YesMua Corporation
5
Exit: turn off 123 Systems.
Printer Status: delete printer error when printer not working.
Open Cash Drawer: click here to open Cash Drawer.
Edit Cards: view, adjust amount, edit and add tip for Credit Card transaction
(YesMua Merchant Only).
Add Tips: add tips for Credit Card transaction (YesMua Merchant Only).
II) Instruction
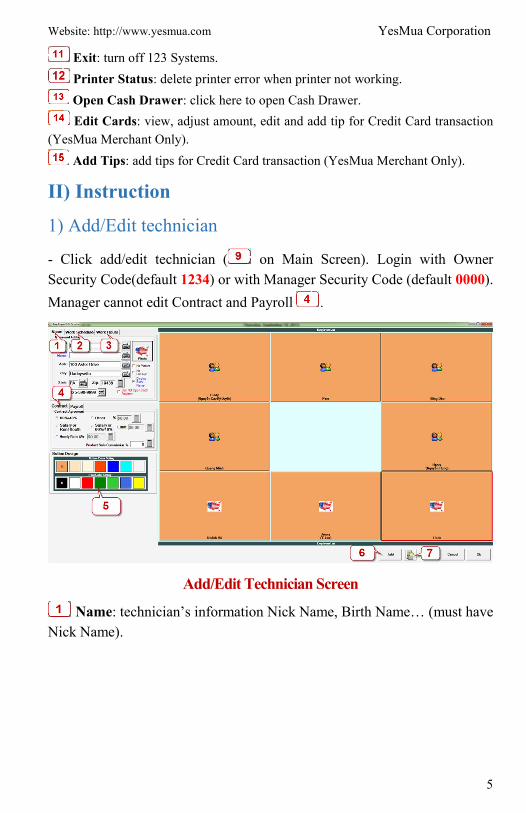
1) Add/Edit technician
- Click add/edit technician ( on Main Screen). Login with Owner
Security Code(default 1234) or with Manager Security Code (default 0000).
Manager cannot edit Contract and Payroll .
Add/Edit Technician Screen
Name: technician’s information Nick Name, Birth Name… (must have
Nick Name).
Website: http://www.yesmua.com YesMua Corporation
6
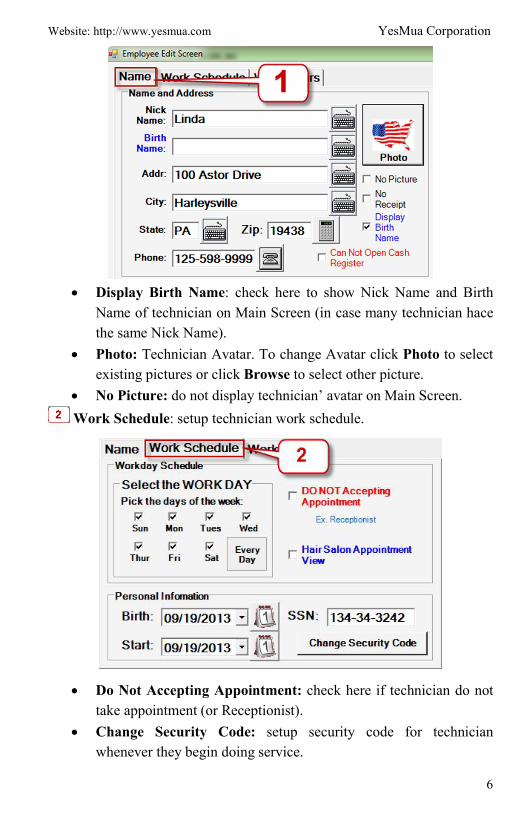
Display Birth Name: check here to show Nick Name and Birth
Name of technician on Main Screen (in case many technician hace
the same Nick Name).
Photo: Technician Avatar. To change Avatar click Photo to select
existing pictures or click Browse to select other picture.
No Picture: do not display technician’ avatar on Main Screen.
Work Schedule: setup technician work schedule.
Do Not Accepting Appointment: check here if technician do not
take appointment (or Receptionist).
Change Security Code: setup security code for technician
whenever they begin doing service.
Website: http://www.yesmua.com YesMua Corporation
7
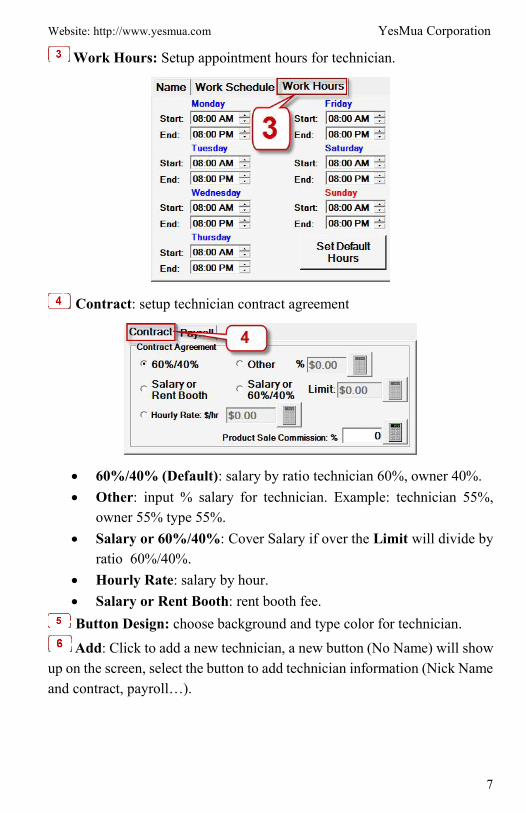
Work Hours: Setup appointment hours for technician.
Contract: setup technician contract agreement
60%/40% (Default): salary by ratio technician 60%, owner 40%.
Other: input % salary for technician. Example: technician 55%,
owner 55% type 55%.
Salary or 60%/40%: Cover Salary if over the Limit will divide by
ratio 60%/40%.
Hourly Rate: salary by hour.
Salary or Rent Booth: rent booth fee.
Button Design: choose background and type color for technician.
Add: Click to add a new technician, a new button (No Name) will show
up on the screen, select the button to add technician information (Nick Name
and contract, payroll…).
Website: http://www.yesmua.com YesMua Corporation
8
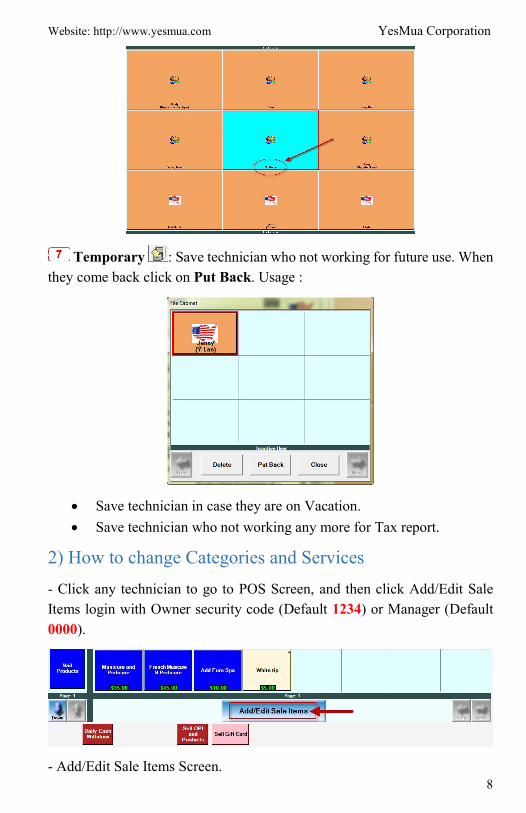
Temporary : Save technician who not working for future use. When
they come back click on Put Back. Usage :
Save technician in case they are on Vacation.
Save technician who not working any more for Tax report.
2) How to change Categories and Services
- Click any technician to go to POS Screen, and then click Add/Edit Sale
Items login with Owner security code (Default 1234) or Manager (Default
0000).
- Add/Edit Sale Items Screen.
Website: http://www.yesmua.com YesMua Corporation
9
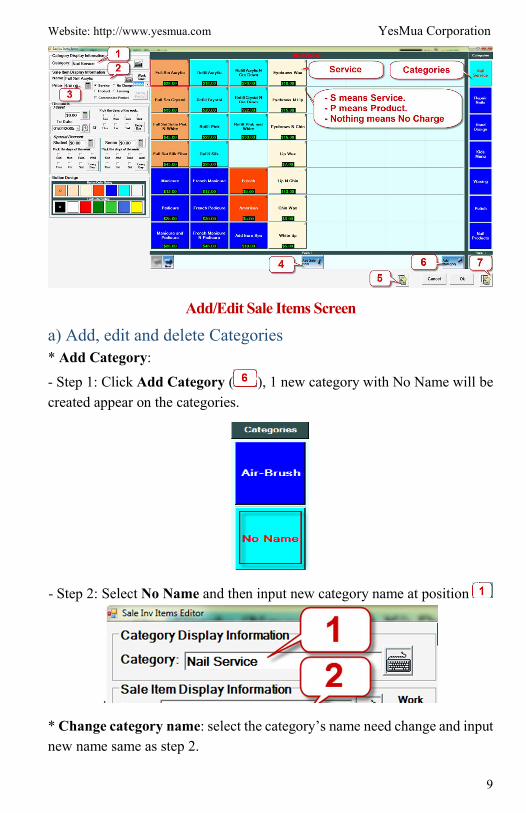
Add/Edit Sale Items Screen
a) Add, edit and delete Categories * Add Category:
- Step 1: Click Add Category ( ), 1 new category with No Name will be
created appear on the categories.
- Step 2: Select No Name and then input new category name at position
.
* Change category name: select the category’s name need change and input
new name same as step 2.
Website: http://www.yesmua.com YesMua Corporation
10
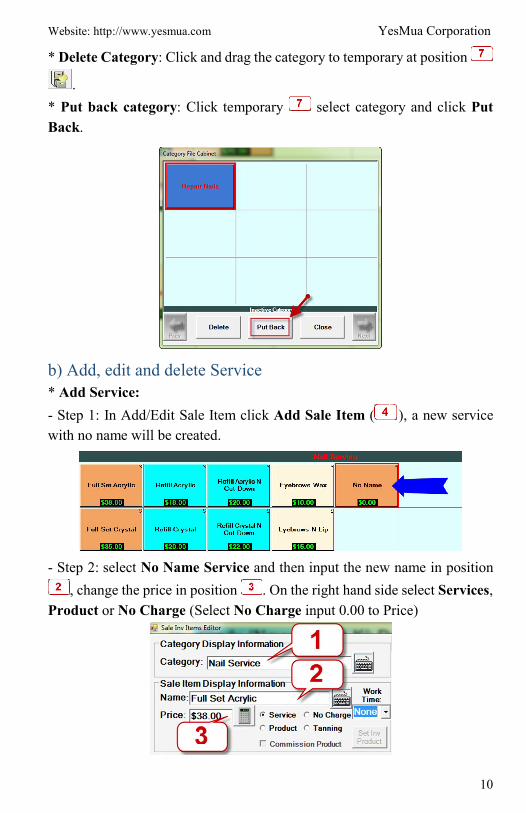
* Delete Category: Click and drag the category to temporary at position
.
* Put back category: Click temporary select category and click Put
Back.
b) Add, edit and delete Service * Add Service:
- Step 1: In Add/Edit Sale Item click Add Sale Item ( ), a new service
with no name will be created.
- Step 2: select No Name Service and then input the new name in position
, change the price in position . On the right hand side select Services,
Product or No Charge (Select No Charge input 0.00 to Price)
Website: http://www.yesmua.com YesMua Corporation
11
* Change Service: select service and do the same as step 2.
* Delete Service: click and drag service to temporary on position
* Put back Service: click temporary on position select the service and
then click Put Back (same as put back category).
3) Payment type (Cash, Credit, Gift Card or Check)
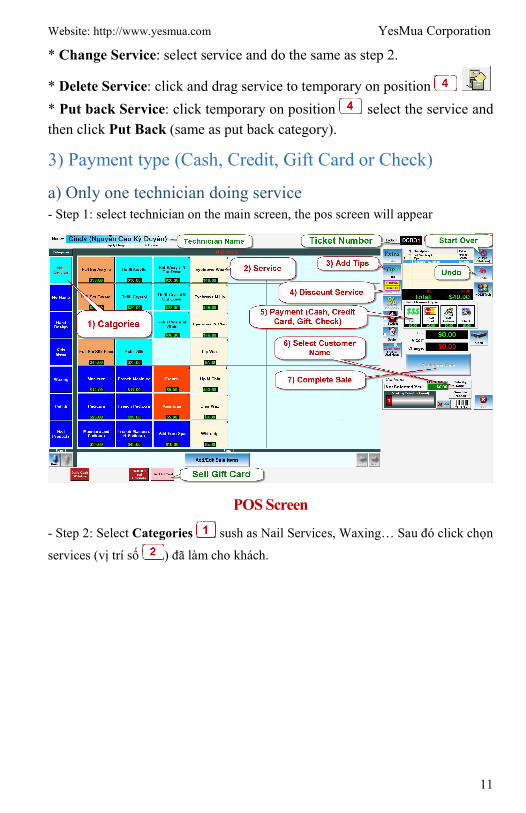
a) Only one technician doing service - Step 1: select technician on the main screen, the pos screen will appear
POS Screen
- Step 2: Select Categories sush as Nail Services, Waxing… Sau đó click chọn
services (vị trí số ) đã làm cho khách.
Website: http://www.yesmua.com YesMua Corporation
12
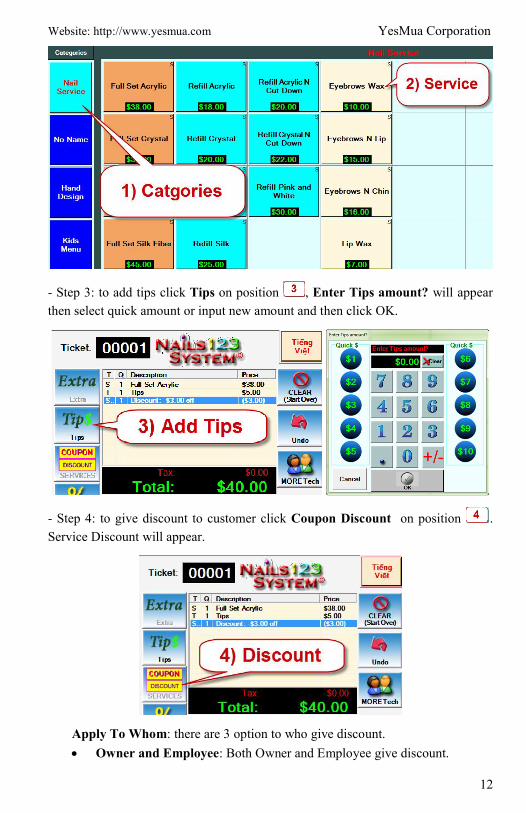
- Step 3: to add tips click Tips on position , Enter Tips amount? will appear
then select quick amount or input new amount and then click OK.
- Step 4: to give discount to customer click Coupon Discount on position .
Service Discount will appear.
Apply To Whom: there are 3 option to who give discount.
Owner and Employee: Both Owner and Employee give discount.
Website: http://www.yesmua.com YesMua Corporation
13
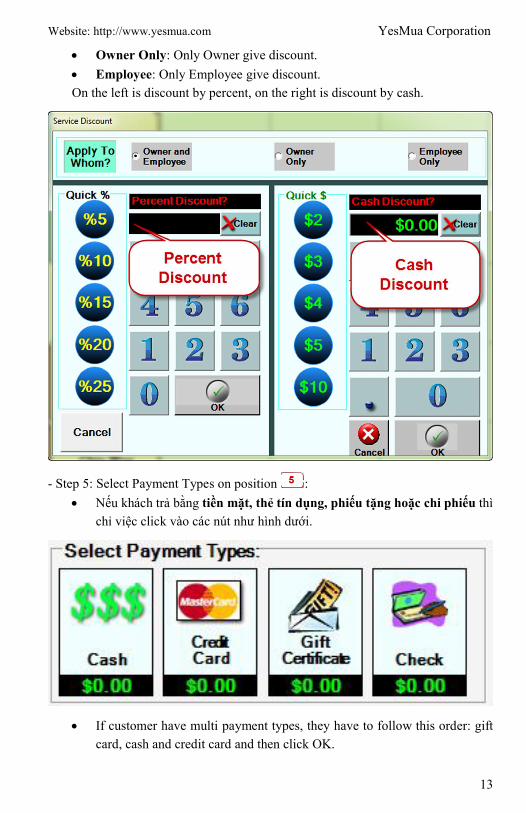
Owner Only: Only Owner give discount.
Employee: Only Employee give discount.
On the left is discount by percent, on the right is discount by cash.
- Step 5: Select Payment Types on position :
Nếu khách trả bằng tiền mặt, thẻ tín dụng, phiếu tặng hoặc chi phiếu thì
chỉ việc click vào các nút như hình dưới.
If customer have multi payment types, they have to follow this order: gift
card, cash and credit card and then click OK.
Website: http://www.yesmua.com YesMua Corporation
14
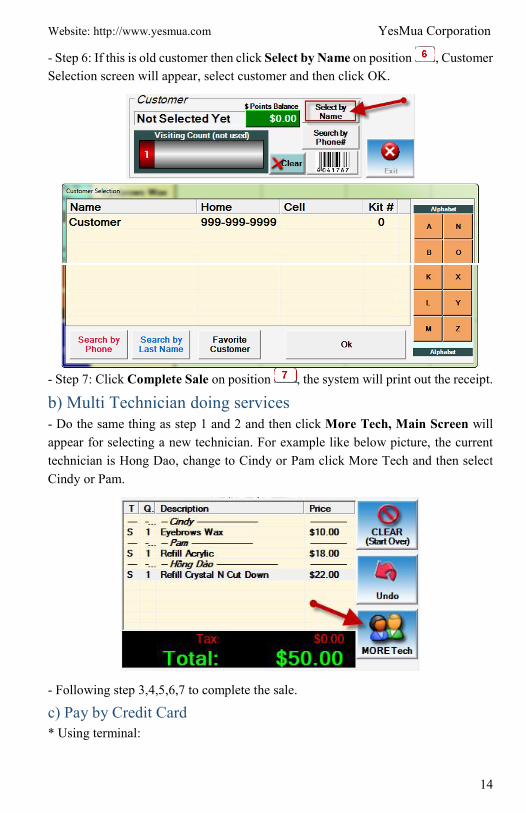
- Step 6: If this is old customer then click Select by Name on position , Customer
Selection screen will appear, select customer and then click OK.
- Step 7: Click Complete Sale on position , the system will print out the receipt.
b) Multi Technician doing services - Do the same thing as step 1 and 2 and then click More Tech, Main Screen will
appear for selecting a new technician. For example like below picture, the current
technician is Hong Dao, change to Cindy or Pam click More Tech and then select
Cindy or Pam.
- Following step 3,4,5,6,7 to complete the sale.
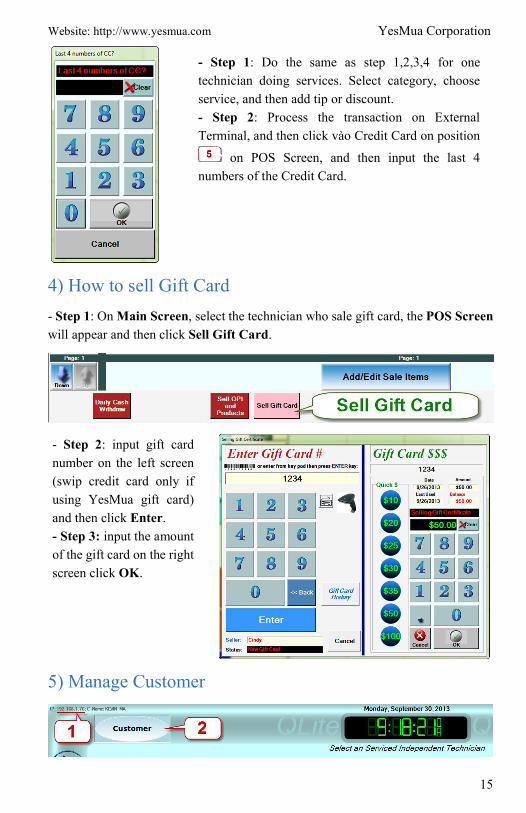
c) Pay by Credit Card * Using terminal:
Website: http://www.yesmua.com YesMua Corporation
15
4) How to sell Gift Card
- Step 1: On Main Screen, select the technician who sale gift card, the POS Screen
will appear and then click Sell Gift Card.
5) Manage Customer
- Step 1: Do the same as step 1,2,3,4 for one
technician doing services. Select category, choose
service, and then add tip or discount.
- Step 2: Process the transaction on External
Terminal, and then click vào Credit Card on position
on POS Screen, and then input the last 4
numbers of the Credit Card.
- Step 2: input gift card
number on the left screen
(swip credit card only if
using YesMua gift card)
and then click Enter.
- Step 3: input the amount
of the gift card on the right
screen click OK.
Website: http://www.yesmua.com YesMua Corporation
16
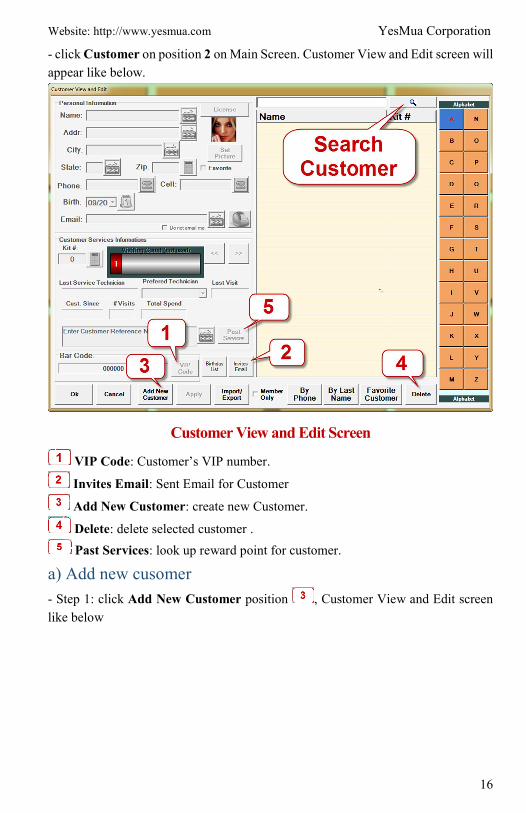
- click Customer on position 2 on Main Screen. Customer View and Edit screen will
appear like below.
Customer View and Edit Screen
VIP Code: Customer’s VIP number.
Invites Email: Sent Email for Customer
Add New Customer: create new Customer.
Delete: delete selected customer .
Past Services: look up reward point for customer.
a) Add new cusomer
- Step 1: click Add New Customer position , Customer View and Edit screen
like below

Website: http://www.yesmua.com YesMua Corporation
17
- Step 2: input customer’s information. typing Name, Phone and Email.
Wan to create customer’s VIP number click VIP Code on position
Add New Code screen will appear, swip VIP Card only if using
YesMua VIP or type customer’s Name and Bar Code number and then
click OK.
Website: http://www.yesmua.com YesMua Corporation
18
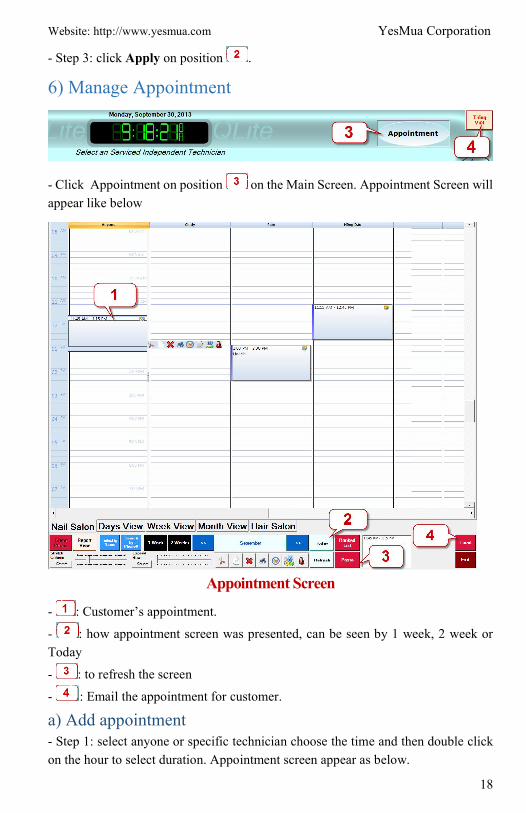
- Step 3: click Apply on position .
6) Manage Appointment
- Click Appointment on position on the Main Screen. Appointment Screen will
appear like below
Appointment Screen
- : Customer’s appointment.
- : how appointment screen was presented, can be seen by 1 week, 2 week or
Today
- : to refresh the screen
- : Email the appointment for customer.
a) Add appointment - Step 1: select anyone or specific technician choose the time and then double click
on the hour to select duration. Appointment screen appear as below.

Website: http://www.yesmua.com YesMua Corporation
19
- Step 2: select the duration and then click OK.
(Optional) if this is a new customer click New Customer to create a new profile, if
is exiting customer click Existing Customer. Tiếp theo click vào Services chọn dịch
vụ khách muốn làm. Sau đó click OK.
b) Edit/Delete Appointment - Choose appointment need edit:
: Delete appointment.
: Print selected appointment.
: Add/Delete Service.
: Select customer.
: Email appointment to customer.
III) Owner/Manager
- Click Owner/Manager on position on the Main Screen. Login with Owner’s
security code(default 1234) or Manager (default 0000).
Website: http://www.yesmua.com YesMua Corporation
20
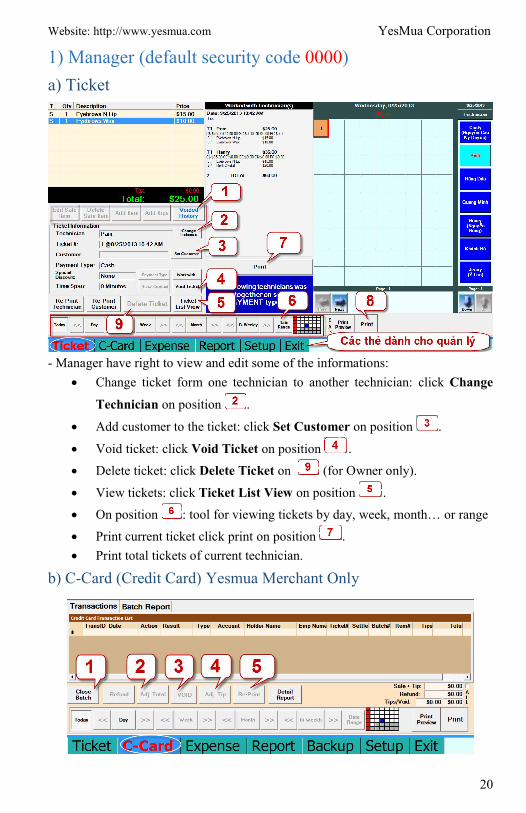
1) Manager (default security code 0000)
a) Ticket
- Manager have right to view and edit some of the informations:
Change ticket form one technician to another technician: click Change
Technician on position .
Add customer to the ticket: click Set Customer on position .
Void ticket: click Void Ticket on position .
Delete ticket: click Delete Ticket on (for Owner only).
View tickets: click Ticket List View on position .
On position : tool for viewing tickets by day, week, month… or range
Print current ticket click print on position .
Print total tickets of current technician.
b) C-Card (Credit Card) Yesmua Merchant Only
Website: http://www.yesmua.com YesMua Corporation
21
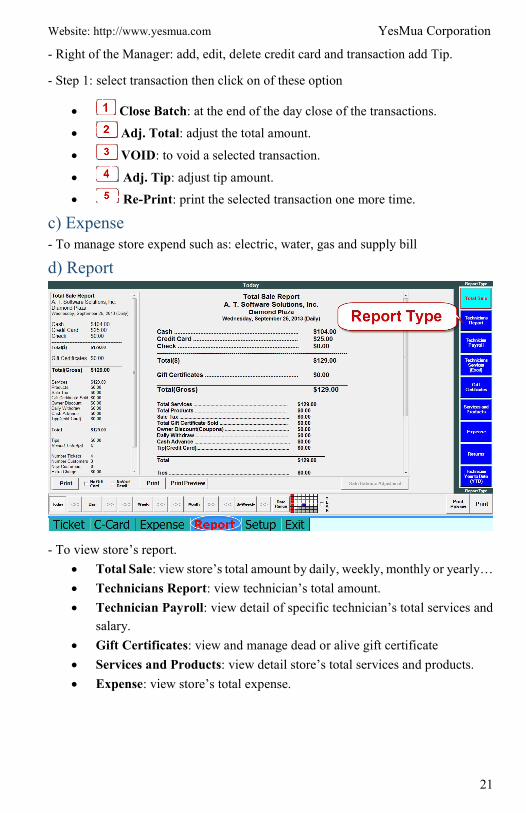
- Right of the Manager: add, edit, delete credit card and transaction add Tip.
- Step 1: select transaction then click on of these option
Close Batch: at the end of the day close of the transactions.
Adj. Total: adjust the total amount.
VOID: to void a selected transaction.
Adj. Tip: adjust tip amount.
Re-Print: print the selected transaction one more time.
c) Expense - To manage store expend such as: electric, water, gas and supply bill
d) Report
- To view store’s report.
Total Sale: view store’s total amount by daily, weekly, monthly or yearly…
Technicians Report: view technician’s total amount.
Technician Payroll: view detail of specific technician’s total services and
salary.
Gift Certificates: view and manage dead or alive gift certificate
Services and Products: view detail store’s total services and products.
Expense: view store’s total expense.
Website: http://www.yesmua.com YesMua Corporation
22
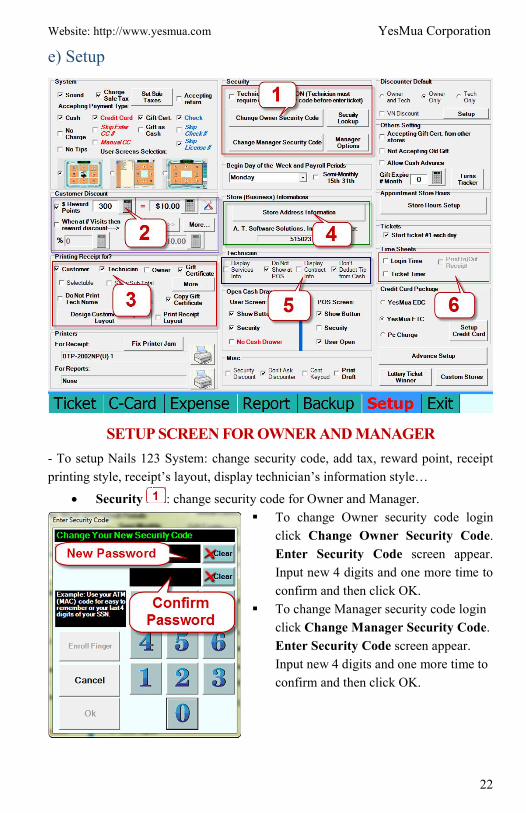
e) Setup
SETUP SCREEN FOR OWNER AND MANAGER
- To setup Nails 123 System: change security code, add tax, reward point, receipt
printing style, receipt’s layout, display technician’s information style…
Security : change security code for Owner and Manager.
To change Owner security code login
click Change Owner Security Code.
Enter Security Code screen appear.
Input new 4 digits and one more time to
confirm and then click OK.
To change Manager security code login
click Change Manager Security Code.
Enter Security Code screen appear.
Input new 4 digits and one more time to
confirm and then click OK.
Website: http://www.yesmua.com YesMua Corporation
23
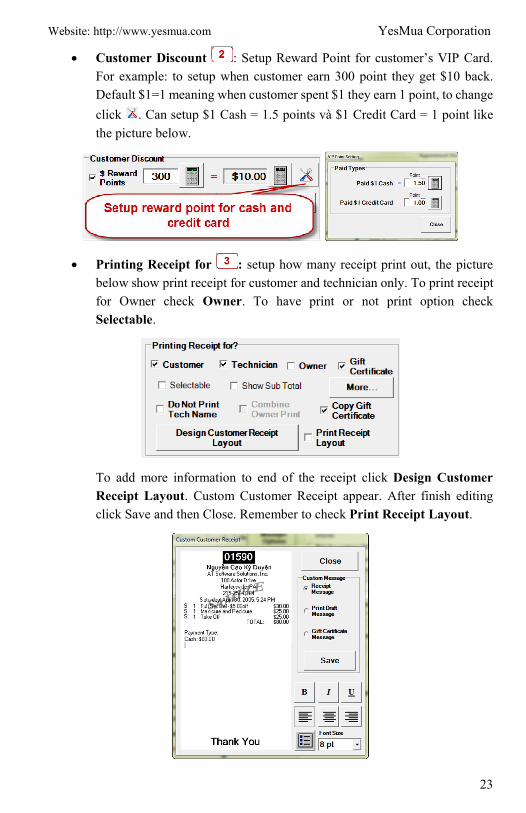
Customer Discount : Setup Reward Point for customer’s VIP Card.
For example: to setup when customer earn 300 point they get $10 back.
Default $1=1 meaning when customer spent $1 they earn 1 point, to change
click . Can setup $1 Cash = 1.5 points và $1 Credit Card = 1 point like
the picture below.
Printing Receipt for : setup how many receipt print out, the picture
below show print receipt for customer and technician only. To print receipt
for Owner check Owner. To have print or not print option check
Selectable.
To add more information to end of the receipt click Design Customer
Receipt Layout. Custom Customer Receipt appear. After finish editing
click Save and then Close. Remember to check Print Receipt Layout.
Website: http://www.yesmua.com YesMua Corporation
24
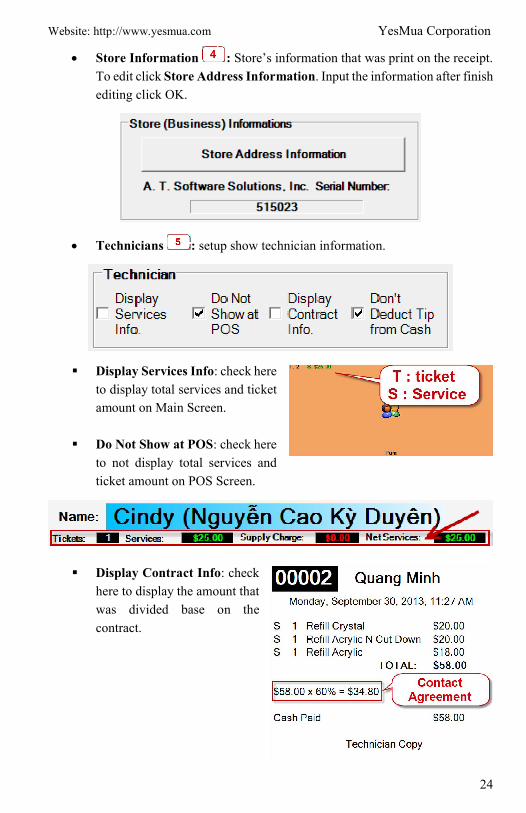
Store Information : Store’s information that was print on the receipt.
To edit click Store Address Information. Input the information after finish
editing click OK.
Technicians : setup show technician information.
Display Services Info: check here
to display total services and ticket
amount on Main Screen.
Do Not Show at POS: check here
to not display total services and
ticket amount on POS Screen.
Display Contract Info: check
here to display the amount that
was divided base on the
contract.
Website: http://www.yesmua.com YesMua Corporation
25
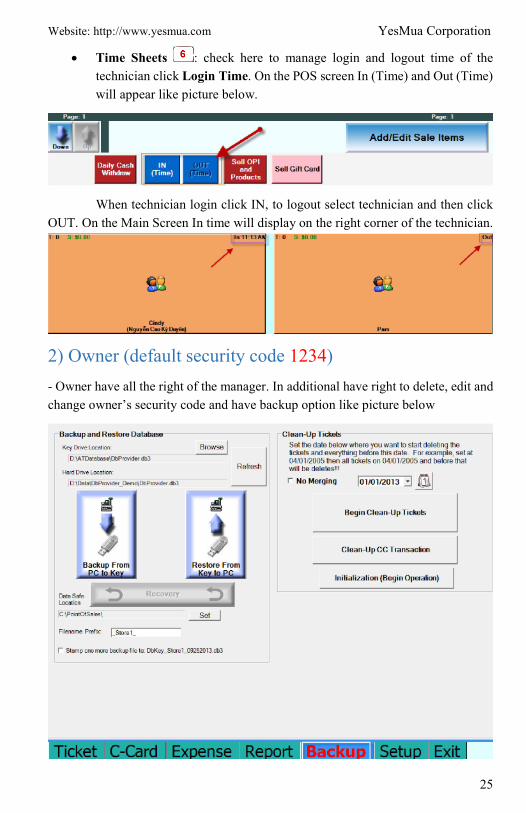
Time Sheets : check here to manage login and logout time of the
technician click Login Time. On the POS screen In (Time) and Out (Time)
will appear like picture below.
When technician login click IN, to logout select technician and then click
OUT. On the Main Screen In time will display on the right corner of the technician.
2) Owner (default security code 1234)
- Owner have all the right of the manager. In additional have right to delete, edit and
change owner’s security code and have backup option like picture below
Website: http://www.yesmua.com YesMua Corporation
26
Backup and Restore Database: call YesMua for support (714-786-8115
or 951-785-1619).
Clean-Up Tickets:
o Begin Clean-Up Tickets: delete all of the ticket from the
beginning to selected day. For example (01-01-2013) all of the
ticket from the beginning to 01-01-2013 will be deleted.
o Clean-Up CC Transaction: delete all of the transaction from the
beginning to selected day.
o Initialization (begin operation): After using the system for demo
and begin to operation click here to clean up everything except
category, service menu and technician.
For more information please contact us:
- Technical support: 714-786-8155
951-785-1619
- Support Merchant services: 714-554-4630
- Fax: 714-786-6662
- Toll Free: 888-593-7682