cch esign user guide - wolters kluwer tax & … · cch esign . user guide . december 2013 . ......
TRANSCRIPT

CCH eSign User Guide December 2013 123456

Copyright 2012, CCH INCORPORATED, a part of Wolters Kluwer. All rights reserved. Material in this publication may not be reproduced or transmitted, in any form or by any means, without prior written permission. Requests for that permission should be directed to:
CCH INCORPORATED 20101 Hamilton Avenue Suite 200
Torrance, CA 90502
The contents of this publication are believed to be accurate. However, responsibility cannot be assumed for the information contained herein, and the consequences resulting from the use thereof. Material in this publication is subject to change without notice.
This User Manual and the computer software it describes are designed to provide accurate and authoritative information in regard to the subject matter covered. They are distributed with the understanding that the publisher is not engaged in rendering accounting, legal, or other professional service. If legal advice or other expert assistance is required, the services of a competent professional should be sought.
“ProSystem fx” is a registered trademark of CCH INCORPORATED.
“Windows” is a registered trademark of Microsoft Corporation.
All other brand, product, or company names are trademarks or registered trademarks of their respective owners.

Introducing CCH eSign 1
Welcome to CCH eSign! .........................................................................................................1 What can be eSigned? .............................................................................................................1
Quick Start 2
Updating Your Permission Key ..............................................................................................2 Setting Up Your eSign Account in Office Manager ...........................................................2 Accessing your eSign Account and Setting Up Users .......................................................3
For 8879 .....................................................................................................................................3
Sending Documents for eSign ...............................................................................................3
Sending 8879 for eSign via ProSystem fx Tax ....................................................................4
Signer Experience 7
Receive email Notifications ...................................................................................................7 Begin signing .............................................................................................................................8 Provide Consent per Requirements of the ESIGN Act .....................................................8 Provide a Signature ..................................................................................................................9 View Signed Documents .........................................................................................................9 Expanded view of signature and date ..................................................................................10 Email with a link to the Signed Document .........................................................................10 Reminders ..................................................................................................................................11
Sending Options 12
Web Interface ...........................................................................................................................12 AssureSign API ..........................................................................................................................12 Desktop Applications ..............................................................................................................12
Send to Assuresign desktop application ..............................................................................12
Document Launch Utility .......................................................................................................13
CRM integration .......................................................................................................................13
Integration with Salesforce ....................................................................................................13
Integration with Microsoft Dynamics ..................................................................................13
Tracking and Reporting Options 14
Document Search/Document Details ..................................................................................14 DocumentTRAK® .....................................................................................................................15 Electronic Filing (ELF) Status system (8879 only) .............................................................15
Managing Users 16
Adding Users .............................................................................................................................16 Selecting a Role ........................................................................................................................16 Configuring Tax Preparers in ProSystem fx Tax (for 8879 eSign only) .........................17
Managing Branding 18
Contents
ii

Customizing Account Settings 19
Customizing the Firm Name ..................................................................................................19 Customizing Security Policies ................................................................................................19 Customizing Notification Preferences: ................................................................................20
Sending emails Using the Tax Preparer email Address ....................................................20
Using a common firm-wide Sender Name and Email Address .......................................20
Using a common firm-wide Sender Name and the AssureSign Domain for email ....20
Using Document Templates 21
Customizing Email Notifications 22
Modifying CCH email designs ...............................................................................................23
Import CCH templates ............................................................................................................23
Edit CCH email designs ...........................................................................................................24
Associate custom templates to the appropriate return type in Office Manager .......24
Merge Fields ..............................................................................................................................25
Managing Reminders 26
Configuring reminders for the eSign Account ....................................................................26 Configuring reminders for a document template .............................................................27 Configuring reminders when sending the document .......................................................27 Sending Adhoc reminders/Resend a previous reminder ..................................................27 Turning Off Reminders ............................................................................................................28 Reminders for 8879 documents ...........................................................................................28
Other Document Management Functions 30
Authenticating Signers 31
Shared Secret Approach .........................................................................................................31
Signer experience .....................................................................................................................31
Setting up the password .........................................................................................................32
Knowledge Based Authentication .........................................................................................33
Signer Experience for 8879 with KBA 34
Receive Email Notifications ...................................................................................................34 Begin Signing .............................................................................................................................35 Provide Responses to KBA questions ...................................................................................35 Provide a PIN .............................................................................................................................36 Provide Consent per Requirements of the ESIGN Act .....................................................36 Provide a Signature ..................................................................................................................37 View Signed Documents .........................................................................................................37 Expanded view of signature, date and KBA audit trail .....................................................38 Reminders ..................................................................................................................................38
iii

eSign Copy of Tax Return 39
Standard Filing Instructions / Transmittal Letter - Refund .............................................39
Standard Filing Instructions / Transmittal Letter - Balance Due / Zero Balance ........39
Filing Instructions .....................................................................................................................39
ELF Status System Updates 40
Publish to Portal 41
Frequently Asked Questions 42
Appendix 43
States that currently permit eSign .......................................................................................43 States that currently do not permit eSign ..........................................................................44
iv

Welcome to CCH eSign! CCH eSign allows you to securely send documents to your clients, employees, and other third parties to obtain their electronic signatures. We have collaborated with AssureSign to provide you a secure eSign solution that is compliant with the ESIGN Act and the guidelines provided by the Internal Revenue Service (IRS).
What can be eSigned? While most documents can be legally eSigned per the ESIGN Act, the IRS does not accept eSignatures on all forms at this time. Documents and forms that can be eSigned include:
Engagement Letters, Representation letters, Confirmations
Internal HR documents, Partnership agreements
IRS forms and documents:
Sec 7216 Consents
Form 4506-T Request for Transcript of Tax Return
Form W4 and W9
8879 (1040 only)
Note: See Appendix for a list of states that currently accept electronic signatures on the 8879.
Chapter 1
INTRODUCING CCH ESIGN
Chapter 1 - Introducing CCH eSign 1
This chapter is designed to familiarize you with the basics of the CCH eSign process, including setting up an eSign account and sending files for eSign.
Updating Your Permission Key Visit support.cch.com to download or update a permission key. Follow the steps provided on the CCH Customer Support Web site.
Note: When adding a new license, use the Only Update Licensing From New Permission Key option.
Setting Up Your eSign Account in Office Manager Use the procedure below to setup an account with AssureSign. The account allows you to manage users, customize the user experience, and monitor eSign usage.
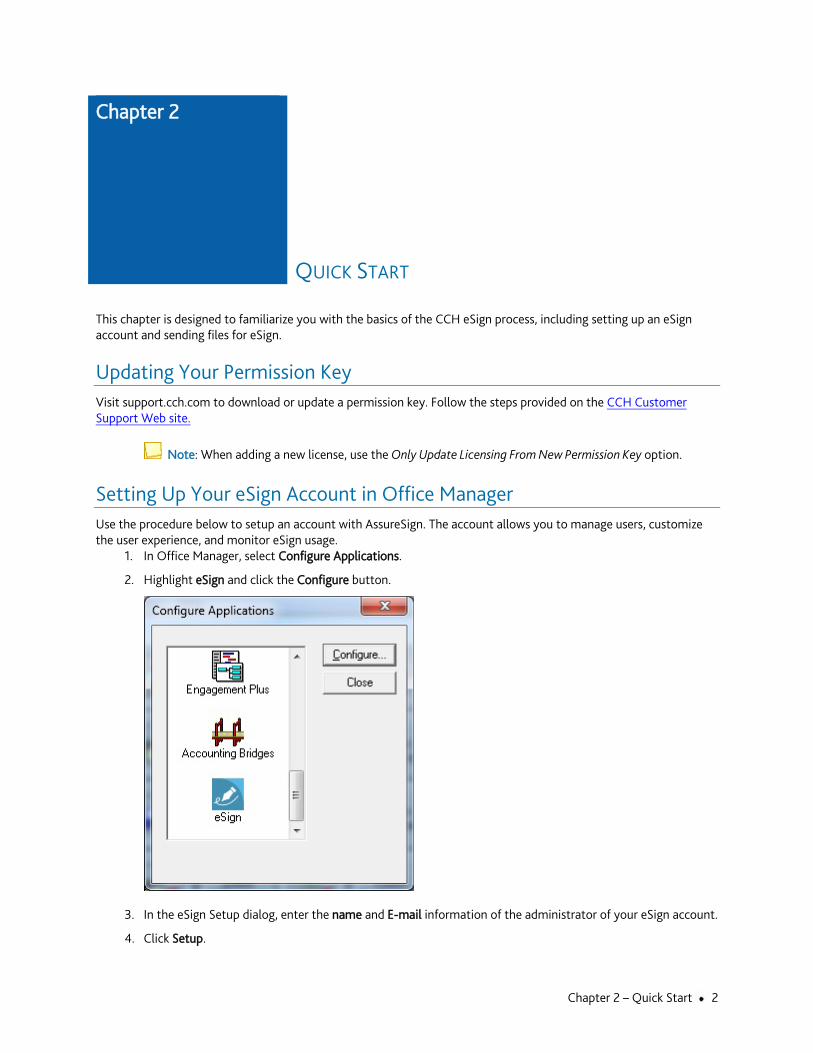
1. In Office Manager, select Configure Applications.
2. Highlight eSign and click the Configure button.
3. In the eSign Setup dialog, enter the name and E-mail information of the administrator of your eSign account.
4. Click Setup.
Chapter 2
QUICK START
Chapter 2 – Quick Start 2

Note: Setup status is set to complete after the eSign account has been successfully setup.
Accessing your eSign Account and Setting Up Users The eSign administrator you set up previously will receive an e-mail with a temporary password and a URL to access the eSign account. After the eSign administrator has logged into the eSign account, they can start sending documents for eSign. Your eSign administrator can also set up other users to access the eSign account.
For 8879 Setup tax preparers as users in the eSign account. Use the same email address used for the tax preparer in ProSystem fx Tax when you setup the user for your eSign account. For more information on configuring tax preparer users to your eSign account, refer to Configuring Tax Preparers in ProSystem fx Tax (for 8879 eSign only).
Sending Documents for eSign Use the following procedure to start sending documents.
1. Select the Documents tab in your eSign account and click Browse to select the document.
2. Enter the required information.
Chapter 2 – Quick Start 3

3. Select the Continue button and follow the instructions on the subsequent screens to complete the upload.
Tips:
You may want to give every document a unique name so as that it is efficient to track, retrieve or store the signed copy of the document.
If you only have one signatory you can skip the remaining document setup process by selecting Finish setup and email signatory now link.
For additional information, refer to the AssureSign Knowledge Base. If you have additional questions, contact CCH Customer Support at http://support.cch.com/ticket/.
Sending 8879 for eSign via ProSystem fx Tax 1. You can activate eSign for your office group or in each return. Activate eSign by doing one of the following:
By office group, activate eSign for all returns in the office group at the account group level in Office Manager.
In Office Manager, navigate to Configure Applications > Tax Preparation > <office group> > Electronic Filing Options > Individual tab and select the option to Electronically sign 8879.
Chapter 2 – Quick Start 4

On a return-by-return basis, activate eSign by selecting Yes in the following:
Worksheet view
General | Electronic filing | Printing Options
Interview forms
EF-1 | Box 58
2. In your tax return, ensure you have entered an email address for the taxpayer (and the spouse if filing a joint return).
Worksheet view
Basic Data | General | Email
Interview forms
Form 2 | Taxpayer email Box 98; Spouse email Box 99
Note: Taxpayer and spouse email will need to be two separate emails.
3. Calculate your return and address any open eSign diagnostics.
4. Select File > Export > Electronic Filing > Return to open the Select Returns for Export dialog.
5. On the Select Returns for Export screen, select the Send for eSign option.
Chapter 2 – Quick Start 5

6. Click Export.
If you select the Publish eSigned copy to Portal option, a signed copy of the return will publish to CCH Portal after the taxpayer (and spouse, if applicable) has signed the return. If the return is not already associated with a client portal, you will be prompted to make the association with the portal during the upload process.
Note: 8879 requests sent on October 20 or prior will be available for eSign until October 20. Tax returns sent for eSign after October 20 will be available for eSign for 60 days.
7. On the confirmation screen click Start.
Continue through the wizard to finish the upload of the tax return to ELF. For information about tracking the status of eSign in ELF, see chapter ELF Status System Updates.
Chapter 2 – Quick Start 6

Once you have sent a request for eSign, the signer will perform the following steps to provide their signature.
Receive email Notifications The following is an example email that the signers will get:
Note: You can customize the text of the emails. For more information about customizing emails refer to Customizing Email notifications.
Chapter 3
SIGNER EXPERIENCE
Chapter 3 – Signer Experience 7
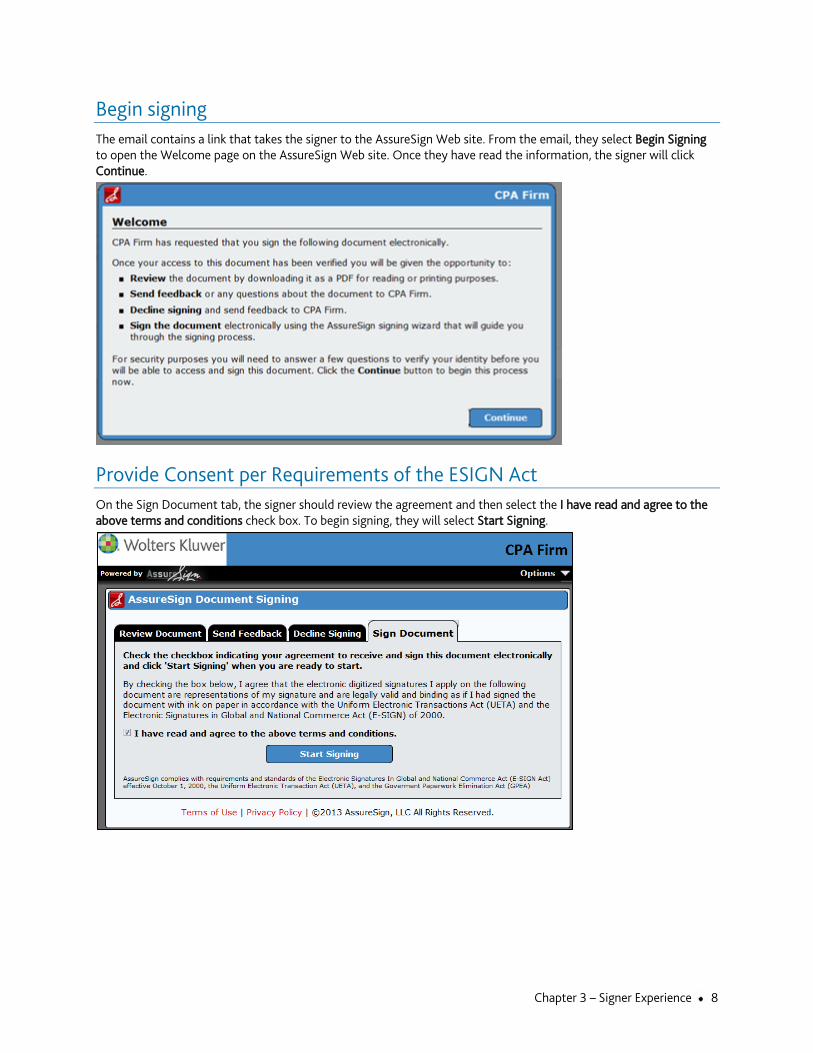
Begin signing The email contains a link that takes the signer to the AssureSign Web site. From the email, they select Begin Signing to open the Welcome page on the AssureSign Web site. Once they have read the information, the signer will click Continue.
Provide Consent per Requirements of the ESIGN Act On the Sign Document tab, the signer should review the agreement and then select the I have read and agree to the above terms and conditions check box. To begin signing, they will select Start Signing.
Chapter 3 – Signer Experience 8

Provide a Signature The Signer can provide a signature using a mouse, stylus, or a touch pad. Follow the on-screen instructions to complete the signing.
View Signed Documents The Signer can view, print, or download the document immediately after signing by clicking View Completed Document.
Chapter 3 – Signer Experience 9

Expanded view of signature and date Below is an expanded view of how the signature will show in the document.
Email with a link to the Signed Document An email is sent to the Signer so that they can review signed documents at a later date.
Note: You can customize the text of the emails. For more information about customizing emails refer to Customizing Email notifications.
Chapter 3 – Signer Experience 10

Reminders If the recipient of your eSign request does not provide a signature, CCH eSign allows you to configure automated emails that are sent on a periodic basis. You can also send reminders at any time you wish to remind the signatory. The following is an example of a reminder email. For more information on reminders refer to chapter Managing Reminders.
Note: You can customize the text of the emails. For more information about customizing emails refer to Customizing Email notifications.
Chapter 3 – Signer Experience 11
CCH eSign provides multiple options to fit eSign into your firm’s processes. You can send documents for eSign using any of the following:
Web Interface This is the most simple to set up and is accessible anywhere, anytime. Once users are setup, they can log into the eSign account, provide their credentials, and start sending documents. See section Sending Documents for eSign in Quick Start for additional information. This option can be used for any document sent for eSign but is best used for documents that do not confirm to a standardized process.
AssureSign API Our eSign partner, AssureSign, provides easy-to-integrate APIs (DocumentNow®) with which you can build integration with your existing processes. Refer to AssureSign Knowledge Base for API information, code samples, etc. This option is recommended when integrating CCH eSign within your existing processes.
Desktop Applications These are desktop applications that allow you to quickly and easily send documents from your computer to eSign without having to log into the web UI. You can choose from two applications:
Send to AssureSign desktop application
Document Launch utility
Send to AssureSign desktop application This application allows you to send documents for eSign in bulk or on a document-by-document basis. It also allows access to more advanced functionality for applying jotblocks (signature and user input fields) during signing process. For more information and installation files, refer to Assuresign Knowledge Base or contact CCH support at http://support.cch.com/ticket/.
Notes:
On installation, you will be prompted to enter URL for your eSign account. Enter URL: https://na1.assuresign.net.
On installation of this application AssureSign installs a print driver called "Send to AssureSign" that may be used to print from any application directly into the Send to AssureSign workspace.
Chapter 4
SENDING OPTIONS
Chapter 4 - Sending Options 12

Document Launch Utility This utility allows you to send for eSign by drag and drop or by using the context menu to select "Send to Assuresign." You can send Microsoft Word documents with the extensions .DOC / .DOCX , Portable Document Format documents with the extension PDF, documents with extensions .ODT, rich text documents with extension .RTF, documents with extensions .HTM/.HTML and extensions .TIF/.TIFF. For more information and installation files, refer to Assuresign Knowledge Base or contact CCH support at http://support.cch.com/ticket/.
Note On installation, you will be prompted to:
Enter URL for your eSign account. Enter URL: https://na1.assuresign.net.
Enter DocumentNow Account Context Identifier (This is available in your eSign account at Administration>Settings>Document Now Integration.)
CRM integration
Integration with Salesforce You can send and track documents sent for eSign through your Salesforce account.
Refer to the AssureSign Knowledge Base to configure your Salesforce account.
Installing AssureSign for Salesforce
Adding AssureSign to the Appropriate Page Layout(s)
Configuring AssureSign/Salesforce Object Field Mapping
Integration with Microsoft Dynamics You can send and track documents sent for eSign in Microsoft Dynamics. For more information about integration with Microsoft Dynamics, refer to the AssureSign Knowledge Base.
Installing the AssureSign solution for Dynamics CRM 2011/2013
Configuring Security
CRM Data Mapping Instructions
Working with Documents
Configuring Relationships with Other Entities
Chapter 4 - Sending Options 13
Documents sent for eSign can be tracked in three ways:
Document Search/Document Details
DocumentTRACK®
Electronic Filing Status system (8879 only)
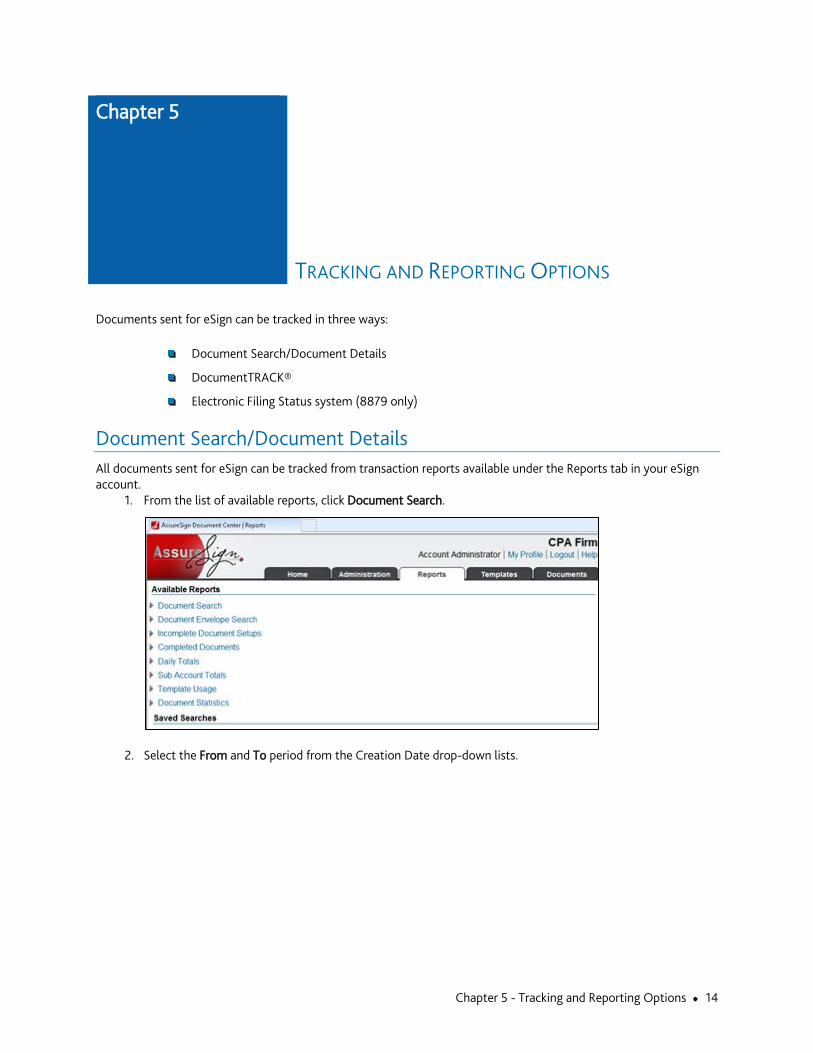
Document Search/Document Details All documents sent for eSign can be tracked from transaction reports available under the Reports tab in your eSign account.
1. From the list of available reports, click Document Search.
2. Select the From and To period from the Creation Date drop-down lists.
Chapter 5
TRACKING AND REPORTING OPTIONS
Chapter 5 - Tracking and Reporting Options 14

3. Click Submit. A list of documents along with their eSign status display from within the Creation Date range selected.
4. Click the Document Name to view the document details.
DocumentTRAK® DocumentTRAK allows you to integrate your status tracking of eSign documents with your firm’s process. Tracking information is sent via web notifications to a URL end-point defined by you. For more information about using DocumentTRAK, refer to AssureSign Knowledge Base. If you have additional questions contact CCH Customer Support at http://support.cch.com/ticket/.
Electronic Filing (ELF) Status system (8879 only) The ELF Status system has been pre-configured to reflect the status of your 8879 documents. Refer to chapter ELF Status System Updates.
Chapter 5 - Tracking and Reporting Options 15

Adding Users To add a user, do the following:
1. In your eSign account, click the Administration tab and select > Users.
2. Click the New link to create a new user.
3. The name, email, and role fields are required.
4. Click Save.
Selecting a Role Choose from the following roles:
Administrator. Allows complete access to all eSign functions and documents.
Power User. Allows access to all eSigned documents but does not allow access to administration functions.
Limited User. Limits the access to documents created by user.
Chapter 6
MANAGING USERS
Chapter 6 – Managing Users 16
You can customize the permissions provided in a role or add new roles. For more information on adding users, roles and permissions, refer to the AssureSign Knowledge Base. If you have additional questions, contact CCH Customer Support at http://support.cch.com/ticket/.
Configuring Tax Preparers in ProSystem fx Tax (for 8879 eSign only) Setup tax preparers as users in the eSign account. Use the same email address used for the tax preparer in ProSystem fx Tax when you setup the user for your eSign account. If your firm uses a centralized email address as the tax preparer email address, use this email address to establish a user in your eSign account. If your firm uses multiple tax preparer s each with a separate email, then each of these tax preparers will need to be set up as a user in your eSign account. When uploading the return for eSign, ProSystem fx Tax will pick the tax preparer email address as below:
1. Tax preparer email address entered in the return.
Worksheet view
General | Return Options | Preparer Information--Override Office Manager | Preparer e-mail address
Interview form
Form 3 | Box 48
2. If email #1 is not provided, the email specified in Office Manager (Configure Staff | < Staff > | Setup | Tax preparer tab | E-mail address) for the tax preparer code specified in the return.
Worksheet view
General | Electronic Filing | Electronic Return Originator Override | Individual preparer code
Interview form
Form 3 | Box 40
3. If email #1 or #2 is not provided, the tax preparer address entered in the return.
Worksheet view
General | Electronic Filing | Electronic Return Originator Override | Preparer e-mail address
Interview form
EF-2 | Box 46
4. If emails are not provided at # 1, #2 or #3, the email provided for the ERO in Office Manager (Configure applications | Tax Preparation | Configure | <Office group> | Electronic Filing Options | Setup | ERO tab | Preparer email address.
Warning! If a user with the tax preparer email is not setup in your eSign account, the upload will not complete and an error message will be displayed.
Tip: If you do not want tax preparers to have access to other tax preparer's returns, you may want setup the tax preparer as a limited user or alternately modify the Document and Reporting permissions to prevent access to documents created by other users.
Chapter 6 – Managing Users 17

You can add your firm’s logo and modify color preferences (of signing screens) to match your firm’s branding. In your eSign account, select the Administration tab and click Customization.
To customize colors, select Theme/Colors (Common) and make appropriate selections.
To upload your logo, follow the instructions under Page Header (Common).
Tip: For mobile usage, your eSign account can be configured with a smaller sized logo.
Note: Themes and colors cannot be modified for mobile usage at this time.
To make additional changes to the user experience, refer to the AssureSign Knowledge Base. If you have questions, contact CCH Customer Support at http://support.cch.com/ticket/.
Chapter 7
MANAGING BRANDING
Chapter 7 – Managing Branding 18

You can customize firm name, security policies, and notification preferences to match the needs of your firm. To modify account settings, in your eSign account, select the Administration tab and click Settings.
Customizing the Firm Name When the account is setup, the Firm Name used in ProSystem fx Tax Office Manager is automatically populated. Under Account information, select the Edit link to modify the Account Display Name.
Customizing Security Policies Default security policies can be modified by clicking any of the Edit links under Security Preferences.
Chapter 8
CUSTOMIZING ACCOUNT SETTINGS
Chapter 8 – Customizing Account Settings 19

Customizing Notification Preferences: Default notification preferences can be can be modified by clicking any of the Edit links under Notification Preferences.
The sender information in email notifications can be customized in the following ways:
Sending emails Using the Tax Preparer email Address The default setting is to send emails using the tax preparer email address and no further configuration is necessary.
Using a common firm-wide Sender Name and Email Address
To use this option:
Edit the information for Sender Email address for Emails and Sender Name for Emails.
Setup your domain to allow AssureSign email servers to send mail on your behalf:
There are two technologies that are used for this purpose are SPF and DKIM. Both technologies use the DNS system for configuration. For more information about configuring your domain, refer to the AssureSign Knowledge Base.
Using a common firm-wide Sender Name and the AssureSign Domain for email
To use this option:
Edit the information in Sender Name for Emails.
Set Send Emails on Behalf of Originator When Account Sender Email Address is Used to No.
For more information on about customizing your account settings, refer to AssureSign Knowledge Base. If you have additional questions, contact CCH Customer Support at http://support.cch.com/ticket/.
Chapter 8 – Customizing Account Settings 20

While you can send a document for eSign without the use of a document template, using templates can simplify customization of your eSign process. Templates are required when sending bulk transmissions using the Send to AssureSign (desktop application), tax documents from ProSystem fx Tax, documents through your CRM applications (Salesforce.com or Microsoft Dynamics), or through custom development using AssureSign API. Document templates allow you to:
Pre-configure the content of your document
Provide input areas for the signer
Define number of signatories
Define placement of the signature and order of signatures
Provide input areas for the signer
Pre-configure notifications and reminders
Templates can be defined with pre-defined content (for example, Sec 7216 consent); or they can only define the workflow of the signature process when documents are not expected to have standardized content.
Note: If you are creating a custom template to manage 8879 email notifications, refer to section Modifying CCH email designs in chapter Customizing Email notifications.
For more information on creating /importing/modifying templates, refer to the AssureSign Knowledge Base. If you have additional questions, contact CCH Customer Support at http://support.cch.com/ticket/
Chapter 9
USING DOCUMENT TEMPLATES
Chapter 9 - Using Document Templates 21

There are two types of notifications used in the eSign process:
Email notifications
DocumentTRACK®
Email notifications are event based emails sent to the signatories or the sender to inform them of the status of the document. This chapter explains the process of configuring and customizing email notifications. DocumentTRACK® notifications are web communications from AssureSign to the configured servers. Docutrack is explained in chapter Tracking and Reporting Options. Your eSign account comes with a set of default email designs that are preconfigured for sending emails to the appropriate parties based on the events in the signing process. For example, there is an email design to request your client to provide eSign and another email design to inform the sender that the documents have been signed. In your eSign account, Navigate to Administration > Notifications > Email. The following built-in email designs are available for selection in your document template.
These default Email designs are locked and cannot be changed. They can be used as a starting point to make further modifications. To customize emails, make a copy of the appropriate default email design and then select the Edit link to make modifications. You can customize the text in the emails per your firm’s standards, add branding, or create additional notifications relevant to the type of document you are sending.
Chapter 10
CUSTOMIZING EMAIL NOTIFICATIONS
Chapter 10 - Customizing Email Notifications 22

Tips:
If you expect to make a several modifications to the default templates, consider creating an email design set to group your custom email designs.
You can specify an email design set when creating document templates. This will help in filtering the relevant email designs for the document template.
If you expect most of your documents to follow the same email design set, you may want to set it as a default email design set.
For additional information on creating or modifying an email design and using email sets refer to AssureSign Knowledge Base. If you have additional questions, contact CCH Customer Support at http://support.cch.com/ticket/.
Modifying CCH email designs Modifying CCH email designs is a three-step process:
Import CCH templates
Edit CCH email designs
Associate custom template to the appropriate return type in Office Manager
Import CCH templates CCH has provided templates as below as starting points for customizing your email notifications. These can be downloaded from the CCH support site<link> or can be accessed from your tax install at wfx32/Samples/eSign:
Single.adt. Used when sending single returns through ProSystem fx Tax.
Joint.adt. Used when sending joint returns through ProSystem fx Tax.
Perform the following steps to import the templates:
1. In your eSign account, click the Templates tab.
2. Click New.
3. Select Import template from a Template Export File.
Chapter 10 - Customizing Email Notifications 23

4. Click Next.
5. Select the appropriate.adt file from wfx32\Samples\esign folder.
6. Rename the template.
7. Select Account and Child Accounts from the Accessibility drop-down list.
8. Complete the process by clicking on the Next through each of the screens.
Warning! Do not change any settings during this process.
9. Click the Finish button to complete the import.
Edit CCH email designs After you import CCH templates the following email designs become available (Navigate to Administration > Notifications > Email). Select Edit to open the email design. Save your edits.
Associate custom templates to the appropriate return type in Office Manager In Office Manager, navigate to Configuration | eSign | Select Customize on the eSign setup screen. Select the appropriate custom template for the return type.
Warning! Your custom template needs to be setup with Account and Child Account accessibility in order for the custom template to be available in Office Manager. See Step 7 in section Import CCH templates in this this chapter.
Chapter 10 - Customizing Email Notifications 24

Merge Fields In addition to the customization features available in the default email designs, for all CCH-8879 templates, the following template-specific merge fields are available to add to the text of the email designs:
Firm Name
Firm Phone
Preparer Name <see warning below>
Preparer Email Address
Preparer Phone
Account Number
Client ID
ERO Name
ERO Phone
ERO Email Address
Return ID
To use a merge field, enclose the merge field text in square brackets. This will mark the text as "merge field information" and it will function like a formula field in the subject or body of the email. For example: "If you choose to not to eSign, or have any questions regarding the return, please contact me at [Preparer Phone] or email me at [Preparer Email Address]." This will populate the Preparer Phone and Preparer Email Address associated with that specific document.
Warning! Default CCH 8879 email notifications are setup with a merge field for Preparer Name. If you do not want the email notifications to display preparer name, remove the Preparer Name field from the email notification following steps above for Modifying CCH email designs.
For more information about merge fields, refer to AssureSign Knowledge Base. If you have additional questions, contact CCH Customer Support at http://support.cch.com/ticket/.
Chapter 10 - Customizing Email Notifications 25
Reminders are automatically sent to signatories when not all signatories have signed the document. Reminders are tied to the date of the expiration of the document and are sent XX (a configurable number) days prior to the expiration date. The text of the reminder email and the frequency of the reminder can be configured for:
The entire eSign account
For the account template
On a document-by-document basis
It is possible to resend previously sent reminders or create new reminders on an ad hoc basis.
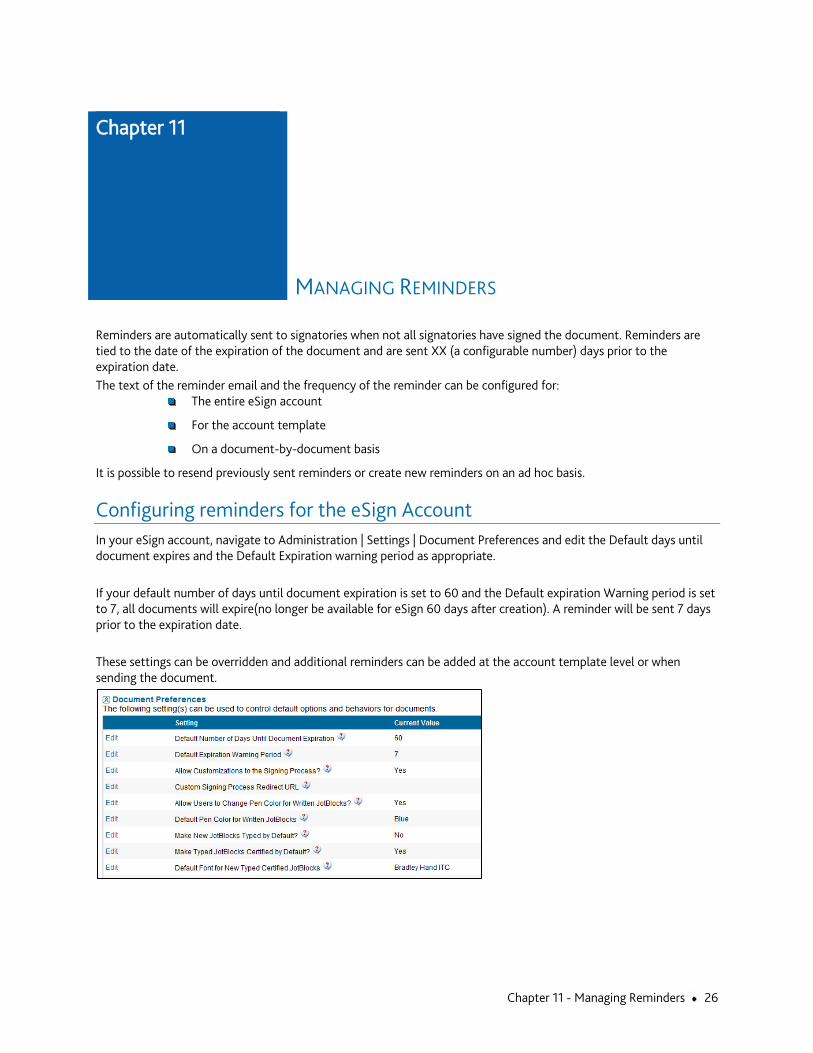
Configuring reminders for the eSign Account In your eSign account, navigate to Administration | Settings | Document Preferences and edit the Default days until document expires and the Default Expiration warning period as appropriate. If your default number of days until document expiration is set to 60 and the Default expiration Warning period is set to 7, all documents will expire(no longer be available for eSign 60 days after creation). A reminder will be sent 7 days prior to the expiration date. These settings can be overridden and additional reminders can be added at the account template level or when sending the document.
Chapter 11
MANAGING REMINDERS
Chapter 11 - Managing Reminders 26

Configuring reminders for a document template Reminders are configured when configuring emails for a document template. To setup reminders, for an existing template, select to Edit an existing template (in your eSign account, Template tab | Existing | click Edit link).
On the Edit template screen, select to edit the workflow and navigate to Emails in the navigation area. Use the Click here to create a new email link under the Expiration Warning section. Specify the email design the signatories and the timing for the reminder. Select Save.
To set up another reminder select New.
Configuring reminders when sending the document When sending the document through the web UI you can set reminders on the Email tab following the same steps in adding reminder emails to the workflow as defined in Configuring reminders for the document template section above. If you are sending the documents via the web API, the reminders will be based on the document template selected.
Sending Adhoc reminders/Resend a previous reminder You can resend previously sent reminders or Adhoc reminders through the Document Details Report. In your eSign account browse to the Reports tab. Select Document Search. From the search results, select the document for which you want to send an Adhoc reminder or resend a previously sent reminder. Browse to the Expiration Warning tab.
Create a new reminder by selecting the New link
Select the resend link to send a previously sent reminder
Note: When resending or creating a new reminder you will have the ability to send to new email address or modify existing recipients.
Chapter 11 - Managing Reminders 27

Turning Off Reminders If your signatories do not wish to sign, reminders are turned off when the signatories select the decline button during the signing process. Reminders are also turned off when the document is cancelled. To cancel a document see Other Document Management Functions.
Reminders for 8879 documents 8879 Reminders are preconfigured to be sent weekly as per the schedule below. An additional reminder has been configured to be sent on April 12 to remind signatories of the upcoming tax deadline.
3-Feb 7-Apr 2-Jun 4-Aug 6-Oct
10-Feb 12-Apr 9-Jun 11-Aug 13-Oct
17-Feb 14-Apr 16-Jun 18-Aug 3-Mar 21-Apr 23-Jun 25-Aug 10-Mar 28-Apr 30-Jun 1-Sep 17-Mar 5-May 7-Jul 8-Sep 24-Mar 12-May 14-Jul 15-Sep 31-Mar 19-May 21-Jul 22-Sep
26-May 28-Jul 29-Sep
Chapter 11 - Managing Reminders 28

Based on the above table, if you sent an 8879 document for eSign on March 15, the signatories will get a weekly reminder starting March 17 until all signatories have signed the document. The document will not be available for eSign after October 20. For 8879 documents sent after October 20, a weekly reminder will be sent to all signatories or until the document expires (after 60 days). For making customizations to the pre-configured reminders for the 8879 documents, see Customizing email notifications and Configuring reminders for a document template.
Chapter 11 - Managing Reminders 29

Once a document has been sent for eSign, you can: View the document
Cancel the document
Modify the password to view completed document
Modify the recipients' email address
In your eSign account navigate to Reports > Document Search > Enter the date or other criteria for the search > Select the document by clicking on the Document Name. Select the desired task under Document tasks and follow the on-screen instructions to finish. To modify the recipients email address select the Edit link in Signatories section.
Chapter 12
OTHER DOCUMENT MANAGEMENT FUNCTIONS
Chapter 12 - Other Document Management Functions 30
Authenticating signers ensures that the document you send for eSign does not fall into the wrong hands. It also provides a proof of identification of the signer, making the electronic signature stronger and harder to reject. CCH eSign provides two different ways to provide authentication.
Shared Secret Approach When uploading a document, you can specify the password that the signer will need to provide before they can open the document sent to them for eSign. We recommend setting the password to a previously shared secret. For example, a social security number or date of birth. This can be used as a prompt during the signing process to eliminate the need to communicate the password separately to the signer.
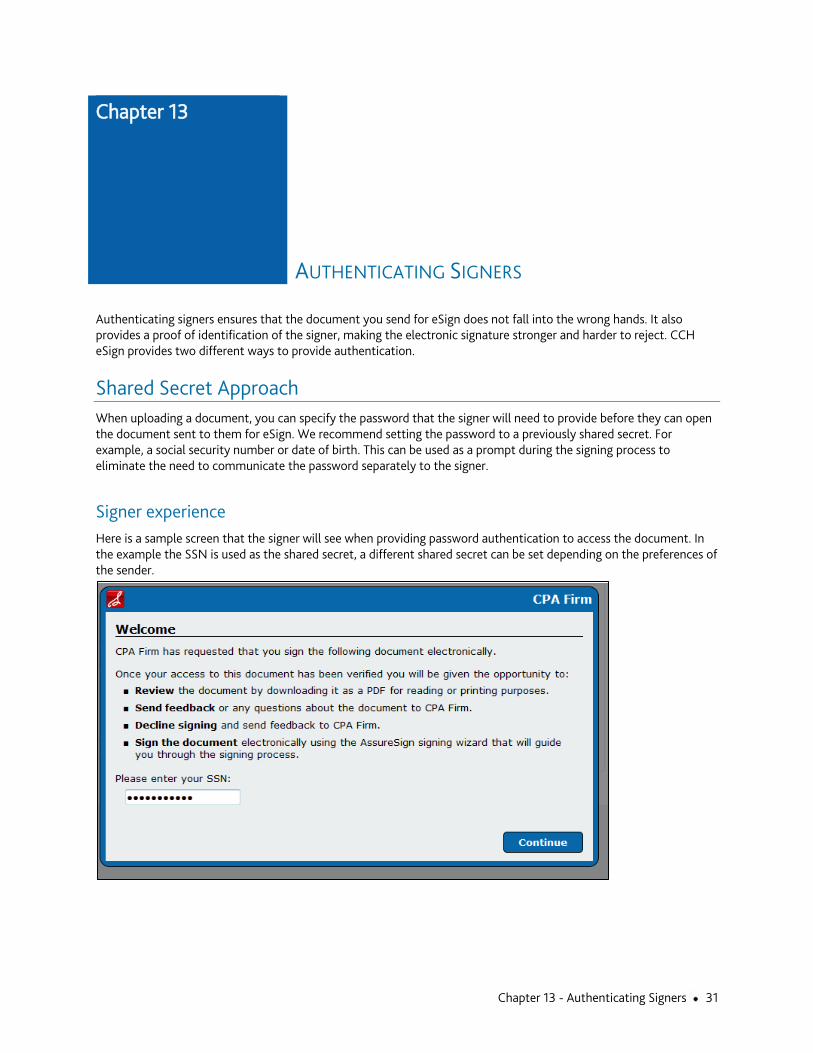
Signer experience Here is a sample screen that the signer will see when providing password authentication to access the document. In the example the SSN is used as the shared secret, a different shared secret can be set depending on the preferences of the sender.
Chapter 13
AUTHENTICATING SIGNERS
Chapter 13 - Authenticating Signers 31

Setting up the password The shared secret password can be setup in the document template or when uploading the document for eSign.
Setting up passwords in the document template
Passwords can be setup at each signatory level when defining signatories in a document template. To setup a password select the Change link on the signatory setup screen.
The Change link screen will launch a wizard to guide you in setting up the password.
Setting up passwords when uploading the document
If you are uploading the document via the web interface in your eSign account, you can setup password based authentication when you are setting up the signatories for the document.
For more information regarding authentication, refer to AssureSign Knowledge Base. If you have additional questions, contact CCH Customer Support at http://support.cch.com/ticket/.
Chapter 13 - Authenticating Signers 32

Knowledge Based Authentication To provide additional security for your clients’ tax return information, we provide the ability to require to a Knowledge Based Authentication (KBA). KBA requires that the signer answer questions correctly before they are allowed to access the documents. The questions are based on public records and credit history information that is likely known only to the signer. While all 8879 eSign requests will require a KBA, you can request KBA for other signatures by selecting the KBA option during the upload document process.
Important! Per IRS guidance electronic signatures on the 8879 will require a KBA.
Signer experience with KBA has been illustrated in chapter Signer Experience for 8879 with KBA. For more information regarding setting up documents requiring a KBA, refer to AssureSign Knowledge Base. If you have additional questions, contact CCH Customer Support at http://support.cch.com/ticket/.
Chapter 13 - Authenticating Signers 33

The signer experience for an 8879 is almost identical to the experience described in Signer Experience above with the exception of the KBA and the email notifications.
Receive Email Notifications Below is the default email notification sent for requesting signatures on the 8879. The taxpayer and the spouse will each get a copy of the email. They are not required to sign in a particular order.
Note: You can customize the text of the emails. For more information about customizing emails refer to Customizing Email notifications.
Chapter 14
SIGNER EXPERIENCE FOR 8879 WITH KBA
Chapter 14 - Signer Experience for 8879 with KBA 34

Begin Signing The email contains a link that takes the signer to the AssureSign Web site. From the email, select Begin Signing to open the Welcome page on the AssureSign Web site. Click Continue to move to next step.
Provide Responses to KBA questions The signer will be prompted to answer the KBA questions. They can select to Skip the question or click Continue after the appropriate selection is made. Signers are able to skip 1 question doing the authentication process. Below is an example.
Chapter 14 - Signer Experience for 8879 with KBA 35

Provide a PIN Once the signer has successfully answered the KBA questions provided, a Signing Password is provided. This allows the signer to stop and re-start the signing process at a later time.
If the signer fails to respond with the correct responses, the document signing is cancelled. The tax preparer is notified by an email.
Provide Consent per Requirements of the ESIGN Act On the Sign Document tab, review the agreement and select the I have read and agree to the above terms and conditions check box. Then click Start Signing. During this step, the signer can also download a copy of their tax return for review, send feedback, and decline to sign by selecting the appropriate action tab. The signer can also select to continue at a later time by using the Options menu. If the signers sends feedback or declines to sign, an email will be sent to the preparer with the relevant information.
Chapter 14 - Signer Experience for 8879 with KBA 36

Provide a Signature The Signer can provide a signature using a mouse, stylus, or a touch pad. Follow the on-screen instructions to complete the signing.
View Signed Documents The Signer can view, print, or download the document immediately after signing by clicking View Completed Document.
Both the signer and the sender will receive an email message with a link to the signed document. Access to the signed document is password protected. It is currently set at last 4 digits of the primary taxpayer's SSN.
Chapter 14 - Signer Experience for 8879 with KBA 37

Expanded view of signature, date and KBA audit trail
Reminders Reminders for eSign are sent weekly until the document is signed. An additional reminder is configured to be sent on April 12 in time for the April tax deadline.
If your client does not wish to provide eSign, you can cancel the document and stop any further reminders. Refer chapter Managing Reminders.
- Signer Experience for 8879 with KBA 38

The eSign Tax return copy is the same as your client copy with the 8879 as the first page. The state return is also included along with the federal return. The transmittal letters and filing instructions have been modified as appropriate for eSignatures.
Standard Filing Instructions / Transmittal Letter - Refund This return has been prepared for electronic filing and eSign has been selected. Please follow the instructions in the e-mail notification to complete the eSign of Form 8879. We will then transmit your return electronically to the IRS*. If after three weeks you have not received your refund, you may contact the IRS at 1-800-829-4477.
Standard Filing Instructions / Transmittal Letter - Balance Due / Zero Balance This return has been prepared for electronic filing and eSign has been selected. Please follow the instructions in the e-mail notification to complete the eSign of Form 8879. We will then transmit your return electronically to the IRS. Do not mail the paper copy of the return to the IRS*.
Filing Instructions This return has been prepared for electronic filing and eSign has been selected. Please follow the instructions in the e-mail notification to complete the eSign of Form 8879. We will then transmit your return electronically to the IRS*. * When state returns are present, the appropriate state authority will be referenced.
Chapter 15
ESIGN COPY OF TAX RETURN
Chapter 15 - eSign Copy of Tax Return 39

The Electronic Filing Status system has been programmed to make real-time updates when receiving completed signatures. When a return requesting eSign is uploaded for electronic filing, it is tagged to display the eSign icon. Upon completion of the signatures, the Signature Form-received column is automatically updated in real time with the date of the signature. The date is shown in blue font. If the taxpayer does not eSign and instead sends a paper signature, you can manually enter the date of receipt. The manually entered date is shown in a black font. To prevent inadvertent filing of returns with the IRS before a signature is received, the returns sent for eSign do not show on the Release Returns tab until a date has been entered in the Signature Form-received column.
Chapter 16
ELF STATUS SYSTEM UPDATES
Chapter 16 - ELF Status System Updates 40
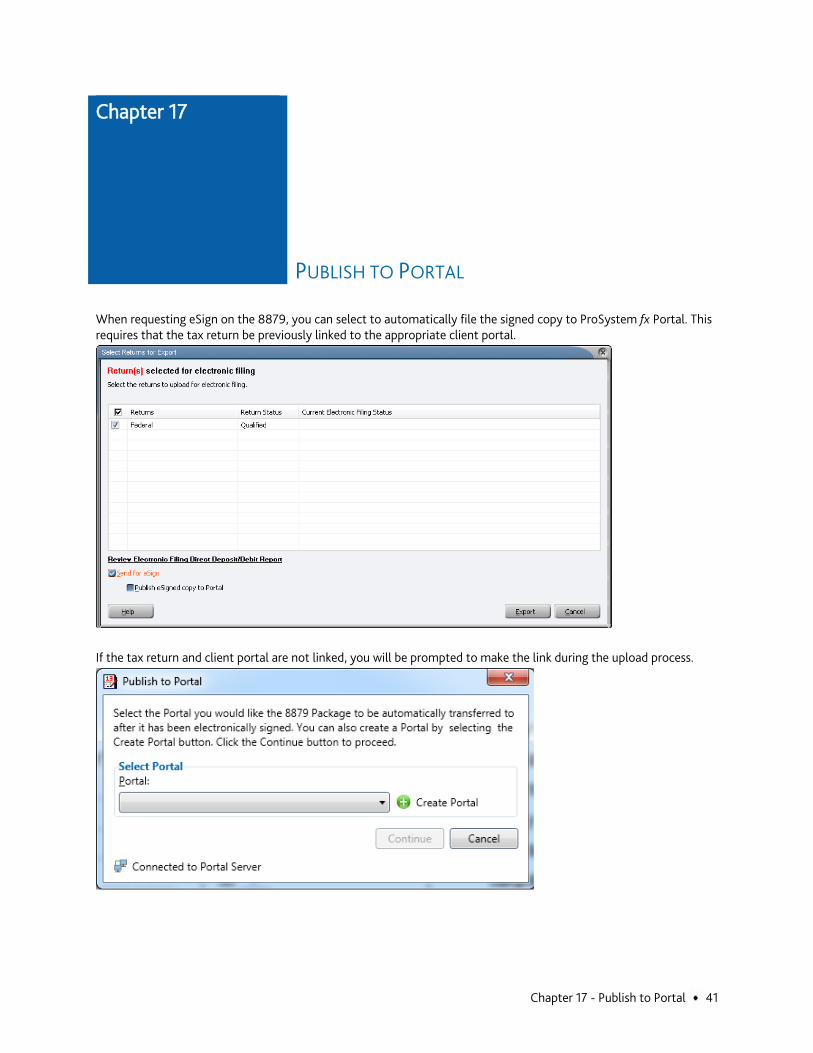
When requesting eSign on the 8879, you can select to automatically file the signed copy to ProSystem fx Portal. This requires that the tax return be previously linked to the appropriate client portal.
If the tax return and client portal are not linked, you will be prompted to make the link during the upload process.
Chapter 17
PUBLISH TO PORTAL
Chapter 17 - Publish to Portal 41

Question: Do I need to enter a separate email for the spouse when sending the 8879 for eSign? Can it be the same email I have used for the taxpayer?
Answer: You will need to use separate email addresses for the spouse and the taxpayer.
Question: Are there any restrictions on the size of the file I can send via AssureSign.
Answer: The file size cannot exceed 20 MB. In addition, there are restrictions when sending documents via the API. Please refer to DocumentNow API documentation in the AssureSign Knowledge Base.
Question: Will PDF attachments in the return be included in the eSign copy sent with the 8879?
Answer: No. PDF attachments are not included in the eSign copy. The eSign copy is the same as the Client copy generated from ProSystem fx Tax with the 8879 printed as the first page. We expect to allow PDF attachments to be added to the client copy in a future release.
Question: What happens to my state return?
Answer: If your state approves the use of eSign, the state return will automatically be included in the eSign copy. For states that have not yet approved eSign, you will be only allowed to send the federal copy of the return for eSign.
Question: If I entered the wrong address for the signatory how will I know? Will I need to resend the document?
Answer: If you entered a non-existent email address, a bounced email notification will be sent to the sender's email address.
In case of a wrong email address, you are not required to resend the document. You can modify the signatory email address by opening the Document Details reports and modifying the appropriate recipient email address.
Chapter 18
FREQUENTLY ASKED QUESTIONS
Chapter 18 - Frequently Asked Questions 42

States that currently permit eSign States that do not require any signature document
Hawaii Florida
Idaho Kansas
Maine Minnesota
New Hampshire North Carolina
North Dakota Nevada
Ohio Tennessee
South Dakota Texas
Washington Wisconsin
Wyoming
States that require a copy of federal signature document and the state has approved use of eSign
Connecticut Missouri
Montana Nebraska
Oregon Utah
Appendix
APPENDIX
Appendix 43

States with conditions
Louisiana – Will not qualify if nonresident or filed as state only
Michigan – Will not qualify if federal PIN not used or MI-8453 is used
New Jersey – Will not qualify if form NJ-8879 is used
West Virginia – Will not qualify if filed as state only
States returns for which eSign has not been enabled
Alabama Arizona
Arkansas California
Colorado Delaware
DC Georgia
Indiana Iowa
Kentucky Massachusetts
Maryland Mississippi
Illinois New Mexico
New York Oklahoma
Pennsylvania Rhode Island
South Carolina Vermont
Virginia
Appendix 44