cdds tutorial v 3 light - cosmonaut1.files.wordpress.com filefile in photoshop and on the dialog box...
TRANSCRIPT
1
CDDS Tutorial v 3 for Lockon: Flaming Cliffs
In this tutorial I’ll explain how to install textures into Lockon as CdDS files, how to replace textures in CdDS files and finally how to create new slots so you can add new color schemes. Please make sure to back up all files before you make any changes to them.
Section: 1. : Software.
Section: 2. : File Preparation.
Section: 3. : Converting Files.
Section: 4. : Installation.
Section: 5. : Replacing Textures.
Section: 6. : Changing The Menu Name.
Section: 7. : Creating New Slots.
Section: 1. : Software. First thing we need to discuss is software; you’ll need some kind of photo editing software to convert the files if they’re not in the correct format. I’ll be using Adobe Photoshop for this tutorial but you can find free software on the net that can complete the necessary file conversions (Google or Ask on the forums for recommended free software). To set up Photoshop you will need a DDS plug-in so Photoshop can recognize .DDS files. I’m using “Adobe Photoshop Normal Map and DDS Authoring Plug-ins Installer Version 7.83 (.exe)” which I found on the NVIDIA website:
http://developer.nvidia.com/object/photoshop_dds_plugins.html
Next you’ll need “CDDSstudio” which can currently be obtained from a sticky thread entitled “ED's plugins” in the “3D Models” section of the ED Forums.
http://forum.lockon.ru/showpost.php?p=237734&postcount=2
2
Download both “.rar” files into ONE folder then just extract the “CDDS-Studio.part01.rar” to a folder with an appropriate name; example “CDDSStudio”(Note: NO gaps in the folder name). Now by extracting just the one file “CDDS-Studio.part01.rar” this in fact extracts both .rar files and NOT just the one you double clicked on. VERY IMPORTANT: Place the “CDDSStudio” folder on your hard drive in a location where there won’t be any gaps in the file path. Example: “C:\CDDSstudio”. You will also need a free program called Modman, which can be obtained from most Lockon download sites. Lastly to create new slots you’ll need a small utility called guidgen for generating new CLSID numbers and thanks to Alfa ☺ it can be obtained, with full instructions, from the “3D Models” section of the ED Forums here:
http://forum.lockon.ru/showthread.php?t=20399.
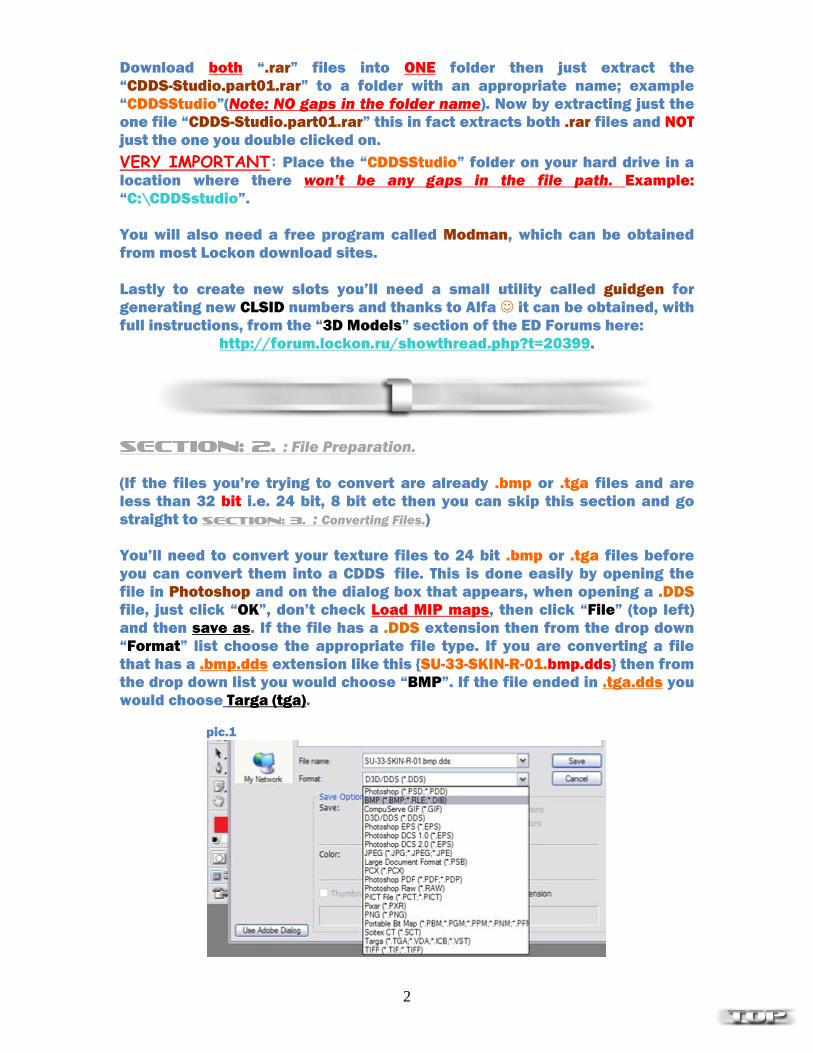
Section: 2. : File Preparation. (If the files you’re trying to convert are already .bmp or .tga files and are less than 32 bit i.e. 24 bit, 8 bit etc then you can skip this section and go straight to Section: 3. : Converting Files.) You’ll need to convert your texture files to 24 bit .bmp or .tga files before you can convert them into a CDDS file. This is done easily by opening the file in Photoshop and on the dialog box that appears, when opening a .DDS file, just click “OK”, don’t check Load MIP maps, then click “File” (top left) and then save as. If the file has a .DDS extension then from the drop down “Format” list choose the appropriate file type. If you are converting a file that has a .bmp.dds extension like this {SU-33-SKIN-R-01.bmp.dds} then from the drop down list you would choose “BMP”. If the file ended in .tga.dds you would choose Targa (tga). pic.1
3
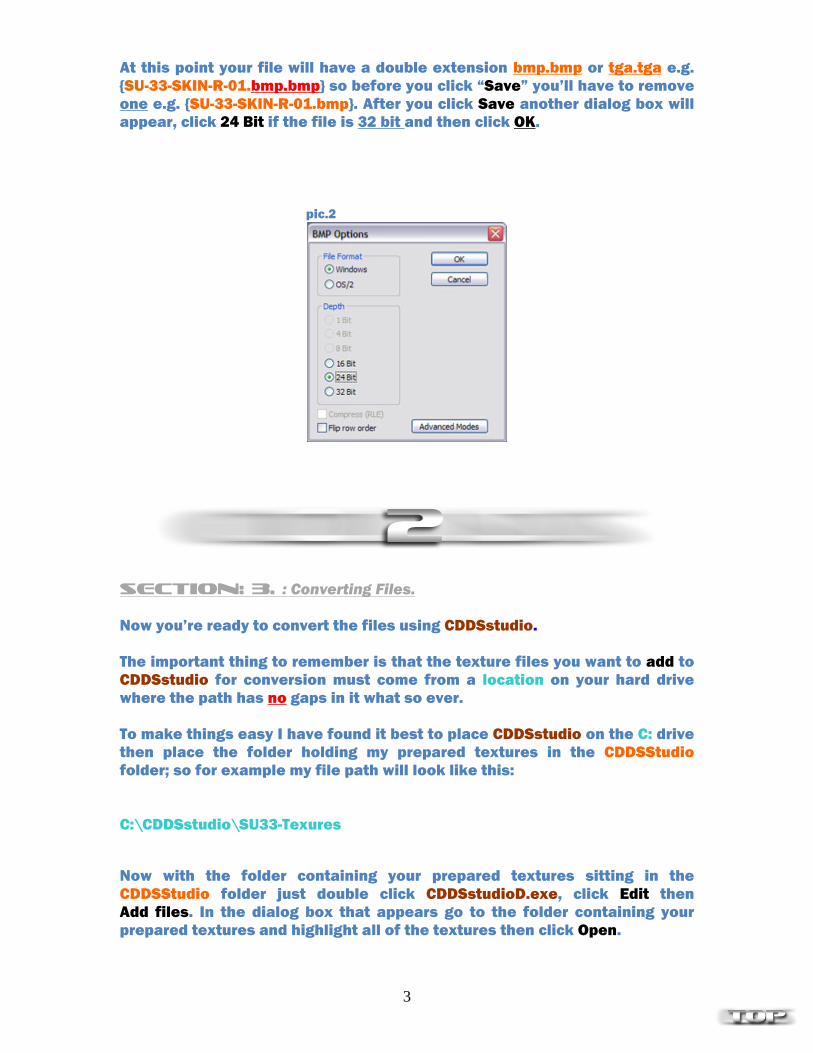
At this point your file will have a double extension bmp.bmp or tga.tga e.g. {SU-33-SKIN-R-01.bmp.bmp} so before you click “Save” you’ll have to remove one e.g. {SU-33-SKIN-R-01.bmp}. After you click Save another dialog box will appear, click 24 Bit if the file is 32 bit and then click OK. pic.2
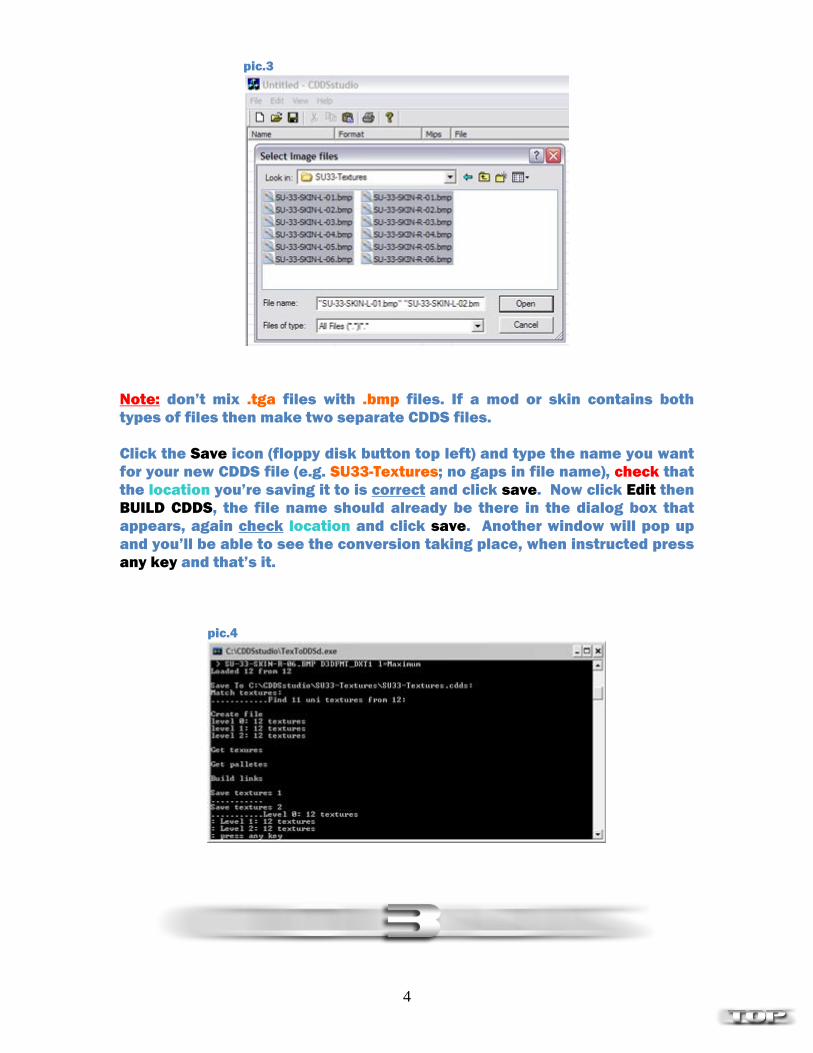
Section: 3. : Converting Files. Now you’re ready to convert the files using CDDSstudio. The important thing to remember is that the texture files you want to add to CDDSstudio for conversion must come from a location on your hard drive where the path has no gaps in it what so ever. To make things easy I have found it best to place CDDSstudio on the C: drive then place the folder holding my prepared textures in the CDDSStudio folder; so for example my file path will look like this: C:\CDDSstudio\SU33-Texures Now with the folder containing your prepared textures sitting in the CDDSStudio folder just double click CDDSstudioD.exe, click Edit then Add files. In the dialog box that appears go to the folder containing your prepared textures and highlight all of the textures then click Open.
4
pic.3
Note: don’t mix .tga files with .bmp files. If a mod or skin contains both types of files then make two separate CDDS files. Click the Save icon (floppy disk button top left) and type the name you want for your new CDDS file (e.g. SU33-Textures; no gaps in file name), check that the location you’re saving it to is correct and click save. Now click Edit then BUILD CDDS, the file name should already be there in the dialog box that appears, again check location and click save. Another window will pop up and you’ll be able to see the conversion taking place, when instructed press any key and that’s it. pic.4
5
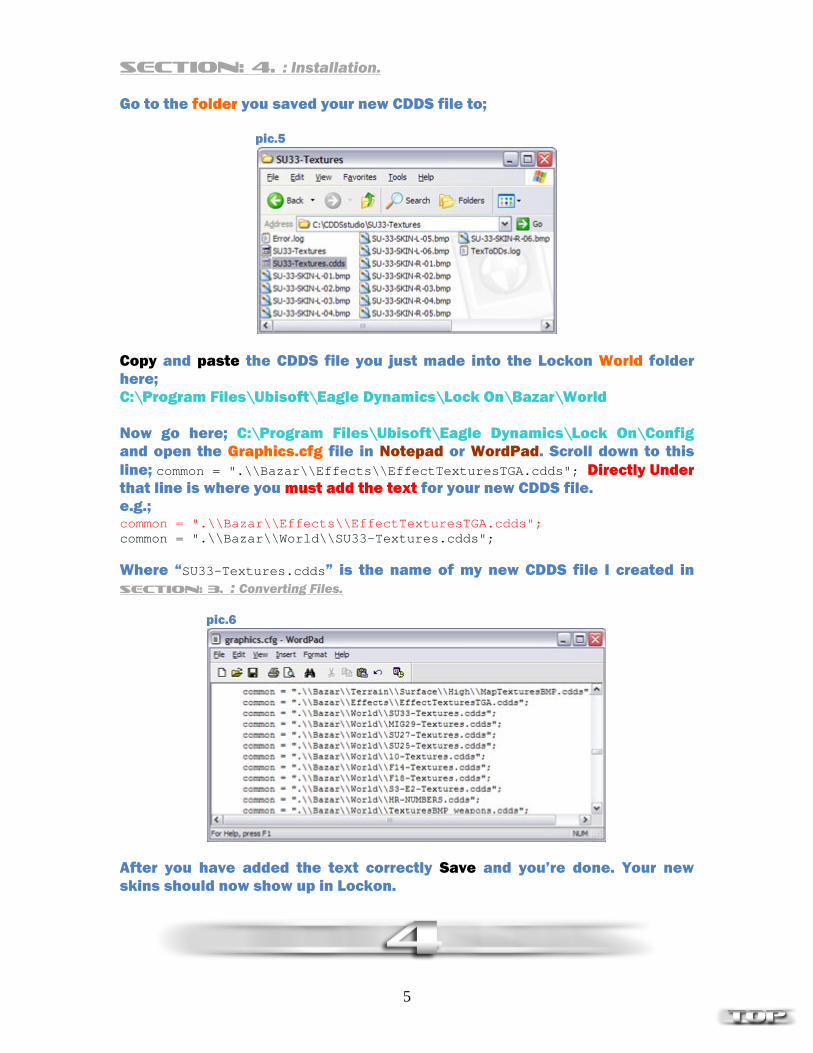
Section: 4. : Installation. Go to the folder you saved your new CDDS file to; pic.5
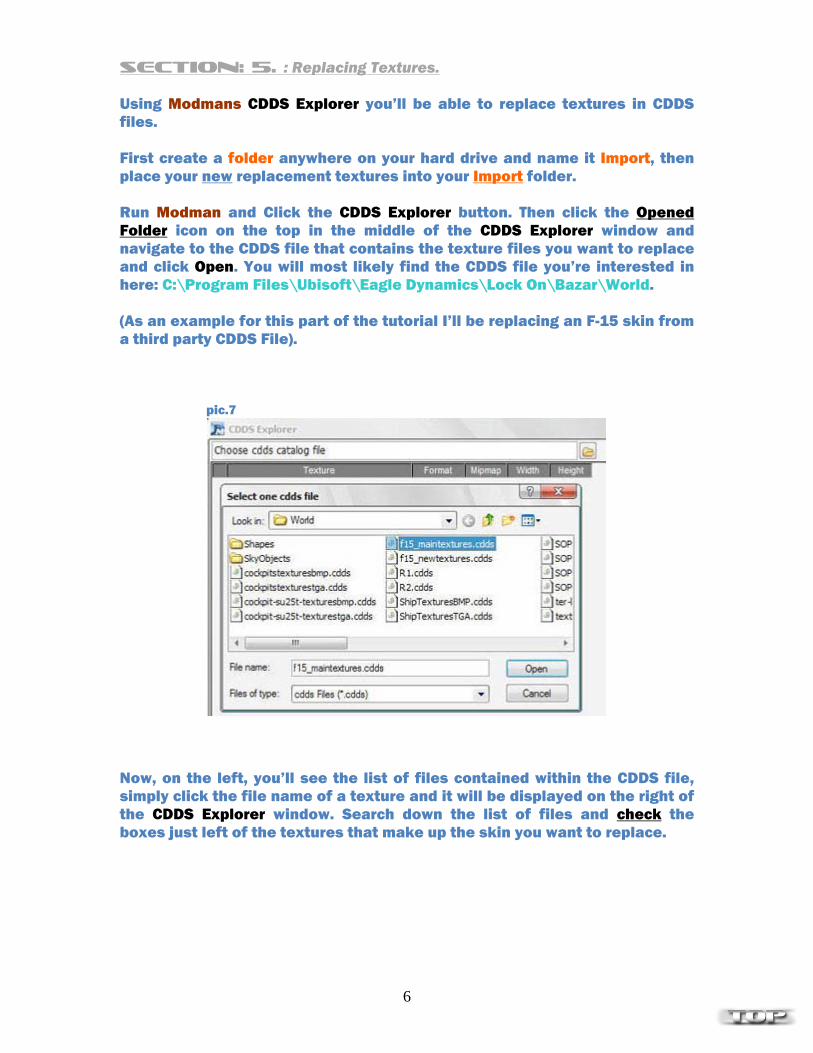
Copy and paste the CDDS file you just made into the Lockon World folder here; C:\Program Files\Ubisoft\Eagle Dynamics\Lock On\Bazar\World Now go here; C:\Program Files\Ubisoft\Eagle Dynamics\Lock On\Config and open the Graphics.cfg file in Notepad or WordPad. Scroll down to this line; common = ".\\Bazar\\Effects\\EffectTexturesTGA.cdds"; Directly Under that line is where you must add the text for your new CDDS file. e.g.; common = ".\\Bazar\\Effects\\EffectTexturesTGA.cdds"; common = ".\\Bazar\\World\\SU33-Textures.cdds"; Where “SU33-Textures.cdds” is the name of my new CDDS file I created in Section: 3. : Converting Files. pic.6
After you have added the text correctly Save and you’re done. Your new skins should now show up in Lockon.
6
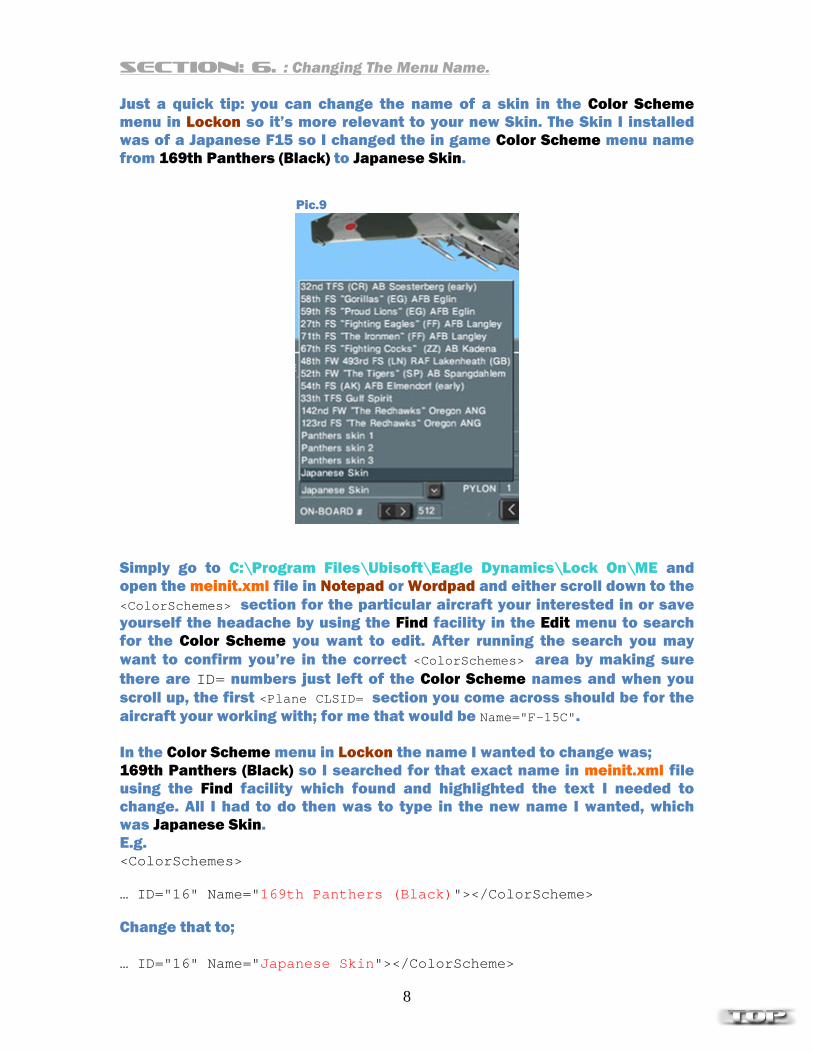
Section: 5. : Replacing Textures. Using Modmans CDDS Explorer you’ll be able to replace textures in CDDS files. First create a folder anywhere on your hard drive and name it Import, then place your new replacement textures into your Import folder. Run Modman and Click the CDDS Explorer button. Then click the Opened Folder icon on the top in the middle of the CDDS Explorer window and navigate to the CDDS file that contains the texture files you want to replace and click Open. You will most likely find the CDDS file you’re interested in here: C:\Program Files\Ubisoft\Eagle Dynamics\Lock On\Bazar\World. (As an example for this part of the tutorial I’ll be replacing an F-15 skin from a third party CDDS File). pic.7
Now, on the left, you’ll see the list of files contained within the CDDS file, simply click the file name of a texture and it will be displayed on the right of the CDDS Explorer window. Search down the list of files and check the boxes just left of the textures that make up the skin you want to replace.

7
Pic.8
The next step is to change the Names of the texture files in your Import folder to the exact names of the corresponding texture files you want to replace in your CDDS file. E.g. Textures in my Import folder; F-15-FIN-PAINT-DEF-1.bmp change to F-15-FIN-PAINT-169TH.bmp F-15-PAINT-L-DEF-1.bmp change to F-15-PAINT-L-DEF-169TH.bmp F-15-PAINT-R-DEF-1.bmp change to F-15-PAINT-R-DEF-169TH.bmp Make sure you rename the correct texture with the correct name and you don’t end up renaming the tail texture with the file name of say the left skin texture. Just take a look at the file names and you’ll see that matching them up is pretty straight forward e.g. F-15-FIN-PAINT-DEF-1.bmp = F-15-FIN-PAINT-169TH.bmp F-15-PAINT-L-DEF-1.bmp = F-15-PAINT-L-DEF-169TH.bmp F-15-PAINT-R-DEF-1.bmp = F-15-PAINT-R-DEF-169TH.bmp Now make sure the boxes next to the files you want to replace are still checked, then at the bottom of the CDDS Explorer window in the Insertion area click the Insert all button and navigate to and highlight your Import folder containing your newly renamed textures. Then just click OK and after the processing is complete you’re done and your new textures will now show up in game. Alternatively you can click the Insert button and replace the textures one at a time. Note: you can run Modmans CDDS Explorer as a standalone application from the Windows Start Menu/All Programs/Modman/CDDS Explorer, however for me this just produces an error each time I try to replace a texture.
8
Section: 6. : Changing The Menu Name. Just a quick tip: you can change the name of a skin in the Color Scheme menu in Lockon so it’s more relevant to your new Skin. The Skin I installed was of a Japanese F15 so I changed the in game Color Scheme menu name from 169th Panthers (Black) to Japanese Skin. Pic.9
Simply go to C:\Program Files\Ubisoft\Eagle Dynamics\Lock On\ME and open the meinit.xml file in Notepad or Wordpad and either scroll down to the <ColorSchemes> section for the particular aircraft your interested in or save yourself the headache by using the Find facility in the Edit menu to search for the Color Scheme you want to edit. After running the search you may want to confirm you’re in the correct <ColorSchemes> area by making sure there are ID= numbers just left of the Color Scheme names and when you scroll up, the first <Plane CLSID= section you come across should be for the aircraft your working with; for me that would be Name="F-15C". In the Color Scheme menu in Lockon the name I wanted to change was; 169th Panthers (Black) so I searched for that exact name in meinit.xml file using the Find facility which found and highlighted the text I needed to change. All I had to do then was to type in the new name I wanted, which was Japanese Skin. E.g. <ColorSchemes> … ID="16" Name="169th Panthers (Black)"></ColorScheme> Change that to; … ID="16" Name="Japanese Skin"></ColorScheme>
9
Pic.10
Save and exit. Now in game your new Color Schemes name will show up in the menu.
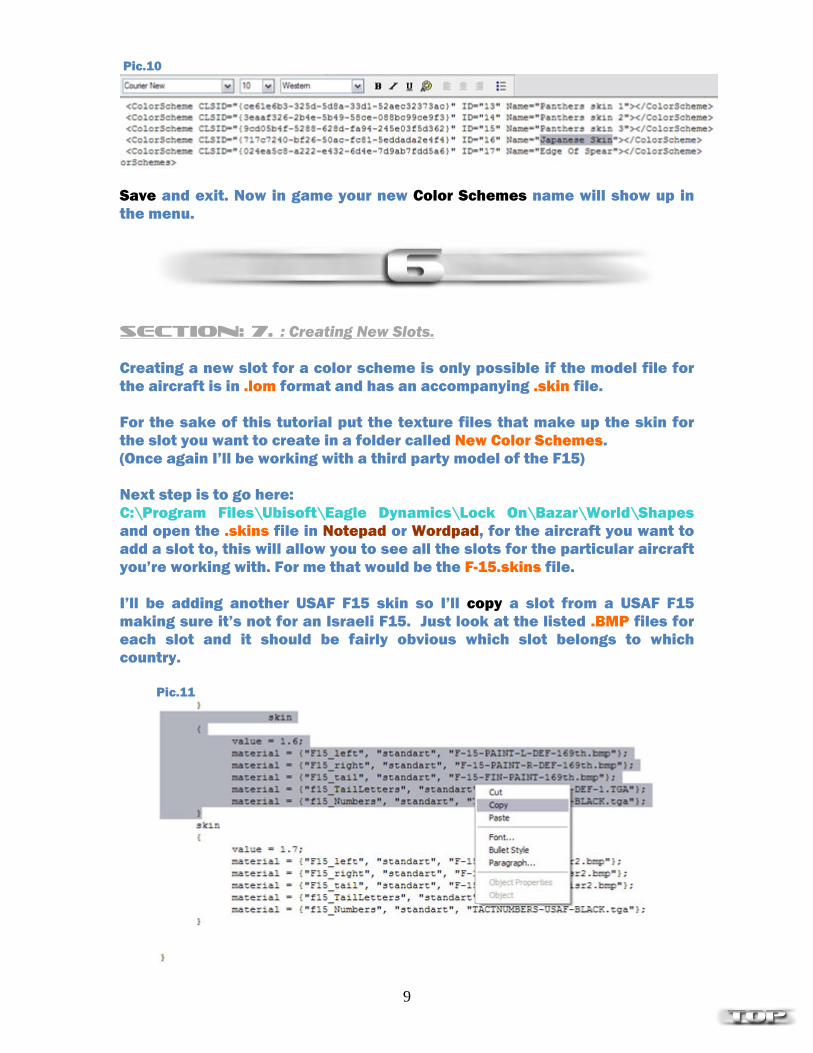
Section: 7. : Creating New Slots. Creating a new slot for a color scheme is only possible if the model file for the aircraft is in .lom format and has an accompanying .skin file. For the sake of this tutorial put the texture files that make up the skin for the slot you want to create in a folder called New Color Schemes. (Once again I’ll be working with a third party model of the F15) Next step is to go here: C:\Program Files\Ubisoft\Eagle Dynamics\Lock On\Bazar\World\Shapes and open the .skins file in Notepad or Wordpad, for the aircraft you want to add a slot to, this will allow you to see all the slots for the particular aircraft you’re working with. For me that would be the F-15.skins file. I’ll be adding another USAF F15 skin so I’ll copy a slot from a USAF F15 making sure it’s not for an Israeli F15. Just look at the listed .BMP files for each slot and it should be fairly obvious which slot belongs to which country. Pic.11
10
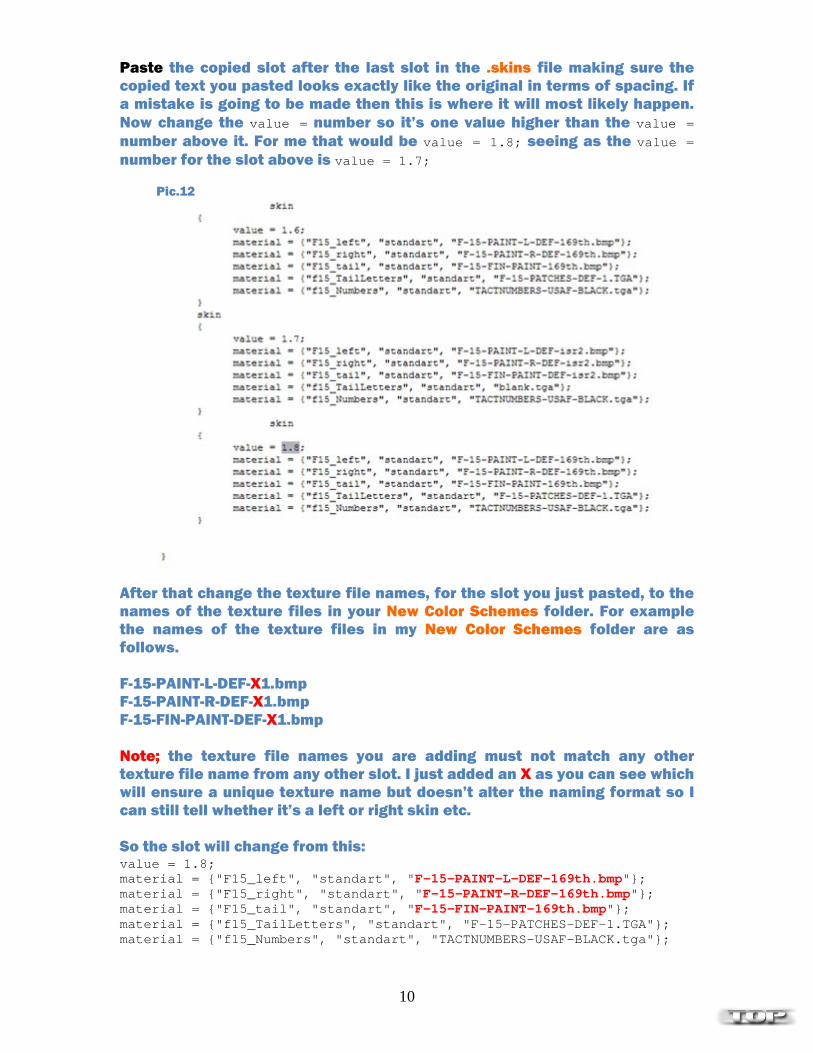
Paste the copied slot after the last slot in the .skins file making sure the copied text you pasted looks exactly like the original in terms of spacing. If a mistake is going to be made then this is where it will most likely happen. Now change the value = number so it’s one value higher than the value = number above it. For me that would be value = 1.8; seeing as the value = number for the slot above is value = 1.7; Pic.12
After that change the texture file names, for the slot you just pasted, to the names of the texture files in your New Color Schemes folder. For example the names of the texture files in my New Color Schemes folder are as follows. F-15-PAINT-L-DEF-X1.bmp F-15-PAINT-R-DEF-X1.bmp F-15-FIN-PAINT-DEF-X1.bmp Note; the texture file names you are adding must not match any other texture file name from any other slot. I just added an X as you can see which will ensure a unique texture name but doesn’t alter the naming format so I can still tell whether it’s a left or right skin etc. So the slot will change from this: value = 1.8; material = {"F15_left", "standart", "F-15-PAINT-L-DEF-169th.bmp"}; material = {"F15_right", "standart", "F-15-PAINT-R-DEF-169th.bmp"}; material = {"F15_tail", "standart", "F-15-FIN-PAINT-169th.bmp"}; material = {"f15_TailLetters", "standart", "F-15-PATCHES-DEF-1.TGA"}; material = {"f15_Numbers", "standart", "TACTNUMBERS-USAF-BLACK.tga"};

11
to this; value = 1.8; material = {"F15_left", "standart", "F-15-PAINT-L-DEF-X1.bmp"}; material = {"F15_right", "standart", "F-15-PAINT-R-DEF-X1.bmp"}; material = {"F15_tail", "standart", "F-15-FIN-PAINT-DEF-X1.bmp"}; material = {"f15_TailLetters", "standart", "F-15-PATCHES-DEF-1.TGA"}; material = {"f15_Numbers", "standart", "TACTNUMBERS-USAF-BLACK.tga"}; Save and exit. Note: because of the Su25T damage modeling you’ll need to perform the above procedure for all of the Su25T skins files i.e. SU-25T.skins, PTB-800.skins, SU-25T-FONAR.skins, SU-25T-NOSE.skins, SU-25T-TAIL.skins, SU-25T-WING-L.skins, SU-25T-WING-R.skins. Now install the textures in your New Color Schemes folder into Lockon as a CDDS file as I have described in previous sections. The next step is to open the meinit.xml file in Notepad or Wordpad and using the find facility search for any Color Scheme menu name, for the aircraft you want to add a slot to, making sure the Color Scheme name is for the correct country (I just searched for: 33th TFS Gulf Spirit) . Once you’re in the correct <ColorSchemes> area copy anyone of the <ColorSchemes lines then scroll down and paste it after the last entry in the list making sure all spacing’s remain the same. Pic.13
After that Change the ID= number of the line you just pasted so its one number higher than the ID= number above it. Note, this number isn’t just the next number in the list, it is also the same number as the value = number you added in the .skins file earlier with the decimal point removed. E.g. I added value = 1.8 to the .skins file so the ID= number I will add to the meinit.xml file will be ID="18". If I added value = 1.9; then my ID= number would be ID="19". Now generate a CLSID number using guidgen and paste the number over the CLSID number for the <ColorSchemes line you are working with (note; you will need this exact CLSID number again later on so you should paste the CLSID number you just generated into Notepad as a back up), then change the Name= of the skin to what ever you want. I am using a Dark Skin so I changed the name to F15 Dark Skin.

12
Pic.14
Ok you now need to add the color scheme to the correct country; just search again for the same Color Scheme menu name you searched for earlier and it should find the correct area a little lower down in the meinit.xml file. Confirm this by making sure the <ColorScheme CLSID= numbers are just left of the Color Scheme names also the color scheme names are for the correct country and above the list you should see the name of the aircraft you’re adding a slot to. Pic.15
This part is basically the same procedure you just performed; Copy anyone of the lines and paste it at the end of the list then change the <ColorScheme CLSID= number of the line you just pasted to the exact CLSID number you generated a minute ago. So now the two <ColorScheme lines you’ve added should now have matching CLSID numbers. Lastly change the name of the color scheme, just right of the CLSID number you just added, to the same name you gave previously; for me that would be F15 Dark Skin.

13
Pic.16
Save and exit. You should now see your new color scheme slot in game.
fin
Thank you for downloading and reading this tutorial. February, 2008.
Disclaimer: If your PC explodes, your Dog runs away and your Girlfriend leaves you then I and this tutorial are in no way liable ☺.