cdn.atmosmed.comcdn.atmosmed.com/docs/912/ga_c21c31_gb_2017-07_vers01_small.pdf · 2 5.0 cleaning...
TRANSCRIPT

ATMOS® C 21 / ATMOS® C 31ENT Unit
GA1GB.110200.0
2017-07 Index: 01
Ope
ratin
g In
stru
ctio
ns
English
0124
2
5.0 Cleaning and care .............................................225.1 General information on cleaning and disinfection ...................................................225.1.1 Cleaning the unit surface ....................................225.1.2 Cleaning "application parts" ................................225.1.3 Secretion canister (without autom. secretion canisterevacuation),bacterialfilterand suction hose ........................................................225.1.4 Secretion canister and electrodes (automatic evacuation of secretion canister) ........................225.1.5 Storage canister for ear irrigation system (option, only ATMOS® C 31) ................................225.1.6 Medicament sprayers..........................................235.1.7 Instrument trays ..................................................235.1.8 Irrigation bottles and accessories .......................235.1.9 Endoscope quivers .............................................235.1.10 Ear irrigation bowl ...............................................235.2 Recommended instrument disinfectants .............245.3 Recommended surface disinfectants ..................255.4 Recommended endoscope disinfectants ............26
6.0 Maintenance and Service .................................26 6.1 Changingthebacterialfilter ................................276.2 Changing the rinsing container ...........................276.3 Changing the hose box of the hose pump ..........286.4 Changing the heating coil of the mirror quick-heater ..............................................29
7.0 Troubleshooting ................................................307.1 Electrical protection.............................................307.2 Power supply ......................................................307.3 Mirror heating ......................................................307.4 Suction system....................................................317.5 Light sources.......................................................317.6 Compressed-air system ......................................327.7 Automatic secretion canister evacuation ............327.8 Endoscope support .............................................327.9 Automatic hose rinsing........................................32
8.0 Consumables, Accessories, Spare Parts ......338.1 Consumables ......................................................338.2 Accessories and spare parts...............................33
9.0 Technical data ...................................................36
10.0 Disposal .............................................................38
11.0 Hygienic plan .....................................................39
12.0 Notes on EMC ....................................................41
Content
1.0 Introduction .........................................................31.1 Notes on operating instructions ............................31.2 Intended use .........................................................41.2.1 ATMOS® C 21 .......................................................41.2.2 ATMOS® C 31 .......................................................41.3 Function ................................................................51.4 Explanation of symbols .........................................5
2.0 For your safety ....................................................6
3.0 Setting up and starting up .................................83.1 Front view .............................................................83.1.1 Service compartment ............................................93.2 Setting up proposal .............................................103.3 Connection to electrical power line .....................113.4 Water supply / Water drainage (option) ..............113.5 Independent water supply (only ATMOS® C 31) .113.6 Starting up...........................................................123.6.1 Electrical connection ...........................................123.6.2 Waste water connection (with optional automatic secretion canister evacuation)............123.6.3 Connection of suction hose.................................123.6.4 Connection of the light guide and light source ....123.6.5 Connection of the compressed air hose (option) 133.6.6 Connection of the hose for ear irrigation (option, only ATMOS® C 31) ................................133.6.7 Connection of the water system (option, only ATMOS® C 31) ................................13
4.0 Operation ...........................................................144.1 ATMOS® C 21 / C 31 - Basic unit ........................144.2 Basic functions ....................................................144.2.1 Main switch .........................................................144.2.2 Maximum loads ...................................................144.2.3 How to open the covering ...................................144.2.4 Suction system....................................................144.2.4.1 Emptying the secretion canister ..........................154.2.4.2 Application with disposable secretion canister systems..................................154.2.5 Light sources.......................................................164.2.6 Mirror quick-heater ..............................................164.3 Options................................................................174.3.1 Secretion canister evacuation, fully-automatic (option)........................................174.3.2 Hose rinsing system (option) ..............................174.3.3 Compressed-air system (option) .........................184.3.4 Connection of the ear irrigation system (option, only ATMOS® C 31) ................................204.3.5 Tulip-shaped ear irrigation bowl ..........................204.3.6 Mirror preheater (option) .....................................214.3.7 Headlamp suspension (option) ...........................214.3.8 Endoscope heating (option) ................................214.3.9 Tongue patches and swab dispenser (option) ....214.3.10 Waste bin (option) ...............................................214.3.11 Holder for standard rail .......................................21

3
1.1 Notes on operating instructionsThese operating instructions contain important notes on how to operate the ATMOS® C 21 / C 31 safely, correctly and effectively. Therefore, they are intended not only for new operating personnel to be instructed in its use, but also for use as a reference manual. They help to avoid risks, and also to reduce repair costs and down-times. Furthermore, reliability and service-life of the equipment will be increased. For these reasons these operating instructions must always be kept available near the appliance.Priortofirstusepleaseperusethechapter2.0“Foryoursafety”, in order to be prepared for any possible dangerous situations. The basic principles are: Judicious and careful work provides best protection against accidents!Operational safety and readiness for use depend not only on your capabilities, but also on care and maintenance given to the ATMOS® C 21 / C 31. For this reason regular cleaning and service work are a must. Major maintenance and repair work may be carried out only by expert personnel authorised by ATMOS. In case of repairs you should insist that original spare parts only are used. You will then have the warranty that operational safety, readiness for work and the value of your appliance will be preserved.These operating instructions are valid for the following devices:ATMOS® C 21 Economy Function Column REF 506.7500.0ATMOS® C 31 Economy Function Column REF 506.7510.0
• Please note that these operation instructions apply for all ATMOS® C 21 / C 31 models and subsequently feature all options and applications. Therefore, it is possible that this document may contain descriptions not relevant for yourspecificappliancetype.
• The product ATMOS® C 21 / C 31 bears CE marking CE 0124 according to the EC Directive of the council for medical products 93/42/EEC and meets the basic requirements of Appendix I of the directive.
• The product ATMOS® C 21 / C 31 complies with all applicable requirements of the directive 2011/65/EC restricting the use of certain hazardous substances in electricalandelectronicequipment(“RoHS”).
• The declaration of conformity and our general standard terms and conditions can be obtained on our website at www.atmosmed.com.
• The quality management system applied at ATMOS has beencertifiedaccordingtointernationalstandardsENISO 13485.
• ATMOS will supply a service manual containing detailed circuit descriptions and schematics as well as information on adjustment and servicing to service organizations authorized by ATMOS.
• Reprints - also in extracts - only with permission in written form by ATMOS.
Short cuts / symbols contained in this operating instructions• Indicating a list
- Subdivision of a list/activityThe recommended sequence must be followed in each case!
) Indicating particularly important advice! ª Describing the effect of an activity.
ATMOS
1.0 Introduction
Phone: + (49) 7653 689-0Fax:+ 49 7653 689-190+ 49 7653 689-493 (Service Centre)E-mail: [email protected]: www.atmosmed.de
MedizinTechnik GmbH & Co. KGLudwig-Kegel-Str. 1679853 LenzkirchGermany

4
1.2 Intended use
1.2.1 ATMOS® C 21
Name: ATMOS® C 21Main functions:• Suction• Compressed air system for medication spraying and the
Politzer manoeuvre• Ear irrigation• Electric power supply for LED light handles and LED
headlight• Light sources• Storage and heating of endoscopes• Mirror quick heater• Instrument deposit and heatingMedical indications / application:Standard ENT examination and/or therapySpecification of the main function:• Suction at 40 l/min / -76 kPa• Alternatively suction at 55 l/min / -98 kPa• Compressed air for medication spraying, max. 2 bar• Compressed air for the Politzer manoeuvre, regulated• Ear irrigation with 37 °C ± 1 °C, max. 500 ml/min• Electric power supply for LED, 700 mA• Light source LED for light guideApplication organ:Mouth to pharynx, auditory canal to the ear drum and the nasal cavitiesApplication time: • ENT unit: Short term use (up to 30 days)• Suction / Compressed air / ear rinsing / light source:
Temporary application on the patient (less than 60 minutes)
Application site:Application sites are clinics and practices for ENT doctors and phoniatrists. The examination and/or therapy with the ENT unit may only be executed by medically trained persons.Contraindications: May not be used for irrigation of the paranasal sinuses. The ear irrigation should not be applied to an infected auditory canal or a perforated eardrum.The product is: activeSterility:The ENT unit is no sterile product.Single-use product / reprocessing:The ENT unit is intended for multiple use. The device and parts of the accessories are reusable. For information on reprocessing, cleaning and disinfection, please see the operating instructions.
1.2.2 ATMOS® C 31
Name: ATMOS® C 31Main functions:• Suction• Compressed air system for medication spraying and the
Politzer manoeuvre• Ear irrigation• Electric power supply for LED light handles and LED
headlight• Light sources• Storage and heating of endoscopes• Mirror quick heater• Instrument deposit and heatingMedical indications / application:Standard ENT examination and/or therapySpecification of the main function:• Suction at 40 l/min / -76 kPa• Alternatively suction at 55 l/min / -98 kPa• Compressed air for medication spraying, max. 2 bar• Compressed air for the Politzer manoeuvre, regulated• Ear irrigation with 37 °C ± 1 °C, max. 500 ml/min• Electric power supply for LED, 700 mA• Light source LED for light guideApplication organ:Mouth to pharynx, auditory canal to the ear drum and the nasal cavitiesApplication time: • ENT unit: Short term use (up to 30 days)• Suction / Compressed air / ear rinsing / light source:
Temporary application on the patient (less than 60 minutes)
Application site:Application sites are clinics and practices for ENT doctors and phoniatrists. The examination and/or therapy with the ENT unit may only be executed by medically trained persons.Contraindications: May not be used for irrigation of the paranasal sinuses. The ear irrigation should not be applied to an infected auditory canal or a perforated eardrum.The product is: activeSterility:The ENT unit is no sterile product.Single-use product / reprocessing:The ENT unit is intended for multiple use. The device and parts of the accessories are reusable. For information on reprocessing, cleaning and disinfection, please see the operating instructions.
1.0 Introduction

5
1.3 Function• The ATMOS® C 21 / C 31 is operated by activating the
main switch ( 1 ,fig.1,page8).• The exact mode of function of the standard equipment
and optional functions is described in detail in chapters 4.2 and 4.3.
1.4 Explanation of symbols
ATMOS® C 21 / C 31
On / Off switch
I ON (power) as to IEC 417/5007 and DIN 30600/16
O OFF(power) as to IEC 417/5007 and DIN 30600/16
Follow operating instructions (blue)
Warm water system
Suction system
Compressed-air system
Cleaningwiththeflowmethod (hose rinsing)
Light guide connection
No function
Transfer of heat, in general; mirror heater
Short-time operation
Foot switch
Dangerous voltage as to IEC 417/5036, DIN 30600/131
Protective earth (ground) as to IEC 417/5019, DIN 30600/1545
Fuse as to IEC 417/5016, DIN 30600/0186
Type B equipment as to IEC 417/5333
Type BF equipment as to IEC 417/5333
~ Alternating current
Do not lean against it!
060.0628.0
Danger of tilting for units with a microscope!Screw the unit into the ground or position it near a wall.
Only ATMOS® C 31
Water temperature for ear irrigation is too high
Correct water temperature for ear irrigation
Water temperature for ear irrigation is too low
2.0 Introduction

6
2.0 For your safety
• The ATMOS® C 21 / C 31 is produced according to IEC 601 / EN 60601 and listed in the following classes:
- VDE Class of protection 1 - Class IIa (EEC 93/42).
• The unit may be connected only to a socket outlet with earthing contact installed according to the rules of the trade.
• The unit should not be positioned directly next to a wall, because of the ventilation openings on the rear side!
• When a microscope is mounted: Screw the unit into the ground or position it near a wall. If the microscope is in an unfavourable position it could tilt the unit backwards.
• The ATMOS® C 31 requires clean water (drinking-water quality) for the operation. In case the clean water cannot beprovidedbythewatersupply,apre-filterhastobeinstalled.Therelevantcountryspecificregulationsfortheinstallation have to be considered.
• Caution! Mirror and endoscope heaters may generate temperatures above 40° C!
• Attention with the cold-light source! Because of the high energy of the light there is a large amount of heat emission at the point of the optical system. Avoid too small a distance between the tissue andthefieldoflightemissionofthelightguiderespectiveof the endoscope, as this may cause coagulation of the patient's tissue. When using the endoscope avoid the direct contact between area of light emission and the tissue. Attention, Fire Hazard! Never place the area of light emission from the light guide or from the endoscope onto heat-absorbing surfaces (dark pieces of cloth, etc.), because this will cause unacceptable high heating or even ignition of the material. Switch the light off when you do not require the light over a prolonged period of time.
• Care is to be paid in respect to light sources when working with endoscopes. The intensity of the light is very high. Do not look directly into the light outlets! In case of possible light failure remove the endoscope from the working area.
• Always make sure that you do not blind patients with the light source! Watch out that patients do not look directly into the light source! Never look directly into the light source! > Damage to the eyes due to the strong glare.
• Exclusively connect ATMOS® HL 21 LED and ATMOS® LS 21 LED to the connections for ATMOS® HL 21 LED and ATMOS® LS 21 LED. Unsuitable application parts may result in an electric shock or damage. Cardiac arrhythmia and even death are possible.
• The ATMOS® C 21 / 31 may be used in supervised operationbyqualifiedpersonnelonlywhichhasbeenauthorised by ATMOS and which has been trained for operating the appliance (IEC 601-1/EN 60601-1).
• The mains voltage indicated on the type plate must correspond to the values of the supply network.
• Make sure prior to every application of the equipment that it is technically safe and in proper condition. Damaged leads and hoses must be replaced immediately!
• Display instruments and valves must be checked for correct function in regular intervals!
• Inspection of compressed air and vacuum display by service technician every 2 years!
• Correctconfigurationinassemblyofcountry-specificconnections:
- green/yellow: protective conductor (PE) - blue: neutral conductor (N) - black or brown: phase (L)
• This product is not re-sterilizable. Repeated reuse of components which are marked with a 2 is forbidden. In case of repeated reuse these components lose their function and there is a high infection risk.
• The control panel must be well visible to and in reach of the operator.
• Do not place used contaminated instruments on the ENT unit!
• Theambientconditionsspecifiedinthe"Technicaldata"(chapter 9.0) must be strictly observed!
• The suction system of the ATMOS® C 21 / C 31 is only tobeusedforthesuctionoffluidsinthemedicalfield.Neverremoveexplosive,inflammableorcorrosivegasesorfluids.
• Switchoffmainswitchafterfinishingworkinpracticeandclose water supply, if present.
• The ATMOS® C 21 / C 31 may be operated only in rooms used for medical purposes, but not in areas subject to explosion hazards and in oxygen rich environments.
• The ATMOS® C 21 / C 31 fully complies with the electromagnetic immunity requirements of standard IEC 601-1-2 / EN 60601-1-2 "Electromagnetic compatibility - Medical Electrical Equipment".

7
• The ATMOS® C 21 / C 31 may not be operated with units not complying with the requirements of standard EN 60601-1 "Medical Electrical Equipment" and EN 60601-1-2 "Electromagnetic compatibility (Medical Electrical Equipment)".
• The warranty will be rendered invalid in case of damages caused due to the utilization of accessories or consumables which are not approved by ATMOS for use with this unit.
• ATMOS is not liable for personal injury and damage to property if
- no original ATMOS parts are being used, - the advice for use in these operating instructions is
not being observed, - assembly, new settings, alterations, extensions
and repairs have been carried out by personnel not authorised by ATMOS.
• Please pay also attention to the safety information in following chapters.
• Please note: A medical insulating transformer with earth leakage monitor or any similar safety system acc. to EN 60 601-1 is required, if several devices are connected over one common power supply. The transformer must correspond to the power consumption of all the devices to be connected.
• When connecting several devices on one grounding receptacle, the allowed strain and leakage current have to be observed!
• Never leave the patient unattended at the treatment unit.• Itisnotallowedtouseflammablesubstanceswiththe
device.
2.0 For your safety

8
3.1 Front view
Drawer resp. deposit for used instruments (optional)Drawer resp. waste bin (option)Connections for light guideVacuum controlDoor for service compartmentCompressed-air control (option)SuctionCompressed-air handle (option)Handle ear irrigation (option, only ATMOS® C 31)Irrigation canister for hose rinsing (option)
Fig. 1. ATMOS® C 21 / C 31 Front viewMain switchSprayer (option)Laryngoscope holderSurface for medicament bottles etc.Ear irrigation (option, only ATMOS ® C 21)Headlamp suspensionCover for upper instrument depositInstrument surfaceFree surface
3.0 Setting up and starting up
1
19
18
17
16
2 3 4 5 66 7
8
9
10
1112131415
1
2
3
4
5
6
7
8
9
10
11
12
13
14
15
16
17
18
19

9
3.1.1 Service compartment
Fig. 2. ATMOS® C 21 / C 31 Service compartmentHose for automatic secretion canister evacuation (optional)Connecting nipple with hose to the vacuum pump Secretion hoseConnecting electrodes for automatic secretion canister evacuation (optional)Attachment for secretion hoseSecretion canisterLid(variantwithbacterialfilterplate)
3.0 Setting up and starting up
1 2 3 4 5
6
7
1
2
3
4
5
6
7

10
3.2 Setting up proposal
At option 2 - where the instrument deposit is slidable (backwards) - an extra 250 mm distance to the wall is required.
560 mm + 250 mm = 810 mm22.5" + 9.84" = 31.84"
3.0 Setting up and starting up

11
Fig. 4.Inlet connector for non-heating apparatusConnection for waste water hose
Fig. 3.Socket outlets with earthing contactWater drainage G3/4" external thread (optional)Water supply with water tap G 3/4" external thread (optional)
3.3 Connection to electrical power line• According to the directions of VDE 0107 and VDE
0100, medically used rooms have to be equipped with a leakage current protective circuit (FI protective circuit) with a nominal leakage current of < 0.03 A. Installation must correspond with VDE 0107.
• The ATMOS® C 21 / C 31 is connected to a earthing contact socket which is to be mounted near the unit (max. 3 m, preferably on the left side, next to the function column)(seefig.3).
• The current consumption of the ATMOS® C 21 / C 31 is maximum 5 A .
• For the connection of further electrical devices, please allow for extra plugs (installation of an electrically operated patient chair).
3.4 Water supply / Water drainage (option)
Water supply:Prerequisites:• There must be existing water pipes with a G 1/2" (internal
thread). For connecting a corresponding water or ball valve with a G 3/8" hose connection.
• This (water tap) ball valve must be installed in such a way that it can be turned off without any problem.
• The water which is provided by the household connection must at least meet the WHO guidelines or the country-specificguidelinesfordrinkingwater.
• Rinse water supply line in order to remove any contamination from the system.
• When clean water is available, connect delivery hose to water tap mentioned above.
• Required pressure in domestic water system: > 2 bar, but < 5 bar.
• Therearecountry-specificregulationsfortheinstallationto be considered when the unit is connected to the public water supply.
• Thereisnospecialcalcificationsafetydeviceintegratedin the water system. Such a system is to be connected when the respective drinking water is of hardness grade 3 (14 - 21°d resp. 2.5 - 3.8 mol/m³ = hard water) but especially with hardness grade 4 (from 21°d resp. from 3.8 mol/m³ = very hard water). You may receive information on the hardness gradeofyourwaterfromthewatersupplyoffice.
Water drainage (option):Prerequisites:• PermanentlyinstalledconnectionfittingwithG3/4"
external thread.• To adapt the 3/4” draining hose to standard HT 40
a connection adapter 510.2130.0 can be ordered (510.2129.0 for HT 50).
• Connect waste water hose with unit ( 2 ,fig.4)andtheG3/4"connectionfitting(insertpertainingseals!).
An anti-syphon trap is not required!
3.5 Independent water supply (only ATMOS® C 31)
If the system is not connected to a water supply, we recommendyoutofillthestoragecanisterfortheearirrigation system with 2,0 litres of tap water or hygienically safe drinking water.For information on the maintenance and cleaning of the water supply, see chapter 5.1.5 in the operating instructions.
3.0 Setting up and starting up
1
2
3
21
1
2

12
Fig. 5. Connections light package 2-channels version 1
1 , 2 Connections for light guide
3 , 4 Connections for ATMOS® HL 21 LED and ATMOS® LS 21 LED
1 2 3 4
3.0 Setting up and starting up
3.6 Starting up
3.6.1 Connection to electrical power line
• Join the inlet connector for non-heating apparatus ( 1 , fig.4)withtheearthsocketoutletusingthepowercablesupplied.
3.6.2 Waste water connection (with optional automatic secretion canister evacuation)
• Connect the waste water connector ( 2 ,fig.4)tothewater drain ( 2 ,fig.3).
3.6.3 Connection of suction hose
• Thread the suction hose through the hole on the side into the service compartment and insert it onto the secretion hose connector ( 5 ,fig.2).
) The transport locking screws on the unit's baseplate must be removed by skilled staff prior to starting up! To do this, the rear panel must be opened and the two front screws must be unscrewed. The pump unit is removed from the rear locking device by pulling it forwards.
3.6.4 Connection of the light guide and light source
The unit has different connections depending on the configuration:
Light package LED economy:• 2 connections for ATMOS® HL 21 LED and ATMOS® LS
21 LED
Light package 2-channel with 2 or 4 channels:Version1(fig.5):• 2 connections for light guide• 2 connections for ATMOS® HL 21 LED and ATMOS® LS
21 LEDVersion 2:• 2 or 4 connections for light guideVersion 3:• 2 or 4 connections for ATMOS® HL 21 LED and ATMOS®
LS 21 LEDExclusively connect ATMOS® HL 21 LED and ATMOS® LS 21 LED to the connections for ATMOS® HL 21 LED and ATMOS® LS 21 LED. Unsuitable application parts may result in an electric shock or damage. Cardiac arrhythmia and even death are possible.• Connect the light guide or light source.
) If you require several adapter sleeves (e.g. Olympus, Pentax, Wolf, etc.), they may be interchanged as necessary (see chapter 8.2).
) Sothatthefibre-opticcablesdonotrestonthefloor,theymay be threaded through behind the handle support.
!

13
Fig. 6. CPC coupling
3.6.5 Connection of the compressed air hose (option)
Connection of the function hose for compressed air at the side of the column.• Compressed-air hose is connected by means of plug
connections; make sure that the plug attachment is engaged. The hose is disconnected by pressing the release slide ( 1 ,fig.6)attheplugconnectorandbypulling out the plug attachment.
) Push the handles into the handle support as indicated by the symbols. The photoelectric barriers will operate the wrong units if the handles are transposed!
3.0 Setting up and starting up
Fig. 7. Connecting the hose for ear irrigationConnection for the ear irrigation hoseConnection for the compressed-air hose
3.6.6 Connection of the hose for ear irrigation (option, only ATMOS® C 31)
The hose for the warm water system is screwed on the CPC coupling.
) Different socket nipples; swapping of the hoses is not possible!
3.6.7 Connection of the water system (option, only ATMOS® C 31)
Connect the aqua stop valve to the water tap (house connection). Open the water tap. If the main switch is activated and a water consuming device (basin rinsing or hose rinsing system) is used, the water supply is opened by an automatic opening of the magnetic valve in the aqua stop system.
ª Thus, there is no pressure inside the water supply hose if no water consuming device is activated.
1
1 2
1
1
2

14
4.1 ATMOS® C 21 / C 31 - Basic unitThe ENT unit ATMOS® C 21 / C 31 offers optimum instrument handling whilst at the same time providing an optimum arrangement of all functions that an ENT specialist requires for his daily work in the practice.
The instrument deposit area:At the top of the functional column there is an area designed to take medicine bottles ( 4 , Fig. 1, page 8), hence the instrument deposit area is also very suitable instruments.There is also the facility for protective storage of less frequently used instruments and consumables in the drawers ( 10 and 11,fig.1).
) Most of the unit's surfaces are coated with a special texturedlacquerthatfulfilstherequirementsforworkplace hygiene. However, as the lacquer is not resistant to all medicines and disinfectants it is imperative to wipe up splashes immediately.
4.2 Basic functions
4.2.1 Main switch
• The ATMOS® C 21 / C 31 is switched ON and OFF by means of the main switch ( 1 ,fig.1,page8).
4.2.2 Maximum loads
• Persons must not lean on the ATMOS® C 21 / C 31 (danger of tilting).
• Maximum load of the instrument surface: 15 kg.• Maximum load of the writing and working surface: 10 kg.• Maximum load of the second deposit surface (optional):
7.5 kg.
4.2.3 How to open the covering
• Open the unit covering up to the stop.
4.2.4 Suction system
The hose attachment must be exchanged after each patient. ) Prior to each application, proper function of the display instruments and control valves must be checked!
• Purpose of the suction system: - Suctionoffluidsandsecretions;collectingthe
secretion in the secretion canister.• Automatic activation of the suction mode by taking out
the suction attachment.• Control of the suction performance via the rotary knob for
vacuum control ( 2 ,fig.9).
!
Fig. 8. Maximum load
max. 15 kg
4.0 Operation

15
• Indication of set vacuum at vacuum gauge ( 3 ,fig.9)(keep suction attachment closed by hand).
• Secretion is collected in 1.25 l canister with mechanical overflowsafetyandwater-repellentbacterialfilter.
ª Prevents ingress of secretion into the pump. ) Secretion canister to be emptied when half full at the latest, see chapter 4.2.4.1!
) The suction system may be operated only with inserted bacterialfilter.Incasethefilterisblockedithastobeexchanged (see chapter 6.1) ! Forhygienicreasons,thebacterialfiltershouldbeexchanged daily.
) The suction hose must never come into direct contact with the application site. Always use a suction catheter, suction tip, or medical suction set!
) Change the suction catheter after every patient and clean the suction hose, e.g. with the aid of the optional hoserinsingsystem(aspiraterinsingfluidordisinfectantsolution)!
• All commercially available models of suction cannulae (Adson, Walter, Frazier, Fergusson, Plester, Yankauer, Torrington) may be attached to the silicone attachment.
4.2.4.1 Emptying the secretion canister
• Detach all hose connections carefully on the lid system and take secretion canister out carefully to prevent spills and contamination of the area. Dispose of secretions properly.
• Griplidsystemfirmly,openlidoffilterhousingbyturninginanti-clockwisedirection.Withbacterialfilterplateorintegratedbacterialfilter:Removefilteranddisposeitof.
• Rinse all parts thoroughly under running water. A detergent or cleaning agent may also be used if required.
• Aftercleaninganewfiltermustbeinserted(withbacterialfilterplate:smoothsidedown).Seechapter6.1.
See also suction accessories (chapter 8.2).
4.2.4.2 Application with disposable secretion canister systems
Assemble the disposable canister system:Insert the disposable bag into the canister. Seal properly on all sides. Check again for tightness, otherwise there will be no build up of vacuum. Connect the vacuum hose.
) Please observe the operating instructions of the disposable secretion canister system.
) Please observe the valid hygiene and waste disposal measures.
) Only the recommended ATMOS disposable secretion canisterswithintegratedfiltermaybeused!
Fig. 9. Suction Suction attachmentON switchVacuum gaugeVacuum control
Fig. 10.Secretion hoseBacterialfilterplate
4.0 Operation
Fig. 11 Disposable secretion canister systems
1 2 3 4
1
2
3
4
1
2
1
2

16
4.2.5 Light sources
) Do not look directly into the light outlets. ) Because of the high energy of the light there is a large amount of heat emission at the point of the optical system.
) Switch the light off when you do not require the light over a prolonged period of time.
Light package LED economy:• Select the light source with the switch 1 (fig.12).
Light package 2-channel with 2 or 4 channels:Switch on• Remove the light guide from the holder ( 4 ,fig13)orthe
headlight from the headlamp suspension ( 3 ,fig13). ) You can manually switch on the light source with the buttons 1 to 4 ( 5 ,fig.13).
Intensity control• Switch on the light source.• Press the button 1 (fig.13),toreducethebrightnessor
press 2 , to increase the brightness. ) When the device is switched off the last adjustment will be kept.
Fig. 12. Light package LED economy:Switch for selecting the light source
Fig. 13. Light package 2-channel with 2 or 4 channels:Reduce brightnessIncrease brightnessHeadlamp suspensionHolder for the light guideSelection of the light channel
4.2.6 Mirror quick-heater
• Switch on the mirror quick-heater with key switch ( 2 ,fig.14). The mirror quick-heater heats up for 10 seconds and then switches off automatically.
• Supply voltage of the heating coils: 6 V / 15 A.• Hold the mirror to be heated over the burning heating coil
( 1 ,fig.14)locatedbeneaththesafetycover.
) Prior to use of the mirror, always check its temperature (with hand etc.)!
) Automatic switching to avoid overheating! ) Safety cover, sleeve and heating element might be very hot. Do not touch directly after heating-up (hot)!
• Changing the heating coil, see chapter 6.4.
Fig. 14. Mirror quick heaterHeating coilPush-button
4.0 Operation
1
1
4
3
2
5
1 2
1
1
2
3
4
5
1
2

17
4.3.1 Secretion canister evacuation, fully-automatic (option)
• Purpose: - Prevents interruption of work in practice. - Secretion is not held in canister over a longer period
of time. - Prevents contact of staff with secretion.
• Activated automatically when: - Reachingtheupperfillinglimit(electrodes). - Returning suction attachment to holder.
) The tube cassette of the tube pump is a wear part and must be replaced at regular intervals (see chapter 6.3)!
) Pay attention to cleaning described in chapter 5.0!
4.3 Options
Fig. 15. Service compartmentHose for automatic secretion canister evacuation (optional)Connecting nipple with hose to the vacuum pumpSecretion hoseConnecting electrodes for automatic secretion canister evacuation (optional)Attachment for secretion hoseSecretion canister
4.0 Operation
4.3.2 Hose rinsing system (option)
After use, the suction system must be rinsed by means of the hose rinsing system. • Insert the silicone suction attachment onto the white
attachment of the hose rinsing (front of the unit) and clean the hose system by rinsing the hose for a few seconds.
ª This procedure will prevent the hoses and suction cannula from clogging up.
Thecanisterfortherinsingfluidofthehoserinsingislocated in the service compartment at the front of the unit. For optimum cleaning, add the ATMOS® special cleanser (Art.No. 080.0006.0) to the rinsing liquid. Optionally the canistercanbeautomaticallyfilledupwithfreshwater.Water supply is then controlled by a level switch. A safety switch beside the canister in the canister support prevents overflowing,incasethecanisteroverflowsorisnotavailable.
) The suction attachment of the hose rinsing system may be contaminated. Therefore, it must be cleaned and disinfected daily!
Fig. 16.Float switchPipe for the hose rinsing systemHose rinsing canister
1 2 3 4 5
6
1
2
3
4
5
6
1
2
3
1
2
3

18
4.3.3 Compressed-air system (option)
) Prior to each application, proper function of the display instruments and control valves must be checked!
Purpose of compressed-air system:a) Medicaments can be applied to the nasopharynx:• The pump for the compressed-air system switches on
after the compressed-air handle has been removed from its holder.
• Handle is mounted on a sprayer. The top of the compressed-air handle locks in place in the ring of the sprayer bottle.
• Available sprayers: - with straight spraying tube for normal liquid
medicaments - with twin tube and adjustable angular jet for oily
medicaments. ) If a sprayer is used with medication the instructions of the medication manufacturers have to be observed.
) Do not use the sprayer for the storage of medication! ) Caution to be paid to avoid injury when introducing sprayer jet!
Please note, in case the ventilation opening is blocked or thesprayerheadisimmersedinfluids(e.g.blood,secretion,etc.)anegativepressurecouldoccurandthefluidcouldflowbackintothebottle.Inthiscasethemedicinesprayer,sprayerhead,flexiblenozzle as well as the hose piece for the medicine sprayer must be reprocessed as described in chapter 5.0 cleaning.• Pull the release lever.
ª The medicament sprayer is supplied with air and the medicament in the sprayer bottle is atomized.
• The amount of compressed air is adjusted with the control knob ( 3 ,fig17)inconjunctionwiththecompressed air gauge ( 2 ,fig17).
• After use, the medicament sprayer is again inserted in its holder, the bar is pressed, the handle is removed from the sprayer and again inserted in its support.
ª Compressed-air system is again switched off. ) For hygienic reasons, the spraying tubes are to be exchanged following each application or with each patient.
Fig. 17. Compressed-air systemSprayer suspensionCompressed-air displayCompressed-air controlSupport for automatic photoelectric barrier controlCompressed-air handle
4.0 Operation
1
2345
1
2
3
4
5

19
Fig. 18. Compressed-air handle with Politzer adapterPolitzer oliveAdapter for Politzer oliveCompressed-air handle
Fig. 19. Removal of the irrigation bottle
Fig. 20. Compressed-air handleRelease buttonAir valveAdjusting lever
b) Politzer manoeuvres with Politzer olives or Eustachian catheter can be carried out.• The pump for the compressed-air system switches on
after the compressed-air handle has been removed from its holder.
• The adapter ( 2 ,fig.18)suppliedforthispurposeislocked into the compressed-air handle.
• Politzer olive ( 1 ,fig.18)isinsertedintheadapter. ) ThepressurefortheinsufflationoftheEustachiantubecan be controlled by means of the manometer and the compressed-airregulator.Selectaninsufflationpressureadapted to the condition of the tympanic membrane. If the tympanic membranes are already pre-damaged even low pressure values might lead to injuries ! Maximum pressure must not exceed 0.2 bar!
• Activating, adjusting and regulating the compressed air and switching off the compressed-air system as described above.
• Scope of delivery: - Compressed-air system with pump, regulating
valve, manometer, handle and handle holder with photoelectric barrier control;
- 3 medicament sprayers (2 single tube, 1 twin tube sprayers for viscous medicaments);
- Politzer adapter; - Politzer olive (for children); - Politzer olive (universal size).
• Accessories, see chapter 8.2.c) For ear irrigationPrior to each ear irrigation perform a visual check to see if the patient's eardrum is perforated. Do not irrigate the ear if itisperforatedorinflamed!Otherwisetheinflammationcanspread.Preparation• Fill both irrigation bottles with microbiologically safe
drinking water. Ideally the drinking water is at room temperature.
• Position the reprocessed irrigation lid with irrigation hose.• Attach the splash protection and hose tip.• Place both irrigation bottles in the heated quiver for
warming.Irrigate ear• Attach the compressed air handle to an irrigation bottle.• Remove the compressed air handle with the irrigation
bottle from the heated quiver.• Check the water temperature with the back of your hand.
Cold water causes dizziness for patients.• Position the ear irrigation nozzle.• Close the air valve with your thumb.• Press the release lever to irrigate the ear.Conclude• Release the lever.• Remove your thumb from the air valve.• Place the irrigation bottle in the heated quiver.• Press the release button and remove the compressed air
handle from the irrigation bottle.• Hang the compressed air handle in the holder.
!
1
2
3
1
2
3
4.0 Operation
1
2
3
1
2
3

20
4.0 Operation
4.3.5 Tulip-shaped ear rinsing bowl
• Purpose: To collect the water during ear irrigation.• The tulip-shaped bowl is attached to the suction
attachment of the suction system.• We provide a special support for the ear irrigation bowl.,
as an accessory.
Fig. 24. Ear irrigation bowl
4.3.4 Ear irrigation system (option, only ATMOS® C 31)
• The ear irrigation system is supplied with water from a heated storage canister (37°C) 4.5 l ( 3 ,fig.22).Thiscanistercaneasilybefilled,cleanedordisinfected.Thepump only switches on automatically when required. Waterpressureandflowquantitymayberegulatedwiththe release lever on the irrigation handle. With the switch 1 ,fig23,theearirrigationsystemcanbeswitchedonand off.
) DonotswitchontheENTunituntilwaterhasbeenfilledin the storage canister of the ear irrigation system.
• Fill the storage canister,e.g. using a measuring cup (000.0583.0), with microbiologically safe drinking water (min. 2 l, max. 4,5 l, drinking water quality) and close the lid.
) The water must not be contaminated and its temperature must not exceed 37°C as it cannot be cooled down. If thereisnodrinkingwateravailable,youmayalsofillthe storage canister with an isotonic saline solution. Alternatively, you may achieve drinking water quality by filteringorboilingthewaterresp.byaddingdisinfectants.
) This system may not be used if the auditory canal is injured as there could be a risk of infection if the irrigation liquid is contaminated.
• The temperature display indicates the water temperature. It takes approx. 15 min. until 2 litres of cold tap water are heated up to 37°C. Observe the temperature display and check water temperature prior to every application. As soon as the middle lamp illuminates the water has reached the desired temperature.
• Take the water handle from the support and spray off the water until it is free of air bubbles and the level of the pump noise becomes less (repeat this procedure every time the pump noise gets louder, e.g. after long periods during which it has not been used or after the water level has dropped below the suction limit).
• Change the jet connection daily. Only use disinfected jet connections, in order to prevent spreading germs. Use the hose tip, REF 502.0844.0, to avoid damages to the eardrum. Exchange the hose tip after every patient.
Frontfolie ATMOS C 31 Bedienteil LED 4
060.0700.0
060.0411.01:1
03.11.16 O.Eirich
Blatt
(sheet)1Bl.1/1
(index)Zust.
(revision)Änderung Datum
(date)Name(name)
Maßstab (scale) Konstr. Nr.
Gepr.
Bearb.
Name
Erstellt
Datum
Ers.f. : Ers.d. :
Benennung (description)
Zeichnungs /Artikel-Nr.(part no.)
Alle Maße in mm/
all dimensions in mm
Allgemeintoleranzen /
General tolerances
DIN ISO 2768 - mK
79853 Lenzkirch / Germany
ATMOS Medizin Technik GmbH & Co. KG
Ludwig - Kegel - Str. 16
Tel: +49 7653 689 -0
Fax: +49 7653 689 -190
www.atmosmed.de
Sch
utz
ve
rme
rk (
Co
pyri
gh
t n
oti
ce)
DIN
IS
O1
60
16
A3
37°C
1 2 3 4
Grundfarbe: RAL 9002 Grauweiß
Präge-, Tastenflächen, Symbole: RAL 7043 Verkehrsgrau B
Abgesetzte Fläche: RAL 7042 Verkehrsgrau A
Logo und Symbol Ø9 mm „Anleitung beachten“: RAL 5005 Signalblau
Transparent Ø3,0 und Ø4,5 mm, und 7,0x25,0 mm
Tasten und Fläche geprägt, Tasten Ø13 mm
Fig. 21.Water temperature display
Fig. 22.Irrigation handleConnection for irrigation handle Storage canister for ear irrigation 37°CIrrigation hose
Fig. 23.
1
1
1
2
3
4
1
2
3
4
1
21
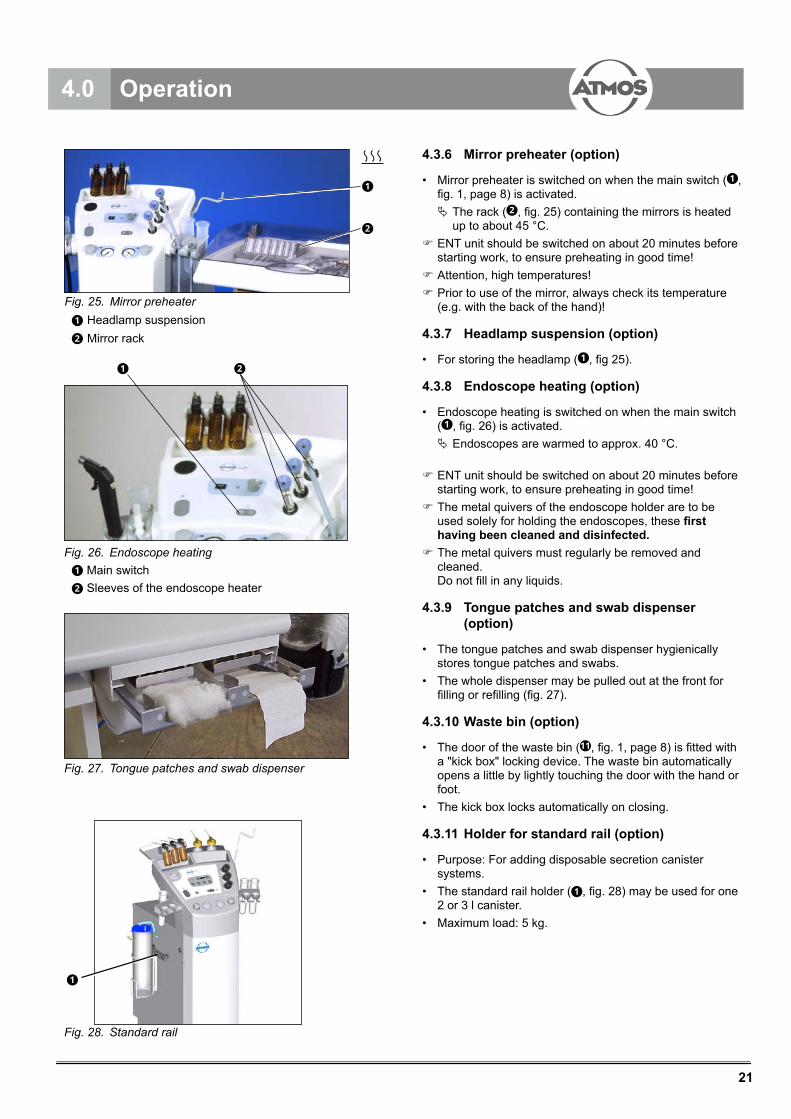
Fig. 26. Endoscope heatingMain switchSleeves of the endoscope heater
Fig. 25. Mirror preheaterHeadlamp suspensionMirror rack
Fig. 27. Tongue patches and swab dispenser
Fig. 28. Standard rail
4.0 Operation
4.3.6 Mirror preheater (option)
• Mirror preheater is switched on when the main switch ( 1 , fig.1,page8)isactivated.
ª The rack ( 2 ,fig.25)containingthemirrorsisheatedup to about 45 °C.
) ENT unit should be switched on about 20 minutes before starting work, to ensure preheating in good time!
) Attention, high temperatures! ) Prior to use of the mirror, always check its temperature (e.g. with the back of the hand)!
4.3.7 Headlamp suspension (option)
• For storing the headlamp ( 1 ,fig25).
4.3.8 Endoscope heating (option)
• Endoscope heating is switched on when the main switch ( 1 ,fig.26)isactivated.
ª Endoscopes are warmed to approx. 40 °C.
) ENT unit should be switched on about 20 minutes before starting work, to ensure preheating in good time!
) The metal quivers of the endoscope holder are to be used solely for holding the endoscopes, these first having been cleaned and disinfected.
) The metal quivers must regularly be removed and cleaned. Donotfillinanyliquids.
4.3.9 Tongue patches and swab dispenser (option)
• The tongue patches and swab dispenser hygienically stores tongue patches and swabs.
• The whole dispenser may be pulled out at the front for fillingorrefilling(fig.27).
4.3.10 Waste bin (option)
• The door of the waste bin (11,fig.1,page8)isfittedwitha "kick box" locking device. The waste bin automatically opens a little by lightly touching the door with the hand or foot.
• The kick box locks automatically on closing.
4.3.11 Holder for standard rail (option)
• Purpose: For adding disposable secretion canister systems.
• The standard rail holder ( 1 ,fig.28)maybeusedforone2 or 3 l canister.
• Maximum load: 5 kg.
1 2
1
1
2
2
1
2
1

22
5.1 General information on cleaning and disinfection
) Set main switch of the ATMOS® C 21 / C 31 to OFF prior to cleaning and disinfection!
) The described action relating to cleaning and disinfection resp. sterilisation do not substitute the relevant instructions which must be adhered to prior to operation!
• For disinfection, you may use all listed surface and instrument disinfectants.
) Alwaysobservetheconcentrationspecificationsandinstructions by the respective manufacturer!
• Do not use - Disinfectants which contain organic or inorganic acids
or bases as they could cause corrosion damage. - Disinfectants containing chloramides or phenol
derivatives, since these may cause stress cracks in the material used for the housing of the unit.
5.1.1 Cleaning the unit surface
• The surfaces of the ATMOS® C 21 / C 31 are resistant against all listed surface disinfectants.
• Wipe the unit surface with a cloth moistened with a cleaning or disinfecting solution.
• Wipe dry the device surface, the surface edges may not be wet for a longer period.
5.1.2 Cleaning "application parts"
• "Application parts" comprise: All single components or assemblies which come into contact with the patient and might get contaminated:
- Secretion canister, - Secretion hose, - Nozzles of medicament sprayers, - Politzer olives and adapters.
• All application parts can be disinfected using the recommended instrument disinfecting solution (see chapter 5.2).
) All application parts which are exposed to direct contact with the patient during treatment are to be exchanged or cleaned immediately for hygienic reasons.
5.1.3 Secretion canister (without autom. secretion canister evacuation), bacterial filter and suction hose
At the end of every working-day, following parts must be cleaned and disinfected:• Secretioncanisterwithlidsystemandbacterialfilter:
- Detach all hose connections carefully on the lid system and take secretion canister out carefully to prevent spills and contamination of the area. Dispose of secretions properly.
- Griplidsystemfirmly,openlidoffilterhousingbyturning in anti-clockwise direction.
- Withbacterialfilterplateorintegratedbacterialfilter:Removefilteranddisposeitof.
- Withexternalbacterialfilter:Toopenthebacterialfiltercoverpleaseturnit.Removefilteranddisposeit of.
- Aftercleaninganewfiltermustbeinserted(withbacterialfilterplate:smoothsidedown).Seechapter6.1.
- Thebacterialfilterisadisposableandmustbedisposedof.Thebacterialfiltermustbeexchangedatleast once a day.
• Suction system and hose attachment: - After every use, rinse out the suction system by drawinginasmallamountofirrigatingfluid(e.g.Special cleanser for suction systems 080.0006.0, dosage: 10 ml to 1 l water).
ª Keeps the suction hoses from becoming sticky or clogged.
) Suction capacity is limited by the 1.25 l secretion canister. Therefore, do not use more than 1 l rinsing liquid and subsequently evacuate the canister.
) Replacethefilter.
5.1.4 Secretion canister and electrodes (automatic evacuation of secretion canister)
• The secretion canister should be removed and cleaned once every week.
- During the cleaning of the canister the cover has to be pulled off and rinsed thoroughly under running water. Use the disinfectants mentioned in chapter 5.2 for disinfection. Before the canister is assembled again, the electrodes in the cover should be cleaned using a wet cloth.
) Mistake in polarity not possible!
5.1.5 Storage canister for ear irrigation system (option, only ATMOS® C 31)
) Before cleaning the storage canister, switch off the unit otherwise the canister could get too hot, if there is no liquid inside.
• Empty the storage canister and the hose system every eveningviatheirrigationhandle.Theremainingfluidcan,for example, be removed with the suction system.
) To avoid a contamination of the storage canister please use a disinfected suction attachment.
• A measuring of the total number of germs must be performed at regular intervals. If there is a considerable increase in germs between storage canister and irrigation handleabiofilmremovingprocedureandaspecialdisinfection of the hose system must be effected by an ATMOS service technician.
5.0 Cleaning and care

23
5.1.6 Medicament sprayers
• The sprayer tube must be exchanged after each patient.• Dismountthemedicamentsprayer(fig.29,506.5120.0;
fig.30,506.5225.0)andthoroughlyrinseallpartsunderrunning water. A detergent or cleaning agent may also be used if required.
- Use water to thoroughly rinse all residues of these substances.
) Make sure that the air opening is not closed! ) Observe when mounting the twin tube nozzle, that the marking (0,X or milling area, 1 , Fig. 29) on the nozzle shows upwards!
5.1.7 Instrument trays
• Before disinfection, thoroughly rinse the trays under running water. A detergent or cleaning agent (surface disinfectant) may also be used if required.
- Use water to thoroughly rinse all residues of these substances.
Melamine and anodized aluminium trays cannot be sterilised.
5.1.8 Irrigation bottles and accessories
• Exchange the nozzle after every patient.• Disassemble the irrigation bottle, irrigation lid, irrigation
hose, splash protection and nozzle.• Thoroughly rinse all other parts under running water. You
may use a washing up liquid (detergent) or cleanser. The irrigation bottles can be washed in the dishwasher with the glass programme.
• Disinfect all parts either by machine or manually with a recommended instrument disinfectant.
5.1.9 Endoscope quivers
• The metal quivers of the endoscope holder are to be used solely for holding the endoscopes, these first having been cleaned and disinfected. The quivers are to be cleaned daily and subsequently disinfected. For doing this, the stopper at the lower end should be taken off.
5.1.10 Ear irrigation bowl
• The ear irrigation bowl is not autoclavable! Cleaning and disinfection (also machine cleaning) up to 93 °C.
!
000.0237.0055.0029.0
000.0219.0506.5121.0
005.0026.0
000.0577.0
Fig. 29. Medicament sprayer 506.5120.0
505.0280.0
502.0844.0
055.0028.0
005.0026.0
000.0577.0
506.5227.0(055.0028.0)(505.0280.0)(505.0258.0)(005.0026.0)(055.0021.0)
Fig. 30. Medicament sprayer 506.5225.0
Fig 31 Irrigation bottle 508.0451.0
5.0 Cleaning and care
1
501.0331.0508.0427.0 508.0452.0
005.0176.0
000.0504.0

24
5.2 Recommended instrument disinfectants
Manual disinfection of instrumentsDisinfectant Ingredients (in 100 g) ManufacturerKorsolex® basic(Application concentrate)
glutaral(ethylenedioxy)dimethanolsurfactants, salts, corrosion inhibitors
15.2 g19.7 g
Bode Chemie, Hamburg
Korsolex® plus(Application concentrate)
N-(3-aminopropyl)-N-dodecylpropane-1,3-diaminedidecyldimethylammonium chloridesurfactants, corrosion inhibitorscomplexing agents, ph-inhibitors
9.2 g13.0 g
Bode Chemie, Hamburg
Korsolex® extra(Application concentrate)
(ethylenedioxy)dimethanolglutaralbenzyl-C12-18-alkyldimethyl-ammonium chloridesdidecyldimethylammonium chloridesurfactants, foam inhibitors, corrosion inhibitors
15.3 g7.5 g1.0 g1.0 g
Bode Chemie, Hamburg
neodisher® Septo MED(Application concentrate)
N-(3-aminopropyl)-N-dodecylpropane-1,3-diaminedidecyldimethylammonium chloridenon-ionic surfactants, perfumes
9.2 g13.0 g
Dr. Weigert, Hamburg
neodisher® Septo 3000(Application concentrate)
glutaral(ethylenedioxy)dimethanol
15.2 g19.7 g
Dr. Weigert, Hamburg
Sekusept® aktiv(Application concentrate)
Soduim percarbonate, non-ionic surfactants, phosphonate Ecolab, Düsseldorf
Gigasept® Instru AF(Application concentrate)
CocospropylendiaminguanidindiacetatePhenoxypropanolsBenzalkonium chloridenon-ionic surfactants, ph-value regulators, corrosion inhibitors
14 g35 g2.5 g
Schülke & Mayr, Norderstedt
Gigasept® FF (neu)(Application concentrate)
succindialdehydedimethoxytetrahydrofuraneanionic and non-ionic surfactants, perfumes, methylisothiazolinone
11.9 g3.2 g
Schülke & Mayr, Norderstedt
Gigazyme®
(Application concentrate)non-ionic surfactantsenzymes, corrosion inhibitors
5 - 15 g Schülke & Mayr, Norderstedt
Automatic disinfection of instrumentsDisinfectant Ingredients (in 100 g) ManufacturerDismoclean® 24 Vario(Application concentrate)
surfactants, micro-encapsulated enzymes, corrosion inhibitors, complexing agents
Bode Chemie, Hamburg
Dismoclean® 28 alka med(Application concentrate)
alkali dispenser, complexing agents, corrosion inhibitors, surface active materials
Bode Chemie, Hamburg
Dismoclean® twin basic / twin zyme Bode Chemie, HamburgDismoclean® twin basic alkali dispenser, complexing agents, corrosion inhibitors
Dismoclean® twin zyme surface active materials, enzymes, stabilisers, corrosion inhibitorsneodisher® FA phosphates 15 - 30 g Dr. Weigert,
Hamburgneodisher® MediClean forte(Application concentrate)
non-ionic and anionic surfactantsenzymes
< 5 g Dr. Weigert, Hamburg
Thermosept® alka clean forte(Application concentrate)
non-ionic surfactantsanionic surfactantsNTA (nitrilotriacetic acid) and its saltsenzymes, poly carboxylatescorrosion inhibitors
< 5 g< 5 g< 5 g< 5 g
Schülke & Mayr, Norderstedt
Thermosept® RKN-zym non-ionic surfactants,enzymes, corrosion inhibitors, glycols
5 - 15 g
Schülke & Mayr, Norderstedt
5.0 Cleaning and care

25
5.3 Recommended surface disinfectants
Coated surfacesDisinfectant Ingredients (in 100 g) ManufacturerGreen & Clean SK Di alkyl dimethyl ammonium chloride
Alkyl dimethyl ethyl benzyl ammonium chlorideAlkyl dimethyl benzyl ammonium chloride
< 1 g< 1 g< 1 g
Metasys, Rum (Austria)
Dismozon® pur(Granulate) End of product 12/2014
magnesium monoperoxyphthalate hexahydrate 80 g Bode Chemie, Hamburg
Dismozon® plus(Granulate)
magnesium monoperoxyphthalate hexahydrate 95.8 g Bode Chemie, Hamburg
Kohrsolin® FF(Application concentrate)
glutaralbenzyl-C12-C18-alkyldimethyl-ammonium chloridesdidecyldimethylammonium chloride
5 g3 g3 g
Bode Chemie, Hamburg
Perform® Pentapotassium-bis(peroxymonosulphate)-bis(sulphate) 45 g Schülke & Mayr, Norderstedt
Terralin® Protect(Application concentrate)
benzyl-C12-16 alkyldimethyl-, chloride2-phenoxyethanolaminoalkylglycinenon-ionic surfactants, perfumes
22 g17 g0.9 g
Schülke & Mayr, Norderstedt
Other surfacesDisinfectant Ingredients (in 100 g) ManufacturerDismozon® pur(Granulate) End of product 12/2014
magnesium monoperoxyphthalate hexahydrate 80 g Bode Chemie, Hamburg
Dismozon® plus(Granulate)
magnesium monoperoxyphthalate hexahydrate 95.8 g Bode Chemie, Hamburg
Kohrsolin® FF(Application concentrate)
glutaralbenzyl-C12-18-alkyldimethyl-ammonium chloridesdidecyldimethylammonium chloride
5 g3 g3 g
Bode Chemie, Hamburg
Bacillocid® rasantEnd of product 2014
glutaralbenzyl-C12-18-alkyldimethyl-ammonium chloridesdidecyldimethylammonium chloride
10 g6 g6 g
Bode Chemie, Hamburg
Mikrobac® forte(Application concentrate)
benzyl-C12-18-alkyldimethyl-ammonium chloridesN-(3-aminopropyl)-N-dodecylpropane-1,3-diamine
19.9 g5 g
Bode Chemie, Hamburg
Perform® Pentapotassium-bis(peroxymonosulphate)-bis(sulphate) 45 g Schülke & Mayr, Norderstedt
Terralin® Protect(Application concentrate)
benzyl-C12-16 alkyldimethyl-, chloride2-phenoxyethanolaminoalkylglycinenon-ionic surfactants, perfumes
22 g17 g0.9 g
Schülke & Mayr, Norderstedt
Surface disinfection F 312 alkyl-benzyl-dimethyl-ammonium chloridenon-ionic surfactants, complexing agents, hexyl cinnamal, butyl phenyl proionale, linalool
13 g Dürr Dental, Bietigheim-Bissingen
When using disinfectants containing aldehyde and amine at the same object colour changes may occur.
5.0 Cleaning and care

26
• The ATMOS® C 21 / C 31 are equipped with maintenance-free pumps for suction and compressed air. Nevertheless, to ensure correct functioning of the unit over a long period of time simple maintenance work which can either be done by the user himself, or, if desired, by service technicians, is necessary from time to time.
- To ensure correct functioning of the automatic irrigation and suction mechanism, switch off the ENT unit prior to changing the secretion canister!
- There is a service compartment (lower part of the function column) which contains the parts needed for the maintenance procedures. The possible maintenance procedures are described in the following chapters.
6.0 Maintenance and Service
5.4 Recommended endoscope disinfectants
Manual disinfection of endoscopesDisinfectant Ingredients (in 100 g) ManufacturerHelipur® H plus N glutaral
2-propanolethyl hexanolsurfactants, complexing agents, corrosion inhibitors, colorants, perfumes
12 g,7.5 g0.5 g
BBraun, Melsungen
Helix® Ultra peracetic acid BBraun, Melsungen
Korsolex® basic glutaral(ethylenedioxy)dimethanolSurfactants, corrosion inhibitors, salts, perfumes
15.2 g19.7 g
Bode Chemie,Hamburg
neodisher® MediClean forte (Application concentrate)
non-ionic and anionic surfactantsenzymes
< 5 g Dr. Weigert, Hamburg
Sekusept® aktiv (Application concentrate)
Sodium percarbonate, non-ionic surfactants, phosphonate Ecolab, Düsseldorf
Automatic disinfection of endoscopesDisinfectant Ingredients (in 100 g) ManufacturerKorsolex® basic glutaral
(ethylenedioxy)dimethanolSurfactants, corrosion inhibitors, salts, perfumes
15.2 g19.7 g
Bode Chemie,Hamburg
neodisher® MediClean forte(Application concentrate)
non-ionic and anionic surfactantsenzymes
< 5 g Dr. Weigert, Hamburg
Gigasept® FF (neu)(Application concentrate)
succindialdehydedimethoxytetrahydrofuraneanionic and non-ionic surfactants, perfumes, methylisothiazolinone
11.9 g3.2 g
Schülke & Mayr, Norderstedt
Endozime® AW Plus 2-propanol Ruhof, Mineola (USA)
AdaptacleanTM Potassium hydroxide, surfactants ASP, Norderstedt
5.0 Cleaning and care
• Maintenance, repairs and period tests may only be carried out by persons who have the appropriate technical knowledge and are familiar with the product. To carry out these measures the person must have the necessary test devices and original spare parts. ATMOS recommends: Work should be carried out by an authorized ATMOS service partner. This ensures that repairs and testing are carried out professionally, original spare parts are used and warranty claims remain unaffected.
• At least every 12 months a repeat test of the electrical safety should be performed according to IEC 62353. ATMOS recommends an inspection according to the manufacturer‘sspecifications.

27
6.0 Maintenance and Service
Changing the bacterial filter
Exchange daily or when blocked.
Check the bacterial filter• Set the vacuum regulator (13,fig.1,page8)to
"maximum" (right stop).• As soon as the vacuum gauge shows a vacuum value
> -0.3 bar, while the suction hose is open,thefilterhastobe replaced.
Changing the bacterial filterPleasedoonlyuseoriginalATMOSbacterialfilters.ThedevicemayneverbeoperatedwithoutDDSbacterialfilter/oversuction stop.
Bacterialfilterplate/integratedbacterialfilter:• Detach all hose connections carefully on the lid system
and take secretion canister out carefully to prevent spills and contamination of the area. Dispose of secretions properly.
• Griplidsystemfirmly,openlidoffilterhousingbyturninginanti-clockwisedirectionandremovefilter.Disposeoffilterandthoroughlyrinseallpartsunderrunningwater.Adetergent or cleaning agent may also be used if required.
• Aftercleaninganewbacterialfiltermustbeinserted.Withbacterialfilterplates:smoothsidedown.
Externalbacterialfilter:• Toopenthebacterialfiltercoverpleaseturnit.• Disposeofthebacterialfilter.• Insertanewbacterialfilterandclosecover.
) Make sure to clean the electrodes of the automatic secretion canister evacuation!
) Mistake in polarity not possible! ) If no vacuum is achieved after switching on again the suctionsystem,checkfreemovementofthefloat!
Fig. 34. External bacterial filter
Fig. 32. Lid with bacterial filter plate
Fig. 33. Lid with integrated bacterial filter
open

28
6.0 Maintenance and Service
6.3 Changing the tube box of the tube pump
) The tube cassette is located in the unit's pump compartment.Itmayonlybereplacedbyqualifiedstaff!
• The tube box ( 3 ,fig.36)mustbeexchangedregularly(approx. once a year) to prevent leakage.
• Switch off the main switch.• Clean and disinfect the hose system to avoid splashing of
the secretions.• Loosen the two tube connections.• Remove the tube box from the drive axle by depressing
the release lever.• Attach the new tube cassette to the drive axle and arrest
it in the bayonet holder by lifting the release lever. Pull the tube cassette slightly to check for secure locking.
• Addthetwoconnectingtubesagainacc.tofig.36.
) Pump head and cassette holder to be disinfected by means of spray disinfectant!
) Take care to ensure that the hoses are not kinked when installing it (shorten them, if necessary)!
Fig. 36.Hose to the secretion canisterRelease leverTube cassetteDrainage hoseConnecting nipple to the rear wall
Fig. 35. Changing the rinsing container
6.2 Changing the rinsing canister ) Prior to removing the rinsing canister, switch off the treatment unit by the main switch.
• Slide the rinsing canister to the very top and pivot it outwards with the level switch. The canister must be pivoted over the edge of the canister support.
• The canister can then be slanted downwards and removed.
• To insert pivot the level switch upwards. Slide the canister upwards as far as it will go, pivot over the edge of the canister support and insert it downwards into the insert (seefig.39).
1
2
3
4
5
1 2 3 4 5

29
Fig. 38. Removing the heating coil
Fig. 37. Mirror quick heaterGrid
6.4 Changing the heating coil of the mirror quick-heater
) Grid and sleeve might get very hot. Allow them to cool down before changing the heating coil!
• Switch off the main switch of the ENT unit ( 1 ,fig.1,page8).
• Remove grid ( 1 ,fig.37).• Remove the heating coil ( 1 ,fig.38)fromtheplug
connections.• Insert a new heating coil and make sure that the three
heating helices come into contact only with their ends.• Fix the grid again and set main switch to ON.
6.0 Maintenance and Service
1
1
1

30
7.1 Electrical protection• The supply line voltage reaches the individual
components via the main switch ( 1 ,fig.1,page8).Thepower supply is secured by means of melting fuses on therearoftheunit(fig.39).
The following trouble-checks for any problems you may have with the unit are listed according to the respective functions. ) If nevertheless the errors cannot be resolved, please inform the service staff. Do not start any attempts to repair the unit yourself!
) Pay also attention to corresponding chapters in separate operating instructions!
Fig. 39. Fuse support
7.0 Troubleshooting
7.2 Power supply
7.3 Mirror heating
Error indication Possible cause RemedyMain switch is activated, no voltage at the unit, no function, pilot lamps do not light up
• No voltage to power plug• Blown fuse
• Check fuse in building, connect other units (lamp) to the socket, if necessary
• Replace fuse on the rear of the unit• Power plug or cable is defective • Check power plug or cable and replace, if
necessary
Error indication Possible cause RemedyMirror is not warmed up with the mirror preheater
• No voltage • Check voltage by connecting other consuming devices
• Heating coil is defective • Replace heating coil (section 6.4)• Switch or control unit defect • Call service to exchange the switch or
control unitMirror preheater remains cold • Heating plate body in the mirror
preheater plate is defective• Have heating plate body replaced by a
service technician• No voltage • Check voltage by connecting other
consuming devices
1

31
7.0 Troubleshooting
7.4 Suction system
7.5 Light sources
Error indication Possible cause RemedyWeak suction or no suction at all • Suction hose is clogged • Rinse the suction hose with water (hose
can also be removed)• Floatofoverflowsafetyclosesthe
suction opening• Checkfillinglevelinthesecretioncanister
• Lid of secretion canister is not closed tightly
• Check that lid of the secretion canister is closed properly
• Bacterialfilterisclogged • Replacethebacterialfilter• Hose connections are leaking • Seal up or replace connections• Connecting hoses in the secretion
canister compartment are broken• Check hose connections, remove kinks
• Secretion penetrated the suction pump
• Have suction pump cleaned by a service technician
No suction, but vacuum gauge indicates -0.7 bar
• Suction hose is clogged • Rinse the suction hose with water (hose can also be removed)
• Floatofoverflowsafetyclosesthesuction opening
• Checkfillinglevelinthesecretioncanister
• Bacterialfilterisclogged • Replacethebacterialfilter• Connecting hoses in the secretion
canister compartment are broken• Check hose connections, remove kinks
• Overflowsafetyisclosed • Hang up suction attachment, open regulating valve and tap the secretion canister;thefloatsoftheoverflowsafetymust drop back in their resting position
No suction and suction motor does not start
• Photoelectric barrier / electronics defective or photoelectric barrier is polluted
• Clean photoelectric barrier• Have photoelectric barrier checked by a
service technicianNo suction; suction motor fails to start although compressed-air pump starts
• Compressed-air handle and suction hose in handle support transposed
• Position handles corresponding to switching function
Error indication Possible cause RemedyNo light • No voltage • Check mains voltage and fuses
• Light guide was swapped so that another light channel was activated.
• Position light guide correctly

32
7.0 Troubleshooting
7.6 Compressed-air system
Error indication Possible cause RemedySecretion is no longer sucked off • Electrode is contaminated • Switch off unit and clean electrode
• Tube pump defective • Replace tube cassette
Error indication Possible cause RemedyCompressor does not start • No voltage • Check voltage
• Electrical defect • Have the unit checked by a service technician
Compressor does not start but the suction motor does
• Compressed air handle and suction hose were swapped in the handle support
• Position handles corresponding to switching function
Pressure of compressed air is too low< 2.3 bar
• Hose connections are leaking • Check hose connections• Have hose connections inside the unit
checked by a service technicianCompressed air does not switch off • Photoelectric barrier is polluted or
defective• Clean photoelectric barrier• Have photoelectric barrier replaced by a
service technicianSprayer does not work • Sprayer is clogged • Clean sprayer (section 5.1.6)
Error indication Possible cause RemedyEndoscope supports are no longer heated
• Overtemperature protection switch was activated
• Have the switch / control / sensor exchanged by your service technician.
• Control is defective• Temperature sensor is defective
Error indication Possible cause RemedyRinsingcanisterisoverflowing • Float switch is blocked • Cleanfloathose(re-establishmentoffree
movementoffloat)• Float switch is defective • Inform the service technician
7.7 Automatic secretion canister evacuation
7.8 Endoscope support
7.9 Automatic hose rinsing

33
8.0 Consumables, Accessories, Spare Parts
8.1 Consumables
Consumables for suction systemBacterialfilterplates(25pcs) ...........................................................................................................................320.0065.0DDSbacterialfilter,10pcs,50pcs,100pcs .....................................................................................................340.0054.0Special cleanser for suction systems, 2 bottles a 500 ml .................................................................................080.0006.0
Consumables for automatic secretion canister evacuationTube cassette for tube pump............................................................................................................................069.0126.0
Consumables for disposable secretion canisterReceptal® external canister 2 l .........................................................................................................................443.0256.0Receptal®suctionbag2lwithintegrtedoverflowvalvefilter,50pcs. ..............................................................443.0257.0Receptal® external canister 1.5 l ......................................................................................................................310.0221.0Receptal®suctionbag1.5lwithintegrtedoverflowvalvefilter,50pcs. ...........................................................310.0222.2Receptal® external canister 1 l .........................................................................................................................312.0465.0Serres®suctionbag1l,withoutgellantandwithbacterialfilter,36Stück ........................................................312.0466.0Serres®suctionbag1l,withgellantandwithbacterialfilter,32Stück .............................................................312.0466.0Hose (green) ....................................................................................................................................................006.0010.0
Consumables for ear irrigationHose tips, 30 pcs ..............................................................................................................................................502.0844.0Splash protection to be slipped on jet connection ............................................................................................501.0331.0
Further consumables Tongue patches, packet with 6 pcs ..................................................................................................................505.0525.0Cotton roll .........................................................................................................................................................505.0526.0Waste bags, 50 pcs ..........................................................................................................................................505.0515.0Paper for instrument intermediate-deposit, 250 sheets ...................................................................................508.0538.0
8.2 Accessories and Spare Parts
SuctionSpare partsSecretion canister 1.25 l ...................................................................................................................................000.0544.0Bacterialfiltercover ..........................................................................................................................................320.0012.0Sealingringforbacterialfilter ...........................................................................................................................320.0016.0Secretion canister lid ........................................................................................................................................320.0011.0Sealing ring for secretion canister lid ...............................................................................................................320.0013.0Sleeveofoverflowsafety .................................................................................................................................320.0010.0Float .................................................................................................................................................................320.0015.0Suction hose, silicone, black, intern. diam. 8mm, extern. diam. 12mm, per meter .........................................006.0025.0
Mirror quick heaterSpare partsHeating coil ......................................................................................................................................................508.0053.0

34
8.0 Consumables, Accessories, Spare Parts
Compressed airAccessoriesHolder for ear speculae / Politzer olives ...........................................................................................................508.0545.0Politzerolives,Teflon,universalsize ................................................................................................................000.0241.0Politzerolives,Teflon,forchildren ....................................................................................................................000.0241.1Sprayer attachment, straight ............................................................................................................................505.0280.0Twin tube with nozzle .......................................................................................................................................000.0219.0Sprayer complete for oily medicaments ...........................................................................................................506.5120.0Sprayer complete, straight ...............................................................................................................................506.5225.0
Spare partsCompressed-air handle II .................................................................................................................................506.6202.0Glass for sprayer ..............................................................................................................................................000.0577.0Attachment for Politzer olives ...........................................................................................................................505.0284.0Twin tube nozzle ..............................................................................................................................................000.0219.0O-Ring ..............................................................................................................................................................055.0029.0Spring clip with roll ...........................................................................................................................................0.0237.0Sprayer head ....................................................................................................................................................506.5121.0Hose, Rilsan .....................................................................................................................................................005.0026.0Medicament glass ............................................................................................................................................000.0577.0External tube, straight, complete ......................................................................................................................505.0280.0O-Ring ..............................................................................................................................................................055.0028.0Sprayer head II .................................................................................................................................................506.5227.0
See also illustrations on page 21!
Optics / LightAccessories ......................................................................................................................................................Article-No.Fibre optic cable, length: 1.8 m, 90° Storz angular connection ........................................................................508.0664.0HeadlampCLAR73,fibreopticcable2.3m,Storz,withangularconnection ..................................................502.0515.0Headlamp,lightmodel,fibreopticcable,straightconnection ..........................................................................502.0515.5Headlampacc.toBinner,Wolf,fibreopticcable ..............................................................................................502.0516.0Teflonelementforendoscopes,diameter2.8mm-4mm ...............................................................................508.0777.5Tankforflexibleendoscopes(ATMOS,Olympus) ............................................................................................508.0790.0Tankforflexibleendoscopes(Storz) ................................................................................................................508.0792.0Adapter for light conductor with ATMOS®/Storz connection .............................................................................530.6100.0Adapter for light conductor with Olympus connection ......................................................................................530.6101.0Adapter for light conductor with Pentax connection .........................................................................................530.6102.0Adapter for light conductor with Wolf connection .............................................................................................530.6103.0

35
8.0 Consumables, Accessories, Spare Parts
Further Accessories and Spare PartsInstrument tray set, melamine, consisting of 2 large and 2 small trays ............................................................506.7031.0Instrument tray set, aluminium-anodized, consisting of 2 large and 2 small trays, holder for ear speculae / Politzer olives ...........................................................................................................506.7032.0Instrument tray set, stainless steel, consisting of 2 large and 2 small trays, holder for ear speculae / Politzer olives ...........................................................................................................506.7033.0Ear irrigation bowl ............................................................................................................................................505.0353.0Plastic quiver for disinfecting solution, to be mounted to cable holder .............................................................506.7015.0Instrument intermediate-deposit with paper in large aluminium resp. stainless steel tray ..............................508.0533.0Connecting cable for potential balance (5 m) ...................................................................................................008.0596.0Instrument tray, aluminium-anodized, 184 x 142 mm ......................................................................................508.0058.0Instrument tray, aluminium-anodized, 284 x 184 mm ......................................................................................505.0516.0Instrument tray, stainless steel, 180 x 140 mm ................................................................................................508.0058.2Instrument tray, stainless steel, 280 x 180 mm ................................................................................................505.0516.2Instrument tray, melamine, 190 x 150 mm .......................................................................................................000.0746.0Instrument tray, melamine, 300 x 190 mm .......................................................................................................000.0747.0Serrated instrument holder, big ........................................................................................................................508.0566.0Serrated instrument holder, small ....................................................................................................................508.0567.0Holder for ear speculae / Politzer olives, for aluminium resp. stainless steel tray ...........................................508.0545.0

36
9.0 Technical data
Voltage 230 V~ ± 10 %; 50/60 HzSpecial voltage (optional):115 V~ ± 10 %; 50/60 Hz127 V~ ± 10 %; 50/60 Hz
Current consumption ATMOS® C 21Max. 2.6 A (230 V~)Max. 5.2 A (115/127 V~)
ATMOS® C 31Max. 5.0 A (230 V~)Max. 10.0 A (115/127 V~)
Power consumption ATMOS® C 21Max. 600 W
ATMOS® C 31Max. 1150 VA
Fuses ATMOS® C 21T 3.15 A / 250 V (for 230 V~, 50/60 Hz)T 6.3 A / 250 V (for 110 V~, 127 V~, 50/60 Hz)
ATMOS® C 31T 6.3 A / 250 V (for 230 V~, 50/60 Hz)T 12 A / 250 V (for 110 V~, 127 V~, 50/60 Hz)
Suction system 40 l Freeflow:40l/min±10%Vacuum: 90 % from ambient pressure (variable)Secretion canister, 1,25 l TPX
Suction system 55 l (optional)
Freeflow:55l/min±10%Vacuum: 97 % from ambient pressure (variable)Secretion canister, 1,25 l TPX
Compressed-air system Freeflow:21l/min±10%Pressure 2200 hPa (variable)
Cold light source for light guide connection
Illuminance: min. 195 kLux (in 5 cm distance of a 4.7 mm high-performance light guide)In 10 steps from 10-100 % variableColour temperature: 5.500 K ± 10 %
Power supply for ATMOS® LS21 LED and ATMOS® HL 21 LED
Electricity: 700 mA ± 5 %In 10 steps from 10-100% variable
Compressed air-ear irrigation system
Temperature: 37°C ± 2°CFilling quantity: 2 x 250 ml
Ear irrigation system Temperature: 37 °C ± 2 °CFlow: ca. 450 ml/minFilling quantity: 5.0 l
Endoscope heating Temperature: ca. 40 °C
Operation time Continuous operation
Protective earth conductor resistance
Max.0,1Ω
Earth leakage current Max. 0.5 mA
Enclosure leakage current Max. 0.1 mA
Patient leakage current Max. 0.1 mA

37
9.0 Technical data
Ambient conditionsTransport / storage
Temperature: -10...+50°CAir humidity: 30 - 95 % without condensationAir pressure: 500 - 1060 hPa
Ambient conditionsOperation
Temperature: +10...+35°CAir humidity: 30 - 95 % without condensationAir pressure: 700 - 1060 hPa
Maximum operational altitude
2000 - 3000 m (NN)
Contamination level 2
Dimensions (H x W x D) Column: 94.0 x 47.0 x 53.5 cmBasic cabinet base: 94.0 x 132.5 x 60.0 cmDouble cabinet base: 94.0 x 132.3 x 60.0 cm
Weight Column ATMOS® C 21: max. 46,0 kgColumnATMOS® C 31: max. 70,0 kgCabinetbase:32.0-82.0kg,(dependingonconfiguration)
Period tests Repeat test of the electrical safety every 12 months. Recommended: inspection according to themanufacturer‘sspecifications.
Protection class (EN 60601-1)
I
Degree of protection Application parts type BFProtection category IPX0Classification acc. to Annex IX EC Directive 93/42/EEC
Class IIaacc. to rule 11
CE marking CE 0124GMDN code 11585UMDNS code 11-585Canadian ClassificationDevice groupPNCRisk ClassDescription
General & Plastic Surgery79QBU2ASPIRATOR, SURGICAL
Issue of the Technical Data: 14.03.2017

38
• The ATMOS® C 21 / C 31 does not contain any hazardous goods.
• The material of the housing can be recycled completely.• The component parts of the ATMOS® C 21 / C 31 must
be disposed off correctly and the materials are to be separated carefully.
• The electronics circuit boards must be fed into the appropriate recycling process.
This document is subject to change without notice.
10.0 Disposal

39
11.0 Hygiene Plan
What How
Recommendations
When Who
Reusable partsC
CleaningD
DisinfectionS
Sterilisation
Afte
r eac
h pr
oced
ure
Wee
kly
Mon
thly
Qualifi ed and trained staff who are familiar
with reprocessing. (Please fi ll in the
responsible person -> use a water-based
overhead marker)Dai
ly
Secretion canisterHousing for external bacterial fi lter X X2)4)5) Manual or automatic cleaning and disinfection X
/ Bacterial fi lter cover X X2)4)5) Manual or automatic cleaning and disinfection X
/Bacterial fi lter plate with blue marking / bacterial fi lter
Disposable. Exchange daily or when blocked X
/ Lid / sealing rings X X2)4)5) Manual or automatic cleaning and disinfection X
Gasket X X2)4)5) Manual or automatic cleaning and disinfection X
Sleeve of overfl ow safety X X2)4)5) Manual or automatic cleaning and disinfection X
Float, closed side must up X X Manual or automatic cleaning and disinfection X
Secretion collectionjar X X2)4)5) Empty when the jar is full; at least daily;
manual or automatic cleaning and disinfection X
Disposable jarsystem Exchange and disposal of full jar X
Hose rinsing systemSuction nozzle for hose rinsing X X3) Wipe cleaning and disinfection X
Silicone attachment pieceX X2)4)5)6) Manual or automatic cleaning and disinfection X
Exchange of Silicone attachment X
Suction nipple with suction hose (reusable)
X Manual cleaning and disinfection after each patient;rinse with hose disinfectant X
X X2)4)5)6) Manual or automatic cleaning and disinfection X
Secretion suction hose (disposable)
X Rinse the secretion hose with the hose irrigation system after each procedure X
X2)4)5)6) Exchange or disinfection monthly X
Storage container for hose rinsing system X X2)4)5)6) Cleaning with a brush; Manual or automatic cleaning and
disinfection X
Ear irrigationEar irrigation bowl X X2)4)5) Manual or automatic cleaning and disinfection X
Handle X X3) Wipe cleaning and wipe disinfection X
Jet connection X X2)4)5)6) Manual or automatic cleaning and disinfection X
Splash protection X X2)4)5)Manual or automatic cleaning and disinfection X
Hose tip (disposable) Exchange after each application X
Rinsing lid with rinsing hose X X2),4),5) Manual or automatic cleaning and disinfection X
Rinsing bottle X X2),4),5),6) Manual or automatic cleaning and disinfection; cleaning in the dishwasher with the glass care programme X
Ear irrigation system (ATMOS® C 31)
X X3) Empty, dry, wipe, disinfect X
X Rinse weekly with Bilpron (REF 510.2049.0) X
Medication nebulisation / PolitzerHandle for compressed air X X3) Manual cleaning and disinfection X
Sprayer jetX Clean after every procedure X
X2)4)5)6) Manual or automatic cleaning and disinfection X
Sprayer head X X2)4)5) Multiple rinsing of the sprayer head with water X
Hose at sprayer head X X Weekly exchange of the hose or when changing the medication X
Sprayer bottle X X2)4)5)6) Cleaning and disinfection (manual or automatic) weekly or when changing the medication X
Politzer olive X X2)4)5)6) Exchange after each application; afterwards cleaning and disinfection X
Politzer connection X X2)4)5)6) Exchange after each application; afterwards cleaning and disinfection X
Cleaning and disinfection planATMOS® C 21 / ATMOS® C 31

40
11.0 Hygiene Plan
What How
Recommendations
When Who
Reusable partsC
CleaningD
DisinfectionS
Sterilisation
Afte
r eac
h pr
oced
ure
Wee
kly
Mon
thly
Qualifi ed and trained staff who are familiar
with reprocessing. (Please fi ll in the
responsable person -> use a water-based
overhead marker)Dai
ly
Endoscope managementPlastic quiver X X2)4)5) Cleaning with a brush; disinfect afterwards X
Metal quiver X X2)4)5)6) Cleaning with a brush; disinfect afterwards (manual or automatic) X
Protective sleeve (tefl on element for metal quiver) X X2)4)5) Manual or automatic cleaning and disinfection X
Instrument management
ENT instruments X X2)4)5) X
Immerse instruments into solution immediately after use, fully wetting is required, air must be removed from any cavities, after the contact time instruments must be rinsed with water, has to be dried and sterilised afterwards. Ple-ase also observe the ATMOS operatinginstructions for ENT instruments.
X
Instrument bowl with co-ver X X4) Cleaning with a brush;
disinfect afterwards (manual) X
VisualisationATMOS® Cam 21 / 31 X X3) Wipe cleaning and wipe disinfection X
ATMOS® Strobo 21 LED X X3) Wipe cleaning and wipe disinfection X
Flexible scope X X1),7),8) X1) Immediate pre-cleaning after the procedure X
Rigid scope X X1),7),8) X1) Immediate pre-cleaning after the procedure X
Laryngoscope X X1),7),8) X1) Immediate pre-cleaning after the procedure X
Light conductor X X3) Wipe cleaning and wipe disinfection X
Light source X X3) Wipe cleaning and wipe disinfection X
Microscope X X3) Wipe cleaning and wipe disinfection X
Headlight X X3) Wipe cleaning and wipe disinfection X
Radio frequency surgeryATMOS® RS 221(surface) X X3) Wipe cleaning and wipe disinfection X
Ergonomic handles X X1)2)4)5) X1) Wipe cleaning and wipe disinfection X
Bipolar tweezers X X1)2)4)5) X1) Immediate pre-cleaning after the procedure or dispose of in wet disposal tray; use of enzymatic detergents,cleaning and disinfection (manual or automatic)
X
Bipolar electrode X X1)2)4)5) X1) X
Bipolar electrode cable X X1)2)4)5) X1) Immediate pre-cleaning after the procedure or dispose of in wet disposal tray; use of enzymatic detergents,cleaning and disinfection (manual or automatic)
X
Neutral electrode X X1)2)4)5) X1) X
Neutral electrode cable X X1)2)4)5) X1) Immediate pre-cleaning after the procedure or dispose of in wet disposal tray; use of enzymatic detergents,cleaning and disinfection (manual or automatic)
X
ENT electrodes X X1)2)4)5) X1) X
SurfacesHousing X X3) Wipe cleaning and wipe disinfection X
Roller shutter X X3) Wipe cleaning and wipe disinfection X
Drawers X X3) Wipe cleaning and wipe disinfection X
Writing leaf X X3) Wipe cleaning and wipe disinfection X
Instrument deposit X X3) Wipe cleaning and wipe disinfection X
Mirror pre-heater X X3) Wipe cleaning and wipe disinfection X
Tongue patches andswab dispenser X X3) Wipe cleaning and wipe disinfection,
every day or when refi lling X
Waste disposal X X3) Wipe cleaning and wipe disinfection,every day or when emptying the container X
Instrument tray X X3) Wipe cleaning and wipe disinfection, daily or when replacing with new instruments X
ATMOS MedizinTechnik GmbH & Co. KGLudwig-Kegel-Str. 16 79853 Lenzkirch/GermanyPhone +49 7653 689-0 Fax +49 7653 [email protected] www.atmosmed.de
2017-03 Index: 01
Recommended disinfectants3) Surface disinfection for coated surfaces:• Green & Clean SK (ATMOS)• Dismozon® plus (Bode Chemie)• Kohrsolin® FF (Bode Chemie)• Perform® (Schülke & Mayr)• Terralin® Protect (Schülke & Mayr)
Other surfaces:• Dismozon® plus (Bode Chemie)• Kohrsolin® FF (Bode Chemie)• Mikrobac® forte (Bode Chemie)• Perform® (Schülke & Mayr)
Terralin® Protect (Schülke & Mayr)• Surface disinfection FD 312 (Dürr Dental)
Please see the manufacturer‘s instructions for con-centration, contact time, temperature and the com-patibility of materials.
4) Instruments - manual disinfection:• Korsolex® basic (Bode Chemie)• Korsolex® plus (Bode Chemie)• Korsolex® extra (Bode Chemie)
neodisher® Septo MED (Dr. Weigert)• neodisher® Septo 3000 (Dr. Weigert)• Sekusept® aktiv (Ecolab)• Gigasept® Instru AF (Schülke & Mayr)• Gigazyme® (Schülke & Mayr)• Gigasept FF neu (Schülke & Mayr)
5) Instruments - automatic disinfection:• Dismoclean® 24 Vario (Bode Chemie)• Dismoclean® 28 alka med (Bode Chemie)• Dismoclean® twin basic/twin zyme (Bode Chemie)• neodisher® FA (Dr. Weigert)• neodisher® MediClean forte (Dr. Weigert)• Thermosept® alka clean forte (Schülke & Mayr)• Thermosept® RKN-zym (Schülke & Mayr)
7) Endoscopes - manual disinfection:• Helipur® H plus N (BBraun)• Helix® Ultra (BBraun)• Korsolex® Basic (Bode Chemie)• neodisher® MediClean forte (Dr. Weigert)• Sekusept® aktiv (Ecolab)8) Endoscopes - automatic disinfection:• Korsolex® Basic (Bode Chemie)• neodisher® MediClean forte (Dr. Weigert)• Gigasept® FF neu (Schülke & Mayr)• Endozime® AW Plus (Ruhof)• ADAPTACLEAN™ (ASP)
Important informationWipe cleaning and wipe disinfection: All surfaces have to be wiped with a clean (disposable) wipe which is damped with disinfectant solution; the entire surface has to be wiped thoroughly and may not be dried afterwards.1) Please observe the manufacturer‘s operating instructions.2) Alternative to manual cleaning und disinfection: Wash-Disinfector 78°C / 172°F6) Material dimensionally stable at 134°C
The above stated hygiene requirements are based on the regulations according to the Medical Devices Act, the Medical Devices Operator Ordinance, §18 IfSG and the recommendations of the Robert Koch Institute.Defi nition of the required reprocessing steps result from the recom-mendations of the Robert Koch Institute: „Requirements for the repro-cessing of medical products“. The medical products were categorised in the risk groups uncritical, semicritical and critical. The reprocessing measures mentioned in this cleaningand disinfection plan are a recommendation of ATMOS Medizin-Technik. Any additional reprocessing measures are at the operator‘s discretion.All the recommended disinfectants which are stated herein are listed disinfectants (VAH/RKI) and have been tested on their suitability of use on the ATMOS® C 21 / ATMOS® C 31. ATMOS MedizinTechnik cannot be hold liable for any damage caused by wrong concentration of the disinfectants or by the application of any other disinfectants.Patients with suspicion of a clinical disease or who developed a transmissible spongiform encephalopathy (CJK, vCJK, etc.) have to be treated at facilities which are able to provide for the necessary preventive measures against infection. The reprocessing of the reu-sable instruments and material may only be performed at facilities which have an externally certifi ed QM Management acc. to DIN EN ISO 13485.The Medical Devices Act, IfSG, the RKI directives, BGR 250 and TRBA 250 always have to be considered.
Wrong concentration of disinfectants may lead to damage!
GA3GB.110200.0

41
12.0 Notes on EMC
12.1 Guidelines and Manufacturer's Declaration - Emissions The ATMOS®C21/C31isintendedforuseintheelectromagneticenvironmentspecifiedbelow.ThecustomeroruseroftheATMOS® C 21 / C 31 should ensure that it is used in such an environment.
Emissions Test Compliance Electromagnetic Environment - GuidanceRF Emissions CISPR 11 Group 1 The ATMOS® C 21 / C 31 uses RF energy only for its internal
function. Therefore, its RF emissions are very low and are not likely to cause any interference in nearby electronic equipment.
RF Emissions according to CISPR 11
Class B The ATMOS® C 21 / C 31 is suitable for use in all establishments, including domestic, and those directly connected to the public low-voltage power supply network that supplies buildings used for domestic purposes.
Harmonics IEC 61000-3-2 Class BFlicker IEC 61000-3-3 Corresponds
Guidelines and Manufacturer´s Declaration - Immunity
The ATMOS®C21/C31isintendedforuseintheelectromagneticenvironmentspecifiedbelow.ThecustomeroruseroftheATMOS® C 21 / C 31 should ensure that it is used in such an environment.
Immunity Test IEC 60601- Test Level Compliance Level Electromagnetic Environment - GuidanceESD IEC 61000-4-2 ± 6 kV Contact
± 8 kV Air
± 6 kV Contact
± 8 kV Air
Floors should be wood, concrete, or ceramics tile.Iffloorsaresynthetic,therelativehumidity should be at least 30 %.
EFT IEC 61000-4-4 ± 2 kV Mains
± 1 kV I/Os
± 2 kV Mains
Inapplicable
Mains power quality should be that of a typical commercial or hospital environment.
Surges IEC 61000-4-5 1 kVDifferential
1 kVCommon
2 kVDifferential
1 kVCommon
Mains power quality should be that of a typical commercial or hospital environment.
Magneticfieldatpowerfrequency 50/60 Hz acc. to IEC 61000-4-8
3 A/m Inapplicable Powerfrequencymagneticfieldsshouldbe that of a typical commercial or hospital environment.
• Medical electrical equipment is subject to special precautions with regard to EMC and must be installed acc. to following EMC notes.
• PortableandmobileHFcommunicationfacilitiescaninfluencemedicalelectricalequipment.• The use of other accessories, other converters and cables than stated may lead to an increased emission or a reduced
interference immunity of the equipment or system.
The device may not be used directly next to other devices or piled up with other devices. If operation next to or piled with other devices is necessary, please watch the device to check its intended operation in this arrangement.

42
Immunity Test IEC 60601- Test Level Compliance Level Electromagnetic Environment - Guidance
Voltage Dips / Dropout IEC 61000-4-11
< 5 % UT (> 95 % Dip of the UT) for 0,5 Cycles
40 % UT 60% Dip of the UT) for 5 Cycles
70% UT (30 % Dip of the UT) for 25 Cycles
< 5 % UT (>95 % Dip of the UT) for 5 s
< 5 % UT (> 95 % Dip of the UT) for 0,5 Cycles
40 % UT 60% Dip of the UT) for 5 Cycles
70% UT (30 % Dip of the UT) for 25 Cycles
< 5 % UT (>95 % Dip of the UT) for 5 s
Mains power quality should be that of a typical commercial or hospital environment. If the user of the ATMOS® C 21 / C 31 demands continued function even in case of interruptions of the energy supply, it is recommended to supply the ATMOS® C 21 / C 31 from an uninterruptible current supply or a battery.
NOTE UT is the mains alternating current prior to application of the test levels.
12.3 Guidelines and Manufacturer´s Declaration - Immunity The ATMOS®C21/C31isintendedforuseintheelectromagneticenvironmentspecifiedbelow.ThecustomeroruseroftheATMOS® C 21 / C 31 should ensure that it is used in such an environment.
Immunity Test IEC 60601- Test Level Compliance Level Electromagnetic Environment - Guidance
Conducted RF IEC 61000-4-6
3 Veff
150 kHz to 80 MHz3 V
Portable and mobile communications equipment should be separated from the ATMOS® C 21 / C 31 incl. the cables by no less than the distances calculated/listed below.Recommended distances:d=(3.5/V1)*√(P)d=(3.5/E1)*√(P)80-800MHzd=(7/E1)*√(P)0.8-2.5GHzwhere„P“isthemax.powerinwatts(W)andDistherecommended separation distance in meters (m).Fieldstrengthsfromfixedtransmitters,asdeterminedby an electromagnetic site (a) survey, should be less than the compliance level (b).Interference may occur in the vicinity of equipment containing following symbol:
Radiated RF IEC 61000-4-3
3 V/m80 MHz to 2.5 GHz
3 V/m
12.0 Notes on EMC

43
12.4 Recommended separations between portable and mobile RF Communications equipment and the ATMOS® C 21 / C 31
NOTE 1 By 80 MHz and 800 MHz the higher frequency range applies.
NOTE 2These guidelines might not be applicable in any case. The emanation of electromagnetic waves is affected by absorption and reflectionofbuildings,objectsandpeople.
The ATMOS® C 21 / C 31 is intended for use in electromagnetic environment in which radiated disturbances are controlled. The customer or user of the ATMOS® C 21 / C 31 can help prevent electromagnetic interference by maintaining a minimum distance between portable and mobile RF Communications equipment and the ATMOS® C 21 / C 31 as recommended below, according to the maximum output power of the communications equipment.
Safety distance, depending on transmit-frequency mNominal output of the transmitterW
150 kHz to 80 MHzd = [ 3.5 / 3] √P
80 MHz to 800 MHzd = [ 3.5 / 3] √P
800 MHz to 2.5 GHzd = [ 7.0 / 3] √P
0.01 0.12 0.12 0.240.1 0.37 0.37 0.741 1.2 1.2 2.4
10 3.69 3.69 7.38100 11.66 11.66 23.32
For transmitters for which the maximum nominal output is not indicated in the above table, the recommended safety distance d in meters (m) can be determined using the equation belonging to the respective column whereas P is the maximum nominal outputofthetransmitterinwatts(W)acc.tomanufacturer´sspecification.
NOTE 1 By 80 MHz and 800 MHz the higher frequency range applies.
NOTE 2These guidelines might not be applicable in any case. The emanation of electromagnetic waves is affected by absorption and reflectionofbuildings,objectsandpeople.
aThefieldstrengthofstationarytransmitters,suchasbasestationsofcellularphonesandmobileterrainradioequipment,amateur radio transmitters, cbm broadcast and TV stations cannot be predestined exactly. To determine the electromagnetic environmentinregardtostationarytransmitters,astudyofthelocationistobeconsidered.Ifthemeasuredfieldstrengthat the location where the ATMOS® C 21 / C 31 is used exceeds the above compliance level, the ATMOS® C 21 / C 31 is to be observed to verify the intended use. If abnormal performance characteristics are noted, additional measures might be necessary, e. g. a changed arrangement or another location for the ATMOS® C 21 / C 31.
bWithinthefrequencyrangeof150kHzto80MHzthefieldstrengthshouldbebelow3V/m.
12.0 Notes on EMC

ATMOS MedizinTechnik GmbH & Co. KG
Ludwig-Kegel-Straße 16
79853 Lenzkirch / Germany
Phone: +49 7653 689-0
www.atmosmed.com