celebrating christmas - hatched and patched · sprig toss - red 8752-88 berries - lt. blue 8753-11...
TRANSCRIPT

Celebrating ChristmasCelebrating Christmas
49 West 37th Street, New York, NY 10018tel: 212-686-5194 fax: 212-532-3525
Toll Free: 800-294-9495www.henryglassfabrics.com
By Anni Downs
Garland & TagsSkill Level: Beginner
A Free Project SheetNOT FOR RESALE

Celebrating ChristmasFabrics in the Collection
Garland & Tags
Stripe - Pink8751-22
Stripe - Taupe8751-38
Sprig Toss - Lt. Blue8752-11
Sprig Toss - Tan8752-33
Sprig Toss - Red8752-88
Berries - Lt. Blue8753-11
Berries - Tan8753-33
Mini Snowflakes - Cream8754-44
Mini Snowflakes - Navy8754-77
Mini Snowflakes - Red8754-88
Large Snowflakes - Pink8755-22
Large Snowflakes - Taupe8755-39
Large Snowflakes - Cream8755-44
Mini Check - Cream Blue8756-41
Mini Check - Cream Red8756-42
Mini Check - Green8756-66
Berries - Brown8753-38
Large Characters w/ Border - Lt. Blue8750-11
Large Characters w/ Border - Cream8750-44
Page 1Celebrating Christmas Garland & Tags
Cutting Instructions Please note: all strips are cut across the width of fabric (WOF) from selvage to selvage edge unless otherwise noted.
Fig. 1
Fig. 2
Fig. 3
Materials½ yard Large Characters w/Borders - Lt. Blue (A) 8750-11¼ yard Sprig Toss - Red (B) 8752-88¼ yard Stripe - Taupe (C) 8751-38¼ yard Stripe - Pink (D) 8751-22¼ yard Mini Check - Cream Red (E) 8756-42⅛ yard Mini Snowflakes - Navy (F) 8754-77⅛ yard Berries - Lt. Blue (G) 8753-11⅛ yard Large Snowflakes - Pink (H) 8755-22⅓ yard Mini Snowflakes - Cream (I) 8754-44¼ yard Mini Check - Cream Blue (J) 8756-41
You will also need:• Template Plastic• ¼” ribbon
From the Large Characters w/Borders - Lt. Blue (A):• See instructions to cut (3) large circles, (2) medium circles and (7) small circles.
From the Sprig Toss - Red (B), cut:• (1) 3 ¾” x WOF strip. Sub-cut strip into (3) 3 ¾” squares (large) and (5) 2 ¼” squares (small).
From the Stripe - Taupe (C), cut:• See instructions to cut three Large Tags. From the Stripe - Pink (D), cut:• See instructions to cut five small tags.
From the Mini Check - Cream Red (E), cut:• See instructions to cut two medium tags and one small tag.
From the Mini Snowflakes - Navy (F), cut:• (1) 3 ¼” x WOF strip. Sub-cut strip into (2) 3 ¼” squares (medium) and (1) 2 ¼” square (small).
From the Berries - Lt. Blue (G), cut:• See instructions to cut one small tag.
From the Large Snowflakes - Pink (H), cut:• (1) 2 ¼” square (small).
From the Mini Snowflakes - Cream (I), cut:• (1) 4 ½” x WOF strip. Sub-cut strip into (3) 4 ½” x 6” strips and (2) 4” x 4 ½” strips.• (1) 3” x WOF strip. Sub-cut strip into (7) 3” x 4” strips.
From the Mini Check - Cream Blue (J), cut:• (1) ⅜” x 40” strip on the bias.
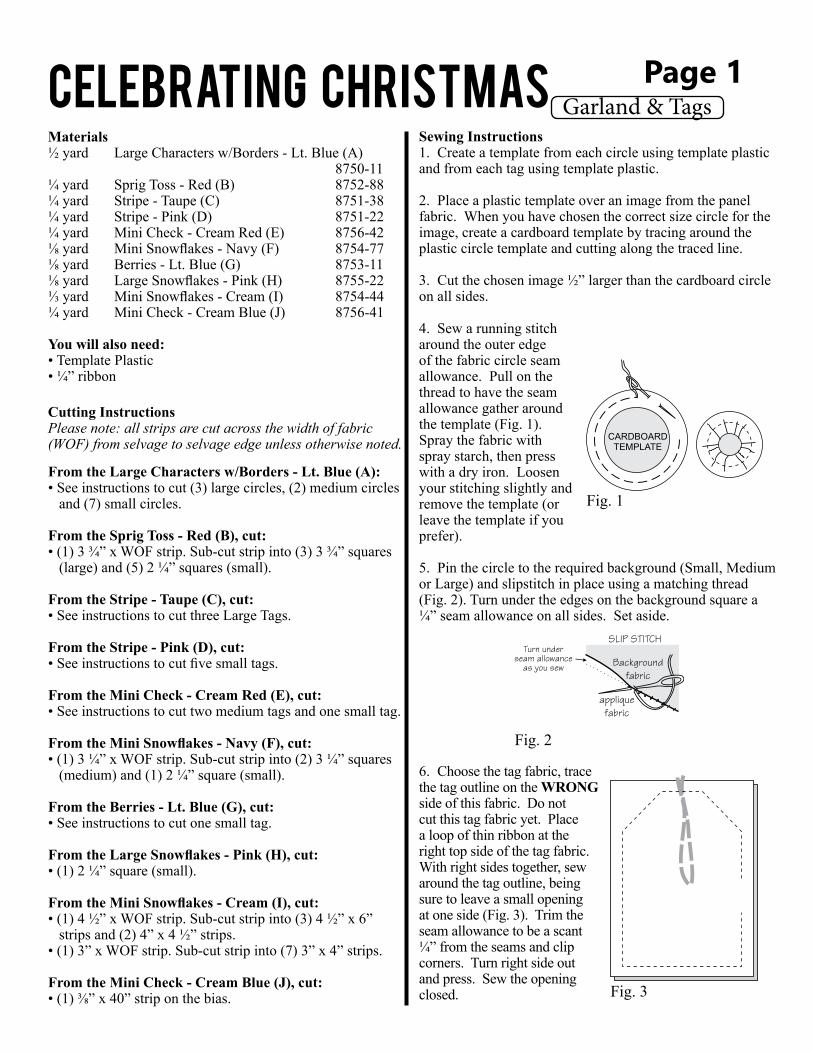
Sewing Instructions1. Create a template from each circle using template plastic and from each tag using template plastic.
2. Place a plastic template over an image from the panel fabric. When you have chosen the correct size circle for the image, create a cardboard template by tracing around the plastic circle template and cutting along the traced line.
3. Cut the chosen image ½” larger than the cardboard circle on all sides.
5. Pin the circle to the required background (Small, Medium or Large) and slipstitch in place using a matching thread (Fig. 2). Turn under the edges on the background square a ¼” seam allowance on all sides. Set aside.
6. Choose the tag fabric, trace the tag outline on the WRONG side of this fabric. Do not cut this tag fabric yet. Place a loop of thin ribbon at the right top side of the tag fabric. With right sides together, sew around the tag outline, being sure to leave a small opening at one side (Fig. 3). Trim the seam allowance to be a scant ¼” from the seams and clip corners. Turn right side out and press. Sew the opening closed.
4. Sew a running stitch around the outer edge of the fabric circle seam allowance. Pull on the thread to have the seam allowance gather around the template (Fig. 1). Spray the fabric with spray starch, then press with a dry iron. Loosen your stitching slightly and remove the template (or leave the template if you prefer).

Page 2Celebrating Christmas Garland & Tags
Fig. 4Fig. 5
Fig. 6
9. Create a myriad of tags and then create a garland by sewing the tags to a bias strip or use them separately as present tags (Fig 6).
7. Slip stitch the square panel image piece to the tag fabric having it centered ¼” from the tag base (Fig. 4).
8. Use one tag on the top of a gift as shown in Fig. 5.

Page 1Celebrating Christmas Garland & TagsPage 3
Large Tag
Large Circle
Medium Circle
Small Circle
Templates
1” squarefor scale

Page 2Celebrating Christmas Garland & TagsPage 4
Every effort has been made to ensure that all projects are error free. All the information is presented in good faith, however no warranty can be given nor results guaranteed as we have no control over the execution of instructions. Therefore, we assume no responsibility for the use of this information or damages that may occur as a result. When errors are brought to our attention, we make every effort to correct and post a revision as soon as possible. Please make sure to check www.henryglassfabrics.com for pattern updates prior to starting the project. We also recommend that you test the project prior to cutting for kits. Finally, all free projects are intended to remain free to you and are not for resale.
©2016 Henry Glass & Co., Inc.
Templates
1” squarefor scale
Medium Tag
Small Tag