centrevu cms administration - pdf.textfiles.compdf.textfiles.com/manuals/telecom-f-r/lucent centrevu...
TRANSCRIPT
585–210–910Comcode 108501743Issue 1November 1999
CentreVu® CMS Administration
Copyright © 1999 Lucent Technologies. All Rights Reserved.
This material is protected by the copyright laws of the United States and other countries. It may not be reproduced, distributed, or altered in any fashion by any entity (either internal or external to Lucent Technologies), except in accordance with applicable agreements, contracts or licensing, without the express written consent of the Customer Training and Information Products organization and the business management owner of the material.Product Development Manager
Product Development Manager 1 888-LTINFO6
Notice
Every effort was made to ensure that the information in this book was complete and accurate at the time of printing. However, information is subject to change.
Mandatory Customer InformationMandatory customer information
European Union declaration of conformity
Lucent Technologies Business Communications Systems declares that the equipment specified in this document conforms to the referenced European Union (EU) Directives and Harmonized Standards listed below: EMC Directive89/336/EEC Low Voltage Directive 73/23/EEC. The “CE” mark affixed to the equipment means that it conforms to the above Directives.
Heritage statement
Lucent Technologies—formed as a result of AT&T's planned restructuring—designs, builds, and delivers a wide range of public and private networks, communication systems and software, consumer and business telephone systems, and microelectronics components. The world-renowned Bell Laboratories is the research and development arm for the company.
Security statementYour responsibility for your system’s security
Toll fraud is the unauthorized use of your telecommunications system by an unauthorized party, for example, persons other than your company's employees, agents, subcontractors, or persons working on your company's behalf. Note that there may be a risk of toll fraud associated with your telecommunications system and, if toll fraud occurs, it can result in substantial additional charges for your telecommunications services.You and your system manager are responsible for the security of your system, such as programming and configuring your equipment to prevent unauthorized use. The system manager is also responsible for reading all installation, instruction, and system administration documents provided with this product in order to fully understand the features that can introduce risk of toll fraud and the steps that can be taken to reduce that risk. Lucent Technologies does not warrant that this product is immune from or will prevent unauthorized use of common-carrier telecommunication services or facilities accessed through or connected to it. Lucent Technologies will not be responsible for any charges that result from such unauthorized use.
Trademarks
SunSun Microsystems, Inc. Sun Microsystems Sun Microsystems, Inc.the Sun LogoSun Microsystems, Inc. Solaris Sun Microsystems, Inc. Solstice DiskSuite Sun Microsystems, Inc. SunLink Sun Microsystems, Inc.UltraSun Microsystems, Inc.SPARC. All SPARC trademarks are used under license and are trademarks or registered trademarks of SPARC International, Inc. in the United States and other countries. Products bearing SPARC trademarks are based upon an architecture developed by Sun Microsystems, Inc. SPARC International, Inc.CentreVuDEFINITYINTELIntel CorporationPentiumIntel CorporationMicrosoftMicrosoft CorporationMSMicrosoft CorporationMS-DOSMicrosoft CorporationWindows Microsoft CorporationWindows NTMicrosoft Corporation
Ordering informationOrdering information
For information about ordering, see About this information product.
Support telephone numbers
Technical Support Telephone NumberLucent Technologies National Customer Care Center
Lucent Technologies provides a telephone number for you to use to report problems or to ask questions about your call center. The support telephone number for customers in the U.S.A. and Canada is 1-800-242-2121. For technical support, customers outside the United States should call their Lucent Technologies Representative or Distributor.
Information Product Support Telephone Number
Call the Lucent Technologies National Customer Care Center.
Lucent technologies fraud intervention
If you suspect that you are being victimized by toll fraud and you need technical support or assistance, call Technical Service Center Toll Fraud Intervention Hotline at 1-800-643-2353.
Developed by Lucent Technologies Customer Training and Information Products.This document was prepared by the Global Learning Solutions organization, Lucent Technologies, Denver, Colorado, U.S.A.
Contents CentreVu CMS Administration
iii
Contents
About this information product . . . . . . . . . . . . . . . . . . . . . . . . vii
Chapter 1: Task: startup and exitStarting CentreVu Supervisor on Windows 98 or NT. . . . . . . . . . . 1-2Logging into CentreVu CMS . . . . . . . . . . . . . . . . . . . . 1-3Adding new servers . . . . . . . . . . . . . . . . . . . . . . . 1-7Choosing or changing your password . . . . . . . . . . . . . . . . 1-9Closing CentreVu Supervisor windows . . . . . . . . . . . . . . . . 1-10Logging out of CentreVu CMS . . . . . . . . . . . . . . . . . . . 1-11Exiting CentreVu Supervisor . . . . . . . . . . . . . . . . . . . . 1-12Task reference: general . . . . . . . . . . . . . . . . . . . . . . 1-13Task reference: CentreVu CMS specifications . . . . . . . . . . . . . 1-16Task reference: switches . . . . . . . . . . . . . . . . . . . . . 1-18Task reference: terminals . . . . . . . . . . . . . . . . . . . . . 1-19Task reference: printers . . . . . . . . . . . . . . . . . . . . . . 1-20Task reference: CentreVu CMS support services . . . . . . . . . . . . 1-21Task reference: using the Helpline. . . . . . . . . . . . . . . . . . 1-22Task reference: CentreVu CMS training classes . . . . . . . . . . . . 1-23
Chapter 2: Navigating CentreVu® SupervisorUsing the controller window before you log into the server . . . . . . . . 2-2Using the controller window after you log into the server . . . . . . . . . 2-4 Using the features common to all CentreVu Supervisor windows . . . . . 2-9Using the selector windows . . . . . . . . . . . . . . . . . . . . 2-10Using the input windows . . . . . . . . . . . . . . . . . . . . . 2-12Using the browse buttons . . . . . . . . . . . . . . . . . . . . . 2-16Using the history list . . . . . . . . . . . . . . . . . . . . . . . 2-19Task reference . . . . . . . . . . . . . . . . . . . . . . . . . 2-20
Chapter 3: Task: naming your call center entities in the DictionaryAdding, deleting, or changing ACDs . . . . . . . . . . . . . . . . . 3-6Creating or copying agent groups . . . . . . . . . . . . . . . . . . 3-8Viewing, listing, adding, or deleting agents in an agent group . . . . . . . 3-11Changing agent string values . . . . . . . . . . . . . . . . . . . 3-16Viewing, adding, or changing announcement synonyms . . . . . . . . . 3-21Viewing, adding, deleting, or changing AUX reason code names . . . . . . 3-23Viewing, adding, or creating calculations . . . . . . . . . . . . . . . 3-26Viewing, adding, deleting, or changing call work codes. . . . . . . . . . 3-29Adding constants to the database . . . . . . . . . . . . . . . . . . 3-31Defining your own database items. . . . . . . . . . . . . . . . . . 3-33
Contents CentreVu CMS Administration
iv
Changing generic string values synonyms . . . . . . . . . . . . . . 3-35Searching the Dictionary globally . . . . . . . . . . . . . . . . . . 3-36Viewing, adding, deleting, or changing location IDs . . . . . . . . . . . 3-38Viewing, adding, or changing login ID names . . . . . . . . . . . . . 3-40Viewing, adding, or changing logout reason code names . . . . . . . . . 3-43Viewing or changing split/skill string values . . . . . . . . . . . . . . 3-46Viewing, adding, deleting, or changing split/skill names . . . . . . . . . 3-49Viewing CentreVu CMS database items . . . . . . . . . . . . . . . 3-52 Viewing, adding, deleting, or changing trunk group names . . . . . . . . 3-54Viewing or changing trunk string values . . . . . . . . . . . . . . . 3-56Viewing, adding, deleting, or changing VDN names . . . . . . . . . . . 3-60Viewing, adding, deleting, or changing vector names . . . . . . . . . . 3-63Running Dictionary reports . . . . . . . . . . . . . . . . . . . . 3-65
Chapter 4: Task: running, printing, exiting, and restarting a reportRunning a report . . . . . . . . . . . . . . . . . . . . . . . . 4-2Printing a report. . . . . . . . . . . . . . . . . . . . . . . . . 4-3Setting up a report page . . . . . . . . . . . . . . . . . . . . . 4-4Exiting and restarting a report . . . . . . . . . . . . . . . . . . . 4-6Task reference . . . . . . . . . . . . . . . . . . . . . . . . . 4-7
Chapter 5: Task: automating your activities with scriptingUsing Save as Script . . . . . . . . . . . . . . . . . . . . . . . 5-2Scripting reports . . . . . . . . . . . . . . . . . . . . . . . . 5-6Scripting the export of report output . . . . . . . . . . . . . . . . . 5-8Scripting a report saved as HTML. . . . . . . . . . . . . . . . . . 5-10Scripting windows and actions . . . . . . . . . . . . . . . . . . . 5-12Task reference . . . . . . . . . . . . . . . . . . . . . . . . . 5-15
Chapter 6: Task: administering call center agentsStarting an agent trace . . . . . . . . . . . . . . . . . . . . . . 6-3Listing agents traced . . . . . . . . . . . . . . . . . . . . . . . 6-7Changing agent skills and extension split assignments . . . . . . . . . 6-9Creating or applying an agent template . . . . . . . . . . . . . . . 6-15Multi-agent skill change and moving extensions between splits . . . . . . 6-17Running a split members report . . . . . . . . . . . . . . . . . . 6-22
Chapter 7: Task: administering your call centerViewing, adding, or deleting call work codes . . . . . . . . . . . . . 7-3Changing VDN skill preferences . . . . . . . . . . . . . . . . . . 7-6Adding, deleting, or changing split/skill call profiles . . . . . . . . . . . 7-9Viewing trunk group assignments . . . . . . . . . . . . . . . . . . 7-11Running a trunk group members report . . . . . . . . . . . . . . . 7-13Changing VDN-to-vector assignments . . . . . . . . . . . . . . . . 7-16Adding, deleting, or changing VDN call profiles . . . . . . . . . . . . 7-19Running vector configuration reports . . . . . . . . . . . . . . . . 7-23
Chapter 8: Task: administering exceptionsChanging your exceptions notification . . . . . . . . . . . . . . . . 8-3

Contents CentreVu CMS Administration
v
Administering agent exceptions . . . . . . . . . . . . . . . . . . 8-4Administering split/skill exceptions . . . . . . . . . . . . . . . . . 8-11Administering trunk group exceptions . . . . . . . . . . . . . . . . 8-16Administering VDN exceptions . . . . . . . . . . . . . . . . . . . 8-20Administering vector exceptions . . . . . . . . . . . . . . . . . . 8-26Running an agent exceptions report . . . . . . . . . . . . . . . . . 8-30Running a data collection report . . . . . . . . . . . . . . . . . . 8-34Running a malicious call trace report . . . . . . . . . . . . . . . . 8-36Running a split/skill exceptions report . . . . . . . . . . . . . . . . 8-38Running a trunk group exceptions report . . . . . . . . . . . . . . . 8-41Running a VDN exceptions report. . . . . . . . . . . . . . . . . . 8-44Running a vector exceptions report . . . . . . . . . . . . . . . . . 8-47Task reference . . . . . . . . . . . . . . . . . . . . . . . . . 8-50Reference: interactions with other commands . . . . . . . . . . . . . 8-52Reference: real-time exceptions log . . . . . . . . . . . . . . . . . 8-54Task reference: reports . . . . . . . . . . . . . . . . . . . . . . 8-56
Chapter 9: Task: assigning user permissionsAssigning user data . . . . . . . . . . . . . . . . . . . . . . . 9-3Viewing, assigning, deleting, or changing ACD access. . . . . . . . . . 9-9Viewing, assigning, deleting, or changing feature access . . . . . . . . . 9-12Viewing, assigning, or changing main menu addition access . . . . . . . 9-15Viewing, assigning, deleting, or changing split/skill access . . . . . . . . 9-17Viewing, assigning, deleting, or changing trunk group access . . . . . . . 9-20Viewing, assigning, deleting, or changing vector access . . . . . . . . . 9-23Viewing, assigning, deleting, or changing VDN access. . . . . . . . . . 9-25
Chapter 10: Task: viewing and changing system setup valuesTurning data collection on and off for real ACDs . . . . . . . . . . . . 10-3Changing the CentreVu CMS state . . . . . . . . . . . . . . . . . 10-5Setting up a pseudo-ACD . . . . . . . . . . . . . . . . . . . . . 10-8Loading pseudo-ACD data . . . . . . . . . . . . . . . . . . . . 10-12Specifying how CentreVu CMS stores data . . . . . . . . . . . . . . 10-17Archiving data in the historical database . . . . . . . . . . . . . . . 10-20Starting or stopping external applications . . . . . . . . . . . . . . . 10-23Allocating storage space . . . . . . . . . . . . . . . . . . . . . 10-25Steps to set field values. . . . . . . . . . . . . . . . . . . . . . 10-27Migrating CentreVu CMS data . . . . . . . . . . . . . . . . . . . 10-33Setting storage intervals . . . . . . . . . . . . . . . . . . . . . 10-36Viewing switch setup data . . . . . . . . . . . . . . . . . . . . . 10-42
Chapter 11: Task: maintaining CentreVu® CMSViewing ACD status . . . . . . . . . . . . . . . . . . . . . . . 11-3Viewing archiving status . . . . . . . . . . . . . . . . . . . . . 11-7Running a CMSADM file system backup . . . . . . . . . . . . . . . 11-9Running a maintenance backup . . . . . . . . . . . . . . . . . . 11-13Assigning a name and description to a device . . . . . . . . . . . . . 11-18Monitoring connection status. . . . . . . . . . . . . . . . . . . . 11-20Administering a printer . . . . . . . . . . . . . . . . . . . . . . 11-23

Contents CentreVu CMS Administration
vi
Running a restore . . . . . . . . . . . . . . . . . . . . . . . . 11-26Using the maintenance error log . . . . . . . . . . . . . . . . . . 11-31Task reference . . . . . . . . . . . . . . . . . . . . . . . . . 11-35Reference: full backup . . . . . . . . . . . . . . . . . . . . . . 11-36Reference: incremental backup . . . . . . . . . . . . . . . . . . 11-37Reference: complex backup . . . . . . . . . . . . . . . . . . . . 11-39Reference: recovery kit . . . . . . . . . . . . . . . . . . . . . . 11-41Reference: labeling the backup volume . . . . . . . . . . . . . . . 11-43Reference: results of daily, weekly, and monthly data summaries . . . . . 11-45
Chapter 12: Task: learning and using SolarisLogging into Solaris . . . . . . . . . . . . . . . . . . . . . . . 12-2Using Solaris . . . . . . . . . . . . . . . . . . . . . . . . . . 12-3Viewing a Solaris system file . . . . . . . . . . . . . . . . . . . . 12-4Changing a user’s password . . . . . . . . . . . . . . . . . . . . 12-5Returning to CentreVu CMS . . . . . . . . . . . . . . . . . . . . 12-6Administering a printer . . . . . . . . . . . . . . . . . . . . . . 12-7Stopping or starting the Scheduler utility . . . . . . . . . . . . . . . 12-10Restore files in Solaris . . . . . . . . . . . . . . . . . . . . . . 12-11
Chapter 13: Task: using timetables and shortcutsCreating and scheduling a timetable . . . . . . . . . . . . . . . . . 13-3Creating a timetable without scheduling it . . . . . . . . . . . . . . . 13-6Copying a timetable . . . . . . . . . . . . . . . . . . . . . . . 13-9Deleting a timetable . . . . . . . . . . . . . . . . . . . . . . . 13-11Editing a timetable . . . . . . . . . . . . . . . . . . . . . . . . 13-12Adding tasks to a timetable . . . . . . . . . . . . . . . . . . . . 13-13Copying timetable tasks . . . . . . . . . . . . . . . . . . . . . 13-16Deleting tasks from a timetable . . . . . . . . . . . . . . . . . . . 13-18Editing a timetable globally . . . . . . . . . . . . . . . . . . . . 13-20Changing timetable tasks . . . . . . . . . . . . . . . . . . . . . 13-23Listing all the timetables in your database. . . . . . . . . . . . . . . 13-25Using timetables with the system clock . . . . . . . . . . . . . . . . 13-26Creating a shortcut . . . . . . . . . . . . . . . . . . . . . . . 13-28Running a shortcut . . . . . . . . . . . . . . . . . . . . . . . 13-30Copying a shortcut . . . . . . . . . . . . . . . . . . . . . . . 13-31Deleting a shortcut . . . . . . . . . . . . . . . . . . . . . . . 13-33Editing a shortcut . . . . . . . . . . . . . . . . . . . . . . . . 13-34Adding tasks to a shortcut . . . . . . . . . . . . . . . . . . . . . 13-35Copying shortcut tasks . . . . . . . . . . . . . . . . . . . . . . 13-37Deleting tasks from a shortcut . . . . . . . . . . . . . . . . . . . 13-39Changing shortcut tasks . . . . . . . . . . . . . . . . . . . . . 13-40Task Reference . . . . . . . . . . . . . . . . . . . . . . . . . 13-42
Glossary . . . . . . . . . . . . . . . . . . . . . . . . . . . . . . . . GL-1
Index . . . . . . . . . . . . . . . . . . . . . . . . . . . . . . . . IN-1

About this information product CentreVu CMS Administration
vii
About this information product
Purpose If you are a CentreVu® CMS administrator with access to all parts of CentreVu CMS, this information product tells you what you need to know to administer your call center. For split/skill supervisors with limited access to CentreVu CMS, this information product will also be helpful.
This information product specifically addresses the DEFINITY® Enterprise Communications Server (ECS) functionality of CentreVu CMS. If you are implementing CentreVu CMS R3V8 for the first time, you may have DEFINITY ECS Release 8. If you are upgrading from an earlier version of CentreVu CMS, you may have an earlier ECS or an earlier Generic 3 (G3) switch release.
Reason for reissue This information product is a task-based guide to call center administration.
The ACD basics appendix has been moved to the DEFINITY® ECS R8 Guide to ACD Call Centers 555-233-503.
The vectoring EAS appendix has been moved to the DEFINITY ECS R8 Vectoring and EAS Guide 555-230-521.
This information product documents version 8 of CentreVu Supervisor.
DEFINITY/G2 information has been removed throughout.
About this information product CentreVu CMS Administration
viii
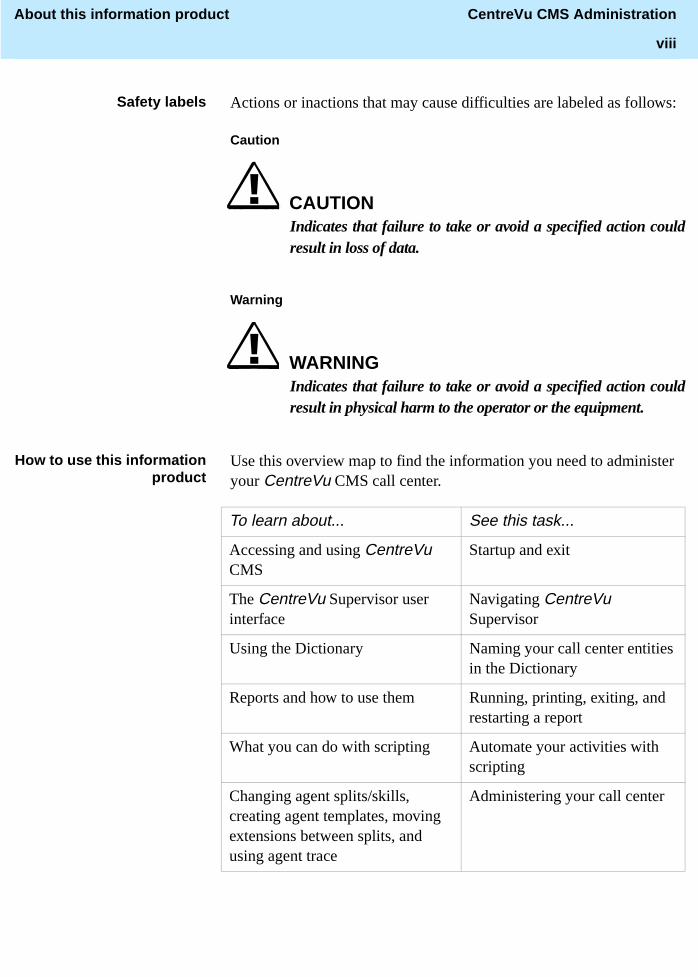
Safety labels Actions or inactions that may cause difficulties are labeled as follows:
Caution
CAUTIONIndicates that failure to take or avoid a specified action couldresult in loss of data.
Warning
WARNINGIndicates that failure to take or avoid a specified action couldresult in physical harm to the operator or the equipment.
How to use this informationproduct
Use this overview map to find the information you need to administer your CentreVu CMS call center.
To learn about... See this task...
Accessing and using CentreVu CMS
Startup and exit
The CentreVu Supervisor user interface
Navigating CentreVu Supervisor
Using the Dictionary Naming your call center entities in the Dictionary
Reports and how to use them Running, printing, exiting, and restarting a report
What you can do with scripting Automate your activities with scripting
Changing agent splits/skills, creating agent templates, moving extensions between splits, and using agent trace
Administering your call center
About this information product CentreVu CMS Administration
ix
Conventions used The following conventions are used in this information product.
Product release
DEFINITY Enterprise Communications Server is called “ECS” or “switch”. Unless otherwise noted, the term ECS includes Releases 6, 7, and 8. The functionality of earlier switch releases is noted if it differs from that of Releases 6 through 8.
Document number
Lucent publication titles are followed by their document number. For example, see CentreVu Supervisor Release 8 Reports 585-210-929.
Adding or deleting call work codes and split/skill call profiles, changing VDN skill preferences, viewing trunk group assignments, changing VDN call profiles, and other call center activities
Administering your call center
To learn about... See this task...
Defining agents, split/skill, trunk group, VDN, and vector exceptions, and running exceptions reports
Administering exceptions
Kinds of permissions; how and when to assign them
Assigning user permissions
Changing CentreVu CMS state, allocating storage space, specifying storage intervals, and other system setup activities
Viewing and changing system setup values
Understanding maintenance: backups, restores, and backup strategy; the maintenance error log; backup volumes and labeling
Maintaining CentreVu CMS
The Solaris operating system and how to use it
Learning and using Solaris
How timetables and shortcuts streamline your activities
Using timetables and shortcuts
About this information product CentreVu CMS Administration
x
Typography
Courier font
designates input and output.
• Input is something you type into the user interface. For example, Type x next to Printer, Terminal, or File.
• Output is a character, word, or phrase that the system generates. For example, Please wait for initialization .....
Italic font highlights references to file names and directories. For example, / cms.
Related documentation The following information may also be helpful:
• CentreVu CMS R3V5 Custom Reports585-215-822
• CentreVu CMS R3V5 Forecast585-215-825
• CentreVu Supervisor Release 8 Reports 585-210-929
• CentreVu CMS R3V8 Open Database Connectivity585-210-911
• Lucent Call Center Release 8 Change Description 585-210-925
• CentreVu CMS R3V8 External Call History Interface 585-210-912
• CentreVu Advocate Release 8 User Guide585-210-927
• CentreVu Supervisor Release 8 Installation and Getting Started 585-215-860
• CentreVu CMS R3V8 Sun Microsystems, Inc.Sun Upgrades and Migrations 585-210-913
• CentreVu CMS Sun Microsystems, Inc.Sun Software Installation and Maintenance 585-215-866
• Lucent Call Center Documentation CD-ROM585-210-926
• CentreVu CMS R3V8 Hardware Maintenance and Troubleshooting585-210-919
About this information product CentreVu CMS Administration
xi
Other useful information
The information shipped with the following products may also be helpful:
• Terminals
• Printers
• Solaris system software
• Switch
How to order thisinformation product
By telephone:
Lucent Technologies Publications CenterVoice: 1-800-457-1235or international voice: 317-322-6416Fax: 1-800-457-1764 or international fax: 317-322-6699
By mail:
Lucent Technologies Publications Center2855 N. Franklin RoadIndianapolis, IN 46219US
Order:
Document 585-210-910
Comcode 108501743Issue 1, December 1999
For additional documents, see “Related Documentation” in About this information product.
You can be placed on a Standing Order list for this and other documents you may need. Standing Order will enable you to automatically receive updated versions of individual documents or document sets, billed to account information that you provide. For more information on Standing Orders, or to be put on a list to receive future issues of this document, please contact the Lucent Technologies Publications Center.

About this information product CentreVu CMS Administration
xii

Task: startup and exit CentreVu CMS Administration
1-1
1 Task: startup and exit
............................................................................................................................................................................................................................................................Overview
Purpose In this task you will find the following procedures:
• Starting CentreVu® Supervisor on Windows 98 or NT
• Logging into CentreVu CMS
• Adding new servers
• Choosing or changing your password
• Closing CentreVu Supervisor windows
• Logging out of CentreVu CMS
• Exiting CentreVu Supervisor
Use the procedures that follow to access CentreVu CMS.

Task: startup and exit CentreVu CMS Administration
Starting CentreVu Supervisor on Windows 98 or NT 1-2
............................................................................................................................................................................................................................................................Starting CentreVu Supervisor on Windows 98 or NT
Steps ...........................................................................................................................................................................
1 Click Start on the toolbar.
...........................................................................................................................................................................
2 Select Programs on the Start menu.
...........................................................................................................................................................................
3 Click the Lucent CentreVu Supervisor program group.
...........................................................................................................................................................................
4 Click CentreVu Supervisor – [your language].
E N D O F S T E P S...........................................................................................................................................................................
Result
This is how the controller window looks before you log into the server.

Task: startup and exit CentreVu CMS Administration
Logging into CentreVu CMS 1-3
............................................................................................................................................................................................................................................................Logging into CentreVu CMS
Purpose Use the Connect menu or the Login button to log into the CentreVu CMS server. When you log out, wait at least 10 seconds before trying to log in again if CentreVu CMS is in single-user mode and you are the single user.
Resource limits If you run CentreVu Supervisor on Windows 98, available resources limit you to one of the following:
• one instance with four reports running
• four instances, each with one report running
Login types From the controller window, you can connect to the CentreVu CMS server in either of the following ways. Note that you are limited to one instance of a login ID per server.
Automatic login
Opens an input window in which you type your login ID and password. When you click OK, the connection to the CentreVu CMS server is automatically started. If you use automatic login to connect to the CentreVu CMS server and the connection is broken or dropped while you are logged into the server, CentreVu Supervisor tries to restore the connection.
Manual login
Opens an interactive login window that requires you to type your login ID, password, the terminal type �FYVXS�, and then to manually log into CentreVu CMS. Manual login is typically used for troubleshooting, and for CentreVu CMS services and administration login IDs.
Steps for automatic login ...........................................................................................................................................................................
1 Select Login on the Connect menu or click Login on the toolbar.
Task: startup and exit CentreVu CMS Administration
Logging into CentreVu CMS 1-4
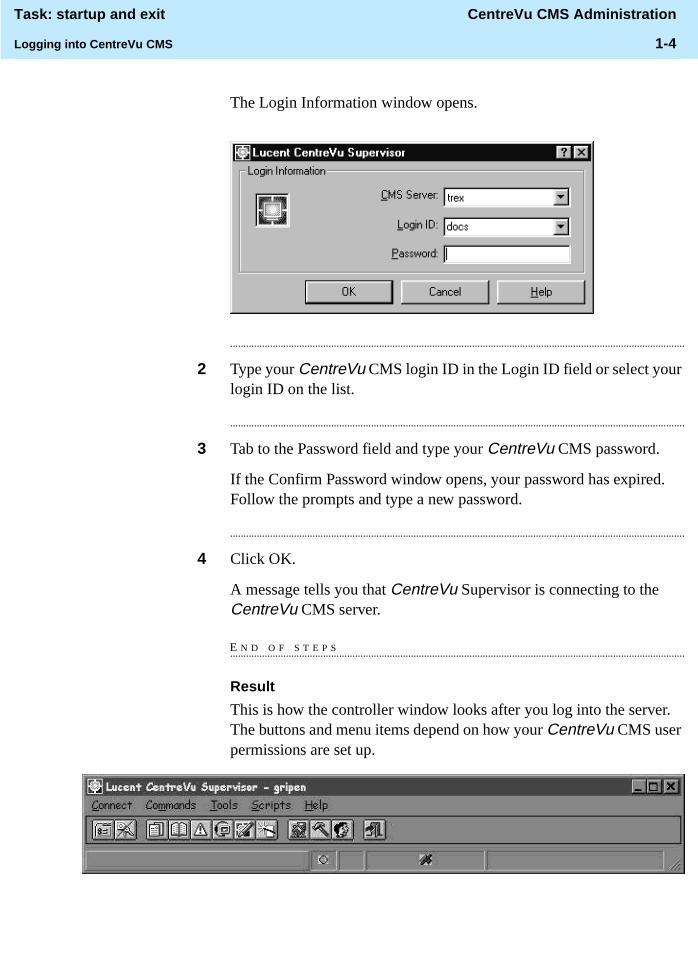
The Login Information window opens.
...........................................................................................................................................................................
2 Type your CentreVu CMS login ID in the Login ID field or select your login ID on the list.
...........................................................................................................................................................................
3 Tab to the Password field and type your CentreVu CMS password.
If the Confirm Password window opens, your password has expired. Follow the prompts and type a new password.
...........................................................................................................................................................................
4 Click OK.
A message tells you that CentreVu Supervisor is connecting to the CentreVu CMS server.
E N D O F S T E P S...........................................................................................................................................................................
Result
This is how the controller window looks after you log into the server. The buttons and menu items depend on how your CentreVu CMS user permissions are set up.
Task: startup and exit CentreVu CMS Administration
Logging into CentreVu CMS 1-5
Steps for manual login ...........................................................................................................................................................................
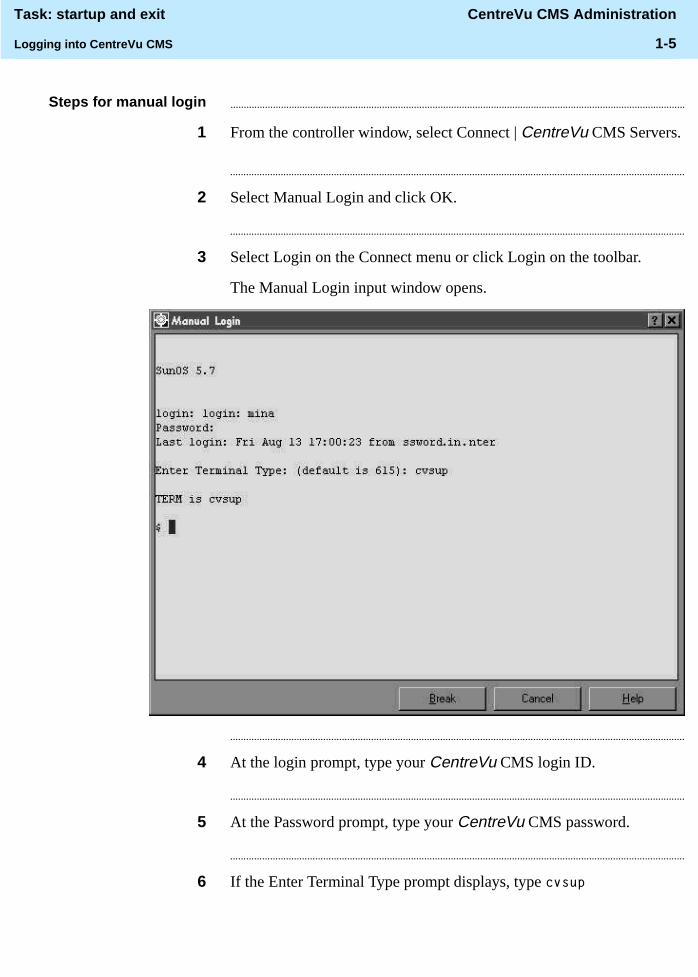
1 From the controller window, select Connect | CentreVu CMS Servers.
...........................................................................................................................................................................
2 Select Manual Login and click OK.
...........................................................................................................................................................................
3 Select Login on the Connect menu or click Login on the toolbar.
The Manual Login input window opens.
...........................................................................................................................................................................
4 At the login prompt, type your CentreVu CMS login ID.
...........................................................................................................................................................................
5 At the Password prompt, type your CentreVu CMS password.
...........................................................................................................................................................................
6 If the Enter Terminal Type prompt displays, type FYVXS
Task: startup and exit CentreVu CMS Administration
Logging into CentreVu CMS 1-6
...........................................................................................................................................................................
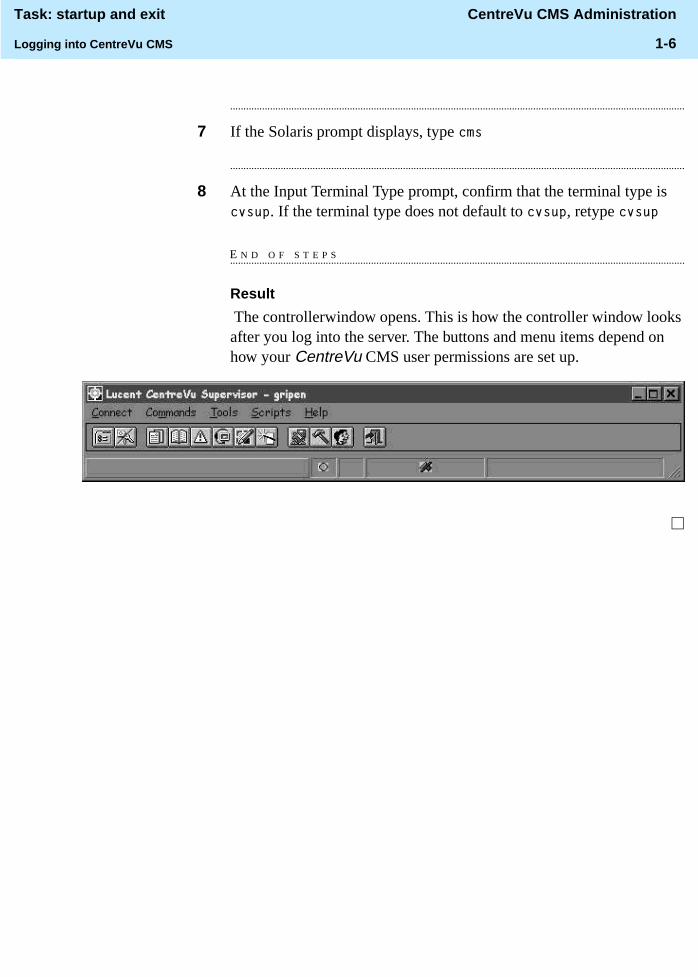
7 If the Solaris prompt displays, type FPV
...........................................................................................................................................................................
8 At the Input Terminal Type prompt, confirm that the terminal type is FYVXS. If the terminal type does not default to FYVXS, retype FYVXS�
E N D O F S T E P S...........................................................................................................................................................................
Result
The controllerwindow opens. This is how the controller window looks after you log into the server. The buttons and menu items depend on how your CentreVu CMS user permissions are set up.

Task: startup and exit CentreVu CMS Administration
Adding new servers 1-7
............................................................................................................................................................................................................................................................Adding new servers
Steps to start a connectionwith a server: ...........................................................................................................................................................................
1 On the Connect menu, select CentreVu CMS Servers.
The Options window opens.
...........................................................................................................................................................................
2 Click New to add a CentreVu CMS server, Properties to change a connection to a CentreVu CMS server, or Remove to remove a CentreVu CMS server from the list of available servers.
E N D O F S T E P S...........................................................................................................................................................................
Task: startup and exit CentreVu CMS Administration
Adding new servers 1-8
Results
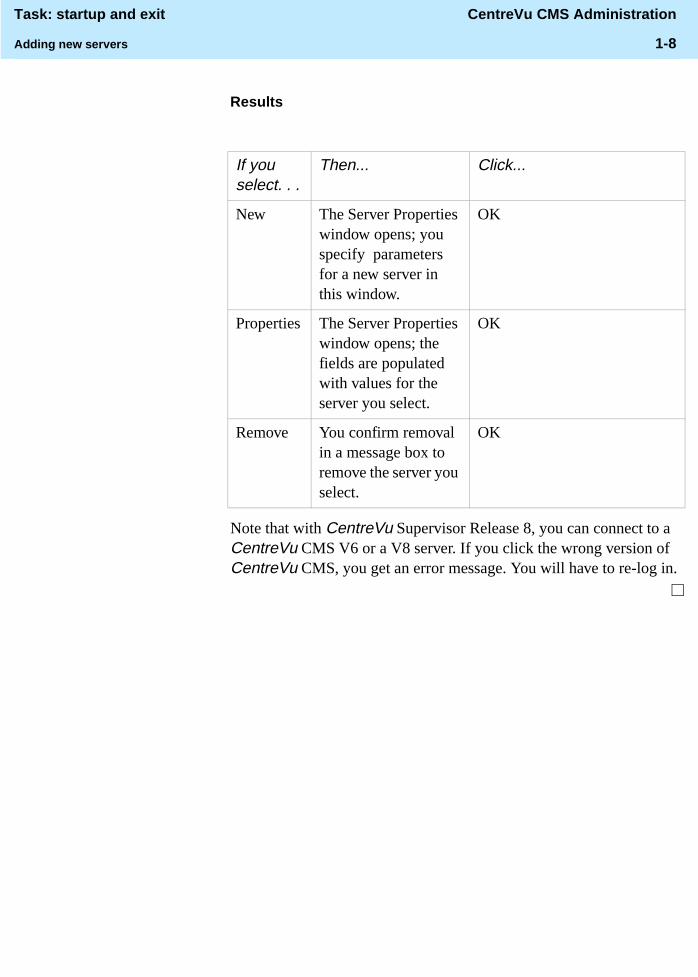
Note that with CentreVu Supervisor Release 8, you can connect to a CentreVu CMS V6 or a V8 server. If you click the wrong version of CentreVu CMS, you get an error message. You will have to re-log in.
If you select. . .
Then... Click...
New The Server Properties window opens; you specify parameters for a new server in this window.
OK
Properties The Server Properties window opens; the fields are populated with values for the server you select.
OK
Remove You confirm removal in a message box to remove the server you select.
OK
Task: startup and exit CentreVu CMS Administration
Choosing or changing your password 1-9
............................................................................................................................................................................................................................................................Choosing or changing your password
Overview For system security, passwords are required for all CentreVu CMS user login IDs. If you do not type a password on your first login, the system will force you to add one.
CentreVu CMS allows users to type and change their password, but only a CentreVu CMS administrator working on the Solaris system can replace a forgotten password. See “Task: learning and using Solaris” for the steps to do this.
To choose a validpassword:
Steps
...........................................................................................................................................................................
1 Choose a password with at least six characters.
...........................................................................................................................................................................
2 Choose a password with at least one number or special character, and at least two alphabetic characters.
See “Assigning user data” in “Task: assigning user permissions” for more information on special characters.
E N D O F S T E P S...........................................................................................................................................................................
To change your password: Steps
...........................................................................................................................................................................
1 Choose a new password with at least three characters that are different from your previous password.
...........................................................................................................................................................................
2 Type a new password in the New Password field.
...........................................................................................................................................................................
3 Retype the new password in the Retype New Password field and click OK.
E N D O F S T E P S...........................................................................................................................................................................

Task: startup and exit CentreVu CMS Administration
Closing CentreVu Supervisor windows 1-10
............................................................................................................................................................................................................................................................Closing CentreVu Supervisor windows
Steps To close CentreVu Supervisor windows, do one of the following:
• Use any of the standard Windows methods.
• Click Exit on the Connect menu. Exit closes all windows and quits CentreVu Supervisor.
Important! If the server shuts down or changes to single-user mode, you will see a warning message before any open windows close.
Task: startup and exit CentreVu CMS Administration
Logging out of CentreVu CMS 1-11
............................................................................................................................................................................................................................................................Logging out of CentreVu CMS
Steps To log out of the server, do one of the following:
• Select Logout on the Connect menu. Logout is inactive if you are not logged into the server.
• Select Logout or Exit on the toolbar.
• Select Exit on the Connect menu.
Results
If you. . . Then you see this message. . .
Click. . .
Select Logout from the Connect menu or click Logout. .
“Are you sure you want to logout?”
OK to log off the server but keep CentreVu Supervisor running.
Select Exit from the Connect menu or click Exit.
“You are currently logged in. Are you sure you want to exit?”
Yes to log off the server and close CentreVu Supervisor.

Task: startup and exit CentreVu CMS Administration
Exiting CentreVu Supervisor 1-12
............................................................................................................................................................................................................................................................Exiting CentreVu Supervisor
Steps To exit CentreVu Supervisor, select Exit on the Command menu or click Exit on the toolbar.
Important! If you try to exit CentreVu Supervisor before logging out of the CentreVu CMS server, you will see the message, “You are currently logged in. Are you sure you want to exit?” Click Yes to automatically log off the server and exit CentreVu Supervisor.

Task: startup and exit CentreVu CMS Administration
Task reference: general 1-13
............................................................................................................................................................................................................................................................Task reference: general
How CentreVu CMS works CentreVu CMS is a software product used by businesses and organizations that have a Lucent Technologies telecommunications Enterprise Communications Server (ECS) and receive a large volume of telephone calls that are processed through the Automatic Call Distribution (ACD) feature of the ECS. (In this information product, the ECS is called the “switch.”) CentreVu CMS collects call-traffic data, formats management reports, and provides an administrative interface to the ACD feature on the switch.
The CentreVu CMS administrator accesses the CentreVu CMS database, generates reports, administers ACD parameters, and monitors call activities to determine the most efficient service for the calling customers.
Solaris
CentreVu CMS interfaces with the Solaris operating system and uses several Solaris system utilities to communicate with terminals and printers, to log errors, and to execute processes. CentreVu CMS works with the INFORMIX database management system, which provides an interface to the CentreVu CMS historical database.
ACD administration
CentreVu CMS provides an administrative interface to the switch. From the ACD interface, you can view or change various ACD-, Call Vectoring-, and Expert Agent Selection (EAS)-related parameters on the switch, and you can run reports that describe your call center configuration.
For example, you can add agents to or remove agents from splits or skills; move extensions between splits; change skill assignments; change trunk group-to-split, trunk group-to-VDN, or VDN-to-vector assignments; start an agent trace and list the agents being traced; and create, copy, and edit call vectors. See “Task: administering call center agents” and “Task: administering your call center” for more information.
Call Vectoring
The CentreVu CMS Call Vectoring feature enables you to create, copy, and edit call vectors on the ECS and G3 switches. Call vectors are user-defined, call-processing programs. Call vectors direct calls to specified

Task: startup and exit CentreVu CMS Administration
Task reference: general 1-14
on-network or off-network destinations; to queues in ACD splits; to call prompting and digit collection; or to treatments such as music, recorded announcements, forced disconnect, and forced busy.
On the switch and CentreVu CMS, Call Vectoring is a separately purchased feature. All CentreVu CMS Call Vectoring windows are described in this information product. A description of ECS/G3 Call Vectoring is in “Administering call center agents” and “Administering the call center.” A description of the Vector Contents window (which you use to create, copy, and edit call vectors) and the allowed values for all the vectoring commands are in “Administering the call center”. See CentreVu Visual Vectors Version 8 User Guide585-210-932 for more information.
Expert Agent Selection
EAS is an optional switch feature that routes incoming calls to the right agent on the first try. When you use the ACD queuing and the vector Queue-to and Check commands, a call routes to an agent that has the skills to handle that call.
With EAS, call distribution is based on skill groups. Calls are queued to skill groups and handled by an agent who is a member of at least one of the groups for the skills a caller needs.
The ECS and G3 switches have different EAS capabilities so you need to plan ahead to add EAS. See “Task: administering call center agents” and “Task: administering the call center” for more on EAS.
If you do not have EAS, call distribution is based on splits.
Forecast
Forecast is an optional CentreVu CMS feature. Forecast enables you to generate reports that predict both future call traffic and the resources you will need to meet call-handling objectives. See CentreVu CMS R3V5 Forecast585-215-825 for more on Forecast.
CentreVu Advocate
CentreVu Advocate is an optional switch feature that provides flexibility in the way a call is selected for an agent in a call-surplus situation. See the CentreVu Advocate User Guide 585-215-855.
Task: startup and exit CentreVu CMS Administration
Task reference: general 1-15
ODBC
Open Database Connectivity (ODBC) is an optional CentreVu CMS feature that enables you to access data in the CentreVu CMS database for use in other software applications such as a spreadsheet program. With ODBC, you can access CentreVu CMS data directly from your application.
Task: startup and exit CentreVu CMS Administration
Task reference: CentreVu CMS specifications 1-16
............................................................................................................................................................................................................................................................Task reference: CentreVu CMS specifications
Hardware platforms CentreVu CMS is certified to run on the following computers:
• Sun Ultra Enterprise 3000
• Sun SPARCserver 20
• Sun SPARCserver 10
• Sun SPARCserver 5
• Sun Enterprise 3500
• Sun Ultra 5
Recommended PCconfiguration
The recommended PC configuration for CentreVu Supervisor is the following:
• Intel Pentium 133 MHz processor or higher
• A hard disk drive with 50 MB of free space
• A CD-ROM drive
• 48 MB RAM or more; if you are running simultaneous CentreVu Supervisor instances in the background, you may need additional memory to maintain acceptable performance
• An SVGA monitor and graphics adapter that supports at least 16-bit color and can be set to a graphics resolution of at least 800x600x256 colors
• Microsoft Windows 95, Windows 98, or Windows NT 4.0 operating system; if you are installing CentreVu Supervisor on a Windows NT 4.0 operating system, you must first install the Microsoft Service Pack 3 or higher. Microsoft also recommends that the Service Pack be re-installed after the CentreVu Supervisor installation.
• A mouse compatible with the your Windows operating system
• For network connection:
– WinSock 1.1–compliant TCP/IP stack
– Ethernet communications board
• For serial connection:
– Serial cable correctly wired for hardware flow control and a 16550A UART communications port
– Available COM port
Task: startup and exit CentreVu CMS Administration
Task reference: CentreVu CMS specifications 1-17
• For modem connection:
– At least a 19.2-Kbps modem and a 16550A UART communications port; if the modem is external, the cable must be correctly wired for hardware flow control
• For each language installed on the PC in addition to English, an additional 5 MB of disk space
Software for a Sun platform The following software is required for R3V8 CentreVu CMS to operate correctly:
• Solaris 7 Hardware 3/99 CD-ROM
• Common Desktop Environment 1.3
• Sun Online Validation Test Suite 3.1 (Software Supplement CD-ROM)
• Solaris Online DiskSuite 4.2 (Solaris Easy Access Server CD-ROM)
• INFORMIX-SE 7.22.UC2 CD-ROM
• INFORMIX ILS 2.11 CD-ROM
• CMS Supplemental Services CD-ROM
• INFORMIX Runtime ESQL 9.14
The following software is optional for R3V8 CMS:
• INFORMIX-SQL 7.20 UD1 CD-ROM
• SunLink HSI/P 2.0 CD-ROM (Only required when an HSI card is installed on PCI platforms)
• SunLink HSI/S 3.0 CD-ROM (Only required when an HSI card is installed on sBus platforms)
• SunLink X.25 Version 9.1 CD-ROM
• Bay Networks Annex Release 10.0b (only when an NTS is installed)
• Aurora Ports 6.18 8 port and/or 5.16 16 port drivers (only when an Aurora ports card is installed on SparcServer platforms)
• Special Asynchronous Interface PCI 2.0 (only when a SAIP card is installed on a PCI platform)

Task: startup and exit CentreVu CMS Administration
Task reference: switches 1-18
............................................................................................................................................................................................................................................................Task reference: switches
Switch names and releases This release of CentreVu CMS is certified to run with the following releases of Lucent Technologies switches:
• DEFINITY® Communications System Generic 3 Version 2 load 71 and later
• DEFINITY Communications System Generic 3 Version 3
• DEFINITY Communications System Generic 3 Version 4
• DEFINITY G3V5
• DEFINITY Enterprise Communications Server Release 5
• DEFINITY Enterprise Communications Server Release 6
• DEFINITY ECS R7
• DEFINITY ECS R8

Task: startup and exit CentreVu CMS Administration
Task reference: terminals 1-19
............................................................................................................................................................................................................................................................Task reference: terminals
Terminal requirements You can use the display terminals connected to your computer to access CentreVu CMS administration and reporting capabilities. You can also access the Solaris system from these terminals. If you use terminals incompatible with CentreVu CMS or if you do not properly identify the terminals within the CentreVu CMS environment, or if you do not properly set up the terminal options, the terminals may not work correctly.
Approved terminals The following terminals are approved for use with CentreVu CMS:
• 605MT monochrome
• 615MT monochrome
• 615CMT color
• 620MTG multitasking graphics
• 705MT monochrome
• 715BCS monochrome
• 2900/AWTC color
• 4000/SWTC color
• DATASPEED 4425 monochrome
• 260 LS terminal
Troubleshooting If the screen on a terminal becomes garbled or confused, redraw the screen by using Ctrl+L or select the Redraw menu item from the Window Screen Labeled Key (SLK).
See CentreVu CMS R3V8 Sun SPARCserver Computer Hardware Installation and Maintenance 585-215-868 for information about other terminal requirements and for troubleshooting. Also see CentreVu CMS R3V8 Terminals, Printers, and Modems 585-215-874.
Task: startup and exit CentreVu CMS Administration
Task reference: printers 1-20
............................................................................................................................................................................................................................................................Task reference: printers
Printer requirements Note that:
• All CentreVu CMS sites need at least one system printer for CentreVu CMS reports, error logs, and so forth.
• All printers are named during CentreVu CMS installation so you should know the names of these printers.
• During CentreVu CMS installation one printer is identified as the default printer and must be administered via Commands SLK.
• When you send a CentreVu CMS print request, the print job is normally routed to the default printer, unless you have changed the printer destination.
• For CentreVu Supervisor users, the default printer is the printer directly connected to your PC or available to you via your LAN.
• Each CentreVu CMS login ID can be assigned a printer.
Printers for your system To identify the correct printer for your system, contact your local Lucent distributor or representative.

Task: startup and exit CentreVu CMS Administration
Task reference: CentreVu CMS support services 1-21
............................................................................................................................................................................................................................................................Task reference: CentreVu CMS support services
Helpline and training Lucent Technologies offers Helpline support tailored to the specific needs of your company and your CentreVu CMS system. To further enhance the value of your CentreVu CMS investment, Lucent offers training courses and training packages on CentreVu CMS administration, data analysis, and report design.

Task: startup and exit CentreVu CMS Administration
Task reference: using the Helpline 1-22
............................................................................................................................................................................................................................................................Task reference: using the Helpline
If you have a problem If you have a problem with CentreVu CMS, call the Lucent Technologies Customer Care Helpline at (800) 242-2121 to report the problem and obtain a trouble ticket number. For customers outside the United States and Canada, please contact your local Lucent distributor or representative.
The Customer Care Helpline is staffed by trained CentreVu CMS technicians at the Technical Service Center (TSC). The technicians at TSC will try to fix your problem in a timely manner. If they cannot fix it, they will escalate the problem to a higher level of customer support.
Provide information When you call the Helpline, be sure to report the problem as a “CentreVu Call Management System R3V8 problem” and be prepared to give the following information:
• Your full name, your organization, and a phone number where a Lucent Technologies representative can contact you about the problem.
• The installation location (IL) number.
The IL number is a 10-digit number from a Lucent Technologies database that identifies the details of your CentreVu CMS installation and environment.
• The DEFINITY and CentreVu CMS release information.
• The CPU type and speed.
• The Windows operating system (if you are using CentreVu Supervisor.)
• A description of the problem.
• The type of service contract your organization has with Lucent Technologies, if any.
If your system is not covered by warranty or a service contract, you will be invoiced for the Helpline troubleshooting. A service contract may provide coverage for business hours only or for twenty-four hours a day, seven days a week. Alternatively, the contract may provide you with a technician dedicated to your installation.

Task: startup and exit CentreVu CMS Administration
Task reference: CentreVu CMS training classes 1-23
............................................................................................................................................................................................................................................................Task reference: CentreVu CMS training classes
Training included withsoftware
Training for one person on CentreVu CMS administration and custom reports is included with the price of the CentreVu CMS software. (The price is not for each ACD). Your Lucent Technologies project manager should call 800-255-8988 to schedule the appropriate classes for you. For training outside the United States, contact your local Lucent distributor or representative.
Available courses Call 800-255-8988 for a list of available CentreVu CMS training courses.
Entitlement training is moving from instructor-led training to distance learning throughout 2000. See Document 300 for current entitlement offers. Document 300 can be found at http://training.gbcset.lucent.com, select Customer Training, On-Line Materials, Summary of Training Seats, Document 300.
Use price element codes (PECs) only if you are enrolling people in addition to the person who receives training at no charge.
Upgrade training If you are upgrading from CentreVu CMS Release 2, one person is entitled to enroll in an administration course. Additional people may enroll at their own expense. One or more people may enroll in additional courses at their own expense.
Other CentreVu CMS training
You may benefit by taking further courses (at additional charge) in the following subject areas:
• Traffic theory/data analysis
• Host computer administration
• Switch administration
• CentreVu Advocate
You automatically receive the following Individualized Learning Programs (booklets) after one of your call center's employees is enrolled in the CentreVu CMS administration course:
• ACD fundamentals
• Call Vectoring and EAS basics

Task: startup and exit CentreVu CMS Administration
Task reference: CentreVu CMS training classes 1-24
Navigating CentreVu® Supervisor CentreVu CMS Administration
2-1
2 Navigating CentreVu® Supervisor
............................................................................................................................................................................................................................................................Overview
Purpose In this task you will find the following procedures:
• Using the controller window before you log into the server
• Using the controller window after you log into the server
• Using the features common to all CentreVu Supervisor windows
• Using the selector windows
• Using the input windows
• Using the browse buttons
• Using the history list
CentreVu Supervisor is your interface to CentreVu CMS. The procedures that follow show you how to navigate CentreVu Supervisor.

Navigating CentreVu® Supervisor CentreVu CMS Administration
Using the controller window before you log into the server 2-2
............................................................................................................................................................................................................................................................Using the controller window before you log into the server
Overview This is how the main CentreVu Supervisor window, called the controller window, looks before you log into the server.
Steps ...........................................................................................................................................................................
1 Use the system menu field; the title bar; the maximize, minimize, and close buttons; and the menu bar as you normally do in Windows.
...........................................................................................................................................................................
2 Move your cursor over each button on the toolbar to see a tooltip describing what that button does (the status bar at the bottom of the window also shows the description when your cursor is on the toolbar button).
...........................................................................................................................................................................
3 From the menu bar, access the Connect, Tools, and Help menus.
...........................................................................................................................................................................
4 From the Connect menu, select Login to open the Automatic Login window (unless you have set manual login), click CMS Servers to go to the CMS Servers tab on the Options window, and click Exit to close CentreVu Supervisor.
...........................................................................................................................................................................
5 From the Tools menu, select Options to open the Options window, where you can view or change connection settings.
...........................................................................................................................................................................
6 The Advanced menu takes you to the Advanced window, which is used for debugging. Do not change the settings in this window unless you are instructed to do so by a Lucent representative.

Navigating CentreVu® Supervisor CentreVu CMS Administration
Using the controller window before you log into the server 2-3
...........................................................................................................................................................................
7 Use the Login Status indicator on the status bar to see your login status. This is a green light if you are logged into the server and a gray light if you are not logged into the server.
...........................................................................................................................................................................
8 From the Help menu, click Contents to access the Help Topics window and the CentreVu Supervisor table of contents, click Technical Support to see technical support information, and click About to see the CentreVu Supervisor software version number. You can also press F1 to access Help Topics.
E N D O F S T E P S...........................................................................................................................................................................

Navigating CentreVu® Supervisor CentreVu CMS Administration
Using the controller window after you log into the server 2-4
............................................................................................................................................................................................................................................................Using the controller window after you log into the server
Overview When you are logged into the CentreVu CMS server, the toolbar, status bar, and menu bar on the controller window offer additional functions. Your CentreVu CMS user permissions determine which toolbar buttons and menu options you can use.
Steps ...........................................................................................................................................................................
1 From the Connect menu, select Logout to log off the server at any time, or select Exit to see a logout prompt and then click Yes to close CentreVu Supervisor.
...........................................................................................................................................................................
2 From the Commands menu, select Reports to open the Reports selector window; select Dictionary to open the Dictionary selector window; select Exceptions to open the Exceptions selector window; select Agent Administration to open the Agent Administration selector window; select Call Center Administration to open the Call Center Administration selector window; and select Report Wizard to build a custom report and see data in charts, tables, or a combination of both.

Navigating CentreVu® Supervisor CentreVu CMS Administration
Using the controller window after you log into the server 2-5
...........................................................................................................................................................................
3 From the Tools menu, select Options to choose report colors and other similar options; select Add Button to start the Add Button wizard, which helps you create a custom or standard button and add it to the toolbar; select Remove Button to remove a button from the toolbar; select CMS System Setup to open the CMS System Setup selector window; select Maintenance to open the Maintenance selector window; and select User Permissions to open the User Permissions selector window.
...........................................................................................................................................................................
4 On the menu bar, select Scripts to view the drop-down menu, then click the item for the action you want to automate through scripting.
...........................................................................................................................................................................
5 On the toolbar, click a button to see the drop-down description of the button’s function
E N D O F S T E P S...........................................................................................................................................................................
Navigating CentreVu® Supervisor CentreVu CMS Administration
Using the controller window after you log into the server 2-6
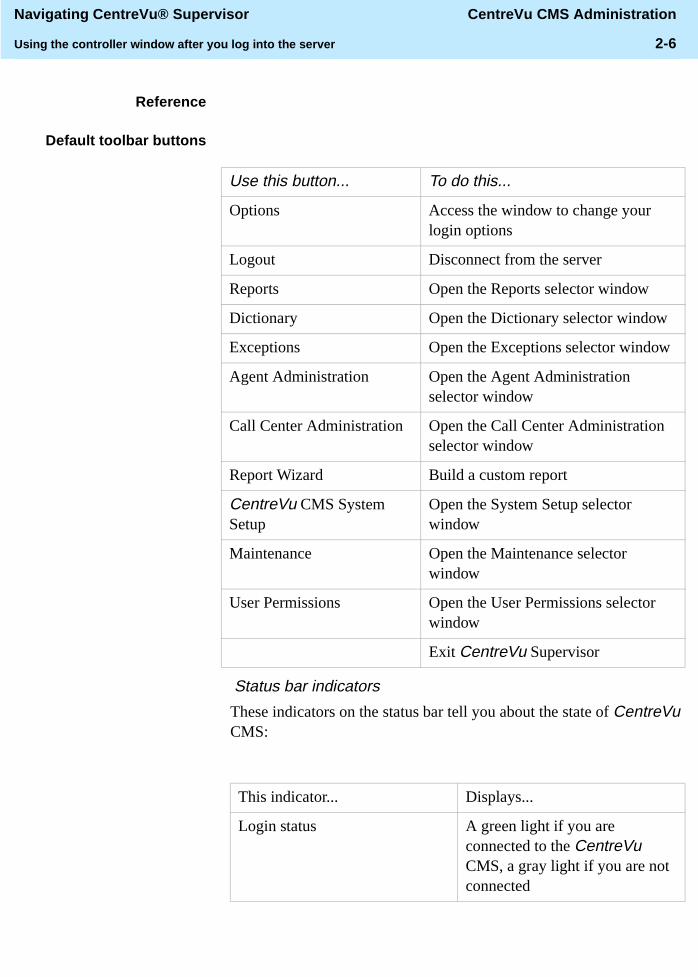
Reference
Default toolbar buttons
Status bar indicators
These indicators on the status bar tell you about the state of CentreVu CMS:
Use this button... To do this...
Options Access the window to change your login options
Logout Disconnect from the server
Reports Open the Reports selector window
Dictionary Open the Dictionary selector window
Exceptions Open the Exceptions selector window
Agent Administration Open the Agent Administration selector window
Call Center Administration Open the Call Center Administration selector window
Report Wizard Build a custom report
CentreVu CMS System Setup
Open the System Setup selector window
Maintenance Open the Maintenance selector window
User Permissions Open the User Permissions selector window
Exit CentreVu Supervisor
This indicator... Displays...
Login status A green light if you are connected to the CentreVu CMS, a gray light if you are not connected
Navigating CentreVu® Supervisor CentreVu CMS Administration
Using the controller window after you log into the server 2-7
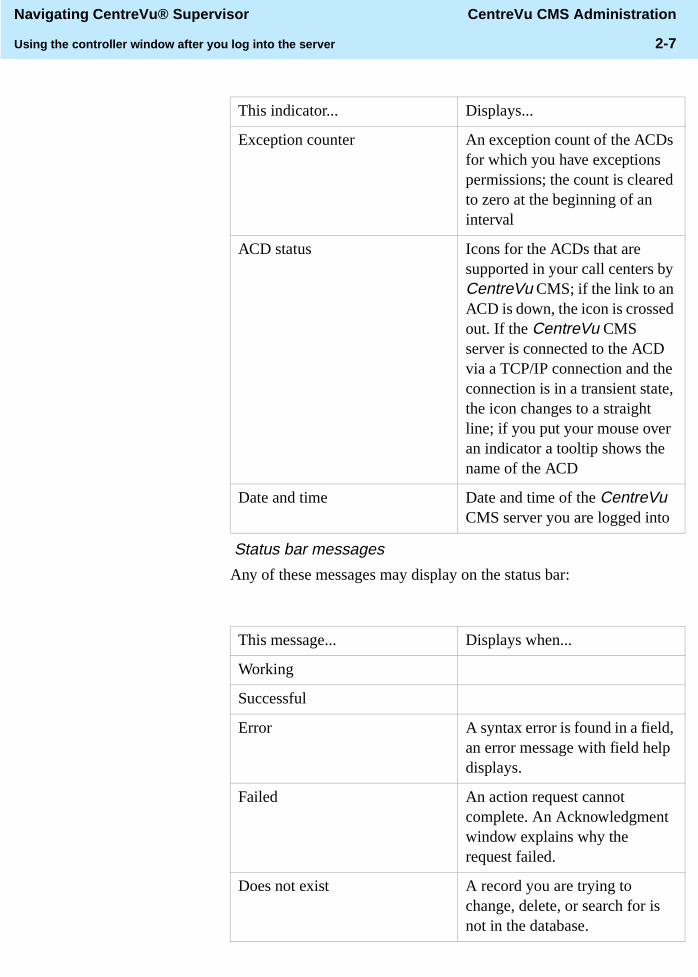
Status bar messages
Any of these messages may display on the status bar:
This indicator... Displays...
Exception counter An exception count of the ACDs for which you have exceptions permissions; the count is cleared to zero at the beginning of an interval
ACD status Icons for the ACDs that are supported in your call centers by CentreVu CMS; if the link to an ACD is down, the icon is crossed out. If the CentreVu CMS server is connected to the ACD via a TCP/IP connection and the connection is in a transient state, the icon changes to a straight line; if you put your mouse over an indicator a tooltip shows the name of the ACD
Date and time Date and time of the CentreVu CMS server you are logged into
This message... Displays when...
Working
Successful
Error A syntax error is found in a field, an error message with field help displays.
Failed An action request cannot complete. An Acknowledgment window explains why the request failed.
Does not exist A record you are trying to change, delete, or search for is not in the database.
Navigating CentreVu® Supervisor CentreVu CMS Administration
Using the controller window after you log into the server 2-8
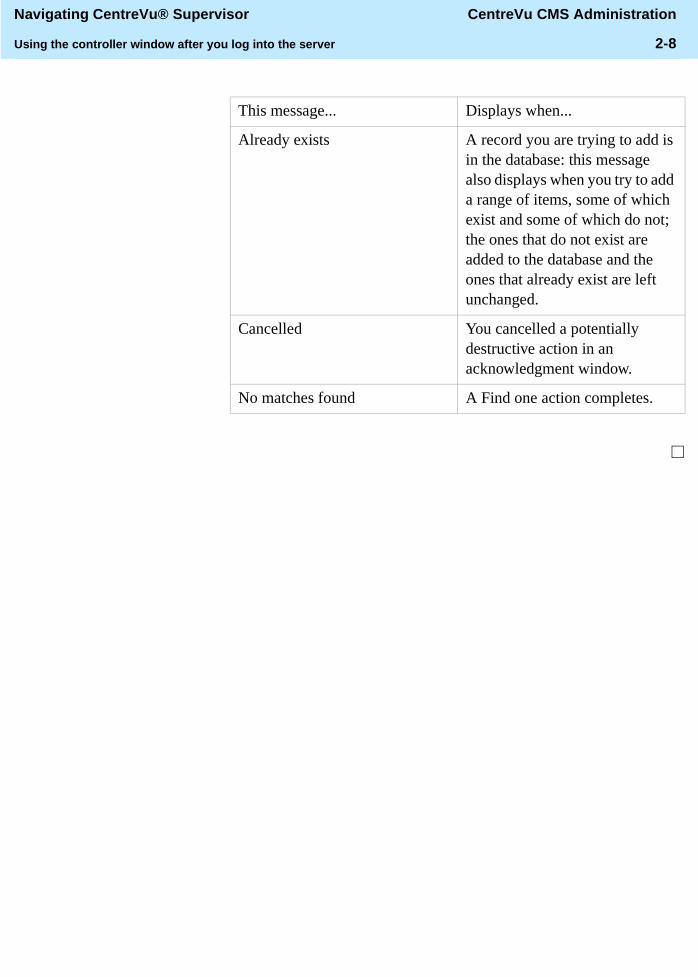
This message... Displays when...
Already exists A record you are trying to add is in the database: this message also displays when you try to add a range of items, some of which exist and some of which do not; the ones that do not exist are added to the database and the ones that already exist are left unchanged.
Cancelled You cancelled a potentially destructive action in an acknowledgment window.
No matches found A Find one action completes.
Navigating CentreVu® Supervisor CentreVu CMS Administration
Using the features common to all CentreVu Supervisor windows 2-9
............................................................................................................................................................................................................................................................ Using the features common to all CentreVu Supervisor windows
Overview The features that are common to all CentreVu Supervisor windows are the system tray icon, the CentreVu Supervisor menus, and the help system. The system tray icon is covered next.
Steps ...........................................................................................................................................................................
1 Click the system tray icon to see a list of all the CentreVu Supervisor windows you have open, then select a window on the list to make it the current window.
...........................................................................................................................................................................
2 Double-click the system tray icon to make the controller the current window or to bring another window to the front.
Several icons may be displayed:
• If the CentreVu Supervisor icon is displayed, the controller is the current window.
• If the caution icon is displayed, all reports that are running with a caution condition are brought to the front.
• If the warning icon is displayed, all reports that are running with a warning condition are brought to the front.
...........................................................................................................................................................................
3 Control the sort order of the system tray icon and turn the feature on and off from Tools | Options | General.
E N D O F S T E P S...........................................................................................................................................................................

Navigating CentreVu® Supervisor CentreVu CMS Administration
Using the selector windows 2-10
............................................................................................................................................................................................................................................................Using the selector windows
Overview Selector windows take you to input and reports windows for all your actions (except scripting, which has its own button on the Commands window and on selector windows).
Selector windows typically have an Operations tab and a Reports tab. The exceptions are the Commands | Reports selector window, which has Real-Time, Historical, and Integrated tabs, and the Tools | Options window, which has General, Report Colors, Threshold Colors, Name Format, Scripting, and CMS Servers tabs.
Steps ...........................................................................................................................................................................
1 Here is an example of a selector window.
On the selector window for the action you want, check that the ACD selected in the ACD field is the one you want for this action. If not, use the down arrow to see a list of ACDs, highlight the one you want, and select OK.

Navigating CentreVu® Supervisor CentreVu CMS Administration
Using the selector windows 2-11
...........................................................................................................................................................................
2 Select a folder tab to bring the window you want to the front, then use the up and down arrow keys or your mouse to highlight the item for which you want to open an input or reports window and click OK (or choose a tab and double-click an item).
E N D O F S T E P S...........................................................................................................................................................................
Results
The input or reports window opens.
Navigating CentreVu® Supervisor CentreVu CMS Administration
Using the input windows 2-12
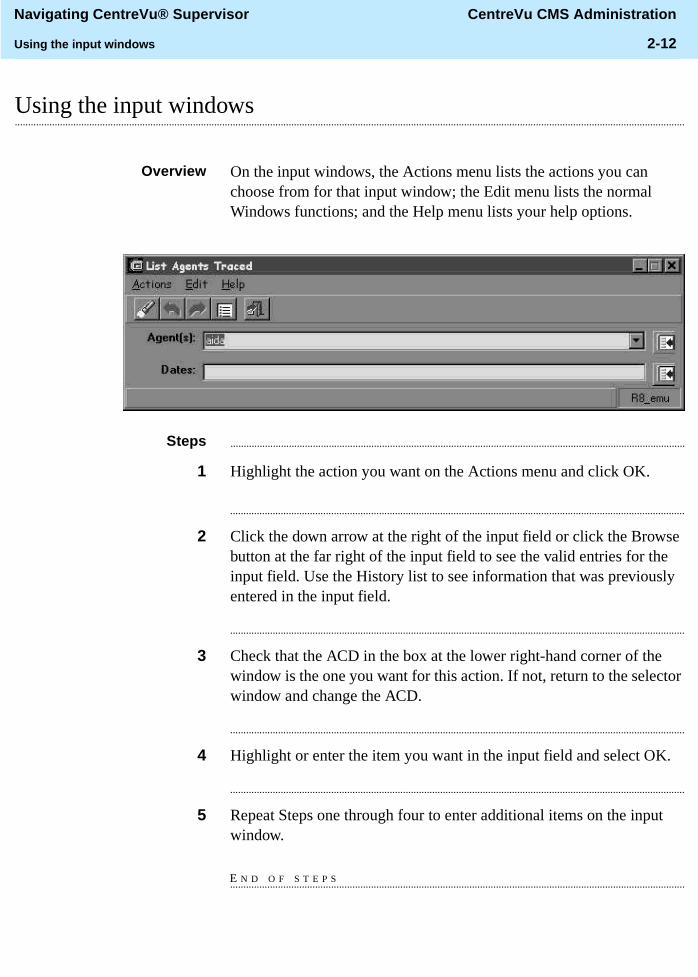
............................................................................................................................................................................................................................................................Using the input windows
Overview On the input windows, the Actions menu lists the actions you can choose from for that input window; the Edit menu lists the normal Windows functions; and the Help menu lists your help options.
Steps ...........................................................................................................................................................................
1 Highlight the action you want on the Actions menu and click OK.
...........................................................................................................................................................................
2 Click the down arrow at the right of the input field or click the Browse button at the far right of the input field to see the valid entries for the input field. Use the History list to see information that was previously entered in the input field.
...........................................................................................................................................................................
3 Check that the ACD in the box at the lower right-hand corner of the window is the one you want for this action. If not, return to the selector window and change the ACD.
...........................................................................................................................................................................
4 Highlight or enter the item you want in the input field and select OK.
...........................................................................................................................................................................
5 Repeat Steps one through four to enter additional items on the input window.
E N D O F S T E P S...........................................................................................................................................................................

Navigating CentreVu® Supervisor CentreVu CMS Administration
Using the input windows 2-13
Input window options
These additional steps may further help you use input windows:
Actions menu items
Use this option... To do this...
Menu bar Choose from a list of actions, edit options, and online help
Toolbar button Add, change, or delete your input
Input fields Type your input
History list View a list of previous inputs
Browse button Browse valid inputs
Current ACD View the ACD that your inputs apply to
Select this... To do this...
Add Add your inputs to the database
Cancel Cancel your inputs
Copy Group/Create Create a new agent group from an existing one
Delete Delete your input from the database
Exit Exit this window and other open windows
Find one Search the database for values that match the values in this window
Get contents Access the members of the agent group
List all List all values that match the values in this window
List devices List all the devices in the Maintenance Backup/Restore Devices window

Navigating CentreVu® Supervisor CentreVu CMS Administration
Using the input windows 2-14
Reference
Rules for input fields:
CentreVu CMS has three classes of input field: name (synonym), field description, and number. This section describes the rules that apply to each class.
Name (synonym)
A name (synonym) field:
• Must begin with an alphabetic character. Characters are case sensitive.
• Can be one to twenty characters. Letters, numbers, underscores ( B), blanks, commas ( ��), periods ( �), and plus signs ( �) are valid.
Pattern-matching (see below) is not allowed in a name (synonym) field, except in the Dictionary. For example, in a report input window having a Split(s)/Skill(s) field, you can type a list of splits/skills or a range of numeric splits/skills, but you cannot type 6D �.
Field description
A field description can be one to fifty characters. All keyboard characters are allowed except backslash ( ?), grave accent ( �C), tilde ( a ), double quotes ( �), pipe symbol ( _), asterisk ( ), and question mark ( �").
Select this... To do this...
Modify Change the database value to reflect your inputs
Next After you select Find One, display the next match found
Previous After you select Find One, display the previous match found
Run/Start Start the process for this window.
Select tables Select tables to back up or restore
Script Automate your activities

Navigating CentreVu® Supervisor CentreVu CMS Administration
Using the input windows 2-15
Pattern-matching
Here are some guidelines for using CentreVu CMS pattern-matching.
• If you know your entry begins with the letters “ ac,” you can type DF in a description field. The asterisk ( ) matches any number of characters that follow the “ac.” You might have several matches, no match, or only one match. If you type only an in a field, you get a list of all entries in the CentreVu CMS database for that particular field.
• You cannot use an or " to search for strings in entity name input fields that are labeled with (s) — for example, Split(s).
• A question mark ( ") matches a single character in the search pattern. So if you type �DF" in a field, the resulting matches would be items in the CentreVu CMS database that begin with DF and have three letters (for example, DFG).
• You can leave the field blank to get a list of all entries in the CentreVu CMS database for that particular field.
Number
A numeric entry can be a single item, a range, a list, or a combination of range and list.
• Type a range by placing a hyphen between items (for example, login IDs 1000–1053).
A numeric range cannot include more than 1000 numbers. For example, 1000–1999, 1050–2049, and 2000–2999 are valid, but 1000–2000 is not valid.
• Type a list by placing a semicolon between entries (for example, login IDs 1002;1100; 2022).
Navigating CentreVu® Supervisor CentreVu CMS Administration
Using the browse buttons 2-16
............................................................................................................................................................................................................................................................Using the browse buttons
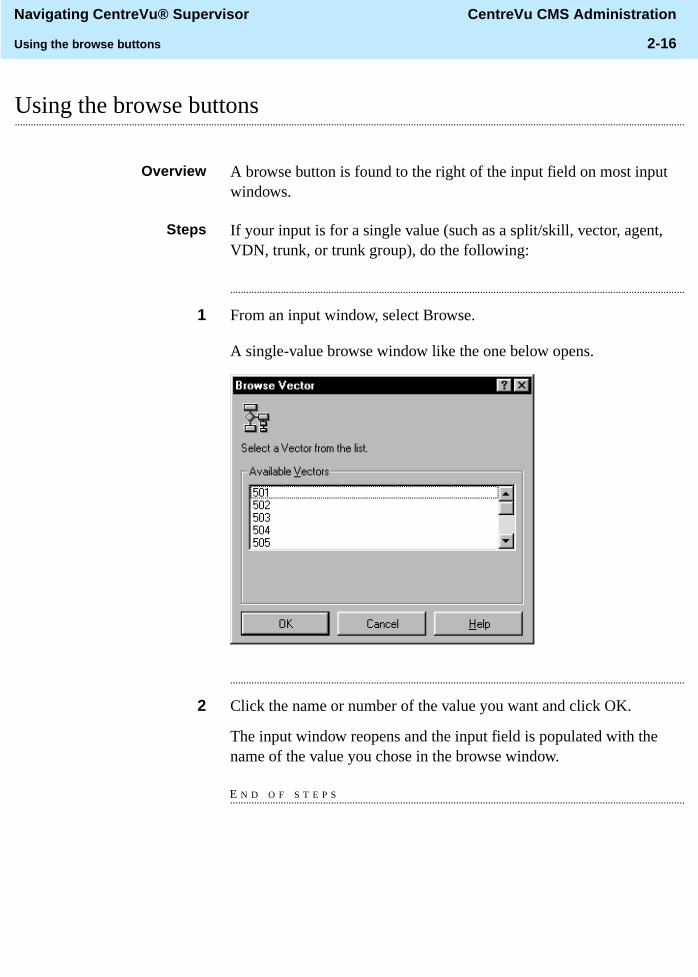
Overview A browse button is found to the right of the input field on most input windows.
Steps If your input is for a single value (such as a split/skill, vector, agent, VDN, trunk, or trunk group), do the following:
...........................................................................................................................................................................
1 From an input window, select Browse.
A single-value browse window like the one below opens.
...........................................................................................................................................................................
2 Click the name or number of the value you want and click OK.
The input window reopens and the input field is populated with the name of the value you chose in the browse window.
E N D O F S T E P S...........................................................................................................................................................................

Navigating CentreVu® Supervisor CentreVu CMS Administration
Using the browse buttons 2-17
Steps If your input is for multiple value instances of a value (such as split/skill, vector, agent, VDN, trunk, or trunk group) do the following:
...........................................................................................................................................................................
1 Select Browse.
...........................................................................................................................................................................
2 In the Choices field, click the names of the entities you want.
You can select the entities individually or select a range. To select a range:
1. Select the Range of... option.
2. In the First input field, type a beginning entity number for the range.
3. Tab to the Last input field.
4. In the Last input field, type an ending entity number for the range.
For example, if your call center has skills 1, 2, 3, 4, and 5, and you want to select all of them, you can type � in the First input field and then type � in the Last input field.

Navigating CentreVu® Supervisor CentreVu CMS Administration
Using the browse buttons 2-18
...........................................................................................................................................................................
3 Click Add after every selection (or double-click each selection on the Available list) to transfer it to the Selected list for input. Click Remove to delete a choice from the Selected list and return it to the Available list.
...........................................................................................................................................................................
4 Click OK.
E N D O F S T E P S...........................................................................................................................................................................
Results
• The entities you highlighted in the Choices field and/or the range you specified are now listed in the Selected field.
• The input window opens and the input field is populated with the names/numbers of the entities that you selected in the browse window.
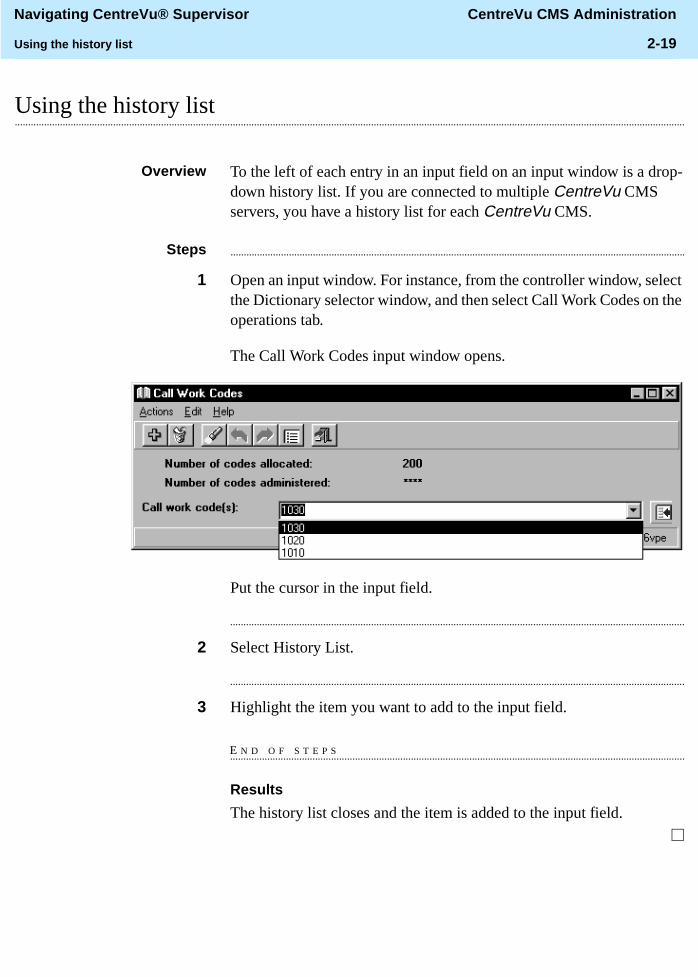
Navigating CentreVu® Supervisor CentreVu CMS Administration
Using the history list 2-19
............................................................................................................................................................................................................................................................Using the history list
Overview To the left of each entry in an input field on an input window is a drop-down history list. If you are connected to multiple CentreVu CMS servers, you have a history list for each CentreVu CMS.
Steps ...........................................................................................................................................................................
1 Open an input window. For instance, from the controller window, select the Dictionary selector window, and then select Call Work Codes on the operations tab.
The Call Work Codes input window opens.
Put the cursor in the input field.
...........................................................................................................................................................................
2 Select History List.
...........................................................................................................................................................................
3 Highlight the item you want to add to the input field.
E N D O F S T E P S...........................................................................................................................................................................
Results
The history list closes and the item is added to the input field.

Navigating CentreVu® Supervisor CentreVu CMS Administration
Task reference 2-20
............................................................................................................................................................................................................................................................Task reference
Map of the CentreVuSupervisor user interface

Task: naming your call center entities in the Dictionary CentreVu CMS Administration
3-1
3 Task: naming your call center entities in the Dictionary
............................................................................................................................................................................................................................................................Overview
Purpose In this task you will find the following procedures:
• Adding, deleting, or changing ACDs
• Creating or copying agent groups
• Viewing, listing, adding, or deleting agents in an agent group
• Changing agent string values
• Viewing, adding, or changing announcement synonyms
• Viewing, adding, deleting, or changing AUX reason code names
• Viewing, adding, or creating calculations
• Viewing, adding, deleting, or changing call work codes
• Adding constants to the database
• Defining your own database items
• Changing generic string values synonyms
• Searching the Dictionary globally
• Viewing, adding, deleting, or changing location IDs
• Viewing, adding, or changing login ID names
• Viewing, adding, or changing logout reason code names
• Viewing or changing split/skill string values
• Viewing, adding, deleting, or changing split/skill names

Task: naming your call center entities in the Dictionary CentreVu CMS Administration
3-2
• Viewing CentreVu® CMS database items
• Viewing, adding, deleting, or changing trunk group names
• Viewing or changing trunk string values
• Viewing, adding, deleting, or changing VDN names
• Viewing, adding, deleting, or changing vector names
• Running Dictionary reports
Prerequisites The following rules apply to the Dictionary:
• Names (synonyms) must begin with an alphabetic character.
• Dictionary names can have from one to 20 characters.
• Names can include the underscore (_), blank ( ), comma (,), period (.), single quotes ('), and plus sign (+). Blanks ( ) are allowed in all Dictionary names except calculation and constant names.
• Descriptions in the Dictionary can have from one to fifty characters. Descriptions can include all printable characters except the semicolon (;), backslash (\), grave accent (`), tilde (~), double quotes (“), pipe (|), asterisk (*), and question mark (?).
• Names must be unique within each section of the Dictionary. For example, you can name trunk group 1 sales and split/skill 1 sales, but you cannot name split/skill 1 sales and split/skill 2 sales.
• See the “Reference” section in “Task: navigating CentreVu Supervisor” for information on searching string fields.
Permissions These permissions apply to naming your call center entities in the Dictionary. See “Task: assigning user permissions” for more information.
• To add, delete, or change an ACD name, you need write permission for the Dictionary command and for the ACD.
• To view ACD names, you need read permission for the Dictionary command and for the ACD.
• To view agent groups, you need read permission for the Dictionary command.
• To create or copy an agent group, you need write permission for the Dictionary command.
• To view agent groups, you need read permission for the Dictionary command.

Task: naming your call center entities in the Dictionary CentreVu CMS Administration
3-3
• To add, delete, or change an agent group, you need write permission for the Dictionary command.
• To view agent string values, you need read permission for the Dictionary command.
• To change any agent string value, you need write permission for the Dictionary command.
• To add, change, or view announcements, you need read permission for the Dictionary command.
• To change any announcement, you need write permission for the Dictionary command.
• To view AUX reason code names, you need read permission for the Dictionary command.
• To add, delete, or change an AUX reason code name, you need write permission for the Dictionary command.
• To view calculations, you must have read permission for the Dictionary command.
• To change or create a new calculation, you need write permission for the Dictionary command.
• To view call work code names, you need read permission for the Dictionary command.
• To add, delete, or change a call work code name, you need write permission for the Dictionary command.
• To view a constant, you need read permission for the Dictionary command.
• To add, delete, or change a constant, you need write permission for the Dictionary command.
• To create custom database items, you need write permission for the Dictionary command .
• To view generic string values, you need read permission for the Dictionary command.
• To change any value, you need write permission for the Dictionary command.
• To search for anything in the Dictionary, you need read permission for the Dictionary command.
• To view Location IDs, you need read permission for the Dictionary command.
Task: naming your call center entities in the Dictionary CentreVu CMS Administration
3-4
• To add, delete, or modify Location IDs or agent names, you need write permission for the Dictionary command.
• To view login IDs, you need read permission for the Dictionary command.
• To add, delete, or change login IDs or agent names, you need write permission for the Dictionary command.
• To view logout reason code names, you need read permission for the Dictionary command.
• To add or change a logout reason code name, you need write permission for the Dictionary command. See “Task: assigning user permissions” for more information.
• To view split/skill string values, you need read permission for the Dictionary command.
• To change split/skill string values, you need write permission for the Dictionary command.
• To list the assigned split or skill names, you need read permission for the Dictionary command and for the appropriate split/skill.
• To add, delete, or change a split or skill name, you need write permission for the Dictionary command and the appropriate split or skill.
• To view the database items, you need read permission for the Dictionary command.
• To list the assigned trunk group names, you need read permission for the Dictionary command and for the appropriate trunk group.
• To add, delete, or change a trunk group name, you need write permission for the Dictionary command and for the appropriate trunk group.
• To view any trunk string values, you need read permission for the Dictionary command.
• To make any changes to trunk string values, you need write permission for the Dictionary command.
• To list names already assigned to VDNs, you need read permission for the Dictionary command and for the specific VDNs and other entities (split/skills, agents, etc.) whose names you want to see.
• To add, delete, or change a VDN name, you need write permission for the Dictionary command and the appropriate VDN and other entities (split/skills, agents, etc.).

Task: naming your call center entities in the Dictionary CentreVu CMS Administration
3-5
• To list assigned vector names, you need read permission for the Dictionary command and for the specific vectors whose names you want to see.
• To add, delete, or change a vector name, you need write permission for the Dictionary command and for the appropriate vector.
• To generate a report, you need read permission for the Dictionary command.
Use the steps that follow to name your call center entities in the Dictionary.

Task: naming your call center entities in the Dictionary CentreVu CMS Administration
Adding, deleting, or changing ACDs 3-6
............................................................................................................................................................................................................................................................Adding, deleting, or changing ACDs
Prerequisites Note that:
• You can add, delete, or change an ACD name regardless of the ACD you have selected. For example, you could be in ACD 1 and change the name for ACD 3. This change does not appear on the changed ACDs window border until you open a new window.
• You can only change ACDs in the selector window or during a backup. Note that if you change ACDs during a backup, you need to close and restart the backup to register the change. See “Task: maintaining CentreVu CMS” for more information on backup procedures.
Steps ...........................................................................................................................................................................
1 From the controller window, select Commands | Dictionary or select Dictionary on the toolbar.
The Dictionary selector window opens.
...........................................................................................................................................................................
2 Select ACDs.

Task: naming your call center entities in the Dictionary CentreVu CMS Administration
Adding, deleting, or changing ACDs 3-7
The ACDs input window opens.
...........................................................................................................................................................................
3 In the ACD Name box, type the ACD name you want to add, delete, or change.
...........................................................................................................................................................................
4 In the ACD Number box, type a number between one and 26 that corresponds with the name you entered in the ACD Name field.
...........................................................................................................................................................................
5 In the Description box, type descriptive information about the ACD.
...........................................................................................................................................................................
6 On the Actions menu, select Add to add your changes to the Dictionary.
E N D O F S T E P S...........................................................................................................................................................................
Reference
The name you assign to an ACD in the Dictionary displays on all reports and window titles associated with that ACD (real or pseudo).
You can script the ACDs window and schedule the script. See “Task: automating your activities with scripting” for more information.

Task: naming your call center entities in the Dictionary CentreVu CMS Administration
Creating or copying agent groups 3-8
............................................................................................................................................................................................................................................................Creating or copying agent groups
Overview You can create and copy agent groups and group agents to meet the needs of your call center regardless of split/skill assignment. For example, you can create a group for new employees or a group for employees with special skills.
Steps To create an agent group:
...........................................................................................................................................................................
1 From the controller window, select Commands | Dictionary or select Dictionary on the toolbar.
The Dictionary selector window opens.
...........................................................................................................................................................................
2 In the ACD field, select the arrow for the drop-down menu, then select the ACD for which you want to create the agent group. Select OK.
...........................................................................................................................................................................
3 Select Operations | Agent Groups.
The Agent Groups input window opens.
...........................................................................................................................................................................
4 Type a descriptive name of the agent group that you want to create.
...........................................................................................................................................................................
5 Select Add on the Actions menu or select Add on the toolbar.
E N D O F S T E P S...........................................................................................................................................................................
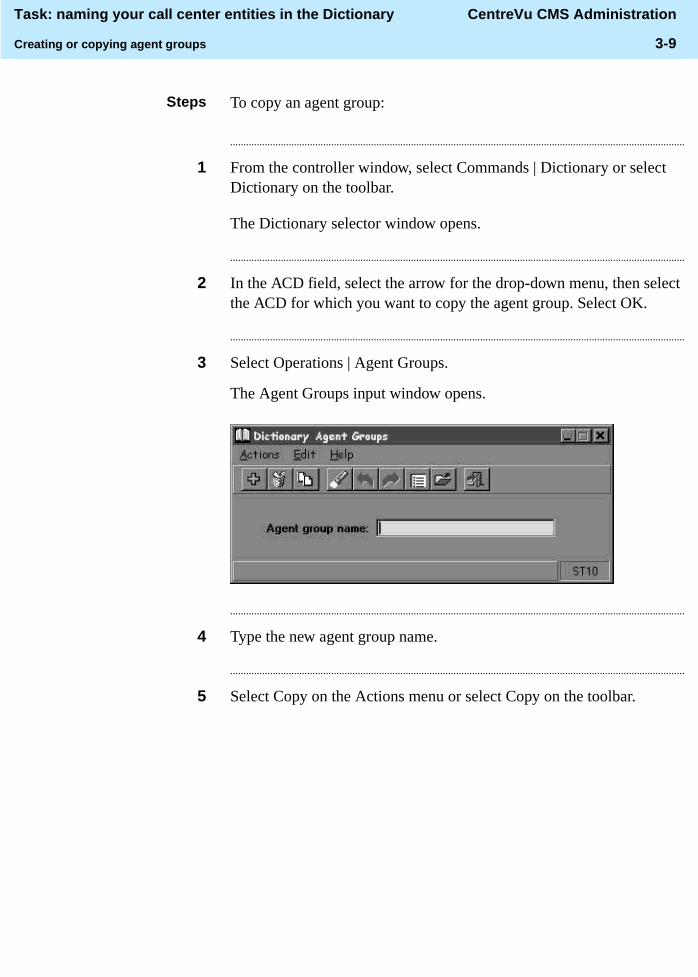
Task: naming your call center entities in the Dictionary CentreVu CMS Administration
Creating or copying agent groups 3-9
Steps To copy an agent group:
...........................................................................................................................................................................
1 From the controller window, select Commands | Dictionary or select Dictionary on the toolbar.
The Dictionary selector window opens.
...........................................................................................................................................................................
2 In the ACD field, select the arrow for the drop-down menu, then select the ACD for which you want to copy the agent group. Select OK.
...........................................................................................................................................................................
3 Select Operations | Agent Groups.
The Agent Groups input window opens.
...........................................................................................................................................................................
4 Type the new agent group name.
...........................................................................................................................................................................
5 Select Copy on the Actions menu or select Copy on the toolbar.
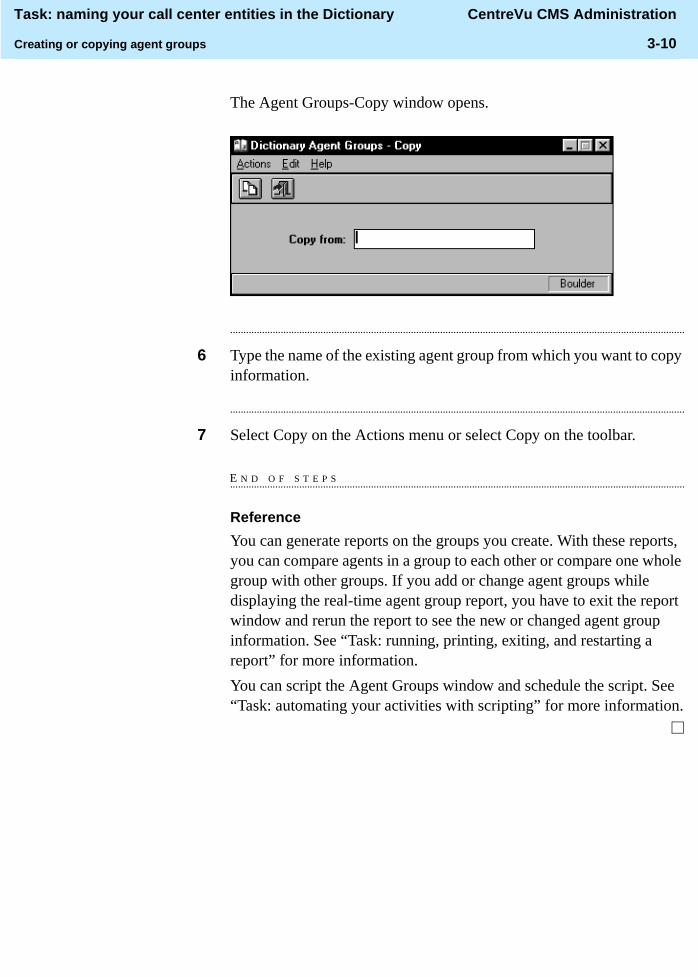
Task: naming your call center entities in the Dictionary CentreVu CMS Administration
Creating or copying agent groups 3-10
The Agent Groups-Copy window opens.
...........................................................................................................................................................................
6 Type the name of the existing agent group from which you want to copy information.
...........................................................................................................................................................................
7 Select Copy on the Actions menu or select Copy on the toolbar.
E N D O F S T E P S...........................................................................................................................................................................
Reference
You can generate reports on the groups you create. With these reports, you can compare agents in a group to each other or compare one whole group with other groups. If you add or change agent groups while displaying the real-time agent group report, you have to exit the report window and rerun the report to see the new or changed agent group information. See “Task: running, printing, exiting, and restarting a report” for more information.
You can script the Agent Groups window and schedule the script. See “Task: automating your activities with scripting” for more information.

Task: naming your call center entities in the Dictionary CentreVu CMS Administration
Viewing, listing, adding, or deleting agents in an agent group 3-11
............................................................................................................................................................................................................................................................Viewing, listing, adding, or deleting agents in an agent group
Overview You can list and view all agents in an agent group and assign an agent to a new or existing agent group.
Steps To list and view all agents in an agent group:
...........................................................................................................................................................................
1 From the controller window, choose Commands | Dictionary or select Dictionary on the toolbar.
The Dictionary selector window opens.
...........................................................................................................................................................................
2 Select Operations | Agent Groups.
The Agent Groups input window opens.
...........................................................................................................................................................................
3 In the Agent group name field, type the name of the agent group for which you want to list and view the agents.
...........................................................................................................................................................................
4 Select Get contents on the Actions menu or select Get contents on the toolbar.

Task: naming your call center entities in the Dictionary CentreVu CMS Administration
Viewing, listing, adding, or deleting agents in an agent group 3-12
The Agent Groups – Get Contents window opens.
...........................................................................................................................................................................
5 Select List all on the Actions menu or on the toolbar.
The Agent Groups – List All window opens, showing the list of all agents in the agent group you chose in Step 3.
...........................................................................................................................................................................
6 When you are done viewing the agents, close the window.
E N D O F S T E P S...........................................................................................................................................................................
Steps To add agents to an agent group:
...........................................................................................................................................................................
1 From the controller window, select Commands | Dictionary or select Dictionary on the toolbar.
The Dictionary selector window opens.
...........................................................................................................................................................................
2 Select Operations | Agent Groups.

Task: naming your call center entities in the Dictionary CentreVu CMS Administration
Viewing, listing, adding, or deleting agents in an agent group 3-13
The Agent Groups input window opens.
...........................................................................................................................................................................
3 In the Agent group name box, type the name of the agent group to which you want to add agents.
...........................................................................................................................................................................
4 Select Get Contents on the Actions menu or on the toolbar.
The Agent Groups – Get Contents window opens.
...........................................................................................................................................................................
5 In the Login IDs field, type the agent login IDs to add to this agent group.
...........................................................................................................................................................................
6 Select Add on the Actions menu or on the toolbar.
E N D O F S T E P S...........................................................................................................................................................................
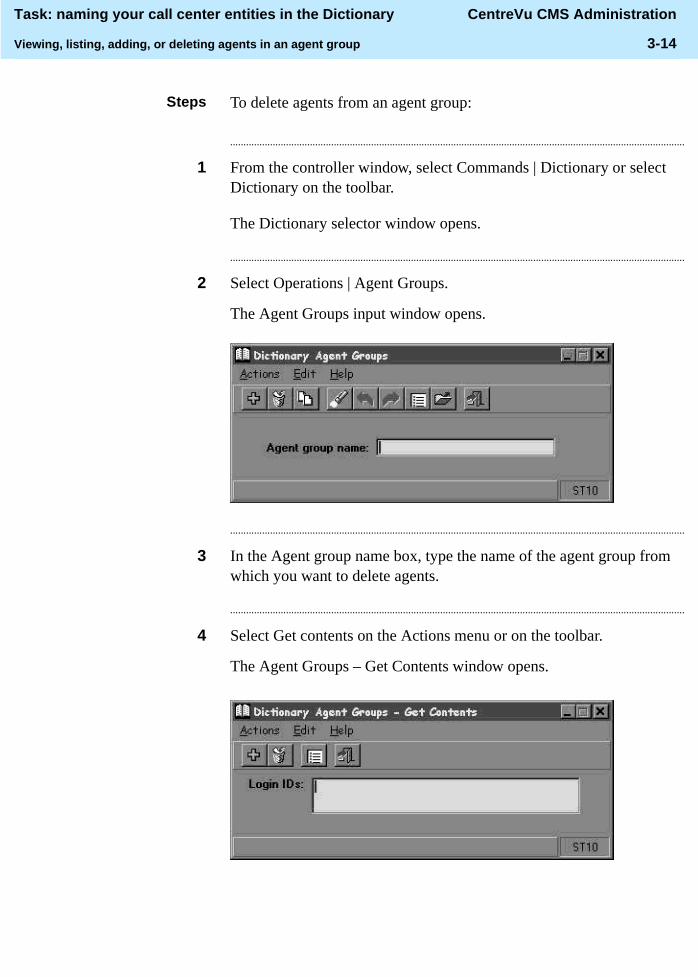
Task: naming your call center entities in the Dictionary CentreVu CMS Administration
Viewing, listing, adding, or deleting agents in an agent group 3-14
Steps To delete agents from an agent group:
...........................................................................................................................................................................
1 From the controller window, select Commands | Dictionary or select Dictionary on the toolbar.
The Dictionary selector window opens.
...........................................................................................................................................................................
2 Select Operations | Agent Groups.
The Agent Groups input window opens.
...........................................................................................................................................................................
3 In the Agent group name box, type the name of the agent group from which you want to delete agents.
...........................................................................................................................................................................
4 Select Get contents on the Actions menu or on the toolbar.
The Agent Groups – Get Contents window opens.

Task: naming your call center entities in the Dictionary CentreVu CMS Administration
Viewing, listing, adding, or deleting agents in an agent group 3-15
...........................................................................................................................................................................
5 In the Login IDs field, type the agent login IDs you want to delete from this agent group.
...........................................................................................................................................................................
6 Select Delete on the Actions menu or select Delete on the toolbar.
...........................................................................................................................................................................
7 When you are done deleting the agents, close the window.
E N D O F S T E P S...........................................................................................................................................................................

Task: naming your call center entities in the Dictionary CentreVu CMS Administration
Changing agent string values 3-16
............................................................................................................................................................................................................................................................Changing agent string values
Overview Agent string values are the descriptive words in reports dealing with agents. These words, such as ACD, ACW, or AUX, describe the value of the data. Strings are changed to the values you administer when they display as data in a report. The report heading is not affected.
Steps ...........................................................................................................................................................................
1 From the controller window, select Commands | Dictionary or select Dictionary on the toolbar.
The Dictionary selector window opens.
...........................................................................................................................................................................
2 Select Operations | Agent String Values.

Task: naming your call center entities in the Dictionary CentreVu CMS Administration
Changing agent string values 3-17
The Agent String Values input window opens.
...........................................................................................................................................................................
3 To change any of the work-mode default names, type the new descriptive word in the appropriate work mode field. Agents can be in any one of the following work modes:
• ACD — the agent is on an ACD call.
• ACW — the agent is in the after-call work mode.
• AUX — the agent is in the auxiliary work mode.
• AVAIL — the agent is available to take an ACD call.
Task: naming your call center entities in the Dictionary CentreVu CMS Administration
Changing agent string values 3-18
• DACD — the agent is on a direct agent ACD call.
• DACW — the agent is in the after-call work mode for a direct agent ACD call.
• OTHER — the agent has just logged in and CentreVu CMS has not yet been notified of the agent's state, or the agent is dialing to place an extension call while in auto-in/manual-in (AI/MI), or the agent is in AI/MI and has an extension call ringing, or the agent has put a call on hold and has taken no further call-related action.
• RINGING — an ACD call is ringing at the agent's voice terminal and the agent is not doing anything else.
• UNKNOWN — CentreVu CMS does not recognize the current state.
• UNSTAFF — the agent is not logged in (is not staffed).
...........................................................................................................................................................................
4 To change the agent trace, work-mode default names, type the new descriptive word next to LOGON or LOGOFF.
• LOGON — an agent is logged in.
• LOGOFF — an agent is logged out and is not available to take ACD calls.
...........................................................................................................................................................................
5 To change the call-handling preference default names, type the new descriptive word next to LEVEL or NEED or PERCENT.
• LEVEL — the agent's call-handling preference is by skill level.
• NEED — the agent's call-handling preference is by greatest need.
• PERCENT — the agent's call-handling preference is based on an assigned percentage of time allocated to each skill.

Task: naming your call center entities in the Dictionary CentreVu CMS Administration
Changing agent string values 3-19
...........................................................................................................................................................................
6 To change the reserve-level default names, type the new descriptive word next to Reserve1 or Reserve2.
• Reserve1 — the agent begins answering calls when the skill's 1st threshold is crossed.
• Reserve2 — the agent begins answering calls when the skill's second threshold is crossed.
...........................................................................................................................................................................
7 To change the call-direction default names, type the new descriptive word next to IN or OUT.
• IN — the agent is on an incoming call.
• OUT — the agent is on an outbound call.
...........................................................................................................................................................................
8 To change the call-origination default names, type the new descriptive word next to PHONE or KEYBOARD. Agents can be on either of the following types of outbound calls:
• PHONE — the agent dialed an outbound call using the voice terminal dial pad.
• KEYBOARD — the agent dialed an outbound call using the computer keyboard.
...........................................................................................................................................................................
9 To change the call-destination default names, type the new descriptive word next to PBX or OFF.
• PBX — internal to the switch.
• OFF — external to the switch.
...........................................................................................................................................................................
10 To change the agent role default names, type the new descriptive word next to TOP, ALLOCATED, BACKUP, ROVING, and RESERVE.
• TOP — the agent can be counted on to answer the skill's calls (unless an agent's other skills go into overload).
• ALLOCATED — the agent has a percentage of his/her time allocated to answering the skill's calls.

Task: naming your call center entities in the Dictionary CentreVu CMS Administration
Changing agent string values 3-20
• BACKUP — the agent helps to answer the skill's calls when his/her top skill is not busy.
• ROVING — the agent answers a skill's calls when this skill has the greatest need.
• RESERVE — the agent helps answer the skill's calls when the skill is over threshold. These roles vary according to call-handling preference.
E N D O F S T E P S...........................................................................................................................................................................
Reference
If you assign values that are longer than 20 characters, the values are truncated when they are displayed on those reports. You can, however, create a similar custom report that accommodates the longer string values.
Any change to the agent string values affects what you see in the descriptive data (word) fields on your agent reports. See “Task: running, printing, exiting, and restarting a report” for more information.
You can script the Agent String Values window and schedule the script. See “Task: automating your activities with scripting” for more information.

Task: naming your call center entities in the Dictionary CentreVu CMS Administration
Viewing, adding, or changing announcement synonyms 3-21
............................................................................................................................................................................................................................................................Viewing, adding, or changing announcement synonyms
Overview You can view, add, or change announcement synonyms for each ACD.
Prerequisites Note that:
• Announcement names must be unique.
• Multiple values are not allowed for announcement names or numbers.
Steps ...........................................................................................................................................................................
1 From the controller window, select Commands | Dictionary or select Dictionary on the toolbar.
The Dictionary selector window opens.
...........................................................................................................................................................................
2 On the Operations tab, select Announcements.
The Announcements input window opens.
...........................................................................................................................................................................
3 In the Announcement Name field, type the name that you want to view, add, or change.
...........................................................................................................................................................................
4 In the Announcement Number field, type the number that corresponds to the name you typed in the Announcement Name box.

Task: naming your call center entities in the Dictionary CentreVu CMS Administration
Viewing, adding, or changing announcement synonyms 3-22
...........................................................................................................................................................................
5 In the Description field, type the descriptive information for the announcements.
...........................................................................................................................................................................
6 On the Actions menu, select Add to add your changes to the Dictionary.
E N D O F S T E P S...........................................................................................................................................................................

Task: naming your call center entities in the Dictionary CentreVu CMS Administration
Viewing, adding, deleting, or changing AUX reason code names 3-23
............................................................................................................................................................................................................................................................Viewing, adding, deleting, or changing AUX reason code names
Overview AUX reason codes enable a call center to track an agent’s time when the agent is in the AUX work mode. You can view, add, delete, or change AUX reason code names by selecting AUX Reason Codes from the Dictionary menu.
Complete the AUX Reason Codes window if you want names associated with your AUX reason codes to appear in the AUX Reasons Code standard real-time and historical reports.
Prerequisites Note that:
• AUX reason codes are single digits, zero through nine.
• AUX reason code names can be up to 20 characters long.
• AUX reason code 0 is used for cases in which the switch automatically puts an agent into AUX work mode. You can change this name.
• To use AUX reason codes, your switch must have EAS.
• Names must be unique within an ACD. No two AUX reason codes in the same ACD can have the same name.
Steps ...........................................................................................................................................................................
1 From the controller window, select Commands | Dictionary or select Dictionary on the toolbar.
The Dictionary selector window opens.
...........................................................................................................................................................................
2 Select Operations | AUX Reason Codes.
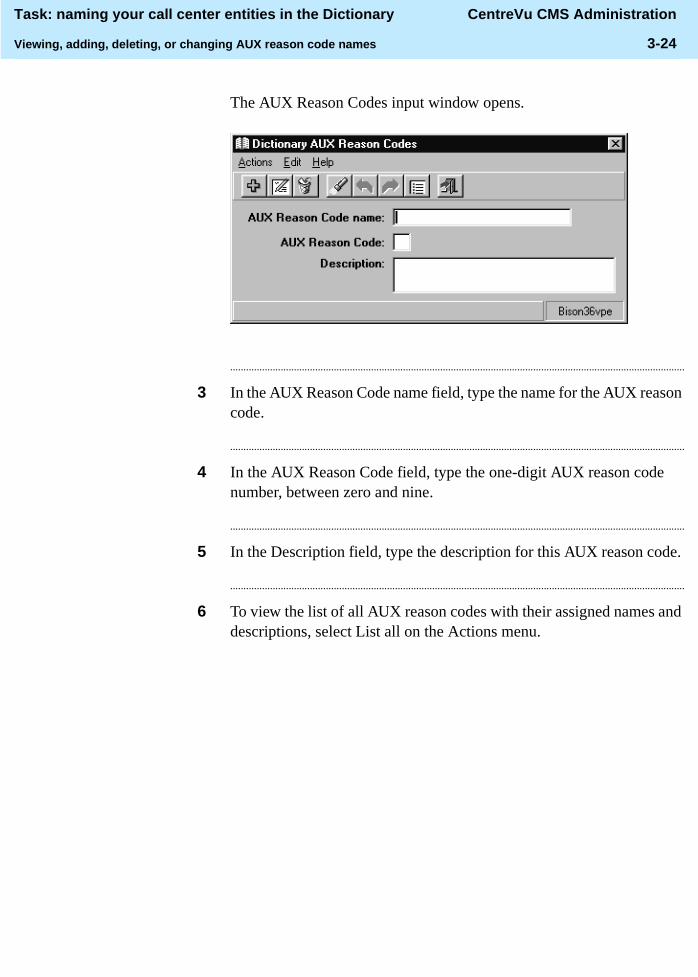
Task: naming your call center entities in the Dictionary CentreVu CMS Administration
Viewing, adding, deleting, or changing AUX reason code names 3-24
The AUX Reason Codes input window opens.
...........................................................................................................................................................................
3 In the AUX Reason Code name field, type the name for the AUX reason code.
...........................................................................................................................................................................
4 In the AUX Reason Code field, type the one-digit AUX reason code number, between zero and nine.
...........................................................................................................................................................................
5 In the Description field, type the description for this AUX reason code.
...........................................................................................................................................................................
6 To view the list of all AUX reason codes with their assigned names and descriptions, select List all on the Actions menu.

Task: naming your call center entities in the Dictionary CentreVu CMS Administration
Viewing, adding, deleting, or changing AUX reason code names 3-25
The AUX Reason Codes – List All window opens.
...........................................................................................................................................................................
7 When you are done viewing AUX reason code names, close the window.
E N D O F S T E P S...........................................................................................................................................................................
Reference
AUX reason code names display on real-time reports that include the agent state. AUX reason code names also display on report showing numbers of agents in each AUX reason code. If you make changes to AUX reason code names, you must rerun the report to see the changes. See “Task: running, printing, exiting, and restarting a report” for more information.
Interval, daily, weekly, and monthly historical reports are available for AUX reason codes. The AUX reason code names are used in standard reports. If you make any changes to AUX reason code names, you must rerun the report to see the changes. See “Task: running, printing, exiting, and restarting a report” for more information.
You can script the AUX Reason Codes window and schedule the script. See “Task: automating your activities with scripting” for more information.
Agent exception historical reports use the names administered for the AUX reason codes when agent time in AUX exceptions has been recorded. The real-time exceptions log displays AUX reason code names when it logs agent time in AUX exceptions. See “Task: administering exceptions” for more information.

Task: naming your call center entities in the Dictionary CentreVu CMS Administration
Viewing, adding, or creating calculations 3-26
............................................................................................................................................................................................................................................................Viewing, adding, or creating calculations
Overview Calculation names are abbreviated names for calculations that are used to create reports. You can view or change standard calculations or create your own custom calculations to use in custom reports. The calculations for standard reports are already in the Dictionary.
Prerequisites Note that:
• Reports will not run if you embed calculations within calculations to more than three levels deep.
• You cannot delete standard calculations.
• Identify your own calculations in all lowercase letters to distinguish them from the standard CentreVu CMS calculations, which are in all uppercase letters.
• You may adversely affect standard reports if you change a standard CentreVu CMS calculation. Reports will probably run, but the results may be different from those expected.
• Reports will not run if you create calculations that reference each other in a circular fashion.
Steps ...........................................................................................................................................................................
1 From the controller window, select Commands | Dictionary or select Dictionary on the toolbar.
The Dictionary selector window opens.
...........................................................................................................................................................................
2 Select Operations | Calculations.
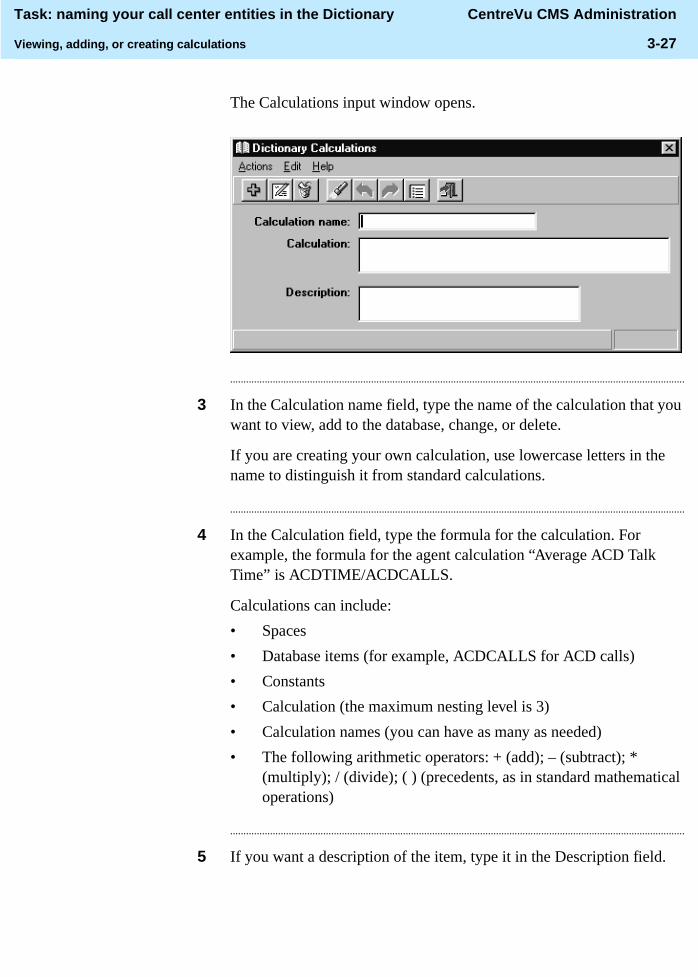
Task: naming your call center entities in the Dictionary CentreVu CMS Administration
Viewing, adding, or creating calculations 3-27
The Calculations input window opens.
...........................................................................................................................................................................
3 In the Calculation name field, type the name of the calculation that you want to view, add to the database, change, or delete.
If you are creating your own calculation, use lowercase letters in the name to distinguish it from standard calculations.
...........................................................................................................................................................................
4 In the Calculation field, type the formula for the calculation. For example, the formula for the agent calculation “Average ACD Talk Time” is ACDTIME/ACDCALLS.
Calculations can include:
• Spaces
• Database items (for example, ACDCALLS for ACD calls)
• Constants
• Calculation (the maximum nesting level is 3)
• Calculation names (you can have as many as needed)
• The following arithmetic operators: + (add); – (subtract); * (multiply); / (divide); ( ) (precedents, as in standard mathematical operations)
...........................................................................................................................................................................
5 If you want a description of the item, type it in the Description field.

Task: naming your call center entities in the Dictionary CentreVu CMS Administration
Viewing, adding, or creating calculations 3-28
...........................................................................................................................................................................
6 On the Actions menu, select Add to add your changes to the Dictionary.
E N D O F S T E P S...........................................................................................................................................................................
Reference
You can script the Calculations window and schedule the script. See “Task: automating your activities with scripting” for more information.
The standard CentreVu CMS calculations are listed in CentreVu CMS Report Designer Version 8 User Guide585-215-859 , CentreVu CMS Reports 585-215-851, and CentreVu CMS R3V5 Custom Reports585-215-822.
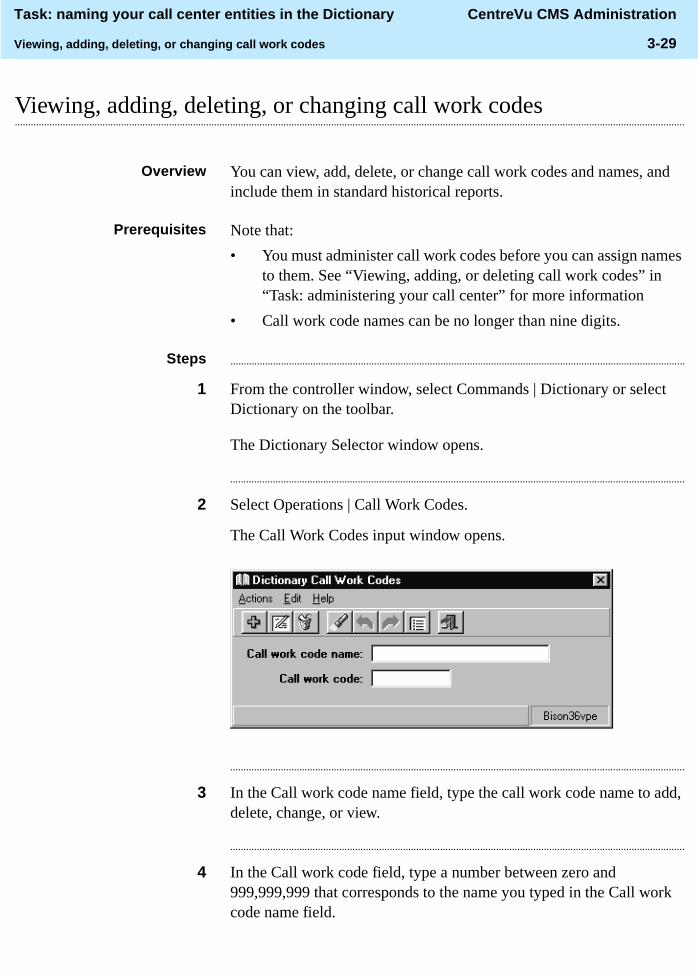
Task: naming your call center entities in the Dictionary CentreVu CMS Administration
Viewing, adding, deleting, or changing call work codes 3-29
............................................................................................................................................................................................................................................................Viewing, adding, deleting, or changing call work codes
Overview You can view, add, delete, or change call work codes and names, and include them in standard historical reports.
Prerequisites Note that:
• You must administer call work codes before you can assign names to them. See “Viewing, adding, or deleting call work codes” in “Task: administering your call center” for more information
• Call work code names can be no longer than nine digits.
Steps ...........................................................................................................................................................................
1 From the controller window, select Commands | Dictionary or select Dictionary on the toolbar.
The Dictionary Selector window opens.
...........................................................................................................................................................................
2 Select Operations | Call Work Codes.
The Call Work Codes input window opens.
...........................................................................................................................................................................
3 In the Call work code name field, type the call work code name to add, delete, change, or view.
...........................................................................................................................................................................
4 In the Call work code field, type a number between zero and 999,999,999 that corresponds to the name you typed in the Call work code name field.
Task: naming your call center entities in the Dictionary CentreVu CMS Administration
Viewing, adding, deleting, or changing call work codes 3-30
...........................................................................................................................................................................
5 On the Actions menu, select Add to add your changes to the Dictionary.
E N D O F S T E P S...........................................................................................................................................................................
Reference
Call work code 0 is reserved for unknown/unadministered work codes so that summary data can be collected. The default name for call work code 0 is Unadministered codes. You can change this name.
Daily, weekly, and monthly historical reports are available for call work codes. The names you add in the Call Work Codes window are displayed in the call work codes reports. See “Task: running, printing, exiting, and restarting a report” for more information.
You can script the Call Work Codes window and schedule the script. See “Task: automating your activities with scripting” for more information.

Task: naming your call center entities in the Dictionary CentreVu CMS Administration
Adding constants to the database 3-31
............................................................................................................................................................................................................................................................Adding constants to the database
Overview Constants are elements with fixed numerical values that you can add to the database and use in custom reports. Constants are not in CentreVu CMS when it is first installed.
Steps ...........................................................................................................................................................................
1 From the controller window, select Commands | Dictionary or select Dictionary on the toolbar.
The Dictionary selector window opens.
...........................................................................................................................................................................
2 Select Operations | Constants.
The Constants input window opens.
...........................................................................................................................................................................
3 In the Constant name field, type the name of the constant that you want to view, add, delete, or change.
...........................................................................................................................................................................
4 In the Value field, type the numerical value of the constant. The range is –99999 to +99999.
...........................................................................................................................................................................
5 In the Description field, type a description of the constant.
Task: naming your call center entities in the Dictionary CentreVu CMS Administration
Adding constants to the database 3-32
...........................................................................................................................................................................
6 On the Actions menu, select Add to add your changes to the Dictionary.
E N D O F S T E P S...........................................................................................................................................................................
Reference
Use constants only in designer or custom reports.
You can script the Constants window and schedule the script. See “Task: automating your activities with scripting” for more information.
See the CentreVu Report Designer Version 8 User Guide 585-210-930 and CentreVu CMS Custom Reports 585-215-822, Issue 2 for more information.
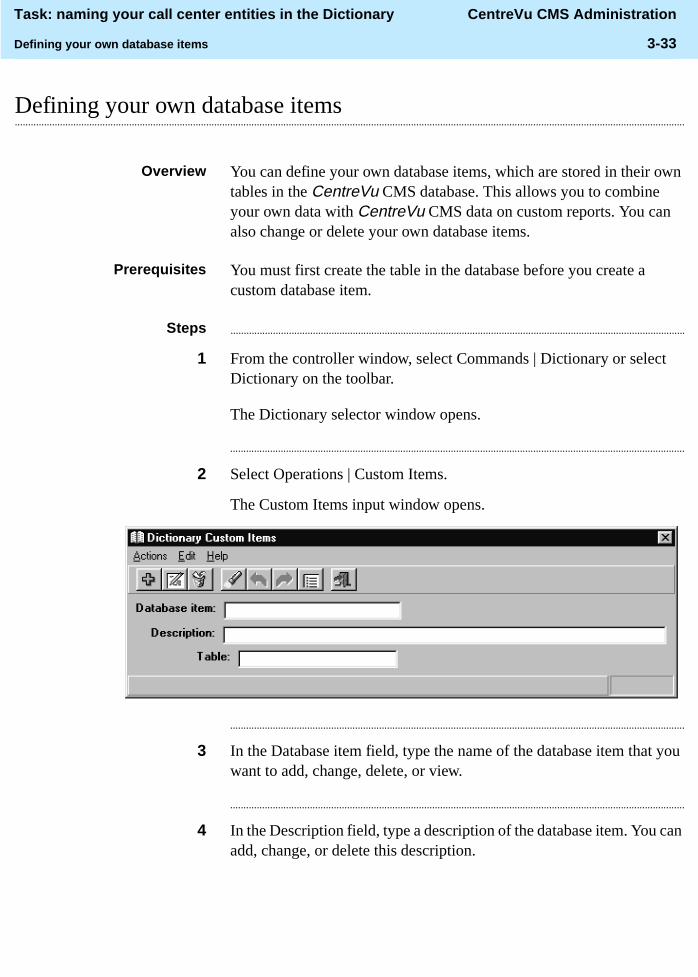
Task: naming your call center entities in the Dictionary CentreVu CMS Administration
Defining your own database items 3-33
............................................................................................................................................................................................................................................................Defining your own database items
Overview You can define your own database items, which are stored in their own tables in the CentreVu CMS database. This allows you to combine your own data with CentreVu CMS data on custom reports. You can also change or delete your own database items.
Prerequisites You must first create the table in the database before you create a custom database item.
Steps ...........................................................................................................................................................................
1 From the controller window, select Commands | Dictionary or select Dictionary on the toolbar.
The Dictionary selector window opens.
...........................................................................................................................................................................
2 Select Operations | Custom Items.
The Custom Items input window opens.
...........................................................................................................................................................................
3 In the Database item field, type the name of the database item that you want to add, change, delete, or view.
...........................................................................................................................................................................
4 In the Description field, type a description of the database item. You can add, change, or delete this description.

Task: naming your call center entities in the Dictionary CentreVu CMS Administration
Defining your own database items 3-34
...........................................................................................................................................................................
5 In the Table field, type the name of the table that holds this database item.
...........................................................................................................................................................................
6 On the Actions menu, select Add to add your changes to the Dictionary.
E N D O F S T E P S...........................................................................................................................................................................
Reference
If you try to run a designer or custom report that uses a database item you have not added to the Dictionary, you will get an error message.
You can script the Custom Items window and schedule the script. See “Task: automating your activities with scripting” for more information.
See CentreVu Report Designer Version 8 User Guide 585-210-930 and CentreVu CMS Custom Reports 585-215-822, Issue 2 for more information on using and creating your own custom database items.

Task: naming your call center entities in the Dictionary CentreVu CMS Administration
Changing generic string values synonyms 3-35
............................................................................................................................................................................................................................................................Changing generic string values synonyms
Overview Follow these steps to designate a character for YES or NO in the Dictionary, and that character will appear on custom reports that use the new YES/NO synonyms.
Steps ...........................................................................................................................................................................
1 From the controller window, select Commands | Dictionary or select Dictionary on the toolbar.
The Dictionary selector window opens.
...........................................................................................................................................................................
2 Select Operations | Generic String Values.
The Generic String Values input window opens.
...........................................................................................................................................................................
3 To change the Generic Value for each ACD, type a character for YES or NO or both in the Generic Value field.
• For YES, type a character to display in reports for boxes that use YES/NO. If you have not input a string, the default value is y.
• For NO, type a character to display in reports for fields that use YES/NO. If you have not input a string, the default value is n.
Remember that the input window fields YES and NO must be exactly one character each, with defaults y and n, respectively.
...........................................................................................................................................................................
4 On the Actions menu, select Add to add your changes to the Dictionary.
E N D O F S T E P S...........................................................................................................................................................................
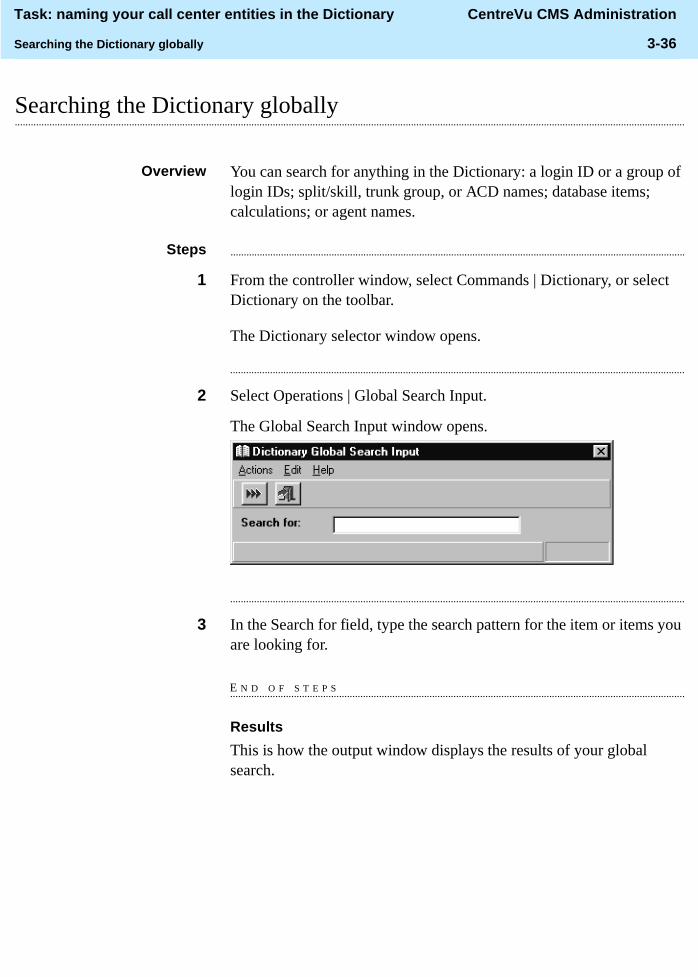
Task: naming your call center entities in the Dictionary CentreVu CMS Administration
Searching the Dictionary globally 3-36
............................................................................................................................................................................................................................................................Searching the Dictionary globally
Overview You can search for anything in the Dictionary: a login ID or a group of login IDs; split/skill, trunk group, or ACD names; database items; calculations; or agent names.
Steps ...........................................................................................................................................................................
1 From the controller window, select Commands | Dictionary, or select Dictionary on the toolbar.
The Dictionary selector window opens.
...........................................................................................................................................................................
2 Select Operations | Global Search Input.
The Global Search Input window opens.
...........................................................................................................................................................................
3 In the Search for field, type the search pattern for the item or items you are looking for.
E N D O F S T E P S...........................................................................................................................................................................
Results
This is how the output window displays the results of your global search.
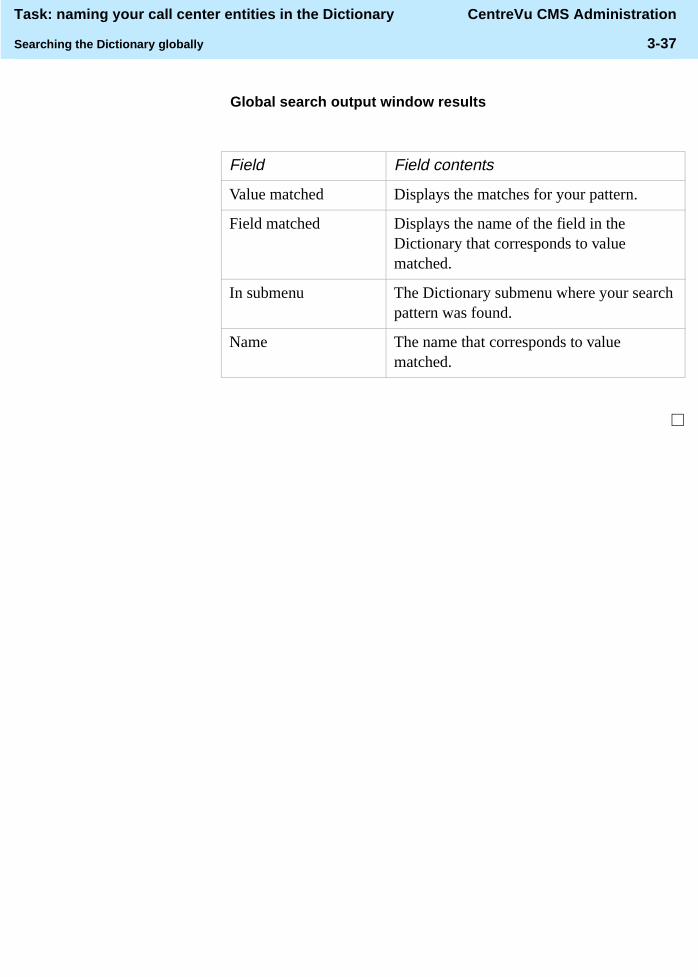
Task: naming your call center entities in the Dictionary CentreVu CMS Administration
Searching the Dictionary globally 3-37
Global search output window results
Field Field contents
Value matched Displays the matches for your pattern.
Field matched Displays the name of the field in the Dictionary that corresponds to value matched.
In submenu The Dictionary submenu where your search pattern was found.
Name The name that corresponds to value matched.
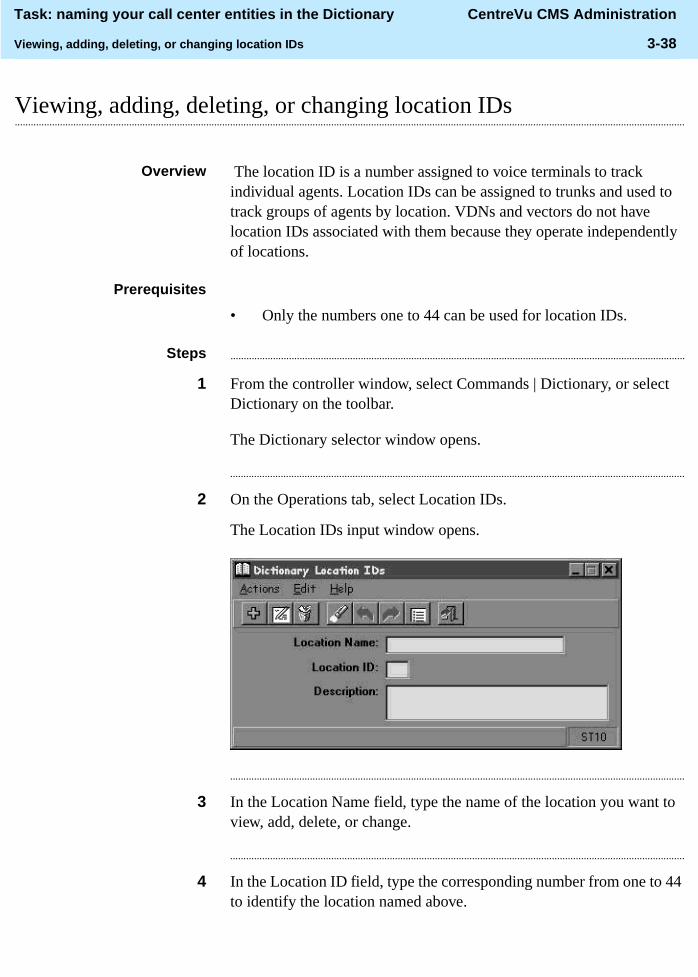
Task: naming your call center entities in the Dictionary CentreVu CMS Administration
Viewing, adding, deleting, or changing location IDs 3-38
............................................................................................................................................................................................................................................................Viewing, adding, deleting, or changing location IDs
Overview The location ID is a number assigned to voice terminals to track individual agents. Location IDs can be assigned to trunks and used to track groups of agents by location. VDNs and vectors do not have location IDs associated with them because they operate independently of locations.
Prerequisites
• Only the numbers one to 44 can be used for location IDs.
Steps ...........................................................................................................................................................................
1 From the controller window, select Commands | Dictionary, or select Dictionary on the toolbar.
The Dictionary selector window opens.
...........................................................................................................................................................................
2 On the Operations tab, select Location IDs.
The Location IDs input window opens.
...........................................................................................................................................................................
3 In the Location Name field, type the name of the location you want to view, add, delete, or change.
...........................................................................................................................................................................
4 In the Location ID field, type the corresponding number from one to 44 to identify the location named above.
Task: naming your call center entities in the Dictionary CentreVu CMS Administration
Viewing, adding, deleting, or changing location IDs 3-39
...........................................................................................................................................................................
5 In the Description field, type pertinent information about the location. This is for information only. It is not displayed elsewhere in the system or on reports other than List All or Find One operations in this window.
...........................................................................................................................................................................
6 On the Actions menu, select Add to add your changes to the Dictionary.
E N D O F S T E P S...........................................................................................................................................................................
Reference
You can script the Location ID window and schedule the script. See “Task: Automating your activities with scripting” for more information.
Location IDs are used in three reports: the Historical Split/Skill by Location report, the Agent Status by Location report, and the Real-time Split/Skill by Location report. See “Task: running, printing, exiting, and restarting a report” for more information.

Task: naming your call center entities in the Dictionary CentreVu CMS Administration
Viewing, adding, or changing login ID names 3-40
............................................................................................................................................................................................................................................................Viewing, adding, or changing login ID names
Overview CentreVu CMS uses agent login IDs to identify measured ACD agents. After an agent’s name is assigned to a login ID, CentreVu CMS windows and reports show that agent’s name instead of the login ID number.
You do not have to input agent names in the Dictionary, but CentreVu CMS administration windows and reports are easier to understand with agent names instead of login IDs. Depending on the amount of space in the report, agent names can be truncated.
Prerequisites Note that:
• The CentreVu CMS Dictionary listings are sorted alphabetically (collating sequence) based on the first character you input in the Agent name field. For example, if the agent is listed as Jane Brown, CentreVu CMS sorts on the J for Jane; it does not sort on the B for Brown. Real-time reports, however, do not show agent names alphabetically.
• You can assign no more than one agent name to the same login ID.
• You cannot assign the same agent name to multiple login IDs.
• You can use only numbers in login IDs.
• CentreVu CMS only recognizes login IDs in DEFINITY® R8.1 or later.
Steps ...........................................................................................................................................................................
1 From the controller window, select Commands | Dictionary or select Dictionary on the toolbar.
The Dictionary selector window opens.
...........................................................................................................................................................................
2 On the Operations tab, select Login Identifications.

Task: naming your call center entities in the Dictionary CentreVu CMS Administration
Viewing, adding, or changing login ID names 3-41
The Login Identifications input window opens.
...........................................................................................................................................................................
3 In the Login ID field, type the login ID number to view, add, delete, or change.
Login IDs for DEFINITY ECS/Generic 3 without EAS can be a number with one to nine digits — for example:
1 (1-digit logins) 423 (3-digit logins) 1234567 (7-digit logins) 999,999,999 (9-digit logins)
...........................................................................................................................................................................
4 In the Agent Name field, type the name of the agent that corresponds to the login ID.
The Login Identifications List All window shows names alphabetically (collating sequence), based on the first character you type in the Agent Name field.
...........................................................................................................................................................................
5 On the Actions menu, select Add to add your changes to the Dictionary.
E N D O F S T E P S...........................................................................................................................................................................

Task: naming your call center entities in the Dictionary CentreVu CMS Administration
Viewing, adding, or changing login ID names 3-42
Reference
If you assign names to the login IDs, agent names display on reports. If you make additions or changes to login IDs, you must exit the report and then rerun the report to see the new agent names. See “Task: running, printing, exiting, and restarting a report” for more information.
You can script the Login Identifications window and schedule the script. See “Task: automating your activities with scripting” for more information.

Task: naming your call center entities in the Dictionary CentreVu CMS Administration
Viewing, adding, or changing logout reason code names 3-43
............................................................................................................................................................................................................................................................Viewing, adding, or changing logout reason code names
Overview Logout reason codes enable an agent to give the reason for logging out, such as training or the end of a shift.
You can add, change, or view logout reason codes and their names. These names display in the standard agent login/logout and agent trace historical reports.
Prerequisites Note that:
• Logout reason codes are single digits, zero through nine. A zero is used when the system logs an agent out or if the agent does not specify a code. You can change the assigned default name.
• Logout reason code names can be up to 20 characters long.
• To use logout reason codes, your switch must have EAS.
Steps ...........................................................................................................................................................................
1 From the controller window, select Commands | Dictionary or select Dictionary on the toolbar.
The Dictionary selector window opens.
...........................................................................................................................................................................
2 Select Operations | Logout Reason Codes.
The Logout Reason Codes input window opens.
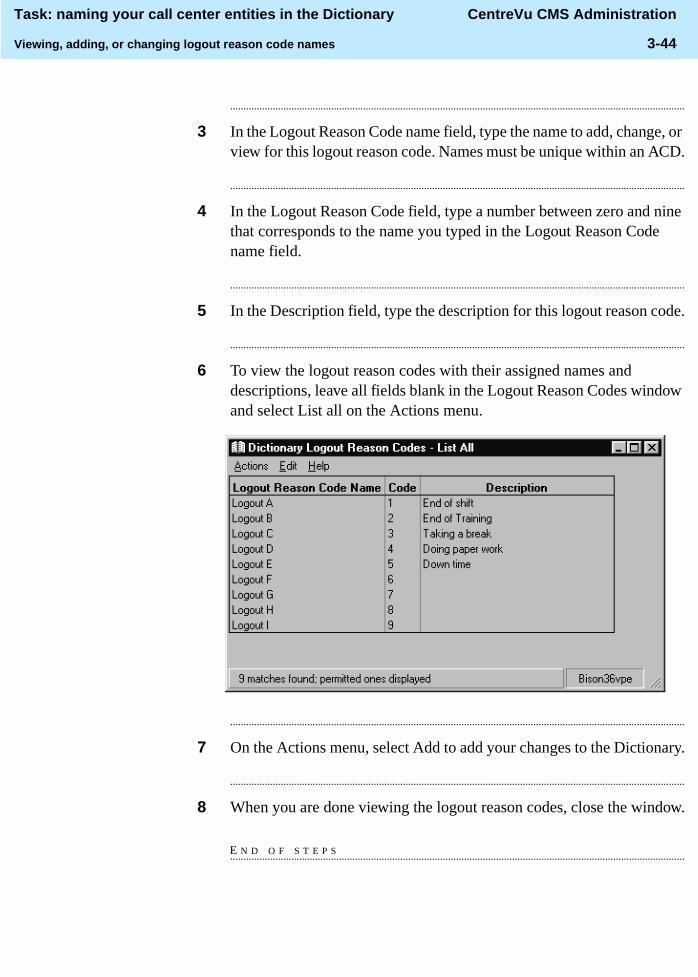
Task: naming your call center entities in the Dictionary CentreVu CMS Administration
Viewing, adding, or changing logout reason code names 3-44
...........................................................................................................................................................................
3 In the Logout Reason Code name field, type the name to add, change, or view for this logout reason code. Names must be unique within an ACD.
...........................................................................................................................................................................
4 In the Logout Reason Code field, type a number between zero and nine that corresponds to the name you typed in the Logout Reason Code name field.
...........................................................................................................................................................................
5 In the Description field, type the description for this logout reason code.
...........................................................................................................................................................................
6 To view the logout reason codes with their assigned names and descriptions, leave all fields blank in the Logout Reason Codes window and select List all on the Actions menu.
...........................................................................................................................................................................
7 On the Actions menu, select Add to add your changes to the Dictionary.
...........................................................................................................................................................................
8 When you are done viewing the logout reason codes, close the window.
E N D O F S T E P S...........................................................................................................................................................................

Task: naming your call center entities in the Dictionary CentreVu CMS Administration
Viewing, adding, or changing logout reason code names 3-45
Reference
Logout reason code names display in the agent login/logout and agent trace historical reports. If you make changes to logout reason code names, you must exit the report and rerun it to see the new name. See “Task: running, printing, exiting, and restarting a report” for more information
You can script the Logout Reason Codes window and schedule the script. See “Task : automating your activities with scripting” for more information.

Task: naming your call center entities in the Dictionary CentreVu CMS Administration
Viewing or changing split/skill string values 3-46
............................................................................................................................................................................................................................................................Viewing or changing split/skill string values
Overview Split/skill string values are the descriptive words in the split/skill call profile reports. The words are used to describe the value of the data. You can change the default string values and view or change split or skill names and skill state names to meet the needs of your call center.
Prerequisites
• If you assign values that are longer than the field lengths allowed on standard reports, the values are truncated to fit on those reports. But you can create a similar custom report that accommodates the longer string values.
• If you do not assign different values to the split/skill string values, the default values are used.
Steps ...........................................................................................................................................................................
1 From the controller window, select Commands | Dictionary or select Dictionary on the toolbar.
The Dictionary selector window opens.
...........................................................................................................................................................................
2 Select Operations | Split/Skill String Values.
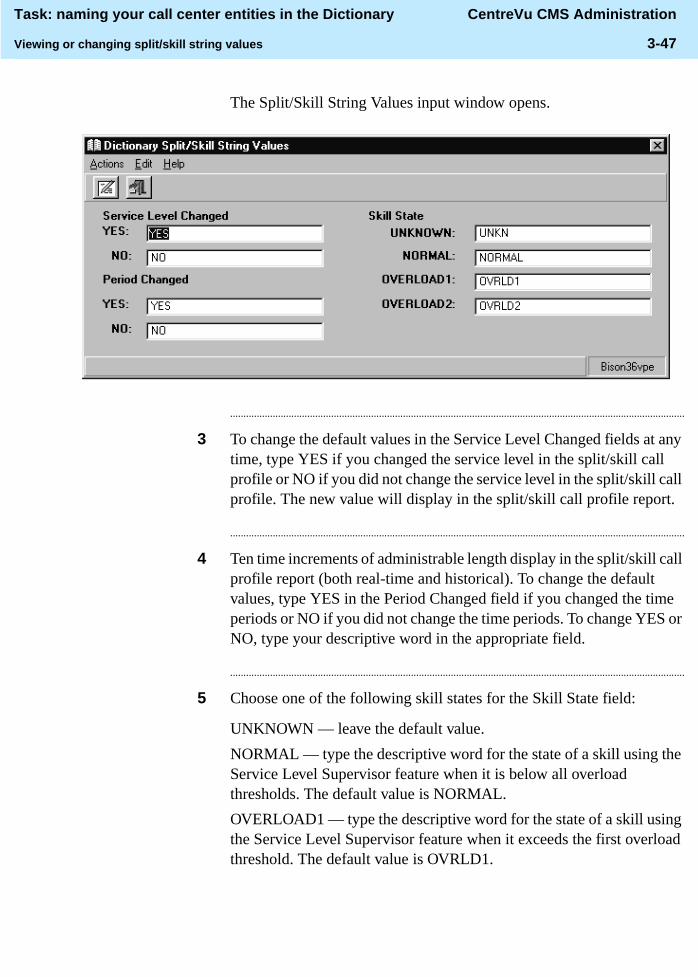
Task: naming your call center entities in the Dictionary CentreVu CMS Administration
Viewing or changing split/skill string values 3-47
The Split/Skill String Values input window opens.
...........................................................................................................................................................................
3 To change the default values in the Service Level Changed fields at any time, type YES if you changed the service level in the split/skill call profile or NO if you did not change the service level in the split/skill call profile. The new value will display in the split/skill call profile report.
...........................................................................................................................................................................
4 Ten time increments of administrable length display in the split/skill call profile report (both real-time and historical). To change the default values, type YES in the Period Changed field if you changed the time periods or NO if you did not change the time periods. To change YES or NO, type your descriptive word in the appropriate field.
...........................................................................................................................................................................
5 Choose one of the following skill states for the Skill State field:
UNKNOWN — leave the default value.
NORMAL — type the descriptive word for the state of a skill using the Service Level Supervisor feature when it is below all overload thresholds. The default value is NORMAL.
OVERLOAD1 — type the descriptive word for the state of a skill using the Service Level Supervisor feature when it exceeds the first overload threshold. The default value is OVRLD1.

Task: naming your call center entities in the Dictionary CentreVu CMS Administration
Viewing or changing split/skill string values 3-48
OVERLOAD2 — type the descriptive word for the state of a skill using the Service Level Supervisor feature when it exceeds both the first and second thresholds. The default value is OVRLD2.
E N D O F S T E P S...........................................................................................................................................................................
Reference
Any change you make here affects what you see in the corresponding fields in the split/skill call profile report and in the split/skill string values screen.
Generally, the defaults on the screen are the field names chosen for the split/skill string values screen.
You can script the Splits/Skill String Values window and schedule the script. See “Task: automating your activities with scripting” for more information.

Task: naming your call center entities in the Dictionary CentreVu CMS Administration
Viewing, adding, deleting, or changing split/skill names 3-49
............................................................................................................................................................................................................................................................Viewing, adding, deleting, or changing split/skill names
Overview You can assign names to your ACD splits or skills. These split or skill names appear on the split or skill reports, making your reports easier to identify and read.
Split or skill names should reflect the configuration of your splits or skills and ACDs. For example, if you want splits in your system to be divided according to Sales, Customer Service, and Wholesale, assign those names to the splits that handle those areas of the business. Or if you want skills in your system to be divided by language such as French, Spanish, and German, assign those names to the skills that handle calls in those languages.
Prerequisites Note that:
• When naming splits or skills, you may want to be consistent with the names given by your switch administrator.
• If you assign a name to a split or a skill, the split or skill number no longer appears on split or skill reports or windows. The split or skill name appears instead.
Steps ...........................................................................................................................................................................
1 From the controller window, select Commands | Dictionary or select Dictionary on the toolbar.
The Dictionary selector window opens.
...........................................................................................................................................................................
2 Select Operations | Splits/Skills.

Task: naming your call center entities in the Dictionary CentreVu CMS Administration
Viewing, adding, deleting, or changing split/skill names 3-50
The Splits/Skills input window opens.
...........................................................................................................................................................................
3 In the Split/Skill name field, type the name that you want to add, delete, change, or view for this split or skill.
...........................................................................................................................................................................
4 In the Split/Skill number field, type the split or skill number that corresponds to the name you typed in the Split/Skill name field.
...........................................................................................................................................................................
5 In the Description field, type descriptive information for this split or skill.
...........................................................................................................................................................................
6 On the Actions menu, select Add to add your changes to the Dictionary.
E N D O F S T E P S...........................................................................................................................................................................
Reference
When you assign a split or skill name, that name displays on all splits/skills windows and splits/skills reports (real-time and historical). If you make additions or changes to split or skill names, you must exit the report and rerun it to see the new split or skill name.

Task: naming your call center entities in the Dictionary CentreVu CMS Administration
Viewing, adding, deleting, or changing split/skill names 3-51
If you assign exceptions to splits or skills, the split or skill names you assign display in the exceptions text. If you change a split or skill name, the new name displays in the exception text for all exceptions logged after the change. See “Task: administering exceptions” for more information.
Split or skill names display on Forecast reports.
You can script the Splits/Skills window and schedule the script. See “Task: automating your activities with scripting” for more information.

Task: naming your call center entities in the Dictionary CentreVu CMS Administration
Viewing CentreVu CMS database items 3-52
............................................................................................................................................................................................................................................................Viewing CentreVu CMS database items
Overview Standard CentreVu CMS items are names of items in CentreVu CMS database tables. CentreVu CMS uses these tables to collect, store, and retrieve ACD data. Each column in a table represents a specific type of ACD data, such as the number of ACD calls, the number of abandons, or the length of time on ACD calls. You cannot change or delete standard database items.
This is a read-only section of the Dictionary, but you can view the standard information about each database item, the description for that item, and the tables in which the item appears. You can use pattern searching in any field in the window.
Here is an example of a current real-time agent table with standard CentreVu CMS database item column headings.
Note: > * indicates that more database item column headings follow. A dot (.) indicates that more data follows down the table.
Steps ...........................................................................................................................................................................
1 From the controller window, select Commands | Dictionary or select Dictionary on the toolbar.
The Dictionary selector window opens.
...........................................................................................................................................................................
2 Select Operations | Standard CMS Items.
Exten- Split Logid Logon- Work- Started Direc- Changed >*
sion start mode tion >*
1000 1 4000 8:00 AVAIL
8:00 NULL 8:0 >
1001 1 5966 7:58 ACD 8:04 IN 8:04 >
1002 1 2200 7:59 ACD 8:03 IN 8:03 >
. . . . . . . . . . . . . . . . >

Task: naming your call center entities in the Dictionary CentreVu CMS Administration
Viewing CentreVu CMS database items 3-53
The Standard CMS Items input window opens.
...........................................................................................................................................................................
3 In the Database item field, type the name of the database that you want to look up.
...........................................................................................................................................................................
4 In the Description field, type a description of the item.
...........................................................................................................................................................................
5 In the Table field, limit the search for a database item to a single table. If you leave this field blank, all database items are searched.
...........................................................................................................................................................................
6 On the Actions menu, select Add to add your changes to the Dictionary.
...........................................................................................................................................................................
7 When you are done viewing the database items, close the window.
E N D O F S T E P S...........................................................................................................................................................................
Reference
You use these database items when creating designer or custom reports. See CentreVu Report Designer 585-215-859 and CentreVu CMS R3V5 Custom Reports 585-215-822 for more information.

Task: naming your call center entities in the Dictionary CentreVu CMS Administration
Viewing, adding, deleting, or changing trunk group names 3-54
............................................................................................................................................................................................................................................................ Viewing, adding, deleting, or changing trunk group names
Overview Names you assign to your ACD trunk groups display on reports, making your reports easier to identify and read.
Prerequisites Note that:
• A trunk group name can be a published phone number (prepended with an alphabetic character), a variation of an associated split or skill name, or any other name that reflects the configuration of your trunk groups, splits or skills, and ACDs.
• When naming trunk groups, you may want to be consistent with the names given trunk groups and splits or skills by your switch administrator.
• If you assign a trunk group name, the name displays on trunk group reports or windows instead of the trunk group number.
Steps ...........................................................................................................................................................................1 From the controller window, select Commands | Dictionary or select
Dictionary on the toolbar.
The Dictionary selector window opens.
...........................................................................................................................................................................
2 Select Operations | Trunk Groups.
The Trunk Groups input window opens.
Task: naming your call center entities in the Dictionary CentreVu CMS Administration
Viewing, adding, deleting, or changing trunk group names 3-55
...........................................................................................................................................................................
3 In the Trunk group name field, type the name to add, delete, change, or view for this trunk group.
...........................................................................................................................................................................
4 In the Trunk group number field, type the trunk group number that corresponds to the name you typed in the Trunk group name field.
...........................................................................................................................................................................
5 In the Description field, type a description of the database item.
...........................................................................................................................................................................
6 On the Actions menu, select Add to add your changes to the Dictionary.
E N D O F S T E P S...........................................................................................................................................................................
Reference
When you assign a trunk group name, that name displays on all trunk group windows and trunk group reports (real-time and historical). If you make additions or changes to trunk group names, you must exit the report and rerun it to see the new trunk group names.
If you assign exceptions to trunk groups, the trunk group names you assign display in the exceptions text. If you change a trunk group’s name, the new name displays in the exception log text for all exceptions logged after the change. See “Task: administering exceptions” for more information.
Trunk group names display on Forecast reports.
You can script the Trunk Groups window and schedule the script. See “Task: automating your activities with scripting” for more information.

Task: naming your call center entities in the Dictionary CentreVu CMS Administration
Viewing or changing trunk string values 3-56
............................................................................................................................................................................................................................................................Viewing or changing trunk string values
Overview Trunk string values are the descriptive words such as IDLE, HOLD, or QUEUED on trunk reports. These words display in report data fields; they do not display as headings. You can change the default values to any values that meet the needs of your call center. If you do not assign different trunk string values, the default values are used.
Steps: ...........................................................................................................................................................................
1 From the controller window, select Commands | Dictionary or select Dictionary on the toolbar.
The Dictionary selector window opens.
...........................................................................................................................................................................
2 Select Operations | Trunk String Values.

Task: naming your call center entities in the Dictionary CentreVu CMS Administration
Viewing or changing trunk string values 3-57
The Trunk String Values input window opens.
...........................................................................................................................................................................
3 To change any of the trunk state default names, type the new descriptive word next to any of the following:
• IDLE — the trunk is waiting for a call.
• SEIZED — a call is holding the trunk, either incoming or outgoing.
• QUEUED — an ACD call has seized the trunk and is queued to a split or skill waiting for an agent to become available.
• CONN — the caller and an agent are connected on a call.
• DABN — the caller has abandoned the call.
• FBUSY — the caller gets a forced busy signal.
• FDISC — the caller gets a forced disconnect.
• HOLD — the agent has put the caller on hold.

Task: naming your call center entities in the Dictionary CentreVu CMS Administration
Viewing or changing trunk string values 3-58
• MBUSY — the trunk is out of service for maintenance purposes.
• RINGING — the call is ringing at an agent's voice terminal.
• UNKNOWN — CentreVu CMS does not recognize the trunk state.
...........................................................................................................................................................................
4 To change the queue type default names, type the new descriptive name next to MAIN or BACKUP. The name you type here displays instead of the default in real-time reports containing the trunk QUETYPE database item. (Standard reports do not contain this item).
• MAIN — The call is queued to a split or skill as a result of a queue to main split/skill vector command.
• BACKUP — the call is queued to a split or skill as a result of a vector command other than queue to main split/skill.
...........................................................................................................................................................................
5 To change the call priority (nonvectoring) default names, type the new descriptive name next to YES or NO.
• YES — the call occupying the trunk has priority entering the trunk.
• NO — the call occupying the trunk does not have priority entering the split.
The name you type here displays instead of the default name in real-time reports containing the trunk PRIORITY database item. (Standard reports do not contain this item.)
...........................................................................................................................................................................
6 To change the call priority (vectoring) default names, type the new descriptive name next to LOW, MED, HIGH, or TOP. The priority level at which calls on a trunk queue to a split or skill is specified using either the queue to split/skill or check split/skill command in the vector processing the call. The name you type here displays instead of the default name in real-time reports containing the trunk PRIORITY database item. (Standard reports do not contain this item).
• LOW — the call occupying the trunk is queued to a split or skill at the lowest priority level.
• MED — the call occupying the trunk is queued to a split or skill at the second lowest priority level.

Task: naming your call center entities in the Dictionary CentreVu CMS Administration
Viewing or changing trunk string values 3-59
• HIGH — the call occupying the trunk is queued to a split or skill at the second highest priority level.
• TOP — the call occupying the trunk is queued to a split or skill at the highest priority level.
...........................................................................................................................................................................
7 To change the call-direction default names, type the new descriptive word next to IN or OUT.
• IN — the trunk is on an incoming call.
• OUT — the trunk is on an outbound call.
...........................................................................................................................................................................
8 To change the all trunks busy default names, type the new descriptive word next to YES or NO.
• YES — all trunks in the trunk group are busy (in use or maintenance).
• NO — not all trunks in the trunk group are busy.
E N D O F S T E P S...........................................................................................................................................................................
Reference
Changes you make to the trunk string values affect what you see in the corresponding fields on trunk reports. See “Task: running, printing, exiting, and restarting a report” for more information.
You can script the Trunk String Values window and schedule the script. See “Task: automating your activities with scripting” for more information.

Task: naming your call center entities in the Dictionary CentreVu CMS Administration
Viewing, adding, deleting, or changing VDN names 3-60
............................................................................................................................................................................................................................................................Viewing, adding, deleting, or changing VDN names
Overview You can assign names to VDNs so that names instead of numbers appear on VDN reports and VDN administration windows. Your VDN names should reflect the configuration of your ACD and convey one or more of the following:
• The VDN's purpose (for example, sales or customer service)
• The VDN destination vector (for example, FBusy-Nat.Accts)
• The trunk groups assigned to the VDN (for example, WATS 800-331-1111).
Select Find one or List all to list the VDNs that have already been assigned names. To get a list of VDNs that you can name, run the vector configuration report.
Prerequisites Note that:
• The VDNs window is available only if your company has purchased the Call Vectoring feature.
• VDNs must be created on the switch and assigned for measurement via CentreVu CMS.
• Permissions checking for VDNs in Dictionary is turned off if more than 2,000 measured VDNs are authorized.
Steps ...........................................................................................................................................................................
1 From the controller window, select Commands | Dictionary or select Dictionary on the toolbar.
The Dictionary selector window opens.
...........................................................................................................................................................................
2 Select Operations | VDNs.
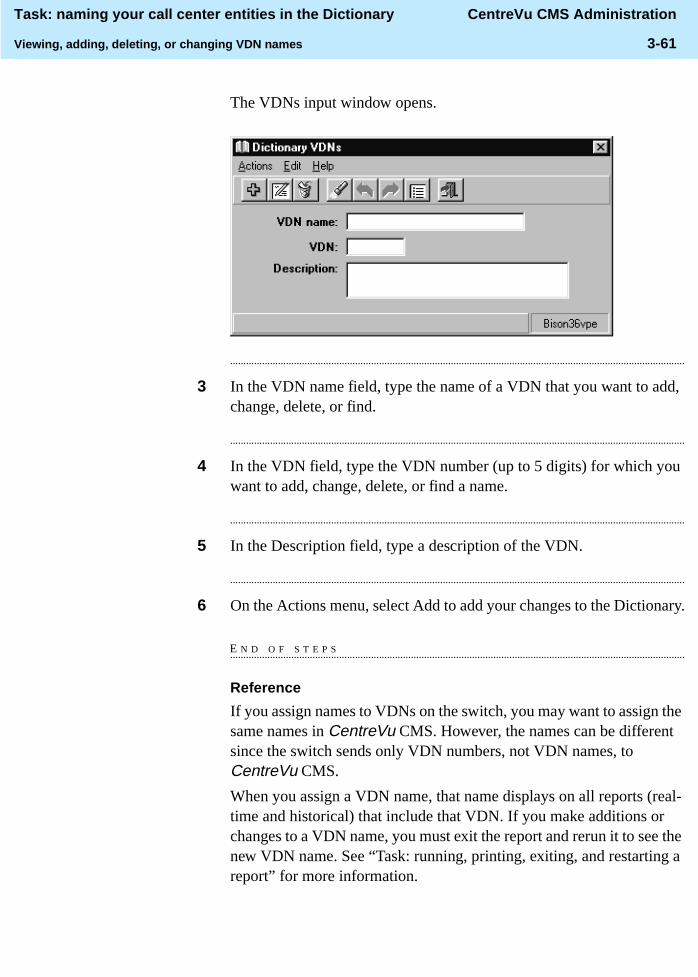
Task: naming your call center entities in the Dictionary CentreVu CMS Administration
Viewing, adding, deleting, or changing VDN names 3-61
The VDNs input window opens.
...........................................................................................................................................................................
3 In the VDN name field, type the name of a VDN that you want to add, change, delete, or find.
...........................................................................................................................................................................
4 In the VDN field, type the VDN number (up to 5 digits) for which you want to add, change, delete, or find a name.
...........................................................................................................................................................................
5 In the Description field, type a description of the VDN.
...........................................................................................................................................................................
6 On the Actions menu, select Add to add your changes to the Dictionary.
E N D O F S T E P S...........................................................................................................................................................................
Reference
If you assign names to VDNs on the switch, you may want to assign the same names in CentreVu CMS. However, the names can be different since the switch sends only VDN numbers, not VDN names, to CentreVu CMS.
When you assign a VDN name, that name displays on all reports (real-time and historical) that include that VDN. If you make additions or changes to a VDN name, you must exit the report and rerun it to see the new VDN name. See “Task: running, printing, exiting, and restarting a report” for more information.
Task: naming your call center entities in the Dictionary CentreVu CMS Administration
Viewing, adding, deleting, or changing VDN names 3-62
If you assign exceptions to a VDN, the VDN name you assign displays in the exceptions text. In addition, if you change a VDN name, the new name displays in the exception text for all exceptions logged after the change. See “Task: administering exceptions” for more information.
You can script the VDNs window and schedule the script. See “Task: automating your activities with scripting” for more information.

Task: naming your call center entities in the Dictionary CentreVu CMS Administration
Viewing, adding, deleting, or changing vector names 3-63
............................................................................................................................................................................................................................................................Viewing, adding, deleting, or changing vector names
Overview You can assign names to vectors so that the names instead of the vector numbers display on vector reports and administration windows. Your vector names should reflect the configuration of your ACD and convey one or more of the following:
• The vector's purpose (for example, sales or customer service)
• The VDNs assigned to the vector (for example, vdn2001, vdn3001, and vdn4001)
• The splits or skills to which the vector sends calls (for example, sales1, sales2, AUDIX system)
• Select Find One or List All to list the vectors that have already been assigned names.
Prerequisites The Vectors window is available only if your company has purchased the Call Vectoring feature.
Steps ...........................................................................................................................................................................
1 From the controller window, select Dictionary | Commands or select Dictionary on the toolbar.
The Dictionary selector window opens.
...........................................................................................................................................................................
2 Select Operations | Vectors.
The Vectors input window opens.

Task: naming your call center entities in the Dictionary CentreVu CMS Administration
Viewing, adding, deleting, or changing vector names 3-64
...........................................................................................................................................................................
3 In the Vector name field, type the name of the vector that you want to add, change, delete, or find.
...........................................................................................................................................................................
4 In the Vector number field, type the vector number for which you want to add, change, delete, or find a name.
...........................................................................................................................................................................
5 In the Description field, type a description of the vector.
...........................................................................................................................................................................
6 On the Actions menu, select Add to add your change to the Dictionary.
E N D O F S T E P S...........................................................................................................................................................................
Reference
Any vector can be named, whether it is empty or not, and you can assign a name to a vector even if the steps in the vector have not been defined. The number of available vectors depends on your switch type.
When you assign a vector name, that name displays in all reports (real-time and historical) containing that vector. If you make additions or changes to the vector name, you must exit the report and rerun it to see the new vector name. See “Task: running, printing, exiting, and restarting a report” for more information.
Assigned vector names display in the text for vector exceptions. In addition, if you change a vector name, the new name appears in the exception text only for exceptions logged after the change. See “Task: administering exceptions” for more information.
You can script the Vectors window and schedule the script. See “Task: automating your activities with scripting” for more information.

Task: naming your call center entities in the Dictionary CentreVu CMS Administration
Running Dictionary reports 3-65
............................................................................................................................................................................................................................................................Running Dictionary reports
Overview You can generate a report on most sections of the Dictionary. You can have sections of the Dictionary printed, sent to a file, or displayed.
Steps To display or print a report on one of the Dictionary items listed on the Reports tab:
...........................................................................................................................................................................
1 From the controller window, select Commands | Dictionary or select Dictionary on the toolbar.
The Dictionary selector window opens.
...........................................................................................................................................................................
2 Select the Reports tab.
The Reports selector window opens.

Task: naming your call center entities in the Dictionary CentreVu CMS Administration
Running Dictionary reports 3-66
...........................................................................................................................................................................
3 Double-click the Dictionary item for which you want a report.
A report input window opens.
...........................................................................................................................................................................
4 Under Destination, select View Reports on screen or Print Report on.
To send the report to your screen or to the default printer, select OK.
To send the report to a printer other than the default printer in the report input window, select Print Report and select the printer icon.
The Print Setup window opens.
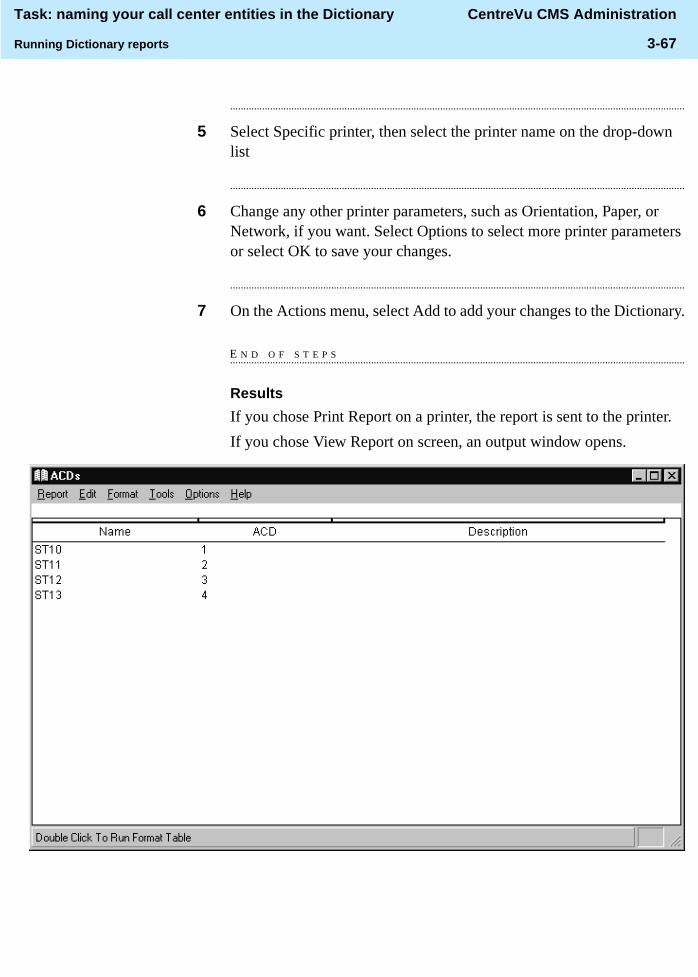
Task: naming your call center entities in the Dictionary CentreVu CMS Administration
Running Dictionary reports 3-67
...........................................................................................................................................................................
5 Select Specific printer, then select the printer name on the drop-down list
...........................................................................................................................................................................
6 Change any other printer parameters, such as Orientation, Paper, or Network, if you want. Select Options to select more printer parameters or select OK to save your changes.
...........................................................................................................................................................................
7 On the Actions menu, select Add to add your changes to the Dictionary.
E N D O F S T E P S...........................................................................................................................................................................
Results
If you chose Print Report on a printer, the report is sent to the printer.
If you chose View Report on screen, an output window opens.

Task: naming your call center entities in the Dictionary CentreVu CMS Administration
Running Dictionary reports 3-68
To run an agent groupmembers report
For the agent group members report only, follow these steps:
...........................................................................................................................................................................
1 Select Reports | Agent Group Members.
The Agent Groups input window opens.
...........................................................................................................................................................................
2 In the Agent group name box, type the name of the agent group for which you want to run the report. The name must first be assigned in the Dictionary.
...........................................................................................................................................................................
3 Type the information requested.
...........................................................................................................................................................................
4 Select the information from the list of previously used items.
...........................................................................................................................................................................
5 Select Browse to view all available items for the input field and then select an item for the input field. When you select Browse, a window opens that lets you select an item for the input field.
...........................................................................................................................................................................
6 Choose a report destination, and select OK.
E N D O F S T E P S...........................................................................................................................................................................
Reference
You can script the Reports window and schedule the script. See “Task: automating your activities with scripting” for more information.
Task: running, printing, exiting, and restarting a report CentreVu CMS Administration
4-1
4 Task: running, printing, exiting, and restarting a report
............................................................................................................................................................................................................................................................Overview
Purpose In this task you will find the following procedures:
• Running a report
• Printing a report
• Setting up a report page
• Exiting and restarting a report
Use the procedures that follow to run, print, exit, and restart a report.

Task: running, printing, exiting, and restarting a report CentreVu CMS Administration
Running a report 4-2
............................................................................................................................................................................................................................................................Running a report
Steps ...........................................................................................................................................................................
1 From the Reports selector window, select the report type on the Reports menu.
...........................................................................................................................................................................
2 Select the ACD and select OK.
The Reports input window opens. The input fields vary according to the report type.
...........................................................................................................................................................................
3 Make your input and select OK to run the report.
E N D O F S T E P S...........................................................................................................................................................................
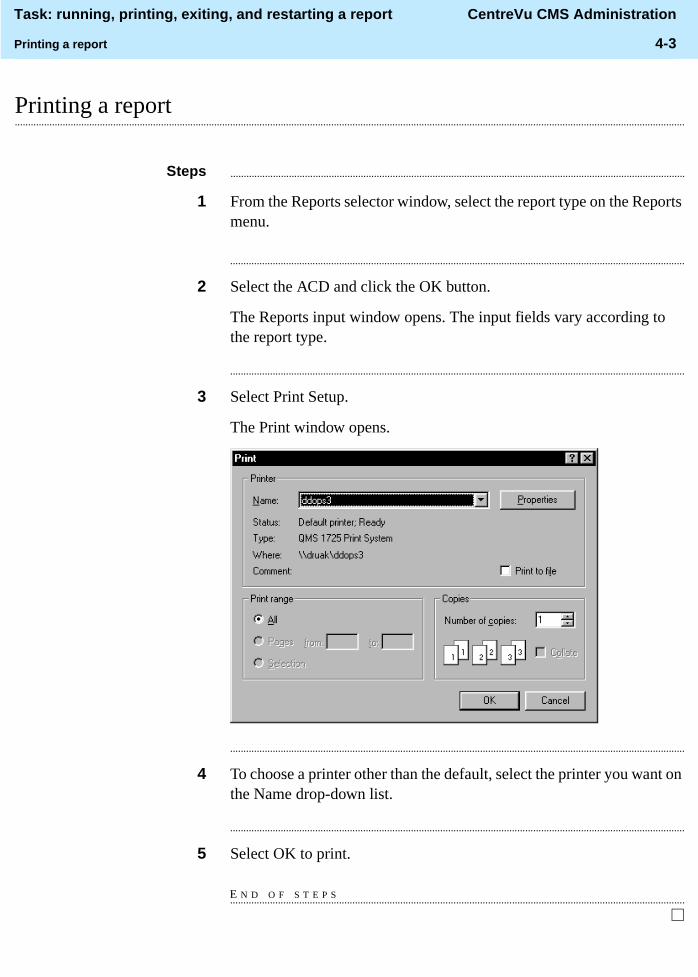
Task: running, printing, exiting, and restarting a report CentreVu CMS Administration
Printing a report 4-3
............................................................................................................................................................................................................................................................Printing a report
Steps ...........................................................................................................................................................................
1 From the Reports selector window, select the report type on the Reports menu.
...........................................................................................................................................................................
2 Select the ACD and click the OK button.
The Reports input window opens. The input fields vary according to the report type.
...........................................................................................................................................................................
3 Select Print Setup.
The Print window opens.
...........................................................................................................................................................................
4 To choose a printer other than the default, select the printer you want on the Name drop-down list.
...........................................................................................................................................................................
5 Select OK to print.
E N D O F S T E P S...........................................................................................................................................................................
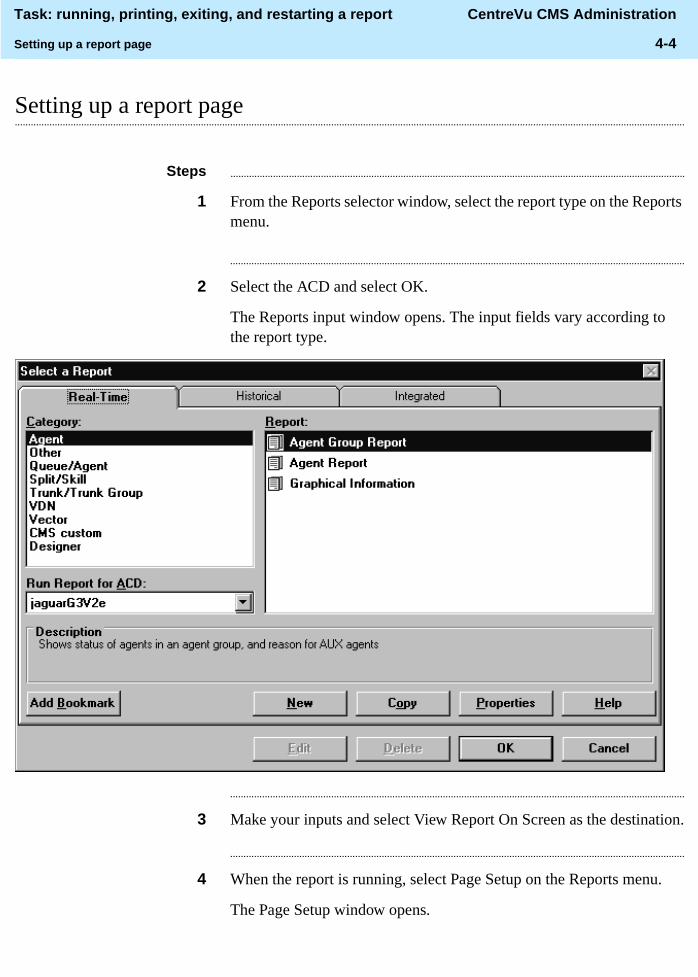
Task: running, printing, exiting, and restarting a report CentreVu CMS Administration
Setting up a report page 4-4
............................................................................................................................................................................................................................................................Setting up a report page
Steps ...........................................................................................................................................................................
1 From the Reports selector window, select the report type on the Reports menu.
...........................................................................................................................................................................
2 Select the ACD and select OK.
The Reports input window opens. The input fields vary according to the report type.
...........................................................................................................................................................................
3 Make your inputs and select View Report On Screen as the destination.
...........................................................................................................................................................................
4 When the report is running, select Page Setup on the Reports menu.
The Page Setup window opens.
Task: running, printing, exiting, and restarting a report CentreVu CMS Administration
Setting up a report page 4-5
...........................................................................................................................................................................
5 In the Page Setup window, set the Margin, Page Numbers, and Box Around Tables (report grids) and select OK.
E N D O F S T E P S...........................................................................................................................................................................

Task: running, printing, exiting, and restarting a report CentreVu CMS Administration
Exiting and restarting a report 4-6
............................................................................................................................................................................................................................................................Exiting and restarting a report
Steps to exit a report From the controller window, do one of the following:
• Double-click System.
• Select Close on the System menu.
• Select Exit on the Report menu.
Steps to restart a report To restart a report:
...........................................................................................................................................................................
1 Return to the Reports input window
...........................................................................................................................................................................
2 Select Restart on the Reports menu.
Note that you cannot restart work-state drill-down reports.
E N D O F S T E P S...........................................................................................................................................................................
Task: running, printing, exiting, and restarting a report CentreVu CMS Administration
Task reference 4-7
............................................................................................................................................................................................................................................................Task reference
How reports work CentreVu® CMS collects data from ACD activity and stores it in one of the CentreVu CMS databases. The data reflects the activity of your splits/skills, trunks, trunk groups, agents, agent groups, VDNs, and vectors. You can view this data by generating a CentreVu CMS report.
Kinds of reports The kinds of reports you can generate are:
• Standard real-time
• Standard historical
• Standard integrated
• Custom real-time
• Designer ( CentreVu Supervisor)
• Custom historical
• Custom CentreVu CMS
• Exceptions
• Forecast (available as an add-on feature)
Configuring reports You can customize standard reports or design custom reports from scratch.
See CentreVu CMS R3V5 Custom Reports and CentreVu Report Designer Version 6 User Guide for more information.
What reports summarize Use CentreVu CMS/CentreVu Supervisor reports to summarize the status of:
• Any measured subset of the ACD, including agents, splits/skills, trunks/trunk groups, VDNs, vectors, call work codes, and call records
• Agent administration
• Call center administration
• Dictionary
• Exceptions
• Maintenance

Task: running, printing, exiting, and restarting a report CentreVu CMS Administration
Task reference 4-8
Printing options The margins, page numbers, and boxes you choose apply only to printed reports and do not affect reports displayed on the screen.
Margins Margins define the spaces at the edges of the page where nothing is printed. Top, bottom, left, and right margins can be set.
Task: automating your activities with scripting CentreVu CMS Administration
5-1
5 Task: automating your activities with scripting
............................................................................................................................................................................................................................................................Overview
Purpose In this task you will find the following procedures:
• Using Save as Script
• Scripting reports
• Scripting the export of report output
• Scripting a report saved as HTML
• Scripting windows and actions
Prerequisites When you create an automatic script on a PC, the PC must be running when the script is scheduled to run.
Permissions The user whose login session is used to run a script must have permission to perform the action.
Use the procedures that follow to automate actions such as changing an agent's skills, running reports, and exporting report data.

Task: automating your activities with scripting CentreVu CMS Administration
Using Save as Script 5-2
............................................................................................................................................................................................................................................................Using Save as Script
Overview Use these steps to save the current display or action as a script.
Steps ...........................................................................................................................................................................
1 Select Script.
The Save as Script window opens.
...........................................................................................................................................................................
2 In the Save in field, select the name of the folder in which the script file will be saved. Select a folder on the drop-down list that shows the folder hierarchy or select Create New Folder. The default is the Scripts subfolder in the folder where CentreVu® Supervisor is installed.
...........................................................................................................................................................................
3 In the File name field, type the name of the script file. You can add or replace existing script files, or create new files.
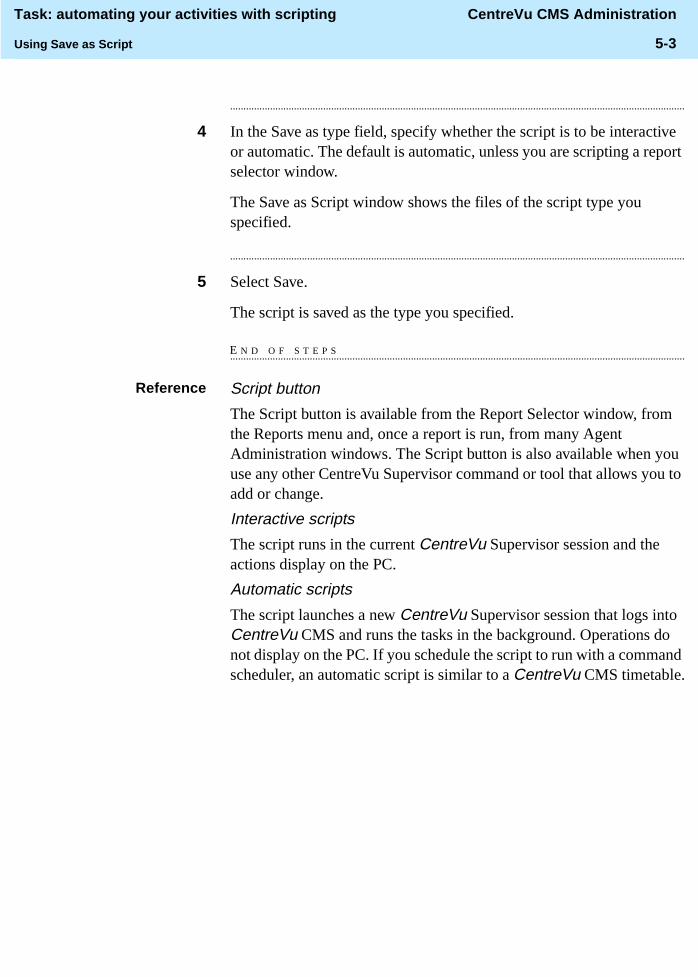
Task: automating your activities with scripting CentreVu CMS Administration
Using Save as Script 5-3
...........................................................................................................................................................................
4 In the Save as type field, specify whether the script is to be interactive or automatic. The default is automatic, unless you are scripting a report selector window.
The Save as Script window shows the files of the script type you specified.
...........................................................................................................................................................................
5 Select Save.
The script is saved as the type you specified.
E N D O F S T E P S...........................................................................................................................................................................
Reference Script button
The Script button is available from the Report Selector window, from the Reports menu and, once a report is run, from many Agent Administration windows. The Script button is also available when you use any other CentreVu Supervisor command or tool that allows you to add or change.
Interactive scripts
The script runs in the current CentreVu Supervisor session and the actions display on the PC.
Automatic scripts
The script launches a new CentreVu Supervisor session that logs into CentreVu CMS and runs the tasks in the background. Operations do not display on the PC. If you schedule the script to run with a command scheduler, an automatic script is similar to a CentreVu CMS timetable.

Task: automating your activities with scripting CentreVu CMS Administration
Using Save as Script 5-4
Error and warning messages
Message Reason Response
This script will not run unless a CentreVu CMS login ID and password have been specified.
The CentreVu CMS login ID and password have not been set on the Scripting tab of the Controller Options window.
Specify a login ID and password on the User Information window.
Automatic scripts are set to run with the permissions of another user of the PC.
The User Information window designates the other user as the owner of automatic scripts.
You can change the permissions via the login information on the Scripting tab of the Controller Options window. The change will apply to subsequent automatic scripts run on the PC.
The Add or Replace window opens (see below).
The file already exists.
Click a button on the bottom of the window: Add (the default)—to add the new script to the end of the existing script, Replace—to delete the existing script and create a new script file, Cancel—to close the Add or Replace window and return to the Save as Script window, Help—to display a help topic for the window.

Task: automating your activities with scripting CentreVu CMS Administration
Using Save as Script 5-5

Task: automating your activities with scripting CentreVu CMS Administration
Scripting reports 5-6
............................................................................................................................................................................................................................................................Scripting reports
Overview Use these steps to script a report that runs in interactive or automatic mode.
• Interactive mode takes you to a report's input window but does not run a report.
• Automatic mode runs a report without prompting for inputs. You cannot script a report's input window in automatic mode.
Steps for report input To create an interactive script for a report input window:
...........................................................................................................................................................................
1 Select the report on the appropriate tab of the selector window.
...........................................................................................................................................................................
2 Select Script on the Reports selector window.
The Save as Script window opens. The file type is set to Interactive and cannot be changed.
...........................................................................................................................................................................
3 Complete the Save as Script window. Executing the script takes you to the input window for the selected report.
The Save as Script window closes and the Reports selector window remains open.
E N D O F S T E P S...........................................................................................................................................................................
Steps for report output ...........................................................................................................................................................................
1 Select the report in the Report selector window.
...........................................................................................................................................................................
2 Fill in the input window and run the report.

Task: automating your activities with scripting CentreVu CMS Administration
Scripting reports 5-7
The report’s output window opens.
...........................................................................................................................................................................
3 Select Script from the Reports menu.
The Save as Script window opens. The file type is set to Automatic but can be changed.
...........................................................................................................................................................................
4 Complete the Save as Script window.
Executing the script causes the report to run with your current inputs. If the script is interactive, the report output window is displayed in the same size and position as when the script is saved. If the script is automatic, the report output is directed to your default printer.
E N D O F S T E P S...........................................................................................................................................................................
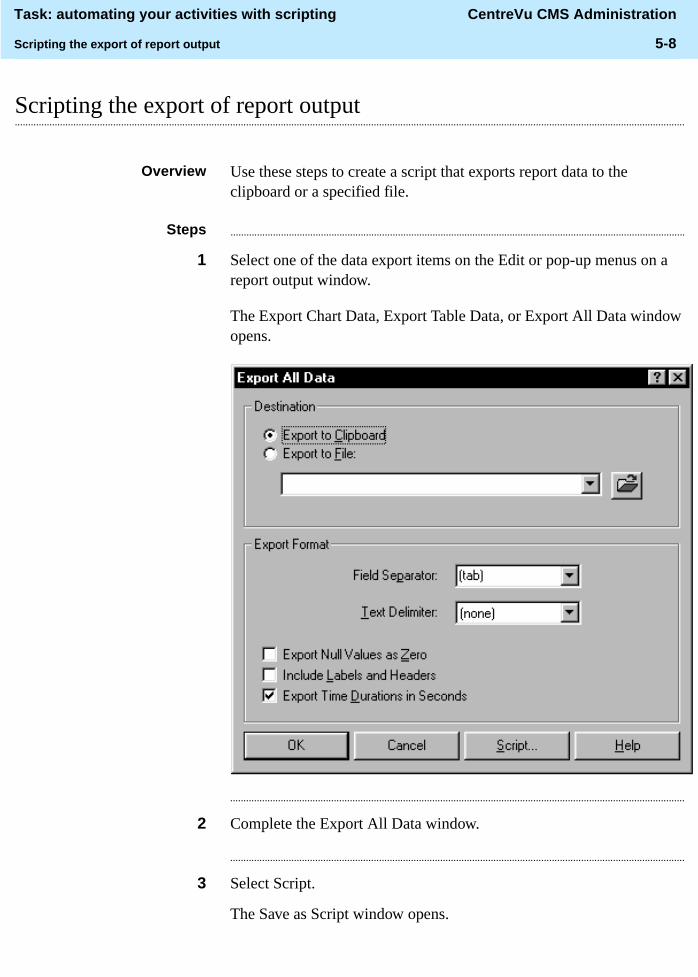
Task: automating your activities with scripting CentreVu CMS Administration
Scripting the export of report output 5-8
............................................................................................................................................................................................................................................................Scripting the export of report output
Overview Use these steps to create a script that exports report data to the clipboard or a specified file.
Steps ...........................................................................................................................................................................
1 Select one of the data export items on the Edit or pop-up menus on a report output window.
The Export Chart Data, Export Table Data, or Export All Data window opens.
...........................................................................................................................................................................
2 Complete the Export All Data window.
...........................................................................................................................................................................
3 Select Script.
The Save as Script window opens.

Task: automating your activities with scripting CentreVu CMS Administration
Scripting the export of report output 5-9
...........................................................................................................................................................................
4 Save the script by following the steps under “Using Save as Script.”
Executing the script runs the report with your current inputs, exports the data, and exits the report.
E N D O F S T E P S...........................................................................................................................................................................
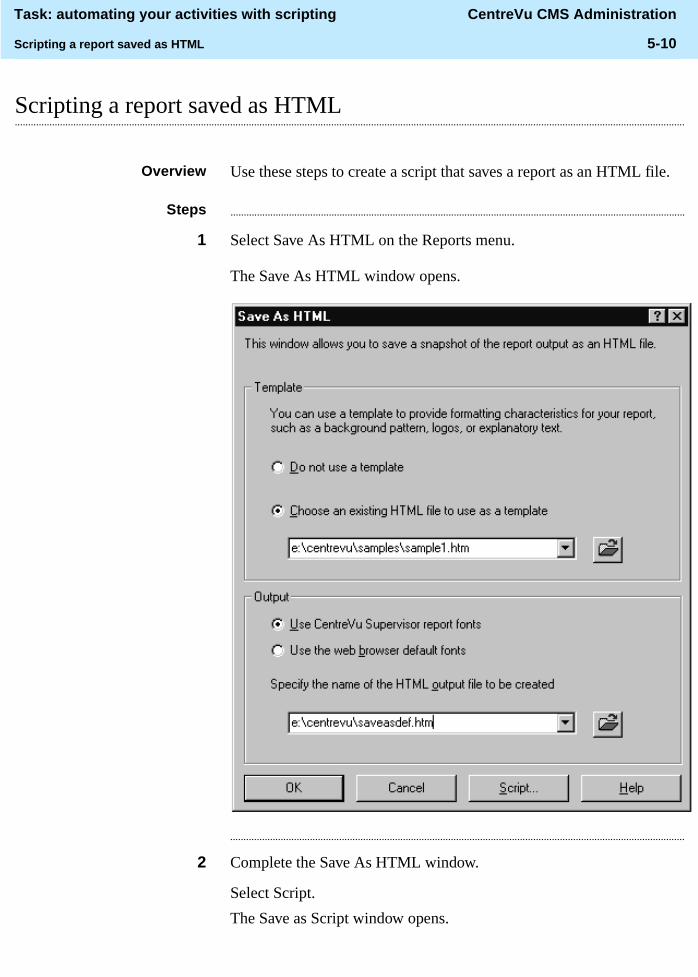
Task: automating your activities with scripting CentreVu CMS Administration
Scripting a report saved as HTML 5-10
............................................................................................................................................................................................................................................................Scripting a report saved as HTML
Overview Use these steps to create a script that saves a report as an HTML file.
Steps ...........................................................................................................................................................................
1 Select Save As HTML on the Reports menu.
The Save As HTML window opens.
...........................................................................................................................................................................
2 Complete the Save As HTML window.
Select Script.
The Save as Script window opens.

Task: automating your activities with scripting CentreVu CMS Administration
Scripting a report saved as HTML 5-11
...........................................................................................................................................................................
3 Save the script using the steps under “Saving as Script.”
Executing the script runs the report with your current inputs, saves the report as HTML, and exits the report.
E N D O F S T E P S...........................................................................................................................................................................
Task: automating your activities with scripting CentreVu CMS Administration
Scripting windows and actions 5-12
............................................................................................................................................................................................................................................................Scripting windows and actions
Overview Use these steps to create a script for one of the following:
• The input window for Dictionary, Exceptions, Maintenance, CentreVu CMS System Setup, Agent Administration, or Call Center Administration actions
• An Add, Modify, or Delete action in Dictionary, Exceptions, Maintenance, CentreVu CMS System Setup, Agent Administration, or Call Center Administration
Steps to script an inputwindow ...........................................................................................................................................................................
1 Select the action on the Operations tab of the selector window for Dictionary, Exceptions, Maintenance, CentreVu CMS System Setup, Agent Administration, or Call Center Administration.
...........................................................................................................................................................................
2 Select Script in the selector window.
The Save as Script window opens. The file type is set to Interactive and cannot be changed.

Task: automating your activities with scripting CentreVu CMS Administration
Scripting windows and actions 5-13
...........................................................................................................................................................................
3 Complete the Save as Script window. Executing the script takes you to the window for the action you selected.
The Save as Script window closes and the selector window remains open.
E N D O F S T E P S...........................................................................................................................................................................
Steps to script an action ...........................................................................................................................................................................
1 Select the action on the Operations tab of the selector window.
...........................................................................................................................................................................
2 Complete the input window but do not select OK.
...........................................................................................................................................................................
3 Select Script on the Actions menu. (If none of the valid scriptable actions — Add, Modify, or Delete — are present, you cannot select Script.)
The Save as Script – Action window opens.
...........................................................................................................................................................................
4 Select the action you want to save in a script.
Task: automating your activities with scripting CentreVu CMS Administration
Scripting windows and actions 5-14
...........................................................................................................................................................................
5 Select OK.
The Save as Script window opens. The file type is set to Automatic but can be changed.
If you select Cancel, you return to the input window without saving an action.
...........................................................................................................................................................................
6 Complete the Save as Script window.
Executing the script performs the action you selected, with the current inputs.
E N D O F S T E P S...........................................................................................................................................................................

Task: automating your activities with scripting CentreVu CMS Administration
Task reference 5-15
............................................................................................................................................................................................................................................................Task reference
• You must purchase a scheduling package if you want to schedule your scripts to run at a specific or later time.
• You are limited to a maximum of four simultaneous Supervisor sessions from one PC. This includes any background Supervisor sessions initiated by an automatic script.
• Once a script file is created, you can execute it manually like other Windows executable files and documents via any method available, such as double-clicking the file name in Windows Explorer.
• It is strongly recommended that you schedule mission-critical actions (such as backups) using Timetable, which resides on the CentreVu CMS server. But note that the risks of scheduling mission-critical actions on the PC are lessened by using a Microsoft Windows NT Server.

Task: automating your activities with scripting CentreVu CMS Administration
Task reference 5-16
Task: administering call center agents CentreVu CMS Administration
6-1
6 Task: administering call center agents
............................................................................................................................................................................................................................................................Overview
Purpose In this task, you will find the following procedures:
• Starting an agent trace
• Listing agents traced
• Changing agent skills and extension split assignments
• Creating or applying an agent template
• Multi-agent skill change and moving extensions between splits
• Running a split members report
Permissions These permissions apply to administering call center agents. See “Task: assigning user permissions” for more information.
• To start or stop an agent trace, you need read/write permission for the Agent Administration command.
• To view agents being traced, you need read permission for the Agent Administration command.
• To change agent skills or extension split assignments, you need read/write permission for the Agent Administration command and for the skills or splits affected by your changes.
• To view skill or extension split assignments, you need read permission for the Agent Administration command.

Task: administering call center agents CentreVu CMS Administration
6-2
• To view a list of agents traced, you need read permission for the Agent Administration command.
• To run a Split Members report, you need read permission for the Agent Administration command and for all splits affected by the report.
Use the procedures that follow to administer call center agents. These procedures include instructions for administering agents with and without Expert Agent Selection (EAS) and Call Vectoring purchased and enabled.

Task: administering call center agents CentreVu CMS Administration
Starting an agent trace 6-3
............................................................................................................................................................................................................................................................Starting an agent trace
Prerequisites Prerequisites for DEFINITY® ECS/G3 switches with EAS:
• To start/stop agent traces, you must have data collection turned on for the ACD. See “Turning data collection on and off for real ACDs” in “Task 10: viewing and changing system setup values” for more information.
• To set the amount of agent trace data to store, see “Allocating storage space” in “Task 10: viewing and changing system setup values” for more information.
Steps ...........................................................................................................................................................................
1 From the controller window, select Commands | Agent Administration or select Agent Administration on the toolbar.
On DEFINITY ECS/G3 with EAS, the Agent Administration selector window looks like this:

Task: administering call center agents CentreVu CMS Administration
Starting an agent trace 6-4
On DEFINITY ECS/G3 without EAS, the Agent Administration selector window looks like this:
...........................................................................................................................................................................
2 On the drop-down ACD list, select the ACD for which you are starting the agent trace.
...........................................................................................................................................................................
3 From the Agent Administration selector window, select Operations | Activate Agent Trace.
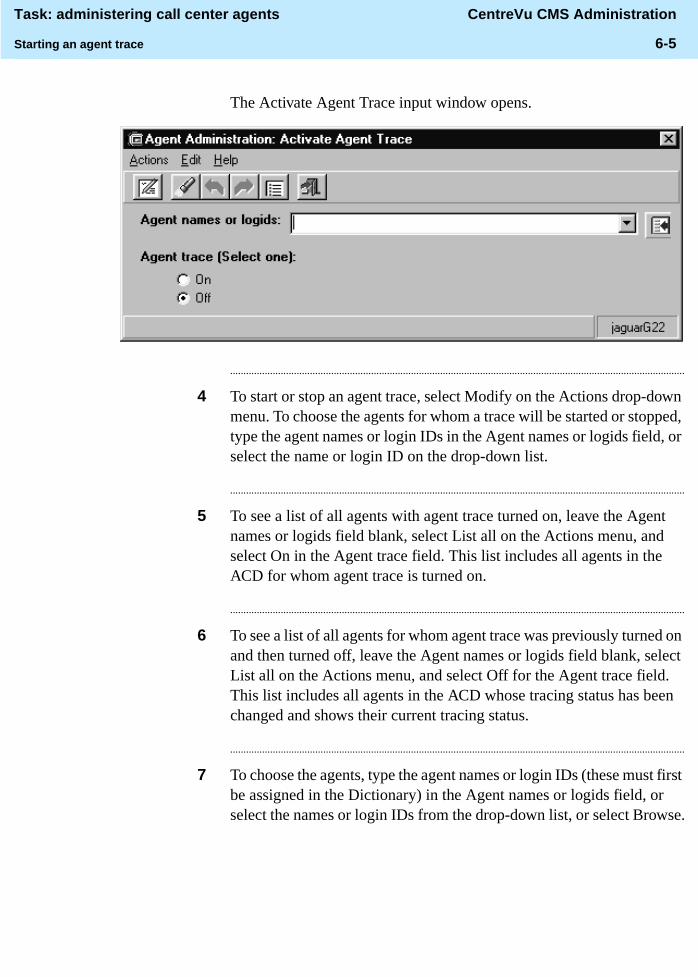
Task: administering call center agents CentreVu CMS Administration
Starting an agent trace 6-5
The Activate Agent Trace input window opens.
...........................................................................................................................................................................
4 To start or stop an agent trace, select Modify on the Actions drop-down menu. To choose the agents for whom a trace will be started or stopped, type the agent names or login IDs in the Agent names or logids field, or select the name or login ID on the drop-down list.
...........................................................................................................................................................................
5 To see a list of all agents with agent trace turned on, leave the Agent names or logids field blank, select List all on the Actions menu, and select On in the Agent trace field. This list includes all agents in the ACD for whom agent trace is turned on.
...........................................................................................................................................................................
6 To see a list of all agents for whom agent trace was previously turned on and then turned off, leave the Agent names or logids field blank, select List all on the Actions menu, and select Off for the Agent trace field. This list includes all agents in the ACD whose tracing status has been changed and shows their current tracing status.
...........................................................................................................................................................................
7 To choose the agents, type the agent names or login IDs (these must first be assigned in the Dictionary) in the Agent names or logids field, or select the names or login IDs from the drop-down list, or select Browse.

Task: administering call center agents CentreVu CMS Administration
Starting an agent trace 6-6
...........................................................................................................................................................................
8 To start or stop an agent trace, click On or Off (the default) in the Agent trace field.
...........................................................................................................................................................................
9 On the Actions menu, select Add, Cancel, Delete, or Modify to complete your action.
E N D O F S T E P S...........................................................................................................................................................................
Reference
• The agent trace file rolls over (the oldest records are discarded as the newest records are written) when the number of records reaches your allocated number of up to a maximum of 500,000 records. You do not have to delete agent trace records. To keep old agent traces, print them.
• You can activate traces for a maximum of 250 agents. This limit applies to the number of agents administered traced by one server across all ACDs. It does not take into account whether or not the agents are logged in. To avoid compromising performance, activate only the traces that you need.
• IMPORTANT! Turning an agent trace off does not delete the records for that agent. Agent trace records are overwritten automatically when the trace file has filled up.
• You must start an agent trace before you can run an agent trace report. This report lists each agent activity and the time it occurred. See CentreVu® Supervisor Release 8 Reports 585-215-852.
• You can script the Activate Agent Trace window and schedule the script. See “Task: automating your activities with scripting” for more information.
• You can put the Activate Agent Trace window on a timetable. See “Task: using timetables and shortcuts” for more information.
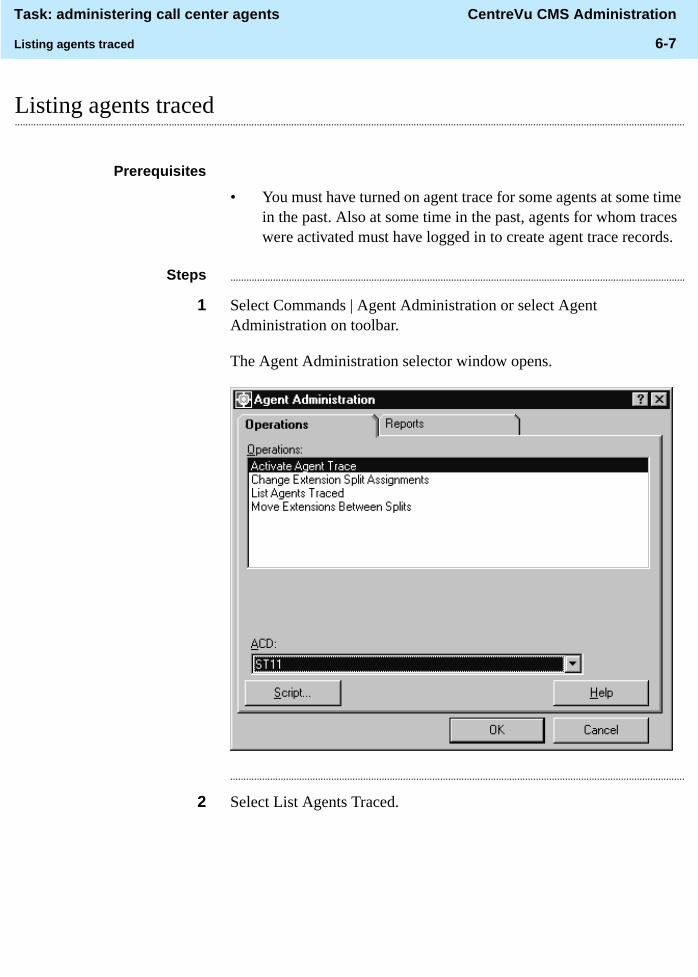
Task: administering call center agents CentreVu CMS Administration
Listing agents traced 6-7
............................................................................................................................................................................................................................................................Listing agents traced
Prerequisites
• You must have turned on agent trace for some agents at some time in the past. Also at some time in the past, agents for whom traces were activated must have logged in to create agent trace records.
Steps ...........................................................................................................................................................................
1 Select Commands | Agent Administration or select Agent Administration on toolbar.
The Agent Administration selector window opens.
...........................................................................................................................................................................
2 Select List Agents Traced.
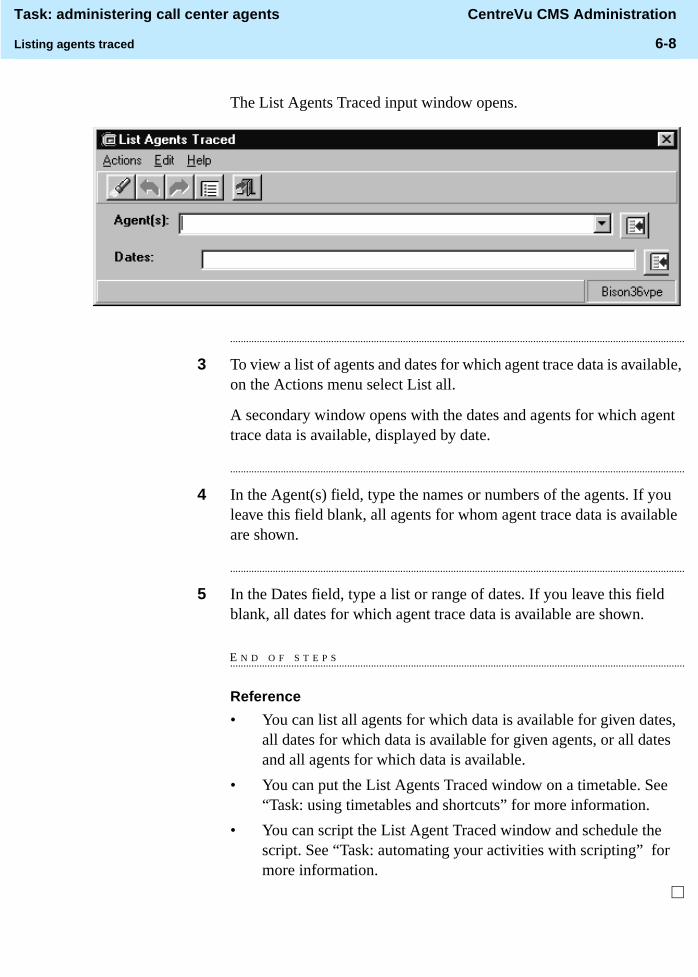
Task: administering call center agents CentreVu CMS Administration
Listing agents traced 6-8
The List Agents Traced input window opens.
...........................................................................................................................................................................
3 To view a list of agents and dates for which agent trace data is available, on the Actions menu select List all.
A secondary window opens with the dates and agents for which agent trace data is available, displayed by date.
...........................................................................................................................................................................
4 In the Agent(s) field, type the names or numbers of the agents. If you leave this field blank, all agents for whom agent trace data is available are shown.
...........................................................................................................................................................................
5 In the Dates field, type a list or range of dates. If you leave this field blank, all dates for which agent trace data is available are shown.
E N D O F S T E P S...........................................................................................................................................................................
Reference
• You can list all agents for which data is available for given dates, all dates for which data is available for given agents, or all dates and all agents for which data is available.
• You can put the List Agents Traced window on a timetable. See “Task: using timetables and shortcuts” for more information.
• You can script the List Agent Traced window and schedule the script. See “Task: automating your activities with scripting” for more information.
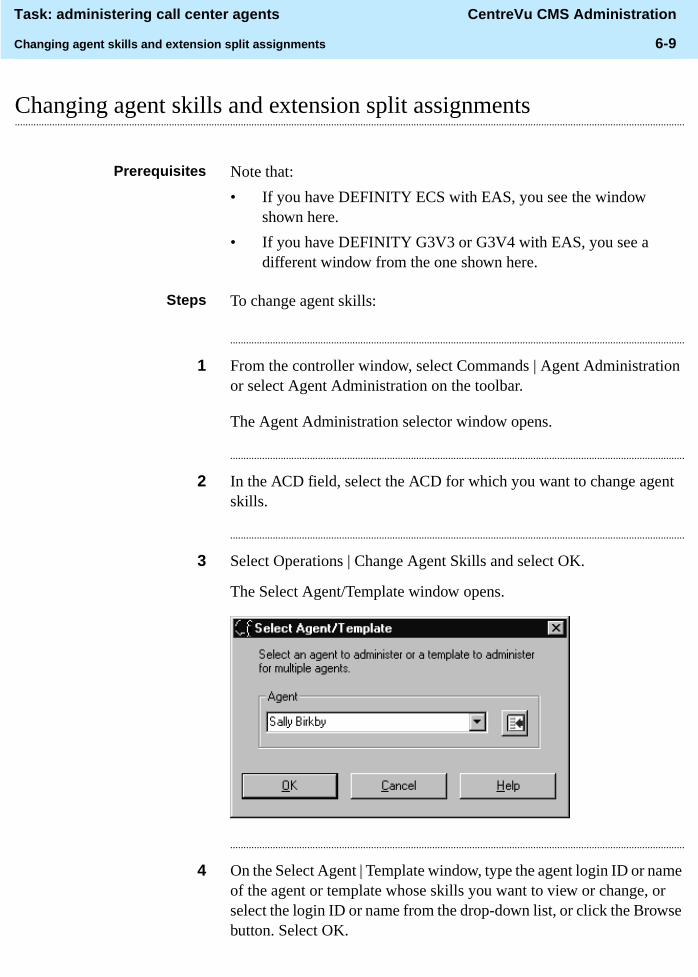
Task: administering call center agents CentreVu CMS Administration
Changing agent skills and extension split assignments 6-9
............................................................................................................................................................................................................................................................Changing agent skills and extension split assignments
Prerequisites Note that:
• If you have DEFINITY ECS with EAS, you see the window shown here.
• If you have DEFINITY G3V3 or G3V4 with EAS, you see a different window from the one shown here.
Steps To change agent skills:
...........................................................................................................................................................................
1 From the controller window, select Commands | Agent Administration or select Agent Administration on the toolbar.
The Agent Administration selector window opens.
...........................................................................................................................................................................
2 In the ACD field, select the ACD for which you want to change agent skills.
...........................................................................................................................................................................
3 Select Operations | Change Agent Skills and select OK.
The Select Agent/Template window opens.
...........................................................................................................................................................................
4 On the Select Agent | Template window, type the agent login ID or name of the agent or template whose skills you want to view or change, or select the login ID or name from the drop-down list, or click the Browse button. Select OK.

Task: administering call center agents CentreVu CMS Administration
Changing agent skills and extension split assignments 6-10
The Change Agent Skills window opens with the agent or template name and login ID on the title bar.
• The skills and skill level for the agent or template you named are shown in the Assigned Skills field and Level field, respectively.
• Skill names are shown for the skills named in the Dictionary. Skill numbers are shown for the skills not named in the Dictionary.
...........................................................................................................................................................................
5 To change which calls an agent gets first, select Skill Level, Greatest Need, or Percent Allocation under Call Handling Preferences.

Task: administering call center agents CentreVu CMS Administration
Changing agent skills and extension split assignments 6-11
...........................................................................................................................................................................
6 To change the skill used to queue an agent’s direct agent calls, type the skill name or number under Agent Skills and Skill Levels, or select the name or number from the drop-down list. If the agent has only reserve skills (not on the list), you cannot give that agent a direct agent skill.
...........................................................................................................................................................................
7 To change the level of an already assigned skill, select the level from the drop-down list. If Skill Level Call Handling is enabled, an arrow icon points to the agent’s top skill. Select a new skill-level value. Select OK to save your changes or select cancel to ignore your changes.
...........................................................................................................................................................................
8 To change which skills are assigned to this agent or template, select the skill on the drop-down list. Assigned skills must have either a skill level or a reserve level. To assign one or more skills, select Add Skill.
...........................................................................................................................................................................
9 Choose from the following:
• On DEFINITY ECS with CentreVu Advocate, to set a new percent allocation, select Percent and select Yes. If an agent or template already has a reserve level, the Percent field is blank.
• To make an assigned skill the top skill for this agent, select the skill and select Make Top Skill.
• To apply your changes to a group of up to 50 agents, select Use for one or more agent(s), type the agent names or login IDs, or select the names or login IDs on the drop-down list, or select Browse. Select OK.
• To change skill assignments for other agents or templates, select another agent or template in the Select Agent/Template window and repeat steps 4 through 9.
• If you are done making changes, select OK, then select Cancel to save your changes and exit this procedure.
If a change is pending, a message tells you that the changes will not be made until the pending conditions are resolved. If you are applying changes to a group of up to 50 agents, a status field shows the status of each change.
E N D O F S T E P S...........................................................................................................................................................................

Task: administering call center agents CentreVu CMS Administration
Changing agent skills and extension split assignments 6-12
Steps To change extension split assignments:
...........................................................................................................................................................................
1 From the controller window, select Commands | Agent Administration or select Agent Administration on the toolbar.
The Agent Administration selector window opens.
...........................................................................................................................................................................
2 In the ACD field, select the ACD for which you want to change extension split assignments.
...........................................................................................................................................................................
3 Select Operations | Change Extension Split Assignments and select OK.
The Select Extension window opens.
...........................................................................................................................................................................
4 On the Select Extension window, type the extension number for which you want to change the split assignments, or select the number from the drop-down list, or select Browse. Select OK.
The Change Extension Split Assignments window opens.
The Move Extension From Split field shows the split assignment. The Move Extension To Split field shows available split names/numbers. If the extension is logged in, the Logged-In icon displays.
...........................................................................................................................................................................
5 Do one of the following:
• To change splits for an extension other than the one shown, select Cancel to reopen the Select Extension window.
• To change splits for this extension, go to Step 6.

Task: administering call center agents CentreVu CMS Administration
Changing agent skills and extension split assignments 6-13
...........................................................................................................................................................................
6 In the Move Extension From Split field, highlight the split name/number you no longer want associated with this extension.
...........................................................................................................................................................................
7 In the Move Extension To Split field, highlight the split name/number you want the extension assigned to.
...........................................................................................................................................................................
8 Do one of the following:
• To change split assignments for other extensions, select OK and repeat Steps 5 through 8 for the next extension number.
• If you are done making changes, select OK, then select Cancel to save your changes and exit this procedure.
E N D O F S T E P S...........................................................................................................................................................................
Reference
Changing agent skills
• Changing agent skills is available only for DEFINITY ECS R5 and later, or for DEFINITY G3V3 or G3V4 with EAS.
• For agents who frequently have calls on hold, skill changes can remain pending for a long time.
• When you change agent skills, the change remains in effect until you make another change.
• You cannot exit this window until you get a response to your changes.
• You can only select up to 50 agents at a time when applying an agent template.
• The skill administered as Skill 1 affects the way tracking is done for an agent. Extension calls and call-handling time are attributed to the first skill administered and successfully logged into. (For DEFINITY G3V3 or G3V4, direct agent calls are also tracked this way; for DEFINITY ECS, direct agent calls are tracked to the direct agent skill.)

Task: administering call center agents CentreVu CMS Administration
Changing agent skills and extension split assignments 6-14
• On G3V4 and any DEFINITY ECS, the change takes place immediately for agents who are in the AUX work mode, available, or logged out. For agents who are handling calls (including non-ACD calls, calls on hold, and direct agent calls waiting in queue) or agents who are in ACW mode, the change is pending until the agent logs out, changes to AUX work mode, or completes all calls and ACW, and becomes available.
• On G3V3, the skill changes go into effect after the agent manually logs out.
• On G3V4 with EAS, the Multi-Agent Skill Change window shows the one-character New skill type input field instead of the two-character New skill level field described here.
• You can script the Change Agent Skills window and schedule the script. See “Task: automating your activities with scripting” for more information.
• You can put the Change Agent Skills window on a timetable (see “Task: using timetables and shortcuts” for more information). When you use the timetable to change agent skills, information about the status of the change is not saved.
Changing extension split assignments
• You can script the Change Extension Split Assignments window and schedule the script. See “Task: automating your activities with scripting” for more information.
• You can put the Change Extension Split Assignments window on a timetable. See “Task: using timetables and shortcuts” for more information.
• You cannot exit this window until the switch responds to your changes.
• For DEFINITY ECS and G3V4, the change takes place immediately for agents who are in the AUX work mode, available, or logged out. For agents who are handling calls (including non-ACD calls, calls on hold, and direct agent calls waiting in queue), are in the ACW mode, or are the last agent in a nonvector-controlled split with calls in queue, the change is pending until the agent logs out, changes to AUX work mode, or completes all calls and ACW, and becomes available.
• For G3V2 and G3V3, the change takes place after the agent manually logs out.

Task: administering call center agents CentreVu CMS Administration
Creating or applying an agent template 6-15
............................................................................................................................................................................................................................................................Creating or applying an agent template
Steps To create an agent template or to apply an agent template to a group of agents:
...........................................................................................................................................................................
1 From the controller window, select Commands | Agent Administration.
The Agent Administration selector window opens.
...........................................................................................................................................................................
2 In the ACD field, select the ACD for which you want to change agent skills.
...........................................................................................................................................................................
3 Select Operations | Change Agent Skills, and select OK.
...........................................................................................................................................................................
4 Select OK.
The Select Agent/Template window opens.
...........................................................................................................................................................................
5 Choose from the following:
• To create a template from an existing agent login ID, on the drop-down list select the agent name or login ID of the agent whose skill assignments you want to use as a template, or select Browse to choose from a list of agents. Select OK.
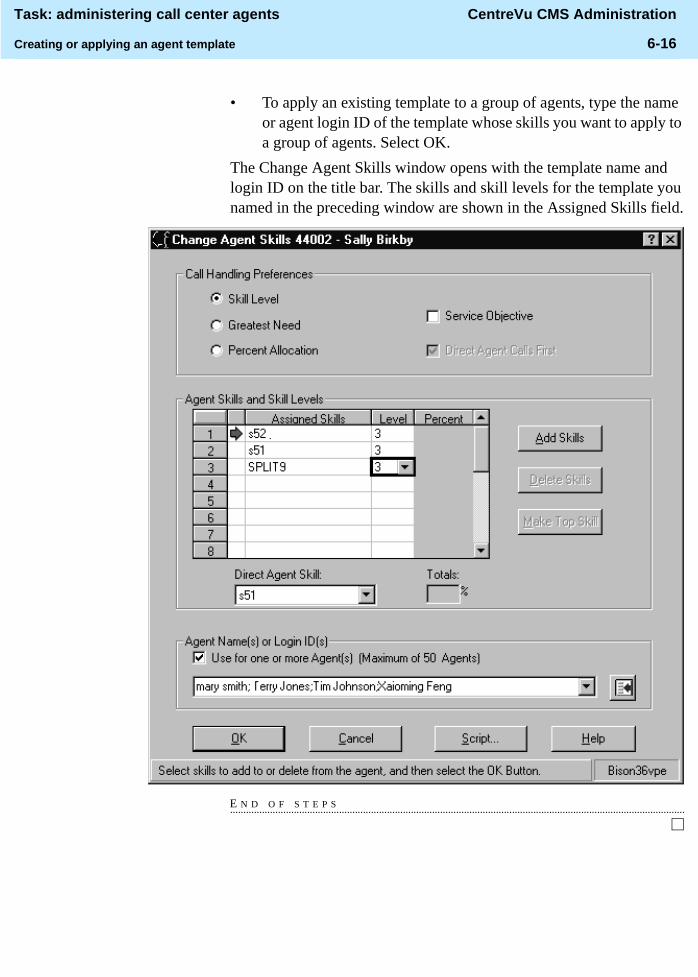
Task: administering call center agents CentreVu CMS Administration
Creating or applying an agent template 6-16
• To apply an existing template to a group of agents, type the name or agent login ID of the template whose skills you want to apply to a group of agents. Select OK.
The Change Agent Skills window opens with the template name and login ID on the title bar. The skills and skill levels for the template you named in the preceding window are shown in the Assigned Skills field.
E N D O F S T E P S...........................................................................................................................................................................
Task: administering call center agents CentreVu CMS Administration
Multi-agent skill change and moving extensions between splits 6-17
............................................................................................................................................................................................................................................................Multi-agent skill change and moving extensions between splits
Steps To change one skill for multiple agents:
...........................................................................................................................................................................
1 From the controller window, select Operations | Agent Administration.
The Agent Administration selector window opens.
...........................................................................................................................................................................
2 In the ACD field, select the ACD for which you want to change agent skills.
...........................................................................................................................................................................
3 Select Operations | Multi-Agent Skill Change and select OK.
The Multi-Agent Skill Change window opens.

Task: administering call center agents CentreVu CMS Administration
Multi-agent skill change and moving extensions between splits 6-18
...........................................................................................................................................................................
4 To move agents from skill to skill, do one of the following (you can also use these steps to add agents in one skill to another skill):
• Select one agent name/number, drag it to the new skill, and release the mouse button. If you hold down the CTRL key while dragging and dropping the agent name, the agent is added instead of moved to the destination skill.
• Hold down the CTRL key on your keyboard and select multiple agent names (as many as 32) in one skill, then drag the agents to the new skill and release the mouse button. If you hold down the CTRL key while dragging and dropping the agent names, the agents are added instead of moved to the destination skill.
• Hold down the Shift key and select the first agent name and the last agent name in a range to select those agents listed between the two. Drag the agents (as many as 32) to the new skill and release the mouse button. If you hold down the CTRL key while dragging and dropping the agent names, the agents are added instead of moved to the destination skill.
A confirmation window shows the agents you moved in the left-hand field, with the agent's call-handling preference, reserve level or skill level, service objective, and percent allocation for the skill (on DEFINITY ECS with CentreVu Advocate.) The right-hand field shows the from-to skill information.
...........................................................................................................................................................................
5 To continue moving agents from skill to skill, do one of the following:
• On DEFINITY ECS, type a skill-level value for each agent moved/added to this new skill. On DEFINITY ECS R8 with CentreVu Advocate, reserves one and two are also valid skill levels.
• On the Move Agents Between Skills window, select Preserve Original Level, to keep the agents' original skill levels. This deactivates the Level field so you cannot type a skill level or reserve level for the destination skill.
• On G3V4, select Primary or Secondary for the new skill.
...........................................................................................................................................................................
6 To complete the move, select OK or select Cancel to ignore your changes.
Task: administering call center agents CentreVu CMS Administration
Multi-agent skill change and moving extensions between splits 6-19
Result
If one or more moves fail, a status window shows the moves that were not made and the reason, or it shows the pending status.
...........................................................................................................................................................................
7 When you are done, the Move or Add window will automatically close after you select OK. If you aren’t done, repeat the preceding steps.
E N D O F S T E P S...........................................................................................................................................................................
Steps To move extensions between splits:
...........................................................................................................................................................................
1 Select Operations | Move Extensions Between Splits and select OK.
The Move Extensions Between Splits window opens.
...........................................................................................................................................................................
2 In the Split List window, double-click the names/numbers of the splits to move extensions from/to.
...........................................................................................................................................................................
3 Do one of the following:
• Select one extension number, drag it to the split to which you want to move the extension, and release the mouse button.
• Hold down the Ctrl key and select multiple extension numbers in one skill, then drag the extensions to the new skill and release the mouse button.
• Hold down the Shift key on your keyboard and select two extension numbers to select the range of extensions listed between the two you selected, then drag the extensions to the new skill and release the mouse button.
The Move Extensions Between Splits confirmation window opens.
E N D O F S T E P S...........................................................................................................................................................................
Task: administering call center agents CentreVu CMS Administration
Multi-agent skill change and moving extensions between splits 6-20
Reference
• To type a split name in the Split moving from or Split moving to field, the name must first be assigned in the Dictionary. See “Task: naming your call center entities in the Dictionary” for more information.
• You can script the Move Extensions Between Splits window and schedule the script. See “Task: automating your activities with scripting” for more information.
• You can put the Move Extensions Between Splits window on a timetable. See “Task: using timetables and shortcuts” for more information. When you use a timetable to move extensions between splits, information about the status of the move is not saved.
• You can move as many as 32 extensions in a single move.
• You cannot exit this window until the switch responds to your changes.
• For DEFINITY ECS and G3V4, the move takes place immediately for agents who are in the AUX work mode, available, or logged out. For agents who are handling calls (including non-ACD calls, calls on hold, and direct agent calls waiting in queue), are in the ACW mode, or are the last agent in a nonvector-controlled split with calls in queue, the move is pending until the agent logs out, changes to AUX work mode, or completes all calls and ACW, and becomes available. When these conditions are met, the agent extensions are automatically logged out of the moving-from split and logged in to the moving-to split.
• For agents who frequently have calls on hold, a move-extensions request can remain pending for a long time.
• For G3V2 and G3V3s, the move takes place after the agent manually logs out.
When agents are moved while staffed, the VuStats feature (available for DEFINITY ECS and DEFINITY G3V3 or G3V4) can give agents current split assignments and other ACD-related information.
Task: administering call center agents CentreVu CMS Administration
Multi-agent skill change and moving extensions between splits 6-21
• For DEFINITY ECS or G3V4, agents cannot be preassigned to splits (through switch administration) and then moved to those splits from CentreVu CMS. If agents are preassigned to splits, the message “already assigned” appears when you try to move an agent to one of the preassigned splits.
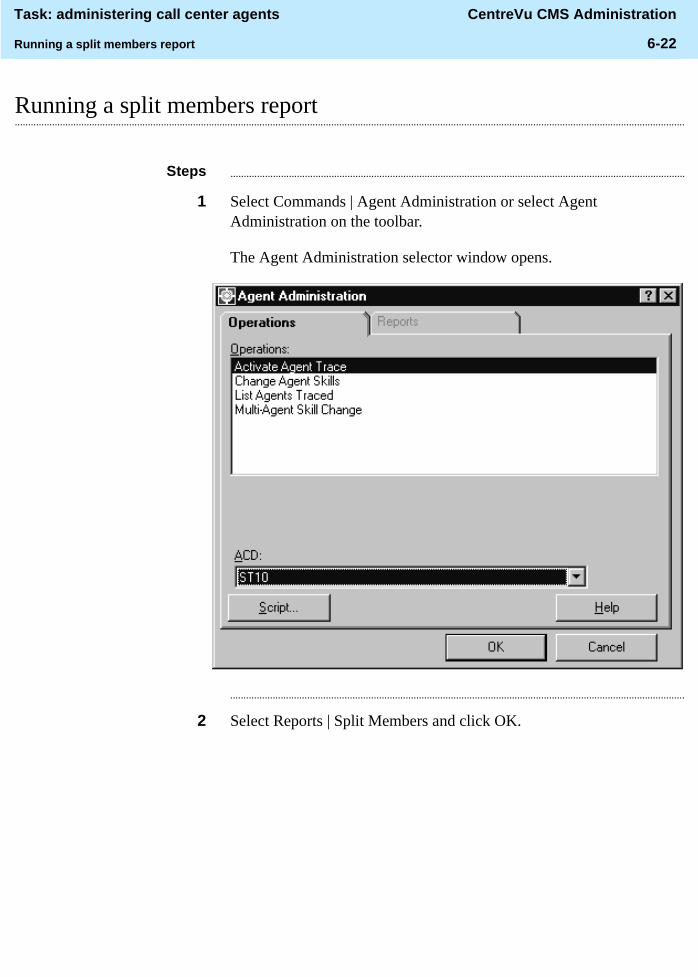
Task: administering call center agents CentreVu CMS Administration
Running a split members report 6-22
............................................................................................................................................................................................................................................................Running a split members report
Steps ...........................................................................................................................................................................
1 Select Commands | Agent Administration or select Agent Administration on the toolbar.
The Agent Administration selector window opens.
...........................................................................................................................................................................
2 Select Reports | Split Members and click OK.

Task: administering call center agents CentreVu CMS Administration
Running a split members report 6-23
The Split Members input window opens.
...........................................................................................................................................................................
3 In the Splits field, type split numbers or names for which you want to run a report (these must first be assigned in the Dictionary,) or select the splits from the Splits pull-down menu. See online help for the valid numeric ranges for your switch.
...........................................................................................................................................................................
4 In the Destination field, select View Report on Screen or Print Report on. Click Select Printer. The default printer name displays.

Task: administering call center agents CentreVu CMS Administration
Running a split members report 6-24
The Split Members report displays or prints.
The Split Members report lists the selected splits in numerical order, each split’s assigned name, and the extensions that are assigned to the split. If the split does not have a name assigned, the Split Name field shows the split number. If the split has no extensions assigned to it, the Extension field is blank.
E N D O F S T E P S...........................................................................................................................................................................
Reference
• To use names for splits, the names must first be assigned in the Dictionary. See “Task: naming your call center entities in the Dictionary” for more information.
• You can script the Split Members window and schedule the script. See “Task: automating your activities with scripting” for more information.
• You can put the Split Members input window and report on a timetable. See “Task: using timetables and shortcuts” for more information.
• You cannot create a custom report from the split members report.
Task: administering your call center CentreVu CMS Administration
7-1
7 Task: administering your call center
............................................................................................................................................................................................................................................................Overview
Purpose In this task you will find the following procedures:
• Viewing, adding, or deleting call work codes
• Changing VDN skill preferences
• Adding, deleting, or changing split/skill call profiles
• Viewing trunk group assignments
• Running a trunk group members report
• Changing VDN-to-vector assignments
• Adding, deleting, or changing VDN call profiles
• Running vector configuration reports
Permissions These permissions apply to administering your call center. See “Task: assigning user permissions” for more information.
• To add or delete call work codes, you need read/write permission for the Call Center Administration command.
• To view call work codes, you need read permission for the Call Center Administration command.
• To change the skill preferences assigned to VDNs, you need read/write permission for the Call Center Administration command and for the VDNs affected by the change.

Task: administering your call center CentreVu CMS Administration
7-2
• To view skill preference assignments, you need read permission for the Call Center Administration command and for the VDNs affected by the change.
• To add, delete, or change a split/skill call profile, you need read/write permission for the Call Center Administration command and for all splits/skills affected by the change.
• To view split/skill call profiles, you need read permission for the Call Center Administration command.
• To view trunk group assignments, you need read permission for Call Center Administration and for any trunk groups, splits, and VDNs you want to view.
• To change VDN assignments, you need read/write permission for the Call Center Administration command and for the vector to which you are assigning the VDNs.
• To view VDN assignments, you need read permission for the Call Center Administration command, and for the vector and VDNs.
• To add, delete, or change a VDN call profile, you need read/write permission for the Call Center Administration command and for VDNs affected by the change.
• To view a VDN call profile, you need read permission for the Call Center Administration command and for the VDNs.
• To run a vector configuration report, you must have read permission for the Call Center Administration command and the vectors you want listed in the report. (The trunk groups and VDNs carrying calls to the vectors are listed even if you do not have read permission for those VDNs and trunk groups.)
• To run a trunk group members report, you need read permission for the Call Center Administration command and for all trunk groups you want in the report.
Use the procedures that follow to administer your call center.

Task: administering your call center CentreVu CMS Administration
Viewing, adding, or deleting call work codes 7-3
............................................................................................................................................................................................................................................................Viewing, adding, or deleting call work codes
Prerequisites
• Call work codes must be positive integers with one to 16 digits. You can assign names in the Dictionary for codes consisting of one to 9 digits. It is recommended that you use a fixed number of digits for all call work codes. A fixed number of digits makes it easier to add, delete, and search for call work codes.
• Call work code 0 is always assigned and is used to collect information on unassigned call work codes. You cannot delete call work code 0. If an agent enters an unassigned call work code, it shows up as code 0 on the call work code report. If you assign an invalid call work code exception, the agent exceptions historical report shows agents who entered invalid (unassigned) call work codes.
• You assign call work codes to a specific ACD. The number of call work codes you can assign depends on your data storage allocation for the ACD. See “Allocating storage space” in “Task: viewing and changing system setup values” for more information.
• For standard call work code reports, you must assign the codes on the Call Work Codes window. For call records to collect call work code data, you do not have to use this window to assign the codes.
Steps ...........................................................................................................................................................................
1 From the controller window, select Commands | Call Center Administration or select Call Center Administration on the toolbar.
The Call Center Administration selector window opens.
...........................................................................................................................................................................
2 Select Operations | Call Work Codes.
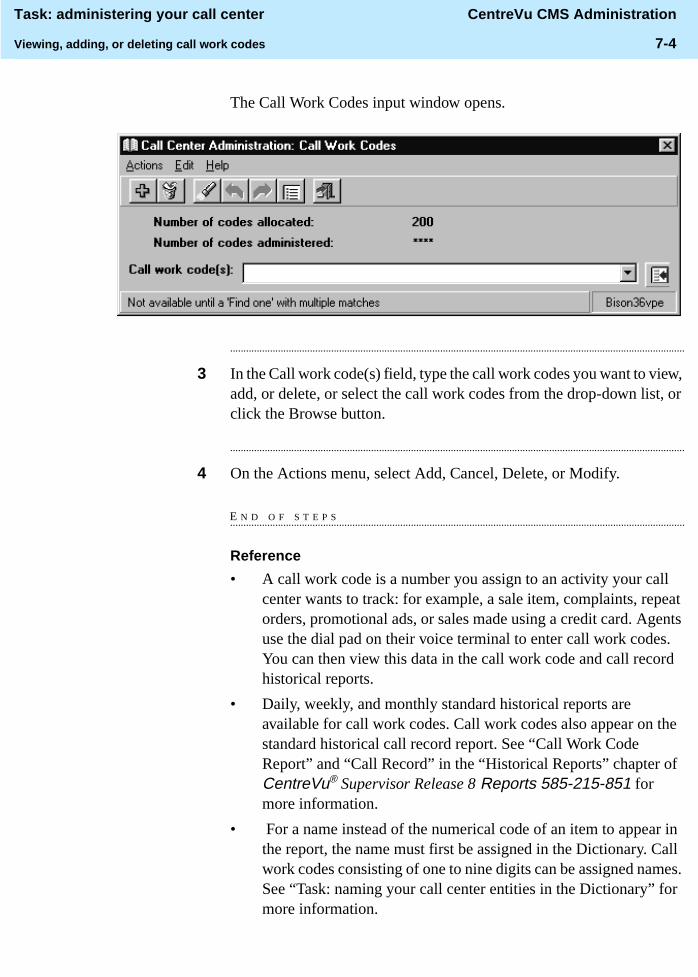
Task: administering your call center CentreVu CMS Administration
Viewing, adding, or deleting call work codes 7-4
The Call Work Codes input window opens.
...........................................................................................................................................................................
3 In the Call work code(s) field, type the call work codes you want to view, add, or delete, or select the call work codes from the drop-down list, or click the Browse button.
...........................................................................................................................................................................
4 On the Actions menu, select Add, Cancel, Delete, or Modify.
E N D O F S T E P S...........................................................................................................................................................................
Reference
• A call work code is a number you assign to an activity your call center wants to track: for example, a sale item, complaints, repeat orders, promotional ads, or sales made using a credit card. Agents use the dial pad on their voice terminal to enter call work codes. You can then view this data in the call work code and call record historical reports.
• Daily, weekly, and monthly standard historical reports are available for call work codes. Call work codes also appear on the standard historical call record report. See “Call Work Code Report” and “Call Record” in the “Historical Reports” chapter of CentreVu® Supervisor Release 8 Reports 585-215-851 for more information.
• For a name instead of the numerical code of an item to appear in the report, the name must first be assigned in the Dictionary. Call work codes consisting of one to nine digits can be assigned names. See “Task: naming your call center entities in the Dictionary” for more information.
Task: administering your call center CentreVu CMS Administration
Viewing, adding, or deleting call work codes 7-5
• You can administer an exception for agents who enter invalid (unassigned) call work codes. See “Task: administering exceptions” for more information.
• You can script the Call Work Codes window and schedule the script. See “Task: automating your activities with scripting” for more information.
• You can put the Call Work Codes window on a timetable. See “Task: using timetables and shortcuts” for more information.
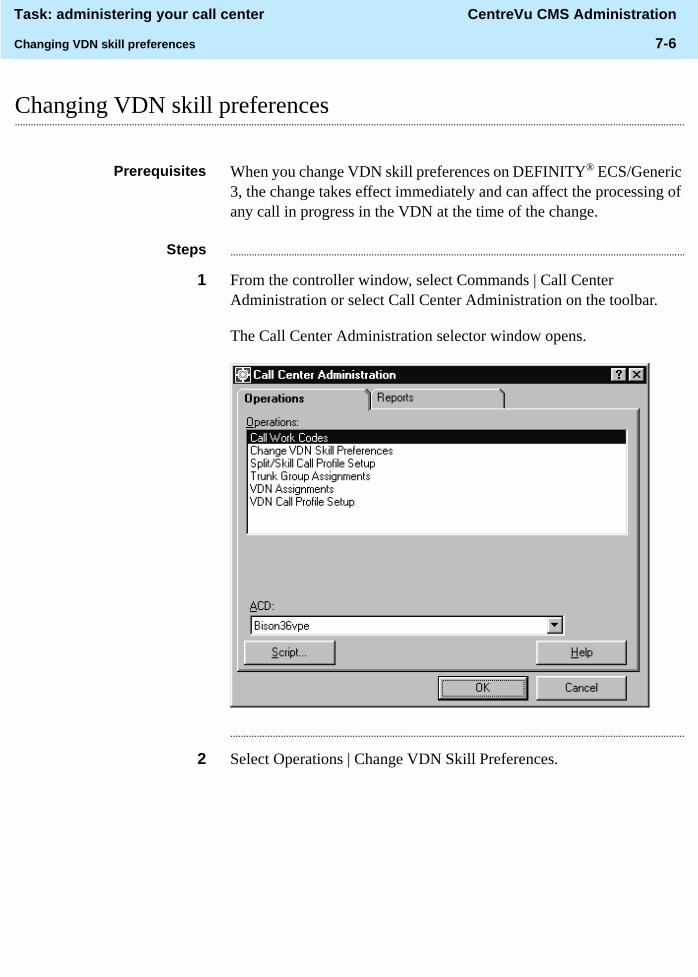
Task: administering your call center CentreVu CMS Administration
Changing VDN skill preferences 7-6
............................................................................................................................................................................................................................................................Changing VDN skill preferences
Prerequisites When you change VDN skill preferences on DEFINITY® ECS/Generic 3, the change takes effect immediately and can affect the processing of any call in progress in the VDN at the time of the change.
Steps ...........................................................................................................................................................................
1 From the controller window, select Commands | Call Center Administration or select Call Center Administration on the toolbar.
The Call Center Administration selector window opens.
...........................................................................................................................................................................
2 Select Operations | Change VDN Skill Preferences.

Task: administering your call center CentreVu CMS Administration
Changing VDN skill preferences 7-7
The Change VDN Skill Preferences input window opens.
...........................................................................................................................................................................
3 In the VDN(s) field, type a list or range of VDNs whose skill preferences you want to view or change.
...........................................................................................................................................................................
4 To see which VDNs you can change, leave the VDN(s) field blank and select List all on the Actions menu.
...........................................................................................................................................................................
5 In the Skill preferences 1st, 2nd, and 3rd fields, type the 1st, 2nd, and 3rd skill preferences to assign to the list of VDNs.
...........................................................................................................................................................................
6 On the Actions menu, select Add, Cancel, Delete, or Modify.
E N D O F S T E P S...........................................................................................................................................................................

Task: administering your call center CentreVu CMS Administration
Changing VDN skill preferences 7-8
Reference
• On DEFINITY ECS/Generic 3, selecting Modify on the Actions menu changes switch administration, which affects calls currently in vector processing and new calls.
• You can script the Change VDN Skill Preferences window and schedule the script. See “Task: automating your activities with scripting” for more information.
• You can schedule VDN skill preference changes on a timetable. This can be useful if you want to make assignments during off-hours. See “Task: using timetables and shortcuts” for more information.
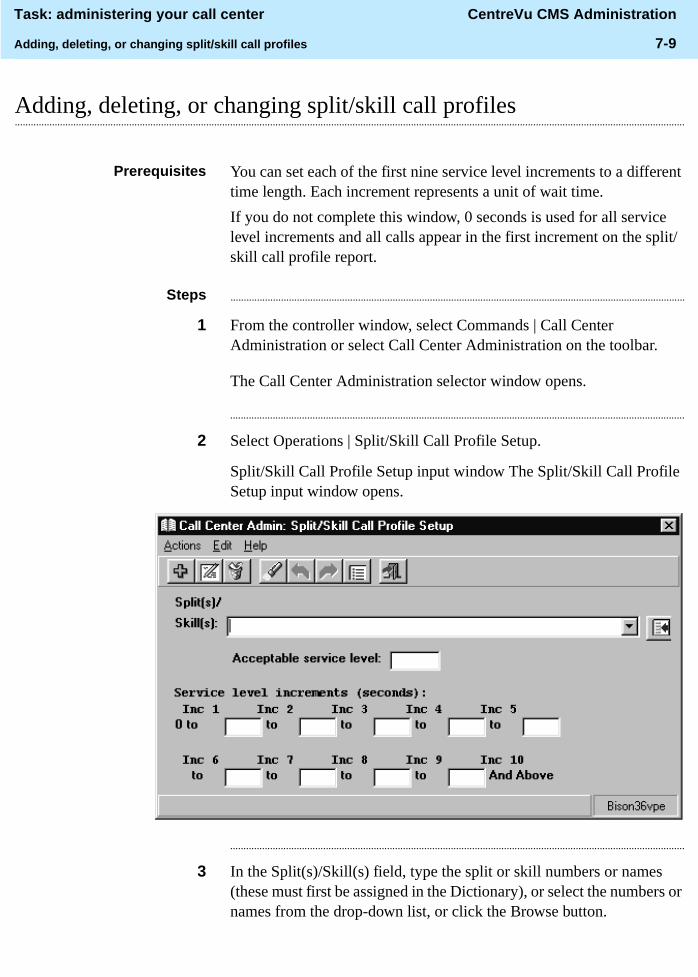
Task: administering your call center CentreVu CMS Administration
Adding, deleting, or changing split/skill call profiles 7-9
............................................................................................................................................................................................................................................................Adding, deleting, or changing split/skill call profiles
Prerequisites You can set each of the first nine service level increments to a different time length. Each increment represents a unit of wait time.
If you do not complete this window, 0 seconds is used for all service level increments and all calls appear in the first increment on the split/skill call profile report.
Steps ...........................................................................................................................................................................
1 From the controller window, select Commands | Call Center Administration or select Call Center Administration on the toolbar.
The Call Center Administration selector window opens.
...........................................................................................................................................................................
2 Select Operations | Split/Skill Call Profile Setup.
Split/Skill Call Profile Setup input window The Split/Skill Call Profile Setup input window opens.
...........................................................................................................................................................................
3 In the Split(s)/Skill(s) field, type the split or skill numbers or names (these must first be assigned in the Dictionary), or select the numbers or names from the drop-down list, or click the Browse button.

Task: administering your call center CentreVu CMS Administration
Adding, deleting, or changing split/skill call profiles 7-10
...........................................................................................................................................................................
4 In the Acceptable service level field, type the number of seconds that are acceptable for an ACD call to wait before connecting to an agent. The acceptable service level must be the same as the service level on the DEFINITY ECS forms. This field is required.
...........................................................................................................................................................................
5 In the Service level increments (seconds) field, type a progressively greater number of seconds in each “to” field. The seconds before and after each “to” define an increment in seconds of wait time. For example, ��WR���WR����WR��� … means 0 to 5, 6 to 10, and 11 to 25, etc.
Each of the nine increments can vary in length (for example, 0 to 15, 16 to 20, 21 to 26, 27 to 38, 39 to 43, etc.). Each increment represents a progressively longer wait time for the call, and is used for both answered and abandoned calls. This field is required.
...........................................................................................................................................................................
6 On the Actions menu, select Add, Cancel, Delete, or Modify.
E N D O F S T E P S...........................................................................................................................................................................
Reference
• To use names for splits/skills, you must first assign the names in the Dictionary. See “Task: naming your call center entities in the Dictionary” for more information.
• CentreVu CMS counts the calls that are either answered or abandoned within each increment. The totals are shown in the split/skill call profile reports and graph reports. Therefore, what you administer in these steps affects what you see in the reports (real-time and historical).
• You can script the Split/Skill Call Profile Setup window and schedule the script. See “Task: automating your activities with scripting” for more information.
• You can put the Split/Skill Call Profile Setup window on a timetable. See “Task: using timetables and shortcuts” for more information.
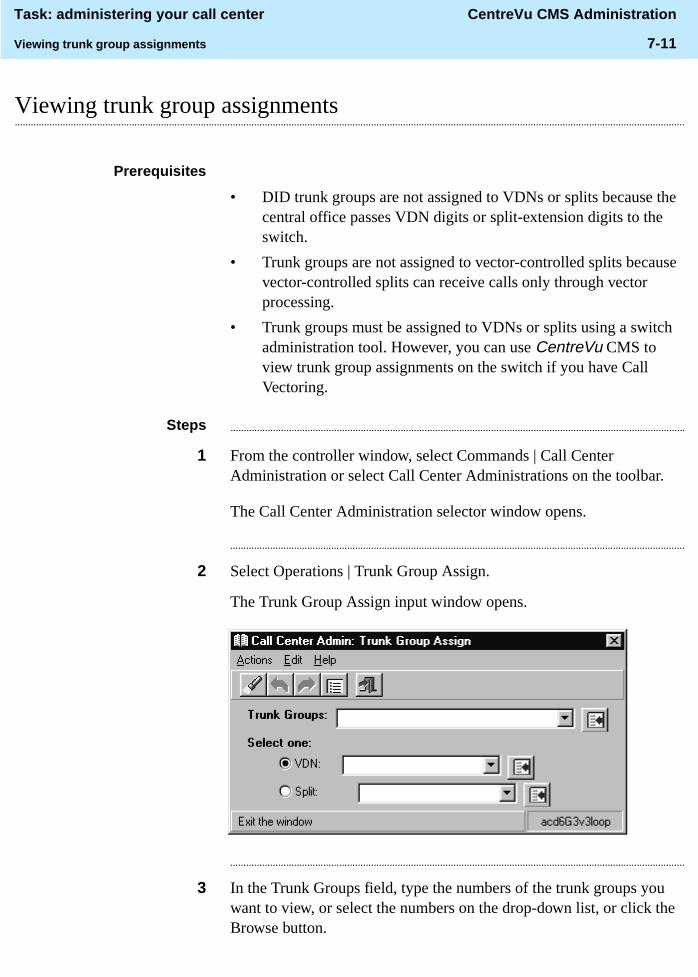
Task: administering your call center CentreVu CMS Administration
Viewing trunk group assignments 7-11
............................................................................................................................................................................................................................................................Viewing trunk group assignments
Prerequisites
• DID trunk groups are not assigned to VDNs or splits because the central office passes VDN digits or split-extension digits to the switch.
• Trunk groups are not assigned to vector-controlled splits because vector-controlled splits can receive calls only through vector processing.
• Trunk groups must be assigned to VDNs or splits using a switch administration tool. However, you can use CentreVu CMS to view trunk group assignments on the switch if you have Call Vectoring.
Steps ...........................................................................................................................................................................
1 From the controller window, select Commands | Call Center Administration or select Call Center Administrations on the toolbar.
The Call Center Administration selector window opens.
...........................................................................................................................................................................
2 Select Operations | Trunk Group Assign.
The Trunk Group Assign input window opens.
...........................................................................................................................................................................
3 In the Trunk Groups field, type the numbers of the trunk groups you want to view, or select the numbers on the drop-down list, or click the Browse button.

Task: administering your call center CentreVu CMS Administration
Viewing trunk group assignments 7-12
...........................................................................................................................................................................
4 Select VDN as the object to search for. Type the number or name (these must first be assigned in the Dictionary) of the VDN whose assigned trunk groups you want to view, or select the number or name on the drop-down list, or click the Browse button.
...........................................................................................................................................................................
5 Select Split as the object to search for. Type the number or name (these must first be assigned in the Dictionary) of the split whose assigned trunk groups you want to view, or select the number on the drop-down list, or click the Browse button.
...........................................................................................................................................................................
6 To view specific trunk group assignments, select Find one on the Actions menu. Complete the Trunk Groups field, and either the VDN or the Split field.
...........................................................................................................................................................................
7 To display a list of trunk groups and the VDNs or splits to which they are assigned, select List all on the Actions menu and leave the input fields blank.
E N D O F S T E P S...........................................................................................................................................................................
Reference
• To use names for trunk groups, you must first assign the names in the Dictionary. See “Task: naming your call center entities in the Dictionary” for more information.
• You can script the Trunk Group Members input window and report window, and schedule the script. See “Task: automating your activities with scripting” for more information.
• You can schedule the Trunk Group Members input window and report on a timetable. See “Task: using timetables and shortcuts” for more information.

Task: administering your call center CentreVu CMS Administration
Running a trunk group members report 7-13
............................................................................................................................................................................................................................................................Running a trunk group members report
Steps ...........................................................................................................................................................................
1 From the controller window, select Commands | Call Center Administration or select Call Center Administration on the toolbar.
The Call Center Administration selector window opens.
...........................................................................................................................................................................
2 Select Operations | Trunk Group Members.
The Trunk Group Members input window opens.
...........................................................................................................................................................................
3 In the Trunk Groups field, type the numbers of the trunk groups you want to view. (The report shows the trunk group number/name and trunk number in the trunk group.) See online help for the valid numeric ranges for your particular switch.
...........................................................................................................................................................................
4 Under Destination, select View Report on Screen or Print Report on, then select Printer to print the report on any printer.
...........................................................................................................................................................................
5 On the Actions menu, select Run to generate the report.

Task: administering your call center CentreVu CMS Administration
Running a trunk group members report 7-14
An example of a Trunk Group Members report is shown below. The report lists the selected trunk groups in numerical order, each trunk group’s assigned name, and the equipment location of each trunk in the trunk group. If the trunk group does not have an assigned name, the Trunk Group Name field shows the trunk group number. If the trunk group has no trunks assigned to it, the equipment location field is blank.
E N D O F S T E P S...........................................................................................................................................................................

Task: administering your call center CentreVu CMS Administration
Running a trunk group members report 7-15
Reference
You cannot create a custom report from the trunk group members report.

Task: administering your call center CentreVu CMS Administration
Changing VDN-to-vector assignments 7-16
............................................................................................................................................................................................................................................................Changing VDN-to-vector assignments
Prerequisites
• You can assign multiple VDNs to a single vector, but you cannot assign a VDN to more than one vector.
• You cannot exit this window until the switch responds to your changes.
• When scheduling VDN moves, group all VDN moves together on one timetable or schedule them far enough apart so that one move completes before the next one starts.
Steps ...........................................................................................................................................................................
1 From the controller window, select Commands | Call Center Administration or select Call Center Administration on the toolbar.
The Call Center Administration selector window opens.
...........................................................................................................................................................................
2 Select Operations | VDN Assignments.

Task: administering your call center CentreVu CMS Administration
Changing VDN-to-vector assignments 7-17
The VDN Assignments input window opens.
...........................................................................................................................................................................
3 In the VDNs field, type the numbers or names (these must first be assigned in the Dictionary) of the VDNs you want to reassign, or select the numbers or names on the drop-down list, or click the Browse button. To see which vectors all measured VDNs have been assigned to, select List all on the Actions menu and leave the input fields blank.
...........................................................................................................................................................................
4 In the Vector field, type the number or name (these must first be assigned in the Dictionary) of the vector to which you want to assign the VDNs. To see which vectors the VDNs have been assigned to, select List all on the Actions menu and leave the input fields blank.
...........................................................................................................................................................................
5 To change VDN assignments, complete the VDNs and Vector fields, and select Modify on the Actions menu.
...........................................................................................................................................................................
6 To see a list of VDNs and the vectors to which they have been assigned, select List all on the Actions menu and leave the input fields blank. If a VDN is not assigned to a vector, the VDN is shown with a blank vector in the List All window.
E N D O F S T E P S...........................................................................................................................................................................

Task: administering your call center CentreVu CMS Administration
Changing VDN-to-vector assignments 7-18
Reference
• You can script the VDN Assignments window and schedule the script. See “Task: automating your activities with scripting” for more information.
• You can schedule VDN assignment changes on a timetable. This is useful if you want to make assignments during off-hours. See “Task: using timetables and shortcuts” for more information.
Task: administering your call center CentreVu CMS Administration
Adding, deleting, or changing VDN call profiles 7-19
............................................................................................................................................................................................................................................................Adding, deleting, or changing VDN call profiles
Prerequisites
• You can set each of the first nine service level increments to a different time length. Each increment represents a unit of wait time.
• CentreVu CMS tracks and records call information for each VDN the call reaches until the call is answered, connected to a non-ACD destination, abandoned, or routed to another VDN or off the switch.
• The service level increments you define for a VDN determine the increments that appear for that VDN on both the real-time and historical VDN call profile reports. Therefore, the acceptable service level you define for a VDN affects the percentage of calls answered within that service level that is shown in the VDN's call profile report. See “Task: running, printing, exiting, and restarting a report” for more information.
Steps ...........................................................................................................................................................................
1 From the controller window, select Commands | Call Center Administration or select Call Center Administration on the toolbar.
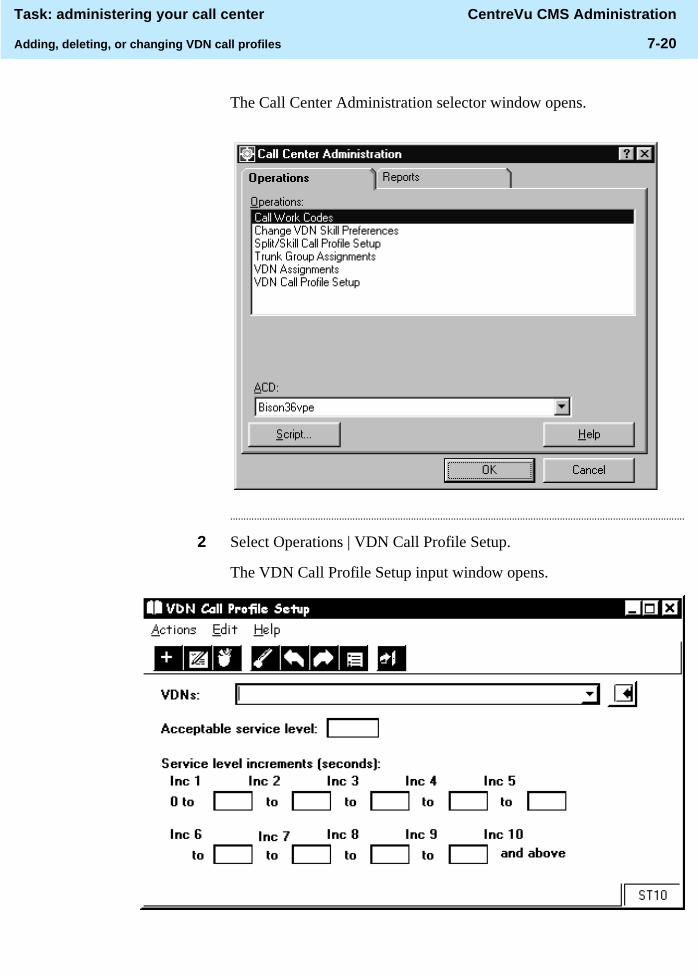
Task: administering your call center CentreVu CMS Administration
Adding, deleting, or changing VDN call profiles 7-20
The Call Center Administration selector window opens.
...........................................................................................................................................................................
2 Select Operations | VDN Call Profile Setup.
The VDN Call Profile Setup input window opens.

Task: administering your call center CentreVu CMS Administration
Adding, deleting, or changing VDN call profiles 7-21
...........................................................................................................................................................................
3 Choose from the following:
• To add a VDN call profile, complete all fields and select Add on the Actions menu.
• To copy an existing VDN call profile to a VDN that does not yet have a profile, select Find one on the Actions menu to display the profile you want to copy. Then change the VDNs listed in the VDN(s) field to the VDNs you want and select Add on the Actions menu.
• To delete a VDN call profile, complete the VDN(s) field and select Delete on the Actions menu.
• To change a VDN call profile, select Find one on the Actions menu to display a profile. Then change the field values and select Modify on the Actions menu.
...........................................................................................................................................................................
4 In the VDN(s) field, type the VDN numbers or names (these must first be assigned in the Dictionary) whose profile you want to add, delete, change, or copy; or select the number or names from the drop-down list; or click the Browse button. To see which VDNs are assigned to vectors, clear the input fields on the VDN Assignments window and select List all on the Actions menu.
...........................................................................................................................................................................
5 In the Acceptable service level field, type the number of seconds for the maximum acceptable time for incoming calls to the VDN to wait before connecting to an agent.
Calls answered within the service level, abandoned within the service level, and outflowed within the service level are recorded in the CentreVu CMS database. The number of seconds can be from one to 3,600 (the maximum number of seconds in an hour-long intrahour interval).
...........................................................................................................................................................................
6 In the Inc 1 field, type a number of seconds from one to 3,600 for the lowest service level increment. This number is the top of the range of seconds.

Task: administering your call center CentreVu CMS Administration
Adding, deleting, or changing VDN call profiles 7-22
CentreVu CMS counts calls that are either answered, connected to non-ACD destinations, or abandoned within this range and the totals are displayed in the VDN call profile report.
...........................................................................................................................................................................
7 In the Inc 2 through Inc 9 fields, type a number of seconds for the second through the ninth service-level increments.
The number of seconds for each increment must be at least one second greater than the number of seconds of the previous increment. For example, if the number of seconds for the previous increment is 25, you must type at least 26 seconds in the current increment.
This number forms a range with the number for the previous increment. Though the number you type is included in the range (and is the top of the range), the number from the previous increment is not included in the range. For example, ��WR���WR����WR��� … means 0 to 5, 6 to 10, and 11 to 25, etc.
CentreVu CMS counts calls that are either answered, connected to a non-ACD destination, or abandoned within each range. The totals are shown on the VDN call profile report.
...........................................................................................................................................................................
8 On the Actions menu, select Add, Cancel, Delete, or Modify.
E N D O F S T E P S...........................................................................................................................................................................

Task: administering your call center CentreVu CMS Administration
Running vector configuration reports 7-23
............................................................................................................................................................................................................................................................Running vector configuration reports
Prerequisites
• A vector number can display in the report even if it does not have an associated trunk group. A vector number can also display if the vector does not yet contain steps.
• You cannot create a custom report from a vector configuration report.
• A �JR�WR�YHFWRU step can cause a trunk group and/or VDN to carry calls to a vector to which the carrying VDN has not been assigned. Trunk groups and VDNs that carry calls to a secondary vector this way do not appear in the vector configuration report for those secondary vectors.
Steps ...........................................................................................................................................................................
1 From the controller window, select Commands | Call Center Administration or select Call Center Administration on the toolbar.
The Call Center Administration selector window opens.
...........................................................................................................................................................................
2 Select Operations | Vector Setup.
The Vector input window opens.
Task: administering your call center CentreVu CMS Administration
Running vector configuration reports 7-24
...........................................................................................................................................................................
3 In the Vector field, type the numbers or names (these must first be assigned in the Dictionary) of vectors you want in the report, or select the numbers or names on the drop-down list, or click the Browse button.
...........................................................................................................................................................................
4 In the Destination field, select View Report on Screen or Print Report on. Then select Select Printer to print the report on any printer.
E N D O F S T E P S...........................................................................................................................................................................

Task: administering exceptions CentreVu CMS Administration
8-1
8 Task: administering exceptions
............................................................................................................................................................................................................................................................Overview
Purpose An exception is a condition in which too many (or too few) occurrences of a type of activity in an ACD fall outside the limits set for your call center. An exception condition usually indicates abnormal or unacceptable performance in the ACD by agents, splits/skills, trunk groups, VDNs, or vectors.
In this task you will find the following procedures:
• Changing your exceptions notification
• Administering agent exceptions
• Administering split/skill exceptions
• Administering trunk group exceptions
• Administering VDN exceptions
• Administering vector exceptions
• Running an agent exceptions report
• Running a data collection report
• Running a malicious call trace report
• Running a split/skill exceptions report
• Running a trunk group exceptions report
• Running a VDN exceptions report
Use the steps that follow to administer exceptions.

Task: administering exceptions CentreVu CMS Administration
8-2
Prerequisites
• You can administer exceptions and generate reports for VDNs and vectors if your company has purchased Call Vectoring.
• You can administer exceptions and generate reports for skills if your company has purchased EAS.
Permissions These permissions apply to administering exceptions. See “Task: assigning user permissions” for more information.
• To set up or change checking for exceptions, you need write permission for the Exceptions command.
• To be notified of an exception for an entity, you need exceptions permission for that particular split or skill, trunk group, VDN, vector, or ACD. To see the exceptions in the real-time exceptions log, you also need exceptions permission for that entity.
• If you have multiple ACDs, to be notified of an exception for an ACD you need permission for each ACD. To be notified of an exception for that element and to see exceptions in the real-time exceptions log, you also need permission for a particular split or skill, trunk group, VDN, or vector for the ACD.
• If you have exceptions permission to a given entity but have no permission for Exceptions, you are notified when exceptions occur but you cannot view the exceptions log or any exception reports.
• To be notified of a malicious call exception, you need exception permission for the appropriate split or skill.
• To use the exceptions action, you need read or read/write permission for the Exceptions command. To be notified when limits for ACDs, splits/skills, trunk groups, VDNs, or vectors are exceeded, you need exceptions notification permission for these items. If you have more than 2,000 measured VDNs authorized, permissions checking for VDN exceptions administration will be turned off.
• For a report to display data, you need read permission for the ACD and for the split/skill, trunk group, VDN, or vector. For example, if you have read permission for splits 1, 2, and 4, and you try to run a report on splits 1, 4, and 5, you receive data for splits 1 and 4. You do not receive data for split 5 because you do not have read permission for that split. VDN permissions checking is disabled when more than 2000 VDNs are authorized.
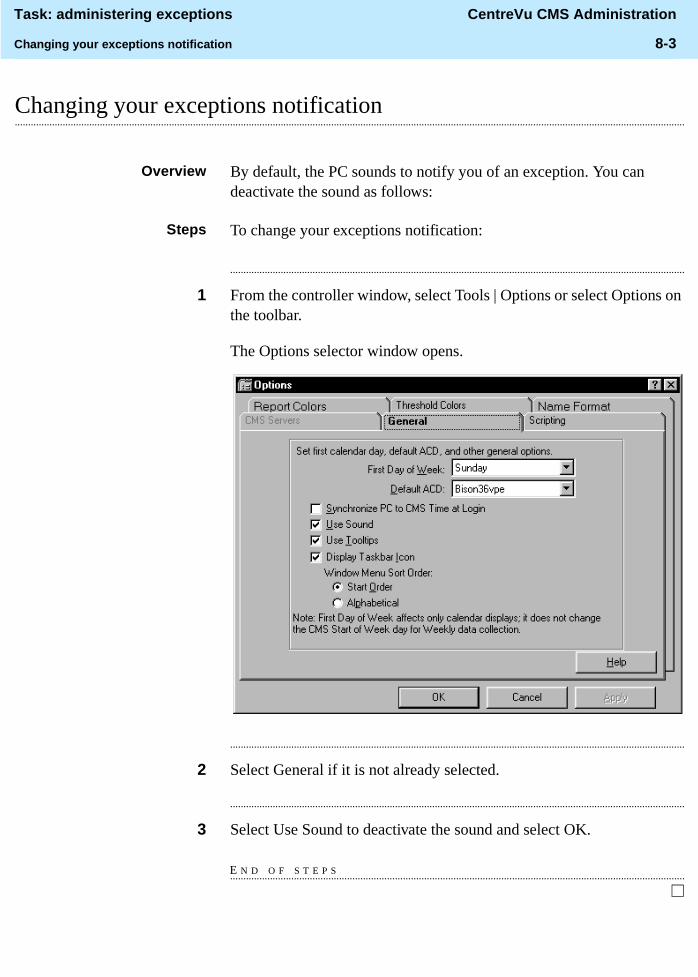
Task: administering exceptions CentreVu CMS Administration
Changing your exceptions notification 8-3
............................................................................................................................................................................................................................................................Changing your exceptions notification
Overview By default, the PC sounds to notify you of an exception. You can deactivate the sound as follows:
Steps To change your exceptions notification:
...........................................................................................................................................................................
1 From the controller window, select Tools | Options or select Options on the toolbar.
The Options selector window opens.
...........................................................................................................................................................................
2 Select General if it is not already selected.
...........................................................................................................................................................................
3 Select Use Sound to deactivate the sound and select OK.
E N D O F S T E P S...........................................................................................................................................................................

Task: administering exceptions CentreVu CMS Administration
Administering agent exceptions 8-4
............................................................................................................................................................................................................................................................Administering agent exceptions
Overview
• You administer agent exceptions per split or per skill; the exceptions apply to all agents logged into the split or skill.
• External outbound exceptions are a subset of outbound exceptions. If both types of exceptions are administered, the limit for external outbound covers external outbound calls and the limit for outbound covers only internal outbound calls.
Steps ...........................................................................................................................................................................
1 From the controller window, select Tools | Commands | Exceptions.
The Exceptions selector window opens.
...........................................................................................................................................................................
2 In the ACD, select the ACD for which you want to administer agent exceptions.
...........................................................................................................................................................................
3 Select Operations | Agent Exceptions.
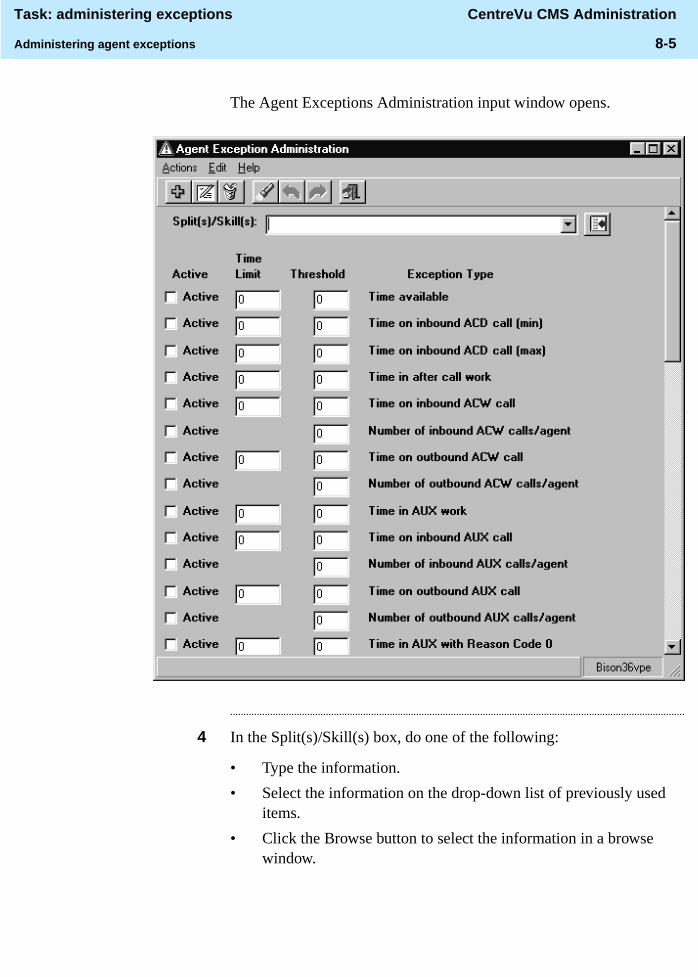
Task: administering exceptions CentreVu CMS Administration
Administering agent exceptions 8-5
The Agent Exceptions Administration input window opens.
...........................................................................................................................................................................
4 In the Split(s)/Skill(s) box, do one of the following:
• Type the information.
• Select the information on the drop-down list of previously used items.
• Click the Browse button to select the information in a browse window.

Task: administering exceptions CentreVu CMS Administration
Administering agent exceptions 8-6
...........................................................................................................................................................................
5 In the Active field, make each exception type active by selecting the check box or inactive by leaving the check box blank.
...........................................................................................................................................................................
6 In the Time Limit field, set the time limit in seconds for exception types that use a time limit. This field is required even if the Active check box is not selected.
...........................................................................................................................................................................
7 In the Threshold field, type a number from 0 to 999 for each active exception type. This sets the limit on acceptable occurrences; any occurrences beyond this number generate an exception. This field is required even if the Active check box is not selected.
...........................................................................................................................................................................
8 To set thresholds for each exception type, follow the steps in the table below.
E N D O F S T E P S...........................................................................................................................................................................
Exception type thresholds
In this field... Type this value...
Time available The time an agent spends in AVAIL (this is idle time).
Time on inbound ACD call (minimum)
The minimum time an agent spends on an ACD call.
Time on inbound ACD call (maximum)
The maximum time an agent spends on an ACD call.
Time in after-call work (maximum)
The maximum time an agent spends on after-call work.
Time on inbound ACW call (maximum)
The maximum time an agent spends on an inbound call during after-call work.

Task: administering exceptions CentreVu CMS Administration
Administering agent exceptions 8-7
Number of inbound ACW calls/agent
The total number of inbound calls an agent can receive during after-call work. This exception cannot trigger more than once within an interval.
Time on outbound ACW call (maximum)
The maximum time an agent spends on an outbound call during after-call work.
Number of outbound ACW calls/agent
The total number of outbound calls an agent can make during after-call work. This exception cannot trigger more than once within an interval.
Time in AUX work (maximum)
The maximum time an agent spends doing auxiliary work.
Time on inbound AUX call
The maximum time an agent spends on an inbound call during auxiliary work.
Number of inbound AUX calls/agent
The total number of inbound calls an agent can receive during auxiliary work. This exception cannot trigger more than once within an interval.
Time on outbound AUX call (maximum)
The maximum time an agent spends on an outbound call during auxiliary work.
Number of outbound AUX calls/agent
The total number of outbound calls an agent can place during auxiliary work. This exception cannot trigger more than once within an interval.
Time in AUX with Reason Code X (maximum)
The maximum time agents can spend doing auxiliary work with Reason Code X (X is from 0 to 9).
Login Identification Notification of a login violation. If you deactivate this exception, checking for Dictionary login violations is turned off. You cannot turn off checking for agents who try to log in using more than one login ID. This exception cannot trigger more than once within an interval.
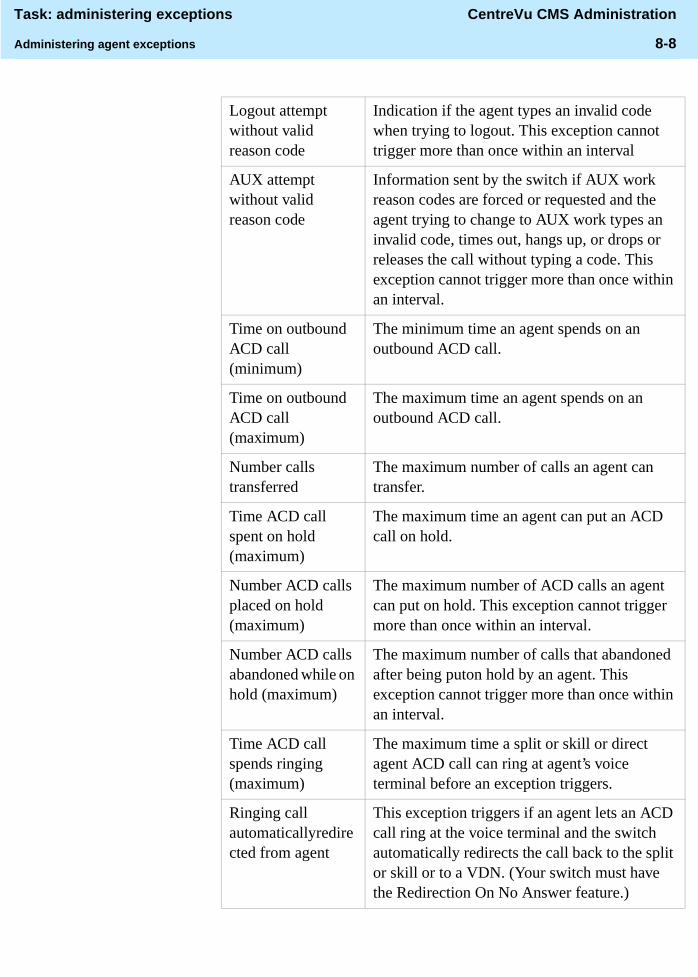
Task: administering exceptions CentreVu CMS Administration
Administering agent exceptions 8-8
Logout attempt without valid reason code
Indication if the agent types an invalid code when trying to logout. This exception cannot trigger more than once within an interval
AUX attempt without valid reason code
Information sent by the switch if AUX work reason codes are forced or requested and the agent trying to change to AUX work types an invalid code, times out, hangs up, or drops or releases the call without typing a code. This exception cannot trigger more than once within an interval.
Time on outbound ACD call (minimum)
The minimum time an agent spends on an outbound ACD call.
Time on outbound ACD call (maximum)
The maximum time an agent spends on an outbound ACD call.
Number calls transferred
The maximum number of calls an agent can transfer.
Time ACD call spent on hold (maximum)
The maximum time an agent can put an ACD call on hold.
Number ACD calls placed on hold (maximum)
The maximum number of ACD calls an agent can put on hold. This exception cannot trigger more than once within an interval.
Number ACD calls abandoned while on hold (maximum)
The maximum number of calls that abandoned after being puton hold by an agent. This exception cannot trigger more than once within an interval.
Time ACD call spends ringing (maximum)
The maximum time a split or skill or direct agent ACD call can ring at agent’s voice terminal before an exception triggers.
Ringing call automaticallyredirected from agent
This exception triggers if an agent lets an ACD call ring at the voice terminal and the switch automatically redirects the call back to the split or skill or to a VDN. (Your switch must have the Redirection On No Answer feature.)

Task: administering exceptions CentreVu CMS Administration
Administering agent exceptions 8-9
Time on direct agent call (maximum)
The maximum number of seconds an agent spends on a direct agent ACD call.
Number calls in direct agent queue (maximum)
The maximum number of direct agent ACD calls an agent can have waiting in queue.
Time call waited in direct agent queue (maximum)
The maximum time any call waits in the direct agent queue.
Number calls abandoned from direct agent queue (maximum)
The maximum number of direct agent ACD calls that can leave the direct agent queue by abandoning before an exception triggers. This exception cannot trigger more than once within an interval.
Number calls outflowed from direct agent queue (maximum)
The maximum number of direct agent calls that outflow from the direct agent queue. This exception cannot trigger more than once within an interval.
Time on external outbound ACW call (maximum)
The maximum number of seconds an agent spends on an external outbound call during after-call work (ACW).
Number of external outbound ACW calls/agent (maximum)
The maximum number of external outbound calls an agent can make while in after-call work. This exception cannot trigger more than once within an interval.
Time on external outbound AUX calls (maximum)
The maximum number of seconds an agent spends on an external outbound call during auxiliary work
Number external outbound AUX calls/agent (maximum)
The maximum number of external outbound calls an agent can make during auxiliary work. This exception cannot trigger more than once within an interval.
Agent logged out with active/held calls
The condition in which an agent has active calls or calls on hold when the agent logs out.

Task: administering exceptions CentreVu CMS Administration
Administering agent exceptions 8-10
Agent could not be logged in
An exception that is not on the Agent Exceptions Administration window because it is always enabled. The exception displays as “Could not be logged in” on the agent exceptions report.
Agent entered invalid call work codes
An exception pegged for CWC 0 (an agent types an unadministered call work code). This exception should be turned off if you are collecting call work codes in call records only.
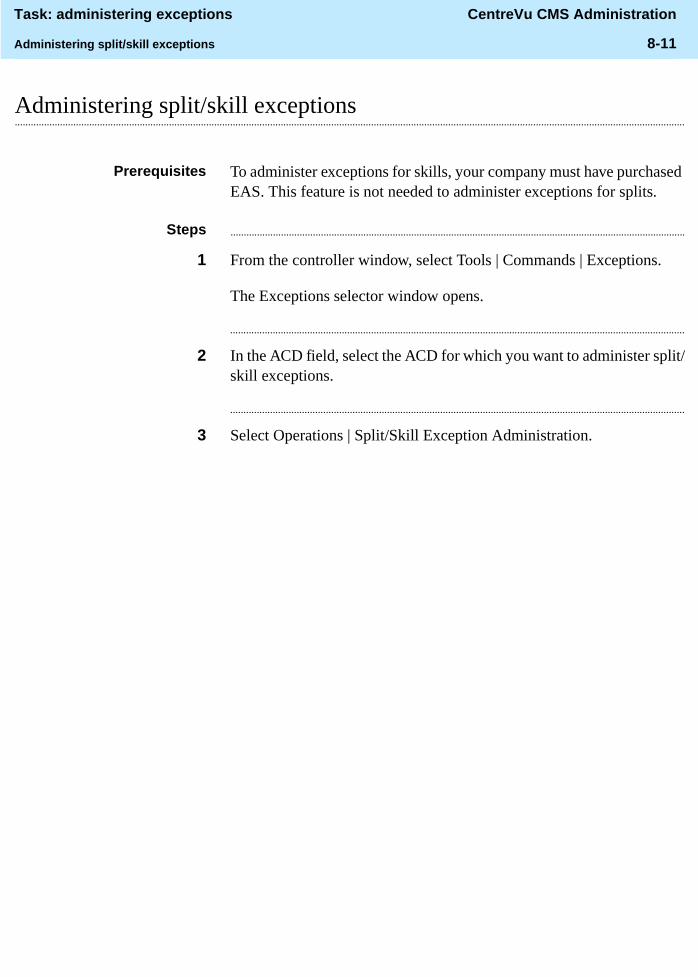
Task: administering exceptions CentreVu CMS Administration
Administering split/skill exceptions 8-11
............................................................................................................................................................................................................................................................Administering split/skill exceptions
Prerequisites To administer exceptions for skills, your company must have purchased EAS. This feature is not needed to administer exceptions for splits.
Steps ...........................................................................................................................................................................
1 From the controller window, select Tools | Commands | Exceptions.
The Exceptions selector window opens.
...........................................................................................................................................................................
2 In the ACD field, select the ACD for which you want to administer split/skill exceptions.
...........................................................................................................................................................................
3 Select Operations | Split/Skill Exception Administration.
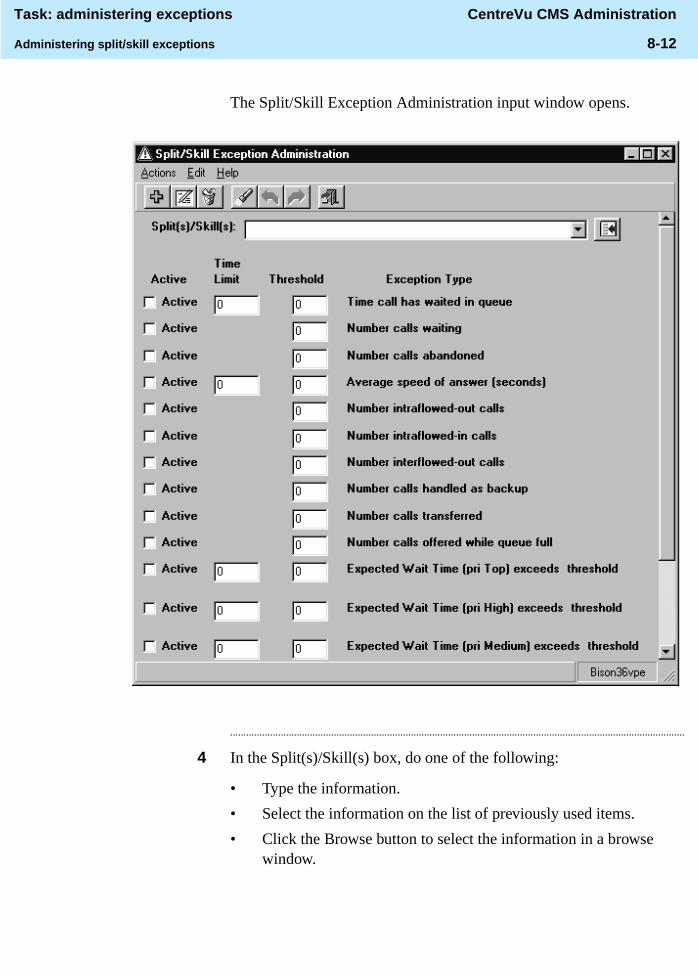
Task: administering exceptions CentreVu CMS Administration
Administering split/skill exceptions 8-12
The Split/Skill Exception Administration input window opens.
...........................................................................................................................................................................
4 In the Split(s)/Skill(s) box, do one of the following:
• Type the information.
• Select the information on the list of previously used items.
• Click the Browse button to select the information in a browse window.

Task: administering exceptions CentreVu CMS Administration
Administering split/skill exceptions 8-13
...........................................................................................................................................................................
5 In the Active field, make each exception type active by selecting the check box or inactive by leaving the check box blank.
...........................................................................................................................................................................
6 In the Time Limit field, set the time limit in seconds for exception types that use a time limit (this can be a zero default). This field is required even if the Active check box is not selected.
...........................................................................................................................................................................
7 In the Threshold field, type a number from 0 to 999 for each active exception type. This sets the limit on acceptable occurrences; any occurrences beyond this number generate an exception (this can be a zero default). This field is required even if the Active check box is not selected.
...........................................................................................................................................................................
8 To set thresholds for each exception type, follow the steps in the table below.
E N D O F S T E P S...........................................................................................................................................................................
Exception type thresholds
In this field... Type this value...
Time call has waited in queue
The total acceptable time any call in queue remains unanswered before an occurrence is counted against the threshold limit.
Number calls waiting
The maximum number of calls waiting in queue at any one time.
Number calls abandoned
The total number of acceptable abandoned calls. This exception cannot trigger more than once within an interval.
Average speed of answer (seconds)
The time counted (in seconds) against threshold limit when the average speed of answer for the split or skill is longer than the limit administered. This exception cannot trigger more than once within an interval.

Task: administering exceptions CentreVu CMS Administration
Administering split/skill exceptions 8-14
Number intraflowed-out calls
The acceptable number of calls that can intraflow out of the split or skill before an occurrence is counted against the threshold limit. This exception cannot trigger more than once within an interval.
Number intraflowed-in calls
The acceptable number of calls that can intraflow into the split or skill before an occurrence is counted against the threshold limit. This exception cannot trigger more than once within an interval.
Number interflowed-outcalls
The acceptable number of calls that can interflow out of the split or skill. This exception cannot trigger more than once within an interval.
Number calls handled as backup
The acceptable number of calls that this split or skill can handle as a backup for another split or skill. This exception cannot trigger more than once within an interval.
Number calls transferred
The acceptable number of calls that can be transferred from this split or skill. This exception cannot trigger more than once within an interval
Number calls offered while queue full
The acceptable number of calls that can be offered to the split orskill while the queue is full. This exception cannot trigger more than once within an interval.
Expected Wait Time (pri Top) exceeds threshold
An estimate of how long an incoming call with the highest priority waits in queue before connecting to an agent. This exception is triggered once per interval, when the time limit exceeds the number of times specified in the threshold.
Expected Wait Time (pri High) exceeds threshold
An estimate of how long an incoming call with the second highest priority waits in queue before connecting to an agent.
Expected Wait Time (pri Medium) exceeds threshold
An estimate of how long an incoming call with the third highest priority waits in queue before connecting to an agent.

Task: administering exceptions CentreVu CMS Administration
Administering split/skill exceptions 8-15
Expected Wait Time (pri Low)
An estimate of how long an incoming call with the lowest priority waits in queue before connecting to an agent.
Rolling Average Speed of Answer
The rolling average speed of answer for the measured split/skill sent to CentreVu® CMS via the ASA message. An occurrence is counted (in seconds) when CentreVu CMS receives an ASA that exceeds the time limit specified for a split/skill. An exception is triggered when the threshold is exceeded.

Task: administering exceptions CentreVu CMS Administration
Administering trunk group exceptions 8-16
............................................................................................................................................................................................................................................................Administering trunk group exceptions
Steps ...........................................................................................................................................................................
1 From the controller window, select Tools | Commands | Exceptions.
The Exceptions selector window opens.
...........................................................................................................................................................................
2 In the ACD box, select the ACD for which you want to administer trunk group exceptions.
...........................................................................................................................................................................
3 Select Operations | Trunk Group Exceptions.
The Trunk Group Exception Administration input window opens.

Task: administering exceptions CentreVu CMS Administration
Administering trunk group exceptions 8-17
...........................................................................................................................................................................
4 In the Trunk groups field, complete the Trunk group(s) box:
• Type the information.
• Select the information from the drop-down list of previously used items.
• Click the Browse button to view all available items for the input field and select the items to input.
...........................................................................................................................................................................
5 To make an exception type Active, select the check box; to make an exception type inactive, leave the check box blank, then type a value in the Time Limit and Threshold field.
See the table below for instructions for completing the fields in this window.
E N D O F S T E P S...........................................................................................................................................................................
In this field... Administer this exception type...
Time limit For exception types that use a Time Limit, set the Time Limit, set the Time Limit in seconds. The time limit is the amount of time that must pass before occurrences are counted against the threshold limit. This field is required even if the Active check box is not selected.
Threshold For each active exception type, type a Threshold number from 0 to 999 to define the number of acceptable occurrences. Anything above that number generates an exception. If you want the first occurrence of an exception to notify you, type 0 in this field. This field is required even if the Active check box is not selected.

Task: administering exceptions CentreVu CMS Administration
Administering trunk group exceptions 8-18
Time trunk in use (Exceptions per trunk) (minimum)
The minimum acceptable time a trunk in the trunk group can be in use. CentreVu CMS checks the allowed time the trunk is in use before an occurrence is counted against the threshold for that trunk. You receive an exception notification when the threshold is exceeded. This exception cannot trigger for the same trunk more than once within an interval.
Time trunk in use (Exceptions per trunk) (maximum)
The maximum acceptable time a trunk in the trunk group is in use. CentreVu CMS checks the allowed time the trunk is in use before an occurrence is counted against the threshold for that trunk. You receive an exception notification when the threshold is exceeded. This exception cannot trigger for the same trunk more than once within an interval.
Time any trunk maintenance busy (Exceptions per trunk group)
The maximum time a trunk in the trunk group can be maintenance busy. CentreVu CMS checks the allowed time the trunk is in use before an occurrence is counted against the threshold for that trunk. You receive an exception notification when the threshold is exceeded. This exception cannot trigger for the same trunk more than once within an interval.
Length of time all trunks busy (Exceptions per trunk group)
The total time that all trunks can be busy in the trunk group without counting as an occurrence. You receive an exception notification when the threshold is exceeded. This exception cannot trigger more than once within an interval.
Number of trunk failures in group (Exceptions per trunk group)
The maximum acceptable number of trunks failing to carry a call in a trunk group. CentreVu CMS checks the allowed number of trunk failures before you recieve an exception notification. This exception cannot trigger more than once within an interval.

Task: administering exceptions CentreVu CMS Administration
Administering trunk group exceptions 8-19
Reference
The Audio Difficulty exception is always provided for all switches that support event counts.
Number of trunks in use (Exceptions per trunk group)
The maximum acceptable number of trunks that can be in use at any one time in the trunk group. Since this condition can come and go, you receive an exception notification each time the allowed number of trunks in use exceeds the threshold within the interval.
Number of trunks maintenance busy (Exceptions per trunk group)
The maximum acceptable number of trunks that can be maintenance busy in the trunk group without generating an exception. Since this condition can come and go, you receive an exception notification each time the allowed number of maintenance-busy trunks exceeds the threshold within the interval.
Number of failures on a single trunk
The maximum acceptable number of failures that a single trunk can have in the trunk group without counting as an occurrence. CentreVu CMS checks the allowed number of trunk failures before you receive an exception notification for that trunk. This exception cannot trigger for the same trunk more than once within an interval.

Task: administering exceptions CentreVu CMS Administration
Administering VDN exceptions 8-20
............................................................................................................................................................................................................................................................Administering VDN exceptions
Prerequisites To administer VDN Exceptions, your company must have purchased Call Vectoring. VDN permissions checking is disabled for exceptions administration when more than 2000 VDNs are authorized.
Steps ...........................................................................................................................................................................
1 From the controller window, select Tools | Commands | Exceptions.
The Exceptions selector window opens.
...........................................................................................................................................................................
2 In the ACD box, select the ACD for which you want to run the report.
...........................................................................................................................................................................
3 Select Operations | VDN Exceptions.

Task: administering exceptions CentreVu CMS Administration
Administering VDN exceptions 8-21
The VDN Exception Administration window input opens.
...........................................................................................................................................................................
4 To complete the VDN(s) box:
• Type the information.
• Select the information on the pull-down list of previously used items.
• Click the Browse button to view all available items for the input field and select your inputs.
See the table below for instructions for completing the fields in this window.
E N D O F S T E P S...........................................................................................................................................................................

Task: administering exceptions CentreVu CMS Administration
Administering VDN exceptions 8-22
In this field... Administer this exception type...
Active By selecting the check box or inactive by leaving the check box blank.
Time Limit On exception types that use a time limit, set the time limit in seconds. The time limit is the amount of time that must pass before occurrences are counted against the threshold limit.
This field is required even if the Active check box is not selected.
Threshold For each active exception type, type a threshold number from 0 to 999 to define the number of acceptable occurrences. Anything above that number generates an exception. If you want to be notified on the 1st occurrence of an exception, type a 0 in this field. This field is required even if the Active check box is not selected.
Time in Vector Shows the time that a vector takes to process each call. An occurrence is counted against the threshold when the time exceeds the number of seconds specified in the Time Limit field. This exception cannot trigger more than once within an interval.
Time at agent (minimum)
Shows the length of time that a call is connected to an agent while still in the VDN. An occurrence is counted against the threshold when the time does not last as long as the number of seconds specified in the Time Limit field.
Time at agent (maximum)
Shows the length of time that a call is connected to an agent while still in the VDN. An occurrence is counted against the threshold when the time exceeds the number of seconds specified in the Time Limit field. This exception cannot trigger more than once within an interval.
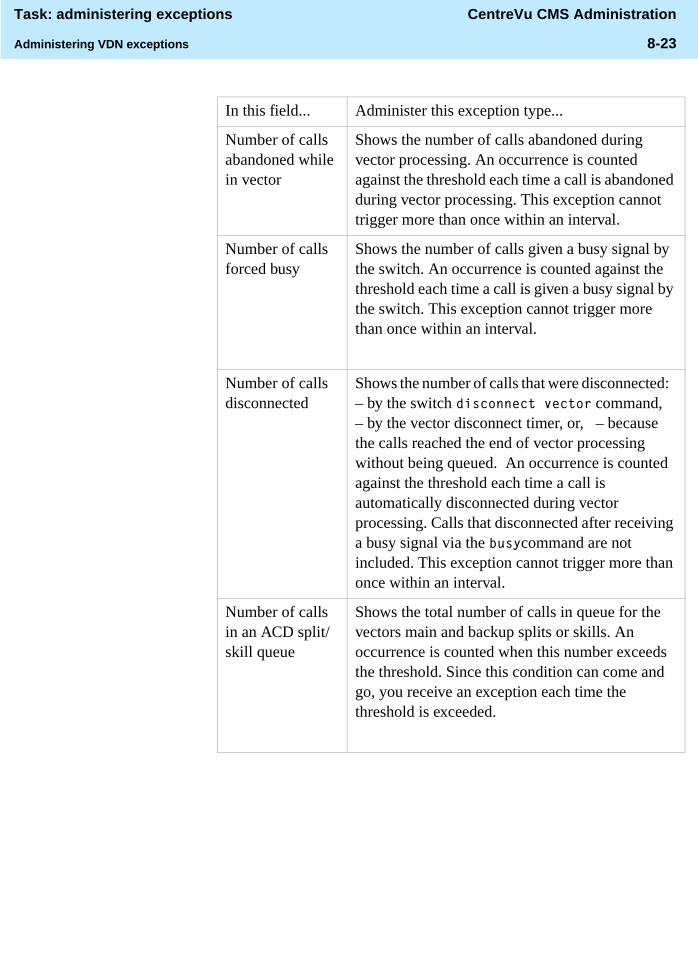
Task: administering exceptions CentreVu CMS Administration
Administering VDN exceptions 8-23
Number of calls abandoned while in vector
Shows the number of calls abandoned during vector processing. An occurrence is counted against the threshold each time a call is abandoned during vector processing. This exception cannot trigger more than once within an interval.
Number of calls forced busy
Shows the number of calls given a busy signal by the switch. An occurrence is counted against the threshold each time a call is given a busy signal by the switch. This exception cannot trigger more than once within an interval.
Number of calls disconnected
Shows the number of calls that were disconnected: – by the switch GLVFRQQHFW�YHFWRU command, – by the vector disconnect timer, or, – because the calls reached the end of vector processing without being queued. An occurrence is counted against the threshold each time a call is automatically disconnected during vector processing. Calls that disconnected after receiving a busy signal via the EXV\command are not included. This exception cannot trigger more than once within an interval.
Number of calls in an ACD split/skill queue
Shows the total number of calls in queue for the vectors main and backup splits or skills. An occurrence is counted when this number exceeds the threshold. Since this condition can come and go, you receive an exception each time the threshold is exceeded.
In this field... Administer this exception type...
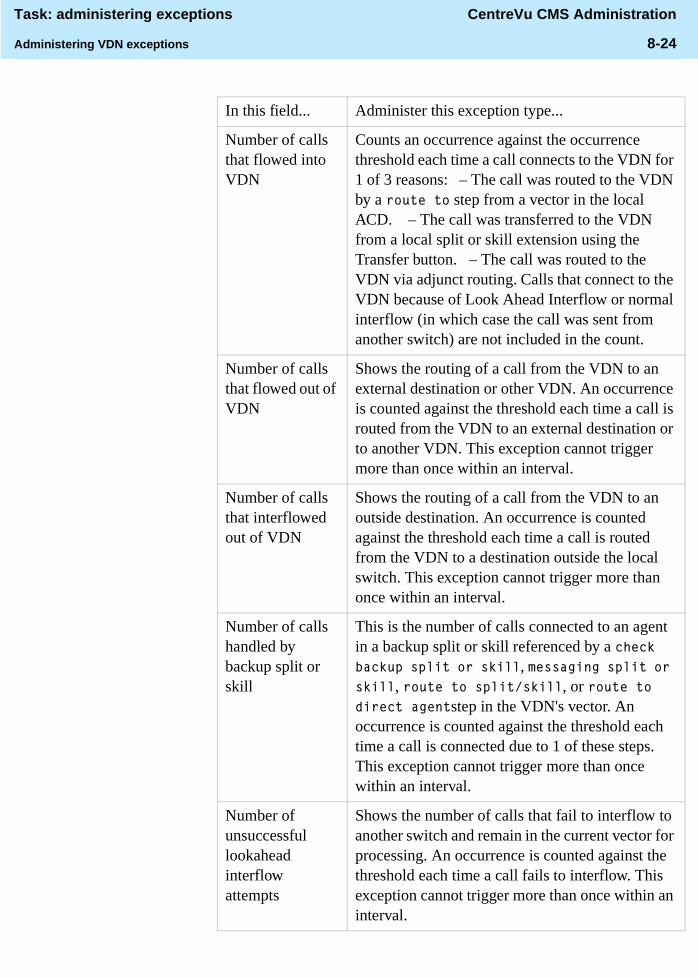
Task: administering exceptions CentreVu CMS Administration
Administering VDN exceptions 8-24
Number of calls that flowed into VDN
Counts an occurrence against the occurrence threshold each time a call connects to the VDN for 1 of 3 reasons: – The call was routed to the VDN by a URXWH�WR step from a vector in the local ACD. – The call was transferred to the VDN from a local split or skill extension using the Transfer button. – The call was routed to the VDN via adjunct routing. Calls that connect to the VDN because of Look Ahead Interflow or normal interflow (in which case the call was sent from another switch) are not included in the count.
Number of calls that flowed out of VDN
Shows the routing of a call from the VDN to an external destination or other VDN. An occurrence is counted against the threshold each time a call is routed from the VDN to an external destination or to another VDN. This exception cannot trigger more than once within an interval.
Number of calls that interflowed out of VDN
Shows the routing of a call from the VDN to an outside destination. An occurrence is counted against the threshold each time a call is routed from the VDN to a destination outside the local switch. This exception cannot trigger more than once within an interval.
Number of calls handled by backup split or skill
This is the number of calls connected to an agent in a backup split or skill referenced by a FKHFN�EDFNXS�VSOLW�RU�VNLOO, PHVVDJLQJ�VSOLW�RU�VNLOO, URXWH�WR�VSOLW�VNLOO, or URXWH�WR�GLUHFW�DJHQWstep in the VDN's vector. An occurrence is counted against the threshold each time a call is connected due to 1 of these steps. This exception cannot trigger more than once within an interval.
Number of unsuccessful lookahead interflow attempts
Shows the number of calls that fail to interflow to another switch and remain in the current vector for processing. An occurrence is counted against the threshold each time a call fails to interflow. This exception cannot trigger more than once within an interval.
In this field... Administer this exception type...

Task: administering exceptions CentreVu CMS Administration
Administering VDN exceptions 8-25
Reference
CentreVu CMS begins checking when a call connects to the VDN and ends when the call is disconnected, sent to another VDN, sent to an external destination, or transferred. The call remains connected to the VDN if:
• The call routes to another vector (by the JR�WR�YHFWRU step).
• The call is sent (by a URXWH�WR or DGMXQFW�URXWLQJ step) to an extension (other than a VDN) internal to the local switch.
• The “Time in vector” exception may include time in more than one vector because of the JR�WR�YHFWRU command.
• Some exception types need the appropriate step in the vector to which the VDN is assigned. For example, to get exceptions on unsuccessful Look Ahead Interflow attempts, the VDN's vector must have at least one URXWH�WR step which routes calls to a vector on a remote switch.
Number of unsuccessful adjunct routing attempts
Shows an occurrence counted against the threshold each time an DGMXQFW�URXWLQJstep fails. A failure occurs when the adjunct host computer does not take routing control of the call. The failure can occur because the connection to the adjunct is down or busy, or because the adjunct software rejects control. This exception cannot trigger more than once within an interval.
Rolling Average Speed of Answer
Shows the rolling average speed of answer for the measured VDN to CentreVu CMS via the ASA message. An occurrence is counted when CentreVu CMS receives an ASA that exceeds the time limit specified for a VDN. An exception is generated when the threshold is reached. The rolling ASA for the VDN is switch-based. The exception can be triggered once per interval.
In this field... Administer this exception type...

Task: administering exceptions CentreVu CMS Administration
Administering vector exceptions 8-26
............................................................................................................................................................................................................................................................Administering vector exceptions
Steps ...........................................................................................................................................................................
1 From the controller window, select Tools | Commands | Exceptions.
The Exceptions selector window opens.
...........................................................................................................................................................................
2 In the ACD box, select the ACD for which you want to administer vector exceptions..
...........................................................................................................................................................................
3 Select Operations | Vector Exceptions.
The Vector Exception Administration input window opens.

Task: administering exceptions CentreVu CMS Administration
Administering vector exceptions 8-27
...........................................................................................................................................................................
4 In the Vectors box, do one of the following:
• Type the information.
• Select the information on the list of previously used items.
• Click the Browse button to select the information in a browse window.
...........................................................................................................................................................................
5 In the Active field, make each exception type Active by selecting the check box or inactive by leaving the check box blank.
...........................................................................................................................................................................
6 In the Time Limit field, set the time limit in seconds for exception types that use a time limit. This field is required even if the Active check box is not selected.
...........................................................................................................................................................................
7 In the Threshold field, type a number from 0 to 999 for each active exception type. This sets the limit on acceptable occurrences; any occurrences beyond this number generate an exception. This field is required even if the Active check box is not selected.
...........................................................................................................................................................................
8 See the table below to set thresholds for each exception type
E N D O F S T E P S...........................................................................................................................................................................
Exception type thresholds
In this field..... Type this value...
Time in vector The time that a vector takes to process each call. This exception cannot trigger more than once within an interval.
Number of calls abandoned while in vector
The number of calls given a busy signal by the switch. This exception cannot trigger more than once within an interval.
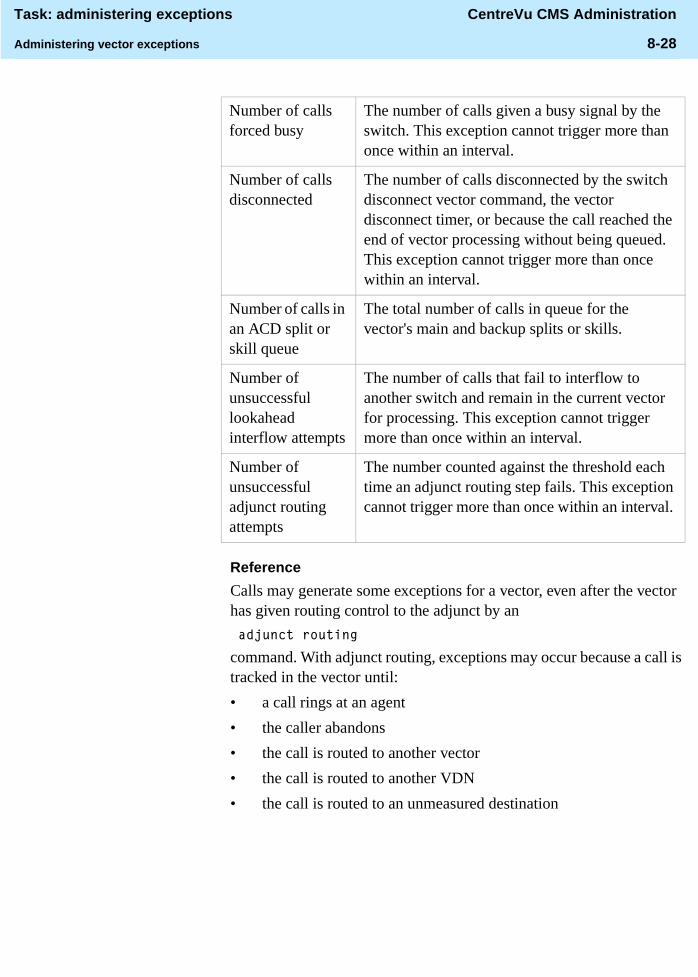
Task: administering exceptions CentreVu CMS Administration
Administering vector exceptions 8-28
Reference
Calls may generate some exceptions for a vector, even after the vector has given routing control to the adjunct by an
�DGMXQFW�URXWLQJ�
command. With adjunct routing, exceptions may occur because a call is tracked in the vector until:
• a call rings at an agent
• the caller abandons
• the call is routed to another vector
• the call is routed to another VDN
• the call is routed to an unmeasured destination
Number of calls forced busy
The number of calls given a busy signal by the switch. This exception cannot trigger more than once within an interval.
Number of calls disconnected
The number of calls disconnected by the switch disconnect vector command, the vector disconnect timer, or because the call reached the end of vector processing without being queued. This exception cannot trigger more than once within an interval.
Number of calls in an ACD split or skill queue
The total number of calls in queue for the vector's main and backup splits or skills.
Number of unsuccessful lookahead interflow attempts
The number of calls that fail to interflow to another switch and remain in the current vector for processing. This exception cannot trigger more than once within an interval.
Number of unsuccessful adjunct routing attempts
The number counted against the threshold each time an adjunct routing step fails. This exception cannot trigger more than once within an interval.

Task: administering exceptions CentreVu CMS Administration
Administering vector exceptions 8-29
Exceptions checking begins when a call enters the vector and ends when the call connects to an agent, is abandoned, or is routed to another destination.
Some exception types need an appropriate step in the vector. For example, to get exceptions on unsuccessful Look Ahead Interflow attempts, the vector must have at least one �URXWH�WR step that routes calls to a remote switch.

Task: administering exceptions CentreVu CMS Administration
Running an agent exceptions report 8-30
............................................................................................................................................................................................................................................................Running an agent exceptions report
Overview Use the agent exceptions report to see exceptions made in the past for the agents you select for the report. For each agent exception, the report shows the time, agent, and type of exception.
Prerequisites To run an agent exceptions report:
• The check box next to the exception you want in the Exceptions field of the Agent Exceptions window must be selected for the reporting time period you choose.
• Exceptions must have occurred for the exception type you want the report to cover.
Steps ...........................................................................................................................................................................
1 From the controller window, select Tools | Commands | Exceptions.
The Exceptions selector window opens.
...........................................................................................................................................................................
2 In the ACD box, select the ACD for which you want to run the report.

Task: administering exceptions CentreVu CMS Administration
Running an agent exceptions report 8-31
...........................................................................................................................................................................
3 Select Reports | Agent Exceptions.
The Agent Exceptions input window opens.
...........................................................................................................................................................................
4 In the Date field, type the date for which you want to run the report. Use MM/DD/YY format (for example, 07/11/1999) or a day relative to today (for example, 0 for today, -1 for yesterday, or -7 for one week ago), or select the date on the drop-down list, or click the Browse button. This is a required field.

Task: administering exceptions CentreVu CMS Administration
Running an agent exceptions report 8-32
...........................................................................................................................................................................
5 In the Split/Skill field, type the name or number (these must first be assigned in the Dictionary) of the split/skill for which you want to run the report, or select the name or number on the drop-down list, or click the Browse button.
...........................................................................................................................................................................
6 In the Agents field, type the name or number of agents for which you want to run the report. You can type an agent name if you have assigned it in the Dictionary.
...........................................................................................................................................................................
7 In the Order by field, type the time to list exceptions according to the time the exceptions were made, or select the time on the drop-down list. Type DJHQW� to list exceptions numerically by login ID.
...........................................................................................................................................................................
8 In the Exceptions field, select the exceptions you want to include in the report. Clear the check box next to an exception if you do not want to include that exception in the report. At least one must be selected.
...........................................................................................................................................................................
9 Under Destination, select View Report on Screen to view the report on screen or Print Report on to see a list of printers. You can print reports on any printer your PC is connected to.

Task: administering exceptions CentreVu CMS Administration
Running an agent exceptions report 8-33
An example of an agent exceptions report is shown below.
E N D O F S T E P S...........................................................................................................................................................................
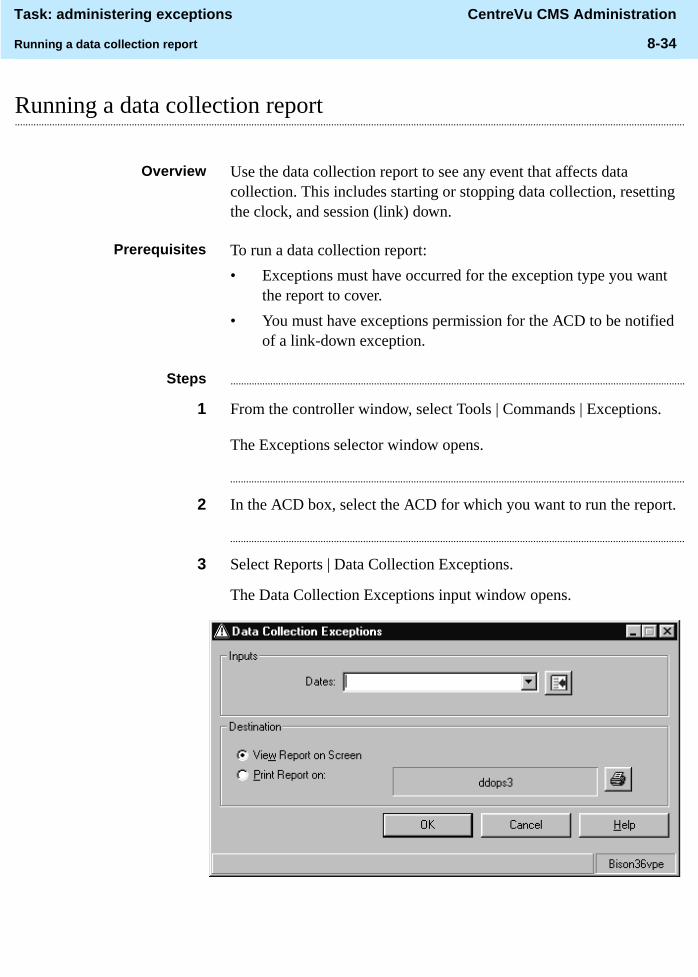
Task: administering exceptions CentreVu CMS Administration
Running a data collection report 8-34
............................................................................................................................................................................................................................................................Running a data collection report
Overview Use the data collection report to see any event that affects data collection. This includes starting or stopping data collection, resetting the clock, and session (link) down.
Prerequisites To run a data collection report:
• Exceptions must have occurred for the exception type you want the report to cover.
• You must have exceptions permission for the ACD to be notified of a link-down exception.
Steps ...........................................................................................................................................................................
1 From the controller window, select Tools | Commands | Exceptions.
The Exceptions selector window opens.
...........................................................................................................................................................................
2 In the ACD box, select the ACD for which you want to run the report.
...........................................................................................................................................................................
3 Select Reports | Data Collection Exceptions.
The Data Collection Exceptions input window opens.
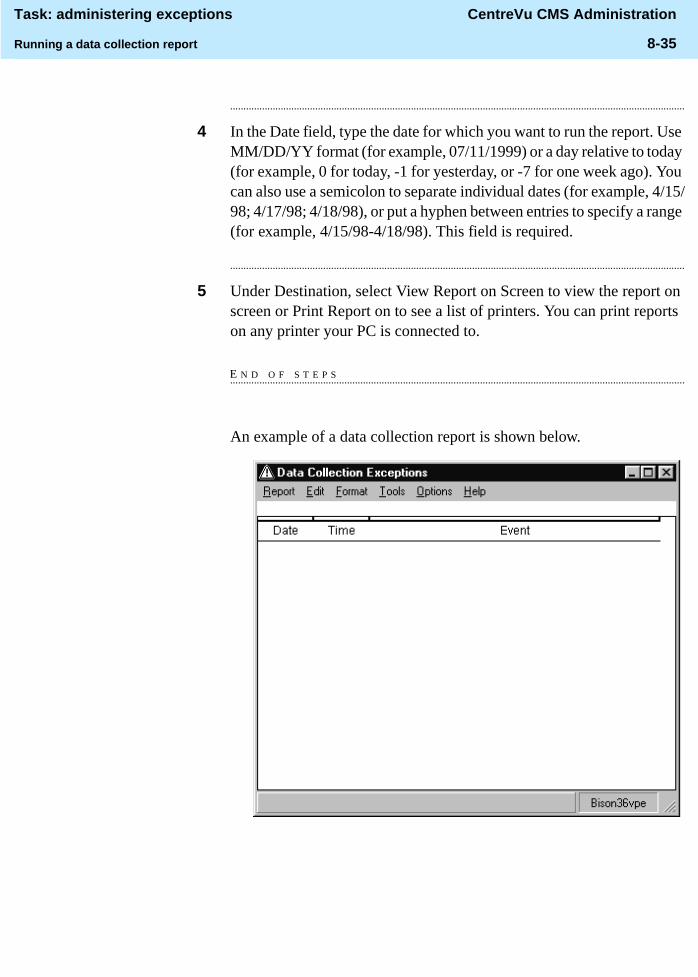
Task: administering exceptions CentreVu CMS Administration
Running a data collection report 8-35
...........................................................................................................................................................................
4 In the Date field, type the date for which you want to run the report. Use MM/DD/YY format (for example, 07/11/1999) or a day relative to today (for example, 0 for today, -1 for yesterday, or -7 for one week ago). You can also use a semicolon to separate individual dates (for example, 4/15/98; 4/17/98; 4/18/98), or put a hyphen between entries to specify a range (for example, 4/15/98-4/18/98). This field is required.
...........................................................................................................................................................................
5 Under Destination, select View Report on Screen to view the report on screen or Print Report on to see a list of printers. You can print reports on any printer your PC is connected to.
E N D O F S T E P S...........................................................................................................................................................................
An example of a data collection report is shown below.

Task: administering exceptions CentreVu CMS Administration
Running a malicious call trace report 8-36
............................................................................................................................................................................................................................................................Running a malicious call trace report
Overview Use the malicious call trace report to see detailed information on malicious call occurrences. The report shows the date and time each call occurred, and the agent and split or skill that received the call. If you have the automatic number identification/station number identification (ANI/SID) network feature on G3V4 or later, the report also shows where the call originated. This report is only available with CentreVu Supervisor.
Steps ...........................................................................................................................................................................
1 From the controller window, select Tools | Commands | Exceptions.
The Exceptions selector window opens.
...........................................................................................................................................................................
2 In the ACD box, select the ACD for which you want to run the report.
...........................................................................................................................................................................
3 Select Reports | Malicious Call Trace.
The Malicious Call Trace input window opens.

Task: administering exceptions CentreVu CMS Administration
Running a malicious call trace report 8-37
...........................................................................................................................................................................
4 In the Date field, type the date for which you want to run the report. Use MM/DD/YY format (for example, 07/11/1999) or a day relative to today (for example, 0 for today, -1 for yesterday, or -7 for one week ago), or select the date on the drop-down list, or click the Browse button. You can also use a semicolon to separate individual dates (for example, 4/15/98; 4/17/98; 4/18/98), or put a hyphen between entries to specify a range (for example, 4/15/98-4/18/98). This field is required.
...........................................................................................................................................................................
5 Under Destination, select View Report on Screen to view the report on screen or Print Report on to see a list of printers. You can print reports on any printer your PC is connected to.
E N D O F S T E P S...........................................................................................................................................................................
An example of a malicious call trace report is shown below.

Task: administering exceptions CentreVu CMS Administration
Running a split/skill exceptions report 8-38
............................................................................................................................................................................................................................................................Running a split/skill exceptions report
Overview Use the split/skill exceptions report to see exceptions made in the past for the splits/skills you select for the report. For each split/skill exception, the report shows the time and type of exception.
Prerequisites To run a split/skill exceptions report:
• The check box for the exception you want in the Exceptions field of the Split/Skill Exceptions window must be selected for the reporting time period you choose.
• Exceptions must have occurred for the exception type you want the report to cover.
Steps ...........................................................................................................................................................................
1 From the controller window, select Tools | Commands | Exceptions.
The Exceptions selector window opens.
...........................................................................................................................................................................
2 In the ACD box, select the ACD for which you want to run the report.
...........................................................................................................................................................................
3 Select Reports | Split/Skill Exceptions.
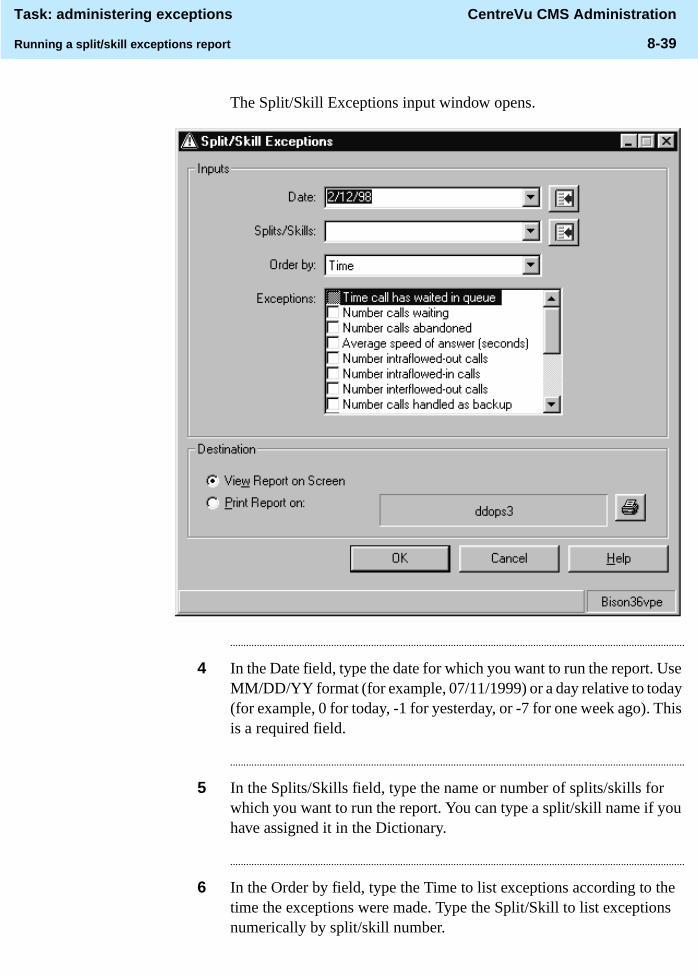
Task: administering exceptions CentreVu CMS Administration
Running a split/skill exceptions report 8-39
The Split/Skill Exceptions input window opens.
...........................................................................................................................................................................
4 In the Date field, type the date for which you want to run the report. Use MM/DD/YY format (for example, 07/11/1999) or a day relative to today (for example, 0 for today, -1 for yesterday, or -7 for one week ago). This is a required field.
...........................................................................................................................................................................
5 In the Splits/Skills field, type the name or number of splits/skills for which you want to run the report. You can type a split/skill name if you have assigned it in the Dictionary.
...........................................................................................................................................................................
6 In the Order by field, type the Time to list exceptions according to the time the exceptions were made. Type the Split/Skill to list exceptions numerically by split/skill number.

Task: administering exceptions CentreVu CMS Administration
Running a split/skill exceptions report 8-40
...........................................................................................................................................................................
7 In the Exceptions field, select the exceptions you want to include in the report. Clear the check box next to an exception if you do not want to include that exception in the report.
...........................................................................................................................................................................
8 Under Destination, select View Report on Screen to view the report on screen, or Print Report on to see a list of printers. You can print reports on any printer your PC is connected to.
E N D O F S T E P S...........................................................................................................................................................................
An example of a split/skill exceptions report is shown below.

Task: administering exceptions CentreVu CMS Administration
Running a trunk group exceptions report 8-41
............................................................................................................................................................................................................................................................Running a trunk group exceptions report
Overview Use the trunk group exceptions report to see exceptions made in the past for the trunk groups you select for the report. For each trunk group exception, the report shows the time and type of exception.
Prerequisites To run a trunk group exceptions report:
• The check box for the exception you want in the Exceptions field of the Trunk Group Exceptions window must be selected for the reporting time period you choose.
• Exceptions must have occurred for the exception type you want the report to cover.
Steps ...........................................................................................................................................................................
1 From the controller window, select Tools | Commands | Exceptions.
The Exceptions selector window opens.
...........................................................................................................................................................................
2 In the ACD box, select the ACD for which you want to run the report.
...........................................................................................................................................................................
3 Select Reports | Trunk Group Exceptions.

Task: administering exceptions CentreVu CMS Administration
Running a trunk group exceptions report 8-42
The Trunk Group Exceptions input window opens.
...........................................................................................................................................................................
4 In the Date field, type the date for which you want to run the report, or select the date on the drop-down list, or click the Browse button. Use MM/DD/YY format (for example, 07/11/1999) or a day relative to today (for example, 0 for today, -1 for yesterday, or -7 for one week ago). This field is required.
...........................................................................................................................................................................
5 In the Trunk Groups field, type the name or number of trunk groups for which you want to run the report, or select the name or number on the drop-down list, or click the Browse button. You can enter a trunk group name if you have assigned it in the Dictionary.
...........................................................................................................................................................................
6 In the Order by field, type the time to list exceptions according to the time the exceptions were made, or select the time on the drop-down list.

Task: administering exceptions CentreVu CMS Administration
Running a trunk group exceptions report 8-43
...........................................................................................................................................................................
7 In the Exceptions field, select the exceptions you want to include in the report. Clear the check box next to an exception if you do not want to include that exception in the report.
...........................................................................................................................................................................
8 Under Destination, select View Report on Screen to view the report on screen or Print Report on to see a list of printers. You can print reports on any printer your PC is connected to.
E N D O F S T E P S...........................................................................................................................................................................
An example of a Trunk Group Exceptions report is shown below.

Task: administering exceptions CentreVu CMS Administration
Running a VDN exceptions report 8-44
............................................................................................................................................................................................................................................................Running a VDN exceptions report
Overview Use the VDN exceptions report to see exceptions made in the past for the VDNs you select for the report. For each VDN exception, the report shows the time, VDN, vector, and type of exception.
Prerequisites To run a VDN exceptions report:
• The check box next to the exception you want in the Exceptions field of the VDN Exceptions window must be selected for the reporting time period you choose.
• Exceptions must have occurred for the exception type you want the report to cover.
Steps ...........................................................................................................................................................................
1 From the controller window, select Tools | Commands | Exceptions.
The Exceptions selector window opens.
...........................................................................................................................................................................
2 In the ACD box, select the ACD for which you want to run the report.
...........................................................................................................................................................................
3 Select Reports | VDN Exceptions.
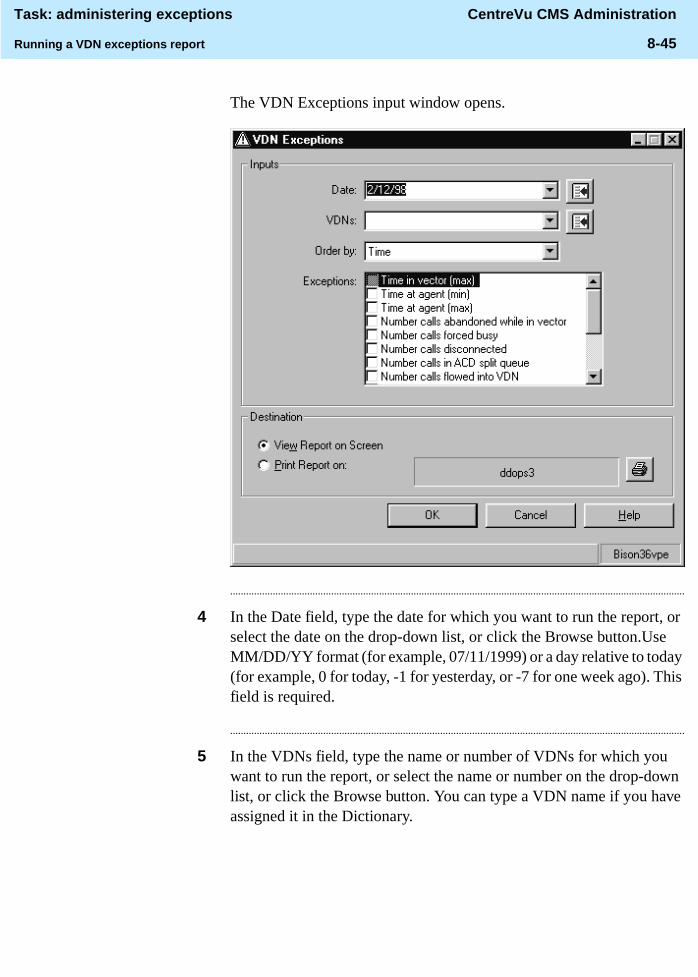
Task: administering exceptions CentreVu CMS Administration
Running a VDN exceptions report 8-45
The VDN Exceptions input window opens.
...........................................................................................................................................................................
4 In the Date field, type the date for which you want to run the report, or select the date on the drop-down list, or click the Browse button.Use MM/DD/YY format (for example, 07/11/1999) or a day relative to today (for example, 0 for today, -1 for yesterday, or -7 for one week ago). This field is required.
...........................................................................................................................................................................
5 In the VDNs field, type the name or number of VDNs for which you want to run the report, or select the name or number on the drop-down list, or click the Browse button. You can type a VDN name if you have assigned it in the Dictionary.
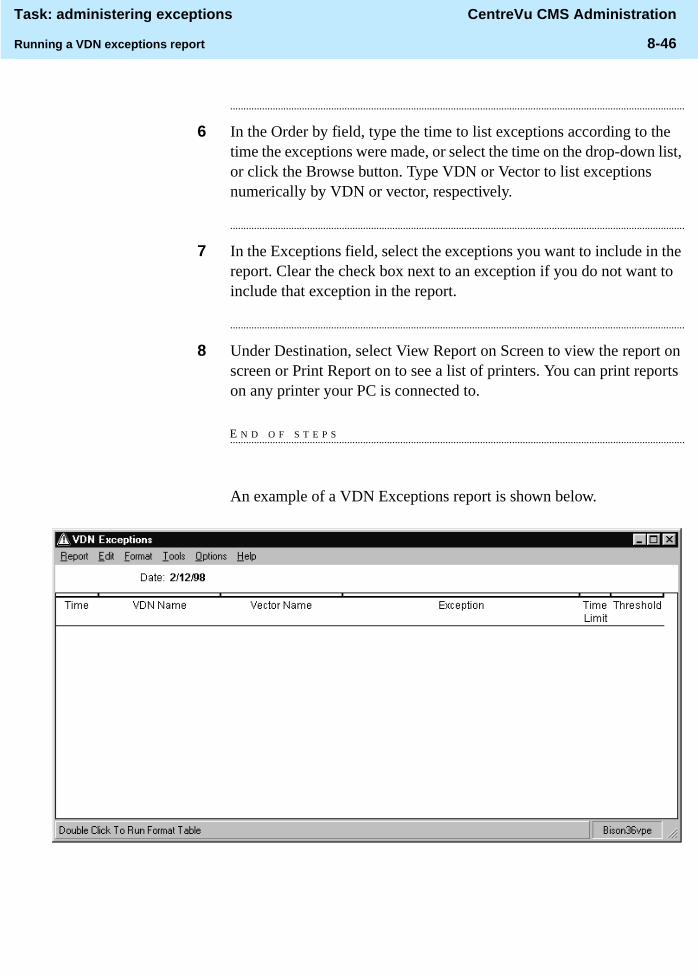
Task: administering exceptions CentreVu CMS Administration
Running a VDN exceptions report 8-46
...........................................................................................................................................................................
6 In the Order by field, type the time to list exceptions according to the time the exceptions were made, or select the time on the drop-down list, or click the Browse button. Type VDN or Vector to list exceptions numerically by VDN or vector, respectively.
...........................................................................................................................................................................
7 In the Exceptions field, select the exceptions you want to include in the report. Clear the check box next to an exception if you do not want to include that exception in the report.
...........................................................................................................................................................................
8 Under Destination, select View Report on Screen to view the report on screen or Print Report on to see a list of printers. You can print reports on any printer your PC is connected to.
E N D O F S T E P S...........................................................................................................................................................................
An example of a VDN Exceptions report is shown below.

Task: administering exceptions CentreVu CMS Administration
Running a vector exceptions report 8-47
............................................................................................................................................................................................................................................................Running a vector exceptions report
Overview Use the vector exceptions report to see exceptions made in the past for the vectors you select for the report. For each vector exception, the report shows the time, vector, and type of exception.
Prerequisites To run a vector exceptions report:
• The check box for the exception you want in the Exceptions field of the Vector Exceptions window must be selected for the reporting time period you choose.
• Exceptions must have occurred for the exception type you want the report to cover.
Steps To run an vector exceptions report:
...........................................................................................................................................................................
1 From the controller window, select Tools | Commands | Exceptions.
The Exceptions selector window opens.
...........................................................................................................................................................................
2 Select the ACD you want to run the report for from the ACD list box.
...........................................................................................................................................................................
3 Select Reports | Vector Exceptions.

Task: administering exceptions CentreVu CMS Administration
Running a vector exceptions report 8-48
The Vector Exceptions input window opens.
...........................................................................................................................................................................
4 In the Date field, type the date for which you want to run the report. Use MM/DD/YY format (for example, 07/11/1999) or a day relative to today (for example, 0 for today, -1 for yesterday, or -7 for one week ago). This field is required.
...........................................................................................................................................................................
5 In the Vectors field, type the name or number of vectors for which you want to run the report, or select the name or number on the drop-down list, or click the Browse button. You can type a vector name if you have assigned it in the Dictionary.
...........................................................................................................................................................................
6 In the Order by field, type the time to list exceptions according to the time the exceptions were made, or select the time on the drop-down list, or click the Browse button.

Task: administering exceptions CentreVu CMS Administration
Running a vector exceptions report 8-49
...........................................................................................................................................................................
7 In the Exceptions field, select the exceptions you want to include in the report. Clear the check box for an exception if you do not want to include that exception in the report.
...........................................................................................................................................................................
8 Under Destination, select View Report on Screen to view the report on screen or Print Report on to see a list of printers. You can print reports on any printer your PC is connected to.
E N D O F S T E P S...........................................................................................................................................................................
An example of a Vector Exceptions report is shown below.
Task: administering exceptions CentreVu CMS Administration
Task reference 8-50
............................................................................................................................................................................................................................................................Task reference
An exception can be one of three types: peg count, agent timed, or other timed exceptions.
Peg count exceptions A peg count exception occurs when within the current interval, the number of occurrences of an ACD activity exceeds an occurrence threshold defined for your call center. (This occurrence threshold is not the same as the threshold defined for CentreVu CMS R3V5.)
The current interval is a set number of minutes. This means that CentreVu CMS starts collecting ACD event occurrences at the beginning of the interval and continues collecting ACD event occurrences until the end of the interval. The current interval can be 15, 30, or 60 minutes.
Exception conditions apply to ACD events that occur within the current interval defined for your call center. When the current interval changes, all ACD event occurrences are cleared, and CentreVu CMS begins to count event occurrences again starting from zero. Therefore, make sure your exception conditions realistically reflect what will trigger an exception within your current interval.
Agent timed exceptions Agent timed exceptions are tracked from the time the agent logs in until the agent logs out. These exceptions can occur many times during the login period and within an interval. The exception count is cleared when the agent leaves the state that triggered the exception.
For example, an agent timed exception may be triggered whenever an agent spends more than five minutes in AUX work. When an agent spends longer than five minutes in AUX work, an exception is triggered for that agent. When the agent changes to another state, such as (available) AVAIL, the exception is reset so it can occur again when the agent reenters AUX work.
Other timed exceptions Other timed exceptions are triggered when the number of ACD activity occurrences exceeds a boundary at which the duration of each occurrence is either less than a minimum time limit or greater than a maximum time limit.
For example, you may set the time limit at 20 seconds for any call to wait in queue before being answered. You may then define an occurrence boundary of three for the acceptable number of calls that

Task: administering exceptions CentreVu CMS Administration
Task reference 8-51
can wait in the queue for 20 seconds. An exception occurs if, within an interval, more than three calls wait in the queue longer than 20 seconds.
Timed occurrence boundaries for Other Timed Exceptions apply to ACD activity within the last interval. At the beginning of the next interval, the occurrence count for any timed exception type (except for agent timed exceptions) is cleared and starts again from zero. However, since the time limit for a timed exception type can be more than one hour, the duration of an exception activity is not cleared at the end of the intrahour interval. CentreVu CMS continues to track the time spent on an exception activity that continues from one interval to the next.
The interval for timed exceptions is the limit for timed exceptions for occurrences within an interval.
Exceptions count on the status bar
The exceptions count on the status bar shows the current total for both peg count exceptions and timed exceptions for all ACDs for which you have exception permissions. The exceptions count is cleared at the end of each interval. The maximum exception count shown in the status bar is 9999.
Task: administering exceptions CentreVu CMS Administration
Reference: interactions with other commands 8-52
............................................................................................................................................................................................................................................................Reference: interactions with other commands
Data storage allocation
• CentreVu CMS can store up to 2000 exception records of each type, except for VDNs, which can store up to 10,000 records. This number is the total for all ACDs for each category of ACD element. Thus, your call center can store up to 2000 agent, 2000 split or skill, 2000 trunk group, 10,000 VDN, and 2000 vector exception records across all ACDs.
• For each ACD, the number of entities (agents, splits/skills, trunk groups, VDNs, or vectors) with exceptions cannot be greater than the number of entities for which storage space is allocated. For example, if 100 VDNs are allocated, you should not administer exceptions for more than 100 VDNs. If you administer more than 100 exceptions, some of them will not be counted.
• Exception retrieval capacity is the number of days in the past for which you can retrieve exceptions. It is determined by the following:
– The number of exception records allocated for storage in the Data Storage operation in the CMS System Setup window. The maximum number of exception records of each type you can store is 2000.
– The frequency with which exceptions are recorded each day. For example, if you allocate storage for 1000 exception records and about 100 exceptions occur each day, you can save exception records for approximately the last 10 days.
Dictionary
• When you administer exceptions or order exceptions reports, you can use the split or skill, trunk group, VDN, and vector name instead of numbers if you have assigned the names in the Dictionary. See “Task: naming your call center entities in the Dictionary” for more information.
• Those names display instead of numbers in the real-time exceptions log and in the exceptions report.

Task: administering exceptions CentreVu CMS Administration
Reference: interactions with other commands 8-53
Custom/designer reports
• You can create custom exception reports, or reports that combine exceptions data with regular historical data, from the Custom Reports menu.
• For more information on creating custom reports, see CentreVu CMS R3V5 Custom Reports585-215-822 and CentreVu Report Designer Version 6 User Guide585-215-859.
Scripting You can schedule exceptions administration and historical reports via scripting. See “Automating your activities with scripting” for more information.
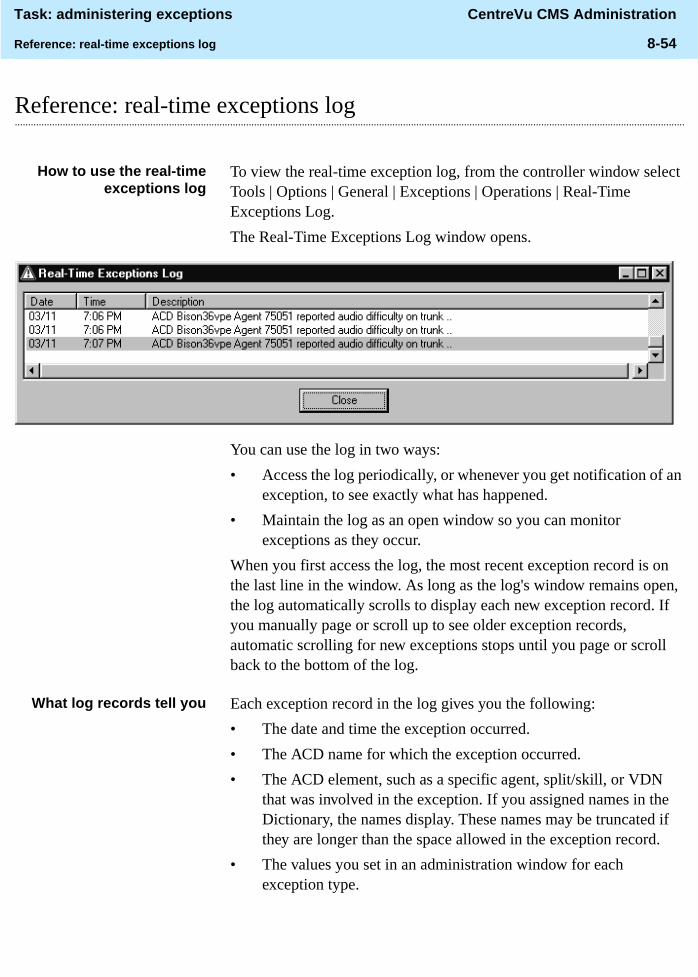
Task: administering exceptions CentreVu CMS Administration
Reference: real-time exceptions log 8-54
............................................................................................................................................................................................................................................................Reference: real-time exceptions log
How to use the real-timeexceptions log
To view the real-time exception log, from the controller window select Tools | Options | General | Exceptions | Operations | Real-Time Exceptions Log.
The Real-Time Exceptions Log window opens.
You can use the log in two ways:
• Access the log periodically, or whenever you get notification of an exception, to see exactly what has happened.
• Maintain the log as an open window so you can monitor exceptions as they occur.
When you first access the log, the most recent exception record is on the last line in the window. As long as the log's window remains open, the log automatically scrolls to display each new exception record. If you manually page or scroll up to see older exception records, automatic scrolling for new exceptions stops until you page or scroll back to the bottom of the log.
What log records tell you Each exception record in the log gives you the following:
• The date and time the exception occurred.
• The ACD name for which the exception occurred.
• The ACD element, such as a specific agent, split/skill, or VDN that was involved in the exception. If you assigned names in the Dictionary, the names display. These names may be truncated if they are longer than the space allowed in the exception record.
• The values you set in an administration window for each exception type.
Task: administering exceptions CentreVu CMS Administration
Reference: real-time exceptions log 8-55
• Information about an activity that has fallen outside of the exception conditions you set. Thus, for a peg count exception, the exception record shows the occurrence threshold you set, even though the number of occurrences may be substantially greater. For a timed exception, the exception record shows the time limit you set, not the actual duration of an occurrence.
• The real-time exceptions log holds up to 100 exception records. As each new exception occurs, CentreVu CMS adds a new record to the log. If the log already contains 100 records, CentreVu CMS deletes the oldest exception record from the log at the same time that it adds the new exception record.
• The log simultaneously displays exception records for all elements of the ACDs for which you have exceptions permissions, regardless of whether the exceptions involve agents, splits or skills, trunk groups, VDNs, or vectors. You cannot select exception records for just one item, such as VDNs or vectors. However, you see exception records on only the ACD elements, such as splits or skills, for which you have exception permissions. See “Task: assigning user permissions” for more information.

Task: administering exceptions CentreVu CMS Administration
Task reference: reports 8-56
............................................................................................................................................................................................................................................................Task reference: reports
• The Audio Difficulty exception, found in the Trunk Group Exceptions selection of the Reports menu, is always provided for all switches that support event (stroke) counts.
• Whenever you define or change exceptions, CentreVu CMS starts checking for the exceptions immediately, as long as data collection is on.
• For any exception type, the occurrence threshold must be from 0 to 999.
• For timed exceptions, the time limit for each occurrence must be from 0 to 28,800 seconds (the equivalent of 8 hours).
• If you set a time limit for an activity, you must also set an occurrence threshold for the same activity.
• You must select Find one on the Actions list before selecting Modify so you will get the current settings.
• The default setting is off (not active) for most exceptions. Exceptions checking for the following events, however, is always turned on. These events cannot be turned off.
– Malicious call traces
– Data collection disruptions
– Agent attempts to log in with more than one login ID
• You are notified of exceptions in two ways:
– When you have set exceptions, the exceptions count in the status bar increases by one every time an exception threshold is met or exceeded.
– The PC beeps.
Task: assigning user permissions CentreVu CMS Administration
9-1
9 Task: assigning user permissions
............................................................................................................................................................................................................................................................Overview
Purpose In this task you will find the following procedures:
• Assigning user data
• Viewing, assigning, deleting, or changing ACD access
• Viewing, assigning, deleting, or changing feature access
• Viewing, assigning, or changing main menu addition access
• Viewing, assigning, deleting, or changing split/skill access
• Viewing, assigning, deleting, or changing trunk group access
• Viewing, assigning, deleting, or changing vector access
• Viewing, assigning, deleting, or changing VDN access
Use the steps that follow to assign user permissions. Your CentreVu® CMS administrator login ID gives you read/write permissions for all the CentreVu CMS features purchased by your company and for ACDs (real and pseudo). Secondary administrators such as split/skill supervisors may need only limited access to features and call center entities.

Task: assigning user permissions CentreVu CMS Administration
9-2
For example:
You can give users any access permissions you consider necessary. However, if you give a user write permission to the User Permissions window, that user can change access permissions for any user at any time.
If your call center has one split called. . .
And assigned to it. . .
The split 1 supervisor has read/write permissions for. . .
Split 1 Trunk groups 22 and 23
Split 1, trunk groups 22 and 23
Dictionary and exceptions commands for split 1, trunk groups 22 and 23
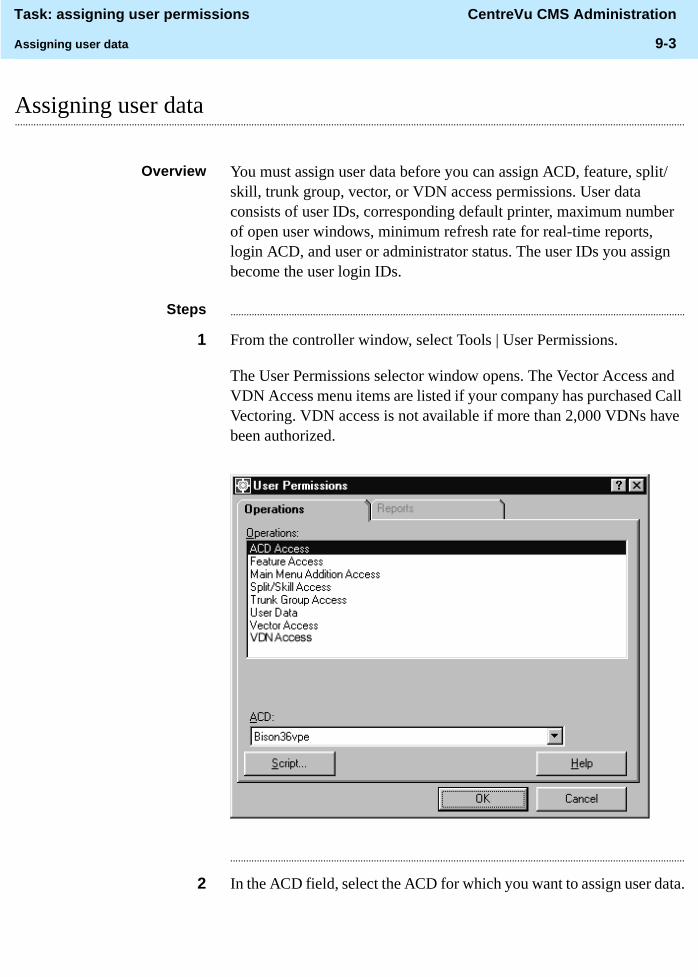
Task: assigning user permissions CentreVu CMS Administration
Assigning user data 9-3
............................................................................................................................................................................................................................................................Assigning user data
Overview You must assign user data before you can assign ACD, feature, split/skill, trunk group, vector, or VDN access permissions. User data consists of user IDs, corresponding default printer, maximum number of open user windows, minimum refresh rate for real-time reports, login ACD, and user or administrator status. The user IDs you assign become the user login IDs.
Steps ...........................................................................................................................................................................
1 From the controller window, select Tools | User Permissions.
The User Permissions selector window opens. The Vector Access and VDN Access menu items are listed if your company has purchased Call Vectoring. VDN access is not available if more than 2,000 VDNs have been authorized.
...........................................................................................................................................................................
2 In the ACD field, select the ACD for which you want to assign user data.
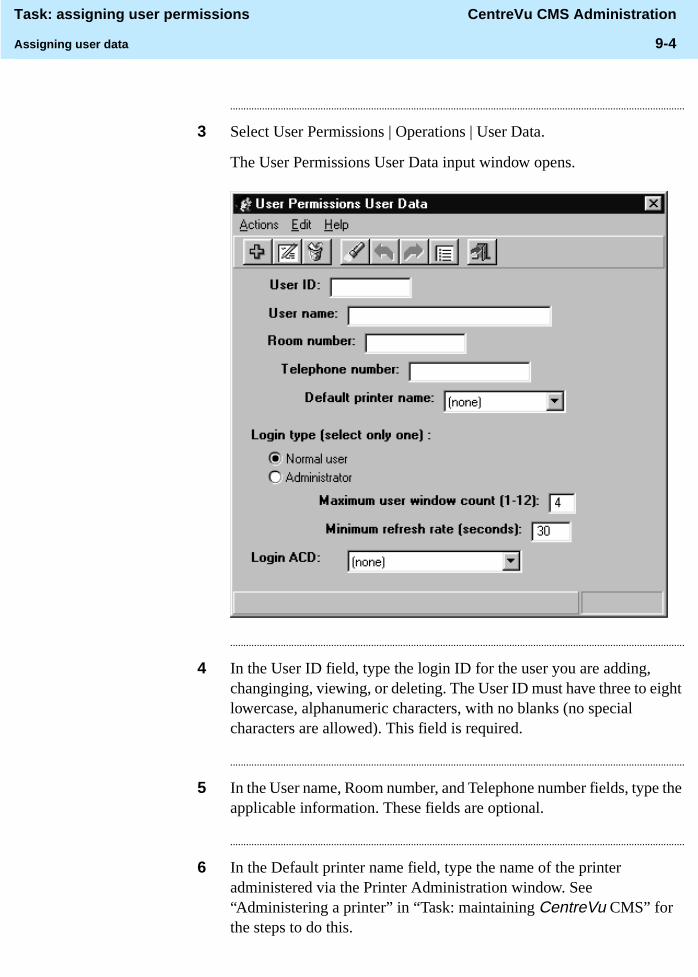
Task: assigning user permissions CentreVu CMS Administration
Assigning user data 9-4
...........................................................................................................................................................................
3 Select User Permissions | Operations | User Data.
The User Permissions User Data input window opens.
...........................................................................................................................................................................
4 In the User ID field, type the login ID for the user you are adding, changinging, viewing, or deleting. The User ID must have three to eight lowercase, alphanumeric characters, with no blanks (no special characters are allowed). This field is required.
...........................................................................................................................................................................
5 In the User name, Room number, and Telephone number fields, type the applicable information. These fields are optional.
...........................................................................................................................................................................
6 In the Default printer name field, type the name of the printer administered via the Printer Administration window. See “Administering a printer” in “Task: maintaining CentreVu CMS” for the steps to do this.

Task: assigning user permissions CentreVu CMS Administration
Assigning user data 9-5
...........................................................................................................................................................................
7 Under Login type, select Normal user if the user does not have access (by default) to system setup, user permissions, and Forecast (if purchased); select Administrator if the user has access (by default) to all parts of CentreVu CMS.
...........................................................................................................................................................................
8 In the Maximum user window count (1–12), type the maximum number of open CentreVu CMS windows this user can have. The default is four.
Important! The more open windows you allow, the more processor resources this user is allowed to consume.
...........................................................................................................................................................................
9 In the Maximum refresh rate (seconds) field, type the minimum update rate for real-time reports that this user runs. The default is 30 seconds. You can set a refresh rate from every three seconds to every 600 seconds.
Important! Faster refresh rates consume more processor resources.
...........................................................................................................................................................................
10 In the Login ACD field, type the ACD name or number for this user's current ACD each time this user logs into CentreVu CMS. The default value is one.
E N D O F S T E P S...........................................................................................................................................................................
Reference
• Users can change their current ACD any time during a login session by selecting Tools | Options | General. However, when the user logs out and logs back in, the current ACD defaults back to what you set in this window.
• If you change a user's login type from administrator to normal or vice versa after assigning the user data, you must change the user's feature access permissions manually.
• Before you select Find one or List all , clear the default values, unless you want to include these values in the search.
• Assigning only the necessary access permissions ensures the best system performance.

Task: assigning user permissions CentreVu CMS Administration
Assigning user data 9-6
• Do not allow users to share the same login ID because this quickly consumes Solaris system resources. This also applies to one person logging in at multiple terminals using the same login ID.
User messages
• If a user's login ACD is removed and the user tries to log into CentreVu CMS, an acknowledgement tells the user either to contact the CentreVu CMS administrator or to change the login ACD.
• If you try to add a login ID for a user who already exists in CentreVu CMS, “Already exists ” displays on the status line. If the user is neither a CentreVu CMS nor a Solaris system user, CentreVu CMS adds the user ID to both CentreVu CMS and to the Solaris system.
• If you add or change the Login ACD field for a user and this user does not have access to the new or changed login ACD, an acknowledgement displays.
Solaris
• A new user may have an existing Solaris system login ID. If not, CentreVu CMS automatically creates one when you add the user.
• User IDs added via the Solaris system have a login shell of /bin/sh (or whatever was administered). CentreVu CMS does not change this. New user IDs added to CentreVu CMS and the Solaris system via CentreVu CMS have cms as the login shell.
• Users added through the Solaris system start at the Solaris system prompt when they log in. To run the CentreVu CMS application, they have to type CMS. Users added through CentreVu CMS are automatically in the CentreVu CMS application when they log in.
• Delete removes the user login ID and user permissions from CentreVu CMS. If the Solaris system ID was added via CentreVu CMS, delete also removes the user from the Solaris system. If the user has a Solaris system login ID before the CentreVu CMS login ID, that Solaris system login ID is not removed. See “Task: learning and using Solaris” for more information.

Task: assigning user permissions CentreVu CMS Administration
Assigning user data 9-7
Reports and timetables
• You can refresh or update real-time reports from every 3 to every 600 seconds. Before a CentreVu CMS user can display a real-time report, you must set a minimum refresh rate for the user. The default is 15 seconds greater than the number of seconds set as the minimum refresh rate.
• You can put the User Data window on a timetable. See “Using timetables and shorcuts” for more information.
• If you delete a user who has custom reports, timetables, or designer reports, an acknowledgement asks if you want to move the deleted user's reports and timetables into your login. You do not have to save these deleted items. If you do and there is a conflict between your report or timetable names for these items and the deleted user's, you need to rename the deleted user's.
• If you delete a user on a scheduled timetable, the timetable fails if you have not moved or removed the timetables or custom reports owned by the deleted user.
If the deleted user was added via CentreVu CMS, all other files (other than timetables and custom reports) owned by the user are removed unless you have previously moved the files to another directory or removed them yourself.
Scripting
• You can script the User Data window and schedule the script. See “Task: automating your activities with scripting” for more information.
• Scripts do not run automatically after the user who owns them has been removed.
Rules for login ID characters
• If you try to create a login ID with an invalid character, you get an error message.
• User IDs on a Solaris system cannot contain certain diacritical, accented, or special characters (for example, i��x��o��_���).

Task: assigning user permissions CentreVu CMS Administration
Assigning user data 9-8
Only the following characters are allowed in login IDs:
! " # $ & ‘ ( ) * + , - . /
0 1 2 3 4 5 6 7 8 9 : ; < = > ? @
A B
C D E F G
H I J K L
M N O P Q
R S T U V W X
Y Z [ \ ] ^ _ ‘
a b c d e f g h i j k l m n o p q
r s t u v w x y z { | } ~
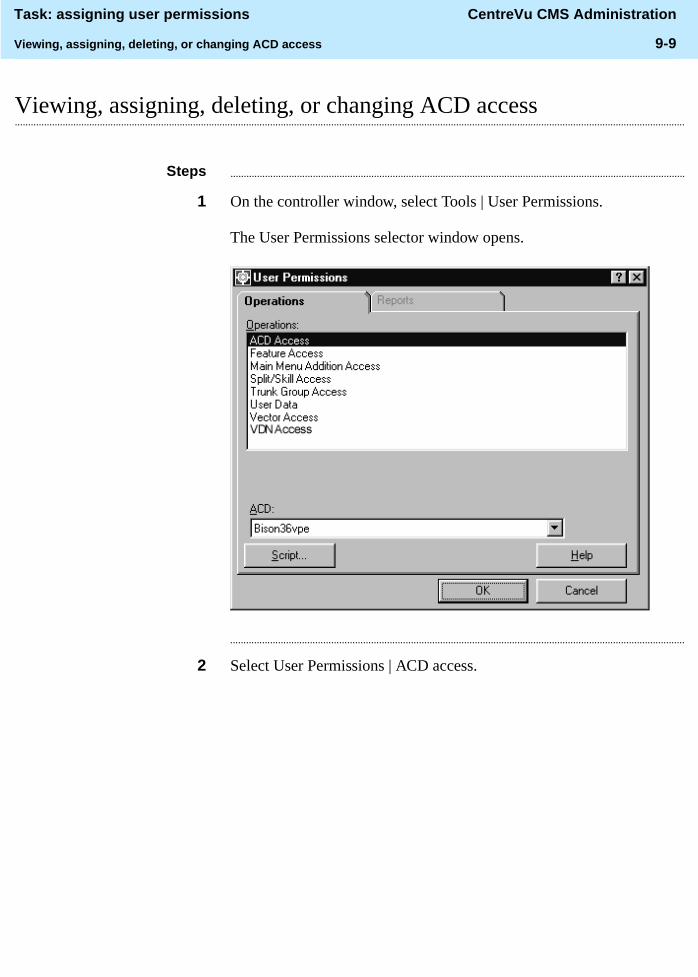
Task: assigning user permissions CentreVu CMS Administration
Viewing, assigning, deleting, or changing ACD access 9-9
............................................................................................................................................................................................................................................................Viewing, assigning, deleting, or changing ACD access
Steps ...........................................................................................................................................................................
1 On the controller window, select Tools | User Permissions.
The User Permissions selector window opens.
...........................................................................................................................................................................
2 Select User Permissions | ACD access.

Task: assigning user permissions CentreVu CMS Administration
Viewing, assigning, deleting, or changing ACD access 9-10
The User Permissions ACD Access input window opens.
...........................................................................................................................................................................
3 In the User ID field, type the ID of the user whose ACD access permissions you want to add, change, or view. This field is required.
...........................................................................................................................................................................
4 In the ACD field, type the ACD names or numbers that this user can access (real or pseudo), or select the names or numbers from the drop-down list, or click the Browse button.
...........................................................................................................................................................................
5 Do the following:
• Select the Read check box if the user will have read permission, or clear the check box if the user will not have read permission.
• Select the Write check box if the user will have write permission or clear the check box if the user will not have write permission. If a user has write permission, the user also needs read permission.
• Select Exceptions if the user will get exceptions notification; clear the check box if the user will not get exceptions notification.
E N D O F S T E P S...........................................................................................................................................................................
Task: assigning user permissions CentreVu CMS Administration
Viewing, assigning, deleting, or changing ACD access 9-11
Reference
• The default permission for ACD Access is yes, which gives all users access to all ACDs (real or pseudo).
• To turn off a user's access permissions to an ACD (real or pseudo), delete that user's permissions for the ACD instead of clearing the Read and Write check boxes (this saves disk space). Then the CentreVu CMS default of no permissions is in effect for that user for that ACD.
• For each ACD, you can give users read and write permission, read without write permission, or no permission.
• If you turn the ACD read/write access permission off for any user, read/write access permission for all splits/skills, trunk groups, vectors, and VDNs (if you have Call Vectoring) in that ACD is overridden by the ACD permission.
• Assigning only necessary access permissions ensures the best system performance.
• If you try to change access permissions for a split/skill, trunk group, vector, or VDN when the user has no access permission for the ACD, an acknowledgement tells you that the user does not have ACD access and that the change does not affect the user's ACD access permissions.
• If you remove a user's access to his or her login ACD, you must change the user's login ACD.
• You can put the ACD Access window on a script. See “Task: automating your activities with scripting” for more information.
• You can put the ACD Access window on a timetable. See “Task: using timetables and shortcuts” for more information.
Task: assigning user permissions CentreVu CMS Administration
Viewing, assigning, deleting, or changing feature access 9-12
............................................................................................................................................................................................................................................................Viewing, assigning, deleting, or changing feature access
Overview You cannot change or delete feature access permissions for CentreVu CMS and CentreVu Supervisor login IDs. This prevents a user with access to user permissions from mistakenly turning off access permissions to all or any part of CentreVu CMS for the CentreVu CMS administrator and/or the Lucent Services organization.
However, you can create other administrator login IDs and change the permissions for those login IDs at any time.
Steps ...........................................................................................................................................................................
1 On the controller window, select Tools | User Permissions.
The User Permissions selector window opens.
...........................................................................................................................................................................
2 In the ACD field, select the ACD for which you want to administer a user’s feature access.
...........................................................................................................................................................................
3 Select User Permissions | Operations | Feature Access.

Task: assigning user permissions CentreVu CMS Administration
Viewing, assigning, deleting, or changing feature access 9-13
The User Permissions Feature Access input window opens.
...........................................................................................................................................................................
4 In the User IDs field, type the ID of the user whose feature access permissions you want to change or view. This field is required.
...........................................................................................................................................................................
5 Do the following:
• In the Read field, select the check box if the user will have read permission. Clear the check box if the user will not have read permission.
• In the Write field, if the user will have write permission for the features in the Features field, select the check box. If the user will not have write permission, do not select the check box. If you assign a user write permission, you must also assign the user read permission.
E N D O F S T E P S...........................................................................................................................................................................

Task: assigning user permissions CentreVu CMS Administration
Viewing, assigning, deleting, or changing feature access 9-14
Reference
• You can put the Feature Access window on a script. See “Task: automating your activities with scripting” for more information.
• You can put the Feature Access window on a timetable. See “Task: using timetables and shortcuts” for more information.
• When a user has neither read nor write permission for a feature, that feature is not listed in the user's menu options.
• Assigning only necessary access permissions ensures the best system performance.

Task: assigning user permissions CentreVu CMS Administration
Viewing, assigning, or changing main menu addition access 9-15
............................................................................................................................................................................................................................................................Viewing, assigning, or changing main menu addition access
Steps ...........................................................................................................................................................................
1 On the controller window, select Tools | User Permissions.
The User Permissions selector window opens.
...........................................................................................................................................................................
2 In the ACD field, select the ACD for which you want to administer a user’s main menu addition access.
...........................................................................................................................................................................
3 Select User Permissions | Operations | Main Menu Addition Access.
The User Permissions Main Menu Addition Access input window opens. The Available Additions field shows the available main menu additions.
...........................................................................................................................................................................
4 In the User IDs field, type the ID of the user whose access permissions you want to administer. This field is required.

Task: assigning user permissions CentreVu CMS Administration
Viewing, assigning, or changing main menu addition access 9-16
...........................................................................................................................................................................
5 In the Addition field, type the name of the menu additions that the user will or will not have access to. The name must match the menu addition name exactly.
...........................................................................................................................................................................
6 If this user is to have access to the items listed in the Addition field, verify that the Access check box is selected.
E N D O F S T E P S...........................................................................................................................................................................
Reference
• Menu additions are accessible from CentreVu CMS depending on user permissions.
• You can put the Main Menu Addition Access window on a timetable. See “Task: using timetables and shortcuts” for more information.
• You can script the Main Menu Addition Access window and schedule the script. See “Task: automating your activities with scripting” for more information.
• If the assigned access permission is no, this main menu item does not appear on the user's CentreVu CMS main menu.
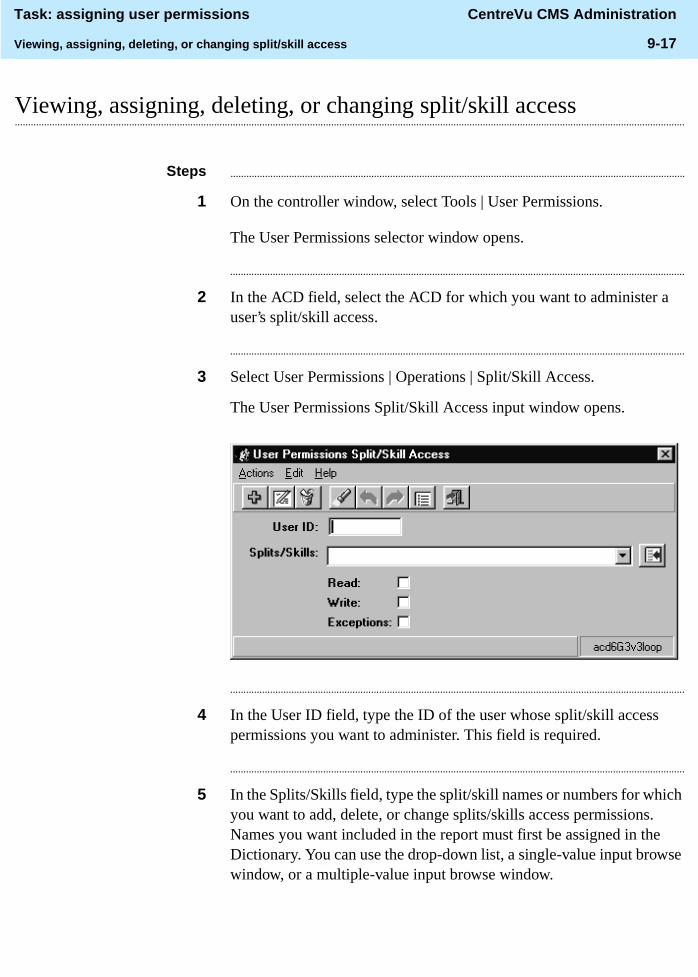
Task: assigning user permissions CentreVu CMS Administration
Viewing, assigning, deleting, or changing split/skill access 9-17
............................................................................................................................................................................................................................................................Viewing, assigning, deleting, or changing split/skill access
Steps ...........................................................................................................................................................................
1 On the controller window, select Tools | User Permissions.
The User Permissions selector window opens.
...........................................................................................................................................................................
2 In the ACD field, select the ACD for which you want to administer a user’s split/skill access.
...........................................................................................................................................................................
3 Select User Permissions | Operations | Split/Skill Access.
The User Permissions Split/Skill Access input window opens.
...........................................................................................................................................................................
4 In the User ID field, type the ID of the user whose split/skill access permissions you want to administer. This field is required.
...........................................................................................................................................................................
5 In the Splits/Skills field, type the split/skill names or numbers for which you want to add, delete, or change splits/skills access permissions. Names you want included in the report must first be assigned in the Dictionary. You can use the drop-down list, a single-value input browse window, or a multiple-value input browse window.
Task: assigning user permissions CentreVu CMS Administration
Viewing, assigning, deleting, or changing split/skill access 9-18
...........................................................................................................................................................................
6 Do the following:
• Select the Read check box if this user will have read permission for the splits/skills; clear the check box if the user will not have read permission for the splits/skills.
• Select the Write check box if the user will have write permission for the splits/skills; if the user will not have write permission, clear the check box. If you assign a user write permission, you must also assign the user read permission.
...........................................................................................................................................................................
7 Select the Exceptions check box if this user will get exceptions notification for the specified splits/skills; clear the check box if this user will not get an exceptions notification.
E N D O F S T E P S...........................................................................................................................................................................
Reference
• When you change a user's access permissions, the change does not take effect until the user logs out and logs back in.
• You get an acknowledgement if you try to change access permissions for a user who does not have the correct ACD access permissions.
• For each split/skill, you can give users read and write permission, read-only permission, or no permission.
• Find one and List all show only users for whom permission records have been stored.
• You cannot use the � or " for searching in any field.
• The default permissions for all splits/skills is no read and no write permission. However, CentreVu CMS does not store records of split/skills access permissions until you add the permissions to the Split/Skill Access window.
• To turn off a user's access permissions to a split/skill, delete that user's permissions for that split or skill instead of clearing the check boxes. The Read and Write default of no permissions is in effect again for that user for that split or skill.
• Assigning only necessary access permissions ensures the best system performance.

Task: assigning user permissions CentreVu CMS Administration
Viewing, assigning, deleting, or changing split/skill access 9-19
• When you give a user access to the ACD, you must give the user split/skill access for each applicable ACD.
• You can put the Split/Skill Access window on a timetable. See “Task: using timetables and shortcuts” for more information.
• You can put the Split/Skills Access window on a script. See “Task: automating your activities with scripting” for more information.

Task: assigning user permissions CentreVu CMS Administration
Viewing, assigning, deleting, or changing trunk group access 9-20
............................................................................................................................................................................................................................................................Viewing, assigning, deleting, or changing trunk group access
Steps ...........................................................................................................................................................................
1 On the controller window, select Tools | User Permissions.
The User Permissions selector window opens.
...........................................................................................................................................................................
2 In the ACD field, select the ACD for which you want to administer a user’s trunk group access.
...........................................................................................................................................................................
3 Select User Permissions | Operations | Trunk Group Access.
The User Permissions Trunk Group Access input window opens.
...........................................................................................................................................................................
4 In the User ID field, type the ID of the user whose trunk group access permissions you want to add, delete, change, or view. This field is required.
...........................................................................................................................................................................
5 In the Trunk Groups field, type the trunk group names or numbers that you want the user to have access to.

Task: assigning user permissions CentreVu CMS Administration
Viewing, assigning, deleting, or changing trunk group access 9-21
...........................................................................................................................................................................
6 Do the following:
• Select the Read check box if the user will have read permission; clear the Read check box if the user will not have read permission.
• Select the Write check box if the user will have write permission; Clear the check box if the user will not have write permission. If you assign a user write permission, you must also assign the user read permission.
...........................................................................................................................................................................
7 Select the Exceptions check box if this user will get exceptions notification for the specified trunk groups; clear the check box if this user will not get an exception notification.
E N D O F S T E P S...........................................................................................................................................................................
Reference
• If you change a user's access permissions, the change does not take effect until the user logs out and logs back in.
• If you try to change access permissions for a user who does not have the correct ACD access permissions, you get an acknowledgement.
• Find one and List all show only the user IDs for which have trunk group access permissions have been saved.
• For each trunk group, you can give users read and write permission, read-only permission, or no permission.
• You cannot assign a user write permission without read permission.
• You cannot use the � or " for searching in any field.
• The default permissions for all trunk groups are no read and no write permission. However, CentreVu CMS does not store records of trunk group access permissions until you add permissions on the Trunk Group Access window.
• Assigning only necessary access permissions ensures the best system performance.
Task: assigning user permissions CentreVu CMS Administration
Viewing, assigning, deleting, or changing trunk group access 9-22
• To turn off a user's access permissions to a trunk group, delete that user's permissions for that trunk group instead of disabling the check boxes. The Read and Write default of no permissions is in effect again for that user for that trunk group.
• You should have already assigned access permission for the correct ACD when you completed the ACD Access window.
If not, you get an acknowledgement. Your changes do not go into effect until the user's ACD access permissions change.
• You can put the Trunk Group Access window on a timetable. See “Task: using timetables and shortcuts” for more information.
• You can script the Trunk Group Access window and schedule the script. See “Task: automating your activities with scripting” for more information.

Task: assigning user permissions CentreVu CMS Administration
Viewing, assigning, deleting, or changing vector access 9-23
............................................................................................................................................................................................................................................................Viewing, assigning, deleting, or changing vector access
Steps ...........................................................................................................................................................................
1 On the controller window, select Tools | User Permissions.
The User Permissions selector window opens.
...........................................................................................................................................................................
2 In the ACD field, select the ACD for which you want to administer a user’s vector access.
...........................................................................................................................................................................
3 Select User Permissions | Operations | Vector Access. Vector access is only available if your company has purchased Call Vectoring.
The User Permissions Vector Access input window opens.
...........................................................................................................................................................................
4 In the User ID field, type the ID of the user whose vector access permissions you want to add, delete, change, or view. This field is required.
...........................................................................................................................................................................
5 In the Vectors field, type the vector names or numbers for which you want to add, delete, or change the user’s permissions.

Task: assigning user permissions CentreVu CMS Administration
Viewing, assigning, deleting, or changing vector access 9-24
...........................................................................................................................................................................
6 Do the following:
• Select the Read check box if the user will have read permission; clear the Read check box if this user will not have read permission.
• Select the Write check box if the user will have write permission; clear the check box if the user will not have write permission. If you assign a user write permission, you must also assign the user read permission.
...........................................................................................................................................................................
7 Select the Exceptions check box if the user will get exceptions notification; clear the check box if the userwill not get exceptions notification.
E N D O F S T E P S...........................................................................................................................................................................
Reference
• If you change a user's access permissions, the change does not take effect until the user logs out and logs back in.
• For any vector, you can give a user either read permission, read and write permission, or no permission.
• You cannot assign a user write permission without also assigning a user read permission.
• CentreVu CMS activates any changes you make to a user's vector permissions the next time the user opens a window or runs a report involving vectors.
• The default permissions for all vectors is no read and no write permission. However, CentreVu CMS does not store records of vector access permissions until you enter permissions on the Vector Access window.
• To turn off a user's access permissions to a vector, delete that user's permissions for that vector instead of disabling the Read and Write check boxes; the default of no permissions is in effect again for that user for that vector.

Task: assigning user permissions CentreVu CMS Administration
Viewing, assigning, deleting, or changing VDN access 9-25
............................................................................................................................................................................................................................................................Viewing, assigning, deleting, or changing VDN access
Steps ...........................................................................................................................................................................
1 On the controller window, select Tools | User Permissions.
The User Permissions selector window opens.
...........................................................................................................................................................................
2 In the ACD field, select the ACD for which you want to administer a user’s VDN access.
...........................................................................................................................................................................
3 Select User Permissions | Operations | VDN Access.
The User Permissions VDN Access input window opens.
VDN access is only available if your company has purchased Call Vectoring. VDN access is not available if more than 2000 VDNs have been authorized.
...........................................................................................................................................................................
4 In the User ID field, type the ID of the user whose VDN access permissions you want to add, delete, change, or view. This field is required.
...........................................................................................................................................................................
5 In the VDNS field, type the VDN names or numbers that the user will have access to.

Task: assigning user permissions CentreVu CMS Administration
Viewing, assigning, deleting, or changing VDN access 9-26
...........................................................................................................................................................................
6 Do the following:
• Select the Read check box if the user will have read permission; clear the Read check box if the user will not have read permission.
• Select the Write check box if the user will have write permission; if the user will not have write permission, clear the check box. If you assign a user write permission, you must also assign the user read permission.
...........................................................................................................................................................................
7 Select the Exceptions check box if the user will get exceptions notification; clear the check box if the user will not get exceptions notification.
E N D O F S T E P S...........................................................................................................................................................................
Reference
Note that:
• If you change a user's access permissions, the change does not take effect until the user logs out and logs back in.
• To remove a user's permissions for one or more VDNs, complete the User ID and VDNs fields, and select Delete. To remove all VDN permissions for a user, fill in the User ID field and select Delete .
• All VDN permissions checking system-wide (VDN exceptions, Dictionary, VDN reports) is turned off when more than 2000 VDNs have been authorized.
• For any VDN, you can give a user either read permission, read and write permission, or no permission.
• You cannot assign a user write permission without also assigning read permission.
• The default permissions for all VDNs are no read and no write permission. However, CentreVu CMS does not store records of VDN access permissions until you enter permissions on the VDN Access window.
Task: assigning user permissions CentreVu CMS Administration
Viewing, assigning, deleting, or changing VDN access 9-27
• To turn off a user's access permissions to a VDN, delete that user's permissions for that VDN instead of clearing the Read and Write check boxes. The default of no permissions is in effect again for that user for that VDN.
• Assigning only necessary access permissions ensures the best performance of your system.
Task: assigning user permissions CentreVu CMS Administration
Viewing, assigning, deleting, or changing VDN access 9-28

Task: viewing and changing system setup values CentreVu CMS Administration
10-1
10 Task: viewing and changing system setup values
............................................................................................................................................................................................................................................................Overview
Purpose In this task you will find the following procedures:
• Turning data collection on and off for real ACDs
• Changing the CentreVu® CMS state
• Setting up a pseudo-ACD
• Loading pseudo-ACD data
• Specifying how CentreVu CMS stores data
• Archiving data in the historical database
• Starting or stopping external applications
• Allocating storage space
• Migrating CentreVu CMS data
• Setting storage intervals
• Viewing switch setup data
Use the procedures that follow to view and change system setup values.
Important! Do not work in the CentreVu CMS System Setup window daily. Changes you make in this window could affect performance, disk space, and data collection.

Task: viewing and changing system setup values CentreVu CMS Administration
10-2
Permissions These permissions apply to viewing and changing system setup values. See “Task: assigning user permissions” for more information.
• To view the current CentreVu CMS state or the master ACD, you need read permission for the CentreVu CMS System Setup command.
• To change the current CentreVu CMS state or the master ACD, you need write permission for the CentreVu CMS System Setup command.
• To view the status of data collection, you need read permission for the CMS System Setup command. To change the status of data collection, you need write permission for the CentreVu CMS System Setup command.
• Change access permissions as necessary for the pseudo-ACD.
• To view the Free Space Allocation window, you need read permission for the CentreVu CMS System Setup command. To change field values, you must have write permission.
• To view the Data Summarizing window, you need read permission for the CentreVu CMS System Setup command. To run data summarizing, you need write permission.
• To view the status of external applications, you need read permission for the CMS System Setup command. To turn External Application Status on or off, or to start or stop an external application, you need write permission.
• To view switch setup information, you must have read permission for the CentreVu CMS System Setup command. See “Task: assigning user permissions” for more information.
• To view the Pseudo-ACD Setup window, you need read permission for the CMS System Setup command. To create pseudo-ACDs, you need write permission for the CMS System Setup command. See “Task: assigning user permissions” for more information.
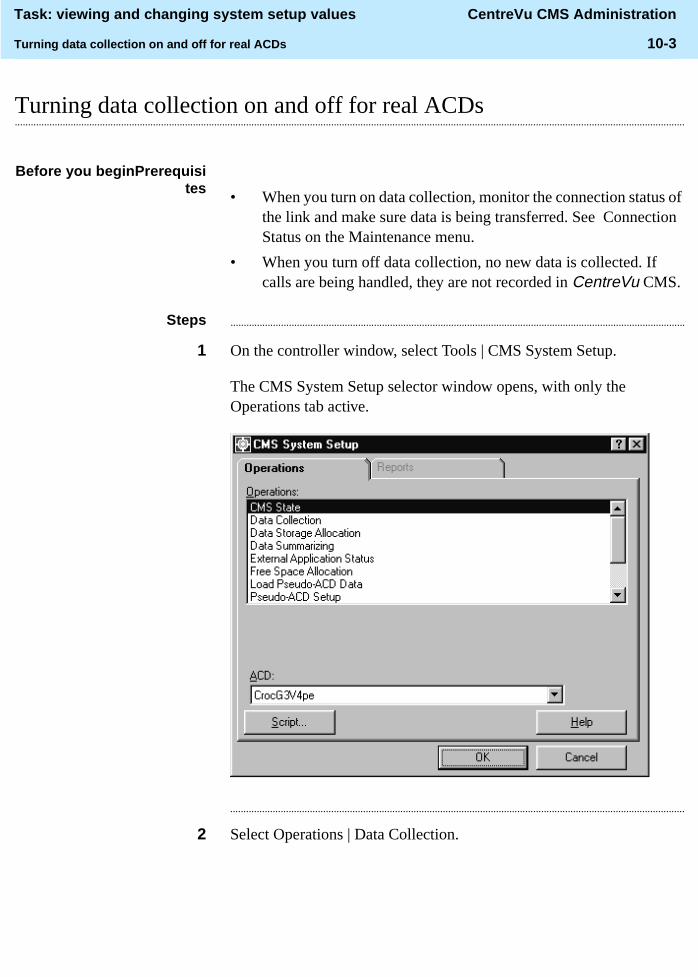
Task: viewing and changing system setup values CentreVu CMS Administration
Turning data collection on and off for real ACDs 10-3
............................................................................................................................................................................................................................................................Turning data collection on and off for real ACDs
Before you beginPrerequisites
• When you turn on data collection, monitor the connection status of the link and make sure data is being transferred. See Connection Status on the Maintenance menu.
• When you turn off data collection, no new data is collected. If calls are being handled, they are not recorded in CentreVu CMS.
Steps ...........................................................................................................................................................................
1 On the controller window, select Tools | CMS System Setup.
The CMS System Setup selector window opens, with only the Operations tab active.
...........................................................................................................................................................................
2 Select Operations | Data Collection.

Task: viewing and changing system setup values CentreVu CMS Administration
Turning data collection on and off for real ACDs 10-4
The Data Collection input window opens.
...........................................................................................................................................................................
3 In the ACD field, select the ACD name for which you want to turn data collection on or off.
...........................................................................................................................................................................
4 Under Data collection, click: On (the default value): to turn data collection on. Off: to turn data collection off.
E N D O F S T E P S...........................................................................................................................................................................
Reference
• This window does not apply to a pseudo-ACD because a pseudo-ACD does not collect data.
• Data collection must be on for the current ACD when you activate an agent trace or do any switch administration from CentreVu CMS.
• Check the archiving status before turning off data collection or wait until the interval archive finishes.
• You can script this action. See “Task: automating your activities with scripting” for more information.

Task: viewing and changing system setup values CentreVu CMS Administration
Changing the CentreVu CMS state 10-5
............................................................................................................................................................................................................................................................Changing the CentreVu CMS state
Prerequisites
• To add to or change configuration data for storage allocation, storage intervals, or restoring data (for system administration and ACD administration data), you must put CentreVu CMS in single-user mode.
Steps ...........................................................................................................................................................................
1 From the controller window, select Tools | CMS System Setup.
The CMS System Setup selector window opens.
...........................................................................................................................................................................
2 In the ACD field, select the ACD for which you want to change the CMS state.
...........................................................................................................................................................................
3 Select Operations | CMS State.

Task: viewing and changing system setup values CentreVu CMS Administration
Changing the CentreVu CMS state 10-6
The CMS State input window opens.
...........................................................................................................................................................................
4 Do one of the following:
• Click Single-user mode and select Modify.
A message displays, telling all users that CentreVu CMS will be brought down in one minute. Users are automatically logged off after one minute.
• Click Multi-user mode and select Modify.
...........................................................................................................................................................................
5 In the ACD field, select the ACD name you want as master ACD for clock synchronization or type the ACD name in the ACD field.
The master ACD time displays on the status bar of the controller window.
E N D O F S T E P S...........................................................................................................................................................................
Reference
• Single-user mode means that only one person can log onto the CentreVu CMS server. Multi-user mode means that any administered user can log onto the CentreVu CMS server.
• When you are in single-user mode, data collection continues for the ACDs for which data collection is on.
• If you log off the CentreVu CMS server while in single-user mode, you must wait at least 10 seconds before logging in again.

Task: viewing and changing system setup values CentreVu CMS Administration
Changing the CentreVu CMS state 10-7
• To add or change data in the following areas, you must put CentreVu CMS in single-user mode (viewing current data does not require single-user mode). You may want to do some or all of these actions during off-peak hours:
–Allocating data storage
—Specifying storage intervals
—Specifying how CentreVu CMS stores data
—Running a restore (for system administration and ACD administration data)
• You can script the CMS State window and schedule the script. See “Task: automating your activities with scripting” for more information.

Task: viewing and changing system setup values CentreVu CMS Administration
Setting up a pseudo-ACD 10-8
............................................................................................................................................................................................................................................................Setting up a pseudo-ACD
Overview A pseudo-ACD is an area in CentreVu CMS used to place previously backed-up ACD data.
Prerequisites
• If you create a pseudo-ACD using CentreVu Supervisor, you need to log out of CentreVu Supervisor and then log back into CentreVu Supervisor to see the new pseudo-ACD.
• If the Forecast is enabled on the pseudo-ACD, change the values for the Forecast archive parameters as necessary.
Steps ...........................................................................................................................................................................
1 From the controller window, select Tools | CMS System Setup.
The CMS System Setup selector window opens.
...........................................................................................................................................................................
2 Select Operations | Pseudo ACD Setup.
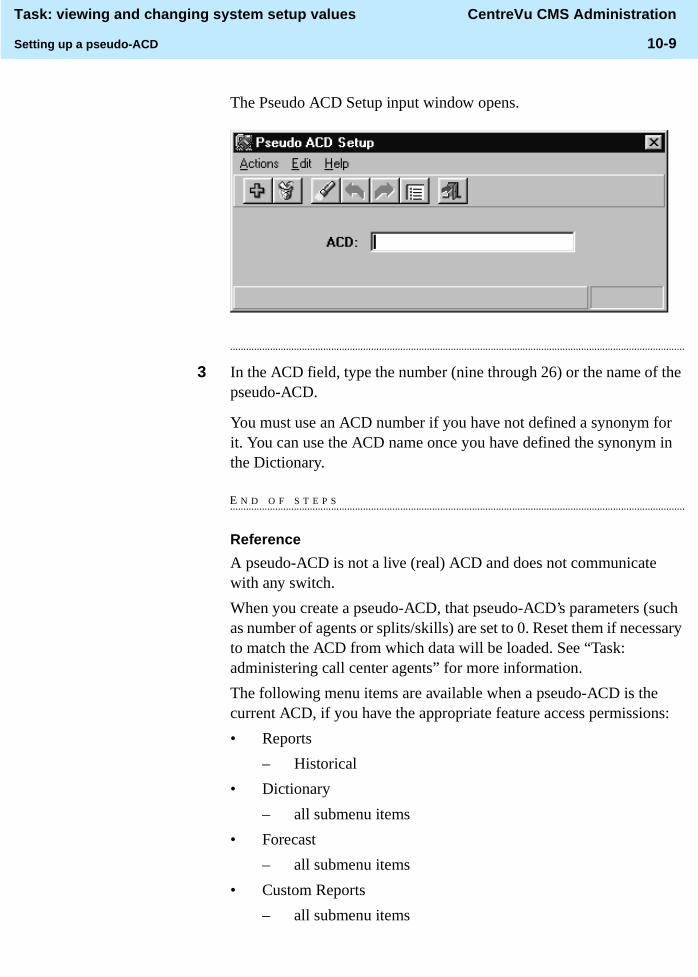
Task: viewing and changing system setup values CentreVu CMS Administration
Setting up a pseudo-ACD 10-9
The Pseudo ACD Setup input window opens.
...........................................................................................................................................................................
3 In the ACD field, type the number (nine through 26) or the name of the pseudo-ACD.
You must use an ACD number if you have not defined a synonym for it. You can use the ACD name once you have defined the synonym in the Dictionary.
E N D O F S T E P S...........................................................................................................................................................................
Reference
A pseudo-ACD is not a live (real) ACD and does not communicate with any switch.
When you create a pseudo-ACD, that pseudo-ACD’s parameters (such as number of agents or splits/skills) are set to 0. Reset them if necessary to match the ACD from which data will be loaded. See “Task: administering call center agents” for more information.
The following menu items are available when a pseudo-ACD is the current ACD, if you have the appropriate feature access permissions:
• Reports
– Historical
• Dictionary
– all submenu items
• Forecast
– all submenu items
• Custom Reports
– all submenu items
Task: viewing and changing system setup values CentreVu CMS Administration
Setting up a pseudo-ACD 10-10
• User Permissions
– all submenu items
• CMS System Setup
– CMS State
Data Collection
Data Storage Allocation
Data Summarizing
Free Space Allocation
Load Pseudo-ACD
Pseudo-ACD Setup
R2 Migrate Data
R3 Migrate Data
Storage Intervals
Switch Setup
• Maintenance
– ACD Status
Archiving Status
Backup Data
Backup/Restore Devices
Connection Status
Printer Administration
Restore Data
• CentreVu CMS does not automatically summarize pseudo-ACD data. See “Archiving data in the historical database” in this task for more information on how to summarize pseudo-ACD data into daily, weekly, or monthly summaries.
• Before you load the previously backed-up ACD data to the pseudo-ACD, make the pseudo-ACD your current ACD. After you change your current ACD, see “Loading Pseudo-ACD Data” in this task for information on loading the data.
• Back up the historical data you want for the pseudo-ACD. See “Task: maintaining CentreVu CMS” for more information.
• Define a synonym for your pseudo-ACD in the Dictionary. See “Task: naming your call center entities in the Dictionary” for more information.

Task: viewing and changing system setup values CentreVu CMS Administration
Setting up a pseudo-ACD 10-11
• Verify that enough free space is available to unarchive the data. View free space allocation to see where data is stored, how much space is needed for the existing ACDs (both real and pseudo-ACDs), and how much space is available for the pseudo-ACD data. See “Specifying how CentreVu CMS stores data” in this task for more information.
• Define how much historical data will be stored for the pseudo-ACD. Data storage values are 0 for a newly created pseudo-ACD. See “Specifying how CentreVu CMS stores data” in this task for more information.
• Set the storage intervals for the data to be loaded into the pseudo-ACD. Storage interval size and data collection times for the pseudo-ACD should match those of the loaded data. See “Specifying how CentreVu CMS stores data” in this task for more information.
• Before deleting a pseudo-ACD, turn off access permissions to the pseudo-ACD. This minimizes the risk of a user working in the pseudo-ACD when it is deleted.
• You can use scripting to access the pseudo-ACD. See “Task: automating your activities with scripting” for more information.
• You can put this window on a timetable. See “Task: using timetables and shortcuts” for more information.

Task: viewing and changing system setup values CentreVu CMS Administration
Loading pseudo-ACD data 10-12
............................................................................................................................................................................................................................................................Loading pseudo-ACD data
Overview Use these steps to load ACD data into the pseudo-ACD you created in the “Setting up a pseudo-ACD.” For example, you could take data previously backed up on one CMS and unarchive the data to another CMS.
Prerequisites Before you load the pseudo-ACD data:
• Do a backup to generate a pseudo-ACD data volume.
• Set up the pseudo-ACD. See “Setting up a pseudo-ACD” in this task for more information.
• Define how much historical data will be stored for this pseudo-ACD. The storage allocation parameters must be large enough to accommodate the data to be loaded. See “Allocating storage space” in this task for more information.
• Set the storage intervals for the data to be unarchived. The storage-interval size and data collection times for the pseudo-ACD must match those of the data to be loaded. See “Specifying storage intervals” in this task for more information.
Steps ...........................................................................................................................................................................
1 On the controller window, select Tools | CMS System Setup.

Task: viewing and changing system setup values CentreVu CMS Administration
Loading pseudo-ACD data 10-13
The CMS System Setup selector window opens.
...........................................................................................................................................................................
2 Select Operations | Load Pseudo-ACD Data.

Task: viewing and changing system setup values CentreVu CMS Administration
Loading pseudo-ACD data 10-14
The Load Pseudo-ACD Data input window opens.
The Status field shows the status of the data being loaded into the pseudo-ACD; the Errors field shows any errors found while loading the pseudo-ACD data.
...........................................................................................................................................................................
3 In the ACD field, type the number of the ACD from which you will load the data. This is the ACD number for the machine on which the backup was made.
...........................................................................................................................................................................
4 In the Device name field, type the name of the device from which you will load the data. The devices are listed in the Maintenance Backup/Restore Devices window.
...........................................................................................................................................................................
5 In the Start date field, type the date that will be the first day the historical data is loaded on the pseudo-ACD.
The start date tells CentreVu CMS which date to look for on the backup volume and at which point to begin loading data to the pseudo-ACD.

Task: viewing and changing system setup values CentreVu CMS Administration
Loading pseudo-ACD data 10-15
...........................................................................................................................................................................
6 In the Start time field, type the time from when you want to start migrating data to the pseudo-ACD. The default is 12:00 a.m., midnight.
The time tells CentreVu CMS which time to look for on the backup volume and at which point to begin loading data to the pseudo-ACD.
...........................................................................................................................................................................
7 In the Stop date field, type the date that you want to stop migrating the data from the backup volume to the pseudo-ACD.
This is the date on the backup volume at which you want CentreVu CMS to stop loading data to the pseudo-ACD. This field is required.
...........................................................................................................................................................................
8 In the Stop time field, type the time at which you want to stop migrating data from the volume to the pseudo-ACD. The default is 11:59 p.m.
This is the time on the backup volume at which you want CentreVu CMS to stop loading data to the pseudo-ACD.
E N D O F S T E P S...........................................................................................................................................................................
Reference
• The data loaded from a full backup may be more than you need and which could create disk space problems. Determine the amount of data and disk space needed, and do only a Specific Tables backup.
The Load Pseudo-ACD command automatically removes existing data and inserts new data if pseudo-ACD data already exists for this ACD.
• Cancel stops loading data. If you stop before data-loading completes, partial data for this pseudo-ACD remains.
• Data is migrated to the pseudo-ACD for the period between the start and stop dates set in the Pseudo-ACD Data window.
• If Forecast is enabled on the pseudo-ACD, change the values for the forecast archive parameters as necessary.
• Back up the data that will be loaded in the pseudo-ACD. See “Task: maintaining CentreVu CMS” for more information.

Task: viewing and changing system setup values CentreVu CMS Administration
Loading pseudo-ACD data 10-16
• You can access the Load Pseudo-ACD Data via a script. See “Task: automating your activities with scripting” for more information.
• You can put this window on a timetable. See “Task: using timetables and shortcuts” for more information.

Task: viewing and changing system setup values CentreVu CMS Administration
Specifying how CentreVu CMS stores data 10-17
............................................................................................................................................................................................................................................................Specifying how CentreVu CMS stores data
Overview Use these steps to see which file systems CentreVu CMS uses and to specify where to store CentreVu CMS files.
Steps ...........................................................................................................................................................................
1 Turn off data collection for all ACDs and put CMS in single-user mode.
...........................................................................................................................................................................
2 When the status line reads “Successful,” turn data collection back on and restore CentreVu CMS to multi-user mode. If you log out while in single-user mode, wait at least 10 seconds before logging in again.
...........................................................................................................................................................................
3 On the controller window, select Tools | CMS System Setup.
The CMS System Setup selector window opens.
...........................................................................................................................................................................
4 Select Operations | Free Space Allocation.
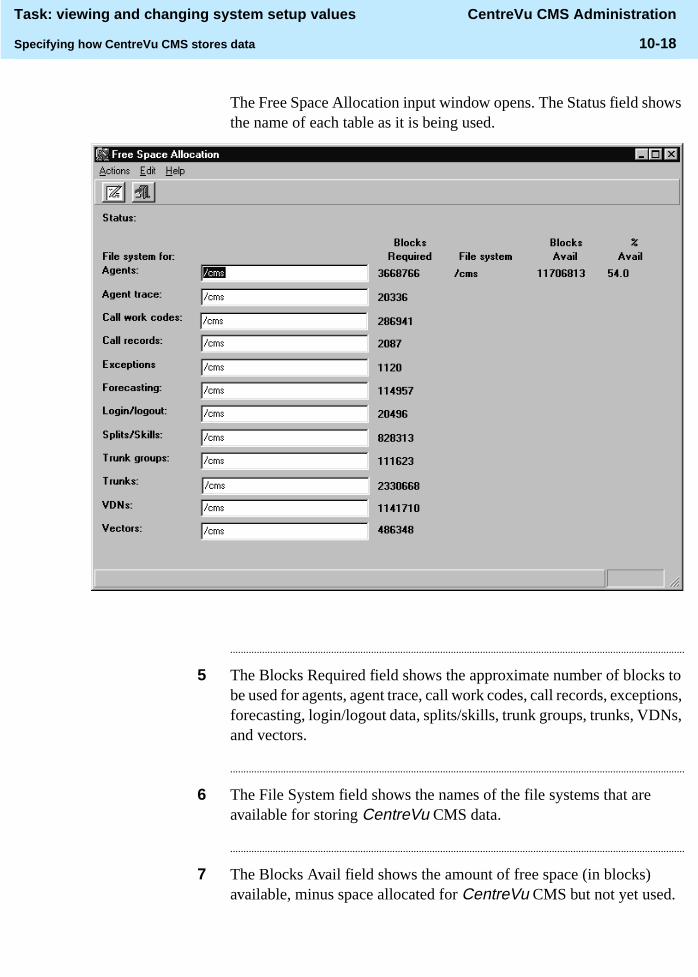
Task: viewing and changing system setup values CentreVu CMS Administration
Specifying how CentreVu CMS stores data 10-18
The Free Space Allocation input window opens. The Status field shows the name of each table as it is being used.
...........................................................................................................................................................................
5 The Blocks Required field shows the approximate number of blocks to be used for agents, agent trace, call work codes, call records, exceptions, forecasting, login/logout data, splits/skills, trunk groups, trunks, VDNs, and vectors.
...........................................................................................................................................................................
6 The File System field shows the names of the file systems that are available for storing CentreVu CMS data.
...........................................................................................................................................................................
7 The Blocks Avail field shows the amount of free space (in blocks) available, minus space allocated for CentreVu CMS but not yet used.

Task: viewing and changing system setup values CentreVu CMS Administration
Specifying how CentreVu CMS stores data 10-19
...........................................................................................................................................................................
8 The % Avail field shows the percentage of space still available.
E N D O F S T E P S...........................................................................................................................................................................
Reference
• The Vectors, VDNs, and Forecasting fields are not available if your company has not purchased these features.
• Available space is calculated as follows: free space, minus space allocated for CentreVu CMS but not yet used.
• CentreVu CMS does not automatically check the database for disk space used by data in custom tables. If you inadvertently fill up your disk with custom data, you can lose or damage custom data and ACD data. Prevent this by regularly checking the amount of disk space available.
• When you change CentreVu CMS data storage parameters, the change is reflected (for information purposes only) in the Free Space Allocation window. For example, if in the Data Storage Allocation window you increase the number of splits/skills, the Free Space Allocation window shows the new number and the approximate amount of disk space needed for the total number of splits/skills.
• If you allocate more space on a file system than is available, the number of blocks that the file system is short is displayed in parentheses.
• The Free Space Allocation window includes a % Available column as a convenience for determining how much space is available on the file systems.
• Values you set on the Forecast–Data Storage Allocation window affect storage space. See CentreVu CMS Release 3 Version 5 Forecast585-215-825 for more information on the Forecast feature.
• You can script the Free Space Allocation window via scripting. See “Task: automating your activities with scripting” for more information.
• You cannot put the Free Space Allocation window on a timetable.

Task: viewing and changing system setup values CentreVu CMS Administration
Archiving data in the historical database 10-20
............................................................................................................................................................................................................................................................Archiving data in the historical database
Overview Data is automatically archived based on your entries in the Storage Intervals window. It is recommended that you do not archive data in the historical database unless an archive fails or does not occur. In that case, use the Data Summarizing window to manually archive data in the historical database on demand for daily, weekly, and monthly summaries.
Steps ...........................................................................................................................................................................
1 On the controller window, select Tools | CMS System Setup.
The CMS System Setup selector window opens.
...........................................................................................................................................................................
2 Select Operations | Data Summarizing.
The Data Summarizing input window opens.
...........................................................................................................................................................................
3 In the ACD field, type the name or number of the ACD for which you want to summarize data.
...........................................................................................................................................................................
4 In the Data type field, select: Daily (default value) to summarize intrahour data into daily data. Weekly to summarize daily data into weekly data. Monthly to summarize daily data into monthly data.

Task: viewing and changing system setup values CentreVu CMS Administration
Archiving data in the historical database 10-21
...........................................................................................................................................................................
5 In the Date field, type the date (MM/DD/YY) for which you want the data summarized.
Use the following as a guide:
• A daily summary consists of a partial day. Daily summaries must be complete for each day of the week or month before CentreVu CMS archives the data for that week or month.
• For a weekly summary, set a date that falls within your predefined week (as set in the Storage Intervals window) or any date after that week but before the next week's start date.
• For a monthly summary, set any day during the month for which you want the monthly data summarized.
E N D O F S T E P S...........................................................................................................................................................................
Reference
• If the date you set does not fall within your predefined week, the previous week is summarized (as long as each day of the previous week has been archived successfully). So if your designated week is Monday through Friday and you enter a date that falls on Saturday, the data is archived for the previous week.
• If the date you choose sets a week or month for which a daily summary is not complete, archiving does not occur for the week or month. You cannot archive partial weekly or monthly data.
• You can use the drop-down list, Single Date Input browse window, or Multiple Daily Input browse window to enter the dates.
• Your data is automatically archived based on your storage intervals.
• Data summarizing is done on demand from the Data Summarizing window and happens immediately.
• Before you start a manual archive, a message warns you that archiving data can take a long time and cannot be canceled. You can back out from this message field before you start the archive.
• Multiple data-summarizing requests are queued and are run in the order you request.
Task: viewing and changing system setup values CentreVu CMS Administration
Archiving data in the historical database 10-22
• “Archiver started” displays on the status line for the first request and “Archiver request submitted” displays if there is already a data summary in progress.
• Scheduled daily, weekly, and monthly data summaries are queued with manual requests so that just one type of data summarizing runs at one time.
• You cannot request a manual archive without existing data for the day, week, or month summarized. You must allocate space in the Data Storage Allocation window before you can archive.
• The results of daily, weekly, and monthly data summaries are written to the error log. You can use the error log report to see when the summaries ran and whether or not they were successful. The Archiving Status window also shows this information.
• The Archiving Status window shows the status, date, and time of the last archive for interval, daily, weekly, and/or monthly summarizing. If CentreVu CMS is down when a data summarizing timetable is scheduled to run, an error message directs you to do a manual archive from the Data Summarizing window. See “Task: maintaining CentreVu CMS” for more information.
• The Data Summarizing window is automatically put on a timetable to run at the data-summarizing time that you set in the Storage Intervals window. You can also put manual archiving on a timetable. See “Task: using timetables and shortcuts” for more information.

Task: viewing and changing system setup values CentreVu CMS Administration
Starting or stopping external applications 10-23
............................................................................................................................................................................................................................................................Starting or stopping external applications
Overview Use these steps to turn on or turn off the External Application feature, to start or stop external applications, or to view the status of external applications. This feature sends CentreVu CMS real-time data to an external device such as a wallboard or to an external program such as an employee scheduler. External Application is a separately purchased CentreVu CMS feature.
Steps ...........................................................................................................................................................................
1 On the controller window, select Tools | CMS System Setup.
The CMS System Setup selector window opens.
...........................................................................................................................................................................
2 Select Operations | External Application Status.
The External Application Status input window opens.
...........................................................................................................................................................................
3 In the External Applications field, select the name of the external application. If you do not know the name, select External Application and select List all on the Actions menu or on the toolbar.
...........................................................................................................................................................................
4 In the Application Status field, click Start to start the external application, or Stop to stop the external application.
E N D O F S T E P S...........................................................................................................................................................................

Task: viewing and changing system setup values CentreVu CMS Administration
Starting or stopping external applications 10-24
Reference
The status of an external application can be one of the following:
• Starting — a request to start the external application has been made.
• Running — the external application has started and is still running after 10 seconds.
• Stopping — a request to stop the external application has been made.
• Stopped — all processes associated with the external application have stopped.
• Failed — the external application has failed repeatedly and is no longer being restarted.
• In the United States, the external applications are designed and administered by the Technical Service Center. For more information about external applications, call the National Customer Care Center Call Center Helpline at 1-800-242-2121. For help outside the United States, contact your local Lucent distributor or representative.
• A standard or custom real-time report collects the CentreVu CMS data that is sent to the external application. See “Task: running, printing, exiting, and restarting a report” for more information.
• You can script the External Application Status window. See “Task: automating your activities with scripting” for more information.
• You can put the External Application Status window on a timetable. See “Task: using timetables and shortcuts” for more information.
Task: viewing and changing system setup values CentreVu CMS Administration
Allocating storage space 10-25
............................................................................................................................................................................................................................................................Allocating storage space
Overview Use these steps to specify how much data CentreVu CMS saves and for how long. The amount of data and the length of time the data is saved affects disk space, and is limited by your system configuration. Data storage parameters are initially set during installation.
Prerequisites Wait to begin a second modification
If you are in the process of modifying data, do not open another Data Storage Allocation window to start another modification. Wait until the first modification finishes. You could lose data tables by doing simultaneous modifications.
Check free space
Check the amount of free space in the Free Space Allocation window and determine where you can allocate space for data storage. This window shows the amount of disk space that is available for use. The values you set in the Data Storage Allocation window affect the amount of free space still available. See “Specifying how CentreVu CMS stores data” in this task for more information.
Know your permission status
To view how space has been allocated, you need read permission for the CMS System Setup command. To change data storage allocation, you need write permission. See “Task: assigning user permissions” for more information.
Steps ...........................................................................................................................................................................
1 On the controller window, select Tools | CMS System Setup.
The CMS System Setup selector window opens.
...........................................................................................................................................................................
2 Select Operations | Data Storage Allocation.

Task: viewing and changing system setup values CentreVu CMS Administration
Allocating storage space 10-26
The Data Storage Allocation input window opens.
This window shows the values set during installation: the maximum number of splits/skills, agents, trunk groups, trunks, call work codes, vectors, and VDNs for your system. You can allocate storage space for those maximums or you can change those maximums to meet the needs of your call center. You can also enter shift times (at least one) and the number of agents for those shifts.
E N D O F S T E P S...........................................................................................................................................................................

Task: viewing and changing system setup values CentreVu CMS Administration
Allocating storage space 10-27
Steps to set field values The following steps include only the fields that need an explanation:
...........................................................................................................................................................................
1 In the # of Items field, type the number of items for splits/skills, trunk groups, trunks, call work codes, vectors, and VDNs for which you want space allocated.
...........................................................................................................................................................................
2 In the Days of Daily field, type the number of days for which you want daily data stored for splits/skills, agents, trunk groups, trunks, call work codes, vectors, and VDNs. If you type �, CentreVu CMS does not save daily data. Each entry (split/skill, trunk group, etc.) can be different. To store daily data for a complete month, type ���
...........................................................................................................................................................................
3 In the Weeks of Weekly field, type the number of weeks for which you want weekly data stored for splits/skills, agents, trunk groups, trunks, call work codes, vectors, and VDNs. Each entry (split/skill, trunk group, etc.) can be different. If you type �, CentreVu CMS does not save weekly data.
...........................................................................................................................................................................
4 In the Months of Monthly field, type the number of months for which you want monthly data stored for splits/skills, agents, trunk groups, trunks, vectors, and VDNs. Each entry (split/skill, trunk group, etc.) can be different. If you type ��, CentreVu CMS does not save monthly data.
...........................................................................................................................................................................
5 In the Shift 1 (2, 3, or 4) field, type the shift start and stop times for each shift of agents (up to four shifts) for your ACD. Shifts can overlap.
If you specify a shift that starts before the data collection start time or ends after the data collection stop time, you get an acknowledgment.
...........................................................................................................................................................................
6 In the Maximum agents logged in field, type the maximum number of agents logged in during the shift.
...........................................................................................................................................................................
7 In the field for total split/skill members, summed over all splits/skills (0-9,999), type the maximum number of measured split/skill members summed over all splits/skills.
Task: viewing and changing system setup values CentreVu CMS Administration
Allocating storage space 10-28
...........................................................................................................................................................................
8 In the field for Number of Agent login/logout records (0–999,999), type the number of agent login/logout records you want to store. A record is generated each time an agent logs in, one record per login/logout session.
...........................................................................................................................................................................
9 In the field for Number of agent trace records (0–500,000), type the number of agent trace records for this ACD (not for all ACDs). To calculate how many records you need, multiply the number of days for which you want to save this information times the number of agents who log in and out each day times the number of times each agent logs out each day.
...........................................................................................................................................................................
10 In the field for Number of unmeasured trunk facilities, type the number of unmeasured trunk facilities. Set this number high enough to handle the traffic expected over these unmeasured trunk facilities but not to exceed the maximum number of trunks minus the number of measured trunks.
...........................................................................................................................................................................
11 In the field for Number of exceptions records (0–2,000), type the total number of exceptions (for example, agents, splits/skills, VDNs).
...........................................................................................................................................................................
12 In the field for the Number of call records (0–5,000) or (0–999,999), type the number of call records you want to store for this ACD. If you collect and report these records on CentreVu CMS itself, this is the number of records that are stored. The value can be from 0 to 5,000.
If you send the records to another computer for storage and analysis, this is the amount of buffer space set aside to collect the records before transmission to the other system. The value can be from 0 to 999,999.

Task: viewing and changing system setup values CentreVu CMS Administration
Allocating storage space 10-29
...........................................................................................................................................................................
13 When you are done changing field values, do one of the following:
• Select Modify on the Actions menu or on the toolbar to accept your changes.
• Select Exit on the Actions menu or on the toolbar to exit the window without saving your changes.
E N D O F S T E P S...........................................................................................................................................................................
Reference
Always:
• Turn off data collection for all real ACDs. When the status line reads “Successful,” you can turn data collection back on. For a pseudo-ACD, data collection can be on when you change data storage parameters.
• Put CentreVu CMS in single-user mode before you change data storage parameters. If you log out while in single-user mode, you must wait at least 10 seconds before logging in again.
Calculate storage needs: Data storage allocation needs vary among installations. Base your CentreVu CMS data needs on these criteria:
• Available disk space on your system configuration
• Number of ACDs (real ACD and pseudo-ACDs) on CentreVu CMS
• Size of the real ACDs and all pseudo-ACDs (number of agents, trunks, etc.)
• Length of time for data to be stored (for example, 30 days versus 100 days versus two years)
The historical database probably uses the most disk space. You can reduce the amount of historical data saved by using the Data Storage Allocation command.
Your CentreVu CMS reporting priorities also determine how you set your data storage allocation.
The maximum amount of storage space for each data type (agent, split/skill, trunk, trunk group, etc.) is limited by the amount of free space available in that file system and the maximum storage needs.

Task: viewing and changing system setup values CentreVu CMS Administration
Allocating storage space 10-30
Assuming that free space is available, the maximum storage capabilities are:
• Intrahour storage: 62 days
• Daily storage: five years (1,825 days)
• Weekly/monthly storage: 10 years (520 weeks/120 months)
Understand implications
The length of the intrahour interval affects how much disk space is needed to store the days of intrahour data. For example, if you set your intrahour interval to be 15 minutes, the amount of disk space required is four times larger than if you set your intrahour interval at 60 minutes for the same number of days of data.
The start time, stop time, weekly start day, and weekly stop day set in the Storage Intervals window also affect disk space.
Existing values and what they mean
• The values in this field are calculated to include expected growth. For example, if space is allocated for three splits/skills, � displays under the # of Items heading in the row corresponding to the splits/skills data item.
• Days of Intrahour: this field shows the number of days for which you are currently storing intrahour data. For example, if the Days of Intrahour field is set to store 31 days of intrahour data, ��� displays under the Days of Intrahour heading in the row corresponding to the appropriate data item.
• Days of Daily: this field shows the number of days for which you are currently storing daily data. For example, if the Days of Daily are set to store daily data for 387 days, ��� displays under the Days of Daily heading in the row corresponding to the appropriate data item.
• Weeks of Weekly: this window shows the number of weeks that you are storing weekly data. For example, if you have the Weeks of Weekly currently set to store weekly data for 104 weeks, then ��� displays under the Weeks of Weekly heading in the row corresponding to the appropriate data item.
• Months of Monthly: these fields show the number of months for which you are storing monthly data. For example, if the Months of Monthly field is set to store monthly data for 60 months, ��� displays under the Months of Monthly heading in the row corresponding to the appropriate data item.

Task: viewing and changing system setup values CentreVu CMS Administration
Allocating storage space 10-31
• Shift 1 (2, 3, or 4): CentreVu CMS rounds shift times to the nearest interval. For example, if you use 30-minute intervals and set a shift from 8:15 to 5:15, CentreVu CMS assumes that this shift is from 8:00 to 5:30.
Shifts must be at least one minute long.
You cannot set a shift from 8:00 a.m. to 8:00 a.m. for a 24-hour shift; you must set 8:00 a.m. to 7:59 a.m. for a 24-hour shift.
This information is used CMS-wide.
• Total split/skill members, summed over all splits/skills (0–9,999: the link between CentreVu CMS and the switch does not come up if you assign more agent members to splits/skills than your company has paid for.
On G3/ECS, you need to count extensions in multiple splits/skills once for each split/skill in which they are members. On G3/ECS, this represents the maximum number of split/skill members measured or logged in at any one time. On G3/ECS without EAS, this represents the maximum split members. On G3/ECS with EAS, this represents the maximum agent/skill pairs (skill members) logged in.
• Number of Agent login/logout records (0–999,999): when you change skills for an agent, a new record is generated if the agent is logged in when the change occurs.
• Number of unmeasured trunk facilities: an unmeasured facility is needed for all internal station to station calls and all calls that use an unmeasured CentreVu CMS trunk group.
An unmeasured facility can be either an external trunk or an internal (intercom) trunk. All call activity to or from measured agents or measured splits/skills/VDNs uses either a measured trunk group or an unmeasured trunk facility.
Call Vectoring
If you do not have Call Vectoring or your switch does not support call work codes, the fields corresponding to call work codes, vectors, and VDNs are not displayed.
Maintenance
If you change the data storage allocation values, do a full backup of the historical data. See “Task: maintaining CentreVu CMS” for more information.
Task: viewing and changing system setup values CentreVu CMS Administration
Allocating storage space 10-32
Scripting
You can script the Data Allocation Status window and schedule the script. See “Task: automating your activities with scripting” for more information.
Timetable
You cannot put the Data Allocation Status window on a timetable.
Switch parameters
If you change the switch parameters using �VZVHWXS� check the parameters on the Data Allocation Status screen. See CentreVu CMS R3V8 Upgrades and Migration 585-210-913. (For example, enable Call Vectoring means you need data storage space for VDNs and vectors. Changing the release of the switch may change the number of measured entities allowed and affect the storage allocation for each entity.)
Reports
The data storage values determine how much data is available for running historical reports. For example, if you choose not to save weekly and monthly data, weekly or monthly reports display no data.
Conversely setting a high limit for data storage allocation does not guarantee that more than 1,000 call work code entries appear on the call work code report. See CentreVu Supervisor Release 8 Reports 585-215-851 for more information.

Task: viewing and changing system setup values CentreVu CMS Administration
Migrating CentreVu CMS data 10-33
............................................................................................................................................................................................................................................................Migrating CentreVu CMS data
Overview Use these steps to migrate R2 CentreVu CMS data residing on a 3B2 computer to a current CentreVu CMS release.
R2 data items that can be migrated include:
• Administration data (user permissions)
• Dictionary
• Custom reports
• Historical data
• Forecast administration data
Use the R3 Migrate Data window to migrate R3 CentreVu CMS data from prior R3 CentreVu CMS releases to current releases.
Steps to migrate R2 data ...........................................................................................................................................................................
1 From the controller window, select Tools | CMS System Setup.
The CMS System Setup selector window opens.
...........................................................................................................................................................................
2 Select Operations | R2 Migrate Data.

Task: viewing and changing system setup values CentreVu CMS Administration
Migrating CentreVu CMS data 10-34
The R2 Migrate Data input window opens.
...........................................................................................................................................................................
3 For information on using the R2 Migrate Data window, see CentreVu CMS R2V8 Upgrades and Migration 585-215-856.
E N D O F S T E P S...........................................................................................................................................................................
Steps to migrate R3 data ...........................................................................................................................................................................
1 From the controller window, select Tools | CMS System Setup.
The CMS System Setup window opens.
...........................................................................................................................................................................
2 Select Operations | R3 Migrate Data
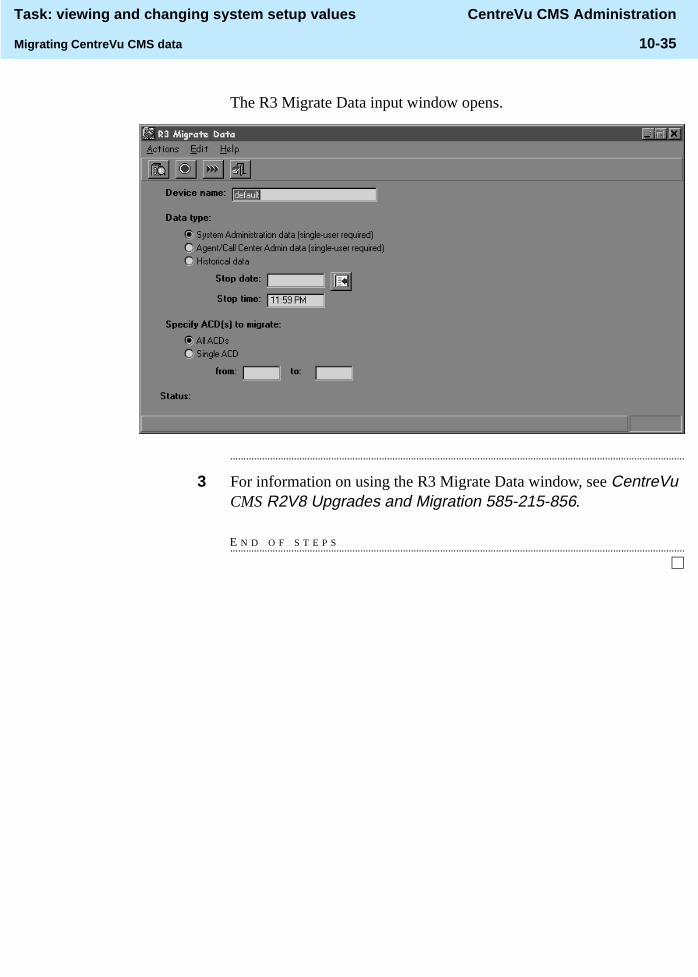
Task: viewing and changing system setup values CentreVu CMS Administration
Migrating CentreVu CMS data 10-35
The R3 Migrate Data input window opens.
...........................................................................................................................................................................
3 For information on using the R3 Migrate Data window, see CentreVu CMS R2V8 Upgrades and Migration 585-215-856.
E N D O F S T E P S...........................................................................................................................................................................

Task: viewing and changing system setup values CentreVu CMS Administration
Setting storage intervals 10-36
............................................................................................................................................................................................................................................................Setting storage intervals
Overview You can set a 15-, 30-, or 60-minute storage interval for ACD data. This allows you to choose the storage interval that best meets the needs of your call center. You can also select the days of the week that begin and end your call center’s week.
Storage intervals determine how often intrahour data is archived and at which times. For example, if your call center’s hours change, you can specify a change in the daily start time or daily stop time.
Steps ...........................................................................................................................................................................
1 On the controller window, select Tools | CMS System Setup.
The CMS System Setup selector window opens.
...........................................................................................................................................................................
2 Select Operations | Storage Intervals.
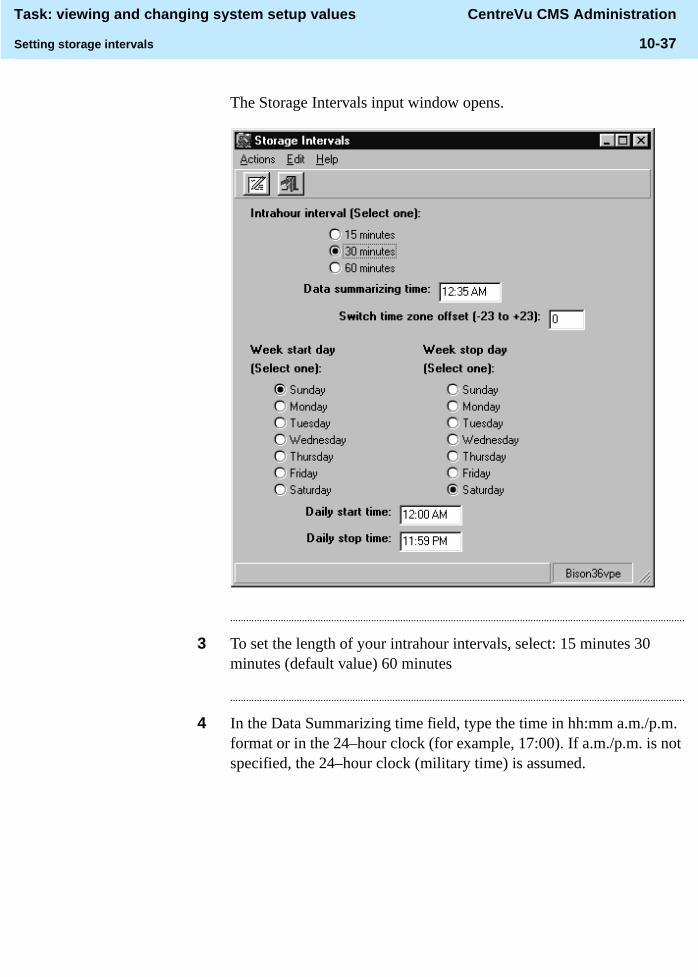
Task: viewing and changing system setup values CentreVu CMS Administration
Setting storage intervals 10-37
The Storage Intervals input window opens.
...........................................................................................................................................................................
3 To set the length of your intrahour intervals, select: 15 minutes 30 minutes (default value) 60 minutes
...........................................................................................................................................................................
4 In the Data Summarizing time field, type the time in hh:mm a.m./p.m. format or in the 24–hour clock (for example, 17:00). If a.m./p.m. is not specified, the 24–hour clock (military time) is assumed.
Task: viewing and changing system setup values CentreVu CMS Administration
Setting storage intervals 10-38
Use the following as a guide:
• The default daily summary time is 12:35 a.m. on the day following the day the data was collected. Weekly summaries are started on the day following the selected stop day. Monthly summaries are started on the first day of the next month. For example, January's monthly summary is done on the first day of February.
• To start data summarizing on the current day, set the summarizing time 15 minutes after the daily stop time and before midnight. CentreVu CMS uses the daily stop time plus 15 minutes (the last interval is needed to complete archiving). The weekly summaries are then started two hours later, with the monthly summaries following by four hours.
...........................................................................................................................................................................
5 In the field for Switch time zone offset, type the adjustment needed to convert switch time to local CentreVu CMS time. The value in this field is 0 except when the ACD is in a different time zone from the CentreVu CMS system.
...........................................................................................................................................................................
6 For the Week start day field, select the check box next to the day of the week that begins your call center's week. When you request a weekly report, the start date must correspond to the day specified in this field. You can select one day of the week; Sunday is the default.
Use the following as a guide:
• If the current week is defined as Monday through Friday and you want to change it to Sunday through Saturday, if you make the change between Monday and Friday, the week of the change is Monday through Saturday (the old start day, Monday, through the new stop day, Saturday).
• If you make the change on Saturday the old week is archived for Monday through Friday, and the new week is Sunday through Saturday.
• If possible, make the change after the weekly archive, preferably on a day when data is not normally collected (unless you collect data for a seven-day week).
• The week of the change has the data item INCOMPLETE set to indicate that this week's data is unusual because the definition of what constitutes a week was changed.

Task: viewing and changing system setup values CentreVu CMS Administration
Setting storage intervals 10-39
• If the start and stop day are the same day of the week, one day's worth of data is stored per week.
• When you change the weekly start or stop day, the current week can be one to 13 days long. You do not need to migrate the data because of this change.
• If the current start day is Sunday and the stop day is Saturday, and you change the stop day on Saturday morning to Friday, the current week has 13 days in it. If the start day is Sunday and the stop day is Saturday, and on Sunday you change the stop day to Sunday, the current week has only one day.
...........................................................................................................................................................................
7 For Week stop day, select the check box next to the day of the week that ends your call center's week. You can select one day of the week; Saturday is the default. Data through the end of the stop day is included in the weekly summary.
When you change the weekly start or stop day, the current week can be one to 13 days long. (You do not need to migrate the data because of this change.) For example, if the current work day is Sunday and the stop day is Saturday, and on Saturday morning you change the stop day to Friday, the current week has 13 days. Or if the start day is Sunday and the stop day is Saturday, and on Sunday you change the stop day to Sunday, the current week has only one day.
...........................................................................................................................................................................
8 In the Daily start time field, type the time that data collection starts each day. Use the hh:mm a.m./p.m. format or the 24-hour clock (for example, 17:00). The default is 12:00 a.m. (midnight).
Daily start time must be for the same calendar day as Daily stop time.
...........................................................................................................................................................................
9 In the Daily stop time field, type the time that the data collection stops each day. Use the hh:mm a.m./p.m. format or the 24-hour clock (for example, 17:00). The default is 11:59 p.m.
E N D O F S T E P S...........................................................................................................................................................................

Task: viewing and changing system setup values CentreVu CMS Administration
Setting storage intervals 10-40
Reference
Guidelines for setting storage intervals
A change in the intrahour interval does not take effect until the end of the current intrahour interval, and existing historical data is automatically migrated when you are changing to a longer intrahour interval.
If the new intrahour report interval is 15 minutes, the existing 30- or 60-minute data is divided by two or four, respectively, with any remainder falling in the last 15-minute interval. If the new intrahour report interval is 60 minutes, two 30-minute intervals or four 15-minute intervals are combined.
The Data Summarizing time field shows the time when the daily/weekly/monthly summaries are done. The time is displayed in the hh:mm a.m./p.m. format.
The Switch time zone offset field helps ensure that all CentreVu CMS date and time stamps use the same clock. For example, suppose that CentreVu CMS runs on a machine in New York City and one of its ACDs is in London. CentreVu CMS must collect all data in U.S. Eastern time. Since New York is five hours behind London, you would need to type –5 in this field for the London switch.
When you change the start or stop day for the week, data is archived from the old start day through the new stop day for the week in which the change was made.
If the start or stop time is extended, there are no records in the historical database for the added hours before the time of the change.
If the start and stop day are the same day of the week, only one day's worth of data is stored per week.
Wait to begin a second modification
If you are in the process of modifying data, do not open another Storage Intervals window to start another modification. Wait until the first modification finishes. You could lose data tables by doing simultaneous modifications.
Turn data collection back on
When the status line reads “Successful,” turn data collection back on and restore CentreVu CMS to multi-user state. Turning data collection or CentreVu CMS back on before changing storage intervals is finished may affect the accuracy of your data.
Task: viewing and changing system setup values CentreVu CMS Administration
Setting storage intervals 10-41
It is time-consuming...
If you change your storage intervals, be aware that it is very time-consuming to change storage intervals for all the data that is being collected.
Allocate enough space
If you change storage intervals, you may need to adjust the location of CentreVu CMS files or reduce the length of time you store data. The Free Space Allocation window shows the amount of free space available on your CentreVu CMS. As you increase the number or frequency of storage intervals, more storage space is needed. Allocating data storage enables you to set aside additional space.
Is my data archived?
CentreVu CMS automatically archives your data, based on your entries in the Storage Intervals window.
Real-time reports
The intrahour interval you select also represents how long the current intrahour interval lasts in real-time reports. Cumulative data is reset to 0 at the beginning of each intrahour interval. See “Task: running, printing, exiting, and restarting a report” for more information.
Historical reports
When you request a weekly report, the date you set must correspond to the day of the week you set in the Week start day field in the Storage Intervals window. See “Task: running, printing, exiting, and restarting a report” for more information.
Maintenance
Before changing the storage-interval size or data collection times (the daily start or stop time), do a full backup of the historical data. After you change the data storage-allocation parameters, do a full backup of the historical data. See “Task: maintaining CentreVu CMS” for more information.
Scripting
You can script the Storage Intervals window. See “Task: automating your activities with scripting” for more information.
Timetable
You cannot put the Storage Intervals window on a timetable.

Task: viewing and changing system setup values CentreVu CMS Administration
Viewing switch setup data 10-42
............................................................................................................................................................................................................................................................Viewing switch setup data
Overview Use these steps to view the switch setup values that were set during installation:
• Switch type
• Switch release
• Purchased CentreVu CMS release and version
• CentreVu CMS load designation
• Phantom abandon call timer
• CentreVu CMS-administrable switch features (Call Vectoring, Call Prompting, and EAS).
Prerequisites
• The Switch Setup window accepts only live ACDs in the ACD field, not pseudo-ACD names or numbers.
• When you select List all or Find one, the phantom abandon call timer value for the ACDs is displayed.
Steps ...........................................................................................................................................................................
1 On the controller window, select Tools | CMS System Setup.
The CMS System Setup selector window opens.
...........................................................................................................................................................................
2 Select Operations | Switch Setup.

Task: viewing and changing system setup values CentreVu CMS Administration
Viewing switch setup data 10-43
The Switch Setup input window opens.
...........................................................................................................................................................................
3 In the ACDs field, type the names or numbers of the ACDs for which you want information.
...........................................................................................................................................................................
4 Review the following fields:
• Switch type (such as DEFINITY®)
• Switch release (such as G3V5, G3V6, or G3V8)
• Purchased CentreVu CMS release and version (the CentreVu CMS release and version that was originally purchased)
• CentreVu CMS load (the CentreVu CMS load name, including the field update section of the load number)
• The phantom abandon call timer (the value of the phantom abandon call timer–calls shorter in duration than the number of seconds set here are counted as abandoned calls rather than ACD calls). This is useful in areas where the central office does not provide disconnect supervision on trunks
Task: viewing and changing system setup values CentreVu CMS Administration
Viewing switch setup data 10-44
• The switch features (shows the purchased DEFINITY ECS features that affect CentreVu CMS data: Call Vectoring, Call Prompting, and EAS)
E N D O F S T E P S...........................................................................................................................................................................
Reference To display an ACD name in the Switch Setup window, you must first assign the name in the Dictionary. See “Task: naming your call center entities in the Dictionary” for more information.
Task: maintaining CentreVu® CMS CentreVu CMS Administration
11-1
11 Task: maintaining CentreVu® CMS
............................................................................................................................................................................................................................................................Overview
Purpose Use the procedures that follow to maintain CentreVu CMS. Maintenance consists of routine tasks such as backing up data, checking the status of the CentreVu CMS connection to the switch, and viewing the maintenance error log.
In this task, you will find the following procedures:
• Viewing ACD status
• Viewing archiving status
• Running a CMSADM file system backup
• Running a maintenance backup
• Assigning a name and description to a device
• Monitoring connection status
• Administering a printer
• Running a restore
• Using the maintenance error log
Permissions These permissions apply to maintaining CentreVu CMS. See “Task: assigning user permissions“ for more information.
• To view the ACD Status window, you need read permission for the Maintenance command.

Task: maintaining CentreVu® CMS CentreVu CMS Administration
11-2
• To view the Archiving Status window, you need read permission for the Maintenance command.
• To do any of the maintenance procedures, you need write permission for the Maintenance command.
• To list devices, you need read-only permission.
• To view the Connection Status window, you need read permission for the Maintenance command.
• To view printer administration, you need read permission for the Maintenance command.
• To add, delete, or change printer administration, you need write permission for the Maintenance command.
• To do any maintenance procedures, you need write permission for the Maintenance command.
• To display the maintenance error log, you need read permission for the Maintenance command.

Task: maintaining CentreVu® CMS CentreVu CMS Administration
Viewing ACD status 11-3
............................................................................................................................................................................................................................................................Viewing ACD status
Overview The ACD Status window displays information about the current ACD selected in the window, including the number of splits or skills, agents logged in, trunk groups, trunks, VDNs, vectors (if your company has purchased Call Vectoring), and measured splits.
Steps ...........................................................................................................................................................................
1 On the controller window, select Tools | Maintenance.
The Maintenance selector window opens.
...........................................................................................................................................................................
2 Select Operations | ACD Status.
The ACD Status input window opens.

Task: maintaining CentreVu® CMS CentreVu CMS Administration
Viewing ACD status 11-4
If your switch does not have EAS, the ACD Status window looks like this:

Task: maintaining CentreVu® CMS CentreVu CMS Administration
Viewing ACD status 11-5
If your switch has EAS, the ACD Status window looks like this:
E N D O F S T E P S...........................................................................................................................................................................
Reference
For actions with EAS, note the following field descriptions:
• Skills: skills measured by CentreVu CMS
• Skill members in use: agent/skill pairs logged in at the time the ACD Status window was open
• Trunk groups: trunk groups measured by CentreVu CMS
• Trunks: trunks measured by CentreVu CMS; unmeasured trunks are not included
• VDNs: VDNs measured on this ACD
• Vectors: vectors available for use in the selected ACD
• Errors: errors found

Task: maintaining CentreVu® CMS CentreVu CMS Administration
Viewing ACD status 11-6
For actions without EAS, note the following field descriptions
• CentreVu CMS is measuring: the current value of each of the following items
• Splits: splits measured by CentreVu CMS
• Total split members: agent/split pairs logged in at the time the ACD Status window was open
• Trunk groups: trunk groups measured by CentreVu CMS
• Trunks: trunks measured by CentreVu CMS; unmeasured trunks are not included
• VDNs: VDNs measured on this ACD
• Vectors: vectors available for use in the selected ACD
• Measured splits: to change the number of measured splits in the selected ACD, type a new value and select Translations from the Actions menu
• Errors: errors found
Translations
• When you select Translations on the Actions menu, CentreVu CMS requests a full set of translations if data collection for the ACD is on. An Acknowledgment window indicates that data will be lost during the translations pumpup. The Acknowledgment window asks if you want to proceed.
• If the link to the switch is not up when you request the translations, the status line shows Failed and the error message is listed in the Errors field.
• Translations cannot be used for a pseudo-ACD since it has no connection to a switch.
• If you select either Find one or List all on the Actions menu and the ACD's link to the switch is down, the Errors field displays the link status.

Task: maintaining CentreVu® CMS CentreVu CMS Administration
Viewing archiving status 11-7
............................................................................................................................................................................................................................................................Viewing archiving status
Overview Use these steps to display the status, date, and time of the last archive for interval, daily, weekly, and/or monthly data. This information can help you decide when to turn off data collection or change your archiving times without losing data.
Steps ...........................................................................................................................................................................
1 On the controller window, select Tools | Maintenance.
The Maintenance selector window opens.
...........................................................................................................................................................................
2 In the ACD field, type or select the ACD for which you want to view archiving status.
...........................................................................................................................................................................
3 Select Operations | Archiving Status.
The Archiving Status input window opens.
...........................................................................................................................................................................
4 Type the ACD name or number for which you want to view archiving status, or select the name or number from the drop-down list, or click the Browse button.
...........................................................................................................................................................................
5 Select the check box next to any archiving type you want to view.

Task: maintaining CentreVu® CMS CentreVu CMS Administration
Viewing archiving status 11-8
...........................................................................................................................................................................
6 To view the last archiving status for interval daily, weekly, and/or monthly data, select List all on the Actions menu.
The Archiving Status – List All window opens.
E N D O F S T E P S...........................................................................................................................................................................
Reference
• Archiving status indications can be any of the following:
– Finished means the last archive ran. See the maintenance error log to determine if it succeeded or failed.
– Running means the archive is currently running.
– Not run means an archive of this type (interval, daily, weekly, or monthly) has never run for this ACD.
– Archive means that CentreVu CMS is storing your interval, daily, weekly, and monthly data in the appropriate database tables.
• The Archiving Status - List All window displays the ACD name or number, archiving type, status, date, and time of the last archive.
• The date and the time fields show the date and time that the next archive is scheduled for daily, weekly, and monthly archives. The next scheduled time for interval archives is shown as a blank, but interval archiving always occurs at the beginning of the next interval.
The field names mean the following:
• Status: the archiving status of the ACD
• Date: the time the last archive completed for the ACD
• Time: the date the last archive completed for the ACD
• Next scheduled: the date and time of the next-scheduled archive
Task: maintaining CentreVu® CMS CentreVu CMS Administration
Running a CMSADM file system backup 11-9
............................................................................................................................................................................................................................................................Running a CMSADM file system backup
Overview A backup copies the data stored on the CentreVu CMS computer to a removable volume such as tape. Backups minimize the loss of data caused by system failures or errors. Regular backups allow you to recover data that would otherwise be lost.
Important! If you do not do backups and data is lost, you cannot recover it.
The CMSADM backup consists of:
• Solaris system files and programs
• CentreVu CMS programs
• Non-CMS data you put on the computer
CAUTION: the CMSADM backup alone does not save CMS data. Therefore, for complete data recovery, both CMS and maintenance backups are required.
For instructions on running a full maintenance backup, see “Running a maintenance backup” in this task.
Steps To run the CMSADM file system backup:
...........................................................................................................................................................................
1 At the system console, log in as root and verify that the computer is in multi-user mode.
...........................................................................................................................................................................
2 In multi-user mode, type the following command at the � prompt to access the CentreVu CMS Administration menu:
FPVDGP
The CentreVu CMS Administration menu opens. The menu items and their descriptions are listed below:
1) acd_create: Define a new ACD
2) acd_remove: Remove all administration and data for an ACD
3) backup: File system backup
4) pkg_install: Install a feature package
5) pkg_remove: Remove a feature package
Task: maintaining CentreVu® CMS CentreVu CMS Administration
Running a CMSADM file system backup 11-10
6) run_pkg: Turn a feature package on or off
7) run_cms: Turn CentreVu CMS on or off
8) port_admin: Administer Modems, Terminals, and Printers
Enter choice (1-8) or q to quit.
...........................................................................................................................................................................
3 Type � to select the �EDFNXS option.
Depending on the configuration of your system, go to step 1 or 2, below.
1. If only one tape drive is available on the system, the program responds with: 3OHDVH�LQVHUW�WKH�ILUVW�FDUWULGJH�WDSH�LQWR�>GHYLFH�QDPH@��3UHVV�(17(5�ZKHQ�UHDG\�RU�'HO�WR�
TXLW�
2. If more than one tape drive is available for use by the system, the program will display output similar to the following example:
6HOHFW�WKH�WDSH�GULYH��
���>GHYLFH�QDPH@
���>GHYLFH�QDPH@
Enter a tape drive selection from the displayed list. The program responds:
3OHDVH�LQVHUW�WKH�ILUVW�FDUWULGJH�WDSH�LQWR�>GHYLFH�
QDPH@��3UHVV�(17(5�ZKHQ�UHDG\�RU�'HO�WR�TXLW�
...........................................................................................................................................................................
4 Press Enter. The backup process begins. If more than one tape is required, the program displays the following message:
(QG�RI�PHGLXP�RQ�´RXWSXW�µ
3OHDVH�UHPRYH�WKH�FXUUHQW�WDSH��QXPEHU�LW��LQVHUW�WDSH�
QXPEHU�[��DQG�SUHVV�(QWHU�
If you receive the message displayed above, insert the next tape and allow it to rewind. when it is properly positioned, press Enter.
...........................................................................................................................................................................
5 When the backup is completed, the program response varies according to the number of tapes used for the backup:

Task: maintaining CentreVu® CMS CentreVu CMS Administration
Running a CMSADM file system backup 11-11
If the number of tapes required is one, the system responds:
• [[[[[[[�EORFNV
7DSH�9HULILFDWLRQ
[[[[[[[�EORFNV
:$51,1*��$�&06�)XOO�0DLQWHQDQFH�%DFNXS�LQ�DGGLWLRQ�WR�
WKLV�FPVDGP�EDFNXS�PXVW�EH�GRQH�WR�KDYH�D�FRPSOHWH�
EDFNXS�RI�WKH�V\VWHP������������
3OHDVH�ODEHO�WKH�EDFNXS�WDSH�V��ZLWK�WKH�GDWH�DQG�WKH�
FXUUHQW�&06�YHUVLRQ��U�Y�[[�[�
If the number of tapes required is more than one, the system responds:
• [[[[[[[�EORFNV
7DSH�9HULILFDWLRQ
,QVHUW�WKH�ILUVW�WDSH
3UHVV�5HWXUQ�WR�SURFHHG�
If you receive the message displayed above, insert the first tape used in the backup and press Enter. Wait for the tape drive light-emitting diode (LED) to stop blinking before you remove the tape. When prompted, repeat this process for any additional tapes generated by the backup process. When the final tape is verified, the program displays the output shown above.
...........................................................................................................................................................................
6 Save the tapes until a backup restore is performed.
Important!Label all tapes with the tape number and the date of
E N D O F S T E P S...........................................................................................................................................................................
the backup. Set the tape write-protect switch to read-only.
E N D O F S T E P S...........................................................................................................................................................................
Reference
Lucent Technologies provides two
�FPVDGP
file system backups:
• A backup is done at the factory and shipped with your CentreVu CMS. This backup is precautionary and is used during installation if necessary.

Task: maintaining CentreVu® CMS CentreVu CMS Administration
Running a CMSADM file system backup 11-12
• A backup is done when your CentreVu CMS is provisioned. This backup contains all the Solaris system files and programs and the CentreVu CMS configuration data that was done by provisioning.
Labels for the FPVDGP� File system backup tapes are shipped with your CentreVu CMS. You should label the tapes appropriately and store them in a secure area.

Task: maintaining CentreVu® CMS CentreVu CMS Administration
Running a maintenance backup 11-13
............................................................................................................................................................................................................................................................Running a maintenance backup
Prerequisites
• You must do a full backup before doing the first incremental backup.
• You should back up your system data when it has changed or on a weekly basis.
Steps To run a maintenance backup:
...........................................................................................................................................................................
1 On the controller window, select Tools | Maintenance.
The Maintenance selector window opens.
...........................................................................................................................................................................
2 In the ACD field, type or select the ACD for which you are running a maintenance backup.
Select Operations | Backup Data.
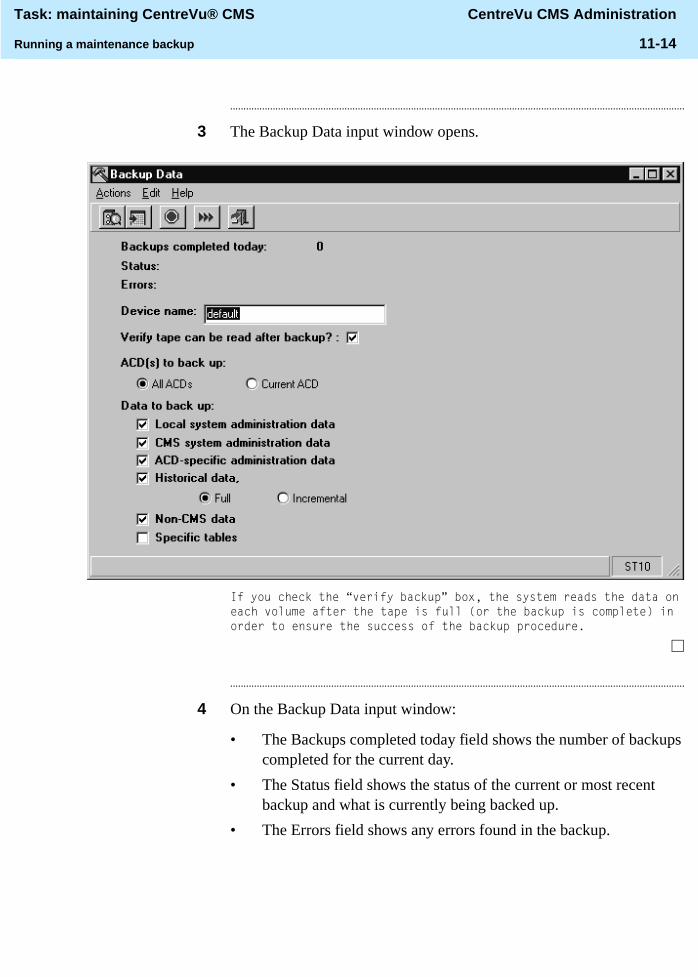
Task: maintaining CentreVu® CMS CentreVu CMS Administration
Running a maintenance backup 11-14
...........................................................................................................................................................................
3 The Backup Data input window opens.
,I�\RX�FKHFN�WKH�´YHULI\�EDFNXSµ�ER[��WKH�V\VWHP�UHDGV�WKH�GDWD�RQ�HDFK�YROXPH�DIWHU�WKH�WDSH�LV�IXOO��RU�WKH�EDFNXS�LV�FRPSOHWH��LQ�RUGHU�WR�HQVXUH�WKH�VXFFHVV�RI�WKH�EDFNXS�SURFHGXUH�
...........................................................................................................................................................................
4 On the Backup Data input window:
• The Backups completed today field shows the number of backups completed for the current day.
• The Status field shows the status of the current or most recent backup and what is currently being backed up.
• The Errors field shows any errors found in the backup.

Task: maintaining CentreVu® CMS CentreVu CMS Administration
Running a maintenance backup 11-15
...........................................................................................................................................................................
5 In the Device name field, type the device name from which/to which you are loading the data.
To see a list of device names and attributes, select List device.
This field may default to the device specified during installation; you can accept the default device name.
...........................................................................................................................................................................
6 Select the Verify tape can be read after backup field, check box to request that the data be reread; this ensures that the data has been stored properly.
While the data is being reread, a Verifying message displays on the status line. If there is no data to be reread or if verification fails, error messages are displayed on the status or error lines. Restart the backup using a different volume from the one that failed.
...........................................................................................................................................................................
7 Under ACD(s) to back up, select one of the following check boxes:
• All ACDs — data backup for each ACD on the CentreVu CMS system except pseudo-ACDs.
• Current ACD — data backup for the current ACD on the CentreVu CMS system.
Note: the All ACDs and Current ACD buttons only apply to Historical Data.
...........................................................................................................................................................................
8 Under Data to back up, select the following check boxes for the types of data you want to back up.
• Local administration data includes ACD setup files which are common to all ACDs, and printer administration data. This data is server-specific, and should not be restored to a different CMS server other than the one from which it was obtained.
• CMS System administration data includes user permissions and feature access permissions, Main Menu additional data, timetable, printer administration, default values and color choices, and custom report definitions (not the data associated with custom reports).
Task: maintaining CentreVu® CMS CentreVu CMS Administration
Running a maintenance backup 11-16
• ACD-specific administration data: includes Forecast data (if the feature is active), call work code administration data, VDN administration data, data storage allocation data, exception administration data, agent trace data (historical list of agents traced), and ACD-specific Dictionary names.
• Full: includes data for all the time periods in the historical database. You must do a full backup before the first incremental backup. It is recommended that you periodically (for example, once a week) do a full backup of your system.
• Incremental: includes the CentreVu CMS data recorded since the last backup (incremental or full) was completed. Only the historical data can be stored incrementally; administration data is stored in full.
• Non-CMS data: includes all data from INFORMIX tables with names that start with FB. The table definitions for non-CMS INFORMIX tables are not backed up; instead, use a CMSADM backup.
• When you select Specific tables , choose Select tables on the Actions menu. [If you select Specific tables to back up, you cannot make any other selection (for example, ACD-specific administration data) in the Data to back up field.]
A secondary window, the Select Tables window, opens.
• On the Select Tables window, the Table name field shows the name of the INFORMIX table and the Description field shows the type of data in the INFORMIX table. Select the check boxes for the tables you want to back up.
E N D O F S T E P S...........................................................................................................................................................................
Reference
Maintenance backup
• Backups run in the background. You can exit the Backup Data window without affecting the background backup. But you should periodically check for any errors or for the prompt to mount a new volume.
• Running backups while doing archiving may cause performance problems. For best performance, run backups either after archiving completes or before archiving begins.
• See Task Reference in this task for more information on backup strategy.
Task: maintaining CentreVu® CMS CentreVu CMS Administration
Running a maintenance backup 11-17
• Timetables for full and incremental backups are already created
While running a normal backup, you could receive any of these messages:
• CentreVu CMS cannot access the specified device. Enter a new device name.
• The volume mounted is bad (corrupt). Mount a new volume.
• A volume tape is not mounted in the drive. Mount a volume.
• The volume mounted contains CentreVu CMS data that you might not want to overwrite. Mount a different volume if you do not want to overwrite the data on the volume in the drive.
• The volume mounted is the last backup volume. You have to mount a different volume. CentreVu CMS does not let you overwrite your last backup
(Note that you cannot overwrite your last backup unless you direct CentreVu CMS to do so.
• The volume mounted has errors. You are asked to mount another volume.
• A table cannot be backed up. You are asked if you want to skip the table and continue or cancel the backup.
After you back up the INFORMIX tables, you can: send monthly data to another location, then restore that data to a pseudo-ACD, and create specific reports for your upper management.

Task: maintaining CentreVu® CMS CentreVu CMS Administration
Assigning a name and description to a device 11-18
............................................................................................................................................................................................................................................................Assigning a name and description to a device
Overview Use these steps to assign a name and description to a full path name for a device. The device name is used for data backup, data migration, data restore, and for loading a pseudo-ACD.
Steps ...........................................................................................................................................................................
1 From the controller window, select Tools | Maintenance.
The Maintenance window opens.
...........................................................................................................................................................................
2 In the ACD field, type or select the ACD for which you want to assign device names.
...........................................................................................................................................................................
3 Select Operations | Backup/Restore Devices Status.
The Backup/Restore Devices input window opens.
...........................................................................................................................................................................
4 In the Device Name field, type the name of the device from which/to which you are loading the data. For example, to name your storage device ddrive1, type GGULYH� as the device name.

Task: maintaining CentreVu® CMS CentreVu CMS Administration
Assigning a name and description to a device 11-19
...........................................................................................................................................................................
5 In the Path field, type the full Solaris system path to access the specified storage device (for example, �GHY�UPW��F).
The Solaris system devices are described in your Solaris system administrator’s guide.
...........................................................................................................................................................................
6 In the Description field, type a description to identify the location or use of the storage device. For example, WDSH�GULYH�%�LQ�FRPSXWHU�URRP����.
...........................................................................................................................................................................
7 Under Device type, select the check box for the appropriate device type:
SCSI cartridge tape - 150 MB
SCSI cartridge tape - 2.5 GB
SCSI cartridge tape - 5 GB
SCSI cartridge tape - 4 – 8 GB
SCSI cartridge tape - 14 GB
SCSI cartridge tape - 20 - 40 GB
Choose the right capacity for your SCSI tape drive so that the number of tapes estimated for a full backup is accurate. (Choosing the incorrect capacity does not affect the backup or restore operation, or the tape capacity.)
E N D O F S T E P S...........................................................................................................................................................................
Reference
The List device command from the Backup Data and Restore Data windows displays the device names and attributes you assign in the Backup/Restore Devices window.
You must complete the Backup/Restore Devices window to assign a name and description to a full path name for a device.

Task: maintaining CentreVu® CMS CentreVu CMS Administration
Monitoring connection status 11-20
............................................................................................................................................................................................................................................................Monitoring connection status
Overview You can monitor the data link between the CentreVu CMS processor and the switch. You can also view the current status of the application, session, and connection layers of the link between the switch and CentreVu CMS.
Steps To view the data link:
...........................................................................................................................................................................
1 From the controller window, select Tools | Maintenance.
The Maintenance window opens.
...........................................................................................................................................................................
2 Select Operations | Connection Status.
The Connection Status input window opens.
...........................................................................................................................................................................
3 In the ACD(s) field, type or select the number or name of the ACD you want, or click the Browse button. You must complete this field to view the data link.
E N D O F S T E P S...........................................................................................................................................................................
Task: maintaining CentreVu® CMS CentreVu CMS Administration
Monitoring connection status 11-21
Reference: Application field
The Application field shows status for the application layer of the link between the switch and CentreVu CMS. Possible status messages for the Application field are:
• ZDLWLQJ�VHVVLRQ
The application layer is inactive. This is the state of the application layer when the system is first powered on.
• WUDQVODWLRQ�SXPSXS
The CentreVu CMS processor is receiving translations from the switch. Translations are needed for CentreVu CMS to correctly track the ACD calls coming from the switch.
• GDWD�WUDQVIHU
The application layer can receive and transmit data successfully.
• QRW�FROOHFWLQJ�GDWD
Data collection has been turned off from the Data Collection window.
• &06�6\VWHP�6HWXS
The link has been taken down. To resume data collection, turn on data collection from the Data Collection window
• EXVLHG�RXW��VZLWFK�
The link between the CentreVu CMS processor and the switch has been busied out from the switch side, usually to change switch translations.
Reference: Session field
The Session field shows status for the session layer of the link between the switch and the CentreVu CMS. Possible status messages for the Session field are:
• TXLHVFHQW
The session layer is inactive. This is the state of the session layer when the system is first powered on.
• ZDLWLQJ�DFFHSWDQFH
The session layer is waiting for the connection layer to become operational and for the remote session layer to accept the session.
• GDWD�WUDQVIHU
The session layer can now transmit and receive data from the switch.

Task: maintaining CentreVu® CMS CentreVu CMS Administration
Monitoring connection status 11-22
Reference: Connection field
The Connection field shows status for the connection layer of the link between the switch and CentreVu CMS. Possible status messages for the Connection field are:
• TXLHVFHQW
Indicates that the connection is inactive. This is the state of the connection when the system is first powered on.
• RXW�RI�RUGHU
Something is wrong with the connection to the switch; for example, the cable is not connected between the switch and the CentreVu CMS processor.
• RSHUDWLRQDO
The connection can transmit information physically between the switch and the CentreVu CMS processor.
• ZDLWLQJ�VHVVLRQ�DFFHSW
The link is down.
Reference: Date/Time field
Displays the date/time for this ACD, unless the link to the ACD is down when CentreVu CMS is brought up. If CentreVu CMS is brought up and the link to the ACD is down, CentreVu CMS uses the Solaris system time until the link is reestablished.
Reference: Errors field
Displays any errors found.

Task: maintaining CentreVu® CMS CentreVu CMS Administration
Administering a printer 11-23
............................................................................................................................................................................................................................................................Administering a printer
Overview Use these steps to assign a name, description, and some options to a printer. The printer is then known by CentreVu CMS and can be used by terminals for printing CentreVu CMS reports or windows. For CentreVu Supervisor users, the printer is directly connected to your PC or available to you via your LAN.
Prerequisites
• Before you can add or change the name for a printer that is used as a CentreVu CMS printer, you must administer it in the Solaris system. If you have a Sun platform, see Terminals, Printers, and Modems 585-215-874, for guidelines and procedures for printer installation.
• The CentreVu CMS printer name must be unique when you add a new printer, but the same physical printer can have multiple names and options.
Steps ...........................................................................................................................................................................
1 From the controller window, select Tools | Maintenance.
The Maintenance selector window opens.
...........................................................................................................................................................................
2 In the ACD field, type or select the ACD for which you want to administer a printer.
...........................................................................................................................................................................
3 Select Operations | Printer Administration.

Task: maintaining CentreVu® CMS CentreVu CMS Administration
Administering a printer 11-24
The Printer Administration input window opens.
...........................................................................................................................................................................
4 In the CMS printer name field, type a unique name for this printer. To change the CentreVu CMS printer name, you must first delete the printer name and then add a new name. You cannot change this field by selecting Modify on the Actions menu. If you try to use Modify, you will get an error message.
...........................................................................................................................................................................
5 In the LP printer name field, type the LP ( Solaris system printer) printer name that corresponds to the CMS printer name. This printer must be administered in the Solaris system before you can add or change the CMS printer name.
...........................................................................................................................................................................
6 In the Description field, type a description of the printer — for example, the printer's physical location.
...........................................................................................................................................................................
7 In the IBM graphics characters field, select the check box if your printer has IBM graphics characters. Leave the check box blank if your printer does not have IBM graphics characters.

Task: maintaining CentreVu® CMS CentreVu CMS Administration
Administering a printer 11-25
...........................................................................................................................................................................
8 In the Lines per page field, type the number of lines that fit on a page. The default is 66 lines. Reports are formatted to correspond to the value of this field.
...........................................................................................................................................................................
9 Under Print type, select the check box next to Normal or Other. The default is Normal. If you select Other, you can specify a print type such as pica, elite, or compressed.
...........................................................................................................................................................................
10 In the Banners field, select the check box if you want banners. A banner is a sheet of paper that separates two printer jobs.
E N D O F S T E P S...........................................................................................................................................................................
Reference
• All jobs initiated from CentreVu CMS go to the default printer unless another printer is specified.
• If print jobs are sent to a printer that is no longer administered, the jobs print on the system default printer and an error is logged to the customer Error Log.
• If you try to Delete a printer name that is assigned to users, you get an acknowledgment asking if you still want to delete the printer. Print jobs are sent to the system default printer if you delete the printer.
• See Terminals, Printers, and Modems585-215-874 for more information.
• The CentreVu CMS printer name can be used by terminals as the default printer in the Destination field on any historical reports.
• For CentreVu Supervisor users, the printer used is the printer directly connected to your PC or available to you via your LAN.
Task: maintaining CentreVu® CMS CentreVu CMS Administration
Running a restore 11-26
............................................................................................................................................................................................................................................................Running a restore
Overview Use these steps to restore CentreVu CMS data that has been lost due to system failure, disk crashes, or power outages. You can restore all CentreVu CMS data files that you have previously backed up. From the Restore Data window, you can:
• Do an automatic restore from the last backup (the normal method) or you can do a manual restore
• Use automatic restore to restore all CentreVu CMS data files from your last backup
• Use manual restore to restore specific CentreVu CMS data files
Prerequisites You must back up data before you can restore data. For this reason and to ensure the safety of your data, you should run complete backups of your system often.
Steps ...........................................................................................................................................................................1 From the controller window, select Tools | Maintenance | Restore Data.

Task: maintaining CentreVu® CMS CentreVu CMS Administration
Running a restore 11-27
The Restore Data input window opens. The Status field shows the status of the current or most recent restore; the Errors field shows any errors found in the restore.
...........................................................................................................................................................................
2 In the Device name field, type the name of the device from which/to which you are restoring data.
If this field defaults to the device named during installation, you can accept the default.
...........................................................................................................................................................................
3 For an automatic restore: select the Restore from last backup check box and run the restore. For a manual restore: leave the check box blank.
...........................................................................................................................................................................
4 For a manual restore: close the Restore Data input window and return to the Maintenance window. Select Operations | Restore Data – Select Tables.
The Select Tables input window opens.
Task: maintaining CentreVu® CMS CentreVu CMS Administration
Running a restore 11-28
...........................................................................................................................................................................
5 In the Tables to restore field, select the check boxes for the INFORMIX tables for which you want to restore data.
• The table name field shows the designated name of the INFORMIX table.
• The Description field shows the type of data in the INFORMIX table.
E N D O F S T E P S...........................................................................................................................................................................
Reference
During an (automatic) restore, you may get an error message for any of these reasons:
• CentreVu CMS cannot access the specified device.
• CentreVu CMS cannot read the volume.
• The tape is not a CentreVu CMS backup tape.
• The mounted volume is not compatible with the current database.
• CentreVu CMS cannot read the current volume. You are asked if you want to continue with another volume.
• CentreVu CMS cannot restore tables. You are asked if you want to skip these tables, and to continue or stop.
At the end of every restored volume, you see how many tables have been fully or partially restored.
Steps To run a manual restore:
...........................................................................................................................................................................
1 From the controller window, select Maintenance | Restore Data.

Task: maintaining CentreVu® CMS CentreVu CMS Administration
Running a restore 11-29
The Restore Data input window opens. The Status field shows the status of the current or most recent restore; the Errors field shows any errors found in the restore.
...........................................................................................................................................................................
2 In the Device name field, type the name of the device from which/to which you are restoring data.
If this field defaults to the device named during installation, you can accept the default.
...........................................................................................................................................................................
3 Under Restore from last backup, select the check box for an automatic restore or leave the check box blank for a manual restore.

Task: maintaining CentreVu® CMS CentreVu CMS Administration
Running a restore 11-30
Note: the start/stop date fields for this procedure only accept a two–digit year.
E N D O F S T E P S...........................................................................................................................................................................

Task: maintaining CentreVu® CMS CentreVu CMS Administration
Using the maintenance error log 11-31
............................................................................................................................................................................................................................................................Using the maintenance error log
Overview The maintenance error log helps you (and Lucent Services) resolve system problems. This log displays a chronological list of warnings, information, and errors detected by CentreVu CMS. To reach Lucent Services, call the Lucent Technologies National Customer Care Center at 800 242-2121.
The maintenance error log can contain up to 500 entries. When it reaches 500 records, the log rolls over. The oldest record is overwritten by the newest record.
The log displays the entries in a reverse time order (the most recent entry is displayed first). You can search on an error code or severity level.
Steps ...........................................................................................................................................................................
1 From the controller window, select Tools | Maintenance.
The Maintenance selector window opens.
...........................................................................................................................................................................
2 Select Operations | Maintenance.
The Maintenance Error Log input window opens.
Task: maintaining CentreVu® CMS CentreVu CMS Administration
Using the maintenance error log 11-32
...........................................................................................................................................................................
3 In the ACD field, type or select the name or number of the ACD for which you want to view the maintenance error log.
...........................................................................................................................................................................
4 In the Error codes field, type unique identifiers for each error. This allows you to refer to a specific error when dealing with Call Center Services personnel or your own departmental personnel. This field is used to filter the output so you can create a report with only those errors you need. If you leave the field blank, all errors are displayed.
...........................................................................................................................................................................
5 In the Severity field, select the severity of the error for which you want to create a report:
• ALARM could cause the system to crash or fail. You must work with Lucent Services to avoid the possibility of system failure.
• ERROR needs immediate action — for example, a backup may not be working properly.
• INFO does not need immediate action but is listed either to let you know that some aspect of the system is not operating correctly or to indicate the status of an operation—for example, “Successful.”
...........................................................................................................................................................................
6 In the Dates field, type or select the dates for which you want to run the report or click the Browse button. Use the MM/DD/YY format to type the dates.
...........................................................................................................................................................................
7 Under Destination, select the View Report on Screen check box or the Print Report on check box.
E N D O F S T E P S...........................................................................................................................................................................
Reference
• If CentreVu CMS is down when a data summarizing timetable or a script is scheduled to run, an error message directs you to do a manual archive from the Data Summarizing window.
• The results of daily, weekly, and monthly data summaries are written to the maintenance error log. You can use the log to see when the summaries ran and whether or not they were successful.
Task: maintaining CentreVu® CMS CentreVu CMS Administration
Using the maintenance error log 11-33
• You can use the maintenance error log to get the status of the Forecast manager.
• You can use the maintenance error log to get the status of backups and/or archiving that completed without a Backup/Archiving Status window open.

Task: maintaining CentreVu® CMS CentreVu CMS Administration
Using the maintenance error log 11-34
Maintenance error codes and related messages are listed by error code number. Each message is followed by a explanation of why the error occurred and how to fix it:
Error code
Message/reason/action
500 81,;�HUURU�RQ�23(1��ILOH�
Reason — This error is logged when a <save> has been done on a timetable and the timetable is unable to write the changes.
505 81,;�HUURU�RQ�:5,7(��ILOH��)LOH�V\VWHP�PD\�EH�RXW�RI�VSDFH�
Reason — The Set dest destination was a file, but the file could not be written completely.
Action — Delete files that are not needed from disk (or copy to tape and then delete). Call Services.
505 81,;�HUURU�RQ�:5,7(��ILOH��6,*3,3(�VLJQDO�FDXJKW�GXULQJ�SULQWLQJ��SULQW�UHTXHVW�LV�
LQFRPSOHWH�RU�IDLOHG�
Reason — Could not print a file. UNIX probably does not have a default system line printer assigned, and the user probably does not have a CentreVu CMS default printer assigned.
Action — Assign a default printer to the user through User Permissions.
505 81,;�HUURU�RQ�:5,7(��ILOH��OS��7KH�XVHU�PD\�KDYH�QR�GHIDXOW�SULQWHU�DVVLJQHG�DQG�WKH�81,;�
V\VWHP�DGPLQLVWUDWLRQ�IRU�D�GHIDXOW�V\VWHP�OLQH�
SULQWHU�KDV�QRW�EHHQ�GRQH�
Reason — Could not print a file. UNIX probably does not have a default system line printer assigned, and the user probably does not have a CentreVu CMS default printer assigned.
Action — Assign a default printer to the user through User Permissions.
Task: maintaining CentreVu® CMS CentreVu CMS Administration
Task reference 11-35
............................................................................................................................................................................................................................................................Task reference
Backup strategy Use the information that follows to develop a backup strategy appropriate to your call center.
Kinds of backups
• CMSADM: backs up Solaris system files and programs, CentreVu CMS programs, non-CMS data
• Maintenance: backs up CentreVu CMS database tables, including historical data, Dictionary data, and permissions data; maintenance backups can be full, incremental, or complex
• Caution: running a CMSADM backup alone does not save data; you must follow the CMSADM backup with a full maintenance backup.
Frequency of backups Base the frequency of your backups on the amount of data your call center is willing to lose in case of catastrophic failure. In addition:
• Back up the CentreVu CMS historical data for each ACD after CentreVu CMS is first installed and tested.
• Back up system data weekly or when it has changed.
Managing the tapes Supply, secure storage, and labeling are key to ensuring that if you need to restore data, you can do it quickly and accurately.
• Keep enough tapes on hand to rotate them so that several tapes are available at all times. For example, if you do daily backups, keep seven tapes in stock and recycle them weekly (use a new tape for each day of the week and repeat each weekly sequence.)
• Store tapes in a safe, secure area.

Task: maintaining CentreVu® CMS CentreVu CMS Administration
Reference: full backup 11-36
............................................................................................................................................................................................................................................................Reference: full backup
Purpose A full backup includes all the data in the CentreVu CMS database tables (historical data, dictionary, permissions, etc.). It is strongly recommended that you do a full backup at least weekly. If the backup does not fit on one tape, you are prompted for another tape when needed.
Allocate tapes You can use many backup combinations to preserve your data. In the following example, the call center does a full backup twice a week. This is how tapes are allocated for the backups:
Set up a schedule The next example shows how the tapes that were allocated for a twice-weekly, full backup are rotated over a two-week period. Notice that extra tapes alternate with regular tapes from week to week so the same tapes are not used every time.
Backup type Day Regular tapes Extra tapes
Full Wednesday 2 (Set 1) 2 (Set 1)
Full Saturday 2 (Set 2) 2 (Set 2)
Week 1 Mon Tues Wed
Full backup
(Use regular tapes from Set 1)
Thurs Fri Sat
Full backup
(Use regular tapes from Set 2)
Sun
Week 2 Mon Tues Wed
Full backup
(Use extra tapes from Set 1)
Thurs Fri Sat
Full backup
(Use extra tapes from Set 2)
Sun
Task: maintaining CentreVu® CMS CentreVu CMS Administration
Reference: incremental backup 11-37
............................................................................................................................................................................................................................................................Reference: incremental backup
Purpose An incremental backup includes new CentreVu CMS historical data since the previous full or incremental backup. Incremental backups may be a more efficient and less time-consuming way to back up your CentreVu CMS data when a full maintenance backup needs more than one tape. But note that you must run a full backup before your first incremental backup.
Allocate tapes It is strongly recommended that you have an appropriate number of extra tapes to rotate your tapes each week. In the following example, you need two sets of four tapes so you can rotate the set of tapes between the full backup and the incremental backups.
In this example, time constraints and personnel prevent the call center from doing a full backup more than once a week, but the call center wants to preserve the data in between full backups with incremental backups during the week.
Backup type Day Regular tapes Extra tapes
Full Saturday
The full backup contains all the CentreVu CMS data.
2 2
Incremental Tuesday
The Tuesday incremental backup contains all the new data since the Saturday backup.
1 (Set 1) 1 (Set 1)
Incremental Thursday
The Thursday incremental backup contains all the new data since the Tuesday backup.
1 (Set 2) 1 (Set 2)
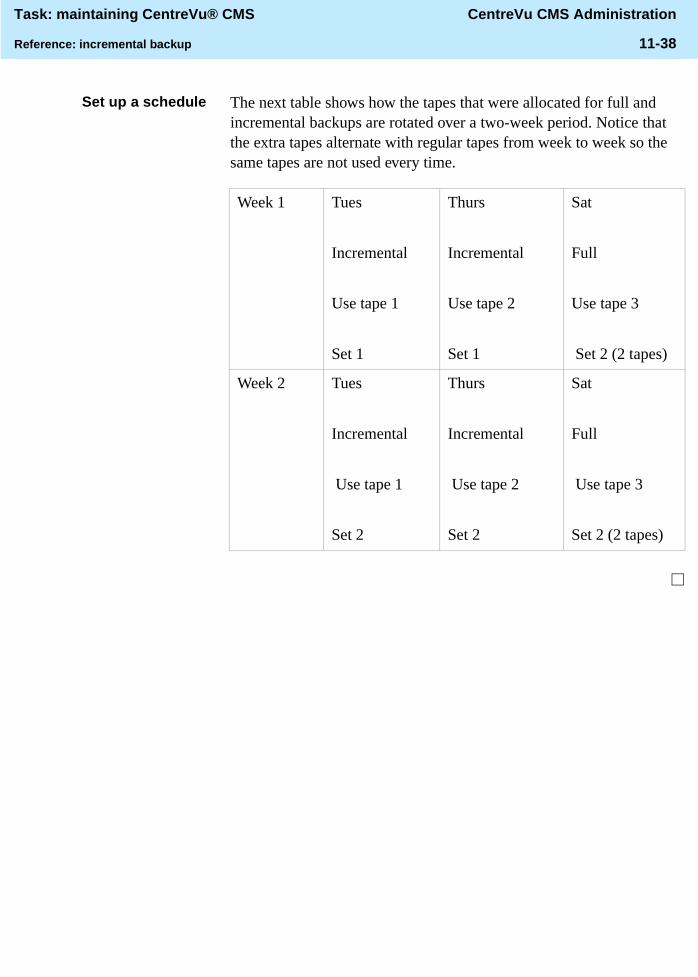
Task: maintaining CentreVu® CMS CentreVu CMS Administration
Reference: incremental backup 11-38
Set up a schedule The next table shows how the tapes that were allocated for full and incremental backups are rotated over a two-week period. Notice that the extra tapes alternate with regular tapes from week to week so the same tapes are not used every time.
Week 1 Tues
Incremental
Use tape 1
Set 1
Thurs
Incremental
Use tape 2
Set 1
Sat
Full
Use tape 3
Set 2 (2 tapes)
Week 2 Tues
Incremental
Use tape 1
Set 2
Thurs
Incremental
Use tape 2
Set 2
Sat
Full
Use tape 3
Set 2 (2 tapes)
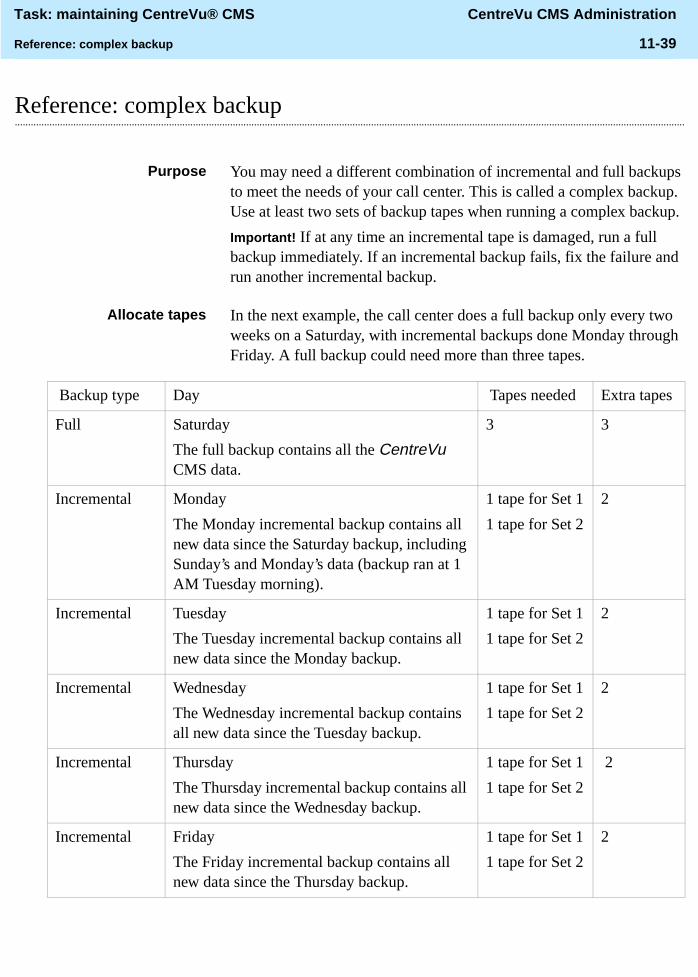
Task: maintaining CentreVu® CMS CentreVu CMS Administration
Reference: complex backup 11-39
............................................................................................................................................................................................................................................................Reference: complex backup
Purpose You may need a different combination of incremental and full backups to meet the needs of your call center. This is called a complex backup. Use at least two sets of backup tapes when running a complex backup.
Important! If at any time an incremental tape is damaged, run a full backup immediately. If an incremental backup fails, fix the failure and run another incremental backup.
Allocate tapes In the next example, the call center does a full backup only every two weeks on a Saturday, with incremental backups done Monday through Friday. A full backup could need more than three tapes.
Backup type Day Tapes needed Extra tapes
Full Saturday
The full backup contains all the CentreVu CMS data.
3 3
Incremental Monday
The Monday incremental backup contains all new data since the Saturday backup, including Sunday’s and Monday’s data (backup ran at 1 AM Tuesday morning).
1 tape for Set 1
1 tape for Set 2
2
Incremental Tuesday
The Tuesday incremental backup contains all new data since the Monday backup.
1 tape for Set 1
1 tape for Set 2
2
Incremental Wednesday
The Wednesday incremental backup contains all new data since the Tuesday backup.
1 tape for Set 1
1 tape for Set 2
2
Incremental Thursday
The Thursday incremental backup contains all new data since the Wednesday backup.
1 tape for Set 1
1 tape for Set 2
2
Incremental Friday
The Friday incremental backup contains all new data since the Thursday backup.
1 tape for Set 1
1 tape for Set 2
2
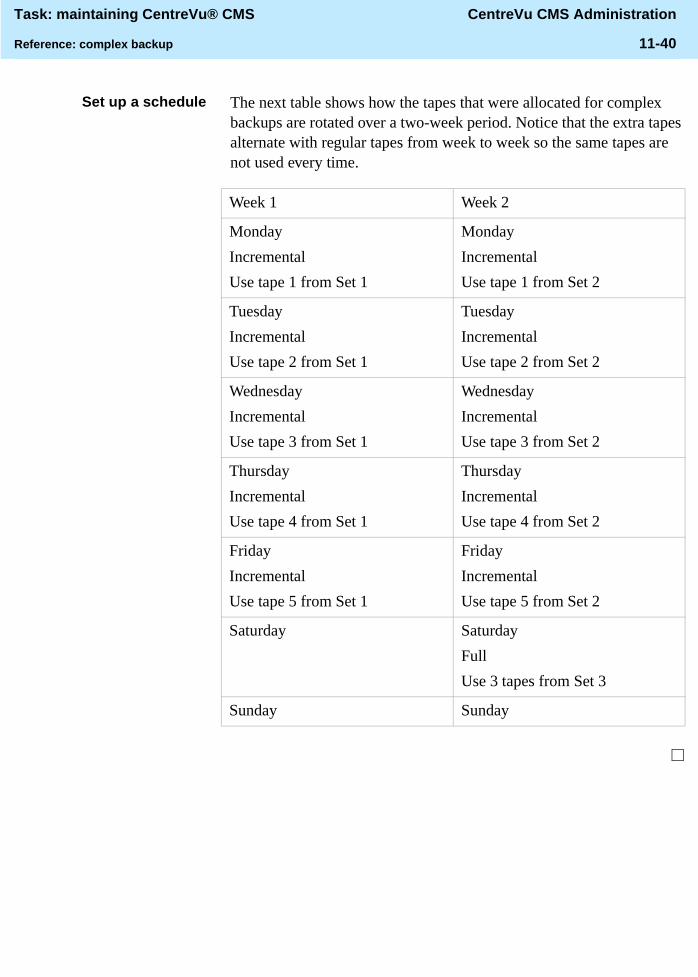
Task: maintaining CentreVu® CMS CentreVu CMS Administration
Reference: complex backup 11-40
Set up a schedule The next table shows how the tapes that were allocated for complex backups are rotated over a two-week period. Notice that the extra tapes alternate with regular tapes from week to week so the same tapes are not used every time.
Week 1 Week 2
Monday
Incremental
Use tape 1 from Set 1
Monday
Incremental
Use tape 1 from Set 2
Tuesday
Incremental
Use tape 2 from Set 1
Tuesday
Incremental
Use tape 2 from Set 2
Wednesday
Incremental
Use tape 3 from Set 1
Wednesday
Incremental
Use tape 3 from Set 2
Thursday
Incremental
Use tape 4 from Set 1
Thursday
Incremental
Use tape 4 from Set 2
Friday
Incremental
Use tape 5 from Set 1
Friday
Incremental
Use tape 5 from Set 2
Saturday Saturday
Full
Use 3 tapes from Set 3
Sunday Sunday
Task: maintaining CentreVu® CMS CentreVu CMS Administration
Reference: recovery kit 11-41
............................................................................................................................................................................................................................................................Reference: recovery kit
Purpose The recovery kit consists of the backup media that the Lucent Services organization needs to restore service to your system when problems occur.
How to use the recovery kit Store this kit in a secure location to minimize the time your system is out of service.
Note the contents of the kit:
• Latest FPVDGP file system backup tapes (before and after an upgrade or the routinely run �FPVDGP backup)
• Latest full maintenance backup tapes, plus all incremental backup tapes since the latest full backup
• Patching CDs and tapes.
Software shipped withCentreVu CMS
A number of software packages are shipped with your CentreVu CMS. It is recommended that you store this software with the recovery kit.
CMS requires the following software packages (optional packages are noted):
• Solaris7 operating system (Hardware: 3/99 version)
• Sun Validation Test Suite (VTS) 3.1
• High-Speed serial Interface/Sbus (HSI/S) (required only for Sun SPARCserver or Enterprise systems that have an HSI/S card)
• High-Speed Serial Interface/PCI (HSI/P) (required only for Sun Ultra 5 systems that have an HSI/P card)
• Serial Asynchronous Interface/PSI (SAI/P) drivers (required only for Sun Ultra 5 systems that have an SAI/P card)
• Aurora Ports Card drivers (required only for Sun SPARCserver systems that have an SBus multiport card)
• Bay Networks Annex R10.0B (required only for systems using Network Terminal Server [NTS])
• Solstice for Server Connect X.25 Version 9.1 drivers (required only for systems using an X.25 link to a switch)
• INFORMIX
– Structured Query Language (SQL) 7.20 (optional)
– Standard Engine (SE) 7.22

Task: maintaining CentreVu® CMS CentreVu CMS Administration
Reference: recovery kit 11-42
– Runtime Enhanced SQL (ESQL) 9.14
– International Language Supplement (ILS) 2.11
• Solaris 4.2 (contained on the Solaris Easy Access Server 2.0 CD)
• Solaris patches
• CMS Supplemental Services
• CMS Software
• CMS patches
• CMS Open Database Connectivity (ODBC) (optional)
• Visual Vectors Server software (optional)

Task: maintaining CentreVu® CMS CentreVu CMS Administration
Reference: labeling the backup volume 11-43
............................................................................................................................................................................................................................................................Reference: labeling the backup volume
Purpose After a successful backup, the computer automatically labels your backup volumes. In addition:
• CentreVu CMS provides the backup information in the final Acknowledgment window or, if the backup was scheduled on a timetable, in the maintenance error log.
• The Acknowledgment window tells you when a backup can write to any tape (except tapes used in the most recent backup).
• You should have the appropriate number of tapes for the backup. When you run a manual backup (not from a timetable), you get an acknowledgment in the Back Up Data window that tells you the number of tapes needed for a full backup. (Incremental backups should fit on one tape so no estimate is needed.)
• Backup tapes can wear out. Be sure to refresh your supply of backup tapes at appropriate intervals. For more information, see the documentation that came with your backup tapes.
Backup information format ���� &06�111111�11�////�11�/�11���� �_�����_����_��_���_�_��_���� �������������������������

Task: maintaining CentreVu® CMS CentreVu CMS Administration
Reference: labeling the backup volume 11-44
How to interpret backupinformation
Decode backup information as follows.
Part # Code Meaning
1 CMS System name
2 NNNNNN Year, month and day of the backup, in the form yymmdd
3 NN Number of backups for this day
4 LLL Type of data backed up:
• A for both ACD-specific administration data and historical data
• C for custom data
• H for historical data
• L for local system administration data
• M for ACD-specific administration data
• S for CMS system data
• X for no backup
In the second position, an “S” appears if system data was backed up or an “X” displays if system data was not backed up.
An “L” appears if local system is backed up.
In the third position, an “H”, “M”, “ A”, or “X” displays.
In the fourth position, a “C” or “X” displays.
Any combination of letters identifying the type of backup may display.
5 NN Number of the ACD (00 means All ACDs was selected on the Back Up window)
6 L Backup mode (F for Full, I for Incremental)
7 NN The tape number in the backup series (for this backup only)
Task: maintaining CentreVu® CMS CentreVu CMS Administration
Reference: results of daily, weekly, and monthly data summaries 11-45
............................................................................................................................................................................................................................................................Reference: results of daily, weekly, and monthly data summaries
The results of daily, weekly, and monthly data summaries are written to the maintenance error log. You can use the log to see when the summaries ran and whether or not they were successful.

Task: maintaining CentreVu® CMS CentreVu CMS Administration
Reference: results of daily, weekly, and monthly data summaries 11-46

Task: learning and using Solaris CentreVu CMS Administration
12-1
12 Task: learning and using Solaris
............................................................................................................................................................................................................................................................Overview
Purpose In this task you will find the following procedures:
• Logging into Solaris
• Using Solaris
• Viewing a Solaris system file
• Changing a user's password
• Returning to CentreVu® CMS
• Administering a printer
• Stopping or starting the Scheduler utility
• Restore files in Solaris
CentreVu Call Management System (CMS) interfaces with the Solaris system and uses several Solaris system utilities to communicate with terminals and printers, to log errors, and to run operations. The steps that follow tell you how to use Solaris operating system commands.

Task: learning and using Solaris CentreVu CMS Administration
Logging into Solaris 12-2
............................................................................................................................................................................................................................................................Logging into Solaris
Prerequisites Note the following:
• Caution: Be careful when accessing the Solaris system and running Solaris system commands. Damage can result to CentreVu CMS if you use the Solaris system commands incorrectly. Before you run any Solaris system command, be sure you know what effect it will have.
• To do some of the Solaris system procedures, you need to know the root password for your system.
Steps To access Solaris:
...........................................................................................................................................................................
1 Access Solaris by logging in as URRW at any terminal. When you log in as URRW, your cursor is at the # prompt.
E N D O F S T E P S...........................................................................................................................................................................
Task: learning and using Solaris CentreVu CMS Administration
Using Solaris 12-3
............................................................................................................................................................................................................................................................Using Solaris
Steps To use Solaris:
...........................................................................................................................................................................
1 From CentreVu CMS, highlight the COMMANDS SLK.
Note: some commands require a URRW login. See the remainder of this task for specifics.
The Commands menu opens.
...........................................................................................................................................................................
2 Highlight UNIX and press ENTER.
The screen clears and a � prompt displays.
Since this is not a root login, some commands are not available.
...........................................................................................................................................................................
3 When you have finished working in the system, type H[LW at the prompt and press ENTER.
You return to your current open window in CentreVu CMS.
E N D O F S T E P S...........................................................................................................................................................................

Task: learning and using Solaris CentreVu CMS Administration
Viewing a Solaris system file 12-4
............................................................................................................................................................................................................................................................Viewing a Solaris system file
Prerequisites Note that the pg command displays Solaris system file data one terminal screen at a time.
Steps To view a system file:
...........................................................................................................................................................................
1 From CentreVu CMS, highlight the COMMANDS SLK.
The Commands window opens.
...........................................................................................................................................................................
2 Highlight UNIX and press ENTER.
The screen clears and a � prompt displays.
...........................................................................................................................................................................
3 At the � prompt, type the following command to view a CentreVu CMS historical report sent to a file:
SJ��ILOHQDPH!
The �ILOHQDPH! is the name you typed for the file specified as the report destination. This command shows you the file, one page (terminal screen) at a time.
E N D O F S T E P S...........................................................................................................................................................................

Task: learning and using Solaris CentreVu CMS Administration
Changing a user’s password 12-5
............................................................................................................................................................................................................................................................Changing a user’s password
Steps If a user forgets his or her password:
...........................................................................................................................................................................
1 From CentreVu CMS, highlight the COMMANDS SLK.
The Commands window opens.
...........................................................................................................................................................................
2 Highlight UNIX and press ENTER.
The screen clears and a � prompt displays.
...........................................................................................................................................................................
3 Type VX²URRW.
...........................................................................................................................................................................
4 At the prompt, type the correct root password.
...........................................................................................................................................................................
5 At the � prompt, type �SDVVZG��XVHULG!, then type the ID of the user who forgot the password.
...........................................................................................................................................................................
6 At the prompt, type a new password for the user.
...........................................................................................................................................................................
7 At the � prompt, type �SDVVZG��I��XVHULG!�This means that the user must type a new password the next time he or she logs in to CentreVu CMS.
E N D O F S T E P S...........................................................................................................................................................................

Task: learning and using Solaris CentreVu CMS Administration
Returning to CentreVu CMS 12-6
............................................................................................................................................................................................................................................................Returning to CentreVu CMS
Steps ...........................................................................................................................................................................
1 Type �H[LW�and press ENTER.
The screen clears and a � prompt displays.
...........................................................................................................................................................................
2 Again, Type �H[LW�and press ENTER.
The screen clears and the CentreVu CMS prompt displays, returning you to your current open window in CentreVu CMS.
E N D O F S T E P S...........................................................................................................................................................................
Task: learning and using Solaris CentreVu CMS Administration
Administering a printer 12-7
............................................................................................................................................................................................................................................................Administering a printer
Overview Using the CentreVu Supervisor interface, you can administer a printer for each PC. The information that follows does not apply to printers directly connected to the PC or to the PC via the LAN.
Prerequisites
• If a printer jams and the print requests are no longer in queue, you must resubmit the print requests that did not print. If the print request is still in queue after you fix the printer, the job prints. You may need to resubmit the print request that was printing when the printer jammed.
• If the printer runs out of paper during a print job, you must reenable the printer after you add the paper.
• You can only cancel your own print job.
Steps To administer a printer:
...........................................................................................................................................................................
1 From CentreVu CMS, select the COMMANDS SLK.
The Commands window opens.
...........................................................................................................................................................................
2 Press ENTER.
The screen clears and a � prompt displays.
...........................................................................................................................................................................
3 To check the status of the print spooler utility, to see if the printer is enabled, and to list the print request job IDs, type: �XVU�ELQ�OSVWDW��W
...........................................................................................................................................................................
4 To cancel a queued print job at the � prompt, type: �XVU�ELQ�FDQFHO����SULQW�MRE�UHTXHVW�,'! Each user can only cancel his or her own print job.

Task: learning and using Solaris CentreVu CMS Administration
Administering a printer 12-8
...........................................................................................................................................................................
5 In the �SULQW�MRE�UHTXHVW�,'! field, type the job number of the print request you want to cancel.
E N D O F S T E P S...........................................................................................................................................................................
Steps To move a print job to a different printer:
...........................................................................................................................................................................
1 Log in as URRW, then type the following command at the ��prompt:
�XVU�OLE�OSPRYH��QXPEHUV!��GHVW�!
...........................................................................................................................................................................
2 In the <numbers> field, type the print request nulmbers for the current printer, then type the name of the new printer in the <dest2> field.
E N D O F S T E P S...........................................................................................................................................................................
Steps To move all print requests to a different printer:
...........................................................................................................................................................................
1 Log in as URRW, then type the following command at the � prompt:
�XVU�OLE�SPRYH��GHVW�!��GHVW�!
...........................................................................................................................................................................
2 In the <dest1> field, type the name of the current printer you want to disable.
...........................................................................................................................................................................
3 In the <dest2> field, type the name of the printer you want to enable.
E N D O F S T E P S...........................................................................................................................................................................
Steps To disable a printer from actively printing queued requests:
...........................................................................................................................................................................
1 Log in as URRW, then type the following command at the � prompt.
�XVU�ELQ�GLVDEOH��SULQWHU�QDPH!

Task: learning and using Solaris CentreVu CMS Administration
Administering a printer 12-9
...........................................................................................................................................................................
2 To resume printing queued requests at a disabled printer, type the following command at the � prompt:
�XVU�ELQ�HQDEOH��SULQWHU�QDPH!
E N D O F S T E P S...........................................................................................................................................................................
Reference
Printers are normally administered during CentreVu CMS installation but you may add printers later. See Terminals, Printers, and Modems 585-215-874 for more information.
The CentreVu CMS maintenance error log lists printer errors. See “Task: maintaining CentreVu CMS” for more information.
You cannot move or delete print jobs at the � prompt. You must be at the URRW login to move or delete print jobs.

Task: learning and using Solaris CentreVu CMS Administration
Stopping or starting the Scheduler utility 12-10
............................................................................................................................................................................................................................................................Stopping or starting the Scheduler utility
Overview The Scheduler utility stops or starts print jobs scheduled for a printer.
Steps To access the Scheduler utility:
...........................................................................................................................................................................
1 From CentreVu CMS, select the COMMANDS SLK.
The Commands window opens.
...........................................................................................................................................................................
2 Press ENTER.
The screen clears and a � prompt is shown.
E N D O F S T E P S...........................................................................................................................................................................
Steps To stop the Scheduler utility:
...........................................................................................................................................................................
1 Log in as root, then type the following command at the � prompt:
�XVU�OLE�OSVKXW
E N D O F S T E P S...........................................................................................................................................................................
Steps To start the Scheduler utility:
...........................................................................................................................................................................
1 Log in as root, then type the following command at the � prompt:
�XVU�OLE�OSVFKHG
E N D O F S T E P S...........................................................................................................................................................................

Task: learning and using Solaris CentreVu CMS Administration
Restore files in Solaris 12-11
............................................................................................................................................................................................................................................................Restore files in Solaris
Overview The file systems on the computer can be restored when an accidental loss of data occurs.
Steps ...........................................................................................................................................................................
1 To restore the file systems from the Solaris system environment, refer to Hardware, Maintenance, and Troubleshooting 585-210-919.
E N D O F S T E P S...........................................................................................................................................................................

Task: learning and using Solaris CentreVu CMS Administration
Restore files in Solaris 12-12
Task: using timetables and shortcuts CentreVu CMS Administration
13-1
13 Task: using timetables and shortcuts
............................................................................................................................................................................................................................................................Overview
Purpose In this task you will find the following procedures:
• Creating and scheduling a timetable
• Creating a timetable without scheduling it
• Copying a timetable
• Deleting a timetable
• Editing a timetable
• Adding tasks to a timetable
• Copying timetable tasks
• Deleting tasks from a timetable
• Editing a timetable globally
• Changing timetable tasks
• Listing all the timetables in your database
• Using timetables with the system clock
• Creating a shortcut
• Running a shortcut
• Copying a shortcut
• Deleting a shortcut
• Editing a shortcut

Task: using timetables and shortcuts CentreVu CMS Administration
13-2
• Adding tasks to a shortcut
• Copying shortcut tasks
• Deleting tasks from a shortcut
• Changing shortcut tasks
Timetable is a software program that enables you to schedule one or more administrative tasks for completion at specified times. You can put up to 100 tasks on each timetable and schedule each timetable's start time.
A shortcut is similar to a timetable but it does not schedule tasks for completion. Instead, when you run the shortcut, the tasks you assign execute immediately. Shortcuts are usually used to run real-time reports.
Timetables and shortcuts are available only via the ASCII interface to CentreVu® CMS.
The steps that follow tell you how to use timetables and shortcuts.
Prerequisites
• Incremental and full backup timetables are already created, but you have to schedule them to run.
• Changing incremental and full timetables may affect system performance. Make sure there are no conflicts with other scheduled activities, such as archiving, when running backups.
• Timetables are only accessible from CentreVu CMS.
• You must assign a CentreVu CMS user ID to anyone who will be using a shortcut.
Permissions These permissions apply to using timetables and shortcuts. See “Assigning user permissions” for more information.
• To create, change, or delete timetables, you need write permission for timetables.
• To view timetables, you need read permission for timetables.
• You need read and/or write permission for CentreVu CMS actions or for ACD entities associated with the tasks on a timetable.

Task: using timetables and shortcuts CentreVu CMS Administration
Creating and scheduling a timetable 13-3
............................................................................................................................................................................................................................................................Creating and scheduling a timetable
Steps ...........................................................................................................................................................................
1 Select Timetable on the Keep SLK menu.
The Timetable window opens.
...........................................................................................................................................................................
2 In the Timetable name field, type a name that is unique to your user ID. You cannot change a timetable name after adding the timetable to CentreVu CMS.
...........................................................................................................................................................................
3 In the Description field, type a description for the timetable.
...........................................................................................................................................................................
4 In the User ID field, type your user ID. The default is the logged-in user ID.
...........................................................................................................................................................................
5 In the Start time field, type the time that you want your timetable to start running. You can type the time in either hh or hh:mm format. If a.m. or p.m., a 24-hour clock is used. To run a timetable immediately, set the start time to a few minutes ahead of the current time (for example, three minutes from now.)
...........................................................................................................................................................................
6 In the Start date field, type the date that you want your timetable to start running .
...........................................................................................................................................................................
7 Under Frequency, choose from the following:
• Once to run the timetable only one time.
• Dates to run the timetable on specific dates. Type the dates in the date fields.
• Hourly to run the timetable every hour. Type the time you want the timetable to stop running in the Stop time field.
Task: using timetables and shortcuts CentreVu CMS Administration
Creating and scheduling a timetable 13-4
• Daily to run the timetable on the same days every week. (For weekly reports, type [ next to the one day of the week on which you want the timetable to run.)
E N D O F S T E P S...........................................................................................................................................................................
Steps To add the timetable to CentreVu CMS:
...........................................................................................................................................................................
1 Press Return, highlight Add on the Actions menu, and press Return again.
“Working” displays on the status line. If the timetable name already exists, “already exists” displays on the status line and you must type a different timetable name. If all entries are valid, the MainMenu displays with “Keeping Entries” in the border.
...........................................................................................................................................................................
2 From the MainMenu, go to the window for which you want to schedule one or more tasks, complete the fields on the window, and select an action list item.
When you have made and validated each action list selection, “Entries Stored” displays on the status line of the current window.
...........................................................................................................................................................................
3 Repeat Step 2 for each task.
...........................................................................................................................................................................
4 Select the Keep SLK and select Stop when you have finished adding tasks. An acknowledgment window asks if you want to save your changes.
...........................................................................................................................................................................
5 Type \ to save the timetable. Your tasks are now scheduled on a timetable.
...........................................................................................................................................................................
6 Select the Exit SLK to close the Timetable window. Your previously opened windows displays.
E N D O F S T E P S...........................................................................................................................................................................

Task: using timetables and shortcuts CentreVu CMS Administration
Creating and scheduling a timetable 13-5
Reference
• You can create more than one timetable task from a window. For example, suppose you want historical split/skill summary interval reports for skills 1 through 9, and you also want the same date and times for each report:
— Go to the report window and type � for the skill number, � for the date, and �����������for the times.
— Select Run on the action list. This creates a timetable task for skill 1.
— Change skill 1 to skill 2 and select Run on the action list. This creates a timetable task for skill 2. Repeat the same process for skills 3 through 9.
• You can also reuse a different open window by using the Current SLK. Change the appropriate field values, then select an action list item.
• To exit Timetable at any time without saving your changes, select Stop from the Keep SLK menu, then type �Q in the acknowledgment window.

Task: using timetables and shortcuts CentreVu CMS Administration
Creating a timetable without scheduling it 13-6
............................................................................................................................................................................................................................................................Creating a timetable without scheduling it
Steps ...........................................................................................................................................................................
1 On the Keep SLK menu, select Timetable
The Starting Timetable acknowledgment window and the Timetable input window open.
...........................................................................................................................................................................
2 In the Timetable name field, type a name that is unique to your user ID and go to the next field.
Make sure the name of the timetable is unique and what you want it to be. You cannot change a timetable name after adding the timetable to CentreVu CMS.
...........................................................................................................................................................................
3 In the Description field, type a description for the timetable and go to the next field.
...........................................................................................................................................................................
4 In the User ID field, type your user ID and go to the next field.
The default value is the logged-in user ID.
...........................................................................................................................................................................
5 Skip the Start time and Start date fields, and go to the next field.
...........................................................................................................................................................................
6 Under Frequency, choose from the following:
• Once to run the timetable only one time.
• Hourly to run the timetable every hour. Type the time that you want the report to stop running in the Stop time field.
• Dates to run the timetable on specific dates. Type the specific dates on which you want the timetable to run.
Task: using timetables and shortcuts CentreVu CMS Administration
Creating a timetable without scheduling it 13-7
• Daily to run the timetable on the same days every week. Type [ next to the days of the week on which you want the timetable to run. (For weekly reports, type [ next to the one day of the week on which you want the timetable to run).
E N D O F S T E P S...........................................................................................................................................................................
Reference
To exit from Timetable at any time without saving your changes, select Stop from the Keep SLK menu and then type �Q in the popup window.
Steps To add the timetable to CentreVu CMS:
...........................................................................................................................................................................
1 Press Return, highlight Add from the action list, and press Return again.
“Working”displays on the status line. If the timetable name already exists, “Already exists” is shown on the status line, and you must type a different timetable name. If all entries are valid, the MainMenu shows “Keeping Entries ”in the border.
...........................................................................................................................................................................
2 From the MainMenu, go to the window for which you want to schedule one or more tasks, complete the fields on the window, and select an action list item.
When you have made and validated each action list selection, Entries Stored displays on the status line of the current window.
...........................................................................................................................................................................
3 Repeat Step 2 for each task.
...........................................................................................................................................................................
4 Select the Keep SLK and select Stop when you have finished adding tasks.
An acknowledgment window asks if you want to save your changes.
...........................................................................................................................................................................
5 Type \ to save the timetable.
You can now schedule tasks at your convenience. The Timetable window opens.

Task: using timetables and shortcuts CentreVu CMS Administration
Creating a timetable without scheduling it 13-8
...........................................................................................................................................................................
6 Select the Exit SLK to close the Timetable window.
Your previously opened window displays.
When you are ready to schedule the timetable, type a time in the Start time field and a date in the Start date field, then select Modify on the action list. You must specify a start time that is later than the current time or the timetable is not scheduled.
E N D O F S T E P S...........................................................................................................................................................................

Task: using timetables and shortcuts CentreVu CMS Administration
Copying a timetable 13-9
............................................................................................................................................................................................................................................................Copying a timetable
Steps To copy a timetable:
...........................................................................................................................................................................
1 Select Timetable on the Keep SLK menu.
The Timetable input window opens.
...........................................................................................................................................................................
2 In the Timetable field, type the name of the new timetable into which you want to copy the existing timetable.
...........................................................................................................................................................................
3 In the User ID field, type your user ID.
...........................................................................................................................................................................
4 On the action list, type Copy and press Return.
The Copy window opens.
...........................................................................................................................................................................
5 In the Copy from field, type the name of the timetable that you want to copy and go to the next field.
...........................................................................................................................................................................
6 In the User ID field, type the user ID of the user whose timetable you want to copy.
...........................................................................................................................................................................
7 To copy the timetable, select Copy from the action list and press Return.
“Successful” displays if the timetable is copied.
An acknowledgment window notifies you if you copy a timetable that needs to be rescheduled to run.
...........................................................................................................................................................................
8 Press the Exit SLK to close the Timetable window and return to your previously opened window.
Your previously opened windows displays.

Task: using timetables and shortcuts CentreVu CMS Administration
Copying a timetable 13-10
E N D O F S T E P S...........................................................................................................................................................................
Reference
• You can copy timetables from other users. You cannot copy over an existing timetable.
• When you copy a timetable, the schedule information and the timetable tasks are copied.
Task: using timetables and shortcuts CentreVu CMS Administration
Deleting a timetable 13-11
............................................................................................................................................................................................................................................................Deleting a timetable
Steps To delete a timetable:
...........................................................................................................................................................................
1 On the Keep SLK menu, select Timetable.
The Timetable window displays.
...........................................................................................................................................................................
2 In the Timetable name field, type the name of the timetable that you want to delete
Note: you cannot delete another user’s timetable.
...........................................................................................................................................................................
3 On the action list, select Delete and press Return.
An acknowledgment window tells you that all tasks associated with this timetable will be deleted.
...........................................................................................................................................................................
4 To delete the timetable, type \ and press Return.
The timetable is deleted.
...........................................................................................................................................................................
5 To close the Timetable window, select the Exit SLK.
Your previously opened windows displays.
E N D O F S T E P S...........................................................................................................................................................................

Task: using timetables and shortcuts CentreVu CMS Administration
Editing a timetable 13-12
............................................................................................................................................................................................................................................................Editing a timetable
Steps To edit a timetable:
...........................................................................................................................................................................
1 Use the Get Contents window.
...........................................................................................................................................................................
2 In the Task number(s) field, type the numbers corresponding to the tasks you want to copy, delete, or change, or type the number of the task after which you want to add new tasks. You can type a list (using a semicolon for the list separation) or range (using a minus sign for the range separation) for all actions except Add tasks.
...........................................................................................................................................................................
3 Use the following display-only fields for information:
• The Task field lists the number corresponding to the position of the task in the timetable.
• The Action field lists the action associated with the task.
• The Window Title field lists the title of the window that constitutes the task.
• The ACD field lists the ACD associated with the task.
• The Value field lists the input data associated with the task.
E N D O F S T E P S...........................................................................................................................................................................
Task: using timetables and shortcuts CentreVu CMS Administration
Adding tasks to a timetable 13-13
............................................................................................................................................................................................................................................................Adding tasks to a timetable
Overview The Get Contents Add Tasks menu selection enables you to add tasks to a timetable in the same way you added tasks when you first created the timetable.
Steps To add tasks to a timetable:
...........................................................................................................................................................................
1 On the Keep SLK menu, select Timetable.
The Timetable window displays.
...........................................................................................................................................................................
2 In the Timetable name field, type the name of the timetable to which you want to add a task and press Return.
...........................................................................................................................................................................
3 On the action list, select Get Contents and press Return.
The Get Contents window opens.
...........................................................................................................................................................................
4 In the Task number(s) field, type the number of the task that you want the new tasks to follow.
• To add a task to the beginning of the timetable, leave the Task number(s) field blank. The new task is added before the first task.
• To add tasks to a timetable with no tasks, leave the Task number(s) field blank.
...........................................................................................................................................................................
5 Select Add Tasks and press Return.
The MainMenu displays. A new task is added after the task number you typed. If you select the Exit SLK and you have not selected an action list entry, the task is not saved.

Task: using timetables and shortcuts CentreVu CMS Administration
Adding tasks to a timetable 13-14
...........................................................................................................................................................................
6 To go to the task you want to schedule, use the normal menu selections from the Main Menu
Keeping Entries displays on the status line. This is the Keep mode.
...........................................................................................................................................................................
7 Complete the fields on the window and select an action list item.
When you have made and validated each action list selection, Entries Stored displays on the status line of the current window.
...........................................................................................................................................................................
8 To add as many tasks as you need, repeat the preceding steps.
E N D O F S T E P S...........................................................................................................................................................................
Steps To save your timetable:
...........................................................................................................................................................................
1 Press the Keep SLK and select Stop when you have finished adding tasks.
An acknowledgment window asks if you want to save your changes.
...........................................................................................................................................................................
2 Type \ to save the timetable.
The new tasks you added are displayed in the Get Contents window following the task you specified. Subsequent tasks are renumbered.
...........................................................................................................................................................................
3 Press the Exit SLK to close the Timetable window.
Your previously opened windows displays.
E N D O F S T E P S...........................................................................................................................................................................

Task: using timetables and shortcuts CentreVu CMS Administration
Adding tasks to a timetable 13-15
Reference
• Only the owner of the timetable and the call center administrator can add tasks to a timetable.
• To add a task to the beginning of a timetable, leave the Task number(s) field blank and add the new task before the first task. If you are adding tasks to a timetable that has no tasks, leave the Task number(s) field blank.
• To exit Timetable at any time without saving your changes, select Stop from the Keep SLK menu and then te Q in the acknowledgment window.

Task: using timetables and shortcuts CentreVu CMS Administration
Copying timetable tasks 13-16
............................................................................................................................................................................................................................................................Copying timetable tasks
Steps To copy a timetable task:
...........................................................................................................................................................................
1 On the Keep SLK menu, select Timetable.
The Timetable window displays.
...........................................................................................................................................................................
2 In the Timetable name field, type the name of the timetable to which you want to add tasks.
...........................................................................................................................................................................
3 On the action list, select Get Contents, and press Return.
The Get Contents window opens.
...........................................................................................................................................................................
4 In the Task number(s) field, type the task numbers that you want to copy.
...........................................................................................................................................................................
5 On the action list, select Copy and press Return.
The Get Contents Copy window opens.
...........................................................................................................................................................................
6 Next to the Add following task field or the Add each task after the task from which it was copied field, type an [�
• Choosing Add following task causes the copies to be placed after a specific task in the timetable.
• Choosing Add each task after the task from which it was copied causes each copy to display directly after the task of which it is a copy.
Task: using timetables and shortcuts CentreVu CMS Administration
Copying timetable tasks 13-17
...........................................................................................................................................................................
7 Press Return to move the cursor to the action list, then select Copy and press Return again.
If the action completes successfully, “Successful” displays in the status line. If the action fails, the status line displays “ Failed” and an acknowledgment window explains the reason for the failure. The Get Contents window displays after the copy completes.
...........................................................................................................................................................................
8 Select the Exit SLK.
The Timetable window opens.
E N D O F S T E P S...........................................................................................................................................................................
Reference
• Only the owner of the timetable and the administrator can copy timetable tasks.
• You cannot specify the same task more than once when using the Copy action in the Get Contents window. If you specify the same task more than once, or specify overlapping ranges, an error message displays.
• You cannot copy more than 100 tasks into a timetable. If you exceed the limit, none of the tasks are copied. The status line displays “ Failed” and you get an error message.
• You can put copies after a specified task in the timetable or you can put each copy directly after the task from which it was copied. The default is to put the copies after the last task in the timetable.
Task: using timetables and shortcuts CentreVu CMS Administration
Deleting tasks from a timetable 13-18
............................................................................................................................................................................................................................................................Deleting tasks from a timetable
Steps To delete a task from a timetable:
...........................................................................................................................................................................
1 On the Keep SLK menu, select Timetable.
The Timetable window opens.
...........................................................................................................................................................................
2 In the Timetable name field, type the name of the timetable from which you want to delete a task.
...........................................................................................................................................................................
3 Select Get contents on the action list, and press Return.
The Get Contents window opens.
...........................................................................................................................................................................
4 In the Task number(s) field, type the task numbers that you want to delete.
...........................................................................................................................................................................
5 On the action list, select Delete and press Return.
An acknowledgment window asks you to verify if you want to delete the tasks.
...........................................................................................................................................................................
6 Do one of the following:
• Type \ to delete the tasks.
• Type Q not to delete the tasks.
The tasks you selected are deleted and the remaining tasks on the list are renumbered. “Successful” displays on the status line. If the action fails, “Failed” displays on the status line and an acknowledgment window explains the reason for the failure.
Task: using timetables and shortcuts CentreVu CMS Administration
Deleting tasks from a timetable 13-19
...........................................................................................................................................................................
7 Select the Exit SLK.
The Timetable window opens.
E N D O F S T E P S...........................................................................................................................................................................
Reference
Only the owner of the timetable and the call center administrator can delete tasks from a timetable.

Task: using timetables and shortcuts CentreVu CMS Administration
Editing a timetable globally 13-20
............................................................................................................................................................................................................................................................Editing a timetable globally
Overview The Global Edit menu selection enables you to replace all occurrences of a given input value in a task with a new value. For example, you may have reports scheduled to run in a timetable using data from yesterday and you want to use data from three days ago instead. Global Edit enables you to use the older data for all the reports with a single action.
Steps To edit a timetable globally:
...........................................................................................................................................................................
1 On the Keep SLK menu, select Timetable.
The Timetable window opens.
...........................................................................................................................................................................
2 In the Timetable name field, type the name of the timetable that you want to edit.
...........................................................................................................................................................................
3 On the action list, select Get contents and press Return.
The Get Contents window opens.
...........................................................................................................................................................................
4 In the Task number(s) field, type the task numbers that you want to edit.
...........................................................................................................................................................................
5 Select Global edit and press Return.
The Get Contents Global Edit window opens.
...........................................................................................................................................................................
6 Type [ next to the type of field you want to change.
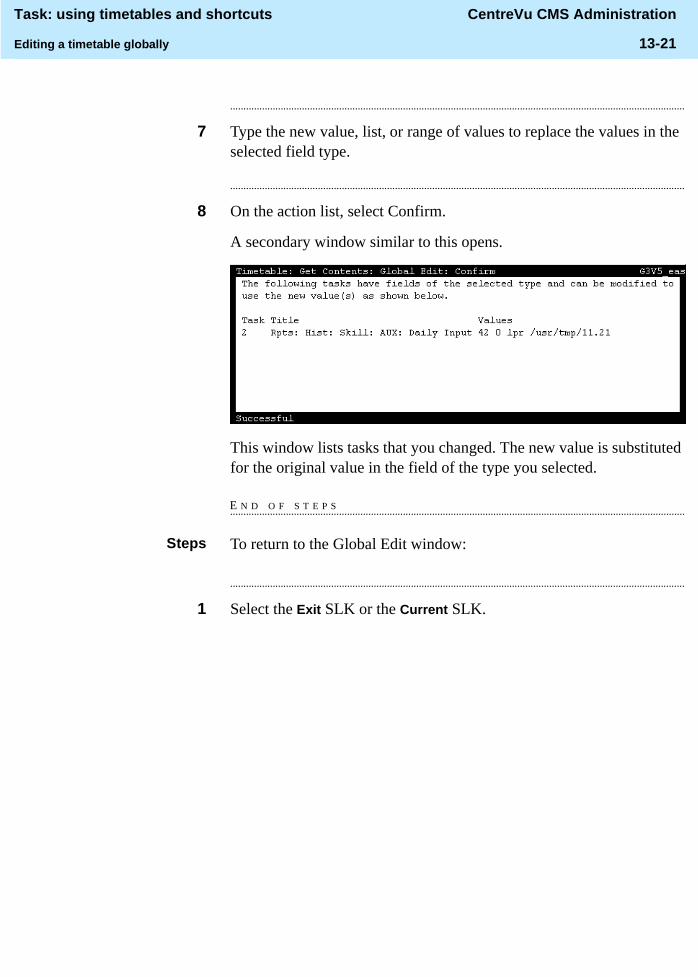
Task: using timetables and shortcuts CentreVu CMS Administration
Editing a timetable globally 13-21
...........................................................................................................................................................................
7 Type the new value, list, or range of values to replace the values in the selected field type.
...........................................................................................................................................................................
8 On the action list, select Confirm.
A secondary window similar to this opens.
This window lists tasks that you changed. The new value is substituted for the original value in the field of the type you selected.
E N D O F S T E P S...........................................................................................................................................................................
Steps To return to the Global Edit window:
...........................................................................................................................................................................
1 Select the Exit SLK or the Current SLK.

Task: using timetables and shortcuts CentreVu CMS Administration
Editing a timetable globally 13-22
...........................................................................................................................................................................
2 Do the following
...........................................................................................................................................................................
3 Select the Exit SLK.
E N D O F S T E P S...........................................................................................................................................................................
Reference
• Only the owner of the timetable and the call center administrator can globally edit a timetable.
• If you make a copy of the original timetable and then edit the copy, you can preserve the original timetable to run normally.
• When you select Global Edit, the secondary window opens. This secondary window allows you to select the field in which to replace values and to specify the new values. Any error found in the input is reported to you in an error message window. You must correct all errors before selecting an action.
If Then
You want to make the changes you specified.
Select Modify.
The change is made in all the tasks that match the input field type you specified and the old values in the fields are replaced by the new values you typed.
If the action completes successfully, “Successful” displays in the status line. If the action fails, “Failed” displays on the status line and a popup window explains the reason for the failure.
If none of the tasks have an input field of the type you select for change, the status line displays “Successful” but no tasks are modified.
After you successfully complete the Global Edit window, you can see the changed values on the Get Contents window Values list.
You do not want to make the changes you specified.
Select the Exit SLK.
The Global Edit window opens.
To repeat this procedure with different field values, return to Step 6.

Task: using timetables and shortcuts CentreVu CMS Administration
Changing timetable tasks 13-23
............................................................................................................................................................................................................................................................Changing timetable tasks
Steps To change a timetable task:
...........................................................................................................................................................................
1 On the Keep SLK menu, select Timetable.
The Timetable window opens.
...........................................................................................................................................................................
2 In the Timetable name field, type the name of the timetable in which you want to change tasks.
...........................................................................................................................................................................
3 On the action list, select Get contents and press Return.
The Get Contents window opens.
...........................................................................................................................................................................
4 In the Task number(s) field, type the task numbers that you want to change and select Modify.
You are now in Keep mode. The task window opens for the task you selected.
...........................................................................................................................................................................
5 Make your changes to the fields:
• You must select an action to complete the change. You can change the task data, the task action, or both.
• The default action for the task is the one currently associated with the task. You can press Return twice to complete the change of task data without changing the task action.
...........................................................................................................................................................................
6 Press Return, select the appropriate action, and press Return again.
The next task to be changed displays.

Task: using timetables and shortcuts CentreVu CMS Administration
Changing timetable tasks 13-24
...........................................................................................................................................................................
7 Repeat Steps 5 and 6 until you have changed all the tasks.
After you have changed the last task, a prompt asks if you want to save your changes.
...........................................................................................................................................................................
8 Type < to save the changes.
The Get Contents window opens.
E N D O F S T E P S...........................................................................................................................................................................
Reference
• Only the owner of the timetable and the administrator can change timetable tasks.
• The Current SLK and MainMenu SLK are blocked while you change tasks. The terminal beeps if you select either of these two keys.
• The only valid choice on the Keep SLK menu is Stop.
• The only option available from the Window SLK is the Redraw screen.
• If you press the Exit SLK without selecting a task action, a popup window tells you that task modification is cancelled (the input data values have not changed for this task). Press Return to continue.
• To exit the timetable without saving your changes, select Stop from the Keep SLK menu and then type �Q in the acknowledgment window.

Task: using timetables and shortcuts CentreVu CMS Administration
Listing all the timetables in your database 13-25
............................................................................................................................................................................................................................................................Listing all the timetables in your database
Steps To list all the timetables in your database:
...........................................................................................................................................................................
1 On the Timetable List all window, press Ctrl+Z to clear all fields.
...........................................................................................................................................................................
2 Use the Status field to see the status of the timetable scheduled to run:
• Finished indicates that the timetable was scheduled to run once and it completed successfully.
• Failed indicates that the timetable failed to run successfully for the last scheduled run time. For example, if CentreVu CMS is off, the List All window displays “Failed” in the status line.
— If the timetable is rescheduled and the next run time is valid, the timetable runs as scheduled.
— If you want to run the timetable for the time that it failed you must set a new start time. First, go into the timetable and change the start time to two minutes or so from the present time. Then change the start date to today's date.
• Successful indicates that the timetable completed successfully.
• Unscheduled indicates that the timetable does not have a start time or start date (is not scheduled).
• Running indicates that the timetable is running.
E N D O F S T E P S...........................................................................................................................................................................
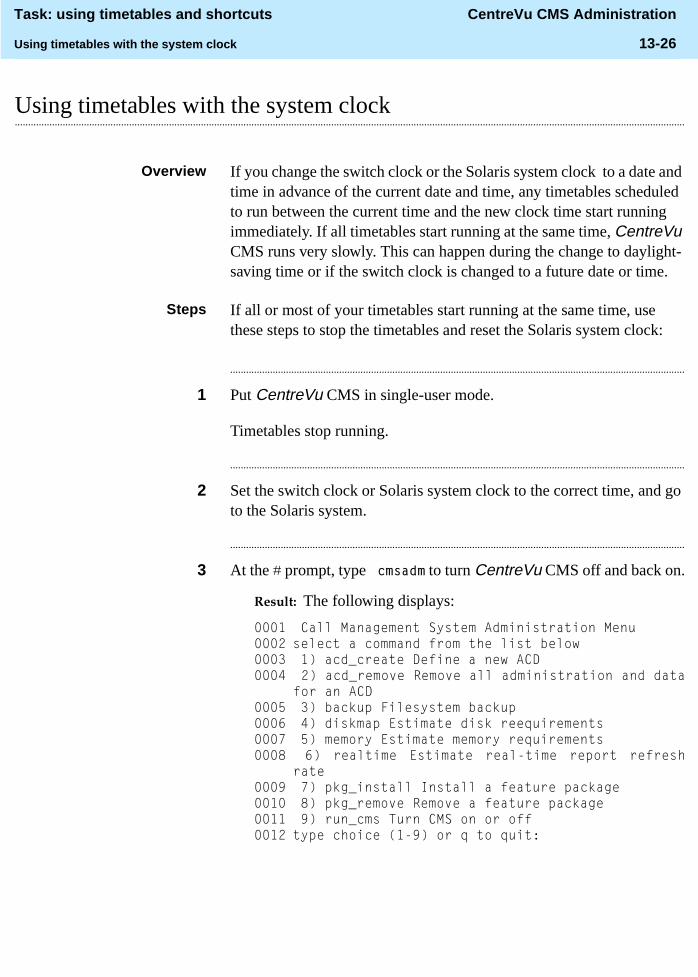
Task: using timetables and shortcuts CentreVu CMS Administration
Using timetables with the system clock 13-26
............................................................................................................................................................................................................................................................Using timetables with the system clock
Overview If you change the switch clock or the Solaris system clock to a date and time in advance of the current date and time, any timetables scheduled to run between the current time and the new clock time start running immediately. If all timetables start running at the same time, CentreVu CMS runs very slowly. This can happen during the change to daylight-saving time or if the switch clock is changed to a future date or time.
Steps If all or most of your timetables start running at the same time, use these steps to stop the timetables and reset the Solaris system clock:
...........................................................................................................................................................................
1 Put CentreVu CMS in single-user mode.
Timetables stop running.
...........................................................................................................................................................................
2 Set the switch clock or Solaris system clock to the correct time, and go to the Solaris system.
...........................................................................................................................................................................
3 At the � prompt, type �FPVDGP to turn CentreVu CMS off and back on.
Result: The following displays:
���� �&DOO�0DQDJHPHQW�6\VWHP�$GPLQLVWUDWLRQ�0HQX���� VHOHFW�D�FRPPDQG�IURP�WKH�OLVW�EHORZ���� ����DFGBFUHDWH�'HILQH�D�QHZ�$&'���� ����DFGBUHPRYH�5HPRYH�DOO�DGPLQLVWUDWLRQ�DQG�GDWD
IRU�DQ�$&'���� ����EDFNXS�)LOHV\VWHP�EDFNXS���� ����GLVNPDS�(VWLPDWH�GLVN�UHHTXLUHPHQWV���� ����PHPRU\�(VWLPDWH�PHPRU\�UHTXLUHPHQWV���� � ��� UHDOWLPH� (VWLPDWH� UHDO�WLPH� UHSRUW� UHIUHVK
UDWH���� ����SNJBLQVWDOO�,QVWDOO�D�IHDWXUH�SDFNDJH���� ����SNJBUHPRYH�5HPRYH�D�IHDWXUH�SDFNDJH���� ����UXQBFPV�7XUQ�&06�RQ�RU�RII���� W\SH�FKRLFH�������RU�T�WR�TXLW�

Task: using timetables and shortcuts CentreVu CMS Administration
Using timetables with the system clock 13-27
...........................................................................................................................................................................
4 Type �.
Result: The following displays:
���� VHOHFW�WKH�IROORZLQJ����� ���7XUQ�RQ�&06���� ���7XUQ�RII�&06���� W\SH�WKH�FKRLFH�������
...........................................................................................................................................................................
5 To turn CentreVu CMS off, type �.
...........................................................................................................................................................................
6 To turn CentreVu CMS back on, type �FPVDGP� at the � prompt, and then type ��� at the W\SH�FKRLFH�������RU�T�WR�TXLW prompt.
...........................................................................................................................................................................
7 After VHOHFW�WKH�IROORZLQJ, type �.
The message 3OHDVH�ZDLW�IRU�LQLWLDOL]DWLRQ��� displays. When CentreVu CMS is successfully turned back on, the message &06�LV�QRZ�XS displays. Your cursor is at the � prompt.
...........................................................................................................................................................................
8 Type H[LW to return to the �� prompt and log into CentreVu CMS.
E N D O F S T E P S...........................................................................................................................................................................
Reference
When changing to daylight-saving time, do not change the time during the hour in which all your daily timetables are scheduled to run.

Task: using timetables and shortcuts CentreVu CMS Administration
Creating a shortcut 13-28
............................................................................................................................................................................................................................................................Creating a shortcut
Steps To create a shortcut:
...........................................................................................................................................................................
1 On the Keep SLK menu, select Shortcut.
The Shortcut window opens.
...........................................................................................................................................................................
2 In the Shortcut name field, type a unique name and press the down arrow or Tab to go to the next field.
...........................................................................................................................................................................
3 In the Description field, type a description for the shortcut.
The user ID field shows your user ID and the cursor moves to the action list.
...........................................................................................................................................................................
4 To add your shortcut to CentreVu CMS, press �$, select Add on the action list, and press Return.
You can display multiple windows on the screen by selecting Move and Size from the Window SLK menu, then moving and sizing the output windows so they do not overlap. This allows you to make the best use of space on your screen.
“Working” displays in the status line. (All other windows temporarily close.) If the shortcut name already exists, “Already exists” displays on the status line; you must type another shortcut name. If all entries are valid, “ Successful” displays on the Shortcut window status line and “Keeping Entries” displays in the border of the MainMenu.
...........................................................................................................................................................................
5 From the MainMenu, go to the task that you want to view, complete the fields on the window, and click an action list item.
...........................................................................................................................................................................
6 When you have made and validated each action list selection, Entries Stored displays on the status line of the current window.

Task: using timetables and shortcuts CentreVu CMS Administration
Creating a shortcut 13-29
...........................................................................................................................................................................
7 Repeat the window and action list selections for each task that you want to view with this shortcut.
...........................................................................................................................................................................
8 Select the Keep SLK and select Stop on the menu when you have finished adding tasks to this shortcut.
An acknowledgment window displays.
...........................................................................................................................................................................
9 Type < to save your shortcut.
Your tasks are now saved on a shortcut. All windows are closed and “Successful” displays on the status line of the Shortcut window.
...........................................................................................................................................................................
10 Select the Exit SLK to close the Shortcut window.
Your previously opened windows opens.
E N D O F S T E P S...........................................................................................................................................................................
Reference
To exit from creating shortcuts at any time without saving your changes, select Stop from the Keep SLK menu and type �Q in the acknowledgment window.
Task: using timetables and shortcuts CentreVu CMS Administration
Running a shortcut 13-30
............................................................................................................................................................................................................................................................Running a shortcut
Steps ...........................................................................................................................................................................
1 On the MainMenu, type the shortcut name after the semicolon ( �)
The shortcut starts running and the keyboard locks until the shortcut finishes. “Successful” displays on the status line.
E N D O F S T E P S...........................................................................................................................................................................

Task: using timetables and shortcuts CentreVu CMS Administration
Copying a shortcut 13-31
............................................................................................................................................................................................................................................................Copying a shortcut
Steps To copy a shortcut:
...........................................................................................................................................................................
1 On the Keep SLK menu, select Shortcut.
The Shortcut window opens.
...........................................................................................................................................................................
2 In the Shortcut name field, type a new name for the shortcut to which you want to copy.
...........................................................................................................................................................................
3 In the User ID field, type your user ID.
...........................................................................................................................................................................
4 On the action list, select Copy and press Return.
The Copy window opens.
...........................................................................................................................................................................
5 In the Shortcut copy from field, type the name of the shortcut that you want to copy.
...........................................................................................................................................................................
6 In the User ID field, type the ID of the user whose shortcut you want to copy.
...........................................................................................................................................................................
7 To copy the shortcut, select Copy from the action list and press Return.
If the shortcut is copied, “Successful” displays on the status line.
...........................................................................................................................................................................
8 Press the Exit SLK to close the Copy window and return to your previously opened Shortcut window.
The previous Shortcut window opens.

Task: using timetables and shortcuts CentreVu CMS Administration
Copying a shortcut 13-32
...........................................................................................................................................................................
9 Press Exit to close the Shortcut window and return to your previously opened windows.
Your previously opened windows displays.
E N D O F S T E P S...........................................................................................................................................................................
Reference
• You can copy a shortcut only for yourself and not for another user.
• You cannot copy over an existing shortcut.

Task: using timetables and shortcuts CentreVu CMS Administration
Deleting a shortcut 13-33
............................................................................................................................................................................................................................................................Deleting a shortcut
Steps To delete a shortcut:
...........................................................................................................................................................................
1 On the Keep SLK menu, select Shortcut.
The Shortcut window opens.
...........................................................................................................................................................................
2 In the Shortcut name field, type the name of the shortcut that you want to delete.
Note: you cannot delete another user’s shortcut.
...........................................................................................................................................................................
3 On the action list, select Delete and press Return.
An acknowledgment window tells you that all tasks associated with this shortcut will be deleted.
...........................................................................................................................................................................
4 Type < to delete the shortcut and press Return.
The shortcut is deleted.
...........................................................................................................................................................................
5 Press the Exit SLK to close the Shortcut window.
Your previously opened windows displays.
E N D O F S T E P S...........................................................................................................................................................................

Task: using timetables and shortcuts CentreVu CMS Administration
Editing a shortcut 13-34
............................................................................................................................................................................................................................................................Editing a shortcut
Steps To edit a shortcut:
...........................................................................................................................................................................
1 Use the Shortcut Get Contents window to edit a shortcut.
...........................................................................................................................................................................
2 In the Task(s) field, type the numbers corresponding to the tasks that you want to copy, delete, or change, or type the number of the task after which you want to add new tasks. You can type a list (using a semicolon for the list separation) or range (using a minus sign for the range separation) for all actions except Add tasks.
...........................................................................................................................................................................
3 View the following display-only fields for information about the shortcut you are editing:
• The Shortcut field shows the shortcut.
• The Number of tasks field shows the number of tasks in the shortcut.
• The Task field lists the number corresponding to the position of the task in the shortcut.
• The Action field lists the action associated with the task.
• The Window Title field lists the title of the window that constitutes the task.
• The ACD field lists the ACD associated with the task.
• The Value field lists the input data associated with the task.
E N D O F S T E P S...........................................................................................................................................................................

Task: using timetables and shortcuts CentreVu CMS Administration
Adding tasks to a shortcut 13-35
............................................................................................................................................................................................................................................................Adding tasks to a shortcut
Steps To add tasks to a shortcut:
...........................................................................................................................................................................
1 On the Keep SLK menu, select Shortcut.
The Shortcut window opens.
...........................................................................................................................................................................
2 In the Shortcut name field, type the name of the shortcut to which you want to add a task.
...........................................................................................................................................................................
3 Press Return, then select Get contents on the action list and press Return again.
...........................................................................................................................................................................
4 In the Task number(s) field, type the number of the task that you want the new tasks to follow.
...........................................................................................................................................................................
5 Select Add tasks and press Return.
The MainMenu displays. The new task is added after the task number you typed. If you select the Exit SLK and you have not selected an action list item, the task is not saved.
...........................................................................................................................................................................
6 Use the normal menu items on the Main Menu to go to the task you want to schedule.
“Keeping Entries” displays on the status line.
...........................................................................................................................................................................
7 Complete the fields on the window and select an action list item.
When you have made and validated each action list selection, “ Entries Stored” displays on the status line.

Task: using timetables and shortcuts CentreVu CMS Administration
Adding tasks to a shortcut 13-36
...........................................................................................................................................................................
8 Repeat the preceding steps to add as many tasks as you need, then select the Keep SLK and select Stop when you are finished adding tasks.
An acknowledgment window asks if you want to save your changes.
...........................................................................................................................................................................
9 Type < to save the new tasks.
The Get Contents window displays with the entries you chose in the preceding menu.
...........................................................................................................................................................................
10 Press the Exit SLK.
The Get Contents window closes and the Shortcut window displays.
E N D O F S T E P S...........................................................................................................................................................................
Reference
• Only the owner of the shortcut and the call center administrator can add tasks to a shortcut.
• To exit the Shortcut window at any time without saving your changes, select Stop on the Keep SLK menu and respond to the popup window with Q.

Task: using timetables and shortcuts CentreVu CMS Administration
Copying shortcut tasks 13-37
............................................................................................................................................................................................................................................................Copying shortcut tasks
Steps To copy a shortcut task:
...........................................................................................................................................................................
1 On the Keep SLK menu, select Shortcut.
The Shortcut window opens.
...........................................................................................................................................................................
2 In the Shortcut name field, type the shortcut name into which you want to copy a task.
...........................................................................................................................................................................
3 Select Get contents and press Return.
The Get Contents window opens.
...........................................................................................................................................................................
4 In the Task number(s) field, type the number of the task or tasks that you want to copy.
...........................................................................................................................................................................
5 Select Copy.
The Get Contents Copy window opens.
...........................................................................................................................................................................
6 Type [ either next to the Add following task field or next to the Add each task after the task from which it was copied field.

Task: using timetables and shortcuts CentreVu CMS Administration
Copying shortcut tasks 13-38
Choosing the Add following task field causes the copies to be placed after a specified task in the shortcut. Choosing Add each task after the task from which it was copied causes each copy to display directly after the task of which it is a copy.
...........................................................................................................................................................................
7 Press Return, select Copy, and press Return again.
The message “Working” displays. If the action completes successfully, “Successful” displays on the status line. If the action fails, “Failed” displays in the status line and a popup window indicates the reason for the failure. The Get Contents window opens.
...........................................................................................................................................................................
8 Press the Exit SLK.
The Shortcut window opens.
E N D O F S T E P S...........................................................................................................................................................................
Reference
• You cannot specify the same task more than once when using Copy in the Get Contents window. If you specify the same task more than once or specify overlapping ranges, you get an error message.
• You cannot copy more than 100 tasks into a shortcut. If you exceed the limit, none of the tasks are copied. “ Failed” displays on the status line and you get an error message.
• You can put copies after a specified task in the shortcut or you can put each copy directly after the task from which it was copied. The default is to place the copies after the last task in the shortcut.
Task: using timetables and shortcuts CentreVu CMS Administration
Deleting tasks from a shortcut 13-39
............................................................................................................................................................................................................................................................Deleting tasks from a shortcut
Steps To delete a task from a shortcut:
...........................................................................................................................................................................
1 On the Keep SLK menu, select Shortcut.
The Shortcut window opens.
...........................................................................................................................................................................
2 In the Shortcut name field, type the shortcut name from which you want to delete tasks.
...........................................................................................................................................................................
3 On the action list, select Get contents and press Return.
The Get Contents window opens.
...........................................................................................................................................................................
4 In the Task number(s) field, type the task numbers that you want to delete.
...........................................................................................................................................................................
5 Select Delete and press Return.
The tasks you selected are deleted. The remaining tasks are renumbered on the list. “Successful” displays on the status line. If the action fails, “Failed” displays on the status line and a popup window explains the reason for the failure.
...........................................................................................................................................................................
6 Select the Exit SLK.
The Shortcut window opens.
E N D O F S T E P S...........................................................................................................................................................................
Reference
Only the owner of the timetable and the call center administrator can delete tasks from a shortcut.

Task: using timetables and shortcuts CentreVu CMS Administration
Changing shortcut tasks 13-40
............................................................................................................................................................................................................................................................Changing shortcut tasks
Steps To change a shortcut task:
...........................................................................................................................................................................
1 On the Keep SLK menu, select Shortcut.
The Shortcut window opens.
...........................................................................................................................................................................
2 In the Shortcut name field, type the name of the shortcut that has tasks you want to change.
...........................................................................................................................................................................
3 On the action list, select Get contents and press Return.
The Get Contents window opens.
...........................................................................................................................................................................
4 In the Task number(s) field, type the numbers of the tasks you want to change.
...........................................................................................................................................................................
5 Select Modify.
You are now in the Keep mode and the task window for the task you have selected opens.
...........................................................................................................................................................................
6 Make your changes to the fields.
You must select an action to complete the change. You can change the data for the task, the action for the task, or both.
The default action for the task is the one currently associated with the task. You can press Return twice to complete the change of task data without changing the task action.
...........................................................................................................................................................................
7 Press Return, select the appropriate action, and press Return again.
The next task to be changed displays.

Task: using timetables and shortcuts CentreVu CMS Administration
Changing shortcut tasks 13-41
...........................................................................................................................................................................
8 Repeat Steps 6 and 7 until you have changed all tasks.
After you have changed the last task, a prompt asks if you want to save your changes.
...........................................................................................................................................................................
9 Type < to save the changes.
The Get Contents window opens.
E N D O F S T E P S...........................................................................................................................................................................
Reference
• Only the owner of the timetable and the call center administrator can change shortcut tasks.
• The Current SLK and MainMenu SLK are blocked while you change tasks. The terminal beeps if you select either of these two keys. The only valid choice on the Keep SLK menu is Stop. The only option available on the Window SLK is the Redraw screen. If you press the SLK without selecting a task action, a Return popup window tells you that task modification is cancelled (the input data values have not changed for this task). Press Return to continue.
• You can move and resize shortcut windows when you are making changes. The new size and position are saved when the window is closed.
• To exit the shortcut without saving your changes, select Stop on the Keep SLK menu and type �Q in the acknowledgment window.

Task: using timetables and shortcuts CentreVu CMS Administration
Task Reference 13-42
............................................................................................................................................................................................................................................................Task Reference
Timetables
• You cannot select the terminal as a destination for report output on a timetable.
• Timetables run in the background, not on your terminal. (Outputs are usually print requests or Solaris system files).
• Important! Changing these timetables may affect system performance. Make sure there are no conflicts with other scheduled activities when running backups. For example, running backups while you are archiving may cause performance problems. For best performance, schedule backups to run either after archiving has been completed or before archiving begins.
• Daily, weekly, and monthly summaries are already scheduled to run automatically. See “Specifying storage intervals” in “Task: Viewing and changing system setup values” for more information.
• Timetables that fail to run, or that fail at some point during execution, are logged in the customer error log. The List all action item on the Timetable window also displays the timetable status.
• Each timetable can have up to 100 tasks (entries).
• You can schedule up to five timetables to start at the same time (minute).
• You cannot put real-time reports, the Vector Contents window, or custom report creations on a timetable.
• You cannot put a timetable on another timetable.
• You can change the ACD before creating a task but once you have assigned a task (window, data, and action), the ACD association is fixed for that window. The only way to change the ACD for a task is to delete it from the current ACD and add a new task for a different ACD.
• Use the Commands SLK to change the current ACD. See CentreVu Call Management System Release 3 Version 8 Administration and Operations585-210-910 for the procedures on changing your current ACD.
• You cannot add a task to change the current ACD to run the tasks for a different ACD. Changing the current ACD before running a timetable has no effect on tasks created under different ACDs.

Task: using timetables and shortcuts CentreVu CMS Administration
Task Reference 13-43
• Tasks associated with different ACDs can be on the same timetable.
• To run identical tasks on more than one ACD, you must either create separate timetables for each ACD or separate tasks on the same timetable.
• Selecting Add, Get contents: Add tasks, or Get Contents: Modify from the Timetable action list automatically activates Keep mode. This means you cannot access windows you opened before making your selection. After you exit Keep mode, the previously opened windows open again.
• A task is stored with each Add, Delete, Modify, Run, and List all action list selection. Action list selections not saved by CentreVu CMS are Find one, Next, Previous, and Get contents. For Find one, Next, Previous, and Get contents, the action happens immediately.
• Users who are not administrators can view other users' timetables but cannot add, change, or delete another user's timetables or entries.
• You cannot move or size windows in the timetable edit mode.
• CentreVu CMS tries to run each task on a timetable. If an event occurs, such as an acknowledgment window that needs a �\HV or QR response, the timetable is stopped and is logged in the customer error log.
• Tasks for which you do not have permission do not run on a timetable.
• To verify timetable status, check the List all window for the timetable and check the Error Log Report in the Maintenance operation.
• Using the Current key in Keep mode rotates only through your Timetable windows; it does not rotate through any windows opened before you typed Keep mode.
Printing a timetable
• To print a report more than once on a timetable, you must type a task for each copy of the report you want. For example, if you want three copies of a report, type the task three times. The timetable quits if a timetable task fails.

Task: using timetables and shortcuts CentreVu CMS Administration
Task Reference 13-44
• A timetable print job is automatically sent to your default printer unless a printer name is specified on the task. If your default printer is changed, CentreVu CMS automatically sends your timetables to your new default printer. You do not have to change the timetable tasks.
• If you specify a destination other than your default printer for a timetable task and that printer is removed or out of service, your timetable task does not execute. You must remove that printer destination and type a new printer destination.
• If your printer jams, you must resubmit any print request that did not print.
Assigning a task
• To assign a task, you access a user window, type the appropriate values, and select an item on the action list. For example, a task can access and complete a historical report window and then run the report. You can schedule historical reports to run at any time on any date you specify.
Using Stop
• Stop exits the add or edit mode for a timetable. An acknowledgment window asks if you want to save the additions or changes.
Stop does not stop the execution of a timetable. For example, if you type a timetable name and then decide you do not want to run the timetable, selecting Stop does not stop the timetable from running. The only way to stop a timetable from running is to turn the terminal off.
Timetables and permissions
• If you delete a CentreVu CMS user ID that owns timetables, you are asked if you want to save and rename the timetables owned by that user. The timetables are deleted if you do not assign them to another user.
• If you change a user's permissions, it may affect the timetables that the user has scheduled. For example, if a user has access to skills 1, 2, 3, and 4 and you change the user's permissions to skills 1, 2, and 4, the timetable tasks that the user has scheduled for skill 3 either does not run or the tasks display no data.

Task: using timetables and shortcuts CentreVu CMS Administration
Task Reference 13-45
Shortcuts
• Each user can create up to 10 shortcuts.
• Once a shortcut is started, it cannot be stopped.
• You can copy shortcuts from other users.
• When creating a shortcut, a user cannot exceed the maximum window count assigned to that user.
• When you select Shortcut, you are automatically placed in the Keep mode if you select Add, Get contents: Add tasks, or Get Contents: Modify from the action list. You cannot access any other open window until you exit the Keep mode.
• A task is stored with each Add, Delete, Modify, Run, Find one, and List all action list selection. Action list selections not saved by CentreVu CMS are Next, Previous, and Get contents.
• You cannot create a custom report using a shortcut.
• Using the Current key in the Keep mode rotates only through your Shortcut windows; it does not rotate through any windows opened before you typed Keep mode.
• When you are adding tasks to a shortcut, tasks with errors are saved in the shortcut. For example, if you create a task to run a report and you type invalid data in the report window, the report does not run but the task is saved in the shortcut.
• In this case, you can:
– Save the shortcut and then use the Get contents action in Shortcut to change the error, or
– Exit the shortcut without saving the new task.
• Error messages or acknowledgment windows stop a shortcut at the task where the error message or acknowledgment window appears. For example, lack of permission for a skill may cause a shortcut to stop when the shortcut reaches that skill. Correct the problem and rerun the shortcut.
• Shortcut edit mode is like timetable edit mode except that you are allowed to run action list selections to move and size windows.
Task: using timetables and shortcuts CentreVu CMS Administration
Task Reference 13-46
Shortcuts and permissions
• If you delete a CentreVu CMS user ID and that user has shortcuts, all shortcuts belonging to that user are deleted.
• If you change a user's access permissions, it could affect that user's shortcuts. For example, if a user has access to skills 1, 2, 3, and 4 and you change the user's permissions to skills 1, 2, and 4, the shortcuts for skill 3 either do not run or the shortcuts display no data.
Assigning tasks
• To assign a task, you access a user window, type the appropriate values, and select an item from the action list. For example, a task can access and complete a historical report window and then run the report. You can schedule historical reports to run at any time on any date you specify.
Using Stop
• Stop exits the add or edit mode for a timetable or shortcut. An acknowledgment window asks if you want to save the additions or changes.
• Stop does not stop the execution of a shortcut. For example, if you type a shortcut name and then decide you do not want to run the shortcut, selecting Stop does not stop the shortcut from running. The only way to stop a shortcut from running is to turn the terminal off.
Glossary CentreVu CMS Administration
GL-1
Glossary
............................................................................................................................................................................................................................................................
A abandoned callA call on which a caller hangs up before an agent answers.
abandoned call searchAn ACD capability that enables the system to verify that the caller is still on the line before passing the call to an agent.
acceptable service level 1) A target value for the acceptable amount of time before an agent answers a call.
2) A percentage of calls answered within a set amount of time (for example, 80% of calls answered within 20 seconds).
access permissionsPermissions assigned to a CentreVu® CMS user so that the user can access different CentreVu CMS capabilities or administer specific elements such as splits/skills, trunks, or vectors of the ACD feature. Access permissions can be read or write. See also read permission, write permission.
ACD See Automatic Call Distribution.
ACD call A call that queues to a split/skill and is answered by an agent in that split/skill, or a call that queues as a direct agent call and is answered by the agent for whom it was queued.
Glossary CentreVu CMS Administration
GL-2
acknowledgment A window that requires you to confirm an action or acknowledge a system message. You cannot move, size, or scroll this window and it closes only when you confirm the action or acknowledge the message.
active VDN calls A Call Vectoring feature on G3V4 or later switches that provides conditional branching (to a different step in the same vector or to a different vector), based on the number of incoming trunk calls a VDN is processing in a vector or at an agent position. Also called “counted calls to VDN”.
ACW See after call work.
Adjunct/Switch Applications Interface (ASAI) A recommendation for interfacing adjuncts and communications systems that is based on the CCITT Q.932 specification for layer 3. ASAI supports activities such as event notification and call control.
after call work (ACW)An agent state consisting of work related to the preceding ACD call. If an agent hangs up after an ACD call, the agent is in ACW. On G3, ACW is also accessible by a button on the agent's set and does not have to be related to an ACD call.
agent A person or VRU port that answers calls to an ACD split/skill. The agent is represented to CentreVu CMS by a login identification keyed into a voice terminal.
agent login IDA 1- to 9-digit number keyed by an ACD agent from a voice terminal to activate the agent position. Agent logins are needed for all CMS-measured ACD agents.
agent occupancy The percentage of time that you expect or target for each split/skill agent to spend on ACD calls and in ACD while logged in.
agent position (EAS) The combination of the agent login ID and the skills the agent is assigned. Data is collected for the agent by skill, so the total work for the agent is the sum of all skills in which the agent worked.

Glossary CentreVu CMS Administration
GL-3
agent position (non-EAS) The combination of agent login ID and split the agent logged into. Agents logged into multiple splits are associated with multiple positions. Call data is collected separately for each agent/split combination.
agent roleA description of the kind of service an agent in multiple skills gives for 1 of these skills. Agent role is a combination of call-handling preference and skill/reserve levels.
agent skill An attribute that is associated with an ACD agent and that qualifies the agent to handle calls requiring the attribute. An agent can be assigned up to 20 skills – for example, the ability to speak a particular language or the expertise to handle a certain product.
See also primary skill, secondary skill, and skill level.
agent state A call work mode or call state such as ACD, ACW, AVAIL, AUX, UNSTAFF, DACD, DACW, OTHER, UNKNOWN, RINGING.
agent terminal The voice terminal used by a call center agent.
agent traceA CentreVu CMS capability that allows you to trace agent activities such as state changes to generate a report.
AI See Auto-In.
Algorithm A procedure for solving a problem in a finite number of steps.
ANI See automatic number identification.
announcement A recorded voice message that typically identifies the call's destination, asks the caller to stay on the line, and describes the product or service offered. With the Call Vectoring feature, announcements can be part of a vector's call processing.

Glossary CentreVu CMS Administration
GL-4
ASA See average speed of answer.
ASAI See Adjunct/Switch Applications Interface.
auto-available split An ACD capability that enables VRUs such as the CONVERSANT® Voice Information System to be brought online again immediately after a power failure or system restart, without time-consuming reprogramming.
Auto-In (AI) An ACD work mode that makes the agent available to receive calls and allows the agent to receive a new ACD call immediately after disconnecting from the previous call.
Automatic Call Distribution (ACD) 1) A switch feature that channels high-volume incoming and outgoing call traffic to agent groups (splits or skills).
2) An agent state in which the extension is engaged on an ACD call.
automatic number identification (ANI) An industry term for notification of the calling party number (CPN). When the calling party is connected through a switch, the CPN can be either a billing number for the switch or the station identification (SID) number.
AUX See auxiliary work.
AUX reason codes Codes that enable a call center to track an agent's time more precisely when the agent is in the AUX state. Agents can specify why they are in the AUX state – for example, on break or in a meeting.
auxiliary work (AUX)An agent state in which, for example, the agent is doing non-ACD work, is on break, or is in a meeting. Agents enter AUX work by pressing the AUX WORK button or dialing the access code from their voice terminal. Agents can also enter AUX work by going off-hook to make or answer an extension call while in AVAIL or with a call on hold.
AVAIL See available.

Glossary CentreVu CMS Administration
GL-5
............................................................................................................................................................................................................................................................
............................................................................................................................................................................................................................................................
available (AVAIL)An agent work mode in which the extension can accept an ACD call. The agent enters this state by selecting the AI or MI work mode.
average agent service timeThe average time you are expecting or targeting each agent to spend on an ACD call, including talk time and ACW time.
average speed of answer (ASA)The average time a caller waits in queue before connecting to an agent. The ASA for a split/skill includes the time spent in queue and the time ringing an agent. The ASA for a VDN includes the time spent in vector processing (including the time spent in queue and the time ringing) for the VDN that the call was answered in.
B back up The process of protecting data by writing the contents of the disk to an archive such as tape that can be removed from the computer environment and stored safely.
C calculationA formula for representing call center entities in the Dictionary. Calculations generate the date for fields in a report.
call-based items The category of database items in CentreVu CMS that are entered in the database after a call completes. If a call starts and ends in different intrahour intervals, the call-based data is recorded for the interval in which the call completed. Most database items are call-based.
call-handling preferenceA parameter of agent administration in an EAS environment that specifies how calls are selected for the agent.
call-handling profile A set of objectives describing how a split/skill handles calls. Call-handling profiles are part of the Forecasting feature.

Glossary CentreVu CMS Administration
GL-6
Call Prompting A switch feature that routes incoming calls based on information supplied by the caller, such as an account number. The caller hears an announcement and is prompted to select an option from those listed in the announcement.
Call VectoringA switch feature that provides a highly flexible method for processing ACD calls using VDNs and vectors as processing points between trunk groups and splits. Call Vectoring permits a treatment of calls that is independent of splits.
call work code (CWC) An ACD capability that allows the agent to enter a string of digits during or after the call and send them to CentreVu CMS for management reporting.
calls carried The number of inbound/outbound calls carried by a trunk.
CentreVu AdvocateA set of features designed to enhance call and agent selection in a call center.
change agent skills A CentreVu CMS capability that allows you to change a single agent’s skill assignment or apply an agent template to up to 50 agents.
CMS See Call Management System.
CONN See connected.
connected (CONN) A trunk state in which a caller and an agent are connected on an ACD call.
connected call A non-ACD call connected to an agent through a VDN and for which CentreVu CMS receives an indication that the call rang or was answered.
continue A CentreVu CMS action that resumes a suspended restore or migration operation.
CONVERSANT A powerful voice-response system that may include automated call routing, announcement storage, message retrieval, and callback.
Glossary CentreVu CMS Administration
GL-7
............................................................................................................................................................................................................................................................
copy group or profile A CentreVu CMS operation that creates a new group or profile from an existing one.
currentA CentreVu CMS operation that displays data from the current interval.
current intervalThe current intrahour interval, which can be 15, 30, or 60 minutes. The current interval is part of the real-time database.
current wait timeThe time a call has waited for service in a call queue adjusted for queue priority.
custom reportA real-time or historical report that has been customized from standard reports or created from scratch.
CWC See call work code.
D DABN See dequeued and abandoned.
DACD See direct agent ACD.
DACW See direct agent ACW.
daily data Interval data that has been converted to a 1-day summary.
data collection offA state in which CentreVu CMS is not collecting ACD data. If you turn off data collection, CentreVu CMS does not void data on current call activity.
data collection on A state in which CentreVu CMS is collecting ACD data.

Glossary CentreVu CMS Administration
GL-8
database A group of files that store ACD data according to a specific time period. This can be current and previous intrahour real-time data or intrahour, daily, weekly, and monthly historical data.
database item A name for a specific type of data stored in one of the CentreVu CMS databases. A database item can store ACD identifiers such as split numbers or names, login IDs, and VDNs or statistical data on ACD performance such as number of ACD calls, wait time for calls in queue, current states of individual agents, etc.
database tables Tables used to collect, store, and retrieve ACD data. Database items are names of columns in the tables.
date formatThe standard format for entering dates on CentreVu Supervisor reports.
DDCSee direct department calling.
delete A CentreVu CMS operation that removes the entry on the window from the database.
dequeued and abandoned (DABN) A trunk state in which the trunk quickly goes to idle after the caller abandons the call.
designer reportsCustomized reports that you create using CentreVu Report Designer and run from CentreVu Supervisor.
DictionaryA CentreVu CMS capability you use to assign names to call center elements such as login IDs, splits/skills, trunk groups, VDNs, and vectors. These names appear on reports, making them easier to interpret.
DID See direct inward dialing.
direct agent ACD (DACD) An agent state in which the agent is on a direct agent ACD call.
Glossary CentreVu CMS Administration
GL-9
............................................................................................................................................................................................................................................................
direct agent ACW (DACW) An agent state in which the agent is in the after call work state for a direct agent ACD call.
direct agent calling An EAS capability that allows a caller to reach the same agent every time and allows the call center to include the call as an ACD call in management tracking. This is ideal for claims processing in which a client needs to speak with the agent handling the claim. It also ensures a high level of customer service without reducing management control.
direct department calling (DDC) A non-EAS option to select an agent when more than one agent is available. The call goes to the agent closest to the top of an ordered list.
direct inward dialing (DID) The use of an incoming trunk used for dialing directly from the public network into a communications system without help from the attendant.
E EAD See expert agent distribution.
EAS See Expert Agent Selection.
entity A generic term for an agent, split/skill, trunk, trunk group, VDN, or vector.
EWT See expected wait time.
exception Activity in an ACD which falls outside the limits you have defined. An exceptional condition is defined in the CentreVu CMS Exceptions subsystem, and usually indicates abnormal or unacceptable performance of the ACD (by agents, splits/skills, VDNs, vectors, trunks, or trunk groups).

Glossary CentreVu CMS Administration
GL-10
............................................................................................................................................................................................................................................................
expected wait time (EWT)An estimate of how long a caller will have to wait to be served by a call center while in queue. EWT is based on current and past traffic, handling time, and staffing conditions. Time spent in vector processing before being queued and time spent ringing an agent with manual answering on is not included in the EWT. With the G3V5 and later, and CentreVu CMS R3V5 and later, the EWT is a switch-based calculation.
Expert Agent Selection (EAS)An optional switch feature that matches the skills needed to handle a call with an agent who has at least 1 of those skills.
extension call A call originated by an agent or a non-ACD call received by an agent. Extension calls include calls an agent makes to set up a conference or transfer.
F FBUSY See forced busy.
FDISC See forced disconnect.
Find OneA CentreVu CMS action that searches the database for entries that match the input value.
flex agentsAgents who have the role of roving, backup, or allocated. Top and reserve agents are not flex agents. See CentreVu Advocate User Guide585-215-855.
flexible routingAn ACD capability that allows customers to choose how incoming calls should be routed to agents in a split. Calls can be routed to the first available agent or to the most idle agent.
forced busy (FBUSY)A trunk state in which the caller receives a forced busy signal.
forced disconnect (FDISC)A trunk state in which the caller receives a forced disconnect.

Glossary CentreVu CMS Administration
GL-11
............................................................................................................................................................................................................................................................
............................................................................................................................................................................................................................................................
Forced Multiple Call Handling (FMCH)A feature available with G3V4 or later switches. When activated for a split/skill, FMCH allows calls to be automatically delivered to an idle line appearance if the agent is in the AI/MI work mode and if an unrestricted line appearance is available on the voice terminal.
H historical databaseA database consisting of intrahour records for up to 62 days, daily records for up to 5 years, and weekly/monthly records for up to 10 years for each CMS-measured agent, split/skill, trunk, trunk group, vector, and VDN.
historical reportsA report of past ACD data for various agent, split/skill, trunk, trunk group, vector, or VDN activities. Historical reports summarize call data into daily, weekly or monthly totals.
HOLDA trunk state in which an agent has put a call on this trunk on hold.
I IDLEA trunk state in which trunk is not in use and is waiting for a call.
IISee information indicator.
Inbound Call Management (ICM) A set of switch and adjunct features using ASAI to enable the adjunct to provide automatic screen delivery and call routing.
information indicator (II)A 2-digit code that identifies the type of originating line (for example, hotel or pay phone) for incoming ISDN PRI calls.
INFORMIX A relational database management system used to organize CentreVu CMS historical data.

Glossary CentreVu CMS Administration
GL-12
............................................................................................................................................................................................................................................................
INFORMIX SQLAn interactive interface typically used to view the INFORMIX database.
Integrated Services Digital Network (ISDN)A digital standard for telephony that enables telephone, television, and computer signals on the same lines.
interval ASAThe average time a call waits in queue before connecting to an agent, calculated on reporting interval boundaries and used for pre-R3V4 CentreVu CMS reporting. Interval ASA is cleared to zero at the start of each reporting interval. See also average speed of answer (ASA), rolling ASA.
interval-based itemsA category of database items that represent the amount of time during a collection interval spent on a particular activity. Interval-based items are updated throughout the collection interval and timing is restarted at the end of the interval.
intrahour interval A 15-, 30-, or 60-minute segment of time starting on the hour. An intrahour interval is the basic unit of CentreVu CMS report time.
ISDN See Integrated Services Digital Network.
L LAN See local area network.
local area networkA private interactive communication network that allows computers to communicate over short distances, usually less than 1 mile, at high data transfer rates from 1 Mbps to as high as 100 Mbps.
Logical AgentAn EAS feature that associates an agent’s login ID with a physical extension when the agent logs in. Properties such as the assigned skills, class of restriction, and coverage path are associated with the login ID rather than the physical extension. This allows agents to log in at any available set.
Glossary CentreVu CMS Administration
GL-13
............................................................................................................................................................................................................................................................
LOGOFFAn agent trace work mode in which an agent is logged out and not available to take ACD calls.
LOGONAn agent trace work mode in which an agent is logged in and available to take ACD calls.
logout reason codes Codes that enable an agent to specify the reason for logging out, such as the end of a shift or training.
Look Ahead Interflow (LAI) A switch feature that can be used to balance the call load among multiple call centers. LAI works with Call Vectoring and ISDN PRI trunks to intelligently route calls between call centers. This allows multiple call centers to share work loads, expands hours of coverage, and allows calls to be transparently handled by call centers in different time zones.
M maintenance A CentreVu CMS capability that is used for routine maintenance of CentreVu CMS, such as backing up data, checking on the status of the connection to the switch, and scanning the error log.
maintenance busy (MBUSY)A trunk state in which the trunk is out of service for maintenance purposes.
Manual In (MI)An ACD work mode in which an agent is available to receive an ACD call and is automatically placed into the agent into the ACW state on release from the call.
MBUSYSee maintenance busy.
MCHSee multiple call handling.
measuredAn ACD element such as agent, split/skill, trunk, trunk group, vector, or VDN that is identified to CentreVu CMS for data collection. If the ACD element is not measured, no data is collected.
Glossary CentreVu CMS Administration
GL-14
message windowsTemporary windows used for displaying information such as syntactical field errors. Message windows cannot be moved, sized, or scrolled and are not included in the user window count. Message windows are automatically removed when you correct the error or move to the next field.
MISee Manual In.
MIASee most idle agent.
modifyA CentreVu CMS operation that changes a database entry to reflect the new values entered in the current primary window.
monthly dataDaily data that has been converted to a monthly summary.
most idle agent (MIA)An ACD distribution method that maintains a queue of idle agents. An agent is put at the end of the list for a particular split when the agent completes an ACD call for that split. The agent continues to advance on the list as long as he or she remains staffed and in ACW, AVAIL, or on AUXIN/OUT extension calls from the AVAIL mode.
Multi-Agent Skill Change WindowA window in which you can add 1 or more agents to a skill, move 1 or more agents from one skill to another, and remove 1 or more agents from a skill.
multiple call handling (MCH)A process in which an agent receives an ACD call while other calls are active on the agent’s station. The agent must put the current call on hold and press AI/MI to receive another ACD call.
multiple split queuingA Call Vectoring capability that directs a call to up to 4 splits at the same time, with the first agent who is free getting the call.
multiuser modeA CentreVu CMS state in which any administered user can log into CentreVu CMS and data continues to be collected if data collection is on.

Glossary CentreVu CMS Administration
GL-15
............................................................................................................................................................................................................................................................
............................................................................................................................................................................................................................................................
............................................................................................................................................................................................................................................................
N name (synonym) fieldsA field in which you can input a name (synonym) that you have entered in the Dictionary. For example, you can input names of agents, splits/skills, agent groups, trunk groups, vectors, or VDNs.
night service A switch capability that enables calls that come in after business hours or on weekends to be automatically rerouted to a split, an announcement, or an alternate destination set up for after-hours coverage.
nonprimary split/skillThe 2nd and 3rd splits/skills to which a call queued to multiple splits/skills queues in a VDN. Also called secondary and tertiary split/skill, respectively.
O only me reportA custom report that only the report’s creator and the CentreVu CMS administrator can access.
OTHERAn agent work mode in which the agent is on a direct agent call or on a call for another split or skill, or has put a call on hold and has not chosen another work mode.
Outbound Call Management (OCM) A set of switch and adjunct features using ASAI, that distributes outbound calls initiated by an adjunct to internal extensions (usually ACD agents).
P phantom abandon call timerA CentreVu CMS capability that tracks information about abandoned calls. When the phantom abandon call timer is enabled, calls with a duration shorter than the administered value (0 to 10 seconds) are counted as phantom abandon calls. Setting the timer to 0 disables this capability.
percent within service levelThe percentage of calls that you are expecting or targeting to be answered by an agent within a specific number of seconds.
Glossary CentreVu CMS Administration
GL-16
............................................................................................................................................................................................................................................................
............................................................................................................................................................................................................................................................
previous intervalA 1–intrahour interval that is part of the real-time database. At the end of each intrahour interval, the contents of the current intrahour interval are copied to the previous intrahour interval portion of the real-time database.
primary skillA skill assigned to an agent as that agent's strongest skill. Primary skills are the areas in which the agent has the most expertise.
pseudo-ACD An area you create on your CentreVu CMS to place previously backed-up ACD data. A pseudo-ACD is not a live (real) ACD and does not communicate with any switch.
Q queueA holding area for calls waiting to be answered in the order in which they were received. Calls in a queue may have different priority levels, in which case, calls with a higher priority are answered first.
QUEUEDA trunk state in which an ACD call has seized the trunk and is queued to a split/skill, waiting for an agent to answer.
R read permissionA permission with which a CentreVu CMS user can access and view data (for example, run reports or view the Dictionary subsystem).
real-time databaseA database consisting of the current and previous intrahour data on each CMS-measured agent, split, trunk, trunk group, vector, and VDN.
real-time reportsA report that shows ACD call activity on agents, splits/skills, trunks, trunk groups, vectors, and VDNs for the current or previous intrahour interval.

Glossary CentreVu CMS Administration
GL-17
............................................................................................................................................................................................................................................................
Redirect On No AnswerAn ACD capability that assists the user if a call is not answered in a specified number of rings. The terminal extension, including ports with VRUs, is busied out and the call goes back into the queue at top priority.
refresh rateThe number of seconds CentreVu CMS should wait for each update of the real-time report data.
RINGING1) An agent state consisting of the time a call rings at an agent’s voice terminal after leaving the queue and before the agent answers the call.
2) A trunk state in which a call is ringing at the agent’s voice terminal.
rolling ASAA running, weighted, average calculation made without using interval boundaries. Rolling ASA is used for vector routing, beginning with CentreVu CMS R3V4; it is calculated on the G3V4 switch and sent to CentreVu CMS R3V4.
S screen-labeled key (SLK) The first 8 function keys at the top of the keyboard that correspond to the screen labels at the bottom of the terminal screen. The screen labels indicate each key’s function.
scriptingA CentreVu CMS capability that allows you to automate operations such as changing an agent’s skills, running a report, and exporting report data.
secondary skill A skill assigned to an agent in a subject that is not that agent’s strongest area of expertise. Secondary skills are used in G3V2 through G3V4 with EAS.
SEIZEDA trunk state in which an incoming or outgoing call is using the trunk.
service levelA time, in seconds, within which all calls should be answered. Also called acceptable service level (ASA).

Glossary CentreVu CMS Administration
GL-18
............................................................................................................................................................................................................................................................
Service Observing–Remote A feature that allows a user to dial into the switch and monitor a call.
Service Observing–VDNsA feature available with G3V4 or later that gives a user the ability to monitor the treatment a call receives as it is processed by a VDN.
single-user modeA mode in which only 1 person can log into the CentreVu CMS server. Data continues to be collected if data collection is on.
skillSee agent skill.
skill level A rating of from 1 (highest) to 16 (lowest) that indicates an agent’s level of expertise in handling calls for which that expertise is needed. (ECS Version 5 and later.)
splitA group of extensions that receives special-purpose calls in an efficient, cost-effective manner.
staffed agentAn agent who is currently logged into the switch.
standard reportsThe set of reports that are supplied with CentreVu CMS or CentreVu Supervisor software.
station1) An unmeasured extension. 2) An extension that is not currently staffed by an agent or that is a member of an unmeasured split/skill.
T time formatThe standard format for entering times on CentreVu CMS reports: a.m. or p.m. and military clock.
TimetableAn activity or group of activities scheduled for completion at a time that is convenient and nondisruptive for your call center’s operation.

Glossary CentreVu CMS Administration
GL-19
............................................................................................................................................................................................................................................................
............................................................................................................................................................................................................................................................
trunkA telephone circuit that carries calls between 2 switches, between a central office and a switch, or between a central office and a telephone.
trunk groupA group of trunks that are assigned the same dialing digits: either a phone number or a direct inward dialed (DID) prefix.
U uniform call distribution (UCD)A method of call distribution in which the most idle agent for a skill receives the call (if the agent is available).
universal call identifier (UCID)A number that uniquely identifies a call in a network of nodes that support UCID.
UNKNOWN1) An agent state in which CentreVu CMS does not recognize the agent’s state.
2) A trunk state in which CentreVu CMS does not recognize the trunk’s state.
UNSTAF (non-EAS)An agent state in which the agent is not logged in and therefore is not tracked by CentreVu CMS.
user IDThe login ID for a CentreVu CMS user.
V VDNSee vector directory number.
VDN calls-countedSee active VDN calls.
VDN of origin announcement (VOA) A short announcement that is assigned to a VDN through switch administration. The VOA identifies the origin or purpose of a call for the call center agent who answers the call.

Glossary CentreVu CMS Administration
GL-20
............................................................................................................................................................................................................................................................
VDN skill preferenceA prioritized list of agent skills administered for a VDN that are needed or preferred for the answering agent. VDN skill preferences require a call to be routed to an ACD agent with a particular attribute or set of attributes.
vectorA list of steps that process calls according to a user definition. The steps in a vector can send calls to splits, play announcements and music, disconnect calls, give calls a busy signal, or route calls to other destinations.
vector command A vector step that describes the action to be executed for a call (for example, Queue to main, check backup, disconnect).
vector directory number (VDN)An extension number that enables calls to connect to a vector for processing. A VDN can connect calls to a vector when the calls arrive over an assigned automatic-in trunk group or when the calls arrive over a DID trunk group and the final digits match the VDN. The VDN by itself may be dialed to access the vector from any extension connected to the switch.
vector step1 processing step in a vector. A vector step consists of a command and 1 or more conditions or parameters.
vector step conditionA condition accompanying a vector command that defines the circumstances in which the command is applied to a call.
VOA See VDN of origin announcement.
voice terminalA telephone set, usually with buttons, that gives an agent some control over the way calls are handled.
W weekly dataDaily data that has been converted to a weekly summary.
write permissionA permission with which a CentreVu CMS user can add, change, or delete data and execute processes.

Index CentreVu CMS Administration
IN-1
Index
Numerics
3B2 computermigrating data from 10-33
A
access permissionsACD 9-3feature 9-3split/skill 9-3trunk group 9-3VDN 9-3vector 9-3
ACDadministrative interface 1-13master 10-2
ACD access permissionsassigning 9-9changing 9-9deleting 9-9viewing 9-9
ACD Access window 9-10ACD status
viewing 11-3ACD Status window 11-3ACD’s
changing during backup 3-6ACDs
adding 3-6changing 3-6deleting 3-6
ACDs input window 3-7Actions menu 2-12Actions menu items 2-13Activate Agent Trace input window
6-5activating agent trace 6-3Add Button wizard 2-4adjunct routing
command 8-28step 8-20, 8-25
Advanced menu 2-2
Agent Administration selector window 2-4, 2-6
Agent Exception Administration window 8-5
agent exceptionsadministering 8-4report 8-30
Agent Exceptions input window 8-31
agent exceptions reportexample of 8-33
agent groupsadding agents to 3-12agents in 3-11copying 3-9creating 3-8deleting agents from 3-14
Agent Groups Get Contents window 3-12
Agent Groups input window 3-8Agent Groups window 3-11Agent Groups-Copy window 3-10agent skills
changing 6-9agent string values
changing 3-16Agent String Values window 3-17agent templates
applying 6-15changing skills for 6-9creating 6-15
agent timed exceptions 8-50agent trace 10-4
starting 6-3stopping 6-5
agentsadding 3-11deleting 3-11listing 3-11viewing 3-11
allocating data storage 10-7allocating storage space 10-25
ANI/SIDsee automatic number
identification/station number identification 8-36
announcement synonymsadding 3-21changing 3-21viewing 3-21window 3-21
Announcements input window 3-21
archiving status 10-4viewing 11-7
Archiving Status input window 11-7
Archiving Status window 10-22Audio Difficulty exception 8-56automatic login
how to use 1-3window 1-3
automatic number identification/station number identification 8-36
AUX reason code names 3-23AUX reason codes
adding 3-23changing 3-23deleting 3-23names of 3-23viewing 3-23
AUX Reason Codes input window 3-24
B
BACKUP 3-19, 3-58backup 11-26
before restoring 11-26for pseudo-ACD 10-15frequency of 11-35kinds of 11-35managing the tapes 11-35permissions for 11-1

Index CentreVu CMS Administration
IN-2
backup, (continued)recovery kit 11-41status of, in maintenance error
log 11-33to save data 11-35while archiving 11-16
Backup Data input window 11-14Backup Data window
List device command 11-19backup information
format of 11-43how to interpret 11-44
backup strategy 11-35complex backup 11-39full backup 11-36incremental backup 11-37
backup volumelabeling 11-43
backup, CMSADM 11-35steps to run it 11-9what it consists of 11-9
backup, complextape allocation for 11-39
backup, fulltape allocation for 11-36
backup, incrementalsetting up a schedule 11-38tape allocation for 11-37
backup, maintenance 11-9, 11-13, 11-35
full 11-16steps to run it 11-13when to run it 11-13
backup, maintenance,incremental 11-16
Backup/Restore Devices input window 11-18
Backup/Restore Devices window 2-13
browse buttonshow to use 2-16
browse windowmultiple-value 2-17single-value 2-16
C
calculationsadding 3-26creating 3-26names of 3-26viewing 3-26
Calculations input window 3-27Call Center Administration
selector window 2-4, 2-6Call Vectoring 6-1, 8-20, 10-31,
10-42capabilities of 1-13
Call Vectoring, (continued)needed for 8-2not needed for 8-2
call work codedefinition of 7-4
call work code 0 3-30, 7-3call work codes
adding 3-29, 7-3changing 3-29deleting 3-29, 7-3names of 3-29unassigned 7-3viewing 3-29, 7-3
Call Work Codes input window 3-29, 7-4
Call Work Codes window 7-3CentreVu Advocate 6-11
capabilities of 1-14CentreVu CMS data
migrating 10-33R2 data 10-33R3 data 10-33
CentreVu CMS statechanging 10-5
CentreVu Supervisorexiting 1-12resource limits for 1-3
Change Agent Skills window 6-10, 6-12
Change Extension Split Assignments window 6-11
Change VDN Skill Preferences input window 7-7
clock synchronization 10-6closing CentreVu Supervisor
windows 1-10CMS Servers tab 2-2, 2-10CMS State window 10-6CMS System Setup selector
window 2-5CMS System Setup selector
window, System Setup selector window 10-3
CMS System Setup window, System Setup window 10-1
CMS System Setup, System Setup
command 10-8CMSADM file system backup
11-9Lucent-provided backups
11-11steps to run it 11-9what it consists of 11-9
Commands menu 2-4complex backup
tape allocation for 11-39Confirm Password window 1-3
CONN 3-57Connect menu 1-3, 1-5
to log into server 1-3connection status
application layer 11-21connection layer 11-22monitoring 10-3, 11-20session layer 11-21
Connection Status input window 11-20
constantsadding to database 3-31names of 3-31
Constants input window 3-31controller 1-6controller window 1-5, 1-6, 4-6
after you log into server 1-4before you log into server 1-2
custom itemsdefining 3-33
Custom Items input window 3-33custom report 2-6custom reports
for exceptions 8-53
D
DABN 3-57data backup 11-18data collection 10-3, 10-17,
10-29, 10-40, 11-7, 11-21turning on and off for real ACDs
10-3Data Collection Exceptions input
window 8-34data collection report
example of 8-35running 8-34
Data Collection window 10-4data migration 11-18data restore 11-18data storage 10-25data storage allocation
for exceptions 8-52Data Storage Allocation window
10-26data storage parameters
changing 10-19data summarizing 11-32Data Summarizing window 10-20data summary results 11-45database items
changing 3-33custom 3-33defining 3-33deleting 3-33viewing 3-52
data-loading 10-15
Index CentreVu CMS Administration
IN-3
default toolbar buttons 2-6DEFINITY ECS with EAS 6-3,
6-9, 6-13DEFINITY ECS without EAS 6-3devices
naming and describing 11-18Dictionary
names for exceptions and exceptions reports 8-52
permissions for 3-2rules for 3-2searching globally 3-36
Dictionary reportsagent group members 3-68running 3-65
Dictionary selector window 2-4, 2-6, 3-6
E
EAS (see Expert Agent Selection) 8-2, 8-11
capabilities of 1-14EAS (See Expert Agent
Selection), EAS 11-3EAS (See Expert Agent
Selection), Expert Agent Selection 6-1
EAS (see Expert Agent Selection), Expert Agent Selection 1-13, 1-23, 3-43, 6-3, 6-9, 6-13
EAS, Expert Agent Selection 6-14Edit menu 2-12error codes
500 11-34505 11-34
exceptiondefinition of 8-1
Exception counter 2-7Exception type thresholds 8-13,
8-27exception type thresholds 8-6exceptions
agent timed 8-50Audio Difficulty 8-56custom reports for 8-53data storage allocation for 8-52external outbound 8-4occurrence boundaries 8-51occurrence threshold 8-56per split or skill 8-4scripting for 8-53time limit 8-56
exceptions count 8-51exceptions notification
access permissions for 9-10changing 8-3for specified splits/skills 9-18
exceptions notification, (continued)for specified trunk groups 9-21
Exceptions selector window 2-4, 2-6, 8-4
exiting and restarting a report 4-6Export All Data window 5-8Export Chart Data window 5-8export of report output 5-8Export Table Data window 5-8extension split assignments
changing 6-9, 6-12External Application Status
window 10-23external applications
starting or stopping 10-23
F
FBUSY 3-57FDISC 3-57feature access permissions
assigning 9-12changing 9-12deleting 9-12viewing 9-12
Feature Access window 9-13field description 2-14Forecast 3-51, 10-19
capabilities of 1-14on pseudo-ACD 10-8, 10-15status of, in maintenance error
log 11-33Free Space Allocation window
10-18full backup
tape allocation for 11-36
G
General tab 2-10Generic String Values input
window 3-35generic string values synonyms
changing 3-35Global Search Input window 3-36global search output window
results 3-37go to vector
command 8-20, 8-25step 7-23, 8-20, 8-25
Greatest Need 6-10
H
hardware 1-19certified for CentreVu CMS
1-16Help menu 2-12
help system 2-9Help Topics window 2-3Helpline 1-21
how to reach 1-22historical database
archiving data in 10-20Historical tab 2-10history list
using 2-19HOLD 3-56, 3-57HTML
report saved as 5-10
I
IDLE 3-56, 3-57incremental backup
setting up a schedule 11-38tape allocation for 11-37
INFORMIXinterface to historical database
1-13INFORMIX tables
backing up 11-16restoring data for 11-28
input fielddescription of 2-14name/synonym 2-14numeric entry in 2-15rules for 2-14
input windowscripting 5-12
input window options 2-13input windows 2-12Integrated tab 2-10
L
link-down exception 8-34List Agents Traced input window
6-7List devices 11-19listing agents traced 6-7Load Pseudo-ACD Data window
10-14location IDs
adding 3-38changing 3-38deleting 3-38viewing 3-38
Location IDs input window 3-38Login button
to log in to server 1-3login ID characters
rules for 9-7login ID names
adding 3-40changing 3-40
Index CentreVu CMS Administration
IN-4
login ID names, (continued)viewing 3-40
Login Identifications input window 3-41
login IDsagent 3-40names 3-40
Login Information window 1-3Login Status indicator 2-3logout reason codes
adding 3-43changing 3-43names of 3-43viewing 3-43
Logout Reason Codes input window 3-43
Look Ahead Interflow attempts 8-20
M
MAIN 3-58main menu access permissions
assigning 9-15changing 9-15viewing 9-15
Main Menu Addition Access window 9-15
maintenance backup 2-13, 11-13full 11-16incremental 11-16steps to run it 11-13when to run it 11-13
maintenance error log 11-1, 11-45
data summaries in 11-32error messages 11-34using 11-31
Maintenance Error Log input window 11-31
Maintenance selector window 2-5, 2-6
malicious call exception 8-2Malicious Call Trace input window
8-36malicious call trace report
example of 8-37running 8-36
manual archive 10-21manual login
how to use 1-5window 1-3
Manual Login window 1-5map of user interface 2-20master ACD 10-6MBUSY 3-58menu bar 2-5
migrating CentreVu CMS data 10-33
Move Extensions Between Splits window 6-19
moving extensions between splits 6-17, 6-19
Multi-Agent Skill Change window 6-17
multiple agentsadding to another skill 6-18changing skills for 6-17moving from skill to skill 6-18
Multiple Daily Input 10-21multi-user mode 10-17, 11-9
changing to 10-6multi-user state 10-40
N
Name Format tab 2-10NORMAL 3-47numeric entry 2-15
O
ODBC (CMS Open Database Connectivity) 11-41
Open Database Connectivity (ODBC), ODBC (Open Database Connectivity 1-15
Operations tab 2-10Options window 1-7, 2-2other timed exceptions 8-50OVRLD1 3-47OVRLD2 3-47
P
passwordchanging 1-9choosing 1-9replacing 1-9
pattern-matching 2-15PC configuration
recommended for CentreVu CMS 1-16
peg count exceptions 8-50PERCENT 3-17Percent Allocation 6-10phantom abandon call timer
10-43Print Setup window 3-66Print window 4-3Printer Administration input
window 11-24printers
administering 1-20, 11-23assigning descriptions to 11-23
printers, (continued)assigning names to 11-23assigning options to 11-23identifying for your system 1-20requirements 1-20
printing a report 4-3pseudo-ACD
defining synonym in Dictionary 10-10
deleting 10-11loading 11-18loading data into 10-12menu items 10-9permissions for 10-2setting up 10-8
Pseudo-ACD Setup window 10-9
Q
QUEUED 3-56, 3-57
R
R2 Migrate Data window 10-34R3 Migrate Data window 10-35real-time exceptions log 8-2,
8-52using 8-54
Real-Time tab 2-10recovery kit
using 11-41Report Colors tab 2-10report page 4-4Report Wizard 2-4reports 2-9, 8-47
agent exceptions 8-30agent group members, for
Dictionary 3-68configuring 4-7data collection 8-34Dictionary 3-65exceptions 8-56exiting and restarting 4-6historical 10-41kinds of 4-7malicious call trace 8-36printing 4-3printing options 4-8real-time 10-41running 4-2scripting 5-6setting up page for 4-4split/skill exceptions 8-38to summarize 4-7trunk group exceptions 8-41VDN exceptions 8-44
Reports input window 4-3reports saved as HTML 5-10

Index CentreVu CMS Administration
IN-5
Reports selector window 2-4, 2-6, 3-65, 4-2
Reports tab 2-10reports window 2-10RESERVE 3-20restore 2-14
after backing up 11-26automatic 11-26manual 11-26, 11-28running 10-7, 11-26
restore data 10-5Restore Data input window 11-28RINGING 3-58route to 8-25
command 8-20step 8-20, 8-29
ROVING 3-20running a report 4-2
S
Save As HTML window 5-10Save as Script
using 5-2Save as Script Action window
5-13Save as Script window 5-2, 5-6
automatic 5-7interactive 5-7
Scheduler utilitystopping or starting 12-10
Script button 5-3scripting
actions 5-12export of report output 5-8for exceptions administration
and reports 8-53input windows 5-12reports saved as HTML 5-10
scripting an action 5-13scripting an input window 5-12scripting reports 5-6Scripting tab 2-10secondary administrators
permissions for 9-1SEIZED 3-57Select Agent/Template window
6-9, 6-15Select Extension window 6-11,
6-12selector window 2-10server 1-3, 1-5, 1-7, 1-13
adding a new 1-7changing a connection to 1-7logging out of 1-11removing from list of available
servers 1-7Server Properties window 1-8
service levelincrement 7-9, 7-19, 7-21
setting storage intervals 10-36setting up a report page 4-4shortcuts
adding tasks to 13-35and permissions 13-46assigning tasks 13-46changing tasks in 13-40copying 13-31copying tasks in 13-37creating 13-28deleting 13-33deleting tasks from 13-39editing 13-34running 13-30using Stop 13-46using the Keep mode 13-45
Single Data Input browse window 10-21
single value 2-16single-user mode 1-10, 10-17,
10-29, 13-26changing to 10-5to log in using 1-3
Skill Level 6-10Skill Level Call Handling 6-11software
needed for Sun platform 1-17optional for Sun platform 1-17recommended for PC 1-16shipped with CentreVu CMS
11-41software included with training
1-23Solaris
administering printers in 11-24changing user passwords 12-5disabling printers in 12-8interface to CentreVu CMS
1-13logging into 12-2moving print jobs in 12-8restoring files in 12-11returning to CentreVu CMS
from 12-6stopping or starting Scheduler
utility 12-10system devices 11-19using 12-3viewing system file 12-4
specifying storage intervals 10-7Split Members input window 6-23split members report
example of 6-24running 6-22
split/skill access permissionsassigning 9-17changing 9-17deleting 9-17viewing 9-17
Split/Skill Access window 9-17split/skill call profile report 7-9split/skill call profiles
adding 7-9changing 7-9deleting 7-9
Split/Skill Exception Administration window 8-12
split/skill exceptionsadministering 8-11
Split/Skill Exceptions input window 8-39
split/skill exceptions reportexample of 8-40running 8-38
split/skill namesadding 3-49changing 3-49deleting 3-49viewing 3-49
split/skill string valueschanging 3-46viewing 3-46
Split/Skill String Values input window 3-47
split/skill supervisorspermissions for 9-1
Split/Skills input window 3-50splits/skills
exceptions notification for 9-18Standard CMS Items input window
3-53Start menu 1-2status bar indicators 2-6status bar messages 2-7storage allocation 10-5storage intervals 10-5, 10-30
guidelines for 10-40setting 10-36steps for 10-36
Storage Intervals window 10-37storage space
allocating 10-25storing CentreVu CMS data 10-17Sun Microsystems, Inc.Solaris
administering printers in 12-7Supervisor user interface
map of 2-20switch
features 10-44release 10-43type 10-43
Index CentreVu CMS Administration
IN-6
switch setup dataviewing 10-42
switch setup values 10-42Switch Setup window 10-43switches 1-14
certified for CentreVu CMS 1-18
System Setup selector window 2-6
system tray icon 2-9
T
terminalsapproved for CentreVu CMS
1-19troubleshooting 1-19
Threshold Colors tab 2-10thresholds
for each exception type 8-6setting the limit for 8-6
time in vector exception 8-25timetables
adding tasks to 13-13adding to CentreVu CMS 13-4,
13-7and permissions 13-44assigning tasks 13-44available only through ASCII
interface to CentreVu CMS 13-1
backups 13-2changing 13-2changing tasks in 13-23copying 13-9copying tasks in 13-16creating and scheduling 13-3creating without scheduling
13-6deleting 13-11deleting tasks from 13-18editing 13-12editing globally 13-20Get Contents window 13-12listing all in database 13-25permissions for 13-2printing 13-43saving 13-14using Stop 13-44using with system clock 13-26
toolbar 2-5Tools menu 2-2top skill 6-11training 1-21
upgrade 1-23translations 11-6trunk group 2-16
trunk group access permissionsassigning 9-20changing 9-20deleting 9-20viewing 9-20
Trunk Group Access window 9-20Trunk Group Assign input window
7-11trunk group assignments
viewing 7-11Trunk Group Exception
Administration window 8-16trunk group exceptions
administering 8-16Trunk Group Exceptions input
window 8-42trunk group exceptions report
example of 8-43running 8-41
Trunk Group Members input window 7-13
trunk group members reportexample of 7-14running 7-13
trunk group namesadding 3-54changing 3-54deleting 3-54viewing 3-54
trunk groupsadministering exceptions for
8-16DID 7-11
Trunk Groups input window 3-54trunk string values
changing 3-56default names 3-57viewing 3-56
Trunk String Values input window 3-57
U
UNKNOWN 3-47, 3-58user data
assigning 9-3User Permissions selector window
2-5, 2-6, 9-3User Permissions User Data
window 9-4
V
VDN access permissionsassigning 9-25changing 9-25deleting 9-25viewing 9-25
VDN Access window 9-25VDN Assignments input window
7-17VDN call profile
report 7-22VDN Call Profile Setup input
window 7-20VDN call profiles
adding 7-19, 7-21changing 7-19, 7-21copying 7-21deleting 7-19, 7-21
VDN Exception Administration window 8-21
VDN exceptionsadministering 8-20detection 8-25
VDN Exceptions input window 8-45
VDN Exceptions reportexample of 8-46
VDN exceptions reportrunning 8-44
VDN namesadding 3-60changing 3-60deleting 3-60viewing 3-60
VDN skill preferenceschanging 7-6
VDNs input window 3-61VDN-to-vector assignments
changing 7-16vector 2-16
number 7-23step 7-23
vector access permissionsassigning 9-23changing 9-23deleting 9-23viewing 9-23
Vector Access window 9-23vector configuration reports
running 7-23Vector Exception Administration
window 8-26vector exceptions 8-47
administering 8-26Vector Exceptions input window
8-48vector exceptions report
example of 8-49running 8-47
Vector input window 7-23

Index CentreVu CMS Administration
IN-7
vector namesadding 3-63changing 3-63deleting 3-63viewing 3-63
Vectors input window (Dictionary) 3-63
W
work modesdefault names for 3-17

Index CentreVu CMS Administration
IN-8