centricity emr 2005 getting started
TRANSCRIPT

Electronic Medical Records (EMR)
Centricity EMR 2005
----------------
Getting Started

MLCentricityTraining2005.doc Rev. Date: 6/26/07
Centricity – Getting Started Table of Contents
Getting Started ..........................................................................................................................................................1 Launching Centricity EMR 2005 .........................................................................................................................1 Exiting Centricity EMR 2005 ..............................................................................................................................2 Changing your Centricity 2005 Password............................................................................................................2 Returning to your Desktop ...................................................................................................................................3
Centricity EMR 2005 Desktop Summary .................................................................................................................4 Title Bar ...............................................................................................................................................................4 Menu Bar .............................................................................................................................................................4 Centricity 2005 Tool Bar .....................................................................................................................................5 Today’s Appointments on your Centricity 2005 Desktop Summary ...................................................................6 The Right Windowpane – Flags...........................................................................................................................6 The Right Windowpane – Documents .................................................................................................................7 Document Status Classifications..........................................................................................................................7
Flags..........................................................................................................................................................................8 Viewing Flags ......................................................................................................................................................8 Forwarding a Flag ................................................................................................................................................8 Removing Flags ...................................................................................................................................................8 The Flag Window.................................................................................................................................................9 Viewing the Flags of Other Centricity Users .......................................................................................................9 The Flags Toolbar ................................................................................................................................................9 Viewing Removed Flags ....................................................................................................................................10 Replying to a Flag ..............................................................................................................................................10 Creating a New Flag ..........................................................................................................................................11 The Flag Due Date .............................................................................................................................................11 Attaching a Flag to a Chart ................................................................................................................................12 Converting a Flag to a Document ......................................................................................................................12 Saving a Flag......................................................................................................................................................13
Documents ..............................................................................................................................................................14 Your Documents on the Desktop Summary.......................................................................................................14 Viewing Your Documents on the Documents Tab.............................................................................................14 The Full Document Viewer................................................................................................................................15 Viewing Documents on another Centricity User’s Desktop ..............................................................................15
Chart Navigation and Layout..................................................................................................................................16 Finding a Patient Chart ......................................................................................................................................16 Returning to a Patient Chart ...............................................................................................................................16 Opening a Chart from your Centricity 2005 Desktop ........................................................................................17 The Patient Chart ...............................................................................................................................................17 Problems ............................................................................................................................................................18 Medications........................................................................................................................................................18 Alerts..................................................................................................................................................................19 Flowsheet ...........................................................................................................................................................19 Documents .........................................................................................................................................................20
Printing Chart Documents.......................................................................................................................................21 Printing a Chart Summary..................................................................................................................................21 Printing a Specific Chart Document...................................................................................................................21
Viewing Appointments ...........................................................................................................................................22 Appointment Books ...........................................................................................................................................22 Working in the Appointment Book....................................................................................................................23
Getting Help............................................................................................................................................................24 Centricity Help Online .......................................................................................................................................24 EMR Implementation Team...............................................................................................................................24 HealthTeam Information Systems......................................................................................................................24

1
• If you enter your ID in the User ID field and then move the cursor to the Password field, the Location
of care should auto-populate; if it does not, check to make sure you entered your User ID correctly.
• If your password becomes highlighted in blue when you click OK , try entering your password again, making sure that the Caps Lock isn’t on.
• Centricity 2005 remembers the last Location of Care under which you signed onto the system; if you move from one HealthTeam location to another, be sure to select the appropriate one each time you begin a new session.
TIPS
Getting Started
Before you can begin a Centricity 2005 session, you will need to first log into the HealthTeam network. The User
ID and password that you use for logging into the HealthTeam network will vary, depending on your location and
the device you are using; however, you will always use your unique Centricity User ID and password to log into
Centricity. If you have difficulty logging into either the HealthTeam network or Centricity, or if you are uncertain
as to which HealthTeam ID and/or Desktop shortcut to use, call the Health Information Technology (HIT) Help line
at (517) 355-6531.
Launching Centricity EMR 2005
1. With a network connection established, locate, then double-click on the Centricity 2005 icon on
your computer Desktop. The Centricity 2005 icon has a white background, with a blue picture of a
woman and child on it text “Centricity 2005” directly below.
2. The login screen opens, where you will enter your Centricity User ID and password. Your Centricity ID
typically consists of the first 6 letters of your last name, followed by the first 2 letters of your first name.
3. Type your password in the Password field.
4. (When applicable) Select the appropriate Location of Care from the options in the drop-down list of that field.
5. Click OK , or use the [Enter] key of your keyboard.
Type in your Centricity User ID and password.
2
Do not ‘minimize’ your Centricity session when walking away from the computer. Either lock the screen by using the Exit button, or log out entirely. Merely turning off the power to your computer monitor does not meet security and confidentiality standards, either.
SECURITY
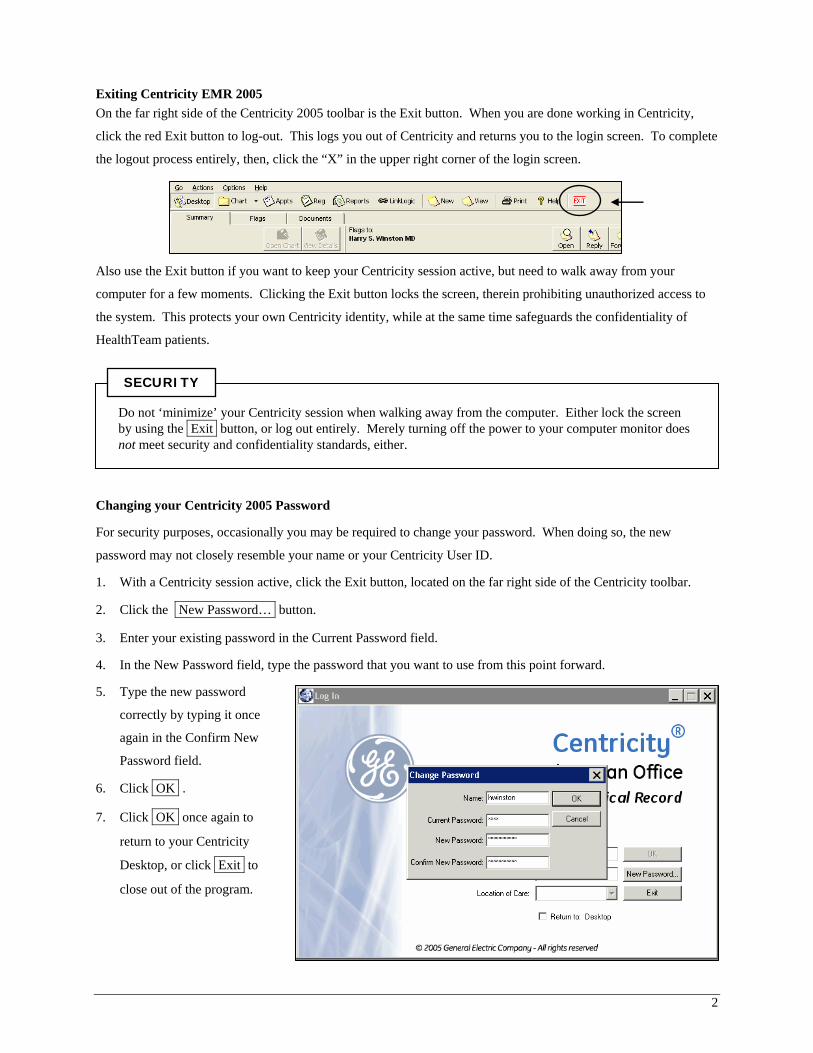
Exiting Centricity EMR 2005 On the far right side of the Centricity 2005 toolbar is the Exit button. When you are done working in Centricity,
click the red Exit button to log-out. This logs you out of Centricity and returns you to the login screen. To complete
the logout process entirely, then, click the “X” in the upper right corner of the login screen.
Also use the Exit button if you want to keep your Centricity session active, but need to walk away from your
computer for a few moments. Clicking the Exit button locks the screen, therein prohibiting unauthorized access to
the system. This protects your own Centricity identity, while at the same time safeguards the confidentiality of
HealthTeam patients.
Changing your Centricity 2005 Password
For security purposes, occasionally you may be required to change your password. When doing so, the new
password may not closely resemble your name or your Centricity User ID.
1. With a Centricity session active, click the Exit button, located on the far right side of the Centricity toolbar.
2. Click the New Password… button.
3. Enter your existing password in the Current Password field.
4. In the New Password field, type the password that you want to use from this point forward.
5. Type the new password
correctly by typing it once
again in the Confirm New
Password field.
6. Click OK .
7. Click OK once again to
return to your Centricity
Desktop, or click Exit to
close out of the program.

3
• Your password must contain both numbers and letters, and be 8 or more characters in length.
• Centricity 2005 passwords are case-sensitive, so pay close attention to your use of upper- and or lower-case letters.
• When changing your password, the new one must be different from your four most recently-used passwords.
PASSWORD POINTERS
Returning to your Desktop
If you lock the screen by clicking the Exit button during an active Centricity 2005 session, then want to return to that
session, first verify that your Centricity ID appears in the User ID
field, then type your password in the Password field. Click OK ,
and the program will open to your Desktop or a particular patient’s
chart, depending on where you had been in the program when you
initially exited.

4
Centricity EMR 2005 Desktop Summary
Your Centricity 2005 Desktop Summary is the first screen you see when beginning a Centricity 2005 session. At
the top of the screen is the Title bar, in blue. Beneath the Title bar is a menu bar, and directly below that is the
Centricity 2005 toolbar. Use the menus and toolbars to quickly navigate the various Centricity 2005 screens and
their components.
Title Bar
The Title Bar displays your name and location, as well as the current date and time. Before documenting patient
information, make sure that your name appears in the title bar, and not that of a colleague. If another name appears
in the title bar, click the Exit button, then log in using your own Centricity User ID and password. Also, if you
work in more than one HealthTeam location, make sure that the location displayed in the title bar is appropriate for
your current session. If it is not, click the Exit button, change the Location of Care field, then log back in.
Menu Bar
The Menu Bar offers methods of navigation throughout Centricity 2005. The
functions included in each of the menus vary, depending on the where you are
at in the program. A few of the options available in the various menus are:
Actions | Find Patient… Ctrl + F Options | Quick Text… Help | Help on this Screen F1
Actions | Print… Ctrl + P Options | Out of Office Assistant… Help | What’s New
Title Bar Menu Bar
Tool Bar
The Centricity 2005 Desktop Summary

5
When first learning to use Centricity 2005, think of your Desktop as home base. Then, if you become disoriented while working in the program, just click on the toolbar’s Desktop button to return to home base (your Centricity Desktop), readjust to the Centricity environment, then continue your session.
TIP
Centricity 2005 Tool Bar
Use the toolbar to move from one area of Centricity 2005 to another.
The most frequently used buttons on the toolbar are displayed below.
The Desktop button; click this to return to your Centricity 2005 Desktop, where you can view your Flags, Documents, or Appointments.
The Chart button allows easy access to patient charts. • If you’ve not yet viewed a patient chart in your current Centricity session, the Find
Patient window opens when you click the Chart button. • If you’ve already been in one or more patient charts during the session, clicking the
Chart button returns you to the patient’s chart you were last in. • Click the to see a list of your five most recently-visited patient charts.
Click the Appts button to navigate to the full Appointments window, where you can view multiple books concurrently, an entire week’s worth of appointments for a specific book, etc.
Use the New button to begin a new Flag. (* Flags allow for communication between HealthTeam Centricity users, in a secure environment).
Print the day’s appointments, flags, and other documents using the Print button. The options in the Print window vary, depending on the window you are in, and the object you have selected, when you click the Print button.
Use the Help button to access the online Centricity 2005 Help utility.
Click the Exit button to end your Centricity 2005 session, or to temporarily lock the screen.
Tool Bar

6
Today’s Appointments on your Centricity 2005 Desktop Summary
If you are a scheduling Provider, your Appointments take up the left column of your Desktop Summary page.
• Use the up and down arrows in the upper left corner of the
Appointments windowpane to change the time increment displayed
(15 minute intervals, 20 minute intervals, etc.).
• A black dot appears in front of a patient’s name in your list of
Appointments when that patient is ‘arrived’ in your clinic.
• See the reason for the patient’s visit by single-clicking on the
patient’s name in the Appointment area, then clicking the View
Details button.
• Open the patient’s chart directly from the Appointments section of
your Desktop by selecting that patient’s name (using a single-click),
then clicking the Open Chart button.
You can get a better look at your Appointments, or those of other Providers in your clinic, by clicking
the Appointments button on the Centricity 2005 toolbar. Using the Appointments feature is discussed
in more detail later in this documentation. (See Viewing Appointments, page 22.)
NOTE: The Appointments appearing in Centricity are driven by what is scheduled in IDX; you cannot add, alter, or
remove scheduled appointments directly from within Centricity.
The Right Windowpane – Flags
The upper right portion of your Desktop Summary page provides you with a glimpse of your Flags, which are
messages, much like email, sent between you and other HealthTeam Centricity users. Flags that you have not yet
viewed are displayed in bold font, and those that you create and save as a reminder to yourself appear in italics.
You can begin a new flag directly from your Desktop Summary by clicking the New button, located on
the Centricity Toolbar. Alternatively, use the [F12] key on your keyboard to launch the New Flag
window.
See Flags (page 8), to learn how to use Flags to enhance your Centricity 2005 experience and facilitate
communication in your clinic and HealthTeam-wide.
Double-click on a specific flag to view it in its entirety.
Use the buttons to work with your Flags on your Desktop.

7
While the Documents Summary tab lets you see appointments, flags and documents in a single glance, use the full Appointments, Flag, and Document Windows to get a comprehensive view of their respective components. This is especially important in clinics where the Comments field is used extensively during the document routing process.
TIP
The Right Windowpane – Documents
The lower right portion of your Desktop Summary page is devoted to patient-specific Documents. A few examples
of Documents are lab reports, transcription, phone notes, and office visits.
A Pencil appears in the far left column of Documents that have yet to be signed. By default, documents on your
Desktop are sorted first by Priority, placing those that are urgent at the top of the list. However, you can change the
order in which they appear by clicking on any given column’s heading. The illustration above has documents sorted
by date; hence, a small, grey arrow ( ) appears directly to the Date column header.
You can Open, Append, Route or Remove a Document from your Centricity Desktop; use caution, though, when
removing Documents, especially if they still require your attention!
Document Status Classifications
The status of a document tells users at what juncture of processing that particular document is at any given time.
Status Meaning
In Progress A Centricity user is working in the document. Other users should not open the document until it is no longer considered In Progress.
On Hold The document - a chart update - is waiting to be completed and signed. Example: a nurse begins documenting an office note, then routes the note to the Desktop of the Provider seeing the patient. When the document arrives on the Physician’s Desktop, it should be marked On Hold.
Unsigned A document that has been imported, such as a transcription or lab result, has yet to be signed by its Responsible Provider or a different, appointed Centricity user.
Signed The document has been signed by a Centricity user and it is a permanent part of the patient’s chart.
Signed A preliminary signature has been applied to the document, but a final signature is still needed. This designation is commonly associated with documentation done by Resident Physicians and Physician Assistants.
Deciphering the Document Status
The document status appears in the left-most column; a pencil signifies that a document needs to be signed.
Click on a column headers to sort your Documents using different criteria.
A red ! indicates that a document requires your immediate attention.

8
Flags
Flags are much like email, but because they are maintained within the confines of Centricity 2005, you can use them
to communicate patient information with your colleagues in a secure, confidential environment. You can send Flags
to, and receive Flags from, anyone in the HealthTeam who has a Centricity account. Flags can be easily replied to,
or forwarded to, other Centricity users, as well.
Viewing Flags
To view a flag on your Desktop Summary, double-click directly on that flag; a split window opens, with your
various flags and their properties listed in the top, and the content of a selected flag revealed down below.
• If the flag that you double-click on is attached to your Desktop, the View Flags window opens in the
foreground, with your Desktop in the background.
• If you double-click on a flag that is attached to a patient’s chart, the View Flags window opens in the
foreground, with that patient’s chart open in the background. Only flags attached to that patient are displayed.
When you have completed that patient-specific task, click the Desktop button, in the upper left corner of the
Centricity toolbar, to return to your Desktop.
Forwarding a Flag
Forward a flag to another HealthTeam Centricity user by clicking directly on the flag, then clicking the
Forward button. Select the person(s) to whom you are forwarding the flag from the drop-down list of the
To field, or use the Binoculars to locate and select someone else. You can do this from your Desktop
Summary page, from within the patient’s chart to whom it has been attached, or from the Flag tab of your Centricity
Desktop.
Removing Flags
Once you have read a flag and no longer need it, you delete it by first selecting that flag, then clicking the
Remove button.

9
The Flag Window
To get the most comprehensive view of your flags, and to access the flags of other HealthTeam Centricity users,
click on the Flags tab of your Desktop. There you will be able to see a list of your flags in the upper portion of the
windowpane. Select one of the flags on the list, and its content will be displayed in the lower windowpane.
Viewing the Flags of Other Centricity Users
On the Flags tab or your Centricity Desktop you can view the flags sent to other individuals and generic accounts in
your clinic. Use the drop-down arrow to locate and select the User ID whose flags you wish to view. Alternatively,
use the Binoculars to launch a full Centricity search.
NOTE: Since you can read the flags of other Centricity users, keep in mind that others can read your flags, as well.
You should not include information in a flag that you would not want others to see.
The Flags Toolbar
Use the various toolbar buttons of the Flags toolbar to Reply to, Forward, Convert, or Remove a flag, just you can
do in the Flags portion of your Desktop Summary page.
Click on the Flags tab of your Desktop to take full advantage of the program’s Flag functionality.
Use the drop-down arrow to access the flags of others in your clinic.

10
Viewing Removed Flags
While on the Flags tab of your Centricity 2005 Desktop, you can view flags that have been removed (deleted) if
thirty days since their date of removal have not passed. After thirty days those messages are removed entirely from
the system and cannot be retrieved.
1. Click the Organize button, located on the far right
end of the Flags toolbar.
2. The Organize Flags window opens; check the
View deleted flags field.
3. Click OK .
Replying to a Flag
To reply to a flag that is currently selected, click the Reply button. This causes the Reply to Flag window to open,
where you can type your response, then send it back to the flag’s original sender.
If you want to keep a copy of the flag on your Desktop even after you have replied to it, route it back to your
Desktop when initially replying; otherwise, it is automatically removed from your Desktop. To do so, use the drop-
down arrow by the To field to locate and select your own Centricity ID, near the very top of that list.
1. Click the Reply button of the Flag toolbar.
2. Make changes to the flag’s Properties as desired in the respective fields on the right.
3. Type the message in the lower portion of the Reply to Flag window.
4. Once completed, click the Send button, and Centricity will send your message, along with the content of the
original message, to the designated recipient(s).
Use the drop-down arrow to locate and select another individual in your group, or yourself, as a flag’s recipient.
The content of your message goes here.
Send a flag to the designated recipient(s), or Save it on your Desktop.

11
Creating a New Flag
1. To create a new flag, click the New button, on the Centricity toolbar.
2. Designate the recipient(s) in the To field by using either the drop-down list or the Binoculars. By default, the
drop-down list is comprised of the other individuals in your clinic. Also, at the top of the list you will see the
names of those to whom you have recently sent either a flag or document.
a. If the intended recipient’s name does not appear in the drop-down list of the To field, click the
Binoculars button.
b. Either scroll through the list of Centricity users
on the Browse page, or go to the Search page
and perform a search for the individual, typing
in that person’s last name.
3. (Optional) If you select a Centricity user to whom
you really don’t want to send the flag, select that
user’s name in the recipient list, then click the
button with the red “x”; this removes that
individual from the recipient list.
4. Add the pertinent information for the flag such as
the Priority and Subject, then type the message itself in the lower portion of the screen.
5. Click Send , and Centricity routes the flag to the Centricity Desktop of the designated recipient(s).
The Flag Due Date
By default, flags are displayed on the designated recipient’s
Desktop when they are initially created and sent; however,
you can create a flag that remains hidden until a specified
date. To create a flag that appears on someone’s Desktop
on a later date, use the calendar utility when creating the
flag to select the desired date of receipt (the ‘Due’ date),
then complete the flag creation process and click Send .

12
Attaching a Flag to a Chart
A flag directly related to a specific patient can be attached to that patient’s chart. When opened, a flag attached to a
chart opens in the foreground, with the patient’s chart opened in the background.
1. Open the patient’s chart to which you want to attach a
flag.
2. Click the New button on the Centricity toolbar; because
you are doing so from within a specific chart, the
patient’s name auto-populates the Patient: and Subject:
fields of the flag.
3. Specify the desired recipient(s) of the flag.
4. Type the flag’s content in the Message area of the New
Flag window.
5. Click the Send button.
Converting a Flag to a Document
If you feel that the content of a flag should become a permanent part of a patient record, you can convert the flag to
a chart document. A flag must be attached to a specific patient before it can be converted to a Document. If it is not
attached to a chart when you attempt to convert it, you will be prompted to identify the correct patient before you
can proceed with the conversion. The steps here are going on the premise that the flag is already attached to a chart.
1. Select the flag that you wish to convert to a Document, then click the Convert Document button.
2. In the Convert Flag to Document window, select the
appropriate Document Type:.
3. If necessary, change the Provider in the Provider:
field.
4. Enter a brief description of the message’s content in
the Summary line.
5. Add additional text in the Note: area, if desired.
6. Click Sign . This applies your electronic signature to
the Document, and saves the document in the patient’s
chart.
NOTE: Read through a flag carefully before converting it
to a document; there may be content that is not appropriate for a permanent document in a patient’s chart.

13
• If you begin replying to, forwarding, or even beginning a new flag, then do not have time to
complete it, click the Save button; this places the flag on your Desktop, where it remains until you have the opportunity to complete it and send it on its way.
• Combine the Due date feature and the Save function to create a reminder that appears on your Desktop at a later date.
• You can view flags assigned a future delivery date. Click on the Organize button of the Flag toolbar, then select Due Anytime.
TIPS
Saving a Flag
Create a flag and save it to your own Desktop to act as a reminder to you, analogous to those little sticky notes that
many of us use and scatter across our real desktops. To create a reminder for yourself, click the New button, set the
priority to important or urgent, if applicable, and add a brief Subject. Then type what you would like to appear in
the note and click Save . This places the flag on your Desktop; flags such as these are easily recognizable, as they
are displayed in italics.

14
Documents
Your Documents on the Desktop Summary
Documents routed to you appear on your Centricity 2005 Desktop Summary. A particular document’s type and
status, your clinic’s workflow and protocols, and your signing privileges determine how you work with that
document.
Viewing Your Documents on the Documents Tab
While the information visible and toolbar buttons available on your Desktop
Summary are useful, you may find that the assorted views and tools available
on the Documents tab of your Desktop are especially helpful. Click on the
Documents tab of your Desktop.
• A document that is selected in the upper portion of the Documents window is highlighted in blue, and its
content is displayed in the lower portion of the window.
• A comment is displayed in the Comments field, in the center
of the window, when the document to which it is associated
is selected.
NOTE: Comments are entered when a document is routed; those comments are not visible from your Desktop
Summary, and they are not saved as part of the document.
The Documents Tab

15
If you apply a filter to view only a particular document type on your Documents tab, be sure to click on “ All Documents” before moving on to another screen. If you don’t, you may overlook important documents on your Desktop.
TIP
• Change the order in which documents are displayed by clicking
directly on a specific column header. Example: Click the column
header “Status” to sort the documents by status.
• The various types of documents on your
Desktop are shown on the left; click directly
on a specific type to filter out all other types.
Example: Click on “Office Visit” to see
only the Office Visit documents on your
Desktop.
The Full Document Viewer
Use the Full Document Viewer button, located below and to the
right of the Comments field of your Documents window, to view
a document and any associated Appends in a separate, scrollable
window.
Viewing Documents on another Centricity User’s Desktop
To view the documents sent to another individual or generic Desktop in your
clinic, use the drop-down arrow of the “View documents to” field. Use the
binoculars, just to the right of the drop-down list, to locate a particular
Desktop if it does not appear in that list.

16
Chart Navigation and Layout
Finding a Patient Chart
To locate a patient’s chart, click on the Desktop toolbar’s Chart button; this should cause the Find
Patient window to open. If, however, you have already been in a patient’s chart during the current
session, you may need to click on the Find Patient button of the Charting toolbar, located on the far left
side of that toolbar (from within another patient chart).
The default search criteria in the Find Patient window is Name, but you can also use the drop-down arrow to prompt
Centricity to search by other criteria, such as Date Of Birth, or Medical Record Number. When searching by Name,
click in the Search for: field and enter the first few characters of the last name, followed by a comma and the first
few characters of the first name. Next, click the Search button, and all HealthTeam patients who meet the criteria
that you have established will be listed in the lower portion of the Find Patient screen.
Centricity provides information in the search results section to help you verify that you have, in fact, found the
correct individual. Open the patient’s chart by either double-clicking on the patient’s name in the search results, or
click once on the patient’s name and then click the OK button.
Keyboard users: the keyboard combination [Ctrl + F] opens the Find Patient window.
NOTE: Be careful when searching for a patient whose real name includes special characters such as apostrophes,
hyphens or spaces; these are usually - but not always - removed from names when patients are initially
entered in IDX (ex: Smith-Jones, John should be entered as SmithJones, John).
Returning to a Patient Chart
Use the drop-down arrow ( ) attached to the Chart button of the Centricity toolbar to
open a patient’s chart in which you’ve worked during a recent session. Your five most
recently accessed charts are displayed in the list; select a name from the list, and you’ll
be returned to that patient’s chart.

17
Opening a Chart from your Centricity 2005 Desktop
Patient-specific documents such as lab results, phone notes and office visits that require your attention are routed to
your Centricity 2005 Desktop. When you
double-click on one such document,
Centricity opens it directly in the patient’s
chart. If you have difficulty double-
clicking to open the document in the
patient’s chart, click once directly on the
document, then click the Open button.
Once you have completed working in the patient’s chart, you can return to your
Desktop by clicking on the Desktop button, located on the far left end of the
Centricity toolbar. Or, if you want to locate another patient’s chart, click the Find
Patient button to open the Find Patient search utility.
The Patient Chart
The patient banner spans the width of a patient’s chart, near the top of the screen, just below the Centricity toolbar.
This banner contains demographical information about the patient whose chart you are viewing. For the most part,
information entered in IDX drives what is displayed in the patient banner; as such, if you wish to change anything
appearing in the banner, it must be changed directly in IDX.
A patient chart is set up with tabs that define specific areas of the chart, each of which contains important patient
information. A few such areas, or chart sections, include: Problems, Medications and Alerts. Additionally, the first
‘page’ of the chart is a summary, where you can view multiple facets of the patient chart in one screen.
The Patient Summary Page
The Patient Banner
Navigation Tabs

18
Problems
While the information displayed on the chart summary page is valuable, much of the time you will find it necessary
to see more detailed information. For example, if you want to see when a specific problem was diagnosed, and by
whom, click on the Problems tab. There you select the problem from the list in the upper portion of the chart, and
its details appear in the lower portion.
You may choose to view only the patient’s current problems by selecting Active Only; or, to see problems that
have been recorded for the patient in the past yet are no longer active, click All. Centricity differentiates active
from inactive problems by highlighting in gray those that are inactive.
Medications
On the Medications tab you see the medications that the patient is taking, along with the associated doses,
instructions, comments, and number of refills that have been given. If any allergies or adverse reactions have been
documented in the patient’s chart, a notice to that effect appears in the upper right portion of the medications
window. Just like with the Problems list, you may change your view of medications such that you see only the
Active medications, or All medications that have been documented in the patient’s chart.
The Problems Tab
View Active or All Problems
A Problem and its associated Assessments
The Medications Tab
Refill Information
Medication Details
Instructions
Comments
Drug/Allergic Interaction Alert

19
Alerts
Alerts may be allergies or adverse reactions that have been recorded for a patient. Additionally, in the lower portion
of the screen you will find any Advanced Directives that are on record. Two examples of directives are Do Not
Resuscitate and Organ Donor.
Flowsheet
The Flowsheet tab provides you with different ways in which you can view patient information such as past and
present height, weight and blood pressure, lab results, etc. Use the drop-down arrow of the View field to access
various predefined flowsheet views.
Values are color coded to help you differentiate between values imported (like lab results) and those entered by a
Provider or staff member.
• Values displayed in black font are those entered by someone on the HealthTeam, such as vital signs,
immunizations, and other information gathered during office visits, or during the preload process.
• Blue font is used to show lab values that are electronically entered into the system via an interface.
• For lab values that are found to be outside the set parameters of what is deemed normal, Centricity adds “ ”
and “ ”symbols to show elevated or decreased levels, respectively.
• A green “ ” indicates that more than one entry has been made for a particular value on the same day, while a
red “ ” signifies the deletion of a value.
The Alerts and Directives Tab
Allergies
Advanced Directives
Use various Views to track specific patient observations
The Flowsheet Tab

20
While identifying one flowsheet view that best suits your needs and clicking the Set Attached View button seems like a good idea, doing so actually sets that view for the entire HealthTeam, which can be considerably inconvenient for others.
FLOWSHEET COURTESY
Details of a value displayed on the flowsheet are readily accessible from that tab. If you single-click on a lab value that was electronically entered via an interface, details of that value are displayed near the bottom of the page. Double-click on a value, and its associated document opens in a separate window.
Documents
Documents associated with a particular patient are visible on the Documents tab. Working with the documents on
the patient’s Documents tab is much like working with documents on your Desktop. The content of the document
that you select in the upper windowpane is displayed in the lower windowpane. If only “+ All” appears in the
upper left area, click the “+” to expand the view; then you can click directly on a particular document type to filter
out all other documents, therein helping you to focus on one particular document type.
Change the sort order of the chart documents by clicking on the header of a column on the right; a faint gray “ ”
indicates which column the documents are currently sorted. In the illustration below, the patient’s documents are
sorted by “Date ”.
Details of value displayed
Documents filtered here on Lab Reports
Content of selected document

21
Printing Chart Documents
Printing a Chart Summary
On occasion you may need to print a patient’s Centricity chart summary. (Ex: You might fax a chart summary to a
non-HealthTeam referring provider.)
1. On the Summary tab of the patient’s chart, click the Print button of the Centricity toolbar.
2. The Print dialog box opens; because you first clicked on the patient’s summary page, Chart Summary should
already be highlighted.
3. Type the number of copies you want to
print in the Copies: field.
4. Use the checkbox for Letterhead to
indicate whether the header, which
includes your location of care, should
appear across the top of the printout.
5. If necessary, change the printer in the
Printer drop-down field.
6. (Optional) Click Preview... to see how
the Chart Summary will appear when printed, then click Close to return to the Print dialogue box.
7. Click Print .
8. Click the Close button to close the Print dialog box to return to the patient chart.
Printing a Specific Chart Document
1. In the patient’s chart, click on the Documents tab.
2. Select the document that you wish to print, then click the Print button of the toolbar. Because you first selected
a specific document, Selected Document(s)
should be highlighted.
3. Determine if you wish to “ Print selected
documents only”, or if you want to “
Print selected documents together with
their appended items”.
4. Indicate how many copies you want to
print, and if Letterhead should appear
across the top of the printout.
5. Click Print , then Close .
NOTE: Be sure that “Full Super Bill…” isn’t selected before you click Print . Rarely is the information included
in the Super Bill useful in HealthTeam clinics, and it causes a backup of other, more important print jobs!
1. Chart 2. Clinical Lists 3. Chart Summary
1. Chart 2. Documents 3. Selected Document(s)

22
Viewing Appointments
If you are a Provider or Nurse who sees patients, appointments scheduled in the IDX scheduling system under your
name appear in the left column of your Centricity Desktop Summary. When a patient is ‘arrived’ in the front office
via IDX, a black dot appears in front of that patient’s name in your Centricity appointment book.
NOTE: Appointments are neither created nor cancelled in Centricity; such tasks must be performed in IDX.
Appointment Books
To view your appointment book in detail, or to see the appointments of another Provider in your clinic,
click on the Appointments button (Appts) on the Centricity toolbar. The full Appointments window
opens. There you can see appointments on different dates, view appointments for an entire week, open multiple
appointment books in your clinic, and customize the screen in various other ways.
• Use the date feature on the left side of the Appointment book to change the display date; the up ( ) and down
( ) arrows change dates one day at a time. The button with the three dots helps you to quickly jump to an
exact date farther out.
• To display both the morning and afternoon appointments of a single day in two columns, click the Split button.
• To see a full week’s appointments, click the Weekly button.
• Click the Select View button to open the appointment books of other Providers in your clinic.
Choose the desired book or books from the Book(s) drop-down list. To include canceled
appointments and no-shows, click their respective boxes. Then, click OK and your settings will
be applied to the appointment book window.
The Appointment Book in Split View

23
If you typically open the appointment books of multiple providers concurrently, you can set a default view that includes those books. That way, you don’t have to recreate the layout at the start of each clinic. In the Appointment’s Select View window, open the appointment books you want included in the custom view, then click the Save As Default button.
APPOINTMENT TIP
Working in the Appointment Book
• To open a scheduled patient’s chart directly from the appointment book, click once on that patient’s name, then
click on the Open Chart button, located in the lower left corner of the appointment book window.
• To view the details of a patient’s scheduled visit, first select the patient in the Appointment book view by
single-clicking directly on the patient’s name, then click the Details… button, located in the mid-lower portion
of the Appointment book window.
• View a patient’s past and future scheduled appointments by selecting the patient’s
name, then clicking the View Appointments… button.
• By clicking the Status… button, after having selected a patient’s name in your
Appointment book, you can see that patient’s current Appointment status.

24
Getting Help
Centricity Help Online
When working in Centricity, click on the Help menu to learn more about the various features and functions in
Centricity. Additionally, in most screens the Centricity toolbar provides a Help on this Screen button, which opens
the screen-specific help page. This button is located on the far right side of the toolbar, just to the left of the Exit
button. If you prefer using keyboard shortcuts, the [F1] key of your Desktop PC also activates the screen-specific
Help feature.
EMR Implementation Team
You can get help from the EMR Implementation Team by calling (517) 353-0817.
Instructional documentation and videos are available online at http://www.emr.msu.edu. Use these tools at your
convenience to become familiar with the various aspects of Centricity and how the program is used to document
patient care in MSU HealthTeam clinics. Here you will also find information about new and upcoming rollouts
taking place at the HealthTeam.
HealthTeam Information Systems
In order to work in Centricity you must first log onto the HealthTeam network. If you have difficulty doing so, call
HIT at (517) 355-6531. Also call this number if you are experiencing difficulty with your computer system, or if
you are unable to print from your HealthTeam computer.
You can also submit a request for help from HIT by going to their website, at http://www.hit.msu.edu.