centrifuge 5702 - cole-parmer · 22 the centrifuge 5702 is a floor centrifuge for use by trained...
TRANSCRIPT

Centrifuge 5702

2
Bedienungsanleitung. . . . . . . . . . . . . . . . . . . . . . . . . . . . . . . . . . . . . . . . . . . . . . . . . . . . 5
Instruction Manual . . . . . . . . . . . . . . . . . . . . . . . . . . . . . . . . . . . . . . . . . . . . . . . . . . . . . 15
Mode d'emploi succinct . . . . . . . . . . . . . . . . . . . . . . . . . . . . . . . . . . . . . . . . . . . . . . . . 25
Istruzioni brevi . . . . . . . . . . . . . . . . . . . . . . . . . . . . . . . . . . . . . . . . . . . . . . . . . . . . . . . . 29
Instrucciones de trabajo abreviadas . . . . . . . . . . . . . . . . . . . . . . . . . . . . . . . . . . . . . . . 33
Korte handleiding . . . . . . . . . . . . . . . . . . . . . . . . . . . . . . . . . . . . . . . . . . . . . . . . . . . . . 37
Kortfatted brugsanvisning . . . . . . . . . . . . . . . . . . . . . . . . . . . . . . . . . . . . . . . . . . . . . . . 41
Kort bruksanvisning. . . . . . . . . . . . . . . . . . . . . . . . . . . . . . . . . . . . . . . . . . . . . . . . . . . . 45
Lyhennetyt käyttöohjeet . . . . . . . . . . . . . . . . . . . . . . . . . . . . . . . . . . . . . . . . . . . . . . . . 49
Manual abreviado . . . . . . . . . . . . . . . . . . . . . . . . . . . . . . . . . . . . . . . . . . . . . . . . . . . . . 53
™˘ÓÔÙÈΤ˜ Ô‰ËÁ›˜ËÁ›Â˜ . . . . . . . . . . . . . . . . . . . . . . . . . . . . . . . . . . . . . 57
Centrifuge 5702
Inhalt / Contents
In
halt /
Con
tent
s

3
1 Netzschalter und -stecker 1 Mains switch and plug2 Rotormutter 2 Rotor nut3 Rotor 3 RotorE Notentriegelung E Emergency lid release
Abb. 1 / Fig. 1
1
STANDBY
E
SPEED
TIME
SHORT
23
STANDBY
Abb
ildun
g 1
/ Fi
gur
1
Centrifuge 5702

4
No part of this publication may be reproduced without the prior permission of the copyright owner.Copyright
©
2001 Eppendorf AG, Hamburg

21
1 Introduction . . . . . . . . . . . . . . . . . . . . . . . . . . . . . . . . . . . . . . . . . . . . . . . . . . . . . . . . 22
1.1 Delivery package . . . . . . . . . . . . . . . . . . . . . . . . . . . . . . . . . . . . . . . . . . . . . . . . . . . . . 221.2 Installing the device . . . . . . . . . . . . . . . . . . . . . . . . . . . . . . . . . . . . . . . . . . . . . . . . . . . 22
2 Safety precautions and applicational limitations. . . . . . . . . . . . . . . . . . . . . . . . . . . 23
3 Operation. . . . . . . . . . . . . . . . . . . . . . . . . . . . . . . . . . . . . . . . . . . . . . . . . . . . . . . . . . . 25
3.1 Functional and operator control elements . . . . . . . . . . . . . . . . . . . . . . . . . . . . . . . . . . 253.2 Fitting and removing the rotors. . . . . . . . . . . . . . . . . . . . . . . . . . . . . . . . . . . . . . . . . . . 253.3 Loading the rotor . . . . . . . . . . . . . . . . . . . . . . . . . . . . . . . . . . . . . . . . . . . . . . . . . . . . . 253.4 Fixed-angle rotor . . . . . . . . . . . . . . . . . . . . . . . . . . . . . . . . . . . . . . . . . . . . . . . . . . . . . 263.5 Swing-bucket rotor . . . . . . . . . . . . . . . . . . . . . . . . . . . . . . . . . . . . . . . . . . . . . . . . . . . . 273.6 Centrifugation with timer setting. . . . . . . . . . . . . . . . . . . . . . . . . . . . . . . . . . . . . . . . . . 283.7 Short centrifugation . . . . . . . . . . . . . . . . . . . . . . . . . . . . . . . . . . . . . . . . . . . . . . . . . . . 293.8 Continuous running . . . . . . . . . . . . . . . . . . . . . . . . . . . . . . . . . . . . . . . . . . . . . . . . . . . 293.9 Rcf display and calculation. . . . . . . . . . . . . . . . . . . . . . . . . . . . . . . . . . . . . . . . . . . . . . 293.10 Activating and deactivating the signal tone . . . . . . . . . . . . . . . . . . . . . . . . . . . . . . . . . 303.11 Parameter lock . . . . . . . . . . . . . . . . . . . . . . . . . . . . . . . . . . . . . . . . . . . . . . . . . . . . . . . 303.12 Opening the centrifuge in case of power failure. . . . . . . . . . . . . . . . . . . . . . . . . . . . . . 313.13 Device fuses . . . . . . . . . . . . . . . . . . . . . . . . . . . . . . . . . . . . . . . . . . . . . . . . . . . . . . . . . 31
4 Maintenance and cleaning. . . . . . . . . . . . . . . . . . . . . . . . . . . . . . . . . . . . . . . . . . . . . 32
4.1 Device . . . . . . . . . . . . . . . . . . . . . . . . . . . . . . . . . . . . . . . . . . . . . . . . . . . . . . . . . . . . . . 324.2 Rotors . . . . . . . . . . . . . . . . . . . . . . . . . . . . . . . . . . . . . . . . . . . . . . . . . . . . . . . . . . . . . . 324.3 Glass breakage. . . . . . . . . . . . . . . . . . . . . . . . . . . . . . . . . . . . . . . . . . . . . . . . . . . . . . . 32
5 Troubleshooting guide . . . . . . . . . . . . . . . . . . . . . . . . . . . . . . . . . . . . . . . . . . . . . . . . 33
6 Technical data . . . . . . . . . . . . . . . . . . . . . . . . . . . . . . . . . . . . . . . . . . . . . . . . . . . . . . 34
7 Ordering information . . . . . . . . . . . . . . . . . . . . . . . . . . . . . . . . . . . . . . . . . . . . . . . . . 35
Contents
Contents

22
The centrifuge 5702 is a floor centrifuge for use by trained professionals in routine, training and research laboratory work in the biosciences, industry, hospitals, and the chemistry field. Its varying rectangular buckets, round buckets and adapters make it specially well suited tocentrifugation of blood sampling systems, Falcons
®
and centrifuge tubes. The fixed-angle rotor F-35-30-17 has a capacity of 30 x 15 ml DIN centrifuge tubes.
Before using the centrifuge 5702 for the first time, please read the operating manual.
You will see this symbol on your centrifuge and at a number of points throughout this manual. The texts it highlights are relevant to safety. Use the centrifuge only after having read the safety notices.
1 centrifuge 5702 without rotor1 power cable1 operating manual1 rotor key1 set of fuses1 pivot grease
– Place the centrifuge on a solid, flat, non-resonant lab bench.
– The surrounding area must be well ventilated and protected against direct sunlight.
– During centrifugation, according to the recommendations set out in EN 61010-2-020 a safety clearance of 30 cm should be maintained around the centrifuge within which there are no objects which may be destroyed and so cause further damage.
– Please remove the transport safety device and keep it for possible use if the device is subsequently moved again.
– Make sure the line voltage and frequency match the specifications on the device identification plate.
– Now connect the centrifuge to the supply system and switch it on at the main power switch. The Standby button lights up red. Press the button and the centrifuge is ready for operation. The Standby button lights up green and the display is active.
– Before starting, check that the rotor is firmly seated.
1.1 Delivery package
1.2 Installing the device
1 Introduction
In
trod
uction
1

23
For your personal safety, please be sure to comply with the following:
– The centrifuge 5702 must only be use for the specified applications (see Introduction). It must not be operated in explosive atmospheres. Explosive or highly reactive substances must not be centrifuged.
– When being moved from the cool room to a normal lab environment, the centrifuge must either warm up for half an hour in the cool room first or it must warm up for at least 3 hours in the lab before being connected to the supply system, in order to prevent damage by condensation.
– The centrifuge must not be moved or knocked while in operation.
– Improperly installed or serviced centrifuges must not be operated. Repairs may only be carried out by Service personnel authorized by Eppendorf. Use only original Eppendorf spare parts and rotors.
– When handling toxic, radioactive liquids or pathogenic bacteria of risk group II (see World Health Organization: Laboratory Biosafety Manual) comply with the relevant national regulations. If such liquids are spilled in the rotor or rotor chamber, the centrifuge must be thoroughly and professionally cleaned. Before using any cleaning or decontamination method other than that set out in section 4, "Maintenance and cleaning", please consult Eppendorf to ensure the intended method will not damage the device.
– Rotors must always be properly secured. The centrifuge may only be operated with the rotor firmly tightened. For mechanical stability, all the places on the rotor must be fitted with identical buckets.
– The rotor may only be loaded symmetrically. Opposing tubes should be of the same type and be filled equally.
– Rotors showing clear signs of corrosion or mechanical damage must not be used. Check the accessories regularly.
– Rotors are high-grade components which have to withstand extreme stresses and strains. Aluminum rotors are largely protected from corrosion by the most common laboratory chemicals by means of an anodized coating, though the protection is not unlimited. Protect the rotors from mechanical damage. Even minor scratches or cracks can result in serious internal material damage. Avoid weakening the rotors by the use of aggressive chemicals, such as: strong and weak alkalis, strong acids, solutions of mercury, copper and other heavy metal ions, chlorinated hydrocarbons, concentrated salt solutions and phenol. If the rotor is contaminated by aggressive substances, clean it
immediately
with a
neutral
rinsing solution.
– The material being centrifuged must not exceed a density of 1.2 g/ml at maximum rotation speed. If the rotor is run for a lengthy period of time the sample tubes will become hot. Keep within the limits specified by the tube manufacturers.
Safety precautions and applicational lim
itations
2 Safety precautions and applicational limitations
2

24
– Seal the tube lid down tight before centrifuging. Open tube lids may rip off during centrifugation and damage the centrifuge.
– When using organic solvents (e.g. phenol, chloroform) the durabilityof plastic tubes may be impaired.
– When closing down the centrifuge lid do not place your fingers underneath the lid, otherwise they may be trapped.
The following rotors and accessory buckets have a maximum service life of 7 years:
F-35-30-17 (30 places) 5702 704.008
F-35-30-17 (10 places) 5702 705.004
A-4-38 5702 720.003
A-8-17 5702 700.002
The date of manufacture is engraved on them in the format 10/01 (October 2001).
Transparent hermetic caps made of polycarbonate have a maximum service life of 3 years. The date of manufacture is embossed on them in the form of a clock .
Aerosol tight caps may lose their sealing strength when exposed to organic solvents (e.g. phenol, chloroform). Check the hermetic caps regularly for changes or minor cracking. Hermetic caps showing cracks or other changes must be replaced immediately.
Rotors, caps or buckets which have been damaged by chemical or mechanical factors or which have passed their maximum service life must no longer be used!
12
7
8 5
42
1
10
11
6
9
0
31
2 Safety precautions and applicational limitations
Sa
fety
pre
caut
ions
and
app
licat
iona
l lim
itat
ions
2

25
Refer to the frontal view on the first inside cover page of this manual.
When mounting the rotor on the motor shaft, the temperature of the rotor and the motor shaft must be in the range 10 °C to 30 °C. When fitting the rotor, follow the marking triangleson each side of the rotor nut. . They indicate the direction of the groove on the underside of the rotor, and are needed to position the rotor safely.
Fit the rotor onto the motor shaft so the marking triangles point in the same direction as the motor shaft driver pin. Tighten the rotor nut by turning them clockwise using the rotor key supplied. If the rotor nut does not tighten easily, check whether the rotor has caught on the motor shaft driver pin.
To release the rotor turn the rotor nut clockwise using the rotor key.
The rotors and buckets (round and rectangular) must be loaded symmetrically. The adapters must be loaded only with the specified tubes. Minimize the difference in weight between the filled sample tubes. This will reduce wear on the drive and cut running noise. The centrifuge 5702 has an automatic imbalance detector, which shuts down the centrifuge if the weight differences are excessive.
The maximum weight for a fully loaded bucket is indicated on each rotor.
TIME
– Time dial and Start/Stop button
SHORT
– Short run button
SPEED
– Speed selector dial and rpm/rcf button
– Standby button
OPEN
– Lid release
Line socket with fuse set and main power switch (rear)
Identification plate with system ratings (rear)
E – Emergency lid release on underside with pull cord
3.1 Functional and operator control elements
3.2 Fitting and removing the rotors
▼
▼
3.3 Loading the rotors
O
peration
3 Operation
3

26
.
The fixed-angle rotor F-35-30-17 can be loaded with 15 ml Falcons
®
and 15 ml round bottom centrifuge tubes.
Before centrifuging the Falcons
®
, place their plastic adapters in the tube holders. The adapters prevent the Falcons
®
from being destroyed. For the centrifugation of round bottom tubes made of glass, round rubber pads are required to prevent the tubes from cracking. Make sure a rubber pad is placed under each glass tube before centrifuging.
The maximum load capacity for Falcons
®
is 20 x 15 ml; for 15 ml round bottom centrifuge tubes 30 x 15 ml. The rotor can be loaded with a combination of 15 ml Falcons
®
and 15 ml round bottom centrifuge tubes. The maximum capacity is then 20 x 15 ml Falcons
®
and 10 x 15 ml round bottom centrifuge tubes
.
Fig. 1: Loading of rotor F-35-30-17 with 15 ml Falcons
®
and 15 ml round bottom centrifuge tubes
The specified weight imprinted on the rotor is the gross weight ratingincluding the tube holder, adapter, tubes and contents.
Always weigh the tube holder and the load together.
3.4 Fixed-angle rotor
15 ml Falcon®
15 ml DIN vessel
3 Operation
O
pera
tion
3

27
Use only the rotor / bucket (round or rectangular) / adapter combinations approved by Eppendorf. Check that all buckets are fully attached and are able to swing out freely. If you use overlength tubes, it is essential to carry out a manual swing test with empty tubes!
For mechanical stability, all the places must be fitted with identical buckets. The buckets are sorted by weight. The weight class is embossed on the side of the bucket: e.g. 90 (the last 2 digits in grams). Opposing buckets must be of the same weight class. When reordering, please quote the weight class required.
Before inserting the buckets in the grooves make sure the grooves are clean. Dirty grooves or pegs will prevent the buckets from swinging out evenly. If the rotor is not fully loaded, spread the load in the buckets evenly across the pegs.
The specified weight imprinted on the rotor is the gross weight rating of the round or rectangular bucket (including adapter, tubes and contents).
Always weigh the bucket and the load together.
3.5 Swing-bucket rotors
Fig. 2: Rotor and buckets symmetrically loaded
Fig. 3: Rotor and buckets asymmetrically loaded. Not permitted, because the pegs of the buckets are subject to differing loads.
O
peration
3 Operation
3

28
Operation of round bucket with hermetic cap:
The hermetic cap is fitted with a profile rubber seal. Before using the hermetic cap, make sure the seal is seated evenly and firmly in the groove. When changing the profile rubber seal in the groove of the hermetic cap, make sure the seal is inserted in the groove with its wide, flat side facing inward. The profiled side with the ridge must point toward the round bucket, to ensure optimum sealing of the hermetic buckets.
When handling the hermetic cap, remember that polycarbonate has limited chemical resistance to phenol.
Switch on the centrifuge by the switch. The nominal values of the last run are displayed. Load the rotor symmetrically and close down the centrifuge lid. After centrifugationthe centrifuge lid opens automatically.
The timer setting and rotation speed can be altered while the centrifuge is running. To make adjustments, press and hold down the SHORT button until the display starts flashing. You have 5 seconds to set the new centrifugation parameters.
While the centrifuge is running the remaining time is displayed. The last minute is counted down in seconds. When the preset time elapses the centrifuge stops automatically and emits a signal tone to indicate the centrifugation is finished. If you extend the running time during the braking phase the centrifuge will accelerate back up to its nominal speed.
When you switch off the centrifuge 5702 at the main power switch the display goes blank after a few seconds' delay.
TIME
– Alters the running time.
SPEED
– Alters the speed in increments of100 rpm or in rcf.
START
– Starts the centrifuge. The
symbol flashes while the rotor is running.
STOP
– Stops the centrifuge. The
symbol appears
briefly as soon as the rotor comes to a standstill.
STANDBY
– Sets the centrifuge to Standby (ready) mode.
OPEN
– Releases the lid latch.
3.6 Centrifugation with timer setting
3 Operation
O
pera
tion
3

29
Note that the rcf (g-force) indicated when the display is switched is standardized to 15 ml Falcon
®
adapters. At 4,400 rpm you can achieve the following maximum rcf with the various adapters:
SHORT
– Press this button with the lid closed to start a short run at a preselected speed or at maximum speed. The centrifuge stops when you release the SHORT button again.
– Press and hold down the button for more than 2 seconds with the lid open to toggle between "Maximum speed" and "Preselected speed" mode.
– Tap the button with the lid open to display the set mode:4 t Short centrifugation at maximum speed1 – 4 t Short centrifugation at preselected speed
TIME
The continuous run function is set by turning the TIME dial to either above 99 minutes or below 0.5 minutes. The timer displays "oo" to indicate that continuous running is active. The time is counted upward in minutes.
STOP
Ends continuous running.
SPEED
Press the dial to toggle the display between rpm and rcf.
Rotor Adapter Max. centrifuging radius (cm) r
max
Max. rcf (g-force),rounded
A-4-38Round bucket
1.1 – 1.4 ml 13.2 2,850
2 – 7 ml 13.2 2,850
2.6 – 7 ml 13.2 2,850
4 – 10 ml 13.2 2,850
9 – 15 ml 13.0 2,800
15 ml Falcon 13.7 3,000
25 ml 13.5 2,900
50 ml Falcon 13.5 2,900
85 ml 13.5 2,900
3.7 Short centrifugation
3.8 Continuous running
3.9 Rcf display and calculation
O
peration
3 Operation
3

30
To ascertain the maximum rcf for a specific adapter you can apply the following formula as per DIN 58 970:
rcf = 1,118 · 10
–5
· n
2
· r
max
n: speed in rpm
r
max
: max. centrifuging radius in cm
Example: The 85 ml adapter has a maximum radius of 13.5 cm. At 4,000 rpm a maximum rcf of 2,415 x g is reached.
Press and hold down the OPEN button for longer than 2 seconds with the centrifuge lid open to toggle between "b on" (signal tone on) and "b OF" (signal tone off). Press the OPEN button for less than 2 seconds with the centrifuge lid open to display the current status.
To secure the centrifuge parameters against unintentional adjustment, the centrifuge 5702 allows you to lock in the parameters you need.
Press and hold down OPEN- and SHORT-button simultaneously for 5 seconds with the centrifuge lid open. After 5 seconds the dial adjuster is disabled and the display shows "Lo on". The preset parameters can then no longer be altered, whether the centrifuge is running or not.The START/STOP button can still be used to start and stop the centrifuge however.
To enable the dial adjuster again, press and hold down OPEN- and SHORT-button simultaneously for 5 seconds with the centrifuge lid open. The display shows "Lo OF".
A-4-38Rectangular bucket
5 – 7 ml 12.7 2,750
9 ml 12.7 2,750
15 ml 12.7 2,750
20 ml 12.7 2,750
25 ml 12.7 2,750
F-35-30-17Outer ring
15 ml 12.7 2,750
15 ml Falcon 12.7 2,750
F-35-30-17Inner ring
15 ml 10.7 2,300
15 ml Falcon 10.7 2,300
Rotor Adapter Max. centrifuging radius (cm) r
max
Max. rcf (g-force),rounded
3.10 Activating and deactivating the signal tone
3.11 Parameter lock
3 Operation
O
pera
tion
3

31
Pull the power plug and wait for the rotor to come to a stop (this may take as long as 5 minutes!). Emergency lid release on underside of device by pull cord: In front of the front right suction foot there is a small white plastic cap in the base plate (see letter "E" in diagram). Remove the cap and draw the cord out straight downward.
After opening the lid, refit the plastic cap in the base plate.
The fuse box is located under the main power plug. The fuse box can be removed toward the rear and the two fuses replaced (see Ordering information).
3.12 Opening the centrifuge in case of power failure
3.13 Device fuses
O
peration
3 Operation
3

32
The outer surfaces of the centrifuge and the rotor chamber should be cleaned regularly with warm rinsing solution. Before cleaning, unplug the power plug, then take off the rotor and clean it separately. The rotor chamber should be cleaned only with a damp cloth. Use only
neutral
agents for cleaning and disinfection (e.g. Extran neutral, RBS neutral or 70 % ethanol/water mixture, Meliseptol, Sterilium). Do not allow any liquid to get into the gap at the motor shaft outlet. To ensure the long life and safe operation of your centrifuge, avoid aggressive chemicals which may damage the rotor, buckets and rotor chamber. Check your unit once a month for corrosion damage.
The rubber seals in the rotor chamber should be rinsed off thoroughly with water and rubbed with glycerin after each clean.
The rotors, buckets, tube holders and adapters should be cleaned once a month with a neutral cleaning agent (z. B. Extran neutral, RBS neutral, Teepol 610 S or 70 % Ethanol/water mixture, Meliseptol, Sterilium) to prevent residues of the material being centrifuged from changing the properties of component materials. The rotor must be taken off for this.
Never place components in disinfectants or cleaning agents which contain sodium hypochlorite/chlorine or are oxidants. This will cause the material to change. Disinfection with glutaraldehyde solution is possible. We recommend Cidex
®
activated glutaraldehyde solution. The plastic adapters and rubber inlays are dishwasher safe.
Check the tube holders and buckets for residues and corrosion. For thorough cleaning, remove the rubber pads from tube holders and buckets and clean all parts separately.
Then refit the rotor and bolt it into place with the supplied rotor key. Check the rotor, tube holders and buckets once a month for mechanical damage.
All rotors, buckets, adapters, caps and tube holders can be autoclaved (121 °C, 20 min). After a maximum of 20 autoclavings replace the seals of the aerosol tight hermetic caps.
Do not unbolt the rectangular bucket adapters from each other.
On the swing-bucket rotor make sure, in particular, that the pegs and grooves of the buckets are free of dirt. They should be rubbed with pivot grease so the buckets can swing freely.
The hermetic buckets must not be stored with their caps sealed!
In case of glass breakage, carefully remove all splinters from the buckets and the rotor chamber.You may need to replace the rubber inlays and adapters in order to prevent further damage. Check the rotor bores regularly for residues or damage.
4.1 Device
4.2 Rotors
4.3 Glass breakage
4 Maintenance and cleaning
M
aint
enan
ce a
nd c
lean
ing
4
33
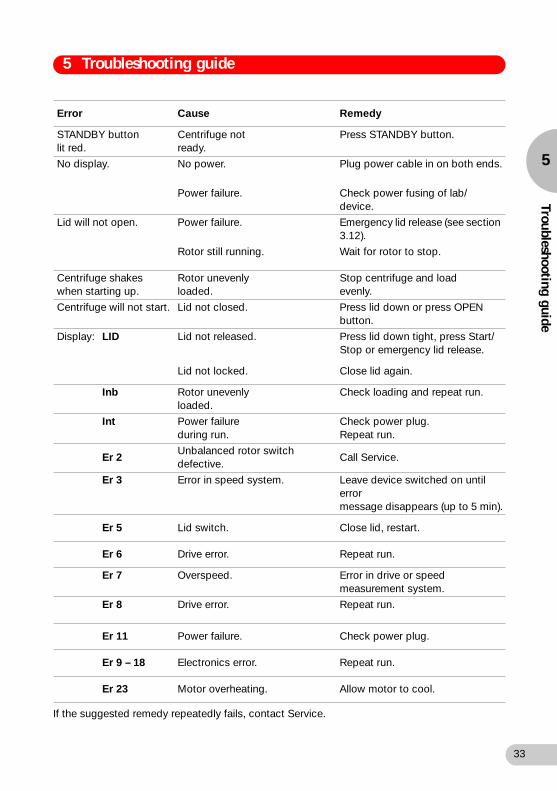
If the suggested remedy repeatedly fails, contact Service.
Error Cause Remedy
STANDBY button lit red.
Centrifuge not ready.
Press STANDBY button.
No display. No power. Plug power cable in on both ends.
Power failure. Check power fusing of lab/ device.
Lid will not open. Power failure. Emergency lid release (see section 3.12).
Rotor still running. Wait for rotor to stop.
Centrifuge shakes when starting up.
Rotor unevenlyloaded.
Stop centrifuge and loadevenly.
Centrifuge will not start. Lid not closed. Press lid down or press OPEN button.
Display:
LID
Lid not released. Press lid down tight, press Start/Stop or emergency lid release.
Lid not locked. Close lid again.
Inb
Rotor unevenlyloaded.
Check loading and repeat run.
Int Power failureduring run.
Check power plug. Repeat run.
Er 2Unbalanced rotor switch defective.
Call Service.
Er 3 Error in speed system. Leave device switched on until errormessage disappears (up to 5 min).
Er 5 Lid switch. Close lid, restart.
Er 6 Drive error. Repeat run.
Er 7 Overspeed. Error in drive or speed measurement system.
Er 8 Drive error. Repeat run.
Er 11 Power failure. Check power plug.
Er 9 – 18 Electronics error. Repeat run.
Er 23 Motor overheating. Allow motor to cool.
5 Troubleshooting guide
Troubleshooting guide
5

34
Line connection: 230 V / 50 – 60 Hz120 V / 50 – 60 Hzsee identification plate
Power output: 200 W
Max. speed: 4400 rpm
Max. centrifugal acceleration: 3000 rcf
Max. load: 4 x 90 ml
Max. kinetic energy: 2 280 Nm
Permissible density ofmaterial being centrifuged: 1.2 g/ml
Ambient temperature: 2 – 40 °C
Max. rel. air humidity: 92 %
Dimensions: Height: 241 mmDepth: 395 mmWidth: 320 mm
Weight excluding rotor: 20 kg
Startup time (230 V): < 25 secDeceleration time: < 25 sec
Startup time (100 V / 120 V): < 25 secDeceleration time: < 25 sec
Fuses: 2.5 A time-lag230 V5.0 A time-lag120 V
Noise level: < 58 dB (A)
Overvoltage category: II
Degree of contamination: 2
Technical specifications subject to change!
Tech
nica
l dat
a
6 Technical data
6

35
Centrifuge 5702230 V / 50 – 60 Hz, excluding rotor 5702 000.019
Fixed-angle rotor and accessories
Fixed-angle rotor F-35-30-17Aluminum, 30 places, angle 35°,for mounting of 15 ml Falcons® or 15 ml round bottom centrifuge tubes,complete with stainless steel tube holders for30 places 5702 704.00810 places 5702 705.004
Tube holders (stainless steel), for rotor F-35-30-17,for mounting of 15 ml Falcons® or 15 ml round bottom centrifuge tubes, set of 10 5702 707.007
Adapter, conical, to support 15 ml Falcons®, for rotor F-35-30-17, set of 10 5702 706.000
Rubber pad for 15 ml round bottom centrifuge tubes, set of 10 5702 708.003
Swing-bucket rotors and accessories
Swing-bucket rotor 4 x 85 ml, type A-4-38,aluminum, incl. 4 round buckets 5702 720.003
Swing-bucket rotor 4 x 85 ml, type A-4-38,aluminum, excluding round buckets 5702 740.004
Round bucket 85 ml for A-4-38, set of 4 5702 722.006
Caps, aerosol tight, for round bucket 85 ml, set of 2 5702 721.000
Adapter for standard tubes and blood sampling systems for round bucket 85 ml
2 adapters 5 x 1.1 – 1.4 ml (ø adapter bore x max. vessel length in mm: 8.5 x 100) 5702 736.0072 adapters 5 x 2 – 7 ml (12.5 x 100) 5702 737.0032 adapters 4 x 2.6 – 7 ml (13.5 x 100) 5702 719.0054 adapters 4 x 2 – 10 ml (16 x 100) 5702 735.0009 adapters 4 x 2 – 15 ml (17.5 x 100) 5702 724.0092 adapters 1 x 15 ml Falcon® (17.2 x 121) 5702 732.0012 adapters 2 x 15 ml Falcon® * (17.2 x 121) 5702 723.0022 adapters 1 x 25 ml (25 x 100) 5702 717.0022 adapters 1 x 50 ml Falcon® (30 x 115) 5702 734.0042 adapters 1 x 85 ml (38 x 106) 5702 718.009
Rectangular bucket 90 ml for A-4-38, set of 4 5702 709.000
* Do not use with aerosol tight caps.
7 Ordering information
Ordering inform
ation
7
36
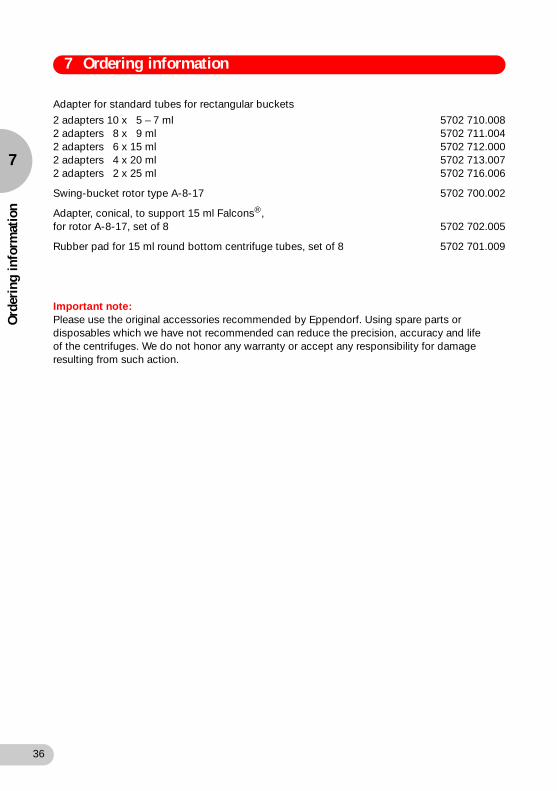
Adapter for standard tubes for rectangular buckets
2 adapters 10 x 5 – 7 ml 5702 710.0082 adapters 8 x 9 ml 5702 711.0042 adapters 6 x 15 ml 5702 712.0002 adapters 4 x 20 ml 5702 713.0072 adapters 2 x 25 ml 5702 716.006
Swing-bucket rotor type A-8-17 5702 700.002
Adapter, conical, to support 15 ml Falcons®, for rotor A-8-17, set of 8 5702 702.005
Rubber pad for 15 ml round bottom centrifuge tubes, set of 8 5702 701.009
Important note:Please use the original accessories recommended by Eppendorf. Using spare parts or disposables which we have not recommended can reduce the precision, accuracy and life of the centrifuges. We do not honor any warranty or accept any responsibility for damage resulting from such action.
Ord
erin
g in
form
atio
n
7 Ordering information
7

In touch with life
Eppendorf AG · 22331 Hamburg · Germany · Phone: +49 40-5 38 01-0 · Fax: +49 40-5 38 01-556
e-mail: [email protected] · Internet: http://www.eppendorf.com
Application Hotline: Phone: +49 180-3 66 67 89 · e-mail: [email protected]
epp
end
orf
®
is a
reg
iste
red
tra
dem
ark.
B 5
702
900.
010-
00/1
101
· P
rinte
d in
Ger
man
y · P
rinte
d o
n ch
lorin
e-fr
ee b
leac
hed
pap
er