cerberuspro - operating proceeduresitpg.com.au/image/data/cerberuspro operating proceedures.pdf ·...
TRANSCRIPT
Edition: 10.2011 1 of 4
InterActive Products Pty. Ltd.
Troy Haynes (0419) 134-279
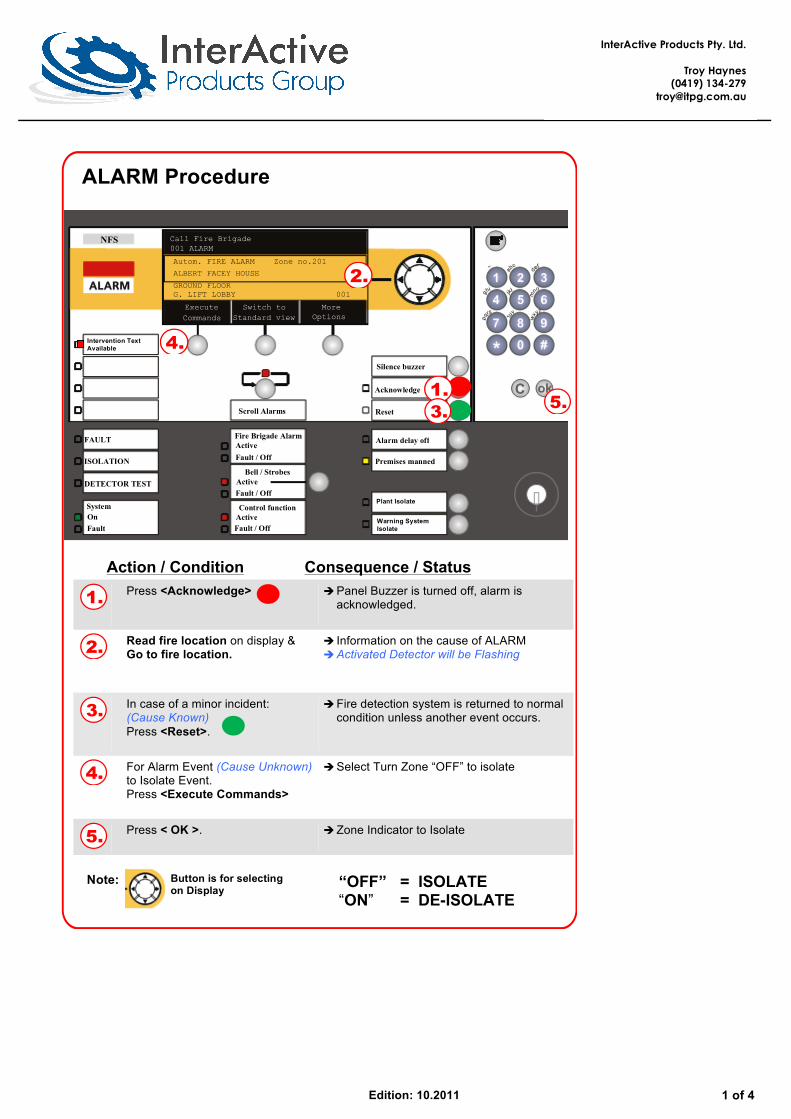
ALARM Procedure
Action / Condition Consequence / Status
Press <Acknowledge>
è Panel Buzzer is turned off, alarm is acknowledged.
Read fire location on display & Go to fire location.
è Information on the cause of ALARM è Activated Detector will be Flashing
In case of a minor incident: (Cause Known) Press <Reset>.
è Fire detection system is returned to normal condition unless another event occurs.
For Alarm Event (Cause Unknown) to Isolate Event. Press <Execute Commands>
è Select Turn Zone “OFF” to isolate
Press < OK >.
è Zone Indicator to Isolate
1.
2.
3.
4.
5.
2.
FAULT
ISOLATION
DETECTOR TEST
System On Fault
Scroll Alarms
Fire Brigade Alarm
NFS Call Fire Brigade
Active Fault / Off
Bell / Strobes
Fault / Off
Control function Active Fault / Off
Silence buzzer
Acknowledge
Reset
Alarm delay off
Premises manned
Autom. FIRE ALARM Zone no.201 ALBERT FACEY HOUSE
GROUND FLOOR G. LIFT LOBBY 001
Active
Execute Commands
Switch to Standard view
More Options
001 ALARM
1.
“OFF” = ISOLATE “ON” = DE-ISOLATE
Warning System Isolate
3.
Plant Isolate
Intervention Text Available 4.
5.
Note: Button is for selecting on Display
2 of 4
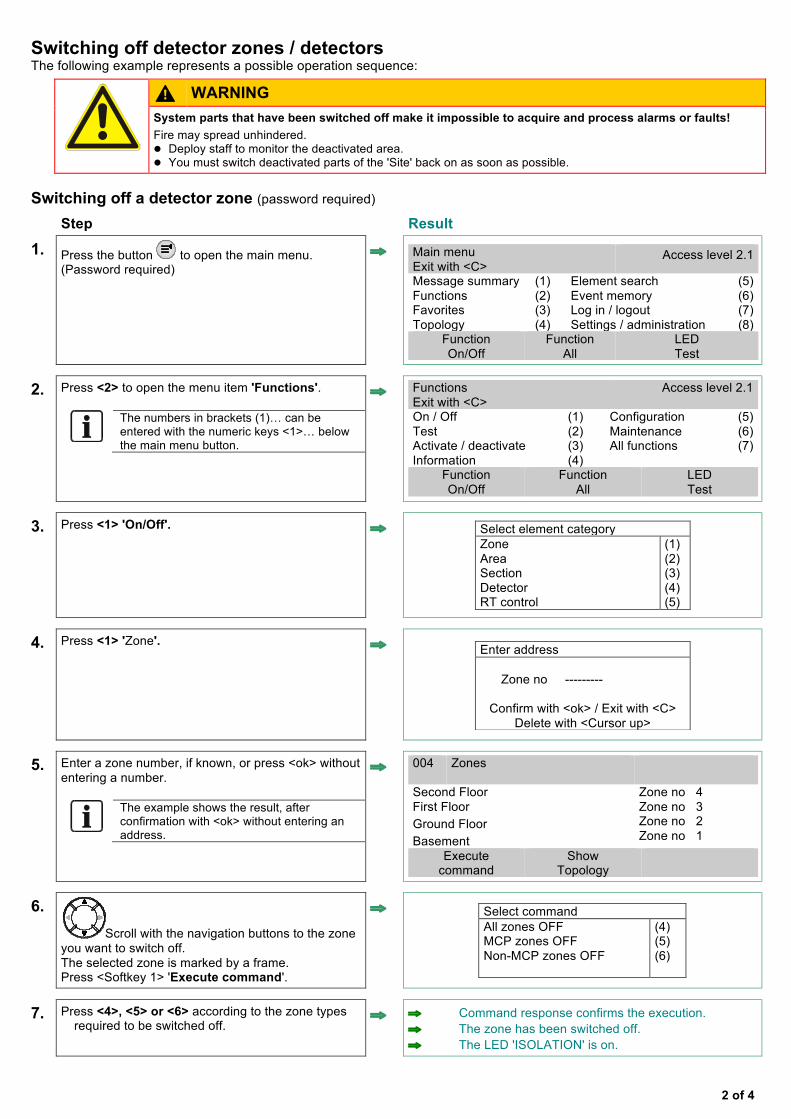
Switching off detector zones / detectors The following example represents a possible operation sequence:
WARNING System parts that have been switched off make it impossible to acquire and process alarms or faults! Fire may spread unhindered. l Deploy staff to monitor the deactivated area. l You must switch deactivated parts of the 'Site' back on as soon as possible.
Switching off a detector zone (password required) Step Result
1. Press the button to open the main menu. (Password required)
⇒
Main menu Exit with <C>
Access level 2.1
Message summary Functions Favorites Topology
(1) (2) (3) (4)
Element search Event memory Log in / logout Settings / administration
(5) (6) (7) (8)
Function On/Off
Function All
LED Test
2. Press <2> to open the menu item 'Functions'.
The numbers in brackets (1)… can be entered with the numeric keys <1>… below the main menu button.
⇒ Functions Exit with <C>
Access level 2.1
On / Off Test Activate / deactivate Information
(1) (2) (3) (4)
Configuration Maintenance All functions
(5) (6) (7)
Function On/Off
Function All
LED Test
3. Press <1> 'On/Off'.
⇒
Select element category Zone Area Section Detector RT control
(1) (2) (3) (4) (5)
4. Press <1> 'Zone'.
⇒
Enter address
Zone no ---------
Confirm with <ok> / Exit with <C> Delete with <Cursor up>
5. Enter a zone number, if known, or press <ok> without entering a number.
The example shows the result, after confirmation with <ok> without entering an address.
⇒
004 Zones
Second Floor First Floor Ground Floor Basement
Zone no 4 Zone no 3 Zone no 2 Zone no 1
Execute command
Show Topology
6. Scroll with the navigation buttons to the zone
you want to switch off. The selected zone is marked by a frame. Press <Softkey 1> 'Execute command'.
⇒
Select command All zones OFF MCP zones OFF Non-MCP zones OFF
(4) (5) (6)
7. Press <4>, <5> or <6> according to the zone types required to be switched off.
⇒ ⇒ Command response confirms the execution. ⇒ The zone has been switched off. ⇒ The LED 'ISOLATION' is on.

3 of 4
Switching off a detector (Password required)
Step Result
1. Press the button to open the main menu. (Password required)
⇒
Main menu Exit with <C>
Access level 2.1
Message summary Functions Favorites Topology
(1) (2) (3) (4)
Element search Event memory Logout / change level Settings / administration
(5) (6) (7) (8)
Function On/Off
Function All
LED Test
2. Press <4> to open the menu item 'Topology'.
Note: The numbers in brackets (1)… can be entered with the numeric keys <1>… below the main menu button.
⇒
Topology Exit with <C>
Access level 2.1
Detection tree Hardware tree Control tree
(1) (2) (3)
Function On/Off
Function All
LED Test
3. Press <1> 'Detection tree'.
Scroll with the navigation buttons to the area within which is the detector that you want to switch off. The selected area is marked by a frame.
⇒
002 Items
Detection tree
Main Building Annex Building
Area Area
Lower level
Execute commands
4. Press Softkey <2> 'Lower level'.
Scroll with the navigation buttons to the section within which is the detector that you want to switch off. The selected section is marked by a frame.
As an alternative to switching off a zone (page 2) executing commands at this point will then lead to the menu item to switch a whole zone of detectors off.
⇒
004 Items Area Main Building
Second Floor First Floor Ground Floor Basement
Zone no 4 Zone no 3 Zone no 2 Zone no 1
Upper level
Lower level
Execute commands
5. Press Softkey <2>'Lower level'.
Scroll with the navigation buttons to the zone (=detector in this system’s terminology) you want to switch off. The selected detector is marked by a frame.
⇒
005
Items
Zone no 2 Ground Floor
1/01 Reception hall Zone no 2 1/02 Corridor MCP Zone no 2 1/03 Storage room Zone no 2 1/04 Meeting room Zone no 2
Upper level
Lower level
Execute commands
6. Select a detector and press Softkey <3> Execute commands'.
⇒
Select command OFF
(2)
7. Press <2> 'OFF' (switch off). ⇒ ⇒ Command response confirms the execution. ⇒ The detector is switched off. ⇒ The LED 'ISOLATION' is on.
4 of 4
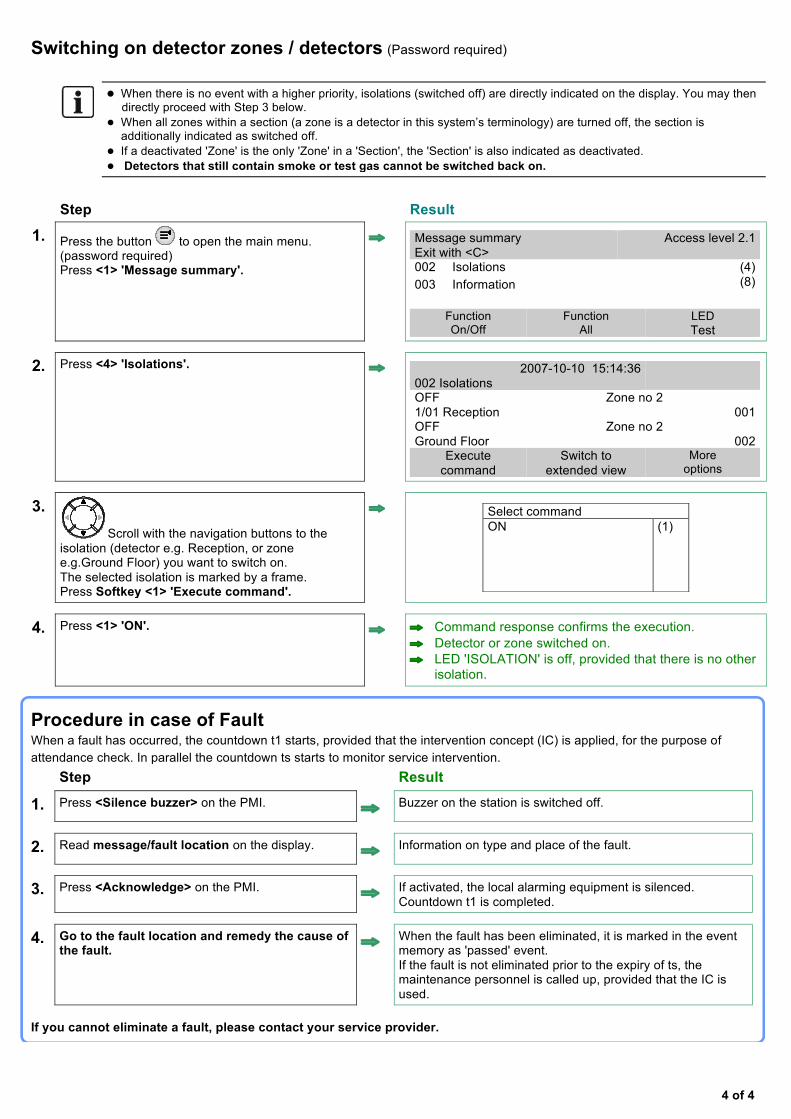
Switching on detector zones / detectors (Password required)
l When there is no event with a higher priority, isolations (switched off) are directly indicated on the display. You may then directly proceed with Step 3 below.
● When all zones within a section (a zone is a detector in this system’s terminology) are turned off, the section is additionally indicated as switched off.
● If a deactivated 'Zone' is the only 'Zone' in a 'Section', the 'Section' is also indicated as deactivated. ● Detectors that still contain smoke or test gas cannot be switched back on.
Step Result
1. Press the button to open the main menu. (password required) Press <1> 'Message summary'.
⇒
Message summary Exit with <C>
Access level 2.1
002 003
Isolations Information
(4) (8)
Function On/Off
Function All
LED Test
2. Press <4> 'Isolations'. ⇒
2007-10-10 15:14:36 002 Isolations
OFF 1/01 Reception OFF Ground Floor
Zone no 2 Zone no 2
001
002
Execute command
Switch to extended view
More options
3. Scroll with the navigation buttons to the
isolation (detector e.g. Reception, or zone e.g.Ground Floor) you want to switch on. The selected isolation is marked by a frame. Press Softkey <1> 'Execute command'.
⇒
Select command ON (1)
4. Press <1> 'ON'. ⇒ ⇒ Command response confirms the execution. ⇒ Detector or zone switched on. ⇒ LED 'ISOLATION' is off, provided that there is no other isolation.
Procedure in case of Fault When a fault has occurred, the countdown t1 starts, provided that the intervention concept (IC) is applied, for the purpose of attendance check. In parallel the countdown ts starts to monitor service intervention.
Step Result
1. Press <Silence buzzer> on the PMI. ⇒ Buzzer on the station is switched off.
2. Read message/fault location on the display. ⇒ Information on type and place of the fault.
3. Press <Acknowledge> on the PMI. ⇒ If activated, the local alarming equipment is silenced. Countdown t1 is completed.
4. Go to the fault location and remedy the cause of the fault. ⇒ When the fault has been eliminated, it is marked in the event
memory as 'passed' event. If the fault is not eliminated prior to the expiry of ts, the maintenance personnel is called up, provided that the IC is used.
If you cannot eliminate a fault, please contact your service provider.