certified network associate (mtcna) -...
TRANSCRIPT

Certified Network Associate (MTCNA)
Riga, LatviaJanuary 1 - January 3, 2016

About the Trainer
• Name
• Experience
• …
Your photo
2

Course Objectives
• Provide an overview of RouterOS software and RouterBOARD products
• Hands-on training for MikroTik router configuration, maintenance and basic troubleshooting
3

The student will:
• Be able to configure, manage and do basic troubleshooting of a MikroTik RouterOS device
• Be able to provide basic services to clients
• Have a solid foundation and valuable tools to manage a network
Learning Outcomes
4

For more info see: http://training.mikrotik.com
MTCNA
MTCRE MTCWE MTCTCE MTCUME
MTCINE
Introduction Course
MikroTik Certified Courses
5

MTCNA Outline
• Module 1: Introduction
• Module 2: DHCP
• Module 3: Bridging
• Module 4: Routing
• Module 5: Wireless
• Module 6: Firewall
6

MTCNA Outline
• Module 7: QoS
• Module 8: Tunnels
• Module 9: Misc
• Hands on LABs during each module (more than 40 in total)
• Detailed outline available on mikrotik.com
7

Schedule
• Training day: 9AM - 5PM
• 30 minute breaks: 10:30AM and 3PM
• 1 hour lunch: 12:30PM
• Certification test: last day, 1 hour
8

Housekeeping
• Emergency exits
• Bathroom location
• Food and drinks while in class
• Please set phone to 'silence' and take calls outside the classroom
9

10
Introduce Yourself
• Your name and company
• Your prior knowledge about networking
• Your prior knowledge about RouterOS
• What do you expect from this course?
• Please, note your number (XY): ___

Module 1Introduction
Certified Network Associate (MTCNA)
11

About MikroTik
• Router software and hardware manufacturer
• Products used by ISPs, companies and individuals
• Mission: to make Internet technologies faster, more powerful and affordable to a wider range of users
12

13
About MikroTik
• 1996: Established
• 1997: RouterOS software for x86 (PC)
• 2002: First RouterBOARD device
• 2006: First MikroTik User Meeting (MUM)
• Prague, Czech Republic
• 2015: Biggest MUM: Indonesia, 2500+

14
• Located in Latvia
• 160+ employees
• mikrotik.com
• routerboard.com
About MikroTik

MikroTik RouterOS
• Is the operating system of MikroTik RouterBOARD hardware
• Can also be installed on a PC or as a virtual machine (VM)
• Stand-alone operating system based on the Linux kernel
15

RouterOS Features
• Full 802.11 a/b/g/n/ac support
• Firewall/bandwidth shaping
• Point-to-Point tunnelling (PPTP, PPPoE, SSTP, OpenVPN)
• DHCP/Proxy/HotSpot
• And many more… see: wiki.mikrotik.com
16

MikroTik RouterBOARD
• A family of hardware solutions created by MikroTik that run RouterOS
• Ranging from small home routers to carrier-class access concentrators
• Millions of RouterBOARDs are currently routing the world
17

• Integrated solutions - ready to use
• Boards only - for assembling own system
• Enclosures - for custom RouterBOARD builds
• Interfaces - for expanding functionality
• Accessories
18
MikroTik RouterBOARD

First Time Access
• Null modem cable
• Ethernet cable
• WiFi
Null ModemCable
Ethernetcable
WiFi
19

First Time Access
• WinBox - http://www.mikrotik.com/download/winbox.exe
• WebFig
• SSH
• Telnet
• Terminal emulator in case of serial port connection
20

WinBox
• Default IP address (LAN side): 192.168.88.1
• User: admin
• Password: (blank)
21

MAC WinBox
• Observe WinBox title when connected using IP address
• Connect to the router using MAC address
• Observe WinBox title
LAB
22

MAC WinBox
• Disable IP address on the bridge interface
• Try to log in the router using IP address (not possible)
• Try to log in the router using MAC WinBox (works)
LABO
ptional
23

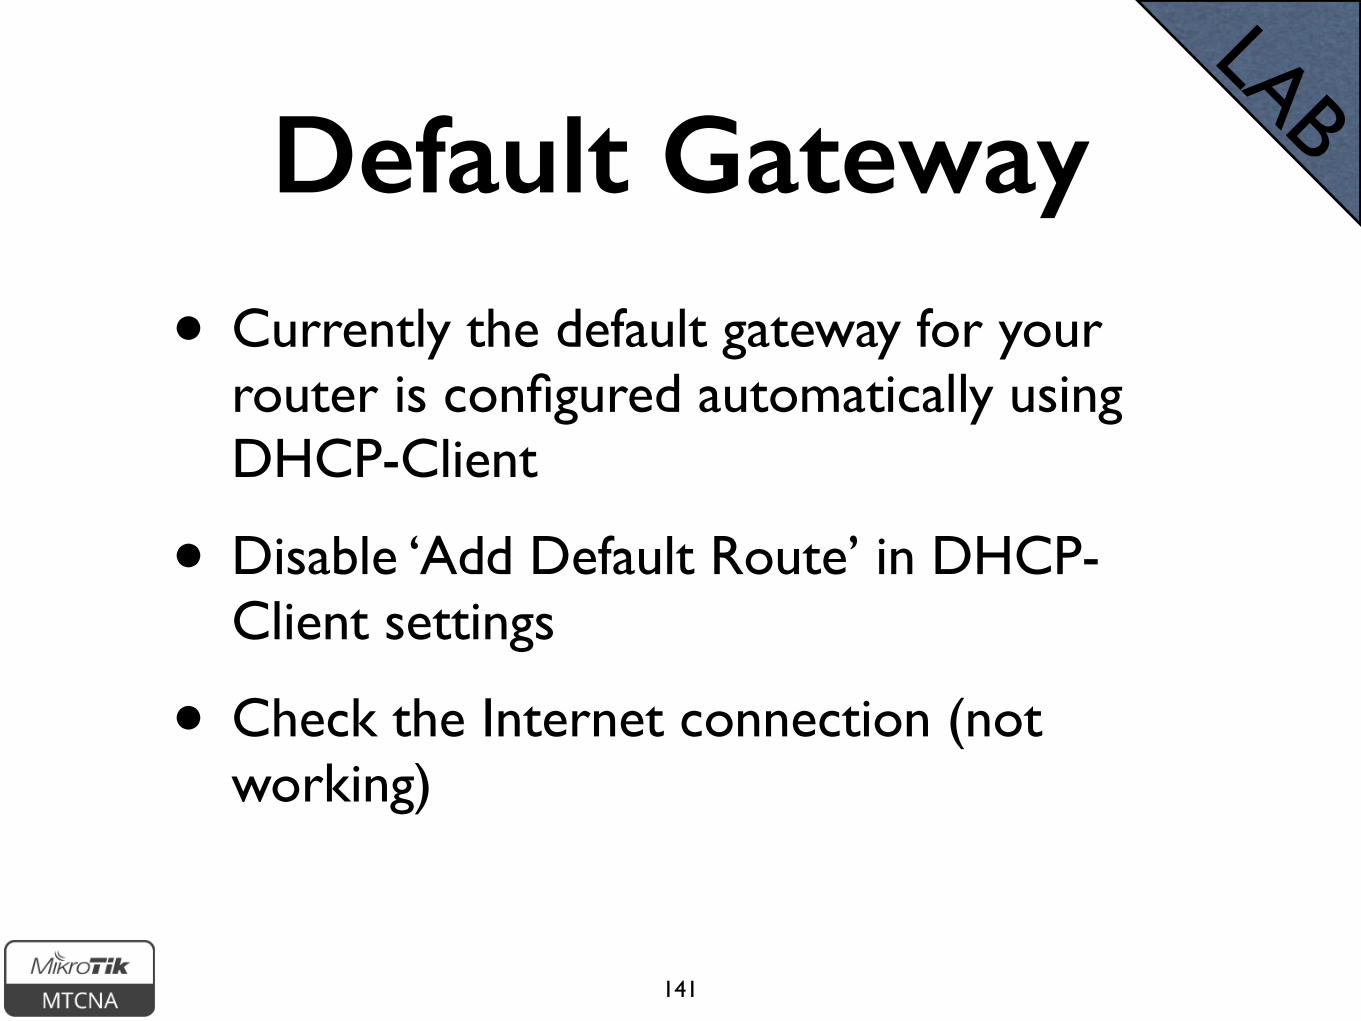
MAC WinBox
• Enable IP address on the bridge interface
• Log in the router using IP address
LABO
ptional
24


Quick Set
• Basic router configuration in one window
• Accessible from both WinBox and WebFig
• In more detail described in “Introduction to MikroTik RouterOS and RouterBOARDs” course
26

Quick Set
27
Default Configuration
• Different default configuration applied
• For more info see default configuration wiki page
• Example: SOHO routers - DHCP client on Ether1, DHCP server on rest of ports + WiFi
• Can be discarded and ‘blank’ used instead
28

• Available via SSH, Telnet or ‘New Terminal’ in WinBox and WebFig
Command Line Interface
29

• <tab> completes command
• double <tab> shows available commands
• ‘?’ shows help
• Navigate previous commands with <↑>, <↓> buttons
Command Line Interface
30

• Hierarchical structure (similar to WinBox menu)
• For more info see console wiki page
In WinBox: Interfaces menu
Command Line Interface
31

Internet Access
Your routerYour laptopClass AP
192.168.88.1
LAB
32

Laptop - Router
• Connect laptop to the router with a cable, plug it in any of LAN ports (2-5)
• Disable other interfaces (wireless) on your laptop
• Make sure that Ethernet interface is set to obtain IP configuration automatically (via DHCP)
LAB
33

Router - Internet
Your routerYour laptopClass AP
192.168.88.1
• The Internet gateway of your class is accessible over wireless - it is an access point (AP)
LAB
34

Router - Internet
• To connect to the AP you have to:
• Remove the wireless interface from the bridge interface (used in default configuration)
• Configure DHCP client to the wireless interface
LAB
35

Router - Internet
• To connect to the AP you have to:
• Create and configure a wireless security profile
• Set the wireless interface to station mode
• And configure NAT masquerade
LAB
36

Router - Internet
Remove the WiFi interface from the bridge
LAB
Bridge → Ports
37

Router - Internet
Set DHCP client to the WiFi interface
LAB
IP → DHCP Client
38

Router - Internet
Set Name and
Pre-Shared Keys
LAB
Wireless → Security Profiles
39

Router - Internet
Set Mode to ‘station', SSID to
'ClassAP' and Security
Profile to 'class'
LAB
Wireless → Interfaces
• “Scan…” tool can be used to see and connect to available APs
40

WinBox Tip
• To view hidden information (except user password), select Settings → Hide Passwords
Wireless → Security Profiles41

Private and Public Space
• Masquerade is used for Public network access, where private addresses are present
• Private networks include 10.0.0.0-10.255.255.255, 172.16.0.0-172.31.255.255, 192.168.0.0-192.168.255.255
42

Router - Internet
Configure masquerade on the WiFi
interface
LAB
IP → Firewall → NAT
43


Troubleshooting
• The router cannot ping further than AP
• The router cannot resolve names
• The laptop cannot ping further than the router
• The laptop cannot resolve domain names
• Masquerade rule is not working
45

RouterOS Releases
• Bugfix only - fixes, no new features
• Current - same fixes + new features
• Release Candidate - consider as a 'nightly build'
46

Upgrading the RouterOS
System → Packages → Check For Updates
47
• The easiest way to upgrade

• Download the update from www.mikrotik.com/download page
• Check the architecture of your router’s CPU
• Drag&drop into the WinBox window
• Other ways: WebFig Files menu, FTP, sFTP
• Reboot the router
Upgrading the RouterOS
48

Package Management
• RouterOS functions are enabled/disabled by packages
System → Packages
49

RouterOS PackagesPackage Functionality
advanced-tools Netwatch, wake-on-LANdhcp DHCP client and server
hotspot HotSpot captive portal serveripv6 IPv6 supportppp PPP, PPTP, L2TP, PPPoE clients and servers
routing Dynamic routing: RIP, BGP, OSPFsecurity Secure WinBox, SSH, IPsecsystem Basic features: static routing, firewall, bridging, etc.
wireless-cm2 802.11 a/b/g/n/ac support, CAPsMAN v2
• For more info see packages wiki page
50

RouterOS Packages
• Each CPU architecture has a combined package, e.g. ‘routeros-mipsbe’, ‘routeros-tile’
• Contains all the standard RouterOS features (wireless, dhcp, ppp, routing, etc.)
• Extra packages can be downloaded from www.mikrotik.com/download page
51

RouterOS Extra Packages
• Provides additional functionality
• Upload package file to the router and reboot
Package Functionality
gps GPS device support
ntp Network Time Protocol server
ups APC UPS management support
user-manager MikroTik User Manager for managing HotSpot users
52

Package Management
• Disable the wireless package
• Reboot the router
• Observe the interface list
• Enable the wireless package
• Reboot the router
LAB
53

Package Management
• Observe WinBox System menu (no NTP client/server)
• Download extra packages file for your router’s CPU architecture
• Install ntp package and reboot the router
• Observe WinBox System menu
LABO
ptional
54
• From System → Packages menu
• ‘Check For Updates’ and choose different Channel (e.g. bugfix-only)
• Click ‘Download’
• Click ‘Downgrade’ in ‘Package List’ window
Downgrading Packages
55

• Downgrade RouterOS from current to bugfix-only version
• Upgrade it back to the current version
LABO
ptional
Downgrading Packages
56

RouterBOOT
• Firmware responsible for starting RouterOS on RouterBOARD devices
• Two boot loaders on RouterBOARD - main and backup
• Main can be updated
• Backup loader can be loaded if needed
57

RouterBOOT
System → Routerboard
• For more info see RouterBOOT wiki page
58

Router Identity
• Option to set a name for each router
• Identity information available in different places
System → Identity
59

Router Identity
• Set the identity of your router as follows: YourNumber(XY)_YourName
• For example: 13_JohnDoe
• Observe the WinBox title menu
LAB
60

• Default user admin, group full
• Additional groups - read and write
• Can create your own group and fine tune access
RouterOS Users
61

System → Users
RouterOS Users
62

• Add a new user to the RouterOS with full access (note name and password)
• Change admin user group to read
• Login with the new user
• Login with the admin user and try to change router’s settings (not possible)
LABRouterOS Users
63

• Generate SSH private/public key pair using ‘ssh-keygen’ (OS X and Linux) or ‘puttygen’ (Windows)
• Upload the public part of the key to the router
• Import and attach it to the user
• Login to the router using the private key
LABO
ptional
RouterOS Users
64

RouterOS Services
• Different ways to connect to the RouterOS
• API - Application Programming Interface
• FTP - for uploading/downloading files to/from the RouterOS
IP → Services
65

RouterOS Services
• SSH - secure command line interface
• Telnet - insecure command line interface
• WinBox - GUI access
• WWW - access from the web browser
66
IP → Services

RouterOS Services
• Disable services which are not used
• Restrict access with ‘available from’ field
• Default ports can be changed
67
IP → Services

RouterOS Services
• Open RouterOS web interface - http://192.168.88.1
• In WinBox disable www service
• Refresh browser page
LAB
68

Configuration Backup
• Two types of backups
• Backup (.backup) file - used for restoring configuration on the same router
• Export (.rsc) file - used for moving configuration to another router
69

Configuration Backup
• Backup file can be created and restored under Files menu in WinBox
• Backup file is binary, by default encrypted with user password. Contains a full router configuration (passwords, keys, etc.)
70

Configuration Backup
• Custom name and password can be entered
• Router identity and current date is used as a backup file name
71

Configuration Backup
• Export (.rsc) file is a script with which router configuration can be backed up and restored
• Plain-text file (editable)
• Contains only configuration that is different than the factory default configuration
72

Configuration Backup
• Export file is created using ‘export’ command in CLI
• Whole or partial router configuration can be saved to an export file
• RouterOS user passwords are not saved when using export
73

Configuration Backup
• Store files in ‘flash’ folder
• Contains ready to use RouterOS commands
74

Configuration Backup
• Export file can be edited by hand
• Can be used to move configuration to a different RouterBOARD
• Restore using ‘/import’ command
75

Configuration Backup
• Download to a computer using WinBox (drag&drop), FTP or WebFig
• Don’t store the copy of the backup only on the router! It is not a good backup strategy!
76

Reset Configuration
• Reset to default configuration
• Retain RouterOS users after reset
• Reset to a router without any configuration (‘blank’)
• Run a script after reset
System → Reset Configuration
77

Reset Configuration
• Using physical ‘reset’ button on the router
• Load backup RouterBOOT loader
• Reset router configuration
• Enable CAPs mode (Controlled AP)
• Start in Netinstall mode
• For more info see reset button wiki page
78

Netinstall
• Used for installing and reinstalling RouterOS
• Direct network connection to the router is required (can be used over switched LAN)
• Cable must be connected to Ether1 port (except CCR and RB1xxx - last port)
• Runs on Windows
• For more info see Netinstall wiki page
79

Configuration Backup
• Create a .backup file
• Copy it to your laptop
• Delete the .backup file from the router
• Reset router configuration
• Copy .backup file back to the router
• Restore router configuration
LAB
81

Configuration Backup
• Create a backup using ‘export’ command
• Copy it to your laptop
• Delete the export file from the router
• Reset router configuration
• Copy export file back to the router
• Restore router configuration
LABO
ptional
82

Netinstall
• Download Netinstall
• Boot your router in Netinstall mode
• Install RouterOS on your router using Netinstall
• Restore configuration from previously saved backup file
LABO
ptional
83
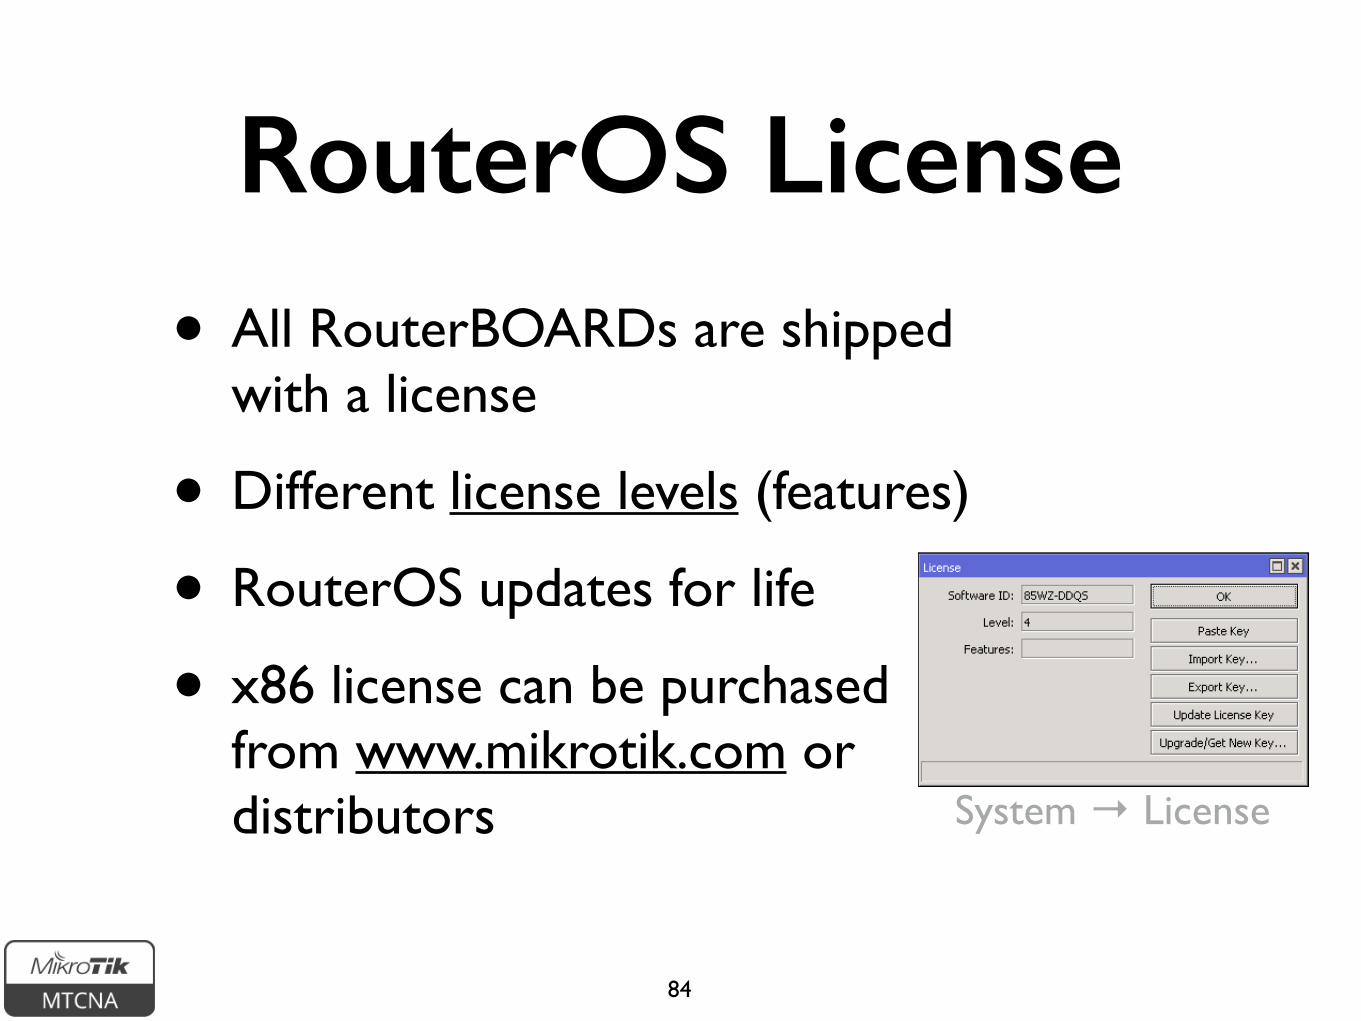
RouterOS License
• All RouterBOARDs are shipped with a license
• Different license levels (features)
• RouterOS updates for life
• x86 license can be purchased from www.mikrotik.com or distributors System → License
84

RouterOS LicenseLevel Type Typical Use
0 Trial Mode 24h trial
1 Free Demo
3 CPE Wireless client (station), volume only
4 AP Wireless AP: WISP, HOME, Office
5 ISP Supports more tunnels than L4
6 Controller Unlimited RouterOS features
85

Additional Information
• wiki.mikrotik.com - RouterOS documentation and examples
• forum.mikrotik.com - communicate with other RouterOS users
• mum.mikrotik.com - MikroTik User Meeting page
• Distributor and consultant support

Module 1 Summary
87

Module 2DHCP
Certified Network Associate (MTCNA)
88

DHCP
• Dynamic Host Configuration Protocol
• Used for automatic IP address distribution over a local network
• Use DHCP only in trusted networks
• Works within a broadcast domain
• RouterOS supports both DHCP client and server
89

DHCP Client
• Used for automatic acquiring of IP address, subnet mask, default gateway, DNS server address and additional settings if provided
• MikroTik SOHO routers by default have DHCP client configured on ether1(WAN) interface
90

DHCP Client
IP → DHCP Client
91

DNS
• By default DHCP client asks for a DNS server IP address
• It can also be entered manually if other DNS server is needed or DHCP is not used
IP → DNS
92

DNS
• RouterOS supports static DNS entries
• By default there’s a static DNS A record named router which points to 192.168.88.1
• That means you can access the router by using DNS name instead of IP
• http://router
IP → DNS → Static93

DHCP Server
• Automatically assigns IP addresses to requesting hosts
• IP address should be configured on the interface which DHCP Server will use
• To enable use ‘DHCP Setup’ command
94

DHCP Server
• Disconnect from the router
• Reconnect using the router’s MAC address
LAB
95

DHCP Server
• We’re going to remove existing DHCP Server and setup a new one
• Will use your number (XY) for the subnet, e.g. 192.168.XY.0/24
• To enable DHCP Server on the bridge, it must be configured on the bridge interface (not on the bridge port)
LAB
96

DHCP ServerLAB
IP → DHCP Server
Remove DHCP Server
RemoveDHCP Network
97

DHCP ServerLAB
RemoveIP Pool
RemoveIP Address
IP → Pool
IP → Address
98

DHCP ServerLAB
Add IP Address192.168.XY.1/24 on the bridge
interface
• For example, XY=199
99

DHCP ServerLAB
IP → DHCP Server → DHCP Setup
1 2
3 4
5 6
100

DHCP ServerLAB
• Disconnect from the router
• Renew the IP address of your laptop
• Connect to the router’s new IP address 192.168.XY.1
• Check that the connection to the Internet is available
101

DHCP Server
• DHCP Server Setup wizard has created a new IP pool and DHCP Server
102

DHCP Static Leases
• It is possible to always assign the same IP address to the same device (identified by MAC address)
• DHCP Server could even be used without dynamic IP pool and assign only preconfigured addresses
103

Convert dynamic lease to static
DHCP Static Leases
IP → DHCP Server → Leases
104

• Set DHCP Address Pool to static-only
• Create a static lease for your laptop
• Change the IP address assigned to your laptop by DHCP server to 192.168.XY.123
• Renew the IP address of your laptop
• Ask your neighbor to connect his/her laptop to your router (will not get an IP address)
DHCP Static LeasesLAB
105

ARP
• Address Resolution Protocol
• ARP joins together client’s IP address (Layer3) with MAC address (Layer2)
• ARP operates dynamically
• Can also be configured manually
106

ARP Table
• Provides information about IP address, MAC address and the interface to which the device is connected
IP → ARP
107

Static ARP
• For increased security ARP entries can be added manually
• Network interface can be configured to reply-only to known ARP entries
• Router’s client will not be able to access the Internet using a different IP address
108

Static ARP
IP → ARP
Static ARP entry
109

Static ARP
Interface will reply only to known ARP
entries
Interfaces → bridge-local
110

DHCP and ARP
• DHCP Server can add ARP entries automatically
• Combined with static leases and reply-only ARP can increase network security while retaining the ease of use for users
111

DHCP and ARP
Add ARP entries for DHCP leases
IP → DHCP Server
112

Static ARP
• Make your laptop’s ARP entry static
• Set the bridge interface ARP to reply-only to disable adding dynamic ARP entries
• You should still have the DHCP server to static-only and a static lease for the laptop. If not, repeat the previous LAB
• Enable ‘Add ARP For Leases’ on DHCP server
LAB
113

Static ARP
• Remove your laptop’s static entry from the ARP table
• Check the Internet connection (not working)
• Renew the IP address of your laptop
• Check the Internet connection (should work)
• Connect to the router and observe the ARP table
LAB
114

Module 2 Summary
115

Module 3Bridging
Certified Network Associate (MTCNA)
116

Bridge
• Bridges are OSI layer 2 devices
• Bridge is a transparent device
• Traditionally used to join two network segments
• Bridge splits collision domain in two parts
• Network switch is multi-port bridge - each port is a collision domain of one device
117

Bridge
• All hosts can communicate with each other
• All share the same collision domain
118

Bridge
• All hosts still can communicate with each other
• Now there are 2 collision domains
119

Bridge
• RouterOS implements software bridge
• Ethernet, wireless, SFP and tunnel interfaces can be added to a bridge
• Default configuration on SOHO routers bridge wireless with ether2 port
• Ether2-5 are combined together in a switch. Ether2 is master, 3-5 slave. Wire speed switching using switch chip
120

Bridge
• It is possible to remove master/slave configuration and use bridge instead
• Switch chip will not be used, higher CPU usage
• More control - can use IP firewall for bridge ports
121

Bridge
• Due to limitations of 802.11 standard, wireless clients (mode: station) do not support bridging
• RouterOS implements several modes to overcome this limitation
122

Wireless Bridge
• station bridge - RouterOS to RouterOS
• station pseudobridge - RouterOS to other
• station wds (Wireless Distribution System) - RouterOS to RouterOS
123

Wireless Bridge
• To use station bridge, ‘Bridge Mode’ has to be enabled on the AP
124

Bridge
• We are going to create one big network by bridging local Ethernet with wireless (Internet) interface
• All the laptops will be in the same network
• Note: be careful when bridging networks!
• Create a backup before starting this LAB!
LAB
125

Bridge
• Change wireless to station bridge mode
• Disable DHCP server
• Add wireless interface to existing bridge-local interface as a port
LAB
126

BridgeLAB
Set mode to station bridge
Disable DHCP Server
Wireless → wlan1
IP → DHCP Server
127

BridgeLAB
Bridge → Ports
Add wireless interface to the bridge
128

Bridge
• Renew the IP address of your laptop
• You should acquire IP from the trainer’s router
• Ask your neighbor his/her laptop IP address and try to ping it
• Your router now is a transparent bridge
LAB
129

Bridge Firewall
• RouterOS bridge interface supports firewall
• Traffic which flows through the bridge can be processed by the firewall
• To enable: Bridge → Settings → Use IP Firewall
130

Bridge Firewall
131

Bridge
• Restore your router’s configuration from the backup you created before bridging LAB
• Or restore previous configuration by hand
LAB
132

Module 3 Summary
133

Module 4Routing
Certified Network Associate (MTCNA)
134

Routing
• Works in OSI network layer (L3)
• RouterOS routing rules define where the packets should be sent
IP → Routes
135

Routing
• Dst. Address: networks which can be reached
• Gateway: IP address of the next router to reach the destination
IP → Routes
136

New Static Route
IP → Routes
137

Routing
• Check gateway - every 10 seconds send either ICMP echo request (ping) or ARP request.
• If several routes use the same gateway and there is one that has check-gateway option enabled, all routes will be subjected to the behaviour of check-gateway
138

Routing
• If there are two or more routes pointing to the same address, the more precise one will be used
• Dst: 192.168.90.0/24, gateway: 1.2.3.4
• Dst: 192.168.90.128/25, gateway: 5.6.7.8
• If a packet needs to be sent to 192.168.90.135, gateway 5.6.7.8 will be used
139

Default Gateway
• Default gateway: a router (next hop) where all the traffic for which there is no specific destination defined will be sent
• It is distinguished by 0.0.0.0/0 destination network
140
Default Gateway
• Currently the default gateway for your router is configured automatically using DHCP-Client
• Disable ‘Add Default Route’ in DHCP-Client settings
• Check the Internet connection (not working)
LAB
141

Default Gateway
• Add default gateway manually (trainer’s router)
• Check that the connection to the Internet is available
LAB
142

Dynamic Routes
• Routes with flags DAC are added automatically
• DAC route originates from IP address configuration
IP → Routes
IP → Addresses
143

Route Flags
• A - active
• C - connected
• D - dynamic
• S - static
IP → Routes
144

Static Routing
• Static route defines how to reach a specific destination network
• Default gateway is also a static route. It directs all traffic to the gateway
145

• The goal is to ping your neighbor’s laptop
• Static route will be used to achieve this
• Ask your neighbor the IP address of his/her wireless interface
• And the subnet address of his/her internal network (192.168.XY.0/24)
LABStatic Routing
146

• Add a new route rule
• Set Dst. Address - your neighbor’s local network address (eg. 192.168.37.0/24)
• Set Gateway - the address of your neighbor’s wireless interface (eg. 192.168.250.37)
• Now you should be able to ping your neighbor’s laptop
LABStatic Routing
147

• Team up with 2 of your neighbors
• Create a static route to one of your neighbor’s (A) laptop via the other neighbor’s router (B)
• Ask your neighbor B to make a static route to neighbor’s A laptop
• Ping your neighbor’s A laptop
LABO
ptional
Static Routing
148

LABO
ptional
Your laptop Your router
Neighbor’s Blaptop
Neighbor’sB router
Neighbor’s Alaptop
Neighbor’sA router
Class AP
Static RoutingCreate a route to
laptop A via router B
149

• Easy to configure on a small network
• Limits the use of router’s resources
• Does not scale well
• Manual configuration is required every time a new subnet needs to be reached
Static Routing
150

Module 4 Summary
151

Module 5Wireless
Certified Network Associate (MTCNA)
152

Wireless
• MikroTik RouterOS provides a complete support for IEEE 802.11a/n/ac (5GHz) and 802.11b/g/n (2.4GHz) wireless networking standards
153

Wireless Standards
IEEE Standard Frequency Speed
802.11a 5GHz 54Mbps
802.11b 2.4GHz 11Mbps
802.11g 2.4GHz 54Mbps
802.11n 2.4 and 5GHz Up to 450 Mbps*
802.11ac 5GHz Up to 1300 Mbps*
Depending on RouterBOARD model
154

2.4GHz Channels
• 13x 22MHz channels (most of the world)
• 3 non-overlapping channels (1, 6, 11)
• 3 APs can occupy the same area without interfering
155

2.4GHz Channels
• US: 11 channels, 14th Japan-only
• Channel width:
• 802.11b 22MHz, 802.11g 20MHz, 802.11n 20/40MHz
156

5GHz Channels
• RouterOS supports full range of 5GHz frequencies
• 5180-5320MHz (channels 36-64)
• 5500-5720MHz (channels 100-144)
• 5745-5825MHz (channels 149-165)
• Varies depending on country regulations
157

5GHz ChannelsIEEE Standard Channel Width
802.11a 20MHz
802.11n20MHz
40MHz
802.11ac
20MHz
40MHz
80MHz
160MHz
158

Country Regulations
• Switch to ‘Advanced Mode’ and select your country to apply regulations
159

Country Regulations
• Dynamic Frequency Selection (DFS) is a feature which is meant to identify radars when using 5GHz band and choose a different channel if a radar is found
• Some channels can only be used when DFS is enabled (in EU: 52-140, US: 50-144)
160

• DFS Mode radar detect will select a channel with the lowest number of detected networks and use it if no radar is detected on it for 60s
• Switch to ‘Advanced Mode’ to enable DFS
Country Regulations
Wireless161

Radio Name• Wireless interface “name”
• RouterOS-RouterOS only
• Can be seen in Wireless tables
162

• Wireless interface “name”
• RouterOS-RouterOS only
• Can be seen in Wireless tables
Radio Name
Wireless → Registration
163

Radio NameLAB
• Set the radio name of your wireless interface as follows: YourNumber(XY)_YourName
• For example: 13_JohnDoe
164

Wireless Chains
• 802.11n introduced the concept of MIMO (Multiple In and Multiple Out)
• Send and receive data using multiple radios in parallel
• 802.11n with one chain (SISO) can only achieve 72.2Mbps (on legacy cards 65Mbps)
165

Tx Power
• Use to adjust transmit power of the wireless card
• Change to all rates fixed and adjust the power
Wireless → Tx Power
166

Tx Power
• Note on implementation of Tx Power on RouterOS
Wireless card
Enabled Chains Power per Chain Total Power
802.11n
1
Equal to the selected Tx Power
Equal to the selected Tx Power
2 +3dBm
3 +5dBm
802.11ac
1 Equal to the selected Tx Power
Equal to the selected Tx Power2 -3dBm
3 -5dBm
167

Rx Sensitivity
• Receiver sensitivity is the lowest power level at which the interface can detect a signal
• When comparing RouterBOARDS this value should be taken into account depending on planned usage
• Smaller Rx sensitivity threshold means better signal detection
168
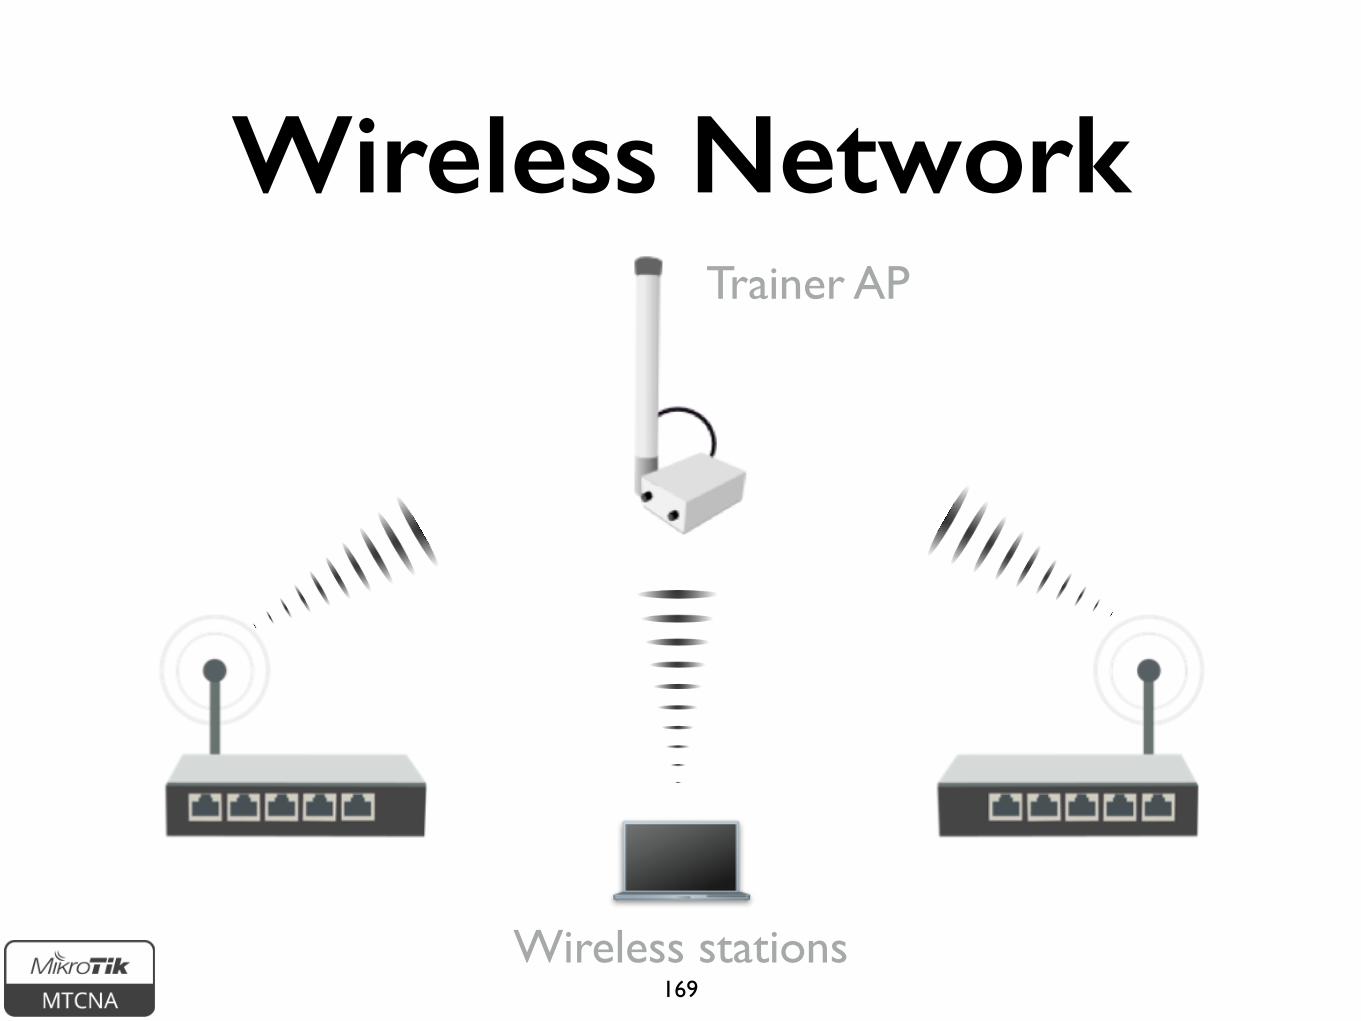
Wireless Network
Wireless stations
Trainer AP
169

Wireless Station
• Wireless station is client (laptop, phone, router)
• On RouterOS wireless mode station
170

Wireless Station
• Set interface mode=station
• Select band
• Set SSID (wireless network ID)
• Frequency is not important for client, use scan-list
171

Security
• Only WPA (WiFi Protected Access) or WPA2 should be used
• WPA-PSK or WPA2-PSK with AES-CCM encryption
• Trainer AP already is using WPA-PSK/WPA2-PSK
172

Security
• Both WPA and WPA2 keys can be specified to allow connection from devices which do not support WPA2
• Choose strong key!
Wireless → Security Profiles
173

Connect List
• Rules used by station to select (or not to select) an AP
Wireless → Connect List
174

Connect List
• Currently your router is connected to the class AP
• Create a rule to disallow connection to the class AP
LAB
175

Access Point
• Set interface mode=ap bridge
• Select band
• Set frequency
• Set SSID (wireless network ID)
• Set Security Profile
176

WPS
• WiFi Protected Setup (WPS) is a feature for convenient access to the WiFi without the need of entering the passphrase
• RouterOS supports both WPS accept (for AP) and WPS client (for station) modes
177

WPS Accept
• To easily allow guest access to your access point WPS accept button can be used
• When pushed, it will grant an access to connect to the AP for 2min or until a device (station) connects
• The WPS accept button has to be pushed each time when a new device needs to be connected
178

WPS Accept
• For each device it has to be done only once
• All RouterOS devices with WiFi interface have virtual WPS push button
• Some have physical, check for wps button on the router
179

WPS Accept
• Virtual WPS button is available in QuickSet and in wireless interface menu
• It can be disabled if needed
• WPS client is supported by most operating systems including RouterOS
• RouterOS does not support the insecure PIN mode
180

Access Point
• Create a new security profile for your access point
• Set wireless interface mode to ap bridge, set SSID to your class number and name, select the security profile
• Disable DHCP client on the wireless interface (will lose Internet connection)
181
LAB

Access Point
• Add wireless interface to the bridge
• Disconnect the cable from the laptop
• Connect to your wireless AP with your laptop
• Connect to the router using WinBox and observe wireless registration table
• When done, restore previous configuration
182
LAB

WPS
• If you have a device that supports WPS client mode connect it to your AP using WPS accept button on your router (either physical or virtual)
• Check router logs during the process
• When done, restore previous configuration
183
LABO
ptional

Snooper
• Get full overview of the wireless networks on selected band
• Wireless interface is disconnected during scanning!
• Use to decide which channel to choose
184

Snooper
Wireless → Snooper185

Registration Table
• View all connected wireless interfaces
• Or connected access point if the router is a station
Wireless → Registration
186

Access List
• Used by access point to control allowed connections from stations
• Identify device MAC address
• Configure whether the station can authenticate to the AP
• Limit time of the day when it can connect
187

Access List
Wireless → Access List
188

Access List
• If there are no matching rules in the access list, default values from the wireless interface will be used
189

Registration Table
• Can be used to create connect or access list entries from currently connected devices
Wireless → Registration
190

Default Authenticate
191

Default Authentication
Access/Connect List Entry Behavior
✓+ Based on access/connect list settings
- Authenticate
✕
+ Based on access/connect list settings
- Don’t authenticate
Default Authenticate
192

Default Forward
• Use to allow or forbid communication between stations
• Enabled by default
• Forwarding can be overridden for specific clients in the access list
193

Module 5 Summary
194

Module 6Firewall
Certified Network Associate (MTCNA)
195

Firewall
• A network security system that protects internal network from outside (e.g. the Internet)
• Based on rules which are analysed sequentially until first match is found
• RouterOS firewall rules are managed in Filter and NAT sections
196

Firewall Rules
• Work on If-Then principle
• Ordered in chains
• There are predefined chains
• Users can create new chains
197

Firewall Filter
• There are three default chains
• input (to the router)
• output (from the router)
• forward (through the router)
input
forward
output
198

Filter Actions
• Each rule has an action - what to do when a packet is matched
• accept
• drop silently or reject - drop and send ICMP reject message
• jump/return to/from a user defined chain
• And other - see firewall wiki page
199

Filter Actions
IP → Firewall → New Firewall Rule (+) → Action
200

Filter Chains
IP → Firewall
• TIP: to improve readability of firewall rules, order them sequentially by chains and add comments
201

Chain: input
• Protects the router itself
• Either from the Internet or the internal network
input
202

Chain: input
• Add an accept input filter rule on the bridge interface for your laptop IP address (Src. Address = 192.168.XY.200)
• Add a drop input filter rule on the bridge interface for everyone else
LAB
203

Chain: input
IP → Firewall → New Firewall Rule (+)
LAB
204

Chain: input
• Change the IP address of your laptop to static, assign 192.168.XY.199, DNS and gateway: 192.168.XY.1
• Disconnect from the router
• Try to connect to the router (not possible)
• Try to connect to the internet (not possible)
LAB
205
Chain: input
• Although traffic to the Internet is controlled with firewall forward chain, web pages cannot be opened
• WHY? (answer on the next slide)
LAB
206

Chain: input
• Your laptop is using the router for domain name resolving (DNS)
• Connect to the router using MAC WinBox
• Add an accept input filter rule on the bridge interface to allow DNS requests, port: 53/udp and place it above the drop rule
• Try to connect to the Internet (works)
LAB
207

Chain: input
• Change back your laptop IP to dynamic (DHCP)
• Connect to the router
• Disable (or remove) the rules you just added
LAB
208

Chain: forward
• Contains rules that control packets going through the router
• Forward controls traffic between the clients and the Internet and between the clients themselves
forward
209

Chain: forward
• By default internal traffic between the clients connected to the router is allowed
• Traffic between the clients and the Internet is not restricted
210

Chain: forward
• Add a drop forward filter rule for http port (80/tcp)
• When specifying ports, IP protocol must be selected
LAB
IP → Firewall → New Firewall Rule (+)
211

Chain: forward
• Try to open www.mikrotik.com (not possible)
• Try to open router WebFig http://192.168.XY.1 (works)
• Router web page works because it is traffic going to the router (input), not through (forward)
LAB
212

Frequently Used Ports
Port Service80/tcp HTTP443/tcp HTTPS22/tcp SSH23/tcp Telnet
20,21/tcp FTP8291/tcp WinBox5678/udp MikroTik Neighbor Discovery20561/udp MAC WinBox
213

Address List
• Address list allows to create an action for multiple IPs at once
• It is possible to automatically add an IP address to the address list
• IP can be added to the list permanently or for a predefined amount of time
• Address list can contain one IP address, IP range or whole subnet
214

Address List
IP → Firewall → Address Lists → New Firewall Address List (+)
215

Address List
• Instead of specifying address in General tab, switch to Advanced and choose Address List (Src. or Dst. depending on the rule)
IP → Firewall → New Firewall Rule (+) → Advanced
216

Address List
• Firewall action can be used to automatically add an address to the address list
• Permanently or for a while
IP → Firewall → New Firewall Rule (+) → Action
217

Address List
• Create an address list with allowed IPs, be sure to include your laptop IP
• Add an accept input filter rule on the bridge interface for WinBox port when connecting from the address which is included in the address list
• Create a drop input filter for everyone else connecting to the WinBox
LAB
218

Firewall Log
• Each firewall rule can be logged when matched
• Can add specific prefix to ease finding the records later
219

Firewall Log
IP → Firewall → Edit Firewall Rule → Action
220

Firewall Log
• Enable logging for both firewall rules that were created during Address List LAB
• Connect to WinBox using allowed IP address
• Disconnect and change the IP of your laptop to one which is not in the allowed list
• Try to connect to WinBox
• Change back the IP and observe log entries
LAB
221

NAT
• Network Address Translation (NAT) is a method of modifying source or destination IP address of a packet
• There are two NAT types - ‘source NAT’ and ‘destination NAT’
222

NAT
• NAT is usually used to provide access to an external network from a one which uses private IPs (src-nat)
• Or to allow access from an external network to a resource (e.g. web server) on an internal network (dst-nat)
223

NAT
Src addressNew
Src address
Private host Public server
224

NAT
Dst AddressNew
Dst Address
Server on a private network
Public host
225

NAT
• Firewall srcnat and dstnat chains are used to implement NAT functionality
• Same as Filter rules, work on If-Then principle
• Analysed sequentially until first match is found
226

Dst NATDst Address
159.148.147.196:80New Dst Address192.168.1.1:80
Web server192.168.1.1
Public host
227

Dst NAT
IP → Firewall → NAT → New NAT Rule (+)
228

Redirect
• Special type of dstnat
• This action redirects packets to the router itself
• Can be used to create transparent proxy services (e.g. DNS, HTTP)
229

RedirectDst Address
Configured DNS server:53
New Dst AddressRouter:53
DNSCache
230

Redirect
• Create dstnat redirect rule to send all requests with a destination port HTTP (tcp/80) to the router port 80
• Try to open www.mikrotik.com or any other website that uses HTTP protocol
• When done disable or remove the rule
231
LAB

Src NAT
• Masquerade is a special type of srcnat
Src address192.168.199.200
New Src addressrouter IP
192.168.199.200Public server
232

Src NAT
• srcnat action src-nat is meant for rewriting source IP address and/or port
• Example: two companies (A and B) have merged. Internally both use the same address space (172.16.0.0/16). They will set up a segment using a different address space as a buffer, both networks will require src-nat and dst-nat rules.
233

NAT Helpers
• Some protocols require so-called NAT helpers to work correctly in a NAT’d network
IP → Firewall → Service Ports
234

Connections
• New - packet is opening a new connection
• Established - packet belongs to already known connection
• Related - packet is opening a new connection but it has a relation to already known connection
• Invalid - packet does not belong to any of known connections
235

Connections
Invalid
New
Established
Related
236

Connection Tracking
• Manages information about all active connections
• Has to be enabled for NAT and Filter to work
• Note: connection state ≠ TCP state
237

Connection Tracking
IP → Firewall → Connections
238

FastTrack
• A method to accelerate packet flow through the router
• An established or related connection can be marked for fasttrack connection
• Bypasses firewall, connection tracking, simple queue and other features
• Currently supports only TCP and UDP protocols
239

FastTrackWithout With
360Mbps 890Mbps
Total CPU usage 100% Total CPU usage 86%
44% CPU usage on firewall 6% CPU usage on firewall
Tested on RB2011 with a single TCP stream
• For more info see FastTrack wiki page
240

Module 6 Summary
241

Module 7QoS
Certified Network Associate (MTCNA)
242
Quality of Service
• QoS is the overall performance of a network, particularly the performance seen by the users of the network
• RouterOS implements several QoS methods such as traffic speed limiting (shaping), traffic prioritisation and other
243

Speed Limiting
• Direct control over inbound traffic is not possible
• But it is possible to do it indirectly by dropping incoming packets
• TCP will adapt to the effective connection speed
244

Simple Queue
• Can be used to easy limit the data rate of:
• Client’s download (↓) speed
• Client’s upload (↑)speed
• Client’s total speed (↓ + ↑)
245

Simple Queue
• Disable Firewall FastTrack rule for Simple Queue to work
246
Queues → New Simple Queue(+)
Specify clientSpecify Max Limit
for the client

Torch
• Real-time traffic monitoring tool
247
Set interface
Set laptop address
Observe the traffic
Tools → Torch

Simple Queue
• Create speed limit for your laptop (192.168.XY.200)
• Set upload speed 128k, download speed 256k
• Open www.mikrotik.com/download and download current RouterOS version
• Observe the download speed
248
LAB

Simple Queue
• Instead of setting limits to the client, traffic to the server can also be throttled
249
Set Target to anySet Dst. to server
address
Queues

Simple Queue
• Using ping tool find out the address of www.mikrotik.com
• Modify existing simple queue to throttle connection to the mikrotik.com server
• Download MTCNA outline
• Observe the download speed
250
LAB

Guaranteed Bandwidth
• Used to make sure that the client will always get minimum bandwidth
• Remaining traffic will be split between clients on first come first served basis
• Controlled using Limit-at parameter
251
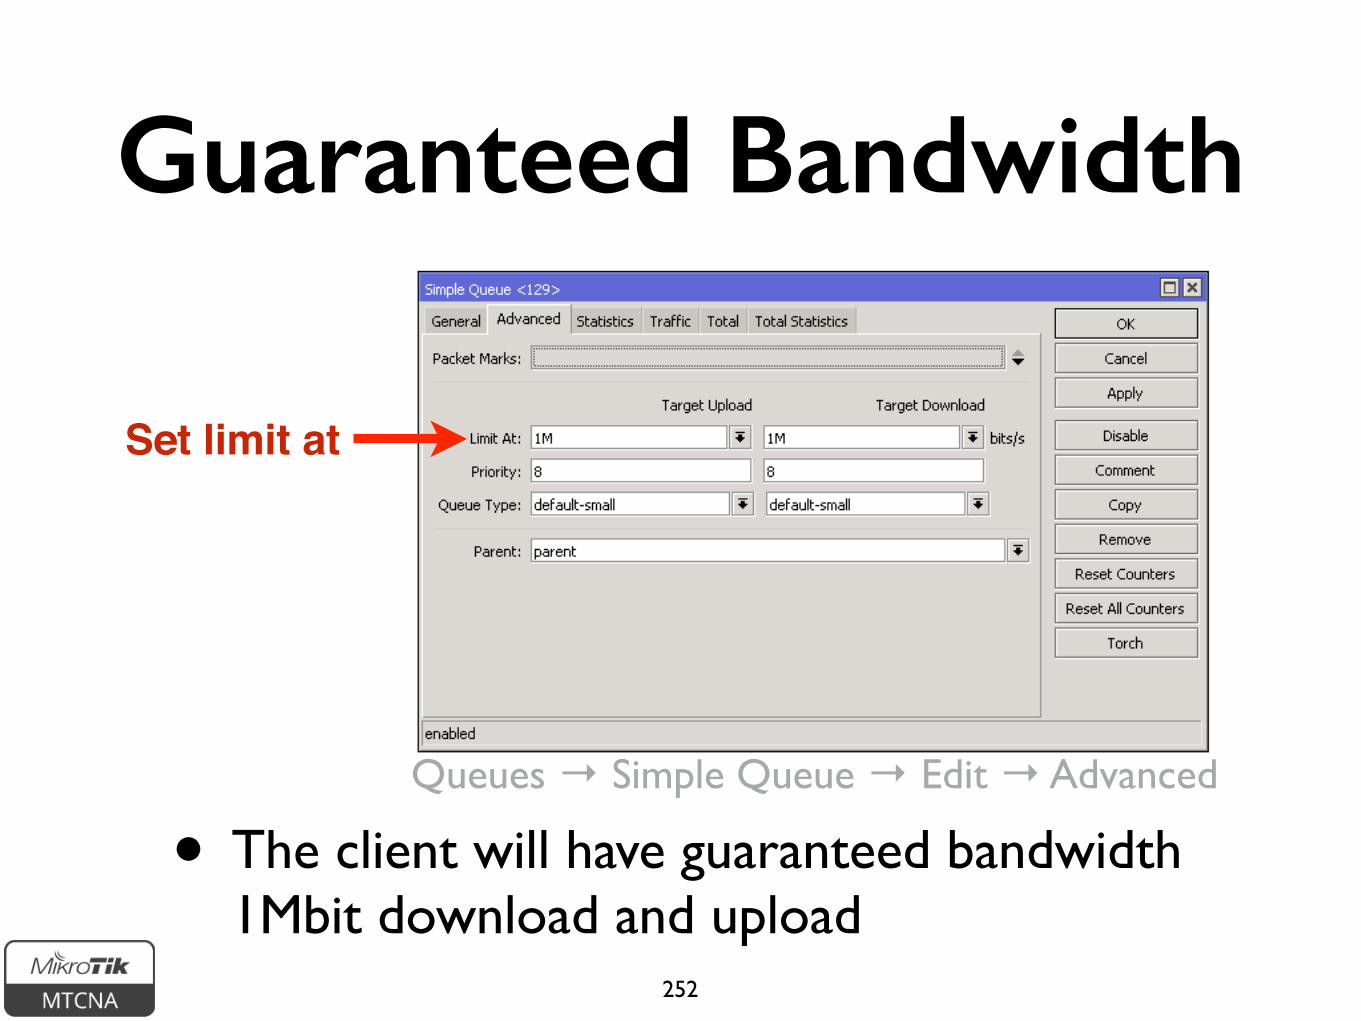
• The client will have guaranteed bandwidth 1Mbit download and upload
252
Guaranteed Bandwidth
Queues → Simple Queue → Edit → Advanced
Set limit at

• Example:
• Total bandwith: 10Mbits
• 3 clients, each have guaranteed bandwidth
• Remaining bandwidth split between clients
Guaranteed Bandwidth

254
Guaranteed Bandwidth
Guranteed bandwidth
Actual bandwidth
Queues

Burst
• Used to allow higher data rates for a short period of time
• Useful for HTTP traffic - web pages load faster
• For file downloads Max Limit restrictions still apply
255

Burst
256
Set burst limit, threshold and
time
Queues → Simple Queue → Edit

Burst
• Burst limit - max upload/download data rate that can be reached during the burst
• Burst time - time (sec), over which the average data rate is calculated (this is NOT the time of actual burst).
• Burst threshold - when average data rate exceeds or drops below the threshold the burst is switched off or on
257

Burst
• Modify the queue that was created in previous LAB
• Set burst limit to 4M for upload and download
• Set burst threshold 2M for upload and download
• Set burst time 16s for upload and download
258
LAB

Burst
• Open www.mikrotik.com, observe how fast the page loads
• Download the newest RouterOS version from MikroTik download page
• Observe the download speed with torch tool
259
LAB

Per Connection Queuing
• Queue type for optimising large QoS deployments by limiting per ‘sub-stream’
• Substitute multiple queues with one
• Several classifiers can be used:
• source/destination IP address
• source/destination port
260

• Rate - max available data rate of each sub-stream
• Limit - queue size of single sub-stream (KiB)
• Total Limit - max amount of queued data in all sub-streams (KiB)
261
Per Connection Queuing

PCQ Example
• Goal: limit all clients to 1Mbps download and 1Mbps upload bandwidth
• Create 2 new queue types
• 1 for Dst Address (download limit)
• 1 for Scr Address (upload limit)
• Set queues for LAN and WAN interfaces
262

263
PCQ Example
Queues → Queue Type → New Queue Type(+)

264
PCQ Example
WAN interface
LAN interface
Queues → Interface Queues
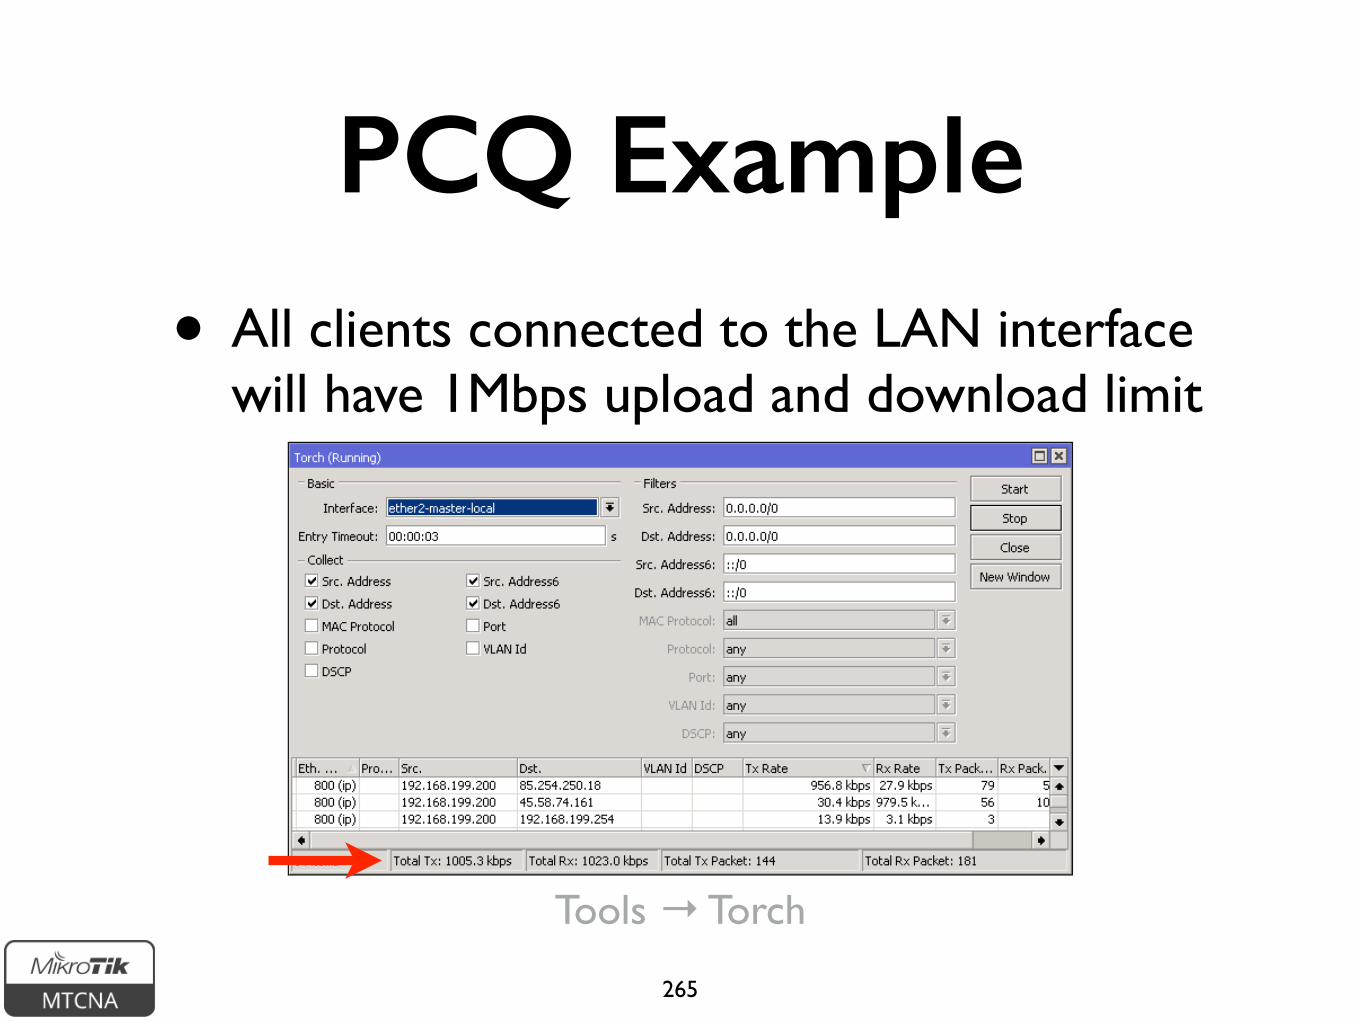
• All clients connected to the LAN interface will have 1Mbps upload and download limit
265
PCQ Example
Tools → Torch

PCQ Example
• The trainer will create two pcq queues and limit all clients (student routers) to 512Kbps upload and download bandwidth
• Try download newest RouterOS version from www.mikrotik.com and observe the download speed with torch tool
266
LAB

Module 7 Summary
267

Module 8Tunnels
Certified Network Associate (MTCNA)
268

Point-to-Point Protocol
• Point-to-Point Protocol (PPP) is used to establish a tunnel (direct connection) between two nodes
• PPP can provide connection authentication, encryption and compression
• RouterOS supports various PPP tunnels such as PPPoE, SSTP, PPTP and others
269

PPPoE
• Point-to-Point Protocol over Ethernet is a layer 2 protocol which is used to control access to the network
• Provides authentication, encryption and compression
• PPPoE can be used to hand out IP addresses to the clients
270

PPPoE
• Most desktop operating systems have PPPoE client installed by default
• RouterOS supports both PPPoE client and PPPoE server (access concentrator)
271

PPPoE Client
272
PPP → New PPPoE Client(+)
Set interface, service,
username, password

PPPoE Client
• If there are more than one PPPoE servers in a broadcast domain service name should also be specified
• Otherwise the client will try to connect to the one which responds first
273

PPPoE Client
• The trainer will create a PPPoE server on his/her router
• Disable the DHCP client on your router
• Set up PPPoE client on your router’s outgoing interface
• Set username mtcnaclass password mtcnaclass
274
LAB

PPPoE Client
• Check PPPoE client status
• Check that the connection to the Internet is available
• When done, disable PPPoE client
• Enable DHCP client to restore previous configuration
275
LAB

IP Pool
• Defines the range of IP addresses for handing out by RouterOS services
• Used by DHCP, PPP and HotSpot clients
• Addresses are taken from the pool automatically
276

IP Pool
277
IP → Pool → New IP Pool(+)
Set the pool name and
address range(s)

PPP Profile
• Profile defines rules used by PPP server for it’s clients
• Method to set the same settings for multiple clients
278

PPP Profile
279
Set the local and remote address of the tunnel
It is suggested to use encryption
PPP → Profiles → New PPP Profile(+)

PPP Secret
• Local PPP user database
• Username, password and other user specific settings can be configured
• Rest of the settings are applied from the selected PPP profile
• PPP secret settings override corresponding PPP profile settings
280

PPP Secret
281
Set the username, password and profile. Specify
service if necessary
PPP → Secrets → New PPP Secret(+)

PPPoE Server
• PPPoE server runs on an interface
• Can not be configured on an interface which is part of a bridge
• Either remove from the bridge or set up PPPoE server on the bridge
• For security reasons IP address should not be used on the interface on which PPPoE server is configured
282

PPPoE Server
283
Set the service name, interface,
profile and authentication
protocols

PPP Status
• Information about currently active PPP users
284
PPP → Active Connections

Point-to-Point Addresses
• When a connection is made between the PPP client and server, /32 addresses are assigned
• For the client network address (or gateway) is the other end of the tunnel (router)
285

• Subnet mask is not relevant when using PPP addressing
• PPP addressing saves 2 IP addresses
• If PPP addressing is not supported by the other device, /30 network addressing should be used
286
Point-to-Point Addresses

PPPoE Server
• Set up PPPoE server on an unused LAN interface (e.g. eth5) of the router
• Remove eth5 from the switch (set master port: none)
• Check that the interface is not a port of the bridge
• Check that the interface has no IP address
287
LAB
• Create an IP pool, PPP profile and secret for the PPPoE server
• Create the PPPoE server
• Configure PPPoE client on your laptop
• Connect your laptop to the router port on which the PPPoE server is configured
288
PPPoE ServerLAB

PPPoE Server
• Connect to PPPoE server
• Check that the connection to the Internet is available
• Connect to the router using MAC WinBox and observe PPP status
• Disconnect from the PPPoE server and connect the laptop back to previously used port
289
LAB

PPTP
• Point-to-point tunnelling protocol (PPTP) provides encrypted tunnels over IP
• Can be used to create secure connections between local networks over the Internet
• RouterOS supports both PPTP client and PPTP server
290

PPTP
• Uses port tcp/1723 and IP protocol number 47 - GRE (Generic Routing Encapsulation)
• NAT helpers are used to support PPTP in a NAT’d network
291

PPP Tunnel
292
Tunnel

PPTP Client
293
Set name, PPTP server IP address, username, password
PPP → New PPTP Client(+)

PPTP Client
• Use Add Default Route to send all traffic through the PPTP tunnel
• Use static routes to send specific traffic through the PPTP tunnel
• Note! PPTP is not considered secure anymore - use with caution!
• Instead use SSTP, OpenVPN or other
294

PPTP Server
• RouterOS provides simple PPTP server setup for administrative purposes
• Use QuickSet to enable VPN Access
295
Enable VPN access and
set VPN password

SSTP
• Secure Socket Tunnelling Protocol (SSTP) provides encrypted tunnels over IP
• Uses port tcp/443 (the same as HTTPS)
• RouterOS supports both SSTP client and SSTP server
• SSTP client available on Windows Vista SP1 and later versions
296

SSTP
• Open Source client and server implementation available on Linux
• As it is identical to HTTPS traffic, usually SSTP can pass through firewalls without specific configuration
297

SSTP Client
298
Set name, SSTP server IP address, username, password

SSTP Client
• Use Add Default Route to send all traffic through the SSTP tunnel
• Use static routes to send specific traffic through the SSTP tunnel
299

SSTP Client
• No SSL certificates needed to connect between two RouterOS devices
• To connect from Windows, a valid certificate is necessary
• Can be issued by internal certificate authority (CA)
300

PPTP/SSTP
• Pair up with your neighbor
• One of you will create PPTP server and SSTP client, the other - SSTP server and PPTP client
• Reuse previously created IP pool, PPP profile and secret for the servers
• Create client connection to your neighbor’s router
301
LAB

• Check firewall rules. Remember PPTP server uses port tcp/1723 and GRE protocol, SSTP port tcp/443
• Ping your neighbor’s laptop from your laptop (not pinging)
• WHY? (answer on the next slide)
302
PPTP/SSTPLAB

• There are no routes to your neighbors internal network
• Both create static routes to the other’s network, set PPP client interface as a gateway
• Ping your neighbor’s laptop from your laptop (should ping)
303
PPTP/SSTPLAB

PPP
• In more detail PPPoE, PPTP, SSTP and other tunnel protocol server and client implementations are covered in MTCRE and MTCINE MikroTik certified courses
• For more info see: http://training.mikrotik.com
304

Module 8 Summary
305

Module 9Misc
Certified Network Associate (MTCNA)
306

RouterOS Tools
• RouterOS provides various utilities that help to administrate and monitor the router more efficiently
307

• Allows to send e-mails from the router
• For example to send router backup
308
Tools → Email/export file=export /tool e-mail send [email protected]\ subject="$[/system identity get name] export"\ body="$[/system clock get date]\ configuration file" file=export.rsc
A script to make an export file and send it via e-mail

• Configure your SMTP server settings on the router
• Export the configuration of your router
• Send it to your e-mail from the RouterOS
309
LABO
ptional

Netwatch
• Monitors state of hosts on the network
• Sends ICMP echo request (ping)
• Can execute a script when a host becomes unreachable or reachable
310
Tools → Netwatch

Ping
• Used to test the reachability of a host on an IP network
• To measure the round trip time for messages between source and destination hosts
• Sends ICMP echo request packets
311
Tools → Ping

Ping
• Ping your laptop’s IP address from the router
• Click ‘New Window’ and ping www.mikrotik.com from the router
• Observe the round trip time difference
312
LAB

Traceroute
• Network diagnostic tool for displaying route (path) of packets across an IP network
• Can use icmp or udp protocol
313
Tools → Traceroute

Traceroute
• Choose a web site in your country and do a traceroute to it
• Click ‘New Window’ and do a traceroute to www.mikrotik.com
• Observe the difference between the routes
314
LAB

Profile
• Shows CPU usage for each RouterOS running process in real time
• idle - unused CPU resources
• For more info see Profile wiki page
315
Tools → Profile

Interface Traffic Monitor
• Real time traffic status
• Available for each interface in traffic tab
• Can also be accessed from both WebFig and command line interface
316Interfaces → wlan1 → Traffic

Torch
• Real-time monitoring tool
• Can be used to monitor the traffic flow through the interface
• Can monitor traffic classified by IP protocol name, source/destination address (IPv4/IPv6), port number
317

Torch
318
Tools → Torch
• Traffic flow from the laptop to the mikrotik.com web server HTTPS port

Graphs
• RouterOS can generate graphs showing how much traffic has passed through an interface or a queue
• Can show CPU, memory and disk usage
• For each metric there are 4 graphs - daily, weekly, monthly and yearly
319

Graphs
320
Tools → Graphing
Set specific interface to
monitor or leave all, set IP address/subnet which will be able to access
the graphs

Graphs
• Available on the router: http://router_ip/graphs
321

Graphs
322

Graphs
• Enable interface, queue and resource graphs on your router
• Observe the graphs
• Download a large file from the Internet
• Observe the graphs
323
LABO
ptional

SNMP
• Simple Network Management Protocol (SNMP)
• Used for monitoring and managing devices
• RouterOS supports SNMP v1, v2 and v3
• SNMP write support is available only for some settings
324

SNMP
325
Tools → SNMP

The Dude
• Application by MikroTik which can dramatically improve the way you manage your network environment
• Automatic discovery and layout map of devices
• Monitoring of services and alerting
• Free of charge
326

The Dude
• Supports SNMP, ICMP, DNS and TCP monitoring
• Server part runs on RouterOS (CCR, CHR or x86)
• Client on Windows (works on Linux and OS X using Wine)
• For more info see The Dude wiki page
327

The Dude
328

The Dude
• Download the Dude client for Windows from mikrotik.com/download page
• Install and connect to MikroTik Dude demo server: dude.mt.lv
• Observe the Dude
329
LABO
ptional

The Dude
330
LABO
ptional

Contacting Support
• In order for MikroTik support to be able to help better, few steps should be taken beforehand
• Create support output file (supout.rif)
331

Contacting Support
• autosupout.rif can be created automatically in case of hardware malfunction
• Managed by watchdog process
• Before sending to MikroTik, support output file contents can be viewed in your mikrotik.com account
• For more info see Support Output File and Watchdog wiki pages
332

System Logs
• By default RouterOS already logs information about the router
• Stored in memory
• Can be stored on disk
• Or sent to a remote syslog server
333
System → Logging

System Logs
• To enable detailed logs (debug), create a new rule
• Add debug topic
334
System → Logging → New Log Rule

Contacting Support
• Before contacting [email protected] check these resources
• wiki.mikrotik.com - RouterOS documentation and examples
• forum.mikrotik.com - communicate with other RouterOS users
• mum.mikrotik.com - MikroTik User Meeting page - presentations videos
335

Contacting Support
• It is suggested to add meaningful comments to your rules, items
• Describe as detailed as possible so that MikroTik support team can help you better
• Include your network diagram
• For more info see support page
336

Module 9 Summary
337

MTCNA Summary
338

For more info see: http://training.mikrotik.com
MTCNA
MTCRE MTCWE MTCTCE MTCUME
MTCINE
Introduction Course
MikroTik Certified Courses
339

Certification Test
• If needed reset router configuration and restore from a backup
• Make sure that you have an access to the www.mikrotik.com training portal
• Login with your account
• Choose my training sessions
• Good luck!
340