cesm1.0.3 user’s guide - community earth system model · netcdf fortran api calls the netcdf c...
TRANSCRIPT

CESM1.0.3 User’s Guide
Mariana VertensteinNCAR
Tony CraigNCAR
Adrianne MiddletonNCAR
Diane FeddemaNCAR
Chris FischerNCAR

CESM1.0.3 User’s Guideby Mariana Vertenstein, Tony Craig, Adrianne Middleton, Diane Feddema, and Chris Fischer

Table of Contents1. Introduction .......................................................................................................................1
How To Use This Document.......................................................................................1CESM Overview...........................................................................................................1
CESM Software/Operating System Prerequisites .........................................1CESM Components ............................................................................................2CESM Component Sets ......................................................................................7CESM Grids .........................................................................................................8CESM Machines ................................................................................................10CESM Validation...............................................................................................10
Downloading CESM ..................................................................................................11Downloading the code and scripts ................................................................11Obtaining new release versions of CESM .....................................................12Downloading input data .................................................................................13
Quick Start (CESM Workflow) .................................................................................142. Creating a Case................................................................................................................17
How to create a new case ..........................................................................................17Modifying an xml file ................................................................................................20Cloning a case (Experts only) ...................................................................................20
3. Configuring a Case .........................................................................................................23Configure Overview ..................................................................................................23Customizing the configuration ................................................................................24
Setting the case PE layout................................................................................25Setting the case initialization type..................................................................26
Setting component-specific variables ......................................................................27CAM variables ..................................................................................................28CLM variables ...................................................................................................30CICE variables...................................................................................................32POP2 variables ..................................................................................................33CISM variables ..................................................................................................34DATM variables ................................................................................................35DLND variables ................................................................................................36DICE variables ..................................................................................................37DOCN variables................................................................................................37Driver/coupler variables.................................................................................38Other variables..................................................................................................40
Reconfiguring a Case .................................................................................................40Summary of Files in the Case Directory .................................................................40
4. Building a Case ...............................................................................................................43Input data ....................................................................................................................43
User-created input data ...................................................................................44Using the input data server.............................................................................44
Build-time variables...................................................................................................45Compiler settings .......................................................................................................46User-modified source code .......................................................................................46Building the executable .............................................................................................46Rebuilding the executable.........................................................................................47
5. Running a case.................................................................................................................49Customizing runtime settings ..................................................................................49
Setting run control variables ...........................................................................49CESM Input/Output........................................................................................50
Load balancing a case ................................................................................................53Model timing data ............................................................................................53Using model timing data.................................................................................54
The Run........................................................................................................................56Setting the time limits ......................................................................................56Submitting the run............................................................................................56
iii

Restarting a run.................................................................................................57Data flow during a model run ........................................................................58
Testing a case...............................................................................................................596. Post Processing CESM Output.....................................................................................617. Porting CESM..................................................................................................................63
Porting to a new machine .........................................................................................63Porting using a generic machine ....................................................................63Porting via user defined machine files ..........................................................65
Port Validation............................................................................................................678. CESM Testing ..................................................................................................................69
Testing overview ........................................................................................................69create_production_test ..............................................................................................69create_test ....................................................................................................................69create_test_suite..........................................................................................................70Debugging Tests That Fail.........................................................................................71
9. Use Cases ..........................................................................................................................73The basic example ......................................................................................................73Setting up a branch or hybrid run ...........................................................................73Changing PE layout ...................................................................................................74Setting CAM output fields ........................................................................................76Setting CAM forcings ................................................................................................77Initializing the ocean model with a spun-up initial condition ............................78Taking a run over from another user.......................................................................79Use of an Earth System Modeling Framework (ESMF) library and ESMF
interfaces ............................................................................................................8010. Troubleshooting ............................................................................................................83
Troubleshooting create_newcase .............................................................................83Troubleshooting configure ........................................................................................83Troubleshooting job submission problems.............................................................84Troubleshooting runtime problems .........................................................................84
11. Frequently Asked Questions (FAQ)..........................................................................87What are the directories and files in my case directory? ......................................87What are CESM1 env variables and env xml files? ...............................................89How do I modify the value of CESM env variables?............................................90Why aren’t my env variable changes working? ....................................................90Why is there file locking and how does it work? ..................................................90How do I change processor counts and component layouts on processors? ....91What is pio?.................................................................................................................91How do I use pnetcdf?...............................................................................................92Is there more information about the coupler/driver implementation? .............92How do I create my own compset? .........................................................................92How do I add a new grid? ........................................................................................92What calendars are supported in CESM?...............................................................93How do I add a new component model to CESM?...............................................93How are cice and pop decompositions set and how do I override them?.........94How do I change history file output frequency and content for CAM and CLM
during a run?.....................................................................................................95
iv

A. Supported Component Sets.........................................................................................99B. Supported Grids...........................................................................................................111C. Supported Machines ...................................................................................................113D. env_case.xml variables ...............................................................................................115E. env_conf.xml variables................................................................................................119F. env_mach_pes.xml variables......................................................................................127G. env_build.xml variables.............................................................................................131H. env_run.xml variables ................................................................................................135Glossary ..............................................................................................................................145
v

vi

Chapter 1. Introduction
How To Use This DocumentThis guide instructs both novice and experienced users on building and runningCESM. If you are a new user, we recommend that the introductory sections be readbefore moving onto other sections or the Quick Start procedure. This document iswritten so, as much as possible, individual sections stand on their own and the user’sguide can be scanned and sections read in a relatively ad hoc order. In addition, theweb version provides clickable links that tie different sections together.
The chapters attempt to provide relatively detailed information about specific aspectsof CESM1 like setting up a case, building the model, running the model, porting, andtesting. There is also a large section of use cases and a Frequently Asked Questions(FAQ) section.
Throughout the document, this presentation style indicates shellcommands and options, fragments of code, namelist variables, etc.Where examples from an interactive shell session are presented,lines starting with ">" indicate the shell prompt.
Please feel free to provide feedback to CESM about how to improve the documenta-tion.
CESM OverviewThe Community Earth System Model (CESM) is a coupled climate model for sim-ulating Earth’s climate system. Composed of five separate models simultaneouslysimulating the Earth’s atmosphere, ocean, land, land-ice, and sea-ice, plus one cen-tral coupler component, CESM allows researchers to conduct fundamental researchinto the Earth’s past, present, and future climate states.
The CESM system can be configured a number of different ways from both a scienceand technical perspective. CESM supports several different resolutions and compo-nent configurations. In addition, each model component has input options to con-figure specific model physics and parameterizations. CESM can be run on a numberof different hardware platforms and has a relatively flexible design with respect toprocessor layout of components. CESM also supports both an internally developedset of component interfaces and the ESMF compliant component interfaces (See theSection called Use of an Earth System Modeling Framework (ESMF) library and ESMFinterfaces in Chapter 9)
The CESM project is a cooperative effort among U.S. climate researchers. Primar-ily supported by the National Science Foundation (NSF) and centered at the Na-tional Center for Atmospheric Research (NCAR) in Boulder, Colorado, the CESMproject enjoys close collaborations with the U.S. Department of Energy and the Na-tional Aeronautics and Space Administration. Scientific development of the CESMis guided by the CESM working groups, which meet twice a year. The main CESMworkshop is held each year in June to showcase results from the various workinggroups and coordinate future CESM developments among the working groups. TheCESM website1 provides more information on the CESM project, such as the manage-ment structure, the scientific working groups, downloadable source code, and onlinearchives of data from previous CESM experiments.
CESM Software/Operating System PrerequisitesThe following are the external system and software requirements for installing andrunning CESM1.0.
1

Chapter 1. Introduction
• UNIX like operating system (LINUX, AIX, OSX)
• csh, sh, perl, and xml scripting languages
• subversion client version 1.4.2 or greater
• Fortran 90 and C compilers. pgi, intel, and xlf are recommended options.
• MPI (although CESM does not absolutely require it for running on one processoronly)
• netcdf 3.6.2 or greater 2
• Earth System Modeling Framework (ESMF) 3 (optional) 5.2.0p1
• pnetcdf 4 (optional) 1.1.1 or newer
The following table contains the version in use at the time of release. These versionsare known to work at the time of the release for the specified hardware.
Table 1-1. Recommmended Software Package Versions by Machine
Machine Version Recommendations
Cray XT Series pgf95 9.0.4, pgcc 10.2, MPT3.5.1
IBM Power Series xlf 12.1, xlC 10.1
IBM Bluegene/P xlf 11.1, xlC 9.0
Generic Linux Machine ifort (intel64) 10.1.018, icc 10.1.018,openmpi 1.2.8
Note: CESM may not compile with pgi compilers prior to release 9.0.x. PGI FortranVersion 7.2.5 aborts with an internal compiler error when compiling CESM1.0, specif-ically POP.
CautionNetCDF must be built with the same Fortran compiler as CESM. Inthe netCDF build the FC environment variable specifies which Fortrancompiler to use. CESM is written mostly in Fortran, netCDF is writtenin C. Because there is no standard way to call a C program from aFortran program, the Fortran to C layer between CESM and netCDF willvary depending on which Fortran compiler you use for CESM. When afunction in the netCDF library is called from a Fortran application, thenetCDF Fortran API calls the netCDF C library. If you do not use thesame compiler to build netCDF and CESM you will in most cases geterrors from netCDF saying certain netCDF functions cannot be found.
Parallel-netCDF, also referred to as pnetcdf, is optional. If a user chooses to usepnetcdf, version 1.1.1. or later should be used with CESM1.0. It is a library thatis file-format compatible with netCDF, and provides higher performance by usingMPI-IO. Pnetcdf is turned on inside pio by setting the PNETCDF_PATH variable inthe pio CONFIG_ARGS in the Macros.$MACH file. You must also specify that youwant pnetcdf at runtime via the io_type argument that can be set to either "netcdf" or"pnetcdf" for each component.
CESM ComponentsCESM consists of five geophysical models: atmosphere (atm), sea-ice (ice), land (lnd),ocean (ocn), and land-ice (glc), plus a coupler (cpl) that coordinates the models andpasses information between them. Each model may have "active," "data," "dead," or"stub" component version allowing for a variety of "plug and play" combinations.
2
Chapter 1. Introduction
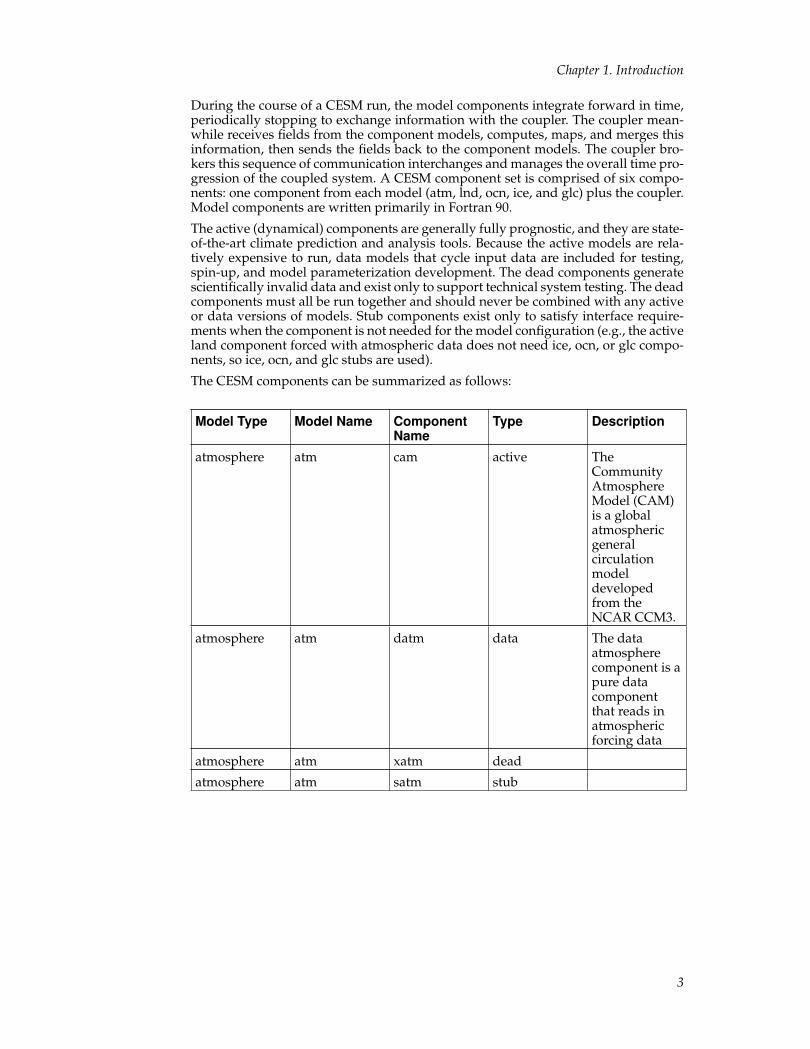
During the course of a CESM run, the model components integrate forward in time,periodically stopping to exchange information with the coupler. The coupler mean-while receives fields from the component models, computes, maps, and merges thisinformation, then sends the fields back to the component models. The coupler bro-kers this sequence of communication interchanges and manages the overall time pro-gression of the coupled system. A CESM component set is comprised of six compo-nents: one component from each model (atm, lnd, ocn, ice, and glc) plus the coupler.Model components are written primarily in Fortran 90.
The active (dynamical) components are generally fully prognostic, and they are state-of-the-art climate prediction and analysis tools. Because the active models are rela-tively expensive to run, data models that cycle input data are included for testing,spin-up, and model parameterization development. The dead components generatescientifically invalid data and exist only to support technical system testing. The deadcomponents must all be run together and should never be combined with any activeor data versions of models. Stub components exist only to satisfy interface require-ments when the component is not needed for the model configuration (e.g., the activeland component forced with atmospheric data does not need ice, ocn, or glc compo-nents, so ice, ocn, and glc stubs are used).
The CESM components can be summarized as follows:
Model Type Model Name ComponentName
Type Description
atmosphere atm cam active TheCommunityAtmosphereModel (CAM)is a globalatmosphericgeneralcirculationmodeldevelopedfrom theNCAR CCM3.
atmosphere atm datm data The dataatmospherecomponent is apure datacomponentthat reads inatmosphericforcing data
atmosphere atm xatm dead
atmosphere atm satm stub
3

Chapter 1. Introduction
Model Type Model Name ComponentName
Type Description
land lnd clm active TheCommunityLand Model(CLM) is theresult of acollaborativeprojectbetweenscientists in theTerrestrialSciencesSection of theClimate andGlobalDynamicsDivision(CGD) atNCAR and theCESM LandModelWorkingGroup. Otherprincipalworkinggroups thatalso contributeto the CLM areBiogeochem-istry,Paleoclimate,and ClimateChange andAssessment.
land lnd dlnd data The data landcomponentdiffers fromthe other datamodels in thatit can run as apurelydata-runoffmodel (readingin runoff data)or as a purelydata-landmodel (readingin couplerhistory data foratm/landfluxes and landalbedosproduced by aprevious run)or both.
land lnd xlnd dead
4

Chapter 1. Introduction
Model Type Model Name ComponentName
Type Description
land lnd slnd stub
ocean ocn pop active The oceanmodel is anextension ofthe ParallelOceanProgram (POP)Version 2 fromLos AlamosNationalLaboratory(LANL).
ocean ocn docn data The data oceancomponent hastwo distinctmodes ofoperation. Itcan run as apure datamodel, readingocean SSTs(normallyclimatological)from inputdatasets,interpolatingin space andtime, and thenpassing theseto the coupler.Alternatively,docn cancomputeupdated SSTsbased on a slabocean modelwhere bottomocean heat fluxconvergenceand boundarylayer depthsare read in andused with theatmo-sphere/oceanand ice/oceanfluxes obtainedfrom thecoupler.
ocean ocn xocn dead
ocean ocn socn stub
5

Chapter 1. Introduction
Model Type Model Name ComponentName
Type Description
sea-ice ice cice active The sea-icecomponent(CICE) is anextension ofthe LosAlamosNationalLaboratory(LANL) sea-icemodel and wasdevelopedthoughcollaborationwithin theCESM PolarClimateWorkingGroup(PCWG). InCESM, CICEcan run as afullyprognosticcomponent orin prescribedmode whereice coverage(normallyclimatological)is read in.
sea-ice ice dice data The data icecomponent is apartiallyprognosticmodel. Themodel reads inice coverageand receivesatmosphericforcing fromthe coupler,and then itcalculates theice/atmosphereand ice/oceanfluxes. Thedata icecomponentacts verysimilarly toCICE runningin prescribedmode.
sea-ice ice xice dead
sea-ice ice sice stub
6

Chapter 1. Introduction
Model Type Model Name ComponentName
Type Description
land-ice glc cism active The CISMcomponent isan extension ofthe Glimmerice sheetmodel.
land-ice glc sglc stub
coupler cpl cpl active TheCCSM4/CESM1coupler wasbuilt primarilythrough acollaborationof the NCARCESMSoftwareEngineeringGroup and theArgonneNationalLaboratory(ANL). TheMCT couplinglibraryprovides muchof theinfrastructure.cpl7 is used inCCSM4 andCESM1 and istechnically acompletelynew driver andcouplercompared toCCSM3.
CESM Component SetsThe CESM components can be combined in numerous ways to carry out variousscientific or software experiments. A particular mix of components, along withcomponent-specific configuration and/or namelist settings is called a componentset or "compset." CESM has a shorthand naming convention for component sets thatare supported out-of-the-box.
The compset name usually has a well defined first letter followed by some charactersthat are indicative of the configuration setup. Each compset name has a correspond-ing short name. Users are not limited to the predefined component set combinations.A user may define their own component set.
See the component set table for a complete list of supported compset options. Run-ning create_newcase with the option "-list" will also always provide a listing of thesupported out-of-the-box component sets for the local version of CESM1. In general,the first letter of a compset name indicates which components are used. An exceptionto this rule is the use of "G" as a second letter to indicate use of the active glc model,
7

Chapter 1. Introduction
CISM. The list of first letters and their corresponding component sets each denotesappears below:
Designation Components Details
A datm,dlnd,dice,docn,sglc All DATA componentswith stub glc (usedprimarily for testing)
B cam,clm,cice,pop2,sglc FULLY ACTIVEcomponents with stub glc
C datm,dlnd,dice,pop2,sglc POP active with data atm,lnd(runoff), and ice plusstub glc
D datm,slnd,cice,docn,sglc CICE active with data atmand ocean plus stub landand glc
E cam,clm,cice,docn,sglc CAM, CLM, and CICEactive with data ocean(som mode) plus stub glc
F cam,clm,cice,docn,sglc CAM, CLM, andCICE(prescribed mode)active with data ocean(sstdata mode) plus stubglc
G datm,dlnd,cice,pop2,sglc POP and CICE active withdata atm and lnd(runoff)plus stub glc
H datm,slnd,cice,pop2,sglc POP and CICE active withdata atm and stub landand glc
I datm,clm,sice,socn,sglc CLM active with data atmand stub ice, ocean, andglc
S satm,slnd,sice,socn,sglc All STUB components(used for testing only)
X xatm,xlnd,xice,xocn,sglc All DEAD componentsexcept for stub glc (usedfor testing only)
CESM GridsThe grids are specified in CESM1 by setting an overall model resolution. Once theoverall model resolution in set, components will read in appropriate grids filesand the coupler will read in appropriate mapping weights files. Coupler mappingweights are always generated externally in CESM1. The components will sendthe grid data to the coupler at initialization, and the coupler will check that thecomponent grids are consistent with each other and with the mapping weights files.
In CESM1, the ocean and ice must be on the same grid, but unlike CCSM3, the at-mosphere and land can now be on different grids. Each component determines itsown unique grid decomposition based upon the total number of pes assigned to thatcomponent.
CESM1 supports several types of grids out-of-the-box including single point, finitevolume, spectral, cubed sphere, displaced pole, and tripole. These grids are used
8

Chapter 1. Introduction
internally by the models. Input datasets are usually on the same grid but in somecases, they can be interpolated from regular lon/lat grids in the data models. Thefinite volume and spectral grids are generally associated with atmosphere and landmodels but the data ocean and data ice models are also supported on those grids.The cubed sphere grid is used only by the active atmosphere model, cam. And thedisplaced pole and tripole grids are used by the ocean and ice models. Not every gridcan be run by every component.
CESM1 has a specific naming convention for individual grids as well as the overallresolution. The grids are named as follows:
• "[dlat]x[dlon]" are regular lon/lat finite volume grids where dlat and dlon are theapproximate grid spacing. The shorthand convention is "fnn" where nn is generallya pair of numbers indicating the resolution. An example is 1.9x2.5 or f19 for theapproximately "2-degree" finite volume grid. Note that CAM uses an [nlat]x[nlon]naming convection internally for this grid.
• "Tnn" are spectral lon/lat grids where nn is the spectral truncation value for theresolution. The shorthand name is identical. An example is T85.
• "ne[X]np[Y]" are cubed sphere resolutions where X and Y are integers. The shortname is generally ne[X]. An example is ne30np4 or ne30.
• "pt1" is a single grid point.
• "gx[D]v[n]" is a displaced pole grid where D is the approximate resolution in de-grees and n is the grid version. The short name is generally g[D][n]. An example isgx1v6 or g16 for a grid of approximately 1-degree resolution.
• "tx[D]v[n]" is a tripole grid where D is the approximate resolution in degrees andn is the grid version. The short name is [agrid]_[lgrid]_[oigrid]. An example isne30_f19_g16.
The model resolution is specified by setting a combination of these resolutions. Ingeneral, the overall resolution is specified in one of the two following ways for reso-lutions where the atmosphere and land grids are identical or not.
"[algrid]_[oigrid]"
In this grid, the atmosphere and land grid are identical and specified by the valueof "algrid". The ice and ocean grids are always identical and specified by "oigrid".For instance, f19_g16 is the finite volume 1.9x2.5 grid for the atmosphere andland components combined with the gx1v6 displaced pole grid for the oceanand ice components.
"[agrid]_[lgrid]_[oigrid]" or "[agrid][lgrid]_[oigrid]" (for short names)
In this case, the atmosphere, land, and ocean/ice grids are all unique. For exam-ple ne30_f19_g16 is the cubed sphere ne30np4 atmospheric grid running withthe finite volume 1.9x2.5 grid for the land model combined with the gx1v6 dis-placed pole grid running on the ocean and ice models.
For a complete list of currently supported grid resolutions, please see the supportedresolutions table.
The ocean and ice models run on either a Greenland dipole or a tripole grid (seefigures). The Greenland Pole grid is a latitude/longitude grid, with the North Poledisplaced over Greenland to avoid singularity problems in the ocn and ice models.Similarly, the Poseidon tripole grid (http://climate.lanl.gov/Models/POP/ ) is a lat-itude/longitude grid with three poles that are all centered over land.
9

Chapter 1. Introduction
Greenland Pole Grid
Poseidon Tripole Grid
CESM MachinesScripts for supported machines, prototype machines and generic machines are pro-vided with the CESM1 release. Supported machines have machine specific files andsettings added to the CESM1 scripts and are machines that should run CESM casesout-of-the-box. Machines are supported in CESM on an individual basis and are usu-ally listed by their common site-specific name. To get a machine ported and function-ally supported in CESM, local batch, run, environment, and compiler informationmust be configured in the CESM scripts. Prototype machines are machines in theCESM user community that CESM has been ported to and the machine specific filesand settings were provided by the user community. Prototype machines all start withthe prefix prototype_. These machines may not work out-of-the-box, however, to thebest of NCAR’s knowledge these machine specific files and settings worked at onetime. Generic machine generally refers more to classes of machines, like IBM AIXor a linux cluster with an intel compiler, and the generic machine names in CESM1all start with the generic_ prefix. Generic machines require that a user provide somesettings via command line options with create_newcase and then some additionaleffort will generally be required to get the case running. Generic machines are handyfor quickly getting a case running on a new platform, and they also can acceleratethe porting process. For more information on porting, see Chapter 7. To get a list ofcurrent machines in each of these categories (supported, prototype and generic) runscript create_newcase with option -list from the $CCSMROOT directory.
The list of available machines are documented in CESM machines . Running cre-ate_newcase with the "-list" option will also show the list of available machines forthe current local version of CESM1. Supported machines have undergone the fullCESM porting process. A prototype machine is provided by the user community andmay not work out-of-the-box, but it is a good starting point for a port to a new ma-chine of the same type. A generic machine is provided as a starting point for newusers to introduce a machine that does not belong to any of the above categories. Themachines available in each of these categories changes as access to machines changeover time.
CESM ValidationAlthough CESM1.0 can be run out-of-the-box for a variety of resolutions, componentcombinations, and machines, MOST combinations of component sets, resolutions,and machines have not undergone rigorous scientific climate validation.
Long control runs are being carried out, and these will be documented in future ver-sions of this guide, located at http://www.cesm.ucar.edu/models/cesm1.0. Modeloutput from these long control runs will accompany future releases, and these con-trol runs should be scientifically reproducible on the original platform or other plat-
10

Chapter 1. Introduction
forms. Bit-for-bit reproducibility cannot be guaranteed due to variations in compileror system versions.
Users should carry out your own validations on any platform prior to doing scientificruns or scientific analysis and documentation.
Downloading CESM
Downloading the code and scriptsCESM release code will be made available through a Subversion repository. Accessto the code will require Subversion client software in place that is compatible withour Subversion server software, such as a recent version of the command line client,svn. Currently, our server software is at version 1.4.2. We recommend using a client atversion 1.5 or later, though older versions may suffice. We cannot guarantee a clientolder than 1.4.2. For more information or to download open source tools, visit:
http://subversion.tigris.org/5
With a valid svn client installed on the machine where CESM1 will be built and run,the user may download the latest version of the release code. First view the availablerelease versions with the following command:
> svn list https://svn-ccsm-release.cgd.ucar.edu/model_versions
When contacting the Subversion server for the first time, the following certificatemessage will likely be generated:
Error validating server certificate for ’https://svn-ccsm-release.cgd.ucar.edu:443’:- The certificate is not issued by a trusted authority. Use thefingerprint to validate the certificate manually!
- The certificate hostname does not match.- The certificate has expired.
Certificate information:- Hostname: localhost.localdomain- Valid: from Feb 20 23:32:25 2008 GMT until Feb 19 23:32:25 2009 GMT- Issuer: SomeOrganizationalUnit, SomeOrganization, SomeCity, SomeState, --- Fingerprint: 86:01:bb:a4:4a:e8:4d:8b:e1:f1:01:dc:60:b9:96:22:67:a4:49:ff
(R)eject, accept (t)emporarily or accept (p)ermanently?
After accepting the certificate, the repository will request a username and password.Be aware that the request may set current machine login id as the default username.Once correctly entered, the username and password will be cached in a protectedsubdirectory of the user’s home directory so that repeated entry of this informationwill not required for a given machine.
The release tags should follow a recognizable naming pattern, and they can bechecked out from the central source repository into a local sandbox directory. Thefollowing example shows how to checkout model version cesm1.0:
> svn co https://svn-ccsm-release.cgd.ucar.edu/model_versions/cesm1_0 cesm1_0
11

Chapter 1. Introduction
CautionIf a problem was encountered during checkout, which may happen withan older version of the client software, it may appear to have down-loaded successfully, but in fact only a partial checkout has occurred. Toensure a successful download, make sure the last line of svn outputhas the following statement:
Checked out revision XXXXX.
Or, in the case of an ’svn update’ or ’svn switch’:
Updated to revision XXXXX.
This will create a directory called cesm1_0 that can be used to modify, build, and runthe model. The following Subversion subcommands can be executed in the workingsandbox directory.
For various information regarding the release version checked out...
> svn info
For a listing of files that have changed since checkout...
> svn status
For a description of the changes made to the working copy...
> svn diff
Obtaining new release versions of CESMTo update to a newer version of the release code you can download a new version ofCESM1.0 from the svn central source repository in the following way:
Suppose for example that a new version of cesm1.0 is available at https://svn-ccsm-release.cgd.ucar.edu/model_versions/cesm1_0_<newversion>. This version can bechecked out directly using the same standard CESM download method.
As an alternative, some users may find the svn switch operation useful. In particular,if you’ve used svn to check out the previous release, cesm1_0_<previousversion>,and if you’ve made modifications to that code, you should consider using the svnswitch operation. This operation will not only upgrade your code to the versioncesm1_0_<newversion>, but will also attempt to reapply your modifications to thenewer version.
How to use the svn switch operation:
Suppose you’ve used svn to check out cesm1_0_<previousversion> into the directorycalled /home/user/cesm1_0
1. Make a backup copy of /home/user/cesm1_0 -- this is important in case youencounter any problems with the update
2. cd to the top level of your cesm1_0 code tree...> cd /home/user/cesm1_0
3. Issue the following svn command...> svn switch https://svn-ccsm-release.cgd.ucar.edu/model_versions/cesm1_0_<newversion>
12

Chapter 1. Introduction
The svn switch operation will upgrade all the code to the newcesm1_0_<newversion> version, and for any files that have been modified, willattempt to reapply those modifications to the newer code.
Note that an update to a newer version of the release code may result in conflictswith modified files in the local working copy. These conflicts will likely require thatdifferences be resolved manually before use of the working copy may continue. Forhelp in resolving svn conflicts, please visit the subversion website,
http://svnbook.red-bean.com/en/1.5/svn.tour.cycle.html#svn.tour.cycle.resolve6
A read-only option is available for users to view via a web browser at
https://svn-ccsm-release.cgd.ucar.edu7
where the entire CESM1 release directory tree can be navigated.
The following examples show common problems and their solutions.
Problem 1: If the hostname is typed incorrectly:
> svn list https://svn-ccsm-release.cgd.ucar.edu/model_versions/cesm1_0_<version>svn: PROPFIND request failed on ’/model_versions/cesm1_0_<version>’svn: PROPFIND of ’/model_versions/cesm1_0_<version>’: Could not resolve hostname ‘svn-ccsm-releese’: Host not found (https://svn-ccsm-releese)
Problem 2: If http is typed instead of https:
> svn list http://svn-ccsm-release.cgd.ucar.edu/model_versions/cesm1_0_<version>svn: PROPFIND request failed on ’/model_versions/cesm1_0_<version>’svn: PROPFIND of ’/model_versions/cesm1_0_<version>’: could not connect to server (http://svn-ccsm-release.cgd.ucar.edu)
Downloading input dataInput datasets are needed to run the model. CESM input data will be made availablethrough a separate Subversion input data repository. The username and passwordfor the input data repository will be the same as for the code repository.
Note: The input data repository contains datasets for many configurations and resolutionsand is well over 1 TByte in total size. DO NOT try to download the entire dataset.
Datasets can be downloaded on a case by case basis as needed and CESM now pro-vides tools to check and download input data automatically.
A local input data directory should exist on the local disk, and it also needs to beset in the CESM scripts via the variable $DIN_LOC_ROOT_CSMDATA. Forsupported machines, this variable is preset. For generic machines, this variableis set as an argument to create_newcase. Multiple users can share the same$DIN_LOC_ROOT_CSMDATA directory.
The files in the subdirectories of $DIN_LOC_ROOT_CSMDATA should be write-protected. This prevents these files from being accidentally modified or deleted. Thedirectories in $DIN_LOC_ROOT_CSMDATA should generally be group writable, sothe directory can be shared among multiple users.
As part of the process of generating the CESM executable, the utility,check_input_data is called, and it attempts to locate all required input data for thecase based upon file lists generated by components. If the required data is not foundon local disk in $DIN_LOC_ROOT_CSMDATA, then the data will be downloadedautomatically by the scripts or it can be downloaded by the user by invokingcheck_input_data with the -export command argument. If you want to downloadthe input data manually you should do it before you build CESM.
13

Chapter 1. Introduction
It is possible for users to download the data using svn subcommands directly, butuse of the check_input_data script is highly recommended to ensure that only therequired datasets are downloaded. Again, users are STRONGLY DISCOURAGEDfrom downloading the entire input dataset from the repository due to the size.
Quick Start (CESM Workflow)The following quick start guide is for versions of CESM that have already been portedto the local target machine. If CESM has not yet been ported to the target machine,please see Chapter 7. If you are new to CESM1, please consider reading the introduc-tion first
These definitions are required to understand this section:
• $COMPSET refers to the component set.
• $RES refers to the model resolution.
• $MACH refers to the target machine.
• $CCSMROOT refers to the CESM root directory.
• $CASE refers to the case name.
• $CASEROOT refers to the full pathname of the root directory where the case($CASE) will be created.
• $EXEROOT refers to the executable directory. ($EXEROOT is normally NOT thesame as $CASEROOT).
• $RUNDIR refers to the directory where CESM actually runs. This is normally setto $EXEROOT/run.
This is the procedure for quickly setting up and running a CESM case.
1. Download CESM (see Download CESM).
2. Select a machine, a component, and a resolution from the list displayed after in-voking this command:> cd $CCSMROOT/scripts> create_newcase -list
See the component set table for a complete list of supported compset options.
See the resolution table for a complete list of model resolutions.
See the machines table for a complete list of machines.
3. Create a case.
The create_newcase command creates a case directory containing the scripts andxml files to configure a case (see below) for the requested resolution, componentset, and machine. create_newcase has several required arguments and if a genericmachine is used, several additional options must be set (invoke create_newcase-h for help).
If running on a supported machine, ($MACH), then invoke create_newcase asfollows:> create_newcase -case $CASEROOT \
-mach $MACH \-compset $COMPSET \-res $RES
If running on a new target machine, see porting in Chapter 7.
4. Configure the case.
14

Chapter 1. Introduction
Issuing the configure command creates component namelists and machine spe-cific build and run scripts. Before invoking configure, modify the case settings in$CASEROOT as needed for the experiment.
a. cd to the $CASEROOT directory.> cd $CASEROOT
b. Modify configuration settings in env_conf.xml and/or inenv_mach_pes.xml (optional). (Note: To edit any of the env xml files, usethe xmlchange command. invoke xmlchange -h for help.)
c. Invoke the configure command.> configure -case
5. Build the executable.
a. Modify build settings in env_build.xml (optional).
b. Run the build script.> $CASE.$MACH.build
6. Run the case.
a. Modify runtime settings in env_run.xml (optional). In particular, set theDOUT_S variable to FALSE.
b. Submit the job to the batch queue. This example uses a submission com-mand for a Cray computer:> qsub $CASE.$MACH.run
7. When the job is complete, review the following directories and files
a. $RUNDIR. This directory is set in the env_build.xml file. This is the loca-tion where CESM was run. There should be log files there for every compo-nent (ie. of the form cpl.log.yymmdd-hhmmss). Each component writes itsown log file. Also see whether any restart or history files were written. Tocheck that a run completed successfully, check the last several lines of thecpl.log file for the string " SUCCESSFUL TERMINATION OF CPL7-CCSM".
b. $CASEROOT/logs. The log files should have been copied into this direc-tory if the run completed successfully.
c. $CASEROOT. There could be a standard out and/or standard error file.
d. $CASEROOT/CaseDocs. The case namelist files are copied into this direc-tory from the $RUNDIR.
e. $CASEROOT/timing. There should be a couple of timing files there thatsummarize the model performance.
f. $DOUT_S_ROOT/$CASE. This is the archive directory. If DOUT_S isFALSE, then no archive directory should exist. If DOUT_S is TRUE, thenlog, history, and restart files should have been copied into a directory treehere.
Notes1. http://www.cesm.ucar.edu/
2. http://www.unidata.ucar.edu/software/netcdf/
3. http://www.earthsystemmodeling.org/download/releases.shtml
4. http://trac.mcs.anl.gov/projects/parallel-netcdf/wiki/Download15

Chapter 1. Introduction
5. http://subversion.tigris.org
6. http://svnbook.red-bean.com/en/1.5/svn.tour.cycle.html#svn.tour.cycle.resolve
7. https://svn-ccsm-release.cgd.ucar.edu
16

Chapter 2. Creating a Case
The first step in creating a CESM experiment is to use create_newcase.
How to create a new caseIn what follows, $CCSMROOT is the full pathname of the root directory of yourCESM source code. First use the -h option to document the create_newcase options.Then use the -l option to determine which component sets, resolutions, and machinesare supported.
> cd $CCSMROOT/scripts> create_newcase -h> create_newcase -l
As explained in cesm compsets, a component set (compset) defines the specificmodel components that will be used in a given CESM configuration, along withany component-specific namelist or configuration settings that are specific tothis configuration. See the component set table for a complete list of supportedcompset options. If you want to create a custom compset, create an appropriate xmlcompset file and use the create_newcase option -compset_file on the create_newcasecommand line. For more information, see the frequently asked quesitons (FAQ)section How do I create my own compset?
See the grids table for a complete list of supported grids options.
See the machines table for a complete list of machines.
Note: CESM component sets and resolutions have both short and long names. Eitherthe short or long name can be entered as input to create_newcase. As an example, thecomponent set B_1850_RAMPCO2_CN has the short name B1850RMCN. Similarly, theresolution, 0.9x2.5_gx1v6 has the short name f09_g16. Both the long and short namesappear in the output from create_newcase -l, where the short name always appears inparentheses.
For a generic machine, create_newcase can be invoked with the following arguments:
> create_newcase -case [case name] \-mach [machine name] \-compset [compset name] \-res [resolution] \-scratchroot [executable root directory] \-din_loc_root_csmdata [input data root directory] \-max_tasks_per_node [max mpi tasks per node] \[-pes_file [user-defined pes-setup file]] \[-compset_file [user-defined compset file]] \[-pecount [S, M, L, X1, or X2]] \[-silent] [-verbose] \[-xmlmode normal/expert]
For a non-generic machine, create_newcase can be invoked with the following argu-ments:
> create_newcase -case [case name] \-mach [machine name] \-compset [compset name] \-res [resolution] \[-pes_file [user-defined pes-setup file]] \[-compset_file [user-defined compset file]] \[-pecount [S, M, L, X1, or X2]] \[-silent] [-verbose] \
17

Chapter 2. Creating a Case
[-xmlmode normal/expert]
Note: -case, -mach, -compset and -res are required arguments to create_newcase. Inaddition, -scratchroot, -din_loc_root_csmdata and -max_tasks_per_node are additionalrequired arguments when a generic machine is targeted.
If you want to use your own pes setup file, specify the full pathname of that filefor the optional -pes_file argument. The sample pes_file format is provided at$CCSMROOT/sample_pes_file.xml.
Here is a simple example of using create_newcase for a non-generic machine.
> cd $CCSMROOT/scripts> create_newcase -case ~/cesm/b40.B2000 \
-compset B_2000 \-res 0.9x1.25_gx1v6 -mach bluefire
This example creates a $CASEROOT directory ~/cesm/b40.B2000 where $CASE isb40.B2000 with a model resolution of 0.9x1.25_gx1v6 (a 1-degree atmosphere/landgrid with a nominal 1-degree ocean/ice grid using the gx1v6 ocean mask). The com-ponent set B_2000 uses fully active components configured to produce a present-daysimulation.
Note: The complete example appears in the basic example. $CASE can include letters,numbers, ".", and "_". Note that create_newcase creates the $CASEROOT directory. Ifthe directory already exists, it prints a warning and aborts.
create_newcase creates the directory $CASEROOT, which is specified by the -caseoption. In $CASEROOT, create_newcase installs the files and directories that are re-sponsible for configuring, building, and running the case. For example, the abovecommand creates the following files and directories in ~/cesm/b40.B2000/. (Notethat user-modifiable files/directories appear in italics.)
Directory or Filename Description
LockedFiles/ A directory that holds copies of files thatshould not be changed.
Macros.bluefire Contains machine-specific makefiledirectives. In the current release, theMacros have been organized into groupsof machine-dependent files eachcontaining site-specific andmachine-specific options.
README/ A directory of README files for thecomponents.
README.case A file detailing the create_newcaseusage in creating your case. This is agood place to keep track of runtimeproblems and changes.
SourceMods A directory where users can placemodified source code.
Tools/ A directory containing support utilityscripts. Users should never need toaccess the contents of this directory.
18

Chapter 2. Creating a Case
Directory or Filename Descriptioncheck_input_data A script that checks for various input
datasets and moves them into place.
configure A script used to configure your case.
create_production_test A script used to create a test of yourcase.
env_build.xml Controls model build settings (seecustomizing a build).
env_case.xml Sets model components and resolution.This file cannot be modified after a casehas been created. To make changes,re-run create_newcase with differentoptions.
env_conf.xml Controls general settings including runinitialization type (see the Section calledSetting the case initialization type inChapter 3), coupler mapping files,component configuration, and namelistgeneration. Sets environment variablesthat are used by the componenttemplate scripts to generate componentnamelist and build scripts (seecustomizing components).
env_mach_pes.xml Controls component machine-specificprocessor layout (see the Section calledSetting the case PE layout in Chapter 3).The settings in this are critical to awell-load-balanced simulation (seeloadbalancing a run).
env_mach_specific A file used to set a number ofmachine-specific environment variablesfor building and/or running. This filecan be edited at any time. However,build environment variables should notbe edited after a build is invoked.
env_run.xml Controls run-time settings such aslength of run, frequency of restarts,output of coupler diagnostics, andshort-term and long-term archiving. Seerunning a case.
xmlchange A script used to modify values in thexml files.
For more complete information about the files in the case directory, see the Sectioncalled What are the directories and files in my case directory? in Chapter 11
Note: Since default values are provided for the above xml file variables, you could now goto configuring a case and configure your case. However, you should first understand whatvariables you might want to change and how these xml variables are used by the scripts.Please continue reading below if you are a new user.
The xml variables in the env_*.xml files are translated into csh environment vari-ables with the same name by the script Tools/ccsm_getenv. Conversion of xml vari-ables to environment variables is used by numerous script utilities as part of con-
19

Chapter 2. Creating a Case
figuring, building, and running a given case. It is important to note that you do notexplicitly see this conversion.
Note: Users can only modify the xml variables. Users cannot modify the csh environmentvariables directly.
Complete lists of CESM environment variables in the xml files that appear in$CASEROOT are provided in env_case.xml variables, env_conf.xml variables ,env_mach_pes.xml variables , env_build.xml variables , and env_run.xml variables.
Modifying an xml fileUsers can edit the xml files directly to change the variable values. However, modifi-cation of variables in the xml scripts is best done using the xmlchange script in the$CASEROOT directory since it performs variable error checking as part of changingvalues in the xml files. To invoke the xmlchange script:
xmlchange -file [name] -id [name] -val [name] -help -silent -verbose -warn -append
-file
The xml file to be edited.
-id
The xml variable name to be changed.
-val
The intended value of the variable associated with the -id argument.
Note: If you want a single quotation mark ("’", also called an apostrophe) to appearin the string provided by the -val option, you must specify it as "'".
-silent
Turns on silent mode. Only fatal messages will be issued.
-verbose
Echoes all settings made by configure.
-help
Print usage info to STDOUT.
-warn
Warn and abort if you would be overwriting a current value in the field. This isuseful so you make sure you aren’t overwriting a field that is currently set.
-append
Append the given value to the end of the current value of the field. Sometimesyou want to add an option to the end of an existing field, making sure youleave the current value there (such as adding additional options to theCAM_CONFIG_OPTS variable).
20

Chapter 2. Creating a Case
Cloning a case (Experts only)This is an advanced feature provided for expert users. If you are a new user, skip thissection.
If you have access to the run you want to clone, the create_clone command willcreate a new case while also preserving local modifications to the case that you wantto clone. You can run the utility create_clone either from $CCSMROOT or from thedirectory where you want the new case to be created. It has the following arguments:
-case
The name or path of the new case.
-clone
The full pathname of the case to be cloned.
-silent
Enables silent mode. Only fatal messages will be issued.
-verbose
Echoes all settings.
-help
Prints usage instructions.
Here is the simplest example of using create_clone:
> cd $CCSMROOT/scripts> create_clone -case $CASEROOT -clone $CLONEROOT
When invoking create_clone, the following files are cloned in the new$CLONEROOT case directory. Note that the new case directory willbe identical to the cloned case directory except for the original clonedscripts $CASEROOT.$MACH.build, $CASEROOT.$MACH.clean_build,$CASEROOT.$MACH.run, and $CASEROOT.$MACH.l_archive, which will havenew names in the new case.
Important:: Do not change anything in the env_case.xml file. In addition, if you want tomodify env_conf.xml, the new case will no longer be a clone, and you will need to config-ure -cleanall, which removes all files associated with all previous invocations of the con-figure script. The $CASEROOT/ directory will now appear as if create_newcase had justbeen run -- with the exception that local modifications to the env_* files are preserved. TheBuildconf/ directory will be removed, however. As a result, any changes to the namelistgeneration scripts in Buildconf/ will not be preserved. Before invoking this command,make backup copies of your "resolved" component namelists in the Buildconf/ directoryif modifications to the generated scripts were made.
Another approach to duplicating a case is to use the information in that case’sREADME.case file to create a new case. Note that this approach will not preserveany local modifications that were made to the original case, such as source-code orbuild-script modifications; you will need to import those changes manually.
21

Chapter 2. Creating a Case
22

Chapter 3. Configuring a Case
Configure OverviewConfigure generates buildnml and buildexe scripts for each component in the Build-conf directory. It also generates build, run, l_archive, and clean_build scripts in theCASEROOT directory. These scripts generate namelist for components and build andrun the CESM1 model.
configure (invoked with the -case option) uses variables in env xml files to generatea new Buildconf/ directory and several new files in $CASEROOT.
Note: Any user modifications to env_conf.xml and env_mach_pes.xml must be donebefore configure is invoked. In the simplest case, configure can be run without modifyingeither of these files and default settings will be then be used.
Before exploring the details of configure, it is important to understand the concept oflocked env files. The env files are "locked" after the variables have been used by otherparts of the system and cannot be changed. The scripts do this by "locking" a file andnot permitting the user to modify that file. More information on locking files can befound in the Section called Why is there file locking and how does it work? in Chapter 11
The configure command must be run in the $CASEROOT directory and must be in-voked with one of the following options:
configure [-help] [-case] \[-cleanmach] [-cleannamelist] [-cleanall]
-case
sets up the case for build and run phases. It creates Buildconf/,$CASE.$MACH.run, $CASE.$MACH.build, $CASE.$MACH.clean_build,$CASE.$MACH.l_archive, directories and files in $CASEROOT.
-cleanmach
Moves all machine-related files to a date-stamped backup directory underMachinesHist/. These files include: Macros.$MACH, $CASE.$MACH.build,$CASE.$MACH.clean_build, $CASE.$MACH.l_archive, and $CASE.$MACH.run.It also unlocks env_mach_pes.xml, Macros.$MACH, and env_build.xml, sousers can reset machine tasks and threads and rerun configure. Reconfiguringwith -cleanmach results in the loss of any local modifications to the local buildand run scripts. But the Buildconf/ directory will not be updated in thisprocess. As a result, local changes to namelists will be preserved.
If you only modify env_mach_pes.xml after running configure, do the follow-ing:> configure -cleanmach> # Make changes to env_mach_pes.xml> configure -case
-cleannamelist
Moves Buildconf/ to a date-stamped backup directory under MachinesHist/and unlocks env_conf.xml. Reconfiguring with -cleannamelist results in the lossof any local modifications to the Buildconf buildnml and buildexe files. But thelocal build and run scripts will be preserved.
If you only want to modify env_conf.xml after running configure, do the fol-lowing:
23

Chapter 3. Configuring a Case
> configure -cleannamelist> # Make changes to env_conf.xml here> configure -case
-cleanall
This performs the functions of both the -cleanmach and -cleannamelist options.All files associated with the previous invocation of configure are moved to atime-stamped directory in MachinesHist. The $CASEROOT directory will nowappear as if create_newcase had just been run with the exception that local mod-ifications to the env_*.xml files are preserved. After further modifications aremade to env_conf.xml and env_mach_pes.xml, you must run configure -casebefore you can build and run the model. Reconfiguring results in the loss of alllocal modifications to the component buildnml or buildexe files in Buildconf aswell as the loss of all local modifications to the local build and run scripts.
-help
Lists all options with short descriptions.
Configure generates buildnml and buildexe scripts for each component in the Build-conf directory. It also generates build, run, l_archive, and clean_build scripts in theCASEROOT directory. These scripts are now sufficient to build and run the model.
Table 3-1. Result of invoking configure
File or Directory Description
Buildconf/ Contains scripts that generatecomponent libraries and utility libraries(e.g., PIO, MCT) and scripts thatgenerate component namelists.
$CASE.$MACH.build Creates the component and utilitylibraries and model executable (seebuilding CESM).
$CASE.$MACH.run Runs the CESM model and performsshort-term archiving of output data (seerunning CESM). Contains the necessarybatch directives to run the model on therequired machine for the requested PElayout.
$CASE.$MACH.l_archive Performs long-term archiving of outputdata (see long-term archiving). Thisscript will only be created if long-termarchiving is available on the targetmachine.
$CASE.$MACH.clean_build Removes all object files and librariesand unlocks Macros.$MACH andenv_build.xml. This step is requiredbefore a clean build of the system.
env_derived Contains environmental variablesderived from other settings. Should notbe modified by the user.
Customizing the configurationBefore calling configure, first customize the default configuration. To customize thedefault configuration, modify env_conf.xml and env_mach_pes.xml before invoking
24

Chapter 3. Configuring a Case
configure. The env_build.xml and env_run.xml files can also be changed at thisstep.
env_mach_pes.xml contains variables that determine the layout of the componentsacross the hardware processors. Those variables specify the number of processors foreach component and determine the layout of components across the processors used.See env_mach_pes.xml variables for a summary of all env_mach_pes.xml variables.
env_conf.xml contains several different kinds of variables including variables forcase initialization, variables that specify the regridding files, and variables thatset component-specific namelists and component-specific CPP variables. Seeenv_conf.xml variables for a summary of all env_conf.xml variables.
Setting the case PE layoutOptimizing the throughput or efficiency of a CESM experiment often involves cus-tomizing the processor (PE) layout for load balancing. The component PE layout isset in env_mach_pes.xml.
CESM1 has significant flexibility with respect to the layout of components across dif-ferent hardware processors. In general, its CESM components -- atm, lnd, ocn, ice,glc, and cpl -- can run on overlapping or mutually unique processors. Each compo-nent is associated with a unique MPI communicator. In addition, the driver runs onthe union of all processors and controls the sequencing and hardware partitioning.The processor layout for each component is specified in the env_mach_pes.xml filevia three settings: the number of MPI tasks, the number of OpenMP threads per task,and the root MPI processor number from the global set.
For example, these settings in env_mach_pes.xml:
<entry id="NTASKS_OCN" value="128" /><entry id="NTHRDS_OCN" value="1" /><entry id="ROOTPE_OCN" value="0" />
cause the ocean component to run on 128 hardware processors with 128 MPI tasksusing one thread per task starting from global MPI task 0 (zero).
In this next example:
<entry id="NTASKS_ATM" value="16" /><entry id="NTHRDS_ATM" value="4" /><entry id="ROOTPE_ATM" value="32" />
the atmosphere component will run on 64 hardware processors using 16 MPI tasksand 4 threads per task starting at global MPI task 32. There are NTASKS, NTHRDS,and ROOTPE input variables for every component in env_mach_pes.xml. There aresome important things to note.
• NTASKS must be greater or equal to 1 (one) even for inactive (stub) components.
• NTHRDS must be greater or equal to 1 (one). If NTHRDS is set to 1, this generallymeans threading parallelization will be off for that component. NTHRDS shouldnever be set to zero.
• The total number of hardware processors allocated to a component is NTASKS *NTHRDS.
• The coupler processor inputs specify the pes used by coupler computation suchas mapping, merging, diagnostics, and flux calculation. This is distinct from thedriver which always automatically runs on the union of all processors to managemodel concurrency and sequencing.
• The root processor is set relative to the MPI global communicator, not the hardwareprocessors counts. An example of this is below.
25

Chapter 3. Configuring a Case
• The layout of components on processors has no impact on the science. The scien-tific sequencing is hardwired into the driver. Changing processor layouts does notchange intrinsic coupling lags or coupling sequencing. ONE IMPORTANT POINTis that for a fully active configuration, the atmosphere component is hardwiredin the driver to never run concurrently with the land or ice component. Perfor-mance improvements associated with processor layout concurrency is thereforeconstrained in this case such that there is never a performance reason not to over-lap the atmosphere component with the land and ice components. Beyond thatconstraint, the land, ice, coupler and ocean models can run concurrently, and theocean model can also run concurrently with the atmosphere model.
• If all components have identical NTASKS, NTHRDS, and ROOTPE set, all compo-nents will run sequentially on the same hardware processors.
The root processor is set relative to the MPI global communicator, not the hardwareprocessor counts. For instance, in the following example:
<entry id="NTASKS_ATM" value="16" /><entry id="NTHRDS_ATM" value="4" /><entry id="ROOTPE_ATM" value="0" /><entry id="NTASKS_OCN" value="64" /><entry id="NTHRDS_OCN" value="1" /><entry id="ROOTPE_OCN" value="16" />
the atmosphere and ocean are running concurrently, each on 64 processors with theatmosphere running on MPI tasks 0-15 and the ocean running on MPI tasks 16-79.The first 16 tasks are each threaded 4 ways for the atmosphere. The batch submissionscript ($CASE.$MACH.run) should automatically request 128 hardware processors,and the first 16 MPI tasks will be laid out on the first 64 hardware processors with astride of 4. The next 64 MPI tasks will be laid out on the second set of 64 hardwareprocessors.
If you set ROOTPE_OCN=64 in the preceding example, then a total of 176 processorswould have been requested and the atmosphere would have been laid out on the first64 hardware processors in 16x4 fashion, and the ocean model would have been laidout on hardware processors 113-176. Hardware processors 65-112 would have beenallocated but completely idle.
Note: env_mach_pes.xml cannot be modified after "configure -case" has been invokedwithout first invoking "configure -cleanmach". For an example of changing pes, see theSection called Changing PE layout in Chapter 9
Setting the case initialization typeThe case initialization type is set in env_conf.xml. A CESM run can be initialized inone of three ways; startup, branch, or hybrid. The variable $RUN_TYPE determinesthe initialization type and is set to "startup" by default when create_newcase isinvoked. This setting is only important for the initial run of a production runwhen the $CONTINUE_RUN variable is set to FALSE. After the initial run, the$CONTINUE_RUN variable is set to TRUE, and the model restarts exactly usinginput files in a case, date, and bit-for-bit continuous fashion.
RUN_TYPE
Run initialization type. Valid values: startup, hybrid, branch. Default: startup.
RUN_STARTDATE
Start date for the run in yyyy-mm-dd format. This is only used for startup orhybrid runs.
26

Chapter 3. Configuring a Case
RUN_REFCASE
Reference case for hybrid or branch runs.
RUN_REFDATE
Reference date in yyyy-mm-dd format for hybrid or branch runs.
This is a detailed description of the different ways that CESM initialization runs.
startup
In a startup run (the default), all components are initialized using baseline states.These baseline states are set independently by each component and can includethe use of restart files, initial files, external observed data files, or internal ini-tialization (i.e., a "cold start"). In a startup run, the coupler sends the start dateto the components at initialization. In addition, the coupler does not need an in-put data file. In a startup initialization, the ocean model does not start until thesecond ocean coupling (normally the second day).
branch
In a branch run, all components are initialized using a consistent set ofrestart files from a previous run (determined by the $RUN_REFCASE and$RUN_REFDATE variables in env_conf.xml). The case name is generallychanged for a branch run, although it does not have to be. In a branch run,setting $RUN_STARTDATE in env_conf.xml is ignored because the modelcomponents obtain the start date from their restart datasets. Therefore, the startdate cannot be changed for a branch run. This is the same mechanism that isused for performing a restart run (where $CONTINUE_RUN is set to TRUE inthe env_run.xml file).
Branch runs are typically used when sensitivity or parameter studies are re-quired, or when settings for history file output streams need to be modifiedwhile still maintaining bit-for-bit reproducibility. Under this scenario, the newcase is able to produce an exact bit-for-bit restart in the same manner as a con-tinuation run if no source code or component namelist inputs are modified.All models use restart files to perform this type of run. $RUN_REFCASE and$RUN_REFDATE are required for branch runs.
To set up a branch run, locate the restart tar file or restart directory for$RUN_REFCASE and $RUN_REFDATE from a previous run, then place thosefiles in the $RUNDIR directory. See setting up a branch run for an example.
hybrid
A hybrid run indicates that CESM will be initialized more like a startup,but will use initialization datasets from a previous case. This is somewhatanalogous to a branch run with relaxed restart constraints. A hybrid run allowsusers to bring together combinations of initial/restart files from a previouscase (specified by $RUN_REFCASE) at a given model output date (specifiedby $RUN_REFDATE). Unlike a branch run, the starting date of a hybrid run(specified by $RUN_STARTDATE) can be modified relative to the referencecase. In a hybrid run, the model does not continue in a bit-for-bit fashion withrespect to the reference case. The resulting climate, however, should becontinuous provided that no model source code or namelists are changed in thehybrid run. In a hybrid initialization, the ocean model does not start until thesecond ocean coupling (normally the second day), and the coupler does a "coldstart" without a restart file.
27

Chapter 3. Configuring a Case
Setting component-specific variablesTo understand how the component-specific variables in env_conf.xml (e.g.,CAM_CONFIG_OPTS) are used to set compile and namelist settings for thatcomponent, you first need to understand how configure uses the variables inenv_conf.xml to create the files in Buildconf/.
In each $CASEROOT directory, the subdirectory $CASEROOT/Tools/Templatescontains files of the form $component[.cpl7].template, where $componentcorresponds to each of the model components that is part of the selectedcomponent set. The .cpl7 appears in some templates and not in others. configuretranslates the $env_*.xml xml variables to csh environment variables, and eachof the component template scripts uses those environment variables to createBuildconf/$component.buildexe.csh (which creates the component library) andBuildconf/$component.buildnml.csh (which creates the component namelist).
configure⇓
Tools/Templates/$component.cpl7.template⇓
Buildconf/$component.buildexe.cshBuildconf/$component.buildnml.csh
When the model run is submitted, $CASE.$MACH.run will callBuildconf/$component.buildnml.csh to produce the run-time componentnamelists:
$CASE.$MACH.run⇓
Buildconf/$component.buildnml.csh⇓
$RUNDIR/$model_in
As an example, for CAM
$CASE.$MACH.run⇓
Buildconf/cam.buildnml.csh⇓
$RUNDIR/atm_in
Important:: Component namelists should normally be set using env_conf.xmlvariables (see below). If a namelist needs to be modified after configure is called,then this should be done in Buildconf/$component.buildnml.csh. Note that ifconfigure -cleanall or configure -cleannamelist is called, then any local changes toBuildconf/$component.buildnml.csh will be lost.
The discussions in the sections below assume the following:
• References to $component.cpl7.template refer toTools/Templates/$component.cpl7.template
• References to $component.buildexe.csh and $component.buildnml.cshrefer to Buildconf/$component.buildexe.csh andBuildconf.$component.buildnml.csh.
CAM variablesThe following are CAM-specific env_conf.xml variables
CAM’s configure utility1 is invoked by cam.cpl7.template as:
28

Chapter 3. Configuring a Case
configure⇓
Tools/Templates/cam.cpl7.template⇓
$CCSMROOT/models/atm/cam/bld/configure \-ccsm_seq -ice none -ocn none -spmd \-dyn $CAM_DYCORE -res $ATM_GRID \$CAM_CONFIG_OPTS \
...⇓
camconf/# Do Not Modify contents of camconf/
⇓Buildconf/cam.buildexe.csh
Note that $CAM_DYCORE and $ATM_GRID are env_conf.xml and env_case.xmlvariables, respectively.
CAM’s build-namelist utility2 is invoked by cam.cpl7.template as:
configure⇓
Tools/Templates/cam.cpl7.template⇓
$CCSMROOT/models/atm/cam/bld/build-namelist \-use_case $CAM_NML_USE_CASE \-namelist "$CAM_NAMELIST_OPTS /"...⇓
camconf/# Do Not Modify contents of camconf/
⇓Buildconf/cam.buildnml.csh
The following env_conf.xml variables are used by CAM to invoke its configure andbuild-namelist utilities.
CAM_CONFIG_OPTS
Provides option(s) for CAM’s configure utility (see above).CAM_CONFIG_OPTS are normally set as compset variables (e.g., "-physcam4 -chem waccm_mozart") and in general should not be modified forsupported compsets. Recommendation: If you want to modify this value foryour experiment, use your own (user-defined component sets).
CAM_NML_USE_CASE
Provides the use_case option for CAM’s build-namelist utility (see above).CAM’s build-namelist leverages groups of namelist options (use cases) thatare often paired with CAM’s configure options. These use cases are xml fileslocated in $CCSMROOT/models/atm/cam/bld/namelist_files/use_cases.In general, this variable should not be modified for supported compsets.Recommendation: If you want to modify this value for your experiment, useyour own (user-defined component sets.
CAM_NAMELIST_OPTS
Provides options to the -namelist argument in CAM’s build-namelist utility (seeabove).
This serves to specify namelist settings directly on the command line by sup-plying a string containing Fortran namelist syntax. The resulting namelist willappear in cam.buildnml.csh.
29

Chapter 3. Configuring a Case
Note: To insert a single quotation mark (apostrophe) when settingCAM_NAMELIST_OPTS, use the string "'". Also note that the "$" symbolshould not be used in CAM_NAMELIST_OPTS.
This example shows how to use xmlchange to set CAM_NAMELIST_OPTS:xmlchange -id CAM_NAMELIST_OPTS\
-val ncdata='cam_0.9x1.25.1860.nc'
If you want to modify numerous cam namelist values, you can use an alternatescheme: Place a file user_nl_cam containing modified cam namelist settings in$CASEROOT. For example, user_nl_cam could contain the following:
&camexpsolar_const = 1363.27ch4vmr = 1860.0e-9nhtfrq = -24
/
and the above settings would appear in cam.buildnml.csh.
CLM variablesThe following are CLM-specific env_conf.xml variables
CLM’s configure utility 3 is invoked by clm.cpl7.template as:
configure -case⇓
Tools/Templates/clm.cpl7.template⇓
$CCSMROOT/models/lnd/clm/bld/configure \-mode ext_ccsm_seq \-comp_intf cpl_$COMP \-usr_src $CASEROOT/SourceMods/src.clm \$CLM_CONFIG_OPTS...⇓
clmconf/# Do Not Modify contents of clmconf/
⇓Buildconf/clm.buildexe.csh
CLM’s build-namelist utility 4 is also invoked by clm.cpl7.template as:
configure -case⇓
Tools/Templates/clm.cpl7.template⇓
$CCSMROOT/lnd/clm/bld/build-namelist-clm_usr_name $CLM_USRDAT_NAME \-res $LND_GRID -mask $OCN_GRID \-clm_start_type $START_TYPE-use_case $CLM_NML_USE_CASE-namelist "&clm_inparm $CLM_NAMELIST_OPTS /"...⇓
clmconf/# Do Not Modify contents of clmconf/
⇓Buildconf/clm.buildnml.csh
30
Chapter 3. Configuring a Case
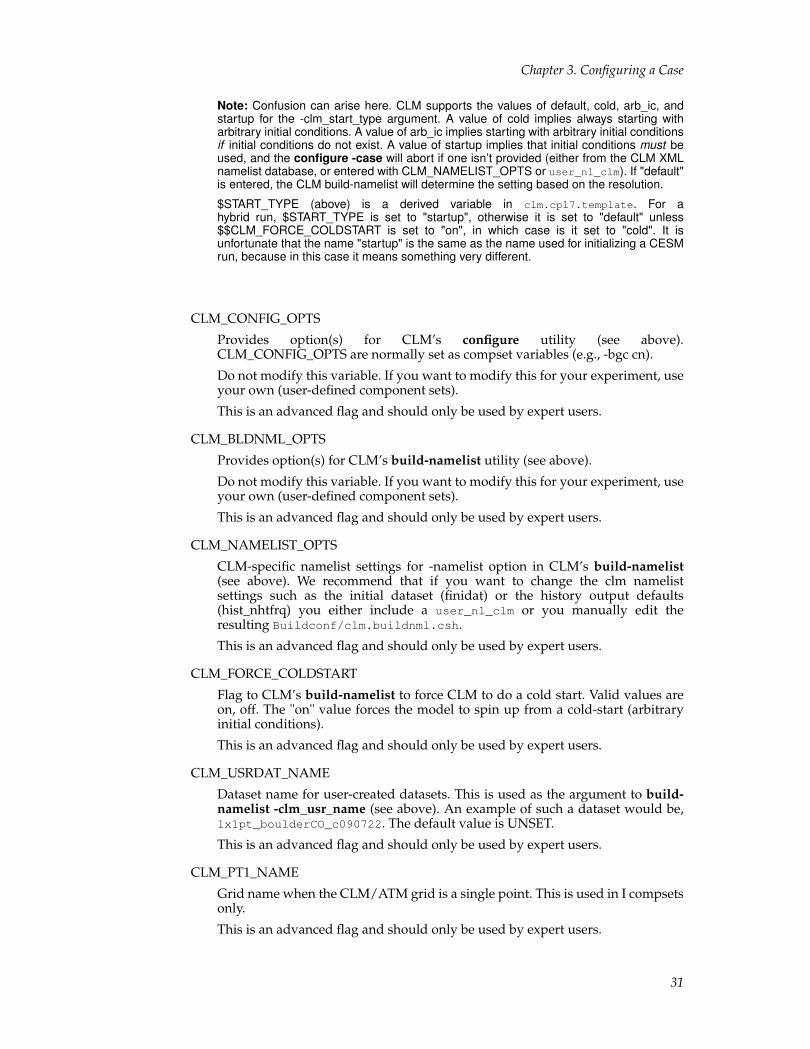
Note: Confusion can arise here. CLM supports the values of default, cold, arb_ic, andstartup for the -clm_start_type argument. A value of cold implies always starting witharbitrary initial conditions. A value of arb_ic implies starting with arbitrary initial conditionsif initial conditions do not exist. A value of startup implies that initial conditions must beused, and the configure -case will abort if one isn’t provided (either from the CLM XMLnamelist database, or entered with CLM_NAMELIST_OPTS or user_nl_clm). If "default"is entered, the CLM build-namelist will determine the setting based on the resolution.
$START_TYPE (above) is a derived variable in clm.cpl7.template. For ahybrid run, $START_TYPE is set to "startup", otherwise it is set to "default" unless$$CLM_FORCE_COLDSTART is set to "on", in which case is it set to "cold". It isunfortunate that the name "startup" is the same as the name used for initializing a CESMrun, because in this case it means something very different.
CLM_CONFIG_OPTS
Provides option(s) for CLM’s configure utility (see above).CLM_CONFIG_OPTS are normally set as compset variables (e.g., -bgc cn).
Do not modify this variable. If you want to modify this for your experiment, useyour own (user-defined component sets).
This is an advanced flag and should only be used by expert users.
CLM_BLDNML_OPTS
Provides option(s) for CLM’s build-namelist utility (see above).
Do not modify this variable. If you want to modify this for your experiment, useyour own (user-defined component sets).
This is an advanced flag and should only be used by expert users.
CLM_NAMELIST_OPTS
CLM-specific namelist settings for -namelist option in CLM’s build-namelist(see above). We recommend that if you want to change the clm namelistsettings such as the initial dataset (finidat) or the history output defaults(hist_nhtfrq) you either include a user_nl_clm or you manually edit theresulting Buildconf/clm.buildnml.csh.
This is an advanced flag and should only be used by expert users.
CLM_FORCE_COLDSTART
Flag to CLM’s build-namelist to force CLM to do a cold start. Valid values areon, off. The "on" value forces the model to spin up from a cold-start (arbitraryinitial conditions).
This is an advanced flag and should only be used by expert users.
CLM_USRDAT_NAME
Dataset name for user-created datasets. This is used as the argument to build-namelist -clm_usr_name (see above). An example of such a dataset would be,1x1pt_boulderCO_c090722. The default value is UNSET.
This is an advanced flag and should only be used by expert users.
CLM_PT1_NAME
Grid name when the CLM/ATM grid is a single point. This is used in I compsetsonly.
This is an advanced flag and should only be used by expert users.
31

Chapter 3. Configuring a Case
CLM_CO2_TYPE
Determines how CLM will determine where CO2
is set. If constant, it will be setto CCSM_CO2_PPMV, if set otherwise, the atmosphere model MUST send it toCLM. CLM_CO2_TYPE is normally set by the specific compset, since it HAS tobe coordinated with settings for the atmospheric model.
Do not modify this variable. If you want to modify for your experiment, useyour own (user-defined component sets).
This is an advanced flag and should only be used by expert users.
CLM_NML_USE_CASE
Determines the use-case that will be sent to the CLM build-namelist.CLM_CO2_TYPE is normally set by the specific compset.
This is an advanced flag and should only be used by expert users.
CICE variablesThe following are CICE-specific env_conf.xml variables
CICE’s configure utility5 is invoked by cice.cpl7.template as:
configure -case⇓
Tools/Templates/cice.cpl7.template⇓
$CCSMROOT/models/ice/cice/bld/configure \-hgrid $ICE_GRID \-mode $CICE_MODE \$CICE_CONFIG_OPTS \...⇓
ciceconf/# Do Not Modify contents of ciceconf/
⇓Buildconf/cice.buildexe.csh
CICE’s build-namelist utility6 is invoked by cice.cpl7.template as:
configure -case⇓
Tools/Templates/cice.cpl7.template⇓
$CCSMROOT/ice/cice/bld/build-namelist-namelist "&cice_inparm $CICE_NAMELIST_OPTS /"...⇓
ciceconf/# Do Not Modify contents of ciceconf/
⇓Buildconf/cice.buildnml.csh
CICE_MODE
Option to CICE’s configure utility for the -mode argument (see above). Validvalues are prognostic, prescribed, thermo_only. The default is prognostic.
CICE_CONFIG_OPTS
Provides option(s) for CICE’s configure utility (see above). Default value is "-ntr_aero 3".
32

Chapter 3. Configuring a Case
CICE_NAMELIST_OPTS
CICE-specific namelist settings for -namelist option (see above).
In addition, $CASEROOT/configure also generates the CICE’s block decompositionin env_build.xml as follows (also see env_build.xml variables ):
configure -case⇓
$NTASKS_ICE and $NTHRDS_ICE⇓
Tools/Templates/generate_cice_decomp.xml⇓
Tools/Templates/cice_decomp.xml⇓
sets env_build.xml CICE_BLCKXsets env_build.xml CICE_BLCKYsets env_build.xml CICE_MXBLCKSsets env_build.xml CICE_DECOMPTYPE
⇓CPP variables in cice.buildexe.csh
POP2 variablesThe following are POP2-specific env_conf.xml variables
POP2’s namelist construction utility7 is invoked by pop2.cpl7.template in the fol-lowing sequence:
configure -case⇓
Tools/Templates/pop2.cpl7.template⇓
$CCSMROOT/models/ocn/pop2/input_templates/pop2_in_build.csh$CCSMROOT/models/ocn/pop2/input_templates/ocn.*.setup.csh
⇓Buildconf/pop2.buildnml.csh
POP2’s script to generate the ocn binary library is created directly frompop2.cpl7.template:
configure -case⇓
Tools/Templates/pop2.cpl7.template⇓
Buildconf/pop2.buildexe.csh
In addition, configure also generates POP2’s block decomposition inenv_build.xml as follows (also see env_build.xml variables ):
configure -case⇓
$NTASKS_OCN and $NTHRDS_OCN⇓
Tools/Templates/generate_pop_decomp.xml⇓
Tools/Templates/pop_decomp.xml⇓
sets env_build.xml POP_BLCKXsets env_build.xml POP_BLCKYsets env_build.xml POP_MXBLCKSsets env_build.xml POP_DECOMPTYPE
⇓CPP variables in pop2.buildexe.csh
33

Chapter 3. Configuring a Case
The following variables are used by the POP2 scripts to generate the settings used inyour $CASE.
OCN_CHL_TYPE
Determine provenance of surface Chl for radiative penetration computations.Valid values are diagnostic, prognostic. The default is diagnostic. This optionis used in the POP2 ecosystem model, which will be available in the CESM1.0release.
OCN_CO2_TYPE
Determine provenance of atmospheric CO2 for gas flux computation. Valid val-ues are constant, prognostic. The default is constant. This option is used in thePOP2 ecosystem model, which will be available in the CESM1.0 release.
OCN_COUPLING
Determine surface freshwater and heat forcing settings. Valid values are full,partial. The full option yields settings that are appropriate for coupling to anactive atmospheric model (e.g., a B-type compset). The partial option yields set-tings that are appropriate for coupling to a data atmospheric model (e.g., a C orG-type compset). The create_newcase command selects the appropriate settingfor this variable based on the specified compset. Users should not change thissetting.
OCN_ICE_FORCING
Determine under-ice forcing settings. Valid values are active, inactive. The activeoption yields settings that are appropriate for coupling to an active ice model(e.g., a B or G-type compset). The inactive option yields settings that are ap-propriate for coupling to a data ice model (e.g., a C-type compset). The cre-ate_newcase command selects the appropriate setting for this variable based onthe specified compset. Users should not change this setting.
OCN_TRANSIENT
Determine settings for transient forcing datasets (e.g., atmospheric pCFC con-centrations). Valid values are unset, 1850-2000. The create_newcase commandselects the appropriate setting for this variable based on the specified compset.Users should not change this setting. This option is used in the POP2 ecosystemmodel, which will be available in the CESM1.0 release.
CISM variablesCISM creates a script to generate the glc binary library directly fromcism.cpl7.template:
configure -case⇓
Tools/Templates/cism.cpl7.template⇓
Buildconf/cism.buildexe.csh
The file cism.cpl7.template is also used to generate CISM’s script to build itsnamelist:
configure -case⇓
Tools/Templates/cism.cpl7.template⇓
Buildconf/cism.buildnml.csh
34

Chapter 3. Configuring a Case
The following are CISM-specific env_conf.xml variables
GLC_GRID
Determines the specific local GLC grid CISM will use for internal calculations.Current valid values are gland20, gland10, and gland5 The default is gland20.
DATM variablesThe following are DATM-specific env_conf.xml variables
DATM is discussed in detail in Data Model’s User’s Guide8. DATM is normallyused to provide observational forcing data (or forcing data produced by a previousrun using active components) to drive CLM (I compset), POP2 (C compset), andPOP2/CICE (G compset). As a result, DATM variable settings are specific to thecompset that will be targeted.
DATM uses the datm.cpl7.template as follows:
configure⇓
Tools/Templates/datm.cpl7.template⇓
Buildconf/datm.builexe.csh
and
configure⇓
Tools/Templates/datm.cpl7.template⇓
$CCSMROOT/scripts/ccsm_utils/build_streams⇓
Buildconf/datm.buildml.csh
The following are CESM environment variables that are used bydatm.cpl7.template:
DATM_MODE
Mode for data atmosphere component (datm). Valid values are CORE2_NYF,CLM_QIAN, CLM1PT, and CPLHIST3HrWx. The default is CORE2_NYF.
CORE2_NYF (CORE2 normal year forcing) is the DATM mode used in C and Gcompsets.
CLM_QIAN and CLM1PT are DATM modes using observational data for forc-ing CLM in I compsets. CPLHIST3HrWx is to run with coupler history forcingfrom a previous simulation.
DATM_PRESAERO
Sets the prescribed aerosol mode for the data atmosphere model. If "none"aerosols will NOT be sent from the datm, otherwise the datasets correspondingto the given mode will be used.
Valid values are: none, clim_1850, clim_2000, trans_1850-2000, rcp2.6, rcp4.5,rcp8.5, pt1_pt1. Default value is none (although most compsets override this)
DATM_CLMNCEP_YR_ALIGN
For I compset only. Year align (simulation year corresponding to starting year)for CLM_QIAN mode. Default value is 1.
35

Chapter 3. Configuring a Case
DATM_CLMNCEP_YR_START
For I compset only. Starting year to loop data over for CLM_QIAN mode. Defaultvalue is 2004.
DATM_CLMNCEP_YR_END
For I compset only. Ending year to loop data over for CLM_QIAN mode. Defaultvalue is 2004.
DATM_CPL_CASE
For CPLHIST3HrWx DATM_MODE only, the I_1850_SPINUP_3HrWx_CNcompset invokes this mode. This is the casename to use for coupler historyforcing of DATM. Default case is b40.20th.track1.1deg.012 a 20th-Centurytransient case, for CPLHIST3HrWx compset otherwise UNSET.
DATM_CPL_YR_ALIGN
For CPLHIST3HrWx DATM_MODE only, the I_1850_SPINUP_3HrWx_CNcompset invokes this mode. Year align (simulation year corresponding tostarting year) for CPL history mode. Default is 1, for CPLHIST3HrWx compsetotherwise -999 (unused).
DATM_CPL_YR_START
For CPLHIST3HrWx DATM_MODE only, the I_1850_SPINUP_3HrWx_CNcompset invokes this mode. Starting year to loop CPL history data over. Defaultis 1850, for CPLHIST3HrWx compset otherwise -999 (unused).
DATM_CPL_YR_END
For CPLHIST3HrWx DATM_MODE only, the I_1850_SPINUP_3HrWx_CNcompset invokes this mode. Ending year to loop CPL history data over. Defaultis 1950, for CPLHIST3HrWx compset otherwise -999 (unused).
DLND variablesThe following are DLND-specific env_conf.xml variables
DLND is discussed in detail in Data Model’s User’s Guide9. The data land model isdifferent from the other data models because it can run as a purely data-runoff model(reading in runoff data), or as a purely data-land model (reading in coupler historydata for atm/land fluxes and land albedos produced by a previous run), or both. Ingeneral, the data land model is only used to provide runoff forcing data to POP2when running C or G compsets.
DLND uses the datm.cpl7.template as follows:
configure⇓
Tools/Templates/dlnd.cpl7.template⇓
Buildconf/dlnd.builexe.csh
and
configure⇓
Tools/Templates/dlnd.cpl7.template⇓
$CCSMROOT/scripts/ccsm_utils/build_streams⇓
Buildconf/dlnd.buildml.csh
36

Chapter 3. Configuring a Case
The following are variables that are used by dlnd.cpl7.template.
DLND_MODE
DLND mode. Valid values are CPLHIST and NULL. In CPLHIST mode, landforcing data (produced by CLM) from a previous model run is output in couplerhistory files and read in by the data land model. In NULL mode, land forcing isset to zero and not utilized. The default is NULL.
DLND_RUNOFF_MODE
DLND_RUNOFF mode. Valid values are CPLHIST, RX1, and NULL. In RX1mode, observational 1-degree runoff data is used. In CPLHIST mode, runoff datafrom a previous model run is read in. In NULL mode, the runoff data is set tozero. In CPLHIST mode, land forcing data from a previous model run is outputby the coupler and read in by the data land model. In NULL mode, land forcingis set to zero and not used. The default is RX1.
DICE variablesThe following are DICE-specific env_conf.xml variables
DICE is discussed in detail in Data Model’s User’s Guide10. DICE is a combinationof a data model and a prognostic model. The data functionality reads in ice cover-age. The prognostic functionality calculates the ice/atmosphere and ice/ocean fluxes.DICE receives the same atmospheric input from the coupler as the active CICE model(i.e., atmospheric states, shortwave fluxes, and ocean ice melt flux). DICE acts verysimilarly to CICE running in prescribed mode.) Currently, this component is onlyused to drive POP2 in C compsets.
DICE uses the dice.cpl7.template as follows:
configure⇓
Tools/Templates/dice.cpl7.template⇓
Buildconf/dice.builexe.csh
and
configure⇓
Tools/Templates/dice.cpl7.template⇓
$CCSMROOT/scripts/ccsm_utils/build_streams⇓
Buildconf/dice.buildml.csh
The following are variables that are used by dice.cpl7.template.
DICE_MODE
DICE mode. Valid value is ssmi.
DOCN variablesThe following are DOCN-specific env_conf.xml variables
The following are variables that are used by docn.cpl7.template.
DOCN is discussed in detail in Data Model’s User’s Guide11.
37

Chapter 3. Configuring a Case
The data ocean component (DOCN) always returns SSTs to the driver. In CESM, at-mosphere/ocean fluxes are computed in the coupler. Therefore, the data ocean modeldoes not compute fluxes like the data ice model. DOCN has two distinct modes ofoperation. It can run as a pure data model, reading in ocean SSTs (normally clima-tological) from input datasets, performing time/spatial interpolations, and passingthese to the coupler. Alternatively, DOCN can compute updated SSTs by running asa slab ocean model where bottom ocean heat flux convergence and boundary layerdepths are read in and used with the atmosphere/ocean and ice/ocean fluxes ob-tained from the driver.
DOCN running in prescribed mode (in conjunction with CICE running in prescribedmode) is used in all F component sets.
DOCN running as a slab ocean model is used (in conjunction with CICE running inprognostic mode) in all E compsets.
For prescribed mode, default yearly climatological datasets are provided forvarious model resolutions. For multi-year runs requiring AMIP datasets ofsst/ice_cov fields, you need to set the variables for DOCN_SSTDATA_FILENAME,DOCN_SSTDATA_YEAR_START, and DOCN_SSTDATA_YEAR_END. CICE inprescribed mode also uses these values.
DOCN uses the docn.cpl7.template as follows:
configure⇓
Tools/Templates/docn.cpl7.template⇓
Buildconf/docn.builexe.csh
and
configure⇓
Tools/Templates/docn.cpl7.template⇓
$CCSMROOT/scripts/ccsm_utils/build_streams⇓
Buildconf/docn.buildml.csh
DOCN_MODE
DOCN mode. Valid values are prescribed, som. Default is prescribed.
DOCN_SSTDATA_FILENAME
Sets sst/ice_cov filename for AMIP runs, only used in F compset. Default is UN-SET.
DOCN_SSTDATA_YEAR_START
Sets start year of sst/ice_cov for AMIP runs, only used in F compset. Default is-999.
DOCN_SSTDATA_YEAR_END
Sets end year of sst/ice_cov for AMIP runs, only used in F compset. Default is-999.
Driver/coupler variablesThe following are CPL-specific env_conf.xml variables
38

Chapter 3. Configuring a Case
CPL_EPBAL
Provides EP balance factor for precip for POP2. A factor computed by POP2is applied to precipitation so that precipitation balances evaporation and ocnglobal salinity does not drift. This is intended for use when coupling POP2 to aDATM. Only used for C and G compsets.
Valid values are off, ocn. Default is off.
CPL_ALBAV
If false, albedos are computed with the assumption that downward solar radia-tion from the atm component has a diurnal cycle and zenith-angle dependence.This is normally the case when using an active atm component.
If true, albedos are computed with the assumption that downward solar radia-tion from the atm component is a daily average quantity and does not have azenith-angle dependence. This is often the case when using a data atm compo-nent.
This is only used for C and G compsets. Valid values are true, false. Default isfalse.
CCSM_BGC
If the value is not "none", the coupler is compiled so that optional BGC relatedfields are exchanged between component models. Currently only "none" and"CO2A" are supported. CO2A will activate sending diagnostic and prognosticco2 from the atm component to the lnd component.
Valid values are: none, CO2A.
CCSM_VOC
If the value is "TRUE", the coupler is compiled so that optional Biogenic VolatileOrganic Compunds (VOC) related fields are exchanged between componentmodels (from the lnd component to the atmosphere component).
Valid values are: TRUE, FALSE. Default is FALSE
MAP_A2OF_FILE
atm-to-ocn mapping file for fluxes (currently first-order conservative).
MAP_A2OS_FILE
atm-to-ocn mapping file for states (currently bilinear).
MAP_O2AF_FILE
ocn-to-atm mapping file for fluxes (currently first-order conservative).
MAP_O2AS_FILE
ocn-to-atm mapping file for states (currently bilinear).
MAP_A2LF_FILE
atm-to-land mapping file for fluxes (currently first-order conservative).
MAP_A2LS_FILE
atm-to-land mapping file for states (currently bilinear).
MAP_R2O_FILE_R05
0.5-degree runoff-to-ocn mapping file.
39

Chapter 3. Configuring a Case
MAP_R2O_FILE_RX1
1-degree runoff-to-ocn mapping file.
MAP_R2O_FILE_R19
19-basin runoff-to-ocn mapping file.
Other variablesThe following variables impact more than one component.
CCSM_CO2_PPMV
This set the namelist values of CO2 ppmv for CAM and CLM. This variables isintroduced to coordinate this value among multiple components.
Reconfiguring a CaseIf env_conf.xml or env_mach_pes.xml variables need to be changed after configurehas been called, the case scripts will need to be reconfigured. To do this, run
> cd $CASEROOT> configure -cleanall> configure -case
This will update the buildnml and buildexe files in the Buildconf directory andthe case build and run scripts in the CASEROOT directory. If only variables inenv_conf.xml have change, clean and reconfigure just the files in Buildconf by doing
> cd $CASEROOT> configure -cleannamelist> configure -case
If only variables in env_mach_pes.xml have changed, clean and reconfigure the buildand run scripts by doing
> cd $CASEROOT> configure -cleanmach> configure -case
Note that the -cleanall option does a combination of the -cleannamelist and-cleanmach options. Reconfiguring with -cleanall results in the loss of all localmodifications to the component buildnml or buildexe files in Buildconf as well asthe loss of all local modifications to the local build and run scripts.
Summary of Files in the Case DirectoryThis table summarizes the directories and files that are created by configure. For morecomplete information about the files in the case directory, see the Section called Whatare the directories and files in my case directory? in Chapter 11
Table 3-2. Result of invoking configure
File or Directory Description
40

Chapter 3. Configuring a Case
File or Directory DescriptionBuildconf/ Contains scripts that generate
component libraries and utility libraries(e.g., PIO, MCT) and scripts thatgenerate component namelists.
$CASE.$MACH.build Creates the component and utilitylibraries and model executable (seebuilding CESM).
$CASE.$MACH.run Runs the CESM model and performsshort-term archiving of output data (seerunning CESM). Contains the necessarybatch directives to run the model on therequired machine for the requested PElayout.
$CASE.$MACH.l_archive Performs long-term archiving of outputdata (see long-term archiving). Thisscript will only be created if long-termarchiving is available on the targetmachine.
$CASE.$MACH.clean_build Removes all object files and librariesand unlocks Macros.$MACH andenv_build.xml. This step is requiredbefore a clean build of the system.
env_derived Contains environmental variablesderived from other settings. Should notbe modified by the user.
Notes1. http://www.cesm.ucar.edu/models/cesm1.0/cam/docs/users_guide/book1.html
2. http://www.cesm.ucar.edu/models/cesm1.0/cam/docs/users_guide/book1.html
3. http://www.cesm.ucar.edu/models/cesm1.0/clm/models/lnd/clm/doc/UsersGuide/book1.html
4. http://www.cesm.ucar.edu/models/cesm1.0/clm/models/lnd/clm/doc/UsersGuide/book1.html
5. http://www.cesm.ucar.edu/models/cesm1.0/cice/doc/index.html
6. http://www.cesm.ucar.edu/models/cesm1.0/cice/doc/index.html
7. http://www.cesm.ucar.edu/models/cesm1.0/pop/doc/users/
8. http://www.cesm.ucar.edu/models/cesm1.0/data8/book1.html
9. http://www.cesm.ucar.edu/models/cesm1.0/data8/book1.html
10. http://www.cesm.ucar.edu/models/cesm1.0/data8/book1.html
11. http://www.cesm.ucar.edu/models/cesm1.0/data8/data8_doc/book1.html
41

Chapter 3. Configuring a Case
42
Chapter 4. Building a Case
After configuring a case, the model executable can be built by running$CASE.$MACH.build which will:
1. create the component namelists in $RUNDIR ($EXEROOT/run) by calling theBuildconf/ scripts $component.buildnml.csh.
2. check for the required input data sets and download missing data automati-cally on local disk, and if successful proceed to the following steps.
3. create the necessary utility libraries by calling the Buildconf/ scriptsmct.buildlib, pio.buildlib and csm_share.buildlib.
4. create the necessary component libraries by calling the Buildconf/ scripts$component.buildexe.csh.
5. create the model executable by calling the Buildconf/ scriptsccsm.buildexe.csh.
Note: $CASEROOT/Tools/Makefile and $CASEROOT/Macros.$MACH are used to generateall necessary utility and component libraries and the model executable.
A user does not need to change the default build settings to create the executable.However, the CESM scripts provide the user with a great deal of flexibility in cus-tomizing various aspects of the build process. It is therefore useful for a user to be-come familiar with these in order to make optimal use of the system.
Input dataAll active and data components use input datasets. A local disk needs to be pop-ulated with input data in order to run CESMwith these components. For all ma-chines, input data is provided as part of the release via data from a subversion in-put data server. However, on supported machines (and some non-supported ma-chines), data already exists in the default local-disk input data area (as specified by$DIN_LOC_ROOT_CSMDATA (see below).
Input data is handled by the build process as follows:
• configure and buildnml scripts create listings of required component inputdatasets in the Buildconf/$component.input_data_list files.
• &$CASE.$MACH.build; in the prestage step checks for the presence of the requiredinput data files in the root directory $DIN_LOC_ROOT_CSMDATA. If all requireddata sets are found on local disk, then the build can proceed.
• If any of the required input data sets are not found, the build script will abort andthe files that are missing will be listed. At this point, you must obtain the requireddata from the input data server using check_input_data with the -export option.
The following variables in env_run.xml determine where you should expect inputdata to reside on local disk and how this input data will be handled during the run.
DIN_LOC_ROOT_CSMDATA
The root directory of CESM input data for the selected machine. Usually a shareddisk area.
43

Chapter 4. Building a Case
DIN_LOC_ROOT
The inputdata area used for the current case. Normally, this is set toDIN_LOC_ROOT_CSMDATA but the system provides flexibility for a user tospecify a distinct directory. This might be needed on certain machines if theuser needs to have the input data reside in a special disk area associated withthe executable directory or the batch nodes, rather than in the default local diskdirectory.
DIN_LOC_ROOT_CLMQIAN
CLM-specific root directory for CLM QIAN type input forcing data. This direc-tory will only be used for I (CLM/DATM) compsets.
PRESTAGE_DATA
Allows the case input data root directory (DIN_LOC_ROOT) to differ from themachine’s root input data directory (DIN_LOC_ROOT_CSMDATA).
If PRESTAGE_DATA is FALSE (the default) then DIN_LOC_ROOT will be set toDIN_LOC_ROOT_CSMDATA.
If PRESTAGE_DATA is TRUE, then DIN_LOC_ROOT will beset to EXEROOT/inputdata. In addition, data will be copied fromDIN_LOC_ROOT_CSMDATA to DIN_LOC_ROOT before the model builds.The input data in EXEROOT/inputdata will then be used for the model run.
User-created input dataIf you want to use new user-created dataset(s), give these dataset(s) names thatare different than the names in $DIN_LOC_ROOT. The best way to access theseuser-specified datasets is to use the script $CCSMROOT/scripts/link_dirtree.link_dirtree creates a virtual copy of the input data directory by linking onedirectory tree to another. The full directory structure of the original directory isduplicated and the files are linked. Invoke the following for usage:
> cd $CCSMROOT/scripts> link_dirtree -h
link_dirtree can be conveniently used to generate the equivalent of a localcopy of $DIN_LOC_ROOT_CSMDATA which can then be populated withuser-specified input datasets. For example, you can first generate a virtual copyof $DIN_LOC_ROOT_CSMDATA in /user/home/newdata with the followingcommand:
> link_dirtree $DIN_LOC_ROOT_CSMDATA /user/home/newdata
then incorporate the new dataset(s) directly into the appropriate directory in/user/home/newdata.
Important:: If you place a new dataset for $component in/user/home/newdata, then Buildconf/$component.buildnml.csh andBuildconf/$component.input_data_list must be modified to point to this newdataset.
Using the input data serverThe script $CASEROOT/check_input_data determines if the required datafiles for the case exist on local disk in the appropriate subdirectory of$DIN_LOC_ROOT_CSMDATA. If any of the required datasets do not exist
44

Chapter 4. Building a Case
locally, check_input_data provides the capability for downloading them to the$DIN_LOC_ROOT_CSMDATA directory hierarchy via interaction with the inputdata server. You can independently verify that the required data is present locally byusing the following commands:
> cd $CASEROOT> check_input_data -help> check_input_data -inputdata $DIN_LOC_ROOT_CSMDATA -check
If input data sets are missing, you must obtain the datasets from the input data server:
> cd $CASEROOT> check_input_data -inputdata $DIN_LOC_ROOT_CSMDATA -export
Required data files not on local disk will be downloaded through interaction withthe Subversion input data server. These will be placed in the appropriate subdirec-tory of $DIN_LOC_ROOT_CSMDATA. For what to expect when interacting with aSubversion repository, see downloading input data.
Build-time variablesThe env_build.xml file sets variables that control various aspects of building themodel executable. Most of the variables should not be modified by users. The vari-ables that you can modify are discussed in more detail below.
EXEROOT
The CESM executable root directory. This is where the model builds its exe-cutable and by default runs the executable. Note that $EXEROOT needs to haveenough disk space for the experimental configuration requirements. As an ex-ample, CESM can produce more than a terabyte of data during a 100-year run,so you should set $EXEROOT to scratch or tmp space and frequently back upthe data to a mass storage device.
RUNDIR
The directory where the executable will be run. By default this is set to$EXEROOT/run. RUNDIR allows you to keep the run directory separate fromthe build directory.
BUILD_THREADED
Valid values are TRUE and FALSE. The default is FALSE.
If FALSE, the component libraries are built with OpenMP capability only if theNTHREADS_ setting for that component is greater than 1 in env_mach_pes.xml.
If TRUE, the component libraries are always built with OpenMP capability.
DEBUG
Flag to turn on debugging for run time and compile time. Valid values are TRUE,FALSE. The default is FALSE.
If TRUE, compile-time debugging flags are activated that you can use to verifysoftware robustness, such as bounds checking.
Important:: On IBM machines, floating point trapping is not activated for productionruns (i.e., non-DEBUG), due to performance penalties associated with turning onthese flags.
45

Chapter 4. Building a Case
GMAKE_J
Number of processors for gmake (integer). 0 < GMAKE_J < [number of proces-sors/node]. $GMAKE_J allows a faster build on multi-processor machines. If thebuild fails in different places without other changes, setting this to 1 may help.
OCN_TRACER_MODULES
A POP2-specific setting for turning on different ocean tracer modules. Valid val-ues are any combination of: iage, cfc, ecosys.
Compiler settingsCompiler settings are located in the two files env_mach_specific andMacros.$MACH. The env_mach_specific file is a shell script that sets variousmachine specific configure options such as modules and MPI or system environmentvariables. This script is run as part of every build or run step, and accounts forsettings not included in the CESM xml env files. The Macros.$MACH file contains themachine specific build options used in the CESM Makefile. Both of these files areusually involved in defining build options, and the env_mach_specific file mightalso contain critical settings for the run phase.
If you are running at NCAR, env_mach_specific also contains variables to set up massstorage archiving. You need to modify these if you activate long-term archiving onthe mass store.
You need to modify these files for user-defined machines during the process of port-ing CESM to your machine.
User-modified source codeEach model component ($component) has an associated directory,$CASEROOT/SourceMods/src.$component, where you can place modifiedsource code before building the executable. Any source code from$component that is placed in $CASEROOT/SourceMods/src.$component/ willautomatically be compiled when the model is built and will overwrite thedefault source code. For example, placing user-modifed cam source code in$CASEROOT/SourceMods/src.cam will cause the user-modified routines to be usedinstead of the routines in $CCSMROOT/models/atm/cam.
If you want to modify numerous cam namelist values, you can use place a file,user_nl, containing modified cam namelist settings in SourceMods/src.cam andthis file will be used by the configure -case; command to generate the appropriatenamelist for CAM.
Building the executableAfter customizing your build options, and adding any user-modified source code,you are ready to build the case executable.
> cd $CASEROOT> $CASE.$MACH.build
Diagnostic comments will appear as the build proceeds.
The following line indicates that the component namelists have been generated suc-cessfully:
46

Chapter 4. Building a Case
....CCSM BUILDNML SCRIPT HAS FINISHED SUCCESSFULLY....
When the required case input data in $DIN_LOC_ROOT has been successfullychecked, you will see:
CCSM PRESTAGE SCRIPT STARTING......CCSM PRESTAGE SCRIPT HAS FINISHED SUCCESSFULLY
Finally, the build script generates the utility and component libraries and the modelexecutable. There should be a line for the mct and pio libraries, as well as each of thecomponents. Each is date stamped, and a pointer to the build log file for that libraryor component is created. Successful completion is indicated by:
CCSM BUILDEXE SCRIPT HAS FINISHED SUCCESSFULLY
The build log files have names of the form $model.bldlog.$datestamp and are locatedin $RUNDIR. If they are compressed (indicated by a .gz file extension), then the buildran successfully.
Invoking $CASE.$MACH.build creates the following directory structure in$EXEROOT:
$EXEROOT/atm$EXEROOT/ccsm$EXEROOT/cpl$EXEROOT/csm_share$EXEROOT/glc$EXEROOT/ice$EXEROOT/lib$EXEROOT/lnd$EXEROOT/mct$EXEROOT/ocn$EXEROOT/pio$EXEROOT/run
The atm/, ccsm/, cpl/, glc/, ice/, lnd/, and ocn/ subdirectories each contain an’obj/’ directory where the compiled object files for the model component is placed.These object files are collected into libraries that are placed in ’lib/’ along with themct/mpeu, pio, and csm_share libraries. Special include modules are also placed inlib/include. The model executable ’ccsm.exe’ is placed in $EXEROOT/run along withcomponent namelists. During the model run, component logs, output datasets, andrestart files are also placed in this directory.
Rebuilding the executableThe model should be rebuilt under the following circumstances:
If env_conf.xml, env_build.xml or $Macros.$MACH has been modified, and/or ifcode is added to SourceMods/src.*, then it’s safest to clean the build and rebuildfrom scratch as follows,
> cd $CASEROOT> $CASE.$MACH.clean_build> $CASE.$MACH.build
If ONLY the PE layout has been modified in env_mach_pes.xml (see setting the PElayout) then it’s possible that a clean is not required.
> cd $CASEROOT
47

Chapter 4. Building a Case
> $CASE.$MACH.build
But if the threading has been turned on or off in any component relative to the previ-ous build, then the build script should error as follows
ERROR SMP STATUS HAS CHANGEDSMP_BUILD = a0l0i0o0g0c0SMP_VALUE = a1l0i0o0g0c0A manual clean of your obj directories is strongly recommendendYou should execute the following:./b39pA1.bluefire.clean_build
Then rerun the build script interactively---- OR ----You can override this error message at your own risk by executing./xmlchange -file env_build.xml -id SMP_BUILD -val 0
Then rerun the build script interactively
and suggest that the model be rebuilt from scratch.
Note: The user is responsible for manually rebuilding the model when needed. If there isany doubt, you should rebuild.
48

Chapter 5. Running a case
To run a case, the user must submit the batch script $CASE.$MACH.run. In addition,the user needs to also modify env_run.xml for their particular needs.
env_run.xml contains variables which may be modified during the course of a modelrun. These variables comprise coupler namelist settings for the model stop time,model restart frequency, coupler history frequency and a flag to determine if therun should be flagged as a continuation run. In general, the user needs to only setthe variables $STOP_OPTION and $STOP_N. The other coupler settings will then begiven consistent and reasonable default values. These default settings guarantee thatrestart files are produced at the end of the model run.
Customizing runtime settingsAs mentioned above, variables that control runtime settings are found inenv_run.xml. In the following, we focus on the handling of run control (e.g. lengthof run, continuing a run) and output data. We also give a more detailed descriptionof CESM restarts.
Setting run control variablesBefore a job is submitted to the batch system, the user needs first check that the batchsubmission lines in $CASE.$MACH.run are appropriate. These lines should be checkedand modified accordingly for appropriate account numbers, time limits, and std-out/stderr file names. The user should then modify env_run.xml to determine thekey run-time settings, as outlined below:
CONTINUE_RUN
Determines if the run is a restart run. Set to FALSE when initializing a startup,branch or hybrid case. Set to TRUE when continuing a run. (logical)
When you first begin a branch, hybrid or startup run, CONTINUE_RUN mustbe set to FALSE. When you successfully run and get a restart file, you will needto change CONTINUE_RUN to TRUE for the remainder of your run. Details ofperforming model restarts are provided below.
RESUBMIT
Enables the model to automatically resubmit a new run. To get multiple runs,set RESUBMIT greater than 0, then RESUBMIT will be decremented and thecase will be resubmitted. The case will stop automatically resubmitting whenthe RESUBMIT value reaches 0.
Long CESM runs can easily outstrip supercomputer queue time limits. For thisreason, a case is usually run as a series of jobs, each restarting where the previousfinished.
STOP_OPTION
Ending simulation time.
Valid values are: [none, never, nsteps, nstep, nseconds, nsecond, nminutes,nminute, nhours, nhour, ndays, nday, nmonths, nmonth, nyears, nyear, date,ifdays0, end] (char)
STOP_N
Provides a numerical count for $STOP_OPTION. (integer)
49

Chapter 5. Running a case
STOP_DATE
Alternative yyyymmdd date option, negative value implies off. (integer)
REST_OPTION
Restart write interval.
Valid values are: [none, never, nsteps, nstep, nseconds, nsecond, nminutes,nminute, nhours, nhour, ndays, nday, nmonths, nmonth, nyears, nyear, date,ifdays0, end] (char)
Alternative yyyymmdd date option, negative value implies off. (integer)
REST_N
Number of intervals to write a restart. (integer)
REST_DATE
Model date to write restart, yyyymmdd
STOP_DATE
Alternative yyyymmdd date option, negative value implies off. (integer)
By default,
STOP_OPTION = ndaysSTOP_N = 5STOP_DATE = -999
The default setting is only appropriate for initial testing. Before a longer run isstarted, update the stop times based on the case throughput and batch queuelimits. For example, if the model runs 5 model years/day, set RESUBMIT=30,STOP_OPTION= nyears, and STOP_N= 5. The model will then run in five yearincrements, and stop after 30 submissions.
CESM Input/OutputEach CESM component produces its own output datasets consisting of history, restartand output log files. Component history files are in netCDF format whereas compo-nent restart files may be in netCDF or binary format and are used to either exactlyrestart the model or to serve as initial conditions for other model cases.
Most CESM component IO is handled by the Parallel IO library.1 This library is con-troled by settings in the file env_run.xml For each of these settings described belowthere is also a component specific setting that can be used to override the CESM widedefault. A value of -99 in these component specific variables indicates that the defaultCESM wide setting will be used. If an out of range value is used for any componentthe model will revert to a suitable default. The actual values used for each componentare written to the cesm.log file near the beginning of the model run.
PIO_NUMTASKS
Sets the number of component tasks to be used in the interface to lower levelIO components, -1 indicates that the library will select a suitable default value.Using a larger number of IO tasks generally reduces the per task memory re-quirements but may reduce IO performance due to dividing data into blocksizeswhich are suboptimal. Note the the OCN_PIO_NUMTASKS overrides the sys-tem wide default value in most configurations.
50

Chapter 5. Running a case
ATM_PIO_NUMTASKS, CPL_PIO_NUMTASKS, GLC_PIO_NUMTASKS,ICE_PIO_NUMTASKS, LND_PIO_NUMTASKS, OCN_PIO_NUMTASKS
Component specific settings to override system wide defaults
PIO_ROOT
Sets the root task of the PIO subsystem relative to the root task of the modelcomponent. In most cases this value is set to 1, but due to limitations in the POPmodel OCN_PIO_ROOT must be set to 0.
ATM_PIO_ROOT, CPL_PIO_ROOT, GLC_PIO_ROOT, ICE_PIO_ROOT,LND_PIO_ROOT, OCN_PIO_ROOT
Component specific settings to override system wide defaults
PIO_STRIDE
Sets the offset between one IO task and the next for a given model component.Typically one would set either PIO_NUMTASKS or PIO_STRIDE and allow themodel to set a reasonable default for the other variable.
ATM_PIO_STRIDE, CPL_PIO_STRIDE, GLC_PIO_STRIDE, ICE_PIO_STRIDE,LND_PIO_STRIDE, OCN_PIO_STRIDE
Component specific settings to override system wide defaults
PIO_TYPENAME
Sets the lowlevel library that PIO should interface. Possible values (dependingon the available backend libraries) are netcdf, pnetcdf, netcdf4p and netcdf4c.netcdf is the default and requires the model to be linked with a netdf3 or netcdf4library. pnetcdf requires the parallel netcdf library and may provide better per-formance than netcdf depending on a number of factors including platform andmodel decomposition. netcdf4p (parallel) and netcdf4c (compressed) require anetcdf4 library compiled with parallel hdf5. These options are not yet consid-ered robust and should be used with caution.
ATM_PIO_TYPENAME, CPL_PIO_TYPENAME, GLC_PIO_TYPENAME,ICE_PIO_TYPENAME, LND_PIO_TYPENAME, OCN_PIO_TYPENAME
Component specific settings to override system wide defaults
PIO_DEBUG_LEVEL
Sets a flag for verbose debug output from the pio layer. Recommended for expertuse only.
PIO_ASYNC_INTERFACE
This variable is reserved for future use and must currently be set to FALSE.
Archiving is a phase of a CESM model run where the generated output data ismoved from $RUNDIR (normally $EXEROOT/run) to a local disk area (short-termarchiving) and subsequently to a long-term storage system (long-term archiving). Ithas no impact on the production run except to clean up disk space and help manageuser quotas. Short and long-term archiving environment variables are set inthe env_mach_specific file. Although short-term and long-term archiving areimplemented independently in the scripts, there is a dependence between the twosince the short-term archiver must be turned on in order for the long-term archiverto be activated. In env_run.xml, several variables control the behavior of short andlong-term archiving. These are described below.
LOGDIR
Extra copies of the component log files will be saved here.
51

Chapter 5. Running a case
DOUT_S
If TRUE, short term archiving will be turned on.
DOUT_S_ROOT
Root directory for short term archiving. This directory must be visible to com-pute nodes.
DOUT_S_SAVE_INT_REST_FILES
If TRUE, perform short term archiving on all interim restart files, not just thoseat the end of the run. By default, this value is FALSE. This is for expert usersONLY and requires expert knowledge. We will not document this further in thisguide.
DOUT_L_MS
If TRUE, perform long-term archiving on the output data.
DOUT_L_MSROOT
Root directory on mass store system for long-term data archives.
DOUT_L_HTAR
If true, DOUT_L_HTAR the long-term archiver will store history data in annualtar files.
DOUT_L_RCP
If TRUE, long-term archiving is done via the rcp command (this is not currentlysupported).
DOUT_L_RCP_ROOT
Root directory for long-term archiving on rcp remote machine. (this is not cur-rently supported).
Several important points need to be made about archiving:
• By default, short-term archiving is enabled and long-term archiving is disabled.
• All output data is initially written to $RUNDIR.
• Unless a user explicitly turns off short-term archiving, files will be moved to$DOUT_S_ROOT at the end of a successful model run.
• If long-term archiving is enabled, files will be moved to $DOUT_L_MSROOT by$CASE.$MACH.l_archive, which is run as a separate batch job after the successfulcompletion of a model run.
• Users should generally turn off short term-archiving when developing new CESMcode.
• If long-term archiving is not enabled, users must monitor quotas and usage in the$DOUT_S_ROOT/ directory and should manually clean up these areas on a fre-quent basis.
Standard output generated from each CESM component is saved in a "log file" foreach component in $RUNDIR. Each time the model is run, a single coordinated dat-estamp is incorporated in the filenames of all output log files associated with that run.This common datestamp is generated by the run script and is of the form YYMMDD-hhmmss, where YYMMDD are the Year, Month, Day and hhmmss are the hour,minute and second that the run began (e.g. ocn.log.040526-082714). Log files are alsocopied to a user specified directory using the variable $LOGDIR in env_run.xml.The default is a ’logs’ subdirectory beneath the case directory.
52

Chapter 5. Running a case
By default, each component also periodically writes history files (usuallymonthly) in netCDF format and also writes netCDF or binary restart files in the$RUNDIR directory. The history and log files are controlled independently by eachcomponent. History output control (i.e. output fields and frequency) is set in theBuildconf/$component.buildnml.csh files.
The raw history data does not lend itself well to easy time-series analysis. For exam-ple, CAM writes one or more large netCDF history file(s) at each requested outputperiod. While this behavior is optimal for model execution, it makes it difficult to an-alyze time series of individual variables without having to access the entire data vol-ume. Thus, the raw data from major model integrations is usually postprocessed intomore user-friendly configurations, such as single files containing long time-series ofeach output fields, and made available to the community.
As an example, for the following example settings
DOUT_S = TRUEDOUT_S_ROOT = /ptmp/$user/archiveDOUT_L_MS = TRUEDOUT_L_MSROOT /USER/csm/b40.B2000
the run will automatically submit the $CASE.$MACH.l_archive to the queue upon itscompletion to archive the data. The system is not bulletproof, and the user will wantto verify at regular intervals that the archived data is complete, particularly duringlong running jobs.
Load balancing a caseLoad balancing refers to the optimization of the processor layout for a given modelconfiguration (compset, grid, etc) such that the cost and throughput will be opti-mal. Optimal is a somewhat subjective thing. For a fixed total number of proces-sors, it means achieving the maximum throughput. For a given configuration acrossvaried processor counts, it means finding several "sweet spots" where the modelis minimally idle, the cost is relatively low, and the throughput is relatively high.As with most models, increasing total processors normally results in both increasedthroughput and increased cost. If models scaled linearly, the cost would remain con-stant across different processor counts, but generally, models don’t scale linearly andcost increases with increasing processor count. This is certainly true for CESM. It isstrongly recommended that a user perform a load-balancing exercise on their pro-posed model run before undertaking a long production run.
CESM has significant flexibility with respect to the layout of components across dif-ferent hardware processors. In general, there are six unique models (atm, lnd, ocn,ice, glc, cpl) that are managed independently in CESM, each with a unique MPI com-municator. In addition, the driver runs on the union of all processors and controls thesequencing and hardware partitioning.
Please see the section on setting the case PE layout for a detailed discussion of howto set processor layouts and the example on changing the PE layout .
Model timing dataIn order to perform a load balancing exercise, the user must first be aware of thedifferent types of timing information produced by every CESM run. How this infor-mation is used is described in detail in using model timing data.
A summary timing output file is produced after every CESM run. This file is placedin $CASEROOT/timing/ccsm_timing.$CASE.$date, where $date is a datestamp setby CESM at runtime, and contains a summary of various information. The followingprovides a description of the most important parts of a timing file.
53
Chapter 5. Running a case
The first section in the timing output, CESM TIMING PROFILE, summarizes generaltiming information for the run. The total run time and cost is given in several metricsincluding pe-hrs per simulated year (cost), simulated years per wall day (thoughput),seconds, and seconds per model day. This provides general summary informationquickly in several units for analysis and comparison with other runs. The total runtime for each component is also provided, as is the time for initialization of the model.These times are the aggregate over the total run and do not take into account anytemporal or processor load imbalances.
The second section in the timing output, "DRIVER TIMING FLOWCHART", pro-vides timing information for the driver in sequential order and indicates which pro-cessors are involved in the cost. Finally, the timings for the coupler are broken out atthe bottom of the timing output file.
Separately, there is another file in the timing directory,ccsm_timing_summary.$CASE.$date that accompanies the above timing summary.This second file provides a summary of the minimum and maximum of all themodel timers.
There is one other stream of useful timing information in the cpl.log.$date file thatis produced for every run. The cpl.log file contains the run time for each model dayduring the model run. This diagnostic is output as the model runs. You can searchfor tStamp in the cpl.log file to see this information. This timing information is usefulfor tracking down temporal variability in model cost either due to inherent modelvariability cost (I/O, spin-up, seasonal, etc) or possibly due to variability due tohardware. The model daily cost is generally pretty constant unless I/O is writtenintermittently such as at the end of the month.
Using model timing dataIn practice, load-balancing requires a number of considerations such as which com-ponents are run, their absolute and relative resolution; cost, scaling and processorcount sweet-spots for each component; and internal load imbalance within a com-ponent. It is often best to load balance the system with all significant run-time I/Oturned off because this occurs very infrequently (typically one timestep per month),is best treated as a separate cost, and can bias interpretation of the overall modelload balance. Also, the use of OpenMP threading in some or all of the componentsis dependent on the hardware/OS support as well as whether the system supportsrunning all MPI and mixed MPI/OpenMP on overlapping processors for differentcomponents. A final point is deciding whether components should run sequentially,concurrently, or some combination of the two with each other. Typically, a series ofshort test runs is done with the desired production configuration to establish a rea-sonable load balance setup for the production job. The timing output can be used tocompare test runs to help determine the optimal load balance.
In general, we normally carry out 20-day model runs with restarts and history turnedoff in order to find the layout that has the best load balance for the targeted num-ber of processors. This provides a reasonable performance estimate for the produc-tion run for most of the runtime. The end of month history and end of run restartI/O is treated as a separate cost from the load balance perspective. To setup thistest configuration, create your production case, and then edit env_run.xml and setSTOP_OPTION to ndays, STOP_N to 20, and RESTART_OPTION to never. Seasonalvariation and spin-up costs can change performance over time, so even after a pro-duction run has started, its worth occasionally reviewing the timing output to seewhether any changes might be made to the layout to improve throughput or decreasecost.
In determining an optimal load balance for a specific configuration, two pieces ofinformation are useful.
• Determine which component or components are most expensive.
54

Chapter 5. Running a case
• Understand the scaling of the individual components, whether they run faster withall MPI or mixed MPI/OpenMP decomposition strategies, and their optimal de-compositions at each processor count. If the cost and scaling of the components areunknown, several short tests can be carried with arbitrary component pe countsjust to establish component scaling and sweet spots.
One method for determining an optimal load balance is as follows
• start with the most expensive component and a fixed optimal processor count anddecomposition for that component
• test the systems, varying the sequencing/concurrency of the components and thepe counts of the other components
• identify a few best potential load balance configurations and then run each a fewtimes to establish run-to-run variability and to try to statistically establish the fasterlayout
In all cases, the component run times in the timing output file can be reviewed forboth overall throughput and independent component timings. Using the timing out-put, idle processors can be identified by considering the component concurrency inconjunction with the component timing.
In general, there are only a few reasonable concurrency options for CESM:
• fully sequential
• fully sequential except the ocean running concurrently
• fully sequential except the ice and land running concurrently with each other
• atmosphere running sequentially with the land and ice which are running concur-rently and then the ocean running concurrently with everything
• finally, it makes best sense for the coupler to run on a subset of the atmosphereprocessors and that can be sequentially or concurrently with the land and ice
The concurrency is limited in part by the hardwired sequencing in the driver. Thissequencing is set by scientific constraints, although there may be some addition flexi-bility with respect to concurrency when running with mixed active and data models.
There are some general rules for finding optimal configurations:
• Make sure you have set a processor layout where each hardwire processor is as-signed to at least one component. There is rarely a reason to have completely idleprocessors in your layout.
• Make sure your cheapest components keep up with your most expensive compo-nents. In other words, a component that runs on 1024 processors should not bewaiting on a component running on 16 processors.
• Before running the job, make sure the batch queue settings in the$CASE.$MACH.run script are set correctly for the specific run being targetted. Theaccount numbers, queue names, time limits should be reviewed. The ideal timelimit, queues, and run length are all dependent on each other and on the currentmodel throughput.
• Make sure you are taking full advantage of the hardware resources. If you arecharged by the 32-way node, you might as well target a total processor count thatis a multiple of 32.
• If possible, keep a single component on a single node. That usually minimizes in-ternal component communication cost. That’s obviously not possible if running onmore processors than the size of a node.
55

Chapter 5. Running a case
• And always assume the hardware performance could have variations due to con-tention on the interconnect, file systems, or other areas. If unsure, run cases multi-ple times.
The Run
Setting the time limitsBefore you can run the job, you need to make sure the batch queue variables are setcorrectly for the specific run being targeted. This is done currently by manually edit-ing $CASE.$MACH.run. The user should carefully check the batch queue submissionlines and make sure that you have appropriate account numbers, time limits, andstdout file names. In looking at the ccsm_timing.$CASE.$datestamp files for "ModelThroughput", output like the following will be found:
Overall Metrics:Model Cost: 327.14 pe-hrs/simulated_year (scale= 0.50)Model Throughput: 4.70 simulated_years/day
The model throughput is the estimated number of model years that you can runin a wallclock day. Based on this, the user can maximize $CASE.$MACH.run queuelimit and change $STOP_OPTION and $STOP_N in env_run.xml. For example, say amodel’s throughput is 4.7 simulated_years/day. On bluefire, the maximum runtimelimit is 6 hours. 4.7 model years/24 hours * 6 hours = 1.17 years. On the massivelyparallel computers, there is always some variability in how long it will take a job torun. On some machines, you may need to leave as much as 20% buffer time in yourrun to guarantee that jobs finish reliably before the time limit. For that reason we willset our model to run only one model year/job. Continuing to assume that the run ison bluefire, in $CASE.bluefire.run set
#BSUB -W 6:00
and xmlchange should be invoked as follows in $CASEROOT:
./xmlchange -file env_run.xml -id STOP_OPTION -val nyears
./xmlchange -file env_run.xml -id STOP_N -val 1
./xmlchange -file env_run.xml -id REST_OPTION -val nyears
./xmlchange -file env_run.xml -id REST_N -val 1
Submitting the runOnce you have configured and built the model, submit $CASE.$MACH.run to yourmachine’s batch queue system. For example on NCAR’s IBM, bluefire,
> # for BLUEFIRE> bsub < $CASE.bluefire.run> # for CRAY> qsub $CASE.jaguar.run
You can see a complete example of how to run a case in the basic example.
When executed, the run script, $CASE.$MACH.run, will:
• Check to verify that the env files are consistent with the configure and build scripts
• Verify that required input data is present on local disk (in$DIN_LOC_ROOT_CSMDATA) and run the buildnml script for each component
56

Chapter 5. Running a case
• Run the CESM model. Put timing information in $LOGDIR/timing. If $LOGDIR isset, copy log files back to $LOGDIR
• If $DOUT_S is TRUE, component history, log, diagnostic, and restart files will bemoved from $RUNDIR to the short-term archive directory, $DOUT_S_ROOT.
• If $DOUT_L_MS is TRUE, the long-term archiver, $CASE.$MACH.l_archive, willbe submitted to the batch queue upon successful completion of the run.
• If $RESUBMIT >0, resubmit $CASE.$MACH.run
NOTE: This script does NOT execute the build script, $CASE.$MACH.build. BuildingCESM is now done only via an interactive call to the build script.
If the job runs to completion, you should have "SUCCESSFUL TERMINATION OFCPL7-CCSM" near the end of your STDOUT file. New data should be in the subdi-rectories under $DOUT_S_ROOT, or if you have long-term archiving turned on, itshould be automatically moved to subdirectories under $DOUT_L_MSROOT.
If the job failed, there are several places where you should look for information. Startwith the STDOUT and STDERR file(s) in $CASEROOT. If you don’t find an obviouserror message there, the $RUNDIR/$model.log.$datestamp files will probably giveyou a hint. First check cpl.log.$datestamp, because it will often tell you when themodel failed. Then check the rest of the component log files. Please see troubleshoot-ing runtime errors for more information.
REMINDER: Once you have a successful first run, you must set CONTINUE_RUN toTRUE in env_run.xml before resubmitting, otherwise the job will not progress. Youmay also need to modify the RESUBMIT, STOP_OPTION, STOP_N, STOP_DATE,REST_OPTION, REST_N and/or REST_DATE variables in env_run.xml before re-submitting.
Restarting a runRestart files are written by each active component (and some data components)at intervals dictated by the driver via the setting of the env_run.xml variables,$REST_OPTION and $REST_N. Restart files allow the model to stop and then startagain with bit-for-bit exact capability (i.e. the model output is exactly the same as ifit had never been stopped). The driver coordinates the writing of restart files aswell as the time evolution of the model. All components receive restart and stopinformation from the driver and write restarts or stop as specified by the driver.
It is important to note that runs that are initialized as branch or hybrid runs,will require restart/initial files from previous model runs (as specified by theenv_conf.xml variables, $RUN_REFCASE and $RUN_REFDATE). These requiredfiles must be prestaged by the user to the case $RUNDIR (normally $EXEROOT/run)before the model run starts. This is normally done by just copying the contents ofthe relevant $RUN_REFCASE/rest/$RUN_REFDATE.00000 directory.
Whenever a component writes a restart file, it also writes a restart pointer file of theform, rpointer.$component. The restart pointer file contains the restart filenamethat was just written by the component. Upon a restart, each component reads itsrestart pointer file to determine the filename(s) to read in order to continue the modelrun. As examples, the following pointer files will be created for a component set usingfull active model components.
• rpointer.atm
• rpointer.drv
• rpointer.ice
• rpointer.lnd
• rpointer.ocn.ovf
57
Chapter 5. Running a case
• rpointer.ocn.restart
If short-term archiving is turned on, then the model archives the component restartdatasets and pointer files into $DOUT_S_ROOT/rest/yyyy-mm-dd-sssss, whereyyyy-mm-dd-sssss is the model date at the time of the restart (see below for moredetails). If long-term archiving these restart then archived in $DOUT_L_MSROOT/rest.DOUT_S_ROOT and DOUT_L_MSROOT are set in env_run.xml, and can bechanged at any time during the run.
Backing up to a previous restartIf a run encounters problems and crashes, the user will normally have to back upto a previous restart. Assuming that short-term archiving is enabled, the user needsto find the latest $DOUT_S_ROOT/rest/yyyy-mm-dd-ssss/ directory that was createand copy the contents of that directory into their run directory ($RUNDIR). The usercan then continue the run and these restarts will be used. It is important to make surethe new rpointer.* files overwrite the rpointer.* files that were in $RUNDIR, or the jobmay not restart in the correct place.
Occasionally, when a run has problems restarting, it is because the rpointer files areout of sync with the restart files. The rpointer files are text files and can easily beedited to match the correct dates of the restart and history files. All the restart filesshould have the same date.
Data flow during a model runAll component log files are copied to the directory specified by the env_run.xmlvariable $LOGDIR which by default is set to $CASEROOT/logs. This location is wherelog files are copied when the job completes successfully. If the job aborts, the log fileswill NOT be copied out of the $RUNDIR directory.
Once a model run has completed successfully, the output data flow will depend onwhether or not short-term archiving is enabled (as set by the env_run.xml variable,$DOUT_S). By default, short-term archiving will be done.
No archivingIf no short-term archiving is performed, then all model output data will remain inthe run directory, as specified by the env_run.xml variable, $RUNDIR. Furthermore,if short-term archiving is disabled, then long-term archiving will not be allowed.
Short-term archivingIf short-term archiving is enabled, the component output files will be moved to theshort term archiving area on local disk, as specified by $DOUT_S_ROOT. The di-rectory DOUT_S_ROOT is normally set to $EXEROOT/../archive/$CASE. and willcontain the following directory structure:
atm/hist/ logs/
cpl/hist/ logs/
glc/logs/
ice/hist/ logs/
lnd/hist/ logs/
ocn/
58

Chapter 5. Running a case
hist/ logs/rest/
yyyy-mm-dd-sssss/....yyyy-mm-dd-sssss/
hist/ contains component history output for the run.
logs/ contains component log files created during the run. In addition to $LOGDIR,log files are also copied to the short-term archiving directory and therefore are avail-able for long-term archiving.
rest/ contains a subset of directories that each contain a consistent set of restart files,initial files and rpointer files. Each sub-directory has a unique name correspondingto the model year, month, day and seconds into the day where the files were created(e.g. 1852-01-01-00000/). The contents of any restart directory can be used to createa branch run or a hybrid run or back up to a previous restart date.
Long-term archivingFor long production runs that generate many giga-bytes of data, the user normallywants to move the output data from local disk to a long-term archival location.Long-term archiving can be activated by setting $DOUT_L_MS to TRUE inenv_run.xml. By default, the value of this variable is FALSE, and long-termarchiving is disabled. If the value is set to TRUE, then the following additionalvariables are: $DOUT_L_MSROOT, $DOUT_S_ROOT DOUT_S (see variables foroutput data management ).
As was mentioned above, if long-term archiving is enabled, files will be moved outof $DOUT_S_ROOT to $DOUT_L_ROOT by $CASE.$MACH.l_archive„ which is runas a separate batch job after the successful completion of a model run.
Testing a caseAfter the case has built and has demonstrated the ability to run via a short test, it isimportant to formally test exact restart capability before a production run is started.See the Section called create_production_test in Chapter 8 for more information abouthow to use create_production_test.
Notes1. http://code.google.com/p/parallelio
59

Chapter 5. Running a case
60
Chapter 6. Post Processing CESM Output
A completed run of CESM1.0 will produce a large number of files, each withmany variables. Post processing these files presents several unique challenges.Various techniques and tools have been developed to meet these challenges. Eachcomponent maintains its own post-processing utility suite that can be accessed fromthe release code repository1. Component post-processing utilities are currentlyprovided only as a service to the community. Informal community support isprovided via the CCSM bulletin board2. General questions should be submitted tothis bulletin board; however, any bugs found in the packages should be reported tothe appropriate working group liaison.
Once approval is granted for access to the release repository, users may freely down-load the diagnostic packages. Users are urged to ’export’ the packages from the repos-itory rather than checking them out. For example:
> svn export https://svn-ccsm-release.cgd.ucar.edu/model_diagnostics/atm/cam/amwg_diag2.5
will result in the user obtaining the post processing utilities "amwg_diag2.5". Formore details on utilizing the release repository, please see Downloading CESM formore details.
Notes1. https://svn-ccsm-release.cgd.ucar.edu/model_diagnostics
2. http://bb.cgd.ucar.edu/
61

Chapter 6. Post Processing CESM Output
62

Chapter 7. Porting CESM
One of the first steps many users will have to address is getting the CESM modelrunning on their local machine. This section addresses that step. This section will de-scribe two different ways of going about that. First, using a generic machine to setupa case, get that case running, then backing out the new machine settings. Second,setting up some new machine settings, creating a case, testing it, and iterating on themachine settings. There are similarities and overlap in both methods. The genericmethod is likely to produce a running case faster. But eventually, users will wantto setup the CESM scripts so their local machine is supported out-of-the-box. Thisgreatly eases setting up cases and benefits groups of users by requiring the port bedone only once. Finally, some steps to validate the model will be recommended.
Note: When porting using either of the two methods described above, you will want toinitially get a dead, X, compset running at a low resolution. So you could, for instance,start with an X compset at resolution f45_g37. This allows you to determine whetherall prerequisite software is in place and working. Once that is working move to an Acompset with resolution f45_g37. Once that’s working, run a B compset at resolutionf45_g37. Finally when all the previous steps have run correctly, run your target compsetand resolution.
Porting to a new machine
Porting using a generic machineThis section describes how to setup a case using a generic machine name and thenwithin that case, how to modify the scripts to get that case running on a local ma-chine. In this section, the case name test1 and the generic machine generic_linux_intelwill be used in the example. But the specific casename, generic machine, resolution,and compset to test is at the discretion of the user.
1. Run create_newcase choosing a generic machine name that is closest to thelocal machine type. Typing> create_newcase -lwill provide a list of possible machines. The generic machines start with thename "generic_". The generic machines are different from the supported ma-chines because extra inline documentation is provided and the user will haveto modify some of the resolved scripts.
Additional command line arguments are required for the generic machines tohelp setup some of the local environment variables. Typing> create_newcase -hprovides a description of the command line arguments. The create_newcasewill look something like this for a generic machine> cd ccsm4/scripts> create_newcase -case test1 \
-res f19_g16 \-compset X \-mach generic_linux_intel \-scratchroot /ptmp/username \-din_loc_root_csmdata /home/ccsm/inputdata \-max_tasks_per_node 8 \
2. Run configure.> cd test1> configure -case
63

Chapter 7. Porting CESM
If there are errors at this step, the best approach might be to port starting fromthe machine files instead of a generic machine. See the Section called Portingvia user defined machine files.
3. Edit the scripts to be consistent with the local machine. Search for"GENERIC_USER" in the scripts. That tag will highlight inline documentationand areas that will likely need to be modified. In particular, modifications willbe needed in the following files.
• env_mach_specific is where modules, paths, or machine environment vari-ables need to be set. See the "GENERIC_USER" inline documentation in thatfile.
• Macros.generic_linux_intel is a Macros file for gmake for the system. Ingeneral, that entire file should be reviewed but there are some particularcomments about setting the paths for the netcdf and mpi external libraries.See the "GENERIC_USER" inline documentation in that file. In generalyou need to set NETCDF_PATH and MPICH_PATH and that can be set inthe Macros file, but they could also be set in the default user paths, byan explicit addition to the local path in the env_mach_specific file, or viasetting NETCDF_PATH and MPICH_PATH environment variables in theenv_mach_specific file. If you want the value in the Macro’s file to alwaysbe used you may need to comment out the if statement that checks if it’s setelsewhere before overriding it to a hardwired value. While CESM supportsuse of pnetcdf in pio, it’s generally best to ignore that feature during initialporting. pio works well with standard netcdf.
• test1.generic_linux_intel.run is the job submission script. Modifications areneeded there to address the local batch environment and the job launch. Seethe "GENERIC_USER" inline documentation in that file.
4. Build the case> ./test1.generic_linux_intel.buildThis step will often fail if paths to compilers, compiler versions, or libraries arenot set properly, if compiler options are not set properly, or if machine envi-ronment variables are not set properly. Review and edit the env_mach_specificand Macros.generic_linux_intel files, clean the build,> ./test1.generic_linux_intel.clean_buildand try rebuilding again.
5. Run the job using the local job submission command. qsub is used here forexample.> qsub test1.generic_linux_intel.runThe job will fail to submit if the batch commands are not set properly. The jobcould fail to run if the launch command is incorrect or if the batch commandsare not set consistent with the job resource needs. Review the run script andtry resubmitting.
6. Once a case is running, then the local setup for the case can be converted into aspecific set of machine files, so future cases can be setup using the user definedmachine name, not the generic machine, and cases should be able to run out-of-the-box. This step is very similar to the steps associated with porting usinguser defined machine files, see the Section called Porting via user defined machinefiles.
Basically, files in ccsm4/scripts/ccsm_utils/Machines will be added or mod-ified to support the user defined machine out-of-the-box. An env_machopts,Macros, and mkbatch file will be added and the config_machines.xml file willbe modified. First, pick a name that will be associated with the local machine.Generally, that’s the name of the local machine, but it could be anything. bugs-bunny will be used in the description to follow and the bugsbunny setup will
64
Chapter 7. Porting CESM
be based on the test1 example case above that is running on bugsbunny. Toadd bugsbunny to the list of supported machines, do the following
• Edit ccsm4/scripts/ccsm_utils/Machines/config_machines.xml. Add anentry for bugsbunny. A good idea is to copy one of the existing entriesand then edit it. The machine specific env variables that need to be setin config_machines.xml for bugsbunny are already set in the env files inthe test1 case directory that was created from the generic machine. Thosevalues can be translated directly into the config_machines.xml files forbugsbunny. That’s a starting point anyway. In some cases, variables mightneed to be made more general. For instance, the port person’s user nameand the initial test case should not appear in the variable definitions.
• Copy the env_mach_specific file from the test1 case directory toccsm4/scripts/ccsm_utils/Machines as follows> cd ccsm4/scripts/test1> cp env_mach_specific ../ccsm_utils/Machines/env_machopts.bugsbunny
• Copy the Macros file from the test1 case directory toccsm4/scripts/ccsm_utils/Machines as follows> cd ccsm4/scripts/test1> cp Macros.generic_linux_intel ../ccsm_utils/Machines/Macros.bugsbunnyThen edit the ccsm4/scripts/ccsm_utils/Machines/Macros.bugsbunny fileand delete everything up to the lines#===============================================================================# The following always need to be setThat first section of the Macros file is added automatically when a case isconfigured so should not be included in the machine specific setting.
• Create a mkbatch.bugsbunny file in ccsm4/scripts/ccsm_utils/Machines.The easiest way to do this is probably to copy themkbatch.generic_linux_intel file from that directory to mkbatch.bugsbunny> cd ccsm4/scripts/ccsm_utils/Machines> cp mkbatch.generic_linux_intel mkbatch.bugsbunnyThen edit the mkbatch.bugsbunny to match the changes made inthe test1.generic_linux_intel.run file in the test1 case. Remove theGENERIC_USER inline documentation and where that documentationexisted, update the batch commands and job launch commands to beconsistent with the test1 run script. The first part of the mkbatch scriptcomputes values that can be used in the batch commands. It might requiresome extra iteration to get this working for all cases, processor counts, andprocessor layouts.
• Test the new machine setup. Create a new case based on test1 using the bugs-bunny machine setup> cd ccsm4/scripts> create_newcase -case test1_bugsbunny \
-res f09_g16 \-compset X \-mach bugsbunny
Then configure, build, and run the case and confirm that test1_bugsbunnyruns fine and is consistent with the original test1 case. Once that works, testother configurations then move to port validation, see the Section called PortValidation.
Porting via user defined machine filesThis section describes how to add support for a new machine using machinespecific files. The basic approach is to add support for the new machine to
65

Chapter 7. Porting CESM
the CESM scripts directly and then to test and iterate on that setup. Files inccsm4/scripts/ccsm_utils/Machines will be added or modified to support the userdefined machine out-of-the-box. An env_machopts, Macros, and mkbatch file willbe added and the config_machines.xml file will be modified. First, pick a name thatwill be associated with the local machine. Generally, that’s the name of the localmachine, but it could be anything. wilycoyote will be used in the description tofollow. It’s also helpful to identify an existing supported machine that is similar toyour machine to use as a starting point in porting. If the user defined machine is alinux cluster with an intel compiler, then after reviewing the current supportedmachines using
> cd ccsm4/scripts> ./create_newcase -l
dublin_intel, hadley, or generic_linux_intel would be good candidates asstarting points. Starting with a generic machine provides some additional inlinedocumentation to aid in porting. If a generic machine is used, search for the tag"GENERIC_USER" in the scripts for additional documentation. In the examplebelow, dublin_intel will be used as the starting point. To add wilycoyote to the list ofsupported machines, do the following
• Edit ccsm4/scripts/ccsm_utils/Machines/config_machines.xml. Add an entryfor wilycoyote. A good idea is to copy one of the existing entries and thenedit the values for wilycoyote. You could start with the dublin_intel settingsalthough nearly any machine will be ok. There are several variable settings here.The definition of these variables can be found in the appendix, see Appendix D,Appendix E, Appendix F, Appendix G, and Appendix H. Some of the importantones are MACH which should be set to wilycoyote, EXEROOT which should beset to a generic working directory like /tmp/scratch/$CCSMUSER/$CASE,DIN_LOC_ROOT_CSMDATA which should be set to the path to the ccsminputdata directory, BATCHQUERY and BATCHJOBS which specify the queryand submit command lines for batch jobs and are used to chain jobs together inproduction, and MAX_TASKS_PER_NODE which set the maximum number oftasks allowed on each hardware node.
• Copy an env_machopts file to env_machopts.wilycoyote. Start with thedublin_intel file.> cd ccsm4/scripts/ccsm_utils/Machines> cp env_machopts.dublin_intel env_machopts.wilycoyoteEdit env_machopts.wilycoyote to change the environment setup, paths, modules,and environment variables to be consistent with wilycoyote.
• Copy a Macros file to Macros.wilycoyote. Start with the dublin_intel file.> cd ccsm4/scripts/ccsm_utils/Machines> cp Macros.dublin_intel Macros.wilycoyoteThen review and edit the Macros.wilycoyote file as needed. Pay particular atten-tion to the compiler name, and the netcdf and mpi paths. While the compiler op-tions for a given compiler are pretty consistent across machines, invoking the com-piler and the local paths for libraries are not. While CESM supports use of pnetcdfin pio, it’s generally best to ignore that feature during initial porting. pio workswell with standard netcdf.
• Copy a mkbatch file to mkbatch.wilycoyote file. Start with the dublin_intel file.> cd ccsm4/scripts/ccsm_utils/Machines> cp mkbatch.dublin_intel mkbatch.wilycoyoteThen edit the mkbatch.wilycoyote to be consistent with wilycoyote. In particular,the batch commands and the job launching will probably need to be changed. Thebatch commands and setup are the first section of the script. The job launching canbe found by searching for the string "CSM EXECUTION".
66

Chapter 7. Porting CESM
• After an initial pass is made to setup the new machine files, try creatinga case, building and running. Getting this to work will be an iterativeprocess. Changes will probably be made in both the machine files inccsm4/scripts/ccsm_utils/Machines for wilycoyote and in the case as testingproceeds. Whenever the machine files are updated, a new case should be setup.Whenever something is changed in the case scripts to fix a problem, that changeshould be migrated back to the wilycoyote machine files. In general, it’s probablyeasiest to modify the machine files and create new cases until the case configuressuccessfully. Once the case is configuring, it’s often easiest to edit the case scriptsto fix problems in the build and run. Once a case is running, those changes inthe case need to be backed out into the wilycoyote machine files and then thosemachine files can be tested with a new case.> cd ccsm4/scripts> create_newcase -case test_wily1 \
-res f19_g16 \-compset X \-mach wilycoyote
> cd test_wily1> configure -case> ./test_wily1.wilycoyote.build> qsub test_wily1.wilycoyote.runEventually, the machine files should work for any user and any configuration forwilycoyote.
Port ValidationThe following port validation is recommended for any new machine. Carrying outthese steps does not guarantee the model is running properly in all cases nor that themodel is scientifically valid on the new machine. In addition to these tests, detailedvalidation should be carried out for any new production run. That means verify-ing that model restarts are bit-for-bit identical with a baseline run, that the model isbit-for-bit reproducible when identical cases are run for several months, and that pro-duction cases are monitored very carefully as they integrate forward to identify anypotential problems as early as possible. These are recommended steps for validatinga port and are largely functional tests. Users are responsible for their own validationprocess, especially with respect to science validation.
1. Verify functionality by performing these functionality tests.ERS_D.f19_g16.XERS_D.T31_g37.AERS_D.f19_g16.B1850CNERI.f19_g16.XERI.T31_g37.AERI.f19_g16.B1850CNERS.f19_f19.FERS.f19_g16.IERS.T62_g16.CERS.T62_g16.DERT.f19_g16.B1850CN
2. Verify performance and scaling analysis.
a. Create one or two load-balanced configurations to check intoMachines/config_pes.xml for the new machine.
b. Verify that performance and scaling are reasonable.
c. Review timing summaries in $CASEROOT for load balance andthroughput.
67

Chapter 7. Porting CESM
d. Review coupler "daily" timing output for timing inconsistencies. As hasbeen mentioned in the section on load balancing a case , useful timinginformation is contained in cpl.log.$date file that is produced for everyrun. The cpl.log file contains the run time for each model day during themodel run. This diagnostic is output as the model runs. You can searchfor tStamp in this file to see this information. This timing information isuseful for tracking down temporal variability in model cost either due toinherent model variability cost (I/O, spin-up, seasonal, etc) or possiblydue to variability due to hardware. The model daily cost is generallypretty constant unless I/O is written intermittently such as at the end ofthe month.
3. Perform validation (both functional and scientific):
a. Perform a CAM error growth test1.
b. Perform a CLM perturbation error growth test (as described in the CLMUser’s Guide2).
c. Follow the CESM 1.0 CICE port-validation procedure.3
d. Follow the CESM 1.0 POP2 port-validation procedure.4
4. Perform two, one-year runs (using the expected load-balanced configuration)as separate job submissions and verify that atmosphere history files are bfbfor the last month. Do this after some performance testing is complete; youmay also combine this with the production test by running the first year as asingle run and the second year as a multi-submission production run. This willtest reproducibility, exact restart over the one-year timescale, and productioncapability all in one test.
5. Carry out a 20-30 year 1.9x2.5_gx1v6 resolution, B_1850_CN compset simula-tion and compare the results with the diagnostics plots for the 1.9x2.5_gx1v6Pre-Industrial Control (see the CESM diagnostics 5). Model output data forthese runs will be available on the Earth System Grid (ESG) 6 as well.
Notes1. http://www.cesm.ucar.edu/models/atm-cam/port/
2. http://www.cesm.ucar.edu/models/cesm1.0/clm/models/lnd/clm/doc/UsersGuide/book1.html
3. http://www.cesm.ucar.edu/models/cesm1.0/cice/validation/index.html
4. http://www.cesm.ucar.edu/models/cesm1.0/pop2/validation/index.html
5. http://www.cesm.ucar.edu/experiments/cesm1.0/diagnostics/
6. http://www.earthsystemgrid.org/browse/viewDataset.htm?datasetId=1358c818-d8b4-48d9-b530-66ad9a2e4381
68

Chapter 8. CESM Testing
Testing overviewCESM has a few tools that support automated testing of the model. In general, theseshould be used only after the model has been ported to the target machine (seeChapter 7). The tools are create_production_test, create_test, and create_test_suite.The create_production_test tool is executed from a working case, and it tests exactrestartability of that case setup in a separate directory. The create_test tool allows auser to quickly setup and run one of several supported tests. The create_test_suitetool quickly allows a user to setup and run a list of supported tests. Each of thesetools will be described below.
create_production_testIn general, after configuring and testing a case and before starting a long productionjob based on that case, it’s important to verify that the model restarts exactly. This isa standard requirement of the system and will help demonstrate stability of the con-figuration technically. The tool create_production_test is located in the case directory,and it sets up an ERU two month exact restart test in a separate directory based onthe current case. To use it, do the following
> cd $CASEROOT> ./create_production_test> cd ../$CASE_ERU.$MACH> $CASE_ERU.$MACH.buildsubmit $CASE_ERU.$MACH.runCheck your test results. A successful test produces "PASS" asthe first word in the file, $CASE_ERU.$MACH/TestStatus
If the test fails, see the Section called Debugging Tests That Fail for test debuggingguidance.
create_testThe create_test tool is located in the scripts directory and can be used to setup astandalone test case. The test cases are fixed and defined within the CESM scripts. Tosee the list of test cases or for additional help, type "create_test -help" from the scriptsdirectory. To use create_test, do something like
> cd $CCSMROOT/scripts> ./create_test -testname ERS.f19_g16.X.bluefire -testid t01> cd ERS.f19_g16.X.bluefire.t01> ERS.f19_g16.X.bluefire.t01.buildsubmit ERS.f19_g16.X.bluefire.t01.testCheck your test results. A successful test produces "PASS" asthe first word in the file TestStatus
The above sets up an exact restart test (ERS) at the 1.9x2.5_gx1v6 resolution using adead model compset (X) for the machine bluefire. The testid provides a unique tagfor the test in case it needs to be rerun (i.e. using -testid t02). Some things to noteabout CESM tests
• For more information about the create_test tool, run "create_test -help".
• Test results are set in the TestStatus file. The TestStatus.out file provides additionaldetails.
69

Chapter 8. CESM Testing
• Tests are not always easily re-runable from an existing test directory. Rather thanrerun a previous test case, it’s best to setup a clean test case (i.e. with a new testid).
• The costs of tests vary widely. Some are short and some are long.
• If a test fails, see the Section called Debugging Tests That Fail.
• There are -compare and -generate options for the create_test tool that support re-gression testing.
• There are extra test options that can be added to the test such as _D, _E, or _P*.These are described in more detail in the create_test -help output.
The test status results have the following meaning
Test Result Description
BFAIL compare test couldn’t find base result
CHECK manual review of data is required
ERROR test checker failed, test may or may nothave passed
FAIL test failed
GEN test has been generated
PASS test passed
PEND test has been submitted
RUN test is currently running OR it hung,timed out, or died ungracefully
SFAIL generation of test failed in scripts
TFAIL test setup error
UNDEF undefined result
The following tests are available at the time of writing
Test Description
SMS 5 day smoke test
ERS 10 day exact restart from startup
ERP 2 month exact restart from startup
ERB branch/exact restart test
ERH hybrid/exact restart test
ERI hybrid/branch/exact restart test
ERT 2 month exact restart from startup,history file test
ERU 2 month exact restart from initialconditions, history file test
SEQ sequencing bit-for-bit test
PEA single processor testing
PEM pe counts mpi bit-for-bit test
PET pe counts mpi/openmp bit-for-bit test
CME compare mct and esmf interfaces test
70

Chapter 8. CESM Testing
create_test_suiteThe create_test_suite tool is located in the scripts directory and can be used to setup asuite of standalone test cases automatically. To use this tool, a list of tests needs to ex-ist in a file. Some examples can be found in the directory scripts/ccsm_utils/Testlists.create_test_suite in invoked on a list of tests and then the full list of tests is gener-ated. In addition, an automated submission script and reporting script are created.The cs.submit script reduces the time to submit multiple test cases significantly. Touse this tool, do something like the following
create a list of desired tests in some filename, i.e. my_lists> create_test_suite -input_list my_lists -testid suite01> ./cs.status.suite01> ./cs.submit.suite01.$MACH> ./cs.status.suite01
The cs.status script is generated by create_test_suite, and it reports the status of allthe tests in the suite. The cs.submit script builds and submits all the tests sequentially.The cs.submit script should only be executed once to build and submit all the tests.The cs.status script can be executed as often as needed to check the status of the tests.When all the tests have completed running, then the results are static and complete.To help debug failed tests, see the Section called Debugging Tests That Fail..
Debugging Tests That FailThis section describes what steps can be taken to try to identify why a test failed. Theprimary information associated with reviewing and debugging a run can be foundin the Section called Troubleshooting runtime problems in Chapter 10.
First, verify that a test case is no longer in the batch queue. If that’s the case, thenreview the possible test results and compare that to the result in the TestStatus file.Next, review the TestStatus.out file to see if there is any additional information aboutwhat the test did. Finally, go to the troubleshooting section and work through thevarious log files.
Finally, there are a couple other things to mention. If the TestStatus file contains"RUN" but the job is no longer in the queue, it’s possible that the job either timedout because the wall clock on the batch submission was too short, or the job hungdue to some run-time error. Check the batch log files to see if the job was killed dueto a time limit, and if it was increase the time limit and either resubmit the job orgenerate a new test case and update the time limit before submitting it.
Also, a test case can fail because either the job didn’t run properly or because the testconditions (i.e. exact restart) weren’t met. Try to determine whether the test failedbecause the run failed or because the test did not meet the test conditions. If a test isfailing early in a run, it’s usually best to setup a standalone case with the same config-uration in order to debug problems. If the test is running fine, but the test conditionsare not being met (i.e. exact restart), then that requires debugging of the model in thecontext of the test conditions.
Not all tests will pass for all model configurations. Some of the issues we are awareof are
• All models are bit-for-bit reproducible with different processor counts EXCEPTpop. The BFBFLAG must be set to TRUE in the env_run.xml file if the coupler is tomeet this condition. There will be a performance penalty when this flag is set.
• Some of the active components cannot run with the mpi serial library. This librarytakes the place of mpi calls when the model is running on one processors and MPIis not available or not desirable. The mpi serial library is part of the CESM re-lease and is invoked by setting the USE_MPISERIAL variable in env_build.xml to
71

Chapter 8. CESM Testing
TRUE. An effort is underway to extend the mpi serial library to support all compo-nents’ usage of the mpi library with this standalone implementation. Also NOT allmachines/platforms are setup to enable setting USE_MPISERIAL to TRUE. Forthese machines the env variable MPISERIAL_SUPPORT is set to FALSE. In or-der to enable USE_MPISERIAL to TRUE you also need to make changes in theMacros and env_machopts files for that machine. The best way to do this is to usea machine where MPISERIAL_SUPPORT is TRUE and look at the type of changesneeded to make it work. Those same changes will need to be introduced for yourmachine. For the Macros file this includes the name of the compiler, possibly op-tions to the compiler, and the settings of the MPI library and include path. For theenv_machopts file you may want/need to modify the setting of MPICH_PATH.There also maybe many settings of MPI specific environment variables that don’tmatter when USE_MPISERIAL is TRUE.
72

Chapter 9. Use Cases
The basic exampleThis specifies all the steps necessary to create, configure, build, and run a case. Thefollowing assumes that $CCSMROOT is /user/ccsmroot.
1. Create a new case named b40.B2000 in the ~/cesm1 directory. Use a present-day control compset at 1-degree resolution on bluefire.> cd /user/ccsmroot> create_newcase -case ~/cesm1/b40.B2000 \
-compset B_2000 \-res 0.9x1.25_gx1v6 \-mach bluefire
2. Go to the $CASEROOT directory. Edit env_mach_pes.xml if a different pe-layout is desired first. Then configure and build the case.> cd ~/cesm1/b40.B2000> ./configure -case> b40.B200.bluefire.build
3. Create a production test. Go to the test directory. Build the test first, then runthe test and check the TestStatus (the first word should be PASS).> ./create_production_test> cd ../b40.B2000_ERT> b40.B2000_ERT.bluefire.build> bsub < b40.B2000_ERT.bluefire.test> cat TestStatus
4. Go back to the case directory, set the job to run 12 model months, use an editorto change the time limit in the run file to accommodate a 12-month run, andsubmit the job.> cd ../b40.B2000> xmlchange -file env_run.xml -id STOP_OPTION -val nmonths> xmlchange -file env_run.xml -id STOP_N -val 12> # use an editor to change b40.B2000.bluefire.run "#BSUB -W 1:30" to "#BSUB -W 6:00"> bsub < b40.B2000.bluefire.run
5. Make sure the run succeeded.> grep "SUCCESSFUL TERMINATION" poe.stdout.*
6. Set it to resubmit itself 10 times so that it will run a total of 11 years (includingthe initial year), and resubmit the case. (Note that a resubmit will automaticallychange the run to be a continuation run).> xmlchange -file env_run.xml -id RESUBMIT -val 10> bsub < b40.B2000.bluefire.run
Setting up a branch or hybrid runThe section setting the case initialization discussed starting a new case as a branchrun or hybrid run by using data from a previous run. First you need to create a newcase. Assume that $CCSMROOT is set to /user/ccsmroot and that $EXEROOT is/ptmp/$user/b40.B2000p. Finally, assume that the branch or hybrid run is beingcarried out on NCAR’s IBM system, bluefire.
> cd /user/ccsmroot/scripts> create_newcase -case ~/cesm1/b40.B2000p \
-compset B_2000 \
73

Chapter 9. Use Cases
-res 0.9x1.25_gx1v6 \-mach bluefire
> cd ~/cesm1/b40.B2000p
For a branch run, modify env_conf.xml to branch from b40.B2000 at year 0001-02-01.
> xmlchange -file env_conf.xml -id RUN_TYPE -val branch> xmlchange -file env_conf.xml -id RUN_REFCASE -val b40.B2000> xmlchange -file env_conf.xml -id RUN_REFDATE -val 0001-02-01
For a hybrid run, modify env_conf.xml to start up from b40.B2000 at year 0001-02-01.
> xmlchange -file env_conf.xml -id RUN_TYPE -val hybrid> xmlchange -file env_conf.xml -id RUN_REFCASE -val b40.B2000> xmlchange -file env_conf.xml -id RUN_REFDATE -val 0001-02-01
For a branch run, env_conf.xml for b40.B2000p should be identical to b40.B2000,except for the $RUN_TYPE setting. In addition, any modifications introducedinto ~/cesm1/b40.B2000/Buildconf/$component.buildnml.csh, should bere-introduced into b40.B2000p.
Configure and build the case executable.
> configure -case> b40.B200p.bluefire.build
Prestage the necessary restart/initial data in $RUNROOT (assumed to be/ptmp/$user/b40.B2000p/run). Note that /ptmp/$user/b40.B2000p/run wascreated during the build. Assume that the restart/initial data is on the NCAR massstore.
> cd /ptmp/$user/b40.B2000br/run> hsi "cd /CCSM/csm/b40.B2000/rest/0001-02-01-00000; get *"
It is assumed that you already have a valid load-balanced scenario. Go back to thecase directory, set the job to run 12 model months, use an editor to change the timelimit in the run file to accommodate a 12-month run, then submit the job.
> ~/cesm1/b40.B2000p> xmlchange -file env_run.xml -id STOP_OPTION -val nmonths> xmlchange -file env_run.xml -id STOP_N -val 12> # use an editor to change b40.B2000.bluefire.run "#BSUB -W 1:30" to "#BSUB -W 6:00"> bsub < b40.B2000p.bluefire.run
Verify that the run succeeded.
> grep "SUCCESSFUL TERMINATION" poe.stdout.*
Change the run to a continuation run. Set it to resubmit itself 10 times so that it willrun a total of 11 years (including the initial year), then resubmit the case.
> xmlchange -file env_run.xml -id CONTINUE_RUN -val TRUE> xmlchange -file env_run.xml -id RESUMIT -val 10> bsub < b40.B2000p.bluefire.run
Changing PE layoutThis example modifies the PE layout for our original run, b40.B2000. We now targetthe model to run on the jaguar supercomputer and modify our PE layout to use acommon load balance configuration for CESM on large CRAY XT5 machines.
74

Chapter 9. Use Cases
In our original example, b40.B2000, we used 128 pes with each component runningsequentially over the entire set of processors.
128-pes/128-tasks layout
Now we change the layout to use 1728 processors and run the ice, lnd, and cpl modelsconcurrently on the same processors as the atm model while the ocean model will runon its own set of processors. The atm model will be run on 1664 pes using 832 MPItasks each threaded 2 ways and starting on global MPI task 0. The ice model is runusing 320 MPI tasks starting on global MPI task 0, but not threaded. The lnd modelis run on 384 processors using 192 MPI tasks each threaded 2 ways starting at globalMPI task 320 and the coupler is run on 320 processors using 320 MPI tasks startingat global MPI task 512. The ocn model uses 64 MPI tasks starting at global MPI task832.
1728-pes/896-tasks layout
Since we will be modifying env_mach_pes.xml after configure was invoked, thefollowing needs to be invoked:
> configure -cleanmach> xmlchange -file env_mach_pes.xml -id NTASKS_ATM -val 832> xmlchange -file env_mach_pes.xml -id NTHRDS_ATM -val 2> xmlchange -file env_mach_pes.xml -id ROOTPE_ATM -val 0> xmlchange -file env_mach_pes.xml -id NTASKS_ICE -val 320> xmlchange -file env_mach_pes.xml -id NTHRDS_ICE -val 1> xmlchange -file env_mach_pes.xml -id ROOTPE_ICE -val 0> xmlchange -file env_mach_pes.xml -id NTASKS_LND -val 192> xmlchange -file env_mach_pes.xml -id NTHRDS_LND -val 2> xmlchange -file env_mach_pes.xml -id ROOTPE_LND -val 320> xmlchange -file env_mach_pes.xml -id NTASKS_CPL -val 320> xmlchange -file env_mach_pes.xml -id NTHRDS_CPL -val 1> xmlchange -file env_mach_pes.xml -id ROOTPE_CPL -val 512> xmlchange -file env_mach_pes.xml -id NTASKS_OCN -val 64> xmlchange -file env_mach_pes.xml -id NTHRDS_OCN -val 1> xmlchange -file env_mach_pes.xml -id ROOTPE_OCN -val 832> configure -mach
Note that since env_mach_pes.xml has changed, the model has to be reconfiguredand rebuilt.
It is interesting to compare the timings from the 128- and 1728-processor runs. Thetiming output below shows that the original model run on 128 pes cost 851 pe-hours/simulated_year. Running on 1728 pes, the model cost more than 5 times asmuch, but it runs more than two and a half times faster.
128-processor case:Overall Metrics:
75

Chapter 9. Use Cases
Model Cost: 851.05 pe-hrs/simulated_year (scale= 1.00)Model Throughput: 3.61 simulated_years/day
1728-processor case:Overall Metrics:Model Cost: 4439.16 pe-hrs/simulated_year (scale= 1.00)Model Throughput: 9.34 simulated_years/day
See understanding load balancing CESM for detailed information on understandingtiming files.
Setting CAM output fieldsIn this example, we further modify our b40.B2000p code to set various CAM outputfields. The variables that we set are listed below. See CAM Namelist Variables1 for acomplete list of CAM namelist variables.
avgflag_pertape
Sets the averaging flag for all variables on a particular history file series. Defaultis to use default averaging flags for each variable. Average (A), Instantaneous(I), Maximum (X), and Minimum (M).
nhtfrq
Array of write frequencies for each history files series.
When NHTFRQ(1) = 0, the file will be a monthly average. Only the first file seriesmay be a monthly average.
When NHTFRQ(i) > 0, frequency is input as number of timesteps.
When NHTFRQ(i) < 0, frequency is input as number of hours.
mfilt
Array of number of time samples to write to each history file series (a time sam-ple is the history output from a given timestep).
ndens
Array specifying output format for each history file series. Valid values are 1 or2. ’1’ implies output real values are 8-byte and ’2’ implies output real values are4-byte. Default: 2,2,2,2,2,2
fincl1 = ’field1’, ’field2’, ...
List of fields to add to the primary history file.
fincl[2..6] = ’field1’, ’field2’, ...
List of fields to add to the auxiliary history file.
fexcl1 = ’field1’, ’field2’, ...
List of field names to exclude from the default primary history file (default fieldson the Master Field List).
fexcl[2..6] = ’field1’, ’field2’,...
List of the field names to exclude from the auxiliary history files.
In the $CASEROOT/Buildconf/cam.buildnml.csh file, namelists are delineated withan ampersand followed by the namelist’s name. Namelists end with a slash. For ex-ample, the first namelist might look like this:
76

Chapter 9. Use Cases
& phys_ctl_nlatm_dep_flux = .false.deep_scheme = ’ZM’eddy_scheme = ’HB’microp_scheme = ’RK’shallow_scheme = ’Hack’srf_flux_avg = 0/
Just before the ending slash for the cam_inparm namelist, add the following lines:
avgflag_pertape = ’A’,’I’nhtfrq = 0 ,-6mfilt = 1 , 30ndens = 2 , 2fincl1 = ’FSN200’,’FSN200C’,’FLN200’,
’FLN200C’,’QFLX’,’PRECTMX:X’,’TREFMXAV:X’,’TREFMNAV:M’,’TSMN:M’,’TSMX:X’
fincl2 = ’T’,’Z3’,’U’,’V’,’PSL’,’PS’,’TS’,’PHIS’
avgflag_pertape specifies how the output data will be averaged. In the first outputfile, b40.2000p.cam2.h0.yyyy-mm.nc, data will be averaged monthly. In the secondoutput file, b40.2000p.cam2.h1.yyyy-mm-dd.nc, data will be instantaneous.
nhtfrq sets the frequency of data writes, so b40.2000p.cam2.h0.yyyy-mm.nc will bewritten as a monthly average, while b40.2000p.cam2.h1.yyyy-mm-dd.nc will con-tain time slices that are written every 6 hours.
mfilt sets the model to write one time sample in b40.2000p.cam2.h0.yyyy-mm.ncand 30 time samples in b40.2000p.cam2.h1.yyyy-mm-dd.nc.
ndens sets both files to have 32-bit netCDF format output files.
fincl1 sets the output fields for b40.2000p.cam2.h0.yyyy-mm.nc. A complete list ofthe CAM output fields appears here. In this example, we’ve asked for more variablesthan will fit on a Fortran line. As you can see, it is all right to split variable lists acrosslines. Also in this example, we’ve asked for maximum values of TREFMXAV andTSM, and minimum values of TREFMNAV and TSMN.
fincl2 sets the output fields for b40.2000p.cam2.h1.yyyy-mm-dd.nc, much the same asfincl1 sets output fields for b40.2000p.cam2.h0.yyyy-mm.nc, only in this case, we areasking for instantaneous values rather than averaged values, and choosing differentoutput fields.
Setting CAM forcingsTo set the greenhouse gas forcings, we must first understand the namelist variablesassociated with them. See CAM Namelist Variables2 for a complete list of CAMnamelist variables.
scenario_ghg
Controls treatment of prescribed co2, ch4, n2o, cfc11, cfc12 volume mixing ratios.May be set to ’FIXED’ or ’RAMPED’ or ’RAMP_CO2_ONLY’.
FIXED => volume mixing ratios are fixed and have either default or namelistinput values.
RAMPED => volume mixing ratios are time interpolated from the dataset spec-ified by bndtvghg.
RAMP_CO2_ONLY => only co2 mixing ratios are ramped at a ratedetermined by the variables ramp_co2_annual_rate, ramp_co2_cap, andramp_co2_start_ymd.
77

Chapter 9. Use Cases
Default: FIXED
bndtvghg
Full pathname of time-variant boundary dataset for greenhouse gas surface val-ues. Default: set by build-namelist.
rampyear_ghg
If scenario_ghg is set to "RAMPED" then the greenhouse gas surface values areinterpolated between the annual average values read from the file specified bybndtvghg. In that case, the value of this variable (> 0) fixes the year of the lowerbounding value (i.e., the value for calendar day 1.0) used in the interpolation.For example, if rampyear_ghg = 1950, then the GHG surface values will be theresult of interpolating between the values for 1950 and 1951 from the dataset.Default: 0
To set the following variables to their associated values, edit$CASEROOT/Buildconf/cam.buildnml.csh and add the following to thecam_inparm namelist:
scenario_ghg = ’RAMPED’bndtvghg = ’$DIN_LOC_ROOT/atm/cam/ggas/ghg_hist_1765-2005_c091218.nc’rampyear_ghg = 2000
Initializing the ocean model with a spun-up initial conditionThe recommended method for initializing the CESM active ocean model (pop2) in aCESM startup case is to use the default settings; these initialize the ocean model froma state of rest. Occasionally, however, researchers are interested in initializing theocean model from a "spun up" ocean condition that was generated from an existingCESM run. To accommodate their request, a nonstandard method of initializing themodel was developed. It is called the startup_spunup option. The startup_spunupinitialization is a research option that is designed for use by expert users only.
Because of the complex interactions between the ocean-model parameterizationsused to generate the spun-up case, $CASE_SP, and those used in the new startupcase, it is impossible to provide a single recommended spun-up ocean initialcondition for all cases. Instead, researchers must carefully select an existing solutionwhose case conditions closely match those in the new case. A mismatch of optionsbetween the spun-up case and the new case can result in scientifically invalidsolutions.
When a startup_spunup case is necessary, use this procedure:
1. Create a new case, $CASE. By default, $CASE will be a "startup run."> create_newcase -case ~/cesm1/b40.B2000ocn \
-mach bluefire \-compset B20TR \-res 0.9x1.25_gx1v6
> cd ~/cesm1/b40.B2000ocn> configure -case
2. Specify the startup_spunup option in the pop2_in namelist file by editing the$CASE/Buildconf/pop2.buildnml.csh script. Find the namelist init_ts_nmland change
set init_ts_suboption = ’null’ to
set init_ts_suboption = ’spunup’.
78

Chapter 9. Use Cases
3. The ocean restart filename is of the form ${CASE_SP}.pop.r.$date, where $dateis the model date of your spun-up dataset. If the ocean restart files were writtenin binary format, a companion ascii-formatted restart "header" file will alsoexist. The companion header file will have the same name as the restart file,except that it will have the suffix ".hdr" appended at the end of the filename.You must copy both the binary restart file and the header file to your datadirectory.
4. The spun-up ocean restart and restart header files must be available to yournew case. Copy them directly into $RUNDIR. It is critically important to copyboth the binary restart file and its companion header file to the $RUNDIR.> cp ${CASE_SP}.pop.r.$date $RUNDIR> cp ${CASE_SP}.pop.r.${date}.hdr $RUNDIR
5. Redefine the ocean-model initial-condition dataset by editing$CASE/Buildconf/pop2.buildnml.csh. Go to the pop2_in namelist sectionand edit the init_ts_nml namelist variable init_ts_file. Change
set init_ts_file = ’$init_ts_filename’ to
set init_ts_file = ’${CASE_SP}.pop.r.$date’
Note that the model will automatically look for the${CASE_SP}.pop.r.${date}.hdr file in $RUNDIR.
6. Build and run as usual.
Taking a run over from another userIf you ever a need to take over a production run from another user, follow this pro-cedure:
1. Create a clone of the production case. The case name needs to be the same, butthe new filepath needs to be different.> $CCSMROOT/scripts/create_clone -clone $CASEROOT -case $NEWCASEROOT
2. Configure the case for the new user:> cd $NEWCASEROOT> configure -case
3. Rebuild for the new user:> ./$CASE.$MACH.build
4. Copy the restart and rpointer files from the original run directory:> cp $CASEROOT/run/$CASE* $NEWCASEROOT/run/.> cp $CASEROOT/run/rpointer* $NEWCASEROOT/run/.
5. Copy the archive directory contents:> cp $ORIGDIR/archive/$CASE $NEWDIR/archive/$CASE
6. Submit the run:> bsub < $CASE.$MACH.run
Here is an example:
> $CCSMROOT/scripts/create_clone -clone /user/b40.1850 -case /newuser/b40.B2000> cd /newuser/b40.B2000> configure -case> ./b40.B2000.bluefire.build> cp /user/b40.B2000/run/b40.B2000* /newuser/b40.B2000/run/.> cp /user/b40.B2000/run/rpointer* /newuser/b40.B2000/run/.> cp -r /ptmp/user/archive/b40.B2000/* /ptmp/newuser/archive/b40.B2000/.> bsub < b40.B2000.bluefire.run
79
Chapter 9. Use Cases
Use of an Earth System Modeling Framework (ESMF) library andESMF interfaces
CESM supports either the default MCT based component interfaces or the ESMFcomponent interfaces. In both cases, the driver and component models remain fun-damentally the same.
The ESMF component interface implementation exists in CESM to allow CESMmodel components to interact with other coupled systems using ESMF couplingstandards as well as to support further development and testing of an ESMF driveror ESMF couplers.
In addition, when using the ESMF component interface, if ESMF is compiled withthe Xerces XML library, CESM will automatically generate a metadata file using theESMF attribute capabilities; this XML metadata file provides CIM (Common Infor-mation Model) compliant documentation of CESM and the model components. Af-ter a CESM case job is completed, a file named, CESM_Component.xml, can be foundwithin the run directory. For more details on ESMF Attributes and the generated XMLfile, refer to the ESMF Reference Manual section on the Attribute class 3. For detailson the CIM, visit the European Union’s METAFOR project site4.
The ESMF implementation in CESM1 requires ESMF version 5.2.0p1.
ESMF is NOT required or provided by CESM1. It must be downloaded and installedseparately. It is safest to compile ESMF and CESM with identical compilers and mpiversions. It may be possible to use versions that are different but compatible; how-ever, it is hard to predict which versions will be compatible and using different ver-sions can result in problems that are difficult to track down. In addition, dependingon whether or not you wish to generate XML metadata files using the ESMF attributefunctionality, you may also need to download and install the Apache Xerces C++ li-brary; details on using the Xerces library with ESMF are described later in this docu-ment.
There are three possible modes of interaction between CESM and ESMF.
1. No linking to an external ESMF library. CESM uses its own implementation ofESMF timekeeping interfaces (default).
To run with the MCT based component interfaces and the CESM time manager,set the following environment variables- cd to your case directory- edit env_build.xml- set COMP_INTERFACE to "MCT"- set USE_ESMF_LIB to "FALSE"
2. Linking with an ESMF library to use the ESMF time manager but continueduse of the MCT based component interfaces.
To run with the MCT based component interfaces and ESMF time manager, setthe following environment variables- cd to your case directory- edit env_build.xml- set COMP_INTERFACE to "MCT"- set USE_ESMF_LIB to "TRUE"- set ESMF_LIBDIR to a valid installation directory of ESMF version 5.2.0p1
3. Linking with an ESMF library in order to use ESMF component interfaces andgenerate the XML metadata file. In this mode ESMF timekeeping is also acti-vated.
To run with the ESMF component interfaces and ESMF time manager, set thefollowing environment variables- cd to your case directory- edit env_build.xml- set COMP_INTERFACE to "ESMF"
80

Chapter 9. Use Cases
- set USE_ESMF_LIB to "TRUE"- set ESMF_LIBDIR to a valid installation directory of ESMF version 5.2.0p1
The ESMF library can be activated in two ways in CESM. The primary way is viathe ESMF_LIBDIR environment variable in the env_build.xml file described above.The secondary way is via a system environment variable called ESMFMKFILE. If thisenvironment variable is set either through a system or module command, then theESMF library will be picked up by the CESM scripts, but the local CESM variable,ESMF_LIBDIR, will always have precedence.
When compiling ESMF for CESM with the intent of generating an attributes XMLmetadata file, the Xerces XML library must be installed and ESMF must be configuredto use it. The following environment variables must be set:
• Set ESMF_XERCES to "standard"
• Set ESMF_XERCES_INCLUDE to the Xerces include directory
• Set ESMF_XERCES_LIBPATH to the Xerces library directory
If these environment variables are not set when ESMF is compiled, and CESM is runusing the ESMF component interface, error messages will be written to the PET logfiles indicating that the Xerces library is not available. The CESM run will continueun-hindered, however an XML metadata file will not be generated.
For more detailed instructions on compiling ESMF with the Xerces library, see theESMF User’s Guide section on Building and Installing ESMF and the Xerces third-party library 5.
To verify the correctness of the ESMF component interfaces in CESM, compute andcompare CESM global integrals with identical runs differing only in the use of theMCT based and ESMF component interfaces. In both cases, the ESMF library shouldbe active to guarantee identical time manager values. In both runs, the ’INFO_DBUG’parameter in env_run.xml should be set to 2 which activates the global integral diag-nostics. A valid comparison would be a 10 day test from the same initial conditions.The global integrals produced in the cpl log file should be identical in both cases.This test can be setup manually as described above or a CME test can be carried outwhich is designed to test this exact capability.
The following table contains combinations of CESM/ESMF release versions that aretested and known to work together:
Table 9-1. Recommmended Software Package Combinations
CESM Version ESMF Version
1.0 4_0_0rp2
1.0.3 5_2_0p1
Notes1. http://www.cesm.ucar.edu/cgi-bin/eaton/namelist/nldef2html-pub/
2. http://www.cesm.ucar.edu/cgi-bin/eaton/namelist/nldef2html-pub/
3. http://www.earthsystemmodeling.org/esmf_releases/non_public/ESMF_5_2_0p1/ESMF_refdoc/node6.html#SECTION06020000000000000000
4. http://metaforclimate.eu/
5. http://www.earthsystemmodeling.org/esmf_releases/non_public/ESMF_5_2_0p1/ESMF_usrdoc/node9.html#SECTION00093500000000000000
81

Chapter 9. Use Cases
82

Chapter 10. Troubleshooting
Troubleshooting create_newcaseGenerally, create_newcase errors are reported to the terminal and should providesome guidance about what caused the error.
If create_newcase fails on a relatively generic error, first check carefully that the com-mand line arguments match the interfaces specification. Type
> create_newcase -help
and review usage.
Troubleshooting configureGenerally, configure errors are reported to the terminal and should provide someguidance about what caused the error. Most of this section deals with the "-case"option of configure which is the biggest step in setting up a case and the supportinginput files and scripts. The configure step is fairly extensive and a brief descriptionof what configure does follows. $CASEROOT is the top level case directory (i.e. thelocation where the env xml files and the configure script is located for a specific case).
The first thing configure does is load the case environment variables. In general,this is done by sourcing the $CASEROOT/Tools/ccsm_getenv. For more informationabout the environment variables, see the Section called What are CESM1 env variablesand env xml files? in Chapter 11
Then the first major step for configure is to run the script$CASEROOT/Tools/generate_resolved.csh. This cycles through each of thecomponent template files in $CASEROOT/Tools/Templates sequentially. Thesecomponent template files are copied from locations in the component source codeby create_newcase when the case is created. Each component template file generatesa component buildnml.csh and buildexe.csh script in $CASEROOT/Buildconfbased on the resolution, configuration, and other env settings. Generally, an error inthis phase of configure will point to a specific component. Begin by debuggingthe component template file in $CASEROOT/Tools/Templates. The componenttemplate filename will be something like cam.cpl7.template for the cam component.If there is a bug in the component template file, then it’s probably important to fixthe original copy of the template file. These can be found in the create_newcasescripts (i.e. search for the string, template).
The specific implementation of the component template files is very much compo-nent dependent. However, each must generate a buildnml.csh script in the $CASE-ROOT/Buildconf directory to generate namelist input on-the-fly. Each template filemust generate a buildexe.csh script in the same $CASEROOT/Buildconf directoryto support the build of that component. And each template file must support gen-eration of input_data_list files in the $CASEROOT/Buildconf directory either at theconfigure or build step to specify the required input files for that configuration andcomponent.
Next, configure runs the $CASEROOT/Tools/generate_batch.csh script. This scriptgenerates the build and run scripts for the case. This is partly accomplished by run-ning the mkbatch.$MACH script for the particular machine. That script is locatedin $CCSMROOT/scripts/ccsm_utils/Machines. If there are problems with the re-sulting build or run script, the error can usually be traced to the setup of the mk-batch.$MACH machine file.
For instance an error like this
> create_newcase -case ~/cesm1/b40.B2000bad \
83

Chapter 10. Troubleshooting
-res 0.23x0.31_0.23x0.31 \-mach bluefire \-compset B
> cd ~/cesm1/b40.B2000bad> configure -case
Generating resolved namelist, prestage, and build scriptsbuild-namelist - No default value found for ncdatauser defined attributes:key=ic_md val=00010101Died at /user/ccsmroot/models/atm/cam/bld/build-namelist line 2019.ERROR: generate_resolved.csh error for atm templateconfigure error: configure generated error in attempting to created resolved scripts
indicates the generate_resolved.csh script failed in the atm template, which is thecam template for this compset. It also reports that the cam build-namelist step in thecam template failed at line 2019. In this case, CAM could not find a valid value ofncdata from its default_namelist.xml file. To fix this particular problem, the usercan supply an alternative initial dataset and the update the value in either theCAM_CONFIG_OPTS values or in the SourceMods/src.cam/user_nl_cam.
Troubleshooting job submission problemsThis section addresses problems with job submission. Most of the problems associ-ated with submission or launch are very site specific.
First, make sure the runscript, $CASE.$MACH.run, is submitted using the correctbatch job submission tool, whether that’s qsub, bsub, or something else, and for in-stance, whether a redirection "<" character is required or not.
Review the batch submission options being used. These probably appear at the topof the $CASE.$MACH.run script but also may be set on the command line whensubmitting a job. Confirm that the options are consistent with the site specific batchenvironment, and that the queue names, time limits, and hardware processor requestmakes sense and is consistent with the case running.
Review the job launch command in the $CASE.$MACH.run script to make sure it’sconsistent with the site specific recommended tool. This command is usually anmprun, mpiexec, aprun, or something similar. It can be found just after the string"EXECUTION BEGINS HERE" in the $CASE.$MACH.run script.
The batch and run aspects of the $CASE.$MACH.run script is setupby configure and uses a machine specific mkbatch.$MACH script in the$CCSMROOT/scripts/ccsm_utils/Machines directory. If the run script is notproducing correct batch scripts or job launching commands, the mkbatch.$MACHscript probably needs to be updated.
Troubleshooting runtime problemsTo check that a run completed successfully, check the last several lines of the cpl.logfile for the string " SUCCESSFUL TERMINATION OF CPL7-CCSM ". A successfuljob also usually copies the log files to the directory $CASEROOT/logs.
Note: The first things to check if a job fails are whether the model timed out, whether adisk quota limit was hit, whether a machine went down, or whether a file system becamefull. If any of those things happened, take appropriate corrective action and resubmit thejob.
84
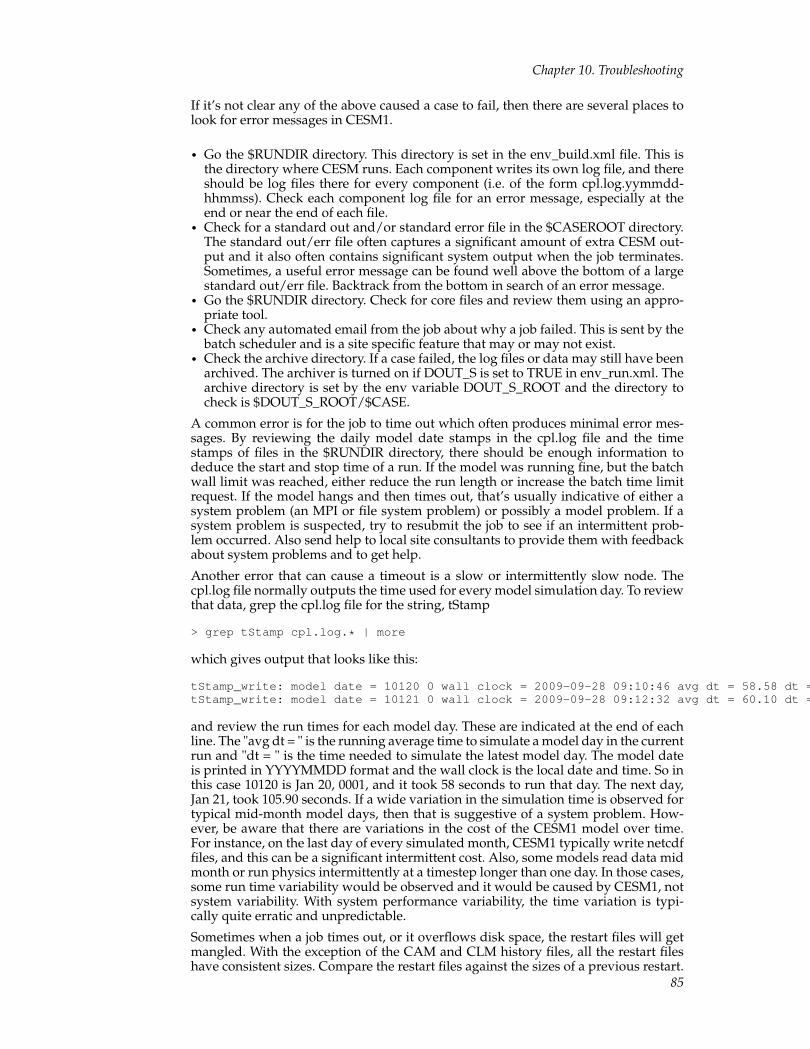
Chapter 10. Troubleshooting
If it’s not clear any of the above caused a case to fail, then there are several places tolook for error messages in CESM1.
• Go the $RUNDIR directory. This directory is set in the env_build.xml file. This isthe directory where CESM runs. Each component writes its own log file, and thereshould be log files there for every component (i.e. of the form cpl.log.yymmdd-hhmmss). Check each component log file for an error message, especially at theend or near the end of each file.
• Check for a standard out and/or standard error file in the $CASEROOT directory.The standard out/err file often captures a significant amount of extra CESM out-put and it also often contains significant system output when the job terminates.Sometimes, a useful error message can be found well above the bottom of a largestandard out/err file. Backtrack from the bottom in search of an error message.
• Go the $RUNDIR directory. Check for core files and review them using an appro-priate tool.
• Check any automated email from the job about why a job failed. This is sent by thebatch scheduler and is a site specific feature that may or may not exist.
• Check the archive directory. If a case failed, the log files or data may still have beenarchived. The archiver is turned on if DOUT_S is set to TRUE in env_run.xml. Thearchive directory is set by the env variable DOUT_S_ROOT and the directory tocheck is $DOUT_S_ROOT/$CASE.
A common error is for the job to time out which often produces minimal error mes-sages. By reviewing the daily model date stamps in the cpl.log file and the timestamps of files in the $RUNDIR directory, there should be enough information todeduce the start and stop time of a run. If the model was running fine, but the batchwall limit was reached, either reduce the run length or increase the batch time limitrequest. If the model hangs and then times out, that’s usually indicative of either asystem problem (an MPI or file system problem) or possibly a model problem. If asystem problem is suspected, try to resubmit the job to see if an intermittent prob-lem occurred. Also send help to local site consultants to provide them with feedbackabout system problems and to get help.
Another error that can cause a timeout is a slow or intermittently slow node. Thecpl.log file normally outputs the time used for every model simulation day. To reviewthat data, grep the cpl.log file for the string, tStamp
> grep tStamp cpl.log.* | more
which gives output that looks like this:
tStamp_write: model date = 10120 0 wall clock = 2009-09-28 09:10:46 avg dt = 58.58 dt = 58.18tStamp_write: model date = 10121 0 wall clock = 2009-09-28 09:12:32 avg dt = 60.10 dt = 105.90
and review the run times for each model day. These are indicated at the end of eachline. The "avg dt = " is the running average time to simulate a model day in the currentrun and "dt = " is the time needed to simulate the latest model day. The model dateis printed in YYYYMMDD format and the wall clock is the local date and time. So inthis case 10120 is Jan 20, 0001, and it took 58 seconds to run that day. The next day,Jan 21, took 105.90 seconds. If a wide variation in the simulation time is observed fortypical mid-month model days, then that is suggestive of a system problem. How-ever, be aware that there are variations in the cost of the CESM1 model over time.For instance, on the last day of every simulated month, CESM1 typically write netcdffiles, and this can be a significant intermittent cost. Also, some models read data midmonth or run physics intermittently at a timestep longer than one day. In those cases,some run time variability would be observed and it would be caused by CESM1, notsystem variability. With system performance variability, the time variation is typi-cally quite erratic and unpredictable.
Sometimes when a job times out, or it overflows disk space, the restart files will getmangled. With the exception of the CAM and CLM history files, all the restart fileshave consistent sizes. Compare the restart files against the sizes of a previous restart.
85

Chapter 10. Troubleshooting
If they don’t match, then remove them and move the previous restart into place be-fore resubmitting the job. Please see restarting a run.
On HPC systems, it is not completely uncommon for nodes to fail or for access tolarge file systems to hang. Please make sure a case fails consistently in the same placebefore filing a bug report with CESM1.
86

Chapter 11. Frequently Asked Questions (FAQ)
What are the directories and files in my case directory?The following describes many of the files and directories in the $CASEROOT direc-tory.
Buildconf
is the directory where the buildnml and buildexe component scripts are gener-ated by configure. The input_data_list files are also generated by configure orthe buildnml scripts and copied here.
CaseDocs
is a directory where copies of the latest namelist/text input files from the$RUNDIR are stored. These exist only to help document the case setup and run.
LockedFiles
is the directory that holds copies of the locked files.
MachinesHist
is a directory where previous case configurations are stored. In other words,when configure -clean is run, the current configured scripts are copied into thisdirectory, so when configure -case is subsequently run, there is an opportunityto review and compare previous setups.
Macros.$MACH
is the Makefile Macros file for the current configuration. The Makefile is locatedin the Tools directory and is identical on all machines. The Macros file is a ma-chine and compiler dependent file. This file is locked during the build step.
README.case
provides a summary of the commands used to generate this case.
SourceMods
contains directories for each component where case specific source code modifi-cations can be included. The source files in these directories will always be usedin preference to the source code in CCSMROOT. This feature allows users tomodify CESM source code on a case by case basis if that preferable over makingmodifications in the CCSMROOT sandbox.
$CASE.$MACH.build
is the script that is run interactively to build the CESM model.
$CASE.$MACH.clean_build
is the script that cleans the CESM build.
$CASE.$MACH.l_archive
is the script that is submitted to the batch queue to archive CESM data to thelong-term archive disk, like an hpss or mass storage system.
$CASE.$MACH.run
is the script that is submitted to the batch queue to run a CESM job. This scriptcould also be run interactively if resources allow.
87

Chapter 11. Frequently Asked Questions (FAQ)
check_input_data
is a tool that checks for missing input datasets and provides a capability forexporting them to local disk.
configure
is the script that is run to generate files in Buildconf and the build and run scriptsfor a case.
create_production_test
is a tool that generates an exact restart test in a separate directory based on thecurrent case.
env_*.xml files
contain variables used to setup, configure, build, and run CESM.
logs
is a directory that contains a copy of the component log files from successful caseruns.
timing
is a directory that contains timing output from each successful case run.
xmlchange
is a script that supports changing xml variables in the env files.
$CASEROOT/Tools
contains many scripts that are used to setup and configure the CESM model aswell as run it. Some of particular note are
• Makefile is the Makefile that will be used for the build.• Templates is a directory that contains all the component template files used dur-
ing the configure phase to generate buildnml and buildexe scripts in the $CASE-ROOT/Buildconf directory.
• ccsm_buildexe.csh is invoked by $CASEROOT/$CASE.$MACH.build to generatethe model executable. This script calls the component buildexe scripts in Buildconf.
• ccsm_buildnml.csh is invoked by $CASEROOT/$CASE.$MACH.build to generatethe component namelists in $RUNROOT. This script calls the component buildnmlscripts in Buildconf.
• ccsm_check_lockedfiles checks that any files in the $CASEROOT/LockedFiles/ di-rectory match those in the $CASEROOT directory. This helps protect users fromoverwriting variables that should not be changed.
• ccsm_getenv converts the xml variables in $CASEROOT to csh environmental vari-ables.
• ccsm_l_archive.csh is the script that does long-term archiving of model data as partof the $CASE.$MACH.l_archive batch job.
• ccsm_postrun.csh may run the short & long-term archivers, resubmit the runscript, and run the timing script.
• ccsm_prestage.csh checks that required input datasets are available.• generate_batch.csh is the script that generates resolved run and long-term archiv-
ing batch scripts by configure.• generate_resolved.csh generates resolved buildnml and buildexe scripts in the
$CASEROOT/Buildconf directory for model components.• getTiming.csh generates the timing information.• getTiming.pl generates timing information and is used by getTiming.csh.• mkDepends generates Makefile dependencies in a form suitable for inclusion into
a Makefile.
88

Chapter 11. Frequently Asked Questions (FAQ)
• perf_summary.pl generates timing information.• st_archive.sh is the short-term archive script. It moves model output out of run
directory to the short-term archive directory. Associated with DOUT_S andDOUT_S_ROOT env variables in env_run.xml.
• taskmaker.pl derives pe counts and task and thread geometry info based on envvar values set in the env_mach_pes file.
• xml2env converts env_*xml files to shell environment variable files that are thensourced for inclusion in the model environment. Used by the ccsm_getenv script.
What are CESM1 env variables and env xml files?CESM1 cases are configured largely through setting what CESM1 calls "environmentvariables". These actually appear to the user as variables defined in xml files. Thosefiles appear in the case directory once a case is created and are named somethinglike env_*.xml. They are converted to actual environment variables via a csh scriptcalled ccsm_getenv. That script calls a perl script called xml2env that converts the xmlfiles to shell files that are then sourced and removed. The ccsm_getenv and xml2envexist in the $CASEROOT/Tools directory. The environment variables are specified inxml files to support extra automated error checking and automatic generation of envvariable documentation. If you want to have the ccsm environment variables in yourlocal shell environment, do the following
> cd $CASEROOT> source ./Tools/ccsm_getenv
You must run the ccsm_getenv from the CASEROOT directory exactly as shownabove. There are multiple env_*.xml files including env_case.xml, env_conf.xml,env_mach_pes.xml, env_build.xml, and env_run.xml. To a large degree, the differentenv files exist so variables can be locked in different phases of the case setup, build,and run process. For more info on locking files, see the Section called Why is there filelocking and how does it work?. The important point is that env_case.xml variablescannot be changed after create_newcase is invoked. env_conf and env_mach_pescannot be changed after configure is invoked unless you plan to reconfigure thecase. env_build variables cannot be changed after the model is built unless youplan to clean and rebuild. env_run variables can be changed anytime. The CESM1scripting software checks that xml files are not changed when they shouldn’t be.
CESM recommends using the xmlchange tool to modify env variables. This will de-crease the chance that typographical errors will creep into the xml files. Conversion ofthe xml files to environment variables can fail silently with certain xml format errors.To use xmlchange, do, for instance,
> cd $CASEROOT> ./xmlchange -file env_run.xml -id STOP_OPTION -val nmonths> ./xmlchange -file env_run.xml -id STOP_N -val 6
which will change the variables STOP_OPTION and STOP_N in the file env_run.xmlto the specified values. The "-warn" option to xmlchange also makes sure you aren’toverwriting a current value in a field. And the "-append" option to xmlchange keepsthe current value in a field and just appends a new value on the end. It can be useful toknow the value was merely appended and the previous value wasn’t inadvertentlychanged as well. The xml files can be edited manually, but users should take carenot to introduce any formatting errors that could lead to incomplete env settings. Ifthere appear to be problems with the env variables (i.e. if the model doesn’t seem tohave consistent values compared to what’s set in the xml files), then confirm that theenv variables are being set properly. There are a couple of ways to do that. First, runthe ccsm_getenv script as indicated above and review the output generated by thecommand "env". The env variables should match the xml settings. Another optionis to edit the $CASEROOT/Tools/ccsm_getenv script and comment out the line "rm$i:r". That should leave the shell env files around, and they can then be reviewed.
89

Chapter 11. Frequently Asked Questions (FAQ)
The latter approach should be undone as soon as possible to avoid problems runningccsm_getenv later.
How do I modify the value of CESM env variables?CESM recommends using the xmlchange tool to modify env variables. xmlchangesupports error checking as part of the implementation. Also, using xmlchange willdecrease the chance that typographical errors will creep into the xml files. Conversionof the xml files to environment variables can fail silently with certain xml formaterrors. To use xmlchange, do, for instance,
> cd $CASEROOT> ./xmlchange -file env_run.xml -id STOP_OPTION -val nmonths> ./xmlchange -file env_run.xml -id STOP_N -val 6
which will change the variables STOP_OPTION and STOP_N in the file env_run.xmlto the specified values. Use the "-warn" option to warn you so you don’t overwrite afield that currently has a value. And use the "-append" option to perserve the currentfield and add a new bit on the end of it. The xml files can be edited manually, but usersshould take care not to introduce any formatting errors that could lead to incompleteenv settings. See also .
Why aren’t my env variable changes working?It’s possible that a formatting error has been introduced in the env xml files. Thiswould lead to problems in setting the env variables. If there appear to be problemswith the env variables (i.e. if the model doesn’t seem to have consistent values com-pared to what’s set in the xml files), then confirm that the env variables are being setproperly. There are a couple of ways to do that. First, run the ccsm_getenv script via
> cd $CASEROOT> source ./Tools/ccsm_getenv> env
and review the output generated by the command "env". The envvariables should match the xml settings. Another option is to edit the$CASEROOT/Tools/ccsm_getenv script and comment out the line "rm $i:r". Thatshould leave the shell env files around, and they can then be reviewed. Thelatter approach should be undone as soon as possible to avoid problems runningccsm_getenv later.
Why is there file locking and how does it work?In CESM, there are several different env xml files. These include env_case.xml,env_conf.xml, env_mach_pes.xml, env_build.xml, and env_run.xml. Theseare organized so variables can be locked during different phases of the caseconfiguration, build, and run. Locking variables is a feature of CESM that preventsusers from changing variables after they have been resolved (used) in other parts ofthe scripts system. The variables in env_case are locked when create_newcase iscalled. The env_conf and env_mach_pes variables are locked when configure iscalled. The env_build variables are locked when CESM is built, and the env_runvariables are never locked and can be changed anytime. In addition, the Macros fileis locked as part of the build step. The $CASEROOT/LockedFiles directory savescopies of the xml files to facilitate the locking feature. In summary
90

Chapter 11. Frequently Asked Questions (FAQ)
• env_case.xml is locked upon invoking create_newcase and cannot beunlocked. To change settings in env_case, a new case has to be generated withcreate_newcase.
• env_conf.xml and env_mach_pes.xml are locked after running configure -case.After changing variable values in these files, reconfigure the model using "config-ure -cleanall" (or some variation) and then "configure -case".
• Macros.$MACH and env_build.xml are locked upon the successful completion of$CASE.MACH.build. Both Macros.$MACH and env_build.xml can be unlockedby invoking $CASE.$MACH.cleanbuild and then the model should be rebuilt.
How do I change processor counts and component layouts onprocessors?
See the Section called Setting the case PE layout in Chapter 3 or the use case the Sectioncalled Changing PE layout in Chapter 9.
What is pio?The parallel IO (PIO) library is included with CESM1 and is automatically built aspart of the CESM build. Several CESM1 components use the PIO library to readand/or write data. The PIO library is a set of interfaces that support serial netcdf,parallel netcdf, or binary IO transparently. The implementation allows users to easilyconfigure the pio setup on the fly to change the method (serial netcdf, parallel netcdf,or binary data) as well as various parameters associated with PIO to optimize IOperformance. The pio parameter settings are described in detail in the Section calledCESM Input/Output in Chapter 5.
CESM1 prefers that data be written in CF compliant netcdf format to a single filethat is independent of all parallel decomposition information. Historically, data waswritten by gathering global arrays on a root processor and then writing the data fromthe root processor to an external file using serial netcdf. The reverse process (read andscatter) was done for reading data. This method is relatively robust but is not memoryscalable, performance scalable, or performance flexible. This lead to the introductionof the PIO parallel IO library.
PIO works as follows. The PIO library is initialized and information is providedabout the method (serial netcdf, parallel netcdf, or binary data), and the number ofdesired IO processors and their layout. The IO parameters define the set of processorsthat are involved in the IO. This can be as few as one and as many as all processors.The data, data name and data decomposition are also provided to PIO. Data is writ-ten through the PIO interface in the model specific decomposition. Inside PIO, thedata is rearranged into a "stride 1" decomposition on the IO processors and the datais then written serially using netcdf or in parallel using pnetcdf or netcdf4/hdf5.
There are several benefits associated with using PIO. First, even with serial netcdf, thememory use can be significantly decreased because the global arrays are decomposedacross the IO processors and written in chunks serially. This is critical as CESM1runs at higher resolutions where global arrays need to be minimized due to memoryavailability. Second, pnetcdf can be turned on transparently potentially improvingthe IO performance. Third, PIO parameters such as the number of IO tasks and theirlayout can be tuned to reduce memory and optimize performance on a machine bymachine basis. Fourth, the standard global gather and write or read and global scattercan be recovered by setting the number of io tasks to 1 and using serial netcdf.
CESM1 uses the serial netcdf implementation of PIO and pnetcdf is turned off in PIOby default. To use pnetcdf, a pnetcdf library (like netcdf) must be available on thelocal machine and PIO pnetcdf support must be turned on when PIO is built. This isdone as follows
91

Chapter 11. Frequently Asked Questions (FAQ)
1. Locate the local copy of pnetcdf. It must be version 1.1.1 or newer library
2. Set LIB_PNETCDF in the Macros file to the directory of the pnetcdf library (eg./contrib/pnetcdf1.1.1/lib).
3. Add PNETCDF_PIO to the pio CONFIG_ARGS variable in the Macros file, andset it to the directory of the top level of a standard pnetcdf installation (eg /con-trib/pnetcdf1.1.1).
4. Run the clean_build script if the model has already been built.
5. Run the build script to rebuilt pio and the full CESM1 system.
6. Change IO namelist settings to pnetcdf and set appropriate IO tasks and layout.
The PNETCDF_PIO variable tells pio to build with pnetcdf support turned on. TheLIB_PNETCDF variable tells the CESM Makefile to link in the pnetcdf library at thelink step of the CESM1 build.
There is an ongoing effort between CESM, pio developers, pnetcdf developers andhardware vendors to understand and improve the IO performance in the variouslibrary layers. To learn more about pio, see http://code.google.com/p/parallelio.1
How do I use pnetcdf?See the Section called What is pio?
Is there more information about the coupler/driverimplementation?
Additional implementation details are provided in the the CESM coupler user guide2
about sequencing, parallel IO, performance, grids, threading, budgets, and otheritems.
How do I create my own compset?Several compsets are hardwired in the CESM1 release. "create_newcase -l" providesa current listing of supported "out-of-the-box" compsets.
To create a customized compset,
> cd $CCSMROOT/scripts
Now copy sample_compset_file.xml to another file, e.g. my_compset.xml.
> cp sample_compset_file.xml my_compset.xml
Edit the file, my_compset.xml, to create your own compset configuration.In particular, the NAME, SHORTNAME, DESC, and COMP_ variablesshould be specified. The STATUS and CCSM_CCOST variables can beignored. Note: Other CESM env variables can also be added here. Seescripts/ccsm_utils/Case.template/config_compsets.xml for other variables thatmight be related to compset configuration.
Next run create_newcase with the optional -compset_file argument.
> create_newcase -case mycase -res f19_g16 -compset MYCS -mach mymach -compset_file my_compset.xml
The case mycase should have been generated and the configuration should be con-sistent with settings from the my_compset.xml file.
92

Chapter 11. Frequently Asked Questions (FAQ)
How do I add a new grid?Support for several grids are hardwired in the CESM1 release. "create_newcase -l"provides a current listing of supported "out-of-the-box" grids. In general, CESM gridsare associated with a specific combination of atmosphere, land, and ocean/ice gridsusing a particular naming convention like f19_g16 for the f19 atm/lnd grid combinedwith the g16 ocn/ice grid. The f19 atm/lnd grid is the shortname for the 1.9x2.5 finitevolume dycore grid. The g16 ocn/ice grid is the shortname for the gx1v6 one-degreedisplaced pole grid. To add a new grid, just a few things need to be done. First, createboth an individual long and shortname for the individual grid (ie. f19=1.9x2.5) andfor the grid combination (ie. f19_g16). Then add that grid to the config_grid.xml file.Next, update individual components to support those new grids. This usually beginswith the components template file, but may also require source code modificationsin some cases. More details are provided below.
The most difficult issue associated with adding a new grid is generating the requiredgrid files for components and generating any new mapping files required by thecoupler. On some level, the best advice is to mimic datasets that already exist for othergrids for your grid. That means, produce new datasets that follow the formattingstandard. CESM has some tools to help with this, and they should be outlined ineach components’ documentation. There is specific process for generating mappingfile in CESM. To learn more about this process, contact CESM directly.
To add a new grid, edit the scripts/ccsm_utils/config_grid.xml and add thespecific individual grids in the first section with their nx and ny sizes. The add thegrid combination as a section below specifying the individual grids for each compo-nent, the mapping filenames, and other information. Just follow an example of anexisting grid definition. Once this is complete, the grid will be "supported" in theCESM scripts and cases can be created with it.
The next step is to add support for the new grids in the components.This would generally be done initially in the component template files,models/*/*/bld/*.template . Each component handles this differently, so it’s upto the user to decide which components need updates and how to best implementthe update. As part of the template update, new grid files and input datasets mayhave been generated. These need to be added to each component on an individualbasis.
What calendars are supported in CESM?In general, the only supported calendar in the CESM time manager is the 365 day orno-leap calendar. This calendar has the standard 12 months, but it has 365 days everyyear and 28 days in every February. Monthly averages in CESM are truly computedover varying number of days depending on the month of the year.
A gregorian calendar is available if the ESMF time manager is used. To use the ESMFtime manager, the ESMF library has to be available locally and the ESMF libraryhas to be turned on in CESM. See using ESMF in CESM for more information aboutsetting up CESM with the ESMF library.
How do I add a new component model to CESM?Support for specific components (ie. cam, pop, cice, clm, datm, etc) is hardwired intothe CESM scripts. To add a new component model, specifically a new atmosphere,land, ocean, or sea ice component, several things need to be done. This section onlysummarizes the tasks to complete without providing details. This is an advancedexercise, and CESM may be able to provide addition assistance if resources are avail-able. In the directions below, the model "cxyz" is a new land model that is going tobe added to CESM. There are two major parts. First, the component needs to be sup-
93

Chapter 11. Frequently Asked Questions (FAQ)
ported in the CESM scripts. Second, the component needs to be able to run under theCESM driver.
• Add the new model under the appropriate models/"component" directory. Forinstance add the cxyz model under models/lnd/cxyz.
• Add a template file to the new model under the bld directory. For instance, mod-els/lnd/cxyz/bld/cxyz.cpl7.template. Use another models’ template file as a start-ing point. The template file should be able to produce buildnml, buildexe, and in-put_data_list files in the Buildconf directory.
• Edit scripts/create_newcase. Add support for the new model under the definitionof "my @comps". Also add a pointer to the template file under the variable "my%templates".
• Add the new model as a valid option in thescripts/ccsm_utils/Case.template/config_definition.xml file forthe specific component. For instance, for COMP_LND, add cxyz as a valid option.Add any new env variables that are needed specifically for that component andcreate a new group for them called, for instance, "conf_cxyz". Add the new modelto the list of components in scripts/ccsm_utils/Case.template/ConfigCase.pm ifany component specific env variables are added to the config_definition.xml file.
• Add a new compset that supports the new component toscripts/ccsm_utils/Case.template/config_compsets.xml. For instance, add a newcompset called IZ that is based on the I_2000 compset but has cxyz instead of clmas the land component.
• Review the Macros files in scripts/ccsm_utils/Machines to provide any compilermodifications specifically for the new component. This might be a step that is doneafter further testing.
• Add support for output files for the new component in thescripts/ccsm_utils/Tools/st_archive.sh script. This might be done after the newcomponent is in "production".
• For the new component to run under the CESM driver, a new top level*_comp_mct.F90 file needs to be added to the component. For instance, alnd_comp_mct.F90 file should exist in the cxyz model source code. This file willprovide the init, run, and final interfaces that the CESM driver require. Togenerate one of these for the new component, copy an existing one from anothercomponent and modify it to run with the new component. There are severalinherent requirements that make this work such as• the driver provides the mpi communicator for the component at initialization.
The component must save and use this mpi communicator internally.• The top level "program" file for the new component should be disabled.• the component must set various parameters at initialization such as the present
and prognostic flags, and the nx and ny size values.• the component must pass the grid and decomposition to the driver at initializa-
tion in the particular format required.• the component must unpack and pack data from the coupling datatype at initial-
ization and during runtime. the fields used must be set in the seq_flds_mod.F90module in the driver.
• the component must stay synchronized in time with the provided driver timeand should abort if time coordination is incorrect. the component must advancethe correct amount of time whenever the run method is called. the time is pro-vided to the component by the driver.
How are cice and pop decompositions set and how do I overridethem?
The pop and cice models both have similar decompositions and strategies for speci-fying the decomposition. Both models support decomposition of the horizontal grid
94

Chapter 11. Frequently Asked Questions (FAQ)
into two-dimensional blocks, and these blocks are then allocated to individual pro-cessors inside each component. The decomposition must be specified when the mod-els are built. There are four environment variables in env_build.xml for each modelthat specify the decomposition used. These variables are POP or CICE followed by_BLCKX, _BLCKY, _MXBLCKS, and _DECOMP. BLCKX and BLCKY specify the sizeof the local block in grid cells in the "x" and "y" direction. MXBLCKS specifies themaximum number of blocks that might be on any given processor, and DECOMPspecifies the strategy for laying out the blocks on processors.
The values for these environment variables are set automatically by scripts in the ciceand pop "bld" directories when "configure -case" is run. The scripts that generate thedecompositions are
models/ocn/pop2/bld/generate_pop_decomp.plmodels/ice/cice/bld/generate_cice_decomp.pl
Those tools leverage decompositions stored in xml files,
models/ocn/pop2/bld/pop_decomp.xmlmodels/ice/cice/bld/cice_decomp.xml
to set the decomposition for a given resolution and total processor count. The de-composition used can have a significant effect on the model performance, and thedecompositions specified by the tools above generally provide optimum or near op-timum values for the given resolution and processor count. More information aboutcice and pop decompositions can be found in each of those user guides.
The decompositions can be specified manually by setting the environment variablePOP_AUTO_DECOMP or CICE_AUTO_DECOMP to false in env_mach_pes.xml(which turns off use of the scripts above) and then setting the four BLCKX, BLCKY,MXBLCKS, and DECOMP environment variables in env_build.xml.
In general, relatively square and evenly divided Cartesian decompositions work wellfor pop at low to moderate resolution. Cice performs best with "tall and narrow"blocks because of the load imbalance for most global grids between the low and highlatitudes. At high resolutions, more than one block per processor can result in landblock elimination and non-Cartesian decompositions sometimes perform better. Test-ing of several decompositions is always recommended for performance and valida-tion before a long run is started.
How do I change history file output frequency and content forCAM and CLM during a run?
If you want to change the frequency of output for CAM or CLM (i.e. generate outputevery 6 model hours instead of once a model day) in the middle of a run, or if youwant to change the fields that are output, in the middle of a run, you need to stopthe run, rebuild and rerun it with the same casename and branch from the samecasename. See the steps below for doing a branch run while retaining the casename.
Rebuilding the case and restarting it where you left off, are necessary because CAMand CLM only read namelist variables once, at the beginning of a run. This is not thecase for POP and CICE, they read the namelist input on every restart, and thereforefor POP and CICE, you can change output fields and frequency by modifying theappropriate namelist variables and then doing a restart.
The following example shows case B40.20th.1deg which runs from 1850 to 2005, andwill generate high frequency output for years 1950 through 2005. CAM will outputdata every six hours instead of once a day. Also starting at year 1950 additional fieldswill be output by the model.
95

Chapter 11. Frequently Asked Questions (FAQ)
1. The first step is to create case b40.20th.1deg and run the case for years 1850through 1949 with your initial settings for output.
2. Next move your entire case directory, $CASEDIR, somewhere else, becauseyou need to rebuild and rerun the case using the same name.> cd $CASEDIR> mv b40.20th.1deg b40.20th.1deg.1850-1949
3. Now move your run directory, $RUNDIR, somewhere else as well.> cd $RUNDIR> mv b40.20th.1deg b40.20th.1deg.1850-1949
4. Next create a new case in your case directory with the same name,b40.20th.1deg.> cd $CASEDIR/scripts> create_newcase -mach bluefire -compset B_1850-2000_CN -res f09_g16 -case b40.20th.1degcd $RUNDIR
5. Next edit the namelist file, env_conf.xml, in the run directory, $RUNDIR, asfollows:> cd $RUNDIR> xmlchange -file env_conf.xml -id RUN_TYPE -val ’branch’> xmlchange -file env_conf.xml -id RUN_REFCASE -val ’b40.20th.1deg’> xmlchange -file env_conf.xml -id RUN_REFDATE -val ’1948-01-01’> xmlchange -file env_conf.xml -id CAM_NML_USE_CASE -val ’1850-2005_cam4’> xmlchange -file env_conf.xml -id BRNCH_RETAIN_CASENAME -val ’TRUE’> xmlchange -file env_conf.xml -id GET_REFCASE -val ’FALSE’
6. Next configure the case and edit the coupler and CAM namelists.
a. Configure case.> configure -case
b. Edit Buildconf/cpl.buildnml.csh. Replace existingbrnch_retain_casename line with the following linebrnch_retain_casename = .true.
Edit Buildconf/cam.buildnml.csh. Check that bndtvghg =’$DIN_LOC_ROOT’ and add:&cam_inparm
doisccp = .true.isccpdata = ’/fis/cgd/cseg/csm/inputdata/atm/cam/rad/isccp.tautab_invtau.nc’mfilt = 1,365,30,120,240nhtfrq = 0,-24,-24,-6,-3fincl2 = ’TREFHTMN’,’TREFHTMX’,’TREFHT’,’PRECC’,’PRECL’,’PSL’fincl3 = ’CLDICE’,’CLDLIQ’,’CLDTOT’,’CLOUD’,’CMFMC’,’CMFMCDZM’,’FISCCP1’,
’FLDS’,’FLDSC’,’FLNS’,’FLUT’,’FLUTC’,’FSDS’,’FSDSC’,’FSNS’,’FSNSC’,’FSNTOA’,’FSNTOAC’,’LHFLX’,’OMEGA’,’OMEGA500’,’PRECSC’,’PRECSL’,’PS’,’Q’,’QREFHT’,’RELHUM’,’RHREFHT’,’SHFLX’,’SOLIN’,’T’,’TGCLDIWP’,’TGCLDLWP’,’U’,’V’,’Z3’
fincl4 = ’PS:I’,’PSL:I’,’Q:I’,’T:I’,’U:I’,’V:I’,’Z3:I’fincl5 = ’CLDTOT’,’FLDS’,’FLDSC’,’FLNS’,’FLNSC’,’FSDS’,’FSDSC’,’FSNS’,
’LHFLX’,’PRECC’,’PRECL’,’PRECSC’,’PRECSL’,’SHFLX’,’PS:I’,’QREFHT:I’,’TREFHT:I’,’TS:I’/
7. Now build and run the case.> b40.20th.1deg.$MACH.build> bsub < b40.20th.1deg.$MACH.run
96

Chapter 11. Frequently Asked Questions (FAQ)
Notes1. http://code.google.com/p/parallelio
2. ../../cpl7/
97

Chapter 11. Frequently Asked Questions (FAQ)
98

Appendix A. Supported Component Sets
The following lists the supported component sets. Note that all the component setscurrently use the stub GLC component, sglc. Run "create_newcase -list" from thescripts directory to view the list for the current version of CESM1.
For an overview of CESM components and component sets see overview of cesmcomponents.
Table A-1. Component Sets
Compset (Shortname) Details
A_PRESENT_DAY (A) Components: datm,dlnd,dice,docn,sglc
Description: All data model
B_2000 (B) Components: cam,clm,cice,pop2,sglc
Description: All active components,present day
B_2000_CN (BCN) Components: cam,clm,cice,pop2,sglc
Description: all active components,present day, with CN (Carbon Nitrogen)in clm
B_1850_CAM5 (B1850C5) Components: cam,clm,cice,pop2,sglc
Description: All active components,pre-industrial, cam5 physics
B_1850_CAM5_CN (B1850C5CN) Components: cam,clm,cice,pop2,sglc
Description: All active components,pre-industrial, cam5 physics, with CN(Carbon Nitrogen) in CLM
B_1850 (B1850) Components: cam,clm,cice,pop2,sglc
Description: All active components,pre-industrial
B_1850_CN (B1850CN) Components: cam,clm,cice,pop2,sglc
Description: all active components,pre-industrial, with CN (CarbonNitrogen) in CLM
B_1850_CN_GLC (BG1850CN) Components: cam,clm,cice,pop2,cism
Description: INVALID: not supported atthis resolution (only f09_g16, f19_g16 orT31_g37)
B_2000_CN_CHEM (B2000CNCHM) Components: cam,clm,cice,pop2,sglc
99

Appendix A. Supported Component Sets
Compset (Shortname) DetailsDescription: All active components,pre-industrial, with CN (CarbonNitrogen) in CLM and super_fast_llnlchem in atm
B_1850_CN_CHEM (B1850CNCHM) Components: cam,clm,cice,pop2,sglc
Description: All active components,pre-industrial, with CN (CarbonNitrogen) in CLM and super_fast_llnlchem in atm
B_1850_RAMPCO2_CN (B1850RMCN) Components: cam,clm,cice,pop2,sglc
Description: All active components,pre-industirial with co2 ramp, with CN(Carbon Nitrogen) in CLM
B_1850-2000 (B20TR) Components: cam,clm,cice,pop2,sglc
Description: All active components, 1850to 2000 transient
B_1850-2000_CN (B20TRCN) Components: cam,clm,cice,pop2,sglc
Description: All active components, 1850to 2000 transient, with CN (CarbonNitrogen) in CLM
B_1850-2000_CN_GLC (BG20TRCN) Components: cam,clm,cice,pop2,cism
Description: INVALID: not supported atthis resolution (only f09_g16, f19_g16 orT31_g37)
B_1850-2000_CN_CHEM(B20TRCNCHM)
Components: cam,clm,cice,pop2,sglc
Description: All active components, 1850to 2000 transient, with CN (CarbonNitrogen) in CLM and super_fast_llnlchem in atm
B_1850-2000_CAM5 (B20TRC5) Components: cam,clm,cice,pop2,sglc
Description: All active components, 1850to 2000 transient, cam5 physics
B_1850-2000_CAM5_CN (B20TRC5CN) Components: cam,clm,cice,pop2,sglc
Description: All active components, 1850to 2000 transient, cam5 physics, with CN(Carbon Nitrogen) in CLM
B_2000_CN_GLC (BGCN) Components: cam,clm,cice,pop2,cism
Description: INVALID: not supported atthis resolution (only f09_g16, f19_g16 orT31_g37)
100
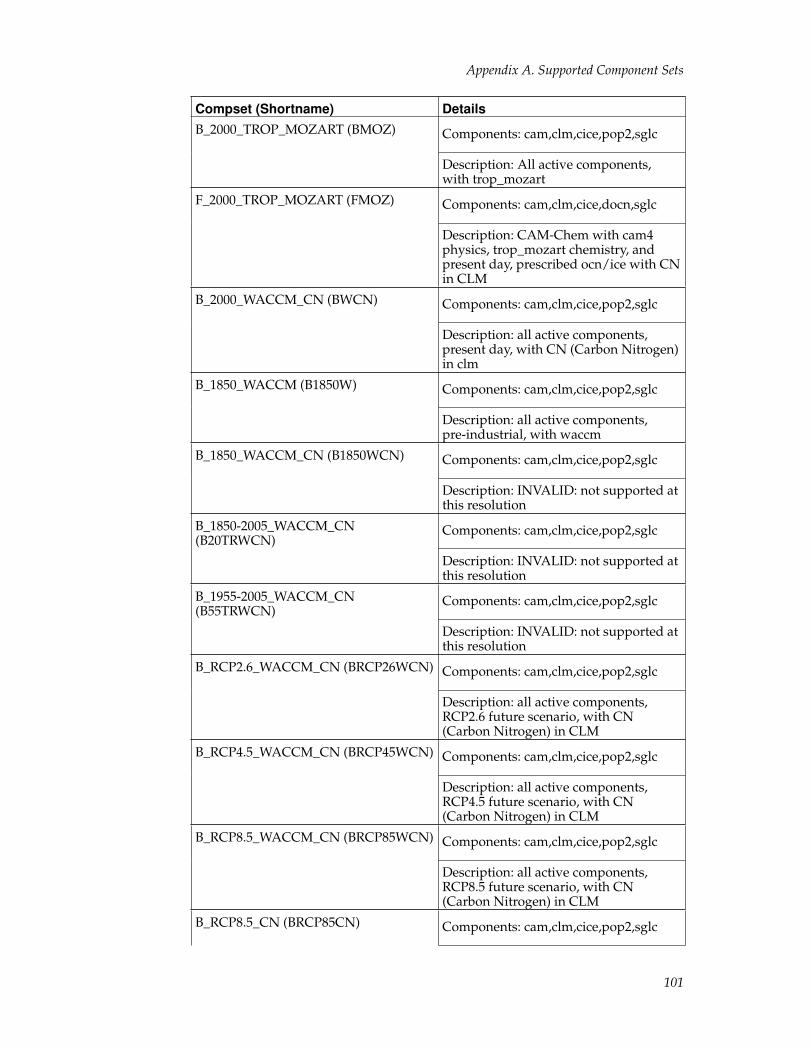
Appendix A. Supported Component Sets
Compset (Shortname) DetailsB_2000_TROP_MOZART (BMOZ) Components: cam,clm,cice,pop2,sglc
Description: All active components,with trop_mozart
F_2000_TROP_MOZART (FMOZ) Components: cam,clm,cice,docn,sglc
Description: CAM-Chem with cam4physics, trop_mozart chemistry, andpresent day, prescribed ocn/ice with CNin CLM
B_2000_WACCM_CN (BWCN) Components: cam,clm,cice,pop2,sglc
Description: all active components,present day, with CN (Carbon Nitrogen)in clm
B_1850_WACCM (B1850W) Components: cam,clm,cice,pop2,sglc
Description: all active components,pre-industrial, with waccm
B_1850_WACCM_CN (B1850WCN) Components: cam,clm,cice,pop2,sglc
Description: INVALID: not supported atthis resolution
B_1850-2005_WACCM_CN(B20TRWCN)
Components: cam,clm,cice,pop2,sglc
Description: INVALID: not supported atthis resolution
B_1955-2005_WACCM_CN(B55TRWCN)
Components: cam,clm,cice,pop2,sglc
Description: INVALID: not supported atthis resolution
B_RCP2.6_WACCM_CN (BRCP26WCN) Components: cam,clm,cice,pop2,sglc
Description: all active components,RCP2.6 future scenario, with CN(Carbon Nitrogen) in CLM
B_RCP4.5_WACCM_CN (BRCP45WCN) Components: cam,clm,cice,pop2,sglc
Description: all active components,RCP4.5 future scenario, with CN(Carbon Nitrogen) in CLM
B_RCP8.5_WACCM_CN (BRCP85WCN) Components: cam,clm,cice,pop2,sglc
Description: all active components,RCP8.5 future scenario, with CN(Carbon Nitrogen) in CLM
B_RCP8.5_CN (BRCP85CN) Components: cam,clm,cice,pop2,sglc
101

Appendix A. Supported Component Sets
Compset (Shortname) DetailsDescription: all active components,RCP8.5 future scenario, with CN(Carbon Nitrogen) in CLM
B_RCP8.5_CN_GLC (BGRCP85CN) Components: cam,clm,cice,pop2,cism
Description: INVALID: not supported atthis resolution
B_RCP6.0_CN (BRCP60CN) Components: cam,clm,cice,pop2,sglc
Description: all active components,RCP6.0 future scenario, with CN(Carbon Nitrogen) in CLM
B_RCP6.0_CN_GLC (BGRCP60CN) Components: cam,clm,cice,pop2,cism
Description: INVALID: not supported atthis resolution (only f09_g16, f19_g16 orT31_g37)
B_RCP4.5_CN (BRCP45CN) Components: cam,clm,cice,pop2,sglc
Description: all active components,RCP4.5 future scenario, with CN(Carbon Nitrogen) in CLM
B_RCP4.5_CN_GLC (BGRCP45CN) Components: cam,clm,cice,pop2,cism
Description: INVALID: not supported atthis resolution (only f09_g16, f19_g16 orT31_g37)
B_RCP2.6_CN (BRCP26CN) Components: cam,clm,cice,pop2,sglc
Description: all active components,RCP2.6 future scenario, with CN(Carbon Nitrogen) in CLM
B_RCP2.6_CN_GLC (BGRCP26CN) Components: cam,clm,cice,pop2,cism
Description: INVALID: not supported atthis resolution (only f09_g16, f19_g16 orT31_g37)
B_1850_BGC-BPRP (B1850BPRP) Components: cam,clm,cice,pop2,sglc
Description: All active components,pre-industrial, CN in CLM, ECO in POP,BGC CO2=prog, rad CO2=prog
B_1850_BGC-BDRD (B1850BDRD) Components: cam,clm,cice,pop2,sglc
Description: All active components,pre-industrial, CN in CLM, ECO in POP,BGC CO2=diag, rad CO2=diag
B_1850-2000_BGC-BPRP (B20TRBPRP) Components: cam,clm,cice,pop2,sglc
102

Appendix A. Supported Component Sets
Compset (Shortname) DetailsDescription: INVALID: not supported atthis resolution
B_1850-2000_BGC-BDRD (B20TRBDRD) Components: cam,clm,cice,pop2,sglc
Description: INVALID: not supported atthis resolution
C_NORMAL_YEAR_ECOSYS (CECO) Components: datm,dlnd,dice,pop2,sglc
Description: Active ocean model withecosys and with COREv2 normal yearforcing
C_NORMAL_YEAR (C) Components: datm,dlnd,dice,pop2,sglc
Description: Active ocean model withCOREv2 normal year forcing
C_INTERANNUAL (CIAF) Components: datm,dlnd,dice,pop2,sglc
Description: active ocean model withCOREv2 interannual forcing
D_NORMAL_YEAR (D) Components: datm,slnd,cice,docn,sglc
Description: Active ice model withCOREv2 normal year forcing
D_INTERANNUAL (DIAF) Components: datm,slnd,cice,docn,sglc
Description: active ice model withCOREv2 interannual forcing
E_2000 (E) Components: cam,clm,cice,docn,sglc
Description: Fully active cam and icewith som ocean, present day
E_2000_CN_GLC (EGCN) Components: cam,clm,cice,docn,cism
Description: INVALID: not supported atthis resolution (only f09, f19 or T31)
E_1850_CN (E1850CN) Components: cam,clm,cice,docn,sglc
Description: Pre-industrial fully activeice and som ocean, with CN
E_1850_CN_GLC (EG1850CN) Components: cam,clm,cice,docn,cism
Description: INVALID: not supported atthis resolution (only f09, f19 or T31)
E_1850_CAM5 (E1850C5) Components: cam,clm,cice,docn,sglc
Description: Pre-industrial fully activeice and som ocean, cam5 physics
103
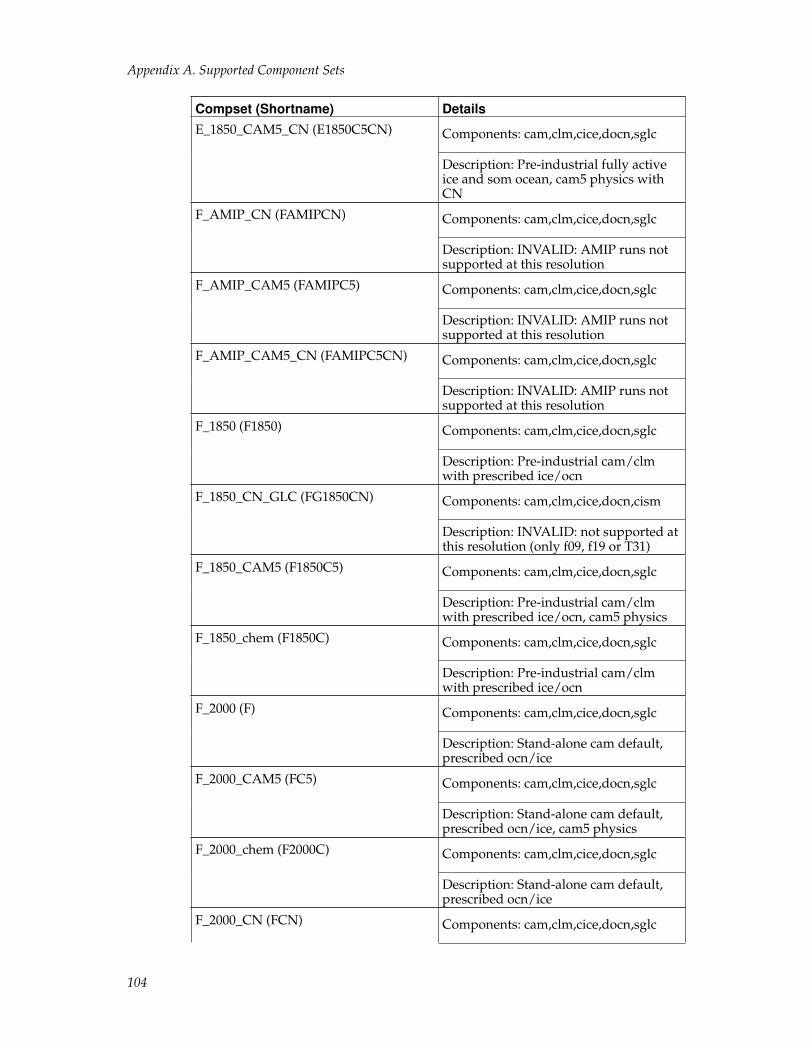
Appendix A. Supported Component Sets
Compset (Shortname) DetailsE_1850_CAM5_CN (E1850C5CN) Components: cam,clm,cice,docn,sglc
Description: Pre-industrial fully activeice and som ocean, cam5 physics withCN
F_AMIP_CN (FAMIPCN) Components: cam,clm,cice,docn,sglc
Description: INVALID: AMIP runs notsupported at this resolution
F_AMIP_CAM5 (FAMIPC5) Components: cam,clm,cice,docn,sglc
Description: INVALID: AMIP runs notsupported at this resolution
F_AMIP_CAM5_CN (FAMIPC5CN) Components: cam,clm,cice,docn,sglc
Description: INVALID: AMIP runs notsupported at this resolution
F_1850 (F1850) Components: cam,clm,cice,docn,sglc
Description: Pre-industrial cam/clmwith prescribed ice/ocn
F_1850_CN_GLC (FG1850CN) Components: cam,clm,cice,docn,cism
Description: INVALID: not supported atthis resolution (only f09, f19 or T31)
F_1850_CAM5 (F1850C5) Components: cam,clm,cice,docn,sglc
Description: Pre-industrial cam/clmwith prescribed ice/ocn, cam5 physics
F_1850_chem (F1850C) Components: cam,clm,cice,docn,sglc
Description: Pre-industrial cam/clmwith prescribed ice/ocn
F_2000 (F) Components: cam,clm,cice,docn,sglc
Description: Stand-alone cam default,prescribed ocn/ice
F_2000_CAM5 (FC5) Components: cam,clm,cice,docn,sglc
Description: Stand-alone cam default,prescribed ocn/ice, cam5 physics
F_2000_chem (F2000C) Components: cam,clm,cice,docn,sglc
Description: Stand-alone cam default,prescribed ocn/ice
F_2000_CN (FCN) Components: cam,clm,cice,docn,sglc
104

Appendix A. Supported Component Sets
Compset (Shortname) DetailsDescription: Stand-alone cam default,prescribed ocn/ice with CN
F_2000_CN_GLC (FGCN) Components: cam,clm,cice,docn,cism
Description: INVALID: not supported atthis resolution (only f09, f19 or T31)
F_1850-2000_CN (F20TRCN) Components: cam,clm,cice,docn,sglc
Description: 20th Century transientstand-alone cam default, prescribedocn/ice, with CN
F_1850-2000_CN_GLC (FG20TRCN) Components: cam,clm,cice,docn,cism
Description: INVALID: not supported atthis resolution (only f09, f19 or T31)
F_1850_CN_CHEM (F1850CNCHM) Components: cam,clm,cice,docn,sglc
Description: stand-alone cam/clm,pre-industrial, with CN in CLM,super_fast_llnl chem in cam
F_1850_CN_MAM3 (F1850CNMAM3) Components: cam,clm,cice,docn,sglc
Description: stand-alone cam/clm,pre-industrial, with CN in CLM, mam3chem in cam
F_1850_WACCM (F1850W) Components: cam,clm,cice,docn,sglc
Description: Pre-industrial cam/clmwith prescribed ice/ocn
F_2000_WACCM (FW) Components: cam,clm,cice,docn,sglc
Description: present-day cam/clm withprescribed ice/ocn
F_2000_WACCMX (FWX) Components: cam,clm,cice,docn,sglc
Description: WACCM-X present-daycam/clm with prescribed ice/ocn
F_1955-2005_WACCM_CN (F55WCN) Components: cam,clm,cice,docn,sglc
Description: INVALID: not supported atthis resolution
F_2000_WACCM_SC (FWSC) Components: cam,clm,cice,docn,sglc
Description: WACCM with specifiedchemistry, prescribed ice/ocn
F_SD_WACCM (FSDW) Components: cam,clm,cice,docn,sglc
105

Appendix A. Supported Component Sets
Compset (Shortname) DetailsDescription: WACCM driven by GEOS5meteorology with radiation feadbacksturned off
F_SD_CAMCHEM (FSDCHM) Components: cam,clm,cice,docn,sglc
Description: CAM-Chem driven byGEOS5 meteorology with radiationfeadbacks turned off
F_SD_BAM (FSDBAM) Components: cam,clm,cice,docn,sglc
Description: Bulk aerosols driven byGEOS5 meteorology with radiationfeadbacks turned off
F_TROP_STRAT_CHEM (FTSC) Components: cam,clm,cice,docn,sglc
Description: CAM-Chem with cam4physics, troposheric/stratosphericinteractive chemistry, and present day,prescribed ocn/ice with CN in CLM
G_1850_ECOSYS (G1850ECO) Components: datm,dlnd,cice,pop2,sglc
Description: 1850 control forpop-ecosystem/cice/datm7/dlnd-rx1
G_NORMAL_YEAR (G) Components: datm,dlnd,cice,pop2,sglc
Description: Coupled ocean ice withCOREv2 normal year forcing
G_INTERANNUAL (GIAF) Components: datm,dlnd,cice,pop2,sglc
Description: Coupled ocean ice withCOREv2 interannual forcing
H_PRESENT_DAY (H) Components: datm,slnd,cice,pop2,sglc
Description: Coupled ocean ice slnd
I_TEST_2003 (ITEST) Components: datm,clm,sice,socn,sglc
Description: Test active land model withQIAN atm input data for just 2002-2003and Satellite phenology (SP), CO2 leveland Aerosol deposition for 2000(BECAUSE OF THE SHORT FORCINGPERIOD -- DO NOT USE FOR LONGSIMULATIONS)
I_2000 (I) Components: datm,clm,sice,socn,sglc
Description: Active land model withQIAN atm input data for 1972-2004 andSatellite phenology (SP), CO2 level andAerosol deposition for 2000
106

Appendix A. Supported Component Sets
Compset (Shortname) DetailsI_1850 (I1850) Components: datm,clm,sice,socn,sglc
Description: Active land model withQIAN atm input data for 1948 to 1972and Satellite phenology (SP), CO2 leveland Aerosol deposition for 1850
I_1850_GLC (IG1850) Components: datm,clm,sice,socn,cism
Description: INVALID: not supported atthis resolution (only f09_g16, f19_g16 orT31_g37)
I_2000_GLC (IG) Components: datm,clm,sice,socn,cism
Description: INVALID: not supported atthis resolution (only f09_g16, f19_g16, orT31_g37)
I_1948-2004 (I4804) Components: datm,clm,sice,socn,sglc
Description: Active land model withQIAN atm input data for 1948 to 2004and Satellite phenology (SP), CO2 leveland Aerosol deposition for 2000
I_1850-2000 (I20TR) Components: datm,clm,sice,socn,sglc
Description: Active land model withQIAN atm input data for 1948 to 1972and transient Satellite phenology (SP),and Aerosol deposition from 1850 to2000 and 2000 CO2 level
I_1850-2000_GLC (IG20TR) Components: datm,clm,sice,socn,cism
Description: INVALID: not supported atthis resolution (only f09_g16, f19_g16, orT31_g37)
I_TEST_2003_CN (ICNTEST) Components: datm,clm,sice,socn,sglc
Description: Test active land model withQIAN atm input data for just 2002-2003and CN (Carbon-Nitrogen), CO2 leveland Aerosol deposition for 2000(BECAUSE OF THE SHORT FORCINGPERIOD -- DO NOT USE FOR LONGSIMULATIONS)
I_2000_CN (ICN) Components: datm,clm,sice,socn,sglc
Description: Active land model withQIAN atm input data for 1972-2004 andCN (Carbon Nitrogen) biogeochemistry,CO2 level and Aerosol deposition for2000
107

Appendix A. Supported Component Sets
Compset (Shortname) DetailsI_2000_CN_GLC (IGCN) Components: datm,clm,sice,socn,cism
Description: INVALID: not supported atthis resolution (only f09_g16, f19_g16, orT31_g37)
I_1850_CN (I1850CN) Components: datm,clm,sice,socn,sglc
Description: Active land model withQIAN atm input data for 1948 to 1972and CN (Carbon Nitrogen)biogeochemistry, CO2 level and Aerosoldeposition for 1850
I_1850_CN_GLC (IG1850CN) Components: datm,clm,sice,socn,cism
Description: INVALID: not supported atthis resolution (only f09_g16, f19_g16, orT31_g37)
I_1850_SPINUP_3HrWx_CN(I1850SPINUPCN)
Components: datm,clm,sice,socn,sglc
Description: Active land model withBCN CPLHIST 3-hourly weather forcingdata and half-hourly solar for 1850spinup of CN (Carbon Nitrogen)biogeochemistry, CO2 level and Aerosoldeposition for 1850
I_1948-2004_CN (I4804CN) Components: datm,clm,sice,socn,sglc
Description: Active land model withQIAN atm input data for 1948 to 2004and CN (Carbon Nitrogen)biogeochemistry, CO2 level and Aerosoldeposition for 2000
I_1850-2000_CN (I20TRCN) Components: datm,clm,sice,socn,sglc
Description: Active land model withQIAN atm input data for 1948 to 1972and transient CN, Aerosol dep from1850 to 2000 and 2000 CO2 level
I_1850-2000_CN_GLC (IG20TRCN) Components: datm,clm,sice,socn,cism
Description: INVALID: not supported atthis resolution (only f09_g16, f19_g16, orT31_g37)
I_RCP8.5_CN (IRCP85CN) Components: datm,clm,sice,socn,sglc
Description: Active land model, RCP8.5future scenario, with CN in CLM, QIANatm input data for 1972 to 2004, 2000CO2 level
I_RCP8.5_CN_GLC (IGRCP85CN) Components: datm,clm,sice,socn,cism
108

Appendix A. Supported Component Sets
Compset (Shortname) DetailsDescription: INVALID: not supported atthis resolution (only f09_g16, f19_g16, orT31_g37)
I_RCP6.0_CN (IRCP60CN) Components: datm,clm,sice,socn,sglc
Description: Active land model, RCP6.0future scenario, with CN in CLM, QIANatm input data for 1972 to 2004, 2000CO2 level
I_RCP6.0_CN_GLC (IGRCP60CN) Components: datm,clm,sice,socn,cism
Description: INVALID: not supported atthis resolution (only f09_g16, f19_g16, orT31_g37)
I_RCP4.5_CN (IRCP45CN) Components: datm,clm,sice,socn,sglc
Description: Active land model, RCP4.5future scenario, with CN in CLM, QIANatm input data for 1972 to 2004, 2000CO2 level
I_RCP4.5_CN_GLC (IGRCP45CN) Components: datm,clm,sice,socn,cism
Description: INVALID: not supported atthis resolution (only f09_g16, f19_g16, orT31_g37)
I_RCP2.6_CN (IRCP26CN) Components: datm,clm,sice,socn,sglc
Description: Active land model, RCP2.6future scenario, with CN in CLM, QIANatm input data for 1972 to 2004, 2000CO2 level
I_RCP2.6_CN_GLC (IGRCP26CN) Components: datm,clm,sice,socn,cism
Description: INVALID: not supported atthis resolution (only f09_g16, f19_g16, orT31_g37)
S_PRESENT_DAY (S) Components: xatm,slnd,sice,socn,sglc
Description: All stub models plus xatm
T_PRESENT_DAY_GLC (TG) Components: satm,dlnd,sice,socn,cism
Description: All stub models plus dataland and cism (active ice sheet model)
X_PRESENT_DAY (X) Components: xatm,xlnd,xice,xocn,xglc
Description: All dead model
109

Appendix A. Supported Component Sets
110

Appendix B. Supported Grids
The following table lists all the supported grids. Run "create_newcase -list" from thescripts directory to view the list for the current version of CESM1.
Table B-1. supported grids
Grid(Short-name)
atm_grid lnd_grid ice_grid ocn_grid atm_gridtype
ocn_gridtype
pt1_pt1(pt1)
pt1 pt1 pt1 pt1 NA NA
0.23x0.31_0.23x0.31(f02_f02)
0.23x0.31 0.23x0.31 0.23x0.31 0.23x0.31 finitevolume
finitevolume
0.23x0.31_gx1v6(f02_g16)
0.23x0.31 0.23x0.31 gx1v6 gx1v6 finitevolume
displacedpole
0.23x0.31_tx0.1v2(f02_t12)
0.23x0.31 0.23x0.31 tx0.1v2 tx0.1v2 finitevolume
triplepole
0.47x0.63_0.47x0.63(f05_f05)
0.47x0.63 0.47x0.63 0.47x0.63 0.47x0.63 finitevolume
finitevolume
0.47x0.63_gx1v6(f05_g16)
0.47x0.63 0.47x0.63 gx1v6 gx1v6 finitevolume
displacedpole
0.47x0.63_tx0.1v2(f05_t12)
0.47x0.63 0.47x0.63 tx0.1v2 tx0.1v2 finitevolume
triplepole
0.9x1.25_0.9x1.25(f09_f09)
0.9x1.25 0.9x1.25 0.9x1.25 0.9x1.25 finitevolume
finitevolume
0.9x1.25_gx1v6(f09_g16)
0.9x1.25 0.9x1.25 gx1v6 gx1v6 finitevolume
displacedpole
1.9x2.5_1.9x2.5(f19_f19)
1.9x2.5 1.9x2.5 1.9x2.5 1.9x2.5 finitevolume
finitevolume
1.9x2.5_gx1v6(f19_g16)
1.9x2.5 1.9x2.5 gx1v6 gx1v6 finitevolume
displacedpole
2.5x3.33_2.5x3.33(f25_f25)
2.5x3.33 2.5x3.33 2.5x3.33 2.5x3.3 finitevolume
finitevolume
4x5_4x5(f45_f45)
4x5 4x5 4x5 4x5 finitevolume
finitevolume
4x5_gx3v7(f45_g37)
4x5 4x5 gx3v7 gx3v7 finitevolume
displacedpole
T62_gx3v7(T62_g37)
96x192 96x192 gx3v7 gx3v7 spectral displacedpole
T62_tx0.1v2(T62_t12)
96x192 96x192 tx0.1v2 tx0.1v2 spectral triplepole
T62_gx1v6(T62_g16)
96x192 96x192 gx1v6 gx1v6 spectral displacedpole
T31_T31(T31_T31)
48x96 48x96 48x96 48x96 spectral spectral
T31_gx3v7(T31_g37)
48x96 48x96 gx3v7 gx3v7 spectral displacedpole
111

Appendix B. Supported Grids
Grid(Short-name)
atm_grid lnd_grid ice_grid ocn_grid atm_gridtype
ocn_gridtype
T42_T42(T42_T42)
64x128 64x128 64x128 64x128 spectral spectral
10x15_10x15(f10_f10)
10x15 10x15 10x15 10x15 finitevolume
finitevolume
ne30np4_0.9x1.25_gx1v6(ne30_f09_g16)
ne30np4 0.9x1.25 gx1v6 gx1v6 cubedsphere
displacedpole
ne30np4_1.9x2.5_gx1v6(ne30_f19_g16)
ne30np4 1.9x2.5 gx1v6 gx1v6 cubedsphere
displacedpole
ne240np4_0.23x0.31_gx1v6(ne240_f02_g16)
ne240np4 0.23x0.31 gx1v6 gx1v6 cubedsphere
displacedpole
ne240np4_0.23x0.31_tx0.1v2(ne240_f02_t12)
ne240np4 0.23x0.31 tx0.1v2 tx0.1v2 cubedsphere
triplepole
T85_0.9x1.25_gx1v6(T85_f09_g16)
128x256 0.9x1.25 gx1v6 gx1v6 spectral displacedpole
T85_0.9x1.25_tx0.1v2(T85_f09_t12)
128x256 0.9x1.25 tx0.1v2 tx0.1v2 spectral triplepole
T85_T85(T85_T85)
128x256 128x256 128x256 128x256 spectral spectral
T341_T341(T341_T341)
512x1024 512x1024 512x1024 512x1024 spectral spectral
T341_0.23x0.31_tx0.1v2(T341_f02_t12)
512x1024 0.23x0.31 tx0.1v2 tx0.1v2 spectral triplepole
ne120np4_0.9x1.25_gx1v6(ne120_f09_g16)
ne120np4 0.9x1.25 gx1v6 gx1v6 cubedsphere
displacedpole
ne120np4_0.23x0.31_tx0.1v2(ne120_f02_t12)
ne120np4 0.23x0.31 tx0.1v2 tx0.1v2 cubedsphere
triplepole
112

Appendix C. Supported Machines
The following table lists all supported and generic machines. Run "create_newcase-list" from the scripts directory to view the list for the current version of CESM1.
Name Description
bluefire NCAR IBM p6, os is AIX, 32 pes/node,batch system is LSF
brutus_po Brutus Linux Cluster ETH (pgi/9.0-1with open_mpi/1.4.1), 16 pes/node,batch system LSF, added by UB
brutus_pm Brutus Linux Cluster ETH (pgi/9.0-1with mvapich2/1.4rc2), 16 pes/node,batch system LSF, added by UB
brutus_io Brutus Linux Cluster ETH(intel/10.1.018 with open_mpi/1.4.1), 16pes/node, batch system LSF, added byUB
brutus_im Brutus Linux Cluster ETH(intel/10.1.018 with mvapich2/1.4rc2),16 pes/node, batch system LSF, addedby UB
edinburgh_lahey NCAR CGD Linux Cluster (lahey), 8pes/node, batch system is PBS
edinburgh_pgi NCAR CGD Linux Cluster (pgi), 8pes/node, batch system is PBS
edinburgh_intel NCAR CGD Linux Cluster (intel), 8pes/node, batch system is PBS
franklin NERSC XT4, os is CNL, 4 pes/node,batch system is PBS
hadley UCB Linux Cluster, os is Linux (ia64),batch system is PBS
hector UK National Supercomuting Servies:Hector Cray XE6, batch system is PBS,user-defined
hopper INVALID: hopper is no longer valid,please use hopp2
hopp2 NERSC XE6, os is CNL, 24 pes/node,batch system is PBS
intrepid ANL IBM BG/P, os is BGP, 4 pes/node,batch system is cobalt
jaguar ORNL XT4, os is CNL, 4 pes/node,batch system is PBS
jaguarpf ORNL XT5, os is CNL, 12 pes/node,batch system is PBS
chester ORNL XT5, os is CNL, 12 pes/node,batch system is PBS, test system
kraken NICS/UT/teragrid XT5, os is CNL, 12pes/node
113

Appendix C. Supported Machines
Name Descriptionlynx_pgi NCAR XT5, os is CNL, 12 pes/node,
batch system is PBS
lynx_pathscale NCAR XT5, os is CNL, 12 pes/node,batch system is PBS
midnight ARSC Sun Cluster, os is Linux (pgi),batch system is PBS
pleiades NASA/AMES Linux Cluster, Linux(ia64), Altix ICE, 3.0 GHz Harpertownprocessors, 8 pes/node and 8 GB ofmemory, batch system is PBS
pleiades_wes NASA/AMES Linux Cluster, Linux(ia64), Altix ICE, 2.93 GHz Westmereprocessors, 12 pes/node and 24 GB ofmemory, batch system is PBS
prototype_atlas LLNL Linux Cluster, Linux (pgi), 8pes/node, batch system is Moab
prototype_hera LLNL Linux Cluster, Linux (pgi), 16pes/node, batch system is Moab
prototype_columbia NASA Ames Linux Cluster, Linux (ia64),2 pes/node, batch system is PBS
prototype_frost NCAR IBM BG/L, os is BGL, 8pes/node, batch system is cobalt
prototype_nyblue SUNY IBM BG/L, os is BGL, 8pes/node, batch system is cobalt
prototype_ranger TACC Linux Cluster, Linux (pgi), 1pes/node, batch system is SGE
prototype_ubgl LLNL IBM BG/L, os is BGL, 2pes/node, batch system is Moab
generic_ibm generic ibm power system, os is AIX,batch system is LoadLeveler,user-defined
generic_xt generic CRAY XT, os is CNL, batchsystem is PBS, user-defined
generic_linux_pgi generic linux (pgi), os is Linux, batchsystem is PBS, user-defined
generic_linux_lahey generic linux (lahey), os is Linux, batchsystem is PBS, user-defined
generic_linux_intel generic linux (intel), os is Linux, batchsystem is PBS, user-defined
generic_linux_pathscale generic linux (pathscale), os is Linux,batch system is PBS, user-defined
generic_darwin_intel generic darwin (intel), os is Darwin(Macintosh OS X), no batch system,user-defined
generic_darwin_pgi generic darwin (pgi), os is Darwin(Macintosh OS X), no batch system,user-defined
114

Appendix D. env_case.xml variables
The following table lists all the environment variables set in the env_case.xml file.These variables cannot be modified.
Table D-1. env_case.xml variables
Name Type Default Description [ValidValues]
ATM_GRID char UNSET atmosphere grid
ATM_NX integer 0 number ofatmosphere cells ini direction
ATM_NY integer 0 Number ofatmosphere cells inj direction
BLDROOT char $CCSMROOT/scripts/ccsm_utils/BuildCCSM sourcescripts builddirectory location
CASE char UNSET case name
CASEBUILD char $CASEROOT/BuildconfBuildconf directorylocation
CASEROOT char UNSET full path of case
CASETOOLS char $CASEROOT/Tools Case Toolsdirectory location
CCSMROOT char UNSET ccsm source rootdirectory
CCSMUSER char UNSET case user name
CCSM_CCOST integer 0 2**n relative cost ofcompset B is 1 (DONOT EDIT)
CCSM_COMPSET char UNSET CCSM componentset
CCSM_GCOST integer 0 2**n relative cost ofgrid f19_g15 is 1(DO NOT EDIT)
CCSM_LCOMPSET char UNSET CCSM componentset, longname
CCSM_MCOST integer 0 2**n relative cost ofmachine (DO NOTEDIT)
CCSM_SCOMPSET char UNSET CCSM componentset, shortname
CODEROOT char $CCSMROOT/modelsCCSM sourcemodels directorylocation
COMP_ATM char cam Name ofatmosphericcomponent[cam,datm,xatm,satm]
115

Appendix D. env_case.xml variables
Name Type Default Description [ValidValues]
COMP_CPL char cpl Name of couplingcomponent [cpl]
COMP_GLC char sglc Name of land icecomponent[xglc,sglc,cism]
COMP_ICE char cice Name of sea icecomponent[cice,dice,xice,sice]
COMP_LND char clm Name of landcomponent[clm,dlnd,xlnd,slnd]
COMP_OCN char pop2 Name of oceancomponent[pop2,docn,xocn,socn,camdom]
GLC_NX integer 0 number of glc cellsin i direction
GLC_NY integer 0 number of glc cellsin j direction
GRID char UNSET CCSM grid
ICE_GRID char UNSET ice grid (mustequal ocn grid)
ICE_NX integer 0 number of ice cellsin i direction
ICE_NY integer 0 number of ice cellsin j direction
LND_GRID char UNSET land grid
LND_NX integer 0 Number of landcells in i direction
LND_NY integer 0 number of landcells in j direction
MACH char UNSET current machinename
OCN_GRID char UNSET ocn grid
OCN_NX integer 0 number of ocn cellsin i direction
OCN_NY integer 0 number of ocn cellsin j direction
OS char UNSET operating system
PTS_MODE logical FALSE Points mode logicalfor single point[TRUE,FALSE]
SCRIPTSROOT char $CCSMROOT/scriptsCCSM sourcescripts directorylocation
116

Appendix D. env_case.xml variables
Name Type Default Description [ValidValues]
SHAREROOT char $CCSMROOT/models/csm_shareCCSM sourcemodels share codelocation
UTILROOT char $CCSMROOT/scripts/ccsm_utilsCCSM sourcescripts utilsdirectory location
XMLMODE char normal xml format option,expert removesextra commentsfrom env xml files[normal,expert]
117

Appendix D. env_case.xml variables
118

Appendix E. env_conf.xml variables
The following table lists all the possible environment variables that can be set in theenv_conf.xml file. Because some of these variables are dependent on the componentsselected, only a subset of these will appear in $CASEROOT. Default values, whereappropriate, are given in parentheses.
Table E-1. env_conf.xml variables
Name Type Default Description [ValidValues]
ATM_NCPL char 24 number of atmcoupling intervalsper day
BRNCH_RETAIN_CASENAMElogical FALSE allow same branchcasename asreference casename[TRUE,FALSE]
CAM_CONFIG_OPTSchar CAM configureoptions, see CAMconfigure utility fordetails
CAM_DYCORE char fv CAM dynamicalcore[eul,fv,homme]
CAM_NAMELIST_OPTSchar CAM specificnamelist settingsfor -namelistoption
CAM_NML_USE_CASEchar UNSET CAM namelistuse_case
CCSM_BGC char none BGC flag[none,CO2A,CO2B,CO2C,CO2_DMSA]
CCSM_CO2_PPMV real 379.000 CO2 ppmv
CCSM_VOC char FALSE Only used forB,E,F,I compsets: iftrue will pass VOCfields from lnd toatm [TRUE,FALSE]
CICE_CONFIG_OPTSchar CICE configureoptions, see CICEconfigure utility fordetails
CICE_MODE char prognostic cice mode[prognos-tic,prescribed,thermo_only]
119

Appendix E. env_conf.xml variables
Name Type Default Description [ValidValues]
CICE_NAMELIST_OPTSchar CICE specificnamelist settingsfor -namelistoption
CLM_BLDNML_OPTSchar Options to send toCLMbuild-namelist (seemodels/lnd/clm/bld/build-namelist -h for listof options)
CLM_CO2_TYPE char constant clm CO2 type,constant meansvalue in CLMnamelist,diagnostic orprognostic meanuse the value sentfrom theatmosphere model[con-stant,diagnostic,prognostic]
CLM_CONFIG_OPTSchar Options to send toCLMconfigure (see mod-els/lnd/clm/bld/configure-h for list ofoptions)
CLM_FORCE_COLDSTARTchar off Value of ’on’ forcesmodel to spinupfrom a cold-start(arbitrary initialconditions) [on,off]
CLM_NAMELIST_OPTSchar Namelist settingsto add to theclm_inparmnamelist Note, use’ around charactervalues, as XMLparser can’t handlequotes insidestrings. (list ofitem=valuesettings, see mod-els/lnd/clm/bld/namelist_files/namelist_definition.xml)
CLM_NML_USE_CASEchar UNSET CLM namelistuse_case (for a listseemodels/lnd/clm/bld/build-namelist -use_caselist)
120

Appendix E. env_conf.xml variables
Name Type Default Description [ValidValues]
CLM_PT1_NAME char UNSET Name of singlepoint resolutiondataset to be usedin I compset only(for a list seemodels/lnd/clm/bld/build-namelist -res list)
CLM_USRDAT_NAMEchar UNSET Data identifiername for CLMuser-createddatasets (seeQuick-start.userdatasets)
CPL_ALBAV logical false Only used for C,Gcompsets: if true,compute albedos towork with dailyavg SW down[true,false]
CPL_EPBAL char off Only used for C,Gcompsets: if ocn,ocn provides EPbalance factor forprecip [off,ocn]
DATM_CLMNCEP_YR_ALIGNinteger -999 year align(simulation yearcorresponding tostarting year) forCLM_QIAN mode
DATM_CLMNCEP_YR_ENDinteger -999 ending year to loopatmosphere forcingdata over forCLM_QIAN mode
DATM_CLMNCEP_YR_STARTinteger -999 starting year toloop atmosphereforcing data overfor CLM_QIANmode
DATM_CPL_CASE char UNSET the case name touse for cpl historyforcing data forCPLHIST3HrWxmode
DATM_CPL_YR_ALIGNinteger -999 year align(simulation yearcorresponding tostarting year) forCPLHIST3HrWxmode
121

Appendix E. env_conf.xml variables
Name Type Default Description [ValidValues]
DATM_CPL_YR_ENDinteger -999 ending year to loopdata over forCPLHIST3HrWxmode
DATM_CPL_YR_STARTinteger -999 starting year toloop data over forCPLHIST3HrWxmode
DATM_MODE char CORE2_NYF DATM mode[CORE2_NYF,CORE2_IAF,CLM_QIAN,CLM1PT,CPLHIST3HrWx]
DATM_PRESAERO char none DATM prescribedaerosol forcing[none,clim_1850,clim_2000,trans_1850-2000,rcp2.6,rcp4.5,rcp6.0,rcp8.5,pt1_pt1]
DICE_MODE char ssmi DICE mode[ssmi,ssmi_iaf]
DLND_MODE char NULL DLND mode[CPLHIST,NULL]
DLND_RUNOFF_MODEchar DIATREN_ANN_RX1DLND runoffmode [CPL-HIST,DIATREN_ANN_RX1,DIATREN_IAF_RX1,NULL]
DOCN_MODE char prescribed DOCN mode[prescribed,som]
DOCN_SSTDATA_FILENAMEchar UNSET Sets sst/ice_covfilename for amipruns, only used inF compset
DOCN_SSTDATA_YEAR_ENDinteger -999 Sets year end ofsst/ice_cov foramip runs, onlyused in F compset
DOCN_SSTDATA_YEAR_STARTinteger -999 Sets year start ofsst/ice_cov foramip runs, onlyused in F compset
GET_REFCASE logical FALSE flag forautomaticallyprestaging therefcase restartdataset[TRUE,FALSE]
GLC_GRID char gland20 Glacier model grid[gland20,gland10,gland5]
GLC_NCPL integer 1 number of glccoupling intervalsper day (integer)
122

Appendix E. env_conf.xml variables
Name Type Default Description [ValidValues]
ICE_NCPL char $ATM_NCPL number of icecoupling intervalsper day (integer)
LND_NCPL char $ATM_NCPL number of landcoupling intervalsper day (integer)
MAP_A2LF_FILE char UNSET atm to landmapping file forfluxes
MAP_A2LS_FILE char UNSET atm to landmapping file forstates
MAP_A2OF_FILE char UNSET atm to ocn fluxmapping file forfluxes (currentlyfirst orderconservative)
MAP_A2OS_FILE char UNSET atm to ocn statemapping file forstates (currentlybilinear)
MAP_L2AF_FILE char UNSET land to atmmapping file forfluxes
MAP_L2AS_FILE char UNSET land to atmmapping file forstates
MAP_O2AF_FILE char UNSET ocn to atmmapping file forfluxes (currentlyfirst orderconservative)
MAP_O2AS_FILE char UNSET ocn to atmmapping file forstates
MAP_R2O_FILE_R05char UNSET runoff (.5 degree)to ocn mapping file
MAP_R2O_FILE_R19char UNSET runoff (19 basin) toocn mapping file
MAP_R2O_FILE_RX1char UNSET runoff (1 degree) toocn mapping file
123
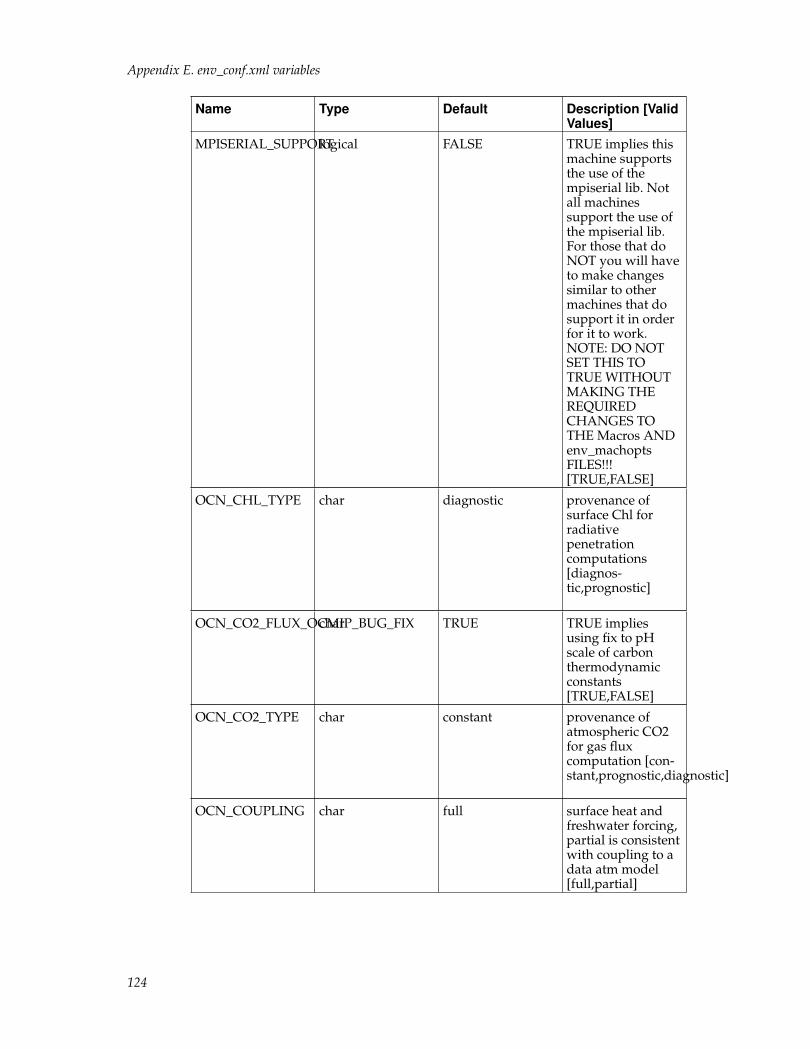
Appendix E. env_conf.xml variables
Name Type Default Description [ValidValues]
MPISERIAL_SUPPORTlogical FALSE TRUE implies thismachine supportsthe use of thempiserial lib. Notall machinessupport the use ofthe mpiserial lib.For those that doNOT you will haveto make changessimilar to othermachines that dosupport it in orderfor it to work.NOTE: DO NOTSET THIS TOTRUE WITHOUTMAKING THEREQUIREDCHANGES TOTHE Macros ANDenv_machoptsFILES!!![TRUE,FALSE]
OCN_CHL_TYPE char diagnostic provenance ofsurface Chl forradiativepenetrationcomputations[diagnos-tic,prognostic]
OCN_CO2_FLUX_OCMIP_BUG_FIXchar TRUE TRUE impliesusing fix to pHscale of carbonthermodynamicconstants[TRUE,FALSE]
OCN_CO2_TYPE char constant provenance ofatmospheric CO2for gas fluxcomputation [con-stant,prognostic,diagnostic]
OCN_COUPLING char full surface heat andfreshwater forcing,partial is consistentwith coupling to adata atm model[full,partial]
124

Appendix E. env_conf.xml variables
Name Type Default Description [ValidValues]
OCN_ICE_FORCINGchar active under ice forcing,inactive isconsistent withcoupling to a dataice model[active,inactive]
OCN_NCPL char 1 number of ocncoupling intervalsper day (integer)
OCN_TRANSIENT char unset specification oftransient forcingdatasets[unset,1850-2000]
RUN_REFCASE char case.std Reference case forhybrid or branchruns
RUN_REFDATE char 0001-01-01 Reference date forhybrid or branchruns(yyyy-mm-dd).Used to determinethe componentdataset that themodel starts from.Ignored for startupruns
RUN_STARTDATE char 0001-01-01 Run start date(yyyy-mm-dd).Only used forstartup or hybridruns Ignored forbranch runs.
RUN_TYPE char startup Run initializationtype[startup,hybrid,branch]
125

Appendix E. env_conf.xml variables
Name Type Default Description [ValidValues]
USE_MPISERIAL logical FALSE TRUE implies codeis built using thempiserial library. IfTRUE, the MPISE-RIAL_SUPPORTmust also be TRUE.FALSE (default)implies that code isbuilt with a realMPI library. If a jobuses only one MPItask (e.g.single-columnCAM and CLM),the mpiserial libmay be analternative to realmpi lib[TRUE,FALSE]
126

Appendix F. env_mach_pes.xml variables
The following table lists all the environment variables set in the env_mach_pes.xmlfile. Default values, where appropriate, are given in parentheses.
Table F-1. env_mach_pes.xml variables
Name Type Default Description [ValidValues]
BATCH_PES integer 0 pes requested atbatch runtime
CCSM_ESTCOST integer 0 2**n relative cost ofcase (DO NOTEDIT)
CCSM_PCOST integer 0 cost relative to 64pes (DO NOTEDIT)
CCSM_TCOST integer 0 2**n relative cost oftest where ERS is 1(DO NOT EDIT)
CICE_AUTO_DECOMPlogical true if false, user mustset the CICEdecomp, otherwiseconfigure sets it[true,false]
MAX_TASKS_PER_NODEinteger UNSET maximum numberof mpi tasks pernode
NTASKS_ATM char 0 number ofatmosphere tasks
NTASKS_CPL char 0 number of couplermpi tasks
NTASKS_GLC char 0 number of glc mpitasks
NTASKS_ICE char 0 number of ice mpitasks
NTASKS_LND char 0 number of landmpi tasks
NTASKS_OCN char 0 number of oceanmpi tasks
NTHRDS_ATM char 0 number ofatmospherethreads
NTHRDS_CPL char 0 number of couplermpi threads
NTHRDS_GLC char 0 number of glc mpithreads
NTHRDS_ICE char 0 number of ice mpithreads
NTHRDS_LND char 0 number of landmpi threads
127

Appendix F. env_mach_pes.xml variables
Name Type Default Description [ValidValues]
NTHRDS_OCN char 0 number of oceanmpi threads
PES_LEVEL char UNSET pes leveldetermined byautomatedinitialization (DONOT EDIT)
PES_PER_NODE char $MAX_TASKS_PER_NODEpes per node forcost scaling
POP_AUTO_DECOMPlogical true if false, user mustset the POPdecomp, otherwiseconfigure sets it[true,false]
PSTRID_ATM integer 1 stride of mpi tasksfor atm comp -currently shouldalways be set to 1[1]
PSTRID_CPL integer 1 stride of mpi tasksfor cpl comp -currently shouldalways be set to 1[1]
PSTRID_GLC integer 1 stride of mpi tasksfor glc comp -currently shouldalways be set to 1[1]
PSTRID_ICE integer 1 stride of mpi tasksfor ice comp -currently shouldalways be set to 1[1]
PSTRID_LND integer 1 stride of mpi tasksfor lnd comp -currently shouldalways be set to 1[1]
PSTRID_OCN integer 1 stride of mpi tasksfor ocn comp -currently shouldalways be set to 1[1]
ROOTPE_ATM char 0 root atm mpi task
ROOTPE_CPL char 0 root cpl mpi task
ROOTPE_GLC char 0 root glc mpi task
ROOTPE_ICE char 0 root ice mpi task
ROOTPE_LND char 0 root lnd mpi task
ROOTPE_OCN char 0 root ocn mpi task
128

Appendix F. env_mach_pes.xml variables
Name Type Default Description [ValidValues]
TOTALPES integer 0 total number of pes(derivedautomatically - DONOT EDIT)
129

Appendix F. env_mach_pes.xml variables
130

Appendix G. env_build.xml variables
The following table lists all the environment variables set in the env_build.xml file.Default values, where appropriate, are given in parentheses.
Table G-1. env_build.xml variables
Name Type Default Description [ValidValues]
BUILD_COMPLETE logical FALSE If TRUE, modelshave been builtsuccessfully. (DONOT EDIT)[TRUE,FALSE]
BUILD_STATUS integer 0 Status of priorbuild. (DO NOTEDIT)
BUILD_THREADEDlogical FALSE TRUE impliesalways buildmodel for openmpcapability IfFALSE, buildmodel withopenmp capabilityonly if THREAD isgreater than 1[TRUE,FALSE]
CICE_BLCKX integer 0 Size of cice block infirst horizdimension. Valueset by gener-ate_cice_decomp.pl(called byconfigure). Onlyexpert users shouldedit this
CICE_BLCKY integer 0 Size of cice block insecond horizdimension. Valueset by gener-ate_cice_decomp.pl(called byconfigure). Onlyexpert users shouldedit this
CICE_DECOMPTYPEchar 0 cice blockdistribution type.Value set by gener-ate_cice_decomp.pl(called byconfigure). Onlyexpert users shouldedit this
131

Appendix G. env_build.xml variables
Name Type Default Description [ValidValues]
CICE_MXBLCKS integer 0 Max number ofcice blocks perprocessor. Value setby gener-ate_cice_decomp.pl(called byconfigure). Onlyexpert users shouldedit this
COMP_INTERFACE char MCT use MCT or ESMFcomponentinterfaces[MCT,ESMF]
DEBUG logical FALSE TRUE impliesturning on run andcompile timedebugging[TRUE,FALSE]
ESMF_LIBDIR char directory ofesmf.mk inpre-built ESMFlibrary
EXEROOT char UNSET executable rootdirectory
GLC_NEC integer 0 GLC land icemodel number ofelevation classes[0,3,5,10]
GMAKE char gmake Fullname of GNUmake command(usually gmake)
GMAKE_J integer 1 Number ofprocessors forgmake
INCROOT char $EXEROOT/lib/includecase lib includedirectory
LIBROOT char $EXEROOT/lib case lib directory
OBJROOT char $EXEROOT case builddirectory
OCN_TRACER_MODULESchar iage Optional oceantracers. Anycombination of:iage cfc ecosys
PIO_CONFIG_OPTSchar --disable-mct--disable-timing
PIO configureoptions, see PIOconfigure utility fordetails
132

Appendix G. env_build.xml variables
Name Type Default Description [ValidValues]
POP_BLCKX integer 0 Size of pop block infirst horizdimension. Valuedetermined bygener-ate_pop_decomp.plwhich is called byconfigure. Onlyexpert users shouldedit this
POP_BLCKY integer 0 Size of pop block insecond horizdimension. Valuedetermined bygener-ate_pop_decomp.plwhich is called byconfigure. Onlyexpert users shouldedit this
POP_DECOMPTYPEchar 0 pop blockdistribution type.Value determinedby gener-ate_pop_decomp.plwhich is called byconfigure
POP_MXBLCKS integer 0 Max number ofpop blocks perprocessor. Valuedetermined bygener-ate_pop_decomp.plwhich is called byconfigure. Onlyexpert users shouldedit this
RUNDIR char $EXEROOT/run case run directory
SMP_BUILD char 0 smp status ofprevious build,coded string. (DONOT EDIT)
SMP_VALUE char 0 smp status ofcurrent setup,coded string (DONOT EDIT)
USE_ESMF_LIB char FALSE TRUE impliesusing the ESMFlibrary specified byESMF_LIBDIR orESMFMKFILE[TRUE,FALSE]
133

Appendix G. env_build.xml variables
134

Appendix H. env_run.xml variables
The following table lists all the xml variables set in the env_run.xml file.
Table H-1. env_run.xml variables
Name Type Default Description [ValidValues]
AOFLUX_GRID char ocn grid for atm ocnflux calc[ocn,atm,exch]
ATM_PIO_NUMTASKSinteger -1 atm pio number ofio tasks
ATM_PIO_ROOT integer -99 pio root processor
ATM_PIO_STRIDE integer -99 pio stride
ATM_PIO_TYPENAMEchar nothing pio io type
AVGHIST_DATE integer -999 yyyymmdd format,sets couplertime-averagehistory date (likeREST_DATE)
AVGHIST_N char -999 sets couplertime-averagehistory filefrequency (likeREST_N)
AVGHIST_OPTION char never sets couplertime-averagehistory filefrequency (likeREST_OPTION)
BATCHQUERY char UNSET command used toquery batch system
BATCHSUBMIT char UNSET command used tosubmit to batchsystem
BFBFLAG logical FALSE turns on bit-for-bitreproducibilitywith varying pecounts in the driverand coupler,performance willlikely be reduced[TRUE,FALSE]
BUDGETS logical FALSE logical that turnson diagnosticbudgets FALSEmeans budgets willnever be written[TRUE,FALSE]
135

Appendix H. env_run.xml variables
Name Type Default Description [ValidValues]
BUDGET_ANNUALinteger 1 output level forannual averagebudget diagnostics,written only ifBUDGETS variableis TRUE, 0=none,1=net summary,2=+detailedsurface,3=+detailed atm[0,1,2,3]
BUDGET_DAILY integer 0 output level fordaily averagebudget diagnostics,written only ifBUDGETS variableis TRUE, 0=none,1=net summary,2=+detailedsurface,3=+detailed atm[0,1,2,3]
BUDGET_INST integer 0 output level forinstantaneousbudget diagnostics,written only ifBUDGETS variableis TRUE, 0=none,1=net summary,2=+detailedsurface,3=+detailed atm[0,1,2,3]
BUDGET_LONGTERM_EOYinteger 1 output level forlongterm averagebudget diagnosticswritten at end ofyear, written only ifBUDGETS variableis TRUE, 0=none,1=net summary,2=+detailedsurface,3=+detailed atm[0,1,2,3]
136

Appendix H. env_run.xml variables
Name Type Default Description [ValidValues]
BUDGET_LONGTERM_STOPinteger 0 output level forlongterm averagebudget diagnosticswritten at end ofrun, written only ifBUDGETS variableis TRUE, 0=none,1=net summary,2=+detailedsurface,3=+detailed atm[0,1,2,3]
BUDGET_MONTHLYinteger 1 output level formonthly averagebudget diagnostics,written only ifBUDGETS variableis TRUE, 0=none,1=net summary,2=+detailedsurface,3=+detailed atm[0,1,2,3]
CALENDAR char NO_LEAP calendar type[NO_LEAP,GREGORIAN]
CASESTR char UNSET case description
CCSM_BASELINE char /UNSET standard ccsmbaselines directoryfor testing
CCSM_CPRNC char /UNSET standard locationof the cprnc tool
CCSM_REPOTAG char UNSET CCSM tag
CHECK_TIMING logical TRUE logical to diagnosemodel timing at theend of the run[TRUE,FALSE]
COMP_RUN_BARRIERSlogical FALSE if TRUE, turns oncomponent runbarrier calls in thedriver[TRUE,FALSE]
CONTINUE_RUN logical FALSE A continue runextends an existingCCSM run exactly.A setting of TRUEimplies acontinuation run[TRUE,FALSE]
CPL_PIO_NUMTASKSinteger -1 pio number of iotasks
CPL_PIO_ROOT integer -99 pio root processor
137

Appendix H. env_run.xml variables
Name Type Default Description [ValidValues]
CPL_PIO_STRIDE integer -99 pio stride
CPL_PIO_TYPENAMEchar nothing pio io type
DIN_LOC_ROOT char $DIN_LOC_ROOT_CSMDATAlocal inputdatadirectory for CCSMprestaged data
DIN_LOC_ROOT_CLMQIANchar UNSET general ccsminputdata directoryfor CLM QIANdatm forcing files
DIN_LOC_ROOT_CSMDATAchar UNSET general ccsminputdata directory
DOUT_L_HPSS_ACCNTchar 00000000 account numbercharged for longterm archival onhpss
DOUT_L_HTAR logical FALSE logical to tar uplong term archiverhistory files[TRUE,FALSE]
DOUT_L_MS logical FALSE logical to turn onlong termarchiving (ifDOUT_S is alsoTRUE)[TRUE,FALSE]
DOUT_L_MSROOT char UNSET local long termarchiving rootdirectory
DOUT_S logical TRUE logical to turn onshort termarchiving[TRUE,FALSE]
DOUT_S_ROOT char UNSET local short termarchiving rootdirectory
DOUT_S_SAVE_INT_REST_FILESlogical FALSE logical to archiveall interim restartfiles, not just thoseat end of run[TRUE,FALSE]
DRV_THREADING logical FALSE Turns oncomponent varyingthread control inthe driver[TRUE,FALSE]
EPS_AAREA real 9.0e-07 error tolerance fordifferences inatm/land areas indomain checking
138

Appendix H. env_run.xml variables
Name Type Default Description [ValidValues]
EPS_AGRID real 1.0e-12 error tolerance fordifferences inatm/land lon/latin domain checking
EPS_AMASK real 1.0e-13 error tolerance fordifferences inatm/land masks indomain checking
EPS_FRAC real 1.0e-02 error tolerance fordifferences infractions in domainchecking
EPS_OAREA real 1.0e-01 error tolerance fordifferences inocean/ice areas indomain checking
EPS_OGRID real 1.0e-02 error tolerance fordifferences inocean/ice lon/latin domain checking
EPS_OMASK real 1.0e-06 error tolerance fordifferences inocean/ice masks indomain checking
GLC_PIO_NUMTASKSinteger -1 pio number of iotasks
GLC_PIO_ROOT integer -99 pio root processor
GLC_PIO_STRIDE integer -99 pio stride
GLC_PIO_TYPENAMEchar nothing pio io type
HISTINIT logical FALSE logical to write anextra initial couplerhistory file[TRUE,FALSE]
HIST_DATE integer -999 yyyymmdd format,sets couplersnapshot historydate (likeREST_DATE)
HIST_N char -999 sets couplersnapshot historyfile frequency (likeREST_N)
HIST_OPTION char never sets couplersnapshot historyfile frequency (likeREST_OPTION)
139

Appendix H. env_run.xml variables
Name Type Default Description [ValidValues]
ICE_PIO_NUMTASKSinteger -1 pio number of iotasks
ICE_PIO_ROOT integer -99 pio root processor
ICE_PIO_STRIDE integer -99 pio stride
ICE_PIO_TYPENAMEchar nothing pio io type
INFO_DBUG integer 1 level of debugoutput,0=minimum,1=normal, 2=more,3=too much[0,1,2,3]
LND_PIO_NUMTASKSinteger -1 pio number of iotasks
LND_PIO_ROOT integer -99 pio root processor
LND_PIO_STRIDE integer -99 pio stride
LND_PIO_TYPENAMEchar nothing pio io type
LOGDIR char $CASEROOT/logs directory where logfiles should becopied in additionto archiving
OCN_PIO_NUMTASKSinteger -1 pio number of iotasks: usespio_numtasksvalue if set to -99
OCN_PIO_ROOT integer -99 pio root processor:uses pio_root valueif set to -99
OCN_PIO_STRIDE integer -99 pio stride: usespio_stride value ifset to -99
OCN_PIO_TYPENAMEchar nothing pio io type: usespio_typenamevalue if set to \
OCN_TAVG_HIFREQchar FALSE tavg output controlfor high-frequencyoutput[TRUE,FALSE]
OCN_TAVG_TRACER_BUDGETchar FALSE tavg output controlfor tracer-budgetterms[TRUE,FALSE]
140

Appendix H. env_run.xml variables
Name Type Default Description [ValidValues]
OCN_TIGHT_COUPLINGlogical FALSE if TRUE, treatsocean model likelnd/ice in couplingand removes 1coupling period lagat the cost ofconcurrency[TRUE,FALSE]
ORBITAL_MODE char fixed_year orbital modesetting[fixed_year,variable_year,fixed_parameters]
ORBITAL_YEAR integer 1990 orbital year
ORBITAL_YEAR_ALIGNinteger 1990 model yearassociated withorbital year forvarying orbitalyears
PIO_ASYNC_INTERFACElogical FALSE TRUE impliesperformasynchronous i/o[TRUE,FALSE]
PIO_DEBUG_LEVELinteger 0 pio debug level[0,1,2,3,4,5,6]
PIO_NUMTASKS integer -1 pio number of iotasks
PIO_ROOT integer 1 pio root processor
PIO_STRIDE integer 4 mpi task stridebetween io tasks
PIO_TYPENAME char netcdf pio io type: netcdf,pnetcdf, netcdf4p,netcdf4c
PTS_LAT real(1) -999.99 Points modenearest latitudes
PTS_LON real(1) -999.99 Points modenearest longitudes
REST_DATE char $STOP_DATE date in yyyymmddformat, sets modelrestart write datewithREST_OPTIONand REST_N
REST_N char $STOP_N sets model restartwrites withREST_OPTIONand REST_DATE(same options asSTOP_N)
141

Appendix H. env_run.xml variables
Name Type Default Description [ValidValues]
REST_OPTION char $STOP_OPTION sets frequency ofmodel restartwrites (sameoptions asSTOP_OPTION)with REST_N andREST_DATE
RESUBMIT integer 0 if RESUBMIT isgreater than 0, thencase willautomaticallyresubmit if thatfeature issupported in therun script
SAVE_TIMING logical FALSE logical to savetiming files inrundir[TRUE,FALSE]
SHR_MAP_DOPOLElogical TRUE invoke poleaveragingcorrections inshr_map_modweights generation[TRUE,FALSE]
START_TOD integer 0 start time-of-day inuniversal time(seconds), shouldbe between zeroand 86400
STOP_DATE integer -999 date in yyyymmddformat, sets the runlength withSTOP_OPTIONand STOP_N, canbe in addition toSTOP_OPTIONand STOP_N,negative valueimplies off
STOP_N integer 5 sets the run lengthwithSTOP_OPTIONand STOP_DATE
142

Appendix H. env_run.xml variables
Name Type Default Description [ValidValues]
STOP_OPTION char ndays sets the run lengthwith STOP_N andSTOP_DATESTOP_OPTIONalarms are:[none/never],turns option off[nstep/s] , stopsevery STOP_Nnsteps , relative tocurrent run starttime [nsecond/s] ,stops everySTOP_N nseconds,relative to currentrun start time[nminute/s] , stopsevery STOP_Nnminutes, relativeto current run starttime [nhour/s] ,stops everySTOP_N nhours ,relative to currentrun start time[nday/s] , stopsevery STOP_Nndays , relative tocurrent run starttime [nmonth/s] ,stops everySTOP_N nmonths ,relative to currentrun start time[nyear/s] , stopsevery STOP_Nnyears , relative tocurrent run starttime [date] , stopsat STOP_DATEvalue [ifdays0] ,stops at STOP_Ncalendar day valueand seconds equal0 [end] , stops atend[none,never,nsteps,nstep,nseconds,nsecond,nminutes,nminute,nhours,nhour,ndays,nday,nmonths,nmonth,nyears,nyear,date,ifdays0,end]
TIMER_LEVEL integer 4 timer output depth[1,2,3,4,5,6,7,8,9,10]
TIMING_BARRIER logical FALSE if TRUE, turns onthe timing barriercalls in the model[TRUE,FALSE]
143

Appendix H. env_run.xml variables
Name Type Default Description [ValidValues]
TPROF_DATE integer -999 yyyymmdd format,sets timing outputfile date (likeREST_DATE)
TPROF_N char -999 sets timing outputfile frequency (likeREST_N)
TPROF_OPTION char never sets timing outputfile frequency (likeREST_OPTION butrelative to run startdate)
VECT_MAP char npfix invoke vectormapping option[none,npfix,cart3d,cart3d_diag,cart3d_uvw,cart3d_uvw_diag]
144

Glossary
Branch
One of the three ways to initialize CCSM runs. CCSM runs can be started asstartup, hybrid or branch. Branch runs use the BRANCH $RUN_TYPE and therestart files from a previous run. See setting up a branch run.
case
The name of your job. This can be any string.
$CASE
The case name. But when running create_newcase, it doubles as the case direc-tory path name where build and run scripts are placed. $CASE is defined whenyou execute the create_newcase command;, and set in env_case.xml. Please seecreate a new case.
$CASEROOT
$CASEROOT - the full pathname of the root directory for case scripts(e.g. /user/$CASE). You define $CASEROOT when you execute thecreate_newcase, and is set in env_case.xml. $CASEROOT must be unique.
component
component - Each model can be run with one of several components. Examplesof components include CAM, CICE, CLM, and POP. Component names will al-ways be in all caps.
component set (compset)
Preset configuration settings for a model run. These are defined in supportedcomponent sets.
$CCSMROOT
The full pathname of the root directory of the CCSM source code. $CCSMROOTis defined when you execute the create_newcase command.
$EXEROOT
The case executable directory root. $EXEROOT is defined when you execute theconfigure command, and is set in env_build.xml.
hybrid run
A type of run. Hybrid runs use the HYBRID $RUN_TYPE and are initialized asan initial run, but use restart datasets from a previous CCSM case. Please seesetting up a hybrid run.
145

Glossary
$MACH
The supported machine name, and is defined in env_case.xml when you runthe configure command. Please see supported machines for the list of supportedmachines.
model
CCSM is comprised of five models (atm, ice, glc, lnd, ocn) and the coupler, cpl.The word model is loosely used to mean any one of the models or the coupler.
model input data
Refers to static input data for the model. CCSM4 input data are provided as partof the release via an inputdata area or data from a server.
release
A supported version of CCSM4.
restart
Refers to a set of data files and pointer files that the model generates and uses torestart a case.
$RUNDIR
The directory where the model is run, output data files are created, and logfiles are found when the job fails. This is usually $EXEROOT/run, and is setin env_build.xml by the configure command.
tag
A version of CCSM4. Note: A tag may not be supported.
146