ch 6. map reading online class 16 (14.10.20)
TRANSCRIPT

Std 10 - Information and Communications Technology
Ch 6. Map Reading - Online Class 16 (14.10.20)
1. Online maps
OpenStreetmap, Wikimapia and Google maps
2. Web address of Online maps
Wikimapia - www.wikimapia.org
OpenStreetmap - www. openstreetmap .org
Google maps - www. map.google . com
3. How to mark your house in Wikimapia
Open Wikimapia.
Click on satellite view from the wikimapia map at the top right
Enlarge the map as far as possible to locate your house clearly.
When you have located your house, right click on it and find the latitude
and longitude..
click on the Add place button.
Draw the boundary of the house by clicking the mouse.
A window will appear when you click on the Save button. Enter the data
and save.
4. Collaborative maps
Maps prepared on the basis of the informations obtained from users
Eg : OpenStreet Map, Wikimapia and Google maps
Prepared by Viswan, GHSS Pulamanthole, 9446769091
Heading

Std 10 - Information and Communications Technology
5. Geographical Information System (GIS)
The surface features of the earth and locational information are collected
in a server in the form of maps and data. GIS is a technique developed to
make necessary changes to this database, analyse them, classify them and
so on.
6. GIS softwares
Geographical Information System is a software that can record land
surface information and positional information in different layers
Important GIS softwares - Quantum GIS, GRASS, Arc GIS
Free softwares - Quantum GIS, GRASS
7. Positional information
Positional informations are the surface features of a fixed latitude and
longitude
8. Quantum GIS software
A free software came out in 2009
Its aims
• To make maps
• To display maps, modify maps, create new ones
• To analyse the data available in the geographic domain
• To display the analysis results in the form of tables or maps as
required
9. How to open QGIS
Application Education QGIS Desktop
10. How to make the comprehensive map of a panchayath
First add an outline map of the Panchayath to the application
It should be subjected to geo-referencing (To correct Latitude and
longitude information)
Each fact is included as layers in the form of object
Prepared by Viswan, GHSS Pulamanthole, 9446769091

Std 10 - Information and Communications Technology
11. How to include the map
Open QGIS
Project Open Qgis projects
Panchayath projects Open
Panchayat.qgs
You can observe the changes by clicking on the
check box next to each layer in the left layer panel in the included
panchayath map.
12. How to see the attributes of a layer
Select the layer.
Rt click open attribute table OR
13. Attributes
Data of a Positional information
Eg : River – a positional information, Its attributes- Drying, non drying
14. To include new layer
► From the menu open layer create layer new
shape file layer
► In the window that opens, select Layer Type
Different layer types
House, Well - Point
River, Road - Line
Pond, Lakes - Polygon
► In the place New field, add the attributes one by
one. Eg: owner, depth, expense, etc
► Define the type of each attribute (text, number, etc.)
► Further add each Field by clicking the button Add
to fields list.
Prepared by Viswan, GHSS Pulamanthole, 9446769091
Std 10 - Information and Communications Technology
► Click OK, give suitable name in the Name of the opened window and
then Save
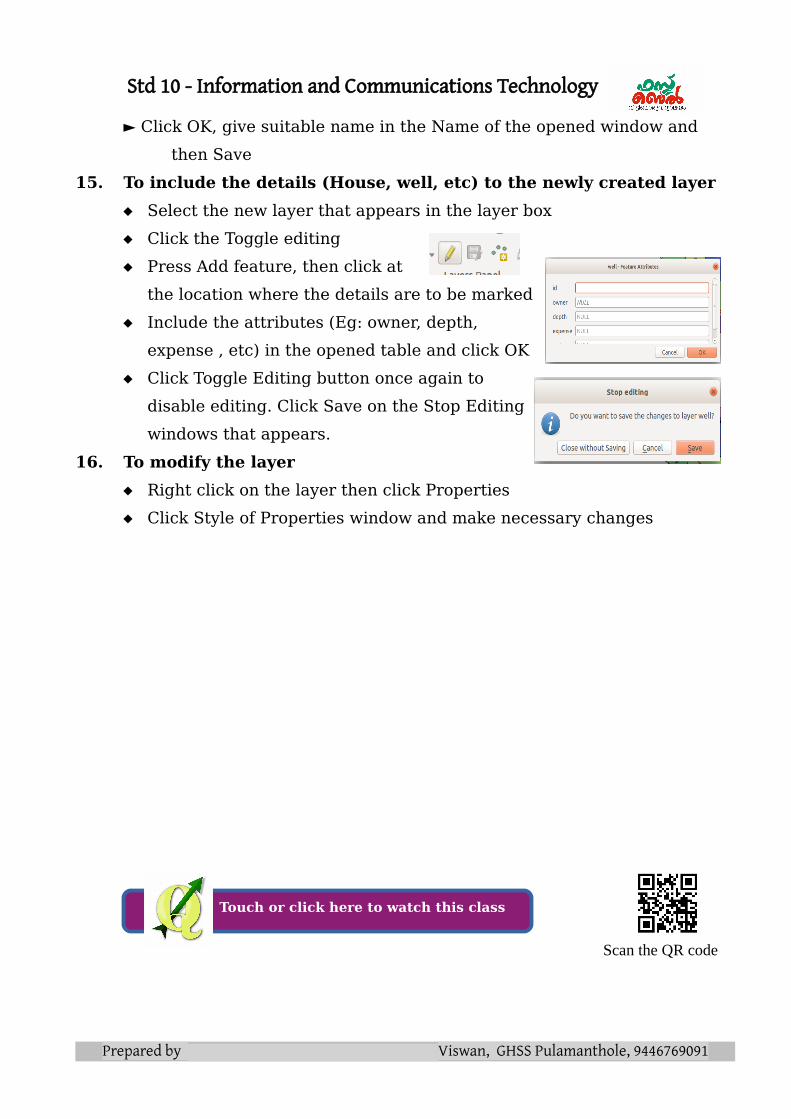
15. To include the details (House, well, etc) to the newly created layer
Select the new layer that appears in the layer box
Click the Toggle editing
Press Add feature, then click at
the location where the details are to be marked
Include the attributes (Eg: owner, depth,
expense , etc) in the opened table and click OK
Click Toggle Editing button once again to
disable editing. Click Save on the Stop Editing
windows that appears.
16. To modify the layer
Right click on the layer then click Properties
Click Style of Properties window and make necessary changes
https://youtu.be/joaNxLBT8q0
Prepared by Viswan, GHSS Pulamanthole, 9446769091
Scan the QR code
Touch or click here to watch this class