chainsaw manual
TRANSCRIPT

®
®
IMPORTANT: Read and understand this manual before assembling oroperating this chain saw. Improper use of saw can cause severeinjury. Keep this manual for future reference.
MODELSLNT-2: 076728J, 100089-06, & 099178HEL-1, EL-1 Fast SharpEL-7: 075762J, 098031J, 099039J, 100015,100089-01, 100089-04, 100089-05, & 100089-07EL-7 Fast Sharp: 076702JPole Saw: 104316-01Pole Saw Assembly: 104317
ELECTRIC CHAIN SAWOWNER’S MANUAL
®
®
2 097017
ELECTRIC CHAIN SAW
®
SAFETYWARNINGS
BEFORE OPERATING SAW1. Read and understand this owner’s
manual before operating chain saw.
2. Watch what you are doing. Use com-mon sense. Do not operate saw whenyou are tired.
3. Use chain saw for cutting wood only.Do not use chain saw for purpose notintended. Do not use for cutting plas-tic, masonry, etc.
4. Only well-instructed adults should op-erate chain saw. Never allow childrento operate chain saw.
5. Use only electrical voltage noted onmodel plate of chain saw.
6. Use only extension cords marked foroutdoor use. See page 8 for extensioncord requirements.
7. Do not operate chain saw• while under the influence of alcohol,
medication, or drugs• in rain or in damp or wet areas• where highly flammable liquids or
gases are present• if saw is damaged, adjusted wrong,
or not fully and securely assembled• if trigger does not turn saw on and off.
Chain must stop moving when yourelease trigger. Have faulty switchreplaced by authorized service center.
• while in a hurry• while in tree or on a ladder unless
trained to do so
8. Wear snug-fitting clothes when oper-ating chain saw. Do not wear looseclothing or jewelry. They can get caughtin moving saw chain.
Make certain you read and un-derstand all Safety Warnings onpages 2 and 3. Improper use ofthis chain saw can cause severeinjury or death from fire, electri-cal shock, body contact withmoving chain, or falling wood.
9. Wear the following safety gear whenoperating chain saw.• heavy-duty gloves (wear rubber
gloves when working outdoors)• steel-toed safety footwear with non-
skid soles• eye protection such as safety glasses,
goggles, or face screen• safety hard hat• ear mufflers or ear plugs• hair covering to contain long hair• face or dust mask (if working in dusty
areas)
10. Before cutting, always provide thefollowing:• clear work area• secure footing• planned retreat path from falling tree
11. Inspect tree before cutting down. Makesure there are no dead limbs or branchesthat may fall on you.
12. To reduce the risk of electric shock, thissaw has a polarized plug (one blade iswider than the other). This plug will fitin a polarized outlet only one way. Ifthe plug does not fit fully in the outletof your extension cord, reverse theplug. If it still does not fit, a polarizedextension cord will be necessary. Donot change the plug in any way.
WHILE OPERATING SAW1. Stay alert. Use common sense while
operating chain saw.
2. Keep work area clean. Cluttered areasinvite injuries.
3. Be aware of extension cord while op-erating chain saw. Be careful not to tripover cord. Keep cord away from chainand operator at all times.
4. Keep children, animals, and bystand-ers away from chain saw and extensioncord. Only chain saw user should be inwork area.
5. Do not cut down a tree unless you aretrained or have expert help.
6. If two or more persons perform buck-ing and felling operations at the sametime, provide plenty of distance betweenoperations. Provide distance of at leasttwice the height of tree being felled.
7. Secure wood you are cutting by usingclamps or chocks.
8. Grip chain saw firmly with both hands.Never operate chain saw with one hand.Never use hand guard as handle.
9. Keep finger off trigger until ready tomake cut.
10. Before starting chain saw, make surechain is not touching anything.
11. To guard against electrical shock, avoidbody contact with grounded objectssuch as pipes, fences, and metal posts.
12. Keep all parts of body away from chainwhen saw is running.
13. Do not force chain saw while cutting.Apply light pressure. It will do the jobbetter and safer at the rate for which itwas intended.
14. Cut small brush and saplings with ex-treme care. Slender material may catchin chain and be whipped toward you.This could also pull you off balance.
15. When cutting limb or tree trunk that isunder tension, use extreme caution. Bealert for wood springing back. Whenwood tension is released, limb couldspring back and strike operator caus-ing severe injury or death.
16. Carry chain saw from one place to an-other• with saw stopped and unplugged• by holding front handle (never use
hand guard as handle)• with finger off trigger• with guide bar and chain to rear
3097017
OWNER’S MANUAL
Kickback Safety Devices OnThis Saw
This saw has a low-kickback chain andreduced kickback guide bar. Both itemsreduce the chance of kickback. Kickbackcan still occur with this saw.
Properly install front hand guard. This itemcan reduce injuries from kickback. Followassembly instructions on page 6. Do notremove front hand guard. Do not replacefront hand guard with substitute.
The following steps will reduce the risk ofkickback.
• Use both hands to grip saw while saw isrunning. Use firm grip. Thumbs andfingers must wrap around saw handles.
• Keep all safety items in place on saw.Make sure they work properly.
• Do not overreach or cut above shoulderheight.
• Keep solid footing and balance at alltimes
• Stand slightly to left side of saw. Thiskeeps your body from being in direct linewith chain.
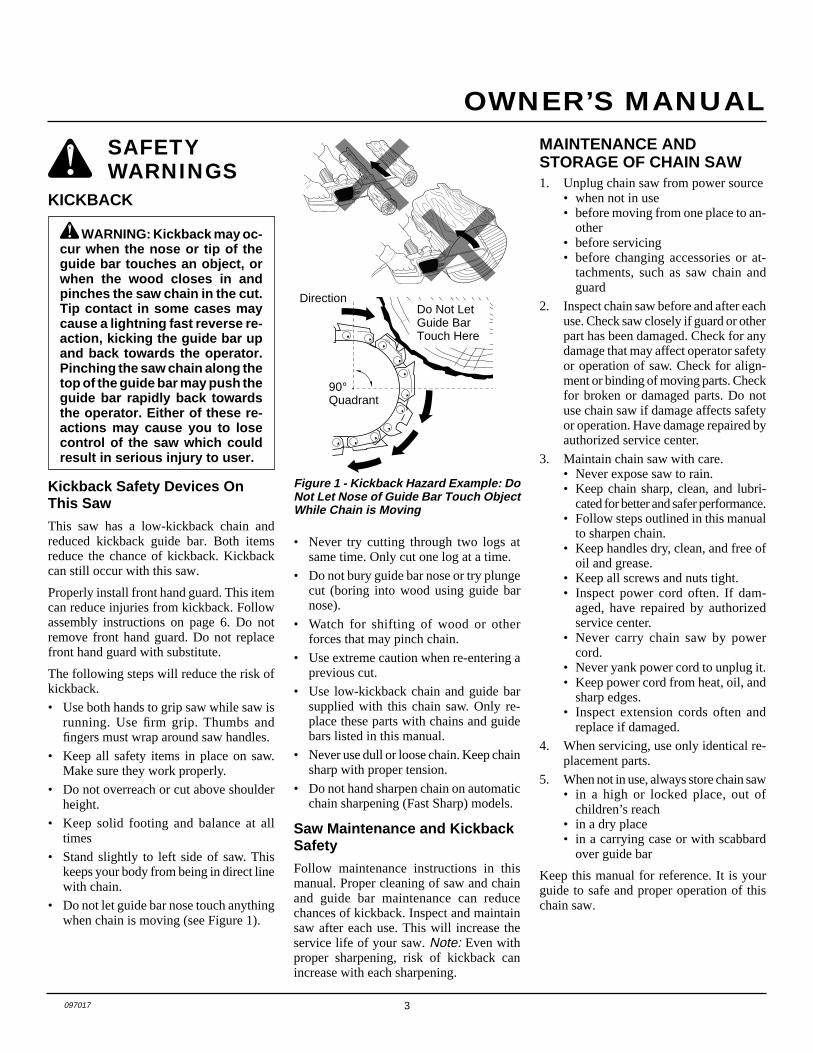
• Do not let guide bar nose touch anythingwhen chain is moving (see Figure 1).
Direction
90°Quadrant
Figure 1 - Kickback Hazard Example: DoNot Let Nose of Guide Bar Touch ObjectWhile Chain is Moving
Do Not LetGuide BarTouch Here
MAINTENANCE ANDSTORAGE OF CHAIN SAW1. Unplug chain saw from power source
• when not in use• before moving from one place to an-
other• before servicing• before changing accessories or at-
tachments, such as saw chain andguard
2. Inspect chain saw before and after eachuse. Check saw closely if guard or otherpart has been damaged. Check for anydamage that may affect operator safetyor operation of saw. Check for align-ment or binding of moving parts. Checkfor broken or damaged parts. Do notuse chain saw if damage affects safetyor operation. Have damage repaired byauthorized service center.
3. Maintain chain saw with care.• Never expose saw to rain.• Keep chain sharp, clean, and lubri-
cated for better and safer performance.• Follow steps outlined in this manual
to sharpen chain.• Keep handles dry, clean, and free of
oil and grease.• Keep all screws and nuts tight.• Inspect power cord often. If dam-
aged, have repaired by authorizedservice center.
• Never carry chain saw by powercord.
• Never yank power cord to unplug it.• Keep power cord from heat, oil, and
sharp edges.• Inspect extension cords often and
replace if damaged.
4. When servicing, use only identical re-placement parts.
5. When not in use, always store chain saw• in a high or locked place, out of
children’s reach• in a dry place• in a carrying case or with scabbard
over guide bar
Keep this manual for reference. It is yourguide to safe and proper operation of thischain saw.
• Never try cutting through two logs atsame time. Only cut one log at a time.
• Do not bury guide bar nose or try plungecut (boring into wood using guide barnose).
• Watch for shifting of wood or otherforces that may pinch chain.
• Use extreme caution when re-entering aprevious cut.
• Use low-kickback chain and guide barsupplied with this chain saw. Only re-place these parts with chains and guidebars listed in this manual.
• Never use dull or loose chain. Keep chainsharp with proper tension.
• Do not hand sharpen chain on automaticchain sharpening (Fast Sharp) models.
Saw Maintenance and KickbackSafety
Follow maintenance instructions in thismanual. Proper cleaning of saw and chainand guide bar maintenance can reducechances of kickback. Inspect and maintainsaw after each use. This will increase theservice life of your saw. Note: Even withproper sharpening, risk of kickback canincrease with each sharpening.
WARNING: Kickback may oc-cur when the nose or tip of theguide bar touches an object, orwhen the wood closes in andpinches the saw chain in the cut.Tip contact in some cases maycause a lightning fast reverse re-action, kicking the guide bar upand back towards the operator.Pinching the saw chain along thetop of the guide bar may push theguide bar rapidly back towardsthe operator. Either of these re-actions may cause you to losecontrol of the saw which couldresult in serious injury to user.
KICKBACK
SAFETYWARNINGS
4 097017
ELECTRIC CHAIN SAW
®
CHAIN SAW NAMESAND TERMSBucking Process of cutting a felled tree orlog into lengths.
Felling Process of cutting down a tree.
Felling Cut Final cut when felling a tree.Make this cut on opposite side of tree fromnotching cut.
Front Handle Located at front of saw body.
Front Hand Guard Shield between fronthandle and guide bar. Protects left handwhile using saw.
Guide Bar Metal bar that extends from sawbody. The guide bar supports and guides chain.
Guide Bar Nose Tip or end of guide bar.
Kickback Quick backward and upwardmotion of guide bar. Kickback may occurwhen tip of guide bar touches an objectwhile chain is moving. The guide bar willkick up and back towards operator.
Limbing Process of cutting limb(s) from afelled tree.
Low-Kickback Chain Chain that re-duces chance of kickback as required byANSI B175.1.
Normal Cutting Position Stance usedwhile making bucking and felling cuts.
Notching Cut Notch cut in tree that di-rects fall of tree.
Oiler Control System for oiling guide barand chain.
Power Head Chain saw without chain andguide bar. Also known as saw body.
Pushback (Kickback, Pinch) Rapidpushback of chain saw. Pushback may oc-cur if chain along top of guide bar is pinched,caught, or contacts a foreign object.
Rear Handle Handle located at rear of sawbody.
Reduced Kickback Guide Bar Guidebar that reduces chance of kickback.
Replacement Chain Chain that com-plies with ANSI B175.1 when used with aspecific saw. It may not meet ANSI require-ments when used with other saws.
Saw Chain (Chain) Loop of chain havingcutting teeth for cutting wood. The motordrives chain. The guide bar supports chain.
Spiked Bumper (Spike) Pointed teeth atfront of saw body beside guide bar. Keepspiked bumper in contact with wood whenfelling or bucking. It helps maintain posi-tion of saw while cutting.
Sprocket Toothed wheel that drives chain.
Switch Device that completes or interruptselectrical circuit to motor of saw.
Switch Linkage This device connectsswitch to trigger. It moves switch when yousqueeze trigger.
Switch Lockout Device that reducesaccidental starting of saw.
Trigger Device that turns saw on and off.Squeezing trigger turns saw on.
Releasing trigger turns saw off.
Trimming (Pruning) Process of cuttinglimb(s) from a living tree.
Undercut An upward cut from undersideof log or limb. This is done while in normalcutting position and cutting with top ofguide bar.
5097017
OWNER’S MANUAL
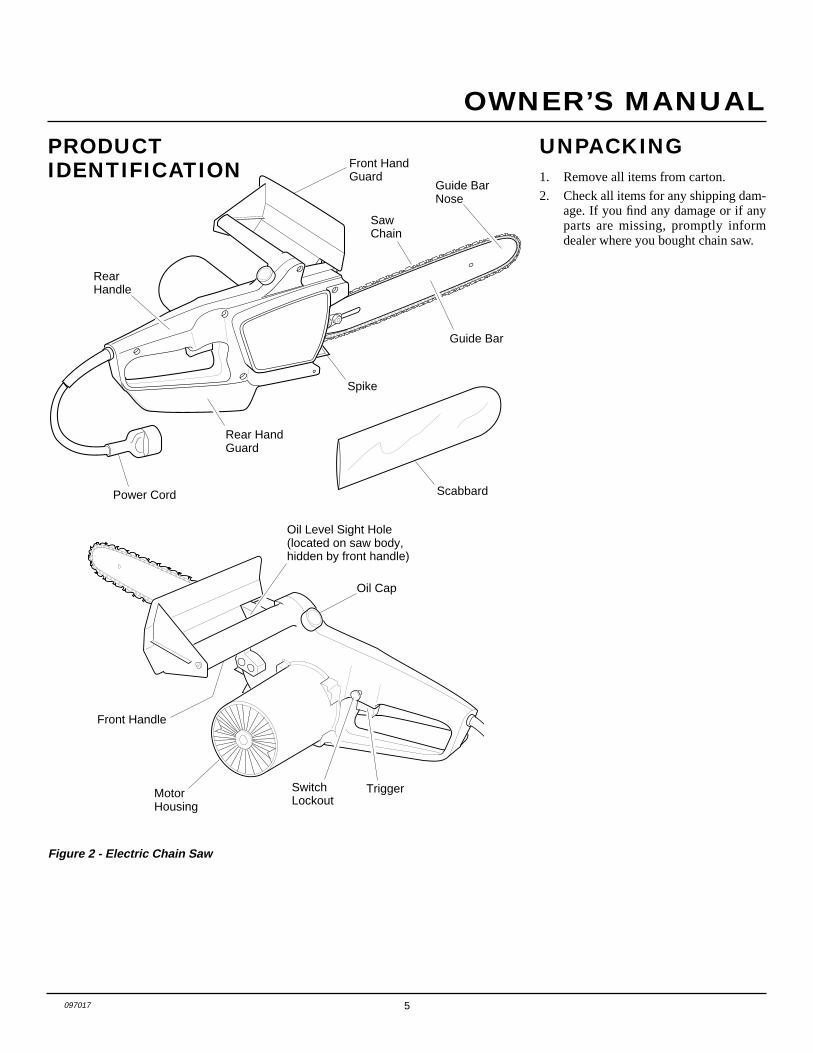
Power Cord
Rear HandGuard
RearHandle
Front HandGuard
Guide Bar
Spike
SawChain
Guide BarNose
Scabbard
Oil Cap
TriggerSwitchLockout
MotorHousing
Figure 2 - Electric Chain Saw
Oil Level Sight Hole(located on saw body,hidden by front handle)
Front Handle
PRODUCTIDENTIFICATION
UNPACKING1. Remove all items from carton.
2. Check all items for any shipping dam-age. If you find any damage or if anyparts are missing, promptly informdealer where you bought chain saw.
6 097017
ELECTRIC CHAIN SAW
®
MountingStand-Outs
Guide BarBolts
Guide BarNuts
AdjustingHole
GuideBar
TappingScrew
SawChain
CuttingEdge
CuttingEdge
TowardsGuideBar Nose
Front HandGuard
DriveSprocket
Figure 3 - Assembling Guide Bar, Chain, and Hand Guard
AdjustingPlate
AdjustingScrew
SprocketSupport
Figure 4 - Part Locations For Assembling Guide Bar
AdjustingBlock
ASSEMBLY
The plastic hardware bag should include:
• two guide bar bolts
• two guide bar nuts
• one Phillips-head tapping screw
• automatic chain sharpener (Fast Sharpmodels only)
1. Lay chain out flat.
2. Install front hand guard onto saw body.Do this by pressing two mounting stand-outs on hand guard into hex-shapedholes in saw body (see Figure 3).
3 Insert tapping screw through handguard and into saw handle. Tightenscrew firmly.
4. Turn adjusting screw counterclockwise(see Figure 4). Continue to turn adjust-ing screw until adjusting block is to rearof adjusting plate.
5. Install guide bar onto saw body. Placerear of guide bar between adjustingplate and sprocket support.
IMPORTANT: Make sure to insert ad-justing block into oval adjusting holeon guide bar.
6. Line up holes on sprocket support withcenter slot on guide bar and holes insaw body.
7. Insert guide bar bolts through fronthand guard, saw body, center slot ofguide bar, and sprocket support. Attachguide bar nuts to guide bar bolts.
IMPORTANT: Tighten guide bar nutsfinger tight only. Make sure adjust-ing block is in oval adjusting hole onguide bar.
8. Place chain around drive sprocket, thenalong top groove of guide bar andaround guide bar nose. Note: Makesure cutting edges of chain are facingthe right direction. Position chain socutting edges on top of guide bar faceguide bar nose (see Figure 3).
Note: Some models are pre assembled. As-sembly is not needed on these models.
See Saw Chain Tension Adjustment, page 7.
WARNING: Cutting edges onchain are sharp. Use protectivegloves when handling chain.
IMPORTANT: Do not clamp chainsaw in vise during assembly.
CAUTION: Do not place chainon saw backwards. If chain isbackwards, saw will vibrate badlyand will not cut.
9. Adjust saw chain tension. Follow stepsunder Saw Chain Tension Adjustment,page 7.

7097017
OWNER’S MANUAL
PUSHTOSHARPEN
INSTALLING AUTOMATICCHAIN SHARPENER(Fast Sharp Models Only)1. Screw automatic chain sharpener into
threaded hole.
2. Continue turning automatic chainsharpener until you hear five (5) clicks.
AutomaticChainSharpener
Figure 5 - Automatic Chain Sharpener(Fast Sharp Models Only)
ASSEMBLYContinued
Note: For pre assembled models, the sawchain tension is properly set at factory. Anew chain will stretch. Check new chainafter first few minutes of operation. Allowchain to cool down. Follow steps below toreadjust saw chain tension.
1. Before adjusting chain, make sure guidebar nuts are only finger tight (see Figure3, page 6). Also make sure adjustingblock is in oval adjusting hole on guidebar (see Figures 3 and 4, page 6).
2. Turn adjusting screw clockwise untilall slack is out of chain (see Figure 6).Note: There should be no gap betweenside links of chain and bottom of guidebar (see Figure 7).
3. Wearing protective gloves, move chainaround guide bar. Chain should movefreely. If chain does not move freely,loosen chain by turning adjusting screwcounterclockwise.
4. After chain tension is correct, tightenguide bar nuts firmly. If not, guide barwill move and loosen chain tension.This will increase the risk of kickback.This can also damage saw. Note: A newchain will stretch. Check new chainafter first few minutes of operation.Allow chain to cool down. Readjustchain tension.
SAW CHAINTENSIONADJUSTMENT
WARNING: Unplug chain sawfrom power source before adjust-ing saw chain tension.
WARNING: Cutting edges onchain are sharp. Use protectivegloves when handling chain.
WARNING: Maintain properchain tension always. A loosechain will increase the risk ofkickback. A loose chain may jumpout of guide bar groove. This mayinjure operator and damagechain. A loose chain will causechain, guide bar, and sprocket towear rapidly.
Figure 6 - Turning Adjusting Screw
Guide Bar
CorrectTension
Guide Bar
Gap
IncorrectTension
Guide BarNuts
Figure 7 - Saw Chain Adjustment
1. Remove oil cap.
2. Fill oil tank with SAE #30 motor oil.Note: For temperatures below 30°F, useSAE #10 oil. For temperatures above75°F, use SAE #40 oil.
3. Replace oil cap at once. Tighten oil capfirmly for good seal. This will avoid oilseepage from tank.
4. Wipe off excess oil.
Note: It is normal for oil to seep when sawis not in use. Empty oil tank after each use toprevent seepage.
FILLING OIL TANK
8 097017
ELECTRIC CHAIN SAW
®
CUTTING WITH THE CHAINSAW1. Connect saw to extension cord. Con-
nect extension cord to power supply.
2. Make sure section of log to be cut isnot laying on ground. This will keepchain from touching ground as it cutsthrough log. Touching ground withmoving chain will dull chain.
3. Use both hands to grip saw. Always useleft hand to grip front handle and righthand to grip rear handle. Use firm grip.Thumbs and fingers must wrap aroundsaw handles (see Figure 10).
4. Make sure your footing is firm. Keepfeet apart. Divide your weight evenlyon both feet.
SwitchLockout
Trigger
Figure 10 - Switch Lockout and TriggerLocation
OPERATING CHAINSAW
EXTENSION CORDSUse proper extension cords with this saw.Use only extension cords marked for out-door use. The cord must be marked withsuffix W or W-A following the cord typedesignation. Example: SJTW-A or SJTW.
Use proper sized cord with this saw. Cordmust be heavy enough to carry currentneeded. An undersized cord will cause volt-age drop at saw. Saw will lose power andoverheat. Follow cord size requirementslisted below.
Cord AWG CordLength Size
25 feet 1650 feet 16100 feet 14150 feet 12
Keep cord away from cutting area. Makesure cord does not catch on branches or logsduring cutting. Inspect cords often. Replacedamaged cords.
The extension cord may come undone fromthe power cord during use. To avoid this,make a knot with the two cords as shown inFigure 8 below.
ExtensionCord
Chain SawPower Cord
Figure 8 - Tying Extension Cord andPower Cord in Knot
OILING CHAINAlways check oil level before using saw. Tooil chain, press oil cap. Do not attempt tooperate the oiler while cutting with the saw.Oil will feed onto guide bar and chain. Pressoil cap at least once before each cut. Check oillevel often by looking at oil sight level hole.Oil sight level hole is on left side of saw,between front handle and front hand guard.
WARNING: Read and under-stand this owner’s manual beforeoperating this saw. Make certainyou read and understand all SafetyWarnings , pages 2 and 3. Improperuse of this chain saw can causesevere injury or death from fire,electrical shock, or body contactwith moving chain, or falling wood.
Figure 9 - Pressing Oil Cap to Oil Chain
5. When ready to make a cut, press inswitch lockout with right thumb andsqueeze trigger (see Figure 10). Thiswill turn saw on. Releasing trigger willturn saw off. Make sure saw is runningat full speed before starting a cut.
6. When starting a cut, place movingchain against wood. Hold saw firmlyin place to avoid possible bouncing orskating (sideways movement) of saw.
7. Guide saw using light pressure. Do notforce saw. The motor will overload andcan burn out. It will do the job better andsafer at the rate for which it was intended.
8. Remove saw from a cut with saw run-ning at full speed. Stop saw by releas-ing trigger. Make sure chain hasstopped before setting saw down.
9. Practice until you can maintain a steady,even cutting rate.
9097017
OWNER’S MANUAL
Figure 12 - Felling A Tree
Directionof Fall
2"1st Cut -LowerNotch Cut
2nd Cut -UpperNotch Cut
Hinge
2Inches
3rd Cut -Felling Cut
WARNING: Do not cut all theway through tree. Leave abouttwo inches of tree diameter un-cut directly behind felling notch(see Figure 12). This uncut por-tion acts as a hinge. The hingehelps keep tree from twisting andfalling in wrong direction.
WARNING: Be alert for fallingoverhead limbs. Watch your foot-ing while exiting area.
Felling is the process of cutting down a tree.Make sure your footing is firm. Keep feetapart. Divide your weight evenly on bothfeet. Follow directions below to fell a tree.
Before Felling a Tree1. Before felling, inspect tree. Make sure
there are no dead limbs or branches thatmay fall on you. Study natural lean oftree, location of larger branches, andwind direction. This will help you judgewhich way tree will fall.
2. Clear work area around tree.
3. Plan and clear a retreat path before fell-ing. Make retreat path opposite toplanned direction of fall of tree and at45° angle (see Figure 11).
4. Remove dirt, stones, loose bark, nails,staples, and wire from tree where youwill make felling cuts.
5. Stay on uphill side when felling tree.Tree could roll or slide downhill afterfalling.
WARNING:• Avoid kickback. Kickback can
result in severe injury or death.See Kickback , page 3 to avoidrisk of kickback.
• Do not fell a tree without ampleskill or expert help.
• Keep children, animals, andbystanders away from areawhen felling a tree.
• If two or more persons performbucking and felling operations
WARNING: When felling atree, be aware of your surround-ings. Do not endanger any per-son, strike utility lines, or causeproperty damage. If tree strikesutility lines, contact utility com-pany at once.
Figure 11 - Retreat Path From Tree
Directionof Fall
RetreatPath
RetreatPath
45°
Tree
FELLING A TREE(Cutting Down a Tree)
Felling ProcedureA) Felling Notch
A properly placed felling notch will deter-mine direction tree will fall. Place fellingnotch on side of tree in direction you wanttree to fall (see Figure 12). Follow direc-tions below to create a felling notch.
1. Make lower notch cut as close toground as possible. Hold saw so guidebar is horizontal. Cut 1/3 the diameterof tree trunk (see Figure 12). Note: Al-ways make this horizontal lower notchcut first. If you make this cut second,tree can pinch chain or guide bar.
2. Start upper notch cut the same distanceabove first cut as first cut is deep.
Example: If lower notch cut is eightinches deep, start upper notch cut eightinches above it. Cut downward at 45°angle. The upper notch cut should meetend of lower notch cut (see Figure 12).
3. Remove tree trunk wedge created bynotching cuts.
B) Felling Cut1. Make felling cut two inches higher than
lower notch cut and on opposite sideof tree (see Figure 12). Keep felling cutparallel to lower notch cut.
2. Cut towards notch.
3. As felling cut nears hinge, tree shouldbegin to fall. Note: If needed, drivewedges into felling cut to control di-rection of fall. If tree settles back andpinches chain, drive wedges into fell-ing cut to remove saw. Only use wedgesmade of wood, plastic, or aluminum.Never use wedge made of steel. Thiscould cause kickback and damage tochain.
4. When tree begins to fall, quickly• remove saw from felling cut• release trigger to turn saw off• put saw down• exit area using retreat path
Continued
OPERATING CHAINSAWContinued
10 097017
ELECTRIC CHAIN SAW
®
BUCKING A LOG
Figure 14 - Bucking Log With EntireLength On Ground
WARNING: Avoid kickback.Kickback can result in severe in-jury or death. See Kickback, page3 to avoid risk of kickback.
WARNING:• If on slope, make sure log will
not roll down hill. Secure logby using wooden stakes. Drivewooden stakes into ground ondownhill side of log. Stand onuphill side of log while cutting.Log may roll after cutting.
• Never try cutting through twologs at same time. This couldincrease the risk of kickback.
• While cutting log, never holdlog with your hand, leg, or foot.
• While cutting log, never allowanother person to hold log.
• Turn off and unplug saw be-fore moving from one place toanother.
Bucking a log is cutting a log into sections.Make sure your footing is firm. Keep feetapart. Divide your weight evenly on both feet.When possible, raise log or section off ground.Do this by using limbs, logs, chocks, etc.
When cutting through log, maintain controlby reducing cutting pressure near end of cut.Do not relax your grip on chain saw handles.Do not let moving chain touch ground.Ground will dull moving chain. After cut-ting through log, release trigger to turn sawoff before moving saw.
Follow directions below to buck a log.
LIMBING A TREE
Figure 13 - Limbing A Tree
WARNING: When cutting limbthat is under tension, use extremecaution. Be alert for wood spring-ing back. When wood tension isreleased, limb could spring backand strike operator causing se-vere injury or death.
WARNING: Avoid kickback.Kickback can result in severe in-jury or death. See Kickback, page3 to avoid risk of kickback.
Limbing is removing branches from a fallentree. Make sure your footing is firm. Keepfeet apart. Divide your weight evenly onboth feet. Do not remove larger limbs undertree that support log off ground. Removeeach limb with one cut (see Figure 13).Clear cut limbs from work area often. Thiswill help maintain a safe work area.
Make sure you start your cut where limbwill not pinch saw during cutting. To avoidpinching, start cut on freely hanging limbsfrom above limb. Start cut on limbs undertension from under limb. If pinch occurs,turn saw off, lift limb, and remove saw.
Entire Length Of Log OnGroundCut log from top (see Figure 14).
Figure 15 - Bucking Log When Log IsSupported On One End
1st Cut
2nd Cut
OPERATING CHAINSAWContinued
Log Supported On One End1. Make first cut on underside of log (see
Figure 15). Use top of guide bar tomake this cut. Cut 1/3 through diam-eter of log. This cut will keep sectionfrom splintering when cut.
2. Make second cut directly above firstcut. Cut down to meet first cut. Thiscut will keep log from pinching guidebar and chain.
11097017
OWNER’S MANUAL
1st Cut
Figure 16 - Bucking Log When Log IsSupported On Both Ends
2nd Cut
TRIMMING A TREE (Pruning)
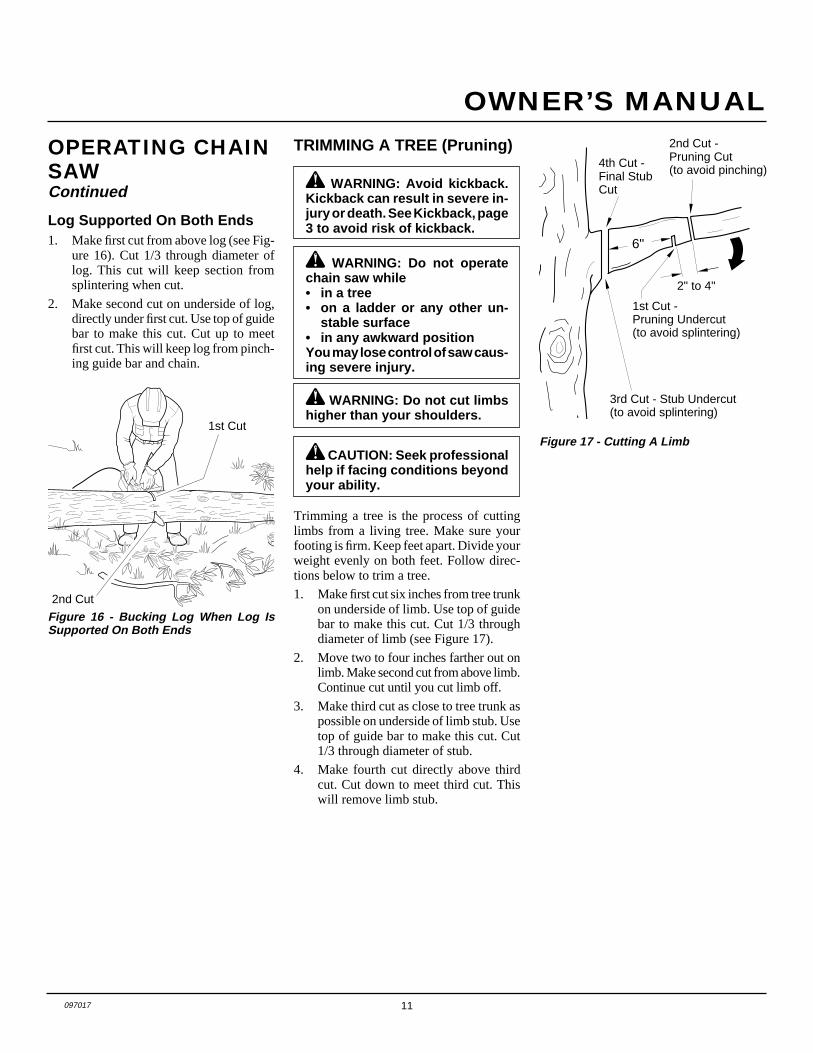
Figure 17 - Cutting A Limb
WARNING: Avoid kickback.Kickback can result in severe in-jury or death. See Kickback, page3 to avoid risk of kickback.
WARNING: Do not operatechain saw while• in a tree• on a ladder or any other un-
stable surface• in any awkward positionYou may lose control of saw caus-ing severe injury.
WARNING: Do not cut limbshigher than your shoulders.
CAUTION: Seek professionalhelp if facing conditions beyondyour ability.
Trimming a tree is the process of cuttinglimbs from a living tree. Make sure yourfooting is firm. Keep feet apart. Divide yourweight evenly on both feet. Follow direc-tions below to trim a tree.
1. Make first cut six inches from tree trunkon underside of limb. Use top of guidebar to make this cut. Cut 1/3 throughdiameter of limb (see Figure 17).
2. Move two to four inches farther out onlimb. Make second cut from above limb.Continue cut until you cut limb off.
3. Make third cut as close to tree trunk aspossible on underside of limb stub. Usetop of guide bar to make this cut. Cut1/3 through diameter of stub.
4. Make fourth cut directly above thirdcut. Cut down to meet third cut. Thiswill remove limb stub.
2" to 4"
6"
1st Cut -Pruning Undercut(to avoid splintering)
3rd Cut - Stub Undercut(to avoid splintering)
2nd Cut -Pruning Cut(to avoid pinching)
4th Cut -Final StubCut
Log Supported On Both Ends1. Make first cut from above log (see Fig-
ure 16). Cut 1/3 through diameter oflog. This cut will keep section fromsplintering when cut.
2. Make second cut on underside of log,directly under first cut. Use top of guidebar to make this cut. Cut up to meetfirst cut. This will keep log from pinch-ing guide bar and chain.
OPERATING CHAINSAWContinued
12 097017
ELECTRIC CHAIN SAW
®
CLEANING SAW BODY
CLEANING ANDMAINTENANCE
Guide BarWith Uneven
Wear
Figure 18 - Guide Bar Cross Section Show-ing Uneven Bar Wear
Guide BarGroove
Guide Bar
NOTICE: Below are instructionsfor servicing your chain saw. Anyservicing not mentioned belowshould be done by an authorizedservice center.
WARNING: Unplug chain sawfrom power source before servic-ing. Severe injury or death couldoccur from electrical shock orbody contact with moving chain.
WARNING: Cutting edges onchain are sharp. Use protectivegloves when handling chain.
WARNING: When cleaningsaw body,• do not submerge saw in any
liquids• do not use products that con-
tain ammonia, chlorine, orabrasives
• do not use chlorinated clean-ing solvents, carbon tetrachlo-ride, kerosene, or gasoline
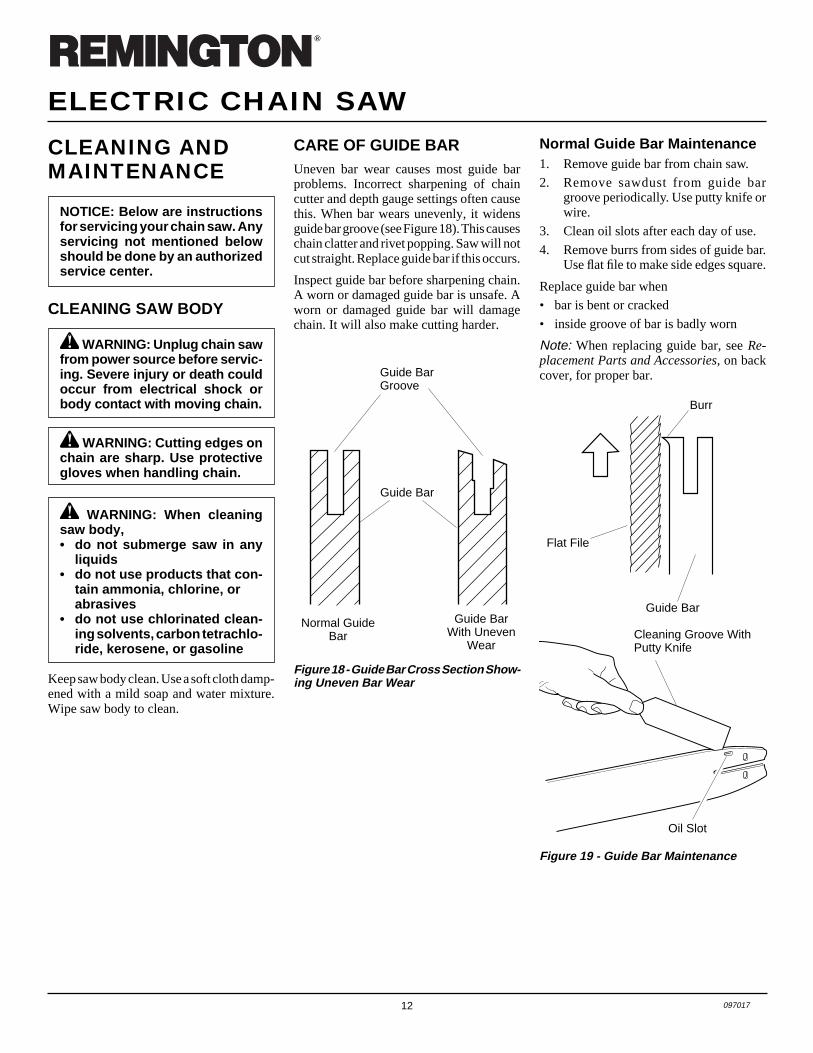
CARE OF GUIDE BARUneven bar wear causes most guide barproblems. Incorrect sharpening of chaincutter and depth gauge settings often causethis. When bar wears unevenly, it widensguide bar groove (see Figure 18). This causeschain clatter and rivet popping. Saw will notcut straight. Replace guide bar if this occurs.
Inspect guide bar before sharpening chain.A worn or damaged guide bar is unsafe. Aworn or damaged guide bar will damagechain. It will also make cutting harder.
Keep saw body clean. Use a soft cloth damp-ened with a mild soap and water mixture.Wipe saw body to clean.
Normal GuideBar
Figure 19 - Guide Bar Maintenance
Flat File
Burr
Oil Slot
Cleaning Groove WithPutty Knife
Guide Bar
Normal Guide Bar Maintenance1. Remove guide bar from chain saw.
2. Remove sawdust from guide bargroove periodically. Use putty knife orwire.
3. Clean oil slots after each day of use.
4. Remove burrs from sides of guide bar.Use flat file to make side edges square.
Replace guide bar when
• bar is bent or cracked
• inside groove of bar is badly worn
Note: When replacing guide bar, see Re-placement Parts and Accessories, on backcover, for proper bar.
13097017
OWNER’S MANUAL
WARNING: Unplug chain sawfrom power source before servic-ing. Severe injury or death couldoccur from electrical shock orbody contact with moving chain.
WARNING: Cutting edges onchain are sharp. Use protectivegloves when handling chain.
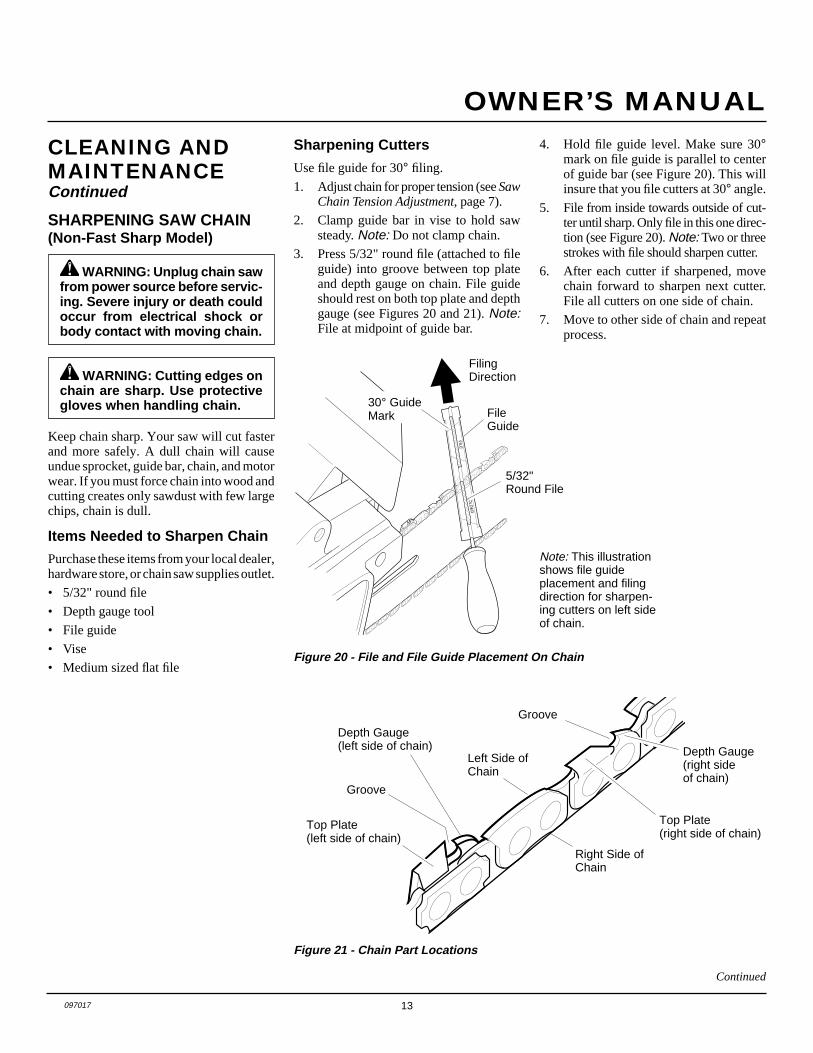
Figure 20 - File and File Guide Placement On Chain
Note: This illustrationshows file guideplacement and filingdirection for sharpen-ing cutters on left sideof chain.
Figure 21 - Chain Part Locations
Right Side ofChain
Left Side ofChain
Groove
Groove
Depth Gauge(left side of chain) Depth Gauge
(right sideof chain)
Top Plate(left side of chain)
Top Plate(right side of chain)
SHARPENING SAW CHAIN(Non-Fast Sharp Model)
Keep chain sharp. Your saw will cut fasterand more safely. A dull chain will causeundue sprocket, guide bar, chain, and motorwear. If you must force chain into wood andcutting creates only sawdust with few largechips, chain is dull.
Items Needed to Sharpen Chain
Purchase these items from your local dealer,hardware store, or chain saw supplies outlet.
• 5/32" round file
• Depth gauge tool
• File guide
• Vise
• Medium sized flat file
Continued
FILE
HO
LDE
R
30° GuideMark File
Guide
FilingDirection
5/32"Round File
Sharpening Cutters
Use file guide for 30° filing.
1. Adjust chain for proper tension (see SawChain Tension Adjustment, page 7).
2. Clamp guide bar in vise to hold sawsteady. Note: Do not clamp chain.
3. Press 5/32" round file (attached to fileguide) into groove between top plateand depth gauge on chain. File guideshould rest on both top plate and depthgauge (see Figures 20 and 21). Note:File at midpoint of guide bar.
4. Hold file guide level. Make sure 30°mark on file guide is parallel to centerof guide bar (see Figure 20). This willinsure that you file cutters at 30° angle.
5. File from inside towards outside of cut-ter until sharp. Only file in this one direc-tion (see Figure 20). Note: Two or threestrokes with file should sharpen cutter.
6. After each cutter if sharpened, movechain forward to sharpen next cutter.File all cutters on one side of chain.
7. Move to other side of chain and repeatprocess.
CLEANING ANDMAINTENANCEContinued

14 097017
ELECTRIC CHAIN SAW
®
PUSHTOSHARPEN
Filing Cutter Depth Gauges
The cutter depth gauge clearance is reducedas cutters are sharpened. After every secondor third sharpening, reset cutter depth gauges.
1. Place depth gauge tool (.025") firmlyacross top of two cutters. Make suredepth gauge enters slot in depth gaugetool (see Figure 22).
2. Use medium flat file. File depth gaugelevel with depth gauge tool.
3. Remove depth gauge tool. With flat file,round off front corner of cutter depthgauge (see Figure 23).
After several hand filings, have authorizedservice center or sharpening service machinesharpen chain. This will insure even filing.
Figure 22 - Depth Gauge Tool On Chain
Flat File
DepthGaugeSlot
Figure 23 - Round Off Front Corner OfDepth Gauge
DepthGaugeTool
Depth Gauge
Front Corner
.025"
CLEANING ANDMAINTENANCEContinued
WARNING: Unplug chain sawfrom power source before servic-ing. Severe injury or death couldoccur from electrical shock orbody contact with moving chain.
WARNING: Cutting edges onchain are sharp. Use protectivegloves when handling chain.
WARNING: Do not hand-sharpen this Fast Sharp chain.Hand-sharpening chain will in-crease risk of kickback.
Figure 24 - Turning Sharpener Knob
Keep chain sharp. Your saw will cut fasterand more safely. A dull chain will causeundue sprocket, guide bar, chain, and motorwear. If you must force chain into wood andcutting creates only sawdust with few largechips, chain is dull.
Follow the steps below to sharpen FastSharp chain. The automatic chain sharpenersharpens cutter, lowers cutter depth gauge,and adjusts guard drive link.
1. Adjust saw chain for proper tension(see Saw Chain Tension Adjustment,page 7).
2. Clean out excess sawdust and woodchips from drive sprocket area.
3. Turn sharpener knob counterclockwiseuntil clicking stops (see Figure 24).
4. Turn sharpener knob clockwise untilyou hear five distinct clicks.
SHARPENING SAW CHAIN(Fast Sharp Model)
Figure 25 - Sharpening Fast Sharp Chain
SharpenerKnob
REPLACING SAW CHAINReplace chain when cutters are too worn tosharpen or when chain breaks. Only usereplacement chain noted in this manual.Always include new drive sprocket whenreplacing chain. This will maintain properdriving of chain. Note: For proper chain anddrive sprocket, see Replacement Parts andAccessories, on back cover.
5. Place saw on clean, flat surface.
6. Connect saw to power supply.
7. Hold saw, with both hands in normalcutting position.
8. Press in switch lockout with rightthumb and squeeze trigger.
9. Gently push on sharpener knob. Sawmust be running for chain to sharpen.
Note: Sparks appearing shows sharp-ener is working (see Figure 25). If nosparks appear, continue to adjust sharp-ener one click at a time. After eachclick, press sharpener knob until lightflow of sparks appears.
After several sharpenings, you must turnsharpener knob more to bring stone intoposition.
15097017
OWNER’S MANUAL
TROUBLESHOOTING WARNING: Unplug chain saw from power source before servicing.Severe injury or death could occur from electrical shock or body contactwith moving chain.
OBSERVED FAULT
Saw runs, but does not cut.
Saw does not cut unless heavily forced.Cutting produces only sawdust with fewlarge chips.
Saw runs slow. Saw stalls easily.
Motor of saw does not run when you squeezetrigger.
Motor of saw runs, but chain does not move.
Chain does not get oil.
Chain comes off guide bar.
Saw smokes.
Saw leaks oil.
POSSIBLE CAUSE
Chain assembled backwards on guide bar
Chain is dull
Low power supply voltage
1. Switch lockout not pressed in to releasetrigger
2. Extension cord connections loose3. Open line fuse or circuit breaker4. Bad motor brushes5. Open wiring circuit on saw
Gear train failure
1. Clogged oil slot in guide bar2. Oil is too thick
1. Chain is loose
2. Guide bar and chain not assembled right
Saw damaged. Do not use saw.
Oil cap is not secure.
REMEDY
See Assembly, page 6
See Sharpening Saw Chain, page 13 (non-Fast Sharp model) or page 14 (Fast Sharpmodel)
Extension cord wire size too small. SeeExtension Cords, page 8
1. Press in switch lockout before squeez-ing trigger
2. Check cord connections3. Check line fuse or circuit breaker4. See authorized service center5. See authorized service center
See authorized service center
1. Remove guide bar and clean oil slot2. Use correct weight of oil. See Filling Oil
Tank, page 7
1. Tighten chain. See Saw Chain TensionAdjustment, page 7
2. See Assembly, page 6
See authorized service center
Tighten oil cap. Note: Empty oil tank whennot in use.
TECHNICALSERVICEYou may have further questions about as-sembling, operating, or maintaining this saw.If so, contact DESA International’s Techni-cal Service Department at 1-800-323-5190.
SERVICEPUBLICATIONSYou can buy a service manual from addresslisted on back page of this manual. Send a checkfor $5.00 payable to DESA International.
You can receive an illustrated parts list freeof charge. Send a self-addressed stampedenvelope to address on back page of thismanual.
When writing, include model number andserial number of saw. You will find thesenumbers on saw motor housing decal.
STORAGEIf storing saw for more than 30 days, followsteps below.
1. Drain oil tank.
2. Remove and clean guide bar and chain.Clean guide bar and chain by soakingin petroleum based solvent or mild soapand water mixture.
3. Dry guide bar and chain.
4. Place chain in container filled with oil.This will prevent rust.
5. Wipe a thin coating of oil over surfaceof guide bar.
6. Wipe off outside of saw body. Do thiswith soft cloth dampened with a mildsoap and water mixture.
7. Store chain saw• in a high or locked place, out of
children’s reach• in a dry place• in a carrying case or with scabbard
over guide bar

16 097017
ELECTRIC CHAIN SAW
®
AUTHORIZED SERVICE CENTERS
PARTS CENTRALSPortable Heater Parts342 North County Road 400 EastValparaiso, IN 46383219-462-74411-800-362-6951
FBD1349 Adams StreetBowling Green, KY 42103-3414502-846-11991-800-654-8534
Lyons & Lyons Sales Co. Inc.Glen Arm RoadGlen Arm, MD 21057301-665-65001-800-333-5966
Master Parts Distributors1184 Wilson NWGrand Rapids, MI 495441-616-791-05051-800-446-1446
Four Flags Power Products1115 Stateline RoadNiles, MI 49120616-684-26971-800-268-4983
Hance Distributors Inc.12795 16th Avenue NorthPlymouth, MN 55441612-559-2299
Automotive Equipment Service3117 HolmesKansas City, MO 64109816-531-91441-800-843-3546
Sun Appliance Service Center1687 Central AvenueAlbany, NY 12205518-869-9591
Ray's Portable Heater Service3191 Myers RoadCamino, CA 95709916-644-7716
Baltimore Electronics1348 Dixwell AvenueHamden, CT 06514203-248-75531-800-397-7553
Eckley’s Small Engine31617 Spruce DriveEustis, FL 32726352-357-6764
Parts Company of America1657 Shermer RoadNorthbrook, Ill 60062708-498-59001-800-323-0620
Forrest Lytle and Sons Inc.740 West Galbraith RoadCincinnati, OH 45231513-521-1464
Bortz Chain Saw ShopRoad #2, Box 64AOley, PA 19547610-987-6452
21st Century2950 Fretz Valley RoadPerkasie, PA 18944215-795-04001-800-325-4828
LaPortes' Parts & Service2444 N 5th StreetHartsville, SC 29550803-332-0191
Webbs Appliance Center1519 Church StreetNashville, TN 37203615-329-40791-800-899-4079
Industrial Hardware4109 Bainbridge Blvd.Chesapeake, VA 23324757-543-22321-800-788-0008
Mills Lawn and Garden4750 B. Baxter Road, Unit BVirginia Beach, VA 23462757-490-7001
Tuco Industrial Products5223 180th Street SWSuite 4A-1Lynnwood, WA 98037425-743-95331-800-735-1268
ALABAMA (AL)A & O General Repair Service1470 Opelika RoadAuburn, AL 36830334-821-7022
Southern Power Tool3956 Government Blvd.Mobile, AL 36693334-666-3623
ARIZONA (AZ)Best Brothers Lawnmower Repair5549 W. Glendale AvenueGlendale, AZ 85301602-939-9170
D & L Small Engines, Inc.10023 North 19th Ave.Phoenix, AZ 85021602-861-1978
Power Tool Service Center660 East 19th StreetTucson, AZ 85719520-884-8974
CALIFORNIA (CA)Ray's Portable Heater Service3191 Meyers RoadCamino, CA 95709916-644-7716
California Electric Service1170 G. Burnett AvenueConcord, CA 94520510-827-1011
California Electric Service612 South Shoppers LaneCovina, CA 91723818-915-4935
California Electric Company1208 East Ash AvenueFullerton, CA 92631714-870-0900
J & N Garden Equipment4460 W. Imperial Hwy.Inglewood, CA 90304310-671-0079
California Electric Company11284 Los Alamitos Blvd.Los Alamitos, CA 90720310-596-7895
California Electric Service23725 Via Fabricante, Unit BMission Viejo, CA 92691714-586-9440
COLORADO (CO)McGuckin Power Equipment Center2845 Valmont RoadBoulder, CO 80302303-443-9317
Ace Mower and Small Engines4718 Chromium DriveColorado Spring, CO 80918719-593-0862
Bartell Tool Service1448 W. Cedar AvenueDenver, CO 80223303-777-5463
Metrogas Equipment Company790 West 64th Ave.Denver, CO 80221303-428-3036
Winfrey's Repair317 8th StreetGreeley, CO 80631970-353-9576
AAA Electric Company, Inc.24 South Main StreetLongmont, CO 80501330-776-6031
Dales Electric Motor Repair932 Coffman StreetLongmont, CO 80501303-651-6907
CONNECTICUT (CT)Baltimore Electronics1348 Dixwell AvenueHamden, CT 06514203-248-75531-800-397-7553
Utility Electric Service53 Main StreetHartford, CT 06106860-246-7271
Goodies Sales and Service133 Hamilton StreetNew Haven, CT 06515203-865-1470
Appliance Servicenter of Stamford15 Cedar Heights RoadStamford, CT 06905203-322-7656
IDAHO (ID)Rossiter Electric1501 S. Capitol Ave.Idaho Falls, ID 83403208-529-3665
Steam Store Rocky Mountain, Inc.155 North Gate MileIdaho Falls, ID 83401208-522-0609
Steam Store of Magic Valley, Inc.156 4th Avenue SouthTwin Falls, ID 83301208-734-3694
J & J Enterprises1704 Addison Avenue EastTwin Falls, ID 83301208-733-2001
ILLINOIS (IL)Cherry Valley Small Engine Repair702 East State StreetCherry Valley, IL 61016815-332-5636
Chainsaw Central11 E. Main StreetChicago Heights, IL 60411708-756-2280
Lange Electric912 E. FayetteEffingham, IL 62401217-347-7626
H & R Pump Company, Inc.2111 E. Washington StreetJoliet, IL 60434815-726-2950
Mathis-Kelley Construction1046 W. Jefferson StreetMorton, IL 61550309-266-9733
Ambraw Power Equipment310 E. Decatur StreetNewton, IL 62448618-783-2821
California Electric Service1139 East 12th StreetOakland, CA 94606510-834-1050
California Electric Service2594 East Colorado Blvd.Pasadena, CA 91107818-792-3194
California Electric Service1717 Bell StreetSacramento, CA 95814916-443-5711
California Electric Service3430 El Cajon Blvd.San Diego, CA 92104619-283-6488
California Electric Service1090 Bryant StreetSan Francisco, CA 94103415-431-8494
California Electric Service783 The AlamadaSan Jose, CA 95126408-295-0475
Lawnmower & Saw3115 S. Main StreetSanta Ana, CA 92707714-540-5307
Rincon Valley Yard & Garden4972 Sonoma HwySanta Rosa, CA 95409707-593-4124
California Electric Service41715 Enterprise Circle NorthSuite 101Temecula, CA 92590909-695-5445
California Electric Service14753 Oxnard StreetVan Nuys, CA 91411818-997-8855
California Electric Service2314 South Westwood Blvd.W. Los Angeles, CA 90064310-475-2532
PBI3160 Industrial DriveYuba City, CA 95993916-671-1871
FLORIDA (FL)Cricket Shop3012 39th Avenue WestBradenton, FL 34205941-755-7758
Eckley's Small Engine31617 Spruce DriveEustis, FL 32736352-357-6764
Al's Small Engine, Inc.2620 Blanding Blvd.Middleburg, FL 32068904-282-5416
S TEK Power Tools2605 South Orange AvenueOrlando, FL 32806407-851-5642
Lindle & Sons Electric Motor Repair7016 Hwy. 22Panama City, FL 32401850-871-1722
Eustis and Sons, Inc.7035 66th Street NorthPinellas Park, FL 34665813-544-1486
Mulvaney's Inc.2148 W. Tennessee StreetTallahassee, FL 32304904-576-5578
A-1 Tool Rental, Inc.2509 South State Road 7West Hollywood, FL 33023305-961-9250
GEORGIA (GA)Hamilton Hardware5300 Veterans Pkwy.Columbus, GA 31904706-322-6545
Cowan Ace Hardware1264 Green StreetConyers, GA 30207770-483-8818
Douglasville Ace Hardware6530 Church StreetDouglasville, GA 30133770-942-7044
S & P Rental & Supply Co.259 Clayton StreetLawrenceville, GA 30245770-963-0392
Tifton Electric Motors1265 US Hwy. 82ETifton, GA 31794912-382-4040

17097017
OWNER’S MANUALINDIANA (IN)Hutchens Sales and ServiceR.R. #5, Box 550Bloomfield, IN 47424812-876-1891
Nichols Ice & Oil2018 Park RoadConnersville, IN 47331317-825-3741
B & W Repair Service213 N. Main StreetDale, IN 47523812-937-2576
Reggie's Small Engine Spec.3011 Lower Huntington RoadFt. Wayne, IN 46809219-747-6212
Eastside Electric928 East LincolnGoshen, IN 46526219-533-3823
Mills Electric4828 Calumet Ave.Hammond, IN 46327219-931-3114
Tyrie Mower Repair110 South 16th StreetLafayette, IN 47905317-742-7886
Kabelin True Value Hardware512 Andrew AvenueLaporte, IN 46350219-362-7917
Krep's Small Engine Repair3301 East County Road 350 NorthMuncie, IN 47303317-282-5139
Lear Lawn & Garden2204 N. Wolfe StreetMuncie, IN 47303317-282-6273
Li'l Engine Sales & Service, Inc.1428 Vincennes StreetNew Albany, IN 47150812-944-1377
Ertel & Sons Portable Welding109 E. Main StreetSwayzee, IN 46986317-922-4611
Portable Heater Parts342 North County Road, 400 EastValparaiso, IN 46383219-462-7441
D W Handy's2112 S. 15th StreetVincennes, IN 47591812-886-0172
IOWA (IA)Brown's408 South Fifth StreetAbel, IA 50003515-993-3053
Beal's Motor Rewinding600 West BeachCherokee, IA 51012712-225-6173
Blink Electric MotorsRear 116 N. 1st Ave.Marshalltown, IA 50158515-752-3036
Fry CompanyBox 96 Thatcher Ave.Millerton, IA 50165515-897-3235
Moreland Repair2145 Jericho RoadPeosta, IA 52068319-583-3669
Northeast Iowa Motor Service24665-150th StreetSumner, IA 50674319-578-5883
Black Hawk Rental324 West 15th StreetWaterloo, IA 50702319-234-4421
KANSAS (KS)Abilene Rent-All & Sales1701 West 1st StreetAbilene, KS 67410913-263-7668
NAAB Electric, Inc.2013 W. JonesGarden City, KS 67846316-276-8101
Morris Electric Repair2423 5th StreetGreat Bend, KS 67530316-792-2919
McPherson Rental Center911 West First StreetMcPherson, KS 67460316-241-3333
Town and Country2008 PrincetonOttawa, KS 66067913-242-3133
KENTUCKY (KY)Hart's Motor Service1747 Woodlawn RoadBardstown, KY 40004502-348-3270
E-Z Rent It Inc.1428 U.S. 31-W By-PassBowling Green, KY 42101502-782-9462
Roman's Repair Shop601 College StreetBowling Green, KY 42101502-746-0857
Hopkinsville Electric Motor704 W. 15th StreetHopkinsville, KY 42240502-886-7585
Maury's Fluorescent Appliance1521 Bardstown RoadLouisville, KY 40205502-456-1671
Rental World, Inc.9509 Dixie Hwy.Louisville, KY 40272502-935-8853
All States Industrial Repair728 E. Center StreetMadisonville, KY 42431502-821-6555
Bluegrass Plumbing and Heating121 South First StreetRichmond, KY 40475606-623-2390
LOUISIANA (LA)Welch Sales & Service13348 W. MainLa Rose, LA 70373504-693-3351
Triangle Bicycle and Lawnmower5433 Crowder RoadNew Orleans, LA 70127504-241-3239
MAINE (ME)Richard's Electric Motor259 Main StreetCaribou, ME 04736207-498-8950
Roger's Electric Motor Shop823-West Main StreetMadawaska, ME 04756207-728-4253
Rent-N-Save28 Allen AvenuePortland, ME 04103207-797-2223
L.A. Pickard Sales & Service383 Lewiston RoadTopsham, ME 04086207-725-2874
MARYLAND (MD)Center Supply Company6802 Industrial Drive #208Beltsville, MD 20705301-595-0860
Lehmans Hardware, Inc.5921 Belair RoadBaltimore, MD 21206410-483-5888
Norris Taylor Contractors, Inc.8480 Ocean GatewayEaston, MD 21601410-822-2050
Southern States Frederick Coop500 E. South StreetFrederick, MD 21705301-663-6165
Lyons and Lyons Sales Co., Inc.Glen Arm RoadGlen Arm, MD 21057410-665-6500
Chesapeake Rent All210 N. Stokes StreetHavre De Grace, MD 21078410-939-1720
Tracy's Appliance Company520 Soleman's Island RoadP. Frederick, MD 20678301-855-1818
MASSACHUSETTS (MA)Holander Electric, Inc.36 Walton StreetAttleboro, MA 02703508-226-1060
Ormond's Inc.115R Dean Ave.Franklin, MA 02038508-528-2013
Beacon Lumber/Beacon Rental513 Church StreetNew Bedford, MA 02745508-995-1766
Grafton Power EquipmentNorth Grafton Shopping Center9 Williams RoadNorth Grafton, MA 01536508-839-6366
Mott's Tool Repair Service92 Rayber RoadOrleans, MA 02653508-240-0764
Utility Electric Service #2810 Main StreetSpringfield, MA 01105413-781-1635
Franconia Fuel Company, Inc.379 Main StreetWareham, MA 02571508-295-0039
MICHIGAN (MI)R & A Service12900 Haggerty RoadBelleville, MI 48111313-697-1144
Thompson's Rental Resale Repair11973 New Lothrop RoadByron, MI 48418810-266-4969
Renter Center, Inc.24948 GratiotEast Pointe, MI 48021810-772-8111
Master Service Center7876 DivisionGrand Rapids, MI 49504616-455-3117
Wolf Creek Farm Supply8011 Wolf Creek RoadHerron, MI 49744517-727-2391
Chicago Drive Rentals, Inc.11298 Chicago DriveHolland, MI 49424616-396-9575
Fowler's Farm City Sales2876 West Washington RoadIthaca, MI 48847517-875-3976
Superior Industrial Sales & Service116 N. State StreetJackson, MI 49201517-784-0539
Norm's Electric Motor Repair414 WalbridgeKalamazoo, MI 49001616-382-5054
A & J Rentals550 S. 11th StreetNiles, MI 49120616-684-3200
Four Flags Power Products1115 Stateline RoadNiles, MI 49120616-684-2697
Bob's Service Shop2537 W. Drahner RoadOxford, MI 48371810-628-2601
Don's Small Engine Repair630 S. Mill StreetPlymouth, MI 48170313-451-5656
Bid's Service, Inc.11276 E. Ten MileWarren, MI 48089810-759-3040
MINNESOTA (MN)Patrick's Sales & Service415 - 8th Ave. NEBrainerd, MN 56401218-829-5356
Perry's Electrical Rebuilders24630 Hale AvenueForest Lake, MN 55025612-464-8054
Hance Distributor, Inc.12795 16th Avenue NorthPlymouth, MN 55441612-559-2299
Hance Sales and Service11212 Wayzata Blvd.Minnetonka, MN 52343612-545-8467
Andy's Small Engine Repair209 9th Avenue, NERochester, MN 55906507-280-0373
Reed's Sales & Service1260 Payne Ave.St. Paul, MN 55101612-774-9515
MISSISSIPPI (MS)Handy Man Rentals1904 Shiloh RoadCorinth, MS 38834601-287-2460
MISSOURI (MO)Stewarts Enterprises7631 NW Salebarn RoadCameron, MO 64429816-632-6578
Northwest Power SalesRD #2, Box 200Maryville, MO 64468816-582-5080
Buchheit, Inc.Route 7, Box 239Perryville, MO 63775573-547-1010
MONTANA (MT)Tom's Service Repair1111-6th Avenue NorthBillings, MT 59103406-259-6179
Mosch Electric Motors, Inc.2513 - 17th St. NEBlack Eagle, MT 59414406-453-2481
Sun Rental Center1301 - 3rd St. NWGreat Falls, MT 59404406-761-6688
NEBRASKA (NE)Hatten's Electric Service130 S. Hastings, Box 843Hastings, NE 68901402-463-4596
Lincoln Tool Service Center3535 North 40th StreetLincoln, NE 68404402-464-1157
Flohr Electric Motor4356 South 90th StreetOmaha, NE 68127402-331-6863
MSE Parts Unlimited4935 South 136th StreetOmaha, NE 68137402-895-0806
Ted's Mower Sales and Service, Inc.5155 Q. StreetOmaha, NE 68117402-731-7058
LaVern Hass Repair1204 - 1st RoadWisner, NE 68791402-529-6846
NEVADA (NV)Fallon Saw & Tool300 N. Marine St.Fallon, NV 89406702-423-1888
One Stop Shop1408 Industrial Way #3Gardnerville, NV 89410702-782-7004
NEW HAMPSHIRE (NH)Taylor Rental Center223 Wincherster StreetKeene, NH 03431603-352-0539
Kingston Enterprises85 North RoadKingston, NH 03848603-642-3506
Hammar Industrial Supply175 Amherst StreetNashua, NH 03061603-822-5161
Exeter Rent AllState Rt 27, Box 68ARaymond, NH 03077603-895-6583

18 097017
ELECTRIC CHAIN SAW
®
NEW JERSEY (NJ)Complete Saw Service336 River RoadGarfield, NJ 07026201-478-7838
Nemeth's Mower Service55 - 4th Ave.Haskell, NJ 07420201-835-0080
Air & Electric Tool Service, Inc.215 North 8th StreetKenilworth, NJ 07033908-272-5567
Associated IndustriesRd 38, Box 2486Mt. Holley, NJ 08060609-267-8417
Woodchuck's Lawnmower and Appliance220 Whitehorse PikeMagnolia, NJ 08049609-783-1111
Myron Tepper/Tep's PowerEquipment1007 N. High StreetMillville, NJ 08332609-825-8294
Capitol Service & Equipment551 New Market RoadPiscataway, NJ 08855908-968-5577
Handyman's Tool Shop508 State Hwy. #10Randolph, NJ 07869201-361-1581
Sam's Repair Shop137 W. Bennett Ave.Wildwood, NJ 03077603-895-6583
NEW MEXICO (NM)K & S Service Center7521 Menaul N.E.Albuquerque, NM 87110505-884-6262
NEW YORK (NY)Sun Appliance Service Center1687 Central AvenueAlbany, NY 12205518-869-9591
Valley Mower Service2857 Ellis Creek RoadBarton, NY 13734607-589-4825
White Tool Supply Inc.3047 Atlantic AvenueBrooklyn, NY 11208718-227-8844
Shields Brothers of Buffalo1410 Main StreetBuffalo, NY 14209716-883-3860
Lehman's Farm & Home SupplyRoute 26Denmark, NY 13631315-493-1151
John’s Engine Repair10482 Sisson Hwy.Eden, NY 14057716-337-3719
M & S Repair Shop303 Hilltop DriveElma, NY 14059716-652-0311
Crossbay Appliance Service158-34 Crossbay Blvd.Howard Beach, NY 11414718-843-4422
Belco Equipment Company3801 - 29th StreetLong Island City, NY 11101718-361-1122
Para-Deys Tools708 Victor RoadMacedon, NY 14502315-986-2520
Advanced Power Equipment101 Fairgrounds DriveManlius, NY 13104315-682-4010
P & C12 East StreetNunda, NY 14517716-468-5050
Otega RepairRd #2, Ostdawa Ave.Otego, NY 13825607-988-7859
Owego Agway Coop38 West AvenueOwego, NY 13827607-687-2039
Jack-n-Heater Service185 Beartown RoadPainted Post, NY 14870607-962-1239
Larmon Small Engine16353 Co. Rt. 91Pierrepont Manor, NY 13674315-465-6671
R & D Mower & Snowblower Sales and Service1630 Empire Blvd.Webster, NY 14580716-671-9409
Bedford Appliance, Inc.1173 Yonkers Ave.Yonkers, NY 10704914-237-7575
NORTH CAROLINA (NC)Ray's Lawn Mower & Machine1414 Landis AvenueCharlotte, NC 28205704-377-1112
Martin Equipment Company4209-B US 70 E.Goldsboro, NC 27534919-778-5996
Hickory Home & Garden Center336 HWY 321 NWHickory, NC 28601704-327-3719
Bowden Electric Motor Service1681 S. Wesleyan Blvd.Rocky Mount, NC 27803919-446-4203
Small Engine Performance Ctr.312 EldredValdese, NC 28690704-879-9652
NORTH DAKOTA (ND)Fix-It Shop316 - 21st St. EastDickinson, ND 58601701-225-0766
Ted's Saw Service412 South 4th StreetGrand Forks, ND 58201701-775-7343
Craig's Small Engine Repair508 East 2nd StreetWilliston, ND 58801701-774-0798
OHIO (OH)Carter Electrical Repair3448 Lunar Rd. NECarrollton, OH 44615330-627-4061
Northwest Mower Sales and Service6086 Cheviot RoadCincinnati, OH 45247513-385-2400
Forrest Lytle & Sons740 W. Galbraith RoadCincinnati, OH 45231513-521-1464
Anytool Precision Sharpening Repair21150 Lorain RoadCleveland, OH 44126216-356-1920
North East Mower Service412 East 156th StreetCleveland, OH 44110216-531-8197
Pecnik's Lawnmower Service732 East 163rd StreetCleveland, OH 44110216-531-8480
Lefeld Welding & Steel Supply512 N. Second StreetColdwater, OH 45828419-678-2397
Dayton Hardware & Supply16-32 N. Irwin StreetDayton, OH 45404513-258-37211-800-762-3426 Ohio only
Ken's Repair3246 S. SectionlineDelaware, OH 43015614-369-4798
Lavon Dietsch Repair07145 Scott Rd. Rt #2Edgerton, OH 43517419-298-2948
Anytool & Outdoor Power Equip.21150 Lorain RoadFairview Park, OH 44126216-356-1920
LaGrange True Value300 E. Main StreetLaGrange, OH 44050216-355-4222
Deep Run Mower Service58781 Heil Addn. Deep RunMartins Ferry, OH 43935614-859-6131
Worcester Sales and Service34200 Lorian RoadN. Ridgeville, OH 44039216-327-2196
Staker Sales & Service1424 Ninth StreetPortsmouth, OH 45662614-353-6965
Leonard Hardware145 North 15th StreetSebring, OH 44672330-938-6329
Sparks Sales & Service5184 Fletcher Chapel RoadSpringfield, OH 45502513-323-5925
Eckert Bros.244 Factory StreetSugarcreek, OH 44681216-852-2611
Larry's Mini Engines4732 US Route 20 WestWakeman, OH 44889216-839-2508
OKLAHOMA (OK)B.M.I. Inc.13102 East 1st StreetBroken Arrow, OK 74012918-252-0011
H. L. Moss1714 E. 15th StreetTulsa, OK 74104918-744-1305
Kay Electric Motors Inc.810 48th StreetWoodward, OK 73801405-256-3254
OREGON (OR)Turner’s Lawnmower and Saw728 SE Robin WayGresham, OR 97080503-665-5441
Pendleton Grain Growers200 S. 1st StreetP.O. Box 1248Hermiston, OR 97801541-567-5591
Mattix Appliance Parts Company501 N. MainPhoenix, OR 97535541-535-6263
Oregon Appliance2137 East Burnside StreetPortland, OR 97214503-235-6681
PENNSYLVANIA (PA)Albright's Hardware2119 Wabert Ave.Allentown, PA 18104610-433-3831
General Rental & Sales CenterOld Rt 1 & 41Avondale, PA 19311610-268-2825
Bud's Tractor and Mower Sevice21 Bock LaneBaden, PA 15005412-869-7142
Copper CreekRd. #1, Locust ValleyBarnesville, PA 18214717-467-2792
Passmore Service Center1108 Rt. 100Betchelsville, PA 19505610-367-9084
Engine Doctors20 Russell Blvd.Bradford, PA 16701814-362-3091
Pro-FixRear 681 Main StreetEdwardsville, PA 18704717-288-0476
Carson's Hardware637-43 Main StreetHellertown, PA 18055610-838-7741
Eaton Enterprises240 Main StreetImperial, PA 15126412-695-0702
Valray Nurseries Inc.R.D. #8, Box 362Kittanning, PA 16201412-548-1579
Petrosky's Hardware & Supply Co.602 Alexandria StreetLatrobe, PA 15650412-537-3541
Reddi-Rentals948 S. Woodbourne Rd.Levittown, PA 19057215-943-4800
Raymond, M. Nolt290 S. Shirk RoadNew Holland, PA 17557717-354-0198
Bortz Chainsaw Shop45 Bortz RoadOley, PA 19547610-987-6452
Snyder Electric Company1500 Chateau StreetPittsburgh, PA 15233412-231-3100
Stamm's Mower RepairRd. 5, Pine Lane Box 150Selinsgrove, PA 17870717-743-7651
SOUTH CAROLINA (SC)Hall's Small Motor Repair225 Heathwood DriveAiken, SC 29803803-649-6313
Todd's Electric Motor Repair110 Laurel StreetConway, SC 29526803-248-2444
LaPortes Parts & Service2444 N. 5th StreetHartsville, SC 29550803-332-0191
Turner Repair Service3 E. Belvue RoadTaylors, SC 29687864-244-1746
TENNESSEE (TN)Cole's Small Equipment Center247-A Vance Tank RoadBristol, TN 37620615-968-1175
Vista Small Engine1510 Vista LaneClarksville, TN 37043615-552-6953
Master Repair Service305 Elmore RoadCrossville, TN 38555615-484-2061
The Speciality Shop2300 East Magnolia AvenueKnoxville, TN 37917423-523-6894
Authorized Equipment Service812 Polk AvenueMemphis, TN 38126901-774-0850
Webb's Appliance Service Center1519 Church StreetNashville, TN 37203615-329-4079
TEXAS (TX)Industrial Distributing Co.9411 Neils Thompson Dr.Austin, TX 78759512-837-4122
Bud's LP Gas & Supply225 GrandChannelview, TX 77330713-457-2456
Corpus Christi Power Tool & Rpr.3701 AgnesCorpus Christi, TX 78405512-883-1117
Freel Enterprise118 ElstonDallas, TX 75232214-376-9913
Hawn Equipment Rental7777 Hawn FreewayDallas, TX 75217214-398-8121
Dyer Cycle4501 Dyer StreetEl Paso, TX 79930915-566-6022
Ray DeSpain's Inc.P.O. Box 184, Loop 494 NorthNew Caney, TX 77357713-689-2121Service Department

19097017
OWNER’S MANUAL
REPLACEMENTPARTS ANDACCESSORIES
WARNING: Use only replace-ment parts and accessories de-scribed in this manual. Use ofother parts or accessories coulddamage saw or injure operator.
Purchase these accessories and parts fromyour nearest dealer or service center. If theycan not supply these accessories or parts,either contact your nearest Parts Central orDESA International for referral informa-tion. Parts centrals are listed in this manual.
DESA InternationalP.O. Box 90004Bowling Green, KY 42102-90041-800-972-7879Parts Department
* Includes automatic chain sharpener.
LNT-2Part Number Description097566-01S Guide bar, 8"091369S Chain, 8"097567-01S Guide bar, 10"091371S Chain, 10"097568-02S Guide bar, 12"091373S Chain, 12"075752 Drive sprocket
099178H, 100089-06, 100089-07 &EL-1Part Number Description097570-01S Guide bar, 14"091374S Chain, 14"075752 Drive sprocket
EL-1/EL-7 Fast SharpPart Number Description097570-01S Guide bar, 14"091367S* Chain, 14"076695 Drive sprocket
EL-7, 098031J, 099039J, 100089-01,100089-04, 100089-05Part Number Description097572-03S Guide bar, 16"091375S Chain, 16"075752 Drive sprocket
POLE SAW, 104316-01POLE SAW ASSEMBLY, 104317Part Number Description104302-01S Guidebar, 8"104301S Chain, 8"075752 Drive Sprocket
UTAH (UT)Roosevelt Service Center133 South 300 East, Box 1546Roosevelt, UT 84066801-722-2708
Longs Engine Service7536 Stone RoadSalt Lake, UT 84121801-943-5135
Appliance Service Center210 E. 600 SouthSalt Lake City, UT 84111801-328-9703
VERMONT (VT)Brown and Roberts182 Main StreetBrattleboro, VT 05301802-257-4566
VIRGINIA (VA)Industrial Hardware4109 Bainbridge Blvd.Chesapeake, VA 23324804-543-2232
Warren E. Smith Shops564 Reading Rd. Ext.300 Madestic DriveChristiansburg, VA 24073540-382-5501
Mills Repair Service4750 B. Baxter Road, Unit BVirginia Beach, VA 23462757-490-7001
American Power Equip. Ctr.6502 Horsepen RoadRichmond, VA 23230804-285-4838
Stafford Equipment Sales & Service21055 Jefferson Davis Hwy.Stafford, VA 22554540-720-1710
Outdoor Power Equipment800 White Marsh RoadSuffolk, VA 23434804-925-4933
WASHINGTON (WA)Action Small Appliance Service1500 145th Place SEBellevue, WA 98005206-455-3578
TUCO Industrial Products5227 180th SW, Suite 4A-1Lynnwood, WA 98046206-743-9533
Action Small Appliance2125 Second AvenueSeattle, WA 98121206-448-2020
A to Z Rentals10903 E. SpragueSpokane, WA 99206509-924-2000
Lifficks Electric Shop8239 S. Park AvenueTacoma, WA 98408206-474-7403
EL-7 - 100015Part Number Description101623-01 Guide bar, 15"101619-01 Chain, 15"075752 Drive sprocket
GeneralPart Number Description079963-02 Plastic scabbard, 8" & 10"079963-04 Plastic scabbard,
12", 14", & 16"079088-01 Hand Guard077155 Adjusting Plate Assy.
WEST VIRGINIA (WV)Beckley Mower Service3695 Robert C. Byrd DriveBeckley, WV 25802304-253-5748
Town and Country Supply4117 First AvenueNitro, WV 25143304-755-3520
WISCONSIN (WI)Smith Petroleum Ltd.217 N. WalworthDarien, WI 53314414-724-3206
Ken's Economy Sales8887 Highway AMarshfield, WI 54449715-676-2143
Moore's Repair ServiceW287 & N2108 Stuart DrivePewaukee, WI 53072414-691-2814
Morisse Power Center200 N. Chicago AvenueS. Milwaukee, WI 53172414-762-6444
097017-01REV. X5/98
2701 Industrial DriveP.O. Box 90004Bowling Green, KY 42102-9004
INTERNATIONAL
ELECTRIC CHAIN SAW LIMITED WARRANTYAlways specify model and serial numbers when writing the factory.
We reserve the right to amend these specifications at any time without notice. The only warranty applicable is our standard written warranty. Wemake no other warranty, expressed or implied.
DESA International warrants this electric chain saw and any parts thereof, to be free from defects in material and workmanship for one year fromthe date of first purchase from an authorized dealer, provided that the product has been properly maintained and operated in accordance with allapplicable instructions. The bill of sales or proof of purchase must be presented at the time a claim is made under this warranty.
This warranty is extended only to the original retail purchaser. This warranty covers only the parts and labor required to restore this chain sawto its proper operating condition. Warranty parts must be obtained through factory authorized dealers and service centers for this product. Thesedealers and service centers will provide original factory replacement parts. Failure to use original factory replacement parts voids this warranty.
This warranty does not cover commercial, industrial, or rental usage, nor does it apply to parts that are not in original condition because of normalwear and tear, or parts that fail or become damaged as a result of misuse, accident, lack of proper maintenance, tampering, or alteration. Travel,handling, transportation, and incidental costs associated with warranty repairs are not reimbursable under this warranty and are the responsibilityof the owner.
To the full extent allowed by the law of the jurisdiction that governs the sale of the product, this express warranty excludes any and all otherexpressed warranties and limits the duration of any and all implied warranties, including warranties of merchantability and fitness for a particularpurpose to one year form the date of first purchase, and DESA International’s liability is hereby limited to the purchase price of the product andDESA International shall not be liable for any other damages whatsoever including indirect, incidental, or consequential damages.
Some states do not allow limitation of how long an implied warranty lasts or an exclusion or limitation of incidental or consequential damages,so the above limitation of damages may not apply to you.
This warranty provides the original purchaser with specific rights. For information regarding those rights, please consult the applicable state laws.
Model ______________
Serial No. ______________
Date Purchased ______________
REPAIR SERVICENote: Only use original replacement parts.This will protect your warranty coverage forparts replaced under warranty.
Each authorized service center is indepen-dently owned and operated. For additionalservice center or warranty information, call1-800-323-5190.
Warranty Service
If saw requires warranty service, return it tonearest authorized service center. You mustshow proof of purchase. If faulty materialsor workmanship caused damage, we willrepair or replace saw without charge.
Non-Warranty Service
If saw requires service, return it to nearestauthorized service center. Repairs will bebilled to you at regular repair list prices.Note: Normal wear, misuse, abuse, neglect,or accidental damage is not covered underwarranty.
097017 01
NOT A UPC