champ ii - pure flow technologiesairdogdiesel.com/.../uploads/2017/05/a7soca700_cat_pft_r.pdf ·...
TRANSCRIPT

PROTECTED UNDER THE FOLLOWING PATENTS CANADA UNITED STATES OF AMERICA MEXICO 2,108,391 5,355,860; 5,746,184; 6,729,310 270409
NEW ZEALAND ITALY AUSTRALIA HONG KONG ECUADOR 532356 1362177 2005101054 1061420 PL10-2021
Additional Foreign Patents Issued and Pending in Europe, South America, Japan, and China!
INSTALLATION MANUAL
For Engines Equipped with the136-5017 Secondary Fuel Filter Housing
Kit No. A7SOCA700
Providing “Test Cell Performance” in “Real World Conditions” Since 1993!
Proudly Made in the USA
www.pureflowtechnologies.com 1-573-635-0555or 1-877-463-4373
Champ II
PLEASE READ THESE INSTRUCTIONS
THOROUGHLY BEFORE BEGINNING
INSTALLATION
“SPIN-ON” For Cat FiltersHigh Pressure Fuel Air Separator
Revised 2/27/17
2
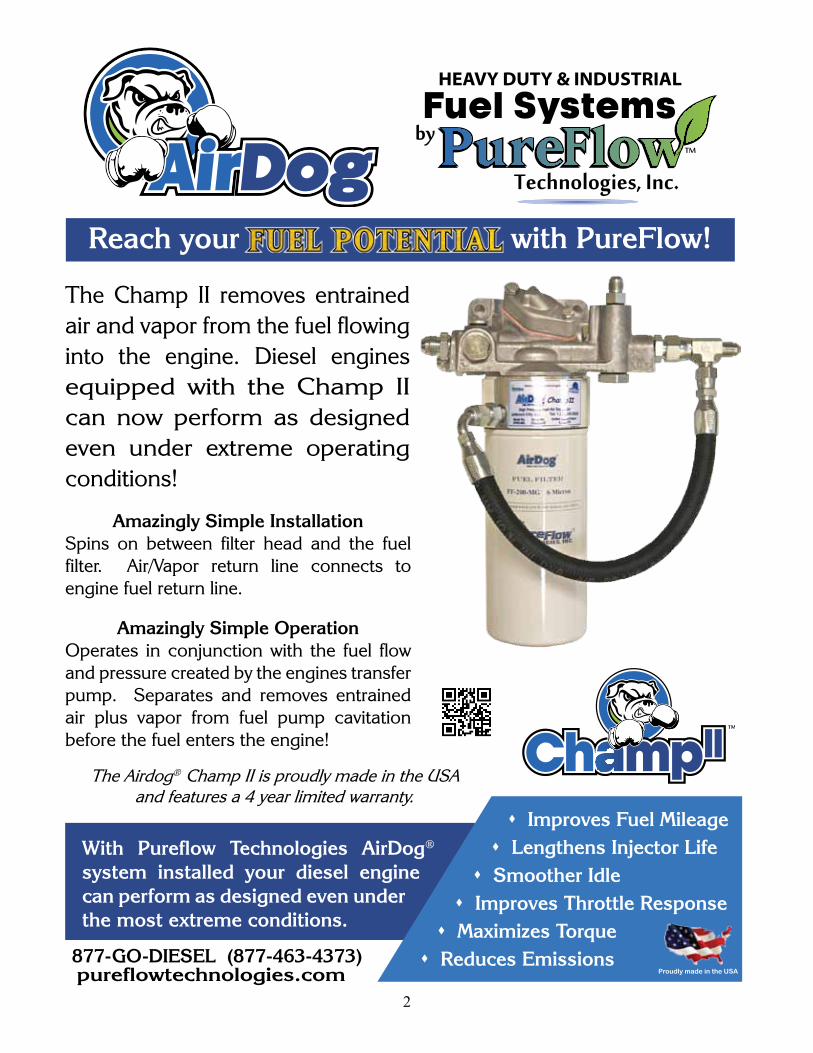
Amazingly Simple InstallationSpins on between filter head and the fuel filter. Air/Vapor return line connects to engine fuel return line.
Amazingly Simple OperationOperates in conjunction with the fuel flow and pressure created by the engines transfer pump. Separates and removes entrained air plus vapor from fuel pump cavitation before the fuel enters the engine!
The Champ II removes entrained air and vapor from the fuel flowing into the engine. Diesel engines equipped with the Champ II can now perform as designed even under extreme operating conditions!
™
with PureFlow!Reach your
The Airdog® Champ II is proudly made in the USA and features a 4 year limited warranty.
s Improves Fuel Mileages Lengthens Injector Life
s Smoother Idles Improves Throttle Response
s Maximizes Torques Reduces Emissions
Proudly made in the USA
With Pureflow Technologies AirDog® system installed your diesel engine can perform as designed even under the most extreme conditions.
877-GO-DIESEL (877-463-4373) pureflowtechnologies.com

3
PureFlow® Technologies, Inc.AirDog® Champ II CATERPILLAR® 3406E, C13, C15, & C16
TABLE OF CONTENTSSection 1………….........…….…...………............…..…………..….Table of Contents
Section 2……………………..........…………………Installation and Safety Guidelines
Section 3……………………..........………………………………………..…Parts List
Section 4……………...........………...........................................….....System Overview
INSTALLATION PROCEDURES
Section 5………………..........………………..............Installing the AirDog® Champ II
Section 6………………………............................Installing the Air /Vapor Return Line
Adjusting Fuel Pressure
Section 7……………..................……...........…….............Adjusting Fuel Rail Pressure
Cat Secondary Fuel System Upgrade
Section 8A……………….............................…...........….............Fuel System Upgrade
Section 8B………………...................…….....FromTransfer Pump to Secondary Filter
Section 8C……………….............................…...........From Secondary Filter to Engine
Section 8D………………....................…Secondary Fuel Filter Housing Modification
Fuel Lines
Section 9…………...……..................................Removing ACERT Recycle Fuel Line
Maintenance
Section 10..…………………………...................……Filter Service Recommendations
Section 1 Table of Contents

4
PureFlow® Technologies, Inc.AirDog® Champ II CATERPILLAR® 3406E, C13, C15, & C16
INSTALLATION GUIDELINESThe installation of your AirDog® Champ can be made relatively easy by following the steps outlined in this manual, and:
1. Inventory the package components. Notify PUREFLOW® Technologies, immediately of any parts missing or damaged.
2. Read the installation manual completely. Understand how the system operates and the installation recommendations before beginning.
SAFETY GUIDELINES!CAUTION: Chock the vehicle’s tires to prevent rolling.
CAUTION: Wear safety glasses when operating power tools such as drills and grinders or when using a punch or chisel.
CAUTION: Route the fuel lines and electrical harnesses keeping them away from hot exhaust components and/or moving parts. Properly secure the fuel lines and electrical harnesses to prevent chaffing.
If you are uncertain of any installation procedure, contact:PureFlow® Technologies, Inc. for technical assistance.
NOTE: The pictures used in this manual are for example only and may not depict the exact components as found on your truck.
Section 2 Installation & Safety Guidelines
5
PureFlow® Technologies, Inc.AirDog® Champ II CATERPILLAR® 3406E, C13, C15, & C16Section 3 Parts List
Installation Parts List
Section 4: System OverviewPureFlow® Technologies, Inc. addresses diesel engine efficiency and peak performance on the fuel side from the fuel tank to the tip of the injector. Removing entrained air and fuel vapor from the fuel flow to the engine is not enough if the internal conditions of the fuel system components are such to allow vapor to form in the injector, itself!
Specifically, if the fuel pressure/flow to the injector, even with entrained air and vapor removed, is insufficient to totally fill the injector barrel on the up stroke of the plunger, a void or low pressure will form that allows vapor to re-form within the injector. The results of “injector lag”, which is just another name for “retarded injection timing”, is increased fuel consumption, lost power, and increased exhaust emissions.
To overcome these concerns, PureFlow® Technologies has an “Up-Grade Kit” available for the Caterpillar 3406E, C15 and C16 engines. The “Up-Grade” kit is NOT included with the Champ II installation kit, although the complete and detailed instructions are included!
Contact PureFlow® Technologies at 1.573.635.0555 for additional information and ordering!
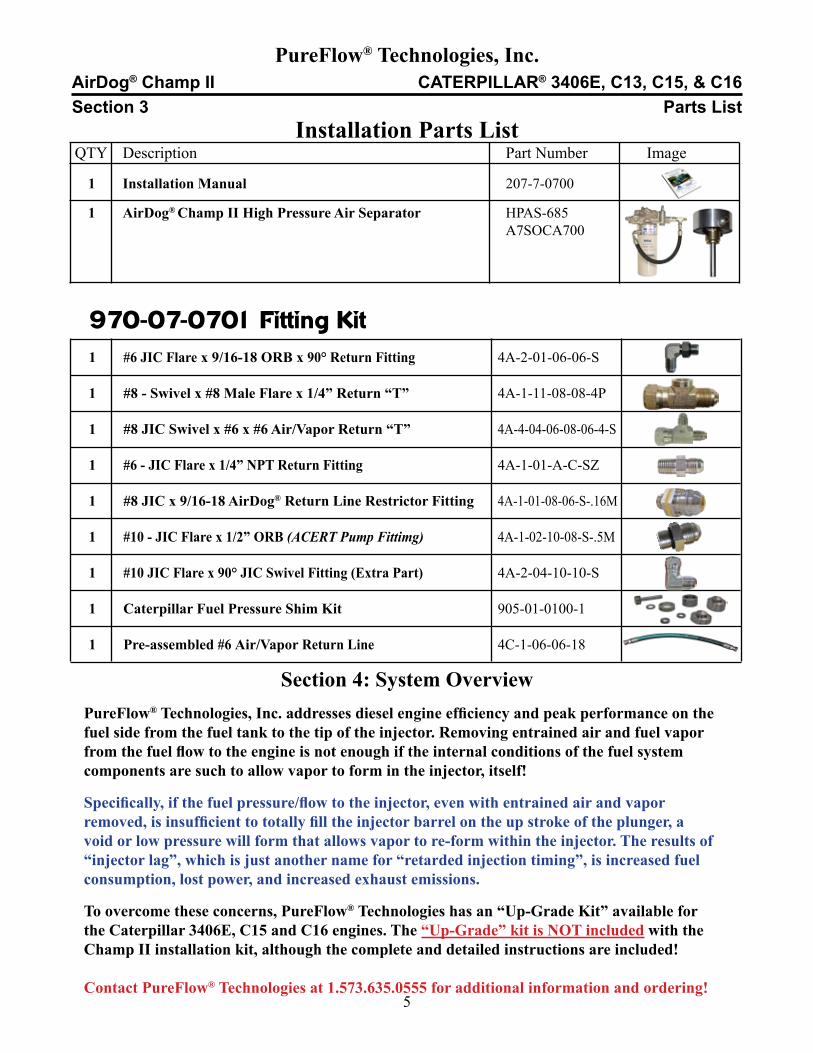
QTY Description Part Number Image
1 Installation Manual 207-7-0700
1 AirDog® Champ II High Pressure Air Separator HPAS-685 A7SOCA700
1 #6 JIC Flare x 9/16-18 ORB x 90° Return Fitting 4A-2-01-06-06-S
1 #8 - Swivel x #8 Male Flare x 1/4” Return “T” 4A-1-11-08-08-4P
1 #8 JIC Swivel x #6 x #6 Air/Vapor Return “T” 4A-4-04-06-08-06-4-S
1 #6 - JIC Flare x 1/4” NPT Return Fitting 4A-1-01-A-C-SZ
1 #8 JIC x 9/16-18 AirDog® Return Line Restrictor Fitting 4A-1-01-08-06-S-.16M
1 #10 - JIC Flare x 1/2” ORB (ACERT Pump Fittimg) 4A-1-02-10-08-S-.5M
1 #10 JIC Flare x 90° JIC Swivel Fitting (Extra Part) 4A-2-04-10-10-S
1 Caterpillar Fuel Pressure Shim Kit 905-01-0100-1
1 Pre-assembled #6 Air/Vapor Return Line 4C-1-06-06-18
970-07-0701 Fitting Kit
6
PureFlow® Technologies, Inc.AirDog® Champ II CATERPILLAR® 3406E, C13, C15, & C16
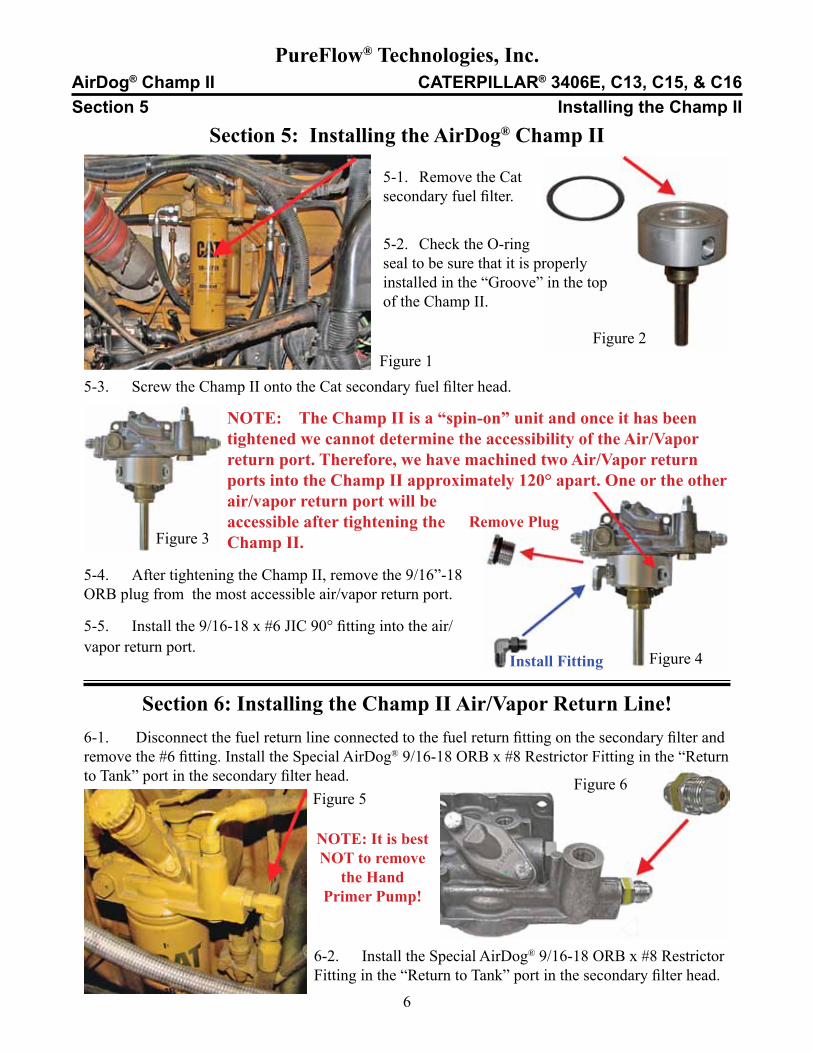
Section 5: Installing the AirDog® Champ II
5-1. Remove the Cat secondary fuel filter.
5-2. Check the O-ring seal to be sure that it is properly installed in the “Groove” in the top of the Champ II.
5-3. Screw the Champ II onto the Cat secondary fuel filter head.
NOTE: The Champ II is a “spin-on” unit and once it has been tightened we cannot determine the accessibility of the Air/Vapor return port. Therefore, we have machined two Air/Vapor return ports into the Champ II approximately 120° apart. One or the other air/vapor return port will be accessible after tightening the Champ II.
5-4. After tightening the Champ II, remove the 9/16”-18 ORB plug from the most accessible air/vapor return port.
5-5. Install the 9/16-18 x #6 JIC 90° fitting into the air/vapor return port.
Section 5 Installing the Champ II
Remove Plug
Install Fitting Figure 4
Figure 3
Figure 2Figure 1
Section 6: Installing the Champ II Air/Vapor Return Line!6-1. Disconnect the fuel return line connected to the fuel return fitting on the secondary filter and remove the #6 fitting. Install the Special AirDog® 9/16-18 ORB x #8 Restrictor Fitting in the “Return to Tank” port in the secondary filter head.
NOTE: It is best NOT to remove
the Hand Primer Pump!
6-2. Install the Special AirDog® 9/16-18 ORB x #8 Restrictor Fitting in the “Return to Tank” port in the secondary filter head.
Figure 5Figure 6

7
PureFlow® Technologies, Inc.AirDog® Champ II CATERPILLAR® 3406E, C13, C15, & C16Section 6 Air/Vapor Return Lines
6-3. Assemble the correct AirDog® return “T” to the Restrictor fitting. Install the #8 Swivel x #6 x #6 T”, If you have a #6 engine return line. Install the #8 “T” and fitting if you have a #8 engine return line.
6-4. Re-attach the original engine fuel return line.
6-5. Install the Champ II Air/Vapor return line. The return line is included in the installation kit.
6-6. Pre-fill the fuel filter with clean fuel and install the filter on the Champ II
Figure 7
#6 “T” with Return Line
Figure 8
Figure 10
#8 “T” Components
Figure 9
Section 6: Installing the Champ II Air/Vapor Return Line, cont’d
Section 7: Adjusting the Fuel Rail Pressure
For the Cat 3406E, C15, and C16 engine to perform at peak efficiency, the fuel rail pressure must be adequate to completely fill the fuel injectors during the “up” stroke of the plunger. A minimum of 115 PSI to an absolute maximum of no more than 120 PSI at “high idle” is required.
NOTE: The first step to resetting the “Fuel Rail Pressure” has already been performed when the AirDog® Champ II 9/16-18 ORB X #8 Special Restrictor Return Fitting was installed in Step 4-2, Figure 6. If your transfer pump is in good condition and not worn out, with the engine running the fuel rail pressure should be at approximately 118 PSI at high idle (1,900 to 2,100 RPM). If the fuel rail pressure is still low, follow the steps below.
There are three models of the Caterpillar® fuel transfer pump. The earlier model, 1st generation transfer pump, with a small diameter spring and hex head plug, as shown in Figure 13, and the later, 2nd generation version, with a larger diameter spring and socket head plug, as shown in Figure 15. The third and latest model is not shown!

8
PureFlow® Technologies, Inc.AirDog® Champ II CATERPILLAR® 3406E, C13, C15, & C16Section 7 Adjusting the Fuel Rail Pressure
Section 7: Adjusting the Fuel Rail Pressure cont’dTemporarily, install a 150 PSI Fuel Pressure Gauge.
It is important to know the original fuel pressure before you start!
Figure 11
Connect the Pressure Gauge Here!
Figure 15LATER STYLE PUMP
Shim Kit Figure 14
To adjust the rail pressure after the AirDog® Restrictor Fitting has been installed (Step 4-2, Fig 6), reset the spring tension on the high pressure bypass regulator.
To Adjust the Earlier Style Cat Fuel Transfer Pump7-1. Remove hex plug “A” on the side of the transfer pump
7-2. Take out spring “C” and the Stiffener Pin “B”.
NOTE: The shim kit includes new stiffener pinwith cap and three shims for the early version transfer pump.
7-3. Put the new stiffener pin w/cap part #”D” into the spring and re-install in transfer pump.
7-4. Start the engine. Run the RPM up slowly until high idle is reached. High idle is 1,900 to 2,100 RPM. Read the fuel rail pressure. If the rail pressure does not reach 118 PSI, add a shim and repeat until at least 118 PSI, but not more than 120 PSI, is reached.
WARNING: Do Not exceed 120 PSI fuel rail pressure. High rail pressure, 130 PSI and above will void you factory engine warranty and may cause engine damage!
Enlarged view of the spring and pin/cap
Figure 16
Figure 13 EARLY STYLE PUMP
Figure 12

9
PureFlow® Technologies, Inc.AirDog® Champ II CATERPILLAR® 3406E, C13, C15, & C16Section 7 Adjusting the Fuel Rail Pressure
“OE” Spring & Plug
“OE” Spring & Plug with shim
Adjusting Rail Pressure for the Later Style Cat Fuel Transfer Pump.7-5. Remove socket head plug “A” on the side of the transfer pump.
VERY IMPORTANT: After these adjustments have been performed and the rail pressure does not reach 118 PSI ±3, it would be wise to have the fuel pump checked for excessive wear. Your fuel pump may be worn out and need replacing!
7-6. Hold the 0.125” shim “C” on the end of the plug “A” and re-install the spring, shim, and plug into the transfer pump.
7-7. When you have completed adjusting the fuel rail pressure, remove the pressure gauge from the secondary fuel filter head and replace the plug
Figure 17 Figure 18NOTE: The Shim Kit includes two shims, one 0.25” thick and one 0.125” thick.
“B”
“A”
“C” “B”
“A”
“C”
Section 8A: The Caterpillar® Secondary Fuel System Upgrade!Upgrading the Cat secondary fuel system is simply replacing the small #6 fuel lines “A & B” with #8 lines and replacing the 9/16-18 x #6 JIC fittings with ported 9/16 x #8 JIC fittings. It is also necessary to port the secondary fuel filter head!
A. Replace fuel line from transfer pump to secondary filter (Green).B. Replace fuel line from secondary filter to head (Blue) C. Fuel return line from engine (Red)NOTE: Due to space restrictions around the fuel inlet fitting at the front of the engine and ease of procedure, it may be necessary to re-route or switch the connection points on the engine for fuel inlet line “B” & return line “C”.
AFTERBEFORE
Figure 19

10
PureFlow® Technologies, Inc.AirDog® Champ II CATERPILLAR® 3406E, C13, C15, & C16Section 8 Fuel System Upgrade
Section 8B: The Caterpillar® Secondary Fuel System Upgrade!Upgrading the fuel line from the transfer pump to secondary fuel filter.
NOTE: The passageways in the original 9/16 -18 x #6 fuel fittings and #6 lines are small and restrictive to the fuel flow. Upgrading the system with ported # 8 fittings and installing #8 fuel lines increases fuel flow and performance.
8B-1. Disconnect the fuel line from the discharge side (high pressure side) of the transfer pump.
Figure 20
Figure 21 Figure 22
8B-2. Remove the #6 fuel fitting in the transfer pump and install the 9/16-18 ORB x #8 ported fitting.
8B-3. Remove the other end of the fuel line from the inlet fitting on the secondary fuel filter marked “From Pump”. Remove the fuel line from the engine.
Figure 24
Figure 23
Figure 25
8B-4. Remove the #6 “From Pump” fitting in the secondary filter head and install the 9/16-18 ORB x #8 ported fitting.
8B-5. Measure and cut the length of fuel line required, when properly routed, to connect the new #8 ported fitting in the transfer pump to the new fitting installed in the secondary fuel filter head inlet fitting. Attach the proper ends. Assemble the fuel line per standard procedures.

11
PureFlow® Technologies, Inc.AirDog® Champ II CATERPILLAR® 3406E, C13, C15, & C16Section 8 Fuel System Upgrade
Figure 27
Section 8B: Upgrading the fuel line from the transfer pump to secondary fuel filter, cont’d
8B-6. Connect the end with the 90° fitting to the transfer pump. DO NOT position the fitting and fuel line too close to the harmonic balancer as shown in Figure 2. Be sure to have adequate clearance!
8A-7. Route the fuel line to the secondary fuel filter and connect the other end to the “From Pump” fitting. Use the 90° fitting if necessary. Properly tighten the fuel lines to the fittings.
Figure 26
Figure 28 Figure 29
Figure 30
Section 8C: Replacing the fuel line from the secondary fuel filter to the engine head!
8C-1. Disconnect the fuel line from the secondary fuel filter head “To Head” port and remove the #6 fitting. Install a new Ported 9/16”-18 ORB x #8 fuel fitting in the filter head in place of the fitting just removed.
8C-2. Disconnect the other end of the fuel line to the engine and remove the line completely.
8C-3. Follow the #6 engine fuel return line from the secondary filter head to the back of the engine head. Disconnect the fuel line from the fitting in the back of the head and remove the #6 fitting.
Figure 31

12
PureFlow® Technologies, Inc.AirDog® Champ II CATERPILLAR® 3406E, C13, C15, & C16Section 8 Fuel System Upgrade
Section 8C: Secondary Fuel Lines, cont’d!8C-4. Replace the original #6 fitting with a Ported #8 x ORB fitting. You will connect the new fuel line from the secondary fuel filter to the engine head here.
Figure 32
Figure 33
8C-5. Re-route the fuel return line disconnected from the engine in step 7B-3, Fig 30, and reconnect it where the fuel line to the engine was connected before, as shown in Fig 33. This reverses the fuel flow through the engine and is only done to make it easier to connect the larger fuel supply line to the back of the engine.
8C-6. Measure and cut the length of #8 fuel line required, when properly routed, to connect the new #8 Ported ORB fitting in the secondary fuel filter head to the new #8 fitting installed in the back of the engine head. Attach the proper ends and assemble per standard procedures.
8C-7. Connect the 90° end of the new #8 fuel line to the fitting in the “TO HEAD” port in the secondary fuel filter head.
Use the 90° fitting as necessary!
Figure 35
Figure 36
Figure 34
8C-8. Connect the other end of the new #8 fuel line to the Ported #8 fitting in the back of the head. Properly tighten all fuel line connections.

13
PureFlow® Technologies, Inc.AirDog® Champ II CATERPILLAR® 3406E, C13, C15, & C16Section 8 Fuel System Upgrade
Section 8D: Secondary Fuel Filter Housing ModificationAll Caterpillar diesel engines are equipped with a secondary fuel filter mounted on the engine. The filter head usually has a Hand Primer Pump attached to make priming and starting the engine after filter changes.
However, the passageway in the filter head, ref. Fig. 37 and the valves in the hand primer pump are restrictive to the fuel flow through the system and to the engine head and negatively affect engine performance. This passageway must be enlarged to allow better fuel flow through the filter head.
Small, Restrictive Passageway
Restrictive One-way Check Valves in Hand Primer Pump
Compare the check valves and port sizes to a dime!
Figure 37 Figure 38NOTE: Perform the following steps to improve fuel flow and engine performance.
In most cases, the filter head can be drilled out without removing it from the engine!
8D-1. Remove the hand primer pump and fuel filter from the filter head.
8D-2. Using the 3/8” bit, carefully drill out the passageway the carries the fuel from the primer pump into the fuel filter.
8D-3. Remove all burrs and shaving from the filter head.
8D-4. Replace the hand primer pump, Champ II, fuel filter, and fuel return line and any other components removed to perform this procedure.
Note: Remove the primer pump bypass valve before porting this passageway!
NOTE: Be careful not to drill into the fuel filter gasket seat on the underside of the filter head.
Figure 40
Figure 39

14
PureFlow® Technologies, Inc.AirDog® Champ II CATERPILLAR® 3406E, C13, C15, & C16
Figure 42
Section 9 Fuel Lines
Section 9: The Cat ACERT Fuel Recycle Line!Caterpillar ACERT Engines have a “Return Fuel Recycle Line”. This fuel line recycles “HOT” fuel, coming directly from the engine head, back to the fuel inlet port of the transfer pump.
For BEST FUEL ECONOMY and MAXIMUM ENGINE EFFICIENCY,the “Return Fuel Recycle Line” must be removed!
9-3. Disconnect the “Return Fuel Recycle Line” from the top of the inlet fitting at the transfer pump.
9-4. Disconnect the “Return Fuel Recycle Line” from the bottom of the Return Line shutoff valve
9-5. There is a bracket on the “Return Fuel Recycle Line” that secures the line to the block Remove the bolt holding the bracket. Remove the “Return Fuel Recycle Line” from the engine.
9-6. Disconnect the fuel supply line from the bottom of the inlet fitting at the transfer pump.
9-7. Remove the Transfer Pump inlet fitting.
9-8. Install the ORB X #10 JIC flare fitting in the Transfer Pump Inlet Port. (Figure 42)
9-9. Reconnect and tighten the fuel supply line removed in step 7A-4. (Figure 43)
Figure 43
Figure 41
Note: Use the 90° #10 Swivel X #10 JIC Flare fitting, as needed!
15
PureFlow® Technologies, Inc.AirDog® Champ II CATERPILLAR® 3406E, C13, C15, & C16Section 10 Filter Service
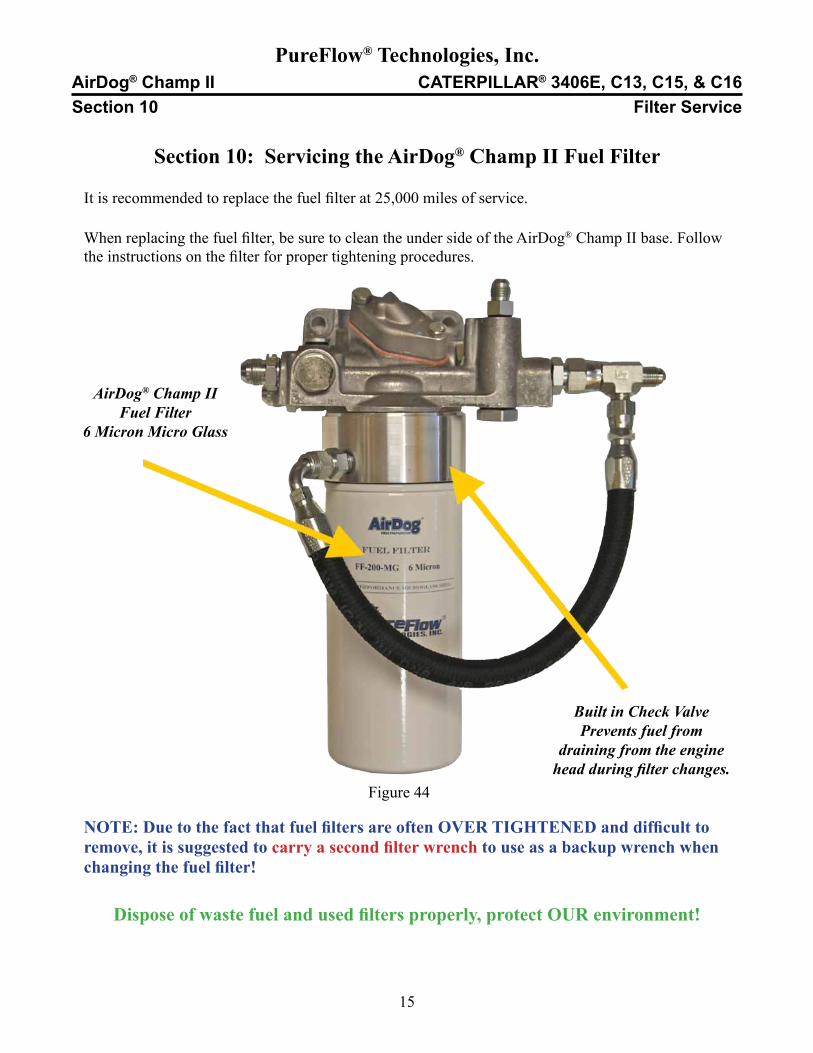
Section 10: Servicing the AirDog® Champ II Fuel Filter
It is recommended to replace the fuel filter at 25,000 miles of service.
When replacing the fuel filter, be sure to clean the under side of the AirDog® Champ II base. Follow the instructions on the filter for proper tightening procedures.
NOTE: Due to the fact that fuel filters are often OVER TIGHTENED and difficult to remove, it is suggested to carry a second filter wrench to use as a backup wrench when changing the fuel filter!
Dispose of waste fuel and used filters properly, protect OUR environment!
AirDog® Champ IIFuel Filter
6 Micron Micro Glass
Built in Check Valve Prevents fuel from
draining from the enginehead during filter changes.
Figure 44
16
PureFlow® Technologies, Inc.AirDog® Champ II CATERPILLAR® 3406E, C13, C15, & C16
Bulletin No. 207-7-0700Revised February, 2017
Copyright© 2016CD Patents, LLC
All Rights Reserved