chapter 1 -...
TRANSCRIPT

ORACLE Series / Oracle JDeveloper 3 Handbook / Dorsey/ 2716-3 / Chapter 1Blind Folio 1:3
CHAPTER1
Working withJDeveloper—Logical
Concepts
P:\010Comp\Oracle8\716-3\ch01.vpTuesday, March 06, 2001 2:18:30 PM
Color profile: Generic CMYK printer profileComposite Default screen

“Contrariwise,” continued Tweedledee,“if it was so, it might be; and if it were so,it would be; but as it isn’t, it ain’t.That’s logic.”
—Lewis Carroll (1832–1898), Through the Looking Glass
The Java environment is much richer and more complex than thetraditional development environment. With terms like web-baseddeployment, Java Foundation Classes, Java Server Pages,encapsulation, Java Virtual Machine, Abstract Windowing Toolkit,inheritance, Common Object Request Broker Architecture, HTML,
polymorphism, XML, application servers, Java Database Connectivity, JARs, Swing,SQLJ, applets, servlets, JavaBeans, multi-tier, and enterprise, all of the possibilitiescan be a bit daunting. However, the Oracle JDeveloper product can assist you increating, debugging, and deploying Java business components and databaseapplications for the Internet.
This chapter provides an overview of the logical concepts you need to keep inmind when creating an application using JDeveloper. To enforce these concepts,the chapter ends with a hands-on practice to demonstrate how to create a simple,working Java application that interacts with the database.
OverviewAs mentioned in the Introduction, this book does not discuss everything that youcan do with JDeveloper. The primary focus is to help client/server developers whouse products such as Oracle Forms, Visual Basic, or PowerBuilder make thetransition into Java using JDeveloper. What will you need to learn? Is buildingsystems in JDeveloper significantly different from using other tools? After wadingthrough all of the confusion, there are not as many differences as you might think.For example, in designing and building a payroll system in a more traditionalenvironment such as Oracle Forms Developer, there is no notion of an “applicationsystem.” You create some number (perhaps hundreds) of smaller applications thatcoordinate and call each other. Together, these form the application system.Similarly, in the JDeveloper environment, there is no such thing as an “applicationsystem.” You will still be creating a number of smaller applications that fit together.
The first major difference between the traditional environments and the JDeveloperenvironment is that in some development environments, the user interfaceand its interaction with the database are inseparable. For example, in Forms,blocks hook directly to database objects. In the JDeveloper environment, the userinterface (UI) and the database interaction are separated. In JDeveloper, you
4 Oracle JDeveloper 3 Handbook
ORACLE Series / Oracle JDeveloper 3 Handbook / Dorsey/ 2716-3 / Chapter 1Blind Folio 1:4
P:\010Comp\Oracle8\716-3\ch01.vpTuesday, March 06, 2001 2:18:31 PM
Color profile: Generic CMYK printer profileComposite Default screen

create files in logical containers called projects. Each program will usually consist oftwo types of JDeveloper projects:
■ User interface components and logic built and written mainly using Javaand Java components
■ Business Components for Java (BC4J) built and written using Java and XMLto provide the database interaction components
Using this architecture, for most of the UI project, you do not actuallycommunicate with the database. Instead, the UI communication with the databaseis done in the middle-tier, BC4J objects. This is not to say that the UI project cannotcontain Java Database Connectivity (JDBC) code that communicates directly withthe database, but the primary GUI objects (such as multi-record screen objects)will usually communicate with the database using BC4J objects.
Using JDeveloperJDeveloper is an application development tool that can support your first steps in theJava world. It can act as a blank sheet of paper for the sophisticated do-it-yourselfer,or as a code generator for those who prefer developing applications by using 4GLtechniques such as drag and drop. JDeveloper can also automatically generate basicdatabase interface code, allowing you to customize the results to your heart’s content.
Coming to an understanding of JDeveloper and Java is like trying to learnEnglish and a computer word processing program at the same time. You shouldhave some experience with other computer languages and application conventionsbefore you leap into this type of effort. It is a good idea to actually build the itemsand structures in the hands-on practices presented in this book as you read thechapters. In this way, you can quickly get a feel for the development environmentby trying out real code. Depending upon how successful you are, you will also geta chance to do some real-time debugging and troubleshooting.
If you are building Internet applications, you will probably not be usingonly Java, but HTML code that is possibly enhanced with JavaScript. A completediscussion of these languages is beyond the scope of this book but Chapter 8provides an introduction.
The Multi-tier Approach to ApplicationDevelopmentJDeveloper is optimized to assist you in producing a multi-tier architecture for yourdatabase applications. The unique power behind JDeveloper to produce a multi-tier
Chapter 1: Working with JDeveloper—Logical Concepts 5
ORACLE Series / Oracle JDeveloper 3 Handbook / Dorsey/ 2716-3 / Chapter 1Blind Folio 1:5
P:\010Comp\Oracle8\716-3\ch01.vpTuesday, March 06, 2001 2:18:31 PM
Color profile: Generic CMYK printer profileComposite Default screen

application is centered on BC4J. A multi-tier architecture encourages the logicalseparation of the following elements:
■ Client tier The client tier supports the data access requirements of the enduser. Complex GUIs can be supported using application code over theInternet, browser-scripting capabilities, and/or by installing applicationcode on the client’s desktop and running it outside of the browser.
■ Application tier The application tier is where the business logic isgenerally enforced and data access is coordinated. Application serverscontain business logic that can be reused across a wide variety of clientsand applications, thus making it possible to share physical and logicalresources across multi-tier architectures. The application tier can alsocontain specialized reporting and analysis tools to handle complex businessintelligence requirements.
■ Database tier The database tier is where the data is stored and queried.This layer may also contain links to other external data sources andapplications, which may be members of the overall architecture.
Hands-on Practice: Create a JavaApplication Using the WizardsNow that you have an idea about the approach to working in JDeveloper, it is timeto try it out. The following practice shows how JDeveloper can be used as a codegenerator. In later chapters, more details will be presented about how to useJDeveloper as a code editor. When you complete this practice session, you shouldhave a good idea of how JDeveloper’s user interface works. The JDeveloper userinterface (the Integrated Development Environment or IDE) is discussed in more detailin Chapter 2.
NOTEAfter you open JDeveloper for the first time, lookat the Welcome page. (Select Help | WelcomeWorkspace (Sample) if you need to reload it.) Thispage provides numerous links to helpful documentsand online resources to help you get started. Asmentioned in the Introduction, users groups,newsgroups, and company web pages are goodresources to guide you down the Java path.
6 Oracle JDeveloper 3 Handbook
ORACLE Series / Oracle JDeveloper 3 Handbook / Dorsey/ 2716-3 / Chapter 1Blind Folio 1:6
P:\010Comp\Oracle8\716-3\ch01.vpTuesday, March 06, 2001 2:18:32 PM
Color profile: Generic CMYK printer profileComposite Default screen

Chapter 1: Working with JDeveloper—Logical Concepts 7
ORACLE Series / Oracle JDeveloper 3 Handbook / Dorsey/ 2716-3 / Chapter 1Blind Folio 1:7
In this first practice, you will create a Java application using the wizards inJDeveloper. This Java application will display employee information by department,in a simple master-detail relationship. The data for this application is from the Scottschema (part of the starter database), which comes with all Oracle databases. If youdo not have access to these tables, please contact your database administrator, oryou can install them from the starter database that comes on the Oracle distributionCD as mentioned in the Introduction.
This practice session consists of the following phases:
I. Set up the workspace
II. Create a business components project
■ Create a project file
■ Create a connection
■ Complete the Business Components Project Wizard
III. Create a user interface project
IV. Define a master-detail data form
■ Launch the Business Components Data Form Wizard
■ Select attributes
■ Add an application wrapper
■ Compile and run the application
When you run the Java application, it will look similar to Figure 1-1.
I. Set up the WorkspaceTo get started with your own code development, you will need to close any openworkspaces and create a new one.
Working within JDeveloper, everything happens within the confines of aworkspace. A workspace is a logical construct that houses all of the elements of anapplication. A workspace can conceivably hold any number of projects; however,experience dictates that you should have a separate workspace for each significant
P:\010Comp\Oracle8\716-3\ch01.vpTuesday, March 06, 2001 2:18:32 PM
Color profile: Generic CMYK printer profileComposite Default screen

8 Oracle JDeveloper 3 Handbook
ORACLE Series / Oracle JDeveloper 3 Handbook / Dorsey/ 2716-3 / Chapter 1Blind Folio 1:8
screen application (corresponding to one form in Oracle Developer or a singleVisual Basic project).
NOTEYou can only have one workspace open at a timein JDeveloper. This is a limitation of the productthat will hopefully be changed in future releases.
Physically, a workspace is a text file (with a .jws extension) that containsinformation about the projects and applications you are building. In this practicesession, you will create a workspace named EmployeeWS to track the files andsettings you use while developing your first Java application. The workspace file willbe stored with your other project-related files in one or more folders (operating
FIGURE 1-1. The completed Java application
P:\010Comp\Oracle8\716-3\ch01.vpTuesday, March 06, 2001 2:18:33 PM
Color profile: Generic CMYK printer profileComposite Default screen

Chapter 1: Working with JDeveloper—Logical Concepts 9
ORACLE Series / Oracle JDeveloper 3 Handbook / Dorsey/ 2716-3 / Chapter 1Blind Folio 1:9
system directory). During your development effort, the physical subdirectory/folder(path) where groups of related files are stored is referred to as a package. The termpackage also refers to a duplicate structure that exists in a class library file (.jar or.zip) that represents the storage paths within the library. The JAR (Java archive) isbasically a compressed file containing the compiled code that you wish to deployor share and an extra file that describes the contents of the JAR. Your workspace filecan maintain information about files stored in many different packages. Wheneveryou save the workspace, all current open files and windows are updated andsaved for you.
1. If you have an existing workspace open, select File | Close Workspace.The Navigation pane will display a new default workspace named“Untitled1.jws.”
2. Select File | Save Workspace.
3. To create a new folder for your application, click the Create New Foldericon in the file dialog and name the New Folder “myempapp.”
4. Double click myempapp to navigate to it.
5. To name the workspace file, click in the File name field, rename Untitled1to “EmployeeWS” to see something similar to Figure 1-2. Then click Save.
6. Select File | Save All.
What Just Happened? You created a workspace and a folder/package to holdthe workspace file and all of the associated files that you will need for your project.
The next step in building your application is to capture the metadata for thetables you wish to access in what Oracle calls the BC4J layer. JDeveloper hasprovided a Business Components Project Wizard to help you with this task.Customizing the BC4J layer will be discussed in detail in Chapter 6, but for now youcan view this code simply as a framework to develop, deploy, and customize yourmulti-tier business applications. For this practice, the Wizard will build predefinedviews of the business data for the Employee and Department tables. The BC4J layerwill maintain the parent-child association rules for the tables and be responsible forupdating the database when you insert, delete, or change rows.
The source code for the Java code (classes) must be stored in files with theextension .java. Each source file is given the same name as the class that it isdefining, and a project file is used to reference each of the source files. When youcompile your code, JDeveloper will save the resulting bytecode (code ready to berun in the Java Virtual Machine or JVM) in a file having the same name asthe source, but using the extension .class. When you compile a Java program, it doesnot generate a .exe file and is not directly callable. Instead, to execute your Javaprogram, you run the JVM and pass the name of the class file as a parameter. This is
P:\010Comp\Oracle8\716-3\ch01.vpTuesday, March 06, 2001 2:18:33 PM
Color profile: Generic CMYK printer profileComposite Default screen

10 Oracle JDeveloper 3 Handbook
ORACLE Series / Oracle JDeveloper 3 Handbook / Dorsey/ 2716-3 / Chapter 1Blind Folio 1:10
not an insurmountable requirement since all modern operating systems comeequipped with their own JVM.
II. Create a Business Components ProjectWithin the workspace, files are logically divided into projects. A project has littlesignificance from a code perspective but merely functions as a logical groupingcontainer for files.
Physically, a project is a file with the extension .jpr, or extensions .jpr and .jpxfor BC4J projects. In this phase of the practice, you will create the BC4J project thatcontains a list of source files (with a .java extension) and metadata files (with a .xmlextension) for the business components layer. This separation of the two projectshelps to create a clean and well-structured application by encapsulating most of thedatabase access in one place.
You will always need to set up a workspace and project file before you do anywork in JDeveloper. These files provide a logical way to organize your code duringits development and act as tables of contents for your work.
You can create any number of projects that point to the same class files. Also,you may store your project files in any location, independent of the class files towhich they point. However, you should carefully consider the scalability of how
FIGURE 1-2. Creating a workspace
P:\010Comp\Oracle8\716-3\ch01.vpTuesday, March 06, 2001 2:18:34 PM
Color profile: Generic CMYK printer profileComposite Default screen

Chapter 1: Working with JDeveloper—Logical Concepts 11
ORACLE Series / Oracle JDeveloper 3 Handbook / Dorsey/ 2716-3 / Chapter 1Blind Folio 1:11
you plan to store your Java workspace, project, and class files. If you put all ofthese files into one location (such as JDEV_HOME\myprojects), you will soon findyourself overwhelmed by the number of files in your root directory. It is a good ideato organize your files in a directory hierarchy that puts the workspace and projectfiles in the same folder as their associated source code.
Create a Project FileWhen you create a project file, you will have the opportunity to run additionalwizards, such as the Business Components Project Wizard, to generate otherapplication files that will be referenced in your project.
1. Select File | New Project to display the Welcome Page of the ProjectWizard. Click Next to display the Project Type page.
NOTEJDeveloper wizards that contain more than one pagestart with a Welcome Page that provides a briefintroduction to the purpose of the wizard andthe types of details that you will need to specify.You can uncheck the “Display this page next time”checkbox if you do not need this information later.Clicking Back the next time you start the wizardwill display the Welcome Page if you have uncheckedthis checkbox. The practices in this book assumethat this checkbox is checked in all wizards. Similarly,the Finish page in each JDeveloper wizard providesa summary of the settings that you specified in thewizard and indicates what you will create when youclick the Finish button. In most wizards, the Finishbutton is enabled on the next to last page and youcan skip the Finish page by clicking this button (ifyou know which page is next to last).
Note for Oracle Developer UsersThe BC4J handling of database access is analogous to how blocks in OracleForms access the database. The event code in the primary application isanalogous to the handwritten triggers and program units that access thedatabase in Forms.
P:\010Comp\Oracle8\716-3(reprint)\ch01.vpFriday, May 04, 2001 2:43:23 PM
Color profile: Generic CMYK printer profileComposite Default screen

12 Oracle JDeveloper 3 Handbook
ORACLE Series / Oracle JDeveloper 3 Handbook / Dorsey/ 2716-3 / Chapter 1Blind Folio 1:12
2. Click Browse to display the Select Project dialog. Doubleclick myempappto navigate to the folder/package to store your project files.
3. To name your project, rename MyProject1 to “MyDeptEmpBusCompPRJ,”and click Open. JDeveloper will apply the extension .jpr to the projectfile name and return you to the Project Type page. (Chapter 3 contains adiscussion on naming conventions for files that you create in JDeveloper.)
4. On the Project Type page, under What type of project would you like tocreate? select “A Project Containing Business Components,” and click Next.
5. On the Project Options page, click Browse, next to What is the name of theproject’s default package, to start the Package Browser. Select “myempapp”as the default folder/package for your project, and click OK. Leave theproject’s source and output directories/paths at their default values.
6. Click Next to complete the Project Options page.
7. On the Project Information page, you may enter information to describeyour project. Leave the Generate project HTML file checkbox unchecked.When you have finished, click Next to continue.
8. You will now see a summary of the options you have selected. Brieflyexamine the contents of this page to confirm your selections.
9. Click Finish to create the project and invoke the Business ComponentsProject Wizard. Click Next if the Welcome page appears.
Create a ConnectionWhen you are asked to create an application, you generally have access to alimited number of database instances. Connecting to these databases is a repetitivetask that you will perform over and over again. To facilitate this task, JDeveloperhas implemented a definition called a connection that is shared across alldevelopment sessions. This definition is used to store the user names, passwords,URLs, and related parameters for your database connections. You can expandthe Connections node (in the Navigator Pane), to view the connections you havealready implemented. By doubleclicking a connection, you can obtain immediateaccess to the Database Browser that allows you to view database objects.
1. In the Connection page, click New to open the Connection dialog. This iswhere you can define the database connection that you want to use.
NOTEVerify the information for the Connection dialog boxfrom your database administrator.
P:\010Comp\Oracle8\716-3\ch01.vpTuesday, March 06, 2001 2:18:36 PM
Color profile: Generic CMYK printer profileComposite Default screen

Chapter 1: Working with JDeveloper—Logical Concepts 13
ORACLE Series / Oracle JDeveloper 3 Handbook / Dorsey/ 2716-3 / Chapter 1Blind Folio 1:13
2. Fill in the fields as follows. This assumes that the database is on your PC:Connection Name as “ScottConnectionAuto”User as “SCOTT”Password as “tiger”Connection Type as “JDBC”Include password in deployment archive (check this checkbox)JDBC Driver as “Oracle JDBC Thin”Connection method as “Named Host”Host ID as “localhost”SID as “ORCL”Port as “1521”Row Prefetch as “10”Batch Value as “1”Report TABLE_REMARKS (leave this unchecked)
3. Click Test Connection. If you entered the appropriate information, you will seethe message “Success!” returned to the right of the Test Connection button.
Click OK to complete the Connection dialog. You will see the settingsappear in the Connection page as follows. Click Next.
If the connection tests successfully, the Package Name page opens. If theconnection fails, JDeveloper displays an exception message and remains onthe Connection page. In the case of an exception, confirm and update theconnection information, and click Test Connection to make sure that theconnection is working. Your connection must test successfully before thewizard will proceed.
P:\010Comp\Oracle8\716-3\ch01.vpTuesday, March 06, 2001 2:18:37 PM
Color profile: Generic CMYK printer profileComposite Default screen

14 Oracle JDeveloper 3 Handbook
ORACLE Series / Oracle JDeveloper 3 Handbook / Dorsey/ 2716-3 / Chapter 1Blind Folio 1:14
Complete the Business Components Project WizardThe previous section created a connection. This is normally a one-time operation.If you need this connection in subsequent projects, you can just select it from thepulldown list in the Connection page. The next steps finish the business componentsdefinition and generate the code.
1. On the Package Name page, accept the default package name myempapp.Click Next.
2. On the Business Components page, the schema field should show “SCOTT”and the Tables checkbox should be checked. Select DEPT and EMP (usingCTRL-click) from the Available field and move them to the Selected field byusing the > button.
3. Check the View Objects and View Links and Application Modulecheckboxes. Click Next.
4. Click Finish to create the business components and add them to your project.
5. To save your work, select File | Save All.
What Just Happened? You used the wizard to create a BC4J project thatconnects to a database schema and defines metadata for the EMP and DEPT tables.This will supply the data elements that you need to create the user interface projectin the next phase.
NOTETake a look at the code that JDeveloper has generatedso far. You now have over 1000 lines of code that canbe modified and extended to obtain the results thatprecisely meet your needs. Browse the NavigationPane and double click on file names to open themin the Source Editor. Be sure to look at the XML files,which hold the definitions for the BC4J objects. Youwill undoubtedly see many terms, tags, specifiers,classes, and language constructs that are new to you.
III. Create a User Interface ProjectThe next project that you will add to the workspace will be used to store the GUIcode to display the data from DEPT and EMP. This project will logically isolate the
P:\010Comp\Oracle8\716-3\ch01.vpTuesday, March 06, 2001 2:18:37 PM
Color profile: Generic CMYK printer profileComposite Default screen

GUI code from the business components code since each of the projects representsa different functional area and may be deployed separately. Projects can have oneor more deployment profiles that designate how to deploy the project. Chapter 8discusses deployment alternatives and profiles in more detail.
Even though you are creating a second project to track the files for thisapplication, you will note that all source files for this practice session are beingstored in the same physical location. Since this practice session is using a singlepackage (subdirectory) to store its source files, you must create unique file namesfor each new piece of code that you intend to add to this subdirectory.
1. Select File | New Project to display the Project Wizard. Click Next todismiss the Welcome page.
2. On the Project Type page, click Browse to display the Select Project dialog.Double-click “myempapp” to navigate to the project’s folder.
3. Name your project “EmpAppPRJ,” and click Open.
4. On the Project Type page, under What type of project would you liketo create? select the An empty project field and click Next.
NOTEAt this point, if you were to select “A projectcontaining a new” and specify “Application,” theBusiness Components Data Form Wizard that is runin the next phase would start. While this bypasses anumber of steps (and is the way that the tutorials inthe JDeveloper help system are written), that pathdoes not show as clearly the different objects thatyou are creating.
5. On the Project Options page, click Browse, next to What is the name of theproject’s default package, to start the Package Browser. Select “myempapp”and click OK.
6. Leave the project’s source and output directories/paths at their defaultvalues. Click Next to complete the Project Options page.
7. On the Project Information page, you may enter information to describeyour project. Leave the Generate project HTML file box unchecked. ClickNext to continue.
Chapter 1: Working with JDeveloper—Logical Concepts 15
ORACLE Series / Oracle JDeveloper 3 Handbook / Dorsey/ 2716-3 / Chapter 1Blind Folio 1:15
P:\010Comp\Oracle8\716-3\ch01.vpTuesday, March 06, 2001 2:18:38 PM
Color profile: Generic CMYK printer profileComposite Default screen

16 Oracle JDeveloper 3 Handbook
ORACLE Series / Oracle JDeveloper 3 Handbook / Dorsey/ 2716-3 / Chapter 1Blind Folio 1:16
8. You will now see a summary of the options you have selected. ClickFinish to create the project. If all went well, you should see a project file(EmpAppPRJ.jpr) shown here with Connections in the Navigation pane.
9. Select File | Save All.
What Just Happened? You created another project to contain the GUI codeand files for the application that you are building.
NOTEFor simplicity, this practice places the BC4J projectin the same folder as the application. However, abetter production practice is to place the BC4Jproject in a separate folder. This makes reusing theBC4J project for other applications a bit cleaner.Other practices in this book follow the path ofcreating a separate folder for the BC4J project.
IV. Define a Master-Detail Data FormThe Business Components Data Form Wizard will now walk you through the stepsto create the basic user interface. This UI will be based on information from theDEPT and EMP tables that are joined in a master-detail relationship, and it will usethe database interface that was developed in your Business Component project toaccess this data. After you finish responding to the choices provided, the Wizardwill generate the Java source code required to implement the UI in a Java frame.Later you will create an application class that calls this frame to display the BusinessForm.
Launch the Business Components Data Form WizardThe following steps start the wizard that creates a frame class file in the UI project.
1. Select EmpAppPRJ.jpr in the Navigation pane. Select File | New to displaythe Object Gallery.
P:\010Comp\Oracle8\716-3\ch01.vpTuesday, March 06, 2001 2:18:38 PM
Color profile: Generic CMYK printer profileComposite Default screen

2. Select the Business Components Data Form icon. Click OK. The Welcomepage of the Business Components Data Form Wizard is displayed.
3. Click Next to display the Data Form page to define a form.
4. Select “Master-Detail” to specify the type of form you want to create.
5. Select “Frame” for your implementation preference. Click Next to displaythe Frame page.
6. Name the frame as “MyEmpFrame,” and accept the defaults for the Packageand Title fields. Click Next to display the Form Layout page.
The Business Components Data Form Wizard allows you to choose the defaultlook and feel of the layout for your form based on UI templates. In this practice,you will display the Department columns using single fields at the top of theform. The Employee columns will be displayed in a multi-record grid controlat the bottom of the form. The “Frame with Navigation Bar” template providedby JDeveloper will manage the form’s default look and feel.
7. For the Master table, select “Vertical” for the Layout. Select “Left” for LabelPosition for each field.
8. For the Detail table, select “Grid” for the Layout field. Check that the LabelPosition field is set to “Above.” The page should look as follows:
9. Click Next to display the Template page.
Chapter 1: Working with JDeveloper—Logical Concepts 17
ORACLE Series / Oracle JDeveloper 3 Handbook / Dorsey/ 2716-3 / Chapter 1Blind Folio 1:17
P:\010Comp\Oracle8\716-3\ch01.vpTuesday, March 06, 2001 2:18:39 PM
Color profile: Generic CMYK printer profileComposite Default screen
18 Oracle JDeveloper 3 Handbook
ORACLE Series / Oracle JDeveloper 3 Handbook / Dorsey/ 2716-3 / Chapter 1Blind Folio 1:18
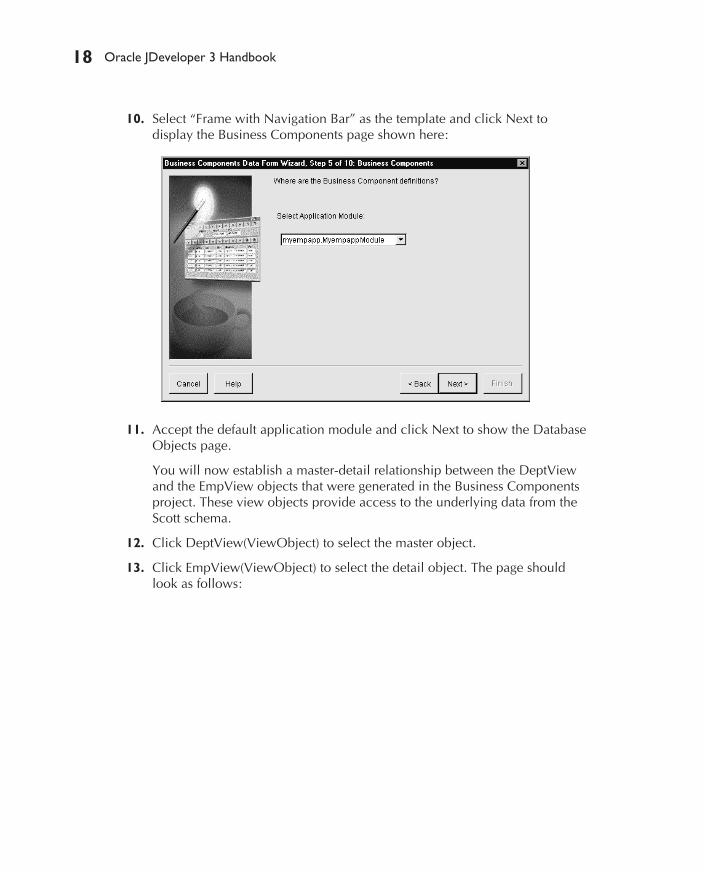
10. Select “Frame with Navigation Bar” as the template and click Next todisplay the Business Components page shown here:
11. Accept the default application module and click Next to show the DatabaseObjects page.
You will now establish a master-detail relationship between the DeptViewand the EmpView objects that were generated in the Business Componentsproject. These view objects provide access to the underlying data from theScott schema.
12. Click DeptView(ViewObject) to select the master object.
13. Click EmpView(ViewObject) to select the detail object. The page shouldlook as follows:
P:\010Comp\Oracle8\716-3\ch01.vpTuesday, March 06, 2001 2:18:39 PM
Color profile: Generic CMYK printer profileComposite Default screen

14. Click Next to display the Join Condition page. The default join conditionwill serve to synchronize the employee records as the user browses throughthe department records.
15. Be sure that both views are highlighted and click Next to accept theassociation.
Select AttributesThe wizard lists all of the attributes belonging to the master and detail view objects.These attributes represent the database columns in DEPT and EMP. The informationafter the attribute name indicates the datatype and size of that column in the table.The following steps are used to select columns for the form.
1. On the Master Attributes page, click the >> button to move all availableattributes to the Selected list as shown here:
Chapter 1: Working with JDeveloper—Logical Concepts 19
ORACLE Series / Oracle JDeveloper 3 Handbook / Dorsey/ 2716-3 / Chapter 1Blind Folio 1:19
P:\010Comp\Oracle8\716-3\ch01.vpTuesday, March 06, 2001 2:18:40 PM
Color profile: Generic CMYK printer profileComposite Default screen

20 Oracle JDeveloper 3 Handbook
ORACLE Series / Oracle JDeveloper 3 Handbook / Dorsey/ 2716-3 / Chapter 1Blind Folio 1:20
2. Click Next to display the Detail Attributes page.
3. Click the >> button to move all attributes from the Available list to theSelected list.
4. Click Next to display the Deployment Connection page. The connectionthat you created earlier (ScottConnectionAuto) should be selected.
5. Click Next to go to the Finish page. You will see a summary of thedefinitions that you have entered in the Wizard.
6. Click Finish to generate the frame and UI code for your form.
7. After designing the user interface, save all of your work by selectingFile | Save All.
Add an Application WrapperThe final piece of code that needs to be generated for your UI project is a classcalled an application that is the executable code responsible for displaying yourframe. You can use the Application Wizard to generate a class that checks yourscreen size and then uses an appropriately sized window to display your frame.
1. Click EmpAppPRJ.jpr in the Navigation Pane.
2. Select File | New to display the Object Gallery.
P:\010Comp\Oracle8\716-3(reprint)\ch01.vpFriday, May 04, 2001 2:44:08 PM
Color profile: Generic CMYK printer profileComposite Default screen

3. Select the Application icon under the Objects tab. Click OK. TheApplication Wizard is displayed as follows:
4. Change Class to “MyEmpApp,” and accept the default for the Packagefield (myempapp).
5. Under Add a default frame, click “An existing frame,” and click the Browsebutton to the right of the empty field to open the Class Browser.
6. In the Class Browser, click the + icon to the left of myempapp to expandthe node, and then click MyEmpFrame to select the frame you previouslycreated for your UI components.
7. Click OK to dismiss the Class Browser and return to the ApplicationWizard. Leave the Center frame on screen checkbox checked and click OKto complete the Wizard and generate the code.
8. Save all of your work by choosing File | Save All.
Compile and Run the ApplicationYou will now compile each of the projects that you have created in preparationfor running your Java application. When you compile the projects, JDeveloperwill generate a duplicate project folder structure under your output directory(JDEV_HOME\myclasses) and fill it with the compiled bytecode files with a .classextension for your application.
Chapter 1: Working with JDeveloper—Logical Concepts 21
ORACLE Series / Oracle JDeveloper 3 Handbook / Dorsey/ 2716-3 / Chapter 1Blind Folio 1:21
P:\010Comp\Oracle8\716-3\ch01.vpTuesday, March 06, 2001 2:18:41 PM
Color profile: Generic CMYK printer profileComposite Default screen

Use the following steps to compile and run the projects that make up yourJava application:
1. In the Navigation pane, click MyDeptEmpBusCompPRJ.jpr, and then selectProject | Rebuild Project “MyDeptEmpBusCompPRJ.jpr”.
2. Click EmpAppPRJ.jpr, and then select Project | Rebuild Project“EmpAppPRJ.jpr”.
3. Save all of your work by selecting File | Save All.
4. Click the MyEmpApp.java file under EmpAppPRJ.jpr in the Navigator pane.
5. Select Run | Run “MyEmpApp”. Accept the Java copyright notice ifdisplayed.
6. Click OK on the login dialog. (Enter a password if necessary.)
JDeveloper will compile your source code and, if no errors are generated, runthe application. Take some time to investigate the operational characteristicsof your Java application. You will find that you can rearrange the columnorder of the detail area by dragging and dropping; sort rows by clicking theheadings of various columns; hide and display columns by selecting thecolumn name from the right-click popup menu; and resize the window.
What Just Happened? You have just completed your first Java applicationusing JDeveloper, generating nearly 40 pages of code. This is no small feat, butthere is still a great deal of work to do if you wish to build even the simplestreal-world business application. You will quickly find that the wizards cannotgenerate everything you might want. However, this is not a significant problembecause, in this flexible environment, you can literally edit every line of generatedcode. The only limit placed on your final product is simply your skill in writing Javacode and your ability to implement what you envision.
22 Oracle JDeveloper 3 Handbook
ORACLE Series / Oracle JDeveloper 3 Handbook / Dorsey/ 2716-3 / Chapter 1Blind Folio 1:22
P:\010Comp\Oracle8\716-3\ch01.vpTuesday, March 06, 2001 2:18:41 PM
Color profile: Generic CMYK printer profileComposite Default screen