chapter 1: general ledger setup -...
TRANSCRIPT

Chapter 1: General Ledger Setup
1-1
CHAPTER 1: GENERAL LEDGER SETUP Objectives
The objectives are:
• Set up Currencies and Exchange Rates. • Create Periods in a new fiscal year. • Create Date intervals. • Create, modify, and delete reason codes. • Create a Financial dimension value. • Create a Dimension Set. • Set up allocation rules. • Contrast the various allocation methods.
Introduction A general ledger is a formal ledger that contains a company’s accounting records. To make the General ledger functional, setup the chart of accounts, fiscal calendars, legal entities, and currencies. The chart of accounts is a list of main accounts and financial dimensions that are allowed by one or more account structures.
Fiscal calendars specify what time period financial data is posted, while currency setup determines which currencies are available for business transactions.
This course explains how to work with the chart of accounts and its multiple dimensions. These dimensions may be used to track profits, cost centers, and other important financial information.
Allocation rules and methods are also defined in this course.
Microsoft Official Training Materials for Microsoft Dynamics®
Your use of this content is subject to your current services agreement
Financials I in Microsoft Dynamics® AX 2012
1-2
Currency and Exchange Rate Setup Currency setup is a mandatory step in Microsoft Dynamics AX® and is used to record financial transactions.
Multi-currency functionality may be used if your company does business in more than one currency. If your organization has multiple legal entities and transacts in multiple currencies, then maintaining currencies and their corresponding exchange rate is essential.
Currency Setup
In Microsoft Dynamics AX, all currencies are provided by default. The currencies are loaded the first time a user opens the General ledger parameters form.
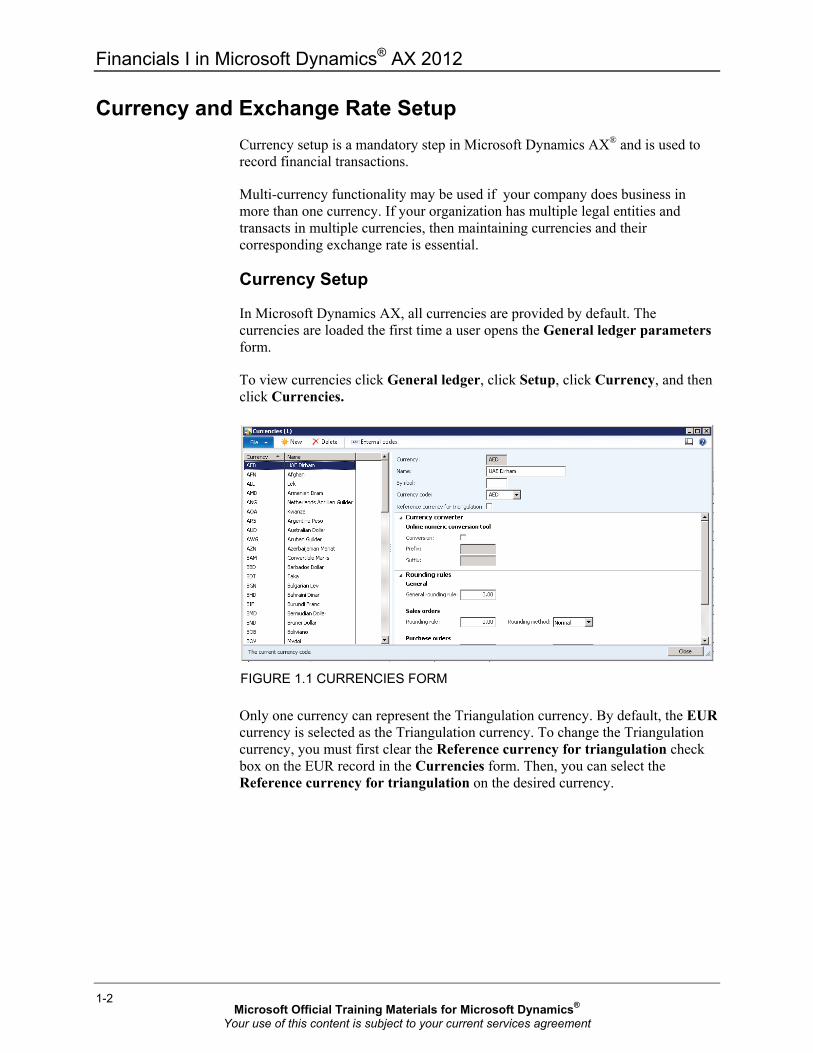
To view currencies click General ledger, click Setup, click Currency, and then click Currencies.
FIGURE 1.1 CURRENCIES FORM
Only one currency can represent the Triangulation currency. By default, the EUR currency is selected as the Triangulation currency. To change the Triangulation currency, you must first clear the Reference currency for triangulation check box on the EUR record in the Currencies form. Then, you can select the Reference currency for triangulation on the desired currency.
Microsoft Official Training Materials for Microsoft Dynamics®
Your use of this content is subject to your current services agreement

Chapter 1: General Ledger Setup
1-3
Currency Names and Symbols
Each currency may have specific attributes associated with it. The name, symbol and currency code are specific to each currency. The following illustrates currencies:
• $ - U. S. dollar • € - Euro
Field Description Currency
The unique identifier – a code of up to three characters – for the selected currency. Examples: • USD- U.S dollar • EUR - Euro • CAD - Canadian dollar
Name A description of the currency. This is typically printed on checks and other documents. Examples: • U.S dollar • Euro • Canadian dollar
Symbol Typically used on reports Example: $
Currency Code
The standard code of the currency as defined by the International Organization for Standardization (ISO).
Accounting and Reporting Currencies
Microsoft Dynamics AX uses the concept of Accounting currency and Reporting currency.
• Accounting Currency: The customary monetary unit of measure used to record the converted monetary value of economic transactions in ledger accounts. In previous releases of Microsoft Dynamics AX, this was called the company currency.
• Reporting Currency: The monetary unit of measure used to record the converted monetary value of economic transactions in ledger accounts for financial and management reporting purposes.
Microsoft Official Training Materials for Microsoft Dynamics®
Your use of this content is subject to your current services agreement
Financials I in Microsoft Dynamics® AX 2012
1-4
An example of this would be if you had a subsidiary company in Canada, your primary company is in the United States. When running reports you want to see the results of the business operations in Canadian dollars (CAD). To accomplish this, you must convert your U.S. dollars (USD) to CAD, the system uses the exchange rate defined on the Exchange rates form to convert the amounts for reporting purposes.
Procedure: Enable a Currency for Currency Conversion
The Currency Converter setup allows numeric conversions for online transactions. If the Conversion box is selected, the system will automatically convert transaction amounts in grids using the exchange rates in the lower pane.
This setup allows the display of financial information in a currency other than the default company currency in forms and reports. This conversion is completed by double-clicking the Currency converter in the Status bar in these forms.
Perform the following steps to convert to another currency.
1. Click General ledger, click Setup, click Currency, and then click Currencies.
2. Select a currency. 3. Select the Conversion check box to enable a currency for
conversion. 4. Specify the currency's symbol before or after an amount, in the
Prefix or Suffix fields.
HINT: Enter a space before the currency symbol to separate the currency amount and the symbol.
Changing the Display Currency
After a currency is enabled for currency conversion, you can display financial information in a form or report using a currency other than the ledger accounting currency. Do this by performing the following steps:
1. On the status bar, click the Currency field to open the Currency converter form.
2. Select any of the currencies that have been set up for conversion in the Currency converter form.
3. Enter the date used for the conversion in the Date of rate field. 4. Click a currency to select the new currency.
Microsoft Official Training Materials for Microsoft Dynamics®
Your use of this content is subject to your current services agreement

Chapter 1: General Ledger Setup
1-5
The Currency converter form will automatically close, and the Currency field on the status bar displays the new currency. All the forms, inquiries, and reports that originally displayed amounts in the company's currency now display the currency selected.
Perform the following steps to return to the default company currency:
1. Open the Currency converter form. 2. Click the Reset button to return to the ledger accounting currency.
Procedure: Set Rounding Options
Perform the following steps to set the Rounding options for each currency.
1. From the Currencies form, select a currency. 2. Tab to the Rounding Rules section. 3. Round the sums according to a fixed unit for general transaction
amounts For example, amounts on transactions are rounded to the nearest unit to 0.01. Specify the general unit for rounding in the General round-off field.
4. Round sums for Sales orders, Purchase orders, and Prices. These have a Rounding option as well as a Rounding method.
Rounding Option - Enter the unit for rounding amounts, such as 0.10 or 1.00.
Rounding Method - Select the rounding convention that applies to the number to the right of the round-off unit that is entered in the Rounding rule text box:
• Normal – round up numbers 5 and higher and round down numbers 4 and lower.
• Downward – round down all numbers. • Rounding-up – round up all numbers.
NOTE: The value in the General round-off field affects all values in all modules.
Microsoft Official Training Materials for Microsoft Dynamics®
Your use of this content is subject to your current services agreement

Financials I in Microsoft Dynamics® AX 2012
1-6
Rounding Option Considerations
All posting amounts are rounded off to the nearest factor of the specified unit, regardless of whether they are calculated and posted automatically or entered manually by the user.
In the General ledger parameters form:
• Specify the maximum rounding amount for a voucher in the default currency, in the Maximum penny difference field.
• Set up the rounding for secondary currencies in the Maximum penny-rounding in secondary currency field.
FIGURE 1.2 GENERAL LEDGER PARAMETERS
Currency Gender
Currency Gender is used for Spanish speaking countries to define the gender printed on checks and reports. Select Feminine if the selected currency has a feminine gender and the gender is used on checks and reports.
The default value for this field is Masculine, which, in effect, means no gender.
Procedure: Create Exchange Rate Types
Exchange rates types are shared data across the entire system and only need to be setup once. Exchange rate types are a grouping that allows different exchange rates for two currencies. Examples include Buy, Sell, Spot, and Budget.
Microsoft Official Training Materials for Microsoft Dynamics®
Your use of this content is subject to your current services agreement

Chapter 1: General Ledger Setup
1-7
Perform the following steps to set up an exchange rate:
1. To access the Exchange rates types form, click General ledger, click Setup, click Currency, and then click Exchange rate types.
2. Click on the New button to create a new record. 3. Enter the identification of the exchange rate type in the Exchange
rate type field and a description in the Name field. 4. Save the record and close the form.
FIGURE 1.3 EXCHANGE RATE TYPES
Procedure: Create Currency Exchange Rates
If a company trades with multiple currencies, and uses multiple exchange rate conversions. Perform the following steps to set up the additional exchange rates:
1. To access the Currency Exchange rates form, click General ledger, click Setup, click Currency, and then click Currency exchange rates or navigate from the Exchange rate type form.
2. Select a Exchange rate type from the drop-down list. 3. Click the New button. 4. Define the necessary exchange rates between a currency pair by
selecting a currency in the From currency and the To currency drop-down list.
Microsoft Official Training Materials for Microsoft Dynamics®
Your use of this content is subject to your current services agreement

Financials I in Microsoft Dynamics® AX 2012
1-8
NOTE: A currency pair can only exist once and entering a reciprocal pair is not supported in the the system. Therefore, if you already have USD to EUR set up, you cannot create a EUR to USD currency pair for the same exchange rate type. The system will calculate the reciprocal rate automatically if it cannot find the exact currency pair during the translation conversion. If you only have USD to EUR set up and you are entering a transaction amount in EUR in a legal entity where USD is the accounting currency, the system will first look for the exact currency pair in the rate type used by the ledger: EUR to USD. If not found, the system will then look for USD to EUR and calculate the reciprocal rate.
5. Define the Quotation unit. Typically the system is based on either one unit or one hundred units. If the field is set to one hundred units, the exchange rate should specify the equivalent of one hundred units of the foreign currency. For example, if the "From" currency is U.S. dollars and the "To" currency is Euro, the exchange rate should specify how many U.S. dollars equal one hundred Euros.
6. Select the date range in by entering the From date and a To Date in the appropriate fields. This date range is used to filter the display of the exchange rates in the grid. By default, this range is set to 30 days prior to and 30 days after the current date
7. It is possible to add multiple exchange rate dates for a single currency pair by clicking the Add button.
8. It is also possible to remove exchange rate dates for a single currency pair by clicking the Remove button.
9. Save the record and close the form
Microsoft Official Training Materials for Microsoft Dynamics®
Your use of this content is subject to your current services agreement

Chapter 1: General Ledger Setup
1-9
NOTE: Because the same currency can have several rates, the posting date determines the rate applied.
For example:
An exchange rate is entered on January 1, and another exchange rate is entered on February 1. If a sales order is invoiced on January 15, the exchange rate from January 1 is used to calculate the invoice amount. If an exchange adjustment is run on February 2, the rate from February is used as an adjustment.
FIGURE 1.4 CURRENCY EXCHANGE RATES
Procedure: Create Revaluation Accounts
When running currency revaluation, exchange rate differences may occur due to the change in exchange rates. This is also used in the customer/vendor settlement of payments and invoices. Revaluation processes will generate unrealized gain/loss amounts where the settlement process will generate realized gain/loss amounts.
For each ledger, define main accounts to account for changes in exchange rate loss or gain. Perform the following steps to set up ledger and currency specific exchange rate loss/gain accounts:
1. Open General ledger, select Setup, select Currency, and then select Currency revaluation accounts.
2. Select the ledger in the Ledger field. 3. Select a Currency and define the main accounts that will be posted
to for any unrealized and realized gains/losses for the currency in that ledger.
4. Repeat the same steps for each ledger/currency. 5. Save the record and close the form.
Microsoft Official Training Materials for Microsoft Dynamics®
Your use of this content is subject to your current services agreement

Financials I in Microsoft Dynamics® AX 2012
1-10
NOTE: This setup can also be completed from the General ledger Setup > Ledger form if different gain/loss accounts are not required for each currency.
FIGURE 1.5 CURRENCY VALUATION ACCOUNTS FORM
Denomination Currencies
Add the currencies that are denominated as the triangulation currency and should be triangulated through the triangulation currency during the currency conversion process.
FIGURE 1.6 DENOMINATION CURRENCIES FORM
Microsoft Official Training Materials for Microsoft Dynamics®
Your use of this content is subject to your current services agreement

Chapter 1: General Ledger Setup
1-11
Accounting and Reporting Currencies
Microsoft Dynamics AX allows Accounting and Reporting currencies.
Accounting Currency: This is the monetary unit of measure that is used to record the converted monetary value of economic transactions in ledger accounts. It may also be referred to as the "company" or ledger currency.
Reporting Currency: This is the monetary unit of measure used to record the converted monetary value of economic transactions in ledger accounts for financial and management reporting purposes.
For example:
A primary company entity is located in the United States, and a subsidiary entity is located in Canada. To see financial reports in the Canadian (CAD ) currency, the system uses the exchange rates defined in the Exchange rates form to convert USD to CAD amounts.
Procedure: Change the Display Currency
After a currency has been enabled for currency conversion, perform the following steps to display financial information in a currency other than the default company currency:
1. On the status bar, click the Currency field to open the Currency converter form.
2. Select any of the currencies that have been set up for conversion in the Currency converter form.
3. Enter the date used for the conversion in the Date of rate field. 4. Click a currency to select the new currency.
The Currency converter form automatically closes, and the Currency field on the status bar displays the new currency. All the screens, inquiries, and reports that originally showed amounts in the company's currency display the new currency.
Perform the following steps to return to the default company currency.
1. Open the Currency converter form. 2. Click the Reset button to return to the default company currency.
NOTE: When you change the display currency, the default currency of a company does not change. Also, this is not a global change; it does not affect any other users in the company, nor does it change the original transaction. It is also meant to be an estimate of the amount in the selected currency.
Microsoft Official Training Materials for Microsoft Dynamics®
Your use of this content is subject to your current services agreement

Financials I in Microsoft Dynamics® AX 2012
1-12
Lab 1.1 - Set up a Currency Exchange Rate Scenario
Ken is the Controller for Contoso Entertainment USA (CEU). CEU uses US dollars as the company's default currency. CEU recently gained a new customer located in South Africa and uses the South African Rand (ZAR). Transactions for this currency should be tracked to two decimal places. As of April 1, 2011, 12.35 USD equals 100 ZAR.
After some research, Ken has found that the following posting accounts should be set for the new currency.
Field Value
Realized Loss 801300
Realized Profit 801500
Unrealized Loss 801400
Unrealized Profit 801600
Challenge Yourself!
1. Set up the South African Rand (ZAR) posting accounts and rounding options.
2. Set up the exchange rate. 3. Convert the ZAR Quotation unit to 100.
Need a Little Help?
1. To set up the currency and specify the posting accounts and rounding options, follow these steps: o Open the Currencies form and enter a general rounding rule. o Open the Currency revaluation accounts form, and set
appropriate main accounts.
2. Set up the exchange rate for the ZAR currency. 3. To set up ZAR for currency conversion, select 100 in the Quotation
unit field
Step by Step
Perform the following steps to set up the currency rounding options:
1. Click General ledger, click Setup, click Currency, and then click Currencies.
2. Highlight the Currency ZAR.
Microsoft Official Training Materials for Microsoft Dynamics®
Your use of this content is subject to your current services agreement

Chapter 1: General Ledger Setup
1-13
3. Click the Rounding rules FastTab and in the General rounding rule field, enter .01.
4. Click Close to close the form.
Perform the following steps to set up the currency posting accounts:
1. Click General ledger, click Setup, click Currency, and then click Currency revaluation accounts.
2. Select ceu as the Ledger. 3. Highlight the Currency ZAR. 4. In the Realized gain line, enter 801500 in the Main account field. 5. In the Realized loss line, enter 801300 in the Main account field. 6. In the Unrealized gain line, enter 801600 in the Main account field. 7. In the Unrealized loss line, enter 801400 in the Main account field. 8. Click Close to close the form.
Perform the following steps to set up the exchange rate. Every currency requires one exchange rate entry with a blank date.
1. Click General ledger, click Setup, click Currency, and then click Currency exchange rates.
2. In the Exchange rate type field, select Default in the drop down list. 3. Click the Add button. 4. In the Start Date field, click the calendar icon. 5. Select 04/01/11. 6. In the Exchange rate field, enter 12.3500
Perform the following steps to set up ZAR for currency conversion.
1. Select 100 in the Quotation unit field. 2. Click Close to close the form.
Microsoft Official Training Materials for Microsoft Dynamics®
Your use of this content is subject to your current services agreement

Financials I in Microsoft Dynamics® AX 2012
1-14
Periods and Fiscal Year Setup The fiscal year in Microsoft Dynamics AX can be:
• Set to any length • Divided into any number of periods • Shared across multiple legal entities
Both fiscal year and periods can be set up by the following measurements of time:
• Years • Months • Days
Each period (at the ledger level) can be:
• Closed completely or put On Hold to block transaction postings • Set to enable selected users to continue an update of one or more
modules
The periods and fiscal year feature is very useful for the preparation and reconciliation of periodic and yearly accounts
Set Up Periods and Fiscal Year
Fiscal calendars are shared across multiple legal entities. The benefits of sharing fiscal calendars include:
• Supporting multiple fiscal calendars for each legal entity.
For example: Fixed assets may require two calendars one for auditing purposes and one for tax purposes. Having multiple calendars allows you to run parallel depreciations.
• Reduces the amount of setup required for each legal entity as it is possible to use the same fiscal calendar for multiple legal entities.
Before posting transactions, a new fiscal year must be divided into periods as transactions cannot post unless a period is created for the posting date.
NOTE: Microsoft Dynamics AX posts transactions according to dates as opposed to periods. Accounting periods are used for reporting. Closing of accounting periods allows the user to close the sub-ledger to make sure that no additional transactions are recorded.
Microsoft Official Training Materials for Microsoft Dynamics®
Your use of this content is subject to your current services agreement

Chapter 1: General Ledger Setup
1-15
Scenario
Phyllis, the Accounting Manager, wants to define calendars for different purposes and share them across different ledgers without having to create them in each legal entity.
Procedure: Create Shared Fiscal Calendar
Perform the following steps to create a new fiscal calendar:
1. Click General ledger, click Setup, and then click Fiscal Calendar. 2. Click the New fiscal calendar button. 3. Enter the name of the calendar to be created in the Calendar field. 4. Enter a description of the fiscal calendar in the Description field.
This description may print on reports. 5. Enter the Start and End dates of the initial fiscal year in the
appropriate fields. 6. Enter a Fiscal year name of the initial fiscal year to be associated
with this fiscal calendar. 7. Enter the Length of the period and the Unit of the periods. These
fields work together to determine how many periods will be created. 8. Click the Create button.
NOTE: There will always be an Open and Closing period created along with the number parameters specified in the Length of the Period and the Unit fields.
Microsoft Official Training Materials for Microsoft Dynamics®
Your use of this content is subject to your current services agreement

Financials I in Microsoft Dynamics® AX 2012
1-16
Example:
Length of period entered in setup
Unit entered in setup
Number of Periods Created
1 Days 367
1 Months 14
1 Year 3
FIGURE 1.7 FISCAL CALENDAR YEAR FORM
Review New Periods
When you create a new fiscal year, the system creates the following:
• An opening period with the Type of Opening • A number of periods (or period) with the Type of Operating • A closing period with the Type of Closing
Microsoft Official Training Materials for Microsoft Dynamics®
Your use of this content is subject to your current services agreement

Chapter 1: General Ledger Setup
1-17
NOTE: There is no Period status control on the Fiscal Calendar form. This is because when you are sharing a calendar across multiple legal entities, all legal entities may not be ready to be closed at the same time. Therefore, you control the period status on a per-legal entity basis, in their ledger (General ledger > Setup > Ledger > Ledger calendar).
The period types are defined as follows:
• Opening – the period can be used to record opening balances from the previous period.
• Operating – the period can be used to record accounting transactions.
• Closing – the period can be used to record general ledger transactions for closing a fiscal period.
Modifying Fiscal Calendar
Once the Fiscal Calendar is created, it is possible to Divide, Delete, or Create closing period in the Fiscal calendar form by clicking the appropriate button.
• To divide an existing period into two periods, click the Divide period button. Enter the start date of the new period, and then click OK to create the new period and return to the Periods form.
• To create a closing period for a fiscal period, click the Create Closing period button. The system automatically creates an opening and closing period for the fiscal year, but not for each individual period.
NOTE: It is also possible to create multiple closing periods. This provides the ability to track internal button external audit adjustments (for example) in separate periods.
• To delete period with an Operating status click the Delete button. The Delete button is not available if the selected fiscal period has a status of Opening. No warning or error message appears when an open period with transaction history is deleted. The transactions are not deleted, and the end date of the period prior to the deleted period changes to coincide with the beginning date of the next period.
• After making changes to periods, it is recommend to run the Recalculate ledger period functionality.
Microsoft Official Training Materials for Microsoft Dynamics®
Your use of this content is subject to your current services agreement

Financials I in Microsoft Dynamics® AX 2012
1-18
Lab 1.2 - Create Periods in a New Fiscal Year Scenario
Ken, the Controller for Contoso Entertainment USA (CEU), must create a new fiscal year. CEU has a fiscal year that begins on July 1, and is divided into one-month periods.
Challenge Yourself!
Create the fiscal year calendar for 2012, which begins on July 1, 2011.
Need a Little Help?
1. In the Fiscal calendars form, click the New fiscal calendar button to create the fiscal year for 2012.
2. Select the period length of one month.
Step by Step
1. Click General ledger, click Setup, and then click Fiscal Calendar. 2. Click the New fiscal calendar button. 3. Enter FIS-2012 in the Calendar field. 4. Enter Fiscal Year 2012 in the Description field. 5. In the Start of fiscal year field, enter 7/1/2011. 6. In the End of fiscal year field, enter 6/30/2012. 7. Enter 2012 in the Fiscal year name field. 8. In the Length of period field, enter 1. 9. In the Unit field, click the arrow to select Months. 10. Click the Create button to create the year. 11. Click Close to close the form.
Microsoft Official Training Materials for Microsoft Dynamics®
Your use of this content is subject to your current services agreement

Chapter 1: General Ledger Setup
1-19
Date Intervals Create and manage date intervals that can be used in financial statements and reports. Date intervals allow you to create dynamic dates. When you use date intervals, you can set up predefined periods when you run financial statements. Date intervals can also be used when setting up an allocation rule.
Scenario
Ken, the Controller at Contoso Entertainment USA (CEU), runs a dimension statement every month. Instead of entering the dates every time he runs the report, he selects a date interval.
The date interval automatically fills in the start date and the end date. Therefore, Ken does not have to specify the start date and the end date when he runs the dimension statement.
Procedure: Create Date Intervals
Perform the following steps to create date intervals:
1. To access the Date intervals form, click General Ledger, click Setup, click Periods, and then click Date Intervals.
2. Click the New button to create a new record. 3. Enter a date interval code in the Date interval code field. Use a code
that is easy to identify when you set up date intervals on statements and reports, such as CP for the Current period.
Microsoft Official Training Materials for Microsoft Dynamics®
Your use of this content is subject to your current services agreement

Financials I in Microsoft Dynamics® AX 2012
1-20
4. Enter a short description of the date interval, in the Description field.
FIGURE 1.8 DATE INTERVALS FORM
Procedure: Create Date Intervals - Start/End
Perform the following steps to further define the date interval start and end dates.
1. From the Date intervals form, click the General tab. 2. Select the time unit that is the basis of the calculation in the Before
list. 3. Specify the starting point of the interval in the Start/End field. This
data is used with the value in the Before list to set the starting point of the date interval. The following examples are for Before and Start/End fields:
Field name Value
Before Fiscal year
Start/End Start
Calculation date 3/13/2012
Starting point 1/1/2012
Field name Value
Before Quarter
Start/End End
Calculation date 3/13/2012
Starting point 3/31/2012
Microsoft Official Training Materials for Microsoft Dynamics®
Your use of this content is subject to your current services agreement

Chapter 1: General Ledger Setup
1-21
NOTE: The Calculation date field is equal to the system date. Changing the system date, (File > Tools > Session Date), will change all the values in the Date calculation area of the form accordingly.
Procedure: Create Date Intervals - Future or Past
Perform the following steps to set whether a date interval moves into the future or the past
1. From the Date intervals form, click the General tab. 2. Indicate whether the interval should move into the future or into the
past, by selecting + for future or - for past in the +/- field. The +/- field is based on the Before field. The number is multiplied by the time units in the Days, months, years or periods field.
3. Select the unit for change of start date in the interval in the Days, Months, Years or periods field. The number of units is displayed in the +/- field. The choices are reflected in the After adjustments field. The following examples are of the +/- field and the Days, months, years and period fields:
Field Value
Before Year
Start/End Start
+/- 1
Days, months, years and periods Years
Calculation date 3/13/2012
Starting point 1/1/2012
After adjustment 1/1/2012
Field Value
Before Year
Start/End Start
+/- - 1
Days, months, years and periods Years
Calculation date 3/13/2012
Starting point 1/1/2012
After adjustment 1/1/2012
Microsoft Official Training Materials for Microsoft Dynamics®
Your use of this content is subject to your current services agreement
Financials I in Microsoft Dynamics® AX 2012
1-22
NOTE: If the +/- field and Days, Months, Years or periods field is empty, the After adjustments field equals the starting point value.
Procedure: Create Date Intervals - After
Follow these steps to select the basis for adjustment of the date in the After adjustments field.
1. From the Date intervals form, click the General tab. 2. Select a time unit to determine the start date or the end date of the
From date field in the After field. The From date field is based on the value in the After adjustments field. The From date is used as the basis of calculation in financial statement columns, and can be the start or the end date of a time unit selected in the After field
3. Select whether the time unit in the After field should be set in the beginning or the end of the time unit in the Start/End field. The following examples are of the After field and the Start/End field.
Field Value
After adjustments 4/17/2012
After Fiscal year
Start/End Start
From date 1/1/2012
Field Value
After adjustments 4/17/2012
After Quarter
Start/End End
From date 6/30/2012
Procedure: Create Date Intervals - Locked Start
Perform the following steps to use a specific date.
1. From the Date intervals form, click the General tab. 2. Enter a fixed start date, in the Locked start field. All other values
are overwritten, and the value is transferred to the From date field.
Microsoft Official Training Materials for Microsoft Dynamics®
Your use of this content is subject to your current services agreement
Chapter 1: General Ledger Setup
1-23
Reason Codes Reason codes are standardized codes that can be used in various transaction types or changes to field values to provide background data about the transaction. For example, auditors or managers frequently want to see reasons recorded for various transactions such as reversals.
When you use standard reason codes instead of transaction text, you have guidelines for which codes to select from. Standard reason codes also allow management and auditors to analyze transaction history by specific reason. Reason codes can be used with the following:
• General ledger • Accounts payable • Accounts receivable • Bank
Procedure: Create a Reason Code
A reason code can be selected in the following General ledger entry processes:
• General journal entry • Process allocation requests • Elimination proposal • Consolidation, Online periodic
Perform the following steps to create a General ledger reason code:
1. To access the Reasons form, click General Ledger, click Setup, and then click Ledger reasons.
2. Click the New button to create a new reason. 3. Enter a unique Reason Code as identification.
Microsoft Official Training Materials for Microsoft Dynamics®
Your use of this content is subject to your current services agreement

Financials I in Microsoft Dynamics® AX 2012
1-24
4. Enter a Default Comment for the reason code. The comment entered here is displayed as the default comment when you select this reason in transactions. You can change the default reason comment.
FIGURE 1.9 LEDGER REASONS FORM
Procedure: Modify a Reason Code
Reason codes can be modified at any time. The Default comment and Account types can be changed.
Perform the following steps to modify a reason code:
1. To access the Reasons form, click General Ledger, click Setup, and then click Ledger reasons.
2. Select the Reason Code to modify. 3. Modify the Default Comment for the reason code. 4. Clear the Ledger check box. As soon as the Ledger check box is
cleared, the reason code is no longer displayed in the General ledger transaction entry forms, and is unable to be used.
Procedure: Delete a Reason Code
Perform the following steps to delete a reason code.
1. To access the Reasons form, click General Ledger, click Setup, and then click Ledger reasons.
2. Select the Reason Code to be deleted.
Microsoft Official Training Materials for Microsoft Dynamics®
Your use of this content is subject to your current services agreement

Chapter 1: General Ledger Setup
1-25
3. Clear the Ledger check box. You can delete a Reason code only if no account types are associated with it. If the Reason code has been selected for use from another module, clear the other Account type check boxes or view the Reasons form from Basic to clear all Account type check boxes.
4. Click the delete icon. 5. Click Yes in the Confirm deletion dialog box.
Financial Dimensions Financial dimensions have the following characteristics:
• Provide a more detailed description of a transaction. • Simplify the accounting process when you enable detailed analysis
without the creation of a detailed Chart of Accounts. • Are defined to analyze and classify financial transactions as follows:
o Financial transactions usually are organized according to voucher and account number.
o Additional grouping and classification options are available when you assign several dimensions to transactions.
• Enable you to view the data file from different perspectives to
improve the effectiveness in tracking figures across accounts. • Can be used throughout the system. • Add dimensions to base data such as:
o Ledger accounts o Customers o Vendors
• Are copied to transactions automatically.
Scenario
Ken, the Controller at Contoso Entertainment USA, must analyze company figures from a perspective other than only ledger accounts. Ken wants to make reports and sales statistics inquiries based on cost centers and departments. Therefore, he decides to set up dimensions as a supplement to voucher and account numbers.
Microsoft Official Training Materials for Microsoft Dynamics®
Your use of this content is subject to your current services agreement

Financials I in Microsoft Dynamics® AX 2012
1-26
Procedure: Create a Financial Dimension
Perform the following steps to create a new financial dimension.
1. To access the Financial Dimensions form, click General ledger, click Setup, click Financial dimensions, and then click Financial dimensions.
2. Click the New button. 3. In the Use values from field, select a system-defined entity to base
the financial dimension on. Financial dimension values will be created from this selection. For example, to create dimension values for projects, select Projects. A dimension value will be created for each project name.
4. Enter the name of the financial dimension in the Dimension name field.
5. In the Report column name field, enter the name of the financial dimension to be displayed as a column name on reports.
6. In the Dimension value mask field, enter a format mask to use for creating financial dimension values. A format mask limits the amount and type of information that you can enter for dimension values. For example, if the dimension value should be 3 characters, you could enter XXX.
7. This field is available only when you select < Custom dimension > in the Use values from field.
8. Click the Financial dimension values button to enter more details about the financial dimension.
Microsoft Official Training Materials for Microsoft Dynamics®
Your use of this content is subject to your current services agreement

Chapter 1: General Ledger Setup
1-27
9. Click the Translations button to open the Text translation form, in which you can enter text to be displayed in different languages for the selected financial dimension.
10. Click Main account translation to open the Text translation form, in which you can enter text to be displayed in different languages for the main account.
FIGURE 1.10 FINANCIAL DIMENSIONS
Financial Dimension Value Details
Use the Dimension Values Detail form to set up the details for financial dimension values. You can set options for dimension values that can be shared between a chart of accounts and a legal entity. You also can set specific options for dimension values based on the chart of accounts or legal entity specified.
Click the Financial dimension values button in the Financial dimensions form to enter detailed values.
NOTE: Depending on your selection in the Select the level of dimension value to display field, some fields will not be available
Field Description
Dimension Value
Displays the financial dimension value for the dimension selected in the Dimension details form
Description The description for the financial dimension value.
Microsoft Official Training Materials for Microsoft Dynamics®
Your use of this content is subject to your current services agreement

Financials I in Microsoft Dynamics® AX 2012
1-28
Field Description
Select the level of dimension value to display
Select the level of the financial dimension value to display. If you select Shared value, fields that can be shared between a chart of accounts and a company are displayed. You can the values for a specific chart of accounts or legal entity by selecting Chart of accounts or Companies. If you select Chart of accounts, some fields will not be available and you can override the shared information for the selected chart of accounts. If you select Companies, some fields will not be available, you can override the shared information for the selected company, and additional fields specific to the selected company will be displayed.
Financial Dimension Value Details General
Expand the General tab to enter general parameters detail for the dimension.
Field Description Active from Enter or select the date that the financial dimension value
is active from. If you leave it blank then it uses the beginning of time.
Active to Enter or select the date that the financial dimension value is active to. If it is left blank, it uses the end of time.
Suspended Select this check box to prevent all postings to the selected financial dimension value. You cannot suspend a financial dimension value that is assigned as a budget group account on another account.
Owner Select the employee number for the employee who is responsible for this financial dimension value.
Group Dimension
Enter a group dimension name. This can be used to group specific financial dimension values into the same dimension value when you consolidate legal entities. This field is available only when Shared value is selected in the Select the level of dimension value to display field.
Calculate total from multiple dimension values
Select this check box to sum up amounts from one or more dimension values. This field is available only when Shared value is selected in the Select the level of dimension value to display field.
Microsoft Official Training Materials for Microsoft Dynamics®
Your use of this content is subject to your current services agreement

Chapter 1: General Ledger Setup
1-29
Field Description
Do not allow manual entry
Select this check box to prevent a user from manually entering a value for this financial dimension in journals. This field is available only when Shared value is selected in the Select the level of dimension value to display field.
Companies
If Companies is selected in the Select the level of dimension value to display field, Financial Statement Formatting and Cost accounting tabs become available.
The following describes how to use each of the fields in the expanded Financial Statement Formatting tab:
Field Description
Invert sign Select this check box to hide the minus sign on the financial statement report when this financial dimension is represented. Typically, revenue and expenses are displayed in both credit and debit balances so that credit balances have a minus sign and debit balances have no sign. When this check box is selected, the minus sign in front of revenue on the report is not displayed.
Column Select the column number that the financial dimension is printed to when the financial statement is printed. You can define how many columns will be used to print a single column definition. For example, if you enter a 2 in the Number of columns field in the Financial statement form, for a definition that shows the current balance, the balance for this financial dimension will be printed in 2 columns.
Bold Select to print the selected financial dimension in bold type on the financial statement.
Italics Select to print the selected financial dimension in italic type on the financial statement.
Line above Select to precede the selected financial dimension with a blank line on the printout of the financial statement.
Line below Select to follow the selected financial dimension with a blank line on the printout of the financial statement.
Underline text Select to underline the text when the selected financial dimension is printed on the financial statement.
Underline amount
Select to underline the amounts when the selected financial dimension is printed on the financial statement.
Microsoft Official Training Materials for Microsoft Dynamics®
Your use of this content is subject to your current services agreement
Financials I in Microsoft Dynamics® AX 2012
1-30
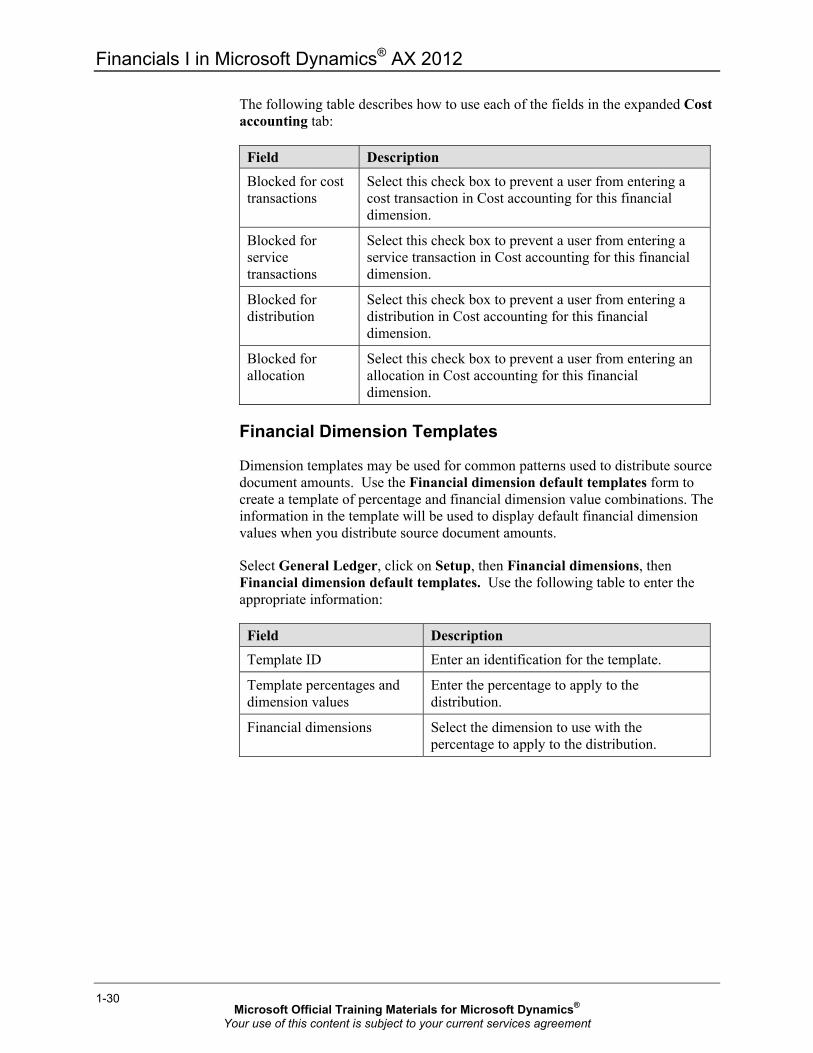
The following table describes how to use each of the fields in the expanded Cost accounting tab:
Field Description
Blocked for cost transactions
Select this check box to prevent a user from entering a cost transaction in Cost accounting for this financial dimension.
Blocked for service transactions
Select this check box to prevent a user from entering a service transaction in Cost accounting for this financial dimension.
Blocked for distribution
Select this check box to prevent a user from entering a distribution in Cost accounting for this financial dimension.
Blocked for allocation
Select this check box to prevent a user from entering an allocation in Cost accounting for this financial dimension.
Financial Dimension Templates
Dimension templates may be used for common patterns used to distribute source document amounts. Use the Financial dimension default templates form to create a template of percentage and financial dimension value combinations. The information in the template will be used to display default financial dimension values when you distribute source document amounts.
Select General Ledger, click on Setup, then Financial dimensions, then Financial dimension default templates. Use the following table to enter the appropriate information:
Field Description
Template ID Enter an identification for the template.
Template percentages and dimension values
Enter the percentage to apply to the distribution.
Financial dimensions Select the dimension to use with the percentage to apply to the distribution.
Microsoft Official Training Materials for Microsoft Dynamics®
Your use of this content is subject to your current services agreement

Chapter 1: General Ledger Setup
1-31
Financial Dimension Entry
After dimension values are set up, you can assign them to the following:
• Ledger accounts • General ledger transactions • Accounts Receivable transactions • Customers • Accounts Payable transactions • Vendors
For example, customer 4037 may be set up by department and cost center dimensions. When a sales order is created for customer 4037, the defined dimensions are populated on the sales order automatically, but the values can be changed.
Throughout Microsoft Dynamic AX, you can separate data in different ways by using dimensions. For example, you can attach a department number to each transaction and then run a query that shows balances by department code.
Microsoft Official Training Materials for Microsoft Dynamics®
Your use of this content is subject to your current services agreement

Financials I in Microsoft Dynamics® AX 2012
1-32
Lab 1.3 - Assign Ledger Account Dimension Values Scenario
Phyllis, the Accounting Manager, at Contoso Entertainment USA (CEU) has been asked by Charlie, the President and CEO, for monthly financial reports by department, cost center, and purpose. Phyllis has determined that cleaning expenses for the building should always be recorded to the Building maintenance cost center.
Challenge Yourself!
Help Phyllis enter the necessary dimension validation options for account 605110.
Need a Little Help?
To guarantee the accuracy of the financial reports, make sure that transactions posted to the cleaning expense account (605110) always specify:
1. Cost center dimension - Building maintenance
Step by Step
1. Click General ledger, click Common, and then click Main accounts.
2. Select account 605110, Cleaning expense, and click the Edit button. 3. Select Companies in the Select the level of main account to display
field. 4. Select CEU in the Companies field. You may have to click on the
green cross icon to select the company. 5. Expand the Financial Dimensions FastTab. 6. In the Cost center field, click the arrow to select the Building
maintenance account. 7. Close the form.
Microsoft Official Training Materials for Microsoft Dynamics®
Your use of this content is subject to your current services agreement

Chapter 1: General Ledger Setup
1-33
Financial Dimension Sets Financial dimension sets have several purposes. Financial dimension sets are used to determine how reports and inquiries related to the general ledger are rendered.
Financial dimension sets are used to calculate balances during the posting process. Balances can also be scheduled for calculation or manually updated.
Balances are stored based on the financial dimension set and are calculated based on the option to calculate with posting or batch schedule. Financial dimension sets also drive the data displayed in the Trial balance list page.
The order in which financial dimension sets are considered in reporting effect how transactions are sorted and fields are presented. For example, the set Department and Cost center indicates that the Department dimension type is first and Cost center second. Therefore, the considered financial set is the composite of Department and Cost center. Department amounts are presented first and Cost center amounts are presented second.
The defined financial dimension set can be used alone or in pairs when inquiring or reporting on financial transactions. The selection of a primary and secondary financial dimension set is considered when presenting the results. The secondary financial dimension set details the figures of the primary dimension set. The selection of a secondary financial dimension set is limited to focuses that do not share a dimension type with a primary dimension set. Therefore, if the primary dimension set is the composite of Main account and Department, these cannot be select in the secondary financial set.
Scenario
Sara, the Chief Financial Officer (CFO) at Contoso Entertainment USA (CEU), must:
• Analyze financial transactions based on dimensions and ledger accounts combined. For example, Sara views sales revenue for each department or country.
• Determine how financial transactions should be organized when users run reports and make inquiries.
To view the sales revenue for all departments in CEU, Sara decides to create a dimension set that consists of ledger accounts and departments dimensions.
Microsoft Official Training Materials for Microsoft Dynamics®
Your use of this content is subject to your current services agreement

Financials I in Microsoft Dynamics® AX 2012
1-34
Procedure: Create a Financial Dimension Set
Perform the following steps to create a dimension set:
1. To access the Financial dimension set form, click General Ledger, click Setup, click Financial dimensions, and then click Financial dimension sets.
2. Enter a unique identifier to name the new dimension set in the Financial dimension set field.
3. Enter a descriptive name in the Name field. 4. Expand the Financial dimension FastTab. 5. Select one or more dimensions in the Available dimensions pane
that should be included in the financial dimension set. Click the arrows to add the dimensions to the Selected dimensions pane. At least one dimension must be selected for each financial dimension set. The financial dimension that is the primary row pattern (primary financial set) must be listed first, and the dimension shown within each primary row must be listed second (secondary financial set). For example, to print a report that displays sales revenue per department, the department dimension should be selected first and ledger accounts selected second.
FIGURE 1.11 DIMENSION SETS FORM
Period Allocations Allocation is the process of distributing monetary amounts to one or more accounts or account and dimension combinations.
Microsoft Dynamics AX has the ability to use predefined allocation rules to perform generated allocations. Generated allocation is the distribution of posted or fixed amounts to combinations of destination accounts and dimensions at any time, which generate new journal entries.
Microsoft Official Training Materials for Microsoft Dynamics®
Your use of this content is subject to your current services agreement
Chapter 1: General Ledger Setup
1-35
Allocation rules have numerous calculation methods, including:
• Basis • Fixed percentage • Fixed weight • Spread even
Allocations also provide the ability to allocate across multiple companies, also known as Intercompany allocations.
Scenario
Phyllis, the Accounting Manager at Contoso Entertainment USA (CEU), creates a new Intercompany allocation rule for Electric Utilities to distribute overhead utility expense to each department based on fixed percentages. The rule is for the new fiscal year that begins on January 1, 2012. Because Phyllis does not want the new rule to be used until then, she enters 01/01/2012 as the start date for the rule. Because CEU typically reviews its allocation rules every fiscal year, Phyllis enters 12/31/2012 as the end date for the rule.
Phyllis enters detailed notes about the basis and reasons for the allocation rule. Phyllis then selects the Microsoft® Word template that was implemented when CEU experienced an audit review to document the allocation rule completely. When Phyllis has finished writing the document, she attaches a copy of it to the rule. Anyone who wants additional information about the rule can open the document or print an Allocation rules definition report.
Ledger Allocation Rules
Ledger allocation rules allow you to define the results you want in the allocation business process.
Each ledger allocation rule has the four primary components:
• The General settings dictate which fields are available in the rule tabs.
• The Source data for the allocation is also known as the allocation pool.
• The Destination defines how the results of the allocation calculation must be distributed to the destination distribution lines.
• Offset entries balance the destination distribution lines.
Microsoft Official Training Materials for Microsoft Dynamics®
Your use of this content is subject to your current services agreement

Financials I in Microsoft Dynamics® AX 2012
1-36
Procedure: Create a Ledger Allocation Rule
Perform the following steps to create an allocation rule:
1. Click General ledger, click Setup, click Posting, and then click Ledger allocation rule.
2. Click the New button to create a new rule. 3. Enter the Rule as identification. 4. Enter a Description of the rule. 5. Optionally select the Effective start date and Effective end date for
the rule. 6. Select the Active check box, if the allocation rule is available to be
processed.
FIGURE 1.12 LEDGER ALLOCATION RULE FORM
Procedure: Create a Ledger Allocation Rule - General
Perform the following steps to complete the setup of allocation rule general settings. These dictate what fields are available in the rule tabs.
1. From the Ledger allocation rule form, select the General tab. 2. Review or change settings from the Overview tab in the
Identification and Administration sections. 3. View the Date last run, which displays the date when a user last
processed the allocation rule and created distributions.
Microsoft Official Training Materials for Microsoft Dynamics®
Your use of this content is subject to your current services agreement

Chapter 1: General Ledger Setup
1-37
4. Select the Intercompany rule check box if the allocation rule involves being processed among multiple companies.
5. Select the Allocation method: o Basis: Defines how and in what proportion the source amounts
are distributed to the various destination lines. For example, allocation based on revenue dollars, in which the cost of corporate advertising expense is shared across all departments, is based on each department's sales in proportion to total departmental sales.
o Fixed percentage: Takes criteria defined in the allocation source and uses a fixed percentage amount that the user entered, to determine the allocation amount for the destination.
o Fixed weight: Takes criteria defined in the allocation source and uses a fixed weight amount that the user entered, to determine the allocation amount for the destination.
o Spread even: Takes criteria defined in the allocation source and disperses the amount evenly across the destination distribution lines.
FIGURE 1.13 LEDGER ALLOCATION RULE FORM, GENERAL TAB
6. In the Data source field, select the source of the amount to allocate: o Ledger o Fixed value
7. If Fixed value is selected in the Data source field, enter a value in
the Fixed value field. 8. If Ledger is selected in the Data source field, select an arithmetic
operation to apply to the source value in the Mathematical operation field.
Microsoft Official Training Materials for Microsoft Dynamics®
Your use of this content is subject to your current services agreement
Financials I in Microsoft Dynamics® AX 2012
1-38
9. If Ledger is selected in the Data source field and either Multiply or Divide is selected in the Mathematical operation field, enter the Amount by which to multiply or divide the source value.
10. If Ledger is selected in the Data source field, select a date interval to determine the account periods used for the allocation rule source. If a date interval is not selected, all balanced for the chosen account or account-dimension combination will be selected for source allocation.
11. Select an allocation Journal name. The Description displays the allocation journal description.
12. If the Spread even Allocation method is selected, select from the Keep account from list to use the source account.
13. If the Spread even Allocation method is selected, select from the Keep dimension form list to indicate if you want to use the source destination account and dimension or a user-specified destination account and dimension.
Procedure: Create a Ledger Allocation Rule - Source
Perform the following steps to complete the setup of settings for the allocation rule source, also known as the allocation pool.
1. From the Ledger allocation rule form, select the Source button. 2. Click New to create a new record. 3. From the Field setting list select to allocate from an Account or
account Dimension combination. 4. If Financial dimension is selected in the Field setting field, select a
Financial dimension.
Microsoft Official Training Materials for Microsoft Dynamics®
Your use of this content is subject to your current services agreement

Chapter 1: General Ledger Setup
1-39
5. In the Source criteria field enter the account or dimension information from which to allocate. You can use wildcard characters to specify accounts or dimension codes. For example, if the selected Financial dimension is Department and the source criteria = Admin,", the system displays information that includes the department dimension equal to Admin or a department dimension has not been specified.
FIGURE 1.14 LEDGER ALLOCATION RULE SOURCE FORM
Procedure: Create a Ledger Allocation Rule - Destination
Perform the following steps to complete the setup of allocation rule destination settings, which define how the results of the allocation calculation must be distributed to the destination distribution lines.
1. From the Ledger allocation rule form, select the Destination button.
2. Click the New button to create a new record. 3. The Company field displays the company in which the allocation
rule was created. If the allocation rule is an inter-company rule, users can change this field.
4. Select the account to allocate to in the To Account field. 5. Select the Dimension you want to allocate to.
Microsoft Official Training Materials for Microsoft Dynamics®
Your use of this content is subject to your current services agreement
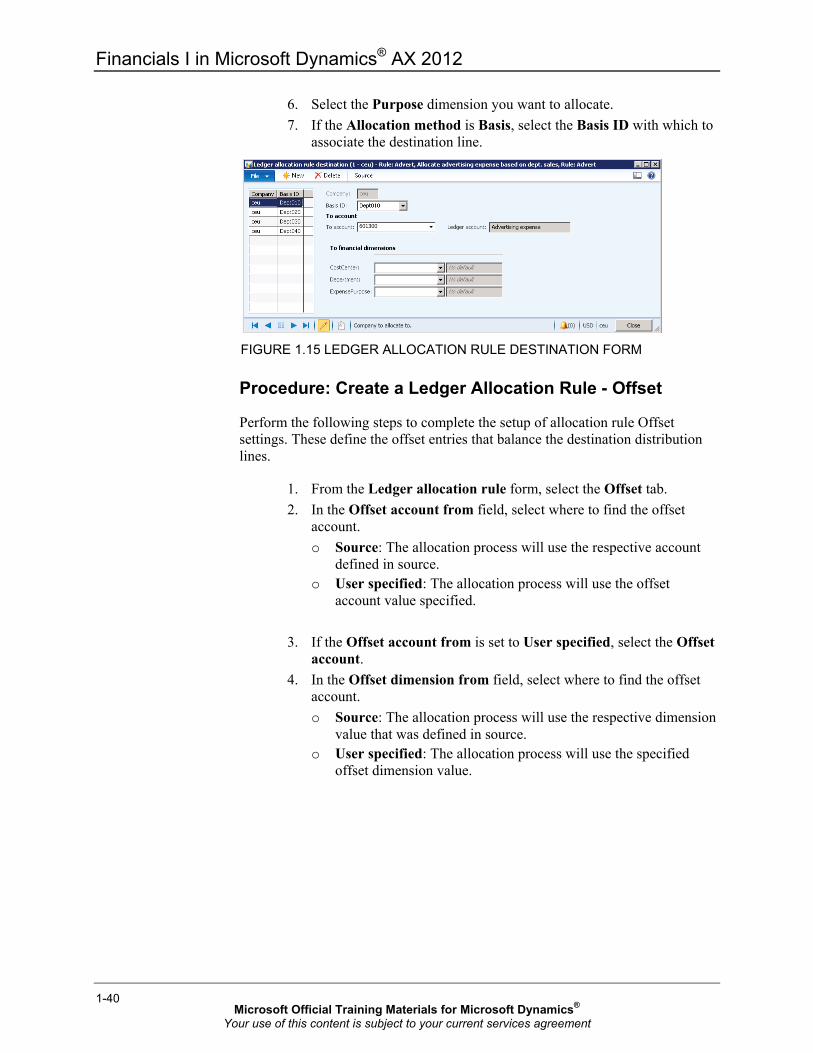
Financials I in Microsoft Dynamics® AX 2012
1-40
6. Select the Purpose dimension you want to allocate. 7. If the Allocation method is Basis, select the Basis ID with which to
associate the destination line.
FIGURE 1.15 LEDGER ALLOCATION RULE DESTINATION FORM
Procedure: Create a Ledger Allocation Rule - Offset
Perform the following steps to complete the setup of allocation rule Offset settings. These define the offset entries that balance the destination distribution lines.
1. From the Ledger allocation rule form, select the Offset tab. 2. In the Offset account from field, select where to find the offset
account. o Source: The allocation process will use the respective account
defined in source. o User specified: The allocation process will use the offset
account value specified. 3. If the Offset account from is set to User specified, select the Offset
account. 4. In the Offset dimension from field, select where to find the offset
account. o Source: The allocation process will use the respective dimension
value that was defined in source. o User specified: The allocation process will use the specified
offset dimension value.
Microsoft Official Training Materials for Microsoft Dynamics®
Your use of this content is subject to your current services agreement

Chapter 1: General Ledger Setup
1-41
5. If the Offset dimension from field is set to User specified, select the dimension to associate to the allocation rule.
FIGURE 1.16 LEDGER ALLOCATION RULE FORM, OFFSET TAB
Scenario
Phyllis runs the Allocation rules definition report that details the allocation rules for the current year. The report contains details about each rule including the rule ID, description, From/To account number and dimension combinations, effective start and end dates, calculation method details, usage information, and other setup information.
Procedure: Print the Ledger Allocation Rules Definition Report
Perform the following steps to print the Allocation Rules Definition report:
1. To access the Allocation Rules Definition report, click General Ledger, click Reports, click Base data, click Various, and then click Allocation rules definition.
2. Select criteria such as Ledger allocation rule.
Microsoft Official Training Materials for Microsoft Dynamics®
Your use of this content is subject to your current services agreement

Financials I in Microsoft Dynamics® AX 2012
1-42
3. Click OK to print.
FIGURE 1.17 ALLOCATION RULES DEFINITION REPORT
Scenario
Phyllis runs an allocation proposal without posting it to review the allocation results and the detailed distributions that will be created based on the allocation rule used. If the results are accurate, Phyllis posts the entry.
Procedure: Process a Ledger Allocation Request
As soon as an allocation rule is created, you can process it and either preview or post an allocation journal. To set up an allocation journal, select General ledger, click Setup, click Journals, and then click Journal names.
Perform the following steps to use the Process allocation request form to create an allocation journal.
1. Click General ledger, click Periodic, and then click Process allocation request.
2. Select an allocation rule. 3. Select the date to include ledger amounts for allocation in the As of
date field. This date corresponds with the Date interval on the allocation rule.
4. Select the date to post the allocation journal to the general ledger in the GL posting date field.
5. Select the action to occur if the allocation process generates a zero source amount. o Select Process to create destination distributions, where
applicable. o Select Stop to create an error that indicates when a zero source
amount is selected and stops the allocation process.
Microsoft Official Training Materials for Microsoft Dynamics®
Your use of this content is subject to your current services agreement

Chapter 1: General Ledger Setup
1-43
6. In the Proposal options field, select a posting preference. o Select Proposal only to review allocation results without
posting. o Select Post only to post the allocation results directly to the
general ledger. 7. Click OK.
NOTE: The Date last run field displays the last date a user processed an allocation rule and created distribution lines.
FIGURE 1.18 PROCESS ALLOCATION REQUEST FORM
Microsoft Official Training Materials for Microsoft Dynamics®
Your use of this content is subject to your current services agreement

Financials I in Microsoft Dynamics® AX 2012
1-44
Summary The General ledger setup course describes the initial setup to start working with Microsoft Dynamics AX financials. The course provides basic introductions to set up:
• Currencies and exchange rates • Fiscal calendars • Financial dimensions and financial dimension sets • Period allocations
Microsoft Official Training Materials for Microsoft Dynamics®
Your use of this content is subject to your current services agreement

Chapter 1: General Ledger Setup
1-45
Test Your Knowledge Test your knowledge with the following questions.
1. What effect does the value in the General round-off field have on the values in Microsoft Dynamics AX 2012?
2. When you change the display currency, it affects all users.
( ) True ( ) False
3. Is it possible to post activity that uses a date for which a period has not been created?
( ) Yes ( ) No
4. What are reason codes?
Microsoft Official Training Materials for Microsoft Dynamics®
Your use of this content is subject to your current services agreement

Financials I in Microsoft Dynamics® AX 2012
1-46
5. What are the parts of an allocation rule?
( ) General ( ) Source ( ) Destination ( ) Offset
6. Which allocation method defines how and in what proportion the source amounts are distributed to the various destination lines, by referring to balances in other account-dimensions?
( ) Basis ( ) Fixed percentage ( ) Fixed weight ( ) Spread even
Microsoft Official Training Materials for Microsoft Dynamics®
Your use of this content is subject to your current services agreement

Chapter 1: General Ledger Setup
1-47
Quick Interaction: Lessons Learned Take a moment and write down three key points you have learned from this chapter
1.
2.
3.
Microsoft Official Training Materials for Microsoft Dynamics®
Your use of this content is subject to your current services agreement

Financials I in Microsoft Dynamics® AX 2012
1-48
Solutions 1. What effect does the value in the General round-off field have on the values
in Microsoft Dynamics AX 2012?
MODEL ANSWER:
The value are used to round all amounts in all modules.
2. When you change the display currency, it affects all users.
( ) True (•) False
3. Is it possible to post activity that uses a date for which a period has not been created?
( ) Yes (•) No
4. What are reason codes?
MODEL ANSWER:
Reason codes are standardized codes that can be used in various transaction types or changes to field values to provide background data about the transaction.
5. What are the parts of an allocation rule?
(√) General (√) Source (√) Destination (√) Offset
6. Which allocation method defines how and in what proportion the source amounts are distributed to the various destination lines, by referring to balances in other account-dimensions?
(•) Basis ( ) Fixed percentage ( ) Fixed weight ( ) Spread even
Microsoft Official Training Materials for Microsoft Dynamics®
Your use of this content is subject to your current services agreement