chapter 2
DESCRIPTION
Chapter 2. Creating Applications with Visual Basic. Section 2.1. Focus on problem Solving: Building the Directions Application. In this section you create your first Visual Basic application: a window that displays a map and road directions to a hotel. In the - PowerPoint PPT PresentationTRANSCRIPT


Addison Wesley is an imprint of
© 2011 Pearson Addison-Wesley. All rights reserved.
Chapter 2
Creating Applications with Visual Basic

Addison Wesley is an imprint of
© 2011 Pearson Addison-Wesley. All rights reserved.
Section 2.1
FOCUS ON PROBLEM SOLVING: BUILDING THE DIRECTIONS APPLICATION
In this section you create your first Visual Basic application:a window that displays a map and road directions to a hotel. In theprocess you learn how to place controls on a form and manipulatevarious properties.

Copyright © 2011 Pearson Addison-Wesley
Define What the Application is To Do
• Purpose: Display a map to the Highlander Hotel
• Input: None• Process: Display a form• Output: Display on the form a graphic image
showing a map
Chapter 2 - Slide 4

Copyright © 2011 Pearson Addison-Wesley
Visualize the Application and Design Its User Interface
• Below is a sketch of the application’s form
Chapter 2 - Slide 5

Copyright © 2011 Pearson Addison-Wesley
Determine the Controls Needed
Control Type Control Name Description
Form Form1 A small form that will serve as (Default Name) the window onto which the other
controls will be placed
Label Label1 Displays the message(Default Name) "Directions to the Highlander
Hotel"
PictureBox PictureBox1 Displays the graphic image(Default Name) showing the map to the hotel
Chapter 2 - Slide 6
Copyright © 2011 Pearson Addison-Wesley
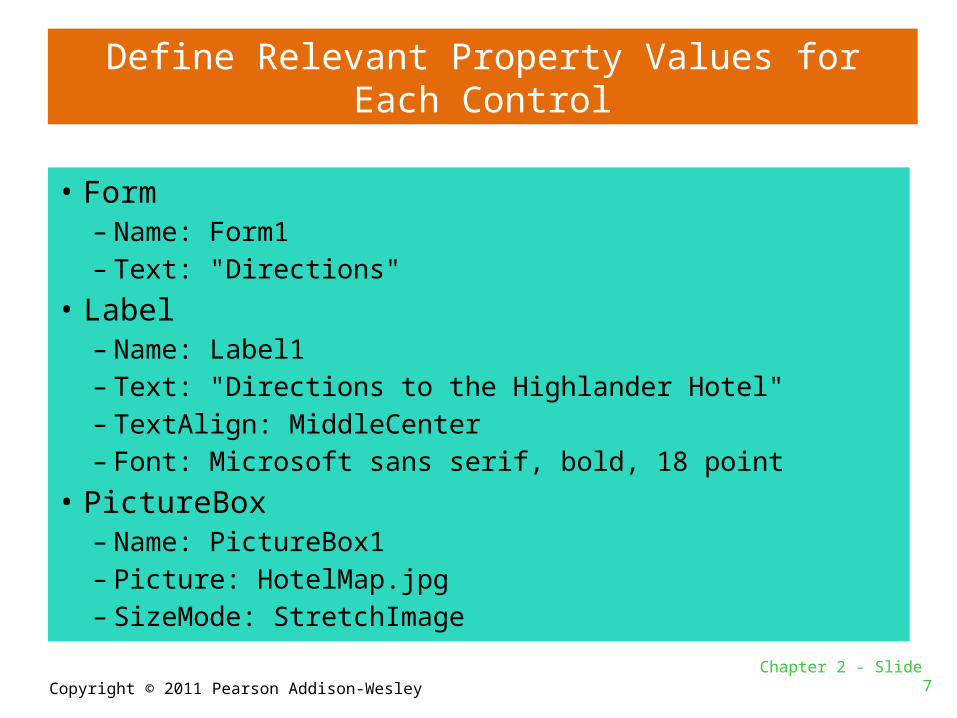
Define Relevant Property Values for Each Control
• Form– Name: Form1– Text: "Directions"
• Label– Name: Label1– Text: "Directions to the Highlander Hotel"– TextAlign: MiddleCenter– Font: Microsoft sans serif, bold, 18 point
• PictureBox– Name: PictureBox1– Picture: HotelMap.jpg– SizeMode: StretchImage
Chapter 2 - Slide 7

Copyright © 2011 Pearson Addison-Wesley
Create the Forms and Other Controls Using Visual Basic
• Establish the Form and set its Text property• Add a Label control
– Position and resize it on the form– Set Text, TextAlign, and Font properties
• Add a PictureBox control– Position and resize it on the form– Set Image property to display HotelMap.jpg
• Run the application• Close and save the application
Chapter 2 - Slide 8
Copyright © 2011 Pearson Addison-Wesley
Design Mode, Run Mode, and Break Mode
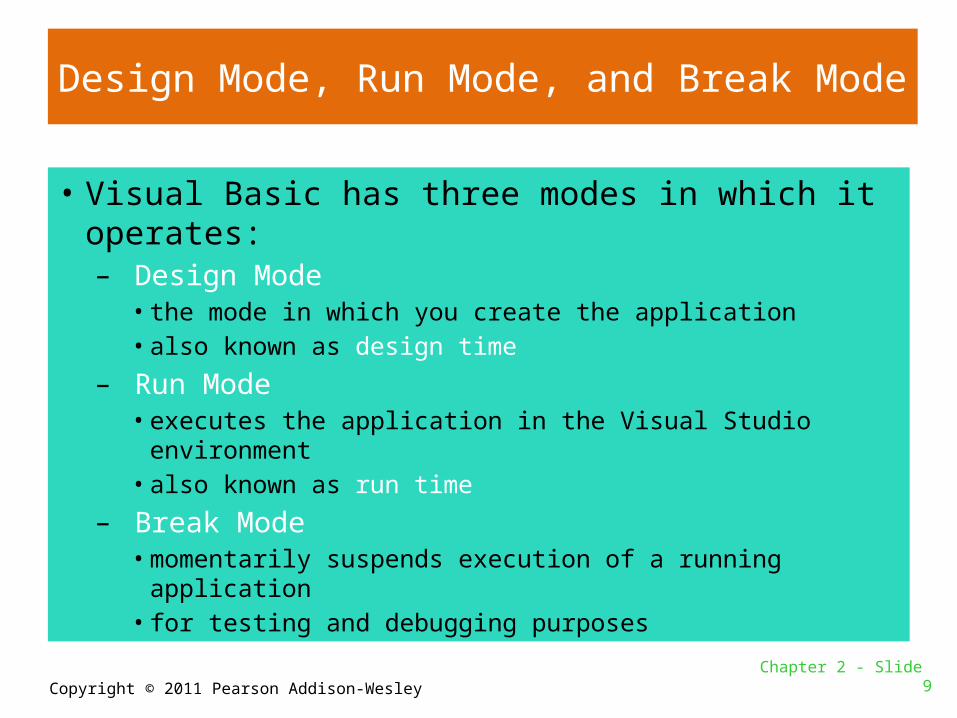
• Visual Basic has three modes in which it operates:– Design Mode
• the mode in which you create the application• also known as design time
– Run Mode • executes the application in the Visual Studio environment• also known as run time
– Break Mode • momentarily suspends execution of a running application • for testing and debugging purposes
Chapter 2 - Slide 9

Copyright © 2011 Pearson Addison-Wesley
Project Organization On Disk
• User creates a new project in Visual Studio– A solution and a folder are created at the same
time with the same name as the project– The project belongs to the solution– Multiple projects can be included in a solution
• The folder stores files related to the project including:– A solution file (.sln)– A project file (.vbproj)
Chapter 2 - Slide 10

Copyright © 2011 Pearson Addison-Wesley
Opening an Existing Project
• Use Recent Projects list on Start Page– Provided it hasn’t been moved or deleted
• Use Open Project button on Start Page– Then browse using Open Project dialog box
• Use Open Project option on File menu– Then browse using Open Project dialog box
Chapter 2 - Slide 11

Copyright © 2011 Pearson Addison-Wesley
Properties Window
• Used to view and modify the property values of a given object
• Two views of the properties are available:– Alphabetic (across all properties)– Categorized (groups properties by logical use)
Chapter 2 - Slide 12

Addison Wesley is an imprint of
© 2011 Pearson Addison-Wesley. All rights reserved.
Section 2.2
FOCUS ON PROBLEM SOLVING: RESPONDING TO EVENTS
An application responds to events, such as mouse clicks andkeyboard input, by executing code known as event handlers.In this section, you write event handlers for the Directionsapplication.

Copyright © 2011 Pearson Addison-Wesley
Modify the Directions Application
• The Highlander Hotel manager would like you to add the following items to the application:– A Label containing the
written directions– A Button to display the
directions– A Button to exit the
application
Chapter 2 - Slide 14

Copyright © 2011 Pearson Addison-Wesley
Controls to be Added
Control Type Control Name Description
Label lblDirections Displays written directions to the hotel
Button btnDisplayDirections When clicked, causes lblDisplayDirections text to appear on the form
Button btnExit Stops the applicationwhen clicked
Chapter 2 - Slide 15

Copyright © 2011 Pearson Addison-Wesley
Control Properties
• Label– Name: lblDirections– Text: “Traveling on I-89,…etc”– Visible: False
• Button– Name: btnDisplayDirections– Text: “Display Directions”
• Button– Name: btnExit– Text: “Exit”
Chapter 2 - Slide 16

Copyright © 2011 Pearson Addison-Wesley
The Code Window
• Double-clicking a control in design mode:– opens the code window– creates a code template for the control’s event
handler where you fill in the code for the event
Chapter 2 - Slide 17

Copyright © 2011 Pearson Addison-Wesley
The Click Event Handler for btnDisplayDirections
Chapter 2 - Slide 18

Copyright © 2011 Pearson Addison-Wesley
Changing a Control’s Visible Property in Code
• Specify the control name (lblDirections)• Then a dot• Then the PropertyName (Visible)• For example:
– lblDirections.Visible– refers to the Visible property of the lblDirections
control– The visible property values may only be true or
falseChapter 2 - Slide 19

Copyright © 2011 Pearson Addison-Wesley
The Assignment Statement
• Specify the item to receive the value • Then the equal symbol• Then the value to be assigned • For example:
– lblDirections.Visible = True– Assigns the value True to the Visible property of
the lblDirections control– Causes the text of the lblDirections control to
become visible to the userChapter 2 - Slide 20

Copyright © 2011 Pearson Addison-Wesley
Switching Between the Code Window and the Designer Window
• Window Tabs
• Solution Explorer Icons
• Menu Bar
• Keyboard Shortcuts– F7 opens the Code Window– Shift + F7 opens the Designer Window
Chapter 2 - Slide 21

Copyright © 2011 Pearson Addison-Wesley
The Click Event Handler for btnExit
Chapter 2 - Slide 22

Copyright © 2011 Pearson Addison-Wesley
Use Visual Basic to Update the Application
• Place the label and the buttons on the form
• Enter the code for the two procedures
• Test the application
Chapter 2 - Slide 23

Copyright © 2011 Pearson Addison-Wesley
Changing Text Colors
• Color properties for a control:– BackColor: Sets the background (fill) color– ForeColor: Sets the foreground (text) color
• In the properties window:– click on the down arrow – select a color from the list
Chapter 2 - Slide 24

Copyright © 2011 Pearson Addison-Wesley
Setting the FormBorderStyle Property
• Border style properties for a form:– Sizable: (Default) Has min, max, and close buttons;
can be resized by dragging edges– Fixed3D: Has a 3D look; min, max, and close
buttons; cannot be resized– FixedSingle: Has single line border; min, max, and
close buttons; cannot be resized
Chapter 2 - Slide 25

Copyright © 2011 Pearson Addison-Wesley
Locking the Controls
• Locking controls prevents them from being moved around during design time
• To Lock Controls:– right-click an empty space on the form– select Lock Controls from the menu
• To Unlock Controls:– right-click an empty space on the form– select Lock Controls from the menu
• Control Locking has a Toggle Effect:– Follow the same steps to lock/unlock controls
Chapter 2 - Slide 26

Copyright © 2011 Pearson Addison-Wesley
Printing Your Code
• To print a project’s code:– open the Code window– click File on the menu bar– click on the Print command
• Using the keyboard shortcut:– open the Code Window– Ctrl + P to print
Chapter 2 - Slide 27

Copyright © 2011 Pearson Addison-Wesley
Using IntelliSense
• IntelliSense is a feature that provides automatic code completion as you type programming statements
• Press the Tab key to use IntelliSense– For Example:
Chapter 2 - Slide 28

Addison Wesley is an imprint of
© 2011 Pearson Addison-Wesley. All rights reserved.
Section 2.3
MODIFYING A CONTROL’S TEXT PROPERTY WITH CODE
Quite often, you will need to change a control’s Text property withcode. This is done with an assignment statement.
Copyright © 2011 Pearson Addison-Wesley
Modifying the Text Property in Code
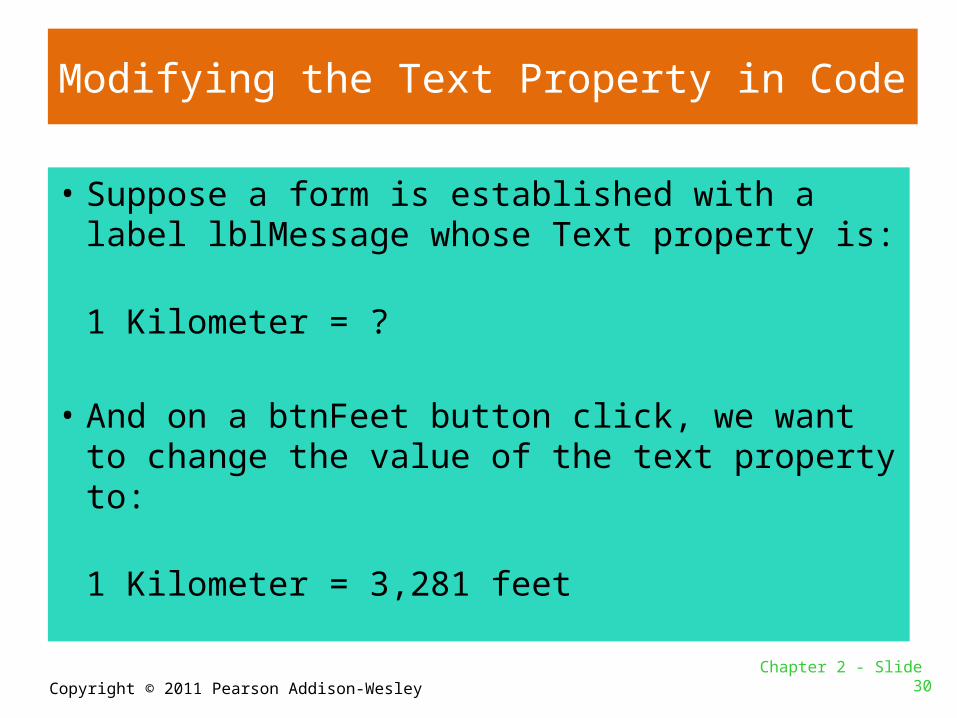
• Suppose a form is established with a label lblMessage whose Text property is:
1 Kilometer = ?
• And on a btnFeet button click, we want to change the value of the text property to:
1 Kilometer = 3,281 feetChapter 2 - Slide 30

Copyright © 2011 Pearson Addison-Wesley
Modifying the Text Property in Code
Private Sub btnFeet_Click(…) Handles btnFeet.Click' Display the conversion to feet.lblMessage.Text = "1 Kilometer = 3,281 feet"
End Sub
Assigns the string to the right of the equal sign to the text property of lblMessage
This replaces the previous text property of lblMessage with the new value shown
Chapter 2 - Slide 31

Addison Wesley is an imprint of
© 2011 Pearson Addison-Wesley. All rights reserved.
Section 2.4
THE AUTOSIZE, BORDERSTYLE,AND TEXTALIGN PROPERTIES
The Label control’s AutoSize property determines whether a labelwill change size automatically to accommodate the amount of textin its Text property, or remain a fixed size. The BorderStyle propertyallows you to set a border around a Label control. The TextAlignproperty determines how the text is aligned within the label.

Copyright © 2011 Pearson Addison-Wesley
The AutoSize Property
• AutoSize is a Boolean (either True or False) Property of labels
• False (the default) means the box size will not change, regardless of the amount of text assigned to it
• True means the box will automatically resize itself to fit the amount of text assigned to it
Chapter 2 - Slide 33

Copyright © 2011 Pearson Addison-Wesley
The BorderStyle Property
• BorderStyle determines the look of the box• None (the default) means no border• FixedSingle results in a border one pixel wide• Fixed3D gives the border a recessed 3-
dimensional look
Chapter 2 - Slide 34

Copyright © 2011 Pearson Addison-Wesley
The TextAlign Property
• The value of TextAlign establishes the alignment (or justification) of the text:
Chapter 2 - Slide 35
Copyright © 2011 Pearson Addison-Wesley
The TextAlign Property
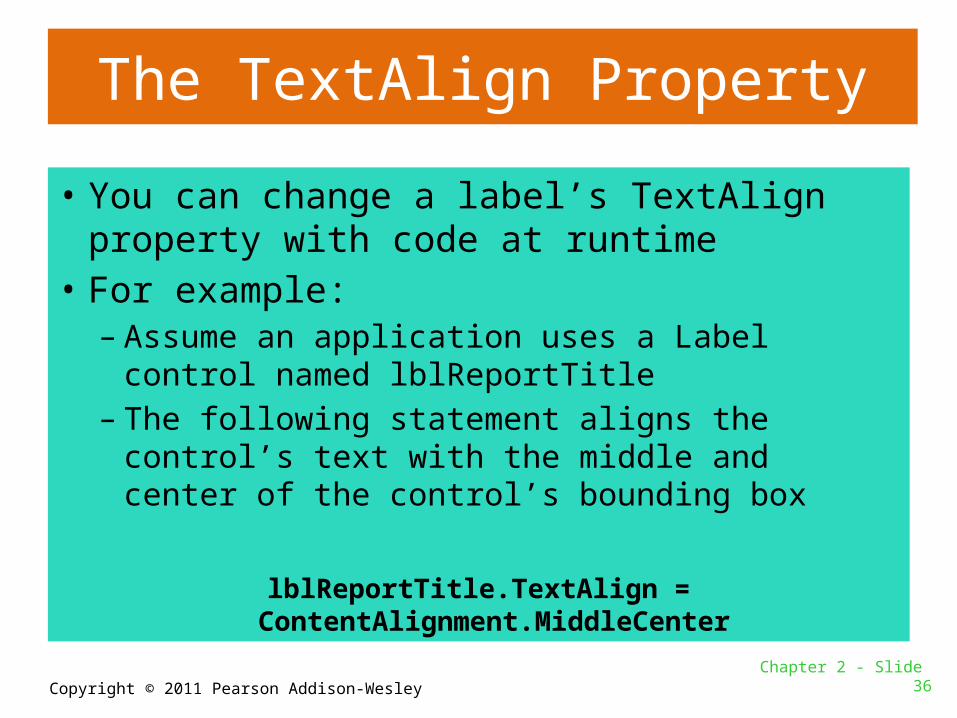
• You can change a label’s TextAlign property with code at runtime
• For example:– Assume an application uses a Label control named
lblReportTitle– The following statement aligns the control’s text
with the middle and center of the control’s bounding box
lblReportTitle.TextAlign = ContentAlignment.MiddleCenter
Chapter 2 - Slide 36

Addison Wesley is an imprint of
© 2011 Pearson Addison-Wesley. All rights reserved.
Section 2.5
DISPLAYING MESSAGE BOXES
You can use the MessageBox.Show method to display a messagebox, which is a dialog box that pops up, showing a message tothe user.

Copyright © 2011 Pearson Addison-Wesley
The Message Box
• A message box is – a small window– sometimes referred to as a dialog box– a convenient way to display output to the user– displayed until the OK button is clicked
• For example:MessageBox.Show("Hello World!")
dot ShowMessageBox string “Message” enclosed in parentheses
Chapter 2 - Slide 38

Addison Wesley is an imprint of
© 2011 Pearson Addison-Wesley. All rights reserved.
Section 2.6
CLICKABLE IMAGES
Controls other than buttons can have Click event handlers. In thissection, you learn to create PictureBox controls that respond tomouse clicks.

Copyright © 2011 Pearson Addison-Wesley
PictureBox Control
• As we saw earlier the Image Property can be set to a graphic image of some sort
• The flag images in Tutorial 2-16 are clickable• The click event can be handled by code to take
whatever action is desired
Chapter 2 - Slide 40

Copyright © 2011 Pearson Addison-Wesley
PictureBox Click Event code
• When PictureBox picUSA is clicked, the lblMessage text property is set to display United States of America
Private Sub picUSA_Click(…) Handles picUSA.Click' Display United States of America.lblMessage.Text = "United States of America"
End Sub
Chapter 2 - Slide 41

Addison Wesley is an imprint of
© 2011 Pearson Addison-Wesley. All rights reserved.
Section 2.7
USING VISUAL STUDIO HELP
Learn to use the Visual Studio Help System

Copyright © 2011 Pearson Addison-Wesley
Accessing the Help System
• You access the Visual Studio Documentation and the MSDN library by clicking Help on the menu bar.
Chapter 2 - Slide 43
Copyright © 2011 Pearson Addison-Wesley
Context-Sensitive Help (F1 Key)
• Displays information about whatever feature the user is currently focused on
• For example:– Click on a Button control– Press F1– Help explains all about the Button control– Click on a Label control– Press F1– Help explains all about the Label control
Chapter 2 - Slide 44

Addison Wesley is an imprint of
© 2011 Pearson Addison-Wesley. All rights reserved.
Section 2.8
DEBUGGING YOUR APPLICATION
At some point, most applications contain bugs (errors) that preventthe application from operating properly. In this section, you learnfundamental debugging techniques.

Copyright © 2011 Pearson Addison-Wesley
Compile Errors
• These are errors in the syntax (form) of your program
• Visual Basic will inform you of these errors as soon as the code is entered
• The area of the error will be underlined with a jagged blue line
• A description of the error will be given in the Error List window
• Display this window by selecting Error List from the View menu option
Chapter 2 - Slide 46

Copyright © 2011 Pearson Addison-Wesley
Runtime Errors
• Some errors occur as your program runs• These are different from syntax errors which
occur as the code is entered by the programmer
• Runtime errors occur when Visual Basic attempts to perform an operation that cannot be executed
Chapter 2 - Slide 47