chapter 3 and taping the neck techniques for testing for testing . 3 and taping the neck. ... the...
TRANSCRIPT
18
Techniques for testing and taping the neck3
CHAPTER
Sternocleidomastoid (SCM)
Scalenes
Splenius capitis
Splenius cervicis
Levator scapula
Upper trapezius
ch03-018-058-9780729541930.indd 18 1/09/2016 10:09 AM

3 • Techniques for testing and taping the neck
19
3
ANATOMYSternocleidomastoid (SCM)
Sternocleidomastoid (SCM)Origin: Manubrium of the sternum and medial ¹⁄₃ of the clavicle
Insertion: Mastoid process of the temporal bone and the lateral ½ of the superior nuchal line of the occiput
Nerve supply: Accessory nerve (cranial nerve XI). Ventral rami of C2, C3
Function: Flexes the lower cervical spine and extends the upper cervical spine. Laterally flexes and contralaterally rotates the head and neck. Elevates the sternum at the clavicle
ch03-018-058-9780729541930.indd 19 1/09/2016 10:09 AM

LENGTH, STRENGTH AND KINESIO TAPE: MUSCLE TESTING AND TAPING INTERVENTIONS
20
3
MUSCLE TESTINGSternocleidomastoid (SCM)
STRENGTH BIAS TESTING
Client positionThe client is lying supine with the head in full rotation to the contralateral side.
Instruction to clientThe client is instructed to maintain the rotated head position whilst lifting the head off the bed.
Examiner position and notesThe examiner sits at the top of the bed with the testing hand positioned over the head above the level of the ear and the supporting hand under the occiput in case the client is unable to hold the position at the start or fatigues. The examiner should note if the client is attempting to rotate the head back to neutral as a compensatory strategy.
ResistanceThe examiner places the hypothenar eminence above the ear and applies a force from one ear to the other in the direction down towards the bed. Resistance using the hypothenar eminence reminds the examiner to be careful, controlled and less aggressive with the testing of the neck. Practitioners are encouraged to use the hypothenar eminence to first learn the test in order to avoid accidental or excessive pressure on the ears and/or neck; practitioners familiar with aggressive handling during treatments are also less likely to apply excessive force when using the less familiar hypothenar eminence during testing. Naturally, once the examiner is comfortable with the appropriate resistance to apply, the hand position can be modified.
ch03-018-058-9780729541930.indd 20 1/09/2016 10:09 AM

3 • Techniques for testing and taping the neck
21
3
MUSCLE TESTINGSternocleidomastoid (SCM)
LENGTH BIAS TESTING
Client positionThe client is seated with neutral lordosis and with the feet supported.
Instruction to clientThe client is instructed to relax the neck in order for the examiner to move the neck into extension, lateral flexion and rotation to the side being tested.
Examiner position and notesThe examiner stands behind and to the side of the muscle being tested on the client. The examiner’s outside forearm rests over the lateral aspect of the client’s shoulder and stabilises it whilst the examiner assesses for compensatory movements. The fingertips of this upper limb are positioned over the client’s chin in order to direct movement. The other hand is placed on the occiput of the client to direct movement and assess for resistance at the end of range.
Whilst stabilising the lateral shoulder, the client is first taken into cervical extension, then lateral flexion away and then rotation to the same side.
The SCM and scalenes have very similar movement functions and so the determination to tape one muscle in preference to the other is identified by the bias with which each muscle is taken into the lengthened position. The SCM being more anteriorly placed is ‘wound’ up first by taking the neck into extension. As the primary movement vector for the SCM is lower cervical spine flexion and upper cervical extension, the process of first lengthening the muscle by taking the lower cervical spine into extension implicates SCM length restrictions over scalenes if the tension is earlier in the movement. Palpation of the muscles also helps to prioritise an intervention of SCM or scalenes.
ch03-018-058-9780729541930.indd 21 1/09/2016 10:09 AM

LENGTH, STRENGTH AND KINESIO TAPE: MUSCLE TESTING AND TAPING INTERVENTIONS
22
3
KINESIO TAPINGSternocleidomastoid (SCM)
STRENGTH TAPING
Client positionThe client is seated with the neck held in extension and lateral flexion away from the side being taped. Rotate the neck so that the chin is facing up to the ceiling.
Measurement of tapeMeasure a length of tape from the mastoid process to the sternum. Cut this tape down the centre into two strips, each 2.5 cm-wide; the second strip can be applied to the other side or used for a subsequent application. Cut the 2.5 cm-wide strip in two again and round out the edges of both strips of tape. Alternatively, cut the mastoid anchor into a crescent shape and cut the remaining tape into a Y-strip. Finally, round both anchors at the end of the Y-strip.
Tape applicationSternal head: apply the starting anchor to the sternum with zero tension. Place the tissue in the lengthened position and apply the base of the tape over the muscle with 15–25% tension towards the mastoid process. Apply the final anchor on the mastoid with zero tension.
Clavicular head: apply the starting anchor on the clavicle with zero tension. Place the tissue in the lengthened position and apply the base of the tape over the muscle with 15–25% tension towards the mastoid process. Apply the final anchor on the mastoid process with zero tension.
Alternative Y application: apply the mastoid anchor to the mastoid process with zero tension. Place the tissue in the lengthened position and tear the backing of the tape so that each tail can be applied separately. Apply each tail down to the sternal and clavicular origins respectively with 25–35% tension. Apply each anchor over the sternum or clavicle with zero tension.
ch03-018-058-9780729541930.indd 22 1/09/2016 10:09 AM
3 • Techniques for testing and taping the neck
23
3
STRENGTH TAPING
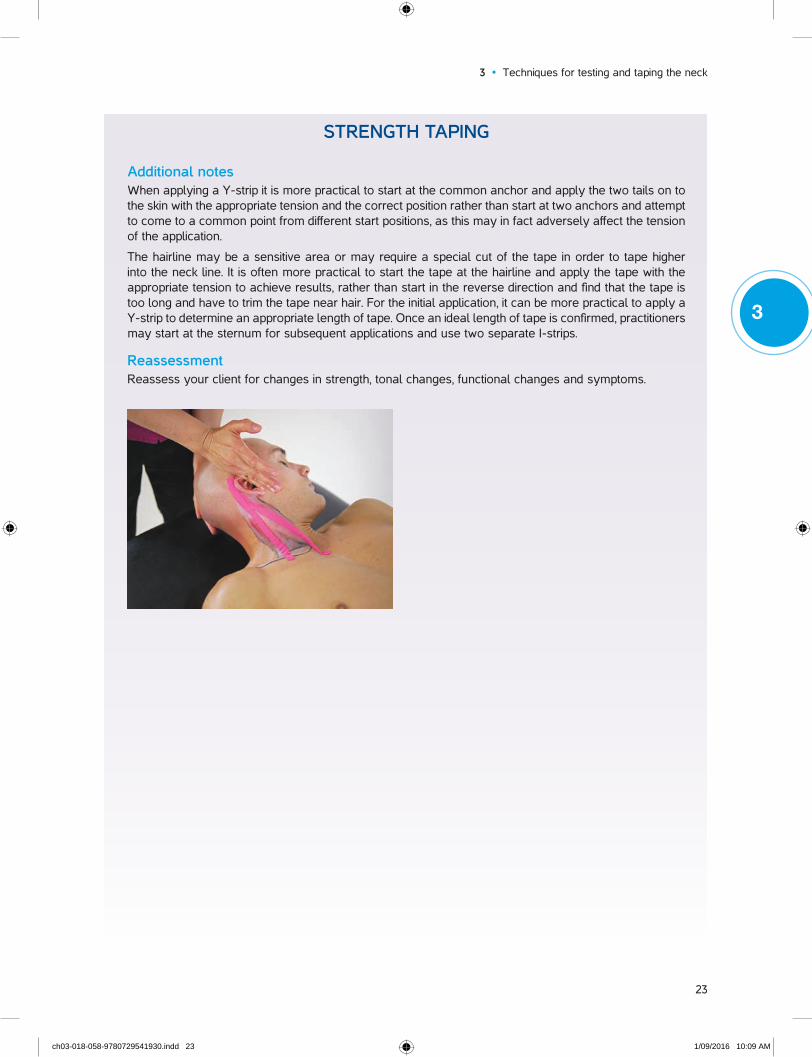
Additional notesWhen applying a Y-strip it is more practical to start at the common anchor and apply the two tails on to the skin with the appropriate tension and the correct position rather than start at two anchors and attempt to come to a common point from different start positions, as this may in fact adversely affect the tension of the application.
The hairline may be a sensitive area or may require a special cut of the tape in order to tape higher into the neck line. It is often more practical to start the tape at the hairline and apply the tape with the appropriate tension to achieve results, rather than start in the reverse direction and find that the tape is too long and have to trim the tape near hair. For the initial application, it can be more practical to apply a Y-strip to determine an appropriate length of tape. Once an ideal length of tape is confirmed, practitioners may start at the sternum for subsequent applications and use two separate I-strips.
ReassessmentReassess your client for changes in strength, tonal changes, functional changes and symptoms.
ch03-018-058-9780729541930.indd 23 1/09/2016 10:09 AM

LENGTH, STRENGTH AND KINESIO TAPE: MUSCLE TESTING AND TAPING INTERVENTIONS
24
3
KINESIO TAPINGSternocleidomastoid (SCM)
LENGTH TAPING
Client positionThe client is seated with the neck held in extension and lateral flexion away from the side being taped. Rotate the neck so that the chin is facing up to the ceiling.
Measurement of tapeMeasure a length of tape from the mastoid process to the sternum. Cut this tape down the centre into two strips, each 2.5 cm-wide; the second strip can be applied to the other side or used for a subsequent application. Cut the mastoid anchor into a crescent shape and cut the remaining tape into a Y-strip. Finally, round both anchors at the end of the Y-strip.
Tape applicationApply the mastoid anchor to the mastoid process with zero tension. Place the tissue in the lengthened position and tear the backing of the tape so that each tail can be applied separately. Run each tail down to the sternal and clavicular origins respectively with 15–25% tension. Apply each anchor over the sternum or clavicle with zero tension. Rub the tape to activate the glue.
Additional notes As the neck is a sensitive area, tension towards the lower side of the spectrum is recommended.
ReassessmentReassess your client for changes in length, strength, tonal changes, functional changes and symptoms.
ch03-018-058-9780729541930.indd 24 1/09/2016 10:09 AM

3 • Techniques for testing and taping the neck
25
3
ANATOMYScalenes
Anterior scaleneOrigin: First rib at the scalene tubercle
Insertion: Transverse process C3–6
Nerve supply: Ventral rami of C4–6
Function: Flexes, laterally flexes and contralaterally rotates the neck. Elevates the first rib when acting from above
Middle scaleneOrigin: First rib lateral to the tubercle of the first rib
Insertion: Transverse process C2–7
Nerve supply: Ventral rami C3–8
Function: Laterally flexes and flexes the neck. Elevates the first rib when acting from above
Posterior scaleneOrigin: Second rib behind the tubercle for the serratus anterior
Insertion: Transverse process C5–7
Nerve supply: Ventral rami C6–8
Function: Laterally flexes the neck. Elevates the second rib when acting from above
ch03-018-058-9780729541930.indd 25 1/09/2016 10:09 AM

LENGTH, STRENGTH AND KINESIO TAPE: MUSCLE TESTING AND TAPING INTERVENTIONS
26
3
MUSCLE TESTINGScalenes
STRENGTH BIAS TESTING A
\
Client positionThe client is lying supine with the head in 30 degrees rotation to the contralateral side.
Instruction to clientThe client is instructed to maintain the rotated head position whilst lifting the head off the bed and laterally flexing towards the ipsilateral clavicle.
Examiner position and notesThe examiner sits at the top of the bed with the testing hand positioned over the head above the level of the ear and the supporting hand under the occiput in case the client is unable to hold the position for the start or fatigues. The examiner should note if the client is attempting to rotate the head back to neutral as a compensatory strategy.
If the client is unable to hold the head against gravity, if there is a lag in the hold of the head once the supporting hand is removed, or if there are increases in symptoms, this is indicative of a positive test and additional resistance applied by the examiner is unnecessary and unwise.
This test offers a convenience to testing and comparing to the sternocleidomastoid without having to move the client. As these two muscles act as synergists, if there is no distinct difference in testing between the scalenes and SCM, or the examiner is unsure, the alternative testing position may be more appropriate as it more effectively biases the testing towards the scalenes because it works more directly against gravity. Completing both tests gives further confirmation of the value of this muscle with regards to the client’s problem.
ResistanceApply resistance with the hypothenar eminence in an oblique direction in the line of one ear to the other.
Resistance using the hypothenar eminence reminds the examiner to be careful, controlled and less aggressive with the testing of the neck. Practitioners are encouraged to use the hypothenar eminence to first learn the test in order to avoid accidental or excessive pressure on the ears and/or neck; practitioners familiar with aggressive handling during treatments are also less likely to apply excessive force by using the less familiar hypothenar eminence during testing. Naturally, once the examiner is comfortable with the appropriate resistance to apply, the hand position can be modified.
ch03-018-058-9780729541930.indd 26 1/09/2016 10:09 AM

3 • Techniques for testing and taping the neck
27
3
MUSCLE TESTINGScalenes
STRENGTH BIAS TESTING B
Client positionThe client is sidelying with the side being tested uppermost. The head is slightly forward and the neck is rotated to look down to the bed (approximately 30 degrees rotation away from neutral).
Instruction to clientInstruct the client to lift the head off the bed against gravity in the forward flexed position whilst keeping the neck in the rotated position.
Examiner position and notesThe examiner is positioned at the top of the bed with the testing hand positioned over the head above the level of the ear and the supporting hand under the head in case the client fatigues.
If the client is unable to lift their head against gravity, or if there are increases in symptoms, this is indicative of a positive test and additional resistance applied by the examiner is unnecessary and unwise.
Resistance using the hypothenar eminence reminds the examiner to be careful, controlled and less aggressive with the testing of the neck. The palm of the hand is not used here in order to avoid accidental or excessive pressure on the ears; practitioners familiar with aggressive handling during treatments are also less likely to apply excessive force by using the less familiar hypothenar eminence during testing.
The sidelying testing position implicates the scalenes muscles as the prime mover over the SCM as the scalenes are better placed to work against gravity.
ResistanceIf lifting against gravity is not significant, the examiner may then apply resistance with the heel of the hand over the occiput in the direction of returning the head to the bed (resisting the lateral flexion component of the test).
ch03-018-058-9780729541930.indd 27 1/09/2016 10:09 AM

LENGTH, STRENGTH AND KINESIO TAPE: MUSCLE TESTING AND TAPING INTERVENTIONS
28
3
MUSCLE TESTINGScalenes
LENGTH BIAS TESTING
Client positionThe client is upright sitting with the feet supported.
Instruction to clientThe client is instructed to relax the neck in order for the examiner to move the neck into lateral flexion away from the side tested, extension, and rotation towards the side being tested.
Examiner position and notesThe examiner is standing behind and to the side of the muscle being tested on the client. The outside forearm rests over the lateral aspect of the client’s shoulder and stabilises it whilst the examiner assesses for compensatory movements. The fingertips of this upper limb are positioned over the client’s chin in order to direct movement. The other hand is placed on the occiput of the client to direct movement and assess for resistance at the end of range.
Whilst stabilising the lateral shoulder, the client is first taken into cervical lateral flexion away from the side tested, then extension and then rotation to the same side.
As the scalene and SCM have very similar movement functions, the determination to tape one muscle in preference to the other is identified in the bias of how each muscle is taken into the lengthened position. The scalenes being more laterally placed is ‘wound’ up first by taking the neck into lateral flexion. The rotation and extension elements of the length test can be swapped to further indicate a positive test to the examiner. An earlier end point when lateral flexion is wound up prior to extension indicates taping for scalenes. Palpation of the muscles also helps to prioritise an intervention of SCM or scalenes.
ch03-018-058-9780729541930.indd 28 1/09/2016 10:09 AM

3 • Techniques for testing and taping the neck
29
3
KINESIO TAPINGScalenes
STRENGTH TAPING
Client positionThe client is seated with the neck held in extension and lateral flexion away from the side being taped. Add rotation of the neck to maximise tissue stretch.
Measurement of tapeMeasure a length of tape from under the border of upper trapezius and sternocleidomastoid (C3) to the clavicle. Cut the tails of the tape so as to fit in the triangle created between the border of the upper trapezius, the sternocleidomastoid and the clavicle. Round out the triangular anchor and cut the remaining tape into a fan strip of three or more tails. Round the edges of the tails.
For clients with smaller muscles, the length of tape can be halved into a 2.5 cm-wide tape and fans cut from this (the width of the tails of the fan will naturally be thinner and this is appropriate for smaller clients).
Tape applicationApply the common anchor to the clavicle. With the tissue in a lengthened position, apply the tails up towards C3 below the border of the SCM and upper trapezius with 25–35% tension. For each tail, ensure that maximal tissue stretch is achieved by changing the angle of the neck. Apply the final anchors with zero tension.
Additional notesAs the neck is a sensitive area, tension towards the lower side of the spectrum is recommended. The tape should be handled very lightly.
ch03-018-058-9780729541930.indd 29 1/09/2016 10:09 AM

LENGTH, STRENGTH AND KINESIO TAPE: MUSCLE TESTING AND TAPING INTERVENTIONS
30
3
STRENGTH TAPING
ReassessmentReassess the client for change in strength, tonal changes, functional changes and symptoms.
ch03-018-058-9780729541930.indd 30 1/09/2016 10:09 AM

3 • Techniques for testing and taping the neck
31
3
KINESIO TAPINGScalenes
LENGTH TAPING
Client position The client is seated with the neck held in extension and lateral flexion away from the side being taped. Add rotation of the neck to maximise tissue stretch.
Measurement of tapeMeasure a length of tape from under the border of upper trapezius and sternocleidomastoid (C3) to the clavicle. Cut this tape diagonally so as to fit in the triangle created between the border of the upper trapezius, the sternocleidomastoid and the clavicle. Round out the triangular anchor and cut the remaining tape into a fan strip of three or more tails depending on the area needing to be covered. Round the edges of the tails.
For clients with smaller muscles, the length of tape can be halved into a 2.5 cm-wide tape and fans cut from this (the width of the tails of the fan will naturally be thinner and this is appropriate for smaller clients).
Tape applicationApply the common anchor to C3 below the border of the SCM and upper trapezius. With the tissue in a lengthened position, apply the tails down to the clavicle with 15–25% tension. For each tail, ensure that maximal tissue stretch is achieved by changing the angle of the neck. Apply the final anchors with zero tension over the clavicle and ribs.
Additional notesAs the neck is a sensitive area, tension towards the lower side of the spectrum is recommended. The tape should be handled very lightly.
ch03-018-058-9780729541930.indd 31 1/09/2016 10:09 AM

LENGTH, STRENGTH AND KINESIO TAPE: MUSCLE TESTING AND TAPING INTERVENTIONS
32
3
LENGTH TAPING
ReassessmentReassess your client for changes in length, strength, tonal changes, functional changes and symptoms.
ch03-018-058-9780729541930.indd 32 1/09/2016 10:09 AM

3 • Techniques for testing and taping the neck
33
3
ANATOMYSplenius capitis
Splenius capitisOrigin: Nuchal ligament from C3–C6 and spinous process of C7–T4
Insertion: Mastoid process of the temporal bone at the lateral ¹⁄₃ of the superior nuchal line of the occiput
Nerve supply: Suboccipital nerve (C1)
Function: Extends, laterally flexes and ipsilaterally rotates the head and neck
ch03-018-058-9780729541930.indd 33 1/09/2016 10:09 AM
LENGTH, STRENGTH AND KINESIO TAPE: MUSCLE TESTING AND TAPING INTERVENTIONS
34
3
MUSCLE TESTINGSplenius capitis
STRENGTH BIAS TESTING
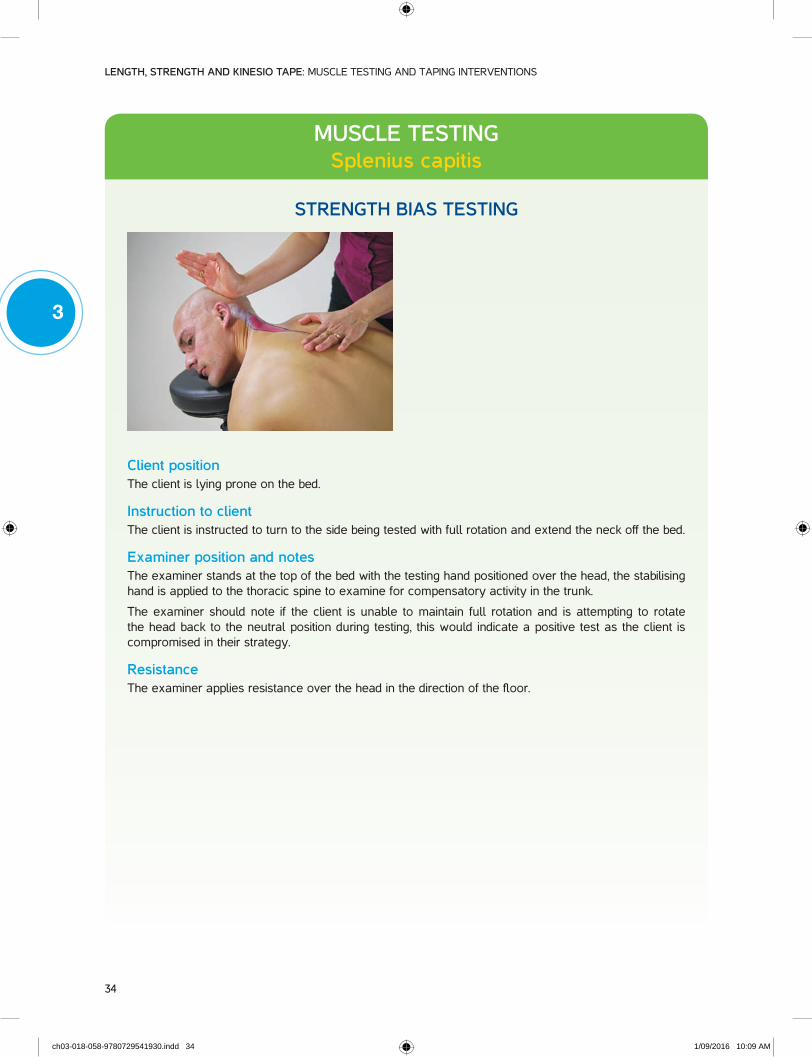
Client positionThe client is lying prone on the bed.
Instruction to clientThe client is instructed to turn to the side being tested with full rotation and extend the neck off the bed.
Examiner position and notesThe examiner stands at the top of the bed with the testing hand positioned over the head, the stabilising hand is applied to the thoracic spine to examine for compensatory activity in the trunk.
The examiner should note if the client is unable to maintain full rotation and is attempting to rotate the head back to the neutral position during testing, this would indicate a positive test as the client is compromised in their strategy.
ResistanceThe examiner applies resistance over the head in the direction of the floor.
ch03-018-058-9780729541930.indd 34 1/09/2016 10:09 AM

3 • Techniques for testing and taping the neck
35
3
MUSCLE TESTINGSplenius capitis
LENGTH BIAS TESTING
Client positionThe client is seated in neutral lordosis and with the feet supported.
Instruction to clientInstruct the client to rotate away from the side being tested and then to flex and laterally flex the neck away from the side being tested. At the completion of the neck movement, remind the client to maintain a chin tuck. This stretch is identical to the levator scapula stretch except that there is no need to hold the scapula down (scapular depression).
Examiner position and notesThe examiner stands behind the client and can apply overpressure by stabilising the thoracic spine whilst applying an upward force on the occiput to lengthen the tissue.
ch03-018-058-9780729541930.indd 35 1/09/2016 10:09 AM

LENGTH, STRENGTH AND KINESIO TAPE: MUSCLE TESTING AND TAPING INTERVENTIONS
36
3
KINESIO TAPINGSplenius capitis
STRENGTH TAPING
Client positionThe client is seated with the neck held in flexion, full rotation and lateral flexion away from the side being taped. The chin is tucked in.
Measurement of tapeMeasure a length of tape from the mastoid process to C7 protuberance or further to T4. Cut the tape down the centre to create a 2.5 cm-wide I-strip; the second strip can be used for a subsequent application or the other side. Cut one anchor into a crescent shape to fit behind the ear onto the mastoid process.
Tape applicationApply the anchor at the C7 protuberance or lower to T4, with zero tension. With the tissue in the lengthened position, apply the tape obliquely towards the mastoid process with 25–35% tension. Apply the final anchor with zero tension. Rub the tape to activate the glue.
Additional notesAs the neck is a sensitive area, tension towards the lower side of the spectrum is recommended.
Because the hairline may be a sensitive area or may require a special cut of the tape in order to tape higher into the neck line, it can be more practical to start the tape at the hairline on the mastoid process and then apply the tape with the appropriate tension towards the spine to achieve results. Starting at C7 and finding that the tape is too long and having to trim the tape near hair may not be ideal for a client, particularly on the first application. Once an ideal length has been calculated, practitioners may commence taping with the initial anchor at the spine on subsequent strength applications.
ch03-018-058-9780729541930.indd 36 1/09/2016 10:09 AM

3 • Techniques for testing and taping the neck
37
3
STRENGTH TAPING
ReassessmentReassess your client for change in strength, tonal changes, functional changes and symptoms.
ch03-018-058-9780729541930.indd 37 1/09/2016 10:09 AM

LENGTH, STRENGTH AND KINESIO TAPE: MUSCLE TESTING AND TAPING INTERVENTIONS
38
3
KINESIO TAPINGSplenius capitis
LENGTH TAPING
Client positionThe client is seated with the neck held in flexion, full rotation and lateral flexion away from the side being taped. The chin is tucked in.
Measurement of tapeMeasure a length of tape from the mastoid process to C7 protuberance or further to T4. Cut the tape down the centre to create a 2.5 cm-wide I-strip; the second strip can be used for a subsequent application or the other side. Cut one anchor into a crescent shape to fit behind the ear onto the mastoid process.
Tape applicationApply the anchor at the mastoid process with zero tension. With the tissue in the lengthened position apply the tape obliquely towards the C7 protuberance with 15–25% tension. Apply the final anchor with zero tension. Rub the tape to activate the glue.
Additional notesAs the neck is a sensitive area, tension towards the lower side of the spectrum is recommended.
ReassessmentReassess your client for changes in length, strength, tonal changes, functional changes and symptoms.
ch03-018-058-9780729541930.indd 38 1/09/2016 10:09 AM

3 • Techniques for testing and taping the neck
39
3
ANATOMYSplenius cervicis
InfraspinatusOrigin: Spinous process T3–6
Insertion: Transverse process of C1–3
Nerve supply: Lateral branches of the lower dorsal primary rami of the spinal nerves
Function: Extends, laterally flexes and ipsilaterally rotates the neck
ch03-018-058-9780729541930.indd 39 1/09/2016 10:09 AM

LENGTH, STRENGTH AND KINESIO TAPE: MUSCLE TESTING AND TAPING INTERVENTIONS
40
3
MUSCLE TESTINGSplenius cervicis
STRENGTH BIAS TESTING
Client positionThe client is lying prone on the bed.
Instruction to clientThe client is instructed to slightly rotate the head (30 degrees) to the side being tested and extend the neck off the bed.
Examiner position and notesThe examiner stands at the top of the bed with the testing hand positioned over the head above the level of the ear and the stabilising hand is applied to the thoracic spine to examine for compensatory activity in the trunk. The examiner should note if the patient is attempting to rotate the head fully or is unable to maintain the rotated position.
ResistanceThe examiner applies resistance over the head in the direction of the floor.
ch03-018-058-9780729541930.indd 40 1/09/2016 10:09 AM

3 • Techniques for testing and taping the neck
41
3
MUSCLE TESTINGSplenius cervicis
LENGTH BIAS TESTING
Client positionThe client is seated in neutral lordosis and with the feet supported.
Instruction to clientThe client is instructed to rotate the head slightly away from the side being tested (approximately 30 degrees) and flex the neck. The chin should be tucked in.
Examiner position and notesThe examiner stands behind the client and can apply overpressure by stabilising the thoracic spine whilst applying an upward force on the occiput to lengthen the tissue.
ch03-018-058-9780729541930.indd 41 1/09/2016 10:09 AM

LENGTH, STRENGTH AND KINESIO TAPE: MUSCLE TESTING AND TAPING INTERVENTIONS
42
3
KINESIO TAPINGSplenius cervicis
STRENGTH TAPING
Client positionThe client is seated with the neck held in flexion, slight rotation and lateral flexion away from the side being taped. The chin is tucked in.
Measurement of tapeMeasure a length of tape from under the hairline to the mid-thoracic spine. Cut the tape down the centre to create a 2.5 cm-wide I-strip; the second strip can be used for a subsequent application or on the other side. Cut one anchor to fit into the shape of the hairline.
Tape applicationApply the anchor with zero tension at the mid-thoracic spine. With the muscles in a lengthened position, apply the tape over the paraspinal muscles with 25–35% tension towards the hairline. Apply the final anchor under the hairline with zero tension. Rub the tape to activate the glue.
Additional notes As the neck is a sensitive area, tension towards the lower side of the spectrum is recommended.
Because the hairline may be a sensitive area or may require a special cut of the tape in order to tape higher into the neck line, it may more practical to start the tape at the hairline for the first application and apply the tape with the appropriate tension towards the thoracic spine to achieve results, rather than start in the reverse direction and find that the tape is too long and having to trim the tape near hair. Once an ideal length is determined, a practitioner can start on the thoracic spine for subsequent strength applications.
ch03-018-058-9780729541930.indd 42 1/09/2016 10:09 AM

3 • Techniques for testing and taping the neck
43
3
STRENGTH TAPING
ReassessmentReassess your client for change in strength, tonal changes, functional changes and symptoms.
ch03-018-058-9780729541930.indd 43 1/09/2016 10:09 AM
LENGTH, STRENGTH AND KINESIO TAPE: MUSCLE TESTING AND TAPING INTERVENTIONS
44
3
KINESIO TAPINGSplenius cervicis
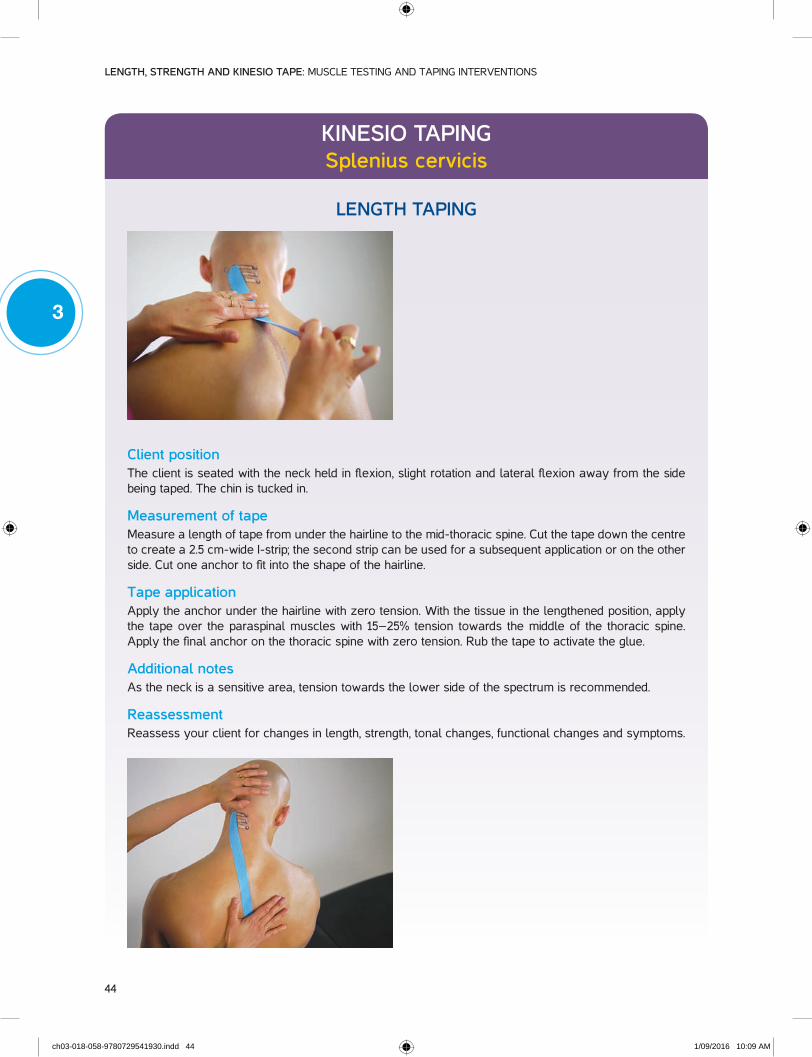
LENGTH TAPING
Client positionThe client is seated with the neck held in flexion, slight rotation and lateral flexion away from the side being taped. The chin is tucked in.
Measurement of tapeMeasure a length of tape from under the hairline to the mid-thoracic spine. Cut the tape down the centre to create a 2.5 cm-wide I-strip; the second strip can be used for a subsequent application or on the other side. Cut one anchor to fit into the shape of the hairline.
Tape applicationApply the anchor under the hairline with zero tension. With the tissue in the lengthened position, apply the tape over the paraspinal muscles with 15–25% tension towards the middle of the thoracic spine. Apply the final anchor on the thoracic spine with zero tension. Rub the tape to activate the glue.
Additional notesAs the neck is a sensitive area, tension towards the lower side of the spectrum is recommended.
ReassessmentReassess your client for changes in length, strength, tonal changes, functional changes and symptoms.
ch03-018-058-9780729541930.indd 44 1/09/2016 10:09 AM

3 • Techniques for testing and taping the neck
45
3
ANATOMYLevator scapula
Levator scapulaOrigin: Transverse process of C1–C4
Insertion: Medial border of the scapula, from the root of the spine to the superior angle
Nerve supply: Nerve root C3–5
Peripheral nerve: Dorsal scapular nerve, C3, C4
Function: Elevates, adducts and downwardly rotates the scapula at the scapulocostal joint. Extends, laterally flexes and ipsilaterally rotates the neck at the spinal joints
ch03-018-058-9780729541930.indd 45 1/09/2016 10:09 AM
LENGTH, STRENGTH AND KINESIO TAPE: MUSCLE TESTING AND TAPING INTERVENTIONS
46
3
MUSCLE TESTINGLevator scapula
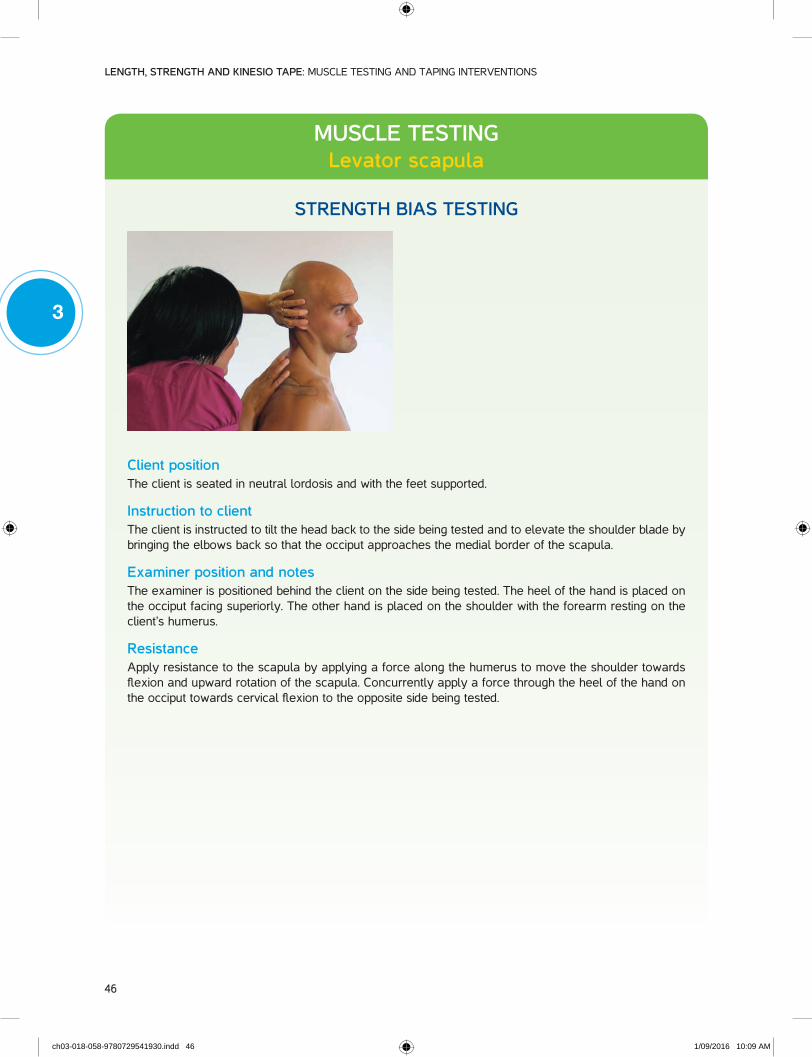
STRENGTH BIAS TESTING
Client positionThe client is seated in neutral lordosis and with the feet supported.
Instruction to clientThe client is instructed to tilt the head back to the side being tested and to elevate the shoulder blade by bringing the elbows back so that the occiput approaches the medial border of the scapula.
Examiner position and notesThe examiner is positioned behind the client on the side being tested. The heel of the hand is placed on the occiput facing superiorly. The other hand is placed on the shoulder with the forearm resting on the client’s humerus.
ResistanceApply resistance to the scapula by applying a force along the humerus to move the shoulder towards flexion and upward rotation of the scapula. Concurrently apply a force through the heel of the hand on the occiput towards cervical flexion to the opposite side being tested.
ch03-018-058-9780729541930.indd 46 1/09/2016 10:09 AM

3 • Techniques for testing and taping the neck
47
3
MUSCLE TESTINGLevator scapula
LENGTH BIAS TESTING
Client positionThe client is seated in neutral lordosis and with the feet supported.
Instruction to clientCervical component: The client is instructed to flex the neck, laterally flex and rotate away from the side being tested.
Scapula component: The client is instructed to place the hand behind the head in order to engage scapular upward rotation, depression of the medial border of the scapula and abduction of the inferior scapular angle.
Examiner position and notesThe examiner should note any shoulder compensations or if symptoms are produced which would indicate the end of range has been reached or that the alternative testing position is more appropriate. End range resistance can be assessed by moving the elbow up (to increase upward rotation and abduction of the scapula) or adding cervical lateral flexion and flexion at the occiput.
Additional notesIf clients have limited shoulder range, an alternative test is to maintain shoulder depression by holding the bench. The examiner can apply overpressure to assess for restriction at the occiput or scapula.
ch03-018-058-9780729541930.indd 47 1/09/2016 10:09 AM
LENGTH, STRENGTH AND KINESIO TAPE: MUSCLE TESTING AND TAPING INTERVENTIONS
48
3
KINESIO TAPINGLevator scapula
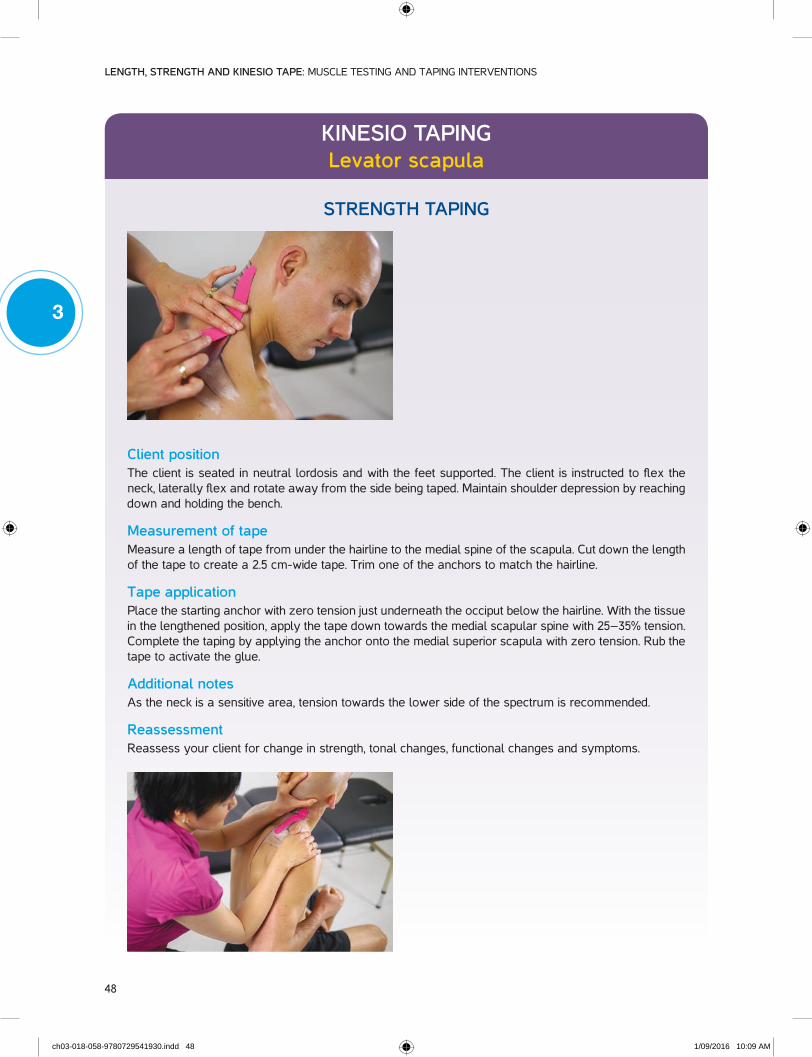
STRENGTH TAPING
Client positionThe client is seated in neutral lordosis and with the feet supported. The client is instructed to flex the neck, laterally flex and rotate away from the side being taped. Maintain shoulder depression by reaching down and holding the bench.
Measurement of tapeMeasure a length of tape from under the hairline to the medial spine of the scapula. Cut down the length of the tape to create a 2.5 cm-wide tape. Trim one of the anchors to match the hairline.
Tape applicationPlace the starting anchor with zero tension just underneath the occiput below the hairline. With the tissue in the lengthened position, apply the tape down towards the medial scapular spine with 25–35% tension. Complete the taping by applying the anchor onto the medial superior scapula with zero tension. Rub the tape to activate the glue.
Additional notesAs the neck is a sensitive area, tension towards the lower side of the spectrum is recommended.
ReassessmentReassess your client for change in strength, tonal changes, functional changes and symptoms.
ch03-018-058-9780729541930.indd 48 1/09/2016 10:09 AM

3 • Techniques for testing and taping the neck
49
3
KINESIO TAPINGLevator scapula
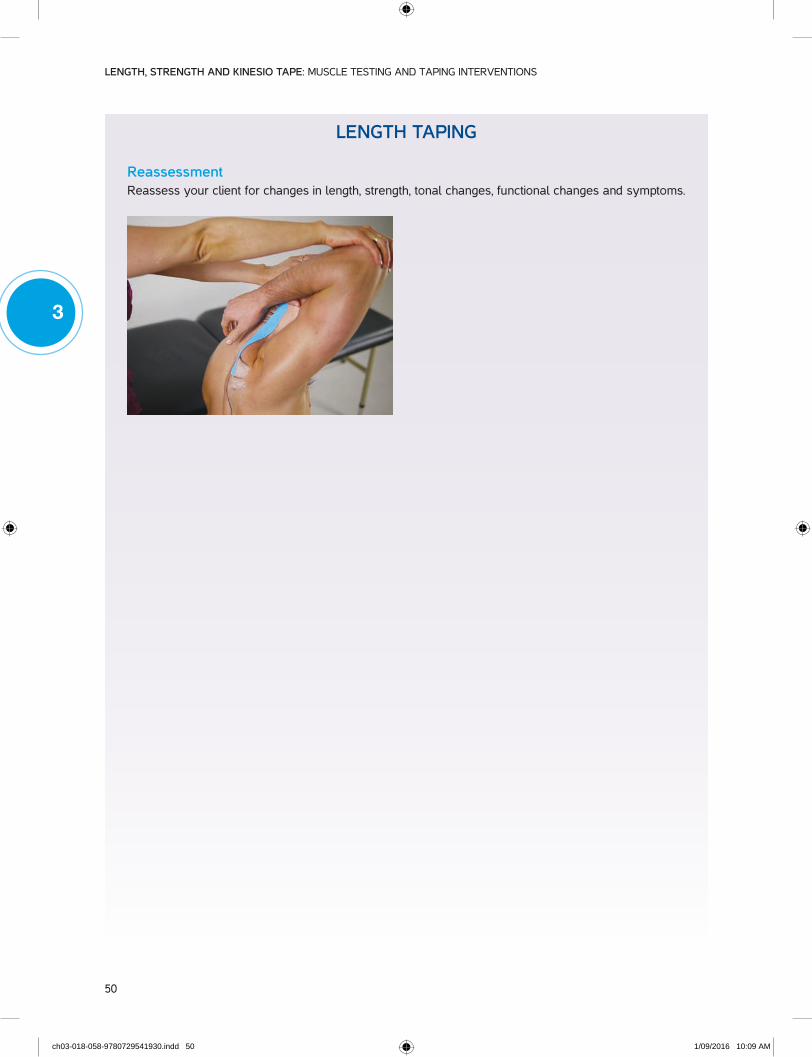
LENGTH TAPING
Client positionThe client is seated in neutral lordosis and with the feet supported. The client is instructed to flex the neck, laterally flex and rotate away from the side being tested. Maintain shoulder depression by reaching down and holding the bench.
Measurement of tapeMeasure a length of tape from under the hairline to the medial spine of the scapula. Cut down the length of the tape to create a 2.5 cm-wide tape. Trim one of the anchors to match the hairline.
Tape applicationPlace the starting anchor with zero tension over the medial scapular spine. With the tissue in a lengthened position, apply the tape up towards the occiput with 15–25% tension. Complete the taping by applying the anchor onto the hairline with zero tension. Rub the tape to activate the glue.
Additional notesAs the neck is a sensitive area, tension towards the lower side of the spectrum is recommended.
The hairline may be a sensitive area or may require a special cut of the tape in order to tape higher into the neck line. For the first application, it can be more practical to start the tape at the hairline and apply the tape with the appropriate tension towards the scapula to achieve results. Starting at the scapula and finding that the tape is too long and having to trim the tape near hair may be avoided. Once an ideal length has been determined, a practitioner may commence taping at the scapula on subsequent length applications.
ch03-018-058-9780729541930.indd 49 1/09/2016 10:09 AM
LENGTH, STRENGTH AND KINESIO TAPE: MUSCLE TESTING AND TAPING INTERVENTIONS
50
3
LENGTH TAPING
ReassessmentReassess your client for changes in length, strength, tonal changes, functional changes and symptoms.
ch03-018-058-9780729541930.indd 50 1/09/2016 10:09 AM

3 • Techniques for testing and taping the neck
51
3
ANATOMYUpper trapezius
Upper trapeziusOrigin: External occipital protuberance, medial ¹⁄₃ superior nuchal line, ligamentum nuchae, spinous
processes of C7
Insertion: Lateral ¹⁄₃ clavicle, acromion process, lateral ¹⁄₃ of spine of the scapula
Nerve supply: Nerve root C1–5.
Peripheral nerve: Spinal portion of the accessory nerve (cranial nerve XI); ventral rami of C3, C4
Function: Elevates, retracts, upwardly rotates the scapula at the scapulocostal joint. Extends, laterally flexes and contralaterally rotates the head and neck at the spinal joints
ch03-018-058-9780729541930.indd 51 1/09/2016 10:09 AM

LENGTH, STRENGTH AND KINESIO TAPE: MUSCLE TESTING AND TAPING INTERVENTIONS
52
3
MUSCLE TESTINGUpper trapezius
STRENGTH BIAS TESTING
Client positionThe client is seated in neutral lordosis and with the feet supported. The hands and back should not be in contact with the supporting surface. Laterally flex the client’s neck to the side being tested and rotate the head away, elevate the acromioclavicular joint of the shoulder towards the ear. The shoulder may abduct to assist in this movement.
Instruction to clientThe client is instructed to maintain shoulder abduction and elevation relative to the head position against the resistance applied by the examiner.
Examiner position and notesDuring function testing, the examiner is positioned behind the client and towards the side being tested.
ResistanceApply resistance simultaneously over the lateral shoulder in the direction of shoulder depression and over the posterior aspect of the occiput in the direction of anterior and contralateral neck flexion.
ch03-018-058-9780729541930.indd 52 1/09/2016 10:09 AM

3 • Techniques for testing and taping the neck
53
3
MUSCLE TESTINGUpper trapezius
LENGTH BIAS TESTING
Client positionThe client is seated in neutral lordosis and with the feet supported
Instruction to clientThe client is instructed to forward flex the neck and laterally flex away from the side tested, then rotate the head back to the same side. The client is to maintain scapular stability by holding under the bench or their leg on the side being tested.
Examiner position and notesThe examiner is positioned standing behind the client in order to assess for range of the movement and quality of the movement. Palpate the trapezius near its insertion at the clavicle for resting tone.
Overpressure can be applied if the client is not irritable to assess for the quality of the end feel. One hand is placed on the acromion to stabilise it whilst the other hand is placed under the occiput to apply a force in the direction for flexion and lateral flexion.
The examiner should note any symptoms that are reproduced during the testing for re-evaluation after the intervention. Range should be compared to the non-affected side for a baseline of normal range when available.
ch03-018-058-9780729541930.indd 53 1/09/2016 10:09 AM

LENGTH, STRENGTH AND KINESIO TAPE: MUSCLE TESTING AND TAPING INTERVENTIONS
54
3
KINESIO TAPINGUpper trapezius
STRENGTH TAPING
Client positionThe client is seated with the neck flexed forward and laterally flexed to the contralateral side and rotated to the ipsilateral side so as to obtain maximal tissue stretch over the area.
Measurement of tapeMeasure a length of tape from under the hairline to the acromion.
Tape applicationApply the anchor under the hairline with zero tension. Place the tissue in the lengthened position and apply the tape with 25–35% tension following the line of the upper trapezius. Complete the taping by applying the anchor onto the acromioclavicular joint with zero tension. Rub the tape to activate the glue. As the neck is a sensitive area, tension towards the lower side of the spectrum is recommended.
ReassessmentReassess your client for change in strength, tonal changes, functional changes and symptoms.
ch03-018-058-9780729541930.indd 54 1/09/2016 10:09 AM

3 • Techniques for testing and taping the neck
55
3
KINESIO TAPINGUpper trapezius
LENGTH TAPING
Client positionThe client is seated with the neck flexed forward and laterally flexed to the contralateral side and rotated to the ipsilateral side so as to obtain maximal tissue stretch over the area.
Measurement of tapeMeasure a length of tape from under the hairline to the acromion. The tape can be left as an I-strip or cut into a Y to combine taping for the middle trapezius and also allow for a better angle as the tape travels up towards the occiput.
Tape applicationApply the anchor over the acromioclavicular joint with zero tension. Place the tissue in the lengthened position and apply the tape with 15–25% tension. Complete the taping by applying the anchor under the occiput with zero tension. Rub the tape to activate the glue.
Additional notesAs the neck is a sensitive area, tension towards the lower side of the spectrum is recommended.
The hairline may be a sensitive area or may require a special cut of the tape in order to tape higher into the neck line. It can be more practical on the first application to start the tape at the hairline and apply the tape with the appropriate tension to achieve results, rather than start in the reverse direction and find that the tape is too long and have to trim the tape near hair. Once an appropriate length of tape has been determined, a practitioner may choose to start the taping process at the acromion on subsequent applications.
ch03-018-058-9780729541930.indd 55 1/09/2016 10:10 AM

LENGTH, STRENGTH AND KINESIO TAPE: MUSCLE TESTING AND TAPING INTERVENTIONS
56
3
LENGTH TAPING
ReassessmentReassess your client for changes in length, strength, tonal changes, functional changes and symptoms.
ch03-018-058-9780729541930.indd 56 1/09/2016 10:10 AM

3 • Techniques for testing and taping the neck
57
3
NECK ASSESSMENT SHEET
Clinic: ..................................................................................................................................................................... Date: ....................................
Client name: .................................................................................................................................................................................................................
Functional review
Functional limitation Pre-test measure Post-test measure
Muscle testing
Tested priority
MuscleStrength Length
CommentsRight Left Right Left
Sternocleidomastoid
Anterior scalene
Middle scalene
Posterior scalene
Splenius capitis
Splenius cervicis
Levator scapula
Upper trapezius
Treatment
Intervention Re-test measures Plan
Practitioner: ............................................................................................ Signature: ...................................................................................
ch03-018-058-9780729541930.indd 57 1/09/2016 10:10 AM

LENGTH, STRENGTH AND KINESIO TAPE: MUSCLE TESTING AND TAPING INTERVENTIONS
58
3
BIBLIOGRAPHY
Berryman Reese, N. M. (2012). Muscle and sensory testing. Missouri: Elsevier-Saunders.
Berryman Reese, N., & Bandy, W. D. (2010). Joint range of motion and muscle length testing. Missouri: Saunders Elsevier.
Calais-Germain, B. (1993). Anatomy of movement (12 ed.). Seattle: Eastland Press.
Comerford, M., & Mottram, S. (2012). Kinetic control: the management of uncontrolled movement. Sydney, Australia: Elsevier.
Kase, K., Hashimoto, T., & Okane, T. (1998). Kinesio Taping perfect manual: amazing taping therapy to eliminate pain and muscle disorders. Albuquerque: Kinesio Taping Association.
Kase, K., & Rock Stockheimer, K. (2006). Kinesio Taping for lymphoedema and chronic swelling. Albuquerque: Kinesio Taping Association.
Kase, K., Wallis, J., & Kase, T. (2003). Clinical thera-peutic applications of the Kinesio taping methods. Albuquerque: Kinesio Taping Association.
Kendall, F. P., McCreary, E., Provance, P., Rodgers, M., & Romanic, W. (2005). Muscles: testing and function with posture and pain. Baltimore: Lippincott Williams Wilkins.
Standring, S., Borely, N., Collings, P., Crossman, A., Gatzoulis, M., Healy, J., … Wigley, C. (2008). Gray’s anatomy: the anatomical basis of clinical practice (S. Susan Ed. 40 ed.). London, United Kingdom: Churchill Livingstone Elsevier.
ch03-018-058-9780729541930.indd 58 1/09/2016 10:10 AM