chapter 3 managing an active directory...
TRANSCRIPT

3C H A P T E R 3
Managing an Active DirectoryInfrastructure
ObjectivesThis chapter covers the following Microsoft-specified objectives for the Planningand Implementing an Active Directory Infrastructure and Managing andMaintaining an Active Directory Infrastructure sections of the Windows Server2003 Active Directory Infrastructure exam:
Implement an Active Directory directory service forest and domain structure. Establish trust relationships. Types of trust relationships might include external
trusts, shortcut trusts, and crossforest trusts.. Business requirements might dictate the need to use more than one forest in your enterprise.
You need to understand how to create trust relationships with external forests and when touse external trusts or forest trusts. You should also understand when to use shortcut trustswithin multiple-domain forests.
Manage an Active Directory forest and domain structure. Manage trust relationships. Manage schema modifications. Add or remove a UPN suffix. This objective is intended to make sure that you can manage several components of the
Active Directory forest and domain structure. You should be aware of the different types oftrust relationships you can configure within and between forests. You should also under-stand how to work with the Active Directory schema and how to use UPN suffixes to facili-tate management and user logon in multiple-domain enterprises.
Implement an Active Directory site topology. Configure site links. Configure preferred bridgehead servers. This objective evaluates your knowledge of how Active Directory handles networks that are
distributed among different physical locations separated by low-speed WAN links. You needto understand how to create and configure sites, site link bridges, and bridgehead servers,and how the Inter-site Topology Generator and Knowledge Consistency Checker operate.
Manage an Active Directory site. Configure replication schedules. Configure site link costs. Configure site boundaries. This objective is intended to make sure that you know how to manage several components of
the links between Active Directory sites. You should understand the factors that affect intra-site and intersite replication and when to modify replication schedules and site link costs.
08_70-294EP_ch03.qxd 11/6/06 2:36 PM Page 115

OutlineIntroduction 118
Active Directory Trust Relationships 118
Trust Relationships Within an ActiveDirectory Forest 119
Interforest Trust Relationships 120
Establishing Trust Relationships 122
Creating an External Trust 122
Creating a Forest Trust 128
Creating a Shortcut Trust 130
Managing Trust Relationships 132
Validating Trust Relationships 132
Changing the Authentication Scope 134
Configuring Name Suffix Routing 134
Removing a Crossforest TrustRelationship 137
Active Directory Federation Services (ADFS) 138
Understanding Trust Relationships 140
Active Directory Forest and DomainStructure 141
Managing Schema Modifications 141
Installing the Schema Snap-In 142
Using the Schema Snap-In 145
Deactivating Schema Objects 149
Adding or Removing a UPN Suffix 151
Understanding the Directory Forest and Domain Structure 155
Active Directory Site Topology 155
Creating Sites 156
Configuring Sites 157
Adding Domain Controllers 157
Specifying a Licensing Server 158
Configuring Site Boundaries 159
Configuring Site Links 162
Site Link Bridges 163
Knowledge Consistency Checker 165
Configuring Connection Objects 166
Inter-Site Topology Generator 168
Preferred Bridgehead Servers 169
Configuring Replication Schedules 171
What Does Active Directory Replicate? 171
How Does Active Directory Replication Work? 172
Intrasite Replication 173
Intersite Replication 174
Manually Forcing Replication 179
Configuring Site Link Costs 181
Chapter Summary 183
Key Terms 184
Apply Your Knowledge 185
Exercises 185
Exam Questions 192
Answers to Exercises 199
Answers to Exam Questions 199
Suggested Readings and Resources 203
08_70-294EP_ch03.qxd 11/6/06 2:36 PM Page 116

Study StrategiesThis chapter builds on the foundations of the preceding chapter by covering the administrationof forests and sites, as well as the Active Directory schema. As you work your way through thechapter, you should pay attention to the following:
. Understand the different types of trust relationships available and when you should usethem. In addition, you should know the differences between incoming and outgoing trustdirections.
. Understand the importance of schema modifications and the potential consequences ofmaking such modifications.
. Understand the ways you can create sites, site links, and site link bridges, and the impor-tance of the Knowledge Consistency Checker and the Inter-Site Topology Generator.
. Understand the way Active Directory replication works and its importance in keeping alldomain controllers up to date.
. Know the differences between intrasite and intersite replication and the way site topologyaffects replication.
08_70-294EP_ch03.qxd 11/6/06 2:36 PM Page 117

118
IntroductionNow that you have created an Active Directory forest with a child domain and configuredglobal catalog servers and operations masters, it is time to examine several issues related tomultisided and multiforest Active Directory deployments. In this chapter, we cover severalissues related to management of trust relationships among Active Directory forests, as well asschema modifications. We then turn our attention to creating, configuring, and managingsites, including replication and site links.
Active Directory Trust RelationshipsObjectiveImplement an Active Directory directory service forest and domain structure
. Establish trust relationships. Types of trust relationships might include external trusts, shortcut trusts,and cross-forest trusts.
Prospects of globalization and international commerce have increased the possibility of com-panies operating multiforest network enterprise structures. Before we look at the intricacies ofinterforest trusts, we briefly review trust relationships as they exist within a single forest.
Before we look at the intricacies of Windows 2000 and interforest trusts, we will briefly reviewtrust relationships as they existed within NT 4.0. Those of you who are upgrading fromWindows NT 4.0 will be familiar with the trust relationships used to allow users in one domainto access resources in another domain. You could configure one domain to trust another oneso that users in the second domain could access resources in the first one. Windows NT 4.0did not create any trust relationships by itself; administrators in both the trusting and trusteddomains had to configure every trust relationship. The domain where the resources are locatedis referred to as the trusting or resource domain, and the domain where the accounts are kept isreferred to as the trusted or accounts domain.
Some characteristics of trust relationships in Windows NT 4.0 follow:
. In a one-way trust relationship, the trusting domain makes its resources available to the trusted domain (see Figure 3.1). With the appropriate permissions, a user from thetrusted domain can access resources on the trusting domain. However, users in the trust-ing domain are unable to access resources in the trusted domain, unless a two-way trustis set up.
Chapter 3: Managing an Active Directory Infrastructure
08_70-294EP_ch03.qxd 11/6/06 2:36 PM Page 118

Active Directory Trust Relationships119
. A trust relationship exists between only two domains. Each trust relationship has justone trusting domain and just one trusted domain.
. A two-way trust relationship between domains is simply the existence of two one-waytrusts in opposite directions between the domains.
. In Windows NT 4.0, trust relationships were not transitive; that is, if Domain A trustsDomain B and Domain B trusts Domain C, these relationships do not mean thatDomain A automatically trusts Domain C. To have such a relationship, a third trustrelationship must be set up whereby Domain A trusts Domain C (see Figure 3.2).
Trust Relationships Within an Active Directory ForestActive Directory in Windows 2000 introduced the concept of two-way transitive trusts thatflow upward through the domain hierarchy toward the tree root domain and across rootdomains of different trees in the same forest. This includes parent-child trusts between parentand child domains of the same tree and tree root trusts between the root domains of differenttrees in the same forest. Because of this arrangement, administrators no longer need to con-figure trust relationships between domains in a single forest.
FIGURE 3.2 If Domain Atrusts Domain B andDomain B trusts DomainC in a nontransitive trust,Domain A does not trustDomain C. In a transitivetrust relationship, DomainA automatically trustsDomain C throughDomain B when the othertwo trusts are created.
A
B
C A
B
C
TransitiveNon-transitive
FIGURE 3.1 In a one-waytrust relationship, thetrusting domain holds theresources that users in thetrusted domain need toaccess.Trusting Domain Trusted Domain
08_70-294EP_ch03.qxd 11/6/06 2:36 PM Page 119

NOTE
120
Managing Trust Relationships You should be aware that only members of the Domain Admins group canmanage trusts.
In addition, Windows Server 2003 provides for another trust relationship called a shortcut trust.It is an additional trust relationship between two domains in the same forest, which optimizesthe authentication process when a large number of users need to access resources in a differ-ent domain in the same forest. This capability is especially useful if the normal authenticationpath needs to cross several domains. Consider Figure 3.3 as an example.
Suppose that users in the C.A.A.com domain need to log on to the C.B.B.com domain, whichis located in the second tree of the same forest. The authentication path must cross five domainboundaries to reach the C.B.B.com domain. If an administrator establishes a shortcut trustbetween the C.A.A.com and C.B.B.com domains, the logon process speeds up considerably.This is also true for shorter possible authentication paths such as C.A.A.com to B.A.com orB.A.com to B.B.com. This also facilitates the use of Kerberos when accessing resources locatedin another domain.
Interforest Trust RelationshipsWhenever there is need for accessing resources in a different forest, administrators have toconfigure trust relationships manually. Windows 2000 offers the capability to configure one-way, nontransitive trusts with similar properties to those mentioned previously, betweendomains in different forests. You have to configure every trust relationship between each
FIGURE 3.3 Shortcut trusts areuseful if the authentication path toanother domain in the forest has tocross several domain boundaries.
A.com
A.A.com B.A.com
C.A.A.com C.B.B.com
B.B.com
B.com
Chapter 3: Managing an Active Directory Infrastructure
08_70-294EP_ch03.qxd 11/6/06 2:36 PM Page 120

Active Directory Trust Relationships121
domain in the different forests explicitly. If you need a two-way trust relationship, you have tomanually configure each half of the trust separately.
Windows Server 2003 makes it easier to configure interforest trust relationships. In this sec-tion, we study these trust relationships. In a nutshell, for forests that are operating at theWindows Server 2003 forest functional level, you can configure trusts that enable two-waytransitive trust relationships between all domains in the relevant forests. If the forest is oper-ating at any other functional level, you still need to configure explicit trusts as inWindows 2000.
Windows Server 2003 introduces the following types of interforest trusts:
. External trusts—These one-way trusts are individual trust relationships set upbetween two domains in different forests, as could be done in Windows 2000. Theforests involved might be operating at any forest functional level. You can use this typeof trust if you need to enable resource sharing only between specific domains in differ-ent forests. You can also use this type of trust relationship between an Active Directorydomain and a Windows NT 4.0 domain.
. Forest trusts—As already mentioned, these trusts include complete trust relationshipsbetween all domains in the relevant forests, thereby enabling resource sharing amongall domains in the forests. The trust relationship can be either one-way or two-way.Both forests must be operating at the Windows Server 2003 forest functional level.The use of forest trusts offers several benefits:
. They simplify resource management between forests by reducing the number ofexternal trusts needed for resource sharing.
. They provide a wider scope of UPN authentications, which can be used across thetrusting forests.
. They provide increased administrative flexibility by enabling administrators to splitcollaborative delegation efforts with administrators in other forests.
. Directory replication is isolated within each forest. Forestwide configuration modifi-cations such as adding new domains or modifying the schema affect only the forestto which they apply, and not trusting forests.
. They provide greater trustworthiness of authorization data. Administrators can useboth the Kerberos and NTLM authentication protocols when authorization data istransferred between forests.
. Realm trusts—These are one-way nontransitive trusts that you can set up between anActive Directory domain and a Kerberos V5 realm such as found in UNIX and MITimplementations.
08_70-294EP_ch03.qxd 11/6/06 2:36 PM Page 121

EXAM ALERT
122
Establishing Trust RelationshipsThis section examines creating two types of trust relationships with external forests: externaltrusts and forest trusts. We then look at the shortcut trust, which is the only configurable typeof trust relationship between two domains in the same forest.
Before you begin to create trust relationships, you must be aware of several prerequisites:
. You must be a member of the Enterprise Admins group or the Domain Admins groupin the forest root domain. New to Windows Server 2003, you can also be a member ofthe Incoming Forest Trust Builders group on the forest root domain. This group hasthe rights to create one-way, incoming forest trusts to the forest root domain. If youhold this level of membership in both forests, you can set up both sides of an interfor-est trust at the same time.
. You must ensure that DNS is properly configured so that the forests can recognizeeach other. You might have to configure conditional forwarding to enable DNS serversin one forest to forward queries to DNS servers in the other forest so that resourcesare properly located.
. In the case of a forest trust, both forests must be operating at the Windows Server2003 forest functional level.
Windows Server 2003 provides the New Trust Wizard to simplify the creation of all types oftrust relationships. The following sections show you how to create these trust relationships.
Creating an External TrustFollow Step by Step 3.1 to create an external trust with a domain in another forest or aWindows NT 4.0 domain.
Trust Creation Can Be Tricky! Know the variations of the procedures so that you can answer questionsabout the troubleshooting of problems related to interforest access as they relate to the options avail-able when creating trusts. In particular, be aware of the differences between the incoming and outgoingtrust directions.
STEP BY STEP3.1 Creating an External Trust
1. Click Start, Administrative Tools, Active Directory Domains and Trusts to open the Active DirectoryDomains and Trusts snap-in.
Chapter 3: Managing an Active Directory Infrastructure
08_70-294EP_ch03.qxd 11/6/06 2:36 PM Page 122

Active Directory Trust Relationships123
2. In the console tree, right-click your domain name and choose Properties to display the Properties dialogbox for the domain.
3. Select the Trusts tab. This tab contains fields listing domains trusted by this domain and domains thattrust this domain. Initially these fields are blank, as in Figure 3.4.
4. Click New Trust to start the New Trust Wizard, as shown in Figure 3.5.
5. Click Next, and on the Trust Name page, type the name of the domain with which you want to create atrust relationship (see Figure 3.6). Then click Next.
FIGURE 3.5 You can create new trust rela-tionships by using the New Trust Wizard.
FIGURE 3.4 You can manage trusts from the Trusts tabof a domain’s Properties dialog box.
08_70-294EP_ch03.qxd 11/6/06 2:36 PM Page 123

NOTE
124
6. The Trust Type page, shown in Figure 3.7, offers you a choice between an external trust and a foresttrust. Select External Trust and then click Next.
Trust Types If the forest functional level is not set to Windows Server 2003, the forest trust option willnot appear. You might receive an option to create a realm trust or an external trust with a Windowsdomain.
7. The Direction of Trust page, shown in Figure 3.8, offers you a choice of the following three types of trusts:
FIGURE 3.7 You can select the trust typerequired from the Trust Type page.
FIGURE 3.6 On the Trust Name page, youcan enter the DNS or NetBIOS name of thedomain with which you want to create atrust.
Chapter 3: Managing an Active Directory Infrastructure
08_70-294EP_ch03.qxd 11/6/06 2:37 PM Page 124

Active Directory Trust Relationships125
. Two-Way—Creates a two-way trust. This type of trust allows users in both domains to be authenti-cated in each other’s domain.
. One-Way: Incoming—Creates a one-way trust in which users in your (trusted) domain can beauthenticated in the other (trusting) domain. Users in the other domain cannot be authenticated inyour domain.
. One-Way: Outgoing—Creates a one-way trust that users in the other (trusted) domain can be authen-ticated in your (trusting) domain. Users in your domain cannot be authenticated in the other domain.
8. Select a choice according to your network requirements and then click Next.
9. The Sides of Trust page, shown in Figure 3.9, allows you to complete both sides of the trust if you havethe appropriate permissions in both domains. If this is so, select Both This Domain and the SpecifiedDomain. Otherwise, select This Domain Only and then click Next.
FIGURE 3.9 The Sides of Trust page enablesyou to complete both sides of the trust ifyou have the appropriate permissions.
FIGURE 3.8 The Direction of Trust pageoffers you options for creating one-way ortwo-way trusts.
08_70-294EP_ch03.qxd 11/6/06 2:37 PM Page 125

126
10. If you selected This Domain Only on the Sides of Trust page, the Trust Password page appears, askingfor a password for the trust. You must specify the same password when creating the trust in the otherdomain. Type and confirm a password that conforms to password security guidelines, click Next, andthen skip to step 13. Ensure that you remember this password.
11. If you selected Both This Domain and the Specified Domain on the Sides of Trust page, the OutgoingTrust Properties—Local Domain page, shown in Figure 3.10, offers the following two choices in thescope of authentication for users in the trusted domain:
. Domain-Wide Authentication—This option authenticates users from the trusted domain for allresources in the local domain. Microsoft recommends this option only for trusts within the sameorganization.
. Selective Authentication—This option does not create any default authentication. You must grantaccess to each server that users need to access. Microsoft recommends this option for trusts thatinvolve separate organizations, such as contractor relationships.
12. Select the appropriate type of authentication and then click Next.
13. The Trust Selections Complete page displays a list of the options that you have configured (seeFigure 3.11). Review these settings to ensure that you have made the correct selections. If any settingis incorrect, click Back and correct it. Then click Next.
FIGURE 3.10 The Outgoing TrustAuthentication Level-Local Domain pageprovides two choices of authenticationscope for users in the trusted domain.
Chapter 3: Managing an Active Directory Infrastructure
08_70-294EP_ch03.qxd 11/6/06 2:37 PM Page 126

Active Directory Trust Relationships127
14. The Trust Creation Complete page informs you that the trust relationship was successfully created. ClickNext to finish the process.
15. The Confirm Outgoing Trust page asks whether you want to confirm the outgoing trust (see Figure3.12). If you have configured the trust from the other side, click Yes, Confirm the Outgoing Trust.Otherwise, click No, Do Not Confirm the Outgoing Trust. Then click Next.
16. The Confirm Incoming Trust page asks whether you want to confirm the incoming trust. Choices are thesame as on the previous page. If you want to confirm this trust, enter a username and password for anadministrator account in the other domain.
17. The Completing the New Trust Wizard page verifies the confirmation of the trust from the other side.Click Finish.
FIGURE 3.12 The Confirm Outgoing Trustpage provides a chance to confirm the otherside of the trust.
FIGURE 3.11 The Trust Selections Completepage displays a review of the trust settingsyou specified.
08_70-294EP_ch03.qxd 11/6/06 2:37 PM Page 127

128
18. You are returned to the Trusts tab of the domain’s Properties dialog box (see Figure 3.13). The name ofthe domain with which you configured the trust now appears in one or both of the fields according tothe trust type you created. Click OK to close this dialog box.
FIGURE 3.13 After you have created the trust relationship, the Trusts tab of the domain’s Properties dialog boxshows the name of the trusted domain together with the trust type and transitivity.
Creating a Forest TrustRecall that this type of trust can be created only between two Active Directory forests that areboth operating at the Windows Server 2003 forest functional level. Follow Step by Step 3.2 tocreate a forest trust.
STEP BY STEP3.2 Creating a Forest Trust
1. Make sure that the forest functional level of both forests is set to Windows 2003. See Chapter 2,“Planning and Implementing an Active Directory Infrastructure,” for details.
2. Follow steps 1–5 of Step by Step 3.1 to access the Trust Name page of the New Trust Wizard.
3. Type the name of the forest root domain with which you want to create a trust and then click Next.
4. On the Trust Type page, select Forest Trust and then click Next.
5. On the Direction of Trust page, select the appropriate direction for the trust and then click Next.
Chapter 3: Managing an Active Directory Infrastructure
08_70-294EP_ch03.qxd 11/6/06 2:37 PM Page 128

Active Directory Trust Relationships129
6. On the Sides of Trust page, specify whether you want to create the trust for this domain only or for boththis domain and the specified domain, and then click Next.
7. If you are creating the trust for both forests, specify a username and password for the specified forestand then click Next. If you are creating the trust for this forest only, specify the trust password that theadministrator in the other forest will need to specify to complete the creation of the trust for her forest.Then click Next.
8. The Outgoing Trust Authentication Level—Local Forest page, shown in Figure 3.14, provides twochoices that are similar to those provided by the Outgoing Trust Authentication Level—Local Domainpage. Make a choice and then click Next.
9. The Trust Selections Complete page displays a list of the options that you have configured (refer toFigure 3.11). Review these settings to ensure that you have made the correct selections. If any settingis incorrect, click Back and correct it. Then click Next.
10. The Trust Creation Complete page informs you that the trust relationship was successfully created. ClickNext to finish the process.
11. The Confirm Outgoing Trust page asks whether you want to confirm the outgoing trust (refer to Figure3.12). If you have configured the trust from the other side, click Yes, Confirm the Outgoing Trust.Otherwise, click No, Do Not Confirm the Outgoing Trust. Then click Next.
12. The Confirm Incoming Trust page asks whether you want to confirm the incoming trust. Choices are thesame as on the previous page. If you want to confirm this trust, enter a username and password for anadministrator account in the other forest.
13. The Completing the New Trust Wizard page verifies the confirmation of the trust from the other side.Click Finish.
14. You are returned to the Trusts tab of the domain’s Properties dialog box (refer to Figure 3.13). The
FIGURE 3.14 The Outgoing TrustAuthentication Level—Local Forest pageprovides two choices of authenticationscope for users in the trusted forest.
08_70-294EP_ch03.qxd 11/6/06 2:37 PM Page 129

EXAM ALERT
EXAM ALERT
130
name of the domain with which you configured the trust now appears in one or both of the fieldsaccording to the trust type you created. Click OK to close this dialog box.
Know When You Should Create a Forest Trust Know that all domains involved must be at the WindowsServer 2003 domain functional level, and that the forests must be at the Windows 2003 forest func-tional level. Also remember that a forest trust is the simplest way to connect forests when access toresources in multiple domains is required, and when Kerberos authentication across the forest bound-ary is needed.
If You Rename a Domain, Cross-Forest Trusts Are Invalidated If a question informs you that a domainhas been renamed and users are unable to access resources in an external forest, the reason for thisproblem is that both external and forest trust relationships are invalidated by the rename process. Youneed to delete and re-create the trust relationships following the renaming process.
Creating a Shortcut TrustRecall that this type of trust can be created between child domains in the same forest to expe-dite crossdomain authentication or resource access. Follow Step by Step 3.3 to create a short-cut trust relationship.
STEP BY STEP3.3 Creating a Shortcut Trust
1. In Active Directory Domains and Trusts, right-click your domain and choose Properties.
2. On the domain’s Properties dialog box, select the Trusts tab and click New Trust to start the New TrustWizard.
3. Click Next, and on the Trust Name and Password page, type the DNS name or NetBIOS name of thedomain with which you want to establish a shortcut trust and then click Next.
4. On the Direction of Trust page (refer to Figure 3.8), choose the appropriate option (two-way, one-wayincoming, or one-way outgoing) and then click Next.
5. On the Sides of Trust page, specify whether you want to create the trust for this domain only or for boththis domain and the specified domain, and then click Next.
Chapter 3: Managing an Active Directory Infrastructure
08_70-294EP_ch03.qxd 11/6/06 2:37 PM Page 130

Active Directory Trust Relationships131
6. If you are creating the trust for both domains, specify a username and password for an administratoraccount in the specified domain. If you are creating the trust for this domain only, specify the trustpassword that the administrator in the other domain will need to specify to complete the creation of thetrust for her domain. Then click Next.
7. The Trust Selections Complete page displays a summary of the settings you have entered (refer toFigure 3.11). Click Back if you need to make any changes to these settings. Then click Next to create the trust.
8. The Trust Creation Complete page informs you that the trust relationship was successfully created. ClickNext to configure the trust.
9. The Confirm Outgoing Trust page asks whether you want to confirm the other side of the trust. If youhave created both sides of the trust, click Yes. Otherwise, click No and then click Next.
10. The Confirm Incoming Trust page asks whether you want to confirm the incoming trust. Choices are thesame as on the previous page. If you want to confirm this trust, enter a username and password for anadministrator account in the other domain.
11. The Completing the New Trust Wizard page informs you that you have created the trust. Click Finish toreturn to the Trusts tab of the domain’s Properties dialog box (refer to Figure 3.13). The name of thedomain with which you configured the trust now appears in one or both of the fields according to thetrust type you created. Click OK to close this dialog box.
If you have created only one side of the trust, an administrator in the other domain must repeatthis procedure to create the trust from her end. She will have to enter the trust password youspecified in this procedure.
A Separate Research ForestA major aircraft manufacturer landed a contract with NASA to design one module of a prototype space-craft for a manned Mars mission. Realizing that the research necessary to complete this project success-fully required a high level of security, management asked the senior network administrator to set up aseparate forest in the organization’s Windows Server 2003 Active Directory design.
For the project to succeed, researchers needed access to certain data stored in the organization’s existingforest. Their user accounts would be in the new forest. Users in the existing forest did not need to accessdata in the research forest. The administrator had to choose a trust model that would enable the appropri-ate levels of access.
With these needs in mind, the administrator decided to implement a one-way external trust relationship inwhich the existing forest trusted the research forest. It was then possible to place the researchers whoneeded access into a group that could be granted access to the appropriate resources in the existing for-est. Because the trust relationship was one-way, no access in the opposite direction was possible. Wetake a further look at the use of groups to grant crossforest access in Chapter 6, “Implementing User,Computer, and Group Strategies.”
08_70-294EP_ch03.qxd 11/6/06 2:37 PM Page 131

132
Managing Trust Relationships
ObjectiveManage an Active Directory forest and domain structure
. Manage trust relationships
After you have created a crossforest trust, the following limited set of configuration options isavailable from the trust’s Properties dialog box:
. Validate Trust Relationships—This option enables you to verify that a trust has beenproperly created and that the forests can communicate with each other.
. Change the Authentication Scope—This option enables you to change the selectionof domainwide authentication or selective authentication that you made during cre-ation of the trust, should you need to modify access control to the trusting forest’sresources.
. Configure Name Suffix Routing—This option provides a mechanism that you canuse to specify how authentication requests are routed across Windows Server 2003forests. It is available only when forest trusts are used.
Validating Trust RelationshipsTo access the trust’s Properties dialog box and validate a trust relationship, follow Step byStep 3.4.
STEP BY STEP3.4 Validating a Trust Relationship
1. In Active Directory Domains and Trusts, right-click your domain name and choose Properties.
2. On the Trusts tab of the domain’s Properties dialog box, select the name of the other domain or forestand click Properties.
3. This action displays the trust’s Properties dialog box, as shown in Figure 3.15.
Chapter 3: Managing an Active Directory Infrastructure
08_70-294EP_ch03.qxd 11/6/06 2:37 PM Page 132

Active Directory Trust Relationships133
4. To validate the trust relationship, click Validate.
5. If the trust is in place and active, you receive a confirmation message box, as shown in Figure 3.16.Otherwise, you receive an error message, such as the one in Figure 3.17.
FIGURE 3.17 If the trust cannot be validated, an error message such as this informs you of the problem.
FIGURE 3.16 This message box informs you that the trust isvalid.
FIGURE 3.15 The General tab of the Properties dialogbox of the other domain provides information on thetrust’s properties.
08_70-294EP_ch03.qxd 11/6/06 2:37 PM Page 133

134
Changing the Authentication ScopeFollow Step by Step 3.5 to change the authentication scope that you set when you create thetrust.
STEP BY STEP3.5 Changing the Authentication Scope of a Trust Relationship
1. Select the Authentication tab of the trust’s Properties dialog box, as shown in Figure 3.18.
2. Select either Domain-Wide Authentication or Selective Authentication (as already described in Step byStep 3.1) and then click OK.
FIGURE 3.18 The Authentication tab of a trust’s Properties dialog box allows you to change the trust’s authenti-cation scope.
Configuring Name Suffix RoutingWhen you initially create a forest trust, all unique name suffixes are routed by default. Aunique name suffix is a name suffix within a forest, such as a User Principal Name (UPN)suffix, Service Principal Name (SPN) suffix, or domain name system (DNS) forest or treename that is not subordinate to any other name suffix. For example, the DNS forest namequepublishing.com is a unique name suffix within the quepublishing.com forest.Consequently, name suffixes in one forest do not exist in another forest.
Chapter 3: Managing an Active Directory Infrastructure
08_70-294EP_ch03.qxd 11/6/06 2:37 PM Page 134

Active Directory Trust Relationships135
Name suffix routing is a mechanism that can manage the routing of authentication requestsacross Windows Server 2003 forests connected by forest trust relationships. It enables namesuffixes that do not exist in one forest to be used to route authentication requests to anotherforest. This includes child name suffixes. As a result, when you view name suffixes in the NameSuffix Routing tab of the domain’s Properties dialog box, as shown in Figure 3.19, they are pre-fixed by * to indicate that they refer to the parent domain and all child domains. If you add newchild domains to either forest, they automatically inherit the name suffix routing properties ofother domains in the forest. After you add a new name suffix and validate the trust, it appearson the Name Suffixes tab with a status (shown on the Routing column) of Disabled. The Statuscolumn indicates New for a newly created name suffix.
You might have to disable name suffix routing to prevent certain authentication requests fromflowing across the forest trust. You might also have to enable name suffix routing for additionalname suffixes you have created or to exclude a child name suffix from routing. Follow Step byStep 3.6 to configure these name suffix routing options.
STEP BY STEP3.6 Configuring Name Suffix Routing
1. On the Name Suffix Routing tab of the trust’s Properties dialog box, select the suffix whose routing sta-tus is to be changed and then click Enable or Disable as required.
2. The routing status in the Routing column changes. In the case of enabling a new name suffix routing,the New entry disappears from the Status column.
FIGURE 3.19 The Name Suffix Routing tab of a trust’sProperties dialog box allows you to enable or disablename suffix routing between forests.
08_70-294EP_ch03.qxd 11/6/06 2:37 PM Page 135

NOTE
136
3. To exclude a child name suffix from routing, select the parent suffix and click Edit to display the Editdomain name dialog box (see Figure 3.20).
4. To exclude the name suffix, click Add. On the Add Excluded Name Suffix dialog box, type the name ofthe suffix and then click OK (see Figure 3.21).
5. The excluded name suffix appears on the Edit domain name dialog box. Click OK.
Name Conflicts Can Occur If the same unique name suffix is used in two forests connected by a foresttrust, a conflict (or collision) might occur. In such situations, the Status column on the Name SuffixRouting tab lists the conflict in the indicated domain. You cannot enable this suffix for name routing untilyou have removed the conflicting name suffix for the indicated domain.
FIGURE 3.21 The Add Excluded Name Suffix dialog boxallows you to exclude a name suffix from routing to thespecified forest.
FIGURE 3.20 You can exclude a name suffix thatdoes not exist in the specified forest from routing byspecifying it on the Edit domain name dialog box.
Chapter 3: Managing an Active Directory Infrastructure
08_70-294EP_ch03.qxd 11/6/06 2:37 PM Page 136

Active Directory Trust Relationships137
Removing a Crossforest Trust RelationshipSometimes you might need to remove a trust relationship between two forests. For example,a contract might have completed or been terminated, an acquisition of one company byanother might have fallen through, and so on. You could have to remove and re-create a trustrelationship if you have incorrectly specified properties such as an incorrect trust type ordirection.
You can remove a trust relationship from the Active Directory Domains and Trusts snap-in byfollowing Step by Step 3.7.
STEP BY STEP3.7 Removing a Trust Relationship
1. In Active Directory Domains and Trusts, right-click your domain name and choose Properties.
2. On the Trusts tab of the domain’s Properties dialog box, select the trust to be removed and clickRemove.
3. You are asked whether you want to remove the trust from the local domain only or from the localdomain and the other domain (see Figure 3.22). If you want to remove the trust from both domains,select Yes, Remove the Trust from Both the Local Domain and the Other Domain, type the usernameand password for an account with administrative privileges in the other domain, and then click OK.
4. Click Yes on the next dialog box to confirm removing the trust.
5. You are returned to the Trust tab of the domain’s Properties dialog box. Notice that the name of theother domain has been removed.
FIGURE 3.22 You are asked whether you want toremove the trust from the local domain only or fromthe local domain and the other domain.
08_70-294EP_ch03.qxd 11/6/06 2:37 PM Page 137

WARNING
138
Removing the Trust If you remove the trust from the local domain only, it still appears from the otherdomain but generates an error if you attempt to validate it. An administrator from the other domainmust remove the trust from that domain as well.
Active Directory Federation Services (ADFS)As introduced in Chapter 1, Active Directory Federation Services (ADFS) is a new fea-
ture in Windows Server 2003 R2 that enables you to set up a single signon capability forusers accessing multiple web applications within a single session. It enables companies andbusiness partners to collaborate with each other without the need to establish trust rela-tionships and without the need for users in these companies to remember multiple user-names and passwords.
Figure 3.23 provides a simple example. Let’s assume that Quepublishing.com is hosting a webapplication to which users in its own company and partner company Examcram.com needaccess. Each company operates its own Active Directory forest, but IT directors in both com-panies do not want to set up a trust relationship similar to those already discussed in this chap-ter. Therefore, both companies set up a server running Windows Server 2003 R2 with ADFSthat allow users in Examcram.com to authenticate to the web server operated byQuepublishing.com with their regular usernames and passwords. The Quepublishing.comADFS server authenticates a user from Examcram.com and grants access to the web applica-tion. As you can see from Figure 3.23, this constitutes a type of trust between the ADFS serverswithout an external or forest trust between the two forests.
FIGURE 3.23 ADFSenables users from onecompany to authenticateto a web application in asecond company withoutthe need for a separateusername and password.
AD Domain
ServerRunning ADFS
User Web Server
AD Domain
ServerRunning ADFS
User
Trust
Access to WebApplication
quepublishing.com examcram.com
Chapter 3: Managing an Active Directory Infrastructure
R2
08_70-294EP_ch03.qxd 11/6/06 2:37 PM Page 138

Active Directory Trust Relationships139
To deploy ADFS, you must first install Internet Information Services (IIS) together with aSecure Sockets Layer (SSL) certificate on the server that will run ADFS. You can obtain a SSLcertificate from a server running Certificate Services, which we introduce in Chapter 5. Thenyou can install ADFS from the Active Directory Services node of the Windows ComponentsWizard. This installs a Microsoft Management Console (MMC) snap-in from which you canmanage all aspects of ADFS, including trust policies, Active Directory Application Mode(ADAM) account stores, and web applications that users will access through ADFS.
The installation and configuration of ADFS is currently beyond the scope of the 70-294 exam(although this could be subject to change in the future). For further information on the capa-bilities and usage of ADFS, refer to “Overview of Active Directory Federation Services inWindows Server 2003 R2,” in the “Suggested Readings and Resources” section.
ChallengeAdding and Removing Trust Relationships
You are the head network administrator for Widgets, Inc., which operates an Active Directory forestnamed widgets.com. The company has a forest trust relationship with an Active Directory forestnamed example.com.
Corporate executives for Widgets, Inc., sell Example off to another business and acquire a new companynamed Samples. Consequently, no access should be permitted between the Widgets, Inc., and Samplesnetworks. Users in widgets.com and samples.com need access to resources on each other’s net-works. The latter company operates a Kerberos V5 realm named samples.com.
As a result of these business decisions, you are required to remove the forest trust relationship withExample and create a new trust relationship with Samples. How should you proceed?
Try to work through this problem on your own first. If you are stuck or need guidance, follow these stepsand look back at the Step by Step procedures for more detailed information.
1. Working from a domain controller in the widgets.com forest, open Active Directory Domains and Trusts.
2. In the console tree, right-click widgets.com and choose Properties.
3. On the Trusts tab, under Domains Trusted by This Domain (Outgoing Trusts), select example.comand click Remove. Click Yes to confirm removal of this trust.
4. Repeat for the incoming trust.
5. Click New Trust and then click Next to bypass the welcome page of the New Trust Wizard.
6. Type samples as the name of the realm for the trust and then click Next.
7. On the Trust Type page, ensure that Realm Trust is selected and then click Next.
8. On the Transitivity of Trust page, leave the default of Nontransitive selected and then click Next.
(continues)
08_70-294EP_ch03.qxd 11/6/06 2:37 PM Page 139

140
9. On the Direction of Trust page, select Two-way and then click Next.
10. On the Trust Password page, type and confirm a secure password and then click Next. Ensure thatyou keep a record of the password you have entered. In the real world, you would provide theadministrator of Examcram the password so that he could configure the opposite end of the trust.
11. On the Trust Selections Complete page, click Next and then click Finish.
Understanding Trust RelationshipsFollowing are points to remember regarding trust relationships:
. In a one-way trust relationship, the trusting domain makes its resources available tousers in the trusted domain. A two-way trust relationship consists of two one-waytrusts in opposite directions.
. By default in Active Directory, all domains in a forest trust each other with two-waytransitive trust relationships. You can also create shortcut trusts between child domainsto facilitate rapid authentication and resource access.
. You need to set up all trust relationships between different forests explicitly. You canset up either external one- or two-way trusts between specific domains in the twoforests or a forest trust in which all domains in the two forests trust each other withtwo–way trusts.
. A one-way incoming trust allows users in your (trusted) domain to be authenticated inthe other (trusting) domain, whereas a one-way outgoing trust allows users in the other(trusted) domain to be authenticated in your (trusting) domain.
. Two authentication scopes are available: Domainwide authentication allows users fromthe trusted domain to access all resources in the local domain. Selective authenticationdoes not create any default authentication; you must grant access to each server thatusers need to access. You can change the authentication scope after trusts are set up, ifnecessary.
. You can enable name suffix routing that simplifies authentication requests being routedto another forest. New child domains added to either forest automatically inherit thesename suffix routing properties; however, you can disable name suffix routing whenrequired or exclude a child name suffix from routing.
. ADFS enables you to set up a type of trust for users to access web applications inanother forest without the need for a separate username and password, without estab-lishing a regular forest or external trust relationship.
Chapter 3: Managing an Active Directory Infrastructure
(continued)
08_70-294EP_ch03.qxd 11/6/06 2:37 PM Page 140

Active Directory Forest and Domain Structure141
Active Directory Forest and DomainStructureNow that you know about creating and administering trust relationships, we are ready to lookat two additional aspects of forest and domain management: schema modifications and UPNsuffixes.
Managing Schema Modifications
ObjectiveManage an Active Directory forest and domain structure
. Manage schema modifications
As discussed in Chapter 1, “Concepts of Windows Server 2003 Active Directory,” the schemais a set of rules that define the classes of objects and their attributes that can be created in anActive Directory forest. All domains in a forest share a common schema, which is replicated toall domain controllers in the forest. However, only the schema master contains a writable copyof the schema; all other domain controllers contain a read-only replica of the schema.
Active Directory stores information on the classes and attributes as instances of theclassSchema and attributeSchema classes, respectively. The schema defines the attributesthat can be held by objects of various types, the various classes that can exist, and the objectclass that can be a parent of the current object class. When you first install Active Directory, adefault schema is created; it includes definitions for the common classes of objects, such asuser, computer, and organizationalUnit. It also includes attribute definitions, such aslastName, userPrincipalName, telephoneNumber, and objectSid. Microsoft designed theschema to be extensible; in other words, you can add classes and attributes, together with theirdefinitions, as required. In addition, you can remove classes and attributes that you no longerrequire, provided the forest is operating at the Windows Server 2003 functional level.
Take Great Care in Modifying the Schema Improper modifications can cause irreparable harm toActive Directory. For this reason, Microsoft created a global group called Schema Admins, and onlymembers of this group can perform such modifications. As a best practice to avoid unauthorized modi-fications, you should remove all users from this group and add a user only when it is necessary tomodify the schema. In addition, it is strongly advisable to create a test forest in a lab environment andtest schema modifications here before deploying them to a production forest.
WARNING
08_70-294EP_ch03.qxd 11/6/06 2:37 PM Page 141

142
Following are the characteristics of these classes:
. Active Directory uses an instance of the classSchema class to define every object classsupported. For example, the mayContain and mustContain attributes describe attrib-utes that an object class may and must contain.
. You can use instances of the attributeSchema class to define every attribute thatActive Directory supports. For example, the attributeSyntax and isSingleValuedattributes describe an attribute in a similar manner to the way in which attributes of auser object describe the user.
. Active Directory uses a well-defined Schema container as a location in the directoryto store the instances of the attributeSchema and classSchema classes. This con-tainer has a distinguished name (DN) of the form CN=Schema,CN=Configuration,DC=quepublishing,DC=Com, where the DC items refer to the forest root domain name,using quepublishing.com as an example.
For further information on object classes, their characteristics, and a description of the key attrib-utes of a classSchema object, see “Characteristics of Object Classes” at the following address:
http://msdn.microsoft.com/library/default.asp?url=/library/en-us/ad/ad/characteristics_of_object_classes.asp
For similar information for attributes, see “Characteristics of Attributes” at this address:
http://msdn.microsoft.com/library/default.asp?url=/library/en-us/ad/ad/characteristics_of_attributes.asp
Installing the Schema Snap-InYou can perform schema modifications from any computer running Windows Server 2003 orWindows XP Professional by installing the Active Directory Schema snap-in on a server orinstalling the Windows Server 2003 Administration Tools Pack on a Windows XP Professionalcomputer. If the computer is not the schema master, it creates a connection to the schema mas-ter when you start the snap-in.
The Active Directory schema snap-in is not present by default when you first install ActiveDirectory. Installation of this snap-in is a two-step process: registration and snap-in installation.
Follow Step by Step 3.8 to register the snap-in.
STEP BY STEP3.8 Registering the Active Directory Schema Snap-In
1. Ensure that you are logged on as a member of the Schema Admins group.
2. Click Start, Command Prompt.
Chapter 3: Managing an Active Directory Infrastructure
08_70-294EP_ch03.qxd 11/6/06 2:37 PM Page 142

Active Directory Forest and Domain Structure143
3. Type regsvr32 schmmgmt.dll.
4. A message box informs you that the registration succeeded. See Figure 3.24.
FIGURE 3.24 Windows informs you when you have successfully registered the Active Directory Schema snap-in.
After you have registered the Active Directory Schema snap-in, you can add this snap-in to anempty Microsoft Management Console (MMC). Follow Step by Step 3.9 to install the ActiveDirectory Schema snap-in.
STEP BY STEP3.9 Installing the Active Directory Schema Snap-in to a New MMC Console
1. Click Start, Run.
2. Type mmc to open an empty MMC console.
3. Click File, Add/Remove Snap-In to open the Add/Remove Snap-In dialog box (see Figure 3.25).
FIGURE 3.25 Using the Add/Remove Snap-In dialogbox, you can add a snap-in to a new or existing MMCconsole.
08_70-294EP_ch03.qxd 11/6/06 2:37 PM Page 143

144
4. Click Add to display the Add Standalone Snap-In dialog box.
5. Select Active Directory Schema, as shown in Figure 3.26, and then click Add.
6. Click Close to return to the Add/Remove Snap-In dialog box.
7. Click OK. The Active Directory Schema snap-in is added to the MMC console (see Figure 3.27).
8. Click File, Save, and on the Save As dialog box, type a descriptive name for the console, such asSchema.msc. Then click Save.
The Schema snap-in is now available, and you can locate it from the Administrative Toolsfolder.
FIGURE 3.27 On completion of this procedure,you have an MMC console containing theActive Directory Schema snap-in.
FIGURE 3.26 Using the Add Standalone Snap-In dialogbox, you can select one or more snap-ins to add to theMMC console.
Chapter 3: Managing an Active Directory Infrastructure
08_70-294EP_ch03.qxd 11/6/06 2:37 PM Page 144

EXAM ALERT
EXAM ALERT
Active Directory Forest and Domain Structure145
Remember the Prerequisites for Installing and Using the Schema Snap-In! First, you must be a mem-ber of the Schema Admins group. Then you must register the Active Directory Schema snap-in to makeit available in the Add Standalone Snap-In dialog box.
Using the Schema Snap-InAfter you have installed the Schema snap-in, you can make any required modifications. Stepby Step 3.10 shows you how to create a new attribute.
You Can Only Deactivate, Not Delete, Improper Schema Objects The exam might present you with ascenario in which an application has created incorrect schema attributes or classes. After objects havebeen created in the schema, you cannot delete them except by completely reinstalling Active Directory.Furthermore, you cannot rename schema objects. The proper solution to this problem is to deactivatethese objects. This is also another reason to test new applications in a lab network before deployingthem to the production network.
STEP BY STEP3.10 Creating a New Schema Attribute
1. Click Start, Administrative Tools, Schema.msc. If you installed the Schema snap-in according to Step byStep 3.9, this selection opens the Schema snap-in.
2. Expand the Active Directory Schema container in the console tree. You see two containers: Classes andAttributes.
3. Select the Attributes container. As you can see in Figure 3.28, a long list of attributes is available.
FIGURE 3.28 By default, the Active DirectorySchema snap-in contains a large number ofattributes.
08_70-294EP_ch03.qxd 11/6/06 2:37 PM Page 145

146
4. Right-click Attributes and select Create Attribute. You are warned that creating schema objects in thedirectory is a permanent operation (see Figure 3.29).
5. Click Continue. This action displays the Create New Attribute dialog box (see Figure 3.30).
6. Enter information in the following text boxes to describe the attribute you are creating:
. Common Name—A unique name that is related to the Lightweight Directory Access Protocol (LDAP)display name.
. LDAP Display Name—A unique display name that programmers and system administrators can useto programmatically reference the object.
. Unique X.500 Object ID—A unique X.500 Object ID (OID) is a unique identifier associated with allobject classes or attributes in the directory. This identifier is required.
. Description—An optional description for the attribute.
. Syntax—Type of information stored by this attribute, such as a case-insensitive string, distinguishedname, integer, numerical string, and so on.
. Minimum and maximum—Depending on the syntax, can be an optional string length, minimum andmaximum values of integers, and so on.
FIGURE 3.30 You use the Create New Attribute dialog boxto create attributes.
FIGURE 3.29 This warning message informs you that creatingschema objects is a permanent operation.
Chapter 3: Managing an Active Directory Infrastructure
08_70-294EP_ch03.qxd 11/6/06 2:37 PM Page 146

NOTE
Active Directory Forest and Domain Structure147
Object Identifiers An OID is not randomly generated; standards organizations such as the InternationalTelecommunications Union issue these identifiers to ensure that they are not duplicated. To obtain a uniqueOID for a class or attribute that you want to create, you should contact one of these standards organizations.
7. Click OK. The attribute is created and displayed in the attributes list. If you have difficulty finding it, clickthe Name header to arrange the attributes in alphabetical order.
You can also create new classes by right-clicking the Classes container and choosing CreateNew Schema Class. The procedure is similar to that of Step by Step 3.10. After you havecreated new attributes and classes, you can easily add attributes to classes, as Step by Step3.11 shows.
STEP BY STEP3.11 Adding an Attribute to a Class
1. In the console tree of the Active Directory Schema snap-in, double-click Classes to expand it. Thisaction displays a long list of available classes (see Figure 3.31).
2. Right-click the class to which you want to add an attribute and select Properties. This action displaysthe Properties dialog box for the selected class, as shown in Figure 3.32.
FIGURE 3.31 By default, the Active DirectorySchema snap-in contains a large number ofclasses.
08_70-294EP_ch03.qxd 11/6/06 2:37 PM Page 147

148
3. Select the Attributes tab and then click Add to display the Select Schema Object dialog box, as shown inFigure 3.33.
4. Scroll down to locate the attribute and then click OK. You return to the Attributes tab of the userProperties dialog box, with the new attribute highlighted.
5. Click OK.
6. Close the Active Directory Schema console.
FIGURE 3.33 You use the Select Schema Object dialog box to selectthe desired attribute.
FIGURE 3.32 In the Properties dialog box for a schemaclass, you make all modifications to the class.
Chapter 3: Managing an Active Directory Infrastructure
08_70-294EP_ch03.qxd 11/6/06 2:37 PM Page 148

Active Directory Forest and Domain Structure149
Deactivating Schema ObjectsAfter you have added an object (class or attribute) to the schema, you cannot simply delete it.However, you can deactivate an unneeded schema object by following the procedure outlinedin Step by Step 3.12.
STEP BY STEP3.12 Deactivating a Schema Object
1. Open the Active Directory Schema snap-in.
2. In the console tree, select either Classes or Attributes, depending on the type of object you want todeactivate.
3. In the details pane, scroll to locate the class or attribute you want to deactivate, right-click it, andchoose Properties.
4. Clear the check box labeled Attribute is Active. You receive a message, like the one in Figure 3.34,warning you that if you make the schema object defunct, you will be unable to make furtherchanges to it.
5. Click Yes to deactivate the object.
The step-by-step procedures given here provide you with a small example of the possibleschema modifications. Other procedures are available to perform such tasks as creating newclasses, adding values to a series of attributes, adding attribute display names, conductingsearches based on the new attributes, and so on. Many of these procedures involve the use ofscripts created using Microsoft Visual Basic for Scripting and are beyond the scope of the 70-294 exam. For additional details, see the first reference in the “Suggested Readings andResources” section at the end of this chapter. Information is also available from the WindowsServer 2003 Help and Support Center.
FIGURE 3.34 You receive a warning when youattempt to deactivate a schema object.
08_70-294EP_ch03.qxd 11/6/06 2:37 PM Page 149

150
ChallengeActive Directory Schema Attributes and Classes
The widgets.com organization you worked with in Chapter 2 needs to store employees’ Social Securitynumbers in their Properties dialog boxes in Active Directory Users and Computers. Although the Propertiesdialog box enables you to store a large number of attributes for each user, the Social Security number isnot among them.
The object of this exercise is to understand how to add an attribute to the schema and associate thisattribute with a schema class. After you have done this, you should be able to create a custom VB scriptor application that modifies a user’s Properties dialog box in Active Directory Users and Computers,thereby enabling you to store employees’ Social Security numbers in Active Directory. Note that theunique X.500 Object ID given here was issued to Microsoft and is suitable for the use described in thisexercise.
You should try working through this problem on your own first. If you are stuck or need guidance, followthese steps and look back at the Step by Step procedures for more detailed information.
1. Working from server01.widgets.com, open Active Directory Schema.
2. Expand the console tree to locate the Classes and Attributes folders, right-click Attributes, and thenselect Create Attribute.
3. Click Continue to accept the warning that appears and display the Create New Attribute dialog box.
4. In the Create New Attribute dialog box, type in the information provided in the following table:
Identifier Enter the Following
Common Name SocialSecurityNumber
LDAP Display Name SocialSecurityNumber
Unique X.500 Object ID 1.2.840.113556.1.4.7000.142
Description Employee Social Security Number
Syntax Select Case Insensitive String from the drop-down list
Minimum 0
Maximum 11
5. Click OK to create the attribute and add it to the list in the details pane.
6. In the console tree, select Classes to display the list of classes in the details pane.
7. Scroll down to locate the user class, right-click it, and choose Properties.
8. On the Attributes tab of the user Properties dialog box, click Add to display the Select SchemaObject dialog box.
9. Scroll down to select the SocialSecurityNumber attribute and then click OK. This action addsthis attribute to the Optional field of the Attributes tab, as shown in Figure 3.35.
Chapter 3: Managing an Active Directory Infrastructure
(continues)
08_70-294EP_ch03.qxd 11/6/06 2:37 PM Page 150

Active Directory Forest and Domain Structure151
10. Click OK to exit the user Properties dialog box.
11. Use any available scripting tools to create a VB script that enables you to enter employees’Social Security numbers and display them in the Properties dialog box in Active Directory Usersand Computers. This action is beyond the scope of the 70-294 exam and will not be furtherdescribed here.
Adding or Removing a UPN SuffixAs described in Chapter 1, a User Principal Name (UPN) is a logon name specified in the for-mat of an email address such as [email protected]. It is a convenient means of log-ging on to a domain from a computer located in another domain in the forest or a trustedforest. Two types of UPNs are available:
. Implicit UPN—This UPN is always in the form user@domain, such as [email protected]. It is defined on the Account tab of a user’s Properties dialog box inActive Directory Users and Computers.
. Explicit UPN—This UPN is in the form string1@string2, where an administratorcan define values for both strings. For example, a user named Mary in the accounts.quepublishing.com domain could have an explicit UPN in the form [email protected] explicit UPNs is practical when a company does not want to reveal its internaldomain structure.
FIGURE 3.35 After you have added the new attrib-ute, it appears in the Attributes tab of the userProperties dialog box.
(continued)
08_70-294EP_ch03.qxd 11/6/06 2:37 PM Page 151

152
New to Windows Server 2003 is the concept of the UPN suffix. This is the portion of the UPNto the right of the at (@) character. By default, the UPN suffix is the DNS domain name of thedomain that holds the user account. You can add an additional UPN suffix to simplify admin-istration and user logon processes. Doing so provides the following advantages:
. A common UPN suffix simplifies logon procedures for all users in the forest. This isespecially true for users who have long child domain names. For example, a user with a default UPN of [email protected] could be provided with asimpler UPN such as Karen@quepublishing.
. You can use the UPN suffix to hide the domain structure of the forest from users inexternal forests and to configure remote access servers for visitor access.
. You can use the UPN suffix in a case where a company has more than one division thatoperates under different company names with separate email domains (for example,quepublishing.com or examcram.com) but are all located in a single Active Directorydomain. Using an additional UPN suffix, these users can log on using their emailaddresses.
You can also use the UPN suffix to log on to a domain in a trusting forest, except in the fol-lowing situations:
. If more than one forest uses the same UPN suffix, you can use it only to log on to adomain in the same forest.
. If you are using explicit UPNs and external trusts, you cannot log on to trustingdomains in another forest. See the section “Managing Trust Relationships” earlier inthis chapter for information on external trusts.
You can use the Active Directory Domains and Trusts MMC console to add or remove UPNsuffixes. Follow Step by Step 3.13 to add a UPN suffix.
STEP BY STEP3.13 Adding a UPN Suffix
1. Click Start, Administrative Tools, Active Directory Domains and Trusts.
2. In the console tree, right-click Active Directory Domains and Trusts and choose Properties. The ActiveDirectory Domains and Trusts Properties dialog box opens, as shown in Figure 3.36.
Chapter 3: Managing an Active Directory Infrastructure
08_70-294EP_ch03.qxd 11/6/06 2:37 PM Page 152

Active Directory Forest and Domain Structure153
3. Type the name of the desired UPN suffix (for example, examprep) in the text box and click Add.
4. The name of the UPN suffix is added to the large field in this dialog box. Click OK.
After you have added the UPN suffix, it is available for use when you are adding a new useraccount (see Figure 3.37) or configuring the properties of an existing user account from theAccount tab of its Properties dialog box.
FIGURE 3.37 After you have added a UPN suffix,you can assign this suffix to a new user from theNew Object—User dialog box.
FIGURE 3.36 You can use the Active Directory Domainsand Trusts Properties dialog box to add or remove UPNsuffixes.
08_70-294EP_ch03.qxd 11/6/06 2:37 PM Page 153

NOTE
154
Troubleshooting Slow UPN Logons If you are using a UPN suffix to allow users to log on across domainsin a multidomain forest, you might have to create a shortcut trust relationship if users report slow authenti-cation times.
If you no longer need an added UPN suffix, you can follow a similar procedure to remove it.See Step by Step 3.14.
STEP BY STEP3.14 Removing a UPN Suffix
1. At the top of the Active Directory Domains and Trusts snap-in, right-click Active Directory Domains andTrusts and choose Properties. The Active Directory Domains and Trusts Properties dialog box opens(refer to Figure 3.36).
2. Select the UPN suffix to be removed and click Remove.
3. You are warned that users who use this UPN suffix will no longer be able to log on with this UPN suffix(see Figure 3.38).
4. Click OK.
FIGURE 3.38 This message box warns you that user accounts referring to the UPN suffix will be unable to logon to the network if you delete the suffix.
If you remove a UPN suffix, you should open the Active Directory Users and Computers con-sole, select any users whose user accounts refer to the removed UPN suffix, and change thesuffix in use from the Accounts tab of their Properties dialog box.
Chapter 3: Managing an Active Directory Infrastructure
08_70-294EP_ch03.qxd 11/6/06 2:37 PM Page 154

Active Directory Site Topology155
Understanding the Directory Forest and DomainStructureFollowing are points you should remember about the directory forest and domain structure:
. All domains in the Active Directory forest share a common schema. Although it isreplicated to all domain controllers in the forest, only the schema operations mastercontains a writable copy of the schema.
. The schema contains classes of objects and a series of attributes that can be held byobjects of various types. It also defines the various classes that can exist and the attrib-utes that can be defined for each specific object.
. Because improper schema modifications can cause irreparable damage to ActiveDirectory, the following conditions must be met before you can modify the schema:You must be a member of the Schema Admins group, and you must register the ActiveDirectory Schema snap-in before you can install it.
. A UPN suffix is the portion of the UPN to the right of the at (@) character. You canadd an additional UPN suffix to simplify logon procedures for all users in the forestand hide the domain structure of the forest.
Active Directory Site TopologyObjectiveImplement an Active Directory site topology
Recall from Chapter 1 the nature of sites in Active Directory. A site is a grouping of comput-ers and other objects that is connected by high-speed LAN connections and contains one ormore Internet Protocol (IP) subnets. A site consists of one or more IP subnets that share a fast,reliable connection such as a local area network (LAN) connection. Because wide area network(WAN) connections are slower and might not be continuously available, network segmentslocated across a WAN should be configured as separate sites. Configuring network segmentsthis way is especially important if your company needs to pay for the WAN link by the num-ber of minutes it is active or the amount of data sent across it.
08_70-294EP_ch03.qxd 11/6/06 2:37 PM Page 155

156
When planning sites, you should assess the needs of various offices and divisions within yourcompany, as well as the speed and utilization of the links between the offices. When assessingthe needs, you should do the following:
. Assess the physical environment—You should look at the locations in which yourcompany is conducting business and the nature of the internal and external networkconnections. Be sure to check factors such as the placement of domain controllers andthe need to access resources at different offices. Even if locations are on different sub-nets, if they are connected by a reliable, fast, high-bandwidth link such as a T3 line,you might be able to include them in a single site.
. Assess the need for frequent replication versus bandwidth usage—If a locationneeds the most recent Active Directory information and is connected with a fast link, itdoes not need to be in a different site.
. Identify the types of physical links between sites—The type, speed, and utilizationof the connection between locations are important factors. Active Directory providesthe concept of site link objects that can be used to determine the replication schedulebetween sites that it links. A cost value also can be associated with it; this value deter-mines when and how often replication can occur.
. Configure site link bridges—The site link bridge is an Active Directory mechanismthat groups sites together to facilitate optimized intersite replication. We discuss sitelink bridges further later in this chapter.
Creating SitesWhen you first install Active Directory, all domain controllers are located in a single site withthe rather ostentatious name of Default-First-Site-Name. If you want, you can rename this sitein the same way you would rename a file or folder. After you have assessed the need for addi-tional sites, creating a new site is simple. See Step by Step 3.15.
STEP BY STEP3.15 Creating a New Site
1. Click Start, Administrative Tools, Active Directory Sites and Services.
2. Right-click the Sites folder and choose New Site.
3. In the New Object—Site dialog box, type the name of the site. Select a site link object from the listprovided, as shown in Figure 3.39, and then click OK.
Chapter 3: Managing an Active Directory Infrastructure
08_70-294EP_ch03.qxd 11/6/06 2:37 PM Page 156

Active Directory Site Topology157
4. You receive a message box listing other tasks you should perform, as shown in Figure 3.40. Click OK.
5. The site you created appears in the console tree of Active Directory Sites and Services, and severaldefault containers appear in the details pane.
Configuring SitesYou should perform several tasks after you have created a site. These tasks include addingdomain controllers to a site, specifying licensing servers, and configuring site boundaries. Wedescribe these tasks in the sections that follow.
Adding Domain ControllersThe first task you should complete is adding domain controllers to the site. Follow Step byStep 3.16 to perform the first task: adding a domain controller to the site you just created.
FIGURE 3.40 Windows reminds you of several tasks to be completed after creating a site.
FIGURE 3.39 You use the New Object—Site dialogbox to create a new site.
08_70-294EP_ch03.qxd 11/6/06 2:37 PM Page 157

158
STEP BY STEP3.16 Adding Domain Controllers to a Site
1. In Active Directory Sites and Services, expand the site containing the domain controller you want tomove to reveal a Servers folder.
2. Click this folder. The details pane lists the domain controllers that are located in this site.
3. Right-click the server to be moved and select Move.
4. In the Move Server dialog box, shown in Figure 3.41, select the site for the server and then click OK.
5. The moved server appears under its site in Active Directory Sites and Services.
Specifying a Licensing ServerA licensing computer collects information from within the site for use by the Windows Server2003 licensing administration tool. It need not be a domain controller, but it should be locatedwithin its site. Follow Step by Step 3.17 to select a licensing computer for a site.
STEP BY STEP3.17 Selecting a Licensing Server
1. In the console tree of Active Directory Sites and Services, click the site to which you want to assign a licensing server. This action displays, among others, a Licensing Site Settings container in thedetails pane.
2. Right-click this container and choose Properties.
FIGURE 3.41 Moving a domain controller to a new site.
Chapter 3: Managing an Active Directory Infrastructure
08_70-294EP_ch03.qxd 11/6/06 2:37 PM Page 158

Active Directory Site Topology159
3. On the Licensing Site Settings Properties dialog box, click Change.
4. In the Select Computer dialog box that appears, type or browse to the name of the desired server, asshown in Figure 3.42. Then click OK.
5. Click OK to close the Licensing Site Settings Properties dialog box.
Configuring Site Boundaries
ObjectiveManage an Active Directory site
. Configure site boundaries
As we have emphasized, the purpose of using sites is to control replication of Active Directoryinformation over slow links between geographically distinct locations. By itself, ActiveDirectory has no knowledge of an organization’s physical network topology. Administratorsmust model the enterprise’s site topology to mirror the physical network. You can accomplishthis by configuring each site to represent one or more IP subnets that are connected by high-speed links, as described in Step by Step 3.18.
STEP BY STEP3.18 Assigning a Subnet to a Site
1. Click Start, Administrative Tools, Active Directory Sites and Services.
2. In the console tree, right-click the Subnets folder and choose New Subnet.
FIGURE 3.42 Selecting a licensing site server.
08_70-294EP_ch03.qxd 11/6/06 2:37 PM Page 159

160
3. In the New Object—Subnet dialog box, type the subnet IP address and subnet mask, as shown inFigure 3.43.
4. The information is shown on the New Object—Subnet dialog box in the form of a network address/bitsmasked. Click OK.
5. In the Site Name field, select the site to which the subnet should belong and then click OK.
6. You return to the Active Directory Sites and Services snap-in. The subnet you created appears under theSubnets folder.
You can configure a limited set of properties for each subnet you have assigned. Follow Stepby Step 3.19 to configure subnet properties.
STEP BY STEP3.19 Configuring Subnet Properties
1. In the console tree, right-click the subnet and choose Properties.
2. On the General tab of the Properties dialog box, type a description for the subnet, as shown in Figure3.44. This description is for information purposes only.
FIGURE 3.43 You can assign a subnet to a site fromthe New Object—Subnet dialog box.
Chapter 3: Managing an Active Directory Infrastructure
08_70-294EP_ch03.qxd 11/6/06 2:37 PM Page 160

NOTE
Active Directory Site Topology161
3. If you need to change the site to which the subnet is assigned, you can do so from the Site drop-downlist box.
4. On the Location tab, you can type the location for the subnet. This location is also for information pur-poses only.
5. The Object and Security tabs function in a similar manner to those on other Properties dialog boxes.
Site Naming Conventions Subnet locations specified on the Location tab should follow a specific namingconvention for your organization. These locations link to printer tracking in Active Directory. Refer to“Establishing a Naming Convention for Printer Locations” in Windows Server 2003 Help and SupportCenter for more information.
FIGURE 3.44 The Subnet Properties dialog box enablesyou to specify a description and location for the subnetand change the site with which it is associated.
08_70-294EP_ch03.qxd 11/6/06 2:37 PM Page 161

162
Configuring Site Links
ObjectiveImplement an Active Directory site topology
. Configure site links
A site link is a path that Active Directory uses to replicate information between sites. Replicationcannot take place between sites unless site links have been created. Because of the limited band-width that usually exists between sites, Active Directory handles intersite replication differentlythan intrasite. In a nutshell, intersite replication is compressed, whereas intrasite replication isnot compressed. Intersite replication takes place at a lower, configurable frequency. We discussintersite replication and its configuration later in this chapter.
Site links can use either of two intersite transport protocols for replicating data: RemoteProcedure Call (RPC) over IP and Simple Mail Transfer Protocol (SMTP).
. RPC over IP—This protocol is the default replication method and the only one thatsupports replication within a domain. It enables low-speed, synchronous replication ofall directory partitions using remote procedure calls.
. SMTP—This protocol is asynchronous email–based replication that can be used toreplicate the schema and configuration partitions of Active Directory and the globalcatalog between domains. You should use this protocol if the reliability of the link isnot good. You need to install an enterprise certification authority (CA) if you are usingthis transport protocol. It signs the SMTP messages that are sent over this protocol.SMTP also must be installed on domain controllers using this site link.
Site links are not created automatically. As outlined in Step by Step 3.20, you can create sitelinks by using Active Directory Sites and Services.
STEP BY STEP3.20 Creating Site Links
1. In the console tree of Active Directory Sites and Services, expand the Inter-Site Transports folder toreveal the IP and SMTP subfolders.
2. Right-click the folder corresponding to the transport protocol that is to be used and choose NewSite Link.
3. In the New Object—Site Link dialog box, type a name for the site link (see Figure 3.45). Then make surethat the sites to be linked appear in the Sites in This Site Link field and click OK.
Chapter 3: Managing an Active Directory Infrastructure
08_70-294EP_ch03.qxd 11/6/06 2:37 PM Page 162
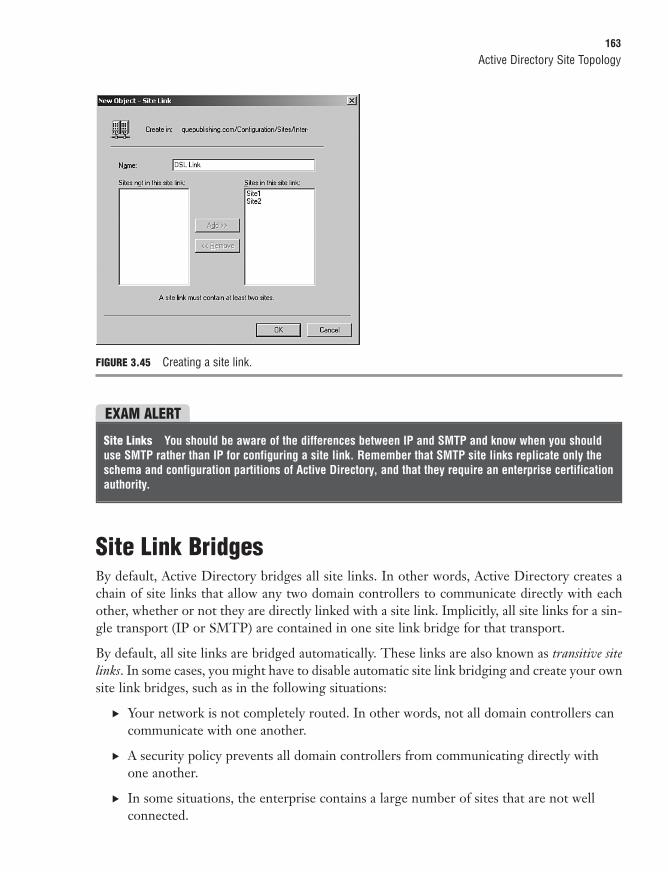
EXAM ALERT
Active Directory Site Topology163
FIGURE 3.45 Creating a site link.
Site Links You should be aware of the differences between IP and SMTP and know when you shoulduse SMTP rather than IP for configuring a site link. Remember that SMTP site links replicate only theschema and configuration partitions of Active Directory, and that they require an enterprise certificationauthority.
Site Link BridgesBy default, Active Directory bridges all site links. In other words, Active Directory creates achain of site links that allow any two domain controllers to communicate directly with eachother, whether or not they are directly linked with a site link. Implicitly, all site links for a sin-gle transport (IP or SMTP) are contained in one site link bridge for that transport.
By default, all site links are bridged automatically. These links are also known as transitive sitelinks. In some cases, you might have to disable automatic site link bridging and create your ownsite link bridges, such as in the following situations:
. Your network is not completely routed. In other words, not all domain controllers cancommunicate with one another.
. A security policy prevents all domain controllers from communicating directly withone another.
. In some situations, the enterprise contains a large number of sites that are not wellconnected.
08_70-294EP_ch03.qxd 11/6/06 2:37 PM Page 163

164
Follow the procedure in Step by Step 3.21 to disable automatic site link bridging and createyour own site link bridges.
STEP BY STEP3.21 Configuring Site Link Bridges
1. In the console tree of Active Directory Sites and Services, expand the Inter-Site Transports folder toreveal the IP and SMTP subfolders.
2. Right-click the transport (IP or SMTP) whose site link bridges you want to configure and chooseProperties.
3. In the Properties dialog box for the transport (see Figure 3.46), clear the check box labeled Bridge AllSite Links and then click OK.
4. Right-click the transport again and choose New Site Link Bridge.
5. In the New Object—Site Link Bridge dialog box (see Figure 3.47), type a name for the site link bridge,ensure that the site links you want bridged appear in the Site Links in This Site Link Bridge field, andthen click OK.
FIGURE 3.46 Disabling automatic site link bridging.
Chapter 3: Managing an Active Directory Infrastructure
08_70-294EP_ch03.qxd 11/6/06 2:37 PM Page 164

NOTE
EXAM ALERT
Active Directory Site Topology165
FIGURE 3.47 Creating a site link bridge.
Site Link Bridges In a multisite situation, you might encounter sites linked by different bandwidthlinks. If considerable intersite traffic is crossing a slow link and a faster link crossing three or morealternative sites is available, you might have to create a site link bridge that encompasses the fasterlinks. This bridge will serve to direct intersite traffic across the fast links.
Knowledge Consistency CheckerThe Knowledge Consistency Checker (KCC) is a process that runs automatically on all domaincontrollers and creates Active Directory replication topologies, both intrasite and intersite. Itcreates optimum topologies at 15-minute intervals according to the conditions that exist atthat time. As new sites and domain controllers are added, the KCC adjusts the replicationtopology to accommodate these changes. It uses a bidirectional ring topology that provides atleast two paths between each domain controller for fault tolerance, and no more than threehops between any two domain controllers to reduce replication latency. It automatically adjuststhe intrasite replication topology without administrator intervention.
Different Topologies for Different Purposes The KCC generates separate topologies for each of theschema, configuration, application, and domain partitions, and the global catalog, according to their indi-vidual requirements.
08_70-294EP_ch03.qxd 11/6/06 2:37 PM Page 165

WARNING
166
For intersite replication, the KCC works from a single domain controller called the Inter-SiteTopology Generator (ISTG) in each site and uses the information you have configured in ActiveDirectory Sites and Services. It designates one or more servers, known as bridgehead servers, foreach site to ensure that changes to Active Directory are replicated only once across any givensite link. Although the KCC usually designates its own bridgehead servers, you can manuallydesignate bridgehead servers from Active Directory Sites and Services.
The KCC normally runs in the background without the need for any type of configuration. Ifyou need to force the KCC to run at a given time, you can run the repadmin command-lineutility or the replmon GUI-based utility. These tools are both located in the Support\Toolsfolder of the Windows Server 2003 CD-ROM. We discuss the use of this tool in Chapter 4,“Maintaining an Active Directory Infrastructure.”
Configuring Connection ObjectsA connection object is an Active Directory object that represents an inbound connection to adomain controller. It is utilized for replication from other domain controllers to the domaincontroller on which it is configured. The KCC in a site automatically creates connectionobjects between domain controllers within its site as well as connection objects for replicationto other sites.
Although the KCC endeavors to create an optimum set of connection objects, the administra-tor might have to configure connection objects manually if the connections created by theKCC do not link the specific domain controllers she wants to be connected.
Create Connection Objects Only If Absolutely Necessary If an administrator adds redundant connec-tion objects, replication traffic might increase.
Follow Step by Step 3.22 to create a manual connection object.
STEP BY STEP3.22 Creating and Configuring a Connection Object
1. In the console tree of Active Directory Sites and Services, expand the Servers folder in the site contain-ing the domain controller for which you want to create an inbound connection object.
2. Right-click the NTDS Settings folder under the desired server and select New Active DirectoryConnection.
Chapter 3: Managing an Active Directory Infrastructure
08_70-294EP_ch03.qxd 11/6/06 2:37 PM Page 166

Active Directory Site Topology167
3. In the Find Domain Controllers dialog box shown in Figure 3.48, select the server with which you wantto create a connection and then click OK.
4. By default, the new connection object is named for the server with which you are creating the connec-tion. In the New Object–Connection dialog box, accept this name or type a different name and then clickOK. The new connection object is added to the details pane.
5. To modify the properties of the connection object, right-click it and choose Properties to display the dia-log box shown in Figure 3.49. From here, you can configure any of the following options:
. Description—Type an optional description for the connection object.
. Transport—Select RPC, IP, or SMTP. You would not normally change this from the default of RPC.
. Change Schedule—Select the times in which you want the replication schedule from its default offour times per hour to once or twice per hour, or none.
. Replicate From Click Change to change the server from which replication takes place. This dis-plays the same Find Domain Controllers dialog box shown in Figure 3.48.
. Object tab Display information about the connection object, including its LDAP canonical name,the creation and modification dates, and update sequence numbers (USNs). This tab does not con-tain configurable items.
. Security tab Configure permissions for users or groups. See Chapter 5, “Planning User, Computer,and Group Strategies.”
FIGURE 3.48 The Find Domain Controllersdialog box enables you to select the out-bound server.
08_70-294EP_ch03.qxd 11/6/06 2:37 PM Page 167

NOTE
168
6. Click OK when finished.
You Can Also Configure Automatically Generated Connection Objects Right-click an automatically gener-ated connection object and choose Properties to configure any of the properties listed in Step by Step 3.22.
Inter-Site Topology GeneratorAs we have already noted, the ISTG is the domain controller used by the KCC to create theintersite replication topology. The ISTG considers the cost of intersite connections and checkswhether any domain controllers have been added to or removed from the site; the ISTG pro-vides this information to the KCC, which then adds or removes connection objects to opti-mize replication as required. Only one domain controller per site acts as the ISTG. If theforest is operating at the Windows Server 2003 forest functional level, the KCC uses animproved, randomized process to determine the site’s bridgehead servers. It distributes thebridgehead replication workload more evenly among a site’s domain controllers, resulting inimproved replication efficiency. The algorithm used allows a domain to contain as many as3,000 sites.
You can use the dcdiag tool from the Support\Tools folder of the Windows Server 2003 CD-ROM to identify the ISTG computer in each site.
FIGURE 3.49 The Properties dialog box enables you toconfigure the connection object.
Chapter 3: Managing an Active Directory Infrastructure
08_70-294EP_ch03.qxd 11/6/06 2:37 PM Page 168

WARNING
Active Directory Site Topology169
Preferred Bridgehead Servers
ObjectiveImplement an Active Directory site topology
. Configure preferred bridgehead servers
The bridgehead server is the domain controller designated by each site’s KCC to take charge ofintersite replication. This server receives information replicated from other sites and thenreplicates it to the site’s other domain controllers. It ensures that the greatest portion of repli-cation takes place within sites rather than between them.
Usually, the KCC automatically decides which domain controller will act as the bridgeheadserver. If necessary, you can designate a specific domain controller to be the bridgehead serverto specify the best conditions for intersite replication. Follow Step by Step 3.23 to designate apreferred bridgehead server.
Be Cautious About Choosing Bridgehead Servers Manually If you allow the KCC to select a bridge-head server and this server fails, the KCC will select another one. However, if you select a bridgeheadserver yourself and it fails, the KCC will not choose another bridgehead server.
STEP BY STEP3.23 Designating a Preferred Bridgehead Server
1. In the console tree of Active Directory Sites and Services, expand the site where you need to designatea bridgehead server and then expand the Servers folder to locate the available servers.
2. Right-click the desired domain controller and choose Properties.
3. On the General tab of the server’s Properties dialog box, select the transport protocol(s) for which thisdomain controller should be a bridgehead server and then click Add, as shown in Figure 3.50.
08_70-294EP_ch03.qxd 11/6/06 2:37 PM Page 169

NOTE
170
4. Click OK.
Replication Across a Firewall If your network uses a firewall to protect a site, you must specify yourfirewall proxy server as a preferred bridgehead server. This ensures that the firewall server is the contactpoint for exchanging data with servers beyond the firewall.
Ports Used for Replication Between SitesBy default, ISTG uses the TCP and UDP port 135 for RPC-based replication between sites. In addition,LDAP uses TCP and UDP port 389, LDAP over Secure Sockets Layer (SSL) uses TCP and UDP ports 636,Kerberos uses TCP and UDP port 88, Server Message Block (SMB) over IP uses TCP and UDP ports 445,and DNS uses TCP and UDP port 53. Global catalog servers also use TCP ports 3268 and 3269. You canspecify any port for RPC-based replication by modifying the following Registry key:
HKEY_LOCAL_MACHINE\SYSTEM\CurrentControlSet\Services\NTDS\Parameters
Add a REG_DWORD value named TCP/IP Port and specify the number of the port to be used. Inaddition, modify the following Registry key:
HKEY_LOCAL_MACHINE\SYSTEM\CurrentControlSet\Services\NTFRS\Parameters
FIGURE 3.50 Designating a bridgehead server for the IPtransport protocol.
Chapter 3: Managing an Active Directory Infrastructure
(continues)
08_70-294EP_ch03.qxd 11/6/06 2:37 PM Page 170

Active Directory Site Topology171
Add a REG_DWORD value named RPC TCP/IP Port Assignment and specify the same portnumber. Make these changes on each domain controller, and ensure that all firewalls are configured topass traffic on the selected port. For additional port numbers that you should open on your firewalls,refer to “Active Directory Replication over Firewalls” in the “Suggested Readings and Resources” sec-tion. Note that you can also secure RPC-based replication by using IP Security (IPSec) and configur-ing the firewalls to pass IPSec traffic. Refer to the same reference for additional details.
Configuring Replication Schedules
ObjectiveManage an Active Directory site
. Configure replication schedules
We have already mentioned that all domain controllers act as peers and that most changes toActive Directory can be made at any domain controller. Active Directory uses the process ofmultimaster replication to propagate these changes to other domain controllers in the domain.In addition, the global catalog is replicated to all other global catalog servers in the forest.Application directory partitions are replicated to a subset of domain controllers in the forest,and the schema and configuration partitions of Active Directory are also replicated to alldomain controllers in the forest. You can see that replication is an important process that musttake place in a timely manner so that updates to Active Directory are synchronized properlyamong all domain controllers in the forest. The amount of replication that is necessary tomaintain Active Directory could easily overwhelm network bandwidth, especially on slow-speed WAN links.
In this section, you learn how to manage replication in Active Directory by configuring repli-cation schedules within and between sites. But before we look at managing replication, we pro-vide an overview of how it operates.
What Does Active Directory Replicate?The following is an overview of the types of information that Active Directory must replicateon a timely basis. These types are based on the Active Directory partitions you learned aboutin Chapter 1.
. Schema data—We discussed schema modification earlier in this chapter. Recall thatthis information contains definitions for all objects and their attributes in the ActiveDirectory forest and is common to all domain controllers in the forest. It must be keptup-to-date so that Active Directory can function properly.
(continued)
08_70-294EP_ch03.qxd 11/6/06 2:37 PM Page 171

172
. Configuration data—This data includes information related to the design of theActive Directory forest, including sites, trees, and domains, and their organizationwithin the hierarchy. All domain controllers in the forest require this information tofunction properly.
. Application data—This data includes application-specific data and DNS informationfor Active Directory–integrated DNS zones that need to be replicated throughout theforest. Some of this information might have to be replicated to only a subset of thedomain controllers in the forest.
. Domain data—This data includes information about all objects in an individualdomain, such as users, groups, computers, printers, shared folders, and so on. ActiveDirectory replicates all this information to every domain controller in the domain. Inaddition, a read-only subset of this information is contained in the global catalog andreplicated to all global catalog servers in the forest.
How Does Active Directory Replication Work?Active Directory replicates data between domain controllers using the following two standardnetworking protocols:
. Remote Procedure Call (RPC) over Internet Protocol (IP)—Used for both intra-site and intersite replication, RPC over IP uses remote procedure calls for replication.It employs both Kerberos-based authentication and data encryption to keep datasecure.
. Simple Mail Transfer Protocol (SMTP)—This email protocol is used only for inter-site replication when a direct or reliable IP-based path is unavailable. It is used forreplication only between two domain controllers that are located in different domainsas well as different sites. It requires an enterprise certification authority (CA) to oper-ate. The CA signs SMTP messages as they are exchanged between domain controllers,ensuring their authenticity. SMTP does not replicate the domain partition of ActiveDirectory; it replicates only the schema, configuration, and application partitions. Inaddition, SMTP replication ignores schedules.
Active Directory uses a numerical sequencing method called the update sequence number (USN)to keep track of replicated updates. This method is more reliable than using time stampsbecause the latter method depends on exact synchronization of the clocks on all domain con-trollers, which is hard to maintain. However, Active Directory also uses a time stamp to resolveconflicting changes.
A USN is a 64-bit number that is maintained at each domain controller in the forest.Whenever an update is initiated, the originating domain controller issues what is known as an
Chapter 3: Managing an Active Directory Infrastructure
08_70-294EP_ch03.qxd 11/6/06 2:37 PM Page 172

NOTE
Active Directory Site Topology173
originating update, which determines the kind of update being made to the Active Directorydatabase. At the same time, the domain controller increments the USN by one and associatesthe updated USN with the originating update. Other domain controllers use the USN todetermine what updates they need to receive. We discuss the use of the USN to track replica-tion and troubleshoot problems in Chapter 4.
Active Directory replication works by a pull process. In other words, individual domain con-trollers request updates from their replication partners at a known interval, which is five min-utes by default. It checks the USNs for each replication partner and uses them to request anyrequired updates. If a domain controller is offline for any reason, it can use the USN to get upto date properly. This process is in contrast to a push process in which domain controllers sendupdates immediately to their replication partners rather than wait for requests. An offlinedomain controller would miss pushed updates and not be up to date. In addition, a domaincontroller might receive the same update from more than one source, which translates to awaste of bandwidth.
In the event that two different administrators happen to modify the same attribute of the sameobject at the same time on different domain controllers, a conflict could occur. In this case,Active Directory uses the timestamp to resolve the conflict, and the latest update wins. If thechanges take place at the exact same millisecond, the change with the higher globally uniqueID wins.
Intrasite ReplicationWe previously discussed how the KCC automatically creates and adjusts the intrasite replica-tion topology. The KCC ensures that each domain controller replicates with at least two oth-ers, so that if one is temporarily unavailable, no domain controller will miss an update. KCCuses a default bidirectional ring topology, with additional connections as needed to keep thenumber of hops between replication partners to three or fewer.
Multiple Replication Topologies Active Directory uses one topology for the schema and configurationpartitions and another one for the domain partition. In some cases, a third replication topology could existfor the application partition because data stored in this partition might not need to be replicated to alldomain controllers. An administrator can explicitly route application partition data to selected domain con-trollers within a forest or to all domain controllers in a domain.
Replication to the first replication partner takes place automatically on the basis of change noti-fication after the administrator has configured an update. After waiting for 15 seconds, thesource domain controller sends an update notification to its closest replication partner andsends additional notifications to other partners at 3-second intervals. After receiving the notifi-
08_70-294EP_ch03.qxd 11/6/06 2:37 PM Page 173

NOTE
174
cation, the replication partners send update requests to the source domain controller, whichthen replicates the change to the partners. However, some updates such as password changesand account lockouts are replicated immediately. Because it is assumed that high LAN band-width is available for intrasite replication, data is not compressed during the replication process.
Intrasite replication is completely automatic and requires no additional configuration afteryou have created and validated your sites, although you can modify intrasite replication ifnecessary, as we described previously in the section “Configuring Connection Objects.”However, intersite replication can be configured and managed; we now turn our attention tomanaging intersite replication schedules.
Intersite ReplicationOne important use of sites is to control replication traffic between network segments locatedacross WAN links. The high frequency of intrasite replication requires a high-speed LAN link(10Mbps or faster) to work properly. Table 3.1 compares several characteristics of intersiteversus intrasite replication.
TABLE 3.1 Comparison of Intersite and Intrasite ReplicationCharacteristic Intersite Intrasite
Compression Compressed Uncompressed
Interval Scheduled, configured Frequent, automatic
Transport Protocol SMTP, RPC over IP RPC over IP
Connection Type According to site link cost Between all DCs in ring topology
Active Directory allows you to schedule intersite replication so that you can control how muchbandwidth it consumes. This capability is important because bandwidth affects the efficiency ofreplication. Replication frequency is a trade-off between keeping Active Directory on remotedomain controllers up to date and using a high amount of bandwidth on a slow link. By default,replication takes place every 180 minutes (3 hours), and can take place 24 hours a day, 7 days aweek. You can configure the replication process to take place at times of low bandwidth usage,such as late at night. Step by Step 3.24 shows you how to configure intersite replication.
Intersite Replication Is Compressed To further conserve bandwidth, Active Directory compresses allupdates to Active Directory above 50KB in size when they are replicated. Because the compression ratiocan be as high as 10:1, this can save a lot of bandwidth. Should you have bandwidth to spare but are lim-ited in processing power, you can configure Active Directory to shut off compression. In addition, youmight be able to increase replication latency to use less bandwidth in the long run. This is true becausecompression takes place only above 50KB.
Chapter 3: Managing an Active Directory Infrastructure
08_70-294EP_ch03.qxd 11/6/06 2:37 PM Page 174

Active Directory Site Topology175
STEP BY STEP3.24 Configuring Intersite Replication Intervals
1. Click Start, Administrative Tools, Active Directory Sites and Services.
2. If necessary, expand the Sites folder in the console tree to locate the Inter-Site Transports folder.
3. Expand this folder and click either IP or SMTP, whichever contains the site link whose replication sched-ule you want to modify (see Figure 3.51).
4. In the details pane, right-click the site link and choose Properties to display the General tab of theProperties dialog box for the site link (see Figure 3.52).
FIGURE 3.52 You can modify the intersite replicationschedule in the Properties dialog box for the site link ofconcern.
FIGURE 3.51 You can configure sitelink properties from the IP or SMTPfolder of Inter-Site Transports inActive Directory Sites and Services.
08_70-294EP_ch03.qxd 11/6/06 2:37 PM Page 175

176
5. In the text box labeled Replicate Every, type the number of minutes between replications and then click OK.
Active Directory processes the interval you enter as the nearest multiple of 15 minutes, up toa maximum of 10,080 minutes (one week).
Notice that the Properties dialog box for the site link contains two additional tabs: Object andSecurity. These tabs also exist for the Properties dialog box of most objects in the ActiveDirectory Sites and Services snap-in. Their functions are the same as described previously forActive Directory connection objects.
If you need to specify that replication not take place during certain times of the day (such asbusiness hours when other WAN traffic must be able to proceed without delay), you canrestrict the times that replication takes place. To do so, follow Step by Step 3.25.
STEP BY STEP3.25 Restricting Intersite Replication Times
1. Follow steps 1–4 of Step by Step 3.24 to access the Properties dialog box for the site link whose repli-cation times you want to modify.
2. Click Change Schedule, and in the Schedule for link name dialog box, select the time block for whichyou want to deny replication, as shown in Figure 3.53.
3. Select Replication Not Available and then click OK twice to return to Active Directory Sites and Services.
FIGURE 3.53 You can configure a timewhen replication is not available in theSchedule for link name dialog box.
Chapter 3: Managing an Active Directory Infrastructure
08_70-294EP_ch03.qxd 11/6/06 2:37 PM Page 176

NOTE
Active Directory Site Topology177
Shortcut Link If you have recently accessed Active Directory Sites and Services (as in performing Step byStep 3.24), a shortcut link will appear on the left side of the Windows Server 2003 Start menu.
You might have to ignore the replication schedule so that replication can take place at any timeof day or night. This is useful if you need to force replication of a large number of changes. Toignore replication schedules, follow Step by Step 3.26.
STEP BY STEP3.26 Ignoring Replication Schedules
1. Follow steps 1–3 of Step by Step 3.24 to access the IP or SMTP folders in the Inter-Site Transportsfolder.
2. In the console tree, right-click the replication method you want to modify and choose Properties.
3. In the Properties dialog box for the replication method, select the Ignore Schedules check box, asshown in Figure 3.54, and then click OK.
FIGURE 3.54 You can choose to ignore replication schedules from the IP or SMTP Properties dialog box.
08_70-294EP_ch03.qxd 11/6/06 2:37 PM Page 177

EXAM ALERT
178
Performing this procedure causes Active Directory to ignore availability schedules and repli-cate changes to Active Directory at the configured interval. Site links are always available forreplication. Clear the Ignore Schedules check box to re-enable the replication schedules.
Notice that this is the same dialog box from which you can choose whether to bridge all sitelinks, as we discussed in the “Active Directory Site Topology” section of this chapter.
Remember the Different Options Available for Scheduling Replication If you need replication to occurmore or less frequently than the default 3-hour interval, specify the desired interval. This intervalshould not be less than the 15-minute maximum intrasite replication interval. If you do not want repli-cation to occur at certain times of the day, specify the appropriate replication schedule. If you needreplication to take place when it is not scheduled, select the Ignore Schedules option.
ChallengeCreating and Configuring Sites
The Widgets company you have been working with has a head office and a factory location connected bya T-1 with 1.544Mbps bandwidth line. The server that was the Windows NT PDC (Server01) is located atthe head office, whereas the former BDC (Server02) is located at the factory. There is also a warehousethat does not currently have a domain controller, and is connected to the head office with an ISDN line.There is no direct connection between the factory and the warehouse.
This exercise requires you to create and configure sites for the three locations. You also need to createthe appropriate site links and bridges. The head office site is on the 172.22.0.0 subnet with a subnetmask of 255.255.248.0, the factory site is on the 172.22.8.0 network with the same subnet mask, and thewarehouse site is on the 172.22.16.0 network with the same subnet mask.
After you have created the site links and bridges, you must configure replication between the sites. Thecompany wants replication to take place between the head office and the factory every four hours, dayand night. Between the head office and the warehouse, the company wants replication to take place everysix hours outside the 8 a.m. to 5 p.m. business day only.
Try to work through the steps on your own, working from the two domain controllers. If you need to seea possible solution, follow these steps, and refer to the Step by Step exercises for more details:
1. Open Active Directory Sites and Services at the Server01 computer.
2. Select the Default-First-Site-Name and rename this site Office.
3. Create a new site named Factory and a third site named Warehouse. Use the default site link.
4. Expand the Office site to locate the two servers and move Server02 to the Factory site.
Chapter 3: Managing an Active Directory Infrastructure
(continues)
08_70-294EP_ch03.qxd 11/6/06 2:37 PM Page 178

Active Directory Site Topology179
5. To add a subnet, right-click the Subnets container and choose New Subnet. Type 172.22.0.0 asthe subnet and 255.255.248.0 as the mask, select the Office site, and then click OK.
6. Repeat step 5 to add subnets for the factory and the warehouse.
7. Expand the Inter-Site Transports folder and click IP.
8. Rename the default site link Office to Factory.
9. Right-click this link and choose Properties. On the Properties dialog box, remove the Warehousesite from this link.
10. Create a new site link named Office to Warehouse. For this link, include the Office andWarehouse sites.
11. Right-click the IP transport and select Properties; then clear the Bridge All Site Links check box.
12. Right-click the IP transport and select New Site Link Bridge. Name this bridge Factory toWarehouse, ensure that the two site links you have configured are in this site link bridge, and thenclick OK.
13. Right-click the Office to Factory site link and choose Properties. In the Replicate Every spin box, type240 and then click OK.
14. Right-click the Office to Warehouse site link and choose Properties. In the Replicate Every spin box,type 360. Click Change Schedule, and in the Schedule for Office to Warehouse dialog box, specifythat replication is not available between 8 a.m. and 5 p.m. (white areas).
Manually Forcing ReplicationSometimes you might need to have Active Directory replication occur immediately, such asafter the addition of new users or groups for a branch office. You can easily force replicationfrom Active Directory Sites and Services. Step by Step 3.27 shows you how.
STEP BY STEP3.27 Manually Forcing Replication
1. In the console tree of Active Directory Sites and Services, expand the server to which you want to forcereplication, to locate the NTDS Settings folder.
2. Select this folder to display the connection objects in the details pane.
3. Right-click the desired connection object and choose Replicate Now (see Figure 3.55).
(continued)
08_70-294EP_ch03.qxd 11/6/06 2:37 PM Page 179

NOTE
180
FIGURE 3.55 You can force replication from the NTDS Settings folder in Active Directory Sites and Services.
Forced Replication Is One-Way Only When you manually force replication using this procedure, thisforces replication to occur to the selected object only. To ensure that the replication occurs immediately,you should perform this procedure on both sides of the link. Use the Connect To option to connect to theother domain controller and initiate a manually forced replication in the other direction.
Keeping Replication at BayA few months ago, a major newspaper with branch offices across the country was covering a breakingnews story. A couple of photographers using digital cameras were trying to upload photos to the newspa-per’s main office several hundred miles away. However, transmitting a single photo over the paper’s dedi-cated ISDN connection was taking almost an hour. Consequently, only a few photos were transmittedbefore the deadline, and the paper went to press without the desired coverage. The resulting news storywas inferior to that provided by a competing paper.
Management contacted the network administration staff to determine what went wrong and ensure this situation did not happen again. At first, the administrators were puzzled that it had taken place. They hadprided themselves on setting up Active Directory to keep information at the branch office domain con-trollers current, but had not taken into consideration the amount of traffic that could be generated. In addi-tion, a lot of other network traffic is transmitted over the ISDN line in the course of everyday business.Analyzing traffic when branch office staff uploaded a few more photos, the administrators discovered theline was 100% utilized for a period of time every 30 minutes. The administrators then remembered thatthey had configured a 30-minute intersite replication interval in Active Directory. Changing this interval to 3hours resulted in reduced utilization of the line and much improved capability to transmit photos and otherimportant data.
Chapter 3: Managing an Active Directory Infrastructure
08_70-294EP_ch03.qxd 11/6/06 2:37 PM Page 180

Active Directory Site Topology181
Configuring Site Link Costs
ObjectiveManage an Active Directory site
. Configure site link costs
In some cases, you might have more than one physical link between two sites. For example,you might have a dedicated T1 line connecting your head office to the branch office. Becauseof occasional downtime on the T1 link, you might also have set up a dial-up link over regularphone lines to the branch office. Obviously, you want replication to use the T1 link at all timeswhen it is available. Active Directory allows you to provide additional information about thecost of the various site links.
The KCC uses this information to determine the optimum link to be used during replication.KCC will use the other link (in this case, the dial-up link) when the optimum one is unavail-able. Although the site link cost factor can include the monetary cost, it is much more than justa monetary cost; it includes variables such as bandwidth, reliability, and availability of a givenline. When available, the KCC always chooses the lowest cost link for replication.
By default, when you first create a site link, it is assigned a cost of 100. In the example usedhere, you might want to set the cost of the T1 link at 50 and keep the cost of the dial-up linkat 100.
You can extend this example to cover more complex networks. Consider the five-site networkshown in Figure 3.56. This network provides two replication paths between domain con-trollers located in sites A and E. As shown in Figure 3.56, you should configure site link costsaccording to bandwidth, availability, and reliability.
FIGURE 3.56 An exampleof site links and costs in amultisite network.
B
A
C
E
D - E56 K DialupCost = 150
A - D56 K DialupCost = 150
C - E33 K DialupCost = 200
B - CISDN
Cost = 100
A - BT1Cost = 50
D
08_70-294EP_ch03.qxd 11/6/06 2:37 PM Page 181

NOTE
182
For replication between sites A and E, the total site link cost is the sum of the costs of all linkscrossed by packets transmitted between the sites. Going by way of sites B and C, the cost is (50 + 100 + 200) = 350, whereas going by way of site D, the cost is (150 + 150) = 300.Consequently, the preferred replication path is through site D. If it is not acceptable for thereplication path to utilize two dial-up links, you should adjust the costs so that the path usingtwo dedicated plus one dial-up links becomes the preferred one.
Site Link Bridge Costs You can extend the principle of site link costs to site link bridges. The cost of asite link bridge is merely the sum of the costs of all site links contained within the bridge.
As Step by Step 3.28 shows, modifying the site link cost is a simple procedure.
STEP BY STEP3.28 Configuring the Site Link Cost
1. Follow steps 1–3 of Step by Step 3.24 to access the IP or SMTP folder in the Inter-Site Transportsfolder.
2. Open the folder containing the site link whose cost you want to modify. The details pane displays infor-mation about the site link (refer to Figure 3.51).
3. Right-click the link and choose Properties. This opens the Properties dialog box for the site link (refer toFigure 3.52).
4. Type a new value in the Cost box or use the up/down arrows to select the desired value. Then click OK.
Chapter 3: Managing an Active Directory Infrastructure
08_70-294EP_ch03.qxd 11/6/06 2:37 PM Page 182

Chapter Summary183
Chapter SummaryIn this chapter, you continued to build on the basics of Active Directory that you learned aboutin Chapter 2. You began by exploring the various types of trust relationships available in ActiveDirectory. Should your organization employ a multiple forest design, you need to create trustrelationships manually so that users in one forest can access resources in other forests.
Two types of crossforest trust relationships are available: external trusts, which are trusts thatare set up between two specific domains, and forest trusts, which are trusts that involve com-plete two-way trust relationships between all domains in the forests involved.
In addition, you can set up shortcut trusts, which are specific trusts between two subdomainsin the same forest. This type of trust relationship speeds up authentication and data access byallowing the trust path to proceed directly between the domains rather than through the par-ent domains.
Having set up these trust relationships, you can now manage them in several ways. We showedyou how to validate trust relationships to ensure that the trusts have been properly created,change the authentication scope of a trust, and configure name suffix routing in forest trusts.Finally, you learned how to remove a crossforest trust.
Next, you learned about the classes of objects and their attributes that make up the ActiveDirectory schema. Because the schema is vital to the function of Active Directory, Microsofthas implemented safeguards to help ensure only authorized schema modifications are per-formed. These safeguards include registering and installing the Schema snap-in before it canbe used and being a member of the Schema Admins group. Microsoft recommends that youadd users to this group only when schema modifications are required and remove them afterthey are completed.
You also learned what a UPN suffix is and how to add or remove one. The UPN suffix is anadditional suffix that can be used to facilitate user logons throughout a forest and to concealthe true domain structure of the enterprise. It is especially useful for users who have long childdomain names.
You also learned about creating and configuring sites in Active Directory. You learned aboutadding domain controllers to sites; configuring site links, site link bridges, and connectionobjects; and designating preferred bridgehead servers. You also learned what the ISTG andKCC do.
Finally, you learned about Active Directory replication. Whereas intrasite replication is essen-tially automatic because it is determined by the KCC, you can configure intersite replicationaccording to the bandwidth and availability of WAN links connecting the sites. You can mod-ify replication intervals and restrict replication to certain times of the day when other WANtraffic is low. You can also specify cost values for site links that determine which link is givenpriority during replication.
08_70-294EP_ch03.qxd 11/6/06 2:37 PM Page 183
184
Key Terms. Active Directory Federation Services (ADFS)
. attribute
. authentication scope
. class
. connection object
. crossforest trust
. external trust
. Inter-Site Topology Generator
. Knowledge Consistency Checker
. name suffix
. object identifier (OID)
. one-way trust
. Remote Procedure Call (RPC)
. replication
. Schema Admins group
. shortcut trust
. Simple Mail Transfer Protocol (SMTP)
. site
. site link
. site link bridge
. site link cost
. SMTP
. subnet
. transitive trust
. trust relationship
. two-way trust
. update sequence number (USN)
. UPN suffix
Chapter 3: Managing an Active Directory Infrastructure
08_70-294EP_ch03.qxd 11/6/06 2:37 PM Page 184

Apply Your Knowledge185
Apply Your KnowledgeThe 70-294 exam tests your knowledge of the various situations that you may encounter wheninstalling and configuring Active Directory. You need to be aware of the implications involvedin modifying the schema, creating and modifying trust relationships, and employing alternateUPN suffixes. You should also know how to create and configure sites and their associated sub-nets, site links, and site link bridges. Finally, you should know how to create and modify inter-site replication. The exercises and exam questions presented here serve to reinforce theserequirements.
Note that you may encounter drag-and-drop or hot-spot questions on the exam. Due to thelimitations of the printed page, we are unable to include questions of these types in the examquestions section. However, the explanations suggest the possibility of these question typeswhere appropriate.
ExercisesTo perform these exercises, you should have at least three computers, on two of which youhave installed the root domain of an Active Directory forest named domain1.com, and a thirddomain controller on which you have installed the root domain of a second forest nameddomain2.com.
If you have only two computers available, you can complete exercises 3.1–3.2 and 3.4–3.8 firstand then demote the domain2.com domain controller and reinstall Active Directory on thiscomputer as a second domain controller in the domain1.com domain. Then create a secondsite and place this domain controller in this site, according to the exercises in Chapter 2. Youcan then complete exercise 3.3.
3.1 Registering and Installing the Schema Snap-In
The first two exercises involve modifying the Active Directory Schema. This exercise shows you how toregister and install the Active Directory Schema snap-in. You can do this from either forest root domaincontroller. By default, these computers hold the role of schema master for their respective forests.
Estimated Time: 5 minutes
1. Click Start, Command Prompt.
2. Type regsvr32 schmmgmt.dll and press Enter.
3. You should receive a message informing you that the registration succeeded. Click OK and closethe Command Prompt window.
4. Click Start, Run, type mmc, and then click OK.
08_70-294EP_ch03.qxd 11/6/06 2:37 PM Page 185

186
5. Click File, Add/Remove Snap-In.
6. In the Add/Remove Snap-In dialog box, click Add.
7. In the Add Standalone Snap-In dialog box, select Active Directory Schema and then click Add.
8. Click Close to return to the Add/Remove Snap-In dialog box.
9. Click OK to add the Active Directory Schema snap-in to the blank MMC.
10. Click File, Save, and on the Save As dialog box, type Schema.msc. Click Save to save the ActiveDirectory Schema MMC in the Administrative Tools folder.
3.2 Creating Classes and Attributes
In this exercise, you create a new attribute named Salary Level. Then you create a new class namedHuman Resources and add the Salary Level attribute to the Human Resources class.
Estimated Time: 10 minutes
1. The Active Directory Schema snap-in should still be open from Exercise 3.1. If not, click Start,Administrative Tools, Schema.msc.
2. In the console tree, expand Active Directory Schema to reveal the Classes and Attributes folders.
3. Right-click Attributes and select Create Attribute.
4. The Schema Object Creation dialog box warns you that creating schema objects is a permanentoperation. Click Continue to create the attribute.
5. In the Create New Attribute dialog box, type the information in the following table:
In This Field Type the Following
Common Name SalaryLevel
LDAP Display Name SalaryLevel
Unique X.500 Object ID 1.2.840.113556.1.4.7000.141
Description Salary Level
Syntax (Select Integer)
Minimum and Maximum (Leave blank)
6. Click OK.
7. Right-click Classes and select Create Class.
8. The Schema Object Creation dialog box warns you that creating schema objects is a permanentoperation. Click Continue to create the class.
Chapter 3: Managing an Active Directory Infrastructure
08_70-294EP_ch03.qxd 11/6/06 2:37 PM Page 186

Apply Your Knowledge187
9. In the Create New Schema Class dialog box, type the information in the following table:
In This Field Type the Following
Common Name HumanResources
LDAP Display Name HumanResources
Unique X.500 Object ID 1.2.840.113556.1.4.7000.17
Description Human Resources
Parent Class (Leave blank)
Class Type (Select Auxiliary)
10. Click Next.
11. In the next page of the Create New Schema Class dialog box, click Add under Optional.
12. In the Select Schema Object dialog box, scroll down to the SalaryLevel attribute you just created and then click OK.
13. This attribute is displayed in the Optional field of the Create New Schema Object dialog box. Click Finish.
14. To verify creation of this class and attribute, expand Classes in the details pane of the ActiveDirectory Schema console and scroll down to locate the HumanResources class. TheSalaryLevel attribute should be displayed at the top of the details pane, along with severalother attributes that were automatically assigned to this class when it was created.
15. Close the Active Directory Schema console.
3.3 Creating a Forest Trust
This exercise demonstrates how to create a two-way forest trust between the two domains. It assumesthat both forests are operating at the Windows Server 2003 forest functional level. You should performthis exercise from the domain1.com root domain controller.
Estimated Time: 10 minutes
1. Click Start, Administrative Tools, Active Directory Domains and Trusts.
2. In the console tree of Active Directory Domains and Trusts, right-click domain1.com and chooseProperties.
3. Select the Trusts tab of the Domain1.com Properties dialog box and then click New Trust to startthe New Trust Wizard.
4. On the Welcome to the New Trust Wizard page, click Next.
5. On the Trust Name page, type domain2.com and then click Next.
6. On the Trust Type page, select Forest Trust and then click Next.
08_70-294EP_ch03.qxd 11/6/06 2:37 PM Page 187
188
7. On the Direction of Trust page, select Two-Way and then click Next.
8. On the Sides of Trust page, select Both This Domain and the Specified Domain and then click Next.
9. On the User Name and Password page, type the name and password of an account that is a mem-ber of the Domain Admins group in the domain2.com forest. Unless you have changed it, this isthe original administrator account created when installing Active Directory.
10. On the Outgoing Trust Authentication Level—Local Domain page, choose Selective Authenticationand then click Next.
11. On the Outgoing Trust Authentication Level—Specified Domain page, choose SelectiveAuthentication and then click Next.
12. On the Trust Selections Complete page, review the choices you have made to make sure they arecorrect. If necessary, click Back and make any needed corrections. When the choices are correct,click Next to create the trust.
13. On the Trust Creation Complete Page, click Next.
14. On the Confirm Outgoing Trust page, click Yes, Confirm the Outgoing Trust and then click Next.
15. On the Confirm Incoming Trust page, click Yes, Confirm the Incoming Trust and then click Next.
16. When the Completing the New Trust Wizard page appears, click Finish to return to the Trusts tab ofthe domain1.com domain’s Properties dialog box. The trust with the domain2.com domainshould appear as both outgoing and incoming, with a trust type of External and a transitivity of No.
3.4 Validating a Forest Trust
In this exercise, you validate the trust you just completed in Exercise 3.3. You should perform this exer-cise from the domain2.com root domain controller.
Estimated Time: 5 minutes
1. Click Start, Administrative Tools, Active Directory Domains and Trusts.
2. In the console tree, right-click domain2.com and choose Properties.
3. Select the Trusts tab of the Domain2.com Properties dialog box. domain1.com should appear inthe two fields of this dialog box.
4. Under Domains Trusted by This Domain (Outgoing Trusts), select domain1.com and clickProperties.
5. On the Domain1.com Properties dialog box, click Validate.
6. You are asked whether you want to validate the incoming direction of trust. Click Yes, Validate theIncoming Trust, type the username and password of an account that is a member of the DomainAdmins group for domain1.com, and then click OK.
7. You should receive a confirmation message. Click OK.
Chapter 3: Managing an Active Directory Infrastructure
08_70-294EP_ch03.qxd 11/6/06 2:37 PM Page 188

Apply Your Knowledge189
8. Click OK to close the Domain1.com Properties dialog box.
9. Back in the Domain2.com Properties dialog box, select domain1.com under Domains That TrustThis Domain (Incoming Trusts).
10. Repeat steps 5–8 to validate the incoming trust.
3.5 Testing a Forest Trust
In this exercise, you attempt to access the domain2.com forest from the domain1.com forest. Youshould perform this exercise from the domain1.com root domain controller.
Estimated Time: 5 minutes
1. Click Start, Run, type \\server (where server is the name of the domain2.com domain controller), and press Enter.
2. Were you able to reach the other server? Why or why not?
_____________________________________________________
_____________________________________________________
_____________________________________________________
3. Click OK to close the message box.
3.6 Changing the Authentication Scope
In this exercise, you change the authentication scope of the trust relationship you just created. You canperform this exercise from either domain controller.
Estimated Time: 5 minutes
1. If the Properties dialog box for your domain is not visible, right-click the domain name in the console tree of Active Directory Domains and Trusts and choose Properties.
2. In the Domains Trusted by This Domain (Outgoing Trusts) field, select the name of the otherdomain and click Properties.
3. Select the Authentication tab of the Properties dialog box.
4. Select Domain-Wide Authentication and then click OK.
5. Repeat steps 2 and 3 for the Domains That Trust This Domain (Incoming Trusts) field. Note thatthe authentication level has already changed to domainwide.
6. Click OK to close the domain’s Properties dialog box.
08_70-294EP_ch03.qxd 11/6/06 2:37 PM Page 189

190
3.7 Testing a Forest Trust
In this exercise, you repeat exercise 3.6 to attempt access to the other forest. You should perform thisexercise from the domain1.com root domain controller.
Estimated Time: 5 minutes
1. Click Start, Run, type \\server (where server is the name of the domain2.com domain controller), and press Enter.
2. Were you able to reach the other server? Why or why not?
_____________________________________________________
_____________________________________________________
_____________________________________________________
3. Click OK to close the message box.
3.8 Creating and Configuring Sites
In this exercise, you rename the default site and create a second site. You then move a domain controllerand add subnets to the site.
Estimated Time: 15 minutes
1. Log on as an administrator.
2. Click Start, Administrative Tools, Active Directory Sites and Services.
3. In the console tree, expand the Sites folder.
4. Right-click Default-First-Site-Name and click Rename.
5. Type Head Office as the name of this site.
6. Right-click Sites and choose New Site.
7. Type Factory as the name of this site, select the default site link, and then click OK.
8. Repeat steps 6 and 7, specifying Branch Office as the name of this site.
9. Expand the Inter-Site Transports folder, right-click IP, and choose New Site Link.
10. Type Remote as the name of this site link, add Head Office and Branch Office to this link, and thenclick OK.
11. Expand the Head Office site and then expand the Servers folder.
12. Right-click the Server2 server and choose Move.
13. In the Move Server dialog box, select the Branch Office site and then click OK.
14. Right-click the Subnets folder and choose New Subnet.
Chapter 3: Managing an Active Directory Infrastructure
08_70-294EP_ch03.qxd 11/6/06 2:37 PM Page 190

Apply Your Knowledge191
15. In the New Object—Subnet dialog box, type 192.168.1.0 in the Address box and255.255.255.0 in the Mask box. Select Head Office as the site object for the subnet and then click OK.
16. Repeat step 15, specifying an address and subnet mask of 192.168.2.0 and 255.255.255.0for the Factory site.
17. Repeat step 15 again, this time specifying an address and mask of 192.168.3.0 and255.255.255.0 for the Branch Office site.
18. In the Inter-Site Transports folder, right-click IP and choose Properties.
19. In the IP Properties dialog box, clear the Bridge All Site Links check box and then click OK.
20. Back in the Inter-Site Transports folder, right-click IP and choose New Site Link Bridge.
21. In the New Site Link Bridge dialog box, type Branch Office as the name of the site link bridge.Select the default link and the Remote link and then click OK.
22. In the console tree, right-click Server1 and choose Properties.
23. In the Server1 Properties dialog box, click IP, click Add, and then click OK. This makes Server1 apreferred bridgehead server for the IP transport protocol.
24. Repeat steps 22 and 23 with the Server2 server.
25. Close Active Directory Sites and Services.
3.9 Configuring Intersite Replication Properties
Because intersite replication can take up a large fraction of bandwidth on a slow link, you can modify cer-tain properties of intersite replication. In this exercise, you configure a two-hour interval for IP intersitereplication and then specify that intersite replication will not take place during daytime (8 a.m. to 6 p.m.)hours. You also set the site link cost to 25.
Estimated Time: 5 minutes
1. Click Start, Administrative Tools, Active Directory Sites and Services.
2. If necessary, expand the Sites folder in the console tree to locate the Inter-Site Transports folder.
3. Expand this folder and click IP. The details pane displays a site link named DEFAULTIPSITELINK.
4. Right-click this link and choose Properties.
5. On the General tab of the site link’s Properties dialog box, type 120 in the text box labeledReplicate Every and then click Apply.
6. Click Change Schedule to display the Schedule for DEFAULTIPSITELINK dialog box.
7. Select the time interval of Monday 8:00 a.m. to Friday 6:00 p.m., select Replication Not Available,and then click OK.
08_70-294EP_ch03.qxd 11/6/06 2:37 PM Page 191
192
8. Back on the General tab of the site link’s Properties dialog box, type 25 in the Cost text box andthen click OK.
9. The cost and replication values you configured are displayed in the details pane of the ActiveDirectory Sites and Services snap-in. Close this snap-in.
Exam Questions1. Evan has upgraded his company’s Windows NT 4.0 domains to Windows Server 2003 and has
consolidated two previous domains into a single domain that contains all 900 users and their com-puters. The previous domains represented two offices that have an ISDN link between them.
Evan sets up two sites, one for each office, and configures a site link to use SMTP for replicatingbetween the offices. However, the domain controllers in the two offices are unable to replicate witheach other. What does Evan need to do?
❍ A. Install Internet Information Services (IIS) on a domain controller at each site, and con-figure IIS as an SMTP server.
❍ B. Install an enterprise certification authority (CA).
❍ C. Install a faster link such as a T1.
❍ D. Use IP replication rather than SMTP replication.
2. Dorothy is a domain administrator for a large engineering company that operates a WindowsServer 2003 forest with three domains. Her company has just acquired a Canadian subsidiary,which operates a single domain Windows 2000 forest. The two companies will be workingtogether on future projects involving continentwide locations, so she recommended to manage-ment that a forest trust be created between the companies’ forests. Working from a domain con-troller in her company, Dorothy accesses the New Trust Wizard and enters the name of theCanadian company’s domain. She discovers that the option to create a forest trust is unavailable.What needs to be done so that she can create a forest trust?
❍ A. Ask an administrator of the Canadian company to provide her with a user account inthat company’s domain.
❍ B. Ask an administrator of the Canadian company to add her domain user account to thatcompany’s Enterprise Admins group.
❍ C. Ask an administrator of the Canadian company to upgrade its domain to the WindowsServer 2003 functional level.
❍ D. Dorothy should create a shortcut trust instead.
Chapter 3: Managing an Active Directory Infrastructure
08_70-294EP_ch03.qxd 11/6/06 2:37 PM Page 192

Apply Your Knowledge193
3. John is creating a new site in his company’s network; this site represents a branch office that thecompany is setting up. He opens the Active Directory Sites and Services console and accesses theNew Object—Site dialog box. What additional piece of information does he need to specify?
❍ A. He needs to specify one or more subnets in the site.
❍ B. He needs to specify the name of a domain controller to be placed in the site.
❍ C. He needs to specify the licensing computer for the site.
❍ D. He needs to specify the site link to which the site will belong.
4. Peter is configuring replication for his company, which operates two offices, one in Dallas and theother in Atlanta. The company has a 1.5Mbps T1 link, a 128Kbps ISDN link, and a 56Kbps dial-uplink between the two sites. Which of the following site link cost values should he configure for thethree links?
❍ A. 50 for the T1 link, 100 for the ISDN link, and 200 for the dial-up link.
❍ B. 50 for the T1 link, 100 for the dial-up link, and 200 for the ISDN link.
❍ C. 50 for the dial-up link, 100 for the ISDN link, and 200 for the T1 link.
❍ D. 50 for the ISDN link, 100 for the dial-up link, and 200 for the T1 link.
5. Paul works for a state department of transportation that has just awarded a contract to a construc-tion company to build a new highway linking the two largest cities in the state. The state govern-ment operates an Active Directory forest, within which the department of transportation operates asingle child domain. The construction company operates a single domain Windows 2000 network.To build the highway, engineers at the construction company need access to resources at thedepartment of transportation. What should Paul do to grant this access?
❍ A. Create a one-way external trust in which the department of transportation domaintrusts the construction company domain.
❍ B. Create a one-way external trust in which the construction company domain trusts thedepartment of transportation domain.
❍ C. Create a two-way external trust in which the two domains involved trust each other.
❍ D. Create a forest trust in which the construction company domain trusts the departmentof transportation domain.
6. Kristin is a domain administrator for a company that has a Manhattan head office and two upstateremote offices. Users in the remote offices are complaining that the links are slow, so she checksthe utilization of the links and discovers that they are running at 100% capacity. Checking further,Kristin discovers that nearly all the traffic on the links is Active Directory replication.
08_70-294EP_ch03.qxd 11/6/06 2:37 PM Page 193

194
On checking the replication schedule, Kristin discovers that replication should be taking place onlyonce every six hours. What else should she be checking?
❍ A. The Ignore Schedule option
❍ B. The Replication Not Available option
❍ C. The Force Replication option
❍ D. How many new users have been added at the various sites in the past few days
7. Mark is the senior network administrator of a high-tech company whose head office is in Boston.The company also operates branch offices in Dallas, Rio de Janeiro, Paris, and Winnipeg.Previously, the company operated five separate domains, one for each city in which it has anoffice. When Mark upgraded the network to Windows Server 2003, he consolidated the entire net-work into a single domain and created sites for each city. Each office has its own domain con-trollers and separate subnet configurations. After receiving several complaints about slow datatransfer rates, Mark realized there was an extreme amount of replication traffic, so he checkedActive Directory Sites and Services. Which of the following is the most likely reason for thisamount of replication traffic?
❍ A. The branch office sites are missing bridgehead servers.
❍ B. All domain controllers are located in the Default-First-Site-Name site. Mark needs tomove them to their respective sites.
❍ C. The site links are using RPC over IP for replication. Mark needs to reconfigure them touse SMTP.
❍ D. The replication topology is improperly configured. Mark needs to run the KnowledgeConsistency Checker to alleviate this problem.
8. Fred is a network administrator for a large company that has just acquired a smaller company.Both companies have operated their own Active Directory domains. Senior management hasdecided that they want to combine the two domains into a single domain with a series of OUs andseveral sites. The Active Directory schema in the smaller company contains several definitions thatare not present in the schema of the large company, and Fred needs to extend the schema toinclude attributes taken from the old schema.
Which of the following needs must Fred define for attributes being added to the schema?
❍ A. He can add new attributes only at installation time. An attribute definition includes aname, a unique object identifier (OID), a unique security ID (SID), a syntax that definesthe type of data the attribute can hold, and optional range limits.
❍ B. He can add new attributes only during replication. An attribute definition includes aname, a unique OID, a syntax that defines the type of data the attribute can hold, andoptional range limits.
Chapter 3: Managing an Active Directory Infrastructure
08_70-294EP_ch03.qxd 11/6/06 2:37 PM Page 194

Apply Your Knowledge195
❍ C. He can add new attributes at any time. An attribute definition includes a name, a uniqueOID, a syntax that defines the type of data the attribute can hold, and optional rangelimits.
❍ D. He can add new attributes at any time. An attribute definition includes a name, anonunique OID, a unique SID, a syntax that defines the type of data the attribute canhold, and optional range limits.
9. Maria is an enterprise administrator for an East Coast manufacturing company that has justmerged with a similar company operating on the West Coast. She has configured external trustsbetween several domains in each forest, for which employees need access. These trusts all useddomainwide authentication. Because management in her company wanted to keep the domainstructure confidential, she had configured a UPN suffix of corp and configured all user accountsto use this suffix. An administrator in the other forest also configured a UPN suffix of corp forusers in that forest.
However, users were unable to access resources in the other forest, although they could accessother domains in their own forest. Which two of the following would enable users to accessresources to both forests?
❏ A. Maria needs to re-create the trust relationship as a forest trust.
❏ B. Maria needs to change the domainwide authentication scope to selectiveauthentication.
❏ C. Users need to specify the domain in the other forest to which they want to log on.
❏ D. Maria should change the UPN suffix in use in her forest.
10. Gwen’s company has just merged operations with a former competitor. Both companies operateWindows Server 2003 Active Directory forests, each of which has three domains in a single tree.Managers at the second company would like to keep their operations as separate as possible; however, employees whose user accounts are in various domains of both forests need access toresources in all domains. What should Gwen do to enable access to the other forest with the leastamount of effort?
❍ A. She should create a shortcut trust between child domains of the two forests.
❍ B. She should create a forest trust between the two forests.
❍ C. She should create an external trust between child domains of the two forests.
❍ D. She should inform her manager that the other company’s forest should be reconfig-ured as a second tree in her company’s forest.
08_70-294EP_ch03.qxd 11/6/06 2:37 PM Page 195

196
11. Roberta works for a company that has just opened a branch office in a neighboring city that isconnected with a 128Kbps ISDN link. Her manager has requested that replication take place atleast once a day during the daytime. However, the line is expected to be close to 90% utilized dur-ing the day, but only about 40% utilized during night hours.
She needs to ensure that replication does not use too much bandwidth during the day, but that atnight it will provide sufficient bandwidth to complete any synchronization. Which of the followingshould Roberta do to complete this request with the least amount of effort?
❍ A. Create two site links: one available only at night with the default replication interval andthe other available only during the day with a replication interval of 6 hours.
❍ B. Create two site links: one available only at night with the default replication interval andthe other available only from noon to 1 p.m. also with the default replication interval.
❍ C. Create two site links: one available only at night with the default cost and replicationinterval and one available only during the day with a site link cost of 500.
❍ D. Create one site link, available only at night with the default cost and replication interval.Once a day, force replication manually.
❍ E. Create one site link with the default cost and replication interval. Configure this link tobe available from noon to 1 p.m. and also during the nighttime hours.
12. Nancy is the network administrator for a company that operates a single domain Active Directorynetwork encompassing three sites located in Cleveland, Nashville, and Columbus. The Clevelandand Nashville sites have three domain controllers, and Columbus has one domain controller. If thedomain controller at Columbus were to fail, Nancy would like Active Directory traffic from this siteto be processed at the Cleveland site rather than the Nashville site.
Which of the following is the best method for Nancy to accomplish this task?
❍ A. She should eliminate the site link between Columbus and Nashville.
❍ B. She should create a site link bridge between Columbus and Cleveland.
❍ C. She should place the domain controller at Columbus in the same site as the Clevelanddomain controllers.
❍ D. She should configure the site link cost of the link between Columbus and Cleveland tobe lower than that of the link between Columbus and Nashville.
13. A junior administrator in your company named Rick has just created a new one-way outgoing trustrelationship between your company’s domain and a supplier’s domain. The purpose of this trust isto enable sales associates to place orders online with the suppliers so that they do not have to faxthe orders. However, sales associates complain that they cannot access the supplier’s domain.What should you do to enable access, while keeping resources in your company’s domain secure?
Chapter 3: Managing an Active Directory Infrastructure
08_70-294EP_ch03.qxd 11/6/06 2:37 PM Page 196

Apply Your Knowledge197
❍ A. In the trust’s Properties dialog box, change the authentication scope of the trust fromselective authentication to domainwide.
❍ B. In the trust’s Properties dialog box, change the direction of the trust from outgoing toincoming.
❍ C. Remove the trust relationship and create a new one-way incoming trust relationship.
❍ D. Remove the trust relationship and create a new two-way trust relationship.
14. Linda works for a company that operates an Active Directory forest consisting of a single domainnamed examcram.com. The domain contains four sites representing the cities in which the com-pany does business.
Linda is training a junior administrator named Julio, who will be responsible for ensuring that thesite links are properly bridged. To which container in the Active Directory Sites and Services snap-in should Linda assign permissions for Julio?
❍ A. Sites
❍ B. Inter-Site Transports
❍ C. Subnets
❍ D. Each of the sites to be contained in the bridge
15. In the past few weeks, your company’s help desk has been receiving complaints from users whoseaccounts are in the USA.marketing.quepublishing.com domain; they complain that it isdifficult to remember the appropriate domain name when logging on. In response to this problem,you create a new UPN suffix named quepublishing so that users should be able to log on witha name like user@quepublishing. However, users complain that they are unable to log on withthis type of name. What do you need to do?
❍ A. Enable name suffix routing for the USA.marketing.quepublishing.com domain.
❍ B. In the properties of each affected user account, specify quepublishing as the UPNsuffix in use.
❍ C. In the properties of each affected user account, append @quepublishing to theuser’s logon name.
❍ D. Delete and re-create each user’s account, specifying quepublishing as the UPNsuffix to be used.
16. Phil’s company has just merged with a competitor. Both companies operate Windows Server 2003forests, each consisting of a single domain. Phil configures a two-way external trust relationshipbetween the two domains so that users in each domain can access shared folders in the otherdomain, which is managed by Gertrude. He creates a group in his domain and adds users who
08_70-294EP_ch03.qxd 11/6/06 2:37 PM Page 197

198
need access to Gertrude’s domain to this group. Gertrude also creates a group in her domain andadds users who need access to Phil’s domain to this group. Both administrators configure theappropriate NTFS permissions for files and folders that need to be accessed.
The next week, users in Phil’s domain start calling the help desk, wondering why they cannot accessthe shared information in Gertrude’s domain. Users in Gertrude’s domain have no problems access-ing resources in Phil’s domain. Which of the following is the most likely reason for this access failure?
❍ A. The authentication scope of Phil’s domain is set to domainwide authentication. Philshould set the scope to selective authentication.
❍ B. The authentication scope of Phil’s domain is set to selective authentication. Phil shouldset the scope to domainwide authentication.
❍ C. The authentication scope of Gertrude’s domain is set to domainwide authentication.Gertrude should set the scope to selective authentication.
❍ D. The authentication scope of Gertrude’s domain is set to selective authentication.Gertrude should set the scope to domainwide authentication.
17. Barry’s company is expanding its North American operations to Europe. To accommodate the newoperations, he needs to add several objects and attributes to the schema. His manager has addedhis user account to the Schema Admins group for this purpose. Working from a branch officedomain controller, Barry attempts to locate the Active Directory Schema snap-in. He calls the helpdesk and asks to be given the appropriate permission to access this snap-in, but is told that this isnot a permissions issue. Which two of the following does Barry need to do to access this snap-in?
❏ A. He must first register the Schema snap-in by using the regsvr32 command from theRun dialog box.
❏ B. He should contact the help desk manager because he has received incorrect advicefrom the support technician. He needs to belong to both the Schema Admins andEnterprise Admins groups to access this snap-in.
❏ C. He needs to install the Active Directory Schema snap-in to a new MMC console.
❏ D. He needs to go to the schema master computer to modify the schema. Because thedomain controller he is working from does not have this snap-in, it must not be theschema master.
18. In the process of upgrading their network from Windows NT 4.0 to Windows Server 2003, admin-istrators at a western clothing outfitters company consolidated two domains representing officelocations in Denver and Billings into a single domain. The two locations are connected with a dedi-cated ISDN line. Joanne, a junior administrator, created sites for both locations and assigned thedomain controllers to their respective sites while working from the Denver location. The next week,
Chapter 3: Managing an Active Directory Infrastructure
08_70-294EP_ch03.qxd 11/6/06 2:37 PM Page 198

Apply Your Knowledge199
users at Billings started complaining about slow logon and resource access. What should Joannedo to speed up access?
❍ A. Configure replication between Denver and Billings to take place only at off-peak times.
❍ B. Assign the subnet containing computers located in Billings to the Billings site.
❍ C. Add an explicit UPN suffix for the users in the Billings site.
❍ D. Obtain approval from management to upgrade the ISDN line to a T1 line.
Answers to Exercises
3.5 Testing a Forest Trust
No. You cannot reach the other server because you configured the authentication scope as selectiveauthentication. This setting requires a specific granting of access to the required server, which you didnot configure.
3.7 Testing a Forest Trust
Yes. You are now able to reach the other server because the authentication scope is now set to domain-wide. This setting allows access to all resources according to NTFS permissions that may have been con-figured for specific files and folders.
Answers to Exam Questions1. D. The problem with SMTP replication in this instance is that SMTP cannot be used to replicate the
domain partition between domain controllers in the same domain, only the schema, configuration,and application partitions. To replicate the domain partition, Evan must configure replication to use RPC over IP. It is true that SMTP replication requires an enterprise CA to work; however, justinstalling the CA would not allow replication of the domain partition. Therefore, answer B is incor-rect (however, it would be correct if the two sites were in different domains). The SMTP packetscan be sent directly between the domain controllers without the need for mail servers; therefore,answer A is incorrect. Installing a faster link such as a T1 will not help; therefore, answer C isincorrect. See the section “Configuring Replication Schedules.”
2. C. To create a forest trust, both forests must be operating at the Windows Server 2003 functionallevel. Therefore, the Canadian company needs to upgrade its domain controllers to WindowsServer 2003 and then raise the domain and forest functional levels. This is not an issue of domainaccounts or membership in the Enterprise Admins group. Therefore, answers A and B are wrong.A shortcut trust connects two child domains in the same forest, not different forests. Therefore,answer D is wrong. Note that Dorothy could instead create external trusts between the domainsinvolved; however, this option was not offered. See the section “Establishing Trust Relationships.”
08_70-294EP_ch03.qxd 11/6/06 2:37 PM Page 199

200
3. D. The New Object—Site dialog box asks for the name of the site and the site link object. Johnshould perform all the other tasks later; however, he cannot specify these tasks from this dialogbox. Therefore, answers A, B, and C are wrong. See the section “Creating Sites.”
4. A. The site link cost is a value that determines which link will be given priority in replication. TheKCC uses this information to determine the optimum link to be used during replication. Whenavailable, it uses the link with the lowest cost. Therefore, Peter should assign the lowest cost to the T1 line, the next higher cost to the ISDN line, and the highest cost to the dial-up link.Consequently answers, B, C, and D are incorrect. Note that a question similar to this may appearas a drag-and-drop question in which you must drag the correct costs to the various site links on a network diagram. See the section “Configuring Site Link Costs.”
5. A. In this scenario, engineers at the construction company need access to resources at the depart-ment of transportation domain. Therefore, the department of transportation domain needs to trustthe construction company domain. Employees of the department of transportation do not needaccess to the construction company domain. Therefore, the construction company domain doesnot need to trust the department of transportation domain, and answers B and C are wrong. Otherdomains in the government do not need to participate in the trust relationship; therefore, answer Dis wrong. See the section “Interforest Trust Relationships.”
6. A. If the Ignore Schedules check box is selected, replication can take place at any time of the dayor night, and the configured schedule is ignored. Kristin needs to clear this check box so that theschedule is followed. She can use the Replication Not Available option if she does not want replica-tion to take place at certain times. Because she does want replication to take place at six-hourintervals, she does not need this option, and answer B is incorrect. There is no Force Replicationoption. Therefore, answer C is incorrect. Even if a large number of users have been added recently,the replication traffic should not tie up the link to that extent. Therefore, answer D is incorrect. Seethe section “Configuring Replication Schedules.”
7. B. By default, all the domain controllers are placed in the Default-First-Site-Name site, and Markneeds to move them to the proper sites. The process of merely creating the sites and assigning the subnets to the sites is insufficient. When new sites are established, the Inter-site TopologyGenerator (ISTG) automatically creates bridgehead servers, so answer A is wrong. SMTP is usedto replicate schema and configuration partitions only between domains, and is not used withindomains, so answer C is wrong. The Knowledge Consistency Checker (KCC) automatically createsand manages the intersite replication topology and does not need to be manually run, so answer Dis wrong. See the section “Active Directory Site Topology.”
8. C. After registering and installing the Schema snap-in, a member of the Schema Admins group can add new attributes to the schema at any time, not just when it is installed or during replication.Therefore, answers A and B are wrong. Attributes are used to define the properties of objects—forexample, the “last name” property of a user object. The attribute requires a unique OID, a descrip-tive name, a syntax that defines the type of data the attribute can hold including a minimum andmaximum value, and optional range limits. The attribute definition does not include a unique SID.Therefore, answer D is wrong. See the section “Managing Schema Modifications.”
9. C and D. When more than one forest uses the same UPN suffix, users can use it only to log on toa domain in the same forest. Therefore, they were unable to log on to a domain in the other forest.As it stands, users can log on to the other forest if the domain name is selected in the Log On to
Chapter 3: Managing an Active Directory Infrastructure
08_70-294EP_ch03.qxd 11/6/06 2:37 PM Page 200

Apply Your Knowledge201
Windows dialog box. Alternately, one of the administrators can change the UPN suffix in use. Itdoes not matter whether an external or forest trust relationship is in use if the UPN suffix is thesame; therefore, answer A is incorrect. This is not a matter of authentication scope; domainwideauthentication should work here. Therefore, answer B is incorrect. See the section “Adding orRemoving a UPN Suffix.”
10. B. The purpose of a forest trust is to create transitive trust relationships between all domains ofthe forests involved. In this scenario, because employees need access to more than one domain in the other company’s forest, it is best to create a forest trust. Gwen could create external trustsbetween various child domains; however, this approach would take far more administrative effort.Therefore, answer C is wrong. A shortcut trust is a shortened path between two child domains inthe same forest and is not used between domains in different forests. Therefore, answer A iswrong. There is no need to reconfigure the other company’s forest as a second tree in her com-pany’s forest. Therefore, answer D is wrong. See the section “Interforest Trust Relationships.”
11. E. Roberta needs only to configure one site link. She should click the Change Schedule button onthe Properties dialog box, and specify that replication be available from noon to 1 p.m. and alsoduring nighttime hours. This enables her to meet both the requirement for at least one replicationduring the day and the need for complete overnight synchronization. By allowing the daytime link toreplicate only between noon and 1 p.m., she has selected a time when traffic would likely be lower.If she were to set a six-hour daytime replication interval, replication would take place sometime dur-ing the day; however, she does not need more than one daytime replication. Therefore, answer A iswrong. Roberta could also configure two site links with two distinct replication schedules. However,this would take more effort than creating a single link, so answer B is wrong. Site link costs do notinfluence replication intervals; they only enable the KCC to select the optimum link. Therefore,answer C is wrong. Roberta could manually force replication once a day; however, doing so takesdaily effort. Therefore, answer D is wrong. See the section “Configuring Replication Schedules.”
12. D. The site link cost determines the preferential replication path (in this case, Columbus toCleveland). Replication traffic proceeds over this link if possible, and over the higher cost link (in this case, Nashville) if a server at the other link cannot satisfy the request that has been made.
It is important for intersite replication traffic to have all possible links available so that any queriesor other traffic can proceed optimally. Therefore, answer A is wrong. A site link bridge consists oftwo or more links with one site in common, across which intersite replication traffic can take place.The cost of the site link bridge is equal to the sum of the costs of the individual links in the bridge.This would not help with the current scenario. Therefore, answer B is wrong. Placing the Columbusdomain controller in the same site as the Cleveland domain controller would direct preferentialreplication between these two cities, but unless a very high speed link were available, the highreplication frequency could overwhelm the link. Therefore, answer C is wrong. See the section“Configuring Site Link Costs.”
13. C. In this scenario, Rick created a trust relationship in the wrong direction. You have to delete andre-create the trust because it is not possible to reverse the direction of the trust relationship fromthe Properties dialog box of the trust. Therefore, answer B is wrong. Changing the authenticationscope of the trust does not help. Therefore, answer A is wrong. Creating a two-way trust is notnecessary; doing so reduces security because employees of the supplier company could thenaccess your domain. Therefore, answer D is wrong. For more information, see the section“Managing Trust Relationships.”
08_70-294EP_ch03.qxd 11/6/06 2:37 PM Page 201

202
14. B. Linda needs to assign Julio permissions on the Inter-Site Transports container. This container isthe location from which you can manage all aspects of intersite transport, including use of the IPand SMTP transport protocols, site links, site link bridges, replication schedules, and so on. Noneof the other locations provide an option for creating site link bridges, so answers A, C, and D areincorrect. Note that on the exam, a question similar to this might be presented in the form of ahot-spot graphic in which you must select the required location from the Active Directory Sites andServices snap-in. See the section “Site Link Bridges.”
15. B. By adding a UPN suffix, you can simplify logon procedures for all users in the forest. It is help-ful for users with long child domain names, such as in this example. However, for the users to logon with the added UPN suffix, you need to specify the UPN suffix in the Account tab of the user’sProperties dialog box in Active Directory Users and Computers. Name suffix routing is used inrouting authentication requests between forests connected by a forest trust. Therefore, answer A is wrong. You cannot simply add the UPN suffix to the user’s logon name; therefore, answer C iswrong. You do not need to delete and re-create any user accounts. Therefore, answer D is wrong.See the section “Adding or Removing a UPN Suffix.”
16. D. The authentication scope controls how access is granted to resources in the trusting domain.Domainwide authentication allows users from the trusted domain to access all resources in thelocal domain. Selective authentication does not create any default access to resources; you mustgrant access to each server that users need to access. In this case, Gertrude’s domain is the trust-ing domain, and because its authentication scope was set to selective, users from Phil’s domainwere unable to reach her domain. She needs either to grant specific access to required resourcesor to reset the authentication scope to domainwide. If Phil’s domain were set to selective authenti-cation, users in Gertrude’s domain would be unable to access resources in Phil’s domain.Therefore, answer B is incorrect. Because domainwide authentication allows users to access allresources, answers A and C are incorrect. See the section “Managing Trust Relationships.”
17. A and C. By default, the Active Directory Schema snap-in is not present when a domain controlleris installed, so Barry has to install it. First, he needs to register the Schema snap-in by using theregsvr32 command from the Run dialog box. He cannot install this snap-in until he performsthis step. This extra step is an additional security measure because of the importance of schemamodifications. Barry does not need to belong to the Enterprise Admins group to access theSchema snap-in. Therefore, answer B is wrong. He does not need to be at the schema masterbecause he can connect to it from another computer. Therefore, answer D is wrong. See the sec-tion “Managing Schema Modifications.”
18. B. When Joanne upgraded the domains to Windows Server 2003 and Active Directory, creating asingle domain from the two domains that previously existed, initially all objects in the directoryfrom both locations were assigned to the first site. When she created a site for the Billings loca-tion, by default no subnets were assigned to it; consequently, client computers and memberservers in Billings thought they were in the Denver site, and all authentication and resource accesstraffic went across the ISDN link to Denver. If Joanne assigns the Billings subnet to its site, thistraffic is handled locally for all resources in its site. This is not a replication issue; therefore,answer A is incorrect. Explicit UPNs are used to simplify logon procedures in a multidomain forest.They are not needed in a single-domain operation; therefore, answer C is incorrect. Because this isan issue of traffic unnecessarily routed over the slow link, there is no need for a faster link such asa T1. Therefore, answer D is incorrect. See the section “Configuring Site Boundaries.”
Chapter 3: Managing an Active Directory Infrastructure
08_70-294EP_ch03.qxd 11/6/06 2:37 PM Page 202

Apply Your Knowledge203
Suggested Readings and Resources1. Microsoft Corporation. “Active Directory Collection” http://technet2.microsoft.com/
WindowsServer/en/library/6f8a7c80-45fc-4916-80d9-16e6d46241f91033.mspx?mfr=true.
2. Microsoft Corporation. “Active Directory Replication over Firewalls.” http://www.microsoft.com/technet/prodtechnol/windows2000serv/technologies/activedirectory/deploy/confeat/adrepfir.mspx.
3. Microsoft Corporation. “How Active Directory Replication Works.” http://technet2.microsoft.com/WindowsServer/en/library/c238f32b-4400-4a0c-b4fb-7b0febecfc731033.mspx?mfr=true.
4. Microsoft Corporation. “Multiple Forest Considerations.” http://download.microsoft.com/download/0/2/6/026ee2e2-e06d-4660-b9db-6926fd200ed9/Multiforest_White_Paper.doc.
5. Microsoft Corporation. “Overview of Active Directory Federation Services inWindows Server 2003 R2.” http://download.microsoft.com/download/d/8/2/d827e89e-760a-40e5-a69a-4e75723998c5/ADFS_Overview.doc.
6. Microsoft Corporation. “Step-by-Step Guide to Using Active Directory Schema andDisplay Specifiers.” http://www.microsoft.com/technet/prodtechnol/windows2000serv/technologies/activedirectory/howto/adschema.mspx.
7. Microsoft Corporation. “Trust Types.” http://technet2.microsoft.com/WindowsServer/en/Library/116d34e5-5615-4fb8-a8ef-47b94c294b581033.mspx?mfr=true.
08_70-294EP_ch03.qxd 11/6/06 2:37 PM Page 203