chapter 4-control vÀ user control trong silverlight
DESCRIPTION
Chapter 4-CONTROL VÀ USER CONTROL TRONG SILVERLIGHTTRANSCRIPT

Microsoft Vietnam LLC – DPE team | Chương IV: Control và User Control trong Silverlight 1
CHƢƠNG IV: CONTROL VÀ USER CONTROL TRONG SILVERLIGHT
1 Giới thiệu về các control phổ biến của Silverlight SDK tích hợp trong VS2008
Các Control trong silverlight cho phép bạn lƣu trữ nội dung hoặc các control khác, bạn có thể tạo hoặc tự thiết kế đƣợc các control này để chúng hiển thị đƣợc những thay đổi trạng thái tới ngƣời dùng. Trong công cụ phát triển Visual studio 2008 đã tích hợp các công cụ silverlight (Cài đặt Siverlight tool, đã hƣớng dẫn ở chƣơng một) có rất nhiều các control có sẵn để bạn tạo, thay đổi hoặc xử lý các sự kiện theo chúng Dƣới đây là hình ảnh danh sách các công cụ đã có trong Silverlight tool
Ở Chƣơng II chúng ta đã tìm hiểu về các cách trình bày control theo Layout (Grid, StackPanel, Canvas). Trong chƣơng này chúng ta sẽ xem và tìm hiểu các control phổ biến trong silverlight 2 và cách trình bày chúng theo Layout đã học.
2 Các control phổ biến trong Silverlight 2
1.1 Border
o Mổ tả
Border cung cấp một background , khu vực cho phép bạn nhúng vào đó một thành phần duy
nhất nhằm tạo ra hiệu quả về đồ hoạ.
o Ví dụ
<Border Background="Coral" Width="300" Padding="10" CornerRadius="20"> <TextBlock FontSize="16">Text Surrounded by a Border</TextBlock>

Microsoft Vietnam LLC – DPE team | Chương IV: Control và User Control trong Silverlight 2
</Border>
1.2 Button
o Mô tả
Button kiểm soát các phản ứng của ngƣời dùng qua các thiết bị đầu vào, bao gồm các sự kiện, style
o Ví dụ
<Grid x:Name="LayoutRoot" Background="White"> <Button Name="Button" Content="Click Me !" Background="Blue" Margin="20,60,200,200" MouseLeftButtonDown="Button_MouseLeftButtonDown"/> </Grid>
1.3 Calendar
o Mô tả
Calendar cho phép ngƣời sử dụng chọn ngày, tháng, năm. Ta có thể sử dụng các style khác nhau thông qua Mode
o Ví dụ
<Grid x:Name="LayoutRoot" Background="White"> <basics:Calendar Height="300" Width="300"IsTodayHighlighted="True" > </basics:Calendar> </Grid>
1.4 CheckBox
o Mô tả
Cho phép ngƣời dùng lựa chọn ba trạng thái dánh dấu ,bỏ dánh dấu và trạng thái trung gian
o Ví dụ
<CheckBox Name="CheckBox1" ClickMode="Release" IsThreeState="False" Content="CheckBox two states" Margin="10,50,0,0"></CheckBox> <CheckBox Name="CheckBox2" ClickMode="Release" IsThreeState="True" Content="CheckBox three states" Margin="10,100,0,0"></CheckBox>

Microsoft Vietnam LLC – DPE team | Chương IV: Control và User Control trong Silverlight 3
1.5 ComboBox
o Mô tả
ComboBox cho phép chọn lựa một Item từ một danh sách Item từ
ComboBox
o Ví dụ
<Grid x:Name="LayoutRoot" Background="White"> <ComboBox Name="ComboBox1" BorderThickness="2" IsDropDownOpen="True" SelectedIndex="0" Width="200" Height="30"> <ComboBoxItem x:Name="ComboBoxItem1" Content="Item1"></ComboBoxItem> <ComboBoxItem x:Name="ComboBoxItem2" Content="Item2"></ComboBoxItem> <ComboBoxItem x:Name="ComboBoxItem3" Content="Item3"></ComboBoxItem> </ComboBox> </Grid>
1.6 ContentControl
o Mô tả
ContentControl có các dẫn xuất nhƣ Button, Panel. Ta có thể tuỳ chỉnh ContentControl thông
qua các template
o Ví dụ
Sau đây là việc cài đặt một vài control đƣợc thừa kế từ ContentControl
<StackPanel Name="root" Width="200" HorizontalAlignment="Center" VerticalAlignment="Center"> <! —Tạo một button với nội dung gán từ Content.--> <Button Margin="10" Content="This is string content of a Button"/> <! —Tạo một button với một UIElement gán từ content.--> <Button Margin="10"> <Rectangle Height="40" Width="40" Fill="Blue"/> </Button> <! —Tạo một button với một panel chứa nhiều đối tƣợng gán từ content.--> <CheckBox Margin="10"> <StackPanel Margin="3,0,0,0" Orientation="Horizontal"> <Ellipse Height="10" Width="10" Fill="Blue"/> <TextBlock TextAlignment="Center" Text="A string of text"></TextBlock> </StackPanel> </CheckBox> </StackPanel>
\

Microsoft Vietnam LLC – DPE team | Chương IV: Control và User Control trong Silverlight 4
1.7 DatePicker
o Mô tả
DatePicker cho phép ngƣời dùng sử dụng để lựa chọn ngày, hoặc gõ trực tiếp vào textbox
hoặc sử dụng lịch thả xuống.
DatePicker cung cấp một loạt các sự kiện hỗ trợ việc kiểm soát lịch thả xuống.
o Ví dụ
<!-- A basic Calendar. --> <swc:Calendar x:Name="cal" Canvas.Left="20" Canvas.Top="100" /> <!-- A Calendar does not highlight today's date. --> <swc:Calendar x:Name="cal2" Canvas.Left="270" Canvas.Top="100" IsTodayHighlighted="false" /> <!-- Two DatePicker controls, one using the default Short date format --> <!-- and the other using the Long date format. --> <swc:DatePicker x:Name="dp1" Canvas.Left="20" Canvas.Top="390" /> <swc:DatePicker x:Name="dp2" Canvas.Left="20" Canvas.Top="480" SelectedDateFormat="Long"/> <!-- A Calendar to demonstrate multiple selection. --> <swc:Calendar x:Name="cal3" Canvas.Left="20" Canvas.Top="540" />
1.8 GridSplitter
o Mô tả
GridSplitter cho phép ngƣời dùng phân phối lại không gian giữa các hàng hoặc cột. Nó là yếu
tố đồ hoạ tƣợng trƣng cho một thành phần gắn vào nó mà thành phần đó có thể tƣơng tác

Microsoft Vietnam LLC – DPE team | Chương IV: Control và User Control trong Silverlight 5
o Ví dụ
<Grid ShowGridLines="True" Canvas.Top="60" Canvas.Left="20" Width="400" Height="400"> <Grid.RowDefinitions> <RowDefinition /> <RowDefinition /> <RowDefinition /> <RowDefinition /> </Grid.RowDefinitions> <Grid.ColumnDefinitions> <ColumnDefinition /> <ColumnDefinition /> <ColumnDefinition /> <ColumnDefinition /> </Grid.ColumnDefinitions> <TextBlock Text="One!" Grid.Row="0" Grid.Column="0" /> <TextBlock Text="Two!" Grid.Row="1" Grid.Column="1" /> <TextBlock Text="Three!" Grid.Row="2" Grid.Column="2" /> <TextBlock Text="Four!" Grid.Row="3" Grid.Column="3" /> <swc:GridSplitter Grid.Row="1" Grid.Column="0" Grid.ColumnSpan="4" Height="5" HorizontalAlignment="Stretch" VerticalAlignment="Top" ShowsPreview="True" /> <swc:GridSplitter Grid.Row="2" Grid.Column="1" Grid.RowSpan="2" Width="5" HorizontalAlignment="Left" VerticalAlignment="Stretch" /> </Grid>

Microsoft Vietnam LLC – DPE team | Chương IV: Control và User Control trong Silverlight 6
1.9 HyperlinkButton
o Mô tả
HyperlinkButton hiển thị một siêu liên kết. Khi bấm vào HyperlinkButton sẽ cho phép ngƣời
dùng truy cập vào một trang web, địa chỉ URI đích đƣợc xác định với các NavigateUri.
Bạn có thể chỉ định cửa sổ hoặc một khung trong những điểm đến trang web bằng cách sử
dụng TargetName
o Ví dụ
<TextBlock Text="HyperlinkButton Demonstration" Margin="0,20,10,20" FontFamily="Verdana" FontSize="18" FontWeight="Bold" Foreground="#FF5C9AC9" /> <HyperlinkButton Content="Click here to learn about Silverlight" NavigateUri="http://www.silverlight.net" TargetName="_blank" Margin="10,60,0,0"/>
1.10 Image
o Mô tả
Image hiển thị hình ảnh trong định dạng JPEG hoặc PNG.
Hình ảnh hiển thị ở 1, 4 hoặc 8 bit màu, hình ảnh thực với 24 hoặc 32 bit
o Ví dụ
Mã XAML: <Image Source="myPicture.png" />
Mã C#: Image myImage = new Image(); myImage.Source = new BitmapImage(new Uri("myPicture.jpg", UriKind.RelativeOrAbsolute)); LayoutRoot.Children.Add(myImage);
1.11 InkPresenter
o Mô tả
InkPresenter cung cấp các bản vẽ mặt để hỗ trợ tính năng Tablet PC. InkPresenter đƣợc dẫn
xuất từ canvas nên có thể hiển thị một hoặc nhiều đối tƣợng và UIElement strokes.
o Ví dụ
Mã XAML: <Canvas> <TextBlock Text="InkPresenter Control" FontWeight="Bold" Margin="50,30,0,0" /> <Rectangle Height="500" Width="500" Margin="50,50,0,0" Stroke="Black" /> <InkPresenter x:Name="MyIP" Height="500" Width="500" Margin="50,50,0,0" MouseLeftButtonDown="MyIP_MouseLeftButtonDown"

Microsoft Vietnam LLC – DPE team | Chương IV: Control và User Control trong Silverlight 7
LostMouseCapture="MyIP_LostMouseCapture" MouseMove="MyIP_MouseMove" Background="Transparent" Opacity="1" /> </Canvas>
Mã C# private void MyIP_MouseLeftButtonDown(object sender, MouseEventArgs e) { MyIP.CaptureMouse(); StylusPointCollection MyStylusPointCollection = new StylusPointCollection(); MyStylusPointCollection.Add(e.StylusDevice.GetStylusPoints(MyIP)); NewStroke = new Stroke(MyStylusPointCollection); MyIP.Strokes.Add(NewStroke); } //StylusPoint objects are collected from the MouseEventArgs and added to MyStroke. private void MyIP_MouseMove(object sender, MouseEventArgs e) { if (NewStroke != null) NewStroke.StylusPoints.Add(e.StylusDevice.GetStylusPoints(MyIP)); } //MyStroke is completed private void MyIP_LostMouseCapture(object sender, MouseEventArgs e) { NewStroke = null; }
1.12 ListBox
o Mô tả
ListBox chứa một danh sách các Item, Item có thể là một doạn văn
bản hay một Control.
o Ví dụ
<TextBlock Text="ListBox Demonstration" Margin="0,20,10,20" FontFamily="Verdana" FontSize="18" FontWeight="Bold" Foreground="#FF5C9AC9" /> <TextBlock Text="ListBox with unbound data:" /> <ListBox Width="350" Margin="0,5,0,10"> <TextBlock Text="TextBlock" /> <TextBox Text="TextBox" /> <Button Content="Button" /> <Rectangle Fill="LightBlue" Height="20" Width="150" Margin="2,2,2,2"/> <Ellipse Fill="Coral" Height="20" Width="150" Margin="2,2,2,2"/>

Microsoft Vietnam LLC – DPE team | Chương IV: Control và User Control trong Silverlight 8
</ListBox>
1.13 MediaElement
o Mô tả
Các MediaElement kiểm soát nội dung Audio hoặc Video.
MediaElement cung cấp một vùng chữa nhật có thể hiển thị Video trên đó, hoặc Audio
o Ví dụ
<MediaElement x:Name="media" Source="xbox.wmv" CurrentStateChanged="media_state_changed" Width="300" Height="300"/>
1.14 MultiScaleImage
o Mô tả
MultiScaleImage cho phép ngƣời dùng mở một hình ảnh cho phép
phóng to thu nhỏ thông qua công nghệ Deep Zoom.
o Ví dụ
Mã XAML: <MultiScaleImage x:Name="deepZoomObject" Source="source/items.bin" MouseEnter="DeepZoomObject_MouseEnter" /> Mã C#: private void DeepZoomObject_MouseEnter(object sender, MouseEventArgs e) { if (deepZoomObject.UseSprings = false) { deepZoomObject.UseSprings = true; } this.deepZoomObject.ZoomAboutLogicalPoint(3, .5, .5); }

Microsoft Vietnam LLC – DPE team | Chương IV: Control và User Control trong Silverlight 9
1.15 PasswordBox
o Mô tả
PasswordBox đƣợc sử dụng để nhập vào thông tin mật khẩu ký tự hiển thị chỉ là ký tự đại diện.
o Ví du
Mã XAML: <TextBlock Margin="20,10,0,0" Text="PasswordBox Demonstration" FontWeight="bold"/> <TextBlock Text="Type password here" Margin="20,10,0,0"/> <PasswordBox x:Name="MyPWBox1" Margin="20,10,0,0" PasswordChanged="MyPWBox1_PasswordChanged" MaxLength="8" Height="35" Width="200" HorizontalAlignment="Left" />
Mã C#: public Page() { InitializeComponent(); } private void MyPWBox1_PasswordChanged(object sender, RoutedEventArgs e) { ReadOnlyTB.Text = MyPWBox1.Password; }
1.16 Popup
o Mô tả
Popup luôn luôn xuất hiện lên trên cùng cửa sổ ứng dụng hữu ích cho việc hiện thị thông báo
cho một nhiệm vụ

Microsoft Vietnam LLC – DPE team | Chương IV: Control và User Control trong Silverlight 10
o Ví dụ
Mã XAML: <Button Width="100" Height="50" x:Name="showPopup" Click="showPopup_Click" Content="Show Popup" />
Mã C# // Create the popup object. Popup p = new Popup(); private void showPopup_Click(object sender, RoutedEventArgs e) { Border border = new Border(); border.BorderBrush = new SolidColorBrush(Colors.Black); border.BorderThickness = new Thickness(5.0); }
1.17 ProgressBar
o Mô tả
ProgressBar hiển thị cho biết tiến trình đang hoạt động bằng việc thay đổi giá trị thay đổi.
o Ví dụ
<StackPanel x:Name="LayoutRoot" Background="White"> <Border BorderThickness="5" BorderBrush="Black"> <StackPanel Background="LightGray"> <TextBlock HorizontalAlignment="Center" Margin="10" Text="Value-Based Progress Bar" /> <ProgressBar x:Name="pg1" Value="100" Margin="10" Maximum="200" Height="15" IsIndeterminate="False" /> </StackPanel> </Border> <Border BorderThickness="5" BorderBrush="Black"> <StackPanel Background="LightGray"> <TextBlock HorizontalAlignment="Center" Margin="10" Text="Indeterminate Progress Bar" /> <ProgressBar x:Name="pg2" Margin="10" Height="15" IsIndeterminate="True" /> </StackPanel> </Border> </StackPanel>
1.18 RadioButton
o Mô tả
RadioButton cho phép ngƣời dùng chọn một tùy chọn từ một nhóm các tùy chọn. Các
RadioButton tổ chức trong cùng một nhóm bằng cách đặt các GroupName chung cho mỗi
RadioButton. Các RadioButton là một ContentControl

Microsoft Vietnam LLC – DPE team | Chương IV: Control và User Control trong Silverlight 11
o Ví dụ
Mã XAML: <Grid.RowDefinitions> <RowDefinition Height="Auto"/> <RowDefinition Height="Auto"/> <RowDefinition Height="Auto"/> <RowDefinition Height="Auto"/> <RowDefinition Height="Auto"/> <RowDefinition Height="Auto"/> </Grid.RowDefinitions> <Grid.ColumnDefinitions> <ColumnDefinition Width="Auto" /> <ColumnDefinition Width="Auto" /> </Grid.ColumnDefinitions> <TextBlock Text="RadioButton Demonstration" Margin="0,20,10,20" FontFamily="Verdana" FontSize="18" FontWeight="Bold" Foreground="#FF5C9AC9" Grid.Row="0" Grid.ColumnSpan="2"/> <TextBlock Text="First Group:" Grid.Row="1" /> <RadioButton x:Name="TopButton" Margin="5,0,0,0" Checked="HandleCheck" GroupName="First Group" Content="First Choice" Grid.Row="1" Grid.Column="1"/> <RadioButton x:Name="MiddleButton" Margin="5,0,0,0" Checked="HandleCheck" GroupName="First Group" Content="Second Choice" Grid.Row="3" Grid.Column="1"/> <TextBlock Text="Ungrouped:" Grid.Row="4" /> <RadioButton x:Name="LowerButton" Margin="5,0,0,0" Checked="HandleCheck" Content="Third Choice" Grid.Row="4" Grid.Column="1"/> <TextBlock Grid.Row="5" x:Name="choiceTextBlock" Margin="0,10,0,0" Grid.ColumnSpan="2"/>
Mã C#: private void HandleCheck(object sender, RoutedEventArgs e) { RadioButton rb = sender as RadioButton; choiceTextBlock.Text = "You chose: " + rb.GroupName + ": " + rb.Name; }
1.19 RepeatButton
o Mô tả
RepeatButton là một nút kiểm soát các sự kiện tác động vào nút nhƣ Mouse Click và thời gian
giữa hai lần click liên tiếp
o Ví dụ
Mã XAML: RepeatButton Content="click and hold for multiple Click events" Click="RepeatButton_Click" Width="250" Margin="0,0,0,5" HorizontalAlignment="Left"/><TextBlock x:Name="clickTextBlock" Text="Number of Clicks:" />
Mã C#:

Microsoft Vietnam LLC – DPE team | Chương IV: Control và User Control trong Silverlight 12
static int Clicks = 0; private void RepeatButton_Click(object sender, RoutedEventArgs e) { Clicks += 1; clickTextBlock.Text = "Number of Clicks: " + Clicks; }
1.20 ScrollBar
o Mô tả
ScrollBar cung cấp một thanh trƣợt có khả năng di chuyển định hƣớng theo chiều ngang hoặc chiều dọc
1.21 ScrollViewer
o Mô tả
ScrollViewer kiểm soát một mảng content, cung cấp hai ScrollBar để kiểm soát việc di chuyển
mảng content .
ScrollViewer cho phép bạn thiết lập kích cỡ của khoảng View liên quan đến Content theo
chiều ngang và chiều dọc.
o Ví dụ
<ScrollViewer Height="200" Width="200" HorizontalScrollBarVisibility="Auto" Canvas.Top="60" Canvas.Left="340"> <TextBlock Width="300" TextWrapping="Wrap" Text="I am the very model of a modern Major-General,." /> </ScrollViewer>
1.22 Slider
o Mô tả
Slider cho phép ngƣời dùng lựa chọn từ một loạt các giá trị bằng cách di chuyển dọc theo một
thanh ngang.

Microsoft Vietnam LLC – DPE team | Chương IV: Control và User Control trong Silverlight 13
o Ví dụ
<Slider Margin="0,5,0,20" x:Name="slider1" Minimum="0"
Maximum="10" />
1.23 TabControl
o Mô tả
TabControl cung cấp một giao diện hiển thị cho các thành phần.
Các thành phần con của TabControl là các TabItem.
o Ví dụ
<UserControl xmlns:swc="clr-namespace:System.Windows.Controls;assembly=System.Windows.Controls" x:Class="TabControlExample.Page" xmlns="http://schemas.microsoft.com/winfx/2006/xaml/presentation" xmlns:x="http://schemas.microsoft.com/winfx/2006/xaml" FontFamily="Trebuchet MS" FontSize="11" Width="400" Height="300"> <Canvas x:Name="LayoutRoot" Background="White"> <!-- Create a simple TabControl in XAML. --> <swc:TabControl x:Name="tab1" Canvas.Top="20" Canvas.Left="20" Height="200" Width="300" /> <swc:TabControl x:Name="tab2" Canvas.Top="240" Canvas.Left="20" Height="200" Width="300" /> </Canvas> </UserControl>

Microsoft Vietnam LLC – DPE team | Chương IV: Control và User Control trong Silverlight 14
1.24 TextBlock
o Mô tả
TextBlock hiển thị nội dung văn bản. bạn có thể gán các nội dung của một TextBlock bằng
cách sử dụng nguồn text. Ngoài ra cũng có thể gán TextBlock bằng một tập hợp các đối
tƣợng text.
o Ví dụ
<TextBlock>Hello, world!</TextBlock>
1.25 TextBox
o Mô tả
TextBox đƣợc sử dụng nhập dữ liệu dạng text từ ngƣời dùng hoặc hiển thị văn bản.
TextBox thƣờng đƣợc dùng để chỉnh sửa văn bản đôi khi cũng đƣợc dùng ở chế độ chỉ đọc.
TextBox có thể hiển thị nhiều dòng văn bản.
o Ví dụ
<TextBox x:Name="ReadWriteTB" TextChanged="ReadWriteTB_TextChanged" IsReadOnly="False" HorizontalAlignment="Left" Margin="20,5,0,0" Height="35" Width="200" />
1.26 ToolTip
o Mô tả
Tooltip cung cấp thông tin về một đối tƣợng đồ họa bằng cách sử dụng một cửa sổ pupup.
o Ví dụ
<!-- A TextBlock with an offset ToolTip. --> <TextBlock Text="TextBlock with an offset ToolTip." Canvas.Top="110" Canvas.Left="20" >

Microsoft Vietnam LLC – DPE team | Chương IV: Control và User Control trong Silverlight 15
<ToolTipService.ToolTip > <ToolTip Content="Offset ToolTip." HorizontalOffset="20" VerticalOffset="30"/> </ToolTipService.ToolTip> </TextBlock> </Canvas> </UserControl>
1.27 DataGrid
o Mô tả
DataGrid cung cấp một cách linh hoạt để hiển thị một tập hợp các dữ liệu trong các hàng và
cột.
Data Grid hỗ trợ nhiều style hiển thị dữ liệu trong các cột hoặc hàng.
Data Grid hỗ trợ các bảng tùy chọn định dạng và khả năng hiển thị hoặc ẩn các tiêu đề, các
thanh trƣợt di chuyển .
Ngoài ra Data Grid còn cung cấp một số kiểu mẫu mà bạn có thể thay đổi hình thức thể hiện
dữ liệu hàng, cột và tiêu đề.
o Ví dụ
<UserControl x:Class="DataGridSnippets.Page" xmlns="http://schemas.microsoft.com/winfx/2006/xaml/presentation" xmlns:x="http://schemas.microsoft.com/winfx/2006/xaml" xmlns:data="clr-namespace:System.Windows.Controls;assembly=System.Windows.Controls.Data" Width="500" Height="Auto"> <ScrollViewer VerticalScrollBarVisibility="Auto" BorderThickness="0"> <StackPanel Margin="10,10,10,10"> <TextBlock Text="DataGrid Demonstration" Margin="0,20,10,20" FontFamily="Verdana" FontSize="18" FontWeight="Bold" Foreground="#FF5C9AC9" /> <TextBlock Text="DataGrid with autogenerated columns:"/> <data:DataGrid x:Name="dataGrid1" Height="140" Margin="0,5,0,10" AutoGenerateColumns="True" /> <TextBlock Text="DataGrid with row details sections:"/> <data:DataGrid x:Name="dataGrid3" Height="140" Margin="0,5,0,10" RowDetailsVisibilityMode="VisibleWhenSelected" > <data:DataGrid.RowDetailsTemplate> <DataTemplate> <StackPanel Orientation="Horizontal"> <TextBlock FontSize="12" Text="Address: " /> <TextBlock FontSize="12" Text="{Binding Address}"/> </StackPanel> </DataTemplate> </data:DataGrid.RowDetailsTemplate> </data:DataGrid>

Microsoft Vietnam LLC – DPE team | Chương IV: Control và User Control trong Silverlight 16
<TextBlock Text="DataGrid with configured columns:"/> <data:DataGrid x:Name="dataGrid4" Height="160" Margin="0,5,0,10" RowHeight="40" AutoGenerateColumns="False" > <data:DataGrid.Columns> <data:DataGridTextColumn Header="First Name" Width="SizeToHeader" Binding="{Binding FirstName}" FontSize="20" /> <data:DataGridTextColumn Header="Last Name" Width="SizeToCells" Binding="{Binding LastName}" FontSize="20" /> <data:DataGridTextColumn Header="Address" Width="150" Binding="{Binding Address}" > <data:DataGridTextColumn.ElementStyle> <Style TargetType="TextBlock"> <Setter Property="TextWrapping" Value="Wrap"/> </Style> </data:DataGridTextColumn.ElementStyle> <data:DataGridTextColumn.EditingElementStyle> <Style TargetType="TextBox"> <Setter Property="Foreground" Value="Blue"/> </Style> </data:DataGridTextColumn.EditingElementStyle> </data:DataGridTextColumn> <data:DataGridCheckBoxColumn Header="New?" Width="40" Binding="{Binding IsNew}" /> <data:DataGridCheckBoxColumn Header="Subscribed?" Width="Auto" Binding="{Binding IsSubscribed}" IsThreeState="True" /> </data:DataGrid.Columns> </data:DataGrid> <TextBlock Text="DataGrid with template column and custom alternating row backgrounds:"/> <data:DataGrid x:Name="dataGrid5" Height="125" Margin="0,5,0,10" AutoGenerateColumns="False" RowBackground="Azure" AlternatingRowBackground="LightSteelBlue"> <data:DataGrid.Columns> <!-- Name Column --> <data:DataGridTemplateColumn Header="Name"> <data:DataGridTemplateColumn.CellTemplate> <DataTemplate> <StackPanel Orientation="Horizontal"> <TextBlock Padding="5,0,5,0" Text="{Binding FirstName}"/> <TextBlock Text="{Binding LastName}"/> </StackPanel> </DataTemplate> </data:DataGridTemplateColumn.CellTemplate> <data:DataGridTemplateColumn.CellEditingTemplate> <DataTemplate> <StackPanel Orientation="Horizontal"> <TextBox Padding="5,0,5,0" Text="{Binding FirstName}"/>

Microsoft Vietnam LLC – DPE team | Chương IV: Control và User Control trong Silverlight 17
<TextBox Text="{Binding LastName}"/> </StackPanel> </DataTemplate> </data:DataGridTemplateColumn.CellEditingTemplate> </data:DataGridTemplateColumn> <!-- Address Column --> <data:DataGridTextColumn Header="Address" Width="300" Binding="{Binding Address}" /> </data:DataGrid.Columns> </data:DataGrid> </StackPanel> </ScrollViewer> </UserControl>
Mã C#: using System; using System.Collections.Generic; using System.Windows.Controls; namespace DataGridSnippets { public partial class Page : UserControl { public Page() { InitializeComponent(); // Thiết lập ItemsSource để tự tạo các cột. dataGrid1.ItemsSource = Customer.GetSampleCustomerList(); dataGrid3.ItemsSource = Customer.GetSampleCustomerList(); dataGrid4.ItemsSource = Customer.GetSampleCustomerList(); dataGrid5.ItemsSource = Customer.GetSampleCustomerList(); } } public class Customer { public String FirstName { get; set; } public String LastName { get; set; } public String Address { get; set; } public Boolean IsNew { get; set; } public Boolean? IsSubscribed { get; set; } public Customer(String firstName, String lastName, String address, Boolean isNew, Boolean? isSubscribed) { this.FirstName = firstName; this.LastName = lastName; this.Address = address; this.IsNew = isNew; this.IsSubscribed = isSubscribed; } public static List<Customer> GetSampleCustomerList() { return new List<Customer>(new Customer[4] { new Customer("A.", "Zero", "12 North Third Street, Apartment 45", false, true), new Customer("B.", "One", "34 West Fifth Street, Apartment 67", false, false), new Customer("C.", "Two", "56 East Seventh Street, Apartment 89", true, null),

Microsoft Vietnam LLC – DPE team | Chương IV: Control và User Control trong Silverlight 18
new Customer("D.", "Three", "78 South Ninth Street, Apartment 10", true, true) }); } } }
3 User Control trong Visual Studio 2008
Trong ví dụ đƣợc trình bày dƣới đây chúng ta tìm hiểu cách tạo một User Control và sử dụng nó nhƣ thế nào trong Visual Studio 2008
1. Trong Project Silverlight đã có chúng ta làm thao tác tạo New Item theo hình vẽ dƣới đây

Microsoft Vietnam LLC – DPE team | Chương IV: Control và User Control trong Silverlight 19
2. Chọn Silverlight User Control trong Templates và đặt tên control này là FormContactUserControl.xaml
3. Chúng ta sẽ có 2 file sau đƣợc tạo ra - FormContactUserControl.xaml
- FormContactUserControl.xaml.cs
Trong FormContactUserControl.xaml chúng ta sẽ có đoạn mã sau
<UserControl x:Class="Chapter2.FromContactUserControl" xmlns="http://schemas.microsoft.com/client/2007" xmlns:x="http://schemas.microsoft.com/winfx/2006/xaml" > </UserControl>
4. Bây giờ chúng ta sẽ thêm đoạn mã dƣới đây vào bên trong thẻ <Usercontrol>
<Canvas Grid.Column="0" Grid.Row="1" Background="WhiteSmoke"> <TextBlock Text="Họ và tên: " Margin="5,22,0,0" /> <TextBox x:Name="txtName" Margin="65,15,0,0" Width="180" Height="20"/> <TextBlock Text="Địa chỉ: " Margin="5,47,0,0"/> <TextBox x:Name="txtAddress" Margin="65,40,0,0" Width="180" Height="20"/> <TextBlock Text="ĐT: " Margin="5,72,0,0"/> <TextBox x:Name="txtPhone" Margin="65,65,0,0" Width="180" Height="20"/> <TextBlock Text="Mobile: " Margin="5,97,0,0"/> <TextBox x:Name="txtMobile" Margin="65,90,0,0" Width="180" Height="20"/> <TextBlock Text="Email: " Margin="5,122,0,0"/> <TextBox x:Name="txtEmail" Margin="65,115,0,0" Width="180" Height="20"/> <Button x:Name="btnSubmit" Content="Lƣu lại" Margin="140,150,0,0" Width="55" <Button x:Name="btnReset" Content="Xóa" Margin="200,150,0,0" Width="45"/> </Canvas>
5. Thêm sự kiện vào nut bấm “btnSubmit’.

Microsoft Vietnam LLC – DPE team | Chương IV: Control và User Control trong Silverlight 20
Chúng ta sẽ xử lý sự kiện btnSubmit_Click vào trong mã c# nhƣ sau
private void btnSubmit_Click(object sender, RoutedEventArgs e) { // Phe duyet du lieu dau vao if (txtName.Text == "") { MessageBox.Show("Họ và tên không đƣợc bỏ trống"); txtName.Focus(); } else { //Tiep tuc xu ly luu contact //... } }
6. Làm thao tác Build Sulution, chúng ta đã tạo xong control FormContactUserControl. Bây giờ chúng ta mở file Page.xaml để sử dụng lại control đó. Chúng ta thêm mới đoạn mã sau: xmlns:inf="clr-namespace:Chapter2" vào bên trong thẻ <UserControl>
7. Để hiển thị đƣợc User control: FormContactUserControl trong Page.xaml ta tiếp tục thêm đoạn mã sau <inf:FromContactUserControl x:Name="From1"></inf:FromContactUserControl>
Microsoft Vietnam LLC – DPE team | Chương IV: Control và User Control trong Silverlight 21
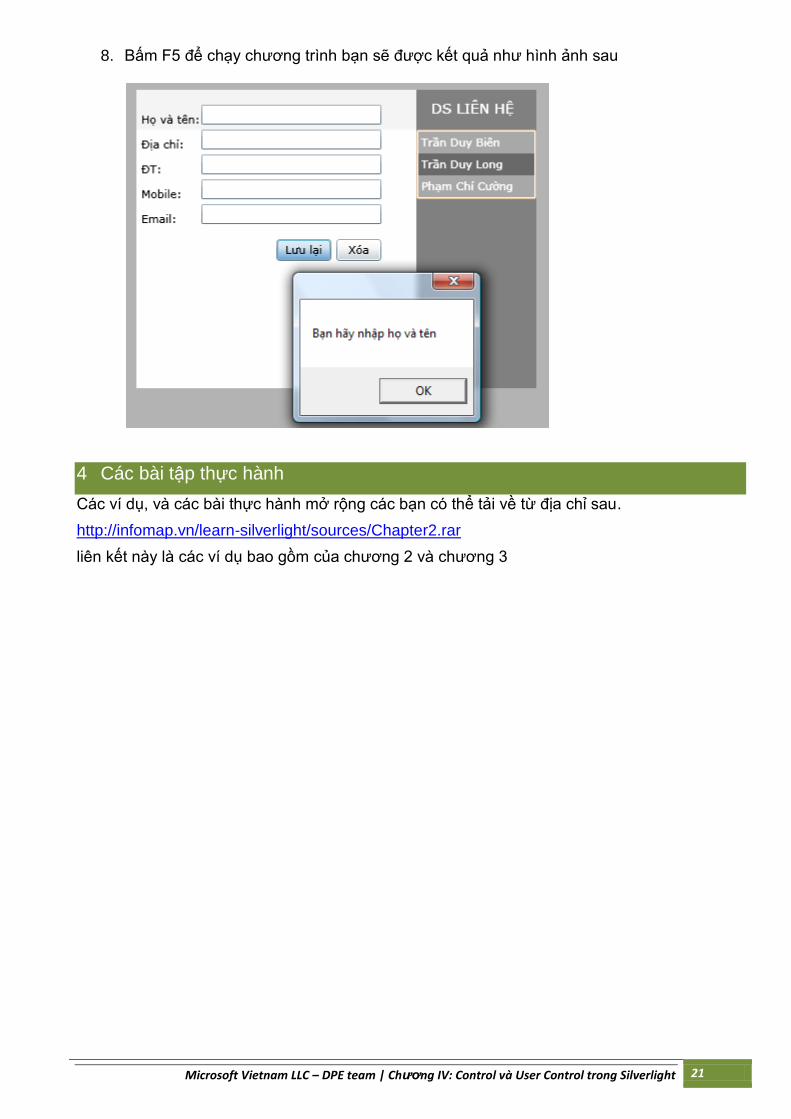
8. Bấm F5 để chạy chƣơng trình bạn sẽ đƣợc kết quả nhƣ hình ảnh sau
4 Các bài tập thực hành
Các ví dụ, và các bài thực hành mở rộng các bạn có thể tải về từ địa chỉ sau.
http://infomap.vn/learn-silverlight/sources/Chapter2.rar
liên kết này là các ví dụ bao gồm của chƣơng 2 và chƣơng 3