chapter 6: data entry and advanced editingdata entry and advanced editing/basic editing 6:2 icms...
TRANSCRIPT
CHAPTER 6: DATA ENTRY AND ADVANCED EDITING
Page
I. BASIC EDITING
A. Overview ...................................................................................................................................... 6:1
What editing functions are available in ICMS?............................................................................. 6:1 When should I use these functions?............................................................................................. 6:1 Do I need special rights to use the editing functions? .................................................................. 6:1 Are the editing functions available for all my records? ................................................................. 6:1
B. Add New Record ......................................................................................................................... 6:1
When do I use the Add New Record function? ............................................................................ 6:1 How does this function work?....................................................................................................... 6:1 How do I save the records I add?................................................................................................. 6:2 What is the difference between ‘Save’ and ‘Save and Close’? .................................................... 6:2 How can I add a number of records in a continuous fashion? ..................................................... 6:2
C. Copy This Record ....................................................................................................................... 6:2
When do I use the Copy This Record function?........................................................................... 6:2 How does this function work?....................................................................................................... 6:2 How do I save the records I copy? ............................................................................................... 6:3
D. Modify This Record .................................................................................................................... 6:3
When do I use the Modify This Record function?......................................................................... 6:3 How does this function work?....................................................................................................... 6:3 How do I save the records I modify? ............................................................................................ 6:3
E. Delete Record(s) ......................................................................................................................... 6:4
When do I use the Delete Record(s) function? ............................................................................ 6:4 How does this function work?....................................................................................................... 6:4
II. SPELL CHECK
A. Overview ...................................................................................................................................... 6:5
Is there a spell check option in ICMS? ......................................................................................... 6:5 How do I access Spell Check? ..................................................................................................... 6:5 Can I spell check more than one field at a time? ......................................................................... 6:5 Can I spell check more than one record at a time?...................................................................... 6:6
B. Using Spell Check ...................................................................................................................... 6:6
How do I use the spell checker when I’m adding or modifying a record? .................................... 6:6 How do I use the spell checker on a record or group of records that have already been saved?6:8 What other options can I set in Spell Check?............................................................................... 6:9
III. MODIFY ALL
A. Overview .................................................................................................................................... 6:11
When do I use the Modify All function? ...................................................................................... 6:11 Do I need special security rights to use Modify All? ................................................................... 6:11 Can I use Modify All on supplemental records? ......................................................................... 6:11 How do I access the Modify All function? ................................................................................... 6:11
B. Using Modify All Records ........................................................................................................ 6:11
How do I use the Modify All Records option?............................................................................. 6:11 How can I blank out a field using Modify All? ............................................................................. 6:14 Can I append data to a field without overwriting the existing data? ........................................... 6:14 Can I make changes to the catalog number or accession number with Modify All? .................. 6:15
IV. GLOBAL SEARCH AND REPLACE
A. Overview .................................................................................................................................... 6:16
What is Global Search and Replace?......................................................................................... 6:16 When would I use Global Search and Replace?........................................................................ 6:16 Do I need special security rights to use Global Search and Replace? ...................................... 6:16
B. Using Global Search and Replace .......................................................................................... 6:16
How do I access the Global Search and Replace function? ...................................................... 6:16 How do I use Global Search and Replace?................................................................................ 6:17
V. QUICK ENTRY
A. Overview .................................................................................................................................... 6:20
What is the Quick Entry Function? ............................................................................................. 6:20 Are there limits to the number and type of fields I can use in Quick Entry?............................... 6:20 When will I use this function? ..................................................................................................... 6:20 Can I use Quick Entry for Supplemental Information? ............................................................... 6:20 Are authority tables available when modifying records through Quick Entry? ........................... 6:20 How do I access the Quick Entry function?................................................................................ 6:20
B. Creating a Quick Entry Format................................................................................................ 6:21
How do I create a Quick Entry format?....................................................................................... 6:21 How do I edit or delete a Quick Entry format?............................................................................ 6:23
C. Using Quick Entry..................................................................................................................... 6:24
What can I do with Quick Entry? ................................................................................................ 6:24 How do I view a group of records using Quick Entry?................................................................ 6:24 How do I modify a group of records using Quick Entry? ............................................................ 6:25 How do I copy data from one field to another in Quick Entry? ................................................... 6:27 How do I print the Quick Entry list? ............................................................................................ 6:27
VI. PRE-ALLOCATE RECORDS (NPS only)
A. Overview .................................................................................................................................... 6:29
What is the Pre-allocate Records function? ............................................................................... 6:29 Why would I need to pre-allocate records? ................................................................................ 6:29 When would I use the Pre-allocate Records function?............................................................... 6:29 How would I pre-allocate records to a staff or contract cataloger? ............................................ 6:29 How would I pre-allocate records to a subject area specialist? ................................................. 6:29 How would I pre-allocate records to enter several records in a row? ........................................ 6:30 How would I pre-allocate records to enter records in a columnar format?................................. 6:30
B. Pre-allocating Records............................................................................................................. 6:30
Where is the Pre-allocate Records function located? ................................................................ 6:30 How do I pre-allocate records?................................................................................................... 6:30
VII. DEFAULTS AND CARRY OVER FIELDS
A. Overview .................................................................................................................................... 6:33
What are Defaults? ..................................................................................................................... 6:33 What are Carry Over fields? ....................................................................................................... 6:33 How does this function work?..................................................................................................... 6:33 Where can I create Defaults and Carry Over Fields accounts? ................................................. 6:33 How do I access the Defaults and Carryover Fields function?................................................... 6:33
B. Setting Defaults and Carry Over Fields.................................................................................. 6:34
How do I create new defaults and carry over fields?.................................................................. 6:34 Can I set defaults on all fields?................................................................................................... 6:36 Can I overwrite defaults and carry over fields? .......................................................................... 6:36 How do I activate an existing defaults account? ........................................................................ 6:36 How do I modify or view an existing defaults account?.............................................................. 6:37 How do I deactivate a defaults account that is currently in use? ............................................... 6:38 How do I delete a defaults account? .......................................................................................... 6:38
VIII. MACROS
A. Overview .................................................................................................................................... 6:39
What is a Macro?........................................................................................................................ 6:39 When do I use Macros?.............................................................................................................. 6:39 Can I create more than one Macro?........................................................................................... 6:39
B. Creating Macros........................................................................................................................ 6:39
How do I create a Macro set?..................................................................................................... 6:39 How do I add to an already existing Macro Set?........................................................................ 6:41 How do I delete a Macro within a Macro Set? ............................................................................ 6:41 How do I delete a Macro Set? .................................................................................................... 6:41
C. Using Macros ............................................................................................................................ 6:42
How do I use a macro during data entry?................................................................................... 6:42 How do I stop using a Macro Set?.............................................................................................. 6:43 How do I select a different Macro Set to use?............................................................................ 6:43

ICMS User Manual (2009) 6:1 Data Entry and Advanced Editing/Basic Editing
I. BASIC EDITING A. Overview
1. What editing functions are available in ICMS?
There are a number of editing functions available in ICMS. These functions
allow you to add, modify, copy and delete data and records. The basic
editing functions are:
• Add New Record
• Copy This Record
• Modify This Record
• Delete Record(s)
For more advanced editing functions, see the other sections in this chapter.
2. When should I use these functions?
Use:
• Add New Record to create new records.
• Copy This Record to save keystrokes when creating records by copying
an existing record and changing only certain fields.
• Modify This Record to edit data in the selected existing record.
• Delete Record(s) to remove records.
3. Do I need special rights to use the editing functions?
For the basic editing functions listed above, you only need Data Entry
security rights with the exception of Delete Multiple Records. For advanced
editing functions described in later sections of this chapter you also need
Administrator security rights or specific access to the advanced function.
Refer to Section VI of Chapter 9 for information on user security.
4. Are the editing functions available for all my records?
Yes. The editing functions are available for all your ICMS records,
including associated module records.
B. Add New Record
1. When do I use the Add New Record function?
Use the Add New Record function when you want to create a single record.
This option places you in Add Mode.
2. How does this function work?
To add a new record:
• click on the add icon on the button bar, or
• go to Edit on the menu bar and choose Add New Record from the pull-
down menu, or
• press the F9 key
A new window opens. “Add Mode” is indicated in the lower right of the status
bar. You can then add and save a record.
Data Entry and Advanced Editing/Basic Editing 6:2 ICMS User Manual (2009)
In the Collections module, the last acronym that was used for the catalog and
accession number will appear on the record. The program returns you to the
View mode when you save the record.
Note: Remember to set any defaults you want before adding records. Refer
to Section VII of this chapter for information on defaults and carryover.
3. How do I save the records I add?
To save a record:
• click Save and Close on the lower right corner of the screen, or
• click the Save and Close icon on the button bar, or
• go to File on the menu bar and select Save and Close.
• or press F2
To cancel the record without saving the data:
• click on Cancel on the lower right corner of the screen
• click on the Cancel icon on the button bar, or
• go to File on the menu bar and select Cancel
You must enter all mandatory data in order to save the records you add. The
program will prompt you for any mandatory data that you have not included
in the record. You then have the choice of returning to the record to add the
data, saving it as a draft record, or aborting the record. Refer to Chapter 2,
Cataloging, for information on saving a catalog record as a draft record. The
on-line field help and this manual identify the mandatory fields for catalog
records and associated modules.
4. What is the difference
between “Save” and “Save and Close”?
Both “Save” and “Save and Close” will save your work and return you to View
Mode on the record. However, “Save” will leave the record window open
whereas “Save and Close” will close the record window.
5. How can I add a number of records in a continuous fashion?
To save time when adding a number of records, use the Save and Add Another
link when saving a record. This option will save the current record and close it,
then immediately open a new blank record window in Add mode for you to
continue entering the next record.
C. Copy This Record
1. When do I use the Copy This Record function?
Use the Copy This Record function to make an exact copy of the record
currently displayed on the screen. You can then edit and save the record as a
new record. This option places you in Copy Mode.
2. How does this function work?
To copy the record currently displayed:
• click on the copy icon on the button bar, or
ICMS User Manual (2009) 6:3 Data Entry and Advanced Editing/Basic Editing
• go to Edit on the menu bar and choose Copy This Record from the pull-
down menu.
A new window opens. “Copy Mode” is indicated in the lower right of the status
bar.
3. How do I save the records I copy?
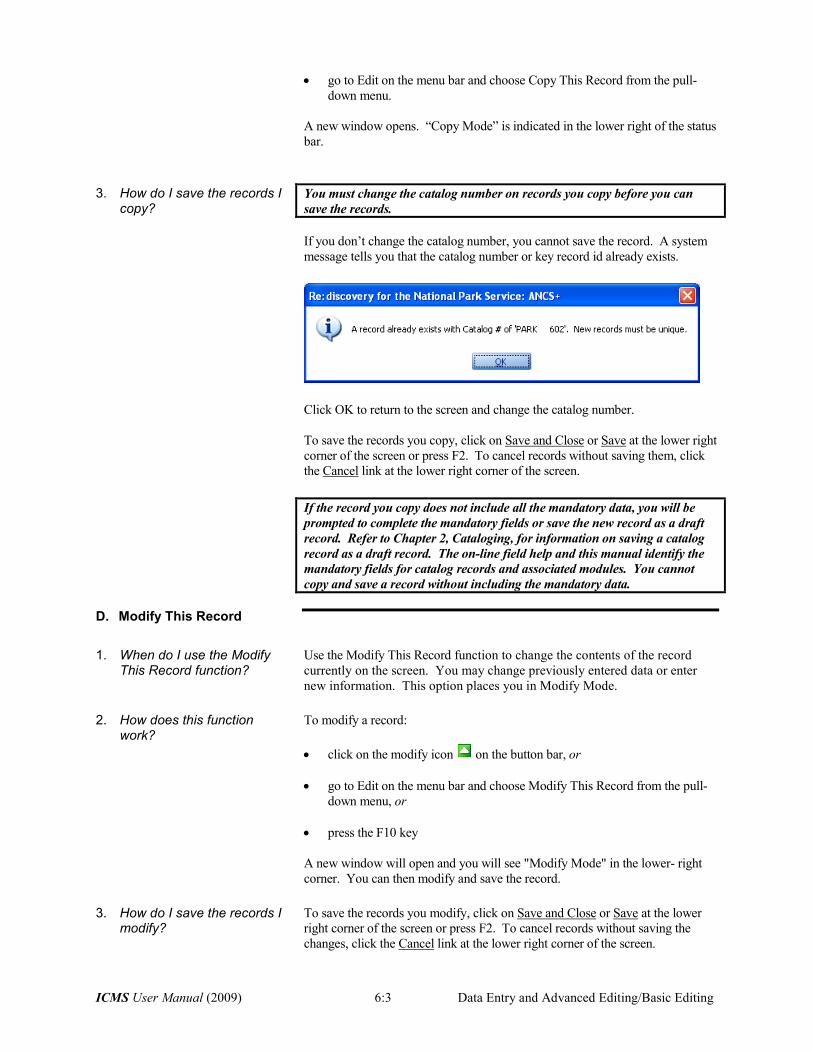
You must change the catalog number on records you copy before you can
save the records.
If you don’t change the catalog number, you cannot save the record. A system
message tells you that the catalog number or key record id already exists.
Click OK to return to the screen and change the catalog number.
To save the records you copy, click on Save and Close or Save at the lower right
corner of the screen or press F2. To cancel records without saving them, click
the Cancel link at the lower right corner of the screen.
If the record you copy does not include all the mandatory data, you will be
prompted to complete the mandatory fields or save the new record as a draft
record. Refer to Chapter 2, Cataloging, for information on saving a catalog
record as a draft record. The on-line field help and this manual identify the
mandatory fields for catalog records and associated modules. You cannot
copy and save a record without including the mandatory data.
D. Modify This Record
1. When do I use the Modify This Record function?
Use the Modify This Record function to change the contents of the record
currently on the screen. You may change previously entered data or enter
new information. This option places you in Modify Mode.
2. How does this function work?
To modify a record:
• click on the modify icon on the button bar, or
• go to Edit on the menu bar and choose Modify This Record from the pull-
down menu, or
• press the F10 key
A new window will open and you will see "Modify Mode" in the lower- right
corner. You can then modify and save the record.
3. How do I save the records I modify?
To save the records you modify, click on Save and Close or Save at the lower
right corner of the screen or press F2. To cancel records without saving the
changes, click the Cancel link at the lower right corner of the screen.

Data Entry and Advanced Editing/Basic Editing 6:4 ICMS User Manual (2009)
If the record you modify does not include all the mandatory data, you will be
prompted to complete the mandatory fields or save the new record as a draft
record. Refer to Chapter 2, Cataloging, for information on saving a catalog
record as a draft record. The on-line field help and this manual identify the
mandatory fields for catalog records and associated modules. You cannot
modify and save a record without including the mandatory data.
E. Delete Record(s)
WARNING! WARNING! Deleted records are PERMANENTLY deleted and not
retrievable.
1. When do I use the Delete
Record(s) function?
Use this option to delete one or more selected records from the database.
You can delete the record that is currently on the screen by choosing "Delete
This Record." You can delete a group of records by choosing "Delete
Multiple Records." Use caution when using this option.
You must have Administrator security rights to delete groups of records.
2. How does this function
work?
To delete a single record:
• In Menu Mode, go to the record you wish to delete.
• Go to Edit on the menu bar and choose Delete Record(s)
• Choose Delete This Record.
• The program will ask if you are sure you want to delete the record. Click
Yes to permanently delete the record. Click No to abort the deletion
process and keep the record.
To delete a group of records, you must first activate a filter, tag set or select
multiple records in the List Pane.
Refer to Chapter 7, Finding and Grouping Records, for information on creating
a subset of your data.
Be extremely careful when using this option. There is only one warning
before the system deletes the records. You should have a reliable backup of
your data before using this function. See Section II of Chapter 9, for
information on backing up your data.
To delete a group of records:
• Activate a tag set, filter or select multiple records in the List Pane of the
records you want to delete.
• Go to Edit on the menu bar and choose Delete Record(s)
• Choose Delete Multiple Records.
• The program will ask if you are sure you want to delete the records. Click
Yes to permanently delete the records. Click No to abort the deletion
process and keep the records.
ICMS User Manual (2009) 6:5 Data Entry and Advanced Editing/Spell Check
II. SPELL CHECK A. Overview
1. Is there a spell check option in ICMS?
Yes. ICMS includes a Spell Check feature that includes English, French,
German, Italian and Spanish words. Spell Check identifies misspelled
words, and suggests replacements. You can edit the word on the screen, look
up an appropriate substitute, add words to the dictionary, or ignore the spell
check suggestions. Spell Check is available in all modules except for
supplemental records.
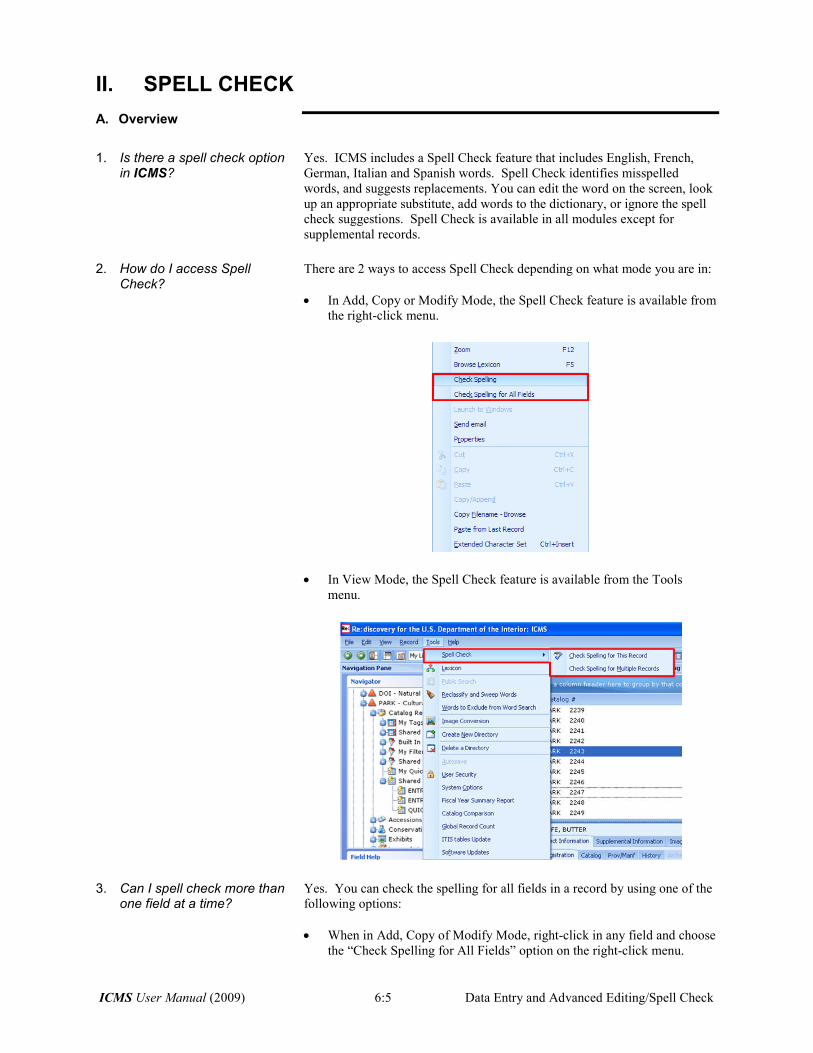
2. How do I access Spell Check?
There are 2 ways to access Spell Check depending on what mode you are in:
• In Add, Copy or Modify Mode, the Spell Check feature is available from
the right-click menu.
• In View Mode, the Spell Check feature is available from the Tools
menu.
3. Can I spell check more than one field at a time?
Yes. You can check the spelling for all fields in a record by using one of the
following options:
• When in Add, Copy of Modify Mode, right-click in any field and choose
the “Check Spelling for All Fields” option on the right-click menu.
Data Entry and Advanced Editing/Spell Check 6:6 ICMS User Manual (2009)
• If you are in View Mode, both spell check options on the Tools menu
will give you the option to check selected fields or all fields in the
current record or group of records if a subset of your data is set.
4. Can I spell check more than one record at a time?
Yes. You can check the spelling on a group of records by activating a filter,
tag set or selecting multiple records in the List Pane.
Once a subset is selected, choose Spell Check on the Tools menu and select
“Check Spelling for Multiple Records”.
B. Using Spell Check
1. How do I use the spell checker when I’m adding or modifying a record?
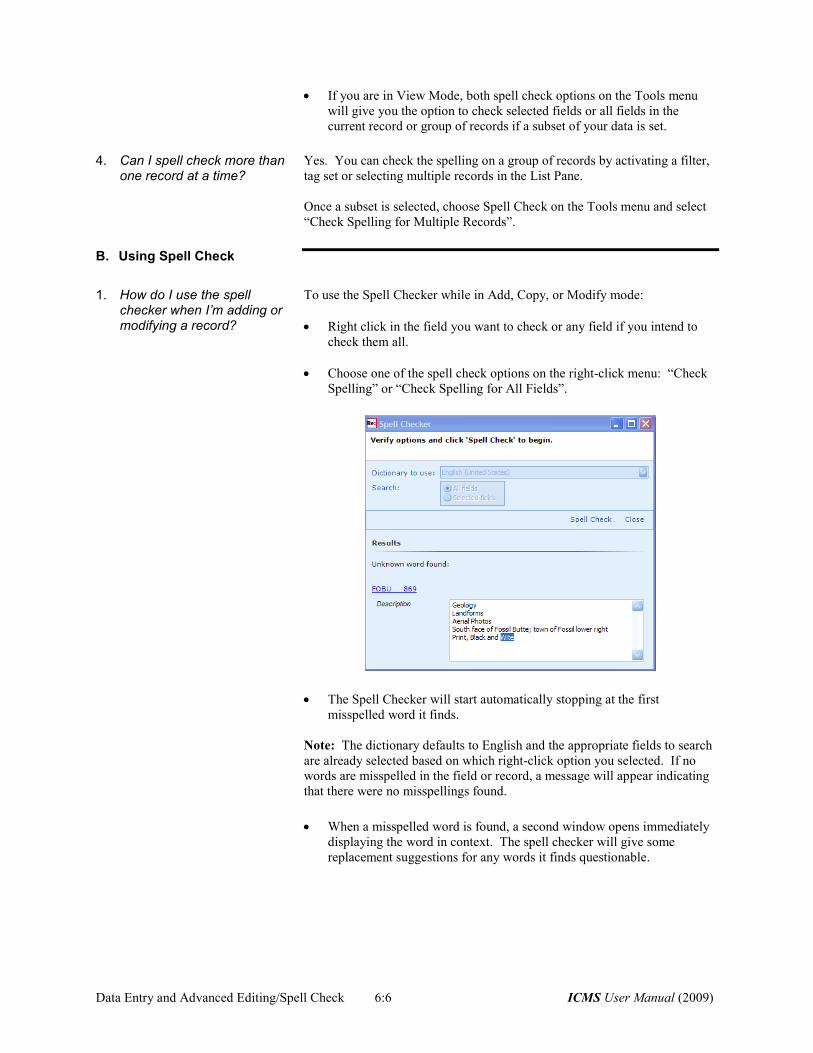
To use the Spell Checker while in Add, Copy, or Modify mode:
• Right click in the field you want to check or any field if you intend to
check them all.
• Choose one of the spell check options on the right-click menu: “Check
Spelling” or “Check Spelling for All Fields”.
• The Spell Checker will start automatically stopping at the first
misspelled word it finds.
Note: The dictionary defaults to English and the appropriate fields to search
are already selected based on which right-click option you selected. If no
words are misspelled in the field or record, a message will appear indicating
that there were no misspellings found.
• When a misspelled word is found, a second window opens immediately
displaying the word in context. The spell checker will give some
replacement suggestions for any words it finds questionable.
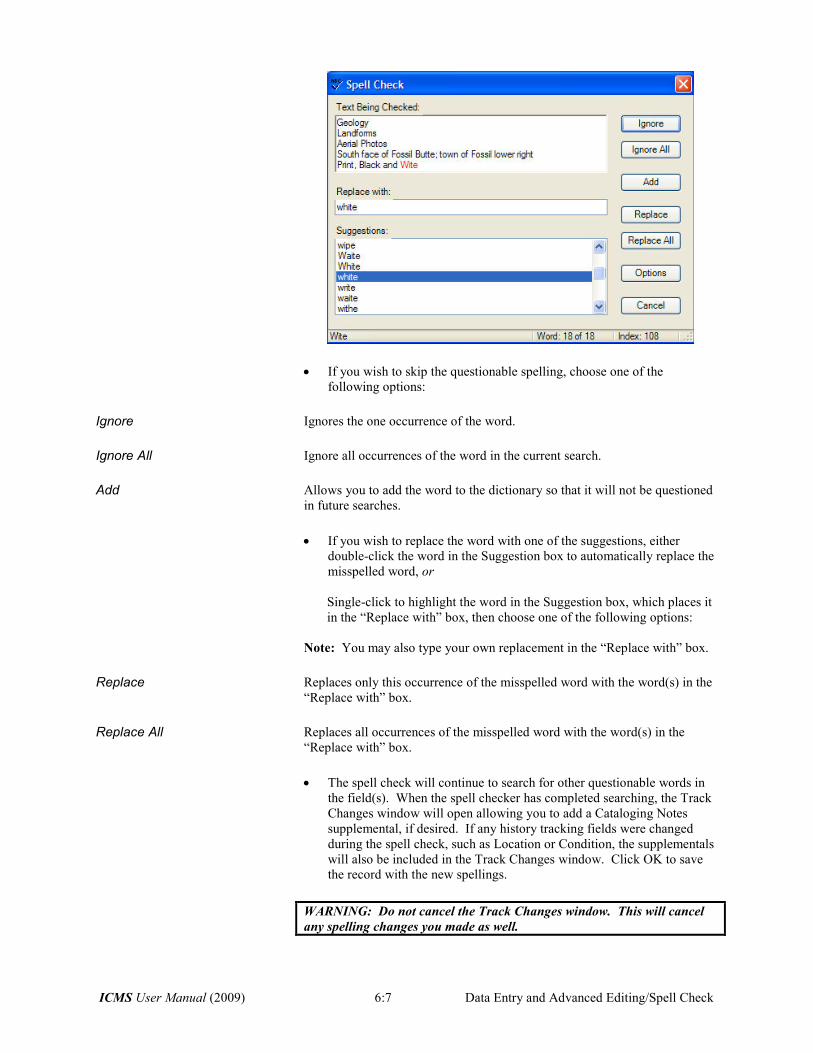
ICMS User Manual (2009) 6:7 Data Entry and Advanced Editing/Spell Check
• If you wish to skip the questionable spelling, choose one of the
following options:
Ignore Ignores the one occurrence of the word.
Ignore All Ignore all occurrences of the word in the current search.
Add Allows you to add the word to the dictionary so that it will not be questioned
in future searches.
• If you wish to replace the word with one of the suggestions, either
double-click the word in the Suggestion box to automatically replace the
misspelled word, or
Single-click to highlight the word in the Suggestion box, which places it
in the “Replace with” box, then choose one of the following options:
Note: You may also type your own replacement in the “Replace with” box.
Replace Replaces only this occurrence of the misspelled word with the word(s) in the
“Replace with” box.
Replace All Replaces all occurrences of the misspelled word with the word(s) in the
“Replace with” box.
• The spell check will continue to search for other questionable words in
the field(s). When the spell checker has completed searching, the Track
Changes window will open allowing you to add a Cataloging Notes
supplemental, if desired. If any history tracking fields were changed
during the spell check, such as Location or Condition, the supplementals
will also be included in the Track Changes window. Click OK to save
the record with the new spellings.
WARNING: Do not cancel the Track Changes window. This will cancel
any spelling changes you made as well.
Data Entry and Advanced Editing/Spell Check 6:8 ICMS User Manual (2009)
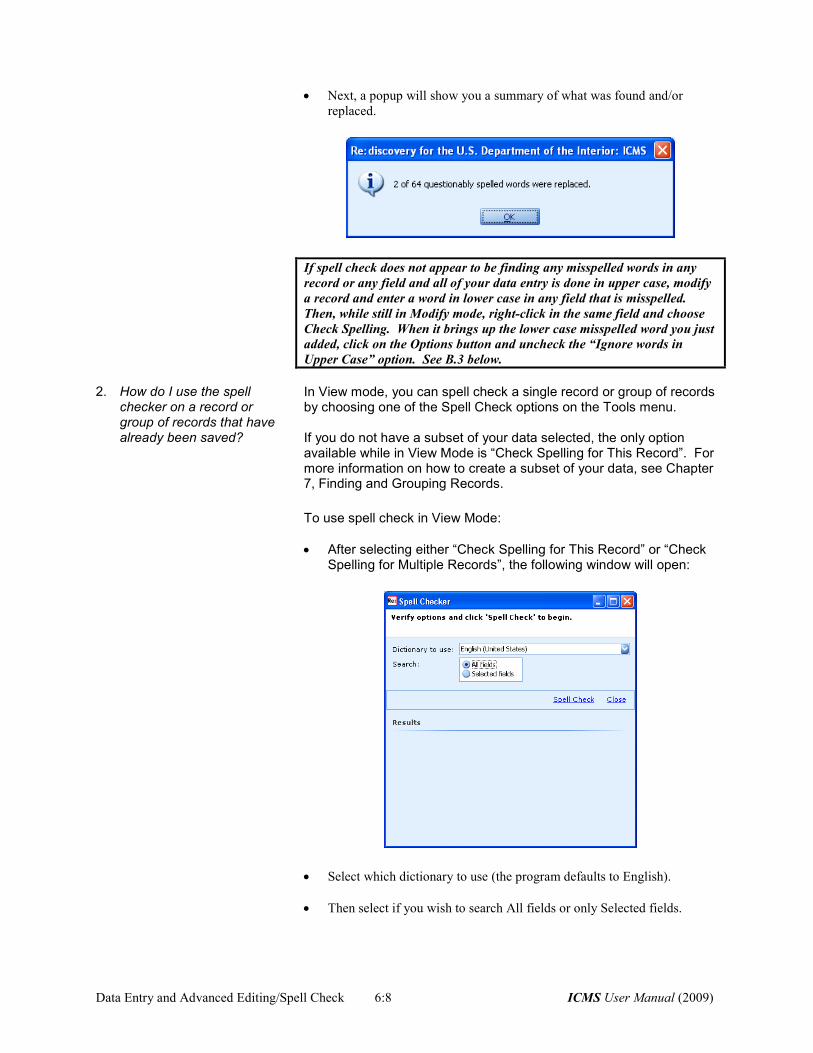
• Next, a popup will show you a summary of what was found and/or
replaced.
If spell check does not appear to be finding any misspelled words in any
record or any field and all of your data entry is done in upper case, modify
a record and enter a word in lower case in any field that is misspelled.
Then, while still in Modify mode, right-click in the same field and choose
Check Spelling. When it brings up the lower case misspelled word you just
added, click on the Options button and uncheck the “Ignore words in
Upper Case” option. See B.3 below.
2. How do I use the spell
checker on a record or group of records that have already been saved?
In View mode, you can spell check a single record or group of records by choosing one of the Spell Check options on the Tools menu. If you do not have a subset of your data selected, the only option available while in View Mode is “Check Spelling for This Record”. For more information on how to create a subset of your data, see Chapter 7, Finding and Grouping Records.
To use spell check in View Mode:
• After selecting either “Check Spelling for This Record” or “Check Spelling for Multiple Records”, the following window will open:
• Select which dictionary to use (the program defaults to English).
• Then select if you wish to search All fields or only Selected fields.
ICMS User Manual (2009) 6:9 Data Entry and Advanced Editing/Spell Check
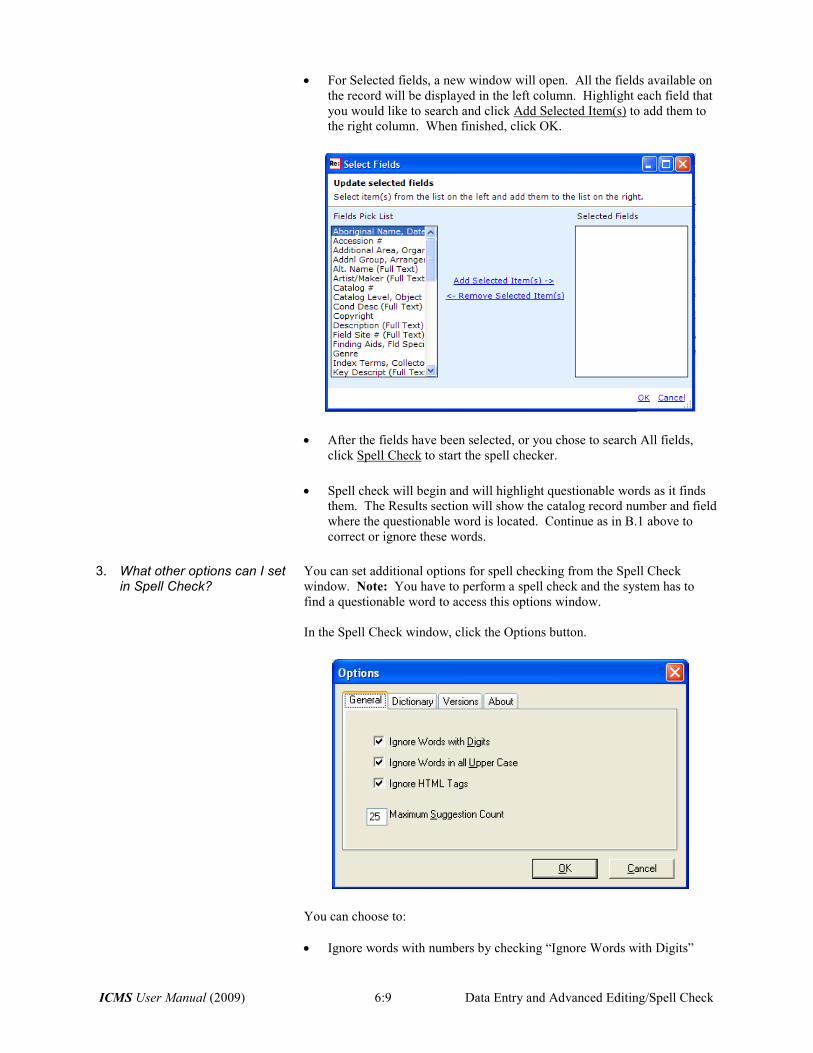
• For Selected fields, a new window will open. All the fields available on
the record will be displayed in the left column. Highlight each field that
you would like to search and click Add Selected Item(s) to add them to
the right column. When finished, click OK.
• After the fields have been selected, or you chose to search All fields,
click Spell Check to start the spell checker.
• Spell check will begin and will highlight questionable words as it finds
them. The Results section will show the catalog record number and field
where the questionable word is located. Continue as in B.1 above to
correct or ignore these words.
3. What other options can I set in Spell Check?
You can set additional options for spell checking from the Spell Check
window. Note: You have to perform a spell check and the system has to
find a questionable word to access this options window.
In the Spell Check window, click the Options button.
You can choose to:
• Ignore words with numbers by checking “Ignore Words with Digits”
Data Entry and Advanced Editing/Spell Check 6:10 ICMS User Manual (2009)
• Ignore Words in all Upper Case. You should uncheck this option if all
of your data entry has been done in upper case. Otherwise, no
misspelled words will be found.
• Ignore HTML Tags
• Set the maximum number of words that appear in the suggestion box.
These settings with the exception of the Maximum Suggestion Count will be
remembered for your user settings whenever you use the Spell Checker.
ICMS User Manual (2009) 6:11 Data Entry and Advanced Editing/Modify All
III. MODIFY ALL A. Overview
1. When do I use the Modify All function?
Use Modify All to make mass changes to a group of existing records. It
allows you to change the same information in more than one record at a time.
It is available in all directories, catalog records and associated modules.
Modify All is not available unless you have limited your visible data by
activating a Filter, Tag Set, or selecting multiple records in the List Pane
using shift-click or control-click. See Chapter 7, Finding and Grouping
Records for information on activating Filters, Tag Sets and List Pane options.
2. Do I need special security rights to use Modify All?
Yes. You must have Administrator rights or specific Modify All rights for a
directory in your security profile. See Chapter 9, Security for more
information about user security rights.
3. Can I use Modify All on supplemental records?
No. Supplemental records are not available for the Modify All function.
However, if you use Modify All on a history tracking field such as Location,
Object Status, or Condition, the Track Changes window will be activated
allowing you to enter supplemental information for Location and Condition
Reports as well as Cataloging Notes.
If you need to update a specific supplemental, use the Mass Supplemental
Update function. See Section I of Chapter 3, Supplemental Records for
information on the Mass Supplemental Update function.
4. How do I access the Modify All function?
Go to Edit on the menu bar and choose Modify All Records.
Note: If you do not have the proper security rights or you have not limited
your visible data using a Filter, Tag Set, etc., the option will be inactive.
B. Using Modify All Records
WARNING: Modify All is a powerful tool! It will replace all the data in
a field with the data you enter. If you want to change only some data in a
field, or only one subfield in a formatted memo field, see the Global
Search and Replace section in this chapter. It is highly recommended
that you make a backup of your directory before proceeding with Modify
All (see Chapter 9, Backup Data).
1. How do I use the Modify All
Records option?
With your visible data limited by one of the methods mentioned above,
choose Modify All Records on the Edit menu and the Modify All wizard
window will open.
Data Entry and Advanced Editing/Modify All 6:12 ICMS User Manual (2009)
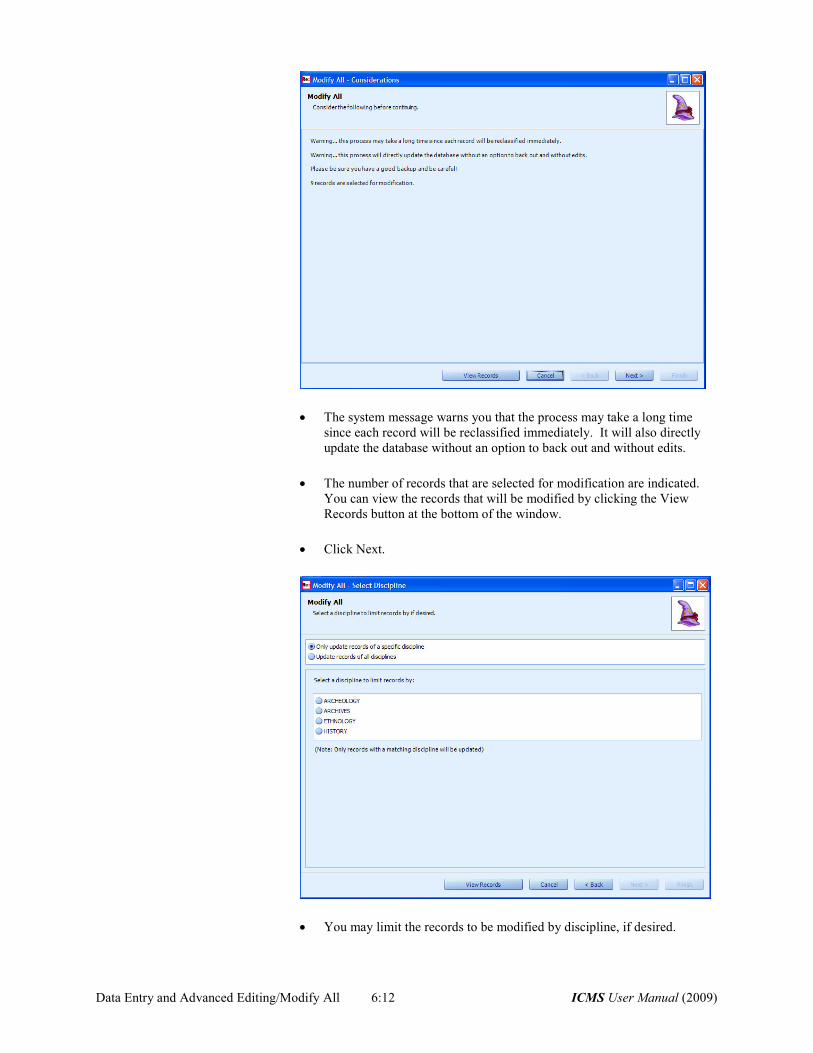
• The system message warns you that the process may take a long time
since each record will be reclassified immediately. It will also directly
update the database without an option to back out and without edits.
• The number of records that are selected for modification are indicated.
You can view the records that will be modified by clicking the View
Records button at the bottom of the window.
• Click Next.
• You may limit the records to be modified by discipline, if desired.
ICMS User Manual (2009) 6:13 Data Entry and Advanced Editing/Modify All
Only update records of a specific discipline: If your data entry screen
has discipline specific fields, you may wish to limit Modify All to a
specific discipline. Select which discipline type from the list. Only the
records in your visible data with a matching Class 1 discipline will be
affected, and the fields on the discipline-specific screen for the selected
discipline will be available for modification.
Update records of all disciplines: Choose this option if you wish to
modify all records in your visible data, regardless of their discipline.
All records in the visible data will be affected, but the fields on the
discipline-specific screens will not be available for you to change.
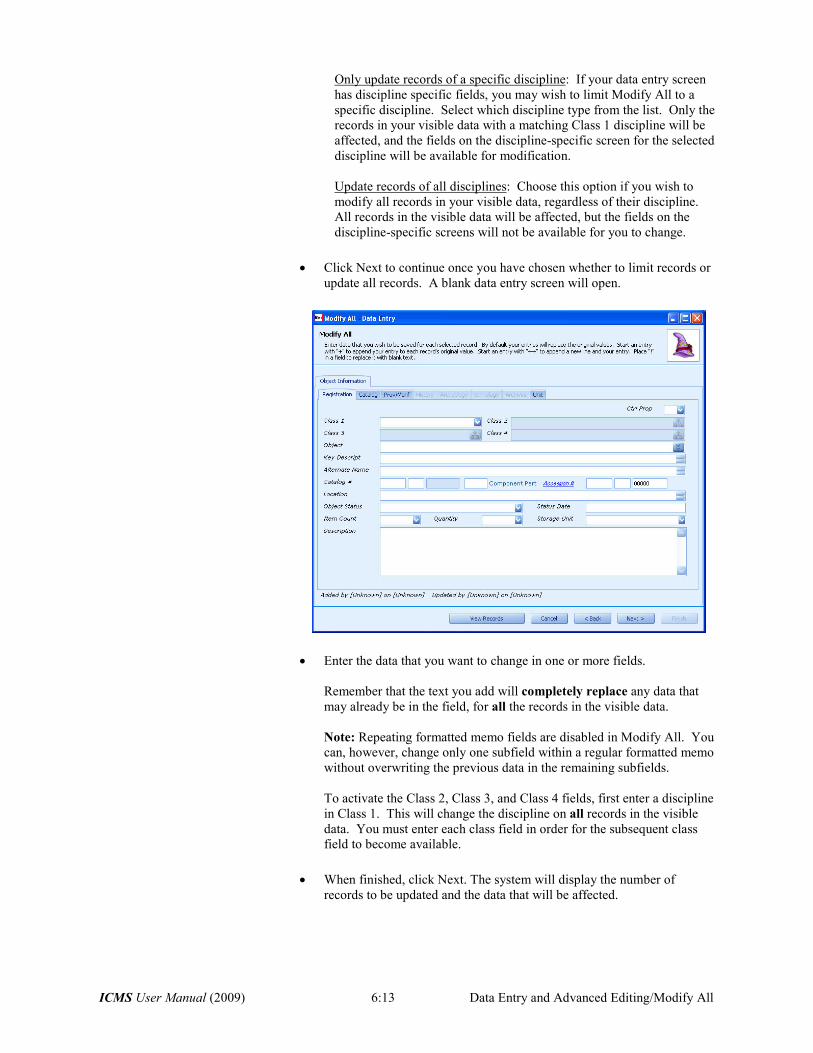
• Click Next to continue once you have chosen whether to limit records or
update all records. A blank data entry screen will open.
• Enter the data that you want to change in one or more fields.
Remember that the text you add will completely replace any data that
may already be in the field, for all the records in the visible data.
Note: Repeating formatted memo fields are disabled in Modify All. You
can, however, change only one subfield within a regular formatted memo
without overwriting the previous data in the remaining subfields.
To activate the Class 2, Class 3, and Class 4 fields, first enter a discipline
in Class 1. This will change the discipline on all records in the visible
data. You must enter each class field in order for the subsequent class
field to become available.
• When finished, click Next. The system will display the number of
records to be updated and the data that will be affected.
Data Entry and Advanced Editing/Modify All 6:14 ICMS User Manual (2009)
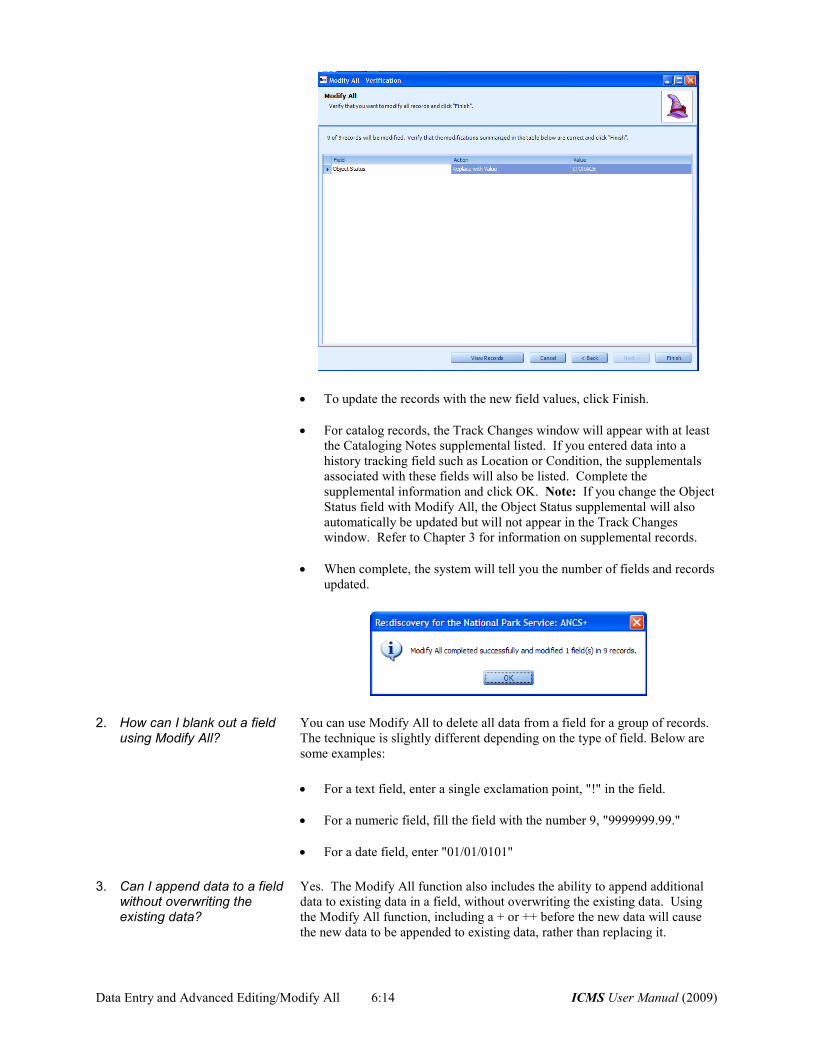
• To update the records with the new field values, click Finish.
• For catalog records, the Track Changes window will appear with at least
the Cataloging Notes supplemental listed. If you entered data into a
history tracking field such as Location or Condition, the supplementals
associated with these fields will also be listed. Complete the
supplemental information and click OK. Note: If you change the Object
Status field with Modify All, the Object Status supplemental will also
automatically be updated but will not appear in the Track Changes
window. Refer to Chapter 3 for information on supplemental records.
• When complete, the system will tell you the number of fields and records
updated.
2. How can I blank out a field using Modify All?
You can use Modify All to delete all data from a field for a group of records.
The technique is slightly different depending on the type of field. Below are
some examples:
• For a text field, enter a single exclamation point, "!" in the field.
• For a numeric field, fill the field with the number 9, "9999999.99."
• For a date field, enter "01/01/0101"
3. Can I append data to a field without overwriting the existing data?
Yes. The Modify All function also includes the ability to append additional
data to existing data in a field, without overwriting the existing data. Using
the Modify All function, including a + or ++ before the new data will cause
the new data to be appended to existing data, rather than replacing it.
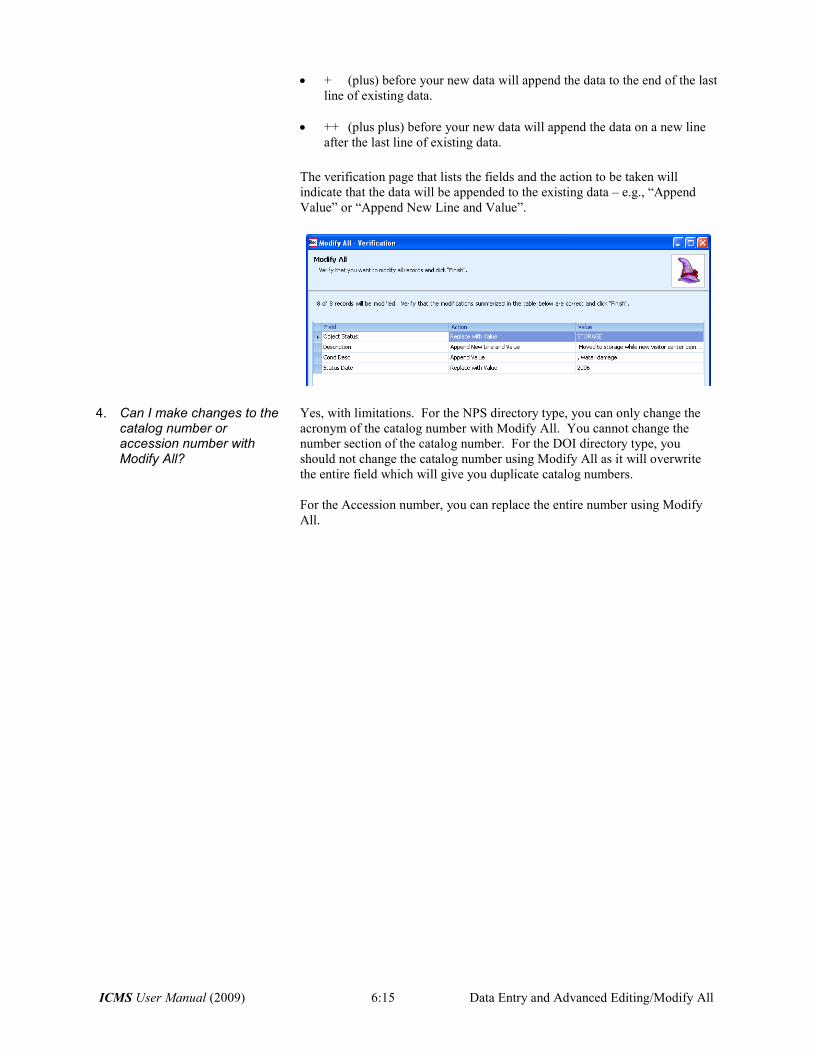
ICMS User Manual (2009) 6:15 Data Entry and Advanced Editing/Modify All
• + (plus) before your new data will append the data to the end of the last
line of existing data.
• ++ (plus plus) before your new data will append the data on a new line
after the last line of existing data.
The verification page that lists the fields and the action to be taken will
indicate that the data will be appended to the existing data – e.g., “Append
Value” or “Append New Line and Value”.
4. Can I make changes to the catalog number or accession number with Modify All?
Yes, with limitations. For the NPS directory type, you can only change the
acronym of the catalog number with Modify All. You cannot change the
number section of the catalog number. For the DOI directory type, you
should not change the catalog number using Modify All as it will overwrite
the entire field which will give you duplicate catalog numbers.
For the Accession number, you can replace the entire number using Modify
All.
Data Entry and Advanced Editing/ 6:16 ICMS User Manual (2009)
Global Search & Replace
IV. GLOBAL SEARCH AND REPLACE A. Overview
1. What is Global Search and Replace?
Global Search and Replace is an option that allows you to locate words or
phrases in a group of records, and replace them with new text for any or all of
the records.
2. When would I use Global Search and Replace?
If you found a word consistently misspelled throughout your database, you
could use Global Search and Replace to locate each occurrence of the word,
and replace it with the correct spelling. You can search whole records, or limit
your search to a specific field. Global Search and Replace requires that you
limit your visible data with a Tag Set, Filter or by selecting multiple records
in the List Pane. You cannot use Global Search and Replace unless you have
limited the number of records you want to change. See Chapter 7 for
information on creating Tag Sets and Filters.
3. Do I need special security rights to use Global Search and Replace?
Yes. You need to have Administrator rights or be given special permission
within your security profile to use Global Search and Replace. See Section
VI of Chapter 9 for information on security.
B. Using Global Search and Replace
It is highly recommended that you make a backup of your directory before
performing any type of mass modification of your data.
1. How do I access the Global
Search and Replace function?
To access Global Search and Replace:
• Activate a tag set, filter or select several records in the List Pane by using
Ctrl-click or Shift-click.
• Go to Edit on the Menu Bar and select “Global Search and Replace”.
• You will get a system message indicating that this process may take
awhile and will permanently update the records in the group. Click Yes
to continue and the Global Search and Replace screen opens.
ICMS User Manual (2009) 6:17 Data Entry and Advanced Editing/
Global Search & Replace
2. How do I use Global Search and Replace?
Global Search and Replace is easy to use. Follow these steps:
The entries you make bypass the validation system in ICMS. You therefore
run the risk of entering data that do not meet Bureau standards. Make sure
you know the correct entries for the data you are changing. Make sure you
know how an entry appears in the table, including the appropriate case
(upper, lower, or mixed). If you make a new entry in a table field, the entry
will appear on the modified records but not in the table. For the entry to
appear in the table, you must access the field from the appropriate record
screen and insert the entry in the table.
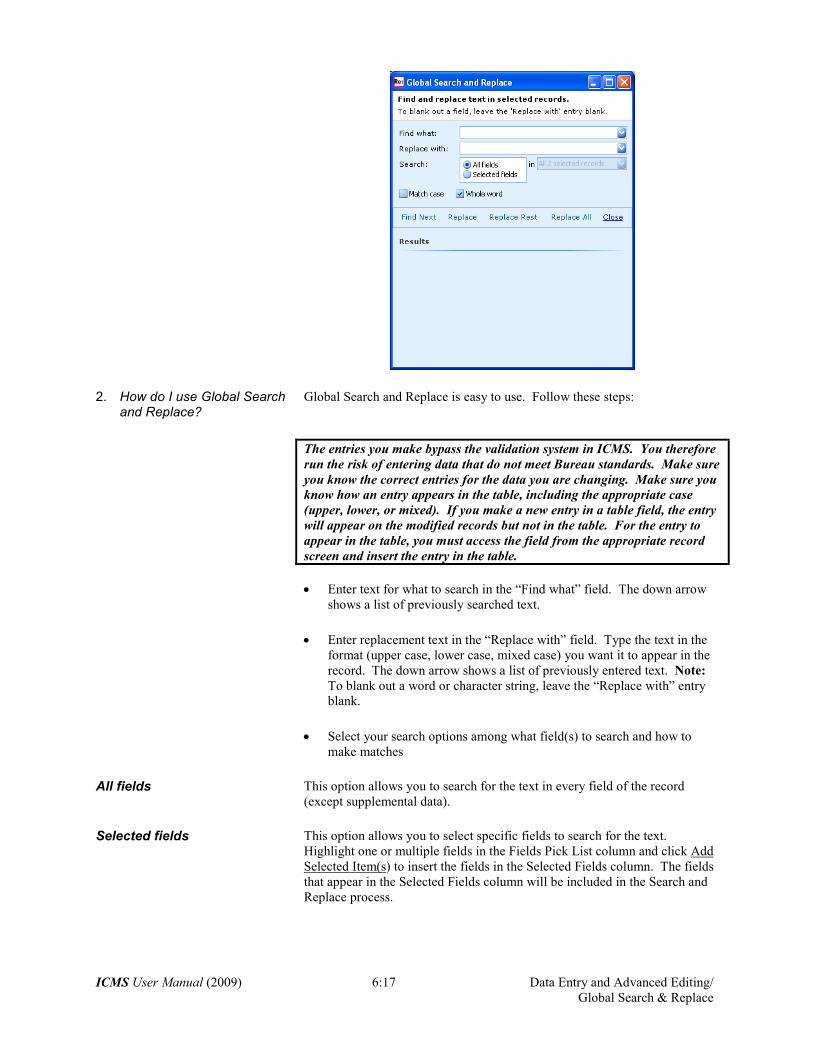
• Enter text for what to search in the “Find what” field. The down arrow
shows a list of previously searched text.
• Enter replacement text in the “Replace with” field. Type the text in the
format (upper case, lower case, mixed case) you want it to appear in the
record. The down arrow shows a list of previously entered text. Note:
To blank out a word or character string, leave the “Replace with” entry
blank.
• Select your search options among what field(s) to search and how to
make matches
All fields This option allows you to search for the text in every field of the record
(except supplemental data).
Selected fields This option allows you to select specific fields to search for the text.
Highlight one or multiple fields in the Fields Pick List column and click Add
Selected Item(s) to insert the fields in the Selected Fields column. The fields
that appear in the Selected Fields column will be included in the Search and
Replace process.

Data Entry and Advanced Editing/ 6:18 ICMS User Manual (2009)
Global Search & Replace
Match Case If this option is checked, Global Search will find only the occurrence of the
word or character strings exactly as it is typed in the “Find what” field
matching the case (upper case, lower case, or mixed case).
Whole Word If this option is checked, Global Search will find and replace only whole
words as typed in “Find what” instead of character strings. This will prevent
words from being changed that may be part of the spelling of other words (for
example, the word ‘ship’ is also part of ‘ownership’ but you only want to
replace ‘ship’).
Note: If you are trying to find and replace punctuation only, do not use the
Whole Word option. Punctuation is usually part of a word not a whole word
by itself. For example, a semicolon between terms is part of the word that
precedes it (brown; black; red;) just as quotes are part of the word they
surround (“Title”).
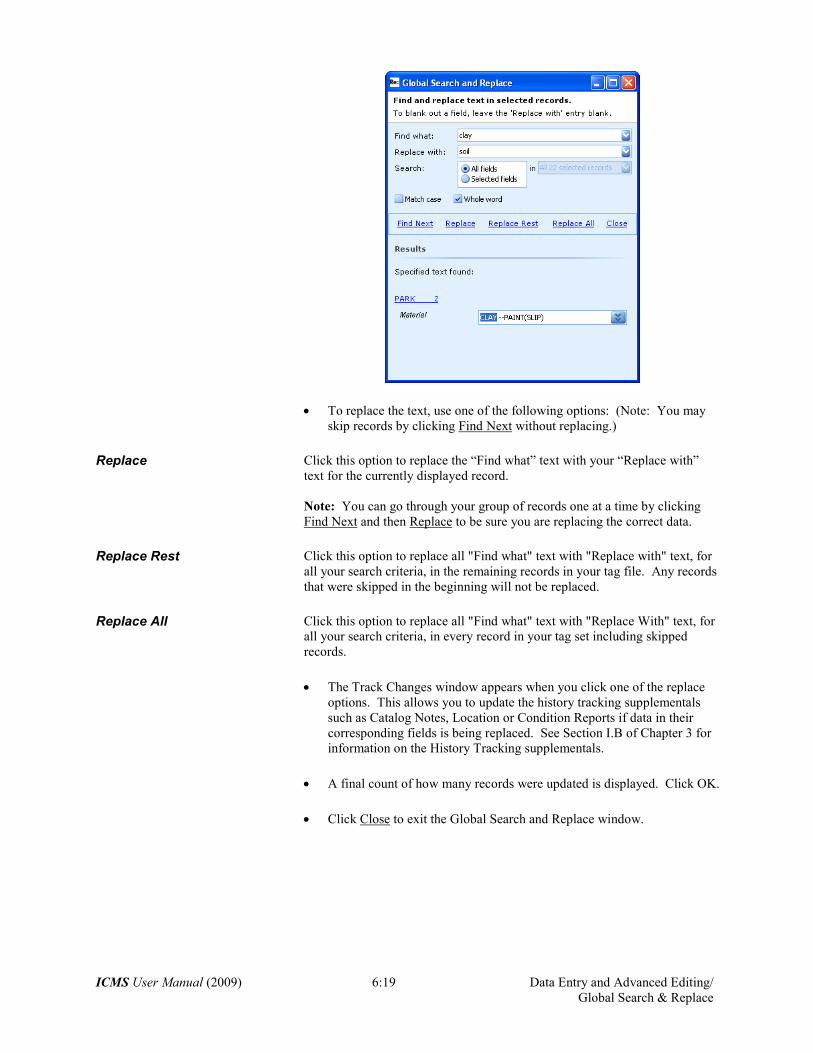
• To begin the search click Find Next. Global Search and Replace
displays the field, catalog number, and the searched for text in context.
To view the record, click on the hyperlinked catalog number (or, for
associated module records, the record identifier such as accession number
or name ID).
ICMS User Manual (2009) 6:19 Data Entry and Advanced Editing/
Global Search & Replace
• To replace the text, use one of the following options: (Note: You may
skip records by clicking Find Next without replacing.)
Replace Click this option to replace the “Find what” text with your “Replace with”
text for the currently displayed record.
Note: You can go through your group of records one at a time by clicking
Find Next and then Replace to be sure you are replacing the correct data.
Replace Rest Click this option to replace all "Find what" text with "Replace with" text, for
all your search criteria, in the remaining records in your tag file. Any records
that were skipped in the beginning will not be replaced.
Replace All Click this option to replace all "Find what" text with "Replace With" text, for
all your search criteria, in every record in your tag set including skipped
records.
• The Track Changes window appears when you click one of the replace
options. This allows you to update the history tracking supplementals
such as Catalog Notes, Location or Condition Reports if data in their
corresponding fields is being replaced. See Section I.B of Chapter 3 for
information on the History Tracking supplementals.
• A final count of how many records were updated is displayed. Click OK.
• Click Close to exit the Global Search and Replace window.
Data Entry and Advanced Editing/Quick Entry 6:20 ICMS User Manual (2009)
V. QUICK ENTRY A. Overview
1. What is the Quick Entry Function?
The Quick Entry function allows you to edit existing records in a table
format, rather than through the standard data entry screen. You choose the
fields to use and create the format. You can use Quick Entry in any module
and associated module.
Quick Entry is not available unless you have limited your visible data by
activating a filter, tag set, or selecting multiple records in the List Pane using
shift-click or control-click. Refer to Chapter 7, Finding and Grouping
Records, for information on filters and tag sets.
You must have Administrator security rights or specific Quick Entry rights
in a directory to use the Quick Entry function. See Section VI in Chapter 9
for information on user security.
2. Are there limits to the
number and type of fields I can use in Quick Entry?
No. Quick Entry will work with all types of fields and as many fields as you
desire. However, the number of fields visible when you print depends on
paper orientation and the width of each field column.
3. When will I use this function?
Use Quick Entry to:
• compare data from several records as you edit,
• edit fields that appear on separate pages of a record,
• edit data in specified fields for consistency,
• browse data in specified fields in a group of existing records to locate
unique or inconsistent entries,
• enter data into new records that you have preallocated (see Section VI of
this chapter for information on preallocating records)
4. Can I use Quick Entry for Supplemental Information?
No. Supplemental records are not available in Quick Entry. However, if you
modify a field through Quick Entry that is connected to a history tracking
supplemental such as location, condition or object status, the Track Changes
window will include these supplementals along with the Cataloging Notes
supplemental when you save the quick entry records.
5. Are authority tables available when modifying records through Quick Entry?
Yes. All fields in Quick Entry perform the same way as when you are
modifying a single record. Authority tables are available and you can add to
authority tables. Formatted memos and repeating formatted memos will
expand to show their subfields.
6. How do I access the Quick Entry function?
Quick Entry is available from the Edit menu. Without a subset of data
selected, only the Quick Entry Formats Management option is available.
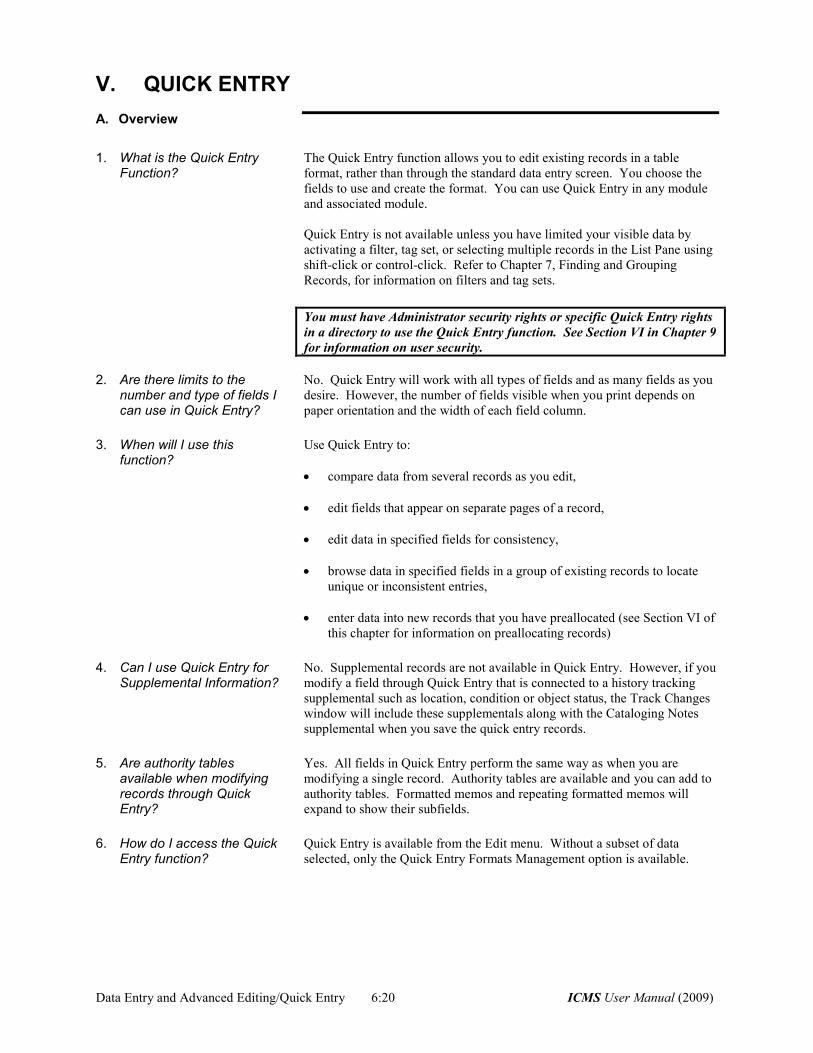
ICMS User Manual (2009) 6:21 Data Entry and Advanced Editing/Quick Entry
Existing Quick Entry formats are also available from the Navigation Pane,
under the “My Quick Entry Formats” or “Shared Quick Entry Formats”
options within each module and associated module. Expand these by
clicking the + in front. You will see a list of the Quick Entry formats
available to you. Double-click on a quick entry format to activate it for
modifying records. Right-click on a quick entry format for options to modify
records, view records, modify the format, or delete the format.
B. Creating a Quick Entry Format
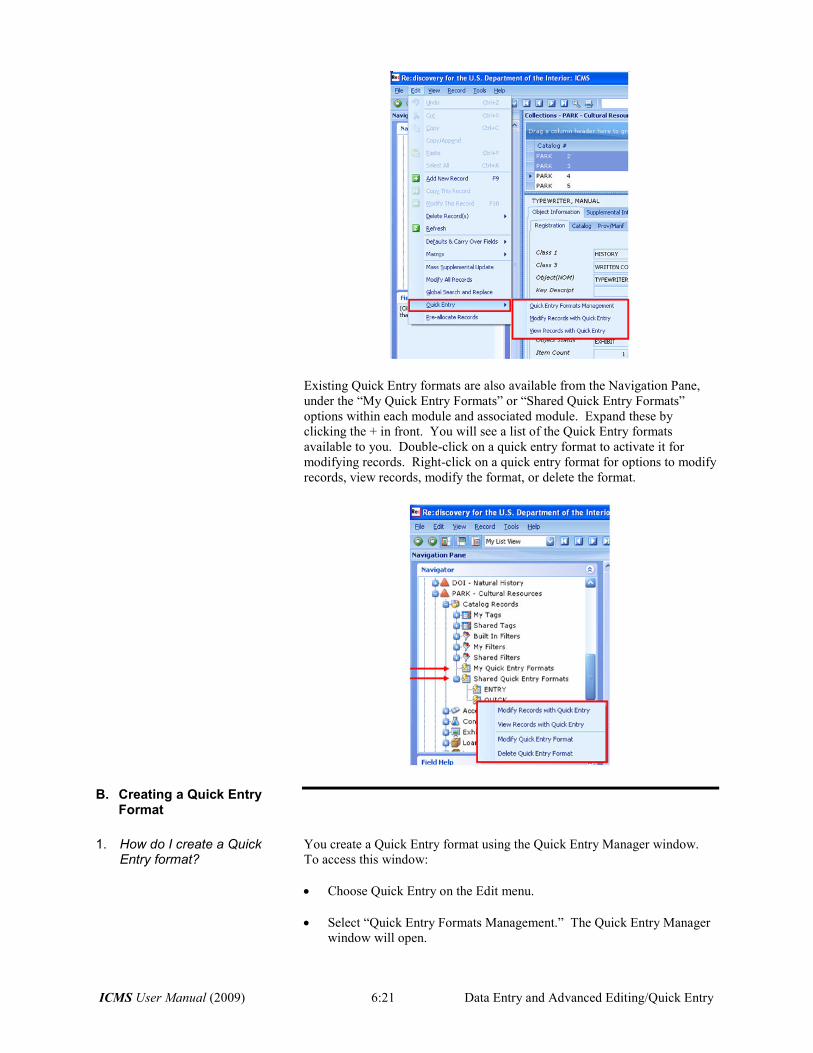
1. How do I create a Quick Entry format?
You create a Quick Entry format using the Quick Entry Manager window.
To access this window:
• Choose Quick Entry on the Edit menu.
• Select “Quick Entry Formats Management.” The Quick Entry Manager
window will open.
Data Entry and Advanced Editing/Quick Entry 6:22 ICMS User Manual (2009)
• Click Create New on the toolbar or go to the File menu and select the
Create New option.
• Enter a unique Name for the quick entry format, a Description (optional)
and select who is allowed to use the new quick entry format (others or
only you).
• Click Columns to select which fields to include in the quick entry
format.
• Select the fields by highlighting them in the Columns Pick List on the
left, then clicking Add Selected Item(s) to add them to the list on the
right. Repeat this for each field that you wish to use. You can use Move
Up and Move Down to change the order of the fields in the list. When
you have selected all of the desired fields and have them in the desired
order, click OK.
• The fields you chose for the format will be listed next to the Columns
link in the Quick Entry Format Properties.
ICMS User Manual (2009) 6:23 Data Entry and Advanced Editing/Quick Entry
• When you have finished creating the new quick entry format, click Save
and Close to save the format and close the Quick Entry Manager.
Note: This format can be used again and again with different data. Think of
the format as a template.
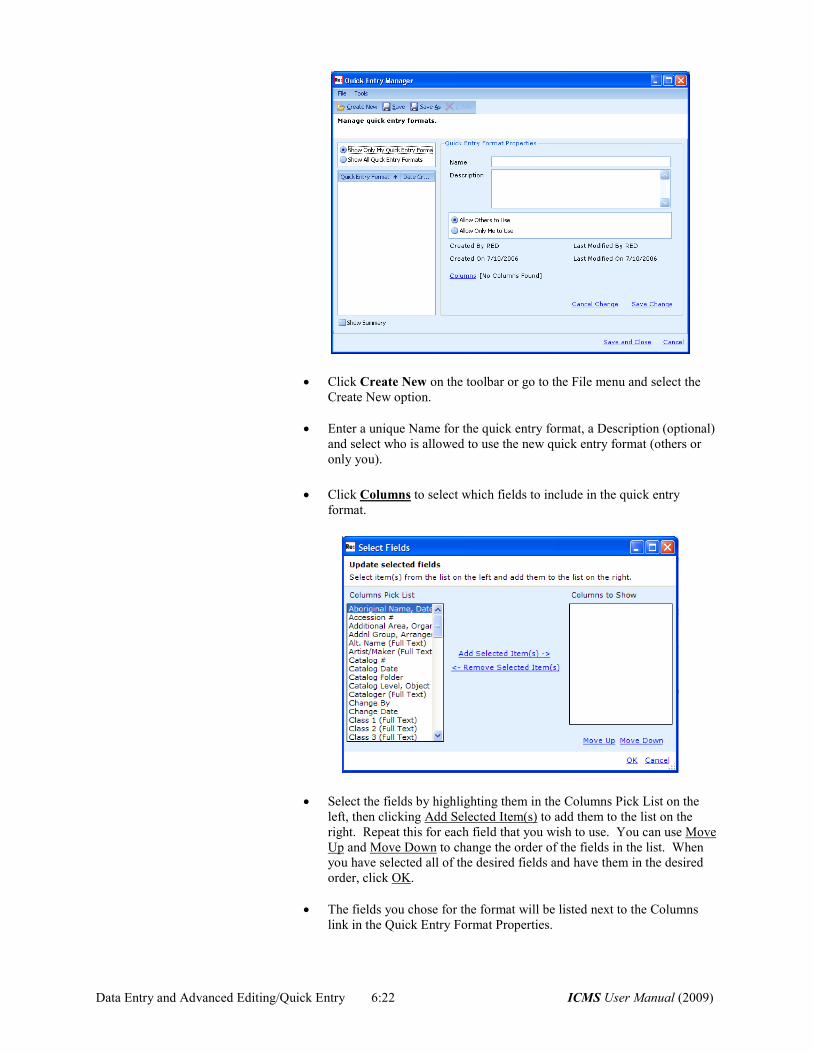
2. How do I edit or delete a Quick Entry format?
To edit or delete a Quick Entry format:
• From the Edit menu, select Quick Entry and then “Quick Entry Formats
Management”, or
From the Navigation Pane, right-click on the quick entry format and
select “Modify Quick Entry Format” or “Delete Quick Entry Format”.
• In the Quick Entry Manager window, select the format you wish to edit
or delete. To see a complete list of formats, select the “Show All Quick
Entry Formats” option. To see only your formats, select “Show Only
My Quick Entry Formats.”
Note: Only the user who created the format can make modifications to the
original. To modify another user’s Quick Entry format, first click Save As
on the toolbar, then make the changes. The Name will have the word
‘(copy)’ after it. You can change the name, if desired. The original format
will remain unchanged.
• Make any desired changes to the quick entry format and click Save
Change to save it or use Save As on the toolbar to save it with a new
name.
• If you wish to delete a quick entry format, select it in the list and click
Delete on the toolbar.
Data Entry and Advanced Editing/Quick Entry 6:24 ICMS User Manual (2009)
C. Using Quick Entry
1. What can I do with Quick Entry?
Once you have created your Quick Entry format, you can use it to:
• View selected fields for a group of records without editing
• Modify selected fields for a group of records
• Print a list of selected fields for a group of records.
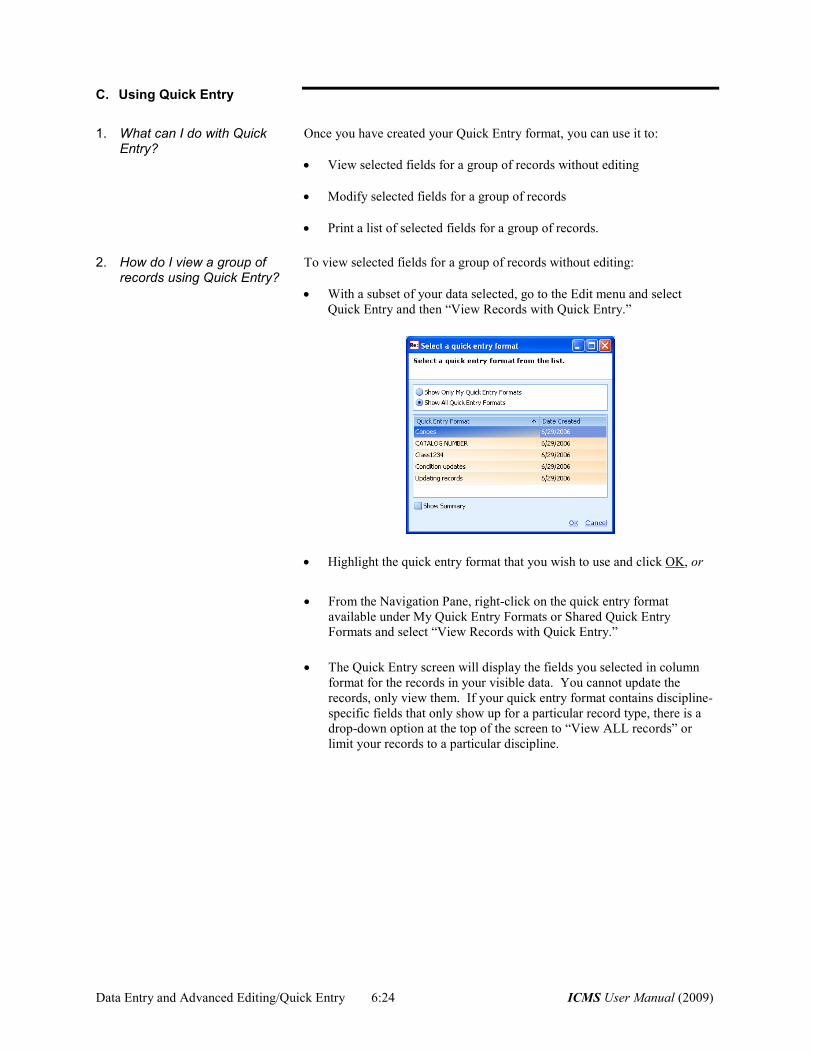
2. How do I view a group of records using Quick Entry?
To view selected fields for a group of records without editing:
• With a subset of your data selected, go to the Edit menu and select
Quick Entry and then “View Records with Quick Entry.”
• Highlight the quick entry format that you wish to use and click OK, or
• From the Navigation Pane, right-click on the quick entry format
available under My Quick Entry Formats or Shared Quick Entry
Formats and select “View Records with Quick Entry.”
• The Quick Entry screen will display the fields you selected in column
format for the records in your visible data. You cannot update the
records, only view them. If your quick entry format contains discipline-
specific fields that only show up for a particular record type, there is a
drop-down option at the top of the screen to “View ALL records” or
limit your records to a particular discipline.
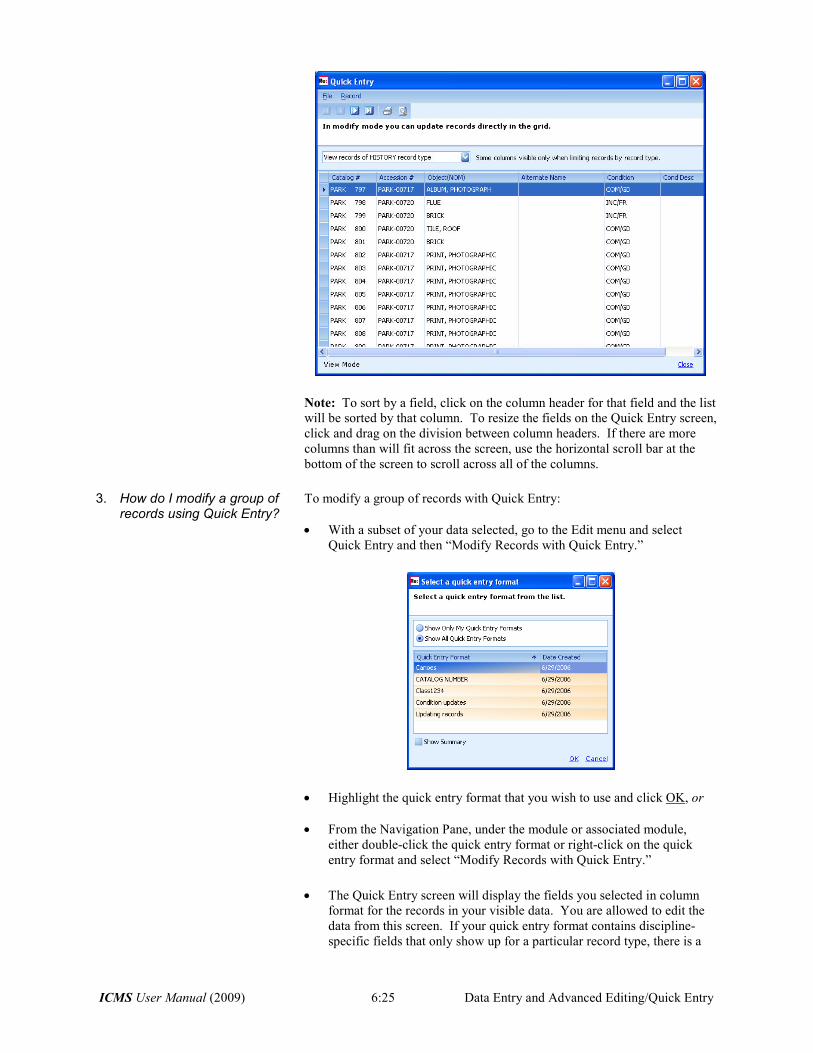
ICMS User Manual (2009) 6:25 Data Entry and Advanced Editing/Quick Entry
Note: To sort by a field, click on the column header for that field and the list
will be sorted by that column. To resize the fields on the Quick Entry screen,
click and drag on the division between column headers. If there are more
columns than will fit across the screen, use the horizontal scroll bar at the
bottom of the screen to scroll across all of the columns.
3. How do I modify a group of records using Quick Entry?
To modify a group of records with Quick Entry:
• With a subset of your data selected, go to the Edit menu and select
Quick Entry and then “Modify Records with Quick Entry.”
• Highlight the quick entry format that you wish to use and click OK, or
• From the Navigation Pane, under the module or associated module,
either double-click the quick entry format or right-click on the quick
entry format and select “Modify Records with Quick Entry.”
• The Quick Entry screen will display the fields you selected in column
format for the records in your visible data. You are allowed to edit the
data from this screen. If your quick entry format contains discipline-
specific fields that only show up for a particular record type, there is a
Data Entry and Advanced Editing/Quick Entry 6:26 ICMS User Manual (2009)
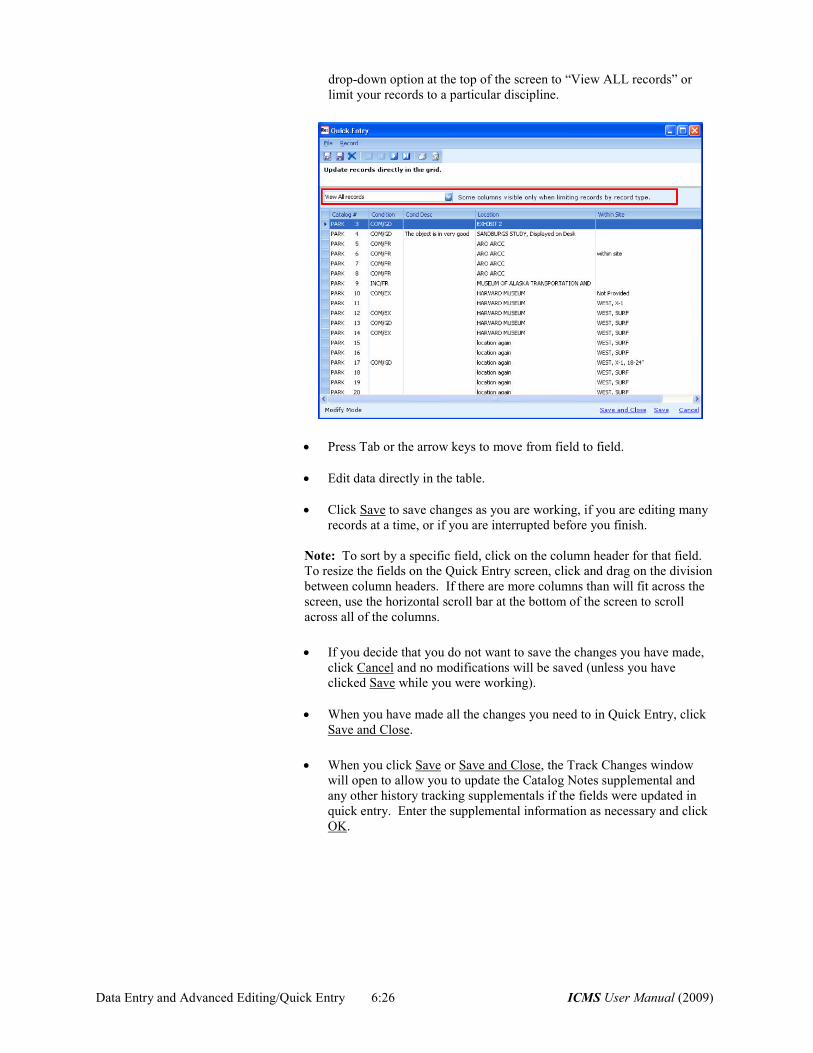
drop-down option at the top of the screen to “View ALL records” or
limit your records to a particular discipline.
• Press Tab or the arrow keys to move from field to field.
• Edit data directly in the table.
• Click Save to save changes as you are working, if you are editing many
records at a time, or if you are interrupted before you finish.
Note: To sort by a specific field, click on the column header for that field.
To resize the fields on the Quick Entry screen, click and drag on the division
between column headers. If there are more columns than will fit across the
screen, use the horizontal scroll bar at the bottom of the screen to scroll
across all of the columns.
• If you decide that you do not want to save the changes you have made,
click Cancel and no modifications will be saved (unless you have
clicked Save while you were working).
• When you have made all the changes you need to in Quick Entry, click
Save and Close.
• When you click Save or Save and Close, the Track Changes window
will open to allow you to update the Catalog Notes supplemental and
any other history tracking supplementals if the fields were updated in
quick entry. Enter the supplemental information as necessary and click
OK.
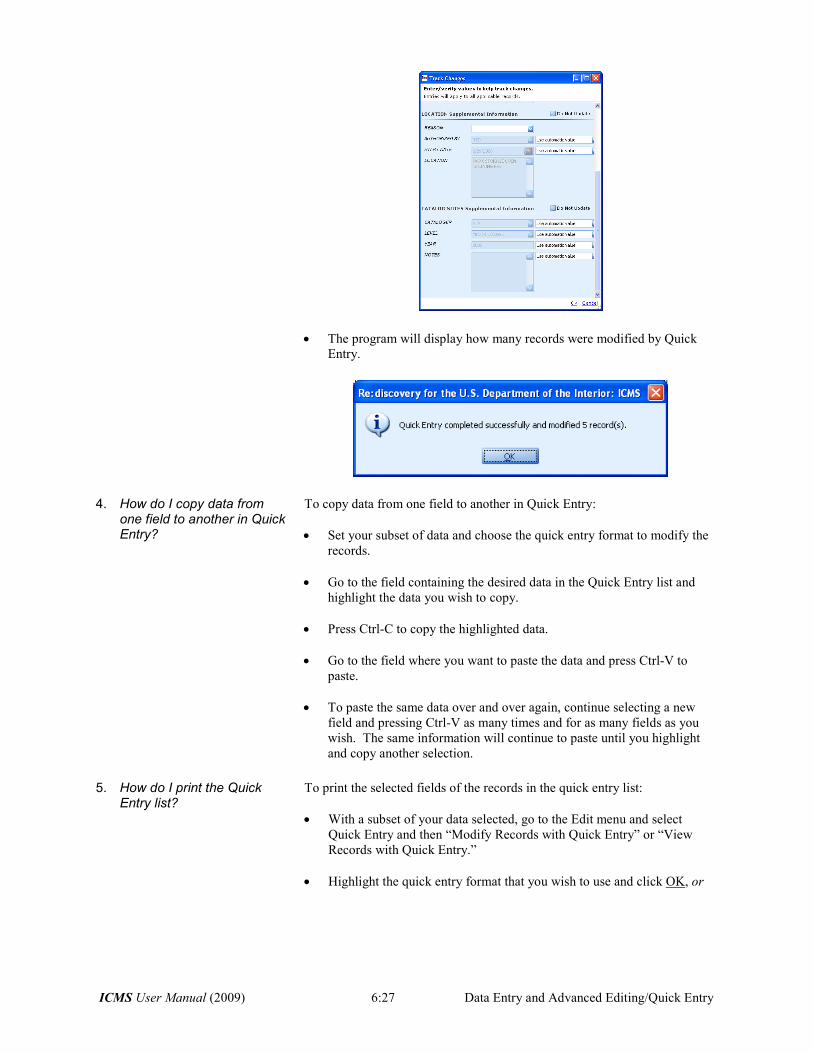
ICMS User Manual (2009) 6:27 Data Entry and Advanced Editing/Quick Entry
• The program will display how many records were modified by Quick
Entry.
4. How do I copy data from one field to another in Quick Entry?
To copy data from one field to another in Quick Entry:
• Set your subset of data and choose the quick entry format to modify the
records.
• Go to the field containing the desired data in the Quick Entry list and
highlight the data you wish to copy.
• Press Ctrl-C to copy the highlighted data.
• Go to the field where you want to paste the data and press Ctrl-V to
paste.
• To paste the same data over and over again, continue selecting a new
field and pressing Ctrl-V as many times and for as many fields as you
wish. The same information will continue to paste until you highlight
and copy another selection.
5. How do I print the Quick Entry list?
To print the selected fields of the records in the quick entry list:
• With a subset of your data selected, go to the Edit menu and select
Quick Entry and then “Modify Records with Quick Entry” or “View
Records with Quick Entry.”
• Highlight the quick entry format that you wish to use and click OK, or
Data Entry and Advanced Editing/Quick Entry 6:28 ICMS User Manual (2009)
• From the navigation pane, under the module or associated module you
are in, either double-click the quick entry format or right-click on the
quick entry format and select “Modify Records with Quick Entry” or
“View Records with Quick Entry.”
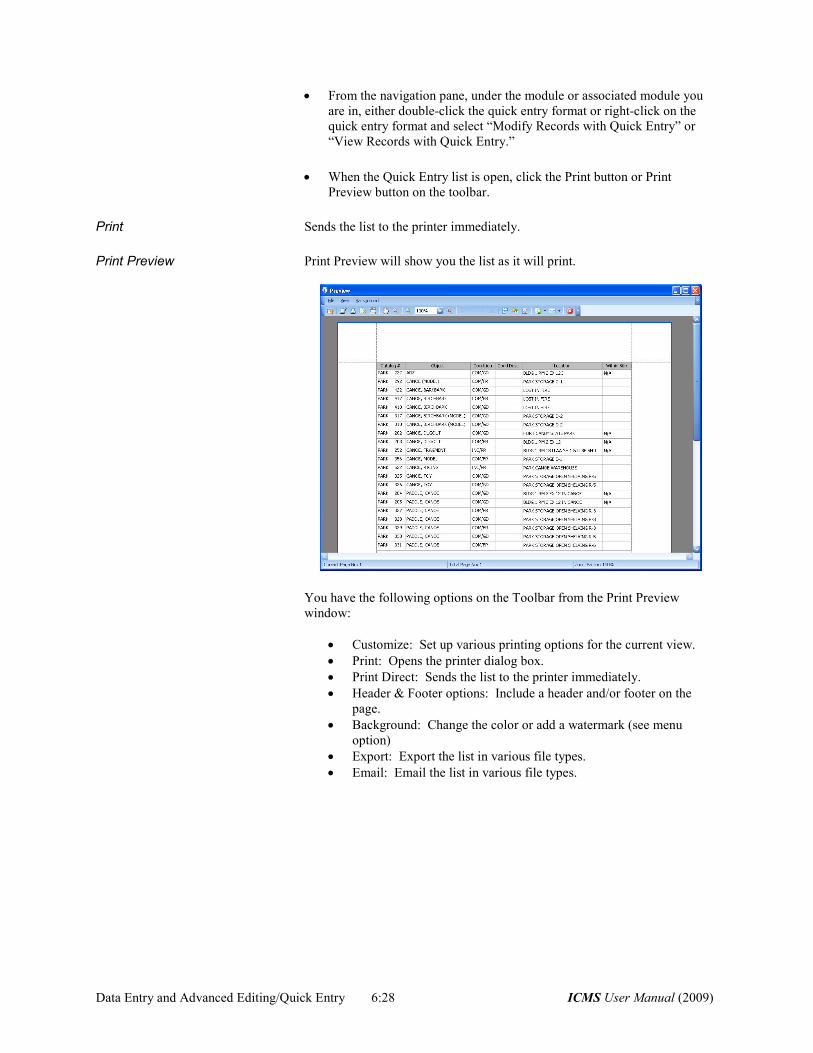
• When the Quick Entry list is open, click the Print button or Print
Preview button on the toolbar.
Print Sends the list to the printer immediately.
Print Preview Print Preview will show you the list as it will print.
You have the following options on the Toolbar from the Print Preview
window:
• Customize: Set up various printing options for the current view.
• Print: Opens the printer dialog box.
• Print Direct: Sends the list to the printer immediately.
• Header & Footer options: Include a header and/or footer on the
page.
• Background: Change the color or add a watermark (see menu
option)
• Export: Export the list in various file types.
• Email: Email the list in various file types.
ICMS User Manual (2009) 6:29 Data Entry and Advanced Editing/
Pre-Allocate Records
VI. PRE-ALLOCATE RECORDS (NPS only) A. Overview
Pre-allocate records is only available in the NPS Cultural and Natural
History directory types.
1. What is the Pre-allocate Records function?
The Pre-allocate Records function allows you to pre-assign catalog numbers
to a defined set of empty catalog records. The Pre-allocate Records function
is a security-protected function. You must have Administrator security rights
to activate this function.
2. Why would I need to pre-allocate records?
Pre-allocating records is one way to reduce data entry time. Sites that do a
great deal of cataloging, such as the archeology centers, will be more likely
to use the Pre-allocate Records function alone or with the other functions
described in this chapter. Many parks with relatively stable collections have
no need for this function.
3. When would I use the Pre-allocate Records function?
Use this function when you want to allot certain catalog numbers for a
specific purpose, such as:
• You want a particular staff cataloger or contract cataloger to use a
particular string of catalog numbers.
• You have a subject area specialist identify and describe artifacts and you
want to include this information in selected fields on the catalog record.
• You know that you will be entering several consecutive records, and you
don’t want to enter the new catalog number each time you begin a new
record.
• You want to enter information quickly in columnar format.
4. How would I pre-allocate records to a staff or contract cataloger?
Use the Pre-allocate Records function together with the Create a New
Directory and Transfer functions to give the cataloger a separate directory
with pre-assigned catalog numbers. Refer to Chapter 9, Tools, for
information on creating a new directory. Refer to Chapter 8, Moving and
Sharing Data, for information on the Transfer functions.
The Pre-allocate Records function will create empty records with sequential
catalog numbers. Transfer these records into the cataloger’s directory
leaving the empty records in your main database as place holders.
When the cataloger is done, check the work to make sure that it is acceptable
and then transfer the completed records back into the master database
updating the target records. The completed pre-assigned catalog records will
overwrite the empty records in your main database.
5. How would I pre-allocate records to a subject area specialist?
Use the Pre-allocate Records function together with the Import/Export
function to give the expert a set of fields to complete. Refer to Chapter 8,
Moving and Sharing Data, for information on the Import/Export function.
The Pre-allocate Records function will create empty records with sequential
catalog numbers. Export these records into whatever database or spreadsheet
format that the specialist is comfortable using.
Data Entry and Advanced Editing/ 6:30 ICMS User Manual (2009)
Pre-Allocate Records
When the specialist is done, import the records back into the master database
updating the target record and make whatever additions necessary to
complete the records.
6. How would I pre-allocate records to enter several records in a row?
Use the Pre-allocate Records function to have the system automatically
provide the next sequential number in the set of records.
7. How would I pre-allocate records to enter records in a columnar format?
Use the Pre-allocate Records function together with the Quick Entry function
to produce a set of records in a list format. Refer to Section V of this chapter
for information on the Quick Entry function.
Use the Pre-allocate Records function to set up a group of records. Create
and activate a tag set or filter of these records before using Quick Entry.
B. Pre-allocating Records
1. Where is the Pre-allocate Records function located?
Pre-allocate Records is located on the Edit menu in the collection module
directories.
You must be in the Cultural Resources directory to pre-allocate Cultural
Resources records. You must be in the Natural History directory to pre-
allocate Natural History records.
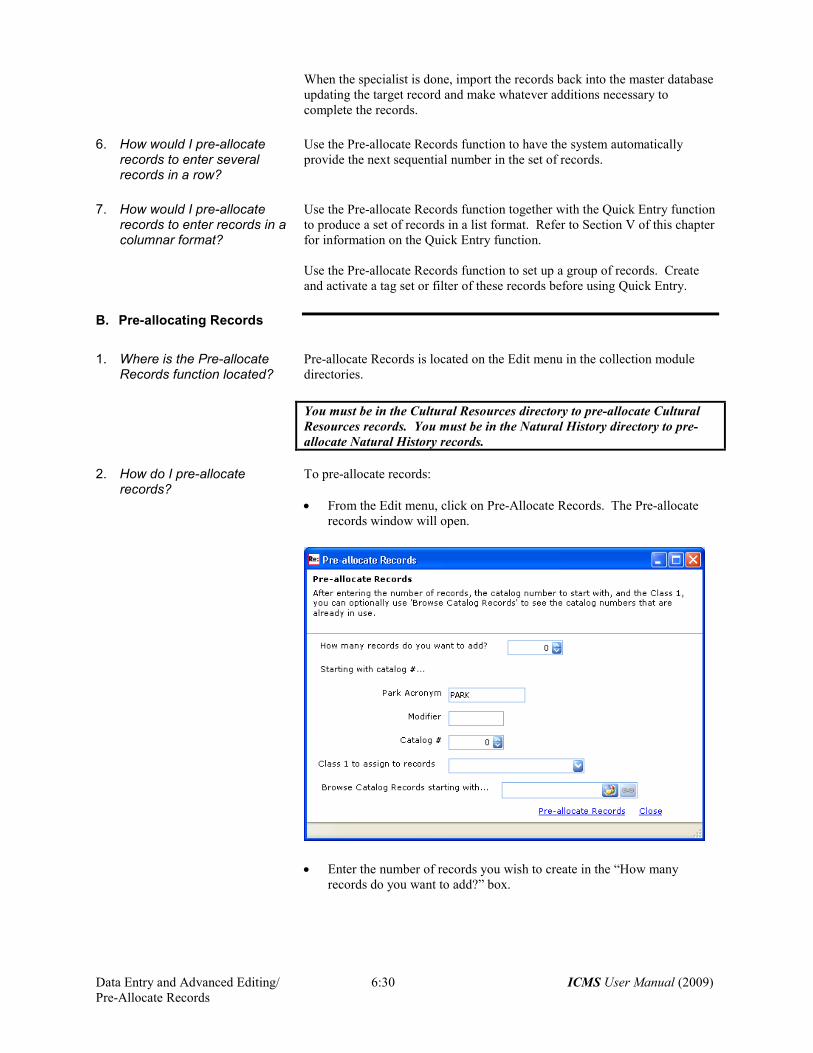
2. How do I pre-allocate
records?
To pre-allocate records:
• From the Edit menu, click on Pre-Allocate Records. The Pre-allocate
records window will open.
• Enter the number of records you wish to create in the “How many
records do you want to add?” box.
ICMS User Manual (2009) 6:31 Data Entry and Advanced Editing/
Pre-Allocate Records
• Next, enter the catalog number for the beginning number to create.
Park Acronym: Enter your park acronym. Note: The Park Acronym
will automatically fill in with the acronym from the record you were
viewing before you started the pre-allocate record function. You can
change this acronym if necessary.
Modifier: Enter the collection modifier, if applicable.
Catalog #: Enter the first number that you wish to pre-assign.
• In “Class 1 to assign to records”, use the pull down menu to choose the
discipline for Classification line 1. For example, choose
“ARCHEOLOGY” if the cataloging project is an archeological
collection. This will fill in the Class 1 entry for all of the records you
are pre-allocating. If your cataloging project includes more than one
discipline, you will have to pre-allocate the records in separate groups to
assign the appropriate Class 1 entry to each group.
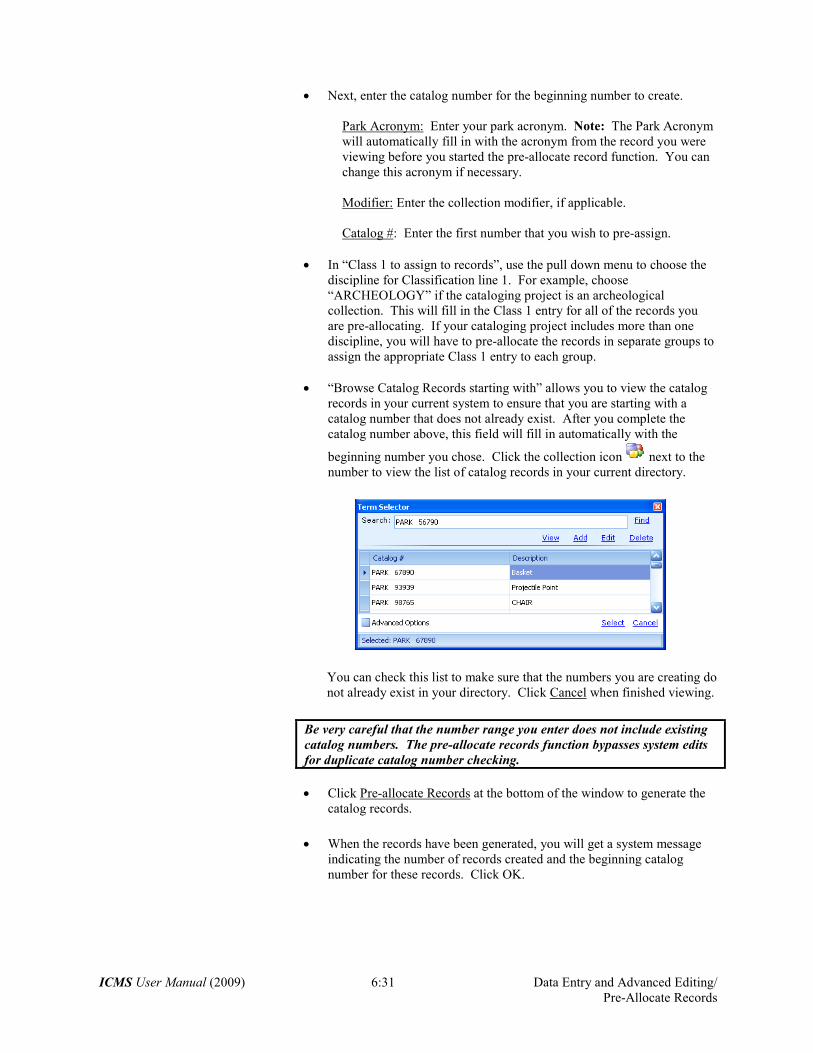
• “Browse Catalog Records starting with” allows you to view the catalog
records in your current system to ensure that you are starting with a
catalog number that does not already exist. After you complete the
catalog number above, this field will fill in automatically with the
beginning number you chose. Click the collection icon next to the
number to view the list of catalog records in your current directory.
You can check this list to make sure that the numbers you are creating do
not already exist in your directory. Click Cancel when finished viewing.
Be very careful that the number range you enter does not include existing
catalog numbers. The pre-allocate records function bypasses system edits
for duplicate catalog number checking.
• Click Pre-allocate Records at the bottom of the window to generate the
catalog records.
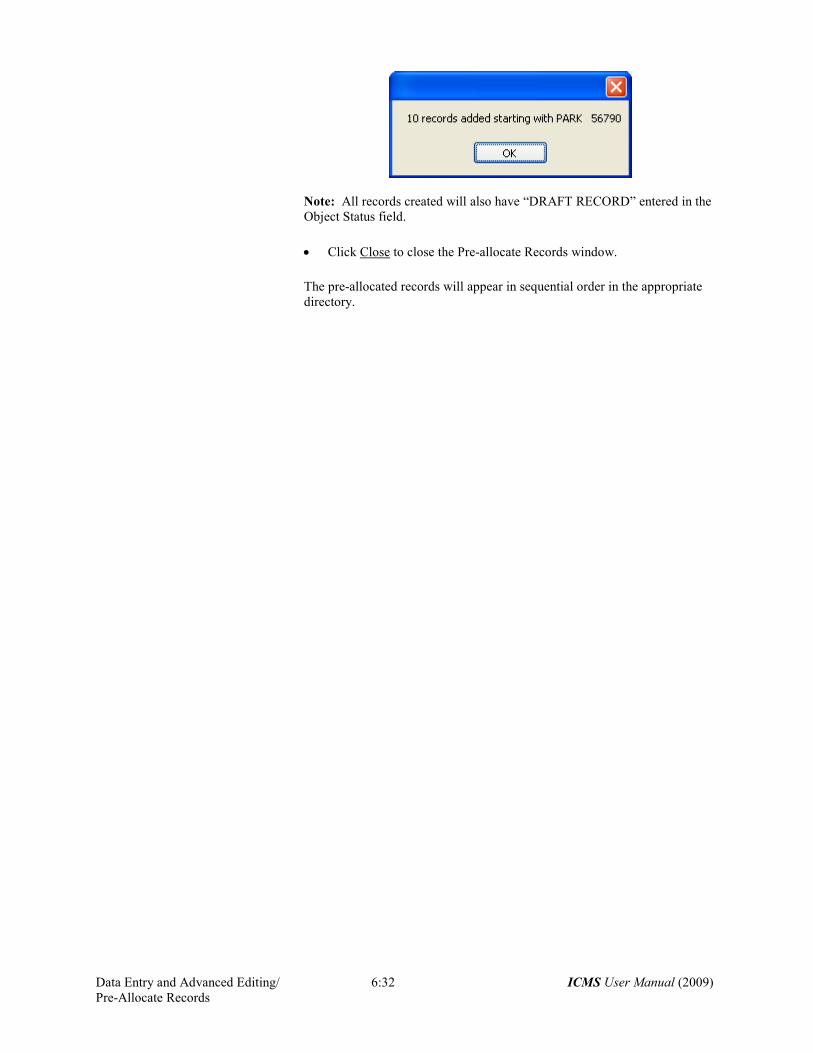
• When the records have been generated, you will get a system message
indicating the number of records created and the beginning catalog
number for these records. Click OK.
Data Entry and Advanced Editing/ 6:32 ICMS User Manual (2009)
Pre-Allocate Records
Note: All records created will also have “DRAFT RECORD” entered in the
Object Status field.
• Click Close to close the Pre-allocate Records window.
The pre-allocated records will appear in sequential order in the appropriate
directory.

ICMS User Manual (2009) 6:33 Data Entry and Advanced Editing/
Defaults and Carry Over Fields
VII. DEFAULTS AND CARRY OVER FIELDS A. Overview
1. What are Defaults? Field defaults are another method of speeding data entry. By setting certain
repeated data as a “default,” it will appear on each new record added to the
database.
Example:
You may be cataloging a large group of objects in a storage cabinet. If you set
the location field to default to "Storage Room A, Cabinet 1" for each new
record, then you would not have to type it each time.
2. What are Carry Over fields? Carry Over fields fill a new record with data from the record that was on the
screen before you added the new record. This option lets you add data that is
similar from record to record, but not exact enough to allow setting a Default
value.
Example:
A series of objects may all require a complex reference number, the same on
each record except for the last character. You could set the reference number
field to carry over, so that on each new record you only have to increase the
last digit by one.
3. How does this function work?
ICMS includes two types of default accounts: master system defaults and
user defined defaults accounts. The system administrator can establish
Master System Defaults, which everyone can use, and each user may also
establish his or her own User Defaults, appropriate for a specific project.
Each user can create multiple accounts to use for different projects.
Note: Master system defaults will override any other user defaults account
settings.
You must have Administrator security rights to set Master system defaults.
4. Where can I create Defaults
and Carry Over Fields accounts?
You can create Defaults and Carry Over Fields accounts in any module and
associated module in the program.
You cannot create defaults for supplemental records.
5. How do I access the Defaults and Carryover Fields function?
Defaults and Carry Over Fields is available from the Edit menu. You can
choose the following options from the submenu:
Defaults Management
Create New Defaults
Activate Defaults
Deactivate Defaults
The quick links to Create New Defaults, Activate Defaults and Deactivate
Defaults are all available within Defaults Management which allows you to
manage everything from one screen.
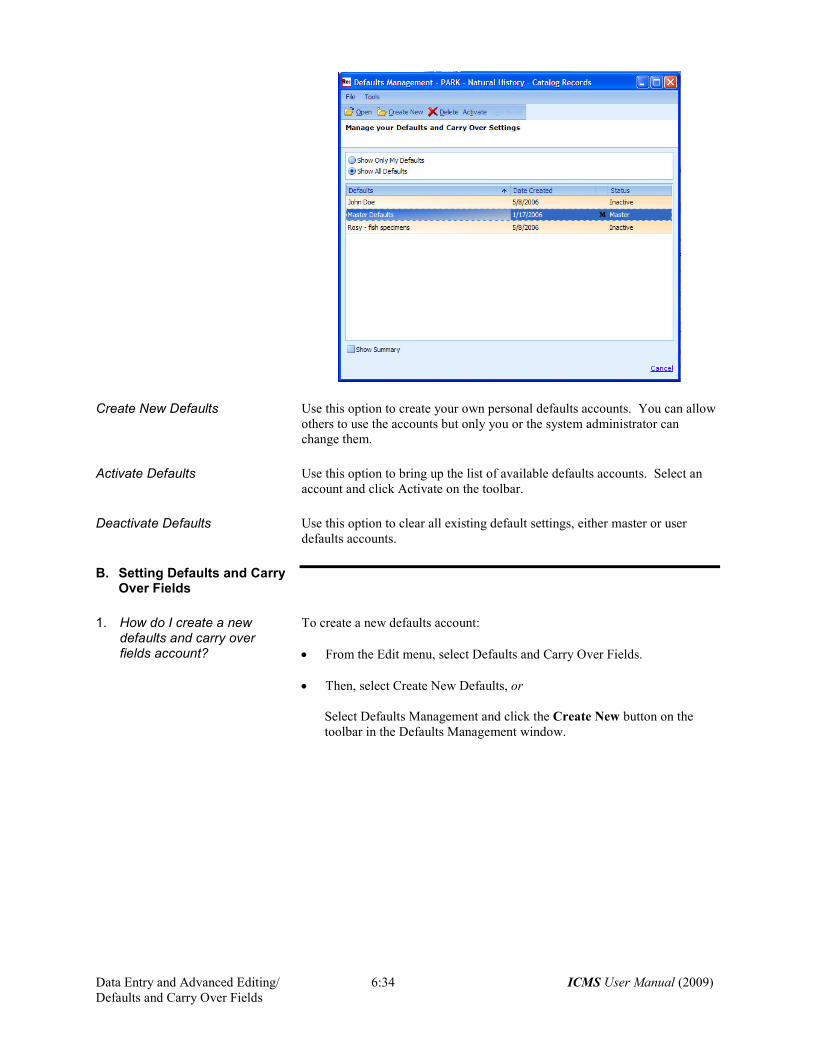
Defaults Management The Defaults Management window allows you to view, add, modify, delete,
activate or deactivate defaults and carry over fields.
Data Entry and Advanced Editing/ 6:34 ICMS User Manual (2009)
Defaults and Carry Over Fields
Create New Defaults Use this option to create your own personal defaults accounts. You can allow
others to use the accounts but only you or the system administrator can
change them.
Activate Defaults Use this option to bring up the list of available defaults accounts. Select an
account and click Activate on the toolbar.
Deactivate Defaults Use this option to clear all existing default settings, either master or user
defaults accounts.
B. Setting Defaults and Carry Over Fields
1. How do I create a new defaults and carry over fields account?
To create a new defaults account:
• From the Edit menu, select Defaults and Carry Over Fields.
• Then, select Create New Defaults, or
Select Defaults Management and click the Create New button on the
toolbar in the Defaults Management window.
ICMS User Manual (2009) 6:35 Data Entry and Advanced Editing/
Defaults and Carry Over Fields
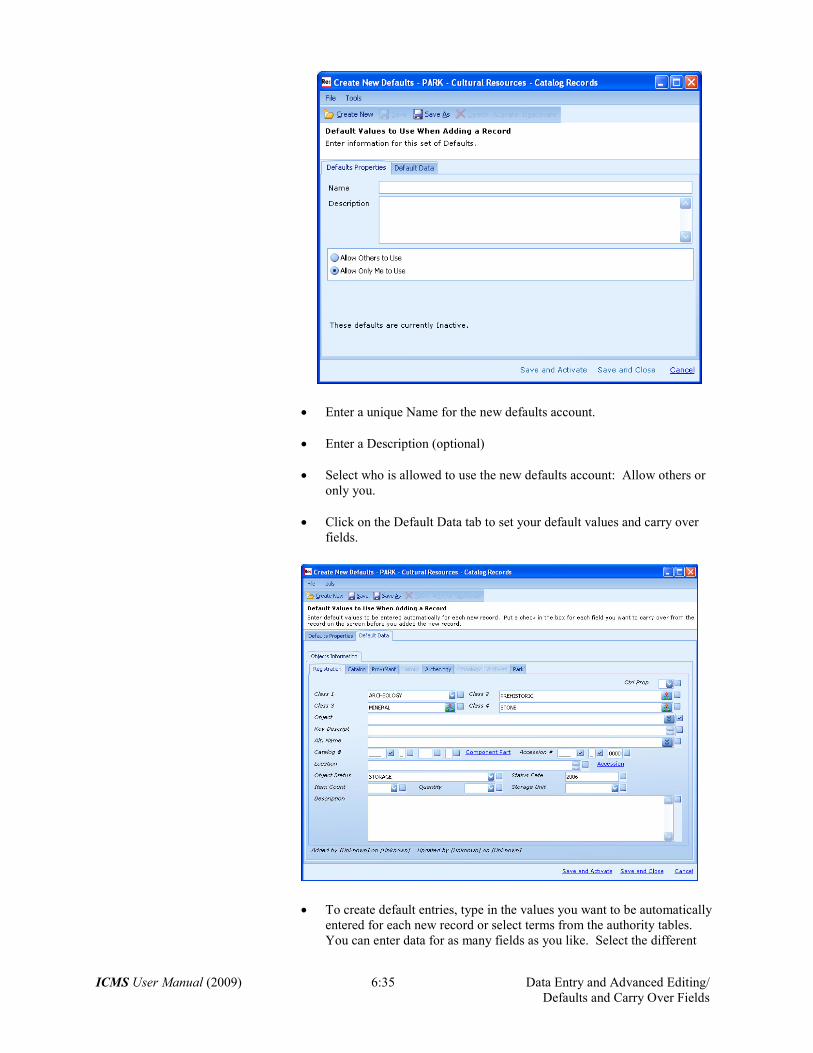
• Enter a unique Name for the new defaults account.
• Enter a Description (optional)
• Select who is allowed to use the new defaults account: Allow others or
only you.
• Click on the Default Data tab to set your default values and carry over
fields.
• To create default entries, type in the values you want to be automatically
entered for each new record or select terms from the authority tables.
You can enter data for as many fields as you like. Select the different
Data Entry and Advanced Editing/ 6:36 ICMS User Manual (2009)
Defaults and Carry Over Fields
tabs to enter data on those pages. Note: If you enter a discipline in Class
1, that discipline tab will become active for you to type default entries in
the discipline fields. You cannot set a default for Controlled Property; it
is already set to enter ‘N’ when you add a record.
• To activate carry over fields, check the box at the end of each field you
want to carry over. Note: Some fields are already set as carry over, such
as the park acronym for Catalog # and Accession # in the NPS
directories.
• When you have finished, click the Save and Activate link to save the
values and immediately activate this defaults account, or
click the Save and Close link to save your changes and close the window
without activating the defaults account.
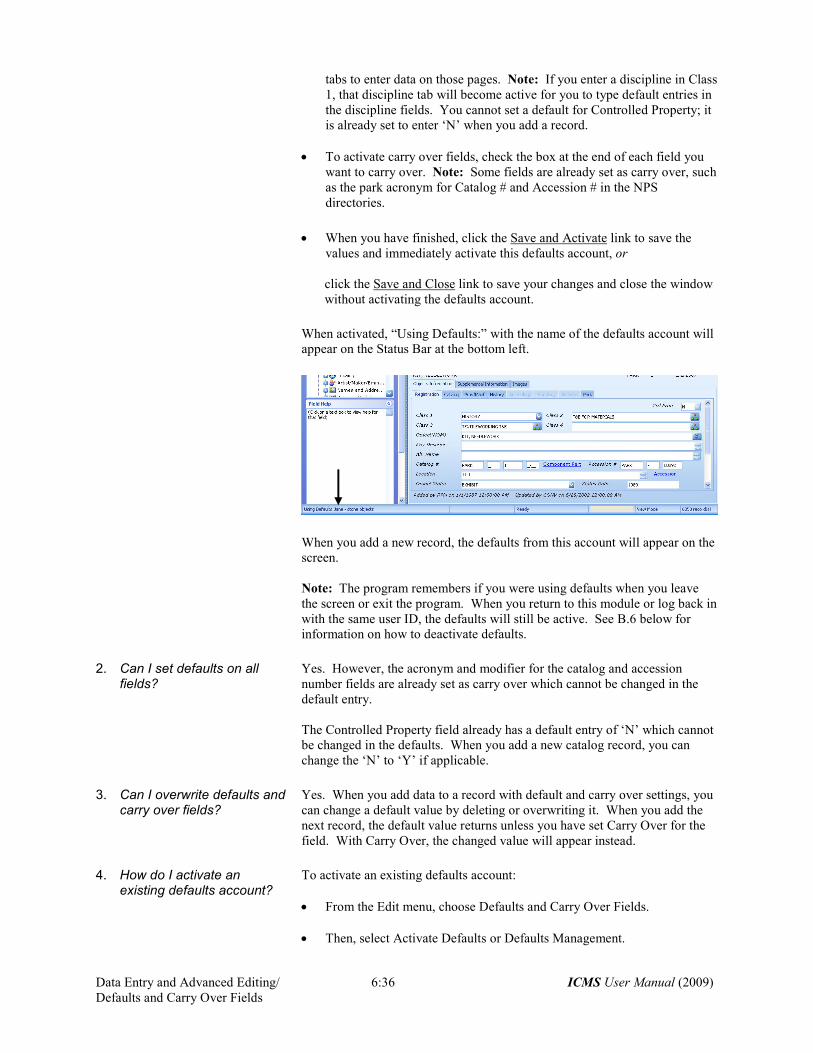
When activated, “Using Defaults:” with the name of the defaults account will
appear on the Status Bar at the bottom left.
When you add a new record, the defaults from this account will appear on the
screen.
Note: The program remembers if you were using defaults when you leave
the screen or exit the program. When you return to this module or log back in
with the same user ID, the defaults will still be active. See B.6 below for
information on how to deactivate defaults.
2. Can I set defaults on all fields?
Yes. However, the acronym and modifier for the catalog and accession
number fields are already set as carry over which cannot be changed in the
default entry.
The Controlled Property field already has a default entry of ‘N’ which cannot
be changed in the defaults. When you add a new catalog record, you can
change the ‘N’ to ‘Y’ if applicable.
3. Can I overwrite defaults and carry over fields?
Yes. When you add data to a record with default and carry over settings, you
can change a default value by deleting or overwriting it. When you add the
next record, the default value returns unless you have set Carry Over for the
field. With Carry Over, the changed value will appear instead.
4. How do I activate an existing defaults account?
To activate an existing defaults account:
• From the Edit menu, choose Defaults and Carry Over Fields.
• Then, select Activate Defaults or Defaults Management.
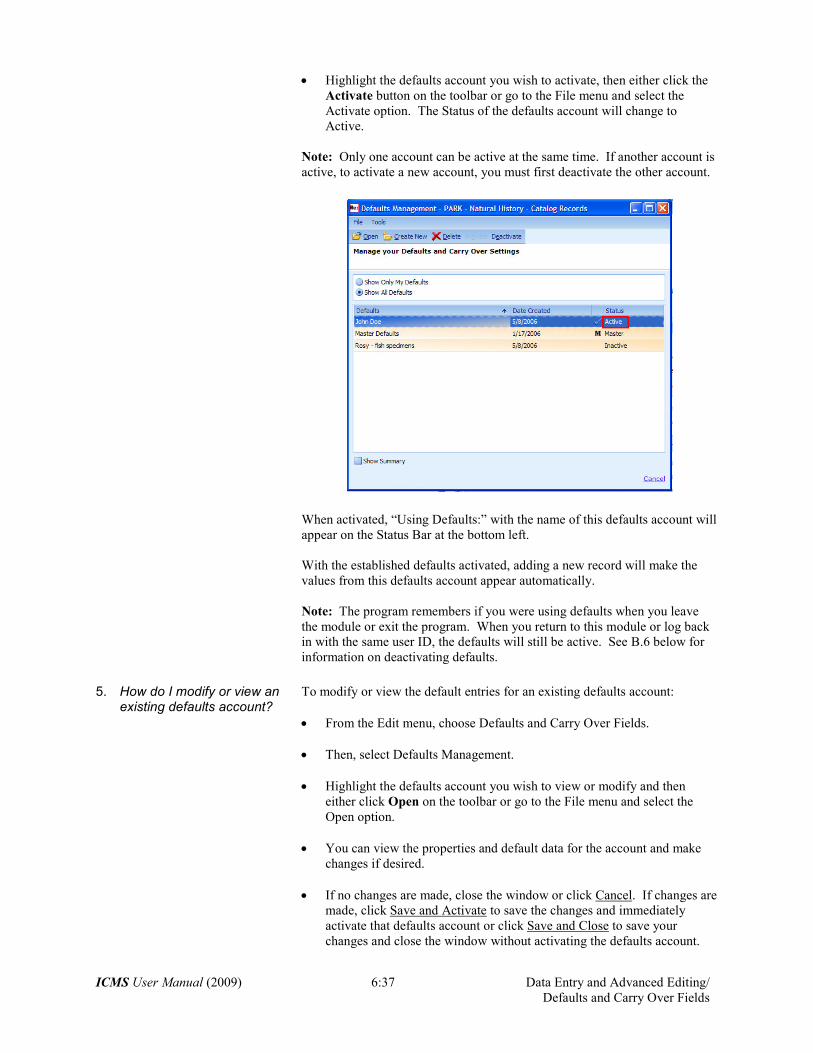
ICMS User Manual (2009) 6:37 Data Entry and Advanced Editing/
Defaults and Carry Over Fields
• Highlight the defaults account you wish to activate, then either click the
Activate button on the toolbar or go to the File menu and select the
Activate option. The Status of the defaults account will change to
Active.
Note: Only one account can be active at the same time. If another account is
active, to activate a new account, you must first deactivate the other account.
When activated, “Using Defaults:” with the name of this defaults account will
appear on the Status Bar at the bottom left.
With the established defaults activated, adding a new record will make the
values from this defaults account appear automatically.
Note: The program remembers if you were using defaults when you leave
the module or exit the program. When you return to this module or log back
in with the same user ID, the defaults will still be active. See B.6 below for
information on deactivating defaults.
5. How do I modify or view an existing defaults account?
To modify or view the default entries for an existing defaults account:
• From the Edit menu, choose Defaults and Carry Over Fields.
• Then, select Defaults Management.
• Highlight the defaults account you wish to view or modify and then
either click Open on the toolbar or go to the File menu and select the
Open option.
• You can view the properties and default data for the account and make
changes if desired.
• If no changes are made, close the window or click Cancel. If changes are
made, click Save and Activate to save the changes and immediately
activate that defaults account or click Save and Close to save your
changes and close the window without activating the defaults account.
Data Entry and Advanced Editing/ 6:38 ICMS User Manual (2009)
Defaults and Carry Over Fields
Note: You can only modify defaults accounts created by you. But you can
use defaults created by others if they chose Allow Others to Use when they
created them. To make modifications to other users’ defaults, open them and
click Save As on the toolbar. Enter a new name and click OK, then close the
Defaults account window. In the Defaults Management window, select the
new name and click Open. You can then modify properties and default data.
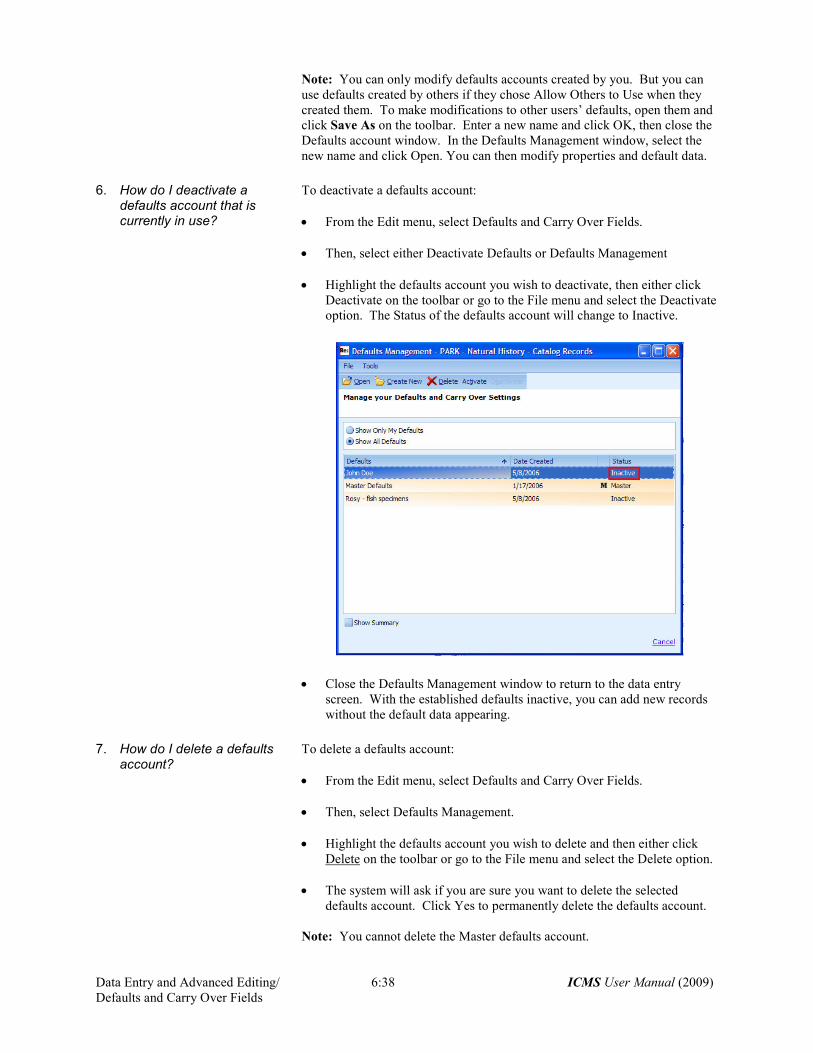
6. How do I deactivate a defaults account that is currently in use?
To deactivate a defaults account:
• From the Edit menu, select Defaults and Carry Over Fields.
• Then, select either Deactivate Defaults or Defaults Management
• Highlight the defaults account you wish to deactivate, then either click
Deactivate on the toolbar or go to the File menu and select the Deactivate
option. The Status of the defaults account will change to Inactive.
• Close the Defaults Management window to return to the data entry
screen. With the established defaults inactive, you can add new records
without the default data appearing.
7. How do I delete a defaults account?
To delete a defaults account:
• From the Edit menu, select Defaults and Carry Over Fields.
• Then, select Defaults Management.
• Highlight the defaults account you wish to delete and then either click
Delete on the toolbar or go to the File menu and select the Delete option.
• The system will ask if you are sure you want to delete the selected
defaults account. Click Yes to permanently delete the defaults account.
Note: You cannot delete the Master defaults account.
ICMS User Manual (2009) 6:39 Data Entry and Advanced Editing/ Macros
VIII. MACROS A. Overview
1. What is a Macro? A Macro is a set of saved keystrokes or keyboard commands.
2. When do I use Macros? Use the Macros function to create data entry shortcuts and save keyboard
work. They can also help prevent misspellings. You only type the entry
once and then reuse it.
Note: Macros are only available in simple text and memo fields.
Example: You may have a large number of objects with the same maker’s
information on them. Instead of typing the information into every
record, set up a macro that allows you to enter the information
with one keystroke.
A macro can also be used to some degree to automate tasks, recording
keystrokes such as Tab as you move from field to field during data entry.
Note: Macros do not record mouse clicks.
In the program you can create and save macros to use at any time. Multiple
macro tasks can be saved in a “macro set”, which is saved as a file on your
computer.
3. Can I create more than one Macro?
Yes. You can create more than one macro to use during data entry. These
are called Macro Sets. You can even have different sets of Macros that can
be used when cataloging different projects.
B. Creating Macros
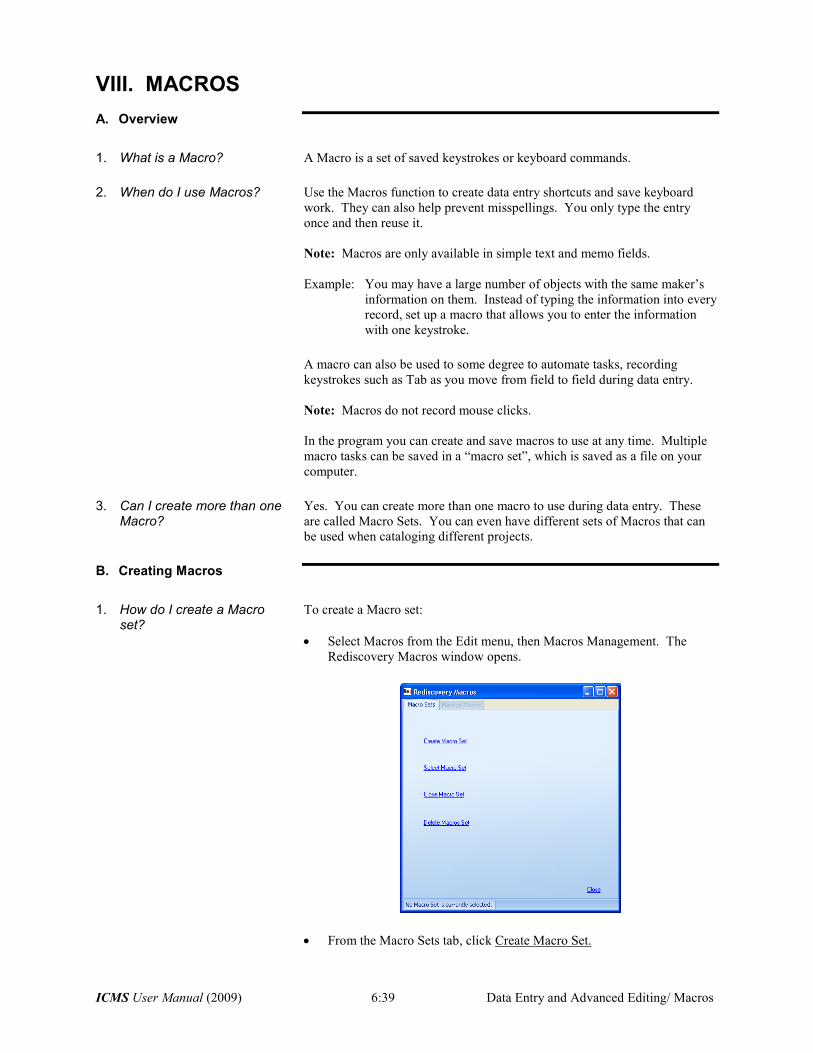
1. How do I create a Macro set?
To create a Macro set:
• Select Macros from the Edit menu, then Macros Management. The
Rediscovery Macros window opens.
• From the Macro Sets tab, click Create Macro Set.
Data Entry and Advanced Editing/Macros 6:40 ICMS User Manual (2009)
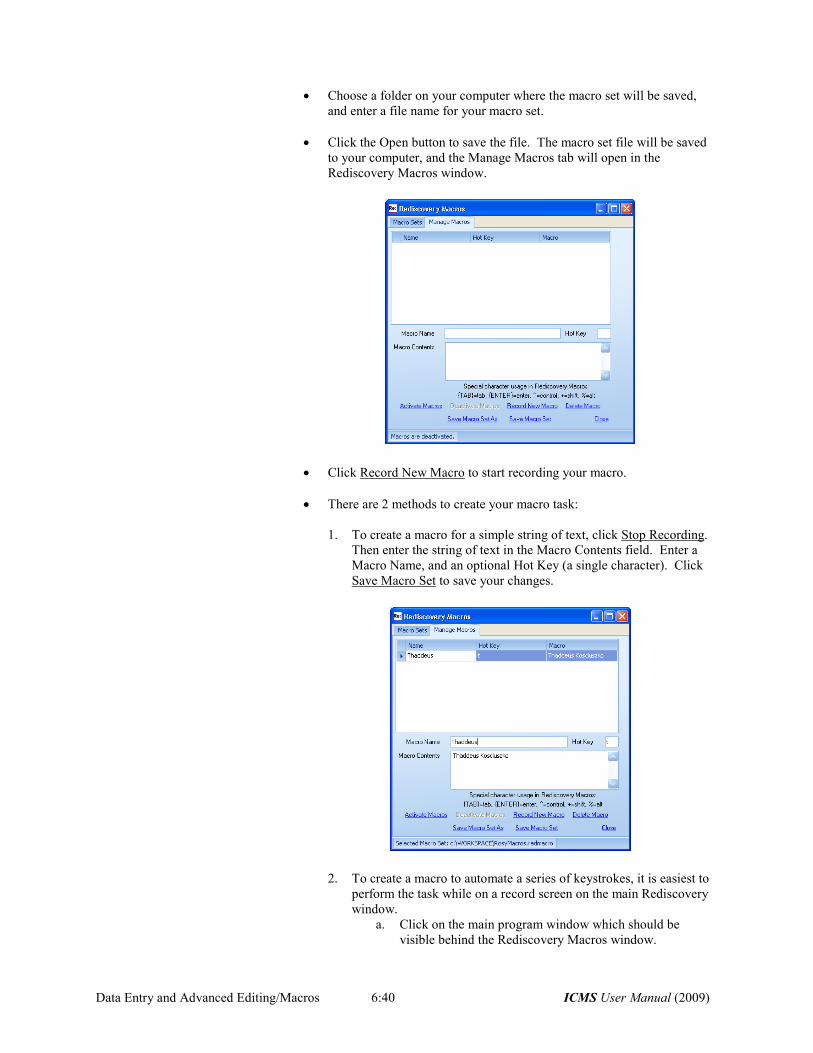
• Choose a folder on your computer where the macro set will be saved,
and enter a file name for your macro set.
• Click the Open button to save the file. The macro set file will be saved
to your computer, and the Manage Macros tab will open in the
Rediscovery Macros window.
• Click Record New Macro to start recording your macro.
• There are 2 methods to create your macro task:
1. To create a macro for a simple string of text, click Stop Recording.
Then enter the string of text in the Macro Contents field. Enter a
Macro Name, and an optional Hot Key (a single character). Click
Save Macro Set to save your changes.
2. To create a macro to automate a series of keystrokes, it is easiest to
perform the task while on a record screen on the main Rediscovery
window.
a. Click on the main program window which should be
visible behind the Rediscovery Macros window.
ICMS User Manual (2009) 6:41 Data Entry and Advanced Editing/ Macros
b. Perform the task you want to record while in add or modify
mode on a record. The macro will record your keystrokes
only. Note: Mouse clicks are not recorded.
c. Return to the Re:discovery Macro window by selecting it
on your Taskbar at the bottom of your computer screen (or
use Alt-Tab to toggle to the Macro screen).
d. Click Stop Recording to stop recording your keystrokes.
e. Enter a Macro Name and an optional Hot Key.
f. You can edit the text in the Macro Contents field to remove
errant keystrokes.
g. Then click Save Macro Set to save your changes.
• Create as many macros for this set as desired.
2. How do I add to an already existing Macro Set?
To add or modify a macro in an existing Macro Set:
• In any mode, select Macros from the Edit menu, then Record New
Macro, or
• Select Macros from the Edit menu then Macros Management and the
Rediscovery Macros window will open. Then click Select Macro Set.
• Choose the macro set file you wish to modify (the file will have a
.redmacro extension).
• Click the Open button to open the macro set. The Manage Macros tab
will open in the Rediscovery Macros window.
• Modify an existing macro or add new macros to the set as instructed in
B.1 above.
• When you have finished adding, deleting or modifying macros, click
Save Macro Set to save your changes. If you want to create a new
macro set instead of overwriting the existing one, click Save Macro Set
As instead. You can then give the macro set a new name and click Open
to save the new set. The original set will be unchanged.
3. How do I delete a Macro within a Macro Set?
To delete a Macro from a Macro Set:
• In any mode, select Macros from the Edit menu, then Macros
Management. The Rediscovery Macros window opens.
• From the Macro Sets tab, click Select Macros Set.
• Choose the file name for your macro set and click Open. The Manage
Macros tab will open in the Rediscovery Macros window.
• Highlight the individual macro you wish to delete and click Delete
Macro.
• Click Save Macro Set or Save Macro Set As to save the changes.
4. How do I delete a Macro Set?
To delete an entire set of Macros:
• Select Macros from the Edit menu, then Macros Management.
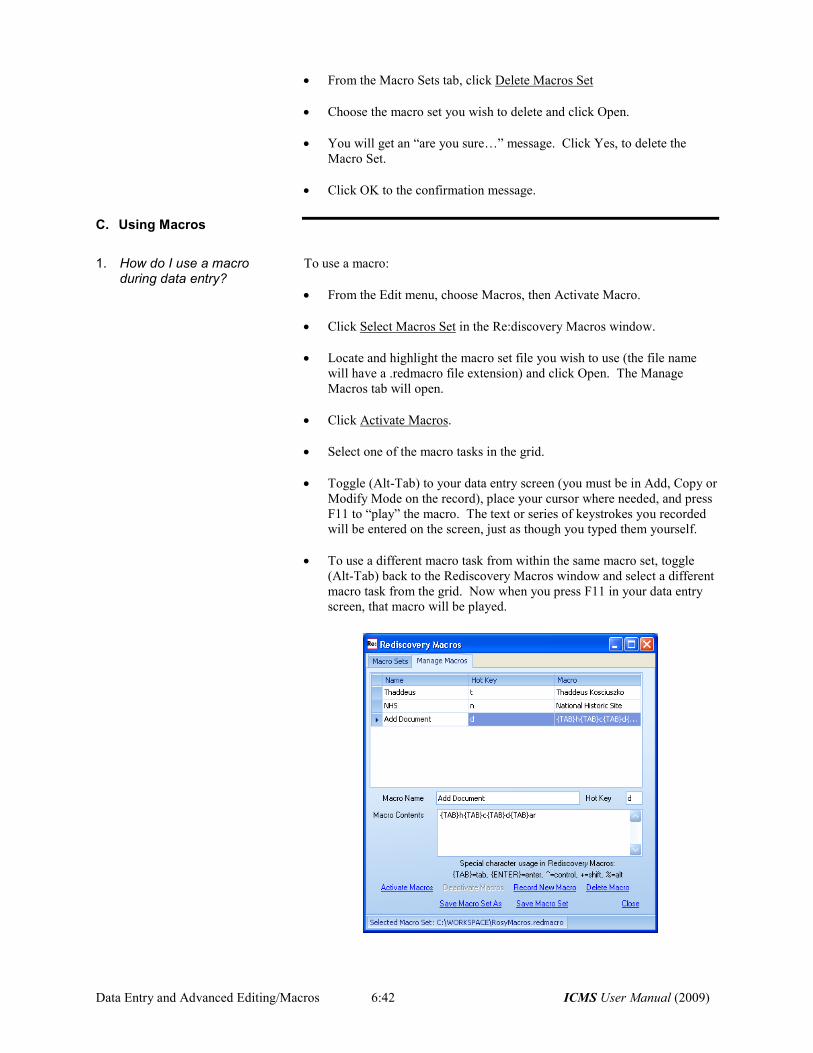
Data Entry and Advanced Editing/Macros 6:42 ICMS User Manual (2009)
• From the Macro Sets tab, click Delete Macros Set
• Choose the macro set you wish to delete and click Open.
• You will get an “are you sure…” message. Click Yes, to delete the
Macro Set.
• Click OK to the confirmation message.
C. Using Macros
1. How do I use a macro during data entry?
To use a macro:
• From the Edit menu, choose Macros, then Activate Macro.
• Click Select Macros Set in the Re:discovery Macros window.
• Locate and highlight the macro set file you wish to use (the file name
will have a .redmacro file extension) and click Open. The Manage
Macros tab will open.
• Click Activate Macros.
• Select one of the macro tasks in the grid.
• Toggle (Alt-Tab) to your data entry screen (you must be in Add, Copy or
Modify Mode on the record), place your cursor where needed, and press
F11 to “play” the macro. The text or series of keystrokes you recorded
will be entered on the screen, just as though you typed them yourself.
• To use a different macro task from within the same macro set, toggle
(Alt-Tab) back to the Rediscovery Macros window and select a different
macro task from the grid. Now when you press F11 in your data entry
screen, that macro will be played.
ICMS User Manual (2009) 6:43 Data Entry and Advanced Editing/ Macros
The example above illustrates a macro set with three tasks. Two of the tasks
are simple text strings. The Add Docs task is a series of keystrokes to
automate adding some data in a catalog record, using a series of authority
table fields. After entering Add Mode, the user presses F11 to play the Add
Docs macro. The macro tabs to the first field (Category) and types H to fill
in “History” from the authority table. Then the macro tabs to the next field
(Classification) and types C to fill in “Communication Artifacts”. Then the
macro tabs to the next field (Sub-class) and types D to fill in “Documentary
Artifact”.
2. How do I stop using a Macro Set?
To stop using the current macro set:
• From the Edit menu choose Macros, then Deactivate Macro, or
• From within the Re:discovery Macros window, click Deactivate Macros.
3. How do I select a different Macro Set to use?
To select a different saved Macro Set:
• In the Rediscovery Macros window or from Macros on the Edit menu,
click Deactivate Macro if they are active.
• On the Rediscovery Macros window, go to the Macro Sets tab and click
Close Macro Set.
• Click Select Macro Set to choose another macro file.
• Then, click Activate Macros to use this set in data entry.
Note: Simply clicking Select Macro Set will also close the current macro set
and allow you to select another macro file.