chapter one introducing auto - ccdmd autocad for the...
TRANSCRIPT

In thIs chapter:
► ExploringAutoCAD’sinterface► WorkingwithAutoCADfiles► Gettingtoknowbasictools► Drawingaroughsketch
Chapter one
Introducing AutoCaD

30 chapter one
Introduction
ThewaythingswereintheElizabethanera,adirectorwouldhaveexpectedasetbuildertoproduceasetbyhandwithoutanydrawings.Overtime,theatrehasembracedthenewestandmostinnovativetechnologies.Ithasprogressedfromcandlestocomputerizedlightingboards,frombackstageFoley artiststosurroundsound,andfromhand-operatedfly systemstomotorizedflysystems.Asanewapproachtodrafting,whichhaslargelybeendonebyhand,manytheatreshavebeguntousecomputer-aideddrafting(CAD,alsocommonlyreferredtoascomputer-aideddesign)software.
Originallydevelopedtolowercostsandreducethetimeneededtocreatecomplexprototypes,CADsoftwaregeneratestwo-andthree-dimensionalgraphicsbyprocessinggeometriccalculations.Thishelpsdesignersfromseveralindustriesprepareaccuratedrawingsandspecificationsforproductionpurposes.IndustriesthatuseCADincludeengineering,manufacturing,architecture,interiordesign,andofcourse,entertainment.1
Fortheatre,CADcanbeusedtogenerateaccurateanddetailedtechnicaldrawingsforsetdesigns,butitalsohasmanyadditionalbenefits.Forexample,drafterswhouseCADcanworkoutcalculations“onthefly,”reducethetimeandenergyneededforlaboriousdrawingtasks,andmakequickalterationstoexistingdrawings.Furthermore,CADdrawingfilescanbeeasilyemailedtotheatresaroundtheworld,wheretheycanbeprintedondemand.
OneofthemostexcitingaspectsofCAD—andwhatreallysetsitapartfromhanddrafting—isthatitallowsthedirectorandproduction teamtovirtually“walkthrough”thesetinthreedimensionstoscrutinize,review,andmodifyitbeforeitisbuilt.It’slikehavingadigitalversionofadesigner’straditionalmaquette.
Inthisbook,we’llintroduceyoutooneofthemorepopularCADapplications,AutoCAD,tostartyouonyourwaytodraftingaccuratetechnicaldrawingsforsetdesigns.Nowlet’sgetthisshowontheroad!
Downloading a Free Copy of AutoCaD
Ifyouareastudent,youareprobablyworkingonalicensededucationalversionofAutoCADatschool.IfyouwouldliketoworkwithAutoCADonyourhomecomputer,youcanobtainafreecopyfromtheAutoDeskEducationCommunityatthefollowinglink:
http://students.autodesk.com1 Yahoo Education Encyclopedia,s.v.“computer-aideddesign,”accessedAugust9,2011,http://education.yahoo.com/reference/encyclopedia/entry/computerAD.
IntroducIng autocad 31
1Getting Started with the Set-Up
Thoughyou’reprobablyeagertojumprightinandstartdrawing,beforeyoustartdraftinginAutoCAD,youneedtounderstandthebasicsofusingtheapplication.Let’shavealookatAutoCAD’sinterface,drawingfiles,andsomedrawingcommands.ThiswillmakeiteasiertounderstandthebookandcommunicatewithotherAutoCADusers.Nowlet’sgetstarted.
LaunChing autoCaD
AutoCADlaunchesjustlikeanyotherWindowsapplication.
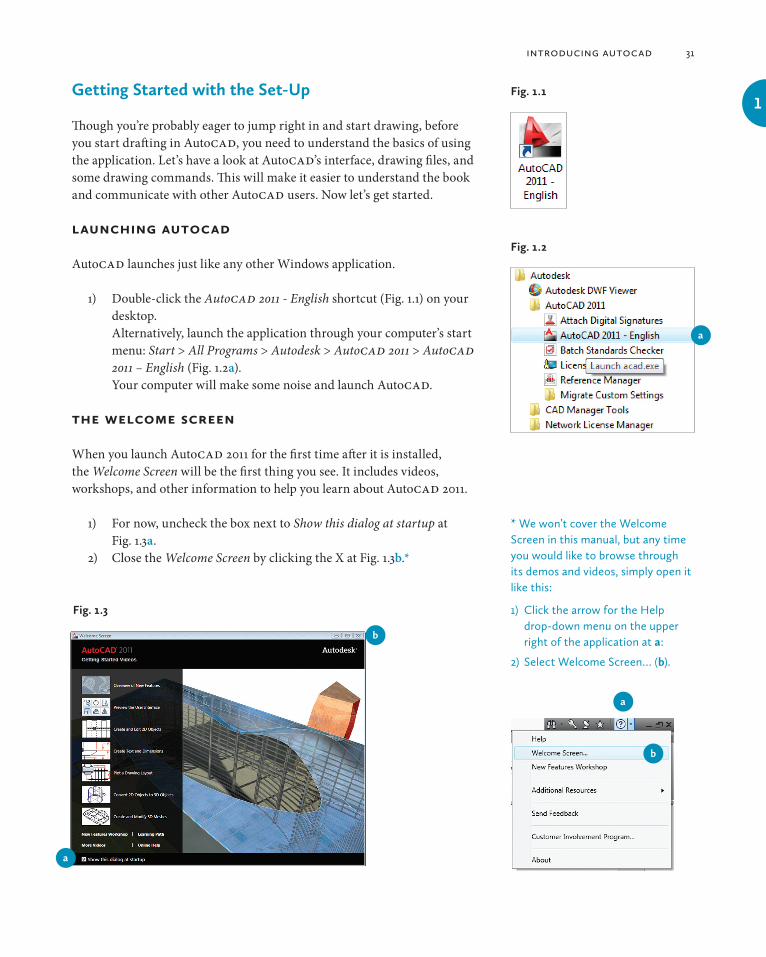
1) Double-clicktheAutoCAD 2011 - Englishshortcut(Fig.1.1)onyourdesktop.Alternatively,launchtheapplicationthroughyourcomputer’sstartmenu:Start>All Programs>Autodesk>AutoCAD 2011>AutoCAD 2011 – English(Fig.1.2a).YourcomputerwillmakesomenoiseandlaunchAutoCAD.
the WeLCome SCreen
WhenyoulaunchAutoCAD2011forthefirsttimeafteritisinstalled,theWelcome Screenwillbethefirstthingyousee.Itincludesvideos,workshops,andotherinformationtohelpyoulearnaboutAutoCAD2011.
1) Fornow,unchecktheboxnexttoShow this dialog at startupat Fig.1.3a.
2) ClosetheWelcome ScreenbyclickingtheXatFig.1.3b.*
Fig. 1.1
Fig. 1.2
Fig. 1.3
a
b
a
* We won’t cover the Welcome Screen in this manual, but any time you would like to browse through its demos and videos, simply open it like this:
1) Click the arrow for the Help drop-down menu on the upper right of the application at a:
2) Select Welcome Screen… (b).
a
b

32 chapter one
Fig. 1.6
a
the appLiCation WinDoW
AutoCADrunswithintheWindowsoperatingsystemandopensasawindowonyourcomputerscreen.2ThisApplication WindowofferscommandsandoptionsforAutoCADdrawingfiles.
HavealookattheApplication Window.Thetitle bar istherowthatrunsacrossthetopofthewindow(seealsoFig.1.12onpage36).Inthecentreofthetitle bar,you’llseeAutoCAD 2011 - Drawing1.dwg,whichisthenameofthecurrentdocument.OntheleftaretheApplication MenuandtheQuick Access Toolbar.OntherightaretheInfoCenterandthebuttonsusedtocontroltheApplication Window.
AswithallWindowsapplications,theAutoCADwindowcanbemanagedwiththebuttonsinthetoprightcornerofthetitle bar.
TestouttheMinimize, Restore,andMaximizebuttons(Table1.1)toseehowtheybehave.NoticehowtheapplicationisminimizedtotheWindowstaskbaratthebottomofyourcomputerscreen(Figs.1.4,1.5).IfyouaccidentallycloseAutoCAD,there’snoneedtoworry;youcaneasilyrelaunchitasshownearlier.
Table 1.1. Window buttons
Full screen window Floating window
Minimize: Shrinks the Application Window to the Windows taskbar at the bottom of your computer screen
Restore: Reduces the Application Window to a smaller floating size
Maximize: Increases the Application Window to full screen
Close: Closes the Autocad application
NoticethatwhenyouclicktheRestore button,itbecomestheMaximizebuttonastheapplicationswitchestoafloatingwindow.Inthisstate,theApplication Windowcanberesizedtosuityourneeds.
1) MovethemousepointertoacorneroranedgeoftheApplication Window.Thepointerwillbecomearesize handle (Fig.1.6a).
2) Pressanddragthemousetoadjustthewindowtoyourliking.
Fig. 1.5
Windows Taskbar: Autocad window floating or maximized
Fig. 1.4
Windows Taskbar: Autocad window minimized
2 AlthoughthereisaversionofAutoCADavailablefortheMac,thisbookwilldealonlywiththeWindowsversion.

IntroducIng autocad 33
1the applIcatIon Menu
WhenyouclickthebigredAatainFig.1.7,theApplication Menu willopen.Itcontainscommoncommandsformanagingfiles,mostofwhichwillbediscussedlaterinthebook.TakenoteoftheDrawing Utilitiesitemat b,whichcontainsoptions,suchasUnits,foradjustingyourdrawing.
AlsohelpfularetheRecent DocumentsandOpen Documentsbuttonsat c.Recent Documentsprovidesyouwithanalphabeticallistofthemostrecentlyopeneddrawings.Tokeepafileinthelistlong-term,clickthepush-pinbuttonatd.
ClickingtheOpen DocumentsbuttonatcshowsyouthelistofdocumentscurrentlyopeninAutoCADandprovidesyouwithaquickwaytoswitchbetweenthem.
Noticethatthismenualsoprovidesyouwithabuttonateforquickaccesstotheapplication’smainOptionsdialogueboxwhereyoucanchangesettings,suchasthebackgroundcolour*ofthedrawingarea.
Fig. 1.7
* Note that a number of words, such as “color,” “center,” “dialog,” etc. are spelled according to American conventions within the Autocad interface.
a
c
d
b
e

34 chapter one
the QuIck access toolbar
TotherightoftheApplication MenuistheQuick Access Toolbar,whichcontainsmanyofthesamecommands.
1) Hoveryourmouseoverthebuttonstoseetheirtooltips:New... (Fig. 1.8a),Open... (b),Save (c),Save As... (d),Undo (e),Redo(f),andPlot... (g)(orPrint...).NoticethattotherightoftheUndoandRedobuttonsateandfaredownwardarrowbuttonsthateachopenadrop-downlistofrecentactionsyouperformedinyourdrawing.Youcanjumptoanyoftheseactionswithjustaclick.
the Infocenter
Includedontherightsideofthetitle baristheInfoCenter.ItstwokeyfeaturesaretheHelpbuttonatFig.1.9aandtheType a keyword or phrasesearchfieldatb.
TheHelpbutton(a)simplylaunchesAutoCAD 2011 Helpinyourdefaultbrowser.
1) ClicktheHelpbutton.TheAutoCAD 2011 Helphomepagewillopen.NoticetheSearchfieldatthetoprightofthewebsiteand,inthenavigationbarontheleft,theUser’s GuideandCommand Referencelinksareparticularlyuseful.*
YoucanalsofindinformationonatopicdirectlywithinAutoCAD.Trythefollowingexample.
1) TypeInfoCenterinthesearchfieldatFig.1.10aandpressEnter.Adrop-downlistappears.Noticethatwithinthelist,majordarkgreyheadingscollapseandexpandverticallywithaclick,andtherearenavigationarrowstotherightofthesubsectionheadings(b)toallowyoutoscrollthroughmoreinformationhorizontally.
2) ClickSearch For Information at cundertheUser’s Guidesection.AbrowserwindowwillopentheappropriatesectionofAutoCAD 2011 Help.
Fig. 1.8
Fig. 1.9
* You can also launch the Help home page by typing “Help” in the command line and pressing Enter.
Fig. 1.10
ab
b
a
c
a b c d e f g

IntroducIng autocad 35
1WorkSpaCeS
Aworkspaceisthecollectionofitemsthataresetuptocreatedifferentuserinterfaces(UI)forspecifictypesofdrawings.IfyoulookatFig.1.12(page36),theworkspaceismadeupoftheribbon,drawing area,command window,andstatus bar.
AutoCADoffersseveraldifferentworkspaces.Setdesignersanddraftersaremostlikelytousethe2D Drafting & Annotationworkspaceandthe3D Modelingworkspace.
Forthetechnicaldrawingsoftheset,we’llworkwith2D Drafting & Annotation,whichopensbydefaultwhenyoulaunchtheapplicationforthefirsttime.We’llalsoworkwiththe3D ModelingworkspaceinChapter6tocreateathree-dimensionaldrawing.
Checktoseewhetheryourworkspaceissettosomethingotherthanthedefault.Ifitis,changeitbacknow:
1) ClicktheWorkspacedrop-downmenuatthetopleftoftheapplication.
2) Select2D Drafting & Annotation atFig.1.11a.
Afterusingaworkspace,youwillquicklybecomeaccustomedtowherethingsarelocatedandbeabletoworkefficiently.
the 2d draftIng & annotatIon Workspace
Nowlet’sexaminesomebasiccomponentsofthetwo-dimensionalworkspace.
Fig. 1.11
a

36 chapter one
Application menu
Fig. 1.12
the ribbon
Belowthetitle barinFig.1.12,youwillfindapalettecalledtheribbonwhichcontainsmanyoftheapplication’scommandsandoptions.
1) ClicktheHome,Insert,etc.,tabsontop.You’llseethateachcontainsdifferentsetsofcommandbuttonsinsiderectangularpanels.
2) IntheHometabatFig.1.13a,clickthearrownexttothetitleoftheDrawpanelatb.Thisopensamenucalledaslide-out orfly-outmenu,whichcontainsadditionalcommands.
3) Clickotherarrowsonthepanelsandyou’llseetheyalsocontainadditionalcommandbuttons.
4) Wheneveryouneedto,clickthepush-pinbutton(Fig.1.14a)tolockaslide-outmenuopen.
Quick Access Toolbar InfoCenter
title bar
ribbon
drawing area
command windowapplication status bar
Fig. 1.14
a
Fig. 1.13 a
b

IntroducIng autocad 37
1tabs and panels
Asyoujustsaw,theribboncontainsbuttonsthatallowyoutoactivateAutoCADcommandsordisplayoptionsandinformation.Thebuttonswe’llusefrequentlyinthebeginningcanbeviewedintheHometabpanels:
DrawactivatesdrawingcommandssuchasLine,Arc,Circle,Rectangle,Polyline,andHatch,whichyouwillusetodrawlinesorobjects.
Modifyactivatescommandsthatallowyoutomodifylinesandobjectsyouhavedrawn.SomeexamplesareErase,Rotate,Scale,Stretch,Copy,Mirror,Offset,andFillet.
Layersactivatescommandstoadddrawinglayers,orhideorlockthem.ThispanelalsocontainscommandstoconfigurelayerLinetypesandColors,andtoselecttheCurrentlayertodrawon.
Propertiescontrolsthepropertiesthatareassociatedwitheachobjectthatyouhavedrawn.Severaldrop-downlistscancontrolobject Color, Lineweight,Linetype,Transparency,andPlot Style.Mostobjectsinheritthedefaultpropertiesassignedtothembythelayer(ByLayer)inwhichtheyaredrawn,butgroupsofobjectscalledblockscanbeassignedtheirownproperties(ByBlock)andindividualobjectscanalsobeassignedtheirownuniqueproperties.
UtilitiescontainscommandsusedtomeasureaDistance,Radius,Angle,andAreainatwo-dimensionaldrawing.Itwillcomeinveryhandywhenwebegindrafting.Besidesthemeasuringcommands,you’llfindtheID Pointbutton,whichisusedtodeterminetheexactlocationofapoint.
Laterwhenweaddmeasurementsandlabelstodrawings,we’llalsoexaminepanelssuchasDimensionsintheAnnotatetabandwe’lllearnaboutpanelsthatarespecificto3Ddrawings.Ifyoudon’tunderstandmuchofthisrightnow,don’tworry;you’llcatchonasweputitintopractice.

tooltIps and the f1 key
Agreatfeaturetotakeadvantageofontheribbonisthetooltip.Pauseyourmousepointeroverabuttonontheinterface,andasmallpop-uptipwillappear.AsyoucanseeintheLinecommandtooltipinFig.1.15,youcanpresstheF1keytoopentherelatedhelptopic(a)whilethetooltipisactiveorafterthecommandisactivated.
38 chapter one
Fig. 1.15
a Fig. 1.16
a
c
b
the MInIMIze rIbbon button
Anotherneatfeatureoftheribbonisthespace-savingMinimizebutton.It’sasmallupwardarrowbuttontotherightoftheExpress Toolstab(Fig.1.16);noticethesmalldrop-downarrownexttoit.
1) Clickthedrop-downarrow(Fig.1.16a).You’llseeamenuwithfouroptionsforminimizingtheribbon.
2) Selectoneofthefirstthreeoptionstosetthelevelofminimizationyouwant.TheCycle through Alloptionat csetsthebuttonsoyoucanalternatebetweenallthreeminimizationlevels.
3) Now,clicktheupwardarrowbuttonat b.Seehowyoucanswitchbetweenthefullribbonandtheminimizedoptionyouchose.
4) Clickitagaintoswitchback.

IntroducIng autocad 39
1
the CommanD WinDoW
AtthebottomoftheApplication Window,you’llfindthecommand window (Fig.1.17).Thisisapalettethatgivesyoufeedbackbydisplayingcommands,options,messages,andvariables.Italsopromptsyouforkeyboardandmouseinput.Thechronologicallistofeverycommandyou’veactivatedduringaworksessioncanbeseenbyusingthescrollingarrowsattherightorbyresizingthewindowusingthe verticalresizehandle onthetopedgeofthepalette.
Theinputlineatthebottomofthecommand windowiscalledthecommand line.ItallowsyoutousethekeyboardtotellAutoCADwhattodo.
Oftenwhenyouactivateacommandbypointingandclickingyourmouse,thecommand windowletsyouknowwhatyournextstepisandwhatinformationyouhavetoenter.
the appLiCation StatuS bar
You’llfindtheapplicationstatus bar (alsocalledthe status bar) atthebottomoftheworkspace.Thestatus barcontainsseveralbuttonsforturningdrawinganddisplayoptionsonandoff.Thesebuttonsarehigh-lightedinbluetoindicatethattheyareturnedon.We’llturnonthesebuttonsasweneedthemthroughoutthemanual.Fornow,togglethemalloff.*
Attheleftendofthestatus bar,you’llseethreesetsofnumbersseparatedbycommas(Fig.1.18a).Thisisthedrawingcoordinatesdisplay.ThefirstnumberistheX coordinateofyourcursorandthesecondoneistheYcoordinate.TheXcoordinatereferstothehorizontallocationofapointonagrid,whereastheYcoordinatereferstotheverticallocationofthesamepoint.Thethirdnumber,knownastheZcoordinate,isonlyactivewhenyoudraftin3D.Together,thesedisplaythecoordinatevaluesofyourcurrentcursorpositionwithinthedrawingarea.
TrymovingyourcursoraroundtoseehowitscoordinateschangeatFig.1.18a.**
Fig. 1.17
command line
Fig. 1.18
a
* You’ll need to pay a little more attention to the Transparency button, which still looks highlighted when it is turned off.
** Looking at the coordinate values, you’ll see that inches are displayed in decimals. This is done for the sake of precision, but it is more common to format inches with fractions. We’ll change this a little later.

FLoating anD DoCking WorkSpaCe eLementS
AutoCADletsyoupersonalizetheworkspacethewayyoulikeit.Bydefault,thetabsandpanelsadheretothedockingregionatthetop,sidesandbottomofthedrawingarea.Butasyou’llsee,youcaneasilydragitemsaroundtheinterface.Forexample,youcandragthetabstochangetheirorder.It’salsopossibletodetachandreattachpalettesandpanelsatyourconvenience.Thisiscalled floatinganddocking.
Tofloatapanel:
1) Clickthepanel’snametodragitintothedrawing area atFig.1.19a.Thepanelwillfloatanditsmovehandlewillappearonitsleft.Youcanmoveitaroundandplaceitwhereyoulike.
2) ClicktheReturn Panels to Ribbonbuttonatbtoresetitintheribbon.Ordragitbackintoplaceontheribbon.
Tofloattheribbon:*
1) Placethecursoroveranytabandright-clicktoseetheribbon’scontextmenu(theright-clickmenu).
2) SelectUndock atFig.1.20a.Theribbonpalettewillfloatonthedrawing area.
3) Right-clickthepalette’smovehandle,whichistheverticalgreybaronitsleft,andyou’llseethePropertiesmenuat Fig.1.21a.(Notethatyoucanalsogetthismenubyclickingthethirdbuttonfromthetop.)Thiswillgiveyouoptionstodocktheribbontotheleftorrightofthedrawingarea.Whenyouneedmorespace,theAuto-hideoptionatFig.121bcanbehandy.Youcanalsopreventapalettefromdockingifyoupreferittofloatbydefault.**
Fornowwe’llreturnthepalettetoitsoriginalspot.
1) Pressandholdthemovehandleanddragitbacktothetopofthedrawing areatoseewhathappens.Whenthepointerapproachestheedge,thepalettewillbereplacedbyarectangularoutlineindicatingitisreadytobedocked.
2) Letgo,andtheribbonwilldockitself.***
Nowthatyouarefamiliarwiththeinterface,youcanrearrangetheworkspacethewayyoulikeit.TheSave Current As…itemoftheWorkspacedrop-downmenuletsyounameandsaveyourcustomizedworkspace.
40 chapter one
Fig. 1.20
a
* The name of the palette becomes visible once it’s floating.
Fig. 1.21
a
b
Fig. 1.19
b
a
** If you accidentally close the float-ing ribbon palette, just enter the word “ribbon” in the command line.
*** You can often double-click the move handle of a floating or docked palette to instantly change its state. Try double-clicking the move handle of the command window to float it. Now do it again to dock it.

the DraWing area
TheareareservedfordrawingfilesisthedarkspaceinFig.1.22.Thisiscalledthedrawing area.AutoCADusesdarkgreyasthedefaultbackgroundcolour.****
Noticethedrawing’s Modeltab(Fig.1.23a)atthebottomleftofthedrawing area.Itshowsyouthatyouarecurrentlyworkinginthedrawing’smodel space.
1) Clickthe Layout 1tabatthebottomleftofthedrawingarea(Fig. 1.23b).TheMODELbutton(notthesameasthetab)ontherightsideofthestatus barwillchangetoPAPERtoshowthatpaper spaceisturnedon.Thiswhitearearepresentsasheetofpaperusedwhenyourdrawingisreadytoprint.
2) ClicktheModeltab(a)atthebottomleftoftheapplicationwindowtoreturntomodel space.
the VIeWcube
YoucanseetheViewCubeintheupperrightcornerofthedrawingarea.WewillcoverthisinChapter6,sowe’llturnitofffornow.
1) ClicktheViewtabontheribbon.2) LocatetheWindowspanel.3) ClickUser Interface.Adrop-downlistwillappear.4) UncheckViewCube.
IntroducIng autocad 41
1
**** Often the drawing area in this manual has been changed to white for the sake of clarity. If you’d like to change the background colour, right-click the drawing area and select Options… from the context menu. Then select Display, click the Colors… button and choose White from the Color: drop-down menu; click the Restore all contexts button to return to the default colours.
Fig. 1.22
World Coordinate System (Wcs)
The drawing’s Minimize, Restore/Maximize, and Close buttons
ViewCube
Navigation bar
Crosshair cursor
Fig. 1.23
a b

42 chapter one
the naVIgatIon bar
Thenavigation barcontainstoolsthathelpyoulookatyourdrawing.Youcandecidewhichtoolsarevisiblebyclickingthearrowforthefly-outoptionsmenuatthebottomofthebar.Themostcommonlyusedtoolsfor2DdrawingsarethePanandZoomtools(see Fig.1.24aandb).We’lllookattheseindetaillater.
the World coordInate systeM (Wcs) and user coordInate systeM (ucs)
Rememberthedrawingcoordinatesattheleftofthestatusbar?Theyaremeasuredinrelationtotheworld coordinate system(WCS).Ifyouthinkofthedrawingasadigitalworld,theWCSisthefixedoriginofthecoordinatesthatdefineadrawing’spoints.WhentheGrid Displaysettingonthestatus barison(turnitoffafteryouexperiment),you’llalsoseearedhorizontallinerepresentingtheX-axisandagreenverticallinefortheY-axisofthecoordinatesystem.
Whentheoriginiswithinthedrawingarea,theWCSiconwilloverlaytheorigin.Iftheoriginisnotinthedrawingarea,theiconwilldockitselfinthelowerleftcornerofthedrawing area.
Sometimesitisusefultomovetheorigintocreateauser coordinate system(UCS),whichgetsitsnamebecauseitisuser-defined.However,whenanobjectwithaUCSiscopiedfromonedrawingtoanother,AutoCADwillalwaysdroptheUCSandreorienttheobjecttotheWCS.Asageneralrule,trytostickwiththeWCS.ThereisnoneedtoworrymuchaboutUCSyet,asthisisafairlyadvancedtopic.
Fig. 1.24
a
b
Fig. 1.25
Docked Wcs with origin outside of drawing areaWcs with origin visible within drawing area

Working with Drawing Files
Drawingfilesarethemostimportantdocumentsforyourprojectbecausetheystoreyourwork.Theyareopenedinthedrawingareaandsavedseparatelyfromtherestoftheworkspace.
Creating neW FiLeS From tempLateS
AutoCADstartsnewdocumentsfromtemplates.Atemplatecontainsasetofpreferencesallowingyoutocreatenewfileswithouthavingtomakechangestothesettingseachtime.Forexample,templatessetdrawing unitsandthebackgroundcolourofthedrawing area.
Aswe’veseeninFig.1.12,whenAutoCADlaunches,anewfilecalledDrawing1.dwgopenswithitbydefault.Thisistypicallyafilemadefromatemplatethatcontainspreferencesfortwo-dimensionaldrafting.
Let’scovertheNewcommandtogiveyouabetterideaoftemplates.*
It’stimetocreateanewfile.
1) ClicktheApplication MenuintheupperleftcornerofAutoCAD.2) SelectNew>Drawingfromthemenuoptions(Table1.2).TheSelect
templatedialogueboxappears.3) Selectacad.dwt (Fig.1.26a),whichisatemplatefile.4) ClicktheOpenbutton(b).AblankdrawingcalledDrawing2.dwg
willopeninthedrawing area.
IntroducIng autocad 43
1* Throughout the manual, tables such as Table 1.2 are provided to show you ways to activate a command either with your mouse or with your keyboard.
Table 1.2. New command
8 Application menu:
>
8 Quick Access Toolbar:
(New/Qnew)
7 Keyboard shortcut: Ctrl + N
7 Command line entry: new
Fig. 1.26
a
b
AutoCADisusedinmanydifferentindustries,soitoffersachoiceoftemplatestostartdrawingswith.Thetwothatarecoveredinthismanualaretheclassicacadtemplateandtheacad3D template.Bothhavedecimalformattedimperialinchesasthedefaultunits.Thismeans,forexample,thataquarterofaninchwillbedisplayedas0.25″.

SWitChing anD managing DraWing WinDoWS
JustliketheApplication Window,drawingfilesalsohaveMinimize, Restore, Maximize,andClosebuttonsjustbelowtheribbontotheright(Fig.1.27).Thesebuttonsareparticularlyusefulforswitchingbetweenfileswhenyouareworkingwithmorethanoneatatime.
1) Clicktheactivedrawing’sMinimizebutton.Yourdrawingfilewillminimizewithinthedrawing areaandyou’llalsobeabletoseetheotherdrawingeitherrestoredorminimized.
2) ClicktheMaximizebuttonforoneofyourtwodrawingssothatitfillsthedrawing areaagain.
ProbablythesimplestwaytoswitchbetweenopenwindowsisthroughtheSwitch Windowsbutton.
1) ClicktheViewtab.You’llseetheWindowspanelattherightside.2) ClicktheSwitch WindowsbuttonasshownatFig.1.28a.Adrop-
downlistwillappear,allowingyoutoselectthedrawingyouwanttoswitchto.
YoucanalsousethebuttonsintheApplication MenuthatweredescribedinFig.1.7(seepage33).
1) ClicktheApplication Menu(thebigredA)intheupperleftcornerofAutoCAD.
2) ClicktheOpen Documentsbutton.You’llseetheOpen Documentslistappear,whichallowsyoutoselecttheopendocumentyouwanttoworkon.
Lastly,youcanusetheCtrl+TabandShift+Ctrl+Tabkeycombinationstomoveforwardsandbackwardsthroughthesequenceofopendrawings.
Saving DraWing FiLeS
Savingyourfilesletsyoustoreyourdrawingsuntilyouarereadytoworkonthemagain.TheAutoCADdrawingfileextension is.dwg(anabbreviationof“drawing”),anditisautomaticallyaddedtotheendofthefilenamesyousave(Table1.3).Thisfileextensionletsthecomputerknowwhichapplicationisusedtoopenthedocument.Ifitisnotvisible,yourWindowsoperatingsystemmaybesettohideextensions;ifso,itisusefultochangeyourWindowsfoldersettingstodisplayfileextensions.Iftheextensionisremovedfromafile’sname,youmayencounterdifficultieswhenyoutrytoopenit.*
44 chapter one
Fig. 1.27
CloseMinimize Restore
Fig. 1.28
a
Table 1.3. Sample drawing file
Drawing1.dwg
* Remember that getting into the habit of saving frequently is good practice. This helps you avoid losing your work should Autocad or your computer ever crash.

IntroducIng autocad 45
1ConnectyourUSBdriveifyouhaveone—moreonthislater.Next,
nameandsaveoneofthefilesimmediately:
1) ActivatetheSave As…commandbychoosingamethodinTable 1.5.TheSave Drawing As dialogueboxwillopen(Fig.1.29).
2) ClicktheSave in: drop-downlistshownatFig.1.29a.3) Selectyourmainsavinglocation.Inthisbook,it’saportableUSB
drive,thoughyoumaywanttosavetoanotherlocation.4) Namethedocumentrough_sketchatb.**5) ClicktheSavebutton(c).
Table 1.4. Save command
8 Quick Access Toolbar:
8 Application Menu:
7 Keyboard shortcut: Ctrl + S
7 Command line entry: save
Table 1.5. Save As command
8 Quick Access Toolbar:
8 Application Menu:
7 Keyboard shortcut: Shift + Ctrl + S
7 Command line entry: saveas
** The way you name your files helps you sort and find them easily. In this book, file names use underscores (_) instead of spaces between words. File names for the set drawings will begin with a capital letter while other drawings will stick with lowercase letters. A rule used to name files is called a naming convention. For other options for naming files effectively, see Appendix A on naming files.
Fig. 1.29
a
b
c

draWIng VersIons
Occasionally,youmayneedtoopenyourdrawingfilesinanolderversionofAutoCAD.Forthissituation,youhavetheoptiontosaveyourdocumentinvariousversionsofAutoCADintheFiles of type:drop-downmenu.Wheneveryouareinsuchasituation,refertotheoptionsinTable1.6todecidewhichfiletypetochoosefortheversionofAutoCADyouwillbeusing.*
46 chapter one
Table 1.6. AutoCaD versions and file types
Autocad Version Files of type
v13, v14, 2000, 2001, Autocad lt97/lt98/r14/2000/2002, 2003 lt2000/Drawing (*.dwg)
2004, 2005, 2006 Autocad 2004/ lt2004 Drawing (*.dwg)
2007, 2008, 2009 Autocad lt2004/2007 (*.dwg)
2010, 2011 Autocad 2010 (*.dwg)
* Note that settings such as drawing units that apply directly to your document will be saved with your file. You won’t need to reset those each time you reopen it. However, workspace settings are not saved with files.

dIsplayIng the full fIle path
IfyouarenewtocomputersandAutoCAD,youmayfinditdifficulttofindyourfiles.Itispossibletoseethecompletepathtoanopenfileinthetitle barifyouchangetheOpen and SaveoptionsintheOptionsdialoguebox:
1) ClicktheApplication Menubutton.2) SelecttheOptionsbuttononthelowerrightsideofthemenu(see
Fig.1.7onpage33).TheOptionsdialogueboxwillopen(Fig.1.30).3) SelecttheOpen and Savetabasshownata.4) LocatetheFile Openboxatthetoprightside.5) CheckofftheDisplay full path in titleoption(Fig.1.31a).
AnotherquickwaytoopentheOptionsdialogueboxistoright-clickthedrawing areaandselectOptionsfromtheright-click(context)menu.
Now,wheneveryouhaveafileopeninAutoCAD,you’llbeabletoseethebreadcrumbtrailwithinthetitle barasshowninFig.1.32.
IntroducIng autocad 47
1
Fig. 1.30
a
Fig. 1.31
a
Fig. 1.32

48 chapter one
proteCting Your Work
Drat!Computersandapplicationscancrash.Filescanbecomecorruptedandimpossibletouse.Harddriveswearoutovertime.USBdrivescanbedamagedorlostandnetworkscanfail.Inordertoprotectthehoursofworkyou’veputintoadrawing,youneedtosaveoften.However,youalsohaveseveralotheralternativestoprotectyourwork.
backup fIles
Generally,whenyousaveanAutoCADfile,AutoCADsavesabackupcopyinthesamelocation(Table1.7).Thisishelpfulifyourcurrentfilegetscorrupted;simplyreplacethe.bakextentionwith.dwgtoregainyourfile.*
fIle hIstorIes and eMaIl
Everytimeyouopenanexistingfile,workonit,andthensaveitagain,youoverwriteyourpreviouswork.Eachtimeyousave,itrepresentsastepinthedevelopmentofyourproject.Ifyouonlysaveasinglefile,youareessentiallykeepingallyoureggsinonebasket,andyouriskhavingtostartalloveragainifthefileevergetscorrupted.
Asimplesolutionistosaveversionsofyourworktocreateahistory.Simplyaddanumbertotheendofthefilenameeachtimeyoumakesignificantprogressinyourproject(Table1.8).Thenstoreolderversionsofyourfilesinaseparatefolder.
Aneveneasierandthriftierwaytocreateafilehistoryistoemailyourselfcopiesofyourfilesafteryourworksessions.ThiswillgiveyouachronologicalseriesofdrawingsinboththeSentandInboxfoldersofyouremailaccount.What’sgreataboutanemailaccountisthatitalsoservesasstoragedeviceifyou’reonatightbudget.
Don’ttaketheriskoflosingallyourwork!Withafilehistory,you’llatleastbeabletoreturntoapreviousstepinyourprojectwithouthavingtostartfromscratch.
hardWare storage deVIces
Anotherwaytosafeguardyourworkisbysavingyourfilestodifferentstoragedevices.Thisisimportantincaseanyonedevicebreaksdown.Toprotectyourwork,takeadvantageofstoragemediasuchasUSB memorydrives,emailaccounts,harddrives,andnetworkserverswhenavailable.
Theruleistokeepcopiesofyourfilesonmorethanonehardwaredeviceatatime.Let’sassumethatyouownaUSBdrive,haveawebemailaccount,andworkonschoolcomputersthatarelinkedtonetworkservers.Thesearefourlocationsthatyoucanusetostorebackupfiles.**
Table 1.7. Backup file example
Drawing1.bak
* Consult the Backup Files Location and Automatic Saving sections of Appendix B for more information on protecting your files.
Table 1.8. Sample file version history
Dussol_Ground_Plan_1.dwg
Dussol_Ground_Plan_1.1.dwg
Dussol_Ground_Plan_1.2.dwg
** Remember that if you remove your usb drive without ejecting first, the file system can be corrupted and you could lose access to your files. Always right-click it and choose Eject from the menu before pulling it out.
For more strategies for protecting your work, see Appendix B on Extended File Protection.

Beginning with Basic Drawing Tools
Andnowforthewordsyou’vebeendesperatelywaitingfor:Let’sdraw!Hereareafewtoolsyouwillneedtostartdrawinglines.
the eSCape keY
Whileyoudraw,it’shelpfultoknowthatwhenyouactivateacommandinAutoCAD,youcannormallyusetheEscape keytodeactivateit.Thesameholdstrueformanyotheroperationsyoumightwanttoescapefrom.Forexample,ifyouaccidentallyclickedtheOpen… Ctrl + OoptionintheApplication Menu,simplypressEscape(seeFig.1.33a)tocanceltheoperationandreturntoyourwork.KeeptheEscapekeyinmindwheneveryou’retrappedinastickysituation.
IntroducIng autocad 49
1Table 1.9. Proposed file storage locations for a student
Main Storage Thrifty Storage Temporary Storage Backup Storage
External usbstorage drive Email account server Computer hard drive Network server
shift
locktab q
a
z x c v b n m , . é
s d f g h j k l ; è
w e r t y u i o p ç à^
shiftctrl
esc
ctrl
ent
bksp ins
psc slk brk
delhmend
pup nlk
7 8 94 5 61 20 .
3
* -
+
ent
pdn
alt alt
F1 F2 F4F3 F5 F6 F7 F8 F9 F10 F11 F12
/ /1 2 3 4 5 6 7 8 9 0 - =
a
Fig. 1.33

50 chapter one
the Line CommanD
Ifyouhaven’tstoppedworkingsincetheprevioussections,youshouldhavetwodrawingsopen:rough_sketch.dwgandDrawing2.dwg.Ifyoudon’talreadyhaverough_sketchopened,openitnow(seeTable1.12fortheOpencommand).
ThereisachoiceofmethodstoactivatetheLinecommand.Nowisthetimetoexperimentwiththem.
1) ClicktheLinecommandintheHometab(Table1.10).NoticethatwhichevermethodyouusetoactivatetheLinecommand,thecommand windowwillpromptyouwiththismessage:
Command: _ line Specify first point:
Theapplicationisaskingyoutospecifywhereyouwouldliketostartyourline.
2) Placethecursor(alsocalledthecrosshair cursor)anywhereinthedrawingareaandclickthemouse.Thecommand windowwillofferyouthechoiceto…
Specify next point or [Undo]:
Thesecondchoiceinthesquarebracketsmeansthatyoucanenter Utoundothelastpointwithoutdeactivatingthecommand.
3) Moveyourcursoraroundthescreenandyouwillnoticethatalinefollowsitfromthefirstpointyouspecified.Thisisknownastherubber band line.
4) Nowclickanywhereinthedrawingareatocompletethefirstsegmentofyourline.Noticethatthecommand windowkeepspromptingyouforthenextpoint.Youcankeepaddingasmanysegmentstothelineasyouwish.
5) Endthelinebydoingoneofthefollowing:► PressEnteronthekeyboard.► Right-clickinthedrawing areaandselectEnterfromthecontext
menu.► PresstheEscapekey.
Table 1.10. Line command
8 Home tab: Draw panel >
7 Command line entry: l or line *
* Note that only a few commands allow you to type the first letter as a shortcut.

the unDo CommanD
Oftenyou’llfindthatyoumakemistakesandneedtoreturntoanearlierstageinyourdrawingtomakeacorrection.Likemostapplications,AutoCADletsyouundothestepsyou’vecompleted.
BoththeQuick Access Toolbarandthecommand lineallowyoutoundoseveralstepsatonce (Note:Youmusthavecompletedatleastonecommandinordertoundoit).You’llnoticethattheUndobuttonisaccompaniedbyadrop-downlist(Fig.1.34),whichdisplaysahistoryofstepscompleted.Selectoneoftheitemsinthelisttoreturntoapreviousstageofyourwork.
Similarly,whenyouentertheUndo commandinthecommand line,thecommand windowwillpromptyoutoenterthenumberofstepsbackwardsthatyouwouldliketotake.
Command: Undo Current settings: Auto = On, Control = All, Combine = Yes, Layer = Yes
Enter the number of operations to undo or [Auto/
Control/BEgin/End/Mark/Back] <1>:
Somecurrentsettingsaredisplayedinthecommand window,butnoticewhat’swritteninthecommand line:<1>.Thenumberinanglebracketsattheendofthispromptindicatesthedefaultnumberof“undos,”whichissetto1.YoucaneitherjustpresstheEnterkeytoautomaticallyundoonecommandorenteranothernumberandpressEnter.(Notethatanynewnumberyouenterwillbecomethedefault,sotrytostickwith1fornowtoavoidconfusion.)
Guesswhat?YoucanundoanUndo.ThisiscalledRedoandyou’llnoticethattheRedobuttonistotherightoftheUndobutton.
the SpaCe bar
Wheneveryouhaveusedacommandandneedtouseitagain,simplypresstheSpace Bartoreactivateit.Trydrawingaline.NowpresstheSpace BartoreactivatetheLinecommand.Howhandyisthat?
Table 1.11. Undo command
8 Quick Access Toolbar:
8 Context (right-click) menu: Undo
7 Keyboard shortcut: Ctrl + Z
7 Command line entry: undo, u
IntroducIng autocad 51
1
Fig. 1.34
52 chapter one
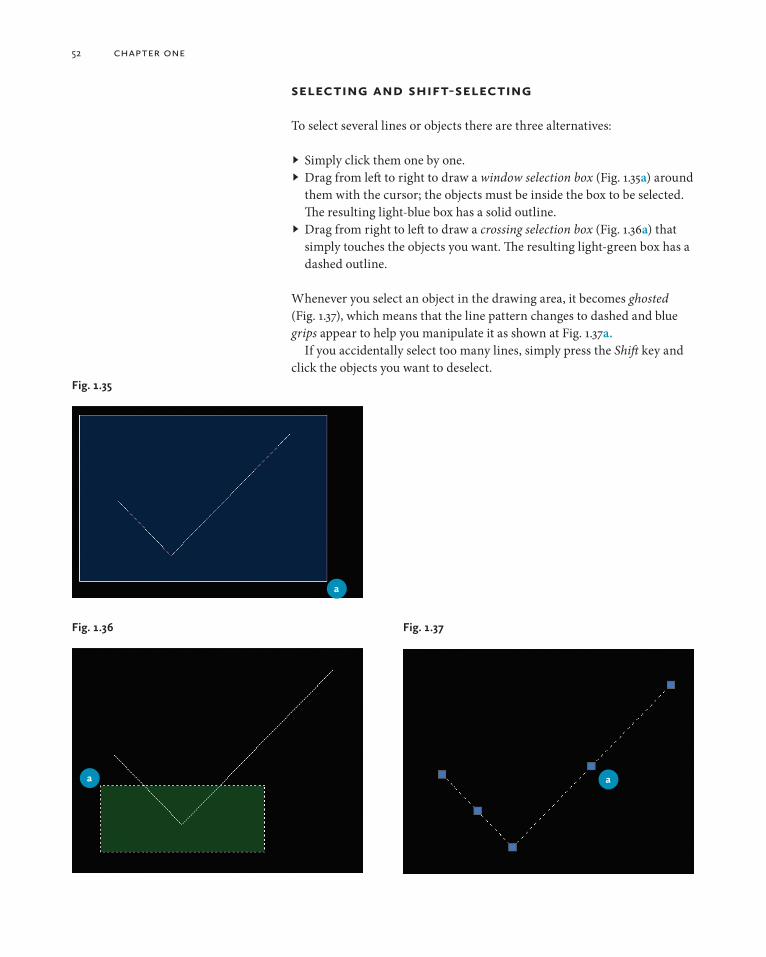
SeLeCting anD ShiFt-SeLeCting
Toselectseverallinesorobjectstherearethreealternatives:
► Simplyclickthemonebyone.► Dragfromlefttorighttodrawawindow selection box (Fig.1.35a)around
themwiththecursor;theobjectsmustbeinsidetheboxtobeselected.Theresultinglight-blueboxhasasolidoutline.
► Dragfromrighttolefttodrawacrossing selection box(Fig.1.36a)thatsimplytouchestheobjectsyouwant.Theresultinglight-greenboxhasadashedoutline.
Wheneveryouselectanobjectinthedrawingarea,itbecomesghosted(Fig.1.37),whichmeansthatthelinepatternchangestodashedandbluegripsappeartohelpyoumanipulateitasshownatFig.1.37a.
Ifyouaccidentallyselecttoomanylines,simplypresstheShiftkeyandclicktheobjectsyouwanttodeselect.
Fig. 1.35
a
Fig. 1.36 Fig. 1.37
a a
IntroducIng autocad 53
1Drawing a Rough Sketch
shakespeare. IwouldlikeyoutocreatearoughsketchofthegroundplanforA Matter of Murder and Peerage in the Scottish Manortogivemeatasteofallthismoderntechnology.IhearthatusingAutoCADfordraftinglooksalittledifferentfromusingapencilandIwouldliketocompare.
Let’sgivethissketchatry.
opening a FiLe
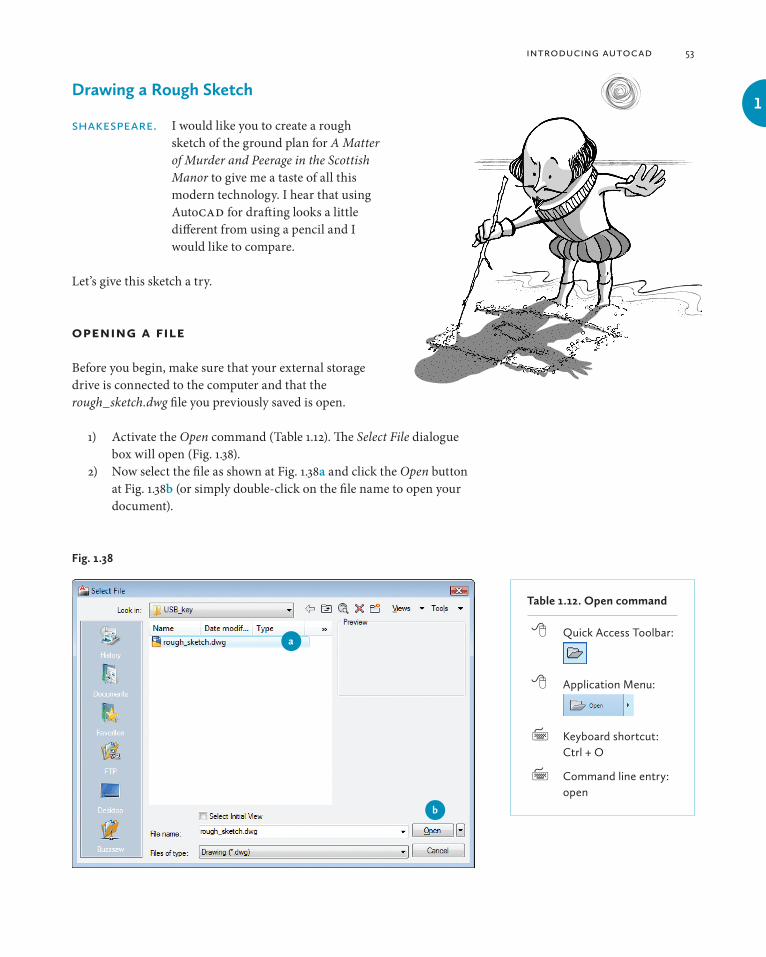
Beforeyoubegin,makesurethatyourexternalstoragedriveisconnectedtothecomputerandthattherough_sketch.dwgfileyoupreviouslysavedisopen.
1) ActivatetheOpencommand(Table1.12).TheSelect Filedialogueboxwillopen(Fig.1.38).
2) NowselectthefileasshownatFig.1.38aandclicktheOpenbuttonatFig.1.38b(orsimplydouble-clickonthefilenametoopenyourdocument).
Table 1.12. Open command
8 Quick Access Toolbar:
8 Application Menu:
7 Keyboard shortcut: Ctrl + O
7 Command line entry: open
Fig. 1.38
a
b

54 chapter one
DraWing FreehanD
Wearegoingtodrawagroundplanfreehandstyle.Sometimesthisiscalledtheinteractivemethodofdrawing;itallowsyoutotestoutyourideasquickly.It’snotquitedraftingbecausethedrawingisnotscaledormeasured,butitwillletyoutogetafeelfordrawingwithAutoCAD.Thismethodcanbeusefulfortestingdifferentpossibilitiesforastagelayout.
Do It Yourself * Referring back to what we’ve already covered, recreate the drawing pictured in Fig. 1.39 as closely as you can.
InFig.1.40,noticethereisaPreviewbox(a).Thisiswhereathumbnailimageofyourdrawingshowsupbeforeyouopenit.Inorderforittoshowyourentiredrawing,yourdrawingneedstobecentredinthedrawing areabeforeyousaveit.
* You’ll notice “do-it-yourself” headings such as the one on the right throughout the manual. They indicate that you can apply what you’ve learned earlier to complete the task on your own.
Fig. 1.39
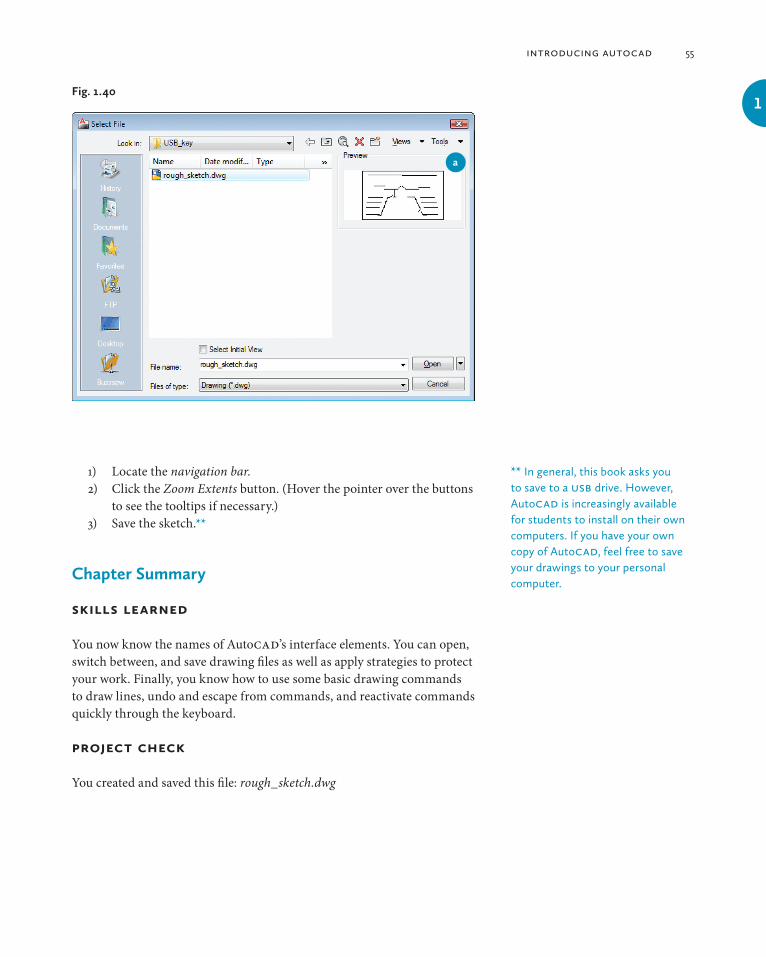
1) Locatethenavigationbar.2) ClicktheZoomExtentsbutton.(Hoverthepointeroverthebuttons
toseethetooltipsifnecessary.)3) Savethesketch.**
Chapter Summary
SkiLLS LearneD
YounowknowthenamesofAutoCAD’sinterfaceelements.Youcanopen,switchbetween,andsavedrawingfilesaswellasapplystrategiestoprotectyourwork.Finally,youknowhowtousesomebasicdrawingcommandstodrawlines,undoandescapefromcommands,andreactivatecommandsquicklythroughthekeyboard.
projeCt CheCk
Youcreatedandsavedthisfile:rough_sketch.dwg
Fig. 1.40
a
** In general, this book asks you to save to a usb drive. However, Autocad is increasingly available for students to install on their own computers. If you have your own copy of Autocad, feel free to save your drawings to your personal computer.
IntroducIng autocad 55
1
