characterization of the universiy of florida...
TRANSCRIPT

1
CHARACTERIZATION OF THE UNIVERSIY OF FLORIDA SOLAR SIMULATOR AND AN INVERSE SOLUTION FOR IDENTIFYING INTENSITY DISTRIBUTIONS FROM
MULTIPLE FLUX MAPS IN CONCENTRATING SOLAR APPLICATIONS
By
BENJAMIN MARTIN ERICKSON
A THESIS PRESENTED TO THE GRADUATE SCHOOL OF THE UNIVERSITY OF FLORIDA IN PARTIAL FULFILLMENT
OF THE REQUIREMENTS FOR THE DEGREE OF MASTER OF SCIENCE
UNIVERSITY OF FLORIDA
2012

2
© 2012 Benjamin Martin Erickson

3
To my beautiful wife to be, thank you for sticking with me through the years. I can’t wait
to turn the miles between us into inches.

4
ACKNOWLEDGMENTS
First and foremost I would like to thank my parents for providing the opportunity
and inspiration to be where I am today. I would also like to thank my fiancée for her
never ending support and dedication. Her willingness to work through two more years
of a long distance relationship allowed me to take this opportunity. I would like to thank
Dr. Gregory Scott Duncan and Dr. Robert Palumbo for their assistance in both
motivating me to further my education and opening doors at the University of Florida. I
would also like to thank Dr. Jörg Petrasch for taking me on as a graduate student and
working with me through the multitude of questions I asked. I would like to thank Dr.
David Hahn and Dr. Raphael Haftka for being on my committee. Lastly, special thanks
goes out to all of my lab mates at the Energy Park, it has been a pleasure working with
you over the last two years.

5
TABLE OF CONTENTS page
ACKNOWLEDGMENTS .................................................................................................. 4
LIST OF TABLES ............................................................................................................ 7
LIST OF FIGURES .......................................................................................................... 8
LIST OF OBJECTS ....................................................................................................... 11
LIST OF ABBREVIATIONS ........................................................................................... 12
ABSTRACT ................................................................................................................... 14
CHAPTER
1 INTRODUCTION .................................................................................................... 16
Motivation ............................................................................................................... 16
Literature Review .................................................................................................... 17 Outline .................................................................................................................... 19
2 SOLAR SIMULATOR .............................................................................................. 20
Design..................................................................................................................... 20
Frame/Cooling .................................................................................................. 20 Power System .................................................................................................. 21
Mirrors/Lamps .................................................................................................. 22 Installation .................................................................................................. 22
Focusing .................................................................................................... 23 Safety...................................................................................................................... 24
Peripheral Subsystems ........................................................................................... 25 XY Table........................................................................................................... 25
Flux target ........................................................................................................ 27 Camera and MATLAB ...................................................................................... 28
Data Measurement (DAQ) ................................................................................ 29
3 MONTE CARLO SIMULATION ............................................................................... 42
Monte Carlo Simulations ......................................................................................... 42 Simple Simulations ........................................................................................... 43
Simulator Model ............................................................................................... 43 2D Case for Intensity ........................................................................................ 44
3D Flux to Intensity ........................................................................................... 44
4 EXPERIMENTS ...................................................................................................... 47

6
Flux Measurements ................................................................................................ 47 Flux Mapping .......................................................................................................... 47
Simulator Flux Maps ............................................................................................... 49
5 INVERSE METHOD................................................................................................ 55
Introduction ............................................................................................................. 55 Methodology ........................................................................................................... 56
Derivation for the general case ......................................................................... 57 Two dimensional case ...................................................................................... 58
Circular Symmetric case................................................................................... 59 Regularization .................................................................................................. 61
Monte Carlo Ray Tracing.................................................................................. 61 Results .................................................................................................................... 61
Parabolic Trough .............................................................................................. 61 Elliptical Trough ................................................................................................ 63
Conclusions ............................................................................................................ 63 Least Squares Constraints ............................................................................... 64
Alternative Methods ................................................................................................ 64 Direct Measurement ......................................................................................... 64
Aperture Method ............................................................................................... 66
6 CONCLUSIONS ..................................................................................................... 75
Summary ................................................................................................................ 75 Outlook ................................................................................................................... 76
APPEENDIX
A SIMULATOR DRAWINGS ...................................................................................... 77
B SIMULATOR SAFETY AND STARTUP DOCUMENTATION ................................. 89
C PERIPHERAL SYSTEM DOCUMENTS ................................................................. 92
LIST OF REFERENCES ............................................................................................... 96
BIOGRAPHICAL SKETCH .......................................................................................... 100

7
LIST OF TABLES
Table page 2-1 Parameters of the simulator mirrors. .................................................................. 30
2-2 Parameters of the simulator lamps. .................................................................... 30
2-3 Parameters of the camera and lens. ................................................................... 30
2-4 Parameters of the DAQ modules. ....................................................................... 30
3-1 Parameters required to implement a ring in Vegas. ............................................ 44
5-1 Parameters of the parabolic trough. ................................................................... 66
5-2 Elliptical trough parameters ................................................................................ 67

8
LIST OF FIGURES
Figure page 2-1 The frame of the simulator at the beginning of construction ............................... 31
2-2 The simulator from behind .................................................................................. 31
2-3 The inside of one of the power transformers ...................................................... 32
2-4 Power to each lamp can be individually turned on or off at the main power box ...................................................................................................................... 32
2-5 The power rack houses a converter and transformer for each lamp assembly on the simulator .................................................................................................. 33
2-6 Ignition unit mounted below its corresponding mirror/lamp assembly ................. 33
2-7 LabView program designed to control the lamps and read the flux sensor. ....... 34
2-8 Mirror holder assemblies with coarse and fine adjustment ................................. 34
2-9 Schematic drawing showing a set of elliptical lamps with a single coincident focal point. .......................................................................................................... 35
2-10 A completed mirror and lamp assembly shown from the front and back ............ 35
2-11 Phillip Hauter working to assemble the simulator frame ..................................... 36
2-12 Installation of the power and cooling systems .................................................... 36
2-13 Protective plexiglass cover for the control room windows .................................. 37
2-14 Two safety interlocks protecting the rear doors during operation of the simulator ............................................................................................................. 37
2-15 Schematic floor plan of the experimental area.................................................... 38
2-16 The safety panel ................................................................................................. 39
2-17 The Velmex BiSlide XY table .............................................................................. 39
2-18 Screen shot of the XY table control program “COSMOS.” .................................. 40
2-19 The flux target..................................................................................................... 40
2-20 The CCD camera and filter wheel ....................................................................... 41
2-21 The DAQ and protection box in the simulator room ............................................ 41

9
3-1 A simple disk and elliptical dish modeled in Vegas............................................. 45
3-2 The simulator as modeled in Vegas with 5.0 mrad reflection error and 7.5 mm bulb diameter ............................................................................................... 45
3-3 Target plot for the simulator modeled with 5.0 mrad reflection error and 7.5 mm bulb diameter ............................................................................................... 46
3-4 Flux distribution at the focal plane for varying reflection errors ........................... 46
4-1 The schematic drawing for the flux sensor from Vatell, Corp. ............................ 50
4-2 A schematic drawing of a typical flux measurement setup. ................................ 50
4-3 A raw and post processed image collected by the flux mapping system ............ 51
4-4 Calibration curve relating pixel value to flux level ............................................... 51
4-5 A completed flux map of lamp 7 with the sensor discoloration removed ............ 52
4-6 A raw image of a reactor during experimentation showing slight spillage onto the aperture ........................................................................................................ 52
4-7 Flux map from the simulator with lamp 5 or lamp 7 turned on ............................ 53
4-8 Flux map from the simulator with lamps 2 and 6 turned on ................................ 53
4-9 Flux map from the simulator with lamps 2, 4, 6 and 7 on illustrating saturation .. 54
5-1 Flux mapping setup. ........................................................................................... 67
5-2 General case of a ray passing through multiple flux planes and the solution plane ................................................................................................................... 68
5-3 Two-dimensional flux maps. ............................................................................... 68
5-4 Schematic representation of the circular symmetric case. .................................. 69
5-5 2D parabolic trough as modeled in VeGaS ........................................................ 69
5-6 Parabolic trough scaled flux distribution at multiple distances (z*=z/f) from the focal plane. ......................................................................................................... 70
5-7 Scaled intensity distribution (I/Imax) along the focal plane of a 2D parabolic trough from Monte Carlo ray tracing. .................................................................. 70
5-8 Scaled inverse solution results (I/Imax) at the focal plane .................................... 71

10
5-9 Schematic representation of the elliptical trough setup as implemented in Vegas. ................................................................................................................ 71
5-10 Scaled flux distribution at varying distances (z*=z/((a+b)/2)) from the parabolic trough. ................................................................................................. 72
5-11 Scaled intensity distribution along the focal plane of a 2D parabolic trough from Monte Carlo ray tracing. ............................................................................. 72
5-12 Scaled inverse solution results (I/Imax) at the focal plane .................................... 73
5-13 Camera as an intensity measurement device. .................................................... 73
5-14 Schematic diagram showing a potential setup for implementing the aperture method. .............................................................................................................. 74

11
LIST OF OBJECTS
Object page 2-1 The XY table user manual .................................................................................. 29
2-2 The XY table extended user manual .................................................................. 29
2-3 Extra information pertaining to the XY table ....................................................... 29
2-4 XY table control (VXM) user manual .................................................................. 29
2-5 CCD camera user’s manual................................................................................ 29
2-6 General information about the CCD camera....................................................... 29
2-7 Supplementary information about the CCD camera ........................................... 29
2-8 Source code for the flux mapping software......................................................... 29
2-9 Function findminmax necessary to run flux.m..................................................... 29
3-1 User’s manual for the Monte Carlo ray tracing program Vegas .......................... 44

12
LIST OF ABBREVIATIONS
( , , , , )I x y z Intensity at point (x,y,z) in the direction ( , )
, , ,oI x y Intensity on the solution plane at point (x,y) in the direction ( , )
''( , , )q x y z Radiative flux at the point (x,y,z)
''
jklq Radiative flux at the point corresponding to ( , ,j k lx y z )
jr Radial position at the jth discretization
jx X-position at the jth discretization
,o jklmnx X-position projected onto the solution plane corresponding to a
point ( , ,j k lx y z ) and direction ( , )
ky Y-position at the kth discretization
,o jklmny Y-position projected onto the solution plane corresponding to a
point ( , ,j k lx y z ) and direction ( , )
xw Weighting factor in the x-direction
yw Weighting factor in the y-direction
rw Weighting factor in the r-direction
w Weighting factor in the -direction
w Weighting factor in the -direction
lz Z-position at the lth discretization
Δx Bin size in the x-direction
Δy Bin size in the y-direction
Δz Distance between planes in the z-direction
Δ Bin size in the x-direction
Δ Bin size in the x-direction

13
ΔΩ Solid angle defined by Δ and Δ
m Theta angle into the mth discretization
n Theta angle into the nth discretization

14
Abstract of Thesis Presented to the Graduate School of the University of Florida in Partial Fulfillment of the
Requirements for the Degree of Master of Science
CHARACTERIZATION OF THE UNIVERSIY OF FLORIDA SOLAR SIMULATOR AND AN INVERSE SOLUTION FOR IDENTIFYING INTENSITY DISTRIBUTIONS FROM
MULTIPLE FLUX MAPS IN CONCENTRATING SOLAR APPLICATIONS
By
Benjamin Martin Erickson
May 2012
Chair: Jörg Petrasch Cochair: David Hahn Major: Mechanical Engineering
A high flux solar simulator has been designed, built and put into operation on the
campus of the University of Florida. The simulator is capable of reaching measured flux
levels of 4230 kW/m2 which corresponds to black body stagnation temperatures of
approximately 2942 K. The simulator has been installed with several vital subsystems.
These subsystems include an XY table, flux measurement setup and data acquisition
system. All of the subsystems have been designed with flexibility in mind to allow for a
broad range of experiments to be performed by the simulator.
Radiative flux measurements at the focal plane of solar concentrators are typically
performed using digital cameras in conjunction with Lambertian targets. To accurately
predict flux distributions on arbitrary receiver geometries directional information about
the radiation is required. Currently, the directional characteristics of solar concentrating
systems are predicted via ray tracing simulations. However, no direct experimental
technique to determine intensities of concentrating solar systems is currently available.
In this thesis, multiple parallel flux measurements at varying distances from the focal

15
plane together with a linear inverse method and Tikhonov regularization are used to
identify the directional and spatial intensity distribution at the solution plane.
The directional binning feature of an in-house Monte Carlo ray tracing program is
used to provide a reference solution. The method has been successfully applied to two
dimensional concentrators, namely parabolic troughs and elliptical troughs using
forward Monte Carlo ray tracing simulations that provide the flux maps as well as
consistent, associated intensity distribution for validation. In the two dimensional case,
intensity distribution obtained from the inverse method approaches the Monte Carlo
forward solution. In contrast, the method has not been successful for three dimensional
and circular symmetric concentrator geometries.

16
CHAPTER 1 INTRODUCTION
Motivation
Solar energy research has been on the rise recently. With the increasing costs of
non-renewable energy, the search for a cost effective renewable option has been in full
swing. One of the largest problems with solar energy is the transient nature of its
availability. This is not just limited to the obvious (day and night) but energy levels also
fluctuate with passing clouds, atmospheric clarity and the seasons. For concentrating
systems, the diffuse to beam fraction of the incoming radiation is important. This
fraction is dependent on atmospheric clarity and can be calculated [1]. However, to
have the most accurate estimation of energy input this calculation must be performed
throughout the experiment and becomes tedious to keep track of. As with any
experiment, it is best to perform concentrating solar research in a highly customizable
and controllable environment. It is easier to identify important system parameters when
all control variables can be easily monitored and adjusted. For this, and some other
reasons, a solar simulator is desired. A set of seven elliptical mirrors coupled with Xe-
arc lamps are focused to a coincident spot to allow for high flux research. The lamps
closely match the spectrum of the sun and thus are good for solar research [2].
An important step in the experimental process is reactor design. Reactors for high
heat flux applications must be able to stand up to intense temperatures. Often,
concentrating systems are not perfectly focused and have a larger than expected focal
spot. This can lead to spillage onto unintended portions of the reactor, causing
efficiency losses and potentially catastrophic failures. Additionally, even if spillage is not
present, the intensity distribution may be overly concentrated in certain areas leading to

17
hotspots within the reactor cavity. These hot spots may reach temperatures exceeding
the design limit for the materials. With flux mapping systems, the directional character
of the incoming radiation is lost. To solve this problem, an inverse method to identify
intensity distributions at the focal plane using multiple flux maps is developed. Having
the ability to calculate the intensity distribution specific to each concentrating setup
allows the experimentalists to successfully design reactors to handle non-uniformities.
Literature Review
Solar energy can be utilized in a plethora of ways. Since this form of power
generation is relatively in its infancy, many new and innovative designs are still being
presented. No other resource is so abundantly available [3]. Unfortunately, it is
extremely transient by nature due to weather, wind and the day and night cycle. All of
these shortcomings must be overcome for solar to become a serious competitor in the
market. For this reason, it is important to perform lifetime cycle analyses to assess the
comparable viability between different solar power generation processes. Attempts
have been made in the past by Liu and Jordan [4] and Duffie and Beckman [5].
Parabolic troughs are the most widely used two dimensional trough geometry
because it is the most proven and cost effective technology [6]. As of 2002, there were
nine commercial scale power plants operating in the Majave Desert, ranging in size
from 14 to 80 MW [6]. As parabolic troughs became more popular, specialized research
into all aspects of the design was increased. Thomas and Guven [7] published a review
detailing design aspects of such facilities focusing on the structural, optical and thermal
subsystems. Parabolic trough technology began to evolve to include secondary
reflectors in and effort decrease losses [8].

18
A parallel vein of solar research includes the use of three dimensional
concentrating optics to obtain higher flux levels. Often, researchers sought to run a
Stirling engine by mounting it at the focal point of a sun-tracking dish receiver [9].
Kongtragool and Wongwises [10] complied a detailed review of the current
concentrating solar Stirling engine technology in 2002. Kaushika [11] provides a helpful
analysis of the design trade-offs faced by dish collector designers. This report takes
into account system cost, reliability and other various system parameters. Large scale
central receiver concentrating power plants use a design strategy similar to that of a
three dimensional dish. In plants such as Solar One in Barstow, CA and CESA-I in
Almeria, Spain [12] the receiver is placed at the top of a tower and a field of heliostats
tracks and focuses the sun on the receiver. Very high temperatures are obtainable and
the heat is typically stored in a molten salt mixture for later use in steam generation.
Other hybrid techniques have been developed and implemented in plants like SOLGAS
and CONSOLAR [13].
The transient nature of the availability of solar energy can cause problems in a
research environment. For this reason, solar simulators are an attractive option to
researchers. Solar simulator systems are typically built using concentrating optics
coupled to a Xe-arc lamp. Hirsch et al. [2] are capable of delivering 75 kW of power
with peak fluxes of 4250 kW/m2 at ETH-Zurich. Similarly, Petrasch et al. [14] designed
and built a system that can deliver 50 kW with peak radiative fluxes reaching 11,000
suns. These systems provide a closely controllable environment for solar research and
the lamps produce a radiative spectrum similar to that of the sun [15].

19
In the course of designing an experiment, it can be helpful to have an accurate
model to base decisions on. Often in the field of radiation heat transfer Monte Carlo ray
tracing is implemented to provide this model. Different Monte Carlo software packages
such as Raytran [16] and SHADOW [17] have been developed to address a wide range
of needs. However, the Monte Carlo method is not limited to the field of radiation heat
transfer. It can be implemented to solve problems in areas ranging from random walk
problems [18] to charge transport [19].
A detailed literature survey of inverse problems and flux mapping is presented in
Chapter 5.
Outline
This thesis will detail the design, construction and operation of the solar simulator
on the campus of the University of Florida. Each subsystem will be detailed in an effort
to inform future users of the basic operation of the simulator. Additionally, all of the
auxiliary systems such as flux mapping and the XY table are fully specified. These
systems are the backbone of the solar simulator and successful operation would not be
possible without them. A brief introduction to the Monte Carlo ray tracing program
Vegas is given. This program is used to model the simulator and also produce the input
files required to test the inverse method. Lastly, the inverse method is presented in full.

20
CHAPTER 2 SOLAR SIMULATOR
Design
The design of the solar simulator on the campus of the University of Florida was
completed mainly by Professor Jörg Petrasch and Phillip Hauter. Dr. Petrasch and Mr.
Hauter used their experience from designing and building previous simulators as the
basis for the UF simulator. The simulator design can be broken down into three main
aspects; the frame and cooling system, the power system, and the mirror and lamp
assemblies. Each of the portions of the design are discussed below.
Frame/Cooling
The frame of the simulator is the basis for the entire system. It must be sturdy
enough to hold of the components and rigid enough to resist the vibrational effects of
the fans. The frame for the UF solar simulator (shown in Figure 2-1) uses 90x90 mm
Bosch extruded aluminum profile. This material choice allows for a high degree of
flexibility in construction while still allowing for the rigidity constraint to be met. Four
custom connectors were manufactured to achieve the proper angle for the outside legs.
In addition to the lamp and mirror assemblies, the frame also has to support the
cooling system. The cooling system is designed to keep the lamps within the operable
temperature in order to reduce the possibility of a lamp shattering. Each mirror and
lamp assembly has a dedicated fan attached at the rear of the mirror to achieve the 7.0
meters per second flow rate required for safe lamps operation. These fans run
continuously during simulator operation and run for approximately seven minutes after
to continue cooling the lamps. In addition, ducts are run to the front of each mirror.
Four fans supply air to these ducts that also cools the mirrors and lamps. Figure 2-2

21
shows the rear view of the simulator. The small fans are attached to the back of each
mirror assembly while the larger fans that supply air to the ducts are attached directly to
the frame.
Power System
The power system is an important element of the simulator design. Since the
power system was first developed for a European electrical grid, a slight redesign was
necessary. The 3 phase high voltage supply in Europe runs at 400 Volts as compared
to the 480 Volt 3 phrase readily supplied in the United States. To accommodate, a
power transformer was added to the system, stepping the voltage down to 400 Volts 3
phase. The inside of one of the transformers is shown in Figure 2-3.
All of the power for each lamp runs through the main power box shown in Figure
2-4. Each lamp has its own switch, allowing for individual control of the supplied power
to the lamps. The power box is located in the experimental room, behind the simulator
so all modifications must be made before running an experiment.
From the power box, the cables run under a cable bridge and to the power rack,
shown in Figure 2-5. It is very important to store all of the power equipment in an
organized fashion in close proximity to the lamps. This reduces the chance for power
loss through the cables and potential interference from outside sources. The power
enters the transformers (one for each lamp) and is stepped down to 400 Volt 3 phase.
The power then enters a converter (the gray boxes shown in Figure 2-5) and is
converted to DC which is then sent to the lamps.
The lamp ignition units, shown in Figure 2-6, are located in close proximity to their
corresponding lamp/mirror assembly. Lamp ignition is a very delicate process. Initially
the lamp requires high voltage (approximately 40 kV) and low current but when the arc

22
is generated the power supply must quickly change to lower voltage and high current
(approximately 150 Amps). Currently, the lamps are controlled by a LabView program.
Each lamp can be individually turned on or off and the power level can be adjusted.
Additionally, the reading from the flux sensor has been integrated to the front panel so
only one LabView program must be running during an experiment. A screen shot of the
program is shown in Figure 2-7.
Mirrors/Lamps
The last portion of the simulator design is the lamp and mirror assembly.
Important parameters of the mirrors and lamps are listed in Tables 2-1 and 2-2. The
assembly must hold the mirror and lamp securely while still allowing for coarse and fine
adjustment of the focal spot. Using a detailed set of schematic drawings, the basic
mirror assemblies (Figure 2-8) are positioned on the frame. Each mirror is an identical
3D ellipse and all are aligned to have one coincident focal point (Figure 2-9). The lamp
for each assembly sits at the other focal point of the mirror. This allows all light emitted
from the lamp to be concentrated onto the coincident focal point. The mirror is locked
into position on the holder assembly. The lamp is inserted carefully from the front,
through the opening in the rear of the mirror. A metal rod on the front of the mirror
provides support on to the lamp to prevent breakage. The rod is specially designed to
allow expansion during operation without putting stress on the lamp. An ignition box is
mounted directly to the frame below the each lamp. The completed mirror and lamp
assembly is shown in Figure 2-10.
Installation
After unpacking and organizing all of the parts, the frame was the first thing to be
constructed. Using a detailed set of drawings (Appendix A) the frame was completed

23
and secured to the floor using concrete anchor bolts. Next, the mirror holder
assemblies were attached in their appropriate positions on the frame. The frame for the
protective shutter was then installed in between the simulator frame and the focal plane.
Figure 2-11 shows the finalization of the position of the simulator frame. The laser level
seen in the forefront of the picture was used in conjunction with a mounted measuring
stick to accurately place the frame cross supports.
The next step after the frame and mirror holder assemblies were properly aligned
was to add the mirrors and lamps. After they were secured, the mirror holder assembly
positions were again adjusted to be as close as possible to the drawings. With
everything in place, the ignition box for each lamp was installed and the wiring from the
power rack was completed. The ignition units are placed as close to the lamps as
possible to prevent transmission losses. Each grouping of cables includes a ferrite ring
to reduce noise interference. This was necessary because of problems with the image
capture system. Since the camera is so close to the simulator, the picture would be
distorted during startup and shutdown. This was mitigated with the addition of the ferrite
rings. The cooling system was the last element to be installed. The fans were mounted
to the frame and ducts were run to the front of each mirror. Figure 2-12 shows the
installation of the power and cooling systems on the rear of the simulator.
Focusing
Focusing is of the utmost importance. Since the simulator consists of seven
individual elliptical mirrors, the focusing process must be carried out for each of them.
The only way to accurately focus the mirrors is to manipulate them while the simulator is
in operation. It is important to take all safety precautions outlined in Appendix B. It
should be noted that only Professor Petrasch was allowed to enter the experimental

24
area while the simulator was on. Each lamp was turned on individually and, through
use of the flux mapping system, was focused. The mirror holding assemblies are
uniquely manufactured to allow as much adjustment as possible. Each assembly
includes three screws accessible from the rear to accurately locate the lamp.
Additionally, the entire mirror assembly was shifted on the frame when the fine
adjustment via the mirror holder assembly was not adequate. After all seven
assemblies were individually focused all were turned on to verify a unified focal spot.
Safety
The simulator is an extremely dangerous device. For this reason, many safety
protocols have been put in place. Extensive startup and shutdown procedures and
general safety warnings have been complied in Appendix B. Along with these
procedures, many safety systems have been implemented for the protection of the
users of the simulator. Many experiments involve high temperatures and pressures.
Compiled with the potential for the simulator bulbs to shatter, there is a high risk of
debris flying through the experimental area. To address this, Plexiglass sheets have
been installed over the windows, protecting the control room. Figure 2-13 shows the
removable window protection.
Another concern is the possibility of someone entering the experimental area
unannounced while the simulator is in operation. To eliminate the possibly of this
happening, all of the doors are interlocked. Figure 2-14 shows an example of a door
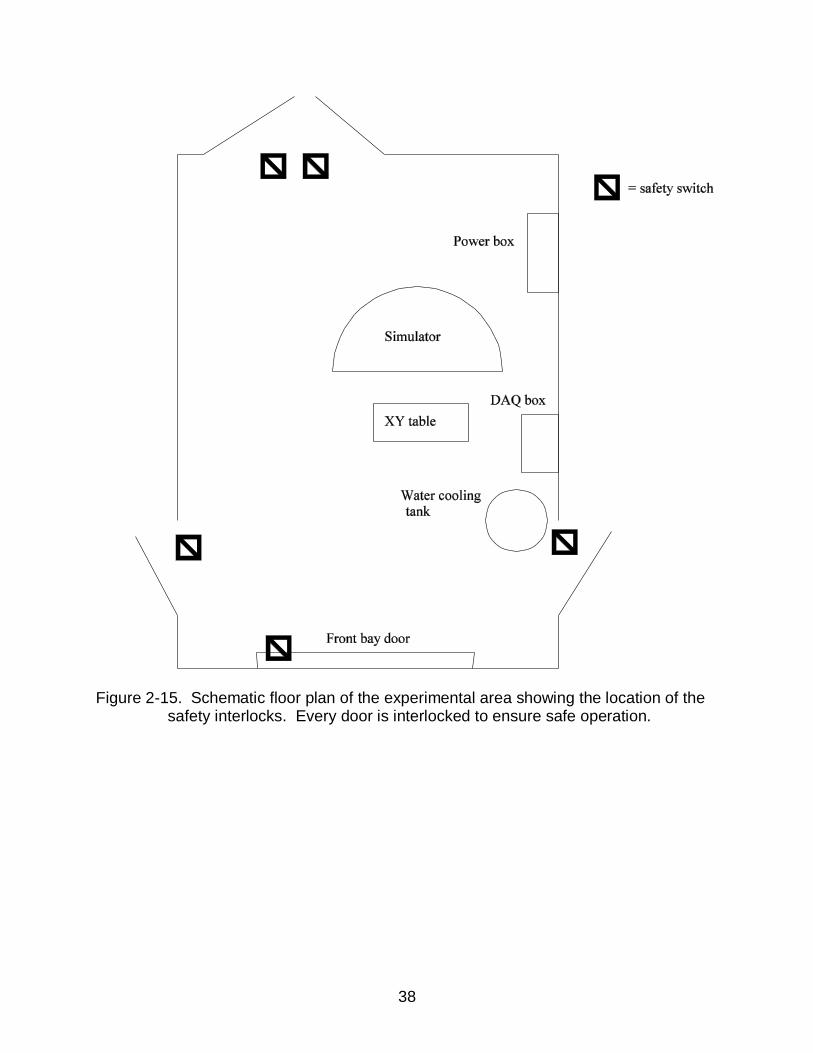
safety interlock and Figure 2-15 is a schematic floor plan showing the location of each
door interlock. All interlocks are wired back to the safety panel in the control room. The
safety panel is a centralized box that allows the user to easily asses the state of the
experimental area without entering it. Each interlock has a corresponding light which is

25
illuminated when the interlock is active (closed). In addition to the doors, the individual
fans on the mirror holder assemblies are interlocked and controlled at the safety panel.
A simple switch turns them on and then seven lights illuminate to show all the fans are
operational. Additionally, the fans run for seven minutes after shutoff to continue
cooling the lamps. The shutter in front of the simulator is also controlled at the panel via
a switch and push button. Once all of the interlocks are engaged power can be
supplied to the simulator by throwing one final red switch. The safety panel is shown in
Figure 2-16. All switches are clearly labeled on the panel. If any interlock is tripped
during operation power is immediately cut from the system and the shutter will return to
the down position.
Peripheral Subsystems
Peripheral subsystems are necessary for successful completion of any
experiment. They provide flexibility and allow for a wide range of experiment types to
be performed using the simulator. The main subsystems for the simulator are the XY
table, flux target, MATLAB, camera and data acquisition systems.
XY Table
It is crucial for a solar simulator to have a way to remotely move experiments in
and out of the focal spot. For example, most experiments require the measurement of
the flux via a Lambertian flux target. This is typically mounted to the side of the
experimental reactor and the mounting apparatus is moved to put the flux target and
then the reactor into to the focal spot. This is most easily accomplished by using a XY
table. To meet this need, the BiSlide dual rail XY table manufactured by Velmex
Incorporated was installed. The user manual along with more information about the XY
table can be found in Objects 2-1, 2-2 and 2-3. The user manual outlines proper care

26
and maintenance which includes lubrication. Before applying the lubricant, the slides
should be cleaned out using the air compressor. Once a month the supplied lubricant
(found in the back of the work area) should be applied to either side of carriage and the
slide should be moved from end to end to distribute evenly.
The table has approximately an 80 centimeter range in the planar (parallel to the
face of the simulator) direction and a 40 centimeter range in the axial direction. This
allows for enough movement to mount a small to medium reactor and flux target by
each other and still be able to move each to the focal spot. The dual rail system was
chosen to increase stability for loadings with eccentricity. A simple mounting plate was
installed with multiple holes for easy configuration to meet the needs of support systems
for any experiments. The XY table assembly is shown in Figure 2-17. The table has a
resolution of 0.005 millimeters to allow for extremely precise positioning. It has a
repeatability of 0.005 millimeters over the short term and 0.010 millimeters after
sustained usage when using the homing function.
The table also came with a program to allow movement to be controlled remotely.
The program, “COSMOS,” allows for individual input or for pre-programed movements.
Simple text files can be run in COSMOS, making it easy to relocate the reactor. For
example, a program was written to zero the XY table and move it back to center the flux
target in the focal spot. To increment the table, first ensure the control module is turned
on (in the experimental area). Next, open the VXM software “COSMOS.” Change the
entry mode in the terminal from immediate to buffered and then type the desired
command into the command line. Basic commands are posted by the computer and
more advanced commands can be found in the VXM user manual. Object 2-4 contains

27
the user manual for the XY table control system (VXM). This is very convenient and
simplifies the experimental process. Figure 2-18 shows a screen shot of the COSMOS
software terminal. Simple movements are outlined in the XY table document (found in
Appendix C) which is also posted in the control room.
Flux target
The flux target is a vital subsystem for the solar simulator. It allows for a complete
flux map to be measured before or after the experiment is run. The target was
manufactured out of two solid pieces of aluminum. The main piece was milled to have
channels to allow for cooling water to be circulated in order to evacuate the heat
absorbed by the target (Figure 2-19A). This piece also has a groove for a gasket and
many tapped holes to allow the back plate to be attached securely. The gasket
provides a seal to eliminate leakage. The back plate is a thin piece of aluminum drilled
through to allow attachment to the main portion. A drawing of the flux target is available
in Appendix C.
The front of the flux target was designed to be Lambertian or diffuse in nature,
reflecting incident radiation evenly in all directions (Figure 2-19B). To accomplish this, a
thin coating of aluminum oxide spray paint is applied to the front surface of the target.
In one of the targets a through hole was drilled and tapped to accommodate a heat flux
gauge from Vatell Corporation. This heat flux sensor measures the flux and allows for
calibration of the flux mapping system (see Chapter 3 for more detail). A second flux
target was manufactured without the hole for the heat flux sensor so unblemished flux
maps can be taken in the future.

28
Camera and MATLAB
The other portion of the flux measurement subsystem is the camera. An industrial
grade CCD camera from Basler (model #: scA1300-32gm) was purchased in addition to
a 35 mm focal length focusable double gauss lens from Edmund Optics. Object 2-5
links to the user manual for the camera and more information is available in Objects 2-6
and 2-7. Detailed information about the camera is available in Table 2-3. The camera
is mounted within the solar simulator and pointed at the focal spot. The extremely high
intensity levels generated by the simulator make it necessary to have a lot of filtering in
front of the camera to protect it. The setup uses neutral density absorptive filters
ranging in optical density from 1.0 to 5.0. These optical densities correspond to
transmission values of 10% and 0.001%, respectively. To handle the variable flux
levels the simulator can generate (i.e. turning on three lamps instead of seven) a filter
wheel with these varying levels of filter has been mounted in front of the camera.
Before the experiment takes place the wheel is moved to the appropriate filter to protect
the camera and give the best image. The camera and filter wheel setup is shown in
Figure 2-20.
The camera is connected to a computer in the control room via a gigabit Ethernet
cable. A MATLAB program has been developed to create a real time visualization of
the picture from the camera. Before an experiment starts it is important to initialize the
flux mapping software to ensure the reactor is in the correct location. By removing the
filtering from the camera it is easy to identify if the reactor is properly placed. Once
confirmed, the filter must be replaced and the experimentalist can continue through the
startup checklist. The program includes options such as “deskew” (to account for the off
axis picture), “adjust” to scale the output and the option to show in black and white or

29
another color scheme. It also includes the ability to save pictures for later analysis.
This functionality is used to generate flux maps. A full listing of the capabilities and
inputs for the MATLAB program is available in Appendix C and the source code is given
in Objects 2-8 and 2-9.
Data Measurement (DAQ)
Every experiment will require measurement of different variables, some more
complex than others. Currently, a data acquisition unit (DAQ) from National Instruments
is installed in the solar simulator room. The DAQ has five modules installed with two
empty spaces for extra modules; NI 9203 analog current input, NI 9264 analog output,
NI 9213 thermocouple input, NI 9485 relay, NI 9205 analog input. More details about
the individual modules are listed in Table 2-4. This setup provides flexibility and can
meet the needs of many different experimental setups. The DAQ is mounted inside a
protective case which also houses the control module for the XY table. This box, shown
in Figure 2-21, is in the experimental area and is hardwired into the control room as
well.
Object 2-1. The XY table user manual (.pdf 251 KB)
Object 2-2. The XY table extended user manual (.pdf 1.166 MB)
Object 2-3. Extra information pertaining to the XY table (.pdf 2.116 MB)
Object 2-4. XY table control (VXM) user manual (.pdf 789 KB)
Object 2-5. CCD camera user’s manual (.pdf 2.244 MB)
Object 2-6. General information about the CCD camera (.pdf 1.249 MB)
Object 2-7. Supplementary information about the CCD camera (.pdf 382 KB)
Object 2-8. Source code for the flux mapping software (.txt 6 KB)
Object 2-9. Function findminmax necessary to run flux.m (.txt 1 KB)

30
Table 2-1. Parameters of the simulator mirrors.
Parameter Value
Semi-major axis, a (m) 1.0201
Semi-minor axis, b (m) 0.4802
Depth (m) 0.4557
Estimated mirror error (mrad) 5.0
Estimated mirror reflectivity (-) 0.92
Table 2-2. Parameters of the simulator lamps.
Parameter Value
Power (kW) 6.0
Required air speed for cooling (m/sec) 7.0
Operating voltage (V) 35
Maximum operating current (A) 170
Ignition voltage (kV) 40
Table 2-3. Parameters of the camera and lens.
Parameter Value
Focal length (mm) 6.0
Sensor size (in) 1/3
Maximum frame rate (fps) 32
Number of pixels, vertical (-) 960
Number of pixels, horizontal (-) 1280
Table 2-4. Parameters of the DAQ modules.
Module Channels Resolution (bits)
NI 9203 8 16
NI 9264 16 16
NI 9213 16 24
NI 9485 8 -
NI 9205 32 16

31
Figure 2-1. The frame of the simulator at the beginning of construction. Photo courtesy of Ben Erickson.
Figure 2-2. The simulator from behind. Photo courtesy of Ben Erickson.

32
Figure 2-3. The inside of one of the power transformers. Photo courtesy of Ben Erickson.
Figure 2-4. Power to each lamp can be individually turned on or off at the main power box. Photo courtesy of Ben Erickson.

33
Figure 2-5. The power rack houses a converter and transformer for each lamp assembly on the simulator. Photo courtesy of Ben Erickson.
Figure 2-6. Ignition unit mounted below its corresponding mirror/lamp assembly. Photo courtesy of Ben Erickson.

34
Figure 2-7. LabView program designed to control the lamps and read the flux sensor.
Figure 2-8. Each mirror has a holder assembly (shown above) which allows for coarse and fine adjustment of the focal point. Photo courtesy of Ben Erickson.

35
Figure 2-9. Schematic drawing showing a set of elliptical lamps with a single coincident focal point.
Figure 2-10. A completed mirror and lamp assembly shown from the front and back. Photos courtesy of Ben Erickson.

36
Figure 2-11. Phillip Hauter working to assemble the simulator frame. Photo courtesy of Ben Erickson.
Figure 2-12. Installation of the power and cooling systems. Photo courtesy of Ben Erickson.

37
Figure 2-13. The windows into the control room are protected by removable plexiglass sheets. Photo courtesy of Ben Erickson.
Figure 2-14. Two safety interlocks protecting the rear doors during operation of the simulator. Photos courtesy of Ben Erickson.
38
Figure 2-15. Schematic floor plan of the experimental area showing the location of the safety interlocks. Every door is interlocked to ensure safe operation.

39
Figure 2-16. The safety panel which alerts the users to open doors and allows for power to be supplied to the simulator if all interlocks are active. Photos courtesy of Ben Erickson.
Figure 2-17. The Velmex BiSlide XY table. Photo courtesy of Ben Erickson.

40
Figure 2-18. Screen shot of the XY table control program “COSMOS.”
A B
Figure 2-19. The flux target shown open from the back (left) and painted and setup (right). Photos courtesy of Ben Erickson.

41
Figure 2-20. The CCD camera and filter wheel. Photo courtesy of Ben Erickson.
Figure 2-21. The DAQ and protection box in the simulator room. Photo courtesy of Ben Erickson.

42
CHAPTER 3 MONTE CARLO SIMULATION
The purpose of the solar simulator is to provide an easily controllable experimental
facility for research into solar processes. Monte Carlo ray tracing simulations are often
employed to predict the behavior of such systems. Monte Carlo simulations allow the
experimentalist to obtain prior information about how the system will respond while
allowing the model to be easily modified. They work based on a statistical sampling
technique known as the Monte Carlo method [20]. In general, every variable included in
the simulation is defined by an individual probability distribution function. Using the
PDF, a cumulative distribution function is created and then inverted. Generating a
random number to be substituted into the inverted cumulative distribution function
produces a value for the desired variable. This value is randomized in the same manor
for subsequent runs and after enough runs, an accurate estimate of the outcome (flux or
intensity distribution) can be made. For example, a ray is traced to a surface. Knowing
the surface properties, we generate a random number that tells us if the ray is
absorbed, reflected or transmitted. The ray is traced until extinction and its ending
location is recorded. This method can be used to generate flux maps that closely match
the real maps produced by the simulator. More detailed reading on the Monte Carlo
method can be done in books by Modest [20], Hamersley and Handscomb [21],
Cashewell and Everett [18] and Schreider [22].
Monte Carlo Simulations
An in-house Monte Carlo ray tracing program [23] was used to model 2D and 3D
concentrating systems. The program has a library of geometries that can be customized
to model most concentrating systems. It also features angular binning, which allows for

43
the output of the intensity distribution at any desired location. The Vegas model
provides the intensity distribution as well as the consistent, associated flux distribution,
allowing for in-depth validation of the inverse method.
Simple Simulations
Vegas has a large library of predefined geometries that can be implemented to
model most concentrating systems. The FORTRAN code is free and open source and
available by contacting Professor Petrasch ([email protected]). It contains
reflection options ranging from fully diffuse to a mix of partially transparent with specular
reflection. A complete list of the general input parameters for reflector geometries is
contained in the manual (Object 3-1). When starting with Vegas it is best to begin with
simple setups. Table 3-1 and Figure 3-1A show the setup and Vegas output for a
simple disk, respectively. Figure 3-1B shows a slightly more complicated geometry, an
elliptical dish. Using a compilation of simple geometries, the user can build and
customize whatever model they require.
Simulator Model
The simulator at UF was successfully modeled in Vegas and is shown in Figure 3-
2. The model consists of seven elliptical mirrors coupled with circular sources at one
focal point. The other focal point of each mirror is aligned to coincide at the focal plane.
The resulting flux distribution is shown in Figure 3-3. By modifying the size of the
circular source to match the estimated size of the Ze-arc and adjusting the reflection
error in the mirrors the focal spot size can be adjusted to approach that of the actual
simulator. Figure 3-4 shows the flux distributions for varied reflector error. The reflector
error of 5 mrad and source size of 7.5 mm was shown to be the best approximation of

44
the actual simulator. However, the exact shape of the focal spot on the real simulator
has an asymmetry that cannot be fully modeled in Vegas.
2D Case for Intensity
The Vegas code also affords us much flexibility in optimizing the parameters of
input for our inverse code. Rather than run experiments every time a change in
parameters is required, we can simply change the input to Vegas and receive
experimental data. While this data will lack the errors we eventually wish to
compensate for, the output is sufficient to optimize the code. Once the optimal input is
found, experimental data from concentrating systems can be easily obtained.
3D Flux to Intensity
Vegas can also produce the intensity results for a fully three dimensional case.
However, a fully three dimensional intensity distribution causes many problems when
attempted to be represented graphically. The distribution cannot be simply displayed
via a contour or 3D plot because it has five dimensions (two special, two directional and
the value of intensity). This fact, combined with the numerical difficulty of highly ill
conditioned matrices (read more about this in Chapter 5) makes the 3D solution not
feasible at this time.
Object 3-1. User’s manual for the Monte Carlo ray tracing program Vegas (.pdf 595 KB).
Table 3-1. Parameters required to implement a ring in Vegas.
String Parameter type Description
X_C= Real X-component of center point C Y_C= Real Y-component of center point C Z_C= Real Z-component of center point C X_N= Real X-component of normal vector n Y_N= Real Y- component of normal vector n Z_N= Real Z-component of normal vector n R_1= Real Inner radius of ring R_2= Real Outer radius of ring

45
A B
Figure 3-1. A simple disk (A) and elliptical dish (B) modeled in Vegas.
Figure 3-2. The simulator as modeled in Vegas with 5.0 mrad reflection error and 7.5 mm bulb diameter.

46
Figure 3-3. Target plot for the simulator modeled with 5.0 mrad reflection error and 7.5 mm bulb diameter.
Figure 3-4. Flux distribution at the focal plane for varying reflection errors.

47
CHAPTER 4 EXPERIMENTS
A complete flux map is the first step in fully characterizing a concentrating solar
facility such as a solar simulator. Without knowing how much power the system can
supply, trying to design an experiment is pointless. To optimally design a reactor, the
experimentalist must take into account many variables. Included in consideration is
maximum temperature along with the characteristics of the incoming beam. Flux maps
also provide the basis for efficiency and other calculations by supplying a full map of the
radiative energy incident on an experiment. Due to their ability to help identify these
parameters, flux maps are essential in assessing the potential success or failure of an
experiment.
Flux Measurements
A point flux measurement is easily obtainable through the use of a flux sensor.
The solar simulator at UF uses a flux sensor provided by Vatell, Corp. It measures the
voltage difference across a thin foil disk to obtain the incident flux measurement. The
schematic drawing for the flux gauge is shown in Figure 4-1 and the certification sheet
from the most recent flux gauge is available in Appendix C. The flux sensor is threaded
to allow for easy insertion from the rear of the flux target. Once fully mounted, the flux
target is moved to the desired location and a flux reading can easily be obtained
through LabView using the provided calibration data. A schematic of a typical flux
measurement setup is shown in Figure 4-2.
Flux Mapping
Once the flux sensor has been successfully setup and integrated into LabView the
next step is to create a flux map. Obtaining a flux map at a given plane is easily

48
achieved using a Lambertian target and a charge-coupled device (CCD) camera in
conjunction with a flux sensor to calibrate images [24]. Typically, a water cooled
Lambertian target is first positioned at the focal plane. With careful use of filters, a
highly linear digital camera is then used to acquire an image of the irradiated target
using Matlab. The brightness of each pixel of the digital image is proportional to the
radiative flux incident at the target location corresponding to the pixel. A flux
measurement device is then used to establish the relation between pixel brightness and
energy flux.
An example raw image is shown in Figure 4-3A. The program “flux.m” has been
developed to simplify the image capture process. This program allows for a real time
video stream from the camera so the experimentalists may view the target or reactor
without risking harm to their eyes. It also allows for the capture of images and saves
them to a predetermined folder for later analysis. Through post image processing the
images can be rendered into color which relates directly to the flux level. Figure 4-3B
shows a post-processed flux map. The discoloration (blue spot) at the middle of the
focal point shows the position of the flux gauge. By moving the flux target to the left or
right and recording another picture and flux measurement a scale correlating pixel value
in the image to flux level can be created. By this method, a complete flux map of the
focal plane can be generated. The calibration results for the simulator are shown in
Figures 4-4 and 4-5. Figure 4-4 shows the calibration curve for four spots along the
focal plane. These points show a linear relationship and the slope is used to convert
pixel value to flux level. This calibration curve will only be valid for the filtering level
predetermined by the experimentalist via the filter wheel. For the flux map shown in
49
Figure 4-5, only lamp 7 was used with a filter having an optical density of 4.0. For best
results, flux maps should be completed before and after every experiment.
Another use for the flux mapping system is reactor observation during
experimentation. Due to the high intensity of the radiation it is dangerous to look
directly at the focal spot during operation. Welding glasses are available in the control
room to allow direct observation but the detail that can be seen with these is limited.
However, reactors can be indirectly observed through the flux mapping system. Figure
4-6 shows an image captured during an experiment. The area where spillage around
the aperture occurs was monitored for deterioration throughout the experiment. If
anything had begun to go wrong the experimentalist can see it first on the flux mapping
system and shut down the system to address the issue. It is just one more safety
mechanism to ensure the safe operation of the solar simulator.
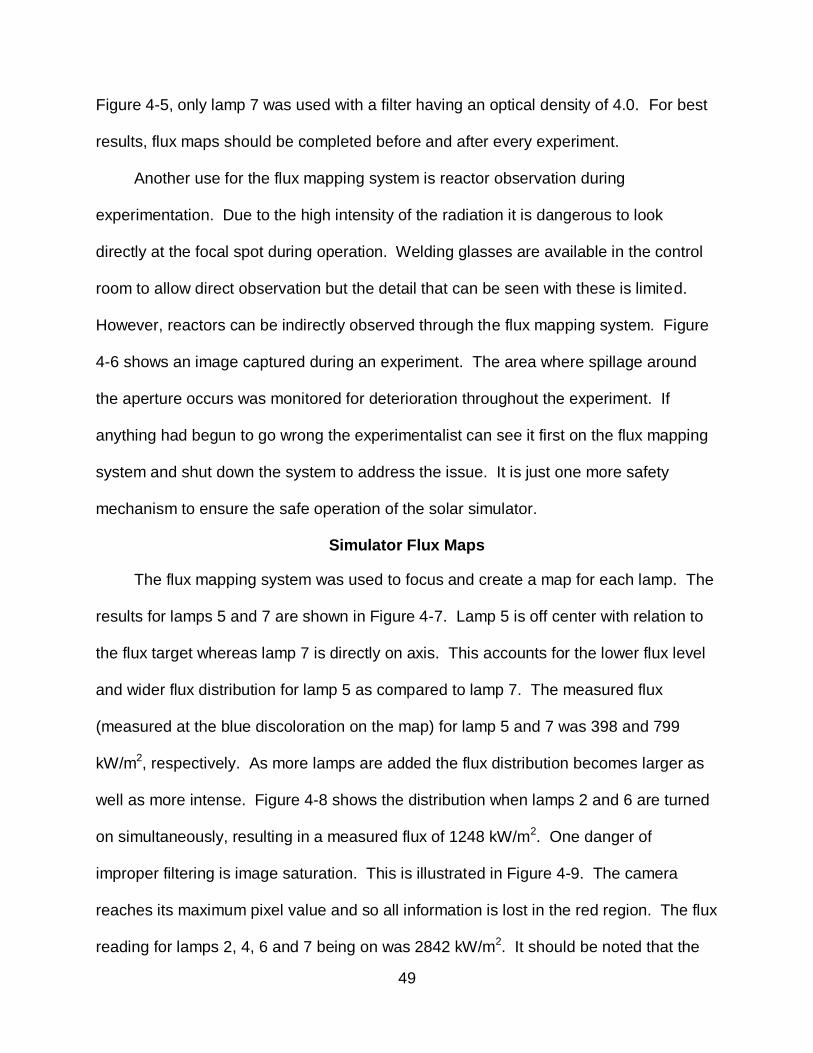
Simulator Flux Maps
The flux mapping system was used to focus and create a map for each lamp. The
results for lamps 5 and 7 are shown in Figure 4-7. Lamp 5 is off center with relation to
the flux target whereas lamp 7 is directly on axis. This accounts for the lower flux level
and wider flux distribution for lamp 5 as compared to lamp 7. The measured flux
(measured at the blue discoloration on the map) for lamp 5 and 7 was 398 and 799
kW/m2, respectively. As more lamps are added the flux distribution becomes larger as
well as more intense. Figure 4-8 shows the distribution when lamps 2 and 6 are turned
on simultaneously, resulting in a measured flux of 1248 kW/m2. One danger of
improper filtering is image saturation. This is illustrated in Figure 4-9. The camera
reaches its maximum pixel value and so all information is lost in the red region. The flux
reading for lamps 2, 4, 6 and 7 being on was 2842 kW/m2. It should be noted that the

50
lamps were operating at approximately 75% power when these flux maps were taken
(140 A).
Figure 4-1. The schematic drawing for the flux sensor from Vatell, Corp.
Figure 4-2. A schematic drawing of a typical flux measurement setup.

51
A B
Figure 4-3. A raw (A) and post processed (B) image collected by the flux mapping system before calibration data is applied.
Figure 4-4. Calibration curve relating pixel value to flux level.

52
Figure 4-5. A completed flux map of lamp 7 with the sensor discoloration removed.
Figure 4-6. A raw image of a reactor during experimentation showing slight spillage onto the aperture.

53
A B
Figure 4-7. Flux map from the simulator with lamp 5 (A) or lamp 7 (B) turned on.
Figure 4-8. Flux map from the simulator with lamps 2 and 6 turned on.

54
Figure 4-9. Flux map from the simulator with lamps 2, 4, 6 and 7 on illustrating saturation due to not enough filtering.

1The majority of the material from this chapter is taken from the conference paper “Inverse identification of intensity distributions from multiple flux maps in concentrating solar applications” submitted and presented at EUROTHERM 95 in Nancy, France.
55
CHAPTER 5 INVERSE METHOD1
Introduction
Solar concentrating systems and high flux solar simulators produce high radiative
flux levels. Hirsch and Steinfeld [2] have reported fluxes in excess of 4,250 kW/m2 for
an elliptical trough based solar simulator. Petrasch et al. [14] have reported fluxes as
high as 11,000 kW/m2 from an array of elliptical reflectors coupled to Xe arc lamps.
These flux levels are equivalent to blackbody stagnation temperatures of 2945 and
3730 K, respectively. Linear systems such as the EuroTrough [25] parabolic
concentrator achieve actual temperatures of roughly 500 C with concentration ratios of
approximately 82:1. The LS-1 and LS-2 parabolic troughs by Luz International Ltd. [26]
have geometric concentration ratios around 23:1, achieving temperatures near 400
C. Flux mapping systems are essential for any experimental concentrating solar energy
system. They provide an accurate measurement of the radiative flux distribution in the
focal plane and thus form the basis for energy balances and efficiency calculations [5,
6]. Flux mapping systems consist of a diffusely reflecting flux target in the focal plane of
the concentrator, a highly linear charge-coupled device (CCD) camera [5–7, 9] and a
flux sensor for calibration [7, 8].
Typically, ray-tracing programs such as CIRCE2 [31], and VEGAS [23] are used to
simulate flux and intensity distributions. These systems rely on idealized reflector
geometries and they are adequate for the design of concentrating systems. However,
they fail to predict non-ideal flux and intensity distributions due to surface imperfections
introduced during manufacturing or operation [32].

56
In this paper, an experimentally based, inverse method to determine the intensity
distribution at a desired solution plane is presented. The method uses multiple flux
maps at varying distances along the concentrator’s axis as an input to solve for the
intensity distribution at the solution plane. There are two main approaches to solving
inverse radiation problems, (i) iterative and (ii) direct methods. The iterative approach is
based on an assumed parametric model of the intensity function. An optimal solution of
then intensity is then found by minimizing the associated residual functionals [33]. While
iterative methods are often more stable than direct methods, they are typically nonlinear
and suffer from larger computation time [33]. Direct methods are based on discretizing
the physical relations between measured (flux) and unknown (intensity) quantities and
solving the resulting system of equations. Direct methods often result in ill conditioned
linear systems of equations. A range of inverse problems involving radiation in
participating medium have been studied in [34–39]. In the current paper a direct
approach is chosen.
Methodology
Flux maps of solar concentrating systems are usually obtained using Lambertian
targets and CCD cameras in conjunction with flux sensors for calibration [24]. A water-
cooled Lambertian target is positioned at the focal plane. A highly linear digital camera
is then used to acquire an image of the irradiated target. The brightness of each pixel of
the resulting digital image is proportional to the radiative flux incident at the pixel
location. Ulmer et al. detail a flux mapping system installed at the Plataforma Solar de
Almeria in Spain [24]. Similar systems have been implemented at the Paul Scherrer
Institute [14] and at ETH-Zurich [2]. A flux sensor is then used to establish the relation
between pixel brightness and energy flux. Multiple types of flux sensors exist. Kaluza

57
and Neumann have compiled a review of the various options. All directional information
is lost in the diffuse reflection from the Lambertian target. Therefore, no predictions of
the flux distribution on arbitrarily shaped receivers can be obtained via the flux maps.
Furthermore, direct measurement of the directional distribution of radiation is impractical
due to the very high flux levels in the focal region. If information about the flux
distribution in multiple planes is available, it can be used to partially restore the
directional information [30]. A schematic representation of a typical flux measurement
setup is depicted in Figure 5-1.
Derivation for the general case
A schematic depiction of the general, three-dimensional case of a ray originating
at a solar concentrator and passing through several parallel planes is shown in Figure
5-2. Air is assumed to be a non-participating medium, reducing the RTE to
0
dI
ds
(5-1)
Thus, the intensity, I, is constant along any straight line. According to Figure 5-2,
for a given direction (, ) positions of equal intensity are given by,
, , , , , , , cos tan , sin tan , , o o o oI x y z I x y I x z y z . (5-2)
The flux at a given position is obtained by integrating the projected intensity over
the hemisphere:
2 2
0 0
, , , , , , cos sinq x y z I x y z d d
(5-3)
Substituting the result of Equation 5-2 for the intensity in Equation 5-3 one obtains
2 2
0 0
, , cos tan , sin tan , , cos sinoq x y z I x z y z d d
(5-4)

58
Equation 5-4 can then be discretized. The measured values of radiative flux,
q (x, y,z) , are known at discrete locations on a Cartesian grid defined by j,k,l:
ref ref ref, , jkl f f fq q x j x y k y z l z (5-5)
The unknown intensity distribution in the solution plane ( 0z ) is spatially
discretized on a uniform rectangular grid in x and y while the directional distribution is
uniform in elevation ( ) and azimuthal ( ) angles. Equation 5-4 then becomes
,, 1, 1, , , , 1, ,
1, 1 , 1, , , , , , ,
1cos
1 1i
1s n
N Nx y o J K m n x y o J K m n
jkl m
m n x y o J K m n x y o J K m n
m
w w I w w Iq
w w I w w I
(5-6)
This is a linear system of equations of the form q AI
0, where the radiative flux, q,
is known and the intensity at the solution plane, Io, is unknown. The system is further
defined by Equations 5-7 through 5-9.
x
o, jklmn x
j z
lcos
ntan
m, y
o, jklmn y
k z
lsin
ntan
m (5-7)
J ceilingx
o, jklmn x
r
x
, K ceiling
yo, jklmn
yr
y
(5-8)
wx
xo, jklmn
xJ
x,w
y
yo, jklmn
yK
y (5-9)
Equations 5-7 calculate the location of intersection on the solution plane for the x
and y-directions, respectively. Equations 5-8 calculate the index of intersection on the
solution plane in the x and y directions. Equations 5-9 calculate the weighting factors in
the x and y-directions as intersections will always occur between two nodal points. The
fully three-dimensional case is presented for completeness but is not yet successfully
implemented and therefore no results are available.
Two dimensional case
The high dimensionality of the intensity distribution on the solution plane in the
most general case (two spatial and two directional coordinates) leads to very large

59
systems of equations. Therefore an important subclass of problems, the purely two-
dimensional case, is explored in detail. The 2D situation is applicable to concentrators
such as parabolic, elliptical, and circular troughs and 2D compound parabolic
concentrators (CPC’s). Figure 5-3 depicts the flux distribution at varying locations on
the focal axis of a 2D concentrator.
The derivation of the 2D case is analogous to that of the 3D case. The intensity at
an arbitrary position and direction ( , ,x y ) can be related to the intensity in the solution
plane according to
( , , ) ( tan , )oI x y I x z
(5-10)
The radiative flux incident at a given location, q (x,z), is calculated from the
intensity according to the two-dimensional equivalent of Equation 5-4.
q (x,z) I(x,z,)cos d Io(x z tan,)cos d
2
2
2
2
(5-11)
Discretization of Equation 5-11 leads to
0, , 0, 1,
1
(1 ) cosN
jl x J m x J m m
m
q w I w I
(5-12)
In Equation 5-12, qj,l represents the radiative flux at location j on plane l. Using the
2D equivalents of Equations 5-7, 5-8, and 5-9, the weighting factor wx is found. The
intensity, I0,J,m, is the intensity in direction m at location J on the solution plane.
Circular Symmetric case
Many optical concentrators are circularly symmetric. In these cases, the intensity
in the focal plane depends on three independent variables: the radial position, r, and
two directional angles, and . In contrast, the general case requires four independent

60
variables. A system consisting of a circular concentrator and a plane circular target is
considered.
From Figure 5-4 one obtains the geometrical relationship between the radial
position and direction (r,,) in any plane z to a position and direction on the solution
plane ( , ,o or ).
2 2( tan ) 2 tan cos( )or r z rz (5-13)
2 2 2
1 ( tan )cos
2 tan
oo
o
r r z
rz
(5-14)
Note that the elevation angle, , remains unchanged. As for the general case, the
intensity along a straight line is constant leading to
2 2
0 0
, , , cos sino o oq r z I r d d
(5-15)
The flux distribution q”(r,z) is known from measurement or ray-tracing simulations
using
, , j l f ref fq q j r z l z , (5-16)
discretization then yields
,, , , , 1, ,
,
1, 1 , , , 1 , 1, , 1
(1 )(1 (1cos
1
) )sin
1 1
N Nr o J m N r o J m N
j l m
m n r o J m N r o J m
m
N
w w I w w Iq
w w I w w I
(5-17)
where
J ceiling
ro
dr
2
dr
, N ceiling
o
d
2
d
(5-18)
wr
ro r
J
dr,w
o
N
d (5-19)

61
Regularization
Inverse radiation problems often suffer from ill-conditioned coefficient matrices
[40]. For continuous solutions, Tikhonov regularization can be employed to impose
smoothness onto the solution [41]. It is implemented by appending a matrix to the A
matrix for each discretization variable. These matrices are carefully chosen to
implement desired constraints on the system. For the inverse method, a smoothness
constraint is applied due to prior knowledge about the intensity distribution. This
method is controlled via one regularization parameter per dimension of the unknown
quantity (x and in the two-dimensional case). Parameter values of zero correspond
to the non-regularized solution while parameter values greater than zero increase the
effect of the regularization.
Monte Carlo Ray Tracing
An in-house Monte Carlo ray tracing program [23] is used to model the
concentrating systems. The program features directional binning, which allows for the
output of the intensity distribution at any desired location. The program provides the
intensity distribution as well as the consistent, associated flux distribution, allowing for
in-depth validation of the inverse method.
Results
Parabolic Trough
Parabolic troughs are the most common 2D concentrators (Figure 5-5). The
EuroTrough 150 (ET-150) [26], which was developed under European Commission
Project EuroTrough II (5th Framework Program contract number ERK6-CT-1999-00018),
was modeled using the Monte Carlo ray tracing code [23]. A Gaussian error of 5 mrad
is introduced at the reflector surface to account for manufacturing and other errors. A

62
larger mirror error corresponds to a larger area of concentration with lower maximum
flux levels. Mirror error can be modified to make the calculated flux distribution closely
match that of an actual concentrator setup.
The flux distributions in the focal plane and the associated intensity distributions
are shown in Figures 5-6 and 5-7. The highest intensity values are found at the center
of the target, where the concentration is the highest, while the intensity diminishes as
the angle of incidence ( ) increases. The flux diminishes as one moves away from the
focal plane (z*=0.0).
The inverse method features a range of parameters that influence the accuracy of
the solution. These parameters include the number of discretization steps in both the
and x-direction (Nx0 and N) and the length of the solution plane ( xoL ). A range of
parameter values was set based on the desired resolution of the solution. The inverse
solution was generated for each possible combination of parameter values. Solutions
were compared based on the RMS difference between each inverse and Monte Carlo
solution with the lowest value corresponding to the optimal solution.
Figure 5-8 shows the inverse solution based on the flux distributions from Figure
5-6. The inverse solution results closely match the Monte Carlo solutions. The
discontinuity at larger angles of incidence is reproduced by the inverse solution. The
largest discrepancies between inverse and Monte Carlo solutions are concentrated
around areas with large gradients and discontinuities in the intensity. The optimal
parameters for the parabolic trough were found to be Nθ=15, Nxo=20 and Lxo=0.12 m.
The inverse solution has a maximum error of 9% with a RMS relative error of 3.1%. The
linear system is of full rank with a characteristic number of 1000. Tikhonov

63
regularization did not improve results. This is attributed to the discontinuous nature of
the solution.
Elliptical Trough
An elliptical trough-based Vortek-type linear concentrator set-up [2] is studied.
The set-up (Table 5-2, Figure 5-9) consists of an Argon long arc lamp, an elliptical
trough reflector and a cylindrical mirror on the underside of the arc. Secondary mirrors
are attached at the outlet of the elliptical trough to reduce losses.
The flux and intensity distributions from Monte Carlo ray tracing are shown in
Figures 5-10 and 5-11. The inverse solution is shown in Figure 5-12. The optimal
parameters for the elliptical trough were found to be Nθ=5, Nxo=41 and Lxo=0.41 m. The
solution has a maximum error of 18% with an RMS relative error of 5.1%. Tikhonov
regularization significantly improves the results in the elliptical trough case. The optimal
values for the Tikhonov coefficients are =5 and x=12. The condition number of the
regularized linear system is 16.4.
Conclusions
An inverse solution method to identify intensity distributions at the focal plane of
two-dimensional concentrating systems has been developed. The method uses
multiple flux maps perpendicular to the concentrator axis to predict the intensity
distribution in the focal plane. The mathematical derivation of the circular symmetric
and general, three-dimensional cases has been presented. A parabolic trough setup
was explored using an in-house Monte Carlo ray-tracing program. The optimal
discretization parameters for this setup were found to be Nθ=15, Nxo=20, and
Lxo/f=0.0702. The results show that the inverse solution process can be applied to a set
of two-dimensional flux measurements to successfully predict the intensity distribution.

64
The maximum relative error was less than 10% with an RMS relative error of 3.1%.
Furthermore, an elliptical trough setup was also implemented. Tikhonov regularization
was used to overcome ill-conditioning of the problem. The elliptical trough solution was
optimal for discretization parameter Nθ=5, Nxo =41, and Lxo =1.7559 and Tikhonov
parameters =5 and x =12 resulting in a relative error of less than 18% and
corresponding RMS relative error of 5.1%. In the parabolic trough case Tikhonov
regularization has a negative effect due to the discontinuous nature of the solution.
Least Squares Constraints
MATLAB provides a large toolbox to aid in the solution of ill conditioned A
matrices. The “lsqlin” command provides many options for constraining the solution to a
least squares problem. It includes the capability of providing an upper and lower bound.
A lower bound of zero is easily applied to the inverse problem because the intensity
must be positive or zero. An upper limit can be applied to improve results but also
increases computation time. The “lsqlin” solver also has other functions that can be
implemented to improve solution accuracy such as the ability to define known
intensities. This is advantageous for areas where the intensity is known to be zero due
to rim angle calculations.
Alternative Methods
The difficulties of implementing the fully 3D case lead us to explore other options
for identifying the intensity distribution. Through the use of cameras, intensity
distributions can be directly measured. Two methods of measurement are presented.
Direct Measurement
First and foremost, intensities can be measured directly at a single point using a
camera. Cameras are, in fact, intensity measurement devices. In its most basic form, a

65
camera consists, of a cavity with a small aperture and a detection device at the
backplane of the cavity (Figure 5-13). The perpendicular distance between the
backplane and the aperture is the focal length, f. Lenses are used to increase the
amount of light that is channeled through the aperture. The CCD chip of the camera
typically returns an integer gray value, ij, proportional to the flux, qij, incident on pixel i,
j, where i is the number of the pixel in the horizontal axis of the chip and j is the number
of the pixel in the vertical axis of the chip.
ij ijq c (5-20)
In Equation 5-20, c represents a device dependent proportionality constant.
According to the definition of intensity
Ω Ωcos ΔΩ cos Δij ij ij p ij ij ijQ q dA I d dA I d dA I A (5-21)
Therefore
,ΔΩ cos
ij
ij ij ij
ij ij
cI I
(5-22)
The system is further characterized by Equations 5-23 through 5-28.
Δix i x (5-23)
Δjy j y (5-24)
Δ Δ ΔA x y (5-25)
2 2 2 2
ij i jS x y f (5-26)
cos ij
ij
f
S (5-27)
2
Δ cosΔΩ
ij
ij
ij
A
S
(5-28)
While providing superior precision and resolution, the direct method suffers from
two drawbacks. First, for very high fluxes like those typically encountered in
concentrating solar applications the camera must be protected by a reflective filter.

66
Alternatively, the camera can be positioned a sufficient distance away from the focal
plane such that the flux levels are too low to harm the equipment. Secondly, the camera
measures the average directional intensity distribution in the aperture. In order to
identify the desired intensity distribution, i.e., at multiple points, the camera must be
accurately positioned in a two-dimensional plane. Then, a measurement is taken at
every point of a rectangular grid. The accurate positioning of the camera is significantly
more complex than the z-positioning of a flux target.
Aperture Method
The aperture method is an approach that solves one of the main problems with the
direct measurement method. The experimental setup is depicted in Figure 5-14. Similar
to the direct measurement method, the intensity can be identified directly. However, the
camera is not directly exposed to high flux levels. While the apparatus can be
positioned close to the focal plane reducing the traveling distance, it still must be
accurately positioned on a two dimensional grid.
Table 5-1. Parameters of the parabolic trough.
Parameter Value
Focal length (m) 1.71
Rim angle () 60.0
Sun Shape (mrad) 4.649
Mirror Error (mrad) 5.0
Mirror Reflectivity (-) 0.95

67
Table 5-2. Elliptical trough parameters
Parameter Value
Semi-major Axis, a (m) 0.277
Semi-minor Axis , b (m) 0.190
Sun Shape (mrad) 4.649
Mirror Error (mrad) 5.0
Mirror Reflectivity (-) 0.90
Collector Length (m) 100
Figure 5-1. Flux mapping setup.

68
Figure 5-2. General case of a ray passing through multiple flux planes and the solution plane (at z=0).
Figure 5-3. Two-dimensional flux maps.

69
Figure 5-4. Schematic representation of the circular symmetric case.
Figure 5-5. 2D parabolic trough as modeled in VeGaS. The useable output from the model is the intensity distribution on the target.

70
Figure 5-6. Parabolic trough scaled flux distribution at multiple distances (z*=z/f) from the focal plane.
Figure 5-7. Scaled intensity distribution (I/Imax) along the focal plane of a 2D parabolic trough from Monte Carlo ray tracing.

71
Figure 5-8. Scaled inverse solution results (I/Imax) at the focal plane (z*=0.0). N = 15,
xoN = 20 xoL = 0.12 m.
Figure 5-9. Schematic representation of the elliptical trough setup as implemented in Vegas.

72
Figure 5-10. Scaled flux distribution at varying distances (z*=z/((a+b)/2)) from the parabolic trough.
Figure 5-11. Scaled intensity distribution along the focal plane of a 2D parabolic trough from Monte Carlo ray tracing.

73
Figure 5-12. Scaled inverse solution results (I/Imax) at the focal plane (z*=0.0). N = 5,
xoN= 41 xoL
= 0.41 m, X = 12 = 5.
Figure 5-13. Camera as an intensity measurement device.

74
Figure 5-14. Schematic diagram showing a potential setup for implementing the aperture method.

75
CHAPTER 6 CONCLUSIONS
Summary
A high heat flux solar simulator was designed, built and operated on the campus of
the University of Florida. The simulator has been fully described, including all
necessary subsystems. These subsystems provide the flexibility required to run a
multitude of experiments in the future. They include the XY table, flux target,
camera/MATLAB integration and data acquisition subsystems. The simulator system
has generated flux levels as high as 4230 kW/m2, which corresponds to black body
stagnation temperatures of approximately 2942 K. It will be used for high temperature
solar research such as phase change energy storage and thermochemical methods for
energy generation.
An inverse solution method to calculate intensity distributions at the focal plane of
two dimensional concentrating systems was presented. The method uses multiple flux
maps along the concentration axis of a concentrating setup to predict the intensity
distribution and the focal plane. The mathematics for the fully three dimensional and
circular symmetric cases has been presented but not yet implemented. A parabolic and
elliptical trough setup was explored using the in-house Monte Carlo ray tracing program.
The optimal parameters for the parabolic trough were found to be N =15, xoN =20, and
xoL =0.12 meters. The results show that the inverse solution process can be applied to
a set of flux measurements to successfully predict the intensity distribution with a
relative error of less than 10%. Tikhonov regularization was on the elliptical trough case
to aid in solving for a distribution that was assumed to have a smooth solution. The
elliptical trough solution was optimized with the parameters N =5, xoN =41, xoL =0.41

76
meters, =5, and x =12 resulting in a relative error of less than 18%. In contrast with
the elliptical trough case, in the parabolic trough case it is evident that Tikhonov
regularization has a negative effect when sharp changes in the intensity distribution are
present. The success with the two dimensional case suggests the three dimensional
case may be possible. However, the high dimensionality of the fully three dimensional
case causes many rank deficiency issues.
Outlook
Looking forward, refinement of the circular symmetric case is the logical next step.
The case has shown some promise in initial testing but does begin to suffer from rank
deficiency issues. After successfully implementing the circular symmetric case, the next
step is to work on the fully three dimensional case. The high dimensionality of this
problem poses many issues and will require some inventive manipulation to get a
reasonable answer. In addition, a method for coherently plotting the results will need to
be developed. A code designed to take the output intensity from the inverse problem
and apply it to designed receiver geometries would be useful. This would allow the
experimentalist to effectively design reactors for specific concentrating systems. The
solar simulator will be used for high temperature experiments for the foreseeable future.
It allows the University of Florida to be at the forefront of the push towards sustainable
energy research.

77
APPENDIX A SIMULATOR DRAWINGS

78

79
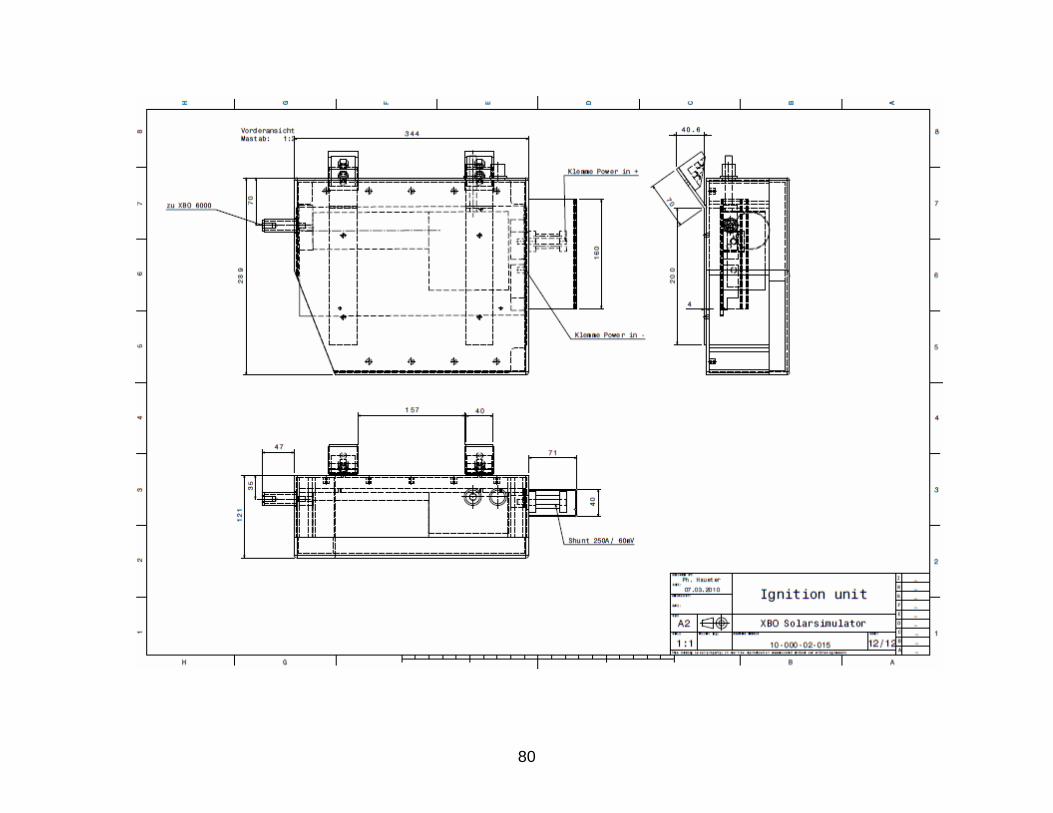
80

81

82

83

84

85

86

87

88

89
APPENDIX B SIMULATOR SAFETY AND STARTUP DOCUMENTATION
General safety warnings and precautions:
1. Safety is the first priority.
2. The simulator emits extremely high levels of thermal radiations that can cause
severe burns and even fatal injuries.
3. Highly concentrated thermal radiations may ignite objects and cause fires.
4. The Xenon arc lamps are pressurized and may shatter, particularly during
startup and shutdown. Glass splinters may cause severe injuries.
5. Always wear safety glasses and protective clothing when the simulator shutter
is open.
6. The simulator operates at extremely high, potentially fatal, electrical power
levels.
7. Always think before your act.
8. If in doubt, turn off the simulator. Know where the off switch is.
9. Know where the fire extinguisher is.
10. Know how to operate a fire extinguisher.
11. Always watch the experiment.
12. Two properly instructed persons have to be present during an experiment.
13. No person is allowed inside the simulator room when the simulator is powered
up, unless Dr. Petrasch is present and authorizes maintenance operations.
14. Use Plexiglass shields and close windows to the control room.

90
Startup checklist:
1. Turn on flux mapping system (computer labeled “FLUX MAPPING”, start
Matlab, start ‘flux.m’).
2. Turn on simulator control DAQ (computer labeled “DAQ”, start LabView, run
program). Make sure all lamps are shut off in the program.
3. Wear protective clothing when simulator shutter is open; welding jacket, long
trousers, and safety glasses.
4. Uncover mirrors.
5. Close simulator shutter.
6. Check experiment; cover up exposed parts with Zirconia felt or Aluminum foil.
7. Position experiment and check position with mounted laser levels.
8. Turn on experiment DAQ.
9. Turn on cooling water.
10. Turn on the back door fan.
11. Turn on power to rectifiers (7 switches in the gray enclosure in the simulator
room, switch on separately leaving 1 second in-between each).
12. Close all doors to the simulator room.
13. Warn people in the shop and control room.
14. Make sure nobody is inside the simulator room.
15. Turn on lamp fans.
16. Open shutter.
17. Put on welding goggles.
18. Turn on main switch.

91
19. Turn on simulator in DAQ.
20. Carefully watch the experiment.
Shutdown checklist:
1. Turn off the simulator in the DAQ.
2. Turn off the main switch.
3. Wait until shutter is completely closed.
4. Wear protective clothing and safety glasses.
5. Inspect experiment for fire or embers.
6. Wait 15 minutes for lamps to cool down.
7. Turn off all lamp fans.
8. Turn off power to rectifiers (7 switches in gray enclosure).
9. Turn off cooling water.
10. Open the shutter.
11. Cover the mirrors (wear protective clothing and safety mask).
12. Close shutter.
13. Turn off back door fan.

92
APPENDIX C PERIPHERAL SYSTEM DOCUMENTS
VXM Movement Instructions
Motor 1 moves the XY table toward (negative move) and away from (positive move) the control room (i.e. along the focal plane)
Motor 2 moves the XY table towards (positive move) and away from (negative move) the simulator (i.e. in and out of the focal plane)
1. Send the XY table to both positive limit switches a. Motor 1 command: F C I1M0, R b. Motor 2 command: F C I2M0, R
2. Return to the pre-defined location (previously measured by incrementing the XY table from the terminal)
a. Motor 1 command: F C I1M-7800, R b. Motor 2 command: F C I2M-17500, R c. Replace the number values 7800 and 17500 with the measured values
pertaining to your setup
Note: Do not use the number pad to enter numbers or symbols, it will result in a
double keystroke value being placed at the end of the command line
Flux mapping system documentation
Start program in MATLAB: flux.m
Program window must be on top. Program is controlled by keystrokes.
A: Adjust colorscale to current min and max.
D: Deskew. Use R or L prior to using D.
G: Switch display output to gray level.
J: Switch display output to color.
K: Turn off Deskew mode (kill).
L: Load prefdefined reference square.
O: Turn image adjust off.

93
Q: Quit program. Always use Q, never just close the program window, since the
connection to the camera is left open and flux can only be restarted after closing and
reopening MATLAB.
R: Define reference square by clicking on image. This should be done before using D.
S: current image is saved as png: raw and adjusted. If this is the first time S is hit since
the program has been started a new directory with respective date and time is created.

94

95

96
LIST OF REFERENCES
[1] Erbs, D. G., Klein, S. A., and Duffie, J. A., 1982, “Estimation of the diffuse radiation fraction for hourly, daily and monthly-average global radiation,” Sol. Energy, 28, pp. 293–302.
[2] Hirsch, D., Zedtwitz, P. v., Osinga, T., Kinamore, J., and Steinfeld, A., 2003, “A
New 75 kW High-Flux Solar Simulator for High-Temperature Thermal and Thermochemical Research,” J. of Sol. Energy Eng., 125, pp. 117-131.
[3] Zekai, Ş., 2004, “Solar energy in progress and future research trends,” Prog. in
Energy and Combust. Sci., 30, pp. 367–416. [4] Liu, B. Y. and Jordan, R. C., 1963, "Rational procedure for predicting the long-term
average performance of flat-plate solar-energy collectors with design data for the US, its outlying possessions and Canada," Sol. Energy, 7, pp. 53-74.
[5] Duffie, J. A. and Beckman, W. A., 1974, Solar energy thermal processes, Wiley,
New York. [6] Price, H., Lupfert, E., Kearney, D., Zarza, E., Cohen, G., Gee, R., and Mahoney,
R., 2002, “Advances in Parabolic Trough Solar Power Technology,” J. Sol. Energy Eng., 124, pp. 109–125.
[7] Thomas, A. and Guven, H., 1993 , “Parabolic trough concentrators—design,
construction and evaluation,” Energy Conv. and Manag., 34, pp. 401–416. [8] Friedman, R. P., Gordon, J. M., and Ries, H., 1993, “New high-flux two-stage
optical designs for parabolic solar concentrators,” Sol. Energy, 51, pp. 317–325.
[9] Mills, D., 2004, “Advances in solar thermal electricity technology,” Sol. Energy, 76,
pp. 19–31. [10] Kongtragool, B. and Wongwises, S., 2003, “A review of solar-powered Stirling
engines and low temperature differential Stirling engines,” Renew. and Sust. Energy Rev., 7, pp. 131–154.
[11] Kaushika, N.D, 1993, “Viability aspects of paraboloidal dish solar collector
systems,” Renew. Energy, 3, pp. 787–793.
[12] Baker, A. F., Faas, S. E., Radosevich, L. G., Skinrood, A. C., Peire, J., Castro, M.,
and Presa, J. L., 1989, "US-Spain evaluation of the Solar One and CESA-I receiver and storage systems," Sandia National Labs.
[13] Romero, M., Buck, R., and Pacheco, J. E., 2002, “An Update on Solar Central
Receiver Systems, Projects, and Technologies,” J. Sol. Energy Eng., 124, pp. 98–108.

97
[14] Petrasch, J., Coray, P., Meier, A., Brack, M., Haberling, P., Wuillemin, D., and Steinfeld, A., 2007, “A Novel 50 kW 11,000 suns High-Flux Solar Simulator Based on an Array of Xenon Arc Lamps,” J. Sol. Energy Eng., 129, pp. 405–411.
[15] Sayre, R. M., Cole, C., Billhimer, W., and Stanfield, J., 1990, “Spectral comparison
of solar simulators and sunlight.,” Photodermatology, Photoimmunology & Photomedicine, 7, pp. 159-165.
[16] Govaerts, Y. M. and Verstraete, M. M., 1998, “Raytran: a Monte Carlo ray-tracing
model to compute light scattering in three-dimensional heterogeneous media,” IEEE Trans. on Geosci. and Remote Sensing, 36, pp. 493–505.
[17] Lai, B. and Cerrina, F., 1986, “SHADOW: A synchrotron radiation ray tracing
program,” Nuc. Inst. and Meth. in Phys. Res. Section A: Accelerators, Spectrometers, Detectors and Assoc. Equip., 246, pp. 337–341.
[18] Cashwell, E. D. and Everett, C. J., 1959, A practical manual on the Monte Carlo
method for random walk problems, Pergamon Press. [19] Jacoboni, C. and Reggiani, L., 1983, “The Monte Carlo method for the solution of
charge transport in semiconductors with applications to covalent materials,” Rev. Mod. Phys., 55, pp. 645–705.
[20] Modest, M. F., 2003, Radiative heat transfer. Academic Press, San Diego. [21] Hammersley, J. M. and Handscomb, D. C., 1975, Monte Carlo methods, Methuen,
London. [22] Shreĭder, I. A., 1964, Method of statistical testing: Monte Carlo method, Elsevier
Pub. Co., Amsterdam. [23] Petrasch, J., 2010, “A Free and Open Source Monte Carlo Ray Tracing Program
for Concentrating Solar Energy Research,” ASME Conf. Proc., 2010, pp. 125–132. [24] Ulmer, S., Reinalter, W., Heller, P., Lüpfert, E., and Martinez, D., 2002, “Beam
characterization and improvement with a flux mapping system for dish concentrators,” J. of Sol. Energy Eng., 124, pp. 182-188.
[25] Geyer, M., Lüpfert, E., Osuna, R., Esteban, A., Schiel, W., Schweitzer, A., Zarza,
E., Nava, P., Langenkamp, J., and Mandelberg, E., 2002, “EUROTROUGH-Parabolic trough collector developed for cost efficient solar power generation,” in 11th Int. Sym. on Conc. Sol. Power and Chem. Energy Tech., pp. 04–06.
[26] Fernández-García, A., Zarza, E., Valenzuela, L., and Pérez, M., 2010, “Parabolic-
trough solar collectors and their applications,” Renew. and Sust. Energy Rev., 14, pp. 1695–1721.

98
[27] Steinfeld, A., Brack, M., Meier, A., Weidenkaff, A., and Wuillemin, D., 1998, “A solar chemical reactor for co-production of zinc and synthesis gas,” Energy, 23,pp.
803–814. [28] Z’Graggen, A., Haueter, P., Trommer, D., Romero, M., De Jesus, J., and Steinfeld,
A., 2006, “Hydrogen production by steam-gasification of petroleum coke using concentrated solar power–II Reactor design, testing, and modeling,” Int. J. of Hyd. Energy, 31, pp. 797–811.
[29] Cameron, C. P., 1993, “High heat flux engineering in solar energy applications,”
Proc. of SPIE, 1997, pp. 460–471. [30] Kaluza, J. and Neumann, A., 2001, “Comparative Measurements of Different Solar
Flux Gauge Types,” J. of Sol. Energy Eng., 123, pp. 251-255.
[31] Romero, V. J., 1991, "CIRCE2/DEKGEN2: A software package for facilitated
optical analysis of 3-D distributed solar energy concentrators," User manual, Sandia National Labs.
[32] Andraka, C. E., Yellowhair, J., and Iverson, B. D., 2010, “A Parametric Study of the
Impact of Various Error Contributions on the Flux Distribution of a Solar Dish Concentrator,” ASME Conf. Proc., 2010, pp. 565–580.
[33] Jin, B. and Zheng, Y., 2006, “A meshless method for some inverse problems
associated with the Helmholtz equation,” Computer Meth. in App. Mech. and Eng., 195, pp. 2270–2288.
[34] Li, H. and Yang, C., 1997, “A genetic algorithm for inverse radiation problems,” Int.
J. of Heat and Mass Trans., 40, pp. 1545–1549. [35] Colton, D. and Kirsch, A., 1996, “A simple method for solving inverse scattering
problems in the resonance region,” Inverse Problems, 12, pp. 383-393.
[36] Bleszynski, E., Bleszynski, M., and Jaroszewicz, T., 1996, “AIM: Adaptive integral
method for solving large-scale electromagnetic scattering and radiation problems,” Radio Sci., 31, pp. 1225–1251.
[37] Ho, C. H. and Özişik, M. N., 1988, “Inverse radiation problems in inhomogeneous
media,” J. of Quant. Spect. and Rad. Trans., 40, pp. 553–560. [38] Subramaniam, S. and Menguc, M. P., 1991, “Solution of the inverse radiation
problem for inhomogeneous and anisotropically scattering media using a Monte Carlo technique,” Int. J. of Heat and Mass Trans., 34, pp. 253–266.
[39] Park, H. M. and Yoon, T. Y., 2000, “Solution of the inverse radiation problem using
a conjugate gradient method,” Int. J. of Heat and Mass Trans., 43, pp. 1767–1776.

99
[40] Golub, G. H., Hansen, P. C., and O’Leary, D. P., 1999, “Tikhonov Regularization and Total Least Squares,” SIAM J. on Matrix Ana. and App., 21, pp. 185-194.
[41] Neumaier, A., 1998, “Solving ill-conditioned and singular linear systems: A tutorial
on regularization,” Siam Rev., 40, pp. 636–666.

100
BIOGRAPHICAL SKETCH
Ben Erickson was born in Cincinnati, Ohio in 1987. He attended Valparaiso
University starting in 2006 and graduated with his Bachelor of Science in mechanical
engineering in 2010. During his time at VU, Ben became heavily involved in both Alpha
Phi Omega (a co-ed service fraternity) and Engineers Without Borders. Through his
involvement in EWB he was able to help install water retrieval options such as a solar
slow pump to help the locals in the Turkana region of northwest Kenya. Ben also
became involved with the design and build of the solar furnace on the campus of VU
which sparked his interest in renewable energy. He was accepted for graduate studies
at the University of Florida and funded by Dr. Jörg Petrasch. His research consisted of
the build of the solar simulator along with the design and installation of many of the
peripheral systems. He graduated with his Master of Science in mechanical
engineering in May 2012.